1
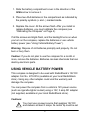
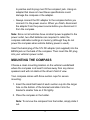
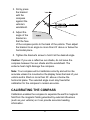
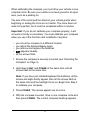
Digital Vehicle Compass
63-1120
OWNER’S MANUAL — Please read before using this equipment.
Thank you for purchasing a RadioShack Digital Vehicle Compass.
Your compass conveniently provides accurate heading
information inside your vehicle. It incorporates the same magnetic
sensor technology that is used in factory-installed vehicle
compasses. The compass electronically separates the Earth’s
magnetic field from the magnetic fields generated by your vehicle,
to provide accurate compass headings.
Automatic Shut-Off — conserves power by turning off the
compass about 10 minutes after you park the vehicle when there
are no significant changes in the surrounding magnetic fields.
Magnetic Distortion Detection — alerts you when outside
magnetic interference is affecting compass accuracy.
INSTALLING BATTERIES
Your compass requires two AAA batteries (not supplied) for
power. For the best performance and longest life, we recommend
RadioShack batteries. Battery life is about 11 months (based on
an average of 8 hours of compass use and 2 hours of backlight
use per week).
Cautions:
• Use only fresh batteries of the required size and
recommended type.
• Do not mix old and new batteries, different types of batteries
(standard, alkaline, or rechargeable), or rechargeable
batteries of different capacities.
© 2001 RadioShack Corporation. All Rights
Reserved.
RadioShack and RadioShack.com are trademarks
used by RadioShack Corporation.
1. Slide the battery compartment cover in the direction of the
OPEN arrow to remove it.
2. Place two AAA batteries in the compartment as indicated by
the polarity symbols (+ and –) marked inside.
3. Replace the cover. All the arrows flash. After you install or
replace batteries, you must calibrate the compass (see
“Calibrating the Compass” on Page 4).
If all the arrows and digits flash, and the backlight turns on when
you turn on the compass, replace the batteries or use vehicle
battery power (see “Using Vehicle Battery Power”).
Warning: Dispose of old batteries promptly and properly. Do not
burn or bury them.
Caution: If you do not plan to use the compass for a month or
more, remove the batteries. Batteries can leak chemicals that can
destroy electronic parts.
USING VEHICLE BATTERY POWER
This compass is designed to be used with RadioShack’s 12V DC
adapter Cat. No. 270-031A (available at your local RadioShack
store). Using any other adapter could void the warranty and
damage the compass.
You can power the compass from a vehicle’s 12V power source
(such as cigarette-lighter socket) using a 12V, 3 amp DC adapter
(not supplied, available at your local RadioShack store).
Cautions:
!
You must use a power source that supplies 12V DC
and delivers at least 3 amps. Its center tip must be set
2
to positive and its plug must fit the compass' jack. Using an
adapter that does not meet these specifications could
damage the compass or the adapter.
• Always connect the DC adapter to the compass before you
connect it to the power source. When you finish, disconnect
the adapter from the power source before you disconnect it
from the compass.
Note: Since not all vehicles have constant power supplied to the
power outlet, two AAA batteries are required to retain the
compass calibration settings in memory (although they do not
power the compass when vehicle battery power is used).
Insert the barrel plug of the 12V DC adapter (not supplied) into the
DC12V jack on the back of the compass. Then insert the DC plug
into your vehicle’s power outlet.
MOUNTING THE COMPASS
Choose a clean mounting location on the vehicle’s windshield
where the compass is at least 5 inches away from any stereo
speakers and will not obstruct the driver’s field of view.
Your compass comes with three suction cups for secure
mounting.
1. Insert the small ball head of each suction cup into the larger
hole on the bottom of the bracket and slide it into the
bracket’s smaller hole so it fits tightly.
2. Place the compass in the holder.
Note: To remove the compass from the holder, simply slide it
out.
3
3. Firmly press
the bracket
with the
compass
against the
vehicle’s
windshield.
4. Adjust the
angle of the
bracket so
that the face
of the compass points to the back of the vehicle. Then adjust
the bracket to an angle no more than 20° above or below the
horizontal plane.
5. Tighten the bracket’s screw to hold it at the desired angle.
Caution: If you use a reflective sun shade, do not leave the
compass between the sun shade and the windshield. The
extreme heat might damage the compass.
Note: Your compass will not calibrate correctly and will not be
accurate unless it is mounted so the display faces the back of your
vehicle and is titled no more than 20° above or below the
horizontal plane. The selected angle must stay fixed after
calibration for the compass to remain accurate.
CALIBRATING THE COMPASS
Calibration enables the compass to separate the earth’s magnetic
field from the magnetic fields generated by external influences
(such as your vehicle) so it can provide accurate heading
information.
4
When calibrating the compass, you must drive your vehicle in one
complete circle. Be sure your vehicle is on level ground in an open
area, such as a parking lot.
The size of the circle and the direction your vehicle points when
beginning or ending the circle do not matter. The circle does not
need to be perfect, but it must be completed within 2 minutes.
Important: If you do not calibrate your compass properly, it will
not work correctly or accurately. You must calibrate your compass
when you use it the first time and recalibrate it anytime:
•
•
•
•
•
you move the compass to a different location
you adjust the bracket/display angle
you remove and replace the batteries
DIST appears steadily
all the arrows flash
1. Ensure the compass is securely mounted (see “Mounting the
Compass” on Page 3).
2. Hold down LIGHT and POWER at the same time until all
arrows flash at the same time.
Note: If you have just installed/replaced the batteries, all the
arrows and digits briefly appear, then all the arrows flash at
the same time and the backlight turns on. Begin from Step 3
to calibrate your compass.
3. Press POWER. The arrows appear one at a time.
4. With the compass mounted, drive in one complete circle and
then press POWER. The current compass heading appears.
5
Note: If you press LIGHT while calibrating your compass (except
after installing/replacing batteries), the compass does not store
the calibration setting and the original setting is unchanged.
USING THE COMPASS
The 8 displayed cardinal points for this compass are N, NE, E, SE,
S, SW, W, and NW.
Distortion Detection
When DIST appears, the compass is detecting magnetic
interference that compromises its accuracy. Distortion occurs
when there has been a significant change in the surrounding
magnetic fields, such as when you are driving under an overpass,
or over a bridge. The steel in these structures causes inaccurate
readings in any magnetic compass, but unlike other compasses,
this compass detects interference and alerts you.
If DIST appears continuously, recalibrate your compass (see
“Calibrating the Compass” on Page 4).
Turning the Compass On and Off
Press POWER to turn the compass on and off. Or, you can press
LIGHT to turn on the compass and the backlight.
To turn off the compass and the backlight, press POWER.
Important: The compass automatically turns off after about 10
minutes to conserve power if no significant changes occur in the
surrounding magnetic fields.
6
Using the Backlight
To turn on the backlight, press LIGHT. To turn off the backlight,
press LIGHT again.
The backlight automatically turns off after about 1 minute if it is
powered by internal batteries. It automatically turns off after about
10 minutes if it is powered by vehicle battery power, unless
significant changes occur in the surrounding magnetic fields.
CARE
Keep the compass dry; if it gets wet, wipe it dry immediately. Use
and store the compass only in normal temperature environments.
Handle the compass carefully; do not drop it. Keep the compass
away from dust and dirt, and wipe it with a damp cloth
occasionally to keep it looking new.
Modifying or tampering with the compass’ internal components
can cause a malfunction and might invalidate its warranty. If your
compass is not performing as it should, take it to your local
RadioShack store for assistance.
SPECIFICATIONS
Power ............................................................................................. 2 × AAA Batteries
Optional 12V DC Adapter
Sampling cycle ......................................................................................... 0.5 Second
Display resolution ............................................................................................... 22.5°
Accuracy ............................................................................................................... ±5°
Storage temperature .................................................. – 40° to 160°F (– 40° to 71°C)
Operating temperature ................................................. – 4° to 140°F (– 20° to 60°C)
Dimensions (with bracket, HWD) ......................................... 25/8 × 23/4 × 23/4 Inches
(66.0 × 69.9 × 69.9 mm)
Dimensions (without bracket, HWD) ........................................ 21/2 × 21/2 × 1 Inches
(63.5 × 63.5 × 25.0 mm)
7
Weight (with bracket, without batteries) .............................................. 2.8 oz (79.4 g)
Weight (without bracket and batteries) ................................................ 2.0 oz (56.7 g)
Specifications are typical; individual units might vary. Specifications are subject to
change and improvement without notice.
Limited One-Year Warranty
This product is warranted by RadioShack against manufacturing defects in material and workmanship under normal use for one (1) year from the date of purchase from RadioShack company-owned stores and authorized RadioShack franchisees and dealers. EXCEPT AS
PROVIDED HEREIN, RadioShack MAKES NO EXPRESS WARRANTIES AND ANY IMPLIED
WARRANTIES, INCLUDING THOSE OF MERCHANTABILITY AND FITNESS FOR A PARTICULAR PURPOSE, ARE LIMITED IN DURATION TO THE DURATION OF THE WRITTEN
LIMITED WARRANTIES CONTAINED HEREIN. EXCEPT AS PROVIDED HEREIN, RadioShack SHALL HAVE NO LIABILITY OR RESPONSIBILITY TO CUSTOMER OR ANY
OTHER PERSON OR ENTITY WITH RESPECT TO ANY LIABILITY, LOSS OR DAMAGE
CAUSED DIRECTLY OR INDIRECTLY BY USE OR PERFORMANCE OF THE PRODUCT
OR ARISING OUT OF ANY BREACH OF THIS WARRANTY, INCLUDING, BUT NOT LIMITED TO, ANY DAMAGES RESULTING FROM INCONVENIENCE, LOSS OF TIME, DATA,
PROPERTY, REVENUE, OR PROFIT OR ANY INDIRECT, SPECIAL, INCIDENTAL, OR
CONSEQUENTIAL DAMAGES, EVEN IF RadioShack HAS BEEN ADVISED OF THE POSSIBILITY OF SUCH DAMAGES.
Some states do not allow limitations on how long an implied warranty lasts or the exclusion or
limitation of incidental or consequential damages, so the above limitations or exclusions may
not apply to you.
In the event of a product defect during the warranty period, take the product and the RadioShack sales receipt as proof of purchase date to any RadioShack store. RadioShack will, at
its option, unless otherwise provided by law: (a) correct the defect by product repair without
charge for parts and labor; (b) replace the product with one of the same or similar design; or (c)
refund the purchase price. All replaced parts and products, and products on which a refund is
made, become the property of RadioShack. New or reconditioned parts and products may be
used in the performance of warranty service. Repaired or replaced parts and products are warranted for the remainder of the original warranty period. You will be charged for repair or replacement of the product made after the expiration of the warranty period.
This warranty does not cover: (a) damage or failure caused by or attributable to acts of God,
abuse, accident, misuse, improper or abnormal usage, failure to follow instructions, improper
installation or maintenance, alteration, lightning or other incidence of excess voltage or current; (b) any repairs other than those provided by a RadioShack Authorized Service Facility;
(c) consumables such as fuses or batteries; (d) cosmetic damage; (e) transportation, shipping
or insurance costs; or (f) costs of product removal, installation, set-up service adjustment or reinstallation.
This warranty gives you specific legal rights, and you may also have other rights which vary
from state to state.
RadioShack Customer Relations, 200 Taylor Street, 6th Floor, Fort Worth, TX 76102
12/99
RadioShack Corporation
Fort Worth, Texas 76102
63-1120
01A02
Printed in China