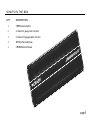
1
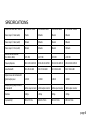
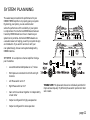
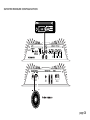
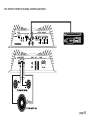
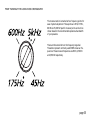
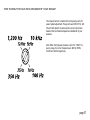
XTREME 300, 400, 800 & 1200
OWNER'S MANUAL
HIGH PERFORMANCE CAR AUDIO
TABLE OF CONTENTS
INTRODUCTION
3
WARRANTY
6
SPECIFICATIONS
8
TECHNICAL DESIGN FEATURES
10
SYSTEM PLANNING
12
POWER CONNECTIONS
20
SPEAKER CONNECTIONS
24
INPUT SECTION
32
INTERNAL CROSSOVER SECTION
34
INTELLI Q
38
AUXILIARY OUTPUT SECTION
42
REMOTE GAIN SECTION
43
INSTALLATION TIPS
44
TROUBLESHOOTING TIPS
50
AUTOSOUND 2000 TROUBLESHOOTING TIPS
52
page 2
INTRODUCTION
Thank you for your purchase of ORION’s XTREME power amplifier. Each XTREME amplifier is designed to be the leader in its class
offering the most power, advanced features and extreme ease of use. In high-end sound systems or high SPL systems, the XTREME
amplifiers will give you years of trouble-free performance.
• XTREME 300- 75 watt per channel 2 channel amplifier with built-in fully variable high-pass, low-pass or bandpass crossover with INTELLLi Q. Equipped with remote gain capability, the XTREME 300 is capable of 3, 2, or 1 channel operation
with a maximum power capability of 300 watts into 4Ω mono.
• XTREME 400- 100 watt per channel 2 channel amplifier with built-in fully variable high-pass, low-pass or bandpass crossover with INTELLLi Q. Equipped with remote gain capability, the XTREME 400 is capable of 3, 2, or 1 channel operation
with a maximum power capability of 400 watts into 4Ω mono.
• XTREME 800- 200 watt per channel 2 channel amplifier with built-in fully variable high-pass, low-pass or bandpass crossover with INTELLLi Q. Equipped with remote gain capability, the XTREME 800 is capable of 3, 2, or 1 channel operation
with a maximum power capability of 800 watts into 4Ω mono
• XTREME 1200- 300 watt per channel 2 channel amplifier with built-in fully variable high-pass, low-pass or bandpass
crossover with INTELLLi Q. Equipped with remote gain capability, the XTREME 1200 is capable of 3, 2, or 1 channel operation with a maximum power capability of 1200 watts into 4Ω mono
The installation of all ORION components will determine the overall performance result. Improper installation will not only limit
the performance of your ORION system but also potentially compromise the reliability of this amplifier. To ensure proper sonic results and component reliability, please refer to your Authorized ORION dealer for installation assistance of advice. If you decide to
perform the installation yourself, read the entire installation section of this manual before beginning the installation.
page 3
ABOUT THIS MANUAL
This manual is designed to answer your questions about this product. In the event you have questions not covered in this manual,
please refer questions to your local Authorized ORION Dealer. Additionally, you can call ORION’s Technical Support Hotline at 1800 315-2052 or (480) 705-5600 for assistance.
PRACTICE SAFE SOUND
Continuous exposure to sound pressure levels over 100 dB may cause permanent hearing loss. High powered automotive sound
systems can generate sound pressure levels in excess of 130 dB. When playing your system at high levels, please use hearing protection and prevent long term exposure.
RECORD YOUR SERIAL NUMBER AND DATE:
MODEL:
SERIAL NUMBER:
DATE OF PURCHASE:
COMPANY PURCHASED FROM:
page 4
WHAT’S IN THE BOX
QTY
DESCRIPTION
1
XTREME power amplifier
2
2 conductor 4 gauge power connector
1
5 conductor 12 gauge speaker connector
4
#8 Phillips Pan Head Screws
1
XTREME Reference Manual
page 5
WARRANTY
ORION Industries Inc. warrants this product to be free from defects in material and workmanship under the following terms:
Parts and Labor are warranted for a period of 3 years IF:
a. The product is purchased from an Authorized ORION Dealer
b. The product is installed by an Authorized ORION Dealer
Parts and Labor are warranted for a period of 1 year IF:
a. The product is purchased from an Authorized ORION Dealer
b. The product is NOT installed by an Authorized ORION Dealer
Parts and Labor are warranted for a period of 90 days IF:
a. The product is NOT purchased from an Authorized ORION Dealer
If you are uncertain as to whether your dealer is authorized, please contact ORION at 1-800-350-9726 or (480) 705-5600. In countries
other than the USA, each distributor warrants the ORION product it sells.
The Following conditions and situations are NOT covered by this warranty:
Any product on which the serial number has been defaced, modified or removed
Damage or malfunction resulting from:
a. Accident, misuse, abuse, unauthorized modification or failure to follow the instructions provided with this product.
b. Repair by anyone NOT authorized by ORION.
c. Damage due to shipping (these claims must be presented to the freight carrier)
d. Removal or installation of this product.
e. Any failure that has NOT been caused by a defect in material or workmanship.
This warranty is in effect for the original purchaser only. ORION will pay for labor and material expense for covered items. ORION does
not cover removal or installation charges, payment of shipping charges to ORION, payment of OUT-OF-WARRANTY shipping charges,
or damage to other property caused by any defects in this product.
page 6
For all warranty and non-warranty service issues, please refer to your nearest Authorized ORION Dealer for assistance. If you require
additional information or assistance regarding service repair issues, please call 1-800-350-9726 or (480) 705-5600.
Exclusion
1. This warranty is in lieu of all other warranties expressed of implied
2. In no event will ORION be liable for any consequential damages resulting from the use of this product or
any defect of this product.
This Warranty gives you specific legal rights and you may also have other rights which vary from state to state.
page 7
SPECIFICATIONS
AMPLIFIER SECTION
XTREME 300
XTREME 400
XTREME 800
XTREME 1200
Power output 4 Ω Stereo (watts)
75 watts
100 watts
200 watts
300 watts
Power output 2 Ω Stereo (watts)1
150 watts
200 watts
400 watts
600 watts
Power output 4 Ω Mono (watts)1
300 watts
400 watts
800 watts
1200 watts
Distortion all channels driven
(from 20Hz to 20kHz)
<0.1% THD
<0.1% THD
<0.1% THD
<0.1% THD
Frequency Response
20Hz to 20 kHz ±0.25 dB
20Hz to 20 kHz ±0.25 dB
20Hz to 20 kHz ±0.25 dB
20Hz to 20 kHz ±0.25 dB
Linear Bandwidth
6Hz to 50 kHz ±3dB
6Hz to 50 kHz ±3dB
6Hz to 50 kHz ±3dB
6Hz to 50 kHz ±3dB
Signal-to-noise ratio full bandwidth
@ rated output power
> 100 dB
> 100 dB
> 100 dB
> 100 dB
Damping factor @ output connector
full bandwidth
>400 at output connector
>400 at output connector
>400 at output connector
>400 at output connector
Slew Rate
> 30V/µs
> 30V/µs
> 30V/µs
> 30V/µs
input sensitivity3
200 mV to 5 Vrms
200 mV to 5 Vrms
200 mV to 5 Vrms
200 mV to 5 Vrms
page 8
input impedance
47kΩ
47kΩ
47kΩ
47kΩ
fuse type
(2) 15 AMP ATC
(2) 20 AMP ATC
(2) 30 AMP ATC
(6) 30 AMP ATC
low-pass crossover4
Continuously
variable
Continuously
variable
Continuously
variable
Continuously
variable
low-pass frequency range
45Hz to 5kHz
45Hz to 5kHz
45Hz to 5kHz
45Hz to 5kHz
high-pass crossover
Continuously
variable
Continuously
variable
Continuously
variable
Continuously
variable
high-pass frequency range
10Hz to 1kHz,
100Hz to 10kHz
10Hz to 1kHz,
100Hz to 10kHz
10Hz to 1kHz,
100Hz to 10kHz
10Hz to 1kHz,
100Hz to 10kHz
INTELLi Q boost range
0dB to 10dB
0dB to 10dB
0dB to 10dB
0dB to 10dB
GENERAL
11" x 10.25" x 2.25"
279mm x
260mm x 57mm
12" x 10.25" x 2.25"
305mm x
260mm x 57mm
18" x 10.25" x 2.25"
457mm x
260mm x 57mm
25" x 10.25" x 2.25"
635mm x
260mm x 57mm
(L x W x H)
(L x W x H)
(L x W x H)
(L x W x H)(L x W x H)
CROSSOVER
SECTION
1. All channels driven, continuous 4 Ω load, 20 Hz to 20,000 Hz, <0.1% THD, power input voltage at 12.0 VDC.
2. All channels driven, continuous 2 Ω load, 20 Hz to 20,000 Hz, <0.1% THD, power input voltage at 12.0 VDC.
page 9
TECHNICAL DESIGN FEATURES
page 10
AMPLIFIER CALL OUTS
1.
Power LED-when lit indicates that the amplifier is on.
2.
Output Configuration Switches-determine the output
configuration of the amplifier
3.
Independent Gain Controls-continuously adjust from
200mV to 5Vrms for full power output
4.
RCA inputs-accepts RCA input from a source unit,
preamplifier or equalizer
5.
AUX RCA outputs-provides easy connection to
additional amplifiers.
6.
AUX RCA output control-determines the audio signal
out the AUX RCAs
7.
Low-pass Frequency Control-adjusts the frequency of
the low-pass crossover
8.
Low-pass Crossover activation switch-activates the
low-pass crossover
9.
INTELLI Q adjust control-adjusts the “Q” boost of the
high-pass crossover
13. REM Remote turn-on input-turns on the amplifier when
fed 12 V+
14. Speaker Connections-allows up to 12 gauge speaker wire.
10. High-pass “x10” Frequency range switch- selects the
frequency range of the high-pass crossover
15. Remote Gain Control Port-allows dashboard remote
gain control.
11. High-pass frequency control- adjusts the frequency of the
high-pass crossover
16. Fuses-Protects the amplifier from over current situations.
12. High-pass Crossover activation switch- activates the
high-pass crossover
17. Power Connections-allows up to 4 gauge power and
ground cables.
page 11
SYSTEM PLANNING
The easiest way to maximize the performance for your
ORION XTREME amplifier is to properly plan your system.
By planning your system, you can avoid situation
where the performance of the reliability of your system
is compromised. Your Authorized ORION dealer has been
trained by ORION Industries on how to maximize your
system’s sonic potential. Authorized ORION dealers are
a valuable resource in helping you with your system de-sign
and installation. If you wish to venture on with your
own system design, here are some systems designed by
ORION Industries.
SYSTEM 1 is a simple two channel amplifier driving a
pair of satellites
•
Lowest Recommended Impedance is 2Ω Stereo.
•
RCA inputs are connected to both left and right
channels
•
Left Phase switch set to 0°
•
Right Phase switch set to 0°
•
Gain controls can be set together or independently
of each other
•
Output is configured for high-pass operation.
•
Output is configured for stereo operation.
TUNING NOTE: The phase switches can be individually switched for
improved sound quality. Try different phase switch positions for best
sonic results.
page 12
SYSTEM 2 adds an additional amplifier to
drive the subwoofers. A RGC-1 (Remote Gain
Control) has been added to the subwoofer amplifier for dash mounted subwoofer level control.
AMPLIFIER 1
•
Output is configured for high-pass
operation.
•
Left Phase switch set to 0°
•
Right Phase switch set to 0°
•
Gain controls can be set together or
independently of each other
AMPLIFIER 2
•
Output is configured for band-pass
operation.
•
The high-pass crossover is used as a sub
sonic filter with INTELLi Q.
•
RCA inputs are connected to both left
and right channels
TUNING NOTES:
•
Left Phase switch set to 0°
Amplifier 1:
The phase switches can be individually switched for improved
sound quality. Try different phase switch positions for best sonic results.
•
Right Phase switch set to 180°
•
Gain controls must be set identically for
both left and right channels.
Amplifier 2:
The phase switches can be individually switched for improved
sound quality. In the summed bridged configuration the left and the right phase
must be set opposite from each other in order to operate correctly. The high-pass
crossover is used as a subsonic filter with INTELLi Q. Configure the high-pass
crossover for “LOW” frequency range operation and set according to instructions
explained in the High-pass Crossover Section in this manual.
page 13
SYSTEM 3
page 14
SYSTEM 3 adds an additional amplifier and another set of satellites to SYSTEM 2 for a front rear fade system.
AMPLIFIER 1 & 2
•
Output is configured for high-pass operation.
•
Left Phase switch set to 0°
•
Right Phase switch set to 0°
•
Gain controls can be set together or
independently of each other
AMPLIFIER 3
•
Output is configured for band-pass operation.
•
The high-pass crossover is used as a subsonic filter with INTELLi Q.
•
RCA inputs are connected to both left and right channels
•
Left Phase switch set to 0°
•
Right Phase switch set to 180°
•
Gain controls must be set identically for both left and right channels.
page 15
SYSTEM 4
SYSTEM 4 adds an amplifier to system 4 to the front satellites for more power
and control.
AMPLIFIER 1 & 3
• Output is configured for high-pass operation.
• Left Phase switch set to 0°
• Right Phase switch set to 0°
• Gain controls can be set together or independently of each other
page 16
AMPLIFIER 2
• Output is configured for bandpass operation.
AMPLIFIER 4
• Output is configured for band-pass operation.
• Left Phase switch set to 0°
• The high-pass crossover is used as a subsonic filter with INTELLi Q.
• Right Phase switch set to 0°
• RCA inputs are connected to both left and right channels
• Gain controls can be set together or independently
of each other
• Left Phase switch set to 0°
• Right Phase switch set to 180°
• Gain controls must be set identically for both left and right channels
page 17
SYSTEM 5
page 18
SYSTEM 5 has one amplifier driving front satellites, one amplifier running as a Master Amplifier and additional amplifiers running as Slave amplifiers to the master. The subwoofer amplifiers are configured in a Master/
Slave configuration for absolute crossover and level matching.
AMPLIFIER 1
• Output is configured for
high-pass operation.
• Left Phase switch set to 0°
AMPLIFIER 2
• Output is configured for
band-pass operation.
AMPLIFIER 3, 4 & 5
• Output is configured for full
range operation.
• Right Phase switch set to 0°
• The high-pass crossover is used as a
subsonic filter with INTELLi Q.
• RCA inputs are connected to both
left and right channels
• Gain controls can be set together
or independently of each other
• RCA inputs are connected to both
left and right channels
• Left Phase switch set to 0°
• Left Phase switch set to 0°
• Right Phase switch set to 180°
• Right Phase switch set to 0°
• Gain controls must be set to
minimum positions
• Gain controls must be set identically
for both left and right channels.
page 19
POWER CONNECTIONS
Amplifier
Fuse Size
XTREME-300
(2) 15 AMP
XTREME 400
(2) 20 AMP
XTREME 800
(2) 30 AMP
XTREME 1200
(6) 30 AMP
page 20
•
Power connections made through a large 4 gauge removable terminal connector. (Dual 4 gauge connectors of the
XTREME 1200)
•
4 Gauge power and ground wire recommended for optimal performance. (Dual 4 gauge connectors of the
XTREME 1200)
•
Minimum 8 Gauge power and ground cable is recommended for acceptable performance. (Use only 4 gauge power wire
on the XTREME 1200).
•
Connect 12V+ to the battery through fuse holder. This connection provides +12V main power to the amplifier.
•
Power wire must be fused less than 18” from battery.
•
Ground amplifier to a good chassis ground as close as possible to the amplifier.
•
Connect REM terminal to remote turn-on lead from source unit. This connection provides +12V power to turn-on
the amplifier.
•
Add Extra Ground wire between the negative terminal of the battery and the chassis.
NOTE:
The addition of a ground wire from the battery to the chassis of the vehicle improves the ability of the battery to supply
power to the amplifier. This helps especially in newer vehicles, where the current delivery of the factory electrical system
was designed only to accommodate electronics supplied by the auto manufacturer.
WARNING: The XTREME 1200 has two seperate 4 gauge power and ground inputs. Both pairs of connections must use 4 gauge
power wire for proper operation. Failure to do this may damage the amplifier and is not covered under warranty.
page 21
POWER CONNECTIONS XTREME 1200
Amplifier
Fuse Size
XTREME 1200
(6) 30 AMP
page 22
•
Power connections made through dual large 4 gauge removable terminal connector.
•
Dual 4 Gauge power and ground wire required for proper performance.
•
Connect 12V+ to the battery through power distribution and fuse holder. This connection provides +12V main power to the
amplifier.
•
Power wires must be fused less than 18” from battery.
•
Terminate both grounds for amplifier to a good chassis ground as close as possible to the amplifier.
•
Connect REM terminal to remote turn-on lead from source unit. This connection provides +12V power to turn-on
the amplifier.
•
Add Extra Ground wire between the negative terminal of the battery and the chassis. Either dual 4 gauge or singal 1/0 gauge.
NOTE:
The addition of a ground wire from the battery to the chassis of the vehicle improves the ability of the battery to supply
power to the amplifier. This helps especially in newer vehicles, where the current delivery of the factory electrical system
was designed only to accommodate electronics supplied by the auto manufacturer.
WARNING: The XTREME 1200 has two seperate 4 gauge power and ground inputs. Both pairs of connections must use 4 gauge
power wire for proper operation. Failure to do this may damage the amplifier and is not covered under warranty.
page 23
TWO CHANNEL STEREO CONFIGURATION
6
100.1
FI
INPUT
AUX
RIGHT PHASE
LEFT PHASE
LOW-PASS
HIGH-PASS
AUX
RCA
INPUT
RCA
600Hz 5kHz
POWER
6dB
10dB
120Hz 1kHz
R
0 180
0
RIGHT LEFT
GAIN GAIN
MONO
BRIDGE
COPY
MASTER
GAIN
45Hz
3dB
LP ON
LP OFF
L
SPEAKER OUTPUTS
LEFT
175Hz
0dB
35Hz
10Hz
180
REMOTE
FUSE
HP x 10
HP x 1
HP ON
HP OFF
POWER
RIGHT
REM
BRIDGED
REM
GAIN
+
+
_
_
12V+ GND
2 ohm minimum
page 24
•
Lowest Recommended Impedance is 2Ω Stereo.
•
RCA inputs are connected to both left and right channels
•
Left Phase switch set to 0°
•
Right Phase switch set to 0°
•
Gain controls can be set together or independently of each other
•
Output can be configured for high-pass, low-pass, band-pass or full range operation.
•
Output is configured either for stereo operation.
TUNING NOTE:
The phase switches can be individually switched for improved sound quality. Try different phase switch positions
for best sonic results. The high-pass crossover can be used as a subsonic filter with INTELLi Q. Configure the
high-pass crossover for “LOW” frequency range operation and set according to instructions explained in the
High-pass Crossover Section in this manual.
page 25
SUMMED BRIDGED CONFIGURATION
page 26
•
Lowest Recommended Impedance is 4Ω bridged mono.
•
RCA inputs are connected to both left and right channels
•
Left Phase switch set to 0°
•
Right Phase switch set to 180°
•
Gain controls must be set identically for both left and right channels.
•
Output can be configured for high-pass, low-pass, band-pass or full range operation.
•
Output is configured summed bridged which is ideal for subwoofer applications..
TUNING NOTE:
The phase switches can be individually switched for improved sound quality. In the summed bridged configura
tion the left and the right phase must be set opposite from each other in order to operate correctly. The highpass crossover can be used as a subsonic filter with INTELLi Q. Configure the high-pass crossover for “LOW” fre
quency range operation and set according to instructions explained in the High-pass Crossover Section in this
manual.
page 27
SINGLE CHANNEL BRIDGED CONFIGURATIONS
page 28
•
Lowest Recommended Impedance is 4Ω bridged mono.
•
Only the Right RCA input is used
•
Right Phase switch set to 0°
•
Left Phase switch set to “MONO BRIDGED”
•
Right Gain control sets the level for the amplifier output.
•
Output can be configured for high-pass, low-pass, band-pass or full range operation.
•
Output is configured mono bridged which is ideal for separate left or right channel subwoofer applications..
TUNING NOTE:
In the “MONO BRIDGED” configuration, the Right Phase control can be used to change the phase of the amplifier
output. The right phase switches can be individually switched for improved sound quality. Try different phase switch
positions for best sonic results. The high-pass crossover can be used as a subsonic filter with INTELLi Q. Configure the
high-pass crossover for “LOW” frequency range operation and set according to instructions explained in the Highpass Crossover Section in this manual.
page 29
TRI-MODE THREE CHANNEL CONFIGURATION
page 30
•
Lowest Recommended Impedance is 2Ω stereo and 4Ω bridged mono.
•
RCA inputs are connected to both left and right channels
•
Left Phase switch set to 0°
•
Right Phase switch is set to 180°, Speaker polarity on the right channel must be inverted to maintain proper speaker polarity.
•
Gain controls must be set identically for both left and right channels.
•
Output must be configured for full range operation.
•
Passive crossover frequencies must not overlap.
WARNING: Failure to do so may result in damage to the amplifier.
•
For optimum performance results, we recommend the use of the ORION CSX-TMC. This passive crossover is designed for
4Ω satellites and a single 4Ω subwoofer.
•
Output is configured summed bridged, which is ideal for single subwoofer applications..
TUNING NOTE:
The phase switches can be individually switched for improved sound quality. In the Tri-mode configuration the
left and the right phase must be set opposite from each other in order to operate correctly. The high-pass cross
over can be used as a subsonic filter with INTELLi Q. Configure the high-pass crossover for “LOW” frequency
range operation and set according to instructions explained in the High-pass Crossover Section in this manual.
page 31
INPUT SECTION
The input section of the amplifier consists of separate phase switches that set output configuration, separate left and right gain
controls and RCA inputs. The input section makes it easy to adapt this amplifier to most system configurations
PHASE SWITCHES
The XTREME amplifier has separate left and right phase control switches. There
are six different setting combinations. Setting 1 is the factory configuration. Both
left and right channels are in Phase. Both left and right gain controls are active.
Setting 2 inverts the output of the right channel. The right channel is 180° out of
phase from the left channel. Both left and right gain controls are active. This
configuration is useful for Tri-mode operation. Additionally, inverting one channel
of satellite speakers can focus imaging.
Setting 3 inverts the output of the left channel. The left channel is 180° out of
phase from the right channel. Both left and right gain controls are active. This
configuration is useful for Tri-mode operation. Inverting one channel of satellite
speakers can focus imaging.
page 32
Setting 4 inverts the output of both the left and right channels. Both left and right
gain controls are active. This configuration is useful for inverting one set of speakers
like rear speakers in front/rear system to improve staging in a vehicle.
Setting 5 inverts the output of the left channel. The left channel is 180° out of phase
from the right channel. Only the right gain control is active. This is the “MONO
BRIDGED” output configuration. Right Phase control determines the phase of the
output. When the Right Phase control is in the 0° position, the bridged output is in
phase with the rest of the system.
Setting 6 inverts the output of the bridged output . The mono bridged input is 180°
out of phase from the rest of the system. Only the right gain control is active. This is
the “MONO BRIDGED” output configuration. Right Phase control determines the
phase of the output. When the Right Phase control is in the 180° position, the
bridged output is out of phase with the rest of the system.
INPUT GAIN
XTREME amplifiers have separate left and right level adjustments. The input sensitivity
of these adjustments range from 200mV up to 5Vrms to easily integrate with any
source unit both after market and OEM (Original Equipment Manufacturer) Refer to
the Testing the System and the Adjusting the Sound of the System for detailed instructions on setting up the level controls.
page 33
INTERNAL CROSSOVER SECTION
The crossover section of the XTREME amplifier is continuously variable and extremely flexible. There are eight different crossover configurations possible allowing high-pass, low-pass and band-pass configurations. New for ORION amplifiers is
the INTELLi Q feature on the high-pass crossover. This circuit is designed to optimize the performance of ORION subwoofers in all types of enclosures.
When using ORION loudspeakers, minor deviations from the recommended frequency ranges can provide superior results depending on your speaker locations and your vehicle acoustics. Setting crossover frequencies higher than recommended will not cause
damage and may provide superior sonic results depending on your system’s performance goals. Refer to your loudspeaker owner’s
manual for assistance in choosing the proper crossover frequencies for your system.
WARNING!!!
DO NOT set crossover frequencies lower than the speakers recommended operating range. This can cause driver
failure that is not covered by manufacturer’s warranty.
LOW-PASS CROSSOVER
When the push
button is in the
“out” position,
the low-pass
crossover is bypassed.
When the push
button is in the
“in” position,
the low-pass
crossover is active.
The low-pass
crossover is
continuously variable
from 45 Hz to 5 kHz.
page 34
FINE TUNING THE LOW-PASS CROSSOVER
The crossover section is marked at four frequency points for
ease of system adjustment. These points are 45 Hz, 175 Hz ,
600 Hz and 5,000 Hz. Specific crossover points can be to be
chosen based on the recommended operational bandwidth
of your speakers.
There are three small dots on the frequency range dial.
These dots represent commonly used ORION crossover frequencies. These crossover frequencies are 85 Hz, 2,500 Hz
and 3,500 Hz respectively.
page 35
HIGH-PASS CROSSOVER
When both push buttons are in the “out” position, the high-pass crossover is bypassed.
MID AND TWEETERS
When both push buttons are in the “in” position, the high-pass crossover is active in
the “HIGH” frequency range. The high-pass crossover is continuously variable from
100 Hz to 10 kHz. This setting is used for crossing over midrange and tweeter speakers.
Set the INTELLi Q level to “0 dB.” NOTE: When the high-pass crossover is in the
“HIGH” frequency range, the frequency indicators represent 1/10 of the crossover frequency. For example, 35Hz = 350Hz.
WARNING!!!
When using the crossover in the “HIGH” range, it is not
recommended to use the INTELLi Q as it may potentially
damage your midrange or tweeter speakers.
HIGH-PASS WOOFERS
When only the push button to activate the high-pass crossover is in the “in” position,
the high-pass crossover is active in the “LOW” frequency range. The high-pass crossover is continuously variable from 10 Hz to 1 kHz. The high-pass crossover is now optimized for use as a subsonic filter for subwoofers. Additionally, boost can be added at
the high-pass crossover frequency for improved bass output while still protecting the
woofer from excessive excursion. The INTELLi Q adjustment allows up to 10 dB of
boost at the crossover frequency. Care must be taken when setting the INTELLi Q at or
near the maximum boost.
page 36
FINE TUNING THE HIGH-PASS CROSSOVER “HIGH RANGE”
The crossover section is marked at four frequency points for
ease of system adjustment. These points are 10 Hz, 35 Hz , 120
Hz and 1 kHz. Specific crossover points can be to be chosen
based on the recommended operational bandwidth of your
speakers.
Note: When the high-pass crossover is set in the “HIGH” frequency range, the corner frequencies are 100 Hz, 350 Hz,
1.2 kHz and 10 kHz respectively.
page 37
ADJUSTING INTELLI Q
Boost Levels
0dB
+3dB
+6dB
+10dB
Infinite Baffle
Acceptable, No
Problems. Tune above
Fs of woofer.
High X-Max
Drivers. Tune above
Fs of woofer.
Not Recommended
Not Recommended
Sealed
Acceptable, No
Problems. Tune above
Fs of woofer.
Acceptable, No
Problems. Tune above
Fs of woofer.
High X-Max Drivers.
Tune above Fs
of woofer.
Not Recommended
Vented
Acceptable No
Problems. Tune to
Port frequency.
Acceptable No
Problems. Tune to
Port frequency.
Acceptable No
Problems. Tune to
Port frequency.
High X-Max Drivers.
Tune to port frequency.
Sealed Bandpass
Acceptable No
Problems. Tune above
Fs ofwoofer.
Acceptable No
Problems. Tune above
Fs ofwoofer.
High X-Max Drivers
Drivers. Tune above
Fs ofwoofer.
Not Recommended
Vented Bandpass
Acceptable No
Problems. Tune to
port frequency.
Acceptable No
Problems. Tune to
port frequency.
Acceptable No
Problems. Tune to
port frequency.
High X-Max Driver.
Tune to
port frequency.
Aperiodic
Set crossover to Fs
of woofer.
Set crossover to Fs
of woofer.
Set crossover to Fs
of woofer.
Not Recommended
Enclosure Type :
page 38
Incorporated in the high-pass crossover, INTELLi Q maximizes the performance of
a subwoofer. The high-pass subsonic filter removes unwanted bass output from
the woofer, increasing the output of a subwoofer by as much as 3 dB due to the
increased mechanical power handling. Depending on the enclosure, using INTELLi
Q can increase the low frequency response by an additional 10dB!!! The boost
level is identified by the corner markings. Acceptable boost levels are determined
by the type of enclosure used and the woofer’s excursion capability. Listed below
are recommended boost levels for different enclosure designs.
“Q” BOOST FILTER RESPONSE
On the left is a frequency response
of the high-pass filter set to 30 Hz.
On the right frequency response of
the high-pass filter set to 20Hz.
INTELLi Q levels of 0dB, 3dB, 6dB
and 10dB are displayed respectively.
page 39
INFINITE BAFFLE EXAMPLE HIGH-PASS SET @ 30Hz
By removing low frequency signal
which the woofer cannot produce, the
woofer can play its capable range
louder The first example is an infinite
baffle situation. The left Graph
displays the frequency response of
a 12 inch woofer in an infinite baffle
application without the high-pass filter,
with the filter and with the filter and the INTELLi Q set to +3dB. As you can see with +3dB of boost and the high-pass filter set to
30Hz, the woofer has more output down to 25Hz and less overall excursion when compared to the non-high-pass response. Maximum physical excursion capability of the woofer is 15mm.
SEALED EXAMPLE HIGH-PASS SET @ 20Hz
This sealed example is the same 12 inch
woofer in the recommended sealed
enclosure. Up to 6 dB of boost is
capable at 20 Hz was used. With +6dB
of boost, the woofer has more output
down to 15 Hz.
page 40
SEALED EXAMPLE HIGH-PASS SET @ 30Hz
In this example, the frequency has
been increased to 30 Hz. Up to 6 dB
of boost is capable at this frequency.
With +6dB of boost, the woofer has
more output down to 23 Hz.
Overall usable output is increased.
VENTED EXAMPLE HIGH-PASS SET @ 30Hz
Vented enclosure benefit most from
the INTELLi Q. Up to 10 dB of
boost is capable at the box tuning
frequency of 30 Hz. With +10dB of
boost, the woofer has more output
down to 22 Hz. The excursion below
the tuning frequency has been
greatly reduced.
page 41
AUXILIARY OUTPUT SECTION
The auxiliary outputs offer ORION amplifiers easy unlimited system expansion .
Routing signal from a source unit, pre-amplifier or equalizer is a matter of routing
RCAs into the RCA Inputs and out the AUX outputs to the next XTREME or HCCA
amplifier in the signal chain. When the switch is in the “COPY” position, the AUX
RCA is an identical copy of the RCA inputs. The signal passes through a buffer
stage so that an infinite number of XTREME amplifiers can be daisy chained without signal loss or overloading of the source unit. This maximizes the amplifier output and minimizes the potential for system noise.
When the switch is in the “GAIN” position, the AUX RCAs are buffered through
the gain stage of the amplifier. When the first amplifier in the signal chain is set this
way, a remote gain controller can be installed in the amplifier and act as a “PREAMP” controlling the overall level of the system. Following amplifiers can be configured in either the “COPY” or “MASTER” configuration for an infinite number
of XTREME or HCCA amplifiers in the signal chain without signal loss or overloading of the source unit. This maximizes the amplifier output and minimizes the potential for system noise.
When the switch is in the “MASTER” position, the AUX RCA are buffered through
the gain stage of the amplifier and filtered through the crossover section of the
amplifier. When set this way, one amplifier’s gain and crossover setting can be sent
to other amplifier down the signal chain. This can be useful for configuring multiple subwoofer amplifiers easily in a large SPL system. A Remote gain controller
will also control the level of all the amplifiers following the amplifier configured in
this master setting. An infinite number of XTREME or HCCA amplifiers in the signal chain without signal loss or overloading of the source unit. This maximizes the
amplifier output and minimizes the potential for system noise.
page 42
Remote Gain Section
The remote gain port provides easy remote access to the internal gain structure of
the XTREME power amplifier. The RGC-1 plugs into the amplifier via the 1/8” mini
jack plug. The RGC-1 can be installed in the front of the vehicle to control the amplifier gain level. The RGC-1 can be used as a bass level control when used on an
amplifier dedicated to subwoofers
page 43
INSTALLATION TIPS
TOOLS FOR THE TRADE
Listed are the majority of the tools required to perform the installation. Having the proper tools will make the installation that
much easier. Some of these tools are necessities. Some make the job much easier.
•
marking pen
•
heat shrink tubing
•
electric drill with assorted drill bits
•
nylon tie straps
•
utility knife
•
volt-ohm meter (optional)
•
Phillips and flat blade screw drivers
•
wire cutters
•
pliers (standard and needle nose)
•
wire crimpers
•
wire brush or sandpaper for chassis grounding
•
wire strippers
•
solder iron and solder
•
RTA (real time analyzer)
•
grommets
•
Reference CD with 1 kHz Sine Wave at 0dB level
(all bits high)
page 44
CHOOSING MOUNTING LOCATIONS
The location of your XTREME amplifier will depend on several important issues. Due to the low profile size of the XTREME amplifiers, there are many possible installation locations that will yield satisfactory amplifier performance. Always mount the amplifier in
a place that protects the amplifier from the elements. In addition, mount the amplifier on a stable, flat mounting surface. As with
any amplifier, there are several possible mounting locations and configurations that can be optimal. We will cover the most obvious of situations.
PASSENGER COMPARTMENT MOUNTING
If you are going to mount the amplifier in the passenger compartment, make sure you have adequate room for ventilation. The XTREME amplifiers have been designed to make possible under seat mounting. When mounting your amplifier under a seat or similar area, keep a minimum of 1” of clearance around the amplifier for adequate cooling.
TRUNK COMPARTMENT MOUNTING
SPEAKER OUTPUTS
GAIN
RIGHT
REMOTE
FUSE
POWER
LEFT
12V+ GND
REM BRIDGED
REM
REM BRIDGED
REM
12V+ GND
GAIN
Mounting the XTREME amplifier in the trunk provides excellent performance as long as you do
not mount the amplifier upside down or restrict the airflow around the heatsink of the amplifier. For optimal results, mount the amplifier with the cooling fins in the vertical position. This
type of mounting will yield the best cooling due to the convection effect of the amplifier chassis
ENGINE COMPARTMENT MOUNTING
Do not mount the XTREME amplifier in the engine compartment. The amplifier was not designed to endure the harsh environment of the exterior elements.
page 45
RIGHT
LEFT
SPEAKER OUTPUTS
REMOTE
FUSE
POWER
GENERAL PRECAUTIONS AND INSTALLATION TIPS
Caution: Be careful not to cut or drill into gas tanks, fuel lines, brake lines, hydraulic lines, vacuum lines, or electrical wiring when
working on your vehicle.
Disconnect the vehicle’s ground wire at the battery before making or breaking connections to the audio system’s power supply
terminals.
Do not use the XTREME Amplifier unmounted. Failing to securely mount the amplifier can result in damage or injury, particularly
in the event of an accident. An unmounted amplifier acts like a heat-seeking missile in the event of a crash. Never mount a
XTREME Amplifier where it might get wet. Mount the XTREME amplifier so the wire connections will not be pulled. Route the
wires where they will not be scraped, pinched or damaged in any fashion.
The +12V power supply wire must be fused as close as possible to the battery terminal, ideally within 18”. Use the recommended
fuse size or circuit breaker listed in the POWER CONNECTIONS section of this manual.
If you need to replace the fuse plugged into the side of the XTREME amplifier, replace the fuse with the same size ATC type fuse
that came with the amplifier. If you are not sure as to the correct value, refer to the POWER CONNECTIONS section of this manual
for details. Using a higher current fuse may result in damage to the XTREME amplifier which is not covered under warranty.
NOTE:
Make sure all the equipment in the system is turned off when making or breaking connections to the XTREME input RCAs or
speakers terminals. Turn on the system and slowly turn up the volume control only after double checking all wire connections.
Power for systems with a single XTREME amplifier can be supplied by most any automotive electrical system. Systems with multiple amplifiers may require a higher capacity battery, alternator or the use of a storage capacitor. WE strongly recommend the
use of both a WIRED! Transient Storage Capacitor and a MBR70 with an extra battery in larger stereo systems.
XTREME amplifiers generate a certain amount of heat as part of its normal operation. Be sure the area around the cooling fins is
unobstructed to allow adequate air circulation. Remember, beach blankets, last weeks laundry, school books and homework papers located on top of the amplifier, does not improve air flow.
page 46
STEP BY STEP INSTALLATION
Step 1
Determine the location for the amplifier. Refer to the Mounting Locations section in this manual for detailed information.
Step 2
Decide on the system configuration for your amplifier. For system suggestions, refer to the System Planning
section of this manual.
Step 3
Run all the wires from the amplifier location to the speakers, source unit and battery. Do not connect the battery
at this time. Be sure to run RCAs, power and speaker wires away from factory electrical wires and system as they
pose a great potential for induced system noise.
Step 4
Pre-drill amplifier mounting holes. Be sure to “think before you drill”. Gas tanks, fuel lines, and other obstructions
have a nasty way of hiding themselves. For best results use a marking pen to mark the mounting holes and
pre--drill these holes with a standard 1/8” drill bit.
Step 5
Mount the amplifier. Make sure the amplifier is mounted on a flat surface. If this is not possible, do not over
tighten the screws such that the chassis of the amplifier is twisted or bent.
Step 6
Turn the vehicle’s key switch to the off position.
Step 7
Disconnect the vehicle’s battery ground terminal.
Step 8
Connect the RCA and speaker wires to the amplifier. Check the quality of your speakers and signal connections.
This will determine the ultimate performance of your ORION amplifier. Refer to the Installation quick reference
section of this manual for correct wiring instructions.
Step 9
Connect power wires to the amplifier. At this time do not connect the fuse at the main battery.
Step 10
Reconnect the ground terminal to the battery.
Step 11
Set crossover and signal routing configurations. Refer to the signal routing switches and the internal crossover
configuration sections of this manual for detailed instructions.
Step 12
Once satisfied that all connections and settings are correct, install fuse at location near the vehicle’s battery and
proceed to the testing the system section of this manual.
WARNING!!!! Never exceed the recommended fuse size of this amplifier. Failure to do so will result in the void of your warranty.
page 47
TESTING THE SYSTEM
After you have completed the installation, you need to test the system. This will help ensure years of trouble free operation. Please refer to the listed steps below when testing the sound of your ORION XTREME system.
Step 1
Check all the wiring connections to be sure they are correct and secure.
Step 2
Turn the signal source volume control down all the way. Set any tone controls to their flat or defeated positions.
This includes the loudness control.
Step 3
Turn the level controls of the amplifier to their minimum positions.
Step 4
Turn the source unit on. Check to see if the remote power LED located on the connection side of the amplifier is on.
If not, please refer to the power connections section and the trouble shooting section of this manual for instructions.
Step 5
If using a aftermarket source unit, turn the level controls of the amplifier about one quarter of a turn. Slowly in
crease the volume level of the source unit to so that you can hear the output of the system. If no sound is heard or if
the output is distorted, turn the system off immediately. Refer to the power connections section and the trouble
shooting section of this manual to solve your installation problems
Step 6
Check to make sure the output for each channel is correct. If the active crossovers are used, check to make sure that
each output is correct from the amplifier. When using active crossovers on midrange and tweeters, do not use
crossover frequencies lower than recommended. If the system is not configured properly, refer to the internal
crossover section of this manual and take corrective action.
Step 7
If the output is clear and undistorted, continue to the adjusting the sound of the system section of this manual.
ADJUSTING THE SOUND OF THE SYSTEM
Once you have checked the system’s operation, adjust the sound of the system. Adjusting the sound of the system is accomplished by
setting the level controls and adjusting the internal crossovers.
Step 1
Turn the signal source volume control down all the way. Set any tone controls to their flat or defeated positions.
This includes the loudness control.
page 48
Step 2
Turn the level controls of the amplifier to their minimum positions.
Step 3
Choose music with high dynamic content that you like, that you are familiar with and will be most often used
in the system.
Step 4
Turn the unit up to its highest undistorted output level. If you lack test equipment, this point occurs between 3/4 to
full volume depending on the quality of your source unit. Listen for any audible distortion, if any distortion is au
dible, reduce the volume of the source unit until you have an undistorted output. Leave the volume control at this
position during your system tuning.
Step 5
While listening to your chosen dynamic music, turn up the level control corresponding to the midrange output until
you hear slight distortion and turn back the level control slightly for an undistorted output. Depending on your
system, the midrange and tweeter output may be on the same output channels.
Step 6
Turn up the level control corresponding to the tweeter output until you hear slight distortion and turn back the
level control slightly for an undistorted output. Depending on your system the midrange and tweeter output may be
on the same output channels.
Step 7
Fine tune the crossover setting and output level between the midrange and tweeters. Refer to the internal crossover
configuration section of this manual for detailed instructions.
Step 8
Repeat Steps 5-7 for the rear speakers. If you do not have rear speakers continue to Step 10.
Step 9
Set levels between the midrange and tweeters for optimum front/rear balance.
Step 10
Turn up the level control corresponding to the woofer output until you hear slight distortion and turn back the level
control slightly for an undistorted output.
Step 11
Fine tune the crossover setting and output levels between satellite speakers and the woofers. Refer to the internal
crossover configuration section of this manual for detailed instructions. If using an RGC-1, adjust the level to match
the output of the woofer to match the sonic requirements of the system.
Step 12
Enjoy your ass kickin’ ORION sound system.
page 49
TROUBLE SHOOTING TIPS
SYMPTOM
PROBABLE CAUSE
ACTION TO TAKE
No output
Low or no remote turn-on input
Check remote turn-on voltage output at amplifier and
fix as needed
Fuse blown
Check power wire integrity and check for speaker shorts.
Fix as needed and replace fuse
Power wires not connected
Check power wire and ground connections and fix or
replace as needed
Audio cycles on
and off
Distorted output
Audio input not connected
Check RCA connections and fix or replace as needed
Speaker wires not connected
Check speaker wires and fix or replace as needed
Speakers are blown
Check system with known working speaker and fix or
replace speakers as needed
Thermal protection engages
when amplifier
temperature exceeds 90°C (190°F)
Make sure there is proper ventilation for amplifier and improve
Heatsink ventilation as needed
Loose or poor audio input
Check RCA connections and fix or replace as needed
Loose power connections
Check power wire and ground connections and fix or replace
as needed
Amplifier level sensitivity set too
high. Exceeding maximum
capability of amplifier
Readjust gain. Refer to Adjusting the sound of the system
section of this manual for detailed instructions
Impedance load to amplifier
too low.
Check speaker impedance load, if below 2Ω stereo or 4Ω mono
Rewire speakers to achieve a higher impedance
Shorted speaker wires
Check speaker wires connections and fix or replace as needed
page 50
SYMPTOM
PROBABLE CAUSE
ACTION TO TAKE
Distorted output
continued...
Speaker not connected to properly
Check speaker wiring and fix or replace as needed. Refer to the amplifier
speaker connections section of this manual for detailed instructions
Internal crossover not set properly
Readjust crossovers. Refer to the internal crossover section of this
for speakers manual for detailed instructions
Poor bass response
Battery fuse blowing
Speakers are blown
Check system with know working speakers and fix or replaceas needed
Speakers wired with wrong
polarity causing cancellation at low frequency
Check speaker polarity and fix as needed
Crossover set incorrectly
section of this manual for detailed instructions
Reset crossovers. Refer to the internal crossover
Impedance load at amplifier
is too low.
Check speaker impedance load, if below 2Ω stereo or 4Ω mono
Rewire speakers to achieve a higher impedance
Short in power wire or incorrect
power connections.
Check power and ground connections and fix or repair as needed
Fuse used is smaller than
recommended
Replace with proper fuse size
Too much current being drawn
Check speaker impedance load, if below 2Ω stereo or 4Ω mono
rewire speakers to achieve a high impedance
Check power and ground connections and fix or repair as needed
Amplifier fuse
blowing
Too much current being drawn
Check speaker impedance load, if below 2Ω stereo or 4Ω mono
rewire speakers to achieve a high impedance and replace with
recommended size fuse
Fuse used is smaller than
recommended
Replace with proper fuse size
Impedance load at amplifier
too low.
Check speaker impedance load, if below 2Ω stereo or 4Ω mono
Rewire speakers to achieve a higher impedance
Speaker is blown with shorted
outputs
Check system with know working speakers and fix or replace
as needed
Check power and ground connections and fix or repair as needed
page 51
AUTOSOUND 2000 TROUBLESHOOTING TIPS
QUICK CHECK FOR TROUBLESHOOTING CAR AUDIO SYSTEMS
Preface:
All audio systems exhibit noise; however, if the level of noise is low enough, and the signal level high enough, noise should not be a problem.
This means that it is very important that the signal level throughout the system be optimized BEFORE dealing with your noise problem. Using a
scope (or a small portable amplifier) and Track 99 (1kHz at all high bits) of Autosound 2000’s CD #101, or tracks 24 through 29 of Autosound 200’s
CD #102, adjust the system so that when the maximum usable signal level of the deck is fed into the system, all the preamp level components clip
at the same time. However, we recommend up to as much as a 3:1 voltage overlap with the power amplifiers; i.e. an amplifier with a 2 volt minimum sensitivity can be driven by up to 6 volts of signal.
Noise Overview:
Car audio electrical accessories are notorious for interfering with car audio systems. The interference commonly arises from three areas:
1)
Power line noise (5%), which can be attenuated with in-line noise filters,
2) Inadequate power supply isolation (45%), which can be cured with transformer signal coupling, additional isolated power
supplies, or changing out components, or
3)
Inductive interference (45%) - Including loop area inductive noise picked up by the signal cables - which can be remedied by relocating or
rewiring components, rerouting signal cables, or using twisted cable or balanced transmission systems.
AUTOSOUND 2000 1-2-3 METHOD OF LOGICAL TROUBLESHOOTING
I.
MUTE THE AMP(S). Insert a muting plug (shorted male RCA connector) into each amplifier channel. Turn up the amp sensitivity. Start the car
and turn on the headlights, air conditioning, brake lights, etc. Listen for noise in each speaker. Be very picky here!
A.
If still noisy, substitute a small test speaker with short leads for the speakers, crossovers, and speaker leads in the car. If still noisy,
substitute an isolated power supply (120 VAC to 13.8 VDC bench supply or a small motorcycle battery) for the car’s alternator. If the
amplifier is noisy with the test speaker, you have a BAD amp. Send it in. It really doesn’t matter if it is quiet or noisy while running on
the isolated supply because you have a BAD amp. Send it in for repair and if it was quiet on the isolated supply, indicate so on the re
pair tag.
page 52
B.
II.
DECK TO AMP. Using a new set of signal cables, connect one channel from the output of the deck directly into one channel of your clean
amp. Run the cables outside the car and as far away as possible from the metal of the car. (For noise purposes, consider a 2" thick cushion of
electromagnetic energy emanating from every metal surface in the car.)
A.
B.
III.
If your muted amp is quiet, you’ve just joined 99.5% of car audio. Amps are usually very clean and do NOT pick up unwanted noise!
Continue on to Step II.
If still noisy, congratulations, in all probability your equalizer, electronic crossover, DSP whatchamacallit, are just fine. This means that
you can’t get your deck playing quiet with your amp, right? go to Step III.
If all is quiet, congratulations, in all probability your deck and amplifier(s) are fine - you obviously have a problem with your equalizer,
electronic crossover, DSP, etc. Skip on down to “Time for the Processors.”
MOVE THE DECK. If you’re at this step, it is time to turn your system into an “amplified deck” by temporarily relocating the deck right
ON-TOP of the clean amplifier. Then using very, very short signal cables, connect the output of the deck into the input of the amp and test
for noise. Play a zero bit track - silence - and make sure all is completely quiet.
A.
B.
If still noisy, you’re in a heap of trouble, We suggest that you try another deck and give us a call so that we can put your name into the
record books. It’s a bad car audio day for you.
If the deck is quiet, then congratulations, you’re on your way to a successful installation. It is now time to slowly, methodically, reinstall
the deck back into its final position. Test for noise each step of the way. If the noise returns, suspect the signal cables, forget shielding
because it will have only a very, minimal effect within the audio band. We highly suggest using twisted pair cables or a balanced
transmission system for cable induced noise.
TIME FOR PROCESSORS:
By the end of step III, you should have the deck playing quietly with the amp, with the quiet cables quietly routed. so it’s time to add the signal
processors - one at a time - back into the system. Simply repeat steps II and III with the equalizer, then the electronic crossover, etc. However, before MOVING-THE-SIGNAL-PROCESSORS to the amplifier, we highly suggest that you supply power to the noisy processor from an isolated power
supply rather than the car’s +12 volt DC and chassis ground. Make sure to also connect the turn-on lead to the isolated power supply. If the processor is now quiet , then it is highly probable that the component has inadequate isolation. Solutions include, changing components or permanently adding an external isolated power supply (Call Autosound 2000 at 209-465-3450 for info on isolated power supplies).
page 53
SUMMATION:
During the design stage of your vehicles, try to avoid using extra batteries and high output alternators. Extra batteries are nothing but loads as
soon as the engine is started and high output alternators usually make more noise than stock alternators. Also, extra batteries installed in the
trunk of a car will ALWAYS force extra ripple current to flow over the car.
Install Transient Storage as close to the power supply input of your amplifier as possible. The big caps will feed the switching power supplies of
your amps and minimize the inductive losses in your power wiring. Plus, they will help your peak system response.
In problem cases, we highly recommend the use of twisted pair cable rather than coaxial cable for RCA leads. This practice will greatly minimize
cable induced noise - especially in four channel amps!
Don’t forget that your system is only as good as its worst component. Do NOT-use components with inadequate power supply isolation or you
will be asking for problems.
The best electrical ground on a car is the CHASSIS of the car. Do NOT-run ground leads up to the case of the alternator or the negative battery
post. Keep ALL-ground leads as short as possible.
With properly isolated components, it does NOT matter where the component is grounded. With inadequately isolated components, it matters!
With poorly isolated components, different grounds can cause different noises.
The deck is the signal reference ground for the entire sound system. The deck usually has THREE connections to the car’s chassis: The black ground
lead, the base of the antenna, and the metal-to-metal bond between the case of the deck and the chassis of the car. With three grounds, there is
usually NO cause to worry about the ground of a deck.
Amplifiers are usually designed with adequate power supply isolation. This means that it should not matter where a deck is grounded. (Decks are
grounded three times and amps float. This is car audio!)
The more components installed on a signal path, the more chances for noise to enter a system. The more electrical accessories on a car, the more
noise will be produced by the alternator.
This information was compiled from more than 20 years of working in car audio. If you would like more information on this topic, or any other
technical aspect of car audio, please call 209-465-3450 and ask for a subscription to Autosound 2000 Tech Briefs - the monthly magazine for the
technically inclined.
page 54
page 55
HIGH PERFORMANCE CAR AUDIO
AMPLIFIERS, SIGNAL PROCESSORS
AND LOUDSPEAKERS
HIGH PERFORMANCE CAR AUDIO
©1998 Orion Industries, Incorporated
9235 S. McKemy Street , Tempe, Arizona 85284
Phone: 480.705.5600 Fax: 480.705.5788
One of the ADST family of companies.
Part # 8900-0113
Rev 5/99