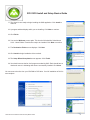
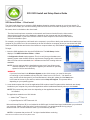
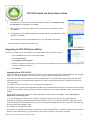
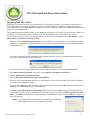
1
SOS 2010 User Manual Installation & Setup Basics Alpha Omega Publications MMVI Alpha Omega Publications, Inc. Switched-On Schoolhouse® 2010, Switched-On Schoolhouse®. Switched-On®, and their logos are registered trademarks of Alpha Omega Publications, Inc.® All Rights Reserved. No part of this publication may be reproduced, stored in an electronic retrieval system, or transmitted in any form by any means – electronic, mechanical, photocopy, recording, or otherwise – without the prior written permission of Alpha Omega Publications, Inc.® Brief quotations may be used in literary review. Table of Contents Welcome............................................................................................................................4 NEW Switched-On Schoolhouse 2010 Features...............................................................5 Recommended System Requirements..............................................................................6 Installing Switched-On Schoolhouse 2010........................................................................7 Attention Netbook Users...............................................................................................7 Attention XP Users.......................................................................................................7 Types of Installs............................................................................................................7 Home Edition Full Install...............................................................................................8 Home Edition Client Install..........................................................................................12 Upgrading to 2010......................................................................................................14 2009 to 2010....................................................................................................................14 2008 to 2010....................................................................................................................15 Upgrading From Earlier Versions.....................................................................................16 Removing (Uninstalling) SOS 2010.................................................................................16 Setting Up Switched-On Schoolhouse 2010....................................................................17 Making the Most of Your SOS Setup........................................................................17 Logging In.................................................................................................................18 Product Registration.................................................................................................18 Setup Wizard............................................................................................................20 Ready to Begin?..................................................................................................21 Creating a Calendar.............................................................................................21 Customizing a Calendar.......................................................................................22 Viewing a Calendar..............................................................................................23 Adding Students...................................................................................................23 Installing Subjects................................................................................................24 Assigning Subjects...............................................................................................25 Sample Lesson....................................................................................................25 SOS Setup Completion / Homepage .........................................................................26 Help Resources...............................................................................................................27 Exiting SOS.....................................................................................................................27 Activities Away from the Computer..................................................................................28 Tutorials...........................................................................................................................29 Overview Presentation.....................................................................................................30 EULA................................................................................................................................31 Resetting Your Teacher Password...................................................................................36 Resource List...................................................................................................................37 SOS 2009 Home Ediition Install and Setup Basics Guide• 3 Switched-On Schoolhouse® 2010 Welcome Welcome to Switched-On Schoolhouse® Home Edition 2010! How to Use This Guide This electronic reference guide was designed to help you quickly and easily find what you need as you help students succeed in Switched-On Schoolhouse®. As you move from topic to topic, you see graphics and buttons accompanied by quick explanations and handy tips. You can also walk through step-by-step instructions that show you how to accomplish different tasks. There are two major sections in this online help guide: SOS TEACHER—A tour through SOS Teacher SOS ASSIGNMENTS—Learn about your student’s assignments and how you can help them when they need assistance Additional Help SOS has a number of on-line tutorials that walk you through many of the functions that maximize SOS performance. A list of the available tutorials can be found on page 29 in this guide. You can access them using any of several methods: • They were installed on your computer with SOS 2010. Simply double-click the icon open the tutorials. • They are also available at http://www.sostutorials.com/. • Finally, you can access them on your computer by following these steps: on your desktop to 1. Click Start on the task bar of your computer. 2. Next, click All Programs. 3. Select AOP. 4. Select Switched-On Schoolhouse 2010. 5. Select Tutorials. AOP offers an overview of how to use the application. You can watch the SOS Overview by clicking the Help button on your Home screen and selecting SOS Overview from the sub-menu that appears. If you need additional help, you can contact Alpha Omega Publications: Visit www.aophomeschooling.com/support/ to view our extensive database of solutions to problems you might encounter with SOS or other AOP products. The database is updated regularly as new issues and solutions are identified. You can also locate software patches and revisions as well at this site. Call toll-free 1-866-444-4498 for Technical Support. Call toll-free 1-800-622-3070 for Customer Service. SOS 2009 Home Ediition Install and Setup Basics Guide• 4 2010 SOS Install and Setup Basics Guide If you need to speak to a Technical Support team member, determine the following information before calling: The version of Windows you are currently using: Windows XP users: Click Start on your computer taskbar, right-click My Computer, and select Properties. Vista and Windows 7 users: Click Start on your computer taskbar, right-click Computer, and select Properties. The version of Switched-On Schoolhouse® you are using: Click the About link in the upper right corner of your MiSOS Homepage or click the SOS logo below the buttons on your “Classic” theme Homepage. Adobe Reader SOS uses Adobe Reader. If you do not already have Adobe Reader, you can download this product free. Go to http://get.adobe.com/reader/ If you do not have access to the internet to download this free package, we have placed it on the application disc. You can copy it to your computer hard drive by: 1. Put the SOS installation disc into the CD-ROM or DVD drive of your pc. 2. If the Install window opens, click Close. 3. Click Start on your computer taskbar, and select My Computer (Computer if using Vista). 4. Right-click the drive containing the SOS installation disc, and click Open. 5. Double-click the Adobe folder or right-click you mouse and select Open. 6. Double-click the file inside that folder to download the Reader. NEW Switched-On Schoolhouse 2010 Features SOS 2010 is packed with new features to help you and your student make the most of the learning experience. Some of these include: • New MiSOS Homepage Themes *** New • Assign Coursework by Day of the Week *** New • Automatic Updates for Curriculum Revisions *** New • Zero-out an Entire Unit with One Click *** New • Immediate Audio Feedback for Student Problem Response • Four All-New Vocabulary Games *** New • Updated Student Journal • New Homepage Widgets *** New • Teacher Tip of the Week • Where in the World • Where in the USA • To Do List Getting Started Switched-On Schoolhouse® (SOS) is easy to install on your home computer. Before putting in the application disc, double-check to make sure your computer meets the recommended minimum system requirements. This ensures the program is able to run at its best. Note: The requirements in the first column of the table on the following page are minimal. Depending on the configuration of your computer, you may find that you need to run SOS on a computer that exceeds these requirements, giving you more memory and a faster processing speed. SOS 2010 Home Ediition Install and Setup Basics Guide• 5 2010 SOS Install and Setup Basics Guide Recommended Minimum System Requirements Note: Only English language versions of Microsoft® XP, Vista, and Windows 7 are supported. The recommended minimum system requirements for running SOS on your computer are: Minimum Requirements Optimal Performance XP Service Pack 3 Microsoft IE 7 or higher 500 MHz or higher processor 512 MB Memory (RAM) 600 MB hard drive space 1024 X 768 or higher resolution monitor, 16 bit color CD-ROM drive Adobe Reader Printer recommended Microsoft IE 7 or higher 1 GHz or higher processor 1 GB Memory (RAM) 600 MB hard drive space 1024 X 768 or higher resolution monitor, 16 bit color CD-ROM drive Adobe Reader Printer recommended Microsoft IE 7 or higher 1 GHz or higher processor 1 GB Memory (RAM) 600 MB hard drive space 1024 X 768 or higher resolution monitor, 16 bit color CD-ROM drive Adobe Reader Printer recommended Microsoft IE 7 or higher 1.5 GHz or higher processor 2 GB Memory (RAM) 1 GB hard drive space 1024 X 768 or higher resolution monitor, 32 bit color CD-ROM drive Adobe Reader Printer recommended Vista (all versions) Windows 7 Microsoft IE 7 or higher 1 GHz or higher processor 1 GB Memory (RAM) (2 GB for 64-bit) 600 MB hard drive space 1024 X 768 or higher resolution monitor, 16 bit color CD-ROM drive Adobe Reader Printer recommended Microsoft IE 7 or higher 1.5 GHz or higher processor 2 GB Memory (RAM) 1 GB hard drive space 1024 X 768 or higher resolution monitor, 32 bit color CD-ROM drive Adobe Reader Printer recommended Note: The requirements in the first row of the table above are minimal. Depending on the configuration of your computer, you may find that you need to run SOS on a computer that exceeds these requirements, giving you more memory and a faster processing speed. Vista Aero Users: We strongly recommend that you use a computer meeting the requirements for optimal performance. SOS 2010 Home Ediition Install and Setup Basics Guide• 6 2010 SOS Install and Setup Basics Guide Installing Switched-On Schoolhouse® SOS is easy to install because most of the components install themselves! But before you begin, there are a few things you should do to ensure that the program will run at its best: 1. Your computer operating system needs to be either Microsoft XP Service Pack 3 (or higher), any version of Microsoft Windows Vista, or Windows 7. 2. Check to make sure your computer meets the recommended minimum system requirements. Your computer must meet or exceed the minimum requirements to receive technical support. (See the requirements table on the previous page. Note: A check is performed during SOS installation to verify that all requirements are met. If they are not, a list of checked items is displayed alerting you to the items that do not meet specification for effective operation of SOS. Attention Netbook Users: To install SOS to your Netbook: 1. On a computer with a CD-ROM/DVD drive, copy the entire install disc onto a Flash drive. 2. Where the installation instructions reference the disc, use the Flash drive and install directly from the Flash drive. Attention XP Users: If you have or had Internet Explorer version 6 (IE 6) and MSXML 6.0 loaded on your computer and installed the Microsoft Windows security update (KB954459), you may see an MSXML6 error during the SQL Server part of your Switched-On Schoolhouse installation. To verify if this applies to you: 1. Click Start. 2. Click Control Panel. 3. Double-click Add or Remove Programs. 4. Check for MSXML 6.0 Service Pack 2 (KB954459). 5. If MSXML 6.0 Service Pack 2 (KB954459) is listed, access the first website below to download and run the Windows Installer Cleanup Utility http://support.microsoft.com/kb/290301. 6. Install the Windows Installer Cleanup Utility and run it, selecting KB954459 from the list displayed. 7. After this update has been removed, continue with your SOS installation 8. When you are finished, upgrade to Internet Explorer 7 (IE7), if you have not already done this. 9. Go to http://www.update.microsoft.com and reapply the security update (along with any others you need.) Before You Install If you are installing SOS for the first time on your computer, continue with the Types of Installs section immediately below. If you already have a version of SOS installed on your computer, please go to Upgrading to SOS 2010 Home Edition beginning on page 14 of this guide BEFORE continuing. Types of Installs SOS Home Edition offers two different installs; a full install and a client install. If this is the first time you are installing SOS 2010, you must do a full install on the main computer before you can do a client install. • Full Install – SOS Teacher, SOS Student and the database all reside on the same computer. • Client Install – SOS Student and SOS Teacher reside on a computer which is part of a home network linked to the main SOS computer, which contains the full install. For SOS to function properly, the client computer requires a constant connection to the main computer with the full install. Note: If you currently have an earlier version of SOS installed on your computer, see the Upgrade section (starting on page 14) of this guide before proceeding. Note to previous SOS users: SOS 2010 installs the database server, database, and tutorials separately this year, so it may seem as if you are repeating the same steps. In a way you are, but first you will install the server and database, then the application, and finally the tutorials. SOS 2010 Home Ediition Install and Setup Basics Guide• 7 2010 SOS Install and Setup Basics Guide SOS Home Edition – Full Install To perform a full install: 1. Insert the SOS 2010 installation disc into your CD-ROM or DVD drive. The SOS 2010 Setup window displays. Select SOS 2010 Home Edition (top button). A Configuration Check window appears. This is to verify that your hardware and operating system meet the SOS minimum requirements. Anything with a checkmark next to it meets minimum standards. An X indicates an item NOT meeting minimum standards. Click Next to continue. NOTE: You may continue with the installation process, even if not all items meet minimum standards. You may need to upgrade your hardware or operating system for SOS to work effectively. WARNING: If you have items listed in the Windows System section of this screen, you must fix them prior to continuing or your installation will very likely fail. If there is not a “Click to fix...” link beside an entry, the file must be decrypted. If you need assistance in doing this, please click the Start button in the lower left corner of your task bar, and then select Help and Support. This process differs depending on your operating system. 2. A new window opens with a list of the applications SOS must install. Programs with a checkmark are already installed on your computer. Any unchecked applications will be installed automatically when you click Install. The installation of applications not already on your computer begins when you click OK. NOTE: This process may take some time depending on the applications that must be installed. The applications installed with SOS include: • Adobe FlashTM Player 10 • Crystal Reports Basic Runtime for Visual Basic Studio 2008 • SOS 2010 SQL 2005 Express Server Microsoft Internet Explorer (IE) is required but not included in the SOS install. It should have been installed when you purchased your computer. You can download IE free by going to www.microsoft.com. Please contact the seller if you have difficulty with this. Microsoft®.NET Framework 3.0 is installed during the initialization process on computers running Microsoft XP operating systems, if it is not already on your computer. NOTE: It is very important that you use IE 7 or higher. If you are currently running IE 6 or below, please download IE 7 before continuing this installation process. 3. While the applications are installing, the server and database are first. The End User License agreement for Microsoft SQL Server 2005 displays, Click the checkbox next to I accept the licensing terms and conditions to continue. SOS 2010 Home Ediition Install and Setup Basics Guide• 8 2010 SOS Install and Setup Basics Guide 4. A list of the required SQL Server Components is displayed. To continue, click Install. If you have a firewall installed on your computer, you may be prompted to allow access to an SQL Server file “sqlservr,exe” during this step of the SQL Server install. Please allow access for this file. 5. When SQL Server 2005 and all of the necessary components are installed, click Next to continue. 6. To complete the installation of your Microsoft SQL Server 2005, click Finish. After some components are successfully installed, you may be prompted to restart your computer. If you are, click OK to restart. You once again see the Switched-On Schoolhouse 2010 Setup Installed Products window as the Server installation finishes. The Switched-On Schoolhouse 2010 - Home Edition Database - AOP Setup window displays again to walk you through the database installation process step-by-step. 7. Click Next on the Welcome screen when it displays. 8. On the Customer Information screen, enter: • User Name: (Only letters and numbers are allowed. Punctuation marks and other special characters are not permitted.) • Organization: (This might be your last name or something like “Home”.) • Serial Number: (The 16 digit serial number is on the inside front cover of this guide.) Enter it exactly as it appears. 9. The Destination Folder & Desktop Icons screen (for the database) displays. To retain the location where the database is automatically placed, click Next. If you must change this default location, click Change, enter the path to the folder you want to use. Click OK when finished. We recommend you leave the SOS database in the default location. SOS 2010 Home Ediition Install and Setup Basics Guide• 9 2010 SOS Install and Setup Basics Guide 10.The Setup Information screen displays. Enter the following information: • Teacher username (Must be no longer than 20 characters. Only letters and numbers are permitted) • Teacher password – Type in your password. Passwords maybe 1-20 characters long. They are case sensitive and may not contain blank spaces or special characters. Be sure to write down your password. You need it to access SOS Teacher after your installation is complete. See page 36 of this guide for instructions on how to change your teacher password if necessary. • Teacher password confirm – Enter your password again. • Teacher first name - This is what displays on your Homepage. It cannot be changed after SOS is installed. • Initial term description (i.e. the name of your school year) – the current school year is the default, you may change it. 11. Click Next when you are ready to continue. 12. Click Install to continue. This may take several minutes. After it is finished installing a completion screen displays. 13. On the Setup Wizard Completed window, click Finish. The SOS Database is now finished installing. 14. The wizard is now ready to install the SOS application. Click Next to continue. 15. The SOS End User License Agreement (EULA) displays. Read this agreement carefully. If you agree to the terms of the agreement, proceed by clicking the circle next to the “I agree…” statement and then click Next. 16. The Destination Folder & Desktop Icons screen displays. Click Next. To remove the shortcut icons on your desktop, remove the check beside Add application icons to desktop, then click Next. SOS 2010 Home Ediition Install and Setup Basics Guide• 10 2010 SOS Install and Setup Basics Guide 17. The wizard is now ready to begin installing the SOS application. Click Install to continue. 18. A progress window displays while you are installing. Click Next to continue. 19. Click Finish. 20.You see the Welcome screen again. This time the Switched-On Schoolhouse 2010 - Home Edittion Tutorials are ready to be installed. Click Next to continue. 21.The Destination Folder screen displays. Click Next. 22.Click Install to begin installation of the tutorials. 23.The Setup Wizard Completed screen appears. Click Finish. 24.You should now see the list of all programs needed by SOS. Each should have a checkmark next to it indicating that all were successfully installed. Click Close. You can remove the disc from your CD-ROM or DVD drive. Your full installation of SOS is now complete. SOS 2010 Home Ediition Install and Setup Basics Guide• 11 2010 SOS Install and Setup Basics Guide SOS Home Edition – Client Install The client install allows you to access the SOS database located on another computer on your home network. To complete a client install, you must have already performed a full install on the other computer on your home network. Be aware, there is a limitation to the client install: The client install requires a connection to the network at all times to function.Since the client version does not have its own copy of the database; it depends on the computer with the full installation to provide the database. If your home network is down or either computer is removed from the network, SOS will not be able to open. For example, you might perform a full install on the computer in your office or family room and the client install on the computer in your child’s room. We recommend you do the full install on a computer where you can access both SOS Teacher and SOS Student and do the client install on a computer where only SOS Student needs to be accessed. To begin: 1. Insert the SOS application disc into the CD-ROM drive. The SOS Setup window displays. Click SOS 2010 Home Edition – Client. A Configuration Check window appears. This is to verify that your hardware and operating system meet the SOS minimum requirements. Anything with a checkmark next to it meets minimum standards. An X indicates an item NOT meeting minimum standards. NOTE: You may continue with the installation process, even if not all items meet minimum standards. You may need to upgrade your hardware or operating system for SOS to work effectively. WARNING: If you have items listed in the Windows System section of this screen, you must fix them prior to continuing or your installation will very likely fail. If there is not a “Click to fix...” link beside an entry, the file must be decrypted. If you need assistance in doing this, please click the Start button in the lower left corner of your task bar, and then select Help and Support. This process differs depending on your operating system. 2. A new window opens with a list of the applications SOS needs to install. Programs with a checkmark are already installed on your computer. Any unchecked applications will be installed automatically when you click Install. NOTE: This process may take some time depending on the applications that must be installed. The applications needed to run SOS include: • Adobe FlashTM Player 10 • Crystal Reports for .NET Framework 2.0 Microsoft Internet Explorer (IE) is not included in the SOS install. It should have been installed when you purchased your computer. Please contact the seller if you do not have IE. You can download IE free by going to www.microsoft.com. Please contact the seller if you have difficulty with this. NOTE: It is important that you have IE 7 or higher installed before continuing. SOS 2010 Home Ediition Install and Setup Basics Guide• 12 2010 SOS Install and Setup Basics Guide Microsoft®.NET Framework 3.0 is installed during the initialization process on computers running Microsoft XP operating systems, if it is not already on your computer. As some components are successfully installed, you may be prompted to restart your computer. If you are, click OK to restart. The SOS 2010 Setup window displays again, showing that the last application to be installed is Switched-On Schoolhouse®. While it does not install automatically, it does walk you through the installation process step-by-step. 3. Click Install on the Setup window to begin. The Welcome screen displays. Click Next. 4. The End User License Agreement (EULA) displays. Read this agreement carefully. If you agree to the terms of the agreement click the circle beside the “I agree…” statement and then click Next. 5. The Custom Setup Screen displays. If you want only the SOS Student features installed: • Select Teacher and highlight: X this feature will not be available If you want only SOS Teacher features installed: • Select Student and highlight: X this feature will not be available 6. The Destination Folder & Desktop Icons screen displays. If you do not want to change the location where the application is automatically placed and you want the shortcut icons for SOS Teacher and SOS Student on your desktop, click Next. We STRONGLY recommend you leave SOS in the default location. If you must change the default location of the application, click Change and enter the pathname to the folder to be used, and then click OK. To remove the shortcut icons on your desktop, remove the check beside Add application icons to desktop, then click Next. 7. On the Database Selection window, locate the computer where your full install resides, either by using the dropdown menu or typing in the computer name followed by: \SOSHOME309 in the blank textbox. Click Next when location has been selected. When you click Next, the application tries to connect to the database on the computer with the full install. If one is found, continue with Step 11. If a connection cannot be made, a message displays that it could not connect to a valid database. Repeat Step 10 until you have a valid connection. NOTE: Locate the procedure “Client Installation Troubleshooting” at www.aophomeschooling.com/support/ for further assistance. SOS 2010 Home Ediition Install and Setup Basics Guide• 13 2010 SOS Install and Setup Basics Guide 8. Once you have successfully located the database connection, the Ready to Install the Program screen displays. Click Install. 9. After all of your new files are copied, you see the completion confirmation screen. Click Finish. 10. An updated list of the installed applications displays with all of the application names checked. Click Close. Don’t forget to remove the application disc from your CD-ROM or DVD drive! Your Client version of SOS is now ready to use. Upgrading to SOS 2010 Home Edition If you have an older version of SOS (prior to the 2009 version) that you need to remove: • Go to the Start button on your computer’s taskbar. • Select Control Panel. • Select Add/Remove Programs. • Select the program to be removed. (If you need to remove SOS 2009, see the section beginning on page 16 for instructions before proceeding.) • Click Remove. Upgrading from 2009 to 2010 If you are currently running the 2009 version of SOS, you can upgrade directly to the SOS 2010 edition. Your upgrade makes your 2009 data available in the new program, letting you take full advantage of SOS 2010. If you have the client version installed, you need to upgrade the Full Install BEFORE doing anything with the client installation. After the Full Install has been upgraded, you need to uninstall the 2009 client, and then install the 2010 client application. If you plan to use 2010 curriculum, you must upgrade your application. The 2009 to 2010 upgrade process automatically backs up your database and restores it for use with the 2010 version of SOS. As a precaution, you should always perform a backup from your existing installation before you install the new version. Need help doing a backup? Open your existing installation of SOS Teacher, click Help? > select SOS Teacher > Application > Backing Up Files. If you are upgrading from 2009 to 2010, do NOT uninstall your 2009 version of SOS. The upgrade process automatically migrates your data and uninstalls the old version for you. You may notice there are duplicate icons for both SOS Teacher and SOS Student for a very brief time during the upgrade process; this is expected. There will only be one set when the upgrade is done. To complete your upgrade from 2009: Go to page 8 of this guide and follow the instructions in the SOS Home Edition - Full install section. If you also need to perform a Client Install (page 12), do this after you finish the Full Install on your primary computer. SOS 2010 Home Ediition Install and Setup Basics Guide• 14 2010 SOS Install and Setup Basics Guide Upgrading from 2008 to 2010 Upgrading is necessary if you plan to use either SOS 2010 or the 2010 curriculum. If you have the client version of SOS 2008 installed, you need to upgrade the full install of 2010 BEFORE you perform any upgrade activity on the client. After the full version install has been upgraded, you need to uninstall the 2008 client, and then reinstall the client using the 2010 installation disc. The upgrade process automatically backs up your database and restores it for use with the 2010 version of SOS. As a precaution, you should always create a backup of your existing database before you install the new version. For help creating a backup, open your existing installation of SOS Teacher, click Help > select User Manual > select SOS Teacher > Application > Backing Up Files. 1. When you put the SOS 2010 application disc in your CD-ROM drive, the first screen you see advises you that a backup of your database has been created and that you must manually uninstall SOS 2008. Click OK and remove the application disc. If you have completed your full install and are now installing the Client, you see a message (see below) alerting you if you have not already removed SOS 2008. 2. To uninstall SOS 2008, click the Start button on your computer’s taskbar, then select the Control Panel. 3. Open Add or Remove Programs. (Vista users, click Programs > Programs and Features.) 4. Remove Switched-On Schoolhouse® 2008. 5. Remove Microsoft® SQL Desktop Engine (SOSHOME22). 6. Return the SOS 2010 application disc into your CD-ROM drive. Follow the instructions in the SOS Home Edition Full install section beginning on page 8. When you reach Step 17 (of the Full Install), return to this page and continue with Step 7 below for instructions on migrating your 2008 database to your 2010 application. 7. Click Next on the Migrate SOS Home 2008 Data screen and then return to Step 17 of the Full Install on page 11. If you do NOT want to migrate your database to SOS 2010, click the circle next to “Do NOT migrate Home 2008 data…”, click Next to enter database setup information, click Next again, and then return to Step 17 on page 11 to finish your upgrade. NOTE: If you do not migrate your database, the information it contains will not be available to you or your students in SOS 2010. SOS 2010 Home Ediition Install and Setup Basics Guide• 15 2010 SOS Install and Setup Basics Guide Upgrading from Earlier (than 2008) Versions If you have a version of SOS older than 2008 installed, you need to uninstall it. SOS 2010 cannot be installed over those older versions. Again, please create a backup of your database. NOTE: You will not be able to migrate a 2007 or earlier database to SOS 2010. For help doing this, open your existing installation of SOS Teacher, click Help? > select SOS Teacher > Application > Backing Up Files. To uninstall: 1. To uninstall your old version of SOS, click Start on your computer’s taskbar, then select the Control Panel. 2. Open Add or Remove Programs. (Vista users, click Programs > Programs and Features.) 3. Remove Switched-On Schoolhouse® 200X. (X being the year of your presently installed version.) 4. Remove Microsoft® SQL Desktop Engine (SOSHOME22). Removing (Uninstalling) Switched-On Schoolhouse® 2010 WARNING: It is critical when removing (uninstalling) the 2010 version of SOS you follow the steps below exactly as written. 1. Open Add/Remove Programs in the Control Panel. 2. Remove Switched-On Schoolhouse 2010 – Home Edition. 3. Remove Switched-On Schoolhouse 2001 – Home Edition Database. 4. Remove Microsoft SQL Server 2005. 5. On the Uninstall dialog window, select the instance of SOSHOME309 and Workstation Components, and then click Next. XP Users: Continue to Step 6 below. Attention Vista Users: At this point in the uninstall process, you will see a dialog box similar to the one ro the right. When you do, click the Ignore button to proceed with your uninstall. Do not click Retry or press your Enter key. You will just continue to loop back to this dialog box. 6. Click Finish to proceed with the uninstall process. 7. Once the SQL Server 2005 uninstall is finished, four SQL components remain in your installed programs list. Remove Microsoft SQL Server Native Client next. 8. Remove Microsoft SQL Server Setup Support Files. 9. Click Yes on the confirm removal box. 10.When the warning appears telling you “This action is only valid for products that are currently installed”, click OK. 11.Repeat Steps 9-10 for Microsoft SQL Server VSS Writer, and MSXML 6.0 Parser. NOTE: You MUST remove Microsoft SQL Server 2005 before any of its components are removed or it will not be properly uninstalled and any subsequent installation attempts will fail. If you try to uninstall one of the components first, you will see a warning that the server should be removed first. SOS 2010 Home Ediition Install and Setup Basics Guide• 16 2010 SOS Install and Setup Basics Guide Setting Up Switched-On Schoolhouse® 2010 Before You Begin The rest of this guide walks you through the basic school level setup you need to get yourself and your students working in SOS as well as a few suggestions to help you make the most of your Switched-On Schoolhouse experience. Before your students can begin working in SOS, you need to establish your school, students and curriculum. To simplify this process, SOS offers a Setup Wizard to walk you through the steps to establish your basic school level setup. The information on the next couple of pages is offered to help you make the best choices for your students. The registration process and the teacher login process are described here, along with some explanation about how the SOS features interact with one another and the impact your choices might have on your students. Making the Most of Your SOS Setup Screens SOS lets you decide how your students: • Process new information • Are graded for their work • Progress through the curriculum So, you need to understand what the options do and how they connect with one another. SOS is designed so that you set up options for assignments, grades, terms; and quizzes and tests at the School level first, the Student level second, and the Subject level third. Each level gets more specific, enabling you to customize the learning experience for your students according to their needs. For example, if you want all students in your school to be able to play the Spelling Bee, leave the checkmark in the checkbox beside Spelling Bee in the Games Access section of the School Setup screen. Removing the checkmark prevents the students from accessing the game. Consider this scenario for example. One of your students, Andrew, tends to play Spelling Bee repetitively. You want him to spend more time studying his lessons. You go to Andrew’s Student Setup screen (specific to him only). You remove the checkmark beside Spelling Bee in the Games Access section of that screen. Finally, you decide that Andrew needs the repetition of the words in Spelling Bee in Science and you want him to practice as much as possible. To give him access to Spelling Bee in Science, you put a checkmark in the box beside Spelling Bee on Andrew’s Science Subject screen. You have now set up your school so that: • At the School level all students have access to Spelling Bee • At the Student level, Andrew does not have access to Spelling Bee • At the Subject level, Andrew does have access to Spelling Bee Every time you go to a more specific level of setup you override the setting on the levels above. Keep in mind: it is very important to know the options you chose at the most specific levels of setup. That way you know what options apply. When you are deciding between options during the setup process, remember that you can choose to set up options at the School level and leave it at that. Setup need be only as specific as you decide. The information in this guide is for School level setup only. You can find instruction on Student and Subject level setup in the Help files in SOS Teacher by pressing the F1 key. SOS 2010 Home Ediition Install and Setup Basics Guide• 17 2010 SOS Install and Setup Basics Guide Logging In As a teacher, you use a single account to perform all your administrative functions, including grading student work. You are asked to login with a teacher password each time you start work in SOS Teacher. This protects your account, blocking others from answer keys, student grades, and teacher controls. 1. Enter your password (the one you created during installation – see page 10) in the password field. (Check your caps lock key if you get an error message, it is case sensitive.) 2. Click the Login button. Registration Switched-On Schoolhouse® requires you to register your software installation. You have 30 days from the time you install the software to complete the registration process. You have the option of registering electronically or by calling AOP Customer Service toll-free at 1-800-622-3070. When you login initially, you see a message similar to this, click Yes to register now. Register By Telephone SOS automatically tries to connect you to the internet registration website. If no connection is made, a screen similar to the one to the right appears. The toll-free number and your installation serial number are displayed. You will need to provide this number (in Step 2) to the customer service representative (CSR). The CSR also asks you for the following information: • • • • • • First and Last Name Address, City, State Zip/Postal Code Country Email address Phone number SOS 2010 Home Ediition Install and Setup Basics Guide• 18 2010 SOS Install and Setup Basics Guide AOP has several optional products / services available that the CSR may offer you. For example, if you want to receive the Daily Focus, a daily devotional or the Homeschool View, an electronic newsletter, you will also be asked to provide your e-mail address. The CSR will give you a registration code when the process is complete. You must enter it into the four boxes in Item 4 on the screen exactly as given. We recommend that you write it down and keep it in a secure place, possibly on the sticker with your serial number in the front of this guide. Click OK when you are finished. Remain on the line with the CSR until you have a message confirming your successful registration. Registering On-line If an internet connection is detected, an account login screen similar to the SOS Online Registration screen to the right is displayed. An SOS Online Registration screen like the one to the right appears. Notice your serial nunber is already popluated. Please complete the form by entering: • First and Last Name • Address, City, State • Zip/Postal Code • Country • E-mail Address • Phone Number Next, you see a list of optional products and services AOP offers, for example the Daily Focus, a daily inspirational devotion for homeschool families or the Homeschool View, an electronic newsletter for homeschool familes. Leave the checkmark beside the ones you want to receive. Click SUBMIT to finish your registration. A new window opens with a message confirming the successful registration of your SOS software installation. This message includes your registration code. Please, write this number down and keep it in a secure location (like the front cover of this guide) or print the page and put it in a safe place. Click OK on this message screen after noting the registration number. Should you misplace either your serial number or registration number, you can find them on the About page of your SOS application. Click the SOS logo on your Homepage for access. SOS 2010 Home Ediition Install and Setup Basics Guide• 19 2010 SOS Install and Setup Basics Guide Register Later If you choose not to register your product immediately, you can access the application for up to 30 days after installation. Each time you open your Teacher application you see a registration reminder with the number of days you have to register before your software is disabled. Click Yes anytime you see this message to register. If you do not register by the end of the 30 day grace period, a message appears on day 30 advising you that SOS will be disabled if you do not register today. Click Yes to register now and follow the procedures on pages 18 – 19. If you have not registered by day 31, a message appears when you open SOS Teacher advising you that SOS has been disabled and cannot be opened until the product has been registered. Click OK to register the product at this time. On day 31, your student also sees a message advising them that they cannot open SOS Student until the product has been registered. SOS Setup Wizard The first time you login to SOS Teacher, the Setup Wizard appears. It walks you through the initial setup steps for your school. You can: • Add a new school term if you need. Remember, you added one during installation. (See page 10.) (You must add a new school term for each new school year, if you want to keep your SOS School records organized.) • Customize calendars for school terms • View the calendar you just created • Add students • Install curriculum and assign subjects When you click the Finish button at the end of the Setup Wizard, the basic setup for SOS is complete. You and your students can immediately begin working. To customize assignment or grade options for your school or change options for a specific student or subject, please see the electronic Help file (press F1) for step-by-step instructions. You can also access the Help file by clicking the Help button on your Home screen and selecting User Manual. Note: Switched-On Schoolhouse includes a tutorial, “How to Use the Setup Wizard”. It walks you through a basic school setup. To access the tutorials, click Start on your computer’s taskbar, and then select All Programs > AOP > Switched-On Schoolhouse > Tutorials; or if you have the Tutorials shortcut icon on your desktop, just double-click it. The Setup Wizard may also be viewed online at www.sostutorials.com. See a complete listing of available tutorials on page 29 of this booklet. SOS 2010 Home Ediition Install and Setup Basics Guide• 20 2010 SOS Install and Setup Basics Guide Ready to Begin? Click Next to begin your setup process or click Cancel to exit the Setup Wizard. Setting Up a School Term You cannot assign schoolwork to your students without school terms. There are a couple of important points to keep in mind as you work with terms: • A student can only work in ONE term at a time. If you assign work to a student in more than one term, you must switch their active term each time they need to work on an assignment from the non-active term. Although there is a View Other Term button on the SOS Student Schoolwork screen, it does not allow students to work in other terms. It only allows them to see what work is assigned to them in another school term. They cannot perform any work on assignments in other terms until you change their active term using the SOS Teacher program. • Terms help you keep SOS School records organized. Create a new term for each new school year. To use the school term you created when you installed Switched-On Schoolhouse® 2010, click Next at the bottom of the School Term screen and skip to the Customizing a Calendar section of this guide on page 22. If you do want to create a new term: 1. Click Add a Term on the School Term screen. 2. Type in the name you want to assign to the school term. 3. Click Save Term. 4. Click Next to see the Calendar screen appear. Creating a Calendar Creating a calendar allows you to assign due dates to student assignments. Due dates help students know how much work must be done each day so they can complete their assigned work by the end of the school year. When due dates are turned off, students must pace their schoolwork. 1.Determine if you want to assign due dates: • Select Yes if you want to assign due dates to student assignments. • Select No if you do not want to assign due dates to student assignments. 2.Click Next to continue. 3.Click the circle next to the type of calendar you want to use: • I want to use a Traditional calendar - this calendar begins the day after Labor Day and lasts 180 school days, excluding time taken off for holidays. You can change the pre-set holidays or school days as necessary for your school. • I want to use a Custom calendar – this calendar allows you to choose the start and end days of the term as well as assigning any holidays to be included. It is useful if you need to start a term at a time not usually associated with the start of the school year or if you want to compress a school year. SOS 2010 Home Ediition Install and Setup Basics Guide• 21 2010 SOS Install and Setup Basics Guide 4.Click Next to continue. 5.If you chose a traditional calendar, select the school year using the up and down arrows, and then click Next to continue. If you chose a custom calendar, you need to select start and end dates for your calendar. To do this: • Select the End Date for your school year, and then select the Start Date for the school year. • Click Next to continue. Note: You must select the End Date first. If you try to enter the Start Date before you enter the End Date, SOS will not allow you to select a date beyond today’s date. Customizing Your Calendar After you have determined the type of calendar you want to use, you are ready to customize the calendar. This means you can change school days to non-school days and vice-versa. You can choose to change individual days or a series of days. You may do this now or at any time during the school term. Just press F1 to access the electronic Help file for step-by-step instructions or watch the tutorial for a video demonstation. 1.Click No if you do not want to customize your calendar, or if you would rather customize it later. Click Next to continue. Skip to the Viewing the Calendar section below. Click Yes if you want to customize your calendar now, and then click Next to continue. 2.Set each date or range of dates individually. To choose specific dates for things like holidays and vacation: • Select the Start Date and End Date of the period you want to customize. (Remember, select the End Date first!) • Enter the Description for the date range, for example, “Family Reunion” or “Weather Catch-up Days”. • Select Yes to designate these days as school days or select No if these days are not to be considered school days. 3. Click Customize more days if you want to add more custom dates and return to Step 2. 4. Click Finished when you have entered the last date you want to customize. A confirmation box appears asking you to select Yes if you are finished customizing calendar dates. SOS 2010 Home Ediition Install and Setup Basics Guide• 22 2010 SOS Install and Setup Basics Guide Viewing the Calendar 1. Click View Calendar to see your selected school term. After you view the calendar, click Save to retain the changes you made to the calendar or Cancel Changes to start over customizing dates. 2. Click Next to continue or Click Back to return to Custom Dates to make additional changes. Adding Students Before students can get started in SOS Student, you need to “enroll” them in your school. SOS allows you to have up to five students working in SOS at once. If you want students to use a password to login, you need to set this up after you complete the Setup Wizard. You can press the F1 key to access the electronic Help file for instructions on setting up a student password. The Student Setup function allows you to add students, edit student profiles or remove students from SOS. For now we are going to add students. 1. To add students, click Next on the first Student Setup screen to begin. 2. If your student’s name is not already displayed on the screen, click Add to open a small window where you can enter the student name and username. 3. Enter the Username. (This is the name SOS uses for the student, just like your teacher name. Use only letters and/or numbers. No periods or other special characters are accepted.) 4. Enter the student’s First name and then Last name. 5. Click OK to see the student information appear in the large white box at the bottom of the Student Setup screen. 6. Click Add to add any additional students, Edit to make changes to a selected student, Remove to delete a selected student, or Next if you are done and ready to continue. SOS 2010 Home Ediition Install and Setup Basics Guide• 23 2010 SOS Install and Setup Basics Guide Installing Subjects Before students can begin work in SOS Student, you need to install curriculum and assign it to them. Make sure you have your curriculum disc(s) handy before you begin. 1. Click Next on the Curriculum Setup screen to begin. 2. Put the A disc for one of your subjects in the the CD-ROM or DVD drive and click Install. NOTE: Netbook users, you need to copy the curriculum disc to a Flash drive using another computer with a CD-ROM/DVD drive and use the Flash drive to install your curriculum. 3. Select the contents.sosx file and click Open. 4. Select Leave on CD-ROM if you want your student(s) to access the subject using the disc(s) or Select Copy to Drive if you want to install the subject onto your computer hard drive. 5. Click OK. 6. If you chose Leave on CD-ROM, go to Step 7. If you chose Copy to Drive, a window opens asking you to Browse to folder. Select the (C:) drive and click OK. NOTE: We STRONGLY suggest leaving your entire curriculum for a school year in the default folder on the drive. 7.SOS begins copying the subject to the selected drive. If the subject has more than one disc, SOS prompts you when to put in the next disc. Perform Steps 2 – 7 until you have installed all of the subjects you intend to assign, and then click Next. Remember: If you do NOT load the subject onto your hard drive, the student must have the disc in the CD-ROM or DVD drive when working on the subject. NOTE: Please see the Setup Wizard tutorial “How to Install a Subject” for additional assistance. SOS 2010 Home Ediition Install and Setup Basics Guide• 24 2010 SOS Install and Setup Basics Guide Assigning Subjects Now that you have installed your subjects, they can be assigned to your students. The first thing you see after you click Next to move to the Assign Subjects step is the Curriculum Update window. This is an automatic process. Just click Ok and the application automatically checks to see if there are any revisions or updates to the curriculum you have installed. If there are updates, they are automatically applied to your database. NOTE: If you do not have internet access, you will need to contact AOP Customer Service (1.800.622.3070) periodically to see if there are any curriculum updates available. Assign each subject to the students who will be taking the course before you click Next. SOS allows you to assign multiple subjects to each student before you move on to the next screen. 1. On the bottom half of the Curriculum Setup window, you see a list of your students, click the checkbox next to to a student name. A list with all of the subjects you installed appears below each student’s name. 2. Below each student’s name, click the checkbox beside each subject you want to assign this student. Repeat Steps 1 – 2 to assign subjects to other students. 3. Click Next when you are finished. 4. Click OK on the Assignment Complete Confirmation box that appears. Assigning a Sample Lesson SOS includes a demo (sample) lesson to lry both you and your students to walk through a lesson experience. It helps both of you learn about each feature and how to use it. This l esson also offers the opportunity to “try out” or practice each problem type without concern for the impact to grades. There are two choices of demo lesson; one for students in grades 3 – 5, and one for students in grades 6 – 12. Each covers the same explanation and features. They are just presented in more age appropriate context. 1.If you do not want to assign a sample lesson, click the circle beside No, I am finished. I want to exit the Setup Wizard; and click Next at the bottom of the screen to exit the Setup Wizard. To assign the sample lesson to a student, click the circle beside Yes, I want to assign a sample lesson and continue with Step 2. 2.Click the checkbox beside the Sample Lesson you want to assign under each student’s name (just as you did to assign the regular subjects). 3. Click Finish on the Assignment Complete Confirmation box when you have selected the sample lesson(s) for each student. SOS 2010 Home Ediition Install and Setup Basics Guide• 25 2010 SOS Install and Setup Basics Guide SOS Setup Completion / Homepage Click OK when the How to Run the Setup Wizard box appears. (You only see this the first time the Setup Wizard runs.) You now see your Teacher Homepage. You can use any of the functions of SOS Teacher from this location. Press F1 or click the User Manual link (in the Help widget) to access the electronic Help files for additional assistance. The new MiSOS format uses two terms you may not be familiar with: Avatar: the small picture to the right of your name in the upper right corner of your Homepage. Widget: these are the boxes on the Homepage containing the sections of SOS plus the new options available to you. For example, all of your administration, application, and report functions are in separate boxes (widgets). You can also choose to have a Daily Bible Verse widget and RSS Feeds, each in a separate widget. Please visit the Help file (F1), select User Manual, and open Teacher Homepage and MiSOS Custom Theme under Getting Started for information about how to use these items. NOTE: If your Homepage looks like the picture to the right and you cannot access the other themes, you must upgrade your version of Internet Explorer to IE 7 or higher. SOS 2010 Home Ediition Install and Setup Basics Guide• 26 2010 SOS Install and Setup Basics Guide Help Resources The Help function/button provides access to several Switched-On Schoolhouse’s (SOS) products and services. You can use it for any of the following: User Manual—immediately opens the SOS Help files. You can still press F1 from anywhere in the application to access Help also. If you press F1 on many of the forms and pages within SOS, the application takes you directly to the information for that form or page. SOS Tutorials—enables you to open the SOS tutorials from within the application for a quick example of how to perform many functions within SOS. SOS Overview—offers you a high level presentation of the many features available in SOS. Content Feedback—provides a quick and easy access method to send AOP feedback about curriculum concerns. Tech Support—lets you access the SOS Tech Support website directly. User Manual The first option opens the online (electronic) Help file. Basically, it includes most of the SOS printable user manuals, such as this one. Installation information is not included, however. It does include instructions on how to use the three views available in the Help file, Contents, using the Search capability, and the Index. Tutorials The next option is the tutorials that show you a demonstration how to perform some of the functions you use in SOS. A list of them and your options for locating them are detailed on page 29 of this guide. SOS Overview Next, is a presentation series of videos providing an overview of the functions available in SOS and an opportunity to view sample pages of the SOS curriculum. See page 30 of this guide for an alternative means of locating them. Content Feedback Click Content Feedback to open the Tech Support page of the AOP Homeschool website. There you find a link to open a form to let the SOS team know you have comments or an issue with something in the curriculum. Tech Support Select this option to open the Tech Support page of the AOP Homeschool website where you will find a number of options to assist you as you use Switched-On Schoolhouse®. Exiting SOS Teacher Ready to close SOS? From your Home screen, you have three options for exiting SOS: Click the Close button ( Click the SOS icon ( ) in the upper right-hand corner. ) in the upper left-hand corner and select Close from the small menu that appears. Press Alt+F4 on your keyboard. SOS 2010 Home Ediition Install and Setup Basics Guide• 27 2010 SOS Install and Setup Basics Guide Activities Away from the Computer Looking to add a bit of variety to your student’s day? Switched-On Schoolhouse® also offers student activities that encourage learning away from the computer. Below are suggestions for off-computer tasks: Special Projects Each unit contains an assignment called “Special Project.” This is a blank assignment available to teachers who want to create their own assignments and incorporate them into the grading system. Teachers can encourage artwork, model-building, map work, etc. Experiments Although science experiments are demonstrated for students through video clips, there’s nothing like hands-on learning. Students will find a listing of the materials and procedures required for various experiments, enabling them to actually do the experiments at home. Novels Language Arts 900-1200 come with paperback novels. Students can find unit lessons in Switched-On Schoolhouse® to guide them as they read the novels. Research Students often need to go on field trips or make visits to a library or museum. They may also need to access other reference sources outside of Switched-On Schoolhouse® for their research. Teachers can use the adjustable calendar and lesson planning to schedule time for students to do research away from the computer. Lesson Printouts Printing out Switched-On Schoolhouse® assignments can be useful if there are several students sharing only one computer, or if students want to work where there’s no access to a computer. Students can go through lessons on paper or even use the printed sheets to review for quizzes or tests. Printing vocabulary or spelling list words also allows students to study definitions and practice spelling away from the computer. Handwritten Notes To keep their skills up for non-computer-based courses, students, especially high school students, should regularly practice taking notes by hand while completing assignments on the computer. They can also use their notes to study from while they are away from the computer. Hands-On Experience Teachers can take advantage of opportunities to make practical application of what students are studying. If students are studying about measurement, for example, teachers can move the “classroom” into the kitchen and teach students how to bake cookies. If students are studying plants, growing an indoor or outdoor garden can help them to tangibly see the scientific principles. Teachers who are creative and involved in what their students are learning can come up with almost anything to effectively supplement learning on Switched-on Schoolhouse®. SOS 2010 Home Ediition Install and Setup Basics Guide• 28 2010 SOS Install and Setup Basics Guide Tutorials Before you get too far along in using SOS, you might want to spend a little time reviewing the tutorials. They walk you through a number of functions you perform as a teacher. All of these tutorials are available on your computer after you install SOS 2010. All of the tutorials below are available on your computer after you install SOS 2010. To view them on your computer, double-click the desktop Tutorials icon or: 1. Click Start on your computer’s taskbar. 2. Click All Programs. 3. Select AOP. 4. Select Switched-On Schoolhouse 2010. 5. Select Tutorials. Tutorials • Setup Wizard • Add a New Term • Set Homepage Settings • MiSOS Custom Theme • Change Between School Days and Non-School Days • Exclude a Range of Days • Add Events to Student Calendars • Install a Subject • Assign a Subject • Clear an Assignment • Clear Highlighting • Remove an Assignment • Create Custom Subjects and Assignments • Remove a Duplicate Subject • Create a Lesson Plan • Update Lessons Plans (Regenerate Due Dates) • Block and Unblock Individual Assignments • Globally Block and Unblock Quizzes and/or Tests • Zero a Unit or an Assignment SOS 2010 Home Ediition Install and Setup Basics Guide• 29 2010 SOS Install and Setup Basics Guide SOS Overview Presentation Switched-On Schoolhouse also offers another view of the program. It is called the SOS Overview Presentation. It includes: 1. Teacher Homepage 2. Administration - Assignment Settings 3. Administration - Quiz and Test Settings 4. Administration - Grading and Term Settings 5. Administration - Student Setup 6. Administration - Curriculum Setup 7. Lesson Book - Assignments 8. Lesson Book - Lesson Plan 9. Student - Homepage 10. Student - Schoolwork 11. Student - Lesson Presentation You can access this presentation by clicking the Help button on your Homepage and selecting SOS Overview from the menu. You can also access them by going to www.aophomeschooling.com, then: 1. Click Curriculum Options 2. Select Grades 3. Click the grade level or subject folder 4. Click the SOS box or specific subject CD 5. Click the Resources tab in the middle of the page SOS 2010 Home Ediition Install and Setup Basics Guide• 30 2010 SOS Install and Setup Basics Guide Switched-On Schoolhouse Home Edition Legal Terms & Conditions By using or allowing others to use the software, curriculum, materials, and documentation (“Software”) accompanying this Agreement, you (the “User”) are agreeing to be bound by these legal terms and conditions (“Agreement”). If you do not agree to the terms and conditions of this Agreement, do not use this Software. Any person interacting with the Software in any way, including but not limited to students, teachers, administrators, and parents, are Users for the purposes of this Agreement. Certain terms of this Agreement may not apply to your use of the Software however all applicable terms are nonetheless binding. Alpha Omega Publications, Inc. (“AOP”) reserves the right to change or terminate the terms of this Agreement at any time and from time to time without any notice to you by posting said changes on the AOP website. Any such changes are hereby incorporated into this Agreement by reference as though fully set forth herein. General Provisions 1. Indemnification. You, the User of this Software, agree to indemnify and hold AOP, its subsidiaries, affiliates, and assigns, and each of their directors, officers, agents, contractors, partners and employees, harmless from and against any loss, liability, claim, demand, damages, costs, and expenses, including reasonable attorneys’ fees, arising out of this Agreement or in connection with any use of the Software including but not limited to any damages, losses, or liabilities whatsoever with respect to damage to any property or loss of any data arising from the possession, use, or operation of the Software by the User or any customers, users, students, or others. 2. Termination. This Agreement shall remain in effect until terminated. This Agreement may be terminated at AOP’s sole discretion and without prior notice, by mutual written agreement between the parties, but not by the User. This Agreement will terminate automatically without notice from AOP if you or any other person or entity using the Software violates any provision of this Agreement. AOP shall not be liable to you or any third party for any termination. Upon termination, you or any other person using the Software shall cease to use and destroy the Software or return the Software to AOP at your expense. 3. Updates. At its option, from time to time, AOP may create updated versions of the Software and may make such updates available to you either for a fee or for free. Unless explicitly stated otherwise, any such updates will be subject to the terms of this Agreement including any amendments to this Agreement, to be determined in AOP’s sole discretion. 4. Proprietary Materials. All content, software, and materials contained in or related to the Software are protected by copyrights, trademarks, service marks, patents, trade secrets, or other proprietary rights and laws. You hereby agree not to sell, license, rent, modify, distribute, copy, reproduce, transmit, publicly display, publicly perform, publish, adapt, edit, or create derivative works from such content or materials. SOS 2010 Home Ediition Install and Setup Basics Guide• 31 2010 SOS Install and Setup Basics Guide 5. Disclaimer of Warranty. The Software is provided “as is”, with all faults and without warranty of any kind. AOP HEREBY DISCLAIMS ALL WARRANTIES WITH RESPECT TO THE SOFTWARE, EITHER EXPRESS, IMPLIED, OR STATUTORY, INCLUDING BUT NOT LIMITED TO THE IMPLIED WARRANTIES OF MERCHANTABILITY, OF SATISFACTORY QUALITY, OF FITNESS FOR A PARTICULAR PURPOSE, OF ACCURACY, OF QUIET ENJOYMENT, AND NON-INFRINGEMENT OF THIRD PARTY RIGHTS. AOP DOES NOT WARRANT, GUARANTEE, OR MAKE ANY REPRESENTATIONS THAT THE CONTENT IS ACCURATE, RELIABLE, OR CORRECT OR THAT IT WILL MEET YOUR NEEDS OR REQUIREMENTS, THAT THE SOFTWARE WILL FUNCTION AT ANY PARTICULAR TIME OR LOCATION, THAT ANY DEFECTS OR ERRORS WILL BE CORRECTED, OR THAT THE SOFTWARE IS FREE OF VIRUSES OR OTHER HARMFUL COMPONENTS. You assume the entire risk as to the quality, results, and performance of the Software as well as the entire risk and cost of all service, repair, or correction. No oral or written information, advice, suggestions, or recommendations given by AOP, its representatives, dealers, distributors, agents, or employees shall create a warranty or in any way increase the scope of this Agreement and you may not rely on any such information, advice, suggestions, or recommendations. Some jurisdictions do not allow the exclusion or limitation of certain warranties or consumer rights so some exclusions and limitations may not apply to you. 6. Limitation of Liability. You hereby agree that AOP, its subsidiaries, affiliates, and assigns, and each of their directors, officers, agents, contractors, partners and employees, shall not be liable to you or any third party for any indirect, special, consequential, or incidental damages including but not limited to damages for loss of profits, business interruption, loss of business opportunity, loss of data, or any other hardship, damages, or losses arising out of or related to the use or inability to use the Software, however caused, and even if AOP has been advised of the possibility of such damages. Some jurisdictions do not allow the exclusion or limitation of certain remedies or damages so some exclusions and limitations may not apply to you. 7. Severability. If any provision of this Agreement is held to be ineffective, unenforceable, or illegal for any reason, AOP may reform such provision to the extent necessary to make it effective, enforceable, and legal or such provision shall be deemed severed and in either case this Agreement with such provision reformed or severed shall remain in full force and effect to the extent permitted by law. 8. Controlling Law and Controversies. This Agreement shall be governed by the laws of the State of Arizona and of the United States. If any controversy or claim arising out of or relating to this Agreement cannot be solved by negotiation between the parties, the parties hereby agree to attempt in good faith to settle the dispute through mediation administered by a mutually agreed upon mediator in Phoenix, Arizona and in accordance with the Rules of Procedure for Christian Conciliation of the Institute for Christian Conciliation, a division of Peacemaker® Ministries. If mediation fails to resolve the dispute, the parties hereby agree that the dispute shall be settled through arbitration administered by a mutually agreed upon arbitrator in Phoenix, Arizona and in accordance with the Rules of Procedure for Christian Conciliation of the Institute for Christian Conciliation, a division of Peacemaker® Ministries. Judgment upon an arbitration decision may be entered in any court otherwise having jurisdiction. 9. Entire Agreement. This Agreement constitutes the entire agreement between AOP and the User relating to the subject matter hereof and supersedes all prior understandings, promises, and undertakings, if any, made orally or in writing with respect to the subject matter hereof. No modification, amendment, waiver, termination, or discharge of any portion of this Agreement shall be binding unless executed and confirmed in writing by AOP. SOS 2010 Home Ediition Install and Setup Basics Guide• 32 2010 SOS Install and Setup Basics Guide 10. Export Prohibitions. You may only export the Software as authorized by United States law and the laws of the jurisdiction in which you reside. Any export of the Software or any portion thereof in any way prohibited by law or regulations issued by agencies of the United States federal government is hereby prohibited. Portions of the Software may include restricted computer software. Neither the Software nor any portion thereof nor the underlying information or technology may be downloaded or otherwise exported or re-exported: (a) into (or to a national or resident of any U.S. embargoed country; (b) to anyone on the U.S. Treasury Department’s list of Specially Designated Nationals; or (c) to the U.S. Commerce Department’s Denied Persons or Entities List or Table of Denial Orders. You hereby represent and warrant that you are not located in or the resident of any such country or on any such list. End User Terms and Conditions 1. Ownership. This Software and associated materials are the property of AOP. The Software is licensed, not sold, to you under the terms of this Agreement. AOP does not sell any title, ownership right, or interest in or to the Software. By using this Software, you are agreeing only to a personal, non-exclusive license to use, according to the terms of this Agreement, the Software and any software programs or other proprietary material of third parties that are incorporated into the Software. You own the media on which the Software is recorded but AOP reserves and retains all other right, title, and interest (including but not limited copyrights, patents, trademarks, and service marks) in and to the Software. The remuneration paid for this product constitutes a license fee for the use of the Software. 2. Use. (a) This Agreement allows you to install and use one copy of the Software on one computer at a time. It is prohibited to electronically transfer the Software from one computer to another (over a network or otherwise) or to use the Software on more than one computer except as expressly provided in paragraph 2(d) of the End User Terms and Conditions herein. No more than five (5) students may use one copy of the Software. (b) The copying, reproduction, duplication, translation, reverse engineering, adaptation, ecompilation, disassembly, reverse assembly, modification, or alteration of the Software or any portion thereof is expressly prohibited without the prior written consent of AOP except as provided for herein. The merger or inclusion of the Software or any portion thereof with any other computer program, and the creation of derivative works or programs from the Software or any portion thereof, is also expressly prohibited without the prior written consent of AOP. One copy of the Software may be made in machine-readable format only, for backup purposes only, and the backup copy must contain terms, conditions, privacy policies, copyright, and other proprietary notices contained in the original. (c) Neither the Software nor any part thereof may be rented, leased, sold, assigned, transferred, re-licensed, sub-licensed, or conveyed for any purpose except as expressly provided in paragraph 2(d) of the End User Terms and Conditions herein. Any attempted rental, lease, sale, assignment, transfer, re-license, sub-license, conveyance, gift, or other disposition of the Software in violation of this Agreement is null and void. Any act or failure to prevent an act in violation of this Agreement may result in civil and/or criminal prosecution. SOS 2010 Home Ediition Install and Setup Basics Guide• 33 2010 SOS Install and Setup Basics Guide (d) The initial and original User of the Software may make a single one-time permanent transfer of the Software, including all materials, media, component parts, upgrades, serial number, and back-up copy, only directly to an end user and only for no monetary or other compensation. Such transfer may not be for trade or by way of consignment or any other indirect transfer. Any transferee of such one-time transfer hereby agrees to comply with the all terms and conditions of this Agreement, including the prohibition of any further or subsequent transfers of the Software. The transferor in such one-time transfer must destroy all duplicate copies of the Software prior to the transfer. All parties hereby acknowledge and agree that no technical support privileges or warranty of any kind is transferred to the transferee of such one-time transfer. The transferee of such onetime transfer hereby assumes all risk as to the quality, results, and performance of the Software as well as the entire risk and cost of all service, repair, or correction of the Software and releases AOP from any and all responsibility for performance of the Software. (e) Programs or software developed and/or owned by entities other than AOP and included with or incorporated into the Software (“Third Party Software”) is subject to and its use is governed by this Agreement. The use of Third Party Software except as for any purpose other than its intended use in conjunction with the Software is prohibited. 3. Third Party Sites and Content. The Service contains (or may send you through or to) links to other websites (“Third Party Sites”) as well as articles, photographs, text, graphics, pictures, designs, music, sound, video, information, applications, software, and other content or items belonging to or originating from third parties (“Third Party Content”). AOP does not check such Third Party Sites and Third Party Content for accuracy, appropriateness, or completeness and AOP is not responsible for any Third Party Sites accessed through use of the Service or for any Third Party Content posted on, available through, or installed from the Service, including the content, accuracy, offensiveness, opinions, reliability, privacy practices, or other policies of or contained in the Third Party Sites or the Third Party Content. Inclusion of, linking to, or permitting the use or installation of any Third Party Site or any Third Party Content does not imply approval or endorsement thereof by AOP. Third Party Notices New American Standard Bible Updates © 1960, 1962, 1963, 1968, 1971, 1972, 1973, 1975, 1977, 1995 by The Lockman Foundation All rights reserved http://www.lockman.org The “NASB”, “NAS”, “New American Standard Bible” and “New American Standard” trademarks are registered in the United States Patent and Trademark Office by the Lockman Foundation. Use of these trademarks requires the permission of the Lockman Foundation. The text of the New American Standard Bible® may be quoted and/or reprinted up to and inclusive of five hundred (500) verses without express written permission of The Lockman Foundation, providing the verses do not amount to a complete book of the Bible nor do the verses quoted account for more than twenty-five percent (25%) of the total work in which they are quoted. SOS 2010 Home Ediition Install and Setup Basics Guide• 34 2010 SOS Install and Setup Basics Guide Notice of copyright must appear on the title or copyright page of the work as follows: Scripture quotations taken from the New American Standard Bible®, Copyright © 1960, 1962, 1963, 1968, 1971, 1972, 1973, 1975, 1977, 1995 by The Lockman Foundation Used by permission. http://www.Lockman.org When quotations from the NASB® text are used in not-for-sale media, such as church bulletins, orders of service, posters, transparencies, or similar media, the abbreviation (NASB) may be used at the end of the quotation. This permission to quote is limited to material which is wholly manufactured in compliance with the provisions of the copyright laws of the United States and all applicable international conventions and treaties. Quotations and/or reprints in excess of the above limitations or other permission requests must be directed to and approved in writing by The Lockman Foundation, P.O. Box 2279, La Habra, CA 90632-2279, (714) 879-3055, http//www.lockman.org. Copying, duplicating, altering, or otherwise modifying the NASB databases is prohibited. Adobe® Trademark/Copyright Notice: Switched-On Schoolhouse® contains Adobe® Flash® Player software by Adobe Systems Incorporated, Copyright © 1995-2008 Adobe Systems Incorporated. All rights reserved. Protected by U.S. patents and patents pending in the United States and other countries. “Adobe” and “Flash” are trademarks of Adobe Systems Incorporated. Component One® Trademark/Copyright Notice: Portions Copyright © ComponentOne, LLC 1991-2008. All rights reserved. Keyoti Trademark/Copyright Notice This product contains RapidSpell spell checking software. Copyright © 2002-2008 Keyoti Inc. Microsoft Trademark/Copyright Notice Microsoft SQL Server 2005 Express, Microsoft.NET, and Microsoft Internet Explorer are either registered trademarks or trademarks of Microsoft Corporation in the United States and/or other countries. All rights reserved. AOP Contact Information Alpha Omega Publications, Inc. Attn: Legal Department 300 North McKemy Ave. Chandler, AZ 85226 Switched-On Schoolhouse, Switched-On, and their logos are registered trademarks of Alpha Omega Publications, Inc. All other trademarks and/or service marks that appear in this product are the property of their respective owners. All rights reserved. © 2003, 2005, 2007, 2008 Alpha Omega Publications, Inc. All rights reserved. SOS 2010 Home Ediition Install and Setup Basics Guide• 35 2010 SOS Install and Setup Basics Guide Forgot Your Teacher Password? SOS does not limit how many times you can try your password. SOS does have a data utility on the SOS application disc you can use to change or reset your password. Remember: • Your password is case sensitive, so check to see if your Caps Lock key is on. • If your password is longer than 20 characters, you will get an error. 1. Put the SOS installation disc into the CD-ROM or DVD drive of your pc. 2. If the Install window opens, click Close. 3. Click Start on your computer taskbar, and select My Computer (Computer if using Vista or Windows 7). 4. Right-click the drive containing the SOS installation disc, and click Open. 5. Double-click the Tools folder, and then double-click the DataUtility.exe. 6. When you are prompted to select a database, choose SOS Home 2010 and click OK. 7. Use the dropdown menu to select the Change Password option and click Execute Command. 8. Enter your new Password twice, and then click Save. When the window closes, notice the “Successfully Changed Password” message below the Execute Command button. Click X in the upper right corner to close the Data Utility window. 9. Remove the disc from the CD-ROM or DVD drive. Important Note: Be sure to write your password down and put both the password and the SOS installation disc somewhere safe. Protect your teacher password by keeping the disc in a safe location. SOS 2010 Home Ediition Install and Setup Basics Guide• 36 2010 SOS Install and Setup Basics Guide Resource List SOS User Manual (Help File) Click the Help button on the left side of your Home screen or press the F1 key on the top row of your keyboard from anywhere in the application. Students, click the Help? button, below the green SOS logo in the center of your Home screen, or press the F1 key anywhere in the application. SOS Tutorials: Start > All Programs > AOP > Switched-On Schoolhouse 2010 > Tutorials, or click the Tutorials icon on your desktop, or http://www.sostutorials.com SOS Overview Presentation www.aophomeschooling.com (See page 30 for navigation steps.) Online Support www.aophomeschooling.com/support/ Content Feedback (Curriculum) www.aophomeschooling.com/errors/ SOS Application and Curriculum Updates: http://www.sosupdates.com Toll-Free Phone Assistance: Customer Service: 1-800-622-3070 Technical Support: 1-866-444-4498 SOS 2010 Home Ediition Install and Setup Basics Guide• 37