1
Operating Instructions
Bedienungsanleitung
Manuel d’instructions
Manuale di istruzioni
Manual de Instrucciones
In-Dash 7" Wide Color LCD Monitor with RDS Receiver and Changer Control
7-Zoll Breitbild-LCD-Farbmonitor mit RDS-Receiver und Wechslersteuerung
für den Einbau in das Armaturenbrett
Moniteur à cristaux liquides couleur grand écran de 7,0 pouces avec récepteur RDS et
commande de changeur Iintégré en tableau de bord
Monitor LCD a schermo ampio di 7" per cruscotto con
ricevitore RDS e controllo cambiadischi (AUTORADIO)
Monitor de pantalla ancha de LCD en color de 7 pulgadas con receptor RDS y control de
cambiador de discos para el tablero de instrumentos
CQ-VA707N
CQ-VA707N
REMOTE
7.0'' WIDE COLOR LCD MONITOR WITH RECEIVER
TV707W
VIDEO
ASPECT
A
NAVIGATION
MUTE
DISC/BAND
MODE
NAVI
ME
VOLU
AV IN
AUDIO
TRACK
TILT
MENU
OPEN/CLOSE
ENTER
PWR
IN-DASH 7.0 WIDE COLOR LCD TV
CQ-VA707N
AM/FM
VTR1
VTR2
CH·C
EON*PTY*CT
TV
MUTE
LOUD
ME
VOLU
MODE
PWR
TILT
OPEN/CLOSE
7.0'' WIDE COLOR LCD MONITOR WITH RECEIVER
Panasonic
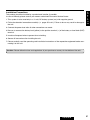
Please read these instructions carefully before using this product and save this manual for future use.
Bitte lesen Sie diese Bedienungsanleitung vor der Verwendung dieses Produktes aufmerksam
durch und bewahren Sie sie danach für spätere Nachschlagezwecke sorgfältig auf.
Prière de lire ces instructions attentivement avant d’utiliser le produit
et garder ce manuel pour l’utilisation ultérieure.
Si prega di leggere attentamente queste istruzioni prima di usare questo prodotto
e di conservare questo manuale per usi futuri.
Lea con atención estas instrucciones antes de utilizar el producto
y guarde este manual para poderlo consultar en el futuro.
Contents
2
Page
Page
Features ............................................................ 4
Precautions ....................................................... 5
ID Code ............................................................. 5
Remote Control Preparation ............................. 6
Names of Controls ............................................. 7
Before Use ......................................................... 11
User Settings ..................................................... 16
Sound Settings .................................................. 28
Screen Adjustment ........................................... 30
Operation: General ............................................ 32
Radio Basics ..................................................... 34
Radio Data System (RDS) ................................ 36
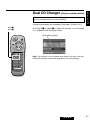
CD Changer Basics ........................................... 44
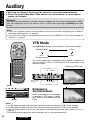
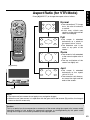
Auxiliary ............................................................. 48
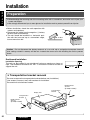
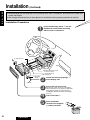
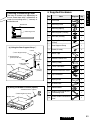
Installation ......................................................... 50
Electrical Connections ....................................... 55
Troubleshooting ................................................. 62
Maintenance ...................................................... 66
Specifications .................................................... 67
CQ-VA707N
E
N
G
L
I
S
H
1
Panasonic welcomes you to their constantly growing family of electronic products owners.
We endeavor to give you the advantages of precise electronic and mechanical engineering, manufactured with carefully selected components, and assembled by people who are proud of the reputation
their work has built for our company. We know this product will bring you many hours of enjoyment, and
after you discover the quality, value and reliability we have built into it, you too will be proud to be a
member of our family.
❏ Features
¡7-inch wide LCD color display
Delivers images of high quality and superb color reproduction.
¡Fully powered display positioning mechanism (except for lateral angle)
Positioning of the display unit is fully power driven. This includes extending the unit, raising it to upright
position, adjusting its vertical (tilt) angle and moving it to the front and rear.
The lateral angle to the right and left can be adjusted manually.
¡Radio tuner [for FM/AM(LW/MW)] and RDS function are integrated.
¡CD Changer control function
Allows system expansion by adding an optional CD Changer (CX-DP88N, CX-DP9061EN, etc.).
When the unit is connected with a CD text recognizable CD changer (CX-DP9061EN, for example), CD
text can appear on the display.
¡ID code setup
4-digit ID code for increased security (The figures 1 to 6 can be used.)
¡The speaker for the car navigation system is integrated in the display unit.
We designed a small speaker which is built-in the display unit.
This speaker is used only for Panasonic car navigation system (CN-DV2000EN, for example).
¡Rear-view camera automatic selection (Rear-view camera is optional.)
When you put a car in reverse, a picture taken by the rear-view camera is displayed on a screen automatically.
* An optional TV tuner (CY-TN1500PEN) is required to receive TV broadcast.
4
CQ-VA707N
WARNING:
TO AVOID THE RISK OF SERIOUS INJURY OR POSSIBLE VIOLATION OF
LAWS, DO NOT USE WHERE VISIBLE TO DRIVER FOR ANY PURPOSE
OTHER THAN NAVIGATION OR USE WITH REAR VIEW CAMERA.
When Driving
¡The driver must not operate the color LCD monitor. Operating the color LCD monitor may lead to distraction and cause an accident. Stop your vehicle in a safe location when operating the unit.
¡The driver must not watch videos while driving. It may lead to distraction and cause an accident.
¡Keep the unit at an appropriate sound level. Driving with the sound at a level that prevents you from
hearing sounds outside and around the vehicle may cause an accident.
E
N
G
L
I
S
H
2
Precautions
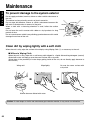
Car Washing
To avoid electrical shorts which may cause a fire
or other damage, do not expose this product to
water or excessive moisture.
Car Ventilation
If your car is parked for several hours in direct
sunlight, the temperature inside the car may
become very high. It is advisable to drive the car
and give the interior a chance to cool down before
switching the unit on.
Power Supply
This product is designed to be used in a car having a 12-volt negative ground battery system.
Service
This product is made of precision parts. Do not
attempt to disassemble or adjust any parts. For
repair, please consult your nearest authorized
Panasonic Service Center.
About Preset Memory
The preset memory is cleared to return to the original factory setting when the power connector or
battery is disconnected.
For Installation
¡Install the monitor in a position that does not
obstruct the driver’s vision.
¡Do not install the control unit in the following
types of location:
A location which is exposed to water, a location
where it could be stepped on, or a location which
is exposed to hot air such as near a heater duct.
¡Do not install the unit in an area where it would
obstruct the operation of an air bag.
¡Ask a trained technician to install the unit.
Installation and wiring require training and experience.
To be safe, ask the sales outlet where you purchased the unit to perform the installation.
When Operating
¡Do not let the unit fall or be strongly impacted
since this may cause a malfunction or fire.
When Parked
¡Do not watch the monitor with the engine off. It
will consume battery power and may prevent the
engine from starting.
ID Code
Prior to operating this unit, it is a advisable to assign your 4-digit ID code for security. (The figures 1 to 6
can be used. The figures 7 to 9 and 0 are not available. Make sure to use four digits for ID code. ID code
can not be set with two or three digits.)
Once the ID code has been set, the unit cannot be operated if the main power supply is disconnected then
re-connected. It is electronically locked up so that the thief could not use the stolen unit unless that person
knows the code you have set.
The ID code operation must be performed only by the person whom the unit belongs to.
Generally, it is not necessary to enter the ID code each time when using the unit if it has never been disconnected from the main power supply (car battery). For the ID code setting procedures, see pages 19 to
21.
Caution:
Record your registered ID code and keep it in a secure location.
If you forget it, you will be unable to use the unit.
CQ-VA707N
5
Remote Control Preparation
E
N
G
L
I
S
H
3
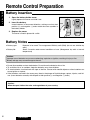
Battery Insertion
1. Open the battery holder cover.
Lightly depress the cover and slide it out.
i | j
i { j
{
2. Insert the battery.
Insert batteries in the correct direction, making sure that their
positive (+) and negative (–) ends match the same symbols in
the battery holder.
|
Slide
|
i { j
{
i | j
3. Replace the cover.
The cover is fixed in place with a click.
Battery Notes
¡Battery type:
¡Battery life:
Batteries to be used: Two manganese UM4 dry cells (R03) (do not use alkaline dry
cells.)
About 5 months under normal conditions of use. (Manganese dry cells at normal
temperature)
Caution:
Improper use of batteries may cause overheating, explosion or ignition, resulting in injury or fire.
Battery leakage may cause damage to the unit.
¡Do not disassemble or short the batteries. Do not throw the batteries into a fire.
¡To avoid the risk of an accident, keep the batteries away from children.
¡To store batteries, insulate them with tape or the like. Contact with metallic objects or other batteries can
cause ignition or rupture.
¡If the batteries are used in the wrong way, there is the danger of liquid leakage, rupture, injuries, and failure. (Insert batteries correctly with respect to their positive (+) and negative (–) ends.)
Caution:
When decayed, follow the rules and regulations of your country.
6
CQ-VA707N
Names of Controls
Warning:
For safe driving, the operation is possible only when stopped with the parking brake engaged. “WARNING” will be displayed, if you try to switch to VTR1 or VTR2 mode by pressing the [MODE] button while
driving.
E
N
G
L
I
S
H
4
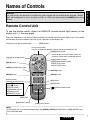
Remote Control Unit
To use the remote control, direct it at REMOTE (remote control light sensor) on the
display unit. (a the next page)
There are differences in the control buttons between the remote control and the display unit. If the remote
control does not have the button you wish to use, operate it on the display unit.
¡Button not on the remote control.................[TILT] button
[}][{](VOLUME) button
[MUTE] button
Infrared Transmitter
Direct it at REMOTE (Remote Control Sensor) on the display unit.
[PWR](Power) button
* On the display unit, one button covers the
ME
functions of both PWR and MODE buttons.
LU
VO
PWR
MUTE
TRACK
DISC/BAND
[]][[](TRACK) button
[}][{](DISC/BAND) button
¡DISC }{ button
¡BAND }{ button
ENTER
[NAVI](NAVIGATION) button
[ENTER] button
NAVIGATION
[MODE] button
Numeric button
(Remote control unit only)
[1](CHz) button
[2](CHx) button
[3](TITLE) button
[4](RANDOM) button
[5](SCAN) button
[6](REPEAT) button
MODE
NAVI
MENU
CHz
CHx
TITLE
1
2
3
RANDOM
SCAN
REPEAT
4
5
6
TA
AF
PTY
[MENU] button
[AF] button
[PTY] button
OPEN/CLOSE
ASPECT
A
LOC
[
](OPEN/CLOSE) button
Car AV
[TA] button
[A](ASPECT) button
[LOC](Local) button
Note:
If the display unit is in the retracted position, the [MENU], [NAVI](NAVIGATION), and [A](ASPECT) buttons cannot be used.
CQ-VA707N
7
Names of Controls (Continued)
E
N
G
L
I
S
H
Operate the controls on the display unit in the same way as you operate the remote
control buttons.
5
¡Buttons not on the display unit:
There are differences in the control buttons between the display unit and the remote control unit. If the display unit does not have the button you wish to use, operate it on the remote control unit.
[1](CHz) button
[4](RANDOM) button
[TA] button
[2](CHx) button
[3](TITLE) button
[5](SCAN) button
[6](REPEAT) button
[AF] button
[PTY] button
[LOC] button
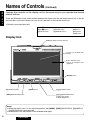
Display Unit
REMOTE (Remote Control Sensor)
CQ-VA707N
REMOTE
7.0'' WIDE COLOR LCD MONITOR WITH RECEIVER
7 inches (18 cm) Wide LCD
Display
Built-In Speaker (rear)
(only for car navigation voice
guidance)
TV707W
VIDEO
AV IN
AUDIO
[ENTER] button
ASPECT
A
NAVIGATION
MUTE
DISC/BAND
TRACK
MODE
NAVI
E
UM
VOL
[A](ASPECT) button
[NAVI](NAVIGATION) button
MENU
[MENU] button
TILT
OPEN/CLOSE
ENTER
PWR
IN-DASH 7.0 WIDE COLOR LCD TV
[]][[](TRACK) button
[}][{](DISC/BAND) button
¡DISC }{ button
¡BAND }{ button
Notes:
¡When the display unit is in the retracted position, the [MENU], [NAVI](NAVIGATION), [A](ASPECT)
and [TILT] buttons cannot be used.
¡When power is on, the indicator of the selected mode lights.
8
CQ-VA707N
Warning:
For safe driving, the operation is possible only when stopped with the parking brake engaged. “WARNING” will be displayed, if you try to switch to VTR1 or VTR2 mode by pressing the [MODE] button while
driving.
E
N
G
L
I
S
H
6
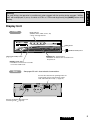
Display Unit
Front
Mode Indicator
(AM/FM, VTR1, VTR2, CH • C, TV)
* CH•C : Changer Control
CQ-VA707N
AM/FM
VTR1
VTR2
CH·C
EON*PTY*CT
TV
[TILT] button
MUTE
LOUD
E
UM
VOL
[}][{](VOLUME) button
MODE
PWR
TILT
OPEN/CLOSE
7.0'' WIDE COLOR LCD MONITOR WITH RECEIVER
[
](OPEN/CLOSE) button
[MODE](PWR : Power) button
* Hold down for more than 2 seconds to turn
the power off.
[MUTE](LOUD) button
* Hold down for more than 2 seconds
to turn the LOUD on/off.
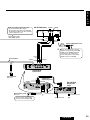
Rear
See pages 55 to 61 about electrical connections.
Connect the subconnector (parking brake connection lead, reverse lead, antenna control
lead, and illumination lead). (a page 55)
Connect the display unit/control unit
connecting cord. (a page 55)
CQ-VA707N
9
Names of Controls (Continued)
E
N
G
L
I
S
H
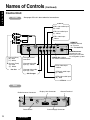
Control Unit
Front
See pages 55 to 61 about electrical connections.
VTR1 In
7
VTR1 right audio input
(R) : Red
VTR1 left audio input
(L) : White
FRONT
VTR1 video input
: Yellow
REAR
REMOTE
Remote terminal
for TV tuner
(CY-TN1500PEN)
Pre-out (Rear)
(R): Red
(L): White
Changer control
connector
Pre-out (Front)
(R): Red
(L): White
Changer left audio
input (L) : White
Pre-Out
Changer right audio
input (R) : Red
CD Changer
RGB Connector
Terminal for connecting to Panasonic
car navigation system
VIDEO-Out: Yellow
For external video monitor
VTR2 video input
: Yellow
VTR2 left audio input
(L) : White
VTR2 right audio input
(R) : Red
VTR2 In
Rear
Radio Antenna Connector
Reset Switch
10
CQ-VA707N
Display Unit Connector
Ground Terminal
Power Supply Connector
Before Use
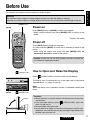
Turn the key in the ignition until the accessory indicator lights.
Warning:
Do not insert hands, fingers or foreign objects into the unit while the display is moving.
Inserting your hands, fingers or foreign objects into the unit can cause injuries and damage to the unit.
E
N
G
L
I
S
H
8
[PWR](Power)
Power on
[MODE]
VO
LU
Press [PWR](Power) or [MODE] to switch on the power.
* When using the display unit, press [MODE](PWR) to switch on the
power.
ME
PWR
MUTE
[Default : FM mode]
TRACK
DISC/BAND
Power off
ENTER
Press [PWR] again to switch off the power.
Or, press and hold [MODE] for more than 2 seconds to switch off the
power.
* When using the display unit, press and hold [MODE](PWR) for
more than 2 seconds to switch off the power.
NAVIGATION
MODE
NAVI
MENU
CHz
CHx
TITLE
1
2
3
RANDOM
SCAN
REPEAT
4
5
6
TA
AF
A
PTY
OPEN/CLOSE
ASPECT
Caution: If your car has no ACC position, be sure to switch this
unit off before stopping the engine.
LOC
Car AV
[
](OPEN/CLOSE)
How to Open and Raise the Display
Press [
CH·C
EON*PTY*CT
TV
MODE
MODE
PWR
[MODE]
TILT
OPEN/CLOSE
7.0'' WIDE COLOR LCD MONITOR WITH RECEIVER
[
](OPEN/CLOSE) to draw out and raise the display.
The display unit is automatically set at the angle and in the position
adjusted before. (a pages 12 and 16)
Note:
When the display unit is opened or closed, a loud beep sounds three
times.
](OPEN/CLOSE)
Display
Cautions:
¡Mount the unit in a position where it will be free from contact with
any obstacle.
¡If the unit stops halfway, press [
](OPEN/CLOSE) again and
draw it all the way in.
¡Do not forcibly move it by hand.
¡Do not enter your finger or hand into moving parts and disc slot.
Otherwise, you and the unit may be damaged. Keep babies and
children away from the unit.
CQ-VA707N
11
Before Use (Continued)
E
N
G
L
I
S
H
CH·C
MODE
PWR
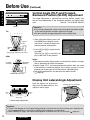
Vertical Angle (TILT) and ForwardBackward Position (SLIDE) Adjustment
EON*PTY*CT
TV
TILT
TILT
The angle adjustment is approximate and may deviate slightly from
the set value depending on the installation position and other conditions.
[Default : TILT 3/SLIDE FRONT]
OPEN/CLOSE
7.0'' WIDE COLOR LCD MONITOR WITH RECEIVER
9
[TILT]
Cautions:
¡For smooth adjustment, make sure to first return the lateral angle
to the neutral position and then adjust the tilt angle.
¡Do not manually change the position of the unit by force.
Tilt
1
2 3 4 5
q After raising the display, press and
hold [TILT] on the display unit for
more than 1 second to display the
monitor position setting menu.
approx.
110°
approx.
70°
w Press [}] or [{] to adjust the tilting angle.
Press []] or [[] to move the display to the front or rear position.
Tilting angle adjustment (5 levels)
Slide
Notes:
¡The monitor position setting menu is automatically closed if no operation is performed for about 10 seconds.
¡Vertical angle (TILT) and forward-backward position data are saved
in the memory, so when the display unit is drawn out next, it is automatically set at the angle and in the position adjusted before.
¡The display position can also be set on the menu screen.
(a page 16)
Backward
(REAR)
Forward
(FRONT)
FRONT-REAR position
Display Unit Lateral Angle Adjustment
Hold the display unit by the nonslip part in the upper half of it, and
adjust its lateral angle.
Non-Slip Part (on the back)
VA707W
VIDEO
AV IN
AUDIO
MUTE
max.
15°
MODE
VOL
UM
TILT
OPEN/CLOSE
E
PWR
IN-DASH 7.0 WIDE COLOR LCD TV RECEIVER
max.
15°
(Top view)
Lateral angle adjustment
Cautions:
¡There is the danger of your fingers being pinched if you hold the unit by the lower part. Hold the unit
by the upper half of it, and move it carefully without applying an undue force.
¡After adjusting its angle, also adjust the brightness to make it easy for you to watch. (a page 31)
12
CQ-VA707N
Warning:
Do not insert hands, fingers or foreign objects into the unit while the display is moving.
Inserting your hands, fingers or foreign objects into the unit can cause injuries and damage to the unit.
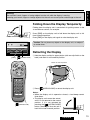
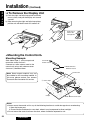
Folding Down the Display Temporarily
E
N
G
L
I
S
H
10
Folding down the display unit is convenient for gaining access to the
air conditioner controls, for example.
Press [TILT] on the display unit to fold down the display unit to 20°
from horizontal position.
Press [TILT] on the display unit again to raise the display unit.
approx.
20°
CH·C
EON*PTY*CT
TV
MODE
PWR
TILT
TILT
OPEN/CLOSE
7.0'' WIDE COLOR LCD MONITOR WITH RECEIVER
[TILT]
Caution: Do not place any object on the display unit, or subject it
to undue force.
[
](OPEN/CLOSE)
Retracting the Display
q Hold the display unit by its upper portion (with non-slip finish on the
back) and return it to the neutral position.
Return to neutral position
ME
LU
VO
PWR
MUTE
TRACK
DISC/BAND
ENTER
NAVIGATION
MODE
NAVI
MENU
CHz
CHx
TITLE
1
2
3
RANDOM
SCAN
REPEAT
4
5
6
TA
AF
A
PTY
](OPEN/CLOSE) to retract the display unit.
LOC
Car AV
[
w Press [
OPEN/CLOSE
ASPECT
](OPEN/CLOSE)
Notes:
¡When the display unit is opened or closed, a loud beep sounds
three times.
¡The display unit cannot be retracted if it is not returned to the neutral
position. If it is not retracted by
pressing the [
] (OPEN/CLOSE)
button, check again that the unit is
back in the lateral neutral position.
CQ-VA707N
13
Before Use (Continued)
E
N
G
L
I
S
H
11
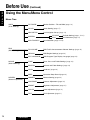
Using the Menu/Menu Control
Menu Tree
USER
(User Settings)
TILT/SLIDE
Monitor Position - Tilt and Slide (page 16)
CLOCK
Clock Settting (page 17)
NAVI SETUP
Car Navigation Set up (page 18)
SYSTEM
RDS
(RDS Settings)
SOUND
(Sound Settings)
SCREEN
(Screen Adjustment)
14
CQ-VA707N
ID CODE
ID Code Setting (pages 19-21)
ACC
ACC Selection (page 27)
INPUT SELECT
Input Selection (page 22-26)
TA VOLUME
RDS Traffic Announcement Volume Settings (page 40)
REGION
RDS Region Settings (page 38)
PTY LANGUAGE
RDS Program Type Display Language (page 43)
TONE
Tone - Bass and Treble Settings (page 28)
BAL/FAD
Balance and Fader Settings (page 28)
LOUD
Loudness (page 29)
BEEP
Operation Beep Sound (page 29)
DIMMER
Dimmer Setting (page 30)
CONTRAST
Contrast Adjustment (page 30)
BRIGHT
Brightness Adjustment (page 31)
COLOR
Color Adjustment (page 31)
TINT
Tint Adjustment (page 31)
The main menu screen consists of a menu and submenus. Refer to the operation guide shown on the
screen.
q Press [MENU] to display the main menu.
E
N
G
L
I
S
H
12
[}][{], []][[]
Menu bar
ME
LU
VO
Selected item
(cyan colored)
PWR
MUTE
Main Menu
Submenu
TRACK
DISC/BAND
[ENTER]
ENTER
NAVIGATION
MODE
NAVI
MENU
CHz
CHx
TITLE
1
2
3
RANDOM
SCAN
REPEAT
4
5
6
TA
AF
A
Operation guide
w Press the [}], [{], []] or [[] button to move the cursor.
e Press [ENTER] to select an item.
The setting/adjusting menu for the selected item is displayed.
PTY
OPEN/CLOSE
ASPECT
CQ-VA707N
[MENU]
LOC
REMOTE
7.0'' WIDE COLOR LCD MONITOR WITH RECEIVER
Note: The RDS menu can be selected only when the radio is in FM
mode.
Car AV
Setting/Adjusting Menu
TV707W
VIDEO
ASPECT
NAVIGATION
ON
MUTE
DISC/BAND
NAVI
E
LUM
AUDIO
TRACK
MODE
A
AV IN
TILT
MENU
MENU
OPEN/CLOSE
OPE
ENTER
ENTER
VO
PWR
[{][}]
[MENU]
IN-DASH 7.0 WIDE COLOR LC
LCD TV
[]][[]
[ENTER]
Notes:
¡The main menu and the setting/adjusting menu are not displayed when the display unit is in the
retracted position.
¡Press [MODE] to close the main menu and the setting/adjusting menu.
CQ-VA707N
15
User Settings
E
N
G
L
I
S
H
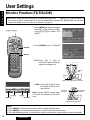
Monitor Position (TILT/SLIDE)
Adjust the tilt angle and front/rear position of the raised display unit.
[Default: TILT 3/SLIDE FRONT]
* The monitor position setting menu can also be displayed by pressing the [TILT] button on the front
panel of the display unit for more than 1 second. (a page 12)
13
q Press [MENU] to display the menu.
Press []] or [[] to select “USER”.
Press [{] or [}] to select “TILT/
SLIDE”.
[}][{], []][[]
ME
LU
VO
PWR
MUTE
TRACK
w Press [ENTER] to set “TILT/SLIDE”.
DISC/BAND
[ENTER]
ENTER
NAVIGATION
MODE
NAVI
MENU
CHz
CHx
TITLE
1
2
3
RANDOM
SCAN
REPEAT
4
5
6
TA
AF
PTY
A
e TILT: Press [}] or [{] to
increase or decrease the tilt
angle of the display unit.
OPEN/CLOSE
ASPECT
CQ-VA707N
[MENU]
LOC
REMOTE
1
2 3 4 5
7.0'' WIDE COLOR LCD MONITOR WITH RECEIVER
approx.
110°
Car AV
approx.
70°
Tilting angle adjustment (5 levels)
TV707W
VIDEO
SPECT
NAVIGATION
ON
MUTE
DISC/BAND
NAVI
ME
AUDIO
TRACK
MODE
A
AV IN
TILT
MENU
MENU
OPEN/CLOSE
OPE
SLIDE: Press []] or [[] to move
the display to the front or
rear position.
ENTER
ENTER
VOLU
PWR
[{][}]
[MENU]
IN-DASH 7.0 WIDE COLOR LC
LCD TV
[]][[]
[ENTER]
Note: Position “REAR” and tilt angle
“5” cannot be selected at the same
time.
Forward
(FRONT)
Backward
(REAR)
FRONT-REAR position
Notes:
¡Press [MODE] to close the main menu and the setting/adjusting menu.
¡Press [MENU] in the setting/adjusting menu to return to the main menu mode.
¡The setting/adjusting menu is automatically closed if no operation is performed for about 10 seconds.
16
CQ-VA707N
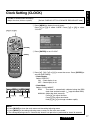
Clock Setting (CLOCK)
• Enable or disable clock the display.
• Adjust the time (24-hour system).
[Default: DISPLAY OFF/CLOCK MODE RDS/ADJUST 0:00]
q Press [MENU] to display the main menu.
Press []] or [[] to select “USER”. Press [{] or [}] to select
“CLOCK”.
E
N
G
L
I
S
H
14
[}][{], []][[]
ME
LU
VO
PWR
MUTE
TRACK
DISC/BAND
[ENTER]
ENTER
w Press [ENTER] to set “CLOCK”.
NAVIGATION
MODE
NAVI
MENU
CHz
CHx
TITLE
1
2
3
RANDOM
SCAN
REPEAT
4
5
6
TA
AF
A
PTY
OPEN/CLOSE
ASPECT
CQ-VA707N
[MENU]
LOC
REMOTE
7.0'' WIDE COLOR LCD MONITOR WITH RECEIVER
Car AV
e Press []], [[], [{] or [}] to move the cursor. Press [ENTER] to
set after each setting.
• Clock Display
Select “DISPLAY”.
ON: Clock display is on.
OFF: Clock display is off.
TV707W
VIDEO
ASPECT
NAVIGATION
ON
MUTE
DISC/BAND
NAVI
ME
AUDIO
TRACK
MODE
A
AV IN
TILT
MENU
MENU
OPEN/CLOSE
OPE
ENTER
ENTER
VOLU
PWR
[{][}]
[MENU]
IN-DASH 7.0 WIDE COLOR LC
LCD TV
[]][[]
[ENTER]
• Clock Mode
Select “CLOCK MODE”.
RDS:
The clock is automatically adjusted using the RDS
clock time service function. (a page 36 about RDS)
MANUAL: Adjust the clock manually.
Press []] to adjust the hour.
Press [[] to adjust the minute.
Hold []] or [[] to change numbers rapidly.
Notes:
¡Press [MODE] to close the main menu and the setting/adjusting menu.
¡Press [MENU] in the setting/adjusting menu to return to the main menu mode.
¡The setting/adjusting menu is automatically closed if no operation is performed for about 10 seconds.
CQ-VA707N
17
User Settings (Continued)
E
N
G
L
I
S
H
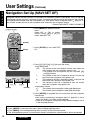
Navigation Set Up (NAVI SET UP)
Navigation volume can be set when a Panasonic car navigation system is connected. This is to set the
voice guide volume of the car navigation system. Its volume can be set so that the volume of the unit will
be automatically lowered when the voice guide is on (Navi Mute). When navigation input (a page 22) is
set to RGB, connect the unit to the navigation mute cord of the car navigation system.
[Default: NAVI MUTE 1/NAVI VOLUME 4]
15
q Press [MENU] to display the main
menu.
Press []] or [[] to select
“USER”. Press [{] or [}] to
select “NAVI SET UP”.
[}][{], []][[]
VO
LU
ME
PWR
MUTE
TRACK
DISC/BAND
[ENTER]
ENTER
w Press [ENTER] to set “NAVI SET
UP”.
NAVIGATION
MODE
NAVI
MENU
CHz
CHx
TITLE
1
2
3
RANDOM
SCAN
REPEAT
5
6
4
CQ-VA707N
REMOTE
TA
7.0'' WIDE COLOR LCD MONITOR WITH RECEIVER
AF
PTY
OPEN/CLOSE
ASPECT
A
[MENU]
LOC
Car AV
TV707W
VIDEO
SPECT
NAVIGATION
ON
MUTE
DISC/BAND
NAVI
ME
AUDIO
TRACK
MODE
A
AV IN
TILT
MENU
MENU
OPE
OPEN/CLOSE
ENTER
ENTER
VOLU
PWR
[{][}]
[MENU]
IN-DASH 7.0 WIDE COLOR LC
LCD TV
[]][[]
[ENTER]
e Press [}], [{], []] or [[] to move the cursor.
¡Navi Mute Level
OFF: The volume of the unit remains normal even when the
voice guide of the car navigation system is on.
* The volume can be adjusted with the VOLUME [}]
and [{] buttons.
1:
The volume of the unit is lowered to about 1/3 of the full
level when the navigation voice guide is on.
2:
The volume of the unit is lowered to about 1/10 of the full
level when the navigation voice guide is on.
3:
The volume of the unit is lowered to zero (no sound)
when the navigation voice guide is on.
¡Navigation Volume
]:
The volume of the navigation voice guide decreases.
[:
The volume of the navigation voice guide increases.
r Press [ENTER] to complete the navi mute level and the navigation
volume level.
¡Navi mute is invalid when navigation input (a page 22) is set to
other than RGB, so no item can be selected.
¡There is no navigation voice guide output when the display unit is
in the retracted position.
Notes:
¡Press [MODE] to close the main menu and the setting/adjusting menu.
¡Press [MENU] in the setting/adjusting menu to return to the main menu mode.
¡The setting/adjusting menu is automatically closed if no operation is performed for about 10 seconds.
18
CQ-VA707N
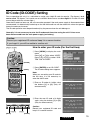
ID Code (ID-CODE) Setting
Prior to operating this unit, it is a advisable to assign your 4-digit ID code for security. (The figures 1 to 6
can be used. The figures 7 to 9 and 0 are not available. Make sure to use four digits for ID code. ID code
can not be set with two or three digits.)
Once the ID code has been set, the unit cannot be operated if the main power supply is disconnected then
re-connected. It is electronically locked up so that the thief could not use the stolen unit unless that person
knows the code you have set.
The ID code operation must be performed only by the person whom the unit belongs to.
E
N
G
L
I
S
H
16
Generally, it is not necessary to enter the ID code each time when using the unit if it has never
been disconnected from the main power supply (car battery).
Caution:
Record your registered ID code and keep it in a secure location.
If you forget it, you will be unable to use the unit.
How to enter your ID code (For the first time)
[}][{], []][[]
q Press [MENU] to display the main
menu.
Press []] or [[] to select “USER”.
Press [}] or [{] to select “SYSTEM” and “ID-CODE”.
ME
LU
VO
PWR
MUTE
TRACK
DISC/BAND
[ENTER]
ENTER
w Press [ENTER] to set “ID-CODE”.
The ID code setting menu appears.
NAVIGATION
MODE
NAVI
MENU
CHz
CHx
TITLE
1
2
3
RANDOM
SCAN
REPEAT
4
5
6
TA
AF
A
Note:
When you are setting your ID code for
the first time, it is not necessary to
enter the old ID code.
PTY
OPEN/CLOSE
ASPECT
CQ-VA707N
[MENU]
LOC
REMOTE
7.0'' WIDE COLOR LCD MONITOR WITH RECEIVER
Car AV
e Enter an ID code of 4 digits using
the buttons [1] to [6]. (Only for
remote control)
Numeric button
TV707W
VIDEO
ASPECT
NAVIGATION
ON
MUTE
DISC/BAND
NAVI
ME
AUDIO
TILT
MENU
MENU
OPE
OPEN/CLOSE
ENTER
ENTER
VOLU
PWR
[{][}]
[MENU]
r Enter the new ID code of 4 digits
again using the buttons [1] to [6].
(Only for remote control)
TRACK
MODE
A
AV IN
IN-DASH 7.0 WIDE COLOR LC
LCD TV
[]][[]
Caution:
Record your registered ID code and
keep it in a secure location.
[ENTER]
CQ-VA707N
19
User Settings (Continued)
E
N
G
L
I
S
H
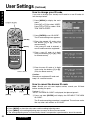
How to change your ID code
If you wish to change your already set ID code for a new ID code, follow the steps below.
q Press [MENU] to display the main
menu.
Press []] or [[] to select “USER”.
Press [}] or [{] to select “SYSTEM” and “ID-CODE”.
[}][{], []][[]
17
ME
LU
VO
PWR
MUTE
w Press [ENTER] to set “ID-CODE”.
The ID code setting menu appears.
TRACK
DISC/BAND
[ENTER]
ENTER
e Enter the present ID code using
the buttons [1] to [6]. (Only for
remote control)
If the wrong ID code is entered, a
new ID code cannot be registered.
NAVIGATION
MODE
NAVI
MENU
CHz
CHx
TITLE
1
2
3
RANDOM
SCAN
REPEAT
4
5
6
TA
AF
r Enter a new ID code of 4 digits
using the buttons [1] to [6]. (Only
for remote control)
PTY
OPEN/CLOSE
ASPECT
A
[MENU]
LOC
Car AV
CQ-VA707N
REMOTE
7.0'' WIDE COLOR LCD MONITOR WITH RECEIVER
t Enter the new ID code of 4 digits
again using the buttons [1] to [6].
(Only for remote control)
Numeric button
Caution:
Record your registered ID code and
keep it in a secure location.
TV707W
VIDEO
SPECT
NAVIGATION
ON
NAVI
ME
AUDIO
How to cancel the known ID code
MUTE
DISC/BAND
TRACK
MODE
A
AV IN
TILT
MENU
MENU
OPEN/CLOSE
OPE
ENTER
ENTER
VOLU
PWR
[{][}]
[MENU]
IN-DASH 7.0 WIDE COLOR LC
LCD TV
Note: Should your unit ever require service, cancel your ID-Code
before sending for repair.
Perform q - e.
“INPUT THE NEW ID-CODE” is displayed, but please ignore it.
[]][[]
[ENTER]
r Press and hold [ENTER] until display the “RE-INPUT THE NEW
ID-CODE”.
The ID code canceling procedure is completed. The unit now works
like any other radio without an ID-CODE.
Notes:
¡Press [MODE] to close the main menu and the setting/adjusting menu.
¡Press [MENU] in the setting/adjusting menu to return to the main menu mode.
¡The setting/adjusting menu is automatically closed if no operation is performed for about 10 seconds.
20
CQ-VA707N
E
N
G
L
I
S
H
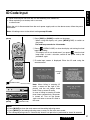
ID Code Input
¡ When removing the unit from the car and mounting it on another car,
¡ When replacing a car battery with a new one,
or other cases
18
When the unit is disconnected from the main power supply such as the above cases, follow the procedure below.
Note: All settings return to the default setting except ID code.
[PWR](Power)
[MODE]
VO
LU
q Press [PWR] or [MODE] to switch on the power.
* When using the display unit, press [MODE](PWR) to switch on
the power.
The loud beep sounds for 10 seconds.
ME
PWR
MUTE
](OPEN/CLOSE) to raise the display unit during the loud
w Press [
beep is sounding.
] after the loud
* The display unit is not raised even if you press [
beep stops. In such a situation, switch off the power and try the
procedure again.
TRACK
DISC/BAND
ENTER
NAVIGATION
MODE
NAVI
MENU
CHz
CHx
TITLE
1
2
3
RANDOM
SCAN
REPEAT
4
5
6
TA
AF
PTY
OPEN/CLOSE
ASPECT
A
e ID code input screen is displayed. Enter the ID code using the
remote control.
LOC
success
➞
Car AV
[
](OPEN/CLOSE) Numeric button
CH·C
EON*PTY*CT
TV
MODE
MODE
PWR
[MODE]
TILT
OPEN/CLOSE
7.0'' WIDE COLOR LCD MONITOR WITH RECEIVER
[
Note: When failing in entering ID
code, a screen on the right is displayed, and the unit beeps three
times. Enter a correct ID code.
In case of failing in entering ID code
three times consecutively, the power
is turned off. Turn on the power
again and enter a correct ID code in
this case.
](OPEN/CLOSE)
Notes:
¡Press [MODE] to close the main menu and the setting/adjusting menu.
¡Press [MENU] in the setting/adjusting menu to return to the main menu mode.
¡The setting/adjusting menu is automatically closed if no operation is performed for about 10 seconds.
CQ-VA707N
21
User Settings (Continued)
E
N
G
L
I
S
H
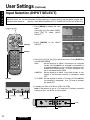
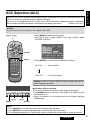
Input Selection (INPUT SELECT)
The unit has three connecting terminals: RGB, VTR1 VTR2. A car navigation system, rear-view camera,
television tuner, etc. can be connected to these terminals. Use this menu to set the device actually connected to each terminal.
[Default : NAVI RGB/CAMERA OFF/TV TUNER OFF/VTR1 PAL/VTR2 PAL]
19
q Press [MENU] to display the main
menu.
Press []] or [[] to select “USER”.
Press [{] to select “INPUT
SELECT”.
[}][{], []][[]
ME
LU
VO
PWR
MUTE
TRACK
w Press [ENTER] to set “INPUT
SELECT”.
DISC/BAND
[ENTER]
ENTER
NAVIGATION
MODE
NAVI
MENU
CHz
CHx
TITLE
1
2
3
RANDOM
SCAN
REPEAT
4
5
6
TA
AF
PTY
OPEN/CLOSE
ASPECT
A
CQ-VA707N
[MENU]
LOC
REMOTE
Car AV
7.0'' WIDE COLOR LCD MONITOR WITH RECEIVER
[MODE]
e Press [{], [}], []] or [[] to move the cursor. Press [ENTER] to
set after each setting.
NAVI:
Set the terminal to which a Panasonic car navigation
system (CN-DV2000EN, for example) is connected. (It
is recommended that a car navigation system be connected to the RGB terminal.) If no car navigation system is connected, select RGB.
CAMERA: Set the terminal to which a rear-view camera is connected. If no rear-view camera is connected, select
OFF.
TV TUNER: Set the terminal to which a TV tuner (CY-TN1500PEN,
for example) is connected. If no TV tuner is connected, select OFF.
TV707W
VIDEO
SPECT
NAVIGATION
ON
MUTE
DISC/BAND
NAVI
ME
AUDIO
TRACK
MODE
A
AV IN
TILT
MENU
MENU
OPEN/CLOSE
OPE
ENTER
ENTER
VOLU
PWR
[{][}]
[MENU]
IN-DASH 7.0 WIDE COLOR LC
LCD TV
r If needed, set PAL or NTSC for VTR1 and VTR2.
Note: If the terminal is set as a TV tuner, the TV mode is automatically set to PAL, and NTSC is not available.
[]][[]
VTR1
[ENTER]
RGB
Control Unit (front)
22
CQ-VA707N
VTR2
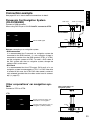
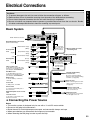
Connection example
See pages 55 to 61 about electrical connections for detail.
Panasonic Car Navigation System
(CN-DV2000EN)
DVD output
RGB: car navigation
E
N
G
L
I
S
H
20
Connect to RGB connector.
When using DVD Player of CN-DV2000EN, connect to VTR1.
CN-DV2000EN
NAVI
CAMERA
TV TUNER
RGB
OFF
OFF
VTR1
VTR1
VTR1
VTR2
VTR2
VTR2
VTR1
VTR1
VTR2
PAL
PAL
PAL for DVD signal
NTSC
NTSC
CQ-VA707N
RGB
Note on connecting a car navigation system
• RGB connection
It is recommended that Panasonic car navigation system be
connected to the RGB terminal. If a car navigation system is
connected to another than the RGB terminal (VTR1 or VTR2),
set the navigation screen to NTSC. To watch a DVD video of
the PAL system with the car navigation system, change the
setting to PAL on this menu.
• RCA cord
It is recommended that the VTR output (RCA cord) of a car
navigation system be connected to VTR1. If a DVD video disc
is inserted in this case, the VTR1 DVD video mode is automatically selected (provided that the video control cord is connected) (B page 57).
Other corporations’ car navigation system
Connect to VTR1 or VTR2.
Other corporations’ car
navigation system
VTR1
NAVI
CAMERA
TV TUNER
VTR1
VTR2
RGB
OFF
OFF
PAL
PAL
VTR1
VTR1
VTR1
NTSC
NTSC
VTR2
VTR2
VTR2
Set the connector that is connected to a car navigation.
Use the same signal as the car
navigation. (ordinary NTSC)
VTR1
CQ-VA707N
CQ-VA707N
VTR2
23
User Settings (Continued)
E
N
G
L
I
S
H
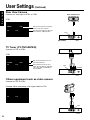
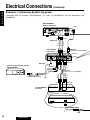
Rear View Camera
Connect to a video input of VTR1 or VTR2.
Rear View Camera
VTR1
21
NAVI
CAMERA
TV TUNER
VTR1
VTR2
RGB
OFF
OFF
PAL
PAL
VTR1
VTR1
VTR1
VTR2
VTR2
VTR2
Set the connector that connected to a rear view camera.
Use the same signal as the rear
view camera. (ordinary PAL)
NTSC
NTSC
VTR1
CQ-VA707N
VTR2
TV Tuner (CY-TN1500PEN)
Connect to VTR1 or VTR2.
VTR1
NAVI
CAMERA
TV TUNER
VTR1
VTR2
CY-TN1500PEN
RGB
OFF
OFF
PAL
PAL
VTR1
VTR1
VTR1
VTR2
VTR2
VTR2
Set the connector that is connected to TV tuner.
If the terminal is set as a TV
tuner, the TV mode is automatically set to PAL, and NTSC is
not available.
NTSC
NTSC
REMOTE
VTR1
REMOTE
CQ-VA707N
VTR2
Others equipment such as video camera
Connect to VTR1 or VTR2.
Example: When connecting a PAL-signal video to VTR1
NAVI
CAMERA
TV TUNER
VTR1
VTR2
RGB
OFF
OFF
PAL
PAL
VTR1
VTR1
VTR1
VTR2
VTR2
VTR2
NTSC
NTSC
VTR1
CQ-VA707N
24
CQ-VA707N
VTR2
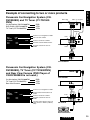
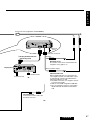
Example of connecting to two or more products
Panasonic Car Navigation System (CNDV2000EN) and TV Tuner (CY-TN1500
PEN)
Car Navigation (CN-DV2000EN)
DVD Player (CN-DV2000EN)
TV Tuner (CY-TN1500PEN)
RGB
VTR1
VTR2
DVD output
RGB: car navigation
E
N
G
L
I
S
H
22
CN-DV2000EN
REMOTE
Connect car navigation to RGB.
NAVI
CAMERA
TV TUNER
VTR1
VTR2
RGB
OFF
OFF
PAL
PAL
VTR1
VTR1
VTR1
VTR2
VTR2
VTR2
No rear view camera
VTR1
Connect TV tuner to VTR2.
Set PAL used in DVD to VTR1.
NTSC
NTSC
Set PAL used in TV tuner to
VTR2.
CQ-VA707N
VTR2
CY-TN1500PEN
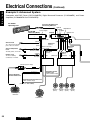
Panasonic Car Navigation System (CNDV2000EN), TV Tuner (CY-TN1500PEN)
and Rear View Camera (DVD Player of
CN-DV2000EN is not used.)
CN-DV2000EN
Car Navigation (CN-DV2000EN)
TV Tuner (CY-TN1500PEN)
Rear View Camera
RGB
VTR1
VTR2
CY-TN1500PEN
Connect car navigation to RGB.
NAVI
CAMERA
TV TUNER
VTR1
VTR2
RGB
OFF
OFF
PAL
PAL
VTR1
VTR1
VTR1
NTSC
NTSC
VTR2
VTR2
VTR2
Connect Rear View Camera to
VTR2
Connect TV tuner to VTR1.
VTR1
Set PAL used in TV tuner to
VTR1.
Use the same signal as the rear
view camera in VTR2. (ordinary
PAL)
CQ-VA707N
VTR2 Video
Rear View Camera
CQ-VA707N
25
User Settings (Continued)
E
N
G
L
I
S
H
23
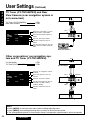
TV Tuner (CY-TN1500PEN) and Rear
View Camera (a car navigation system is
not connected.)
TV Tuner (CY-TN1500PEN)
Rear View Camera
VTR1
VTR2
When not connecting a car navigation system, select RGB.
NAVI
CAMERA
TV TUNER
VTR1
VTR2
RGB
OFF
OFF
PAL
PAL
VTR1
VTR1
VTR1
VTR2
VTR2
VTR2
VTR1
Connect Rear View Camera to
VTR2.
Connect TV tuner to VTR1.
NTSC
NTSC
CY-TN1500PEN
CQ-VA707N
VTR2 Video
Set PAL used in TV tuner to
VTR1.
Use the same signal as the rear
view camera in VTR2. (ordinary
PAL)
Rear View Camera
Other corporations’ car navigation system and TV Tuner (CY-TN1500PEN)
Car Navigation
TV Tuner (CY-TN1500PEN)
VTR1
VTR2
RCA
Car Navigation
Connect car navigation system
to VTR1.
NAVI
CAMERA
TV TUNER
VTR1
VTR2
RGB
OFF
OFF
PAL
PAL
VTR1
VTR1
VTR1
VTR2
VTR2
VTR2
NTSC
NTSC
Rear view camera is not connected.
VTR1
REMOTE
Connect TV tuner to VTR2.
Use the same signal as the car
navigation system in VTR1.
(ordinary NTSC)
CQ-VA707N
VTR2
Set PAL used in TV tuner to
VTR2.
CY-TN1500PEN
REMOTE
Notes:
¡Press [MODE] to close the main menu and the setting/adjusting menu.
¡Press [MENU] in the setting/adjusting menu to return to the main menu mode.
¡The setting/adjusting menu is automatically closed if no operation is performed for about 10 seconds.
26
CQ-VA707N
ACC Selection (ACC)
If your car has an ACC position, turn the switch to ACC. Otherwise, turn it to OFF. When ACC ON is set,
the unit is turned off automatically after stopping the engine.
If your car is not equipped with ACC, be sure to turn off the unit before stopping the engine. Otherwise,
the unit keeps consuming the power. Consequently, the battery goes dead.
[Default: ACC OFF]
E
N
G
L
I
S
H
24
Caution:
If your car has no ACC, be sure to use a default, ACC OFF.
q Press [MENU] to display the main menu.
Press []] or [[] to select “USER”. Press [{] or [}] to select
“SYSTEM” and “ACC”.
[}][{], []][[]
ME
LU
VO
PWR
MUTE
TRACK
DISC/BAND
[ENTER]
ENTER
NAVIGATION
MODE
NAVI
MENU
CHz
CHx
TITLE
1
2
3
RANDOM
SCAN
REPEAT
4
5
6
TA
AF
ASPECT
CQ-VA707N
A
REMOTE
[MENU]
w Press [ENTER] to switch the ACC Selection as follows.
ACC ON ........... ACC provided
PTY
OPEN/CLOSE
7.0'' WIDE COLOR LCD MONITOR WITH RECEIVER
LOC
ACC OFF .......... ACC not provided
Car AV
Caution: If your car has no ACC, be sure to switch this unit off
before stopping the engine.
TV707W
VIDEO
ASPECT
NAVIGATION
ON
MUTE
DISC/BAND
NAVI
E
LUM
AUDIO
TRACK
MODE
A
AV IN
TILT
MENU
MENU
OPEN/CLOSE
OPE
ENTER
ENTER
VO
PWR
[{][}]
[MENU]
IN-DASH 7.0 WIDE COLOR LC
LCD TV
[]][[]
Merits when ACC is activated:
¡The unit is turned off automatically after stopping the engine.
¡The [MODE] button on the front of the display unit remains lit even
when power is off.
¡Even if the power is off, the display unit can be tilted by pressing
[TILT] button.
[ENTER]
Notes:
¡Press [MODE] to close the main menu and the setting/adjusting menu.
¡Press [MENU] in the setting/adjusting menu to return to the main menu mode.
¡The setting/adjusting menu is automatically closed if no operation is performed for about 10 seconds.
CQ-VA707N
27
Sound Settings
E
N
G
L
I
S
H
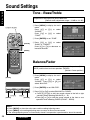
Tone - Bass/Treble
Emphasize or de-emphasize bass/treble level.
[Default: 0 dB, adjustment range: –12 dB to +12 dB]
25
q Press [MENU] to display the main
menu.
Press []] or [[] to select
“SOUND”.
Press [{] or [}] to select
“TONE”.
[}][{], []][[]
ME
LU
VO
PWR
w Press [ENTER] to set “TONE”.
MUTE
TRACK
e Press [{] or [}] to select
“BASS” or “TREBLE”.
Press []] or [[] to decrease or
increase the level.
DISC/BAND
[ENTER]
ENTER
NAVIGATION
MODE
NAVI
MENU
CHz
CHx
TITLE
1
2
3
RANDOM
SCAN
REPEAT
4
5
6
TA
AF
Balance/Fader
LOC
REMOTE
Car AV
CQ-VA707N
PTY
OPEN/CLOSE
ASPECT
A
[MENU]
7.0'' WIDE COLOR LCD MONITOR WITH RECEIVER
q Press [MENU] to display the main
menu.
Press []] or [[] to select
“SOUND”. Press [{] or [}] to
select “BAL/FAD”.
[MODE]
TV707W
VIDEO
SPECT
NAVIGATION
ON
NAVI
ME
AV IN
AUDIO
w Press [ENTER] to set “BAL/FAD”.
MUTE
DISC/BAND
TRACK
MODE
A
Adjust the sound volume between the right and left speakers (BALANCE) and the front and rear speakers (FADER).
[Default: Center position]
TILT
MENU
MENU
OPE
OPEN/CLOSE
ENTER
ENTER
VOLU
PWR
[{][}]
[MENU]
IN-DASH 7.0 WIDE COLOR LC
LCD TV
[]][[]
[ENTER]
e Press [}] or [{] to select BALANCE or FADER.
¡ Press []] or [[] to shift the sound volume to the left or right
speakers when selecting BALANCE (L – R).
¡Press []] or [[] to shift the sound volume to the front or rear
speakers when selecting FADER (FRONT – REAR).
Notes:
¡Press [MODE] to close the main menu and the setting/adjusting menu.
¡Press [MENU] in the setting/adjusting menu to return to the main menu mode.
¡The setting/adjusting menu is automatically closed if no operation is performed for about 10 seconds.
28
CQ-VA707N
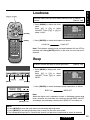
Loudness
[}][{], []][[]
Enhance treble and bass tones when listening at low or medium
volume.
[Default: ON]
ME
LU
VO
MUTE
TRACK
DISC/BAND
[ENTER]
ENTER
26
q Press [MENU] to display the main
menu.
Press []] or [[] to select
“SOUND”. Press [{] or [}] to
select “LOUD”.
PWR
E
N
G
L
I
S
H
NAVIGATION
CQ-VA707N
MODE
NAVI
MENU
CHz
CHx
TITLE
[MENU]
1
2
3
RANDOM
SCAN
REPEAT
4
5
6
TA
AF
PTY
ASPECT REMOTE
A
w Press [ENTER] to switch the loudness as follows.
LOUD ON
7.0'' WIDE COLOR LCD MONITOR WITH RECEIVER
OPEN/CLOSE
LOC
LOUD OFF
Note: The loudness setting can be switched between ON and OFF by
pressing and holding [MUTE](LOUD) on the main unit for more than 2
seconds.
Car AV
Beep
Enable or disable the beep of button operations.
[Default: ON]
TV707W
VIDEO
ASPECT
NAVIGATION
ON
MUTE
DISC/BAND
NAVI
ME
AUDIO
TRACK
MODE
A
AV IN
TILT
MENU
MENU
OPEN/CLOSE
OPE
ENTER
ENTER
VOLU
PWR
[{][}]
IN-DASH 7.0 WIDE COLOR LC
LCD TV
q Press [MENU] to display the main
menu.
Press []] or [[] to select
“SOUND”. Press [{] to select
“BEEP”.
[]][[]
[MENU]
[ENTER]
w Press [ENTER] to switch the beep of button operations as follows.
CQ-VA707N
AM/FM
VTR1
BEEP ON
MUTE
LOUD
E
UM
VOL
Note:
When the display unit is opened or closed, a loud beep sounds three
times. However, this loud beep has nothing to do with BEEP ON/OFF.
Accordingly, the loud beep sounds even if BEEP OFF has been set.
MODE
PWR
[MUTE](LOUD)
BEEP OFF
TILT
OPEN/CLOSE
7.0'' WIDE COLOR LCD MONITOR WITH RECEIVER
Notes:
¡Press [MODE] to close the main menu and the setting/adjusting menu.
¡Press [MENU] in the setting/adjusting menu to return to the main menu mode.
¡The setting/adjusting menu is automatically closed if no operation is performed for about 10 seconds.
CQ-VA707N
29
Screen Adjustment
E
N
G
L
I
S
H
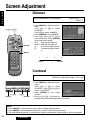
Dimmer
Adjust the brightness of the backlight.
27
q Press [MENU] to display the main
menu.
Press []] or [[] to select
“SCREEN”.
Press [}] to select “DIMMER”.
w Press [ENTER] to set “DIMMER”.
e Press [}], [{], []] or [[] to
move the cursor. Press [ENTER]
to set after each setting.
DAY:
With the side lights off
NIGHT: With the side lights on
[:
To increase light intensity
]:
To decrease light intensity
[}][{], []][[]
ME
LU
VO
PWR
MUTE
TRACK
DISC/BAND
[ENTER]
ENTER
NAVIGATION
MODE
NAVI
MENU
CHz
CHx
TITLE
1
2
3
RANDOM
SCAN
REPEAT
4
5
6
TA
AF
A
[MENU]
1
2
Darker
PTY
3
4
Brighter
OPEN/CLOSE
ASPECT
CQ-VA707N
[Default: DAY 4
NIGHT 1]
LOC
REMOTE
7.0'' WIDE COLOR LCD MONITOR WITH RECEIVER
Car AV
Contrast
Adjust the image contrast.
[Default: 0, adjustment range: –15 to +15]
TV707W
VIDEO
SPECT
NAVIGATION
ON
MUTE
DISC/BAND
NAVI
E
AUDIO
TRACK
MODE
A
AV IN
TILT
MENU
MENU
OPEN/CLOSE
OPE
ENTER
ENTER
M
VOLU
PWR
[{][}]
[MENU]
IN-DASH 7.0 WIDE COLOR LC
LCD TV
[]][[]
[ENTER]
q Press [MENU] to display the main
menu.
Press []] or [[] to select
“SCREEN”. Press [{] or [}] to
select “CONTRAST”.
w Press [ENTER] to set “CONTRAST”.
e Press []] or [[] to increase or
decrease the contrast between black and white.
Notes:
¡Press [MODE] to close the main menu and the setting/adjusting menu.
¡Press [MENU] in the setting/adjusting menu to return to the main menu mode.
¡The setting/adjusting menu is automatically closed if no operation is performed for about 10 seconds.
30
CQ-VA707N
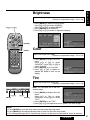
Brightness
Adjust the image brightness.
[Default: 0, adjustment range: –15 to +15]
q Press [MENU] to display the main menu.
Press []] or [[] to select “SCREEN”.
Press [{] or [}] to select “BRIGHT”.
w Press [ENTER] to set “BRIGHT”.
e Press []] or [[] to darken or lighten the display.
[}][{], []][[]
E
N
G
L
I
S
H
28
ME
LU
VO
PWR
MUTE
TRACK
DISC/BAND
[ENTER]
ENTER
Color
NAVIGATION
MODE
NAVI
MENU
CHz
CHx
TITLE
1
2
3
RANDOM
SCAN
REPEAT
4
5
6
TA
AF
PTY
LOC
REMOTE
Car AV
CQ-VA707N
Adjust the image color depth.
[Default: 0, adjustment range: –15 to +15]
OPEN/CLOSE
ASPECT
A
[MENU]
7.0'' WIDE COLOR LCD MONITOR WITH RECEIVER
q Press [MENU] to display the main
menu.
Press []] or [[] to select
“SCREEN”. Press [{] or [}] to
select “COLOR”.
w Press [ENTER] to set “COLOR”.
e Press []] or [[] to lighten or
deepen the depth of color on the
display.
Tint
Adjust the image color tone or tint.
[Default: 0, adjustment range: –15 to +15]
TV707W
VIDEO
ASPECT
NAVIGATION
ON
MUTE
DISC/BAND
NAVI
ME
AUDIO
TRACK
MODE
A
AV IN
TILT
MENU
MENU
OPEN/CLOSE
OPE
ENTER
ENTER
VOLU
PWR
[{][}]
[MENU]
Note: Tint cannot be set on the PAL
setting screen.
IN-DASH 7.0 WIDE COLOR LC
LCD TV
[]][[]
[ENTER]
q Press [MENU] to display the main
menu.
Press []] or [[] to select
“SCREEN”. Press [{] to select
“TINT”.
w Press [ENTER] to set “TINT”.
e Press []] or [[] to emphasize red or green in the color image.
Notes:
¡Press [MODE] to close the main menu and the setting/adjusting menu.
¡Press [MENU] in the setting/adjusting menu to return to the main menu mode.
¡The setting/adjusting menu is automatically closed if no operation is performed for about 10 seconds.
CQ-VA707N
31
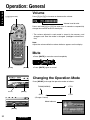
Operation: General
E
N
G
L
I
S
H
Volume
Press [}] or [{] to increase or decrease the volume.
[}][{](VOLUME)
Volume Level 0 to 40
29
ME
LU
VO
Press and hold [}] or [{] for more than 2 seconds to sequentially
change the numeric levels on the display.
PWR
MUTE
TRACK
* The volume adjusted in each mode is stored in the memory, and
changes each time the mode is changed. (Intelligent volume function)
DISC/BAND
ENTER
NAVIGATION
MODE
NAVI
MENU
CHz
CHx
TITLE
Note:
Adjust the volume while the volume indicator appears on the display.
1
2
3
RANDOM
SCAN
REPEAT
4
5
6
TA
AF
PTY
Mute
OPEN/CLOSE
ASPECT
A
LOC
¡Press [MUTE] to mute the sound completely.
Car AV
[MUTE]
[MODE]
Changing the Operation Mode
CQ-VA707N
AM/FM
VTR1
Press [MODE] to change the operation mode as follows.
MUTE
LOUD
MODE
E
UM
VOL
PWR
VTR2
OPEN/CLOSE
VTR1
[MUTE]
CH·C
EO
TV
CH• C
(Changer Control)
Mode Indicator
MUTE
MODE
MODE
PWR
TILT
OPEN/CLOSE
OPEN/
7.0'' WIDE COLOR LCD MONITOR WITH R
RECEIVER
[MODE]
32
TILT
7.0'' WIDE COLOR LCD MONITOR WITH RECEIVER
FM/AM(LW/MW)
Volume
TR1
¡Press [MUTE] again to cancel.
CQ-VA707N
VTR2
[NAVI](NAVIGATION)
ME
LU
VO
PWR
MUTE
TRACK
Notes:
¡In VTR1 mode, the external device connected to VTR1-IN on the
front of the control unit outputs its video and audio signals. (a page
48)
¡In VTR2 mode, the external device connected to VTR2-IN on the
front of the control unit outputs its video and audio signals. (a page
48)
¡CH• C (changer control) mode is not available if no changer is connected.
¡If the navigation mode is ON, only the audio signal is switched while
the video signal remains as it is.
¡The mode can be changed even when the display unit is in the
retracted position.
E
N
G
L
I
S
H
30
DISC/BAND
ENTER
NAVIGATION
MODE
NAVI
MENU
CHz
CHx
TITLE
1
2
3
RANDOM
SCAN
REPEAT
4
5
6
TA
AF
PTY
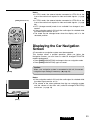
Displaying the Car Navigation
Screen
A Panasonic car navigation system must be connected.
This function allows a parallel operation. While you follow the
Navigation Screen, you can listen to radio/CD changer/VTR1/VTR2
mode in background.
¡Press [NAVI](NAVIGATION) to change to the car navigation mode.
¡Press [NAVI](NAVIGATION) again to cancel.
OPEN/CLOSE
ASPECT
A
LOC
Car AV
CQ-VA707N
REMOTE
7.0'' WIDE COLOR LCD MONITOR WITH RECEIVER
Caution:
When a car navigation system is connected to this unit, the correct
navigation input setting is necessary. (a page 22)
[MODE]
Notes:
¡If the navigation mode is ON, only the audio signal is switched while
the video signal remains as it is.
¡The volume of the voice guidance from the car navigation system
and the volume of the main unit (radio/CD changer/VTR1/VTR2)
can be set. (a page 18)
TV707W
VIDEO
ASPECT
NAVIGATION
MUTE
DISC/BAND
DISC
NAVI
NAVI
ME
OLU
V
AUDIO
TRACK
MODE
A
AV IN
MENU
TILT
OPEN/CLOSE
ENTER
PWR
IN-DASH 7.0 WIDE COLOR LCD TV
[NAVI]
CQ-VA707N
33
Radio Basics
E
N
G
L
I
S
H
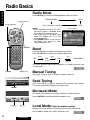
Radio Mode
Press [MODE] to select the FM/AM(LW/MW) mode as follows.
FM/AM(LW/MW)
VTR1
CH• C (Changer Control)
VTR2
[]][[](TRACK)
31
[}][{](BAND)
Notes:
¡If the navigation mode is ON, only
the audio signal is switched while
the video signal remains as it is.
¡The mode can be changed even
when the display unit is in the
retracted position.
¡The [MODE] button on the front of
the display unit remains lit even
when the power is off.
ME
LU
VO
PWR
MUTE
TRACK
DISC/BAND
ENTER
Stereo Indicator
NAVIGATION
MODE
NAVI
MENU
CHz
CHx
TITLE
1
2
3
RANDOM
SCAN
REPEAT
4
5
6
TA
AF
Frequency
[ENTER]
Band
Press [}](BAND) to switch the FM bands as follows.
Press [{](BAND) to switch to the AM(LW/MW) band.
PTY
[}]
OPEN/CLOSE
ASPECT
A
FM1
LOC
[}]
FM2
[}]
Car AV
[{]
FM3
AM(LW/MW)
[}]
The stereo indicator lights during reception of a stereo broadcast (only
for FM bands).
[MODE]
Manual Tuning
[LOC](Local)
Press []] or [[] to move to a lower or higher frequency.
CQ-VA707N
REMOTE
TR1
VTR2
CH·C
7.0'' WIDE COLOR LCD MONITOR WITH RECEIVER
EO
TV
MUTE
MODE
MODE
PWR
TILT
OPEN/CLOSE
OPEN/
7.0'' WIDE COLOR LCD MONITOR WITH R
RECEIVER
Seek Tuning
Press and hold []] or [[] for more than 0.5 seconds, then release.
The tuning automatically stops at the next station.
[MODE]
Monaural Mode
Turn Mono on to reduce noise when receiving a stereo broadcast.
TV707W
VIDEO
SPECT
NAVIGATION
ON
MUTE
DISC/BAND
NAVI
ME
AUDIO
Press [ENTER] to switch the MONO mode on or off.
TRACK
MODE
A
AV IN
TILT
MENU
OPEN/CLOSE
ENTER
VOLU
PWR
[{][}]
IN-DASH 7.0 WIDE COLO
COLOR LCD TV
[]] [[]
Local Mode (Only for remote control)
Receives in strong stations only when performing the seek tuning.
Press [LOC] to switch the LOCAL mode on or off.
34
CQ-VA707N
Station Preset
FM1, FM2, FM3 and AM(LW/MW) can store a maximum of 6 stations
each in their preset station memories.
Manual Station Preset
[}][{](BAND)
q Press [}] or [{] to select a desired band.
w Use manual or seek tuning to find
a station which is to be preset in
the memory.
e Press and hold one of the preset
buttons [1] to [6] until the display
[ENTER]
blinks. (Only for remote control)
ME
LU
VO
PWR
TRACK
DISC/BAND
ENTER
NAVIGATION
MODE
NAVI
MENU
CHz
CHx
TITLE
Preset memory table
1
2
3
RANDOM
SCAN
REPEAT
4
5
6
TA
AF
Note: Preset memory or auto preset memory operation deletes the
previously set station and presets the newly selected station in its
place.
PTY
OPEN/CLOSE
ASPECT
A
LOC
Auto Station Preset
Car AV
CQ-VA707N
REMOTE
7.0'' WIDE COLOR LCD MONITOR WITH RECEIVER
[MODE]
Numeric button
TV707W
VIDEO
ASPECT
NAVIGATION
ON
MUTE
DISC/BAND
NAVI
ME
AV IN
AUDIO
TRACK
MODE
A
MENU
TILT
OPEN/CLOSE
OPE
ENTER
ENTER
VOLU
PWR
[{] [}]
32
Store the currently received station to any of the preset buttons [1] to
[6]. (Up to 6 stations can be memorized per band.) (Only for remote
control)
[]][[](TRACK)
MUTE
E
N
G
L
I
S
H
IN-DASH 7.0 WIDE COLOR LC
LCD TV
Activate the automatic search for the strongest available stations on
the presently received band, starting from the lowest frequency. Then
store the stations offering the best reception to preset buttons [1] to
[6]. (Up to six stations can be memorized per band.) (Only for remote
control)
Select a band, press and hold [ENTER] for more than 2 seconds.
¡ The 6 strongest available stations will be automatically set in the
memory on preset buttons [1] to [6]. (Only for remote control)
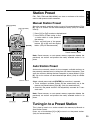
¡ Once set, the preset stations are sequentially scanned for 5 seconds each.
Note: Preset memory or auto preset memory operation deletes the
previously set station and presets the newly selected station in its
place.
[ENTER]
Tuning in to a Preset Station
This is how to tune in to a station stored in the memory by Manual or
Auto Station Preset.
Press any of the buttons [1] to [6] to tune in to the preset station.
(Only for remote control)
CQ-VA707N
35
Radio Data System (RDS)
E
N
G
L
I
S
H
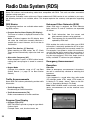
Some FM stations are broadcasting added data compatible with RDS. This radio set offers convenient
functions using such data.
RDS service availability varies with areas. Please understand if RDS service is not available in your area,
the following service is not available, either. This chapter explains the summary and operation regarding
RDS.
33
RDS Basics
Enhanced Other Networks (EON)
The following functions are available when receiving RDS stations.
When EON data is received, the EON indicator
lights and the TA and AF functions are expanded
as follows.
¡Program Service Name Display (PS Display)
The name of station is displayed instead of the
frequency.
Note: It seldom happens that PS display does
not show the information correctly because a
special font is used. However, this is not due to
malfunction.
¡Clock Time Service (CT Service)
When receiving an RDS station, the CT (Clock
Time) service automatically adjusts the time and
date.
¡Alternative Frequency (AF)
When reception is poor, an RDS station broadcasting the same program is tuned in automatically.
¡Region Mode
Changes the selection range of AF and Best
Station Search. (a page 37 for Best Station
Search)
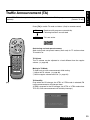
Traffic Announcements
Some RDS FM stations periodically provide traffic
information.
¡Traffic Program (TP)
Broadcasting of traffic information
¡Traffic Announcements (TA)
Radio announcements on traffic conditions
Program Type Display
¡Program Type (PTY)
RDS FM stations provide a program type identification signal.
Example: news, rock, classical music, etc.
36
CQ-VA707N
TA : Traffic information from the current and
other network stations can be received.
AF : The frequency list of preset RDS stations is
updated by EON data.
EON enables the radio to make fuller use of RDS
information. It constantly updates the AF list of preset stations, including the one currently tuned in to.
For example, if you preset a station far from home,
you will later be able to receive the same station at
an alternative frequency, or any other station serving the same program. EON also keeps track of
locally available TP stations for quick reception.
Emergency Announcement
Reception
FM mode
When an emergency announcement is broadcast,
the unit is automatically switched to receiving that
broadcast.
Other mode
If this happens in a mode other than radio mode
(CD changer mode, VTR1 mode, VTR2 mode) or
in Muting in TA mode, “Alarm!” lights on the display. (a page 39 for Muting in TA mode)
Note: When LW/MW mode is activated, an emergency announcement can not be received automatically.
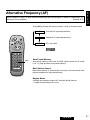
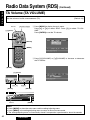
Alternative Frequency (AF)
When reception is poor, an RDS station broadcasting the same program is tuned in automatically. AF
sensitivity can be selected.
[Default: AF1]
E
N
G
L
I
S
H
34
Press [AF] to change AF mode as follows. (Only for remote control)
ME
LU
VO
AF1
Low level AF operating sensitivity
AF2
High level AF operating sensitivity
PWR
MUTE
AF off
TRACK
AF is not active
DISC/BAND
ENTER
NAVIGATION
MODE
NAVI
MENU
CHz
CHx
TITLE
1
2
3
RANDOM
SCAN
REPEAT
4
5
6
Auto Preset Memory
[AF]
TA
AF
OPEN/CLOSE
ASPECT
A
PTY
Auto preset memory works only for RDS stations when the AF mode
is on. (a page 35 about auto preset memory)
LOC
Car AV
Best Station Search
Best Station Search is automatically activated to store the station with
the best reception for each preset button.
Region Mode
Changes the selection range of AF and Best Station Search.
(a page 38 about Region on or off)
CQ-VA707N
37
Radio Data System (RDS) (Continued)
E
N
G
L
I
S
H
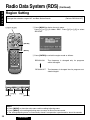
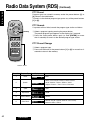
Region Setting
Changes the selection range of AF and Best Station Search.
[Default: REGION OFF]
35
q Press [MENU] to display the main menu.
Press []] or [[] to select “RDS”. Press [{] or [}] to select
“REGION”.
[}][{], []][[]
ME
LU
VO
PWR
MUTE
TRACK
DISC/BAND
[ENTER]
ENTER
NAVIGATION
MODE
NAVI
MENU
CHz
CHx
TITLE
1
2
3
RANDOM
SCAN
REPEAT
4
5
6
TA
AF
A
w Press [ENTER] to switch the region mode as follows.
PTY
REGION ON
The frequency is changed only for programs
within the region.
REGION OFF
The frequency is changed also for programs outside the region.
OPEN/CLOSE
ASPECT
CQ-VA707N
[MENU]
LOC
REMOTE
7.0'' WIDE COLOR LCD MONITOR WITH RECEIVER
Car AV
TV707W
VIDEO
SPECT
NAVIGATION
ON
MUTE
DISC/BAND
NAVI
ME
AUDIO
TRACK
MODE
A
AV IN
TILT
MENU
MENU
OPEN/CLOSE
OPE
ENTER
ENTER
VOLU
PWR
[{][}]
[MENU]
IN-DASH 7.0 WIDE COLOR LC
LCD TV
[]][[]
[ENTER]
Notes:
¡Press [MODE] to close the main menu and the setting/adjusting menu.
¡Press [MENU] in the setting/adjusting menu to return to the main menu mode.
¡The setting/adjusting menu is automatically closed if no operation is performed for about 10 seconds.
38
CQ-VA707N
Traffic Announcement (TA)
Some RDS FM stations periodically provide traffic information. Traffic programs can be received automatically.
[Default: TA off]
E
N
G
L
I
S
H
36
Press [TA] to switch TA mode as follows. (Only for remote control)
TA on
Receive traffic programs automatically.
Following functions are activated.
TA off
TA is not active.
ME
LU
VO
PWR
MUTE
TRACK
DISC/BAND
ENTER
Seek tuning and auto preset memory
Seek tuning and auto preset memory work only for TP stations when
TA mode is on.
NAVIGATION
MODE
NAVI
MENU
CHz
CHx
TITLE
1
2
3
RANDOM
SCAN
REPEAT
4
5
6
TA
AF
LOC
Car AV
[TA]
PTY
OPEN/CLOSE
ASPECT
A
TA Volume
The TA volume can be adjusted to a level different from the regular
volume. (a page 40)
Muting in TA Mode
To listen only to traffic announcement while muting.
qAdjust the TA volume. (a page 40)
wSet the regular volume level to 0. (a page 32)
TA Stand By
Even when the CD changer, the VTR1 or VTR2 mode is selected, FM
traffic announcements will interrupt them.
(If [TA] is pressed in the CD changer, the VTR1 or VTR2 mode when
TA is off, traffic announcements will similarly interrupt.)
CQ-VA707N
39
Radio Data System (RDS) (Continued)
E
N
G
L
I
S
H
TA Volume (TA VOLUME)
Set the volume of traffic announcements (TA).
[Default: 24]
37
q Press [MENU] to display the main menu.
Press []] or [[] to select “RDS”. Press [}] to select “TA VOLUME”.
Press [ENTER] to set the TA volume.
[}][{], []][[]
Volume
[}](BAND)
VO
LU
ME
PWR
MUTE
TRACK
DISC/BAND
[ENTER]
ENTER
NAVIGATION
MODE
NAVI
MENU
CHz
CHx
TITLE
1
2
3
RANDOM
SCAN
REPEAT
4
5
6
TA
AF
PTY
OPEN/CLOSE
ASPECT
CQ-VA707N
[MENU]
REMOTE
7.0'' WIDE COLOR LCD MONITOR WITH RECEIVER
A
LOC
w Press [}](VOLUME) or [{](VOLUME) to increase or decrease
the TA volume.
Car AV
[MODE]
[}](BAND)
TV707W
W
VIDEO
ASPECT
NAVIGATION
GATION
MUTE
DISC/BAND
NAVI
VI
E
LUM
AUDIO
TRACK
MODE
A
AV IN
TILT
MENU
MENU
OPEN/CLOSE
ENTER
ENTER
VO
PWR
[{][}]
IN-DASH 7.0 WIDE COLOR LCD TV
[]][[]
[MENU]
[ENTER]
CQ-VA707N
MUTE
LOUD
MODE
MODE
E
UM
VOL
Volume
PWR
TILT
OPEN/CLOSE
7.0'
7.0'' WIDE COLOR LCD MONITOR WITH RECEIVER
[MODE]
Notes:
¡Press [MODE] to close the main menu and the setting/adjusting menu.
¡Press [MENU] in the setting/adjusting menu to return to the main menu mode.
¡The setting/adjusting menu is automatically closed if no operation is performed for about 10 seconds.
40
CQ-VA707N
Program Type (PTY) Display
RDS FM stations provide a program type identification signal.
Example: news, rock, classical music, etc.
[Default: PTY off]
E
N
G
L
I
S
H
38
Press [PTY] to switch the PTY mode as follows. (Only for remote control)
[]][[]
ME
LU
VO
PTY on
PTY display mode
The following functions are activated.
PTY off
PTY is not active.
PWR
MUTE
TRACK
DISC/BAND
ENTER
[ENTER]
NAVIGATION
MODE
NAVI
MENU
CHz
CHx
TITLE
1
2
3
RANDOM
SCAN
REPEAT
4
5
6
TA
AF
A
PTY
OPEN/CLOSE
ASPECT
LOC
Note: When PTY is activated, band mode switching can not be performed. If it is necessary to switch the band mode, inactivate PTY.
PTY Language
PTY display language can be changed. (a page 43)
English, German, Spanish, Swedish, Italian, French, Dutch
[PTY]
PTY Selection
q Press [[] to change the program type as follows. ([]] : opposite
direction)
Car AV
SPEECH
Current Affairs
Education
Science
Rock Music
Serious Classics
Finance
Religion
Leisure & Hobby
National Music
Documentary
→
→
→
→
→
→
→
→
→
→
→
MUSIC
Information
Drama
Varied Speech
Easy Listening
Other Music
Children's Progs
Phone In
Jazz Music
Oldies Music
SPEECH
→
→
→
→
→
→
→
→
→
→
News
Sport
Cultures
Pop Music
Light Classics M
Weather & Metr
Social Affairs
Travel & Touring
Country Music
Folk Music
→
→
→
→
→
→
→
→
→
→
w Select a desired program and press and hold [ENTER] for more
than 2 seconds. Seek will start to tune in to a station broadcasting
the selected program type.
CQ-VA707N
41
Radio Data System (RDS) (Continued)
E
N
G
L
I
S
H
PTY Preset
Program types are stored in memory under the preset buttons [1] to
[6] shown in the table below.
To tune in to the desired program type, press any of the preset buttons
[1] to [6].
ME
LU
VO
39
PWR
PTY Search
MUTE
If a preset call has failed, search the program type station as follows.
TRACK
DISC/BAND
ENTER
[ENTER]
NAVIGATION
MODE
NAVI
MENU
CHz
CHx
TITLE
1
2
3
RANDOM
SCAN
REPEAT
4
5
6
TA
AF
A
PTY Preset Change
q Select a program type.
w Press and hold one of the preset buttons [1] to [6] for more than 2
seconds to store in the memory.
PTY
OPEN/CLOSE
ASPECT
q Select a program type by pressing the preset button.
The preset program type appears on the display for 5 seconds.
w Press the same preset button again (or hold [ENTER] for more
than 2 seconds) to tune in to the desired program type station.
LOC
Car AV
Numeric button
42
Preset No.
Program Type
1
News
Display
News
Affairs / Info / Educate / Drama / Cultures/ Science
Varied / Weather / Finance / Children / Social
Religion / Phone In / Travel / Leisure / Document
2
Speech
3
Sport
Sport
4
Pop. Music
Pop M
5
Classic Music
6
Other Music
CQ-VA707N
Classics
Rock M / Easy M / Light M / Other M / Jazz / Country
Nation M / Oldies / Folk M
PTY Language
Changes the program type (PTY) display language.
[Default: English]
q Press [MENU] to display the main menu.
Press []] or [[] to select “RDS”. Press [{] or [}] to select “PTY
LANGUAGE”.
[}][{], []][[]
E
N
G
L
I
S
H
40
ME
LU
VO
PWR
MUTE
TRACK
DISC/BAND
[ENTER]
ENTER
NAVIGATION
MODE
NAVI
MENU
CHz
CHx
TITLE
1
2
3
RANDOM
SCAN
REPEAT
4
5
6
TA
AF
A
PTY
OPEN/CLOSE
ASPECT
CQ-VA707N
w Press []], [[], [{] or [}] to select the language.
[MENU]
LOC
REMOTE
7.0'' WIDE COLOR LCD MONITOR WITH RECEIVER
Car AV
e Press [ENTER] to set the PTY language.
Note: Some languages are not available in certain channels.
TV707W
VIDEO
ASPECT
NAVIGATION
ON
MUTE
DISC/BAND
NAVI
ME
AUDIO
TRACK
MODE
A
AV IN
TILT
MENU
MENU
OPEN/CLOSE
OPE
ENTER
ENTER
VOLU
PWR
[{][}]
[MENU]
IN-DASH 7.0 WIDE COLOR LC
LCD TV
[]][[]
[ENTER]
Notes:
¡Press [MODE] to close the main menu and the setting/adjusting menu.
¡Press [MENU] in the setting/adjusting menu to return to the main menu mode.
¡The setting/adjusting menu is automatically closed if no operation is performed for about 10 seconds.
CQ-VA707N
43
CD Changer Basics
E
N
G
L
I
S
H
¡An optional changer (CX-DP88N, for example) must be connected.
¡Use of the optional Dual CD Changer Control Unit (CA-CD55EN) allows you to connect two CD changers (dual changers). (a page 60)
¡When the unit is connected with a CD text recognizable CD changer (CX-DP9061EN,
for example), CD text can appear on the display.
41
Starting the CD Changer
Once the CD changer has been connected, press [MODE] to change
to the CD changer mode as follows.
FM/AM(LW/MW)
VTR1
CH• C
(Changer Control)
VTR2
ME
LU
VO
PWR
MUTE
TRACK
DISC/BAND
Notes:
Disc Number
Track Number
¡The CH • C mode is not available
if no changer is connected.
¡If no disc is in the magazine, “NO
DISC” appears.
¡If the magazine is inserted while
power is on, the CH• C mode is
automatically selected to start
playing.
¡If the navigation mode is ON, only
the audio signal is switched while the video signal remains as it is.
¡The mode can be changed even when the display unit is in the
retracted position.
ENTER
NAVIGATION
MODE
NAVI
MENU
CHz
CHx
TITLE
1
2
3
RANDOM
SCAN
REPEAT
4
5
6
TA
AF
PTY
OPEN/CLOSE
ASPECT
A
LOC
Car AV
[MODE]
TR1
VTR2
[3](TITLE)
CH·C
EO
TV
Title Display
Track title or disc title appears on the display only when the unit is
connected to a CD changer that can recognize CD text (CXDP9061EN, for example).
MUTE
MODE
MODE
PWR
TILT
OPEN/CLOSE
OPEN/
7.0'' WIDE COLOR LCD MONITOR WITH R
RECEIVER
Press [3](TITLE) to switch the display between disc title and track title.
(Only for remote control)
[MODE]
Notes:
¡“NO TITLE” appears on the display if a disc, which does not support
the text display, has been loaded.
¡Up to 12 characters can be displayed at a time.
¡If the text has more than 12 characters, it is shown with up to 48
characters just once by scrolling, then the first 12 characters are
kept displayed.
44
CQ-VA707N
Disc Selection
Press [{](DISC) or [}](DISC)
to select a disc in descending or
ascending order.
[}][{](DISC)
[]][[](TRACK)
Disc number
Track number
E
N
G
L
I
S
H
42
ME
LU
VO
PWR
MUTE
TRACK
DISC/BAND
Track Selection
ENTER
¡Press [[](TRACK) to advance to the next track.
¡Press []](TRACK) to start play from the beginning of the track now
playing.
¡Press [[](TRACK) or []](TRACK) repeatedly to skip the desired
number of tracks.
NAVIGATION
MODE
NAVI
MENU
CHz
CHx
TITLE
1
2
3
RANDOM
SCAN
REPEAT
4
5
6
TA
AF
A
CQ-VA707N
PTY
Track Search
OPEN/CLOSE
ASPECT
LOC
Car AV
REMOTE
7.0'' WIDE COLOR LCD MONITOR WITH RECEIVER
Track Random (Only for remote control)
[4](RANDOM)
Play the tracks of all discs in the changer in random order.
¡Press [4](RANDOM). All the available tracks on all discs in the
magazine will be played in a random sequence.
TV707W
VIDEO
ASPECT
NAVIGATION
ON
MUTE
DISC/BAND
NAVI
ME
AV IN
AUDIO
TRACK
MODE
A
¡Press and hold [[](TRACK) or []](TRACK) for more than 0.5 seconds to advance or reverse through a track.
¡Release [[](TRACK) or []](TRACK) to resume regular CD play
from the released position.
TILT
MENU
OPEN/CLOSE
OPE
ENTER
VOLU
PWR
IN-DASH 7.0 WIDE COLOR LC
LCD TV
¡Press [4](RANDOM) again to cancel.
[{][}]
[]] [[]
Disc Random (Only for remote control)
Play the tracks of the disc you are currently listening to in random
order.
¡Press and hold [4](RANDOM) for more than 2 seconds. All the
available tracks on the current disc will be played in a random
sequence.
¡Press and hold [4](RANDOM) for more than 2 seconds again to
cancel.
CQ-VA707N
45
CD Changer Basics (Continued)
E
N
G
L
I
S
H
Track Scan (Only for remote control)
Play the first 10 seconds of each track on the disc in sequential order,
starting from the track following the one you are currently listening to.
¡Press [5](SCAN). The first 10 seconds of each track on the discs
play in sequence.
After all tracks are scanned, resume normal play from the start of
the original track.
43
¡Press [5](SCAN) again to cancel.
ME
LU
VO
PWR
MUTE
Disc Scan (Only for remote control)
TRACK
DISC/BAND
ENTER
NAVIGATION
[6](REPEAT)
MODE
NAVI
MENU
CHz
CHx
TITLE
1
2
3
RANDOM
SCAN
REPEAT
4
5
6
TA
AF
A
PTY
¡Press and hold [5](SCAN) for more than 2 seconds again to cancel.
OPEN/CLOSE
ASPECT
Play the first 10 seconds of the first track on all discs in the changer in
sequential order, starting from the disc following the one you are currently listening to.
¡Press and hold [5](SCAN) for more than 2 seconds. The 1st track of
all the discs in the magazine is played for 10 seconds each.
When all discs are scanned, resume normal play from the start of
the original disc.
LOC
Car AV
Track Repeat (Only for remote control)
[5](SCAN)
Repeat playing the currently selected track.
¡Press [6](REPEAT) to repeat the current selection.
¡Press [6](REPEAT) again to cancel.
Disc Repeat (Only for remote control)
Repeat playing the currently selected disc.
¡Press and hold [6](REPEAT) for more than 2 seconds to repeat the
current disc selection.
¡Press and hold [6](REPEAT) for more than 2 seconds again to cancel.
46
CQ-VA707N
Dual CD Changer (Only for remote control)
This function lets you control two CD changers through the optional
dual CD Changer control unit (CA-CD55EN).
Change over between two connected CD changers. [Default: CH-1]
[1](CHz)
E
N
G
L
I
S
H
44
Press [1](CHz) or [2](CHx) to select CD changer 1 or CD changer
2. (a page 60) (Only for remote control)
[2](CHx)
CD changer indicator
ME
LU
VO
PWR
MUTE
TRACK
DISC/BAND
ENTER
NAVIGATION
MODE
NAVI
MENU
CHz
CHx
TITLE
1
2
3
RANDOM
SCAN
REPEAT
4
5
6
TA
AF
PTY
OPEN/CLOSE
ASPECT
A
Note: This function is not available when there is no disc in the connected CD changer or when the magazine is not in the changer.
LOC
Car AV
CQ-VA707N
47
Auxiliary
E
N
G
L
I
S
H
¡Watching the Image or listening to the sound of a connected external device
¡Connect a mobile video deck, video camera, rear-view camera, or car navigation
system, for example.
WARNING:
For safe driving, the operation is possible only when stopped with the parking brake engaged. “WARNING” will be displayed, if you try to switch to VTR1 or VTR2 mode by pressing the [MODE] button while
driving.
45
Notes:
¡If your car navigation system is not connected, be sure to set the NAVI (navigation input) to RGB on
the setting/ adjusting menu. (a page 22)
¡If your rear-view camera is not connected, be sure to set the CAMERA to OFF on the setting/adjusting menu. (a page 22)
VTR Mode
ME
LU
VO
Press [MODE] to change to VTR1 mode or VTR2 mode as follows.
PWR
MUTE
TRACK
FM/AM(LW/MW)
VTR1
CH• C
(Changer Control)
VTR2
DISC/BAND
ENTER
NAVIGATION
MODE
NAVI
MENU
CHz
CHx
TITLE
1
2
3
RANDOM
SCAN
REPEAT
4
5
6
The image supplied by a connected external device is displayed. At
the same time, the VTR1 or VTR2 indicator on the front panel of the
display unit lights.
Example of VTR1 mode
VTR1-IN
TA
AF
PTY
R L VIDEO
OPEN/CLOSE
ASPECT
A
LOC
Car AV
Control Unit
(Front)
R L VIDEO
VTR2-IN
[MODE]
TR1
VTR2
CH·C
EO
TV
MUTE
MODE
MODE
PWR
TILT
OPEN/CLOSE
OPEN/
7.0'' WIDE COLOR LCD MONITOR WITH R
RECEIVER
[MODE]
ALARM indicator
Emergency
Announcement
When an emergency announcement
is received in VTR mode, “ALARM!”
lights and that announcement can be
heard.
Notes:
¡In VTR1 mode, the video and audio from the external device connected to VTR1-IN are selected.
¡In VTR2 mode, the video and audio from the external device connected to VTR2-IN are selected.
¡If the navigation mode is ON, only the audio signal is switched while the video signal remains as it is. (a
page 33)
¡The mode can be changed even when the display unit is in the retracted position.
48
CQ-VA707N
Aspect Ratio (for VTR Mode)
Press [A](ASPECT) to change the aspect ratio as follows.
Normal
ME
LU
VO
¡The conventional TV image
has a 4:3 ratio of horizontal
to vertical.
¡In this case, a blank area
remains on the right and left
sides of the display.
PWR
MUTE
TRACK
DISC/BAND
ENTER
NAVI
MENU
CHz
CHx
TITLE
1
2
3
RANDOM
SCAN
REPEAT
4
5
6
TA
AF
¡The screen is extended
horizontally as a whole to
the aspect ratio of 16 to 9.
¡The extension ratio is the
same at any point of the
screen.
PTY
OPEN/CLOSE
A
46
Full
NAVIGATION
MODE
ASPECT
E
N
G
L
I
S
H
LOC
Zoom
Car AV
CQ-VA707N
REMOTE
7.0'' WIDE COLOR LCD MONITOR WITH RECEIVER
¡The screen is fully extended
at the normal aspect ratio of
4 to 3.
¡The top and bottom of the
screen are slightly cut.
[A](ASPECT)
Just
TV707W
VIDEO
ASPECT
NAVIGATION
MUTE
DISC/BAND
DISC
V
NAVI
ME
OLU
AUDIO
TRACK
MODE
A
AV IN
MENU
TILT
¡The screen is extended
horizontally to the aspect
ratio of 16 to 9.
¡The extension ratio increases toward the right and left
ends of the screen.
OPEN/CLOSE
ENTER
PWR
IN-DASH 7.0 WIDE COLOR LCD TV
Aspect
Notes:
¡The zoom and just screens do not apply to car navigation images.
¡When the rear-view camera is in operation with the gear shift in the reverse (R) position, the image is
shown on the full screen only.
Caution:
This is to remind you that compression or extension of the screen using the aspect ratio (screen mode)
changing function of this product for commercial purposes or viewing/listening by the public could
infringe on the rights of the author protected by the copyright laws.
CQ-VA707N
49
Installation
E
N
G
L
I
S
H
47
Preparation
¡When bending the mounting tab of the mounting collar with a screwdriver, be careful not to injure your
hands and fingers.
¡We strongly recommend you to wear gloves for installation work to protect yourself from injuries.
¡Before installation, check the radio operation with
antenna and speakers.
¡Disconnect the cable from the negative (–) battery
terminal (see caution below).
¡The unit should be installed in a horizontal position with the front end up at a convenient angle,
but not more than 30°.
30° or less
Caution: Do not disconnect the battery terminals of a car with trip or navigational computer since all
user settings stored in memory will be lost. Instead take extra care with installing the unit to prevent
shorts.
Dashboard Installation
Installation Opening
The unit can be installed in any dashboard having an opening as shown at
right. The dashboard should be 4.5 mm - 6 mm thick in order to be able to
support the unit.
53 mm
182 mm
❏ Transportation bracket removal
Be sure to remove the transportation brackets before use (installation).
Use screws (5 mmφ x 6 mm) with washers for installation.
Be careful not to lose these screws.
Binding-Head
Screws
(5 mmφ x 6 mm)
Transportation
Bracket
Display Unit
Transportation
Bracket
Binding-Head
Screws
(5 mmφ x 6 mm)
50
CQ-VA707N
Installation Precautions
This product should be installed by a professional installer, if possible.
In case of difficulty, please consult your nearest authorized Panasonic Service Center.
1. This system is to be used only in a 12-volt, DC battery system (car) with negative ground.
2. Follow the electrical connections carefully (a pages 55 to 61). Failure to do so may result in damage to
the unit.
E
N
G
L
I
S
H
48
3. Connect the power lead after all other connections are made.
4. Be sure to connect the battery lead (yellow) to the positive terminal (+) of the battery or fuse block (BAT)
terminal.
5. Insulate all exposed wires to prevent short circuiting.
6. Secure all loose wires after installing the unit.
7. Please carefully read the operating and installation instructions of the respective equipment before connecting it to this unit.
Caution: Please follow the laws and regulations of your province or country for installation of the unit .
CQ-VA707N
51
Installation (Continued)
E
N
G
L
I
S
H
¡When bending the mounting tab of the mounting collar with a screwdriver, be careful not to injure your
hands and fingers.
¡We strongly recommend you to wear gloves for installation work to protect yourself from injuries.
Installation Procedures
49
1
Insert the Mounting Collar w into the
dashboard, and bend the mounting
tabs out with a screwdriver.
!7 Subconnector
Mounting Tabs
!8 Display Unit/Control Unit
Connection Cord
!6 Ground Lead
r Mounting Bolt
e Mounting
Spring
2
Attach the mounting springs e
to the display unit.
3
Secure the rear of the unit.
i Screw
4
5
52
CQ-VA707N
Fix the rear of the unit to the car body by
either method (a) or (b) shown at right after
fixing Ground Lead !6, Subconnector !7,
and Display Unit/Control Unit Connecting
Cord !8.
Insert Trim Plate q.
After installation
reconnect the negative
(–) battery terminal.
❏ Supplied Hardware
Fastening the Mounting Collar
The tabs to be bent vary depending on
the car. Bend them with a screwdriver to
fasten the mounting collar w securely in
the dashboard.
Dashboard
w Mounting Collar
No.
Item
Diagram
Qty
q Trim Plate
1
w Mounting Collar
1
e Mounting Spring
2
r Mounting Bolt (5 mmφ)
1
t Hex. Nut (5 mmφ)
1
Tapping Screw (5 mmφ x
y 16 mm)
1
u Rear Support Strap
1
i Screw (5 mmφ)
2
o Velcro Tape
2
!0 Remote Control Unit
1
!1 Battery (UM4)
2
!2 Power Connector
1
!3 Reverse Extension Cord
1
!4 Clip Connector
1
!5 Wiping Cloth
1
!6 Ground Lead
2
!7 Subconnector
1
Display Unit/Control Unit
!8 Connecting Cord
1
E
N
G
L
I
S
H
50
(a) Using the Rear Support Strap u
3 mmφ
u Rear Support Strap
y Tapping Screw
(5 mmφ x 16 mm)
Fire wall
of car
Display Unit
r Mounting Bolt
(5 mmφ)
t Hex Nut
(5 mmφ)
Display Unit
(b) Using the Rubber Cushion (Option)
Rubber Cushion (option)
r Mounting Bolt (5 mmφ)
Display Unit
!9
Radio Antenna Extension
Cord
CQ-VA707N
1
53
Installation (Continued)
E
N
G
L
I
S
H
51
❏ To Remove the Display Unit
a) Push the right and left clamp plates outwards,
one at a time, and pull the display unit toward
yourself.
b) After removing the right and left clamp plates,
pull the unit with both hands till it comes off.
Push here to
remove the
clamp plates.
<Mounting the Control Unit>
Mounting Example
Stick Velcro tape o on the carpet and
mount the control unit on it.
Connect car radio antenna cord to the
control unit using radio antenna extension cord !9 between them.
Car Radio
Antenna Cord
!9 Radio Antenna
Extension Cord
Control Unit
Note: Some carpet materials may not
be suitable for this mounting method. In
this case, please contact your nearest
Panasonic Service center for service.
o Velcro Tape
Carpet
Rado Antenna Connector
Notes:
¡Never mount the control unit in any of the following locations to avoid damage due to overheating:
1. Near the heater port.
2. Places like the dashboard or rear deck, where it may be exposed to direct sunlight.
¡Do not mount the control unit near the door, where it could be exposed to rain.
54
CQ-VA707N
Electrical Connections
Cautions:
¡To prevent damage to the unit, be sure to follow the connection diagram as follows.
¡Remove about 5 mm of protective covering from the ends of the leads before connecting.
¡Do not insert the power connector into the unit until the wiring is completed.
¡Be sure to insulate any exposed wires to prevent a possible short-circuit from the car chassis. Bundle
all cables and keep cable terminals free from touching any metal parts.
E
N
G
L
I
S
H
52
Basic System
Control Unit (Rear)
Radio Antenna Connector
!2 Power Connector
Dual CD Changer Control Lead
(Brown w/white stripe)
(Left)
Front Speaker
Cord
(Right)
(Left)
Rear Speaker
Cord
TWIN CD • C-CONT
(White w/black stripe)
–
(White)
+
(Gray w/black stripe)
–
(Gray)
+
(Green w/black stripe)
–
(Green)
+
(Violet w/black stripe)
–
(Violet)
+
(Right)
!88 Display Unit/Control Unit
Connecting Cord
FRONT R
Display Unit (Rear)
REAR L
REAR R
Video Control Lead
To the Video Control lead of the
Panasonic car navigation system
(for example, CN-DV2000EN)
VIDEO-CONT
(Green w/yellow stripe)
Navi Mute Lead
To the Navi Mute lead of the
Panasonic car navigation system
(for example, CN-DV2000EN)
Battery Lead
To the car battery, continuous
+12V DC
!6 Ground Lead
To a clean, bare
metallic part of
the car chassis
FRONT L
!66 Ground Lead
To a clean, bare
metallic part of
the car chassis
SIDE BRAKE
NAVI MUTE
(Orange)
(Blue w/yellow stripe)
BATTERY 10A
Side Brake (Parking Brake)
Connection Lead
Be sure to wire the parking
brake for safety and preventing
accidents. (a page 61)
(Fuse 10A) (Yellow)
REVERSE
(Violet w/white stripe)
Power Lead
To ACC power, +12V DC
!7 Subconnector
ACC
(Red)
(Resistor 220Ω)
Ground Lead
To a clean, bare metallic part of
the car chassis
(Black)
External Amplifier Control Power
Lead
AMP-CONT MAX0.1A
TV Control Lead
To the power control lead of the
Panasonic TV tuner
TV-CONT
(Blue w/white stripe)
Reverse Lead
When connecting the rear view
camera, use the reverse lead.
(a page 61)
Antenna Control Lead
To the auto antenna control
power cord of the car
ANT-CONT MAX0.1A
(Blue)
ILLUMINATION
(Orange w/white stripe)
Illumination Lead
To the power line connected to
the side lights of the car
(Blue w/red stripe)
❏ Connecting the Power Source
Notes:
¡This monitor system is designed only for use with a 12 volt DC motor vehicle.
¡Be sure to fully plug in the connectors.
¡Route the cord to avoid high-temperature spots and secure with clamps and tape.
¡When game devices are connected, the image may be unstable.
¡When removing the DIN plug, be sure to press the clip.
CQ-VA707N
55
Electrical Connections (Continued)
E
N
G
L
I
S
H
Example 1: Advanced System Up-grade
Connection with CD Changer (CX-DP9061EN), TV Tuner (CY-TN1500PEN), and Car Navigation (CNDV2000EN)
CN-DV2000EN
53
DVD Car Navigation
(RGB)
(R) (L) (Video)
(Yellow)
(Video)
(White)
(Red)
(R) (L)
RCA Cord
RGB Cord
(supplied to CN-DV2000EN)
CQ-VA707N
Control Unit
(R) (L)
(Video)
(L) (R) (L)
(Remote)
(Video)
(RGB)
(R)(R) (L)
(Video)
RCA Cord
(L)
CY-TN1500PEN
TV Tuner
(R)
(Black)
(White)
(Red)
(R) (L)
(Yellow)
RCA Cord
(supplied to CY-TN1500PEN)
(Red)(R)
Extension Cord
(DIN/BATT/RCA/GND)
(Black)
(White)
(White)(L)
CX-DP9061EN
(Red)
CD Text recognizable CD Changer
(Yellow)
Remote
DIN Cord
(Video) (Remote)
(Video)
(Remote)
(Front)
(Rear)
(Blue w/white stripe)
PWR-CONT
56
CQ-VA707N
E
N
G
L
I
S
H
54
VIDEO-CONT
NAVI MUTE
Power Connector (supplied to CN-DV2000EN)
!6 Ground
Lead
(Rear)
!2 Power Connector
!8 Display Unit/Control Unit
Connecting Cord
(Orange)
NAVI MUTE
Navi Mute Lead
The volume of the unit is lowered when the
navigation voice guide is on.
Display Unit
(Green w/yellow stripe)
VIDEO-CONT
!7 Subconnector
!6 Ground Lead
Video Control Lead
When a DVD video disc is inserted into the
car navigation system, the DVD video screen
is automatically selected, provided that the
following conditions are met.
¡The RCA cord of the car navigation system
is connected to VTR1.
¡NAVI is set to RGB using INPUT SELECT.
¡The car navigation system is connected to
VA707 with both the RGB cord and RCA
cord.
TV-CONT
TV Control Lead
To the power control lead of the
Panasonic TV tuner
CQ-VA707N
57
Electrical Connections (Continued)
E
N
G
L
I
S
H
55
Example 2: Advanced System
Connection with DVD Player (CX-DV1500PEN), Digital Surround Processor (CY-AC300EX), and Power
Amplifiers (CY-M9054EN and CY-M7052EN).
CY-AC300
Operating Unit
Operating Unit/Main Unit
Connecting DIN Cord
SUB•W
REAR ANALOG-IN
Power Supply
FRONT
DIGITAL-IN
(Front)
DIGITAL
DIGATAL
SURROUND
PROCESSO
R
PRO LOGIC
CE
SOUR
AC300
bright
super
VOL
MUTE
L
SE
SO U R C E
1
2
multi-co
3
lay
lor disp
Speaker
Center
r for
Amplifie
Power
DIMMER
& 30w
SPACE
DIM
POSITION
SPC
POSI
DR COMP
4
CY-AC300
Main Unit (Rear)
PWR
L L
L R
R R
Power
Connector
(Black)
Ground Lead
To a clean, bare metallic
part of the car chassis
(Red)
ACC (or IGN) Power
Lead
To ACC power, +12 V DC
ACC
(R) (L) (R) (L) (R) (L)
RCA Cord
(option)
(When a two-way
cord is used)
RCA Cord
(option)
Resistor (220Ω)
RCA Cord
(option)
REAR
(Yellow)
Battery Lead
To the car battery,
continuous +12 V DC
(R)
RCA Cord
(option)
BATTERY 5A
Fuse(5A) (L)
(R)
(White)(L)
CY-M7052
(Red)(R)
(L)
(R)
CY-M9054
(Black w/green stripe)
CENTER
(Black)
Center Speaker Cord
AMP-CONT MAX 0.1A
External Amplifier
Control Power Cord
(Blue w/white stripe)
Amplifier Control
Power Lead
(Blue w/white stripe)
Amplifier Control Power Cord
(Blue w/white stripe)
(Connect to AMP-CONT)
Left
Right
Left
Right
Speaker Speaker Speaker Speaker
(Rear)
(Rear) (Front)
(Front)
Center Speaker
EAB-CF2
Sub-Woofer
58
CQ-VA707N
E
N
G
L
I
S
H
56
Notes on handling optical fiber cable
• Do not bend the cable sharply.
• Do not allow the cable to be damaged
by getting it caught in the door, placing
a heavy object on it, etc.
CX-DV1500 (Rear)
AUDIO
VIDEO
DIGITAL
OUT
Optical Fiber Cable
(CA-LRD60: option)
(R)
(Red)
(L)
(Video)
(Yellow)
(White)
(Red)
Panasonic
RCA Cord
(Red)
(R)
Pre-out (Rear)
ACC (or IGN) Power Lead
ACC
Resistor (1kΩ)
When connected to the external
amplifier control power lead (AMPCONT) of CY-AC300, instead of
connecting to the ACC power
source, the power of unit can be
linked to that of CY-AC300.
(L)
(White)
(Yellow)
FRONT
(L)
(R)
(Front)
CQ-VA707N
Control Unit
Pre-out (Front)
Not used
!8 Display Unit/
Control Unit
Connecting Cord
(Rear)
CQ-VA707N
Display Unit
(Rear)
!2 Power Connector
Video Control Lead
Not used
VIDEO-CONT
Do not connect to the Video
Control Lead of CX-DV1500.
!6 Ground Lead
!77 Subconnector
!6 Ground Lead
CQ-VA707N
59
Electrical Connections (Continued)
E
N
G
L
I
S
H
57
Example 3: Connection with two CD Changers (CX-DP9061EN)
You need the optional dual changer control unit (CA-CD55EN).
CX-DP9061EN
Extension Cord
(DIN/BATT/RCA/GND)
DIN Cord
(White)
(L)
(White)
RCA Cord
(Red)
(R) (Red)
(Yellow)
Battery Lead
To the car battery, continuous +12V DC
(Black)
Ground Lead
To a clean, bare metallic part of the car chassis
(R)
(Red)
(L)
(White)
DIN Cord (Supplied to CA-CD55EN)
(L)
(White)
(L) (White)
RCA Cord
(Supplied to CA-CD55)
CD • C-1
(R) (Red)
CQ-VA707N
Control Unit
(Front)
(L)
(R)
CD • C-2
(R) (Red)
CA-CD55EN
(Rear)
TWIN
TWIN CD • C-CONT
CD • C-CONT
Dual CD Changer Control Lead
(Brown w/white stripe)
(Black)
Ground Lead
To a clean, bare metallic part of the car chassis
(Yellow)
Battery Lead
To the car battery, continuous +12V DC
(R)
(Red)
(L)
(White)
(Red)
(White)
RCA Cord
DIN Cord
CX-DP9061EN
60
CQ-VA707N
(R) (Red)
(L)
(White)
E
N
G
L
I
S
H
Connecting the Parking Brake Connection Lead
Caution: For safety, be sure to ask your nearest professional installer to do this connection.
Foot Brake
Parking Brake
The parking brake switch position
varies with the vehicle model.
58
Parking Brake Switch
+
SIDE BRAKE
Parking Brake Connection Lead
(Blue w/yellow stripe)
–
Battery
!4Clip Connector Brake Light
Vehicle Chassis
Side Brake (parking brake) Connection Lead
When the parking brake lever is engaged, the unit is grounded by the chassis.
q Attach a clip connector !4 to the end of the
parking brake connection lead.
w The clip connector !4 is connected to the
power source side lead of the parking brake
lever.
Comes up to this point
Parking Brake Connection Lead (Blue w/yellow stripe)
Power Source Side Lead
Connecting the Reverse Cord
* In case using an optional rear-view camera, the reverse lead must be connected.
¡Connect the reverse lead (violet w/white stripe) to the positive (+) lead of the reverse lamp (the lamp with
a clear lens that lights when the transmission gear is shifted into the reverse position).
Check the reverse lamp.
Reverse Lamp
Clip Connector
+
-
REVERSE
!3Reverse
Reverse Lead
Extension Cord
(Violet w/white stripe)
* Take it out of the back of the tail lamp mount.
Battery
Car Body
P
R
N
D
2
L
Transmission Gear
Note: Connect the reverse lead after cutting the terminal at the end.
CQ-VA707N
61
Troubleshooting
E
N
G
L
I
S
H
59
Maintenance
Your product is designed and manufactured to ensure a minimum of maintenance. Use a soft cloth for routine exterior cleaning. Never use benzine, thinner or other solvents. (a page 66)
When Something Doesn’t Work
Check the charts for possible causes and solutions to any problem you might be experiencing. Some simple checks or minor adjustments may eliminate the problem.
Product Servicing
If the suggestions in the charts don’t solve the problem, we recommend that you take it to your nearest
authorized Panasonic Service center. The unit should be serviced only by a qualified technician.
Fuse
Use fuses of the same specified rating (10 A). Using different substitutes or fuses with higher ratings, or
connecting the unit directly without a fuse, could cause fire or damage to the unit.
If the replacement fuse fails, contact your nearest authorized Panasonic Service Center.
Reset Switch
Control Unit (Rear)
Press the reset switch when any operation
buttons do not function. If the unit does not
reset even after pressing the switch, contact
your nearest Panasonic Service Center for
service.
Caution: If you press this switch with a sturdy, pointed object, initial setting is restored. However, all
memorized settings are cancelled at that time.
62
CQ-VA707N
■ Error Display Message (CD Changer)
Display
– E1 –
– E2 –
– E3 –
NO DISC
NO MAGAZINE
Possible Cause
Problem
Probable Solution
Disc dirty or wrong side
Next disc is
up
automatically
selected.
Disc damaged
Eject magazine and check the
disc.
Receiver fails to
operate
–
Press EJECT button on changer.
If trouble persists, press the
reset button on changer.
Trouble still persists, ask your
dealer or nearest service center
for repair.
–
Insert discs into magazine.
–
Load the changer with the magazine.
No disc at all in magazine
No magazine in the
changer
E
N
G
L
I
S
H
60
Note: Display contents and operations vary in part from one changer to another (due to the differences
in changer specifications). For details, refer to the manual of the changer you are using.
Troubleshooting Tips
■ Power
Problem
Unit won’t turn on.
Possible Cause
Probable Solution
Dead vehicle battery
Ignition not on
Charge vehicle battery.
Turn ignition to On or Acc.
Connections not made correctly
Check connections.
Bad power battery line
connection
Connect battery cables to terminals that are
always live.
Bad accessory line
connection
Connect accessory power cord with ACC power
supply of the car.
Bad ground lead connection
Connect ground lead to a metallic part of your
car.
A connecting cord between
the display unit and the con- Check the connecting cord between the display
unit and the control unit.
trol unit is not connected
correctly.
Fuse burned out
Replace it with one of the specified rating.
CQ-VA707N
63
Troubleshooting (Continued)
E
N
G
L
I
S
H
61
■ General
Problem
No sound
Probable Solution
Possible Cause
Volume is too low.
Raise volume.
Connections not made correctly
Check connections.
Condensation
Leave for some time before use.
Volume is too low.
Raise navigation volume.
Navigation volume set to 0
Set navigation volume to higher than 0.
No sound from built-in
speakers
No sound from left, right,
front or rear speaker
Left-right, front-rear balance
Properly adjust BAL/FAD.
is off.
Connections not made correctly
Check connections.
Right and left sounds
reversed in stereo
Speaker wires are
connected incorrectly.
Connect speaker wires correctly.
Tilt angles and forwardbackward position of
display unit cannot be
adjusted.
Obstacle is in the way.
Be careful not to let the cord be caught, and
use the display unit in a position free of contact
with obstacles.
Display unit cannot be
retracted.
Display unit is not in the
neutral position of its lateral
angle.
Return the display unit to the neutral position of
its lateral angle.
Possible Cause
Probable Solution
■ Display
Problem
No image
Screen too dark
Dimmer, contrast, bright,
Adjust each of these screen adjustment items
color, tint not adjusted prop(dimmer, contrast, bright, color, tint).
erly.
Screen whitish
Tone not good, colors too
light
■
64
Red, blue or
green spot
This is a characteristic of liquid crystal panels and is not a problem.
CQ-VA707N
■ VTR, AV, CAMERA (Video, Video Camera, Rear View Camera)
Problem
No image from VTR or
video camera
No image from rear-view
camera
Possible Cause
Probable Solution
VTR or video camera is not Connect VTR or video camera correctly, and
correctly connected. Correct change the mode to correspond to the device
mode is not selected.
connected.
Rear-view camera is not
correctly connected.
E
N
G
L
I
S
H
62
Connect rear-view camera correctly.
Camera input is not set corSet camera input correctly.
rectly.
Colors are not correctly
reproduced.
Display brightness and colors are not correctly adjusted.
Adjust display brightness and colors.
Rough screen
Setting PAL/NTSC is not
correct.
Set PAL/NTSC correctly.
■ Radio
Problem
Much noise in FM stereo
and monaural broadcasts
Presettings lost from
memory
Switching the band mode
can not be performed.
Possible Cause
Probable Solution
Station is too far or signals
are too weak.
Tune in to a station emitting strong signals.
Bad power battery line connection.
Connect battery cables to terminals that are
always live.
Fuse for battery power
cables is blown.
Replace it with one of the specified rating.
PTY is activated.
Inactivate PTY and switch the band mode.
■ Remote Control
Problem
No operation by pressing
buttons
Possible Cause
Probable Solution
Battery inserted in wrong
direction.
Insert a battery correctly.
Battery has run down.
Replace battery.
Remote control not in correct direction.
Direct the remote control at the remote control
sensor on the display unit.
CQ-VA707N
65
Maintenance
E
N
G
L
I
S
H
63
To prevent damage to the system exterior
Do not apply pesticides, benzine, thinner or other volatile substances to
the unit.
The cabinet surface primarily consists of plastic materials.
Pesticide
Do not wipe with benzine, thinner or similar substances because this
Alcohol
will result in discoloration or removal of the paint.
Wax
Tape
When a cloth with a cleansing chemical is used, follow the caution
notes.
Thinner
Do not leave the unit in contact with rubber or vinyl products for long
periods of time.
Do not use cleansers which have polishing granules because this could
Benzine Adhesive
damage the surface of the unit.
Tape
Clean dirt by wiping lightly with a soft cloth
When the unit is dirty, wipe the surface of the display using Wiping Cloth !5, an accessory to the unit.
■ Without a Wiping Cloth
When the unit is dirty, wipe with a well-wrung cloth dipped in a liquid dishwashing detergent (neutral)
diluted with water and then go over the same surface with a dry cloth.
(Since there is the possibility of water drops getting inside of the unit, do not directly apply cleanser to
the surface.)
Wring well.
Go over the same surface with
a dry cloth.
Wipe lightly.
a
a
ASPECT
A
NAVIGATION
PANASEARCH
ASPECT
CHANNEL
A
NAVI
MENU
ENTER
NAVIGATION
NAVI
PANASEARCH
MENU
CHANNEL
ENTER
Kitchen cleanser diluted with water
Caution: If water drops or similar wet substances get inside the monitor, it may cause a malfunction.
66
CQ-VA707N
Specifications
E
N
G
L
I
S
H
General
Power Supply
Current Consumption
Audio Input Sensitivity
Pre-output Voltage
Video input signal
Video output signal
Dimensions
Display Unit
Control Unit
Weight
Display Unit
Control Unit
:
:
:
:
:
:
64
: 178 (W) x 50 (H) x 160 (D) mm
: 215 (W) x 41 (H) x 150 (D) mm
: 1.9 kg
: 1.2 kg
k Display Unit
Liquid Crystal Panel
Screen Dimensions
Number of Pixels
Valid Pixel Ratio
Display Method
Drive Method
Light Source
Speaker
Sound Output
12 V DC (11 V - 16 V), test voltage 14.4 V negative ground
7 A (at rated VTR operation output)
0.5 Vrms (VTR)
4 V (CD Changer Play Mode; 1 kHz 0 dB)
Composite video signal, 1.0 Vp-p (75 Ω)
Composite video signal, 1.0 Vp-p (75 Ω)
g
:
:
:
:
:
:
:
:
:
)
7 inches wide
156 (W) x 87 (H) x 178 (D) mm
336,960 pixels (234 vertical x 480 horizontal x 3)
over 99.99 %
Transparent color filter format
TFT (Thin Film Transistor) active matrix format
Internal light (built-in small fluorescent lamp)
36 mm round speaker (one)
0.7 W
Control Unit
FM Stereo Radio
Frequency Range
Usable Sensitivity
Stereo Separation
: 87.5 – 108 MHz
: 8 dB/µV (S/N 30 dB)
: 35 dB (at 1 kHz)
MW Radio
Frequency Range
Usable Sensitivity
: 531 - 1,602 kHz
: 28 dB/µV (S/N 20 dB)
LW Radio
Frequency Range
Usable Sensitivity
: 153 - 279 kHz
: 35 dB/µV (S/N 20 dB)
Note: Specifications and design are subject to modification without notice due to improvements in technology.
CQ-VA707N
67
Matsushita Electric Industrial Co., Ltd.
Central P.O. Box 288, Osaka 530-91, Japan
YEFM283609 B0900-0 Printed in Japan