1
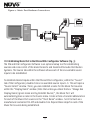
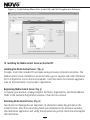
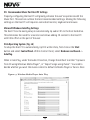
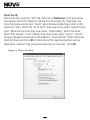
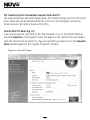
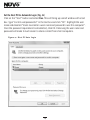
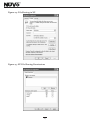
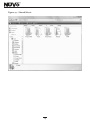
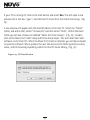
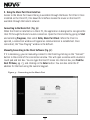
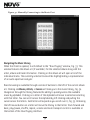
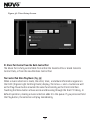
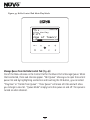
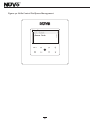
NV-MP Music Port
Installation Guide
FCC Radio Frequency Interference Statement Warning
This equipment has been tested and found to comply with the limits for a Class B digital
device, pursuant to Part 15 of the FCC Rules. These limits are designed to provide reasonable
protection against harmful interference in a residential installation. This equipment generates,
uses, and can radiate radio frequency energy and, if not installed and used in accordance
with the instructions, it may cause harmful interference to radio communications. However,
there is no guarantee that interference will not occur in a particular installation. If this equipment
does cause harmful interference to radio or television reception, which can be determined by
turning the equipment off and on, the user is encouraged to try to correct the interference by
one or more of the following measures:
- Reorient or relocate the receiving antenna.
- Increase the separation between the equipment and receiver.
- Connect the equipment into an outlet on a circuit different from that to which the receiver
is connected.
- Consult the dealer or an experienced radio/TV technician for assistance.
This device complies with Part 15 of the FCC Rules. Operation is subject to the following two
conditions: (1) This device may not cause harmful interference, and (2) this device must accept
any interference received, including interference that may cause undesired operation.
EN55022 Class-B
EN55024
IC Statement
This Class B digital apparatus complies with Canadian ICES-003.
Introduction
The Music Port is a unique collaboration between NuVo Technologies and Autonomic
Controls. It is a compact package of hardware and software that enables home desktop
and laptop PC's to act both as sources and controllers in a NuVo Grand Concerto or
Essentia E6G or future NuVoNet capable multi-room audio systems. Music Port
consists of the NV-MP, a small hardware device which can be installed on-wall, inrack, or otherwise hidden from view, and PC software. You can install Music Port as an
upgrade to an existing system or as part of a brand new NuVo multi-room audio
system. Music Port software is installed via a user-friendly interface, and works with
Windows XP, Windows Vista and Windows Home Server, as well as most existing PC
sound cards.
Music Port delivers two primary functions. The first is to transform a host PC into a
full-fledged multi-output source for a NuVo system. The second primary function of
the Music Port is to enable any desktop PC, laptop PC, or portable tablet PC that is
connected to the home network to serve as a controller for a NuVo distributed audio
system, much like the NuVo OLED Control Pads already do. Through the Music Port
Client, the user can browse their music library with full album art and control their
home's music from anywhere in the home via hard-wired or wireless devices.
Table of Contents
I. Getting Started
II. Hardware Installation
III. Establishing Music Port in the I8G and E6G Confgurator Software
IV. Installing the Media Control Server on the Host PC
V. Configuring the Media Control Server on the Host PC
VI. Advanced Server Configuration
VII. Recommended Music Port Host PC Settings
VIII. Transferring Files from Client PC to Host PC
IX. Installing the Music Port Client
X. Using the Music Port Client Interface
XI. Music Port Control from the NuVo Control Pad
Specifications
Page 3
Page 3
Page 5
Page 6
Page 10
Page 17
Page 19
Page 23
Page 30
Page 33
Page 39
Page 42
I. Getting Started
The Media Control Server (MCS) is designed to run on a computer that is equipped with
Windows XP Home Service Pack 2 or Vista Service Pack 1. It should have 1 GB RAM and
at least a 1 GHz x86 based processor. It is recommended that you dedicate a computer
or server to get the best performance as a NuVoNet audio source. The PC that runs the
MCS will be referred to as the host PC.
The Music Port Client can then be installed on any of the home's networked PCs or
touch screens for music control. The Music Port Client provides the ability to control
audio playback in any zone in the home.
II. Hardware Installation of the Music Port
Making the Audio Connections (Fig. 1)
PC sound cards typically use a stereo mini, 3.5mm audio jack. The Music Port allows
access to stereo, 5.1 or 7.1 surround audio cards on the host PC as multiple
independent stereo audio streams. Use a 3.5mm to RCA cable to connect the PC's
audio outputs to the appropriate source inputs on theGrand Concerto or Essentia E6G.
If you are going to use a 5.1 sound card, for example to convert the PC into a threeoutput music server, you will have to make three connections. You would connect the
Front Left/Right (L/R) jack to one source input on the amplifier, Surround Left/Right
(LS/RS) to a second input, and Center/Low Frequency Effects (C/LFE) to a third input.
Consult the documentation for your particular sound card to determine which audio
jack corresponds to which pair of channels. Once the connections are made, make note
of which sound card output is connected to which amplifier source input, as this
information will be needed when configuring the Media Control Server.
3
Figure 1- Audio Connections
VARIABLE
OUTPUT
TIP=L
RING=R
VARIABLE
OUTPUT
SPEAKER
40W/6 OHMS X 2
LEFT
RIGHT
TIP=L
RING=R
FIXED
OUTPUT
ZONE 1
1
2
VARIABLE
OUTPUT
SPEAKER
40W/6 OHMS X 2
LEFT
RIGHT
TIP=L
RING=R
ZONE 2
3
4
TIP=L
RING=R
FIXED
OUTPUT
ZONE 3
ZONE 4
1
6
5
VARIABLE
OUTPUT
SPEAKER
40W/6 OHMS X 2
LEFT
RIGHT
FIXED
OUTPUT
FIXED
OUTPUT
2
3
5
6
CONNECT TO
NV-I8X
L
L
R
1
L
R
2
3
USE NV-SLC1
CABLE
R
4
5
4
6
SOURCE LINK
SOURCE INPUTS
SOURCE STATUS
Making the Connections to the Music Port Hardware (Fig. 2)
To install the Music Port hardware, connect the DB9 serial port output on the host PC
(this may require the installation of a serial card in the host) using a standard nine pin
serial cable. This connection is made at the side of the Music Port box labeled
Controller. Connect a standard network CAT5 cable from the NuVoNet RJ-45 port on the
Music Port hardware to one of the Device connections on either the Essentia E6G
Allport or the Grand Concerto EZ Port. When connected, the blue Power LED will light.
A second “RS232” DB9 port allows the Music Port Client to access specific Zone and
Source control through NuVoNet. When this serial cable is connected, “Zone” and
“Source” buttons will appear at the top of the PC Interface application. From those
buttons, any zone or source can be accessed and controlled. This second serial cable is
only required if the Music Port Client is going to be used, see section X. Using the
Music Port Client Interface, pg. 33.
4
Figure 2: –Music Port Hardware Connections
SIR
SR 86 (P101)
Sirius Pops
3:09 PM
Jozef Kossovit
Hungaria
MENU
OK
POWER
NuVoNet
Address
VARIABLE
OUTPUT
TIP=L
RING=R
RS-232
FIXED
OUTPUT
1
2
3
4
5
NuVoNet Source Address
6
ZONE 7&8
USE CNLY WITH 250V FUSE
PROGRAM
SYS ON
CONNECT TO
NV-I8EZP1
CONNECT TO
NV-I8X
USE NV-NC1
CABLE
USE NV-SLC1
CABLE
NETWORK
DIGITAL LINK
MODEL NV-I8DM
SIX SOURCE EIGHT ZONE
AUDIO DISTRIBUTION SYSTEM
120V
60Hz 500W
FUSE:T5 A
NuVo Technologies Cincinnati Ohio USA
www.nuvotechnologies.com
EXT. MUTE
R
CONFORMS TO
UL STD.6500
CERTIFIED TO
CAN/CSA STD.E60065
US
C
SYSTEM
3033118
III. Establishing Music Port in the I8G and E6G Configurator Software (Fig. 3)
The I8G and E6G Configurator Software is an optional setup tool for establishing
sources and zone control of the Grand Concerto and Essentia E6G Audio Distribution
Systems. The Source tab within the software allows each of the six available source
inputs to be established.
To establish desired inputs within the I8G and E6G Configurator, within the “Source”
tab of the Configurator, double click on an available source input 1-6. This will open a
“Source Select” window. There, you can establish a name for the Music Port sources
within the “Display Name” window (Note that unless you check the box “Always Use
Display Name (ignore name sent by NuVoNet Device)”, the Music Port will
automatically place a name in the Source menu. Create a three-character abbreviation
for each of the Music Port sources in the “Short Name” window. Scroll to NuVo as a
manufacturer and select NV-MP and double click. Repeat these steps for each of the
Music Port sources being established.
5
Figure 3 – Establishing Music Port in the I8G and E6G Congifurator Software
IV. Installing the Media Control Server on the Host PC
Installing the Media Control Server (Fig. 4)
To begin, insert the included CD and make sure you have an Internet connection. The
Media Control Server installation wizard will allow you to register and install the Music
Port Configuration tool on the host computer. It will also check for software upgrades.
Click on the Next button to proceed to registration.
Registering Media Control Server (Fig. 5)
To register your product, simply complete the Name, Organization, and Email Address
fields in the Customer Registration window. Click next to continue.
Activating Media Control Server (Fig. 6)
Your Music Port Package has an important 26-character License Key printed on the
install CD case. Once the License Key fields are completed in the Activation window,
the installation application will verify the activation key via the Internet and complete
the installation.
6
Figure 4 – Installing the Media Control Server
Figure 5 – Registering the Media Control Server
7
Figure 6 – Activating Media Control Server
Setup (Fig. 7)
The installer wizard will automatically install two applications. The Media Control
Server (MCS) provides access to the music library on the PC and manages its audio
outputs. The NuVo Bridge is used to make the MCS accessible to the NuVo distributed
audio system. The installer has the ability to disable one or both of the applications.
Most installations require that both applications are installed. To complete the
installation in its default format, click the Next button.
Completing the Media Control Server Installation (Fig. 8)
To complete the installation, click on the Next button. The wizard will finish the
installation and prompt you to restart the computer when it is complete.
8
Figure 7 – Setup
Figure 8 – Completing the Media Control Server Installation
9
V. Configuring the Media Control Server on the Host PC
Once the Media Control Server (MCS) is installed, it can be accessed by going to Start>All Programs->Autonomic Controls->Media Control Server->MCS Configuration.
Control Server Tab (Fig. 9)
The Control Server tab displays the status of the MCS. The Media Control Server status
in the upper right hand side of the tab should indicate that the MCS is running. It is
rare that any changes will have to be made to the settings in this tab. If changes are
necessary, see section VI. Advanced Server Configuration, pg. 17.
Figure 9 – Control Server Tab
10
Media Sources Tab (Fig. 10)
Media Sources define the music files available to the user and the configuration of the
audio outputs from the host PC. Windows Media Player is the resident music archiving
software and is included with XP, Vista, or Window's XP Media Center operating
systems. That will appear by default under the Select Media Source header. If you have
downloaded iTunes, it will appear as well. If you intend to use more than 1 audio output
from the PC, make sure that “Split in Multiple Channels?” is set at “True”. This will
convert the audio output configuration from surround to multiple stereo streams.
Figure 10 – Media Sources
11
Configure Playback Devices (Fig. 11)
The Configure Playback Devices button at the bottom of the Media Sources tab will
open an Audio Devices Properties window. The actual appearance of this window will
vary depending on the manufacturer of the PC sound card being used. The “Advanced
Speaker Settings” window will let you establish the type of card within a drop-down
menu. This is an important step. The output choice you make needs to match the number
of sources you intend to setup for NuVoNet. For example, if you have a 5.1 surround card
in the host PC, but you intend on using only two of the three available outputs, you
should select quadraphonic within Advanced Speaker Settings. This will establish two
independent stereo audio streams for NuVoNet. If you intend on using all three of the
available audio outputs on the 5.1 surround card, select 5.1 within the “Advanced
Speaker Settings”. A 7.1 surround card would represent four stereo audio streams for the
NuVo System.
Once you have selected the appropriate number of outputs, return to the “Media
Sources” tab. When this is complete, two new columns will appear, Channels and the
number of channels discovered. For example, if you are configuring a 5.1 surround
card, you will see (three found). Each channel listed in this column can be given a
specific name, (i.e. PC Music A or PC A), to match the appropriate output, Fig. 12. The
names entered here will appear as the source names within the Sources menu on the
NuVoNet Control Pads.
Note that many surround audio cards require an audio cable to be plugged into at least
one output before any information appears in the “Media Sources” tab. It is
recommended that you plug in your audio cables from the host PC to the NuVo system
prior to configuring the MCS, see section II, “Making the Audio Connections”, pg. 3.
12
Figure 11 – Configure Playback Devices
Figure 12 – Renamed Sources
13
NuVo Bridge Tab (Fig. 13)
The sources defined in the previous “Media Sources” tab are now selectable with the
NuVo Bridge. At the top of the tab is a “Serial Connection” drop-down that defaults to
“Automatic”. This drop-down is used to select which of the PC's COM ports is to be
used for communication with the Music Port Hardware. If necessary, the drop-down
menu provides a means for manually selecting a COM Port or you can click on the
Discover button and allow the MCS to search for a connected Music Port.
“Audio Connections” shows six drop-down boxes. These correspond with the six source
inputs on either the Grand Concerto or Essentia E6G systems. Each input has a dropdown menu that contains the outputs established in the previous “Media Sources” tab.
This tab is used to inform the MCS how the audio cables are connected between the PC
and the NuVo System. Next to each NuVo input, select which PC output it is connected
to. Only select a source for the inputs Music Port will occupy within the NuVo System.
Leave the others with the default value of “Please configure your NuVo inputs”. Once
these selections are made, Music Port is ready for NuVoNet communication. Click the
Save button at the bottom of the tab.
Registration (Fig. 14)
The Registration tab indicates that the installed MCS is valid. This is established at the
initial installation of the configuration tool. The license is intended for a single host
PC that acts as the music source for the NuVo audio system. Within the Registration tab
you can transfer the license to a different computer if necessary.
14
Figure 13 – NuVo Bridge
Figure 14 – Registration
15
NuVoNet Communication (Fig. 15)
When NuVoNet communication has been established, the NuVo Control Pads will
display the menu search capability. Scrolling through the music menu is done with the
up and down arrows. The OK button selects the highlighted choice. All of the artist,
album and genre information is supplied by NuVoNet and is automatically displayed on
the Control Pads.
Figure 15 – NuVoNet Communication
Main Menu
Favorites
Sources
Playlists
Artist
Album
Genre
Track
MENU
OK
16
VI. Advanced Server Configuration
The MCS Configuration utility allows you to adjust advanced settings associated with
the control protocol and the host PC. You should only make changes to these settings if
you are familiar with all the concepts in the section, or you have been instructed by
Autonomic Controls support.
Making incorrect changes in this utility can cause the host PC or the Music Port Client to
stop working.
From the start menu select All Programs and select Autonomic Controls, Media Control
Server/MCS Configuration. On the Control Server tab you will observe several settings.
Network Control
This setting establishes the port number on which Music Port Client will communicate
with the host PC. This should only be changed if you have a known conflict and have
been instructed to do so by Autonomic Controls support. If the Music Port Client will be
accessing the host PC through a hardware firewall (through the internet), then you
must configure the firewall to forward requests on this port to the IP address of the
host PC. The installation utility will open the default port (5004) on the Windows
Firewall during installation. If you change this setting, you must manually reconfigure the Windows Firewall to allow communication on this port. Remember, the
Windows Firewall is effective even when communicating within your LAN.
Serial Control
Serial control is used when you have licensed Autonomic Control's Integration
Development Kit, and is documented in the MCS Control Protocol Documentation.
Serial control is also used when a third party automation device is used to control the
Grand Concerto or Essentia E6G. For more information on this see the white paper,
“Using Third Party Automation Device with the Music Port” located on the NuVo
Website Prozone.
17
Web Server Port
This setting should only be changed if absolutely necessary. The installation utility
will open the default port (5005) on the Windows Firewall during installation. If you
change this setting, you must manually re-configure the Windows Firewall to allow
communication on this port. Remember, the Windows Firewall is effective even when
communicating within your LAN.
Media Control Server Status
The Media Control Server Status at the top right-hand corner of the Control Server tab
tells you if the MCS is running and allows you to start or stop the service. If it is not
running, clicking on the Start button to enable it.
18
VII. Recommended Music Port Host PC Settings
Properly configuring the Host PC will greatly enhance the user’s experience with the
Music Port. This section outlines the best recommended settings. Making the following
settings on the Host PC will require a connected monitor, keyboard and mouse.
Microsoft Windows AutoPlay Settings
The Host PC can be easily setup to automatically rip audio CD’s to the host hard drive.
This eliminates the need for a monitor and allows adding CD content to the Host PC
with little effort on the part of the user.
Vista Operating System (Fig. 16)
To setup the Host PC to automatically rip CD’s within Vista, first click on the Start
button and select Control Panel. Within Control Panel, select Hardware and Sound ->
AutoPlay.
When in AutoPlay, under the Audio CD section, Change the default to either “rip music
from CD using Windows Media Player”, or “Import Songs using iTunes”. You need to
decide whether you want the music content to default to Media Player or iTunes. Once
Figure 17– Window Media Player Auto Play
19
XP Operating System (Fig. 17)
Within XP, double click on the My Computer icon on the desktop. Right Click on the CD
drive and select Properties. Within the Properties window, select the “AutoPlay” and
select Music CD from the drop-down menu. Choose “rip music from CD using Windows
Media Player”, or “Import Songs using iTunes”.
Figure 17– Window Media Player Auto Play
20
Customizing Windows Medial Player and iTunes
Within Media Player and iTunes, there are several file format and compression choices.
Media Player’s default format is WMA (Windows Media Audio) and iTunes uses AAC
(Advance Audio Coding). The problem with these formats is that neither will play in
both software applications. This makes freely sharing files across multiple platforms
impossible. The best format for sharing audio files is MP3 since it will play equally well
within Media Player or iTunes. The following section provides instructions for setting
MP3 as the default format and setting the compression rate for the best possible audio
reproduction.
Windows Media Player (Fig. 18)
With Windows Media Player open, direct your cursor over the Rip tab and click on the
down arrow. Select “More Options”. An “Options” window will appear. Select the Rip
tab. Under “Format”, change the format from Windows Media Audio to MP3. Make
sure that Rip CD when inserted is checked. Under that, select Always. Check Eject CD
when ripping is complete. Under “Audio Quality”, the slider allows you to select the
default file compression. Moving the slider to the right improves the audio quality. The
higher the compression number, the larger the file will be. If disc space allows, set the
compression at 320 Kbps for the best possible audio quality.
Figure 18– Window Media Player Rip Music Tab
21
iTunes (Fig. 19)
With iTunes open, select the “Edit” tab, then click on Preferences. In the new window
that appears, select the “Advanced” tab and from that screen, the “Importing” tab
(note that iTunes uses the term “Import” where Windows Media Player refers to this
function as “Rip”). Within the “On CD Insert” drop-down menu, select “Import CD and
Eject”. Below this is another drop-down menu, “Import Using”. Within that menu,
select “MP3 Encoder”. In the “Setting” drop-down menu, select “Custom”. This will
bring up a daughter window with a menu labeled, “Stereo Bit Rate”. Within that menu,
select 320 Kbps and click on OK. At the bottom of the Importing tab there are four
check boxes. Deselect “Play songs while importing or converting”. Select OK.
Figure 19– iTunes AutoPlay
22
VIII. Transferring Files from Another Computer to the Host PC.
The previous sections dealt with ripping audio CD content directly to the Host PC’s hard
drive. Music can also be shared with the Host PC from other computer’s across the
home’s network. We refer to these as Client PCs.
Find the Host PC’s Name (Fig. 20)
If you are using Vista, right click on the “My Computer” icon on the Host PC desktop
and click Properties. The computer’s name will appear in the center of the new window.
Note the name for future reference. If you are using XP, you must click on the Computer
Name tab that appears in the “System Properties” window.
Figure 20– Host PC Name
23
Set the Host PC for Automatic Login (Fig. 21)
Click on the “Start” button and select Run. This will bring up a small window with a text
box. Type “control userpasswords2” in the text box and click “OK”. Highlight the user
name and deselect “Users must enter a user name and password to use this computer”.
Once the password requirement is deselected, click OK. Removing the user name and
password will make it much easier to share content from client computers.
Figure 21– Host PC Auto Login
24
Setup the Music Folder for File Sharing in Vista (Fig. 22)
Click on the Start button of the Host PC and right click on Music. Select Share. In the
drop-down menu, select Everyone and then select Add. Under “Permissions Level”
there is another drop-down menu. Select “Contributor”. If your file sharing is
password protected, click the text labeled “Network and Sharing Center”. This will
bring up a new screen with a drop-down menu, “Password Protected Sharing”. Within
this menu, select “Turn off password protected sharing” and click Apply. This will
return to the “File Sharing” window where you need to click on the Share button to
complete the setup. Windows will confirm that the music folder is now being shared,
and it will give you a link, (Fig. 23). Write down the name of this link, as you will need
it to create short cuts on client computers.
Figure 22– Vista File Sharing
25
Figure 23– Shared Link
Setup the Music Folder for File Sharing in XP (Fig. 24)
Click on the Start Button of the Host PC and right click on My Music. Select Sharing and
Security. The “My Music Properties” window will appear. Within that, switch the
selection to “Share this folder”. Click on the Permissions button. This will bring up a
“Permissions for My Music” window, (Fig. 25). “Everyone” should be in the “Group or
user names” window. Below that in a window titled “Permissions for Everyone” make
sure that “Full Control” is allowed. Click Apply. Click OK in the “My Music Properties”
window.
26
Figure 24– File Sharing in XP
Figure 25– XP File Sharing Permissions
27
Creating a Music Link on a Remote Computer
Once the Host PC is setup, creating a desktop link on the desktop of any client
computer is an easy process.
On the client computer, right click on any part of the desktop where there is not a
shortcut. Choose New and select Shortcut. Type the shared link noted from the previous
section into the text box, (Fig. 26). Click Next and give the shortcut a name. It will
appear as an icon on that computer’s desktop. By double-clicking on the shortcut you
will have access to the Host PC music files. This allows music content to be copied and
pasted between the client PCs and the Host PC, (Fig. 26).
Figure 26 – Creating a New Shortcut
28
Figure 27 – Shared Music
29
IX. Installing the Music Port Client
An important feature of the Music Port is a computer application called the Music Port
Client. This opens a control interface on any computer on the home's wired or wireless
LAN. From the Client, the user has full browsing access to the host PC music library, as
well as zone and source selection capability.
On any client PC, click the Start button. If the PC is running Vista, click on Search and in
the text box type \\ and the Host PC name from the initial Host setup, (Fig. 28).
Figure 28 - Vista Search Window
30
If your PC is running XP, click on the start button and select Run. This will open a new
window with a text box. Type \\ and the Host PC name from the initial Host setup, (Fig.
29).
A new window will appear with the shared folders on the Host PC. Select the “Public”
folder, and within that, select “Documents” and then select “NuVo”. Within the NuVo
folder you will see a NuVo icon labeled “Music Port Client Setup”, (Fig. 29). Doubleclick on the Music Port Client Setup and follow the prompts. This will install the Client
software on the Client PC. When the Music Port Client is installed, you will be prompted
to open the software. When opened, the user has access to the NuVo System’s sources,
zones, and full browsing capability within the Host PC music library, (Fig. 30).
Figure 29 - XP Run Window
31
Figure 29 - Music Port Client Setup
Figure 30 - Music Port Client interface
32
X. Using the Music Port Client Interface
Access to the Music Port music library is available through the Music Port Client. Once
installed on the Client PC, this beautiful interface makes the music on the Host PC
available through the home’s network.
Connecting to the Music Port (Fig. 31)
When the Client is installed on a Client PC, the application is designed to recognize the
Host PC through the home’s router connection. Open the Client either by going to Start
and selecting Programs, then select NuVo, Music Port Client. When the Client is
opened, a connection window will appear as communication is established. Once
connected, the “Now Playing” window is the default.
Manually Connecting to the Client Software (Fig. 32)
If it is necessary, you can manually connect to the Client by clicking on the “Connect”
button in the center of the connection window. This will open a window with a numeric
touch pad and text box. You can type the Host PC name into the text box, see Find the
Host PC Name, pg. 23, and clicking on the Enter button. You can also enter the IP
address for the Host using the numeric keypad.
Figure 31 - Connecting to the Music Port
33
Figure 32 - Manually Connecting to the Music Port
Navigating the Music Library
When the Client is opened, it will default to the “Now Playing” window, Fig. 33. This
window features the album art (if availalbe) for the selected album along with the
artist, album and track information. Clicking on the album art will open a list of the
individual tracks. The currently selected track will be highlighted by a representation
of an audio spectrum analyzer.
Basic browsing is available through a series of buttons to the left of the current album
art. Clicking on Albums, Artists, or Genres will take you to the music library, Fig. 34.
Navigation through the library features the ability to quickly access the available
music by alphabet. Clicking on a letter of the alphabet will move to selections starting
with that letter. You can scroll across the alphabet by left clicking and pulling the
curser across the letters. Each letter will expand as you scroll over it, Fig. 35. Releasing
the left mouse button on a letter will move the library to that letter. Track forward and
back, play/pause, shuffle, repeat, volume and mute transport control is available at
the bottom of the Now Playing interface.
34
Figure 33 - Music Port Client Now Playing Window
Figure 34 - Music Library Navigation
35
Figure 35 - Music Port Client Alphabet Search
Managing the Queue
The Music Port Client is based on a music queue system. When a listening choice is
made it is automatically placed in a temporary playlist. You can view the current list by
clicking on the Queue button to the left of the Client interface. If you want a selection
to begin immediately playing, click and hold for approximately three seconds. Moving
spectrum analyzer bars indicate the choice that is currently playing.
Zones (Fig. 36)
The “Zones” tab allows access to the NuVo System zones through the “RS232” port on
the Music Port box and the DB9 input on the NuVo System. These correspond to the
zone addresses assigned to each Control Pad. This is best accomplished through the
I8G and E6G Configurator software. There you can give names for each assigned zones
which are provided to NuVoNet when the configuration is downloaded to the system.
Clicking on a zone changes the selected listening zone, and clicking on the All Zones
Off button turns all the system’s zones off simultaneously. Clicking on the Party Mode
button on the “Now Playing” window turns all the zones on simultaneously and makes
the Music Port Client the master controller for the home.
36
Figure 36 - Music Port Client Zones Tab
Sources (Fig. 37)
The same RS232 connection used for Zones communication also applies to the NuVo
System’s configured sources. The “Sources” tab will contain a list of the sources in the
order in which they are configured for the system. Clicking on the source name will
change the selected zones listening choice. Other NuVoNet sources such as the M3
Audio Server, T2 Dual Tuners and the NuVoDock for iPod will allow minimal control. Full
metadata for the selected source will appear along with arrow forward and back
control, but full menu function is only possible through the NuVo System’s Control
Pads. Keep in mind that IR controlled sources will appear in the Sources tab as they are
configured in the Configurator software, but the Client interface is not capable of IR
control.
37
Figure 37- Music Port Client Sources Tab
The Client Setup Screen (Fig. 38)
If you click and hold the NuVo logo in the upper left-hand corner of the Client, a setup
screen will appear. The Host PC name should appear next to “Server”. The Select button
allows you to choose any of the configured Music Port sources. The Change button
allows access to the Host PC connection described in, Connecting to the Music Port, pg.
32. Two additional check boxes are intended for touch screen applications. “Hide
Mouse Pointer” eliminates the pointer from view (Note that this is intended only for
touch screen control and should not be used on a conventional PC with mouse and
keyboard) and “Full Screen View” increases the interface to fill the Client PC monitor.
The Rescan Media button manually scans to Host PC music files for new material. The
manual rescan is typically not necessary, since the Media Control Server will
automatically rescan. The Exit button returns to the Now Playing window and the Exit
Music Port button closes the Client application.
38
Figure 38- Client Setup Screen
XI. Music Port Control from the NuVo Control Pad
The Music Port is fully controllable from either the Essentia E6G or Grand Concerto
Control Pads, or from the new Wireless Control Pad.
The Control Pad Main Play Mode (Fig. 39)
When a music selection is made, the artist, track, and album information appear on
the OLED (Organic Light Emitting Diode) display. The Arrow << and >> buttons as well
as the Play/Pause button emulate the same functionality as the Client interface.
Touching the Menu button allows access and browsing through the Host PC library. In
default operation, making a music selection adds it to the queue. If you press and hold
the Play button, the selection will play immediately.
39
Figure 39- NuVo Control Pad Main Play Mode
3:09 PM
PCA
1 of 9
Follow the Day
drift
Edge of Tomorr
1:28
3:48
MENU
OK
Manage Queue from the NuVo Control Pad (Fig. 40)
One of the Menu choices on the Control Pad for the Music Port is Manage Queue. When
that is selected, three sub choices appear. “Edit Queue” allows you to open the current
queue list and by highlighting a selection and touching the OK button, you can select
“Play Now” or “Delete from Queue”. “Clear Queue” will erase all titles and will allow
you to begin a new list. “Queue Mode” simply turns the queue on and off. The queue is
turned on when checked.
40
Figure 40- NuVo Control Pad Queue Management
Main Menu
Edit Queue
Clear Queue
Queue Mode
MENU
OK
41
NuVo Music Port Specifications
Communications
NuVoNet
Connection
Protocol
RS-485
RJ45 Jack
Proprietary
NuVo Serial Control
Connection
Protocol
RS-232
Male DB-9
57,600 Baud
8 Data Bits
No parity
1 Stop Bit
Serial Controller
Connection
Protocol
RS-232
Female DB-9
57,600 Baud
8 Data Bits
No parity
1 Stop Bit
Host PC Requirements
Windows Vista, XP, or Home Server
NV-MPSW (Software Installer)
RS-232 Serial Port
Sound Card
Power Requirements
Power supplied via NuVoNet connection
Voltage
20-24VDC
Power Consumption, Average
400mW
Physical Specifications
(Excluding Mounting Bracket)
Unit Size Millimeters
64 L x 98 W x 25 H
Unit Size Inches
2.5 L x 3.9 W x 1 H
Shipping Size Millimeters
244 L x 212 W x 118 H
Shipping Size Inches
9.6 L x 8.3 W x 4.6 H
Unit Weight Kilograms
0.23
Unit Weight Pounds
0.5
Shipping Weight Kilograms
0.9
Shipping Weight Pounds
2
Regulatory Compliance
CE Electromagnetic Compatibility
FCC
Australia C-Tick
NuVo reserves the right to change specifications without
notice.
NV-MP Package Contents
1- NV-MP
NuVo Music Port
1 - NV-MPSW NuVo Music Port Software
1 - NV-NC1
CAT5 Network Cable, 10 feet
2 - NV-RS232 RS232 Cable, 9 position Male to Female, 6 feet
42
NuVo Technologies
3015 Kustom Dr., Hebron, KY 41048
859-817-7200
www.nuvotechnologies.com
MP 0835