1
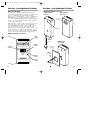
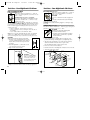
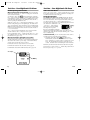
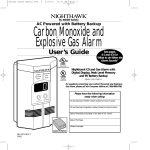
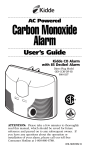
810-1009 AC Digital
11/13/01
11:22 AM
Page 40
Limited Warranty
Warranty Registration
To register for your five year factory warranty, please fill out the
enclosed warranty card completely, apply necessary postage and
place in the mail. You may place the warranty card in a separate envelope if you wish.
Please use the following address for warranty
registration ONLY:
KIDDE Safety
Product Registration Department
PO Box 8748
Denver, CO 80201-8748
By KIDDE Safety
AC Powered
Carbon Monoxide
Alarm
User’s Guide
Please send products and all other
correspondence to:
KIDDE Safety
Attn.: Customer Service Department
1394 South Third Street
Mebane, NC 27302
Nighthawk CO Alarm with
Digital Display and Peak
Level Memory
Warranty information is located on the label on the back of the
CO alarm. For your convenience, please complete the warranty
information before installing the CO alarm.
Power Cord Models (KN-COP-C)
Hardwire Models (KN-COP-HW)
Direct Plug Models (KN-COP-DP)
M
PP
e to
ov
M
The model number and assembly number can be found on the
label on the back of the CO alarm.
For Warranty Service:
In many cases the quickest way to exchange your CO alarm is to
return it to the original place of purchase. If you have questions,
call the KIDDE Safety customer service department at 1-800-8806788 for assistance.
member
CO ir
ofesh A
Fr
ON E
RBXID
CANO M
O R
M ALA
For questions concerning your
Carbon Monoxide Alarm, please
call our Consumer Hotline at
1-800-880-6788.
Please have the following
information ready when calling:
CO Alarm Model Number (Located on the back of alarm):
CO Alarm Assembly Number (Located on back of alarm):
Date of Manufacture (Located on back of alarm):
1394 South Third Street, Mebane, NC 27302
Consumer Hotline: 1-800-880-6788
www.kiddesafety.com
Custom Assembled in Mexico with U.S. and Foreign Components.
Date of Purchase:
Where Purchased:
810-1009 REV. C
5/01
810-1009 AC Digital
11/13/01
11:22 AM
Page 2
Table of Contents
Table of Contents
About this User’s Guide . . . . . . . . . . . . . . . . .i
Introduction . . . . . . . . . . . . . . . . . . . . . . . . .ii
Quick Set Up Guide . . . . . . . . . . . . . . . . . . . .iii,iv
Part One – Your Nighthawk CO Alarm
•About your CO alarm . . . . . . . . . . . . . . . . .1-1,2,3
•What CO alarms can and cannot do . . . . . .1-4
•Where you should install your alarm . . . . . .1-5
•Where you should not install your alarm . . .1-5,6
•How to install your alarm . . . . . . . . . . . . . .1-7,8
•Normal operating characteristics . . . . . . . . .1-9
•How to test your alarm . . . . . . . . . . . . . . .1-10,11
•How to know if your alarm is
malfunctioning . . . . . . . . . . . . . . . . . . . . .1-12,13
•How to care for your alarm . . . . . . . . . . . .1-13
•The peak level memory button . . . . . . . . . .1-14
Part Two – Carbon Monoxide - The Silent Killer
•What is CO? . . . . . . . . . . . . . . . . . . . . . . .2-1
•What are the effects of CO exposure? . . . . .2-1
•Could your family be at risk for CO
poisoning . . . . . . . . . . . . . . . . . . . . . . . . .2-1
•Where does CO come from? . . . . . . . . . . . .2-1,2
•What can you do to protect your family? . . .2-2
•Home safety tips . . . . . . . . . . . . . . . . . . . .2-3,4
•Clues you can and cannot see . . . . . . . . . .2-4
Part Three – What You Should Know Before
the Alarm Sounds
•Learn the difference between dangerous levels,
high levels, mid levels and low levels . . . . .3-1
•Determine if anyone in the household is at
high risk for CO poisoning . . . . . . . . . . . . .3-1,2
•Understand the effects of carbon monoxide
exposure . . . . . . . . . . . . . . . . . . . . . . . . . .3-2
Part Four – What to Do When the Unit Alarms
• How to respond: to a CO emergency; to a
high, mid, or low level alarm or reading .4-1,2,3,4
• Who you should call if you suspect you
have CO in your home . . . . . . . . . . . . . .4-2,3,4
• Sometimes it is difficult to find the source
of CO . . . . . . . . . . . . . . . . . . . . . . . . . .4-4
Part Five – Technical Information
• Product Specifications . . . . . . . . . . . . . . .5-1
• How the unit determines when
to alarm . . . . . . . . . . . . . . . . . . . . . . . . .5-2
Part Six – Frequently Asked Questions . . .6-1,2,3,4
Limited Warranty
• Warranty Registration . . . . . . . . . . . . . . .Back Page
• Warranty Service . . . . . . . . . . . . . . . . . . .Back Page
IMPORTANT
THIS CARBON MONOXIDE ALARM IS DESIGNED TO DETECT CARBON MONOXIDE FROM ANY SOURCE OF COMBUSTION. IT IS
NOT DESIGNED TO DETECT SMOKE, FIRE, OR ANY OTHER GAS.
NOT SUITABLE FOR INSTALLATION IN HAZARDOUS LOCATIONS
AS DEFINED IN THE NATIONAL ELECTRIC CODE.
UNIT WILL NOT OPERATE DURING A POWER OUTAGE,
BUT AUTOMATICALLY RESETS WHEN POWER IS RESTORED.
KIDDE Safety
This manual and the products described in it are copyrighted,
with all rights reserved. Under these copyright laws, no part of
this manual or these products may be copied for any use without prior consent from KIDDE Safety. The only exception to
this is to distribute information on carbon monoxide in a effort
to help educate others on the dangers of this silent killer.
If you wish to do this, please contact KIDDE Safety for
additional educational materials.
©KIDDE Safety, 1998
1394 South Third Street, Mebane, NC 27302
Consumer Hotline: 1-800-880-6788
www.kiddesafety.com
810-1009 AC Digital
i
11/13/01
11:22 AM
Page 4
About This User’s Guide
Introduction
Notice we call this booklet a “User’s Guide” and not an “Owner’s
Manual.” This is because our intention is you use this guide just as
you will be using your Nighthawk CO alarm. Keep the guide in a
handy location and refer to it when you have questions about your
CO alarm, its functions and features, or if you have questions about
carbon monoxide. It will take about an hour of your time, but it’s well
worth it. Please read it in the sequence presented. Reading this guide
is the only way to learn how to use your CO alarm wisely and to
know how to react in the event of an alarm.
Part One
Your Nighthawk Carbon Monoxide Alarm, covers the unique
features of your Nighthawk carbon monoxide alarm, how and where
to install it, as well as information on testing and maintaining your CO
alarm.
Part Two
Carbon Monoxide - The Silent Killer, contains valuable information about carbon monoxide (CO). From discovering the most common sources of CO in your home to recognizing the symptoms of CO
poisoning, this section provides tips and information that could help
protect your family from carbon monoxide poisoning.
Part Three
What You Should Know Before the Alarm Sounds, describes
the effects of exposure to CO levels over time and when your
Nighthawk CO alarm will alarm. It also tells you how to determine
who is at high risk for CO poisoning.
Part Four
What to do When the Unit Alarms, gives you step-by step information on how to respond to an alarm situation. Also covered is
whom to call for help if you think you have CO in your home.
Part Five
Technical Information, covers the technical specifications of your
Nighthawk CO alarm.
Part Six
Frequently Asked Questions, contains the most commonly asked
questions about our alarms. Part six was written by KIDDE Safety
customer service representatives who handle thousands of calls per
month, year-round. This section provides you with answers and tips
that will most likely answer any questions you might have after reading this user’s guide.
This Nighthawk carbon monoxide (CO) alarm is an important part of
your family’s home safety plan. So important, the U.S. Consumer
Product Safety Commission (CPSC) recommends that every household
should have at least one carbon monoxide alarm. In fact, the CPSC
chairman has said that CO alarms are “as important to home safety as
smoke alarms.” Yet because CO alarms for the home haven’t been
available until recently, most people haven’t had much experience
using them. As a new owner of a CO alarm, there are some basic
facts you should know for your protection and convenience.
Many people think that CO alarms operate like smoke alarms. And
in some basic ways, this is true. Like smoke alarms, CO alarms continuously monitor the air in your home and sound a loud alarm to
warn you of trouble.
But, the similarities end here. The way you respond to a CO alarm
is quite different than that of a smoke alarm. That’s because a house
fire and a carbon monoxide problem are two distinctly different situations. If your smoke alarm were to alarm, you would quickly be able
to judge the level of danger you were in (if any) with your five senses: you could see and smell the smoke, you could feel the heat, you
could see and even hear the fire burning. You could also readily see
if your smoke alarm were alarming in a non-emergency situation, say
if someone smoked up the kitchen with some seriously burnt toast.
Because your sense of sight, smell, hearing and touch give you so
much information, you could almost instantly judge what action to
take if you heard your smoke alarm.
But now, what about a CO alarm? Carbon monoxide (CO) is invisible, odorless, tasteless and non-irritating–completely undetectable to
your five senses. That’s why it’s so important to your safety that you
have a carbon monoxide alarm. But, how do you know what to do if
your unit alarms?
You have to learn what to do, because your five senses won’t tell
you. That’s why this user’s guide is so important. Please take the
time to read this guide from cover to cover, to familiarize yourself
with the facts about carbon monoxide, how your new alarm works,
and what to do if it alarms. Then, find a handy place to keep the
guide so it will be readily available in the future when you have a
question. You might want to write down KIDDE Safety’s toll-free customer service number and keep it with your other important phone
numbers for the same reason.
Thank you for making Nighthawk a part of your complete home safety program. With proper installation and use, your new Nighthawk
CO alarm should provide you with years of dependable service.
ii
810-1009 AC Digital
11/13/01
11:22 AM
Page 6
Quick Set Up Guide
Quick Set Up Guide
We urge you to read this entire manual
in the sequence it is presented. But, if
you only read one part of this manual
initially, read these two pages!
Step 5
Listed below are six easy steps for setting up your Nighthawk CO
alarm. Please read the entire guide for complete information.
Step 6
Setting up your CO alarm for first time operation:
Step 1
Make sure the red dot in the digital display is blinking. Then test the
alarm’s operation by pressing the Test/Reset button and releasing.
Within 15 seconds you will hear 4 quick beeps – 5 seconds off – then
4 quick beeps. For complete testing information, refer to page 1-10.
While testing the alarm, have someone else check that the alarm can be
heard easily from the sleeping areas. The CO alarm should be located
where it can wake you if it alarms at night. See page 1-5 for complete
information on the best locations for your CO alarm.
Determine the best location for your CO alarm(s). Usually this is in or
near bedrooms. Refer to page 1-5 for complete information.
Caution: Continuous exposure to the loud 85 decibel alarm at close
range over an extended period of time may cause hearing loss.
Step 2
That’s it. Your Nighthawk CO alarm is now monitoring for the presence
of carbon monoxide.
If your CO alarm is equipped with a power cord, mount the alarm on
the wall at eye level using the hardware provided. Eye level is the best
position to easily see the digital display. If your CO alarm is equipped
with a direct plug, simply plug in (you can rotate the plug if necessary) For hardwire units and for detailed instructions on mounting all
alarms, refer to page 1-7,8.
Step 3
Plug the CO alarm into a standard, unswitched 120 volt AC electric outlet. If you have a direct plug model, mount the CO alarm with digital
display at the top. You will hear the alarm sound briefly to indicate the
unit is receiving power. Refer to page 1-9 for more details.
Step 4
You will first see three eights
in the digital display indicating the
CO alarm is warming up. After approximately 30 seconds, the first reading will appear on the digital display. The number on the digital display
should be zero (0). If not, see page 1-9 for complete information on
normal operating characteristics.
iii
iv
810-1009 AC Digital
11/13/01
11:22 AM
Page 8
Part One – Your Nighthawk CO Alarm
About Your CO Alarm
The number one feature that sets Nighthawk apart from other
alarms is its unique digital display that gives you a continuous readout of CO levels from 30-999 parts per million. The digital
display serves as an early warning of CO presence. Additionally, the
digital display gives you added time to find the source of the CO
and correct the problem, limiting the risk of unrecognized long term
exposure. Of course, the loud 85 decibel alarm warns of higher levels, even while you’re sleeping.
While many other CO alarms require costly sensor or battery pack
replacement, there are no replacement parts on Nighthawk CO
alarms. And Nighthawk is the only CO alarm that gives you the
choice of a direct-plug, a 6' power cord or a hardwire unit.
Depending on how or where you wish to mount your alarm, you
can get exactly what you need for a perfect application. These are
just a few reasons over 4.5 million families have chosen Nighthawk
over every other brand for this kind of life-saving protection.
Nighthawk CO Alarm – front view
Vents
Part One – Your Nighthawk CO Alarm
Nighthawk CO Alarm– rear view
Power cord unit
Direct plug unit
(KN-COP-C)
(KN-COP-DP)
90˚ Rotating
Direct Plug
Keyholes
Sounder
Alarm
Standard Plug
Approx. 8 ft.
(provided)
Hardwire unit
(KN-COP-HW)
Test/Reset
Button
Digital
Display
Mounting Plate
(provided)
TESTRESET
PPM of CO
Move to Fresh Air
CARBON
MONOXIDE
ALARM
Mounting
Screws
(provided)
PEAK
LEVEL
Blinking
Red Dot
Peak Level
Button
Vents
1-1
Wire Nuts
(provided)
1-2
810-1009 AC Digital
11/13/01
11:22 AM
Page 10
Part One – Your Nighthawk CO Alarm
Part One – Your Nighthawk CO Alarm
Nighthawk’s Unique Features
Digital Display
This continuous digital display shows you the level of carbon monoxide (if any) the unit is sensing. The unit updates this reading every 15
seconds so you can watch levels rise or fall.
Note: If the alarm does not sense any CO, the reading is zero (0). In
most homes, the alarm reads “0” all the time. A reading of “0” is
expected under normal conditions, and is good. The blinking dot
after the number shows you the unit is operating.
Test/Reset Button
This button has two functions. First, this is the button you press when
you test the unit weekly (see pages 1-9,10,11 for further details).
Secondly, you press this button if the unit alarms and you want to
turn it off. This will reset the unit and it will then again start monitoring for CO. If CO concentration is above 70 ppm, the CO alarm will
sound within 60 minutes. (More on this on page 5-2).
Peak Level Button
By depressing this button, you can see the peak CO level recorded
by the alarm since it was last reset or unplugged. This Nighthawk feature allows you (or heating contractor or fireman) to see exactly how
big a CO problem you have so you can react accordingly. (More on
the peak level memory feature on page 1-14).
Vents
Air (and CO) enters into the alarm at the bottom vent and
circulates through the sensing chamber, exiting through the top vent.
For proper air circulation, keep vents free of dust, dirt or grease, (see
“How to care for your CO alarm” page 1-13). Do not obstruct or
block vents, (see “Where to install your CO alarm” on page 1-5).
Sensor
The sensor is a highly sensitive, electrochemical sensor that is CO-specific to help avoid false alarms. Turn to page 1-13 for more information on how to care for and protect the CO alarm.
Sounder Alarm
This is the loud 85 decibel pulsing alarm that will sound to alert you
to a potential problem. Alarm condition is 4 quick beeps – followed
by 5 seconds off – then 4 quick beeps, repeat. Caution: Continuous
exposure to this sound level at close range over an extended period
of time may cause hearing loss. We recommend you cover the sounder
with your finger while testing. More on testing on pages 1-10,11.
Keyholes
When the CO alarm is mounted to the wall, these keyholes slide onto
the screws in the wall. (See “How to install your CO alarm on
pages 1-7,8).
What Carbon Monoxide Alarms Can and Cannot Do
CO alarms provide early warning of the presence of carbon monoxide, usually before a healthy adult would experience symptoms.
This early warning is possible, however, only if your Nighthawk CO
alarm is located, installed and maintained as described in this user’s
guide.
This CO alarm is designed to act as a continuous monitor, it is not
designed for use as a short-term testing device to perform a quick
check for the presence of CO.
CO alarms have limitations. Like any other electronic device, CO
alarms are not fool-proof.
CO alarms have a limited operational life. You must test your CO
alarm weekly, because it could fail to operate at any time. If your
CO alarm fails to test properly, or if its self-diagnostic test reveals a
malfunction, immediately have the CO alarm replaced. See back page
for warranty information.
CO alarms will not work without power. This CO alarm requires a
continuous supply of electric power.
CO alarms can only sense CO that reaches the alarm’s sensor.
Carbon monoxide may be present in other areas without reaching
the alarm. The rate at which CO reaches the alarm may be affected
by doors or other obstructions. In addition, fresh air from a vent or
open window or any other source may prevent CO from reaching
the sensor. Please observe cautions on page 1-5 “Where to install
your CO alarm.”
CO could be present on one level of the home and not reach a CO
alarm installed on a different level. For example, CO in the basement may not reach a CO alarm on the second level, near the bedrooms. For this reason, we recommend you provide complete coverage by placing a CO alarm on every level of the home.
CO alarms are not smoke alarms. CO alarms do not sense smoke or
fire. For early warning of fire you must install smoke alarms, even
though carbon monoxide can be generated by a fire.
CO alarms should not be used to detect the presence of natural gas
(methane), propane, butane, or other combustible fuels.
CO alarms are not a substitute for property, disability, life or other
insurance of any kind. Appropriate insurance coverage is your
responsibility. Consult your insurance agent.
1-3
1-4
810-1009 AC Digital
11/13/01
11:22 AM
Page 12
Part One – Your Nighthawk CO Alarm
Part One – Your Nighthawk CO Alarm
Where to Install Your CO Alarm
Your Nighthawk CO alarm should be mounted in or near bedrooms
and living areas. It is recommended that you install a Nighthawk CO
alarm on each level of a multi-level home. You may use the number
and location of smoke alarms installed in your home according to
current building code requirements as a guide to the location of
your Nighthawk CO alarm(s).
WHEN CHOOSING YOUR INSTALLATION LOCATIONS, MAKE
SURE YOU CAN HEAR THE ALARM FROM ALL SLEEPING
AREAS. IF YOU INSTALL ONLY ONE CARBON MONOXIDE
ALARM IN YOUR HOME, INSTALL THE ALARM NEAR BEDROOMS, NOT IN THE BASEMENT OR FURNACE ROOM.
If you must install a Nighthawk CO alarm near a cooking or heating
appliance, install AT LEAST 15 feet away from the appliance.
Do not install in excessively dusty, dirty or greasy areas such as
kitchens, garages and furnace rooms. Dust, grease or household
chemicals can contaminate or coat the CO alarm’s sensor, causing the
unit not to operate properly.
Do not obstruct the vents located at the top and bottom of the CO
alarm. Place the CO alarm where drapes, furniture or other objects
do not block the flow of air to the vents.
Do not install in dead air space, such as peaks of vaulted ceilings or
gabled roofs, where carbon monoxide may not reach the sensor in
time to provide early warning.
Do not install in turbulent air from ceiling fans. Do not install near
doors and windows that open to the outside, near fresh air vents, or
anywhere that is drafty. Rapid air circulation from fans or fresh air
from outside may affect the unit’s alarm response time.
Do not install this CO alarm in a switch- or dimmer-controlled outlet.
Do not install in areas where the temperature is colder than 40˚F
(4.4˚C) or hotter than 100˚F (37.8˚C). These areas include unconditioned crawl spaces, attics, porches and garages. Extreme temperatures
will affect the sensitivity of the alarm.
Do not install CO alarm near deep cell large batteries. Large batteries
have emissions that can cause the CO alarm to perform at less than
optimal performance.
TWO SELF ADHESIVE LABELS ARE INCLUDED WITH THE CO
ALARM. ADD THE PHONE NUMBER OF YOUR EMERGENCY
SERVICE PROVIDER IN THE SPACE PROVIDED. PLACE ONE
LABEL NEXT TO THE ALARM AND ONE LABEL NEAR A FRESH
AIR SOURCE SUCH AS A DOOR OR WINDOW.
CAUTION: This CO alarm will only indicate the presence of carbon
monoxide at the sensor. Carbon monoxide may be present in other
areas.
IMPORTANT: Improper location can affect the sensitive electronic
components in this CO alarm. Please see the next section describing
where NOT to install this CO alarm.
Where Not to Install Your CO Alarm
To avoid causing damage to the CO alarm, to provide optimum
protection, and to prevent unnecessary alarms, follow the directions below where NOT to install this CO alarm:
It is not recommended that you install this CO alarm in garages,
kitchens or furnace rooms. Installation in these areas could lead to
nuisance alarms, may expose the sensor to substances that could
damage or contaminate it, or the alarm may not be heard by persons
in other areas of the home, especially if they are sleeping.
In the garage, vehicle exhaust can contain some carbon monoxide.
These levels are higher when the engine is first started. CO levels in a
garage may not be sufficient to activate the alarm immediately. Within
hours of starting a vehicle and backing it out of the garage, the levels
present over time can activate the alarm and become a nuisance.
In the kitchen and furnace room, some gas appliances can emit a
short burst of carbon monoxide upon startup. This is normal. If your
CO alarm is mounted too close to these appliances, it may alarm
often and become a nuisance.
1-5
1-6
810-1009 AC Digital
11/13/01
11:22 AM
Page 14
Part One – Your Nighthawk CO Alarm
Part One – Your Nighthawk CO Alarm
How to Install Your Alarm
Power Cord Units (KN-COP-C)
First, refer to “Where to Install Your CO Alarm” on
page 1-5 for general guidelines as to where to locate
your CO alarm.
Installation tips for power cord models:
The power cord provides more flexibility in mounting locations and allows the CO alarm to be easily
installed at eye level.
Note: If you mount the alarm high on a wall, make
sure it is at least 6" from the ceiling. Any higher than this, it will be
in “dead air space” and carbon monoxide may not reach the sensor.
Below is a list of suggested mounting locations if you wish to conceal the power cord:
• Above a tall bureau, chest of drawers or bookcase
• Above a doorway or closet, securing the cord to the side of
the molding
• Near a curtain, with the cord behind the curtain.
Note: Do not cover the alarm itself with the curtain. See additional
cautions on 1-6. Note: Plastic casing available in most hardware
stores in an inexpensive way to secure and cover the power cord.
To install:
Single-Screw Mount (for standard wall mount)–
WALL
1. Insert the screw provided until head is approx
1/8” from wall (If mounting in plaster board or
drywall, drill 3/16 hole and use plastic anchor
provided).
2. Hook the Nighthawk CO Alarm unit over the
screw onto keyhole in back of unit.
1/8"
3. Plug cord into electrical outlet.
Direct Plug Unit (KN-COP-DP)
First, refer to “Where to Install Your CO Alarm” on
page 1-5 for general guidelines as to where to
locate your CO alarm.
To install:
1. Choose a standard 120V outlet to plug alarm
into.
2. If outlet is mounted sideways (horizontally),
rotate plug and simply plug in.
CAUTION: Do not rotate unit while plugged in, as damage to plug
may result.
Minimum 6"
from ceiling
CA
M RB
ON O
OX N
ALA
ID
RM E
Black
Wires
(hot)
Reminder:
If you are mounting alarm
high on a wall, make sure
it is at least 6" from ceiling. Any higher and it will
be in “dead air” space.
Note: KIDDE Safety does not recommend mounting alarm on
ceiling as we have not tested our alarms for this type application.
1-7
Hardwire Unit (KN-COP-HW)
First, refer to “Where to Install Your CO Alarm” on page 1-5 for general
guidelines as to where to locate your CO alarm.
To install:
Double-Screw Mount with Mounting Plate
(for standard hardwire mount) –
1. Warning: All electrical installation, including
wiring should be performed by a qualified
licensed technician.
2. Turn off main power to circuit.
3. Screw mounting plate to standard outlet box using the screws
provided. Do not warp mounting plate by over tightening screws.
4. Strip wire ends approximately 5/16”. Using wire nuts provided,
attach wires from the unit to the 120V AC power source
(18 AWG minimum): white to white, black to black.
5. Feed excess wires back into outlet box.
6. Hook the unit on the 2 mounting studs in keyholes on back of unit.
7. Turn on the main power current.
Mounting
Plate
(provided)
Standard
Outlet Box
(not provided)
White
Wires
(neutral)
Nighthawk
CO Alarm
ON E
RB ID
CANOXM
O R
M ALA
Wire Nuts
(provided)
Mounting
Screws
(provided)
1-8
810-1009 AC Digital
11/13/01
11:22 AM
Page 16
Part One – Your Nighthawk CO Alarm
Part One – Your Nighthawk CO Alarm
Normal Operating Characteristics
When you first power up the CO alarm, the alarm will sound
briefly to let you know the CO alarm is receiving power and that the
alarm circuit is functioning.
You should see three eights
on the digital display, indicating
the CO alarm is in the start-up mode. The three eights will remain for
approximately 20 seconds. You should see a blinking red dot to the
lower right of the digital display. The blinking dot shows that the CO
alarm is operating. See illustration below.
Within 20 seconds, your CO alarm will start monitoring for CO, then
the first reading will appear on the digital display. The number indicates a measurement of carbon monoxide in parts per million (ppm).
Note: The number will probably be zero (0). This is a normal condition for most households and shows that no measurable amount of
CO has been detected.
The CO alarm has begun monitoring the air for carbon monoxide
and will continue to do so as long as it receives power.
For more information about CO readings and the effects of CO exposure at different levels over time, refer to the chart on 3-2 as well as
the information on pages 4-1,2,3.
When the CO alarm is unplugged or loses power, a
fading alarm will sound briefly to alert you that it has been
disconnected from its power source. For example, this fading alarm
will sound in the event of a power outage. A brief alarm will also
sound to alert you when the power is restored.
For directions on how to test your alarm, see next column.
For information about how the unit alarms, turn to page 5-2.
For information about alarm’s malfunction alert, turn to page 1-12.
How to Test Your Alarm
There are two aspects of the CO alarm’s operation that can be tested:
the electronics and the sensor response. Instructions on testing each
are outlined below and on the next page.
Testing the Electronics
You should test the alarm once a week, following the directions
listed below. If at any time you test the alarm and it does not perform as described below, have it replaced immediately. Turn to page
1-12 “How to know if your CO alarm is malfunctioning” for a
description of the characteristics of a malfunctioning alarm and what
you should do if a malfunction occurs.
Observe the CO alarm weekly to
Blinking
Dot
make sure the red dot is blinking,
indicating normal operation.
PPM of CO
If the dot is not blinking, unplug the
alarm for three minutes, then plug in again. This will clear the CO
alarm for restart. If the dot does not resume blinking, your CO alarm
may be malfunctioning.
To test the CO alarm, press the Test/Reset button. If the alarm is
operating properly, you should notice the following:
• The display shows three eights
, and then shows a
number (usually around 200). You should then hear 4 quick
beeps – followed by 5 seconds of silence – followed by 4 quick
beeps. The unit will then show the three eights for several
seconds. It will then return to monitoring for carbon monoxide.
Familiarize yourself and household members with the alarm pattern
described above. In the event of a CO incident, this pattern will continue to repeat as long as CO is present.
Three Eights
TESTRESET
PPM of CO
Move to Fresh Air
CARBON
MONOXIDE
ALARM
1-9
PEAK
LEVEL
Blinking
Dot
1-10
810-1009 AC Digital
11/13/01
11:22 AM
Page 18
Part One – Your Nighthawk CO Alarm
Part One – Your Nighthawk CO Alarm
How to Test Your Alarm (continued)
NOTE: Pressing the Test/Reset button tests the functions of the alarm’s
internal components, circuitry and micro-computer. YOU DO NOT
NEED TO PRESS THE TEST BUTTON TO TAKE A CO READING.
CO readings are automatically shown on the CO alarm’s digital display. If the alarm shows zero (0), then no measurable amount of CO
has been sensed by the CO alarm within the past 15 seconds.
Testing the Sensor Response
While it is not required, on occasion you may wish to observe and
become familiar with your alarm’s response in the actual presence of
carbon monoxide. The best and safest way to do this is with either a
cigarette or an incense stick. To perform this test you will need: your
CO alarm (that has been powered up for at least two hours), matches
or a butane lighter, an ashtray, and either a cigarette or an incense
stick.
CAUTION: Please refer to the “Frequently Asked Questions” section
for warnings on how NOT to test the sensor response.
WARNING: This test should be done by adults only. Children should
be warned never to light matches or butane lighters. Please use caution when performing the test described below. Avoid burns from
flame or hot materials. Avoid inhaling excessive smoke from the cigarette or incense stick. Extinguish all flames and properly discard all hot
materials.
Step 1. With a match or a lighter, light a single cigarette or incense
stick. Extinguish the match or lighter. Make sure an ashtray is available
to discard ashes, matches and the burned cigarette or incense stick.
Step 2. Hold the smoldering cigarette or incense stick 12 - 15 inches
directly below the bottom air vents of the CO alarm, making sure the
stream of smoke rises into the vents.
Step 3. Continue holding the cigarette or incense stick directly below
the CO alarm for 3 - 5 minutes, or until you notice a reading on the
display. This time is needed as the CO alarm samples the air every 15
seconds. Note: Do not hold the cigarette or incense stick closer than
12 inches to the CO alarm as smoke will cause a yellow stain to develop on the CO alarm’s outer case.
Step 4. If your unit alarms, you can silence it by pressing the
Test/Reset button and removing the source of CO.
Step 5. Extinguish the cigarette or incense stick by pressing the smoldering tip into the ashtray.
How to Know If Your Alarm is Malfunctioning
Your CO alarm performs an internal self-diagnosis every 15 seconds
to make sure that it is functioning properly. The CO alarm is
designed to alert you in the unusual event of a malfunction.
If the CO alarm malfunctions.
In the rare event that your CO alarm malfunctions, it will alert you
with one of these signal groups (depending upon the type of malfunction that occurs):
Malfunction Signal Group 1 - Component Failure
– An intermittent “chirping” alarm will sound every 30
seconds, and
– An “Err” message will appear on the digital display
1-11
OR,
Malfunction Signal Group 2 - Microprocessor Failure
– The alarm will sound continuously, and
– The digital display will be blank, and
– The alarm cannot be shut off by pushing the
“Test/Reset” button
Unplug the CO alarm immediately and return for warranty exchange
(see “Limited Warranty” on back two pages).
What to do if you’re not sure...
PLEASE familiarize yourself with the malfunction alert, and do not
confuse these signals with an alarm. After reading the information
above, if you are still unsure whether your CO alarm is operating
properly, call the KIDDE Safety toll-free consumer hotline at 800-8806788 to do a quick diagnostic check of the CO alarm over the phone.
The customer service representative will be able to assist you and
answer your questions.
If your alarm sounder is beeping, and you are not sure if it is a CO
alarm or a malfunction alert, reset the alarm, open windows for ventilation, turn off fuel-burning appliances (like kerosene or oil heaters,
furnaces, gas ranges, wood-burning stoves, water heaters, or other
fossil-fuel burning appliances). For furnaces, you can simply turn
down the thermostat to its lowest setting. Open windows and doors
for ventilation. Then call the KIDDE Safety toll-free consumer hotline
at 800-880-6788 for assistance.
Before you call a qualified technician (such as a licensed heating contractor, utility service technician, chimney sweep or fuel provider) to
check your residence for CO, remember that you will probably be
charged for a service call. KIDDE Safety customer service operators
are available to answer your questions and assist you in non-emergency situations at no charge.
1-12
810-1009 AC Digital
11/13/01
11:22 AM
Page 20
Part One – Your Nighthawk CO Alarm
Part One – Your Nighthawk CO Alarm
How to Know If Your Alarm is Malfunctioning (cont.)
Never ignore a CO alarm. A true alarm is an indication of potentially
dangerous levels of carbon monoxide. CO alarms are designed to
alert you to the presence of carbon monoxide before an emergency,
before most people would experience symptoms of carbon monoxide
poisoning, giving you time to resolve the problem calmly.
How to Care for Your Alarm
To keep your CO alarm in good working order, you must follow
these simple steps:
The Peak Level Memory Button
WHAT YOU SHOULD DO:
•Test the alarm once a week by pressing the Test/Reset button
•Vacuum the alarm cover once a month to remove accumulated
dust. Use the soft brush attachment of your vacuum cleaner, and
unplug the alarm from the electrical outlet before vacuuming.
•Instruct children never to touch, unplug or otherwise interfere
with the unit. Warn children of the dangers of CO poisoning.
WHAT YOU SHOULD NOT DO:
•Never use detergents or solvents to clean the alarm. Chemicals
can permanently damage or temporarily contaminate the sensor.
•Avoid spraying air fresheners, hair spray, paint or other aerosols
near the CO alarm.
•Do not paint the CO alarm. Paint will seal the vents and interfere
with proper sensor operation.
•Do not mount the CO alarm directly above or near a diaper pail,
as high amounts of methane gas can cause temporary readings
on the digital display.
Note: If you will be staining or stripping wood floors or furniture,
painting, wall-papering, or using aerosols or adhesives for a do-it-yourself project or hobby, before you begin: Remove the CO alarm to a
remote location to prevent possible damage to or contamination
of the sensor. You may wish to unplug the CO alarm and store in a
plastic bag during the project.
The following is a list of substances that at high levels can affect the
sensor and cause temporary readings on the digital display that are not
carbon monoxide readings:
Methane, propane, iso-butane, ethylene, ethanol, alcohol,
iso-propanol, benzene, toluene, ethyl acetate, hydrogen, hydrogen sulfide, sulfur dioxides.
Also most aerosol sprays, alcohol based products, paints, thinners, solvents, adhesives, hair sprays, after shaves, perfumes,
auto exhaust (cold start) and some cleaning agents.
1-13
Although the peak level feature will display levels below 30 PPM, these levels
will not result in an alarm no matter how long the device is exposed to these
levels.
The peak level feature is helpful in indentifying low level CO occurrences
below 30 PPM. Although the unit will not automatically display levels below
30 PPM, it will detect and store these readings in memory. By pressing the
peak level button, concentration levels as low as 11 and up to 999 PPM will
be displayed.
Concentrations of CO between 0 and 30 PPM can often occur in normal,
everyday conditions. Concentrations of CO below 30 PPM may be an indication of a transient condition that may appear today and never reappear. Just a
few examples of conditions and/or sources that may cause low level readings
are heavy automobile traffic, a running vehicle in an attached garage, an appliance that emits CO when starting up, a fire in a fireplace or charcoal in a
nearby barbecue. A temperature inversion can trap CO generated by traffic
and other fuel burning appliances causing low level readings of CO.
Normally, the digital display will read “0” and under certain conditions you
may notice levels of 30 or more for short periods of time, by using the peak
level memory feature on the Nighthawk CO alarm you can view concentrations of CO between 11 and 30 PPM. Use the low-level concentrations shown
in memory as a tool in identifying the source of the CO. It may be helpful to
purchase additional Nighthawk CO Alarms to place in different locations
throughout your house to isolate the CO source. Monitor the CO concentrations shown in the peak level memory to see if readings occur in certain areas
at certain times of the day, or near a particular appliance.
Once the source is located, correcting the problem may be as easy as opening
a window, venting an appliance, backing a car out of the garage a safe distance from living quarters, closing the garage door, and letting the car warm up
outside. It could be possible that a weather condition caused the low-level
reading and the condition may or may not happen again.
Some CO conditions may start out as low level leaks but could develop into
CO concentrations that could become harmful. If this happens, the CO alarm
will detect the dangerous level and alarm, notifying you and others of the
conditions. DO NOT ignore high concentration readings above 30 PPM or a
CO alarming device that is in alarm. Refer to page 4-2 for more details.
CO concentrations displayed below 30 PPM in memory are for reference only
and the accuracy of the concentration shown may not be as accurate as noted
on page 5-2.
To Reset the Peak Level Memory…
Step 1. Press the peak level button.
Step 2. With the peak level button still pressed, press the test/reset button as well.
The number on the display will turn to “0”. The memory has now been cleared
and the alarm will begin monitoring for CO within 20 seconds.
1-14
810-1009 AC Digital
11/13/01
11:22 AM
Page 22
Part Two – Carbon Monoxide The Silent Killer
Part Two – Carbon Monoxide The Silent Killer
What is Carbon Monoxide?
Carbon monoxide (CO) is an odorless, colorless, poisonous gas created when any fuel is burned – gasoline, propane, natural gas, oil,
wood, coal, and even tobacco. When combustion air is limited, more
CO is produced. Serious problems can develop when combustion
by-products are not properly vented outside the house.
You’ve probably heard about carbon monoxide poisoning in the
news recently. It’s a problem receiving more attention because
groups like the American Lung Association and the Consumer
Product Safety Commission have made it a priority to warn the public about the dangers of this deadly household poison.
What are the Effects of CO Exposure?
When you breathe carbon monoxide, it enters your bloodstream
through your lungs and attaches to red blood cells. These red blood
cells, called hemoglobin, carry oxygen throughout your body. Carbon
monoxide molecules attach to the red blood cells 200 times faster
than oxygen, preventing the flow of oxygen to your heart, brain and
vital organs. As carbon monoxide accumulates in your bloodstream,
your body becomes starved for oxygen. The amount of carbon
monoxide in a person’s body can be measured by a simple blood
test, called a “carboxyhemoglobin level” test.
The early symptoms of carbon monoxide poisoning are often mistaken for the flu – headache, dizziness, weakness, nausea, vomiting,
sleepiness, and confusion.
Breathing very high concentrations of carbon monoxide can be lethal
in minutes. Breathing low concentrations over time is dangerous, too.
Long term exposure to low levels could cause permanent heart and
brain damage.
Could Your Family be at Risk for CO Poisoning?
Carbon monoxide is the number one cause of poisoning deaths in
the United States. According to the Mayo Clinic, at least 10,000
Americans are affected by CO poisoning each year.
While anyone is susceptible, experts agree that unborn babies, small
children, senior citizens and people with heart or respiratory problems are especially vulnerable to CO and are at the greatest risk for
death or serious injury.
Where Does CO Come From?
Inside your home, appliances used for heating and cooking are the
most likely sources of carbon monoxide. Vehicles running in attached
garages can also produce dangerous levels of carbon monoxide.
A by-product of combustion, carbon monoxide can be a potential
problem from a number of common sources – automobiles,
furnaces, water heaters, fireplaces, wood stoves, charcoal grills, gas
ranges, space heaters and portable generators.
When these appliances are in good working condition with proper
ventilation, lethal carbon monoxide gas is vented outdoors where it
quickly disperses. But even the slightest malfunction or misuse of any
of these sources can lead to a build-up of carbon monoxide in your
home that can become deadly before you’d even know it’s there.
And you don’t have to have ancient appliances to have a problem.
Today’s more energy-efficient, airtight home designs can trap CO-polluted air inside where it can quickly build to lethal levels.
What Can You do to Protect Your Family?
To be safe, know the possible sources of CO in your home. Keep
fuel-burning appliances and their chimneys and vents in good working condition. Learn the early symptoms of exposure, and if you suspect carbon monoxide poisoning, move outside to fresh air and get
emergency help. A blood test can confirm that CO caused the problem.
Your first line of defense is an annual inspection and regular maintenance of your appliances. Contact a licensed contractor or call your
local utility company for assistance.
But remember, problems can begin after an inspection is over, like a
crack in a furnace heat exchanger, or a leak in a water heater vent or
a bird’s nest blocking a flue. Other sources are nearly impossible to
detect: even a change in the air pressure outside can turn a normally
safe situation deadly. That’s why you need the 24-hour protection
provided by a CO alarm.
2-1
2-2
810-1009 AC Digital
11/13/01
11:22 AM
Page 24
Part Two – Carbon Monoxide The Silent Killer
Part Two – Carbon Monoxide The Silent Killer
Home Safety Tips
What You Can Do...
•Buy only appliances approved by a nationally recognized
testing laboratory.
•Choose fuel-burning appliances that can be vented to the
outdoors, whenever possible.
•Make sure appliances are installed according to manufacturer’s
instructions and local building codes. Most appliances should
be installed by professionals and should be inspected by the
proper authority after installation.
•Have the heating system, vents, chimney and flue inspected
and cleaned by a qualified technician every year.
•Follow manufacturer’s directions for safe operation of all
fuel-burning appliances.
•Examine vents and chimneys regularly for improper connections,
visible rust or stains.
•Open a window when a fireplace or wood-burning stove is in
use, and provide adequate outdoor air for furnace and water
heater.
•Notice problems that could indicate improper appliance
operation:
– Decreasing hot water supply
– Furnace unable to heat house or runs constantly
– Sooting, especially on appliances
– Unfamiliar or burning odor
– Yellow or orange flame
•Be aware of the symptoms of carbon monoxide poisoning:
– headaches, dizziness, weakness, sleepiness, nausea, vomiting,
confusion and disorientation.
•Recognize that CO poisoning may be the cause when family
members suffer from flu-like symptoms that don’t disappear
but improve when they leave home or extended periods of
time.
•Install a UL 2034 Listed CO alarm for added safety.
– The Consumer Product Safety Commission recommends
that every residence with fuel-burning appliances be
equipped with a UL Listed CO alarm.
What You Should Not Do...
•Never burn charcoal inside a home, garage, cabin, RV or camper.
•Never install, service, or convert fuel-burning appliances from
one type to another without proper knowledge, skills and tools.
•Never use a gas range, oven, or clothes dryer for heating.
•Never operate unvented gas-burning appliances, such as
kerosene or natural gas space heaters, in a closed room.
•Never operate gasoline-powered engines (like vehicles,
motorcycles, lawn mowers, yard equipment or power tools)
in confined areas such as garages or basements, even if an
outside door or window is open.
•Never ignore a safety device when it shuts off an appliance.
•Never ignore a CO alarm.
2-3
Be Aware of the Warning Signs of Carbon
Monoxide: Clues You Can See...
•Streaks of carbon or soot around the service door of your
fuel-burning appliances.
•A yellow or orange flame may indicate a problem with natural
gas appliances.
•Excessive rusting on flue pipes or appliance jackets.
•Loose or missing furnace panel.
•Moisture collecting on the windows and walls of furnace rooms.
•Loose or disconnected vent/chimney, fireplace or appliance.
•Small amounts of water leaking from the base of the chimney,
vent or flue pipe.
•Rust on the portion of the vent pipe visible from outside your
home.
•The absence of a draft in your chimney (indicating blockage).
•Fallen soot from the fireplace chimney.
•Loose, damaged or discolored bricks on your chimney.
Clues You Cannot See...
•Internal appliance damage or malfunctioning components
•Improper burner adjustment
•Hidden blockage or damage in chimneys
2-4
810-1009 AC Digital
11/13/01
11:22 AM
Page 26
Part Three – What You Should Know
Before the Alarms Sounds
Part Three – What You Should Know
Before the Alarms Sounds
Learn the difference between dangerous levels,
high levels, mid levels and low levels:
Dangerous levels, when someone is experiencing symptoms of
CO poisoning and CO readings are generally above 100 ppm.
Anytime someone is experiencing the symptoms of carbon monoxide
poisoning this should be treated as an EMERGENCY. Follow the instructions on page 4-2.
High levels, generally above 100 ppm, with no one experiencing
symptoms. This should be treated as an URGENT situation. Follow the
instructions on page 4-2.
Mid levels, generally between 50 ppm to 100 ppm. This should be
cause for CONCERN and should not be ignored or dismissed. Follow
the instructions on page 4-2.
Low levels, generally below 50 ppm. This indicates a need to watch
the situation closely to see if it resolves itself or worsens. Follow the
instructions on page 4-3.
If anyone in the household is at high risk for CO poisoning, we urge you
to take extra precaution to prevent possible poisoning. If the unit alarms
or if CO readings are shown on the digital display, remove the at-risk
person from the premises, if possible. Ventilate the area. The high-risk
person(s) should not re-enter the residence until the source of the CO
problem has been identified and corrected.
Determine if anyone in the household is at high risk
for CO poisoning:
Many cases of reported carbon monoxide poisoning indicate that while
victims are aware they are not well, they become so disoriented they are
unable to save themselves by either exiting the building or calling for
assistance.
You should take extra precautions to protect high risk persons from
CO exposure because they may experience ill effects from carbon monoxide at levels that would not ordinarily affect a healthy adult. Are there any
infants or small children in the home? Be sure to check them for signs of
possible CO poisoning because they might have trouble explaining their
symptoms. Infants and children are more susceptible to CO poisoning
than a healthy adult.
Pregnant women should be aware that their unborn fetus could be
harmed by exposure to carbon monoxide, even when the mother suffers
no ill effect herself. Any pregnant woman who suspects she may have
been exposed to carbon monoxide should immediately contact her
physician.
Is there anyone in the household who is elderly, or who has anemia,
heart disease or respiratory problems, emphysema or chronic bronchitis?
These individuals are at higher risk for CO poisoning and for health
problems from exposure to low levels of carbon monoxide.
3-1
Understand the Effects of Carbon Monoxide Exposure
Concentration
of CO in Air
(ppm = parts
per million)
Approximate Inhalation Time
and Symptoms Developed
50 ppm
The maximum allowable concentration for continuous exposure for healthy adults in any
8-hour period, according to OSHA*.
Slight headache, fatigue, dizziness, nausea
after 2-3 hours.
Frontal headaches within 1-2 hours, life threatening after 3 hours.
Dizziness, nausea and convulsions within 45
minutes. Unconsciousness within 2 hours. Death
within 2-3 hours.
Headache, dizziness and nausea within 20 minutes. Death within 1 hour.
Headache, dizziness and nausea within 5-10
minutes. Death within 25-30 minutes.
Headache, dizziness and nausea within 1-2 minutes. Death within 10-15 minutes.
Death within 1-3 minutes.
200 ppm
400 ppm
800 ppm
1,600 ppm
3,200 ppm
6,400 ppm
12,800 ppm
* Occupational Safety and Health Administration
Low Levels:
Generally 50 ppm and below.
High Levels:
Generally 100 ppm and above
if no one is experiencing
symptoms.
Mid Levels:
Generally 50 ppm to 100 ppm.
Dangerous Levels:
Generally 100 ppm and above if
someone is experiencing symptoms.
Reminder: The chart above relates to the exposure of healthy adults.
Read the info on the previous page for descriptions of those who are at
higher risk.
3-2
810-1009 AC Digital
11/13/01
11:22 AM
Page 28
Part Four – What to do When the
Alarm Sounds
Determine if anyone in the household is experiencing symptoms of
CO poisoning. Many cases of reported CO poisoning indicates that
while victims are aware they are not well, they become so disoriented that they are unable to save themselves by either exiting the
building or calling for assistance. Also young children and household
pets may be the first affected. The following symptoms are related to
CARBON MONOXIDE POISONING and should be discussed with
ALL members of the household:
Common Mild Exposure Symptoms:
Slight headache, nausea, vomiting, fatigue (“flu-like” symptoms).
Common Medium Exposure Symptoms:
Throbbing headache, drowsiness, confusion, fast heart rate.
Common Extreme Exposure Symptoms:
Convulsions, unconsciousness, heart and lung failure.
It can cause brain damage and death.
Become familiar with these common symptoms
from CO poisoning.
If you experience even mild symptoms of CO poisoning,
consult your doctor immediately!
4-1
Part Four – What to do When the
Alarm Sounds
!
▲
WARNING: Actuation of your CO
Alarm indicates the presence of Carbon
Monoxide (CO) which can KILL YOU.
When the CO alarm senses a dangerous level of CO, the
unit will emit a loud alarm pattern. The alarm pattern is 4 short
beeps – followed by 5 seconds of silence – followed by 4 short
beeps. Know how to respond to a CO emergency. Periodically
review this user’s guide and discuss with all members of your
family.
WARNING! - Actuation of this device
indicates the presence of dangerous levels of
carbon monoxide!
Carbon monoxide can be fatal! If the alarm sounds:
1) Operate test/reset button;
PHONE NUMBER
2) Call your emergency
services (fire dept. or 911);
3) Immediately move to fresh
air - outdoors or by an open door/window. Do a head count to
check that all persons are accounted for. Do not reenter the
premises nor move away from the open door/window until the
emergency services responders have arrived, the premises have
been aired out, and your alarm remains in its normal condition.
4) After following steps 1-3, if your alarm reactivates within a 24
hour period, repeat steps 1-3 and call a qualified technician
to investigate for sources
PHONE NUMBER
of CO from fuel burning
equipment and appliances,
and inspect for proper operation of this equipment. If problems
are identified during this inspection have the equipment serviced
immediately. Note any combustion equipment not inspected by
the technician and consult the manufacturer’s instructions, or
contact the manufacturer’s directly, for more information about
CO safety and this equipment. Make sure that motor vehicles are
not, and have not been, operating in an attached garage or adjacent to the residence.
4-2
810-1009 AC Digital
11/13/01
11:22 AM
Page 30
Part Four – What to do When the Alarm Sounds
Part Four – What to do When the Alarm Sounds
LOW LEVEL READING,
UNIT WILL NOT ALARM
Calling a Qualified Technician to Find and Repair the
Problem
Unit reads below 50 ppm of carbon monoxide.
Remember to determine if anyone is at high risk for CO poisoning. If so,
you should use precaution not to expose the at-risk person to low levels
for more than eight hours.
If no one is experiencing symptoms of carbon monoxide poisoning, press the
reset button on the CO alarm. Otherwise refer to Dangerous and/or High Level
Alarms on page 4-1,2. Under normal operation the CO alarm will not display CO
concentrations detected between 11 and 29 ppm. By pressing the peak level button, you can see if any CO concentration from 11 to 999 has been detected
including low levels of 11 to 29 ppm.
Then, consider whether the following could be sources of the low CO levels:
•Cigarette smoke? Gas oven or range? Attached garage?
Fuel-burning appliances?
•Has anyone used chemicals that could affect the sensor?
(See page 1-13 or a list of chemicals that can have a temporary or
permanent affect on the sensor.)
•Has there been a temperature inversion in the area?
•Do you live in an area with air pollution or heavy traffic?
Test the alarm to verify that it is working properly, following the instructions on
page 1-10,11.
If the CO alarm appears to be functioning properly, ventilate your home and turn
fuel-burning appliances to the “off” position until the digital display returns to “0.”
Then, turn appliances back on and take note of any further readings at one hour
intervals. Note if the turning on of appliances has caused any change in CO
alarm readings.
Sometimes conditions may develop that are not caused by malfunctioning appliances or structural problems that need to be repaired. These conditions can create a temporary build-up of low CO levels that will dissipate and may not return.
(For example: weather conditions or backdrafts caused by differences in air pressure between the inside and outside of the home). This is why we suggest you
ventilate the home and then monitor to see if any CO levels reappear.
Treatment for CO Poisoning
Any person who is suspected to have carbon monoxide poisoning should leave
the potentially dangerous environment, get fresh air immediately and seek care
from a physician. CO poisoning can be determined by a simple blood test,
called a “carboxyhemoglobin” test. This test measures the amount of carbon
monoxide in the bloodstream. For this test to be accurate, it must be done
immediately after CO exposure. Acute CO poisoning is usually treated by
breathing in oxygen. When CO poisoning is severe, (for example, when there is
an altered state of consciousness), high pressure oxygen therapy in a special
“hyperbaric chamber” may be used. A physician will make this determination
and administer treatment if necessary.
4-3
If you call a qualified service technician (such as a licensed heating contractor, utility service technician, chimney sweep or fuel provider) to
inspect your home for possible sources of CO, tell the technician what the
digital readings were and have them press the peak level memory button.
This way they can see how big a problem they are dealing with. Do not
restart these appliances until the problem is corrected. Request service for
as soon as possible, like TODAY.
Please be aware that some service technicians may charge a fee to inspect
your home, even if the source of CO is not found. You may wish to find
out if you will be charged for the service and the amount of the fee before
you request service. Some public utilities do not charge for inspection.
Some service technicians do not charge if you purchased your appliance
from them. To know for sure, you need to ask before the technician
comes to your home. Repair work or replacement of appliances may be
necessary to fix the problem that is creating the CO in your home.
Remember, a CO alarm can only warn you of the presence of CO, it does
not prevent CO from occurring, nor can it solve an existing CO
problem.
Because you’ve provided ventilation by leaving your windows and doors
open, the CO buildup may have dissipated by the time help responds.
Although your problem may appear to be temporarily solved, it’s crucial
that the source of the CO is determined and appropriate repairs are made.
Sometimes it’s Difficult to Find the Source of
CO in a Home
It can be difficult for responders to locate the source(s) of CO if:
•The house was ventilated before they arrived and the fresh air
caused the CO to dissipate. The peak level function on your
Nighthawk CO alarm helps the responders know how severe
the problem was before they arrived.
•The CO problem was caused by a source that fluctuates on and
off, sometimes creating CO and sometimes not. Such a situation
makes it nearly impossible to pinpoint the source of CO in a short
period of time.
•The cause of CO problem was backdrafting – when air in a
chimney or flue is sucked into the home instead of venting
outside. The exact situation that created a negative air pressure
inside the home (the cause of backdrafting) is difficult to recreate
during an investigation for CO. Sometimes the CO problem
disappears when a door or window is opened. Backdrafting
may or may not happen again.
4-4
810-1009 AC Digital
11/13/01
11:22 AM
Page 32
Part Five – Technical Information
Power:
120V AC units: 60 Hz, Current 60 mA max.
Sensor:
Sensor calibrated at 150 ppm (±25 ppm).
Temperature:
Operating range: 40˚F (4.4˚C) to 100˚F (37.8˚C).
Mounting: Power Cord: #8 Philips panhead screw with plastic anchor.
Hardwire: 2, #8 Philips panhead screws with mounting plate.
Direct Plug-In: No mounting screws needed.
Alarm:
85+ dB at 10’ @ 3.4 ± 0.5 KHz pulsing alarm. In alarm
condition you will hear 4 quick beeps, 5seconds off, 4 quick
beeps, repeat.
LED Operation:
Blinking dot denotes normal operation.
Digital readout 30-999.
Unit Malfunction:
“Err” error message will display. Intermittent alarm will
sound every 30 seconds and display dot will stop blinking.
Refer to page 1-12 for other “Err” conditions.
Test/Reset Button:
Test button verifies proper unit operation and resets the
unit in the event of a CO alarm.
Peak Level Memory Button:
When pressed, LED will display the highest CO ppm level
detected since unit was powered up or since unit was reset
with test button. Reading will be stored in memory as long
as unit is not reset or unplugged. Any concentration detected
from 0-999 will be displayed.
Size:
5.6”L x 3.2”W x 2.0”H. Wt. 1.1 lbs.
Housing:
Rigid plastic case meets UL94-5V rating.
Warranty: Five-year warranty from date of purchase against defects in
material and workmanship.
5-1
Part Five – Technical Information
How the Unit Determines When to Alarm
Your Nighthawk CO alarm uses advanced technology to monitor the
environment in your home and warn you of unacceptable levels of
carbon monoxide. An internal microcomputer works together with
the carbon monoxide sensor inside the CO alarm to determine the
levels of carbon monoxide in the air and to calculate the rate that CO
would be absorbed into the human body.
The microcomputer is calibrated to trigger the unit’s alarm before
most people would experience any symptoms of carbon monoxide
poisoning. Because carbon monoxide is a cumulative poison, longterm exposures to low levels can cause symptoms, as well as shortterm exposures to high levels. Your Nighthawk CO alarm has a time
weighted alarm, so the higher the level of carbon monoxide present, the sooner the alarm will be triggered.
This Nighthawk CO alarm meets the alarm response time
requirements of UL Standard 2034 which are as follows:
At 70 ppm, the unit must alarm within 60-240 minutes.
At 150 ppm, the unit must alarm within 10-50 minutes.
At 400 ppm, the unit must alarm within 4-15 minutes.
WARNING: This device may not alarm at low carbon monoxide levels
(see chart above for alarm points). This product is intended for use in
ordinary indoor locations of family living units. It is not designed to
measure compliance with Occupational Safety and Health
Administration (OSHA) commercial or industrial standards. Individuals
with medical problems may consider using warning devices which provide audible and visual signals for carbon monoxide concentrations
under 30 ppm.
Accuracy of the Digital Display
Each Nighthawk CO Alarm is calibrated at a CO concentration of 150
ppm (+/- 25 ppm) in air, at 80˚ F (+/- 10˚ F) and 40% (+/- 3%) relative
humidity. Depending on the ambient condition (temperature, humidity)
and the condition of the sensor, the alarm readings may vary.
The digital reading tolerances are:
Ambient: 80˚ F (+/- 10˚ F), atmospheric pressure +/- 10%, 40% +/- 3%
relative humidity.
Tolerance
Reading
(of displayed reading)
0-999 ppm
± 20% + 15 ppm
5-2
810-1009 AC Digital
11/13/01
11:22 AM
Page 34
Part Six – Frequently Asked Questions
Part Six – Frequently Asked Questions
Q. How many alarms do I need in my house? How much
square footage will one CO alarm cover?
A. We recommend you place alarms near the sleeping area(s). If
you have a multi-level home, you should place an alarm on each
level of the home. A good rule of thumb for the number and placement of CO alarms for your particular home is to place CO alarms
near smoke alarms that have been installed to meet current building
code requirements.
Generally, one CO alarm can be adequate for 1,200 to 1,500 square
feet of living space. The most important determination for the number of alarms needed is whether an alarm can be heard in all sleeping areas.
Q. How do I get the CO alarm to show something besides “0.”
OR, How can I determine if the sensor is operating correctly?
A. Please refer to “Testing Sensor Response” on page 1-10,11 for
complete instructions on how to test your CO alarm’s electronics and
sensor functions.
Q. Can you explain what “time-weighted alarm” means?
A. Because carbon monoxide is a cumulative poison, two factors
determine how the body is affected by CO: the level of exposure
and the length of exposure. For example, being continuously
exposed to low levels of carbon monoxide for many hours can be
as dangerous as being exposed to higher levels of CO for a short
period of time.
The microchip inside your Nighthawk CO alarm monitors the air for
the presence of carbon monoxide and computes the levels and
length of exposure, alarming when you should be concerned about
CO exposure.
For more information about the alarm, see page 5-2.
Q. Do I have to press the test button to get a CO reading?
A. No. Your Nighthawk CO alarm continuously monitors the air for
carbon monoxide. An updated reading is shown on the digital display every 15 seconds. If there is no CO present, the digital display
will show a zero. The CO alarm will alert you to the presence of CO
automatically. To test the internal components and circuitry of your
CO alarm, press the Test/Reset button. For complete instructions on
testing your CO alarm, see pages 1-10,11.
Q. What happens if the power goes out?
A. If the power goes out, your CO alarm will sound a fading alarm
to alert you that power has been disconnected. When the power is
restored, the alarm will automatically reset and will sound a brief
alarm to indicate it is receiving power.
In the event of a power outage, it is important to remember never to
use alternative sources of heat indoors such as charcoal, a gas oven
or unvented space heaters. These heat sources can cause extremely
dangerous amounts of carbon monoxide.
6-1
Q. You warranty the alarm for five years. How will I know
when it doesn’t work anymore and I need to buy a new one?
A. In any event of malfunction, your CO alarm should alert you with
malfunction signals. These signals are described in detail on page 1-12.
Q. What do the numbers mean on the digital display when I
press the “Test/Reset” button?
A. The numbers you see when you press the Test/Reset button are
NOT a CO reading. This is a simulated reading the alarm displays as it
tests its electronics. The numbers displayed when the Test/Reset button
is pushed should be between 100 to 350.
Q. I called in someone to inspect my home for CO after my unit
alarmed, and he couldn’t find anything wrong. Why? Does that
mean this CO alarm “false alarmed”?
A. No. Please read the information explaining why a CO problem can
be difficult to diagnose on page 4-4. Also, please read the information
on page 1-12 to make sure you experienced an alarm and not a malfunction alert.
Q. I tried to test the CO alarm (see below) and it still reads “0.”
Why?
– by running the car in the garage
– by holding it to the tailpipe of the car
– by putting it next to the furnace vent
A. DO NOT try to test your alarm by doing any of the above! Testing
the alarm using any of the methods listed above usually does not yield
satisfactory results and could in fact be dangerous. To accurately test
the CO alarm, please follow the guidelines given on pages 1-10,11.
Never operate a vehicle in a closed garage, as high levels of CO can be
built up in a short time. With an attached garage, dangerous CO levels
develop inside the home as well as within the garage.
Attempting to test the sensor function by holding the CO alarm next to
a tailpipe or furnace vent may not cause a reading on the display
because today’s vehicles emit very little CO once the engine reaches
operating temperature. Likewise, many of today’s high efficiency furnaces emit very low levels of CO.
6-2
810-1009 AC Digital
11/13/01
11:22 AM
Page 36
Part Six – Frequently Asked Questions
Part Six – Frequently Asked Questions
Q. When I tried to test the alarm I got a high number on the
digital display, but the alarm didn’t sound immediately. Why?
A. Please refer to “How the unit determines when to alarm” on page
5-2 for an explanation of the “time weighted alarm.”
Q. My CO alarm shows a reading of 30 ppm. and then drops
immediately to “0” ppm., what causes this?
A. Per UL2034, (section 3,19) which states “Warning signal: except
for alarm and trouble signals, no other audible and visual signals
shall be used. (ie: warning signals that indicate the presence of CO
less than 30 ppm.)”. Nighthawk CO alarms cannot display CO
concentrations detected below 30 ppm. Under normal conditions,
however by pressing the peak level button, concentrations of CO
detected below 30 ppm will be displayed.
Q. How much electricity does it take to run the CO alarm?
A. The CO alarm uses less than one watt of electricity.
A typical night light uses approximately four watts.
Q. Will the CO alarm last longer if I unplug it during the summer months and only use it during the winter?
A. No. Some components of the CO alarm can deteriorate over time
if not used regularly. We recommend the CO alarm be plugged in
continuously for maximum alarm life.
Q. I use the CO alarm in a vacation home that isn’t always
occupied and can have temperature extremes when no one is
there (no heat or no air conditioning). Will that hurt the CO
alarm? Should I leave it plugged in all the time?
A. We recommend that your CO alarm not be installed in areas
where temperatures fall below 40˚F (4.4˚C) or rise above 100˚F
(37.8˚C). Your CO alarm was designed to be constantly plugged in
for maximum performance.
Q. I plugged in the CO alarm at my house (my parents’, my
neighbors’, etc.) and it read “0.” Does that mean everything is
OK? (I’m thinking I can return the CO alarm since everything
checks out OK.)
A. This CO alarm is designed to act as a continuous monitor, it is
not designed for use as a short-term testing device to perform a
quick check for the presence of CO.
Remember, a carbon monoxide problem can occur at any time,
even after a professional inspection has determined that everything
is in proper working order. Examples of problems that can develop
are a crack in a furnace heat exchanger, a leak in a water heater
vent, or a bird’s nest blocking a flue.
Other sources are nearly impossible to detect: even a change in the
air pressure outside can turn a normally safe situation deadly. That’s
why you need the 24-hour protection provided by a CO alarm.
6-3
6-4
810-1009 AC Digital
Notes
11/13/01
11:22 AM
Page 38
Limited Warranty
WARRANTY COVERAGE: THE MANUFACTURER WARRANTS TO THE
ORIGINAL CONSUMER PURCHASER, THAT THIS PRODUCT WILL BE FREE
OF DEFECTS IN MATERIAL AND WORKMANSHIP FOR A PERIOD OF FIVE
(5) YEARS FROM DATE OF PURCHASE. THE MANUFACTURER’S LIABILITY HEREUNDER IS LIMITED TO REPLACEMENT OF THE PRODUCT.
REPAIR OF THE PRODUCT OR REPLACEMENT OF THE PRODUCT WITH
REPAIRED PRODUCT AT THE DISCRETION OF THE MANUFACTURE. THIS
WARRANTY IS VOID IF THE PRODUCT HAS BEEN DAMAGED BY ACCIDENT, UNREASONABLE USE, NEGLECT, TAMPERING OR OTHER CAUSES
NOT ARISING FROM DEFECTS IN MATERIAL OR WORKMANSHIP. THIS
WARRANTY EXTENDS TO THE ORIGINAL CONSUMER PURCHASER OF
THE PRODUCT ONLY.
Warranty Disclaimers: Any implied warranties arising out of this sale, including but not limited to the implied warranties of description, merchantability
and fitness for a particular purpose, are limited in duration to the above warranty period. In no event shall the Manufacturer be liable for loss of use of
this product or for any indirect, special, incidental or consequential damages,
or costs, or expenses incurred by the consumer or any other user of this
product, whether due to a breach of contract, negligence, strict liability in tort
or otherwise. The Manufacturer shall have no liability for any personal injury,
property damage or any special, incidental, contingent or consequential
damage of any kind resulting from gas leakage, fire or explosion.
Some states do not allow limitations on how long an implied warranty lasts,
so the above limitation may not apply to you.
Some states do not allow the exclusion or limitation of consequential or incidental damages, so the above limitations or exclusions may not apply to you.
Legal Remedies: This warranty gives you specific legal rights and you may
also have other rights that vary from state to state.
Warranty Performance: During the above warranty period, your product will
be replaced with a comparable product if the defective product is returned,
postage prepaid, to KIDDE Safety, Customer Service Department, 1-800-8806788, together with proof of purchase date. Please include a note describing
the problem when you return the unit. The replacement product will be in
warranty for the remainder of the original warranty period or for six months,
whichever is longer. Other than the cost of postage, no charge will be made
for replacement of the defective product.
Important: Do not remove back cover. Back cover removal will void warranty.
Your Nighthawk Carbon Monoxide Alarm is not a substitute for property, disability, life or other insurance of any kind. Appropriate insurance coverage
is your responsibility. Consult your insurance agent.