1
Table of Contents
Your New Radio
Radio Diagram
2-3
Batteries
Rechargeable NiMH Battery
4
Using Rechargeable NiMH Battery 4
NiMH Chargers
Tri-Color LED Charger
Charging the NiMH Battery
Charging Status Chart
Single Color LED Charger
Charging the NiMH Battery
AA Alkaline Batteries
Installing Alkaline Battery Tray
Replacing Alkaline Batteries
Battery Meter
Low Battery Alert
Belt Holster
Using Radio With Holster
Before You Can Talk
Power Button
Setting the Channel
Setting the Code
Custom Codes-T289 Only
To Communicate
Monitor Button
Channel Busy Indicator-T289
Volume Control
Push-To-Talk Button
Alert Tones
6
6
6
7
7
8
9
10
10
Features
Auto Power Off
Display Light
Keypad Lock
Reset
Time-out Timer
Channel Scan
Scan List
Call Tone
Hands Free Use
Using VOX Feature
Enabling iVOX-T289 Only
Setting VOX/iVOX Sensitivity
Improving Communication
16
16
17
17
17
18
19
19
20
20
21
Talk Range
Care and Safety
Accessories
22
22
23
Troubleshooting
24-25
Safety Information
Charging Safety Instructions
Channel Chart
Code Chart
Warranty
Copyrights
26-27
28-29
30
31
32-33
34-35
11
12
12
13
13
14
14
14
15
15
Quick Operation Summary
Menu Button
Call Tone
Light/lock Button
Monitor Button
Scan Button
36
37
37
37
37
1
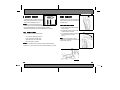
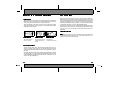
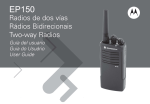
Your New Radio
Motorola Talkabout radios operate on Family Radio Service (FRS)
designated frequencies. This license-free, short range, two-way radio
service was established specifically for family and individual recreational
use. You can use your radios anywhere within the United States and other
areas listed by the FCC.
Contact the FCC for more information at:
1-888-CALL-FCC (1-888-225-5322)
Or:
http://www.fcc.gov
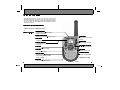
LED Indicator Light
Indicates radio is on; will be steady
red when transmitting.
Battery Meter Indicator
Scroll Buttons
Indicates how much battery charge is left.
Changes volume and radio
settings.
Power Button
Turn radio on or off.
Monitor Button
Accessory Connector
Monitors frequency activity.
Used for plugging in optional audio
accessories.
Push-To-Talk (PTT) Button
Used to transmit messages.
Scan Button
Scans frequencies for activity.
Menu Button
Call Button
Changes function mode.
Calls other radio users.
Light/Lock Button
Charging Connector*
Illuminates display for 5 seconds.
Locks radio to prevent accidental
change of settings.
*NiMH Battery Use Only
Used for charging battery.
Microphone
Picks up audible transmissions.
2
Figure 1.
3
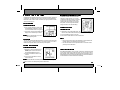
Batteries
Your Talkabout radio operates with either a Nickel-Metal Hydride (NiMH)
rechargeable battery or 3 AA alkaline batteries (battery tray required).
The NiMH rechargeable battery will provide approximately 11 hours of
operation with normal use. Normal use for the rechargeable battery is approximately 0.5 hour transmitting, 0.5 hour receiving and 10 hours of standby or
monitoring time.
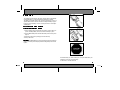
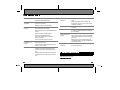
Rechargeable NiMH Battery
Figure 5.
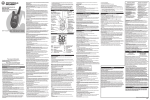
Using Rechargeable NiMH Battery:
1. Grasp radio firmly at top and slide radio back down to remove. Make sure
you are not holding battery door (sides) onto the radio body. Figure 5.
2. Place the NiMH battery inside the radio with battery contacts facing down.
Figure 6.
3. Replace the radio’s back by sliding up and onto radio body.
4. Push up until secure.
Stop Sign: The NiMH battery has a stop sign symbol to remind you to turn the
battery over and align holes with pegs before inserting battery into the radio.
Figure 7.
Figure 6.
Figure 7.
The NiMH battery kit, alkaline battery kit, and spare NiMH battery are
available as accessories (sold separately).
For information, call 1-800-353-2729.
4
5
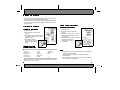
NiMH Chargers
Your radio will use one of the following types of chargers. Follow the instructions below for the charger that shipped with your radio.
To get maximum use from the battery, charge it for at least five hours before
you use it for the first time. After initial charging, your battery will fully charge
in about three hours.
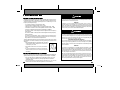
Single Color LED Charger
Tri-Color LED Charger
Charging the NiMH Battery:
Charging the NiMH Battery:
1. Turn the radio off.
2. Plug charger into an AC wall outlet.
Figure 4.
3. Lift charging connector cover on radio (not
detachable) and plug charger connector
into jack. Figure 3.
4. The red LED on charger will flash while battery charges. LED will glow
continuously when battery is
fully charged.
1. Turn the radio off.
2. Plug charger into an AC wall outlet.
Figure 2.
3. Lift charging connector cover on radio (not
detachable) and plug charger connector
into jack. Figure 3.
4. LED Indicator on Battery
Charger will flash. (See chart
below for complete charging
status).
Tri-Color LED Charger
Charging Status Chart
LED Color
Solid Red
Flashing Green
Solid Green
Flashing Red
Flashing Yellow*
Figure 2.
Figure 4.
Figure 3.
Charging Status
Rapid
Top-off
Complete
Battery Fault
Standby
Figure 3.
Completion
Up to 90%
90% to 100%
100%
______
______
*Battery is not receiving correct voltage. Battery charging temperature must remain
between 00 to 400 C / 320 F to 1040 F.
6
Notes:
• The NiMH battery may be charged outside the radio by plugging the
adapter directly into the battery.
• For optimum battery life, battery should not be left charging for
extended periods.
• Turn radio off when charging. If radio is on while charging, additional
time is required to charge the battery.
7
AA Alkaline Batteries
To operate Talkabout radios with alkaline batteries you’ll need to install the
alkaline battery tray. Alkaline batteries will last about 30 hours with normal
use. Normal use for alkaline batteries is approximately 1.5 hours transmitting,
1.5 hours receiving and 27 hours of standby or monitoring time.
Installing Alkaline Battery Tray:
1. Grasp radio firmly at top and slide radio
back down to remove. Make sure you are
not holding battery door (sides) onto the
radio body.
2. Insert 3 AA batteries into alkaline tray.
Make sure you align plus and minus signs
on batteries with markings on battery tray.
Figure 6.
3. Align tabs at top of battery tray with slots
on radio before pressing tray
into place. Figure 5.
4. Replace radio back by
sliding up and onto radio body.
5. Push up until secure.
Replacing Alkaline Batteries:
1. Insert 3 AA batteries into alkaline tray.
Make sure you align plus and minus
signs on batteries with markings on battery tray. Figure 6.
2. Replace radio back by sliding up and
onto radio body.
3. Push up until secure.
Figure 5.
Note: When batteries are low, as indicated by battery meter or low battery
alert, replace the alkaline batteries immediately to avoid interrupted use.
8
Figure 6.
The NiMH battery kit, alkaline battery kit, and spare NiMH battery are
available as accessories (sold separately).
For information, call 1-800-353-2729.
9
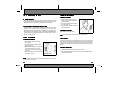
Battery Meter
Belt Holster
The Battery Meter, located on the front
display, is divided into three bars. As power is
used, the bars will disappear. Figure 7.
Talkabout radios come with a belt holster
which can be used with both the NiMH and
AA battery doors.
Note: To ensure proper functioning of the
Figure 7.
battery meter use only the Motorola NiMH rechargeable battery or
three AA alkaline batteries. The meter will not work accurately
with Nickel Cadmium (NiCad) or rechargeable alkaline AA batteries.
Low Battery Alert
When the battery is low, the radio will beep:
•
•
•
•
3 to 4 seconds after turning power on
every 10 minutes in standby mode
after releasing Push-To-Talk button
after releasing the Call button
Using Radio With Holster:
1. Position the base of the radio in bottom
portion of holster.
2. Push the radio towards the holster until
it latches into place. Figure 8.
3. To remove radio from holster, pull the top
tab on holster away from radio.
Figure 9.
Figure 8.
Note: You may find it easier to clip the
holster onto your belt before you insert radio
into the holster. Figure 10.
Note: Remove batteries before storing your radio for extended periods.
Batteries may corrode over time and cause permanent damage to your radio.
Figure 9.
Figure 10.
10
11
Interference Eliminator Codes
Before You Can Talk
Read this manual carefully. Make sure you know how to properly operate the
radio before use. Talkabout radios have 14 channels and 38 Interference
Eliminator Codes. To talk to others, all radios in your group must be set to the
same channel and code.
Power Button
Turning the Radio On:
Setting the Code
1. Press orange Power button, radio beeps
and LED Indicator Light flashes every 3
seconds to indicate radio is on. Figure 11.
2. To turn radio off, press Power button until
display clears. Radio beeps to confirm.
Note: When you turn the radio on you are in
normal operating mode.
Changing the Code
Figure 11.
Channels
You can only communicate with radios that are set on the same channel and
code. The chart on page 30 shows you channel frequencies on which
Motorola Family Radio Service (FRS) two-way radios operate.
Setting the Channel
Changing the Channel:
12
1. With radio on, press Menu button twice. The
current Code (small number) will flash. Figure 13.
2. Use Scroll buttons to select a new code.
3. Press Push-To-Talk button to set new code selection.
Figure 13.
Notes:
• The channel and code may be set sequentially. Just hit the Menu button after setting a new channel to select a new code.
• The radio will return to normal operation mode in 10 seconds or after
pressing Push-To-Talk button.
Custom Codes - T289 Only
1. With radio on, press Menu button once.
CHAN appears and current channel
(large number) will flash. Figure 12.
2. Use the Scroll buttons to select a new
channel.
3. Press Push-To-Talk button to set new
channel selection.
Note: The radio will return to normal operation
mode in 10 seconds or after pressing Push-To-Talk button.
Codes filter out static, noise and unwanted
messages on radio channels. You can only
communicate with radios using the same channel and code. Since radio channels can be
monitored, this will not make your conversations private. To avoid congested channels,
change the radio’s channel/code setting.
The T289 has the ability to save a specific code for each channel. This allows
you to change channel and codes more easily. To save a specific code for
each channel, set the channel and code per the previous instructions. Press
the Menu button once from normal operating mode and use the Scroll Buttons
to switch between selected channel and code settings.
Figure 12.
13
Push-To-Talk Button
To Communicate
Sending Messages:
Monitor Button
The Monitor button is used to check activity on current channel before transmitting.Check channel activity by pressing the Monitor button, you’ll hear
static if the channel is clear. Don’t transmit if you hear conversation.
Channel Busy Indicator - T289 Only
The T289 radio has a Channel Busy Indicator to indicate that your current
channel is in use. If another user is communicating on your channel and a
different code, the flashing CHAN indicator will appear on the display. This
visual indicator of channel activity can be used instead of the Monitor button.
To avoid interrupted conversation, wait until the channel frequency is clear or
switch to another channel.
Volume Control
1. Check channel activity by pressing
Monitor button or view Channel BusyIndicator (T289).
2. Press Push-To-Talk button and speak
into radio. Figure 15.
3. LED Indicator Light glows continuously
while transmitting.
Receiving Messages:
Release the Push-To-Talk button.
Figure 15.
Note: To maximize clarity, hold radio 2 to 3 inches from mouth.
Alert Tones
Adjusting the Volume:
The Alert Tones (beeps) on the Talkabout radios are set at a fixed volume
level and cannot be lowered. However, Alert Tones can be disabled. When
Alert Tones are disabled, the radio will receive messages at the volume
setting you’ve selected, but you will not hear beeps when you press control
buttons.
1. Turn radio on by pressing the orange
Power button.
2. Use Scroll buttons to adjust the radio’s
volume. Figure 14.
3. VOL indicator will appear and display will
show current volume level (1 to 19).
Beeps confirm volume level changes as
you scroll.
4. The radio will return to normal operation
mode after 2 seconds.
Disabling Alert Tones:
1. Hold down the Monitor button while you turn radio on.
2. To re-activate Alert Tones, turn the radio off, then on again while holding
the Monitor button down.
Figure 14.
Note: You may adjust volume by using the Scroll buttons as long as the radio
is not in Menu or Lock mode.
14
15
Features
Keypad Lock
Lock allows you to disable the Scroll, Menu,
and Scan buttons so that the radio settings
cannot be changed accidentally.
Auto Power Off
Your Talkabout can be programmed to turn itself off after a certain period of
inactivity. This feature is used to prevent unwanted battery drain.
Activating Lock Feature:
Enabling Auto Power Off:
Press and hold the Light/Lock button until
LOCK appears on the display.
1. Press Menu button six times to enter Power Off feature.
2. Use the Scroll buttons to set the number of hours, after which, the power
shuts down (1-8 hours).
Disabling Lock Feature:
Notes:
• The radio will return to normal operation mode after 10 seconds or after
you press the Push-To-Talk button. If no buttons are pressed during the
selected time interval, the radio will sound a unique tone one minute
prior to turning itself off.
• Minus sign appears on display if Auto Power Off is disabled.
Display Light
Talkabout radios have a backlit display for use in low-light conditions. Press
Light/Lock button to illuminate the display. The light will stay on for approximately five seconds.
Note: Pressing other buttons will extend the time the light stays on.
16
See Pages 36-37 for quick operation summary.
Figure 16.
Press and hold Light/Lock button until LOCK disappears.
Note: Radio emits audible tone to confirm lock and unlock feature activation.
Disabled buttons will beep if pressed (when Alert Tones are enabled).
Reset
The Reset feature returns all user programmable features back to the original
factory settings.
1. Hold down both the Monitor and Push-To-Talk buttons.
2. Turn the radio on.
Time-out Timer
The Time-out Timer feature helps extend battery life and prevents you from
accidently tying up frequencies. The radio will emit a continuous warning tone
if the Push-To-Talk button is pressed for 60 continuous seconds and radio will
stop transmitting.
17
Features
Scan List
Channel Scan
Scan allows you to monitor channels and codes of other transmitting radios.
When the radio detects channel activity, it stops scanning and locks in on the
active channel and code. It allows you to listen and talk to the person(s) transmitting without having to switch channels. To scan for radios without Interference Eliminator Codes, change your code to zero (off) before pressing the
Scan button.
Activating Scan Feature:
1. With the radio on, press the Scan button. SCAN appears on the display,
flashing.
2. When the radio detects channel activity, SCAN stops flashing and the
active channel and code are displayed.
3. To turn off the Scan feature and return to normal operation mode press the
Scan button.
Pausing on a Channel:
1. Press Monitor button to lock or hold your radio to displayed channel and
code. CHAN SCAN appears to confirm active settings.
2. To begin scanning again, press the Monitor button.
Notes:
• If Monitor button is not pressed, radio will begin scanning for active
channels 5 seconds after activity ceases.
• Radios will scan all Codes (38) on all selected channels.
Talkabout TA280 and T289 radios allow you to
select which channels are to be scanned by
turning them On or OF (off) in the Scan List
menu.
Setting the Scan List Menu:
1. Press Menu button three times to enter the
Scan List menu. SCAN appears and channel number flashes. Figure 17.
2. Use Scroll buttons to change channel.
3. Press Scan button to add (On) or delete
(OF) channels.
Figure 17.
Note: Channels which are turned OF (Off) will not be scanned.
Call Tone
Talkabout radios have multiple unique Call
Tones to identify sender and alert receiver. The
TA280 has 5 call tones, while the T289 has a
total of 10. Press the Call button and users on
your channel and with your code setting will be
alerted with your Call Tone.
Changing and Hearing Call Tones:
1. With radio on, press Menu button four times
to enter Call Tone menu. CALL appears
and Call Tone number is displayed.
Figure 18.
2. Use Scroll buttons to change and hear the CallTones.
Figure 18.
Notes:
• When Alert Tones are disabled you will not hear CallTone beeps when
transmitting, but you will hear them while receiving.
• The radio will return to normal operation mode in 10 seconds or after
pressing Push-To-Talk button.
18
See Pages 36-37 for quick operation summary.
19
Hands Free Use
Resetting To Push-To-Talk Mode:
Talkabout radios have built-in Voice Operated Transmission (VOX) capability.
This means the sound of your voice activates transmission when the radio is
used with VOX accessories (sold separately).
The T289 also has iVOX (Internal Voice Operated Transmission), which allows
you to use the radio hands free without an accessory in place. Read the instructions below to activate the iVOX feature.
Using VOX Feature
1. Press Push-To-Talk button once. The VOX display will disappear.
2. To transmit, press Push-To-Talk button on radio. To receive, release the
Push-To-Talk.
Notes:
• To return to iVOX mode follow instructions above.
• To return to VOX mode, turn the radio off, then on again with the
accessory in place.
Setting VOX/iVOX Sensitivity
Enabling VOX:
Talkabout radios allow you to adjust VOX sensitivity of radio to compensate for varying levels of
background noise.
1. With radio on, press Menu button five times
to enter VOX sensitivity mode.
2. VOX will appear on display along with the
current VOX setting. Figure 20.
3. Use Scroll buttons to select level.
1. With radio off, plug accessory connector into
jack on left side of radio. Figure 19.
2. Turn radio on.
3. Lower volume with Scroll button before placing accessory on head or in ear. VOX
appears on display to indicate VOX is active.
4. To transmit, speak into accessory microphone.
To receive, stop talking.
Figure 19.
Enabling iVOX - T289 only
1. Turn the radio on with the Push-To-Talk depressed to arm the iVOX feature.
2. To activate, quickly press the Push-To-Talk button. The VOX indicator will
appear on the display to indicate that the iVOX feature is active.
3. To transmit, speak into radio microphone. To receive, stop talking.
Note: There will be a brief delay between when you start/stop talking and
radio transmission time. If you press the Push-To-Talk button, you will disable
the VOX/iVOX feature.
20
See Pages 36-37 for quick operation summary.
Three Sensitivity Levels:
1 = Low sensitivity for high levels of background noise.
2 = Medium sensitivity for use in most applications.
3 = High sensitivity for low levels of background noise.
Figure 20.
Notes:
• The radio will return to operation mode after 10 seconds or after you
press the Push-To-Talk button.
• When using audio accessories, radio volume should be kept at a comfortable listening level. Before you place the audio accessory on your
head or in your ear, turn down the volume.
• When using iVOX, sensitivity level 3 is recommended.
21
!"#
Accessories
Talk Range
With the audio and carrying accessories (sold separately) available for
Talkabout radios, you’ll be able to receive incoming messages in privacy with
an Earbud or Flexible Ear Receiver. With a Speaker Microphone or an Earbud
with Push-To-Talk Microphone, you’ll enjoy the convenience of being able to
talk and listen without reaching for your radio. Use your radio hands free with
a headset with swivel boom mic or an ultra lightweight headset.
We’ve also got a selection of cases perfect for all your radio transport needs.
Whether it’s an Arm Pack, Belt Case, or Waterproof Bag, Motorola has a great
carrying case for you! For information contact place of purchase or call
Motorola at:
Talkabout radios have been designed to maximize performance and improve
transmission range in the field. It is recommended that you do not use the
radios closer than 5 feet apart because of heavy interference.
Talk range depends on the terrain. These are line of sight radios and talk
range will be affected by concrete structures, heavy foliage and operating
radios indoors and in vehicles.
1-800-353-2729
45 1)5 5 Talk range in flat, open
areas, up to 2 miles.
Range is decreased when
buildings and trees are in
the way.
Dense foliage or
mountains can limit range.
/ When using audio accessories, the radio’s volume should be kept at a
comfortable listening level. Before you place the audio accessory on your
head or in your ear, turn down the volume.
Care and Safety
To clean the radio, wipe with a soft cloth dampened with water. Don’t use
cleaners or solvents on the radio, they can harm the body and leak inside,
causing permanent damage. Battery contacts may be wiped with a dry, lintfree cloth.
If the radio gets wet, turn it off and remove batteries immediately. Dry battery
compartment with a soft cloth to minimize potential water damage. Leave
cover off the battery compartment overnight or until completely dry. Do not
use the radio until completely dry.
Troubleshooting
No Power
Reposition or replace alkaline batteries.
Recharge or replace NiMH battery.
Message Not
Transmitted
Confirm radios have the same Channel and Interference Eliminator Code settings.
Channel/Code Locked
Make sure radio is unlocked. See page 17 for more
information.
Low Batteries
Recharge NiMH battery or replace alkaline batteries. Extreme operating temperatures will affect the
life of the battery.
Charger LED Double
Flashing
Charger pin is not properly in place. Check to
make sure the charger pin is fully inserted into the
radio. If so, allow the radio to charge until the LED
glows solid.
Make sure Push-To-Talk is not inadvertently being
pressed.
Reposition, replace or charge batteries.
Obstructions, operating indoors or in
vehicles may interfere with communication.
Change your location.
Battery power is very low; double flashing indicates that the battery is charging up slowly before
it starts to quick charge.
Check to make sure volume is turned up.
Hearing Other Noise Or
Conversation on a
Channel
Confirm Interference Eliminator Code is set,
(active settings are 1-38).
Limited Talk Range
Steel/concrete structures, heavy foliage and use in
buildings and in vehicles will decrease range,
check for clear line of sight to improve transmission.
Shared Channel or Interference Eliminator Code
may be in use, try another.
Wearing radio close to body such as in a pocket or
on a belt will decrease range, change location of
radio.
Radios too close. Radios must be at least 5 feet
apart.
Radios too far apart. Obstacles interfere with
transmission. Talk range is up to 2 miles in clear,
unobstructed conditions.
Make sure the Push-To-Talk button is completely
pressed as you transmit.
Reposition, replace or charge batteries.
Message Not
Received
Heavy Static or
Interference
Can not Activate iVOX
(T289 only)
Feature not armed. Follow instructions on page 20
to arm and activate iVOX.
Motorola Product Services
If the radio still doesn’t work properly, contact your place of purchase or call
Motorola Product Services at:
1-800-353-2729
!
Safety Information
&;) # 1 8<)
&
! CAUTION
Damaged Antennas
The design of your Motorola two-way radio, which generates radio frequency (RF) electromagnetic energy (EME), is designed to comply with the following national and international standards and guidelines regarding exposure of human beings to radio
frequency electromagnetic energy:
• FCC Report and Order FCC 96-326 (August, 1996)
• American National Standards Institute (C95-1 - 1992)
• National Council on Radiation Protection and Measurements (NCRP - 1986)
• International Commission on Non-Ionizing Radiation Protection (ICNRP - 1986)
• European Committee for Electrotechnical Standardization (CENELEC)
-Env. 50166 - 1 1995E - Human Exposure to Electromagnetic Fields Low Frequency
(0 Hz to 10 kHz)
-Env. 50166 - 2 1995E - Human Exposure to Electromagnetic Fields High Frequency
(10 kHz to 300 kHz)
-Proceeding of SC211/8 1996 - Safety Considerations for Human Exposure to
E.M.F’s from Mobile Telecommunications Equipment (M.T.E.) in the Frequency
Range 30 MHz - 6 GHz (E.M.F.-Electromagnetic Fields)
To assure optimal radio performance and to ensure that exposure to RF energy is within
the guidelines in the above standards, the following operating procedures should be
observed:
• When transmitting with a two-way portable radio, hold radio in
a vertical position with its microphone 2-3 inches (5.0 to 7.5
cm) away from your mouth.
• Keep antenna at least 1 inch (2.5 cm) from your head and
body.
• If you wear a portable radio on your body, ensure that the
antenna is at least one inch (2.5 cm) from your body when
transmitting.
Do not use the radio with a damaged antenna. If a damaged antenna comes in
contact with the skin, a minor burn may result.
&
5
.
"5
Note: Areas with potentially explosive atmospheres are often, but not always,
clearly marked. They include fuelling areas such as below deck on boats, fuel or
chemical transfer or storage facilities; areas where the air contains chemicals or
particles, such as grain, dust, or metal powders; and any other area where you
would normally be advised to turn off your vehicle engine.
Nearly every electronic device is susceptible to electromagnetic interference (EMI) if inadequately shielded, designed or otherwise configured for electromagnetic compatibility.
• Turn your radio OFF in any facilities where posted notices instruct you to do so.
Hospitals or health care facilities may be using equipment that is sensitive to
external RF energy.
• Turn your radio off when on board aircraft when instructed to do so. Any use of the
radio must be in accordance with airline regulations or crew instructions.
+
Batteries
All batteries can cause property damage and/or bodily, injury or burns if a
conductive material such as jewelry, keys or beaded chains touches exposed
terminals. The material may complete an electrical circuit (short circuit) and become
quite hot. Exercise care in handling any charged battery, particularly when placing
it inside a pocket, purse or other container with metal objects.
! WARNING
For Vehicles With an Air Bag
Do not place a portable radio in the area over an air bag or in the air bag deployment
area. Air bags inflate with great force. If a portable radio is placed in the air bag
deployment area and the air bag inflates, the radio may be propelled with great
force and cause serious injury to occupants of vehicle.
Potentially Explosive Atmospheres
Turn your radio OFF when in any area with a potentially explosive atmosphere,
unless it is a type especially qualified for such use (for example, Factory Mutual
Approved). Sparks in such areas could cause an explosion or fire resulting in bodily
injury or even death.
Batteries
Do not replace or charge batteries in a potentially explosive atmosphere. Contact
sparking may occur while installing or removing batteries and cause an explosion.
To avoid possible interference with blasting operations, turn your radio OFF near
electrical blasting caps or in a “blasting area” or in areas posted: “Turn off two-way
radio”. Obey all signs and instructions.
*
Charging Safety Instructions
SAVE THESE INSTRUCTIONS
Before using the battery charger, read all instructions and cautionary
markings on,
(1) the battery,
(2) battery charger, and
(3) the radio using the battery.
6 , (
To reduce the risk of injury, charge only the rechargeable batteries listed. Other types of batteries may
burst, causing personal injury and damage.
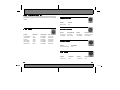
Single-Unit Charger
Kit Number
Description
NTN8871
110V - NiMH Charging Adapter
NTN9150
110V - NiMH Charging Adapter
Batteries
Kit Number
Capacity in milliampere-hour mAH/
Description/Composition
HNN 9720
750 mAH/T289, TA270/280 SLK/NiMH
/
1. Do not expose the charger to rain or snow.
2. Do not operate the charger if it has received a sharp blow, or has been
dropped or damaged in any way.
3. Do not disassemble the charger. If it does not work properly return it to the
point of purchase if within 90 days of purchase. Incorrect reassembly
may result in a risk of electric shock or fire.
4. Never alter the AC cord or plug provided with the unit. If plug will not fit the
outlet, have proper outlet installed by a qualified electrician. An improper
condition can result in a risk of electric shock.
5. To reduce risk of damage to cord or plug, pull by the plug rather than the
6. cord when disconnecting charger from AC receptacle.
7. To reduce the risk of electric shock, unplug the charger from the outlet
before attempting any maintenance or cleaning.
8. Use of an attachment not recommended or sold by Motorola may result in
a risk of fire, electric shock, or personal injury.
9. Make sure that the cord is located so that it will not be stepped on, tripped
over, or subjected to damage or stress.
10. An extension cord should not be used unless absolutely necessary. Use
of an improper extension cord could result in a risk of fire and/or electric
shock. If an extension cord must be used, make sure:
• That the pins on the plug of the extension cord are the same
• Number, size, and shape as those on the plug of the charger.
• That the extension cord is properly wired and in good electrical condition, and
• That the cord size is 18 AWG for lengths up to 100 feet, and 16 AWG
for lengths up to 150 feet.
11. The supply cord of this charger cannot be replaced. If the cord is damaged, the charger should be discarded or returned to the point of purchase if within 90 days of purchase.
0
-9 #
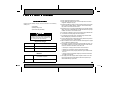
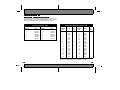
! " # The channel/frequency and Interference Eliminator Code charts on these
pages provide frequency and code compatibility information.These charts are
useful when usingTalkabout two-way radios with other two-way radios.
Channel Frequency Chart
Channel
1
2
3
4
5
6
7
MHz
462.5625
462.5875
462.6125
462.6375
462.6625
462.6875
462.7125
Channel
8
9
10
11
12
13
14
Interference Eliminator Code Chart
MHz
467.5625
467.5875
467.6125
467.6375
467.6625
467.6875
467.7125
Talkabout
Code
Hz Freq
1
2
3
4
5
6
7
8
9
10
11
12
13
14
15
16
17
18
19
67.0
71.9
74.4
77.0
79.7
82.5
85.4
88.5
91.5
94.8
97.4
100.0
103.5
107.2
110.9
114.8
118.8
123.0
127.3
7/7x
Code
A
B
C
D
E
F
Talkabout
Code
Hz Freq
20
21
22
23
24
25
26
27
28
29
30
31
32
33
34
35
36
37
38
131.8
136.5
141.3
146.2
151.4
156.7
162.2
167.9
173.8
179.9
186.2
192.8
203.5
210.7
218.1
225.7
233.6
241.8
250.3
7/7x
Code
G
/ Carrier Squelch (0) disables Interference Eliminator Codes. This
allows you to monitor all activity on the channel you are using.
3
1 YEAR LIMITED WARRANTY
Motorola, Inc. warrants the enclosed product against defects in material and workmanship under normal use and service for one (1) year provided it is returned in accordance
with this warranty. If defective, the product will be repaired or replaced at Motorola’s
option, at no charge, with dated proof of purchase. This warranty does not cover defects
or damage resulting from: misuse, improper operation, unauthorized modification, liquid,
batteries, or normal wear and tear.
MOTOROLA IS NOT LIABLE FOR DAMAGES IN EXCESS OF THE PURCHASE PRICE OF
THE PRODUCT, FOR ANY INCIDENTAL OR CONSEQUENTIAL DAMAGES ARISING OUT
OF THE USE OR INABILITY TO USE SUCH PRODUCT, TO THE FULL EXTENT SUCH MAY
BE DISCLAIMED BY LAW. THE IMPLIED WARRANTIES OF MERCHANTABILITY AND
FITNESS FOR A PARTICULAR PURPOSE ARE LIMITED TO THE DURATION OF THIS
LIMITED WARRANTY. HOWEVER, SOME STATES DO NOT ALLOW LIMITATIONS ON
INCIDENTAL OR CONSEQUENTIAL DAMAGES, OR LIMITATION ON HOW LONG AN
IMPLIED WARRANTY LASTS, SO THE ABOVE LIMITATION MAY NOT APPLY TO YOU. THIS
WARRANTY GIVES YOU SPECIFIC LEGAL RIGHTS, AND YOU MAY HAVE OTHER RIGHTS
WHICH VARY FROM STATE TO STATE.
& 3/ FCC Information: Changes or modifications not
expressly approved by Motorola may void the user’s authority granted by the FCC to
operate this radio and should not be made. To comply with FCC requirements, transmitter
adjustments should be made only by or under the supervision of a person certified as
technically qualified to perform transmitter maintenance and repairs in the private land
mobile and fixed services as certified by an organization representative of the users of
those services. Replacement of any transmitter component (crystal, semiconductor, etc.)
not authorized by the FCC equipment authorization for this radio could violate FCC rules.
8 5 1 $/33$!$*0
Copyright Information: The Motorola products described in this manual may include
copyrighted Motorola programs stored in semiconductor memories or other media. Laws
in the United States and other countries preserve for Motorola, certain exclusive rights for
copyrighted computer programs, including the exclusive right to copy or reproduce in any
form, the copyrighted Motorola programs. Accordingly, any copyrighted Motorola
computer programs contained in the Motorola products described in this manual may not
be copied or reproduced in any manner without the express written permission of
Motorola. Furthermore, the purchase of Motorola products shall not be deemed to grant
either directly or by implication, estoppel, or otherwise, any license under the copyrights,
patents or patent applications of Motorola, except for the normal non-exclusive royalty
free license to use that arises by operation of law in the sale of a product.
The Motorola equipment described in this manual may include copyrighted Motorola
computer programs stored in semiconductor memories or other media. Laws in the
United States and other countries preserve for Motorola certain exclusive rights for copyrighted computer programs, including the exclusive right to copy or reproduce in any
form the copyrighted computer program. Accordingly, any copyrighted Motorola
computer programs contained in the Motorola equipment described in this manual may
not be copied or reproduced in any manner without the express permission of Motorola,
Inc. Furthermore, the purchase of Motorola equipment shall not be deemed to grant either
directly or by implication, estoppel, or otherwise any license under the copyrights, patents or patent applications of Motorola, except for the normal nonexclusive, royalty free
license to use arising by operation of law in the sale of this product.
This product is covered by one or more of the following United
States Patents:
5896277
5894592
5894292
5893027
5864752
5789098
5699006
5734975
5742484
5861850
D408396
D395882
D399821
D383745
D387758
D389827
D389158
D389139
!
:% (' ""
To make it easier for you to learn how to use your two-way radio, we’ve
included this quick reference guide to the button functions of your Talkabout
radio(s).
Function
Call Tone Alert
*% Function
Channel Selection
Code Selection
Scan List
Call Tone Alert
VOX Sensitivity
Auto Power Off
Press Call
Once
Press Menu
Once
2 times
3 times
4 times
5 times
6 times
To Change Use
Scroll Buttons
Scroll Buttons
Scan Button
Scroll Buttons
Scroll Buttons
Scroll Buttons
Press To Set
Push-To-Talk
Push-To-Talk
Push-To-Talk
Push-To-Talk
Push-To-Talk
Push-To-Talk
Function
Turn On Light
Lock Keypad
Press Light/Lock
Press Once
Press and Hold
Function
Turn Off Light
Unlock Keypad
Press Light/Lock
Time Out, 5 seconds
Press and Hold
Function
Check Channel Activity
Press Monitor
Once
Function
Turn On Scan
+
Press Scan
Once
Function
Turn Off Scan
Press Scan
Once
*
Notes:
/
0
Notes:
, Motorola and Talkabout are registered trademarks of Motorola, Inc.
3