1
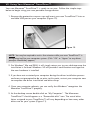
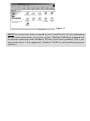
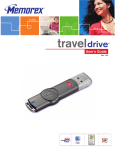
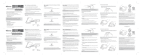
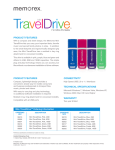
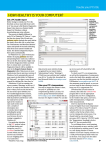
Rev. 2.0C
Thank you for purchasing the Memorex® TravelDrive™ USB 2.0. This user's guide
will help you get the maximum use and enjoyment from your new TravelDrive.
I. Description
The Memorex® TravelDrive™ is a portable storage device utilizing a plug-and-play
USB (Universal Serial Bus) interface that allows it to function as if it were an external hard drive. Based on USB 2.0 standards, the TravelDrive™ is useable in either
an available USB 1.1 or 2.0 port. Your computer easily recognizes the TravelDrive™
once it is inserted into your USB connection. You can drag and drop files to or
from the TravelDrive™ just as you would to a floppy disk or a hard drive with the
added benefit of a faster, far more secure and portable data storage solution than
most other previous alternatives.
II. System Compatibility:
The Memorex® TravelDrive™ can be used with any computer that has either a USB 2.0
or 1.1 port. The TravelDrive™ has the following minimum system requirements:
•
•
•
•
•
•
+
Pentium PC or Apple Macintosh Computer with USB Support
PC - Windows® 98SE*(Second Edition) or later - Windows® Me / 2000 / XP
Linux 2.4.x (Please see Memorex website under FAQ's for Mounting on Linux)
Mac OS 8.6 or above
Available USB 2.0 (for High Speed) or USB 1.1 port
Internet Connection* (Windows® 98SE only)
System Requirements and Specifications are subject to change without notice.
III. Contents:
Your Memorex® TravelDrive™ Kit includes:
1. Memorex® TravelDrive™
2. TravelDrive™ QuickStart Guide
3. Lanyard Carrying Strap
IV. Memorex® TravelDrive™ Features:
The Memorex® TravelDrive™ was designed to provide convenient, easy to carry
transportable data storage for important files, music, video or photos wherever
you go. Some of the key features are:
• USB 2.0 compliance for the fastest
data transfer speeds-up to 10 times
faster than USB 1.1
• Backward compatibility for use with
computers installed with USB 1.1
ports.
• No moving parts, providing safer,
more secure and reliable storage
than most other portable storage
solutions.
• No specific hardware requirements
for use on most computer systems.
Uses standard USB port available on
most computers today and requires
no driver installation (except
Windows® 98SE) for use. Just plug in
and go.
* Windows 98SE requires windows drivers
available as a download from the Memorex
website. See detailed instructions under
section VI. of this document.
• Works between both PC and
Macintosh platforms. Allows
convenient swapping of files from
either system platform (FAT and FAT32
file systems only).
• No batteries or power adapters
required. USB port power driven.
• Snap-on cap offers protection of the
USB connector from damage or the
elements when not in use.
• LED power indicator and activity
monitor lets you know that the drive
is active to assure safe data
transfers.
• External Write / protect switch to
prevent accidental erasure of
valuable data.
V. Getting Started:
Check your Operating System (OS):
• For Windows® Me, Windows® 2000 & Windows® XP
There is no need to install any software or drivers! Go straight to section VII.
Using Your TravelDrive™ below and follow the instructions to begin using
your TravelDrive™.
• For Windows® 98SE
You will need to install a driver for the computer to recognize the TravelDrive™.
See section VI. Windows® 98SE Driver Installation below.
• For Windows® NT
NT does not support USB. The TravelDrive™ is not supported in this OS.
• For Windows® 98 or older
Windows® operating systems prior to Windows® 98SE do not have adequate
USB support, and therefore the TravelDrive™ is not supported with those
operating systems. TravelDrives are not useable in PC's running Windows 98
or older operating systems.
VI. Windows® 98SE Driver Installation:
(Internet Access Required)
If your computer uses Windows® 98 SE as its operating system, you must install a
driver for your Memorex® TravelDrive™. The driver required is available for download if you have Internet access. The required file is titled "USB TravelDrive™
Version C Driver" and is located on the Memorex website at
www.memorex.com/service_support/software.php. Follow the steps below to
download and install the Version C driver:
NOTE: Do not insert your TravelDrive™ into your USB port until steps 1 through 12
below have been completed successfully.
1. Turn on your computer and wait for the Windows® desktop to appear.
2. Close any applications you may have running.
3. Download the necessary driver by launching your Internet browser and insert
the following web address located on the Memorex website:
www.memorex.com/service_support/software.php.
• Select SOFTWARE DOWNLOADS, then USB TRAVELDRIVES.
• Click on DOWNLOAD under TravelDrive Driver C. Read the license
agreement and if you agree to the terms, click on I AGREE AND WISH TO
PROCEED WITH THE DOWNLOAD.
• When the download dialogue box appears, click on SAVE.
• Choose or create a folder on your hard drive in which you want to save the
downloaded driver. You will need to install the driver from this folder after it
has been downloaded.
• When the download is complete, click CLOSE from the dialogue box and exit
the website.
• Click on the zipped file; it will automatically open up the software.
• When prompted, save the unzipped version to the same folder you chose to
save the downloaded file.
Installing Driver 2C
4. Go to the folder in which you saved the driver and double-click on the Setup
icon to open up the installation (Figure 1).
Figure 1
5. A Welcome dialogue box will appear to guide you through the installation of
the drivers (Figure 2). Click on NEXT.
Figure 2
6. The License Agreement will now appear on your display. Click Yes to agree
to the terms of the agreement and continue the software driver installation
(Figure 3).
Figure 3
7. Click NEXT to install the Software Driver in the recommended folder
C:\Memorex\TravelDrive2C (Figure 4).
Figure 4
8. Click NEXT to confirm and to begin installing the drivers onto your system
(Figure 5).
Figure 5
9. An information window (Figure 6) "Please remove TravelDrive 2C if inserted"
will now appear on your display. Remove the TravelDrive if it is currently
inserted into your USB port and click OK to continue.
Figure 6
10. A Setup Status screen will now display the installation process, this may
require a moment to complete, followed by a dialogue box requiring to
restart your computer (Figure 7).
Figure 7
11. Restarting your computer is recommended, choose "Yes, I want to restart
my computer now" and click on Finish to complete the driver installation
process. Click on Finish again to reboot your computer (Figure 8).
Figure 8
Figure 9
12. After rebooting your computer, your Memorex® TravelDrive™ is now ready to
use. When you insert it into a USB port, your computer will identify the
drive, find the driver, and automatically build it into the computer's driver
database.
VII. Using Your Memorex ® TravelDrive™:
Your new Memorex® TravelDrive™ is ready to use now. Follow the simple steps
below to begin using your new portable storage device:
1. Remove the protective snap-on cap and insert your new TravelDrive™ into an
available USB port on your computer (Figure 10).
Figure 10
NOTE: You may be required to wait a few minutes while your new TravelDrive™ is
configuring itself to your computer system. (Click “OK” or “Agree” to any driver
prompts should they appear).
2. For Windows® Me and 2000, it will simply return you to your desktop once the
installation is finished. Windows® XP will provide a confirmation message that
the new hardware is installed.
3. If you have not restarted your computer during the driver installation process
and were not prompted to do so prior to this point, restart your computer now
to complete the driver installation and drive setup.
4. Once your computer reboots, you can verify that Windows® recognizes the
Memorex TravelDrive™ properly.
5. At the desktop screen double-click on "My Computer." The Memorex®
TravelDrive™ should appear as a "Removable disk" icon. The actual drive
letter assigned to your TravelDrive™ will vary depending on how many other
drives are on your system (Figure 11).
Figure 11
NOTE:The actual drive letter assigned to your TravelDrive™ will vary depending
on how many other drives are on your system. (Multiple USB drives plugged into
a computer operating under Windows® 98 may cause some problems, that is just
one reason why it is not supported. Windows® 98 SE has resolved these types of
conflicts.)
VIII. Standard Operation:
Write Protection Switch
Protective Snap-on Cap
LED Power and Activity Monitor
A) Microsoft Windows®
1. Remove the protective snap-on cap. The cap was designed with a keyhole to
attach to the lanyard carrying strap for easy transport of your TravelDrive™ and
safekeeping of your drive.
2. Insert the TravelDrive™ into a USB port on your computer. The green LED
Power and Activity Monitor will light up to confirm that the drive is powered.
3. Double-click on the "My Computer" icon on your desktop, and then double-click
on the "Removable Disk" icon.
4. You can now save, copy, or delete files to the TravelDrive™ just as you would to
a hard drive or a floppy disk. The LED Power and Activity Monitor will flash
quickly when data is being transferred to or from the TravelDrive™.
5. Always wait for the LED to stop blinking and make sure no open files or other
applications are currently using your TravelDrive™ before attempting to remove
it from the USB port.
a. For Windows® Me/2000/XP, select the TravelDrive™ in the drive listing
under "My Computer" and right click to bring up options.
b. Selecting "Eject" from the drop-down menu will also safely remove the
drive
c. For Windows® 98 SE, you merely have to unplug the TravelDrive™ from the
USB port or USB connector cable to safely remove it.
6. Before removing the TravelDrive™ in Windows® Me, 2000 or XP, you can also
click on the "Unplug or Eject Hardware" icon in the lower right task bar on your
computer screen. (Figure 12). Select "Stop USB Mass Storage Device" with the
correct drive letter assigned to your TravelDrive™. Unplugging the device
without Stopping it or Ejecting it properly can cause your computer to become
unstable.
Figure 12
IMPORTANT NOTE: Do not remove the TravelDrive™ while the LED is flashing!
Interrupting the data flow while the LED is flashing will corrupt existing data that is
being transferred as well as possibly other data stored on the drive. You may also
lose access to your drive and your ability to retrieve any files stored on the
TravelDrive™. Once the LED Stops blinking, the data transfer operation is complete;
and it is safe to remove your drive.
B) Apple Macintosh
1. Remove the protective snap-on cap. The cap was designed with a keyhole to
attach to the lanyard carrying strap for easy transport of your TravelDrive™ and
safekeeping of your drive.
2. Insert the TravelDrive™ into a USB port on your computer. The green LED Power
and Activity Monitor will light up to confirm that the drive is powered.
3. Click on the "Untitled" drive icon once the TravelDrive™ has been successfully
mounted on your Mac OS Desktop (Figure 13).
Figure 13
4. You can now save, copy, or delete files to the TravelDrive™ just as you would to a
hard drive or a floppy disk. The LED Power and Activity Monitor will flash quickly
when data is being transferred to or from the TravelDrive™. Do not remove the
TravelDrive™ while the LED is flashing! Interrupting the data flow while the LED
is flashing will corrupt existing data, and you may not be able to retrieve any files
stored on the TravelDrive™. Always wait for the LED to stop blinking, this will
indicate when the data transfer operation is complete.
5. Before removing the TravelDrive™, drag its icon over to the Trash icon. Then
unplug the TravelDrive™ from its USB port once the icon is not visible on your Mac
OS Desktop.
IMPORTANT NOTE: Do not remove the TravelDrive™ while the LED is flashing!
Interrupting the data flow while the LED is flashing will corrupt existing data that is
being transferred as well as possibly other data stored on the drive. You may also
lose access to your drive and your ability to retrieve any files stored on the
TravelDrive™. Once the LED Stops blinking, the data transfer operation is complete;
and it is safe to remove your drive.
C) Using the TravelDrive™ Features:
1. Write Protection Switch
position prevents
Sliding the write protection switch to the left or "lock"
any data writing or accidental erasure of critical files. Sliding the switch back to
the right or "unlock"
position allows data to be written to or changed from
the USB TravelDrive™.
2. LED Power and Activity Monitor
When the green LED is lighted, the TravelDrive™ is powered and recognized
by your computer. When the LED is flashing, that means that data are being
transferred to or from your drive. Always wait until the LED stops flashing
before removing the TravelDrive™! Removing the drive while the LED is
flashing risks corrupting the data files and losing access to any other files on
the drive.
3. Lanyard Carrying Strap
To attach your Lanyard to your TravelDrive™, remove the portion with the
small thin nylon strap by depressing each side of the connector. Once you
have removed this connector, slide the small nylon loop thru the cap keyhole
and insert the connector end thru the middle of the nylon loop. Reattach the
connector to the main strap line of the Lanyard.
IX. Troubleshooting:
Troubleshooting:
1. The green Power and Activity LED does not light.
This means the TravelDrive™ is not receiving power from the USB port. Check to
see if the computer recognizes the device as attached and active. In Windows®,
double-click the "My Computer" icon to bring up a list of active drives. If your
TravelDrive™ does not appear there, unplug the device and reboot your computer.
Insert the drive again after rebooting. Windows® 98 SE users may have to reinstall
the drivers. For all other operating systems, repeat steps listed in section VII: Using
Your TravelDrive™.
2. The TravelDrive™ appears to be full, but I can't find any files on it.
The files may have been corrupted if data were interrupted during a transfer,
either by too early a removal or by a power interruption. Restart your computer
and attempt to access your drive. Otherwise, you may need to attempt using some
recovery software to possibly rescue some files on your TravelDrive™. At this time,
Memorex does not have any specific software that it can endorse or support to
perform this operation. If this operation is not required or the files on your drive
are not needed, you will have to reformat your TravelDrive™ to regain its
functionality.
IMPORTANT NOTE: Reformatting permanently erases all the data on the
TravelDrive™, and you will lose any unsaved files. See "XI. Reformatting" below.
3. My TravelDrive™ will not let me transfer files from my Mac to my PC or vice versa.
The Mac is able to use storage devices formatted with the FAT (File Allocation Table)
file system. This works great with Mac Operating Systems OS 8.6 through 9.21, the
FAT file system is compatible with PCs. Mac OS 9.22 to 10.3 or higher treats storage
devices using the FAT file system differently, this may cause re-indexing of FAT and
FAT 32 files. For those systems you may have to format the TravelDrive™ for Mac
use only with the HFS or HFS+ formats.
4. The data transfer speeds for the TravelDrive™ are not much faster than before.
There are many factors that affect transfer speed performance. The USB ports on
your computer may be USB 1.1 and not USB 2.0. The TravelDrive™ reaches its
fastest speeds with USB 2.0 connections, which can achieve ten times the speed
of USB 1.1. The device works with USB 1.1 ports, but it will not reach its fastest
transfer speeds unless you upgrade to USB 2.0.
X. FAQs (Frequently Asked Questions):
Troubleshooting:
1. I do not have Internet Access, what should I do to download the Window
98SE required Driver?
If you do not have internet access, please contact our Technical Support
Department at 1-877-IS IT LIVE or 1-877-474-8548 to obtain the
Windows 98SE driver.
2. Do I have to protect the TravelDrive™ from airport X-rays or magnetic fields?
No. Normal magnetic fields have no effect on the TravelDrive™. X-rays used in
airport security systems will not damage your drive, however it is always wise to
make a backup of your files before traveling.
3. I don't have USB 2.0. Can I still use the USB 2.0 TravelDrive™ with my USB 1.1
connections?
Yes. The TravelDrive™ is backwards compatible with USB 1.1
4. Can I use a USB 1.1 cable with the TravelDrive™?
Yes, however, it is recommended to use a USB 2.0 cable to achieve optimum performance.
5. I dropped my TravelDrive™ on the ground, and I'm worried that I may have
damaged the drive.
The TravelDrive™ has no moving parts. It is similar to flash media cards and can
be used like an external drive. It is also far more tolerant towards physical
handling than any disk drive or most other forms of transportable data storage
devices. If you can still access files on it, it most likely has not suffered any
damage.
6. Can I fill the TravelDrive™ to its maximum capacity?
Yes, but it is not advisable due to the nature of the file structures of re-writable
technology used on your TravelDrive and other media such as flash cards and
CD-RWs. It is strongly recommended that a small amount of safety margin be
reserved to protect access to your files.
7. I accidentally took out the TravelDrive™ while the activity light was flashing.
Now it doesn't work. Can it be repaired?
Your TravelDrive™ should still function normally; however, there is a strong
likelihood that the file you were transferring may have become corrupted. If that
is the case, recovery software may be able to retrieve some critical files. In order
to get your TravelDrive™ working again, you may have to reformat the drive.
IMPORTANT NOTE: Reformatting permanently erases all the data on the
TravelDrive™, and you will lose any unsaved files. See "XI. Reformatting" below.
8. I've used my TravelDrive™ for a long time, but it's not working as well as
before. Do these things wear out?
The mechanics of the TravelDrive™ do not wear out, but over time adding and
deleting a great many files leaves anomalies in the file structure that may need
fixing up in a manner similar to defragging a hard drive. This is true for all flash
media. Transfer all files you want to save to your hard drive and then reformat
(see below) the TravelDrive™ to restore its filing structure. It will now work as
well as when it was new.
9. When do I have to replace the battery?
Never. The TravelDrive™ draws its power from the USB port. It has no batteries
and requires no external power supply to function.
* For further information, please visit our website at www.memorex.com.
XI. Reformatting:
Troubleshooting:
The file structure of a TravelDrive™ can use refreshing over long periods of use just
as hard drives need defragging over time to make file access faster. Reformatting the
TravelDrive™ restores its file structure if it has been corrupted by an interruption of
data transfer due to too early removal of the device or to a power outage during file
transfers.
IMPORTANT NOTE: Reformatting permanently erases all the data on the
TravelDrive™, and you will lose any files that have not been copied to another hard
disk or CD-R. Use extreme caution before performing this operation.
1. Save all files on the TravelDrive™ to another medium such as a hard drive, a flash
card, or a CD-R. Reformatting permanently erases all the data on the
TravelDrive™, and you will lose any unsaved files.
2. To Format the TravelDrive™, follow the directions listed below based on your
computer type:
PC
a. Close all open applications including anti-virus software that may interrupt the
format process and verify that your TravelDrive™ Write-Protect switch is set to
the Unlock position..
b. Double-click on the "My Computer" icon on the desktop.
c. Right click on the "Removable Disk" icon with the drive letter assigned to
your TravelDrive™.
d. Select "Format" from the drop-down menu that appears.
e. Optional: Type in a name in "Volume label" if you have more than one
TravelDrive™ and prefer to assign names to differentiate them.
f. Click on "Start." A warning notice that all data will be erased pops up. Click
"OK." The formatting will only take a few seconds, and a "Format Complete"
notice will appear when the formatting is done.
g. Your TravelDrive™ should be recognized by your system at this point.
You can return to using your drive as before.
Apple Macintosh
Mac OS 8.6~9.1:
a. Close all open applications including anti-virus software that may interrupt
the format process and verify that your TravelDrive™ Write-Protect switch is
set to the Unlock position.
b. Click on "Special" on the toolbar.
c. Click on "Erase Disk."
d. Choose your Format (DOS[works with PC's], Pro DOS or Mac OS Standard).
e. Click on "Erase" to start the formatting process.
Mac OS X:
a. Close all open applications including anti-virus software that may interrupt the
format process and verify that your TravelDrive™ Write-Protect switch is set
to the Unlock position.
b. Open your "Applications" folder.
c. Open your "Utilities" folder.
d. Click on "Disk Utility."
e. Your TravelDrive™ will be listed to the left of the program by its capacity and
with a drop down description that says "untitled." Click on the drive capacity
listing to get the Erase options.
f. Choose the "Mac OS Extended" format for the use with only Mac systems.
g. Check the box "Install Mac OS 9 Drivers"; this will allow for better Mac
compatibility with older systems.
h. Click on the "Options" button.
i. Check the box "Zero all data" to fully format the drive.
j. Click "OK" to accept the selection.
k. Click "Erase" to initiate the format process.
l. Click "Erase" to verify that you want to start erasing the drive.
The TravelDrive™ should be mounted as "Untitled" after following the above steps.
NOTE: Once you have changed the format of the TravelDrive™ from FAT or FAT32 to
another format, it may not be able to be used on a PC. It will become a Mac-only
device. Using the "DOS" selection (if available) will allow PC compatibility.
Technical
XII.
Troubleshooting:
Technical
Support:
Support:
To receive technical support for your Memorex® TravelDrive™, please visit our website at www.memorex.com or call 1-877-Is It Live... Or 1-877-474-8548. Register your
product under Service and Support, Warranty Registration.
Technical
XIII.
Troubleshooting:
Limited
Support:
1-Year Warranty:
Memorex Products warranties this product against defects in materials or workmanship for
one year from the date of purchase. This warranty applies to the original purchaser; proof
of original retail purchase is required. This warranty specifically excludes damage caused
by misuse, abuse, improper storage, or use in a commercial application. No warranty of
merchantability or fitness for a particular purpose is made. In the event of a claim against
this warranty, Memorex Products' obligation and the claimant's sole remedy shall be
replacement of the product. This warranty specifically excludes responsibility for recorded
data in any form.
Technical
XIV.
Troubleshooting:
FCC Certification
Support:
Statement:
This device complies with FCC Part 15 Class B of the FCC Rules and is designed to
provide reasonable protection against radio and television interference. Although
the equipment has been tested and has been found to comply with the allowed FR
emission limits as specified below, there is no guarantee that interference will not
occur in certain situations.
This device's operation is subject to the following conditions:
1. This device may not cause harmful interference and
2. This device must accept any interference received, including interference that
may cause undesired operation.
Elimination of interference can occur by using one of the following:
1. Reorient the affected device.
2. Increase the distance between the affected device and the computer equipment.
3. Plug the computer and its peripherals into a different branch circuit from that
used by the affected device.
Memorex® TravelDrive™ is a registered trademark of
©2004 Memorex Products, Inc. • Cerritos, CA 90703
5395 7147
Microsoft And Windows are registered trademarks of the Microsoft Corporation.
Apple and Macintosh are registered trademarks of Apple Computers Inc.
All other trade names referenced in this manual are of their respective owners.
Memorex Products, Inc. reserves the right to change specifications without notice.