1
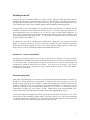
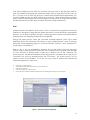
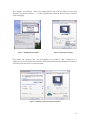
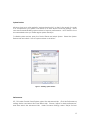
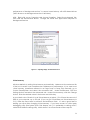
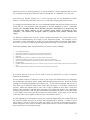
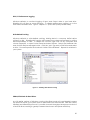
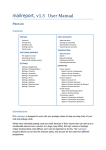
Optimizing Windows 2000 and Windows XP for Audio
Introduction................................................................................................................................. 2
Deciding on an OS..................................................................................................................... 3
Windows XP – Home or Professional? ................................................................................. 3
Hardware requirements ......................................................................................................... 3
Update or fresh install? .......................................................................................................... 4
Give it Time.............................................................................................................................. 4
Preparing for installation............................................................................................................ 5
Installation................................................................................................................................... 6
Formatting your Hard Disk ..................................................................................................... 6
Booting from CD ..................................................................................................................... 7
Setup Tweaks – Things to Do During the Install ....................................................................... 7
FAT32 vs. NTFS.......................................................................................................................... 7
ACPI ......................................................................................................................................... 8
Dual Boot ................................................................................................................................. 9
Mass Storage Devices............................................................................................................ 9
Multiple Users ........................................................................................................................ 10
Updates and service packs ................................................................................................ 10
System Performance Tweaks – Stuff to Do After Installing................................................... 11
Windows Messenger ............................................................................................................ 11
Display properties................................................................................................................. 12
Windows Sounds ................................................................................................................... 14
System Restore...................................................................................................................... 15
Performance ......................................................................................................................... 15
Virtual memory ..................................................................................................................... 16
Fast user switching................................................................................................................ 17
Auto Start and System Services .......................................................................................... 18
Disk I/O Performance Logging ........................................................................................... 20
Write Behind Caching .......................................................................................................... 20
UDMA/ATA Mode for Hard Drives ....................................................................................... 20
Separate Drives – How and Where..................................................................................... 21
Defrag Often.......................................................................................................................... 22
Virus and other Utilities......................................................................................................... 22
PlugIns and other Goodies.................................................................................................. 23
XP and Win2000 Resources..................................................................................................... 23
Stay Up to Date ..................................................................................................................... 23
Introduction
Many of our users have asked us for an update on Dave Casey’s excellent article on PC
optimization for audio. They’ve observed that, while the hardware info in the article is
useful for all PC users, the article is heavily focused on Windows 98 and Windows ME, the
dominant operating systems when the article was written. As more and more PC’s ship
with Windows XP, we’ve prepared this addendum to address those users’ needs.
It’s strongly suggested that you also read Dave’s original document, as much of the
information contained within is useful to all Windows users. (You can find it on the
TASCAM website at www.tascam.com/support/faq/pc_optimize/index.php) This article
will focus specifically on the particulars of these two Windows operating systems,
Windows 2000 and Windows XP.
Some basic background: Windows 2000 and XP are based on the Windows NT kernel.
(The kernel is the basic set of coding “building blocks” upon which the operating system
is built.) Windows 98 and Millennium Edition (ME) are based on the Windows 95 kernel.
Windows 95 had its beginnings as a consumer-oriented operating system, aimed at users
running word processing, games and web browsers. Windows NT, on the other hand,
was designed for information technology and network connectivity, and is widely
regarded as being a more robust and stable operating system.
Since Microsoft originally marketed Windows NT and 2000 as its business solutions,
Windows 2000’s user base is largely made up of corporate users who value its ability to
create and maintain large networks of computers. There are, however, considerable
numbers of audio and multimedia users who praise Win2K’s stability and use it by choice.
In contrast, Microsoft is marketing XP as its “OS for everyone” by offering Home and
Professional versions. Anyone contemplating the purchase of a new computer will
undoubtedly find it preloaded with XP, and many users of W98-based operating systems
are making the switch as well. The main reason cited by most users is system stability:
Audio and other multimedia applications require more precise timing, with processing
and input/output speeds much higher than the needs of typical computer users’
applications. Windows 2000 and XP are simply more efficient in the way they process
system tasks, and that’s a critical factor in system stability and dependability.
The majority of Windows 2000 users have been using Windows 2000 for some time now,
whereas XP is still a relatively new player, with more users actively seeking solutions to
common issues. Consequently we’ve tired to focus a bit more toward XP where
differences exist.
One final note: as with most computer-based technologies, there are far too many
variables and changing conditions to predict how your own hardware and software
combinations will compare. This is intended purely as a guide, and your mileage may
indeed vary.
2
Deciding on an OS
Should you opt for Windows 2000 or a version of XP? Windows 2000 has been around
longer and many pros consider it more stable. It’s true that XP’s still working out some of
the kinks, but by and large it’s proving to be pretty robust. W2k has had more time in use,
thus benefits from more users’ problem reports and (hopefully) the resulting fixes.
Chances are, if you’ve bought a new computer within the last year, it’s already got XP
installed. This pretty much makes the decision for you. But don’t worry too much, since
most applications are now tuned to run on XP, as is most current audio hardware. In
fact, some of the problems and bugs encountered during the last year of WDM audio
drivers development are fixed in XP. In any case, it’s doubtful you’ll encounter any
major problems with either OS.
As Microsoft continues to develop and market XP it’s likely we’ll see support for Win9x
begin to diminish over time. (In fact, the latest updates for some audio applications
have reduced MME support in favor of the more efficient WDM protocol, and these
app’s may not run as efficiently in MME mode under Windows 9x.)
Windows XP – Home or Professional?
Assuming you’re going with XP, you’ve got a choice of two versions. For the most part,
the differences between the Home and Professional versions of XP have little relevance
to the audio user. XP Professional contains much more by way of networking and
connectivity, features absent from XP Home. As a basic rule of thumb, if you’re not
planning on using your computer for any network based functions, the Home edition
should serve your needs.
Hardware requirements
With each new Windows OS the amount of horsepower needed increases, and XP is no
exception. While Microsoft recommends a minimum 300 MHz processor, in truth XP
needs at least a 600 MHz CPU to keep its wheels from dragging on takeoff. Likewise with
memory: while XP will run on Microsoft’s recommended minimum of 128 MB, for serious
audio use 256 MB is the recommended minimum. If you plan on running any virtual
instruments or PlugIns go for at least 512 MB. (While some older motherboards don’t
support more than 512 MB, the more recent ones allow a gigabyte or more.)
XP will also demand a larger hard drive; Microsoft recommends a minimum of 1.5 GB of
disk space for the operating system alone. (Actually, about 10-15 GB is recommended
for all the system files it needs to run.) As with any audio-based system, a separate drive
or drives for audio will dramatically increase your track count.
3
Update or fresh install?
Generally speaking, a fresh install on a wiped hard drive is the best insurance against
potential problems; leftover registry items and other orphaned legacy files can lurk in
your system for months, only to cause unanticipated conflicts with a newly-installed
program or driver at a later date. Unless you are upgrading from Windows 2000 to XP, a
fresh install is recommended.
Give it Time
When preparing to install a new Operating System, it’s best to make sure you’ve got the
time to do it right. The process of formatting the drive, installing the software, new drivers,
and all your programs is one that can take several hours. Try to plan a time when you
can focus on the task at hand without major distractions, if possible, and aren’t likely to
be pulled away mid-install or tempted to skip a step…..what might appear to be an
insignificant item at first glance could end up causing you major aggravation down the
line, so it’s best to lay this foundation right before putting the computer into regular
service.
4
Preparing for installation
Even after confirming that the computer you want to install XP or 2000 on meets
Microsoft’s recommended minimum specifications, you still may wish to do a little more
investigating before you attempt an install or an upgrade, to make sure that all of your
hardware is compatible with Windows XP or 2000.
There are two valuable Microsoft resources that you should employ before installing
Windows XP or 2000 on your existing hardware: the Hardware Compatibility List
(www.microsoft.com/hcl/default.asp),
and
the
Windows
Upgrade
Advisor
(www.microsoft.com/WINDOWSXP/home/howtobuy/upgrading/advisor.asp).
Together
these applications review your system hardware and existing software and deliver a list of
potential compatibility problems. These are divided into two basic categories: critical
incompatibilities (those which would prevent XP from running, e.g. an outdated
motherboard), and compatibility warnings (hardware and/or software which might not
function correctly after upgrading – these might require you to reinstall the program or
driver, or update your version to a Win2k or XP compatible version). If you are
connected to the Internet while running Upgrade Advisor, Windows will offer to retrieve
and install any available updates.
Fig 1 – Microsoft’s Upgrade Advisor page
It’s also a good idea to check and see if there is a BIOS update for your motherboard,
especially if it contains any fix regarding ACPI or Windows 2000/XP, and flash it following
the instructions from the manufacturer.
5
Before you begin the install, it’s a good idea to download all necessary drivers for your
PC hardware from the Internet. Pay particular attention to drivers for your graphics
adapter, and any audio and MIDI interfaces. As well, make sure your printer, CD burner
and any other peripherals are covered. If you’ll be using the computer for connecting to
the Internet, also pay attention to drivers for your network card or modem.
As a general rule of thumb, drivers written for Windows 2000 will work for Windows XP most
(but not all) of the time. Drivers written for Windows 9x will usually require an update. If
there is no Windows 2000 or XP driver for a certain component available and the
manufacturer has none planned, you will have to consider either upgrading that
component or sticking with Windows 9x/ME. This usually tends to be the case with older
hardware (ISA-based cards, scanners, older motherboards, etc).
Generally speaking, Windows 2000 and XP have drivers for most devices built in, but it’s
always a good idea to obtain them beforehand. Beats the heck out of discovering later
that you’re in need of, for example, a driver for your modem which you can’t download
because you need a driver for your modem……
It’s also a good idea when installing drivers to allow Windows to reboot after each
individual driver install. The Windows registry updates itself with every reboot, so it’s best
to allow it to do so before installing additional changes. While this takes more time and
effort, it’s something you’ll (hopefully) only need to do once, and is generally safer in the
long run.
Another thing to remember is that a fresh install of any OS will, by necessity, wipe out any
preference settings in your programs (e.g., bookmarks in your browser, email settings,
etc.) Make sure you make note of these before you begin.
Installation
Formatting your Hard Disk
Assuming you’ve backed up your data and are preparing a fresh install, you’ll want to
format the drive first. While it’s possible to format a (non-OS) drive in Windows, a low-level
format in DOS is preferable. If you presently have Win98 on your computer, you can
simply select “Reboot in DOS” from the shutdown menu. If you’ve got ME, you’ll need to
create a startup floppy and reboot from it. Either way, once you’re in DOS, simply type in
“Format C:\” (without the quotes). DOS will shake its finger and ask if you’re absolutely
sure….type Y for yes (you are sure, aren’t you…?) The drive will then begin FAT32 format.
This can take anywhere from a few minutes to half an hour, depending on the size of the
drive. When complete, you can name your drive (or not) and hit Enter.
6
Booting from CD
You will need to tell your computer to boot from the Windows CD-ROM instead of your
(presumably blank and formatted) hard drive. To do so, you must access your
computer’s BIOS (usually hitting DELETE key during boot up will access the BIOS; some
computers use F8 or another key, so check your computer’s documentation or the
manufacturer’s website). Once in the BIOS, you will need to change the order of boot
up devices. This is normally set for (1) floppy drive, (2) hard disk, (3) CD-ROM. Make the
CD-ROM the first boot device. Put the Windows CD in the drive and restart. After
stepping through the boot up you’ll see a message “Press any key to begin installing
Windows.”
Setup Tweaks – Things to Do During the Install
There are some actions you will need to take during the initial XP installation, as they set
certain system defaults which are much more difficult to change later.
FAT32 vs. NTFS
You have the option under W2k and XP to choose the file system that best suits your
needs, FAT or NTFS. FAT (File Allocation Table) is the native file system based on the
Windows 9x kernel (including 95, 95a, 95b, 95c, 98, 98se and ME). NTFS (New Technology
File System) is the native file system for operating systems based on the Windows NT
kernel (including NT4, 2000 and XP). During the installation, Win2K or XP will ask if you
want to convert the installation partition to NTFS. If you need compatibility for Windows
98 – especially if you want to dual-boot – don't convert.
While NTFS offers a number of improvements over FAT32, most of these advantages are
not all that applicable to audio, and you are unlikely to see a major performance
difference between the two. Moreover, defragmenting your drives (something you
should do on a regular basis anyway) is substantially quicker in FAT32. Be aware that
Windows 9x cannot read data on NTFS-formatted drives. Generally speaking, you should
use FAT32 if you are doing a parallel installation with Windows 9x/ME, or if you will need to
work with files created with a FAT32 system (opening old song files, working with others
using FAT32-based systems, etc.) leave everything with FAT32.
One exception would be if you’ll be working with video or other large files in excess of 4
GB; or if you also use your PC to browse the internet or the computer is part of a LAN
running XP Professional. Only NTFS can limit access rights to your files and therefore
provide the security needed for a networked computer. In this case, select NTFS for all
partitions except those which are to accommodate your audio data later.
7
One other interesting point: NTFS can read the "resource fork" of SDII files from MacOS,
and can therefore recognize the timecode stamps used in these files; FAT(32) can’t do
this. If you do a lot of work with ProTools or other MacOS-based DAW applications, you
should consider at least one NTFS partition in your system. (Note that this does not imply
that your NTFS-based system can mount/read from a MacOS drive; simply that individual
SDII files imported to an NTFS drive will retain their time-stamp information.)
ACPI
Another critical install detail is ACPI mode. ACPI, or Advanced Configuration and Power
Interface, is designed to help allocate system resources to more efficiently run peripheral
devices. For an audio machine, though, it’s been reported to cause some performance
problems due to its assigning all devices to a single IRQ.
During the install process, when the on-screen message appears “press F6 to install
additional drivers for third party SCSI drivers or mass storage devices,” press F5 instead.
When the screen appears giving you a choice between “ACPI-PC” and “standard PC”
mode, select “standard pc”.
Here’s a tip: If you’ve upgraded to Windows XP you may find it’s lost one important
feature: when turning off your PC (Start/Turn Off Computer/Turn Off), WinXP goes through
its usual "Windows is shutting down" routine, but it doesn't turn off the computer. The
power stays on, with Windows helpfully informing you that it is indeed safe to turn off your
computer now, until you manually punch the "off" button. This usually occurs if you’ve
opted to leave ACPI disabled. To fix this, you may want to enable APM (Advanced
Power Management). Here's how:
•
•
•
•
•
Click Start | Control Panel
Click Performance and Maintenance (at the lower left)
Click Power Options
Click on the last tab, marked APM.
Check the box marked "Enable Advanced Power Management Support" and click OK
Figure 2 – Advanced Power Management
8
Dual Boot
The compatibility with legacy (older) software in Windows 2000 and XP is considerably
more restricted compared with Windows 9x; this is intentionally designed to insure stability
against any kind of application failure. If an incompatible program is run, Windows 2000
or XP will stop it as soon as it tries to access that program. It normally will not crash or
cause instability, but it will not allow the program to be run.
1. If you need to run such programs, or want to retain Win9x for any other reason, be
sure to install Windows 2000 or XP in a dual boot configuration, so that you can still
boot Win9x or DOS when needed. This is not a bad idea anyway – you can
always remove the other OS once it’s no longer needed – and a dual boot will let
you migrate safely to 2000 or XP while allowing you to revert to your previous
system if and when something doesn't work in Windows 2000 or XP.
To install Windows 2000 or XP in a dual boot configuration, have your older OS installed
first, then start the Windows 2000 or XP setup from it. When prompted, do not select
“upgrade to Windows 2000 or XP,” rather select "Install a new copy (clean install)", and
specify a new directory for it when asked.
Microsoft recommends installing it in a different partition than your other OS. We
recommend going a step further and using separate physical drives for each OS. This
precludes the possibility of Windows “inadvertently” sharing files across partitions. Your
best bet is purchasing removable hard disk “sleds” for your separate drives – this will
enable you to retain completely discreet operating systems and simply boot up with the
one you want to use.
Mass Storage Devices
A single track of audio for an average song can easily take up more than 20-30 MB –
multiply that by 24 tracks and you can see that larger drives are no longer a luxury. With
the price of hard drives dropping almost by the hour, many users are now opting for
larger drives and even RAID arrays. Redundant Array Inexpensive Disks protect your data
by writing simultaneously to more than one drive (when used in traditional RAID format).
However, many professional audio setups also employ RAID arrays in a different mode
where multiple physical drives are seen as one large drive, allowing for throughput far
exceeding that of a single drive. In the event of a hard disk crash, the data is replicated
on a second, or redundant drive.)
During the install process, you will be prompted to press F6 to install additional drivers for
mass storage devices.
9
Multiple Users
While Win9x also offers the option of setting up multiple users on a single computer, the
implementation under W2k and XP offers far more independence between these
multiple user accounts. If you will be using your computer for multiple functions, it’s a
good idea to set up separate user accounts for audio applications and general use. This
will allow you to slim down the audio profile in order to gain maximum performance from
the OS.
One important note: If you choose to install multiple users, it’s best to do so when first
installing XP. If you do so later, you will need to reinstall your OS.
Another hint: if you are using XP Professional, your audio user profile should be assigned
administrative rights (it defaults to this anyway). Reason: You can only burn CDs under
Windows XP if you are logged on with administrative rights.
Updates and service packs
Microsoft has issued updates and fixes for every operating system they’ve ever released,
and W2K and XP are no exceptions. It’s pretty much unavoidable with a new OS that
there will be some programs and/or hardware that don’t function as expected, and
that’s what the updates are intended to address.
With W2K, the latest update is Service Pack 2, and it definitely addresses some known
problems with audio and MIDI. Windows XP is still relatively new, and updates are still
being developed. As of this writing there are two updates, Q307 and Q310507, both
available from Microsoft, which are recommended for improving audio performance.
10
System Performance Tweaks – Stuff to Do After Installing
Windows Messenger
One of the ‘features’ of XP is the deeper integration of Windows Messenger. While
Messenger may be useful for on-line communication, it’s a real resource hog; we
recommend disabling it for audio use. To do this, right-click on its icon in the task tray
and select 'open'. (If an animated assistant pops up just cancel it…..we’ll deal with
getting rid of those later.) Now go to the “Tools” menu and select “Options /
Preferences”, and uncheck 'Run this program when windows starts'. This will deactivate
automatic startup, preventing Messenger from loading automatically again next time
you log on to Windows XP.
Figure 3- Deactivating Windows Messenger
11
Display properties
While pretty photos and animated graphics are fun, they also contribute to bogging
down your lean mean audio machine. And in keeping with Microsoft’s tradition of
making looks a high priority, those fancy visuals are programmed to take processing
priority away from what we consider important, processing audio. Disabling those
effects is a good idea unless you don’t mind a pretty drop-down menu causing a
frustrating dropout or audio glitch.
If you feel you must have a picture on your desktop, bear in mind that doing so requires
Active Desktop to be activated; those cute animated GIFs suck up even more resources.
To zap those fancy visuals, right-click on your desktop and select 'Properties'. First select
the ‘Desktop’ tab; select “(None)” in the Background field to remove the background.
Figure 4 – Background Display
12
Now disable visual effects. Select the “Appearance” tab, click the Effects button and
disable "Use transition effects…". It's also a good idea to disable "Show window contents
while dragging".
Figure 5 – Disabling Transition Effects
Figure 6 – Selecting Color Quality
Now select the “Settings” tab. Set your display color quality to 16Bit. Setting it to a
higher (24 or 32 bit) depth detracts from audio performance since Windows will need to
allocate more resources to screen redraws.
Figure 7 – Disabling Screensaver and Power Schemes
13
Next select the ‘Screen Saver’ tab. Screen savers generally tend to kick in when you
least want them to; we recommend choosing None. On the same page, select your
monitor power saving options. Windows usually defaults to relatively short times of
inactivity before shutting off your monitor and hard disk and activating hibernate mode.
We recommend deactivating hibernate mode (set to Never). In fact, in most cases it’s
best to set all the energy saving functions to 'always on'.
While you’re in there, it’s also a good idea to deactivate the automatic power down
mode for your hard disk. These start and stop cycles tend to contribute more to hard disk
wear than does actual running time. Also, disable any options that slow down the CPU
when it is unused. While these settings are useful for laptops running on battery power,
they offer no benefit to an AC-powered computer.
Finally, before closing this window select the “Themes” tab. Hee you can choose your
fonts and window dressing. There are no reported performance differences between
the offered themes, but keep in mind that if you modify your theme later you will need to
adjust all settings again, including system sounds (which should be disabled – see below).
Once you’ve decided, click on “Save As…” and save this theme in case you need to
recall it later. You can now click on 'apply' to save your changes.
Windows Sounds
Unless you can’t live without Microsoft’s cutesy startup themes, bings and boings, it’s best
to kill the windows sound scheme. Those Windows alert sounds can interfere with audio
performance by temporarily causing your audio app to lose sync with the audio device.
Select 'Sounds and Audio Devices' in the control panel and switch to the 'sounds' tab.
Choose the 'No Sounds' sound scheme and click on OK. Now open display properties
again and save all your settings as a new 'theme'. Give it a descriptive name like “Audio
Theme'. This way you can easily revert back to your settings later if anything goes wrong.
Figure 8 – Disabling Windows System sounds
14
System Restore
Windows is set up to write periodic “restore check points” so that, in the event of a crash
or a corrupted file, your system can restore to its most recent functional settings. Some
users recommend disabling system restore to improve performance. NOTE that this is not
recommended unless you make regular system backups.
To disable system restore, open the Control Panel and select System. Select the System
Restore tab and check “turn off system restore on all drives.”
Figure 9 – Disabling System Restore
Performance
XP: Still under Control Panel/System, select the Advanced tab. Click the Performance
settings button and select the Visual Effects tab. Choose “adjust for best performance”
and then select the Advanced tab. Under Processor Settings, select “adjust for best
15
performance of background services” to ensure lowest latency with ASIO-based drivers
(ASIO drivers run as background services in Windows).
W2K: Right click on My Computer and choose Properties. Select the Advanced Tab,
then click the Performance Button. Change the mode from Application Response to
Background Services
Figure 10 – Adjusting Display for Best Performance
Virtual memory
Windows defaults to setting virtual memory automatically. Under most circumstances this
is fine, but for audio it can sometimes be a hindrance to performance. If you want to set
virtual memory (sometimes referred to as Page Swap or Swap File) manually, go to
Control Panel/System and select the Advanced tab. Under Performance, click the
Settings button and select the Advanced tab. Under Virtual Memory, click the Change
button. Enter the desired values in the boxes and click okay.
A good basic rule of thumb is to set Virtual Memory at about 1.5 to 2 times the amount of
RAM in your computer, up to 512 MB. (If you’ve got 512 MB RAM, set Virtual Memory to
512.) Enter the same value in Minimum and Maximum fields. It’s also a good idea to
defrag your drive after changing Virtual Memory. If you have access to a third party
defragging utility (like System Suite, Disk Keeper, etc.), it’s preferable to defrag with it,
rather than Windows defrag utility, which doesn’t do a true reorder of the swap file.
16
NOTE: Some users advise disabling virtual memory for increased performance. We do
not recommend this unless you have at least 512 MB of RAM. Even then, note that this is
not practical for all systems, as it can tend to make some machines less stable. That
said, if you choose to disable virtual memory you can do so on the same page (Control
Panel/System/Advanced).
Figure 11 – Setting Virtual Memory
Fast user switching
Windows NT and 2000 introduced a new feature – multiple user logons. While mainly
intended for use in corporate networks (allowing multiple users to access the same
machine), it is also useful for creating multiple profiles (e.g., general use, audio-optimized,
etc).
Windows XP takes the multiple users concept a step further, allowing for fast switching
between user profiles without logging off the first user. (The applications in use by the first
user will remain active until that user logs off, or until the computer is shut down.) While
this is a great feature for large corporate networks, it’s a big resource hog for your audio
17
machine. All those applications running in the background require some degree of CPU
usage, as well as RAM.
To disable this feature, go to Control Panel, and under “User Accounts” click on “Change
the way users log on and off” and uncheck “fast user switching.”
Figure 12 – Disabling Fast User Switching
Auto Start and System Services
Earlier versions of Windows used the startup menu to specify programs which are loaded
into memory on boot up. Win2k and Windows XP still employ Auto Start for some
programs, but also handle most system-based app’s a bit more efficiently with System
Services, which are started in the background before Windows boots up. XP’s improved
multitasking allows these app’s to run without seriously affecting your audio performance
most of the time. But while some of these background app’s are essential to Windows’
operation, many are not. These non-essential applications can be disabled by opening
Control Panel and selecting “Administrative Tools”, then choose “Services”.
Now here’s where it gets a bit complicated. You’ll find a lengthy list of services, along
with (sometimes vague) descriptions of what each does. It will also specify whether the
18
particular service is running presently, as well as whether it loads automatically on boot
up, manually (called up by either the user or a program), or is disabled. You can edit
any service by double clicking on it. Some services can not be disabled for safety
reasons – without these Windows will not run, or will suffer serious performance issues.
It’s strongly recommended that you not completely disable any services without knowing
what they do, and whether other programs or services depend on them. (Example:
disabling the Portable Media Serial Number retrieval, described in its profile only as
“retrieves the serial number of any portable music player connected to your
computer”, will disable the “dongles” used by programs like Cubase, Nuendo and
Logic.)
It’s difficult to define a list of what’s safe to disable and what’s not, since many of the
services are determined by the usage of your particular system. For example, if your
computer is solely dedicated to audio, you can safely disable any printers, DNS clients,
etc., but if you use it for other purposes like Internet browsing, you must leave DNS active.
Generally speaking, these are the services you do NOT want to disable:
•
•
•
•
•
•
•
•
•
•
Cryptographic services
DHCP Client (unless the computer has no internet connection)
DNS Client (unless the computer has no internet connection)
Event log
IPSEC Services (unless the computer has no internet connection)
Network connections (unless the computer has no internet connection)
Network location awareness (unless the computer has no internet connection)
Plug and play
Portable media serial number (if you use Cubase, Logic or any other app which requires a copy-protection
key)
TCP/IP Net BIOS helper (unless the computer has no internet connection)
As to other services, if you’re not sure what it does your safest bet is to set it to Manual
rather than disabling it.
As with earlier versions of Windows, some of the more non-essential boot up programs
are loaded into the Startup menu, rather than through System Services. These are usually
(though not always) displayed in the system tray. To see which programs are set up for
Auto Start, go to Windows’ Start menu, select Run and type in “msconfig” (without the
quotes). Select the startup tab to view a list of app’s loaded for Auto Start. Note that
while it’s also possible to disable auto load app’s by editing the registry, this is generally
speaking far more risky, and only recommended for experienced users. An incorrect edit
to your registry can cause your entire system to crash horribly. In any case, if you decide
to do any edits to your registry, make sure you’ve backed it up first.
A note regarding virus programs: many virus scanning applications will, under W2K and
XP, install as system services (i.e., load in the background) by default. It’s best to avoid
using these in favor of those that offer the option of running as free-standing app’s.
When doing any audio work or installing audio applications, it’s best to make certain you
don’t have any virus software running.
19
Disk I/O Performance Logging
Windows defaults to continual logging of Input and Output data to your hard drive.
Disabling this will free up some resources. To disable performance logging, go to the
Start menu and select Run. Type in “diskperf –n” (minus the quotes) and hit Okay.
Write Behind Caching
Windows defaults to write-behind caching, holding data in a memory buffer before
writing it to disk. Disabling this function will increase your system performance by writing
data immediately to disk. To disable this function, right click on My Computer and
choose Properties, or open Control Panel and select System. Select the Hardware tab
and click the Device Manager button. Click the “plus” sign next to Disk Drives and select
a drive. Choose Properties and uncheck “Write Cache Enabled”. Repeat for all drives in
your system.
Figure 13 – Disabling Write-Ahead Caching
UDMA/ATA Mode for Hard Drives
As with earlier versions of Windows, running Ultra DMA mode will considerably increase
the speed at which your system writes to and reads from the hard disk. With the current
UDMA66 and UDMA100 protocols it’s possible to reach throughput levels equal to that of
wide SCSI drives, resulting in greatly increased track count and system efficiency.
20
Windows 2000 and XP can recognize a DMA capable device, and will detect and
activate DMA mode by default whenever one is connected. Most drives manufactured
in the last few years support DMA, and most modern motherboards’ chipsets detect this.
You can check or change your settings by opening Device Manager (right-click on My
Computer, select “Properties”, then select the “Hardware” tab and click “Device
Manager”. Expand the list by clicking on the plus sign next to “IDE ATA/ATAPI Controllers”
and right-click on “Primary Controller”. Select “Properties”, then go to the “Advanced
Settings” tab. Transfer mode should be set to “DMA if available” (not PIO) and Device
Type to “Auto Detection”. Repeat for “Secondary Controller”.
Figure 14 – Checking DMA Transfer Mode
A small few motherboards, especially some VIA chipsets, do not always auto-detect
DMA. If you so not see options for the above settings, you may need to update the
motherboard’s BIOS or install specific drivers. Check the motherboard manufacturer’s
website for info and downloads.
Also remember to make sure your DMA drives are connected with 80-wire ATA ribbon
cables, rather than the older 40-wire ones. Newer UDMA66 and UDMA100 drives require
them but even older UDMA33 drives, which only need 40-wire cables to operate, benefit
from the increased shielding the unused wires provide.
Separate Drives – How and Where
No doc on optimization would be complete without mentioning the value of separate
drives for applications and audio. Dave’s article covered most of the aspects of SCSI
21
drives, and while SCSI still has clear advantages in using multiple drives, UDMA drives are
now rivaling them in throughput and performance; that and a much lower price point
have helped find their way into more and more audio setups.
Probably the single most important thing you can do for your system to increase
performance and track count is to dedicate a separate physical hard disk to audio
exclusively. It is simply not enough to create a separate audio partition on the same
drive. In fact, this is actually a bad idea – this makes the drive’s stylus work even harder,
since it’s simultaneously seeking application data in one partition and streaming audio
from another. A dedicated audio drive frees up both drives to separately access the
program data and the audio data.
If your motherboard has only two IDE connectors, you would normally connect the
system drive to the primary IDE and the audio drive to the secondary IDE. Set each
drive’s jumpers to be the master. Configure the CD-ROM or CD-RW as the slave, and
make sure to connect it to the same IDE buss as the system drive. This insures an
uninterrupted data flow to and from your more critical audio drive.
If your motherboard has a separate ATA controller and two extra connectors for UDMA
master/slave, your setup is that much more simplified, as well as allowing for more
physical drives.
Defrag Often
Defragmenting your hard drives is recommended in all Windows OS’s, and particularly in
systems running and editing large audio and multimedia files. Defragmenting your disks
places the data for files next to each other (rather than fragmented throughout the disk),
which speeds up reading from and writing to the disk, and increases system stability.
In Windows 2000 and XP, regular defragging offers even more benefits. XP and 2000
monitor the files that are used when the computer starts up, and when your most-used
applications start. By monitoring those files the OS can “prefetch” them….meaning data
that is expected to be requested is read ahead into the cache. Prefetching is improved
if the files are located next to each other on the outer edge of the disk, and XP/2000
optimizes the location of these boot and application files while the computer is idle. This
optimization is done in the background and lasts only a minute or two, but even this
activity can cut into audio performance if Windows decides the system is “idle” at the
wrong time. The defragger will run this task during disk defragmenting instead, so
Windows won’t decide to do it while you’re working.
Virus and other Utilities
While virus protection software is almost a necessity for general-use systems, they often
run in the background and can cause problems with audio systems. If you’re running a
dedicated audio machine, it’s best to not install them at all. If your machine is
connected to the web, it’s safer to protect yourself, but try to find utilities that only run
when called up. System tune-up utilities are also quite useful in most circumstances, but
some tend to optimize according to the needs of general usage, and can change
settings that can compromise audio performance. A clean, minimal setup is your best
insurance.
22
PlugIns and other Goodies
The Web is full of DSP PlugIns, ranging from freeware to shareware to demos of high-end
packages. You’ll also find hundreds of virtual instruments in VSTi and DXi formats. While
many of these are of excellent sound and quality, it’s best to carefully consider before
you install. Do you really need 26 different reverb PlugIns, or ten different vocoders?
Before you install that third virtual Theremin, remember that a bigger plugs folder will
contribute to slowing down your system. Install what you’ll realistically use.
XP and Win2000 Resources
Stay Up to Date
If you’ve owned a computer for more than an hour you know that the world of software
development moves very quickly. While you need not sink neck deep into computer
geekdom, it’s a good idea to stay informed of new information, changes and updates in
your OS and your audio applications. Bookmark your software manufacturers’ websites
and visit them periodically. Most of the major programs also have users’ groups, where
you can read and participate in current discussion with others….many times these
groups are instrumental in discovering new issues and reporting them to the
manufacturers.
The Internet is also a vast resource for info on the various Windows operating systems.
Aside from Microsoft’s own Knowledge Base, you can find hundreds of sites dedicated to
Windows XP and Windows 2000. Some deal specifically with tips for audio optimization,
while others contain more general (but still very useful) information. Sites like XP-erience
(www.xp-erience.org), Tweak XP (www.tweakxp.com) and Pure Performance
(www.pureperformance.com) offer lots of tips on optimizing Windows for your particular
needs. Websites like Tom’s Hardware (www.tomshardware.com) can keep you up to
date on the newest components, and excellent electronic newsletters like Woody’s
Windows Watch (www.woodyswatch.com) provide useful and very timely info on issues
facing all Windows users. And if you’ve never checked out TechTV, they offer some
great programming on multimedia and audio applications. Bottom line…..a bit of effort
toward keeping yourself informed can save you some hair-pulling and nerves the first
time you can say “oh, yeah, I know what’s causing that….”
This article last updated 17 March 2002
Daniel Keller, TASCAM Sr. Product Specialist
23