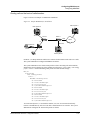
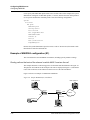
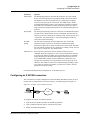
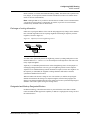
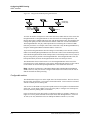
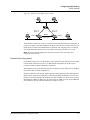
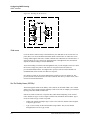
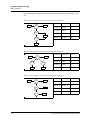
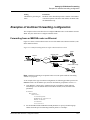
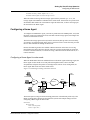
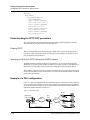
1
MAX™ 6000/3000
Network Configuration Guide
Part Number: 7820-0629-003
For software version 9.0
January 2001
Copyright© 2000, 2001 Lucent Technologies Inc. All rights reserved.
This material is protected by the copyright laws of the United States and other countries. It may not be reproduced, distributed, or altered in any fashion by any
entity (either internal or external to Lucent Technologies), except in accordance with applicable agreements, contracts, or licensing, without the express
written consent of Lucent Technologies. For permission to reproduce or distribute, please email your request to [email protected].
Notice
Every effort was made to ensure that the information in this document was complete and accurate at the time of printing, but information is subject to change.
Safety, Compliance, and Warranty Information
Before handling any Lucent Access Networks hardware product, read the Edge Access Safety and Compliance Guide included in your product package. See
that guide also to determine how products comply with the electromagnetic interference (EMI) and network compatibility requirements of your country. See
the warranty card included in your product package for the limited warranty that Lucent Technologies provides for its products.
Security Statement
In rare instances, unauthorized individuals make connections to the telecommunications network through the use of access features.
Trademarks
4ESS, 5ESS, A Network of Expertise, AnyMedia, APX 8000, AqueView, AUDIX, B-STDX 8000, B-STDX 9000, ...Beyond Compare, CaseView, Cajun,
CajunDocs, CAJUNVIEW, Callmaster, CallVisor, CBX 500, CellPipe, ChoiceNet, ClearReach, ComOS, cvMAX, DACScan, Dacsmate, Datakit, DEFINITY,
Definity One, DSLMAX, DSL Terminator, DSLPipe, DSLTNT, Elemedia, Elemedia Enhanced, EMMI, End to End Solutions, EPAC, eSight, ESS,
EVEREST, Gigabit-scaled campus networking, Globalview, GRF, GX 250, GX 550, HyperPATH, Inferno, InfernoSpaces, Intragy, IntragyAccess,
IntragyCentral, Intuity, IP Navigator, IPWorX, LineReach, LinkReach, MAX, MAXENT, MAX TNT, Multiband, Multiband PLUS, Multiband RPM,
MultiDSL, MultiVoice, MultiVPN, Navis, NavisAccess, NavisConnect, NavisCore, NavisRadius, NavisXtend, NetCare, NetLight, NetPartner, OneVision,
Open Systems Innovations, OpenTrunk, P550, PacketStar, PathStar, Pinnacle, Pipeline, PMVision, PortMaster, SecureConnect, Selectools, Series56,
SmoothConnect, Stinger, SYSTIMAX, True Access, WaveLAN, WaveMANAGER, WaveMODEM, WebXtend, and Where Network Solutions Never End
are trademarks of Lucent Technologies Inc. Advantage Pak, Advantage Services, AnyMedia, ...Beyond Compare, End to End Solutions, Inter.NetWorking,
MAXENT, and NetWork Knowledge Solutions are service marks of Lucent Technologies Inc. Other trademarks, service marks, and trade names mentioned in
this publication belong to their respective owners.
Copyrights for Third-Party Software Included in Lucent Access Networks Software Products
C++ Standard Template Library software copyright© 1994 Hewlett-Packard Company and copyright© 1997 Silicon Graphics. Permission to use, copy,
modify, distribute, and sell this software and its documentation for any purpose is hereby granted without fee, provided that the above copyright notice appear
in all copies and that both that copyright notice and this permission notice appear in supporting documentation. Neither Hewlett-Packard nor Silicon Graphics
makes any representations about the suitability of this software for any purpose. It is provided “as is” without express or implied warranty.
Berkeley Software Distribution (BSD) UNIX software copyright© 1982, 1986, 1988, 1993 The Regents of California. All rights reserved. Redistribution and
use in source and binary forms, with or without modification, are permitted provided that the following conditions are met: 1. Redistributions of source code
must retain the above copyright notice, this list of conditions, and the following disclaimer. 2. Redistributions in binary form must reproduce the above copyright notice, this list of conditions, and the following disclaimer in the documentation and/or other materials provided with the distribution. 3. All advertising
materials mentioning features or use of this software must display the following acknowledgement: This product includes software developed by the University of California, Berkeley, and its contributors. 4. Neither the name of the University nor the names of its contributors may be used to endorse or promote
products derived from this software without specific prior written permission.
THIS SOFTWARE IS PROVIDED BY THE REGENTS AND CONTRIBUTORS “AS IS” AND ANY EXPRESS OR IMPLIED WARRANTIES,
INCLUDING, BUT NOT LIMITED TO, THE IMPLIED WARRANTIES OF MERCHANTABILITY AND FITNESS FOR A PARTICULAR PURPOSE
ARE DISCLAIMED. IN NO EVENT SHALL THE REGENTS OR CONTRIBUTORS BE LIABLE FOR ANY DIRECT, INDIRECT, INCIDENTAL,
SPECIAL, EXEMPLARY, OR CONSEQUENTIAL DAMAGES (INCLUDING, BUT NOT LIMITED TO, PROCUREMENT OF SUBSTITUTE GOODS
OR SERVICES; LOSS OF USE, DATA OR PROFITS; OR BUSINESS INTERRUPTION) HOWEVER CAUSED AND ON ANY THEORY OF
LIABILITY, WHETHER IN CONTRACT, STRICT LIABILITY, OR TORT (INCLUDING NEGLIGENCE OR OTHERWISE) ARISING IN ANY WAY
OUT OF THE USE OF THIS SOFTWARE, EVEN IF ADVISED OF THE POSSIBILITY OF SUCH DAMAGE.
Ordering Information
You can order the most up-to-date product information and computer-based training online at http://www.lucent.com/ins/bookstore.
Feedback
Lucent Technologies appreciates any comments about this manual. Please send them to [email protected].
Lucent Technologies
Customer Service
To obtain product and service information, software upgrades, and technical assistance, visit
the eSight™ Service Center at http://www.esight.com. The center is open 24 hours a
day, seven days a week.
Finding information and software
The eSight Service Center at http://www.esight.com provides technical information,
product information, and descriptions of available services. Log in and select a service. The
eSight Service Center also provides software upgrades, release notes, and addenda. Or you can
visit the FTP site at ftp://ftp.ascend.com for this information.
Obtaining technical assistance
The eSight™ Service Center at http://www.esight.com provides access to technical
support. You can obtain technical assistance through email or the Internet, or by telephone.
If you need to contact Lucent Technologies for assistance, make sure that you have the
following information available:
•
Active contract number, product name, model, and serial number
•
Software version
•
Software and hardware options
•
If supplied by your carrier, service profile identifiers (SPIDs) associated with your line
•
Your local telephone company’s switch type and operating mode, such as AT&T 5ESS
Custom or Northern Telecom National ISDN-1
•
Whether you are routing or bridging with your Lucent product
•
Type of computer you are using
•
Description of the problem
Obtaining assistance through email or the Internet
If your services agreement allows, you can communicate directly with a technical engineer
through Email Technical Support or eSight Live chat. Select one of these sites when you log in
to http://www.esight.com.
Calling the technical assistance center (TAC)
If you cannot find an answer through the tools and information on eSight or if you have a very
urgent need, contact TAC. Access the eSight Service Center at http://www.esight.com
and click Contact Us below the Lucent Technologies logo for a list of telephone numbers
inside and outside the United States.
You can alternatively call (800) 272-3634 for a menu of Lucent services, or call
(510) 769-6001 for an operator. If you do not have an active services agreement or contract,
you will be charged for time and materials.
MAX 6000/3000 Network Configuration Guide
iii
Contents
Customer Service ..................................................................................................................... iii
About This Guide .......................................................................... xxix
How to use this guide............................................................................................................ xxix
What you should know ......................................................................................................... xxix
Documentation conventions.................................................................................................. xxix
MAX 6000/3000 Series documentation set ........................................................................... xxx
Chapter 1
Introduction ..................................................................................... 1-1
Chapter 2
Configuration Concepts and Profiles ........................................... 2-1
Using the MAX as an ISP or telecommuting hub..................................................................
Using the MAX as an ISP hub........................................................................................
Using the MAX as a telecommuting hub........................................................................
Overview of MAX configuration...........................................................................................
Creating a network diagram............................................................................................
Configuring lines, slots, and ports for WAN access.......................................................
Configuring WAN connections and security..................................................................
Concentrating Frame Relay connections ........................................................................
Enabling X.25 terminal connections...............................................................................
Configuring routing and bridging across the WAN........................................................
Enabling protocol-independent packet bridging......................................................
Using IPX routing (NetWare 3.11 or later) .............................................................
IP routing .................................................................................................................
Configuring Internet services..........................................................................................
Multicast ..................................................................................................................
OSPF routing ...........................................................................................................
Virtual Private Networks .........................................................................................
MAX profiles .........................................................................................................................
Obtaining privileges to use the profiles ..........................................................................
Activating a profile .........................................................................................................
Saving a profile ...............................................................................................................
Using RADIUS ...............................................................................................................
Using session accounting................................................................................................
Where to go next ....................................................................................................................
Chapter 3
2-1
2-1
2-2
2-3
2-4
2-4
2-4
2-5
2-5
2-5
2-5
2-6
2-6
2-6
2-6
2-6
2-6
2-7
2-7
2-7
2-8
2-8
2-9
2-9
Configuring WAN Access............................................................... 3-1
Introduction to WAN configuration.......................................................................................
How the VT100 menus relate to slots and ports on the MAX 6000...............................
System slot...............................................................................................................
T1 or E1 slots...........................................................................................................
MAX 6000/3000 Network Configuration Guide
3-2
3-2
3-2
3-2
v
Contents
Expansion slots ........................................................................................................ 3-3
Ethernet and WAN slots .......................................................................................... 3-3
How the VT100 menus relate to slots and ports on the MAX 3000............................... 3-3
System slot............................................................................................................... 3-4
T1 or E1 slot ............................................................................................................ 3-4
Expansion slots ........................................................................................................ 3-4
Ethernet slot ............................................................................................................. 3-4
Etherdata slot ........................................................................................................... 3-4
Serial WAN slot....................................................................................................... 3-4
V.90 S56 III modem slot ......................................................................................... 3-4
Assigning telephone numbers ......................................................................................... 3-5
Add-on numbers ...................................................................................................... 3-5
Hunt groups ............................................................................................................. 3-6
SPIDS (for Net/BRI lines) ....................................................................................... 3-6
How a MAX unit routes inbound and outbound calls .................................................... 3-6
Configuring T1 lines .............................................................................................................. 3-7
Setting the general parameters ........................................................................................ 3-7
Connecting to the Central Office switch......................................................................... 3-8
Signaling mode ........................................................................................................ 3-8
Switch-specific settings ........................................................................................... 3-9
Front-end settings .................................................................................................... 3-9
Monitoring line quality ................................................................................................... 3-9
Supporting PBX connections.......................................................................................... 3-9
Configuring carrier-specific services............................................................................ 3-10
Using MAXDAX .......................................................................................................... 3-10
Configuring channels .................................................................................................... 3-11
Associating a channel with a slot/port in the MAX unit ....................................... 3-12
Assigning nailed channels to groups ..................................................................... 3-12
Assigning channels to trunk groups....................................................................... 3-12
Assigning channels to hunt groups ........................................................................ 3-12
Typical T1 configurations, with examples ................................................................... 3-12
Configuring a line for ISDN PRI service .............................................................. 3-13
Configuring robbed-bit signaling .......................................................................... 3-15
Using NFAS signaling........................................................................................... 3-15
Enabling a robbed-bit PBX with PRI access lines (PRI-to-T1 conversion).......... 3-17
Assigning bandwidth to a nailed link .................................................................... 3-18
Performing T1 line diagnostics..................................................................................... 3-19
Configuring E1 lines ............................................................................................................ 3-19
Setting the general parameters ...................................................................................... 3-20
Connecting to the Central Office switch....................................................................... 3-20
Signaling mode ...................................................................................................... 3-20
Switch-specific settings ......................................................................................... 3-21
Defining how the MAX unit responds during call setup .............................................. 3-21
Defining settings for DPNSS signaling on DASS 2 switches ...................................... 3-22
Configuring DPNSS signaling............................................................................... 3-22
Enabling a line for Clock Source use............................................................................ 3-23
Setting triggers for call-completed information............................................................ 3-23
Using MAXDAX .......................................................................................................... 3-24
Configuring channels .................................................................................................... 3-24
Associating a channel with a slot/port in the MAX unit ....................................... 3-25
Assigning nailed channels to groups ..................................................................... 3-25
Assigning channels to hunt groups ........................................................................ 3-25
vi
MAX 6000/3000 Network Configuration Guide
Contents
Typical E1 configurations, with examples ...................................................................
Using ISDN signaling............................................................................................
Using DPNSS signaling.........................................................................................
Setting up a nailed connection...............................................................................
Performing E1 line diagnostics.....................................................................................
Network Terminating (NT) support for European ISDN PRI ......................................
ISDN call information ..................................................................................................
Configuring the serial WAN port.........................................................................................
Configuring a serial WAN connection .........................................................................
Example of a serial WAN connection ...................................................................
Configuring digital modems ................................................................................................
56K modem numbering ................................................................................................
8-MOD modem numbering ...................................................................................
12-MOD modem numbering .................................................................................
Parameters for configuring digital modems..................................................................
Quiescing digital modems and returning them to service.............................................
Sample configuration ....................................................................................................
Configuring V.110 modems.................................................................................................
Routing calls to the V.110 modems..............................................................................
Example of a V.110 configuration................................................................................
Configuring Personal Handyphone System (PHS) ..............................................................
Configuring ISDN BRI network cards.................................................................................
Specifying a name and other settings for the profile ....................................................
Setting a line’s basic operational parameters................................................................
Configuring the B channels ..........................................................................................
BN Slot and BN Prt/Grp parameters......................................................................
BN Trnk Grp parameter .........................................................................................
Configuring add-on numbers and SPIDs ......................................................................
Typical Net/BRI configurations, with examples ..........................................................
Configuring incoming switched connections ........................................................
Configuring the Net/BRI line for outbound calls ..................................................
Displaying information about BRI calls ................................................................
Configuring Host/BRI lines .................................................................................................
Typical Host/BRI configurations, with examples.........................................................
Routing inbound calls to the terminating device ...................................................
Enabling the device to make outbound calls .........................................................
Configuring local BRI-to-BRI calls ......................................................................
Configuring IDSL connections ............................................................................................
BN Slot and BN Prt/Grp parameters .............................................................................
Example of IDSL configuration ...................................................................................
BRI/LT diagnostics.......................................................................................................
Configuring IDSL voice-call support ...........................................................................
Configuring the MAX IDSL card for outgoing voice calls...................................
Configuring the MAX to route incoming voice calls to the IDSL card ................
Performing loopback diagnostics for IDSL...........................................................
Configuring Host/AIM6 and Host/Dual ports .....................................................................
Configuring the inverse-multiplexing port ...................................................................
Configuring a Port Config profile .........................................................................
Port diagnostics......................................................................................................
Configuring the interface to the codec..........................................................................
Pairing ports for dual-port calls .............................................................................
Enabling dual-port calls.........................................................................................
MAX 6000/3000 Network Configuration Guide
3-25
3-26
3-26
3-27
3-28
3-28
3-28
3-29
3-29
3-29
3-30
3-30
3-30
3-31
3-31
3-32
3-32
3-33
3-33
3-33
3-34
3-34
3-35
3-35
3-36
3-36
3-36
3-37
3-37
3-37
3-38
3-39
3-40
3-41
3-41
3-42
3-43
3-43
3-44
3-45
3-45
3-45
3-46
3-46
3-47
3-48
3-49
3-50
3-51
3-51
3-52
3-52
vii
Contents
Configuring inverse-multiplexed WAN connections ...................................................
Configuring bandwidth WAN connections ..................................................................
Configuring an AIM call...............................................................................................
Example of an AIM call configuration..................................................................
Configuring the FT1-B&O call ....................................................................................
Example of a FT1-B&O call .................................................................................
Configuring a single-channel call .................................................................................
Example of configuring a single-channel call .......................................................
Configuring a dual-port call..........................................................................................
Configuring inbound calls....................................................................................................
Setting up ISDN subaddressing ....................................................................................
Example of ISDN subaddressing configuration ....................................................
Specifying answer numbers for destination host ports .................................................
Specifying host ports’ slot and port numbers in WAN channel configurations ...........
Exclusive port routing...................................................................................................
Using DNIS-related methods to limit incoming calls...................................................
Overview ...............................................................................................................
Call routing ............................................................................................................
Limiting calls to specific dialed numbers..............................................................
Limiting calls to unspecified dialed numbers........................................................
Examples of call routing........................................................................................
Incoming call routing state diagram ......................................................................
Configuring outbound calls..................................................................................................
Enabling trunk groups ...........................................................................................
Dialing through trunk group 2 (local port-to-port calls)........................................
Dialing through trunk group 3 (Destination profiles)............................................
Dialing through trunk groups 4–9 .........................................................................
Dialing through the extended dial plan..................................................................
Matching slot and port specifications (reserved channels)....................................
Configuring MAXDAX .......................................................................................................
Introduction...................................................................................................................
How the MAX determines outbound call routing ........................................................
MAXDAX call-routing flowchart ................................................................................
Configuring channels on which the MAX unit sends outgoing calls ...........................
Configuring channels on which the MAX unit receives calls ......................................
Configuring the MAX unit to directly map channels ............................................
Configuring the MAX unit to use a specific Dial Plan profile ..............................
Configuring the MAX unit to use a caller-defined Dial Plan profile ....................
Configuring the MAX unit to use Answer Plan profiles ..............................................
Displaying MAXDAX configurations..........................................................................
Examples of MAXDAX configuration (T1).................................................................
Routing calls on the basis of called number ..........................................................
Routing calls on the basis of the channel on which MAX 2 receives the call.......
Example of MAXDAX configuration (E1) ..................................................................
Routing calls on the basis of the channel on which MAX 2 receives the call.......
Chapter 4
3-53
3-54
3-55
3-56
3-56
3-57
3-57
3-58
3-58
3-59
3-59
3-59
3-60
3-61
3-62
3-62
3-62
3-62
3-63
3-64
3-64
3-66
3-69
3-69
3-70
3-70
3-71
3-72
3-73
3-74
3-74
3-74
3-75
3-76
3-77
3-78
3-78
3-79
3-81
3-81
3-82
3-83
3-85
3-86
3-86
Configuring Individual WAN Connections.................................... 4-1
Introduction to WAN links ....................................................................................................
The Answer profile ................................................................................................................
Encaps Options ...............................................................................................................
IP Options .......................................................................................................................
IPX Options ....................................................................................................................
viii
4-2
4-3
4-4
4-6
4-6
MAX 6000/3000 Network Configuration Guide
Contents
AppleTalk Options.......................................................................................................... 4-6
PPP Options .................................................................................................................... 4-7
Foundation parameters ............................................................................................ 4-7
Numeric parameters................................................................................................. 4-8
Graceful shutdown and IPX Header Compression.................................................. 4-9
COMB Options ............................................................................................................... 4-9
V.120 Options ................................................................................................................. 4-9
X.75 Options ................................................................................................................... 4-9
PAD Options................................................................................................................. 4-10
T3POS Options ............................................................................................................. 4-11
Timer Options........................................................................................................ 4-11
For DTE-initiated calls .......................................................................................... 4-12
Miscellaneous ........................................................................................................ 4-13
Session Options............................................................................................................. 4-13
Filter-related parameters........................................................................................ 4-14
Timing parameters ................................................................................................. 4-14
Miscellaneous Session Options parameters........................................................... 4-14
DHCP Options .............................................................................................................. 4-15
TCP-Clear Options ....................................................................................................... 4-15
Configuring an Answer profile .................................................................................... 4-16
Example of a configured Answer profile .............................................................. 4-16
The Connection profile ........................................................................................................ 4-17
General Parameters ....................................................................................................... 4-17
Basic setup parameters .......................................................................................... 4-17
Telephone numbers................................................................................................ 4-18
Routing .................................................................................................................. 4-18
Overview of the Options subprofiles ............................................................................ 4-19
Encaps Options ............................................................................................................. 4-20
Encaps=MPP ......................................................................................................... 4-20
Encaps=MP............................................................................................................ 4-23
Encaps=PPP........................................................................................................... 4-23
Encaps=COMB...................................................................................................... 4-24
Encaps=FR and Encaps=FR_CIR ......................................................................... 4-24
Encaps=X25/PAD ................................................................................................. 4-25
Encaps=X25/T3POS.............................................................................................. 4-26
Encaps=X25/IP...................................................................................................... 4-27
Encaps=X.32.......................................................................................................... 4-28
Encaps=TCP-Clear ................................................................................................ 4-28
Encaps=ARA ......................................................................................................... 4-30
IP Options ..................................................................................................................... 4-30
Distance parameters............................................................................................... 4-30
SourceIP Check, RIP and Pool parameters ........................................................... 4-31
Multicast parameters.............................................................................................. 4-32
Client parameters ................................................................................................... 4-32
IPX Options .................................................................................................................. 4-32
IPX parameters ...................................................................................................... 4-33
AppleTalk Options........................................................................................................ 4-34
Session Options............................................................................................................. 4-35
Timing parameters ................................................................................................. 4-35
Miscellaneous Session Options parameters........................................................... 4-35
Frame Relay parameters ........................................................................................ 4-36
Framed Only .......................................................................................................... 4-36
MAX 6000/3000 Network Configuration Guide
ix
Contents
OSPF Options ...............................................................................................................
Authentication parameters .....................................................................................
More OSPF parameters .........................................................................................
Telco Options................................................................................................................
Group, FT1 Caller, Data Svc, Force 56 parameters ..............................................
Bill #, Call-by-Call, Transit #, NAS Port Type parameters ..................................
Accounting Options ......................................................................................................
DHCP options ...............................................................................................................
Configuring a Connection profile..........................................................................
Example of setting time limits...............................................................................
Configuring Names/Passwords profiles...............................................................................
Example of a Names/Passwords profile configuration.................................................
Configuring PPP connections ..............................................................................................
Example of a single-channel PPP connection...............................................................
Settings in a RADIUS profile .......................................................................................
Example of a PPP connection .......................................................................................
Enabling PPP dial-out for V.110 modems....................................................................
Configuring MP, MP+ and BACP connections ...................................................................
The MP and BACP parameters.....................................................................................
MP without BACP.................................................................................................
Enabling BACP for MP Connections ....................................................................
Specifying channel counts .....................................................................................
Dynamic algorithm for calculating bandwidth requirements ................................
Time period for calculating average line utilization..............................................
Target utilization....................................................................................................
Adding or dropping links (Add Pers, Sub Pers, Inc Ch Count, Dec Ch Count)....
Guidelines for configuring bandwidth criteria ......................................................
Settings in a RADIUS profile .......................................................................................
Example of a MP connection without BACP ...............................................................
Example of a MP connection with BACP ....................................................................
Configuring Lucent MP+ connections..........................................................................
The MP+ parameters.....................................................................................................
Channel counts and bandwidth allocation parameters ..........................................
Auxiliary password for added channels.................................................................
Bandwidth monitoring ...........................................................................................
Settings in a RADIUS profile .......................................................................................
Example of MP+ configuration ....................................................................................
Configuring a nailed/MP+ connection..........................................................................
Configuring a Connection profile..........................................................................
Settings in a RADIUS profile ................................................................................
Spanning multichannel calls across a stack of units .....................................................
How MP/MP+ call spanning works.......................................................................
Performance considerations for MAX stacking ....................................................
The stacking parameters ........................................................................................
Configuring a MAX stack .....................................................................................
Disabling a MAX stack .........................................................................................
Adding and removing a MAX ...............................................................................
Configuring bidirectional CHAP support ............................................................................
Configuring bidirectional CHAP on the MAX unit......................................................
Setting up bidirectional CHAP on the MAX unit for all incoming calls ..............
Setting up bidirectional CHAP on the MAX unit for selected incoming calls......
Setting up bidirectional CHAP on the MAX unit for outgoing calls ....................
x
4-37
4-37
4-38
4-38
4-39
4-39
4-40
4-41
4-41
4-42
4-42
4-42
4-43
4-43
4-44
4-45
4-46
4-46
4-47
4-47
4-48
4-48
4-48
4-48
4-49
4-49
4-49
4-49
4-50
4-51
4-52
4-53
4-53
4-53
4-53
4-53
4-54
4-55
4-56
4-56
4-57
4-57
4-59
4-62
4-62
4-63
4-63
4-63
4-64
4-64
4-65
4-66
MAX 6000/3000 Network Configuration Guide
Contents
Setting alternative name for CHAP authentication ...............................................
Configuring bidirectional CHAP in RADIUS ..............................................................
Setting up bidirectional CHAP in RADIUS for incoming calls ............................
Setting up bidirectional CHAP in RADIUS for outgoing calls.............................
Setting up selective bidirectional CHAP with callback.........................................
Setting up an outgoing call with double RADIUS lookups...................................
Enhanced support for MS-CHAP ........................................................................................
LAN Manager MS-CHAP support ...............................................................................
RADIUS support for MS-CHAP ..................................................................................
Configuring dial-in PPP for AppleTalk ...............................................................................
Configuring an AppleTalk PPP connection with a Connection profile........................
Configuring an AppleTalk PPP connection with a Names/Passwords profile .............
Configuring AppleTalk connections from RADIUS ...........................................................
Configuring ARA connections.............................................................................................
Example of an ARA configuration ...............................................................................
Example of ARA configuration that enables IP access ................................................
Configuring terminal-server connections.............................................................................
Connection authentication issues..................................................................................
Analog modems and async PPP connection..........................................................
V.120 terminal adapters and PPP connections ......................................................
V.120 terminal adapters with PPP turned off ........................................................
Modem connections ......................................................................................................
V.120 terminal-adapter connections .............................................................................
TCP-Clear connections .................................................................................................
Settings in a RADIUS profile ................................................................................
TCP-modem connections (DNIS Login) ...............................................................
The terminal-server interface........................................................................................
Terminal mode.......................................................................................................
Menu mode ............................................................................................................
Immediate mode ....................................................................................................
Enabling terminal-server calls and setting security ...............................................
The modem parameters.................................................................................................
Example of a modem configuration..............................................................................
Configuring terminal mode...........................................................................................
Example of terminal-mode configuration..............................................................
Configuring immediate mode .......................................................................................
Example of immediate-mode configuration ..........................................................
Configuring menu mode ...............................................................................................
Example of menu-mode configuration ..................................................................
Configuring PPP mode .................................................................................................
Example of PPP configuration ..............................................................................
Configuring Serial Line IP (SLIP) mode ......................................................................
Example of SLIP configuration .............................................................................
Configuring dial-out options.........................................................................................
Example of dial-out configuration.........................................................................
Configuring a Combinet connection ....................................................................................
The Combinet bridging parameters ..............................................................................
Specifying the hardware address of the remote Combinet bridge.........................
Enabling bridging ..................................................................................................
Requiring a password from the remote bridge ......................................................
Specifying passwords to exchange with the remote bridge...................................
Configuring line-integrity monitoring ...................................................................
MAX 6000/3000 Network Configuration Guide
4-66
4-66
4-66
4-67
4-68
4-69
4-72
4-72
4-72
4-72
4-73
4-73
4-74
4-75
4-75
4-75
4-77
4-78
4-78
4-78
4-78
4-78
4-79
4-80
4-81
4-82
4-82
4-82
4-83
4-83
4-83
4-83
4-84
4-85
4-86
4-86
4-86
4-87
4-87
4-88
4-88
4-88
4-89
4-89
4-90
4-91
4-92
4-92
4-92
4-92
4-92
4-92
xi
Contents
Base channel count ................................................................................................ 4-92
Compression .......................................................................................................... 4-92
Example of Combinet configuration............................................................................. 4-93
Configuring EU connections................................................................................................ 4-93
The EU parameters ....................................................................................................... 4-94
EU-RAW and EU-UI............................................................................................. 4-94
Maximum Receive Unit (MRU)............................................................................ 4-94
DCE address (DCE Addr) ..................................................................................... 4-94
DTE address (DTE Addr)...................................................................................... 4-94
Example of an EU connection ...................................................................................... 4-95
Example of an EU-UI connection................................................................................. 4-95
Configuring DHCP services................................................................................................. 4-96
How the MAX assigns IP addresses ............................................................................. 4-97
Plug and Play ......................................................................................................... 4-97
Reserved address ................................................................................................... 4-97
Lease renewal ........................................................................................................ 4-97
Assignment from a pool ........................................................................................ 4-97
Configuring DHCP services ......................................................................................... 4-97
Setting up a DHCP server...................................................................................... 4-99
Setting up Plug and Play support........................................................................... 4-99
Setting up DHCP spoofing .................................................................................... 4-99
Configuring POTS capability on the MAX 6000 and MAX 3000 .................................... 4-100
FXS line profiles ......................................................................................................... 4-101
Configuring an FXS line profile .......................................................................... 4-101
Saving alternative configurations ........................................................................ 4-101
Activating an alternative profile .......................................................................... 4-101
Call Routes profile ...................................................................................................... 4-102
Viewing Call Routes with the DO command ...................................................... 4-102
Internal sorting of call routes............................................................................... 4-104
Numbering Plan profile .............................................................................................. 4-107
Routing outbound calls ............................................................................................... 4-107
Examples of Call Routes configurations ............................................................. 4-107
Examples of Rollover configurations .................................................................. 4-112
Example of a Numbering Plan profile ................................................................. 4-114
MAXDAX .................................................................................................................. 4-114
Routing inbound calls ................................................................................................. 4-115
Line Status .................................................................................................................. 4-116
Call Detail Reporting .................................................................................................. 4-116
Chapter 5
Configuring Frame Relay ............................................................... 5-1
Introduction ............................................................................................................................
Frame Relay link management .......................................................................................
Using the MAX as a Frame Relay concentrator .............................................................
Using the MAX as a Frame Relay switch.......................................................................
Components of a Frame Relay configuration .................................................................
Configuring nailed bandwidth for Frame Relay ....................................................................
Defining Frame Relay link operations ...................................................................................
Dialing, billing and signaling parameters................................................................
Link parameters .......................................................................................................
Timers and event count parameters .........................................................................
Settings in a Frame Relay profile ...................................................................................
Settings in a RADIUS frdlink profile .............................................................................
xii
5-1
5-2
5-2
5-3
5-3
5-4
5-4
5-5
5-6
5-6
5-7
5-7
MAX 6000/3000 Network Configuration Guide
Contents
Examples of a UNI-DTE link interface .......................................................................... 5-9
Examples of a UNI-DCE link interface ........................................................................ 5-10
Examples of an NNI link interface ............................................................................... 5-12
Configuring a DLCI logical interface .................................................................................. 5-13
Overview of DLCI interface settings............................................................................ 5-13
Settings in a Connection profile ............................................................................ 5-13
The Frame Relay connection parameters .............................................................. 5-14
Settings in a RADIUS profile ................................................................................ 5-15
Examples of a DLCI interface configuration................................................................ 5-16
Examples of backup interfaces for nailed Frame Relay links ...................................... 5-17
Concentrating incoming calls onto Frame Relay ................................................................. 5-19
Setting up a Frame Relay gateway ............................................................................... 5-19
Routing parameters in the DLCI profile................................................................ 5-19
Routing parameters in RADIUS............................................................................ 5-20
Examples of a gateway configuration ................................................................... 5-20
Configuring Frame Relay Direct .................................................................................. 5-21
Settings in a Connection profile ............................................................................ 5-21
Settings in a RADIUS profile ................................................................................ 5-22
Examples of FR Direct connections ...................................................................... 5-23
Configuring the MAX as a Frame Relay switch.................................................................. 5-25
Overview of circuit-switching options ......................................................................... 5-25
Settings in a Connection profile ............................................................................ 5-25
Settings in a RADIUS profile ................................................................................ 5-26
Examples of a circuit between UNI interfaces ............................................................. 5-26
Using local profiles................................................................................................ 5-26
Using RADIUS profiles......................................................................................... 5-27
Examples of a circuit between NNI interfaces ............................................................. 5-28
Using local profiles................................................................................................ 5-28
Using RADIUS profiles......................................................................................... 5-29
Examples of circuits that use UNI and NNI interfaces................................................. 5-30
Using local profiles................................................................................................ 5-30
Using RADIUS profiles......................................................................................... 5-32
Configuring switched Frame Relay connections ................................................................. 5-33
Overview....................................................................................................................... 5-33
Configuring a switched Frame Relay connection......................................................... 5-34
Configuring a Frame Relay profile........................................................................ 5-34
Configuring a Connection profile.......................................................................... 5-35
Configuring the Answer profile............................................................................. 5-35
Establishing the connection ................................................................................... 5-36
Configuring 64 switched Frame Relay connections ............................................................ 5-36
Examples of RADIUS switched Frame Relay connections.......................................... 5-36
Sample RADIUS Frame Relay Data Link profile ................................................. 5-36
Sample RADIUS DNIS profile ............................................................................. 5-36
Sample RADIUS CLID profile ............................................................................. 5-37
Configuring a switched Frame Relay connection for an outbound call ....................... 5-37
Sample RADIUS Route profile ............................................................................. 5-37
Sample RADIUS Frame Relay Data Link profile ................................................. 5-38
Sample RADIUS user profile ................................................................................ 5-38
Chapter 6
Configuring X.25 ............................................................................. 6-1
Introduction to Lucent X.25 implementation......................................................................... 6-2
Configuring the logical link to an X.25 network ................................................................... 6-2
MAX 6000/3000 Network Configuration Guide
xiii
Contents
Dialing, billing and signaling parameters................................................................ 6-3
LAPB parameters .................................................................................................... 6-3
X.25 profile parameters ........................................................................................... 6-4
X.121 and VCE Timer Val parameters ................................................................... 6-6
Example of an X.25 profile configuration ...................................................................... 6-6
Configuring X.25 IP connections........................................................................................... 6-8
Max Unsucc. calls, Inactivity Timer, and MRU parameters .......................................... 6-9
Call Mode and X.121 parameters ................................................................................... 6-9
Route IP and LAN Adrs................................................................................................ 6-10
Example of an X.25 IP configuration ........................................................................... 6-10
Configuring X.25 PAD connections .................................................................................... 6-11
X.25 PAD parameters ................................................................................................... 6-11
X.3 Param Prof ...................................................................................................... 6-12
VC Timer enable ................................................................................................... 6-12
Auto-call X.121 addr ............................................................................................. 6-12
Configuring an X.25 PAD connection.......................................................................... 6-13
Example of X.25 PAD........................................................................................... 6-14
Setting up X.25 PAD sessions ............................................................................................. 6-14
X.3 parameters and profiles .......................................................................................... 6-14
X.25 PAD commands ................................................................................................... 6-18
Commands for working with X.3 parameters and profiles ................................... 6-18
X.25 PAD commands for managing calls ............................................................. 6-19
PAD service signals ...................................................................................................... 6-21
X.25 clear cause codes.................................................................................................. 6-22
X.25 diagnostic field values.......................................................................................... 6-22
Configuring X.25 PAD users from RADIUS ...................................................................... 6-24
Customizing script support for X.25 PAD........................................................................... 6-25
Parameters and commands............................................................................................ 6-25
X28 terminal–server command ............................................................................. 6-25
X.25 PAD commands ............................................................................................ 6-25
Accessing the PAD by using the PAD script support feature....................................... 6-26
Configuring X.32 profiles for incoming switched X.25 connections .................................. 6-27
Net2Net circuit mode.................................................................................................... 6-28
ISDN packet mode (on-demand X.25) ......................................................................... 6-29
Setting up ISDN D channel X.25 support............................................................................ 6-30
Configuring ISDN D channel X.25 support ................................................................. 6-30
Customized X.25 T3POS support................................................................................. 6-30
Protocol summary.................................................................................................. 6-31
Configuring a T3POS connection.......................................................................... 6-34
Accessing the T3POS ............................................................................................ 6-34
Always On/Dynamic ISDN (AO/DI)................................................................................... 6-35
Introduction................................................................................................................... 6-36
How it works................................................................................................................. 6-36
Configuring an AO/DI connection ............................................................................... 6-37
Configuring the X.25 profile ................................................................................. 6-37
Configuring the Answer profile............................................................................. 6-38
Configuring a Connection profile to support AO/DI............................................. 6-38
Displaying AO/DI operation......................................................................................... 6-39
Displaying whether or not the MAX supports AO/DI .......................................... 6-39
Displaying active AO/DI calls............................................................................... 6-40
Displaying packet processing for a specific session.............................................. 6-41
RADIUS support for Always On/Dynamic ISDN (AO/DI) ......................................... 6-41
xiv
MAX 6000/3000 Network Configuration Guide
Contents
Accounting records for each active AO/DI call .................................................... 6-41
RADIUS dial-in AO/DI profile for PAP/CHAP with a fixed IP address.............. 6-46
Changes to show users command .......................................................................... 6-47
Chapter 7
Configuring IP Fax .......................................................................... 7-1
Store-and-forward IP fax ....................................................................................................... 7-1
Incoming IP faxes ........................................................................................................... 7-1
Outgoing IP faxes ........................................................................................................... 7-2
Configuring system parameters for IP fax modem usage ...................................................... 7-2
Assigning bandwidth for typical IP fax usage ................................................................ 7-3
Configuring a typical Call Route profile ........................................................................ 7-4
Specifying the maximum number of parallel dial-outs .................................................. 7-4
Configuring IP fax options..................................................................................................... 7-5
Example of an IP fax configuration for incoming faxes................................................. 7-6
Example of an IP fax configuration for outgoing faxes.................................................. 7-7
Fax hangup codes and disconnect cause codes............................................................... 7-8
IP fax call accounting ..................................................................................................... 7-9
SNMP information about IP fax operation.............................................................. 7-9
RADIUS support for IP fax operation .......................................................................... 7-10
Syslog support for IP fax operation .............................................................................. 7-12
Redialer support on MultiDSP card for store-and-forward fax .................................... 7-12
Atlas redialer and DID support on MAX 6000 units ........................................................... 7-12
Specifying the type of redialer...................................................................................... 7-13
DID on inbound IP fax calls ......................................................................................... 7-13
Chapter 8
Configuring OSPF Routing ............................................................ 8-1
OSPF overview ...................................................................................................................... 8-1
TAOS implementation of OSPF ..................................................................................... 8-2
OSPF features ................................................................................................................. 8-2
Security .................................................................................................................... 8-2
Support for variable length subnet masks................................................................ 8-2
Exchange of routing information............................................................................. 8-3
Designated and Backup Designated Routers........................................................... 8-3
Configurable metrics ............................................................................................... 8-4
Hierarchical routing (areas) ..................................................................................... 8-5
Stub areas................................................................................................................. 8-6
Not So Stubby Areas (NSSAs) ................................................................................ 8-6
The link-state routing algorithm .............................................................................. 8-7
Configuring OSPF routing in the MAX................................................................................. 8-9
Configuring OSPF on the Ethernet interface .................................................................. 8-9
Make sure the MAX is configured as an IP host ................................................... 8-10
Configure the MAX for OSPF............................................................................... 8-10
Configuring OSPF across the WAN ............................................................................. 8-12
Configuring a WAN link that does not support OSPF ................................................. 8-13
Configuring the MAX as an NSSA internal router....................................................... 8-15
Chapter 9
Configuring IP Routing................................................................... 9-1
Introduction to IP routing on the MAX ................................................................................. 9-1
IP address and subnet mask usage in MAX units ........................................................... 9-1
Default subnet masks............................................................................................... 9-1
MAX 6000/3000 Network Configuration Guide
xv
Contents
Subnet mask format ................................................................................................. 9-2
Zero subnetworks .................................................................................................... 9-3
IP routing table................................................................................................................ 9-4
MAX IP interfaces .......................................................................................................... 9-4
Ethernet interfaces ................................................................................................... 9-4
WAN IP interfaces................................................................................................... 9-5
Configuring LAN interfaces .................................................................................................. 9-7
Configuring primary and secondary IP addresses for the LAN...................................... 9-7
Configuring routing table updates .................................................................................. 9-8
Configuring Address Resolution Protocol (ARP) responses .......................................... 9-8
Example of configuration of a MAX IP interface on a subnet ....................................... 9-8
Configuring system-level routing policies........................................................................... 9-10
Dynamic IP addressing for dial-in hosts....................................................................... 9-10
Enabling dynamic address assignment .................................................................. 9-10
Specifying address pools ....................................................................................... 9-10
Forcing callers configured for a pool address to accept dynamic assignment ...... 9-11
Summarizing host routes in routing table advertisements..................................... 9-11
Example of how to set up address pools with route summarization ..................... 9-11
Boot Protocol (BOOTP) requests to other networks .................................................... 9-13
Name resolution service (DNS or WINS) .................................................................... 9-14
DNS lists................................................................................................................ 9-15
Client DNS ............................................................................................................ 9-15
Example of address resolution configuration ........................................................ 9-15
Configuring DHCP services ......................................................................................... 9-19
How the MAX assigns IP addresses when acting as a DHCP server.................... 9-19
Examples of DHCP service configuration............................................................. 9-20
Translating network addresses for a LAN .................................................................... 9-23
Single-address NAT and port routing.................................................................... 9-23
Multiple-address NAT ........................................................................................... 9-24
Configuring single- or multiple-address NAT....................................................... 9-26
Configuring NAT port routing (Static Mapping subprofiles) ............................... 9-27
Support for QuickTime audio/video streaming ..................................................... 9-29
Setting and maintaining system time..................................................................... 9-29
Telnet password ..................................................................................................... 9-30
Shared Connection profiles ................................................................................... 9-30
Dial-out routes in a redundant configuration......................................................... 9-30
UDP checksums for ensuring data integrity .......................................................... 9-31
Suppressing host route advertisements.................................................................. 9-31
Configuring WAN interfaces ............................................................................................... 9-31
Enabling IP routing ....................................................................................................... 9-31
Configuring routes for WAN connections.................................................................... 9-31
Specify the remote IP address ............................................................................... 9-32
Configuring numbered-interface routing............................................................... 9-32
Specifying a local IP interface address.................................................................. 9-32
Enabling dynamic IP addressing ........................................................................... 9-32
Assigning metrics and preferences ........................................................................ 9-33
Configuring RIP on a WAN interface ................................................................... 9-33
IP Direct configuration .......................................................................................... 9-33
Settings in RADIUS profiles ........................................................................................ 9-34
Remote host requirements for WAN connections ........................................................ 9-35
UNIX software ...................................................................................................... 9-36
Windows or OS/2 software.................................................................................... 9-36
xvi
MAX 6000/3000 Network Configuration Guide
Contents
Macintosh software................................................................................................
TCP/IP software configuration ..............................................................................
Examples of WAN interface configuration ..................................................................
Configuring dynamic address assignment to a dial-in host ...................................
Configuring a host connection with a static address .............................................
Configuring an IP Direct connection.....................................................................
Configuring a router-to-router connection ............................................................
Configuring a router-to-router connection on a subnet .........................................
Configuring a numbered interface .........................................................................
Type of service (TOS) support for selecting quality of service....................................
Defining TOS policy within a profile....................................................................
Defining TOS filters ..............................................................................................
Examples of connection-based TOS configuration ...............................................
Example of defining a TOS filter ..........................................................................
Example of applying TOS filters to WAN connections ........................................
Configuring IP routes...........................................................................................................
Static routes...................................................................................................................
Dynamic routes .............................................................................................................
Route preferences and metrics on a MAX unit.............................................................
Static route configuration..............................................................................................
Settings in a Static Route profile ...........................................................................
Settings in a RADIUS route profiles .....................................................................
Route settings in a RADIUS user profile ..............................................................
Connection-specific private static routes (RADIUS only) ....................................
Configuring the default route ................................................................................
Defining a static route to a remote subnet .............................................................
Example of route preferences configuration..........................................................
Dynamic route configuration ........................................................................................
Example of RIP and ICMP configuration.....................................................................
Chapter 10
9-36
9-36
9-36
9-36
9-38
9-40
9-41
9-42
9-44
9-46
9-46
9-49
9-49
9-53
9-54
9-55
9-55
9-56
9-56
9-56
9-56
9-58
9-58
9-59
9-59
9-60
9-60
9-61
9-62
Setting Up IP Multicast Forwarding ............................................ 10-1
Introduction to multicast forwarding ...................................................................................
Configuring multicast forwarding........................................................................................
Enabling multicast forwarding......................................................................................
Identifying the MBONE interface ................................................................................
Multicast forwarder polling activities...........................................................................
Configuring the MAX to support multicast clients ......................................................
Specifying the interfaces that support multicast clients ........................................
Specifying the rate which multicast clients accept packets ...................................
Querying for active group members ......................................................................
Multicast interfaces.......................................................................................................
Implicit priority setting for dropping multicast packets ...............................................
Monitoring connectivity problems through heartbeat monitoring................................
Examples of multicast forwarding configuration.................................................................
Forwarding from an MBONE router on Ethernet.........................................................
Forwarding from an MBONE router on a WAN link...................................................
Configuring the MAX to respond to multicast clients ..........................................
Configuring the MBONE interface .......................................................................
Configuring multicasting on WAN interfaces.......................................................
MAX 6000/3000 Network Configuration Guide
10-1
10-2
10-2
10-2
10-2
10-2
10-2
10-3
10-3
10-3
10-4
10-4
10-5
10-5
10-6
10-7
10-7
10-7
xvii
Contents
Chapter 11
Setting Up Virtual Private Networks............................................ 11-1
Introduction to Virtual Private Networks............................................................................. 11-1
Configuring ATMP tunnels ................................................................................................. 11-2
How the MAX creates ATMP tunnels.......................................................................... 11-2
Setting the UDP port..................................................................................................... 11-3
Setting an MTU limit .................................................................................................... 11-3
How link compression affects the MTU................................................................ 11-4
How ATMP tunneling causes fragmentation ........................................................ 11-4
Pushing the fragmentation task to connection end-points ..................................... 11-4
Forcing fragmentation for interoperation with outdated clients ................................... 11-4
Router and gateway mode............................................................................................. 11-5
Configuring the Foreign Agent..................................................................................... 11-5
Understanding the Foreign Agent parameters and attributes ................................ 11-7
Example of configuring a Foreign Agent (IP)....................................................... 11-9
Example of configuring a Foreign Agent (IPX) .................................................. 11-10
Configuring a Home Agent......................................................................................... 11-11
Configuring a Home Agent in router mode......................................................... 11-11
Configuring a Home Agent in gateway mode ..................................................... 11-15
Specifying the tunnel password ........................................................................... 11-22
Setting an idle timer for unused tunnels .............................................................. 11-22
Configuring the MAX as an ATMP multimode agent ............................................... 11-22
Supporting mobile client routers (IP only) ................................................................. 11-25
Home Agent in router mode ................................................................................ 11-26
Home Agent in gateway mode ............................................................................ 11-26
ATMP connections that bypass a Foreign Agent ....................................................... 11-26
Configuring PPTP tunnels for dial-in clients ..................................................................... 11-27
How the MAX works as a PAC.................................................................................. 11-27
Understanding the PPTP PAC parameters.................................................................. 11-28
Enabling PPTP..................................................................................................... 11-28
Specifying a PRI line for PPTP calls and the PNS IP address ............................ 11-28
Example of a PAC configuration................................................................................ 11-28
Example of a PPTP tunnel across multiple POPs....................................................... 11-29
Routing a terminal-server session to a PPTP server ................................................... 11-30
Configuring L2TP tunnels for dial-in clients ..................................................................... 11-31
Elements of L2TP tunneling ....................................................................................... 11-31
How the MAX creates L2TP tunnels .................................................................. 11-32
Proxy LCP and authentication support for L2TP ................................................ 11-32
LAC and LNS mode ............................................................................................ 11-33
Tunnel authentication .......................................................................................... 11-33
Client authentication............................................................................................ 11-33
Flow control......................................................................................................... 11-34
Using the Tunnel-Assignment-ID (82) RADIUS attribute for L2TP ......................... 11-34
Configuration of the MAX as an LAC ....................................................................... 11-36
Understanding the L2TP LAC parameters .......................................................... 11-36
Configuring the MAX ......................................................................................... 11-37
Using multiple L2TP system names ........................................................................... 11-38
Overview of RADIUS attribute-value pairs ........................................................ 11-38
Example of tunnel authentication ........................................................................ 11-39
Example of connection-based tunnel authentication ........................................... 11-39
Creating parallel L2TP tunnels to the same end point......................................... 11-41
Configuration of the MAX as an LNS........................................................................ 11-43
Using DNS list attempts for L2F and L2TP ............................................................... 11-44
xviii
MAX 6000/3000 Network Configuration Guide
Contents
Using Tunnel Options to support tunneling protocols .......................................................
SNMP MIB for L2TP Added.............................................................................................
Configuring Virtual Routers ..............................................................................................
Background .................................................................................................................
Current limitations ......................................................................................................
Accessible Vrouter profiles ........................................................................................
Creating a Virtual Router profile ................................................................................
Required Connection profile settings .........................................................................
Required Static Rtes profile settings...........................................................................
Disabling a Virtual Router profile ..............................................................................
VRouter support for L2TP tunneling..........................................................................
Configuring VRouter support for IPX networks ........................................................
Enabling the VRouter feature on IPX..................................................................
RADIUS profiles .................................................................................................
Chapter 12
11-44
11-45
11-47
11-47
11-48
11-48
11-49
11-49
11-49
11-50
11-50
11-50
11-51
11-51
Configuring IPX Routing .............................................................. 12-1
Introduction to IPX routing.................................................................................................. 12-1
IPX Service Advertising Protocol (SAP) tables ........................................................... 12-2
IPX Routing Information Protocol (RIP) tables ........................................................... 12-2
IPX and PPP link compression ..................................................................................... 12-3
Lucent extensions to standard IPX ............................................................................... 12-3
IPX Route profiles ................................................................................................. 12-3
IPX SAP filters ...................................................................................................... 12-4
WAN considerations for NetWare client software ....................................................... 12-4
Enabling IPX routing in the MAX ....................................................................................... 12-5
Examples of IPX routing configuration........................................................................ 12-6
A basic configuration using default values............................................................ 12-6
A more complex example...................................................................................... 12-6
Verifying the router configuration......................................................................... 12-7
Configuring IPX routing connections .................................................................................. 12-8
Answer profile parameters............................................................................................ 12-8
Connection profile parameters...................................................................................... 12-8
Settings in RADIUS profiles ...................................................................................... 12-10
Peer dial-in for routing to NetWare clients ......................................................... 12-10
Controlling RIP and SAP transmissions across the WAN connection................ 12-10
Dial Query for bringing up a connection on the basis of service queries............ 12-11
Netware t/o watchdog spoofing ........................................................................... 12-11
SAP HS Proxy (NetWare SAP Home Server Proxy) .......................................... 12-11
Examples of IPX routing connections ........................................................................ 12-12
Configuring a dial-in client connection ............................................................... 12-12
Configuring a connection between two LANs .................................................... 12-13
Configuring a connection with local servers only ............................................... 12-17
Configuring static IPX routes ............................................................................................ 12-19
Settings in local Static route profiles .......................................................................... 12-19
Settings in RADIUS profiles ...................................................................................... 12-20
Example of static-route configuration ........................................................................ 12-21
Creating and applying IPX SAP filters .............................................................................. 12-22
Input SAP filters and output SAP filters..................................................................... 12-23
Applying IPX SAP filters ........................................................................................... 12-24
Example of IPX SAP filter configuration................................................................... 12-24
MAX 6000/3000 Network Configuration Guide
xix
Contents
Chapter 13
AppleTalk Routing ........................................................................ 13-1
Introduction to AppleTalk routing .......................................................................................
When to use AppleTalk routing....................................................................................
Reducing broadcast and multicast traffic ..............................................................
Providing dynamic startup information to local devices .......................................
AppleTalk zones and network ranges ...........................................................................
AppleTalk zones ....................................................................................................
Extended and nonextended AppleTalk networks ..................................................
MAX units and AppleTalk nodes .................................................................................
Configuring AppleTalk routing ...........................................................................................
System-level AppleTalk routing parameters ................................................................
Answer profile parameters............................................................................................
Per-connection AppleTalk routing parameters .............................................................
Configuring an AppleTalk connection with RADIUS .................................................
Chapter 14
13-1
13-1
13-1
13-2
13-2
13-2
13-2
13-4
13-5
13-5
13-6
13-7
13-7
Configuring Packet Bridging ....................................................... 14-1
Introduction to Lucent bridging ........................................................................................... 14-1
Disadvantages of bridging ............................................................................................ 14-2
How the MAX initiates a bridged WAN connection.................................................... 14-2
Physical addresses and the bridge table................................................................. 14-2
Broadcast addresses ............................................................................................... 14-2
Establishing a bridged connection ....................................................................................... 14-3
Enabling bridging................................................................................................................. 14-3
How the MAX supports bridging ........................................................................................ 14-4
Transparent bridging..................................................................................................... 14-4
Configuring bridged connections......................................................................................... 14-5
Bridge and Recv Auth................................................................................................... 14-5
Station ........................................................................................................................... 14-6
Bridge and Dial Brdcast................................................................................................ 14-6
Netware t/o and Handle IPX ......................................................................................... 14-6
Name, Active, and Recv PW ........................................................................................ 14-6
Bridge Adrs parameters ................................................................................................ 14-7
RADIUS bridging attributes ......................................................................................... 14-8
Using RADIUS to configure bridge table entries ......................................................... 14-8
Bridge profile configuration examples .................................................................. 14-9
Example of a bridged connection ............................................................................... 14-10
IPX bridged configurations......................................................................................... 14-12
The IPX bridging parameters .............................................................................. 14-12
Example of an IPX client bridge (local clients) .................................................. 14-14
Example of an IPX server bridge (local servers)................................................. 14-15
Configuring proxy mode on the MAX ....................................................................... 14-16
Chapter 15
Defining Static Filters ................................................................... 15-1
Filter overview .....................................................................................................................
Basic types of filters .....................................................................................................
Data and call filters .......................................................................................................
How filters work ...........................................................................................................
Generic filters ........................................................................................................
IP filters .................................................................................................................
Type of Service filters ...........................................................................................
xx
15-1
15-1
15-2
15-3
15-3
15-3
15-4
MAX 6000/3000 Network Configuration Guide
Contents
IPX filters .............................................................................................................. 15-4
Specifying a filter’s direction ....................................................................................... 15-5
Specifying a filter’s forwarding action ......................................................................... 15-6
Defining generic filters ........................................................................................................ 15-7
Settings in a local Filter profile..................................................................................... 15-7
Settings in a RADIUS profile ....................................................................................... 15-8
Specifying the offset to the bytes to be examined ........................................................ 15-9
Specifying the number of bytes to test.......................................................................... 15-9
Masking the value before comparison ........................................................................ 15-10
Examples of a generic call filter ................................................................................. 15-11
Defining IP filters............................................................................................................... 15-11
Settings in a local Filter profile................................................................................... 15-11
Settings in a RADIUS profile ..................................................................................... 15-13
Filtering by source or destination address .................................................................. 15-14
Filtering by port numbers ........................................................................................... 15-14
Examples of an IP filter to prevent local address spoofing ........................................ 15-15
Examples of an IP filter for more complex security issues ........................................ 15-16
Defining Type of Service filters......................................................................................... 15-18
Settings in a local Filter profile................................................................................... 15-18
Settings in a RADIUS profile ..................................................................................... 15-20
Examples of defining a TOS filter .............................................................................. 15-21
Defining IPX filters............................................................................................................ 15-22
Filtering by source or destination address .................................................................. 15-23
Filtering by socket number ......................................................................................... 15-23
Example of an outbound IPX filter............................................................................. 15-24
Example of an inbound IPX filter............................................................................... 15-24
Applying a filter to an interface ......................................................................................... 15-25
Settings in local profiles ............................................................................................. 15-25
Settings in RADIUS profiles ...................................................................................... 15-26
How the system uses the Answer Default parameter ................................................. 15-26
Examples of applying a data filter to a WAN interface.............................................. 15-27
Examples of applying a call filter to a WAN interface............................................... 15-28
Examples of applying a TOS filter to a WAN interface............................................. 15-28
Example of applying a filter to a LAN interface ........................................................ 15-29
Index.......................................................................................... Index-1
MAX 6000/3000 Network Configuration Guide
xxi
Figures
Figure 2-1
Figure 2-2
Figure 3-1
Figure 3-2
Figure 3-3
Figure 3-4
Figure 3-5
Figure 3-6
Figure 4-1
Figure 4-2
Figure 4-3
Figure 4-4
Figure 4-5
Figure 4-6
Figure 4-7
Figure 4-8
Figure 4-9
Figure 4-10
Figure 4-11
Figure 4-12
Figure 4-13
Figure 4-14
Figure 4-15
Figure 4-16
Figure 4-17
Figure 4-18
Figure 4-19
Figure 5-1
Figure 5-2
Figure 5-3
Figure 5-4
Figure 5-5
Figure 5-6
Figure 5-7
Figure 5-8
Figure 5-9
Figure 5-10
Figure 5-11
Figure 5-12
Figure 6-1
Figure 6-2
Figure 6-3
Figure 6-4
Using the MAX as an ISP hub .......................................................................... 2-2
Using the MAX as a telecommuting hub .......................................................... 2-3
Slot and port numbering in the MAX 6000 ....................................................... 3-2
Slot and port numbering in the MAX 3000 T1 .................................................. 3-3
IDSL connection with repeaters ...................................................................... 3-47
MAXDAX call routing ................................................................................... 3-76
Sample MAXDAX (T1) installation ............................................................... 3-83
Sample MAXDAX (E1) installation ............................................................... 3-86
A PPP connection ........................................................................................... 4-45
Algorithms for weighing bandwidth usage samples ....................................... 4-48
An MP+ connection ........................................................................................ 4-54
A MAX stack for spanning MP or MP+ calls ................................................ 4-57
Packet flow from the slave channel to the Ethernet ........................................ 4-58
Packet flow from the Ethernet ........................................................................ 4-59
Hunt groups for a MAX stack handling both MP and MP+ calls ................... 4-61
Hunt groups for a MAX stack handling only MP-without-BACP calls ......... 4-61
Bidirectional CHAP for all incoming calls to the MAX unit ......................... 4-64
Bidirectional CHAP for selected calls to the MAX unit ................................. 4-65
Multiprovider network .................................................................................... 4-70
An ARA connection enabling IP access ......................................................... 4-76
Terminal-server connection to a local Telnet host .......................................... 4-77
A TCP-Clear connection ................................................................................. 4-80
Sample TCP-modem connection .................................................................... 4-82
A Combinet connection .................................................................................. 4-91
EU Connection ................................................................................................ 4-95
MAXPOTS card ........................................................................................... 4-100
MAXPOTS Line Status display .................................................................... 4-116
Frame Relay network ........................................................................................ 5-2
Frame Relay concentrator ................................................................................. 5-3
Frame Relay switch .......................................................................................... 5-3
Frame Relay DTE interface ............................................................................ 5-10
Frame Relay DCE interface ............................................................................ 5-11
Frame Relay NNI interface ............................................................................. 5-12
Frame Relay PVC ........................................................................................... 5-16
Frame Relay gateway ...................................................................................... 5-20
Frame Relay Direct ......................................................................................... 5-23
Frame Relay circuit with UNI interfaces ........................................................ 5-26
Frame Relay circuit with NNI interfaces ........................................................ 5-28
Frame Relay circuit with UNI and NNI interface ........................................... 5-30
Example of an X.25 IP connection ................................................................. 6-10
Example of a X.25 PAD connection ............................................................... 6-13
Traditional X.25 connection ........................................................................... 6-28
Net2Net circuit mode ...................................................................................... 6-28
MAX 6000/3000 Network Configuration Guide
xxiii
Figures
Figure 6-5 ISDN packet mode .......................................................................................... 6-29
Figure 6-6 T3POS setup ................................................................................................... 6-30
Figure 6-7 Example of a T3POS configuration ................................................................ 6-31
Figure 7-1 Incoming IP fax from fax machine to Internet .................................................. 7-2
Figure 7-2 Outgoing IP fax from Internet to fax machine .................................................. 7-2
Figure 7-3 Receiving and forwarding incoming IP faxes ................................................... 7-6
Figure 7-4 Sending an outgoing IP fax to a fax machine ................................................... 7-8
Figure 8-1 Adjacency between neighboring routers ........................................................... 8-3
Figure 8-2 Designated and Backup Designated Routers .................................................... 8-4
Figure 8-3 OSPF costs for different types of links ............................................................. 8-5
Figure 8-4 Dividing an AS into areas ................................................................................. 8-6
Figure 8-5 Sample network topology ................................................................................. 8-7
Figure 8-6 Example of an OSPF setup ............................................................................... 8-9
Figure 9-1 Default mask for class C IP address ................................................................. 9-2
Figure 9-2 A 29-bit subnet mask and the number of supported hosts ................................ 9-2
Figure 9-3 Typical routing table ......................................................................................... 9-5
Figure 9-4 Interface-based routing example ....................................................................... 9-6
Figure 9-5 Sample dual IP network .................................................................................... 9-7
Figure 9-6 Creating a subnet for the MAX ......................................................................... 9-9
Figure 9-7 Address assigned dynamically from a pool .................................................... 9-12
Figure 9-8 Local DNS table example ............................................................................... 9-17
Figure 9-9 A dial-in user requiring dynamic IP address assignment ................................ 9-36
Figure 9-10 A dial-in user requiring a static IP address (a host route) ............................... 9-39
Figure 9-11 Directing incoming IP packets to one local host ............................................ 9-40
Figure 9-12 A router-to-router IP connection ..................................................................... 9-41
Figure 9-13 A connection between local and remote subnets ............................................ 9-43
Figure 9-14 Example of a numbered interface ................................................................... 9-45
Figure 9-15 Two-hop connection that requires a static route when RIP is off ................... 9-60
Figure 10-1 MAX forwarding multicast traffic to dial-in multicast clients ....................... 10-5
Figure 10-2 MAX acting as a multicast forwarder on Ethernet and WAN interfaces ....... 10-6
Figure 11-1 ATMP tunnel across the Internet .................................................................... 11-2
Figure 11-2 Path MTU on an Ethernet segment ................................................................. 11-3
Figure 11-3 Home Agent routing to the home network ................................................... 11-11
Figure 11-4 Home Agent in gateway mode ...................................................................... 11-15
Figure 11-5 MAX acting as both Home Agent and Foreign Agent ................................. 11-23
Figure 11-6 PPTP tunnel .................................................................................................. 11-28
Figure 11-7 PPTP tunnel across multiple POPs ............................................................... 11-29
Figure 11-8 L2TP tunnel across the Internet .................................................................... 11-32
Figure 11-9 L2TP tunnel setup using tunnel assignment IDs ........................................ 11-35
Figure 11-10 Example of L2TP tunnel authentication ..................................................... 11-39
Figure 11-11Typical VRouter implementation ................................................................. 11-48
Figure 12-1 A dial-in NetWare client ............................................................................... 12-12
Figure 12-2 A connection with NetWare servers on both sides ....................................... 12-14
Figure 12-3 A dial-in client that belongs to its own IPX network ................................... 12-17
Figure 13-1 AppleTalk LAN .............................................................................................. 13-3
Figure 13-2 Routed connection .......................................................................................... 13-4
Figure 14-1 Negotiating a bridge connection (PPP encapsulation) .................................... 14-3
Figure 14-2 How the MAX creates a bridging table .......................................................... 14-4
Figure 14-3 An example of a connection bridging AppleTalk ......................................... 14-10
Figure 14-4 An example of an IPX client bridged connection ......................................... 14-14
Figure 14-5 An example of an IPX server bridged connection ........................................ 14-15
Figure 15-1 Data filters drop or forward certain packets ................................................... 15-2
xxiv
MAX 6000/3000 Network Configuration Guide
Figures
Figure 15-2 Call filters prevent certain packets from resetting the timer ........................... 15-2
MAX 6000/3000 Network Configuration Guide
xxv
Tables
Table 2-1
Table 4-1
Table 4-2
Table 4-3
Table 4-4
Table 6-1
Table 6-2
Table 6-3
Table 6-4
Table 6-5
Table 6-6
Table 8-1
Table 8-2
Table 8-3
Table 8-4
Table 9-1
Table 9-2
Table 11-1
Table 11-2
Table 11-3
Table 11-4
Table 11-5
Table 11-6
Table 14-1
Table 14-2
Where to go next .............................................................................................. 2-9
Full-group ordering of slot and port numbers................................................ 4-105
Example of sorting order ............................................................................... 4-105
Full-group ordering of slot and port numbers................................................ 4-106
Example of Fair Share routing order ............................................................. 4-106
Sample telco subscription form ......................................................................... 6-6
X.3 parameters ................................................................................................. 6-14
X.3 profiles ...................................................................................................... 6-17
PAD service signals ......................................................................................... 6-21
Clear cause codes............................................................................................. 6-22
X.25 diagnostic field values............................................................................. 6-22
Link-state databases for network topology in Figure 8-5 .................................. 8-7
Shortest-path tree and resulting routing table for Router-1 ............................... 8-8
Shortest-path tree and resulting routing table for Router-2 ............................... 8-8
Shortest-path tree and resulting routing table for Router-3 ............................... 8-8
IP address classes and number of network bits.................................................. 9-1
Standard subnet masks and Lucent notation...................................................... 9-3
Required RADIUS attributes to reach an IP home network ............................ 11-7
Required RADIUS attributes to reach an IPX home network ......................... 11-8
RADIUS attributes for specifying L2TP tunnels........................................... 11-37
Existing tunnels to the same LNS.................................................................. 11-42
Tunnels created based on profile settings for incoming callers..................... 11-43
L2TP MIB variables and supported counters ............................................... 11-46
Bridging attributes ........................................................................................... 14-8
Ascend-Bridge-Address arguments ................................................................. 14-9
MAX 6000/3000 Network Configuration Guide
xxvii
About This Guide
How to use this guide
This guide explains how to configure and use the MAXTM as an Internet Service Provider
(ISP) or telecommuting hub. Chapter 1, “Introduction,” begins with a condensed table of contents, followed by an overview of the manual’s contents. Each subsequent chapter begins with
a chapter table of contents, followed by a brief overview of the chapter’s contents. Read the
overview sections if you are not sure about which information applies to your installation.
Note: This guide describes the full set of features for MAX 6000 and MAX 3000 units. Some
features might not be available with earlier versions or specialty loads of the software.
Warning: Before installing this product, see the Important Safety Instructions in the
Installation and Basic Configuration Guide for your MAX unit.
What you should know
This guide is for the person who configures and maintains the MAX. To configure the MAX,
you need to understand the following:
•
Wide Area Network (WAN) concepts
•
Local Area Network (LAN) concepts, if applicable
Documentation conventions
Following are all the special characters and typographical conventions used in this manual:
Convention
Meaning
Monospace text Represents text that appears on your computer’s screen, or that could
appear on your computer’s screen.
Boldface mono- Represents characters that you enter exactly as shown (unless the charspace text
acters are also in italics—see Italics, below). If you could enter
the characters but are not specifically instructed to, they do not appear
in boldface.
Italics
Represent variable information. Do not enter the words themselves in
the command. Enter the information they represent. In ordinary text,
italics are used for titles of publications, for some terms that would
otherwise be in quotation marks, and to show emphasis.
MAX 6000/3000 Network Configuration Guide
xxix
About This Guide
MAX 6000/3000 Series documentation set
Convention
Meaning
[]
Square brackets indicate an optional argument you might add to a
command. To include such an argument, type only the information
inside the brackets. Do not type the brackets unless they appear in
boldface.
|
Separates command choices that are mutually exclusive.
>
Points to the next level in the path to a parameter or menu item. The
item that follows the angle bracket is one of the options that appear
when you select the item that precedes the angle bracket.
Key1-Key2
Represents a combination keystroke. To enter a combination keystroke, press the first key and hold it down while you press one or
more other keys. Release all the keys at the same time. (For example,
Ctrl-H means hold down the Control key and press the H key.)
Press Enter
Means press the Enter, or Return, key or its equivalent on your computer.
Note:
Introduces important additional information.
!
Caution:
!
Warning:
Warns that a failure to follow the recommended procedure could result
in loss of data or damage to equipment.
Warns that a failure to take appropriate safety precautions could result
in physical injury.
Warns of danger of electric shock.
Warning:
MAX 6000/3000 Series documentation set
The MAX 6000/3000 documentation set consists of the following manuals:
xxx
•
MAX Administration Guide
•
MAX 3000 Installation and Basic Configuration Guide
•
MAX 6000 Installation and Basic Configuration Guide
•
MAX 6000/3000 Network Configuration Guide (this manual)
•
MAX Reference
•
MAX Security Supplement
•
TAOS RADIUS Guide and Reference
•
TAOS Glossary
•
Remote Access Networking Services: Technology Overview
•
Access Networks Safety and Compliance Guide
MAX 6000/3000 Network Configuration Guide
About This Guide
MAX 6000/3000 Series documentation set
The MAX 6000/3000 documentation set is available on the Documentation Library CD-ROM
included with your MAX unit, and on either CD-ROM or paper from the online bookstore
(http://www.lucent.com/ins/bookstore).
MAX 6000/3000 Network Configuration Guide
xxxi
Introduction
1
Chapter 1: Introduction . . . . . . . . . . . . . . . . . . . . . . . . . . . . . . . . . . . . . . . . . . . . . . . . . 1-1
Chapter 2: Configuration Concepts and Profiles . . . . . . . . . . . . . . . . . . . . . . . . . . . . . . 2-1
Chapter 3: Configuring WAN Access . . . . . . . . . . . . . . . . . . . . . . . . . . . . . . . . . . . . . . 3-1
Chapter 4: Configuring Individual WAN Connections . . . . . . . . . . . . . . . . . . . . . . . . . 4-1
Chapter 5: Configuring Frame Relay. . . . . . . . . . . . . . . . . . . . . . . . . . . . . . . . . . . . . . . 5-1
Chapter 6: Configuring X.25 . . . . . . . . . . . . . . . . . . . . . . . . . . . . . . . . . . . . . . . . . . . . . 6-1
Chapter 7: Configuring IP Fax. . . . . . . . . . . . . . . . . . . . . . . . . . . . . . . . . . . . . . . . . . . . 7-1
Chapter 8: Configuring OSPF Routing . . . . . . . . . . . . . . . . . . . . . . . . . . . . . . . . . . . . . 8-1
Chapter 9: Configuring IP Routing . . . . . . . . . . . . . . . . . . . . . . . . . . . . . . . . . . . . . . . . 9-1
Chapter 10: Setting Up IP Multicast Forwarding . . . . . . . . . . . . . . . . . . . . . . . . . . . . 10-1
Chapter 11: Setting Up Virtual Private Networks . . . . . . . . . . . . . . . . . . . . . . . . . . . . 11-1
Chapter 12: Configuring IPX Routing . . . . . . . . . . . . . . . . . . . . . . . . . . . . . . . . . . . . . 12-1
Chapter 13: AppleTalk Routing . . . . . . . . . . . . . . . . . . . . . . . . . . . . . . . . . . . . . . . . . . 13-1
Chapter 14: Configuring Packet Bridging . . . . . . . . . . . . . . . . . . . . . . . . . . . . . . . . . . 14-1
Chapter 15: Defining Static Filters . . . . . . . . . . . . . . . . . . . . . . . . . . . . . . . . . . . . . . . 15-1
The MAX links a Local Area Network (LAN) to a Wide Area Network (WAN). The LAN
might comprise a few workstations, a large number of workstations and servers, or any number
of interconnected networks. WAN connections provide links between the LAN and virtually
any site or network.
The MAX provides multiple interfaces for your use in implementing your configuration.
Considerations for development of your WAN configuration include the number of remote
users who need access to your LAN, the types of telecommunications lines and services your
carrier can provide, and the specific MAX model you have purchased. WAN connections have
traditionally been either physically dedicated (nailed) from end to end or dial-up (switched).
Frame Relay, which provides the benefits of nailed connections but with greater flexibility, is
becoming increasingly popular. X.25 networks are predominant in Europe.
Although the MAX has a large number of features, you might only have to configure a few of
them, depending on what you want the MAX to do. Almost all applications require
configuration of IP routing. You might want to use the IP functionality to receive and send
MAX 6000/3000 Network Configuration Guide
1-1
Introduction
faxes. Your IP routing configuration can use Routing Information Protocol (RIP) or the newer
Open Shortest Path First (OSPF) protocol, which addresses many of RIP’s limitations. If you
have Novell Netware clients and servers, you can configure the MAX for Internetwork Packet
eXchange (IPX) routing. Similarly, you can configure it for AppleTalk routing. If you need to
use a protocol that cannot be routed, the MAX supports transparent bridging as an alternative.
If you need to send data-intensive information to multiple users simultaneously, you can
significantly reduce traffic flow by setting up your network to support multicast forwarding. If
you have many remote clients who need secure connections to the home network, a tunneling
protocol, such as ATMP, PPTP, or L2TP, can provide virtual private connections over a public
network.
You can define filters to customize the way the MAX handles individual packets of data. If you
do not implement dynamic filtering by means of a firewall, you should probably define a filter
on the MAX to provide rudimentary security. You can also define filters to prevent
unnecessary connections and to clear idle connections.
1-2
MAX 6000/3000 Network Configuration Guide
Configuration Concepts and Profiles
2
Using the MAX as an ISP or telecommuting hub . . . . . . . . . . . . . . . . . . . . . . . . . . . . . 2-1
Overview of MAX configuration. . . . . . . . . . . . . . . . . . . . . . . . . . . . . . . . . . . . . . . . . . 2-3
MAX profiles . . . . . . . . . . . . . . . . . . . . . . . . . . . . . . . . . . . . . . . . . . . . . . . . . . . . . . . . . 2-7
Where to go next . . . . . . . . . . . . . . . . . . . . . . . . . . . . . . . . . . . . . . . . . . . . . . . . . . . . . . 2-9
A MAX unit typically serves as a hub for numerous connections to a network. Configuration
should therefore be well planned. The parameters you need to set are organized in groups
referred to as profiles.
Using the MAX as an ISP or telecommuting hub
A MAX unit is a high-performance WAN router that concentrates many incoming connections
onto a corporate backbone or another network, such as the Internet or a Frame Relay network.
The connections are usually switched, but the MAX also supports leased connections for those
users whose connection times justify a permanent virtual connection to the backbone network.
A switched connection is a temporary link between devices, established only for the duration
of a call. When you use bandwidth-on-demand, the MAX adds and subtracts bandwidth as
necessary, keeping connection costs as low as possible.
The MAX most commonly serves as an Internet Service Provider (ISP) hub, managing many
switched IP connections to the Internet, or as a telecommuting hub, providing high-speed
connections between a corporate backbone and remote locations. MAX configuration options
provide the flexibility you need to optimize your installation. Management features include a
comprehensive set of control and monitoring functions and easy upgrades.
Using the MAX as an ISP hub
Individuals subscribe to an Internet Service Provider to get a TCP/IP connection to the
Internet. Subscribers dial in to a local Point-of-Presence (POP), typically by means of an
analog modem, an ISDN V.120 Terminal Adapter, or an ISDN router such as a Lucent
Pipeline. If you use the MAX as an ISP hub, configure it as an IP router, because it establishes
the dial-in WAN connection with subscribers and routes their data streams to other Internet
routers.
MAX 6000/3000 Network Configuration Guide
2-1
Configuration Concepts and Profiles
Using the MAX as an ISP or telecommuting hub
Figure 2-1 shows a typical ISP configuration with three POPs. Each POP has at least one MAX
on an Ethernet LAN that also includes another Internet router, which could be, for example, a
Lucent GRF 400 router.
Figure 2-1. Using the MAX as an ISP hub
Internet router
T1 or E1
Pipeline
MAX
T1 or E1
Internet router
WAN
Modem
MAX
T1 or E1
MAX
Pipeline
Internet router
Typically, the MAX has T1 or E1 lines that use ISDN signaling to connect to the WAN and
handle the incoming switched connections. To connect to Internet routers, the MAX most often
uses the local Ethernet network, but the connections between Internet routers can be any high
bandwidth connection, such as Frame Relay, nailed T1, nailed E1, HSSI, FDDI, or Sonet.
Large ISPs often support redundant MAX units and Internet routers on each Ethernet segment.
Using the MAX as a telecommuting hub
Telecommuters are typically at branch offices, at home, at customer sites, at vendor sites, or on
the road. The MAX enables these remote users to access the corporate backbone just as though
they were connected locally. The backbone might be a NetWare LAN, an IP network, or a
multiprotocol network. Figure 2-2 shows an example in which home users, remote offices, and
customer sites can access the backbone network.
2-2
MAX 6000/3000 Network Configuration Guide
Configuration Concepts and Profiles
Overview of MAX configuration
Figure 2-2. Using the MAX as a telecommuting hub
Pipeline 25
Corporate
headquarters
Pipeline 400
Telecommuter
Frame Relay line
LAN
Remote office
Switched 56
WAN
Pipeline 50
MAX
ISDN BRI line
Customer site
LAN
Analog line
Modem
LAN
Traveling user
In this sample network, a telecommuter in a home office uses a Pipeline 25 and Frame Relay to
log in to the corporate LAN. Users on a remote office LAN access the backbone through a
Pipeline 400 with a Switched-56 connection. A customer can access selected corporate
network resources by means of a Pipeline 50 with an ISDN BRI connection. A mobile user
with an analog modem can dial in to the backbone, provided that the MAX has a digital
modem card installed.
Notice that each user can access the MAX through a different type of line. While one user
might access the MAX by using the switched services on an ISDN BRI or Switched-56 line,
another might require a nailed 56K Frame Relay circuit.
Overview of MAX configuration
Before you configure the MAX, you should create a network diagram. Configuration tasks
generally consist of:
•
Configuring the lines, channels, and ports, and how calls are routed between them
•
Configuring Wide Area Network (WAN) connections and security
•
Configuring the MAX as a Frame Relay or X.25 concentrator
•
Configuring routing and bridging across the WAN
•
Configuring Internet services, such as multicast, OSPF, and Virtual Private Networks
(VPNs)
MAX 6000/3000 Network Configuration Guide
2-3
Configuration Concepts and Profiles
Overview of MAX configuration
Creating a network diagram
Lucent strongly recommends that, after you have read these introductory sections, you diagram
your network and refer to the diagram while configuring the MAX unit. Creating a
comprehensive network diagram helps prevent problems during installation and configuration,
and can help in troubleshooting any problems later.
Configuring lines, slots, and ports for WAN access
The MAX unit has four built-in T1 or E1 lines and a V.35 serial port (8 Mbps). Each T1 or E1
line has a wide variety of configuration options, including whether or not you use ISDN
signaling, the type of physical-layer framing, cable length, and telco options. The way you
configure each line affects how much bandwidth will be available and whether you can direct
outbound calls to use specific channels. The way you configure channels depends on your
connectivity needs.
Use the serial WAN port for a leased high-speed connection to a Frame Relay switch or to
another WAN router. The port itself requires little configuration. A Frame Relay or Connection
profile specifies most of the required information.
You can add expansion modules to support additional bandwidth (BRI lines), serial host port
modules to support videoconferencing, and digital modems to support analog modem
connections over digital lines. The lines and ports on the modules (cards) have their own
configuration requirements, including the assignment of telephone numbers and information
about routing calls.
Once you enable the lines, slots, and ports for WAN access, you need to configure the way in
which outbound calls are routed to them (for dial-out access to the WAN) and the way in which
inbound calls are routed from them to other destinations (such as the local network).
Configuring WAN connections and security
When the MAX receives packets that require establishment of a particular WAN connection, it
automatically dials the connection. Software at both ends of the connection encapsulates each
packet before sending it out over the telephone lines. Each type of encapsulation supports its
own set of options, which can be configured on a per-connection basis to enable the MAX to
interact with a wide range of software and devices.
After a connection’s link encapsulation method has been negotiated, the MAX typically uses a
password to authenticate the call. For detailed information about authentication and
authorization, see the MAX Security Supplement. Following are some of the connection
security features the MAX supports:
2-4
Feature
Description
Authentication
protocols
For PPP connections, the MAX supports both Password
Authentication Protocol (PAP) and Challenge-Handshake
Authentication Protocol (CHAP). CHAP is more secure than PAP, and
is preferred if both sides of the connection support it.
Callback security
You can have the MAX call back any user dialing in to it, thus
ensuring that the connection is made with a known location.
MAX 6000/3000 Network Configuration Guide
Configuration Concepts and Profiles
Overview of MAX configuration
Feature
Description
Caller-ID and
called-number
authentication
You can restrict who can access the MAX, by verifying the caller-ID
before answering the call. You can also use the called number to
authenticate and direct the call.
Authentication
servers
You can off load the authentication responsibility to a RADIUS or
TACACS server on the local network.
Security card
authentication
The MAX supports hand-held personal security cards, such as those
provided by Enigma Logic and Security Dynamics. These cards
provide users with a password that changes frequently, usually many
times a day. Support for dynamic passwords requires the use of a
RADIUS server that has access to an authentication server, such as an
Enigma Logic SafeWord AS or Security Dynamics ACE
authentication server.
Terminal server
After a dial-in user has met the initial connection-security criteria, you
can demand another password for access to the MAX terminal
services. Within the terminal server, you can restrict commands that
are accessible to users, or you can prevent them from executing any
command other than Telnet.
Filters and firewalls
Packet-level security mechanisms can provide a very high level of
network security.
Concentrating Frame Relay connections
The MAX provides extensive support for Frame Relay. Using a T1 or E1 line or serial WAN
port for a nailed connection to a switch, it can function as a Network to Network Interface
(NNI) switch, a Data Circuit-terminating Equipment (DCE) unit responding to users, or as a
Data Terminal Equipment (DTE) unit requesting services from a switch.
Enabling X.25 terminal connections
X.25 is a precursor to Frame Relay and is generally considered less efficient. However, many
sites use it to transmit information between users across the WAN. It accommodates both
high-volume data transfers and interactive use of host machines. The MAX can have one
physical connection to an X.25 DCE unit at the other end of a T1, E1, or BRI line. To support
interactive use, the connection must be nailed.
Configuring routing and bridging across the WAN
Routing and bridging configurations enable the MAX to forward packets between the local
network and the WAN and also between WAN connections.
Enabling protocol-independent packet bridging
The MAX can operate as a link-level bridge, forwarding packets from the Ethernet network to
a WAN connection (and vice versa) on the basis of the destination hardware address in each
packet. Unlike a router, a bridge does not examine packets at the network layer. It simply
forwards packets to another network segment if the address does not reside on the local
segment.
MAX 6000/3000 Network Configuration Guide
2-5
Configuration Concepts and Profiles
Overview of MAX configuration
Using IPX routing (NetWare 3.11 or later)
The MAX can operate as an IPX router, linking remote NetWare LANs with the local NetWare
LAN on the Ethernet network. IPX routing has its own set of concerns related to the
client-server model and user logins. For example, users should remain logged in for some
period even if the connection has been brought down to save connection costs.
IP routing
IP routing is the most widespread use of the MAX, and it has a wide variety of configurable
options. IP routing is the required protocol for Internet-related services such as IP multicast
support, OSPF, and cross-Internet tunneling for Virtual Private Networks (VPNs). Most sites
create static IP routes to enable the MAX to reliably bring up a connection to certain
destinations or to change global metrics or preferences settings.
Configuring Internet services
All Internet services and routing methods require that the MAX function as an IP router, so an
IP routing configuration is a necessary precondition.
Multicast
The Multicast Backbone (MBONE) is a virtual network layered on top of the Internet to
support IP multicast routing across point-to-point links. It is often used for transmitting audio
and video on the Internet in real time, because multicasting is a much cheaper and faster way to
communicate the same information to multiple hosts.
OSPF routing
Open Shortest Path First (OSPF) is the next generation Internet routing protocol. The MAX
can be configured to communicate with other OSPF routers within an Autonomous System
(AS). To enable this routing function, you must configure the OSPF options on the Ethernet
interface and for each WAN connection that supports remote OSPF routers.
OSPF can import routes from RIP as well. You can control how these imported external routes
are handled by adjusting systemwide routing options such as route preferences and ASE-type
metrics.
Virtual Private Networks
Many sites use the Internet to connect corporate sites or to enable mobile nodes to log in to a
corporate backbone. Such Virtual Private Networks (VPNs) use cross-Internet tunneling to
maintain security or to enable the Internet to transport packets that it would otherwise drop,
such as IPX packets. To implement VPNs, the MAX supports both Ascend Tunnel
Management Protocol (ATMP), which is a Lucent proprietary tunneling mechanism, and
Point-to-Point Tunneling Protocol (PPTP).
ATMP enables the MAX unit to create and tear down a tunnel to another unit. In effect, the
tunnel collapses the Internet cloud and provides direct access to a home network. Packets
received through the tunnel must be routed, so ATMP currently applies only to IP or IPX
networks.
2-6
MAX 6000/3000 Network Configuration Guide
Configuration Concepts and Profiles
MAX profiles
A PPTP session occurs between the MAX and a Windows NT server over a special TCP
control channel. Either end might initiate a PPTP session and open the TCP control channel.
Note that opening a PPTP session does not mean that a call is active. It simply means that a call
can be placed and received.
MAX profiles
A profile is a group of related parameters and always appears as a menu item in the VT100
interface. Many profiles contain subprofiles, which are, essentially, submenus within a profile.
Whether a profile is called a profile or a subprofile depends on the context because almost any
profile can be considered a subprofile in some sense.
To access a profile, you must have the necessary privileges. To activate a profile so that its
settings take effect, you need further privileges.
Obtaining privileges to use the profiles
As explained in the Installation and Basic Configuration Guide, privileges are often required
for changing settings in MAX profiles. To activate a profile, for example, you need full
privileges. Unless you have a personal profile that grants full privileges, you must activate the
Full Access profile. Proceed as follows:
1
At the Main Edit Menu, press Ctrl-D.
The Main Edit Menu’s DO menu appears.
2
Select P (Password).
3
Press Enter or the Right Arrow key.
The Security menu appears, displaying a list of Security profiles.
4
Select Full Access.
5
Press Enter or the Right Arrow key.
A password-entry field appears.
6
Enter your password within the brackets.
7
Press Enter or the Right Arrow key.
If your password is accepted, you have Full Access privileges.
8
Press Enter.
The Main Edit Menu reappears.
Activating a profile
When you have full privileges, you can make a profile active. Proceed as follows:
1
Open the profile that you want to make current.
2
Press Ctrl-D.
The profile’s DO menu appears.
3
Select L (Load).
The Load Profile.... menu appears.
MAX 6000/3000 Network Configuration Guide
2-7
Configuration Concepts and Profiles
MAX profiles
4
Select 1 to load the profile.
Profile loaded as current profile appears.
The newly activated profile reappears.
Saving a profile
When you exit a profile after changing any of the settings, you are prompted to accept or
discard the changes. You must select the accept option if you want to retain the new settings.
For example, to create a new Line Config profile, complete each of the following steps:
1
Open Net/T1 > Line Config and select an unconfigured profile.
2
Press the Right Arrow key and enter a descriptive name as the setting for the Name
parameter.
3
Continue setting the parameters that are relevant for your environment.
4
When you have set all the relevant parameters, press the Back Arrow key to exit the
profile. The following message appears:
EXIT?
0=ESC (Don’t exit)
1=Exit and discard
2=Exit and accept
5
Select the number that reflects the action you want to take.
Using RADIUS
You can use RADIUS to externally authenticate connections answered by the MAX unit.
External authentication centralizes the management of WAN connections, and concentrates
user profiles into a single text file. The use of RADIUS also enables token-card authentication
for secure networks, or authentication based on a UNIX password database. For details about
obtaining and installing the Ascend RADIUS daemon and dictionary, and for a sample users
file, see the TAOS RADIUS Guide and Reference.
RADIUS profiles are composed of three parts:
User-Name Check-Items
Reply-Items
The User-Name must be left justified. It is typically the name of the caller (or calling device),
but it may also be a phone number (for CLID or DNIS authentication), a special string
indicating a pseudo-user profile, or the string DEFAULT (for the default user profile). For
details about pseudo-user profiles, see the TAOS RADIUS Guide and Reference.
Check-Items must be on the same line as the User-Name, and must be separated by white
space (space or tab) from the User-Name. Check-Items includes zero or more attribute-value
pairs that must match the attributes that are present in the Access-Request for the user to be
authenticated. Check-Items typically include the password for the entry.
Reply-Items must be indented and separated from the User-Name and Check-Items by a
newline. (If a Reply-Item is not indented, it is interpreted as the User-Name of a new entry.)
Reply-Items includes zero or more attribute-value pairs that are returned in Access-Accept
messages to authorize services for the user.
2-8
MAX 6000/3000 Network Configuration Guide
Configuration Concepts and Profiles
Where to go next
Using session accounting
Both RADIUS and TACACS+ enable administrators to keep track of connection statistics,
usually for billing purposes. For details on session accounting see the TAOS RADIUS Guide
and Reference.
Where to go next
When you have planned your network, you are ready to configure the MAX. The flexibility of
the MAX and its ever-increasing number of configurations means there is no set order for
configuration. You can perform configuration tasks in any order you want. Table 2-1 shows
where to look for the information you need.
Table 2-1. Where to go next
To do this:
Go to this chapter or document:
Configure slots, lines, and ports
Chapter 3, “Configuring WAN Access”
Configure WAN connections
Chapter 4, “Configuring Individual WAN Connections”
Set up Frame Relay
Chapter 5, “Configuring Frame Relay”
Set up X.25
Chapter 6, “Configuring X.25”
Set up packet bridging
Chapter 14, “Configuring Packet Bridging”
Set up IPX routing
Chapter 12, “Configuring IPX Routing”
Set up IP routing
Chapter 9, “Configuring IP Routing”
Set up IP fax
Chapter 7, “Configuring IP Fax”
Set up OSPF routing
Chapter 8, “Configuring OSPF Routing”
Set up multicast forwarding
Chapter 10, “Setting Up IP Multicast Forwarding”
Set up Virtual Private Networks
Chapter 11, “Setting Up Virtual Private Networks”
Work with status windows
MAX Reference
Write configuration scripts
MAX Administration Guide
Set up security
MAX Security Supplement
Set up RADIUS
TAOS RADIUS Guide and Reference
MAX 6000/3000 Network Configuration Guide
2-9
Configuring WAN Access
3
Introduction to WAN configuration . . . . . . . . . . . . . . . . . . . . . . . . . . . . . . . . . . . . . . . . 3-2
Configuring T1 lines . . . . . . . . . . . . . . . . . . . . . . . . . . . . . . . . . . . . . . . . . . . . . . . . . . . 3-7
Configuring E1 lines . . . . . . . . . . . . . . . . . . . . . . . . . . . . . . . . . . . . . . . . . . . . . . . . . . 3-19
Configuring the serial WAN port . . . . . . . . . . . . . . . . . . . . . . . . . . . . . . . . . . . . . . . . . 3-29
Configuring digital modems . . . . . . . . . . . . . . . . . . . . . . . . . . . . . . . . . . . . . . . . . . . . 3-30
Configuring V.110 modems . . . . . . . . . . . . . . . . . . . . . . . . . . . . . . . . . . . . . . . . . . . . . 3-33
Configuring Personal Handyphone System (PHS) . . . . . . . . . . . . . . . . . . . . . . . . . . . 3-34
Configuring ISDN BRI network cards. . . . . . . . . . . . . . . . . . . . . . . . . . . . . . . . . . . . . 3-34
Configuring Host/BRI lines . . . . . . . . . . . . . . . . . . . . . . . . . . . . . . . . . . . . . . . . . . . . . 3-40
Configuring IDSL connections . . . . . . . . . . . . . . . . . . . . . . . . . . . . . . . . . . . . . . . . . . 3-43
Configuring Host/AIM6 and Host/Dual ports . . . . . . . . . . . . . . . . . . . . . . . . . . . . . . . 3-48
Configuring inbound calls . . . . . . . . . . . . . . . . . . . . . . . . . . . . . . . . . . . . . . . . . . . . . . 3-59
Configuring outbound calls . . . . . . . . . . . . . . . . . . . . . . . . . . . . . . . . . . . . . . . . . . . . . 3-69
Configuring MAXDAX . . . . . . . . . . . . . . . . . . . . . . . . . . . . . . . . . . . . . . . . . . . . . . . . 3-74
A MAX unit supports up to four T1- or E1-line connections. It also has a serial WAN port,
which typically connects to a Frame Relay switch, and six slots for expansion cards. Expansion
cards can provide other types of WAN connections. Digital-modem cards and V.110-modem
cards provide communications with analog modem users and V.110 Terminal Adapter users,
respectively. In Japan, MAX units support Personal Handyphone System (PHS). You can
install and configure an ISDN BRI card if your connections do not warrant the expense of a T1
or E1 line. With the Host/BRI module, the unit emulates a telco switch providing ISDN BRI
lines to local hosts. The BRI/LT card supports Lucent’s ISDN Digital Subscriber Line (IDSL)
standard for voice and data transmissions. To provide the bandwidth needed for video
teleconferencing, Host/AIM6 and Host/Dual cards support two types of inverse multiplexing:
Bandwidth ON Demand Interoperability Group (BONDING) and Ascend Inverse
Multiplexing (AIM). If your unit connects only to ISDN lines and supports only
digital-modem cards, call routing is preconfigured. You must configure it, however, if you
have a mixture of cards or if the WAN lines do not support ISDN signaling.
MAX 6000/3000 Network Configuration Guide
3-1
Configuring WAN Access
Introduction to WAN configuration
Introduction to WAN configuration
To configure a MAX unit, you set parameters in the VT100 menus. (For a description of
navigating the interface, see the Installation and Basic Configuration Guide for your MAX.)
Many of the menus and submenus include profiles, which are groups of related parameters. To
begin setting the parameters, you must understand how the VT100 menus relate to slots and
ports. You must also understand telephone number assignments and how a MAX unit routes
inbound and outbound calls.
How the VT100 menus relate to slots and ports on the MAX 6000
The menus in the VT100 interface are numbered to correspond to slots in the MAX 6000 unit.
A slot can be an actual expansion slot or virtual slot on the unit’s motherboard. Virtual slots
include the System slot, two T1 or E1 slots, the Ethernet slot, the Etherdata slot, and the Serial
WAN slot.
Figure 3-1. Slot and port numbering in the MAX 6000
Slot #5
Slot #4
Slot #3
Slot #8
Slot #7
Slot #6
Slot #9
Slot B
Slot #1 Slot #2
System slot
The system itself is assigned slot number 0 (menu 00-000). The System menu contains the
following profiles and submenus, which are all related to systemwide configuration,
maintenance, and security:
00-000 System
00-100 Sys Config
00-200 Sys Diag
00-300 Security
00-400 Feature Codes
00-500 Destinations
00-600 Dial Plan
00-700 Answer Plan
T1 or E1 slots
The built-in T1 or E1 connections are slot 1 and slot 2 (menus 10-000 and 20-000,
respectively). Each of these slots accommodates two T1 or E1 lines. The menus for
configuring and testing the lines are organized as follows:
3-2
MAX 6000/3000 Network Configuration Guide
Configuring WAN Access
Introduction to WAN configuration
10-000 Net/T1 or Net/E1
10-100 Line Config
10-200 Line Diag
20-000 Net/T1 or Net/E1
20-100 Line Config
20-200 Line Diag
Expansion slots
The six expansion slots are slots 3–8 (menus 30-000 through 80-000), numbered as shown in
Figure 3-1. (Before installing an expansion card, be sure to read any instructions that might be
packaged with the card.)
Ethernet and WAN slots
Slot 9 is the Ethernet slot (menu 90-000). The Ethernet menu contains submenus and profiles
related to the local network, routing and bridging, and WAN connections. Slot A, Etherdata
(menu A0-000), is a virtual slot that provides support for 32 Ethernet sessions (to supplement
those supported by the Ethernet card). The serial WAN port is slot B (menu B0-000).
Note: There are no parameters associated with the Etherdata card. There is no submenu under
Etherdata on the Main menu. The Ethernet card and Etherdata card are the same type of card.
The Ethernet card allows 64 simultaneous Ethernet sessions. You configure the Ethernet
interface by means of parameters in Ethernet submenus. Each Etherdata card allows an
additional 32 Ethernet sessions.
How the VT100 menus relate to slots and ports on the MAX 3000
Depending on the model, a MAX 3000 unit has six BRI ports, two T1 or E1 ports, a T1 or E1
drop and insert port, and a serial port for WAN access. It also has two expansion slots. For the
purpose of organizing the menus in the VT100 interface, every port on the unit is assigned to a
slot. Except for two expansion slots, the slots are virtual. That is, they exist only for the sake of
organizing the menus to correspond to the physical ports.
Figure 3-2. Slot and port numbering in the MAX 3000 T1
Slot #2
Slot #4
Slot #3
Slot #1
Slot #6
Figure 3-2 shows how ports are assigned to slots on a MAX 3000. Not shown are slots 0 and 5,
which are exceptions in that they do not correspond to any physical port.
MAX 6000/3000 Network Configuration Guide
3-3
Configuring WAN Access
Introduction to WAN configuration
System slot
The system itself is assigned to slot 0 (menu 00-000). The System menu contains the following
profiles and submenus, which are all related to systemwide configuration and maintenance:
00-000 System
00-100 Sys Config
00-200 Sys Diag
00-300 Security
00-400 Feature Codes
00-500 Destinations
00-600 Dial Plan
T1 or E1 slot
The physical built-in T1 or E1 line interfaces are assigned to slot 1 (menu 10-000). The T1 or
E1 slot includes two ports, plus a third port reserved for a drop and insert (D&I) line. The
menus for configuring and testing the lines connected to the ports are organized as follows:
10-000 Net/T1 or Net/E1
10-100 Line Config
10-200 Line Diag
Expansion slots
The two expansion slots are slots 2 and 3 (menus 20-000 and 30-000). The corresponding
physical expansion slots are numbered 2 and 3, from left to right.
Ethernet slot
The Ethernet port is slot 4 (menu 40-000). The Ethernet menu contains submenus and profiles
related to the local network, routing and bridging, and WAN connections.
Etherdata slot
The Etherdata slot is slot 5 (menu 50-000), representing Ether Data HDLC channels. The
Etherdata card gives the MAX 32 extra user Ethernet sessions. Without the Etherdata card, the
MAX supports only 64 simultaneous Ethernet sessions. With two Etherdata cards, the unit can
support 128. Etherdata data cards are no longer available as expansion cards. MAX units
configured for T1 units have 1 virtual Etherdata card built onto the motherboard, and MAX
units configured for E1 units have 2 virtual Etherdata cards built onto the motherboard.
Serial WAN slot
The serial port is slot 6 (menu 60-000). It is used for the serial WAN connection or a nailed-up
T1/E1 connection.
V.90 S56 III modem slot
The on-board modems are assigned to slot 7 (menu 70-000).
3-4
MAX 6000/3000 Network Configuration Guide
Configuring WAN Access
Introduction to WAN configuration
Assigning telephone numbers
A MAX unit receives calls on telephone numbers assigned to its T1 or E1 and (if applicable)
Net/BRI channels. Each number has a limit of 24 characters, which can include the following:
1234567890()[]!z-*#|
To assign the numbers, you must understand add-on numbers, hunt groups, and Service Profile
Identifiers (SPIDs).
Add-on numbers
You build multichannel calls (MP, MP+, AIM, or BONDING) by specifying add-on numbers.
A multichannel call begins as a single-channel connection to one telephone number. The
calling unit can then request and store additional numbers that it dials to connect additional
channels. To add channels to the call, the calling unit must integrate the add-on numbers with
the number it dialed initially. The parameters you set to specify add-on numbers depend on the
type of line you are configuring. For a T1 or E1 line, set the Ch N# parameters. For a BRI line,
set the Pri Num parameter. For some BRI lines, (that is, for multipoint mode) you must also set
the Sec Num parameter.
The group of channels used for a multichannel call is called a bundle. A 10-channel bundle, in
which each channel is 64Kbps, provides a 640 Kbps connection. Typically, the telephone
numbers assigned to a bundle share a group of leading digits. Enter only the unique digits
identifying each number, as follows:
•
If the add-on number in the called unit is shorter than the telephone number dialed by the
calling unit, the MAX unit replaces only the rightmost digits. For example, suppose you
dial 777-3330 to reach channel 1 of line 1, and dial 777-3331 through 777-3348 to reach
other channels (on the same line or a different line). In this case, set Ch1# to 30, and set
the Ch N# parameter for each of the other channels to 31, 32, and so forth.
•
If the add-on number is longer than the number dialed, the unit discards the extra digits.
For example:
•
–
Ch1#=510-655-1212
–
Dial#=655-1212
–
Derived number for channel 1=655-1212
If there is no add-on number, the derived number equals the dialed number. For example:
–
Ch1#=(null)
–
Dial#=555-1213
–
Derived number for channel 1=555-1213
Note: The most common reason multichannel calls fail to connect beyond the initial
connection is that the answering unit sends the calling unit add-on numbers it cannot use to dial
the other channels. For example, AIM and BONDING call bundles should not span dial plans.
If you are receiving AIM or BONDING calls and have multiple dial plans, set up each dial
plan as a separate trunk group. This also prevents MP and MP+ call bundles from spanning
dial plans. If you have, for example, two PRI lines from different service providers, you might
set the ChN Trnk Grp parameters for the first line to 9 and for the second line to 8. For more
information about trunk groups, see “Enabling trunk groups” on page 3-69.
MAX 6000/3000 Network Configuration Guide
3-5
Configuring WAN Access
Introduction to WAN configuration
Hunt groups
A hunt group is a group of channels to which the carrier assigns a single telephone number.
When a call comes in on that number, the Central Office switch delivers the call to the first
available channel. Because channels in a hunt group share a common telephone number, the
add-on numbers in the profile are the same.
Note: If all of a line’s channels have the same add-on number, you can leave the telephone
number assignment blank.
SPIDS (for Net/BRI lines)
The Service Profile Identifiers (SPIDs) assigned to a BRI line operating in multipoint mode are
numbers used at the Central Office switch to identify services provisioned for your ISDN line.
Your carrier bases the SPIDs on the telephone numbers assigned to your BRI lines, and tells
you the SPIDs when it installs the lines.
Most, but not all telephone companies include a suffix on their SPIDs. When receiving SPIDs
from your telephone company, ask whether or not suffixes are included. The following SPID
formats have been agreed upon by most telephone companies.
For an AT&T switch in multipoint mode, SPIDs have one of the following formats:
01nnnnnnn0
01nnnnnnn00
In the AT&T SPID formats, nnnnnnn is the 7 digit telephone number (not including the area
code). For example, if the telephone number is 555-1212, the SPID is 0155512120 or
01555121200.
For a Northern Telecom switch, SPIDs have one of the following formats:
aaannnnnnnSS
aaannnnnnnSS00
In the Northern Telecom SPID formats, aaannnnnnn is the 10-digit telephone number
(including the area code). SS is an optional suffix. If included, the suffix is a 1 or 2 digit
number differentiating the channels. For example, if the telephone numbers are 212-555-1212
and 212-555-1213, the SPIDs might be:
21255512121
21255512132
or:
212555121201
212555121302
In some cases, the suffix is followed by 00 (for example, 21255512130200).
How a MAX unit routes inbound and outbound calls
When a MAX unit receives a call on one of its WAN interfaces, it routes that call internally to
one of its slots or ports. When a digital modem, AIM port, or a host on the local Ethernet port
originates a dial-out connection, the unit routes that call internally to an available WAN
channel to place the call. The channel configuration of a WAN line determines how the
3-6
MAX 6000/3000 Network Configuration Guide
Configuring WAN Access
Configuring T1 lines
channel routes inbound calls and places outbound calls. For details, see “Configuring inbound
calls” on page 3-59 and “Configuring outbound calls” on page 3-69.
Configuring T1 lines
A MAX 6000 unit that supports T1 lines has two T1 slots, each of which supports two T1
lines. Configure a Line Config profile for each of the two slots. You can also configure
additional Line Config profiles, but only one can be active for a given slot at a given time. For
a MAX 3000 unit, only one Line Config profile can be active at a given time. In addition to a
few general parameters, a Line Config profile contains a subprofile for each line connected to
the slot. Each subprofile provides parameters for configuring the line’s connection to the
Central Office switch. You can customize the settings for monitoring line quality and
supporting PBX connections. Other parameters apply to carrier-specific services. Also, you
can enable the MAXDAX feature, which routes incoming calls from inbound T1 or PRI lines
to specific outgoing channels on the same or different T1 (inband) or PRI lines. Each of the
two subprofiles also includes parameters for configuring individual channels within the line.
Setting the general parameters
To create a new T1-line configuration, open the Net/T1 > Line Config menu and display an
available profile:
Net/T1
Line Config
Line Config profile
Name=
1st Line=
2nd Line=
Line 1...
Line 2...
Set the Name parameter to assign a descriptive name to the configuration. (You can configure
multiple profiles for the same slot and activate a profile when it is needed. To activate a profile,
see “Activating a profile” on page 2-7.)
You can set 1st Line and 2nd Line to Trunk (indicating a standard T1 interface with signaling
information), Quiesced, or Disabled. For the second line connected to a MAX 6000 E1 slot,
you can also specify D&I (Drop-and-Insert) service. (A MAX 3000 unit has no D&I setting for
the 2nd Line parameter. Instead, line 3 can be used for D&I only.) Drop-and-Insert on the
second line specifies that some of the first line’s channels transparently move to the second
line. A device such as a PBX connected to the second line is not aware that the channels
actually pass through the MAX unit. For more information about each parameter, see the MAX
Reference.
MAX 6000/3000 Network Configuration Guide
3-7
Configuring WAN Access
Configuring T1 lines
Connecting to the Central Office switch
To configure a line’s connection to the Central Office switch, open the Net/T1 > Line Config >
Line Config profile > Line N subprofile for the line and set the following parameters:
Parameter
Specifies
Sig Mode
The signaling type for the line.
NFAS ID Num
An interface ID number for a line using Non-Facility Associated
Signaling (NFAS). Each NFAS line must have a different ID number.
Rob Ctl
The robbed-bit call-control mechanism that the MAX unit uses for
inband signaling.
Switch Type
Type of switch (carrier specific) providing the ISDN service.
Framing Mode
Physical-layer frame format of the T1 line.
Front End
Type of interface used on the T1/PRI port. Select CSU (the default) if
you plan to use the MAX unit’s internal CSU, or select DSX if you
plan to connect the port to other equipment that provides the interface
to the WAN, (an external CSU, for example), and disable the internal
CSU.
Encoding
Type of encoding that the line uses at the physical-link layer.
Length
The distance between the CSU and the MAX unit. Applies to a MAX
using external CSUs only.
Buildout
Amount of attenuation, in decibels, to apply to the internal CSU.
Consider specifying a value if the MAX is using an internal CSU too
near a repeater. For additional information, consult your carrier.
Clock Source
That the line can (Yes) or cannot (No) be used as the clock source for
timing synchronous transmissions between the sending and the
receiving device. A MAX unit only has one clock source. The first line
that comes up is the clock source for all the lines. If you set this
parameter to No, the MAX uses its internal clock.
Collect DNIS/ANI
That DNIS and CLID information from the switch are (Yes) or are not
(No) available for authentication and accounting. Applies to inband
signaling only. With the Yes setting, the Digital Signal Processor
(DSP) decodes the calling and called DTMF digits.
Send Disc
Number of seconds the MAX unit waits, from the time the call is
presented, before clearing the call.
For detailed information about each parameter, see the MAX Reference.
Signaling mode
You must configure the signaling type (Sig Mode) for each T1 line.
If you set Sig Mode to ISDN_NFAS, you can also establish an interface ID or NFAS ID
number for this type of signaling. You must specify a different interface ID for each NFAS
line.
3-8
MAX 6000/3000 Network Configuration Guide
Configuring WAN Access
Configuring T1 lines
If you set Sig Mode to Inband signaling (also called robbed-bit signaling), you must set the
Rob Ctl parameter to specify a call-control mechanism. For additional information, consult
your carrier.
Switch-specific settings
Set the Switch Type parameter to specify the network switch providing ISDN service on the
T1/PRI line. The carrier supplies the setting. You must also specify the physical layer frame
format for the T1 line by setting the Framing Mode parameter.
Front-end settings
The Front End parameter specifies the type of Channel Service Unit (CSU) used for the T1
line. Your carrier can assist you in setting the Encoding parameter. This parameter specifies the
Layer-1 line encoding used for physical links, which affects the way the digital signals on the
line represent data. Set the Length parameter if you are using an external CSU. If using the
internal CSU, ask your carrier about a value, if any, for the Buildout parameter.
Monitoring line quality
The telephone company uses a Facilities Data Link (FDL) protocol to monitor the quality and
performance of T1 lines. In a line’s subprofile, set the FDL parameter to specify the protocol.
If you are not sure which FDL protocol to specify, your telephone carrier can tell you.
Supporting PBX connections
In a MAX 3000 unit’s T1 slot, or in either T1 slot of a MAX 6000, you can connect line 2 to a
PBX. The unit can act as a switch, moving an incoming call from line 1 to line 2. You can
assign the PBX a number for dialing out through the MAX unit. If the second line’s signaling
mode is PBX T1, you can route calls to the PBX. For all calls received by the PBX, you can
specify a sample count to provide accurate tone detection and decoding. To support PBX
connections, you set the following parameters in the Net/T1 > Line Config > Line Config
profile > Line N subprofile:
Parameter
Specifies
PBX Type
The type of signaling to be used with the PBX on line 2.
Delete Digits
The number of digits to be deleted from the beginning of the dialed
number when changing the number so that the PBX on line 2 can dial out
through the MAX unit.
Add Number
A series of digits to be added to the beginning of the dial-out telephone
number after the digits specified by Delete Digits have been removed.
Ans #
A telephone number to be used for routing calls received on the first T1
line to the device terminating the second T1 line when the second line’s
signaling mode is PBX T1. The answer number is one of the unit’s
telephone numbers. (For more information, see “Configuring inbound
calls” on page 3-59 and “Configuring outbound calls” on page 3-69.)
MAX 6000/3000 Network Configuration Guide
3-9
Configuring WAN Access
Configuring T1 lines
Ans Service
A data service (voice, for example). Any call that uses the specified data
service will be routed to line 2. This parameter can be used as an
alternative to Ans # when the second line’s signaling mode is PBX T1.
(For more information, see “Configuring inbound calls” on page 3-59
and “Configuring outbound calls” on page 3-69.)
Input Sample
Count
Number (one or two) of sets of Goertzel samples the PRI-T1 conversion
process is to use for DTMF tone detection. By default, the MAX uses
only one sample to decode signals from robbed-bit PBXs, because some
PBX devices have a tone duration of less than 50ms, which does not
provide enough time to compute two sets of Goertzel samples. The
PRI-T1 conversion process is more accurate when the MAX can use two
samples. Using two samples is recommended when the tone duration is
longer than 70ms.
For detailed information about each parameter, see the MAX Reference.
Configuring carrier-specific services
To enable the MAX to communicate with your carrier’s switch, and vice versa, obtain values
for the Call-by-Call, T1-PRI:PRI # Type, and T1-PRI:NumPlanID parameters from your
service provider. The value specified for the Call-by-Call parameter sets the signaling value for
routing calls. The T1-PRI:PRI # Type and T1-PRI:NumPlanID parameters specify values that
the MAX unit applies to outbound calls on PRI lines so that the switch can properly interpret
the telephone number dialed.
To configure carrier-specific services, open the Net/T1 > Line Config profile > Line N
subprofile for the line you are configuring and set the following parameters:
Parameter
Specifies
Call-by-Call
Service provider’s call-by-call signaling value for routing calls from a
local device to the carrier’s network through the MAX unit.
T1-PRI:PRI # Type
TypeOfNumber field in the called party’s information element.
T1-PRI:NumPlanID NumberPlanID field in the called party’s information element.
For detailed information about each parameter, see the MAX Reference.
Using MAXDAX
MAXDAX enables you to route incoming calls from T1 or PRI lines to specific outgoing
channels on the same or different T1 or PRI lines. To implement MAXDAX, you must set
parameters in the Net2Net Incoming Calls and Net2Net ChanGroup ID profiles. In the
Net2Net Incoming Calls profile, you define parameters used in configuring channels on which
the MAX unit receives incoming calls. In the Net2Net ChanGroup ID profile, you define
parameters used in configuring channels for outbound calls.
For complete information about MAXDAX, see “Configuring MAXDAX” on page 3-74. Or,
for detailed information about each parameter, see the MAX Reference.
3-10
MAX 6000/3000 Network Configuration Guide
Configuring WAN Access
Configuring T1 lines
Following are the parameters you set in the Net/T1 > Line Config profile > Line N > Net2Net
Incoming Calls profile:
Parameter
Specifies
Ch N
A switched connection for MAXDAX. That is, you must set Ch N
to Switched.
Ch N Dest ChanGroup
The channel group number to which the MAX unit directs
outbound calls.
Ch N Dial Plan #
A Dial Plan profile for the calls received by this channel.
Ch N #DialPlanSelDigits The number of leading digits the unit strips from the called
number.
In the Net/T1 > Line Config > Line Config profile > Line N > Net2Net ChanGroup ID profile,
you set the following parameters:
Parameter
Specifies
Ch N
A switched connection for MAXDAX. That is, you must set Ch N
to Switched.
Ch N ChanGroup
The group to which the channel is assigned.
Configuring channels
Each built-in T1 line provides 24 channels, each of which can support one single-channel
connection. Depending on the signaling mode used on the line, all 24 channels are available for
user data, or 23 channels are available for data and the 24th channel is reserved for signaling.
Each channel can be either switched or nailed. You can assign a switched channel to a slot/port
combination. To make a nailed channel available, you assign the channel to a group, and then
assign that group number to the Connections or call profile. (For the definition of call profile,
see “Assigning nailed channels to groups” on page 3-12.)
Following are the relevant parameters, which are in each Net/T1 > Line Config > Line Config
profile > Line N subprofile. (In the parameter names, N represents a number distinguishing an
individual parameter from other parameters of the same type.)
Parameter
Specifies
Ch N
Type of connection that supports the channel.
Ch N #
Any add-on telephone number associated with a switched channel
only.
Ch N Slot
A slot number for switched calls to be routed to and from this
channel.
Ch N Prt/Grp
For switched calls, a port number to be used with the Ch N Slot
parameter for call routing purposes. For nailed channels, the
group number of the nailed channels used for the connection.
Ch N Trnk/Grp
Trunk group to which a nailed channel is assigned to make it
available for outbound calls.
MAX 6000/3000 Network Configuration Guide
3-11
Configuring WAN Access
Configuring T1 lines
Hunt-N #
A hunt-group number (a telephone number) associated with the
T1 line in a specific Line N profile. Your carrier assigns the huntgroup number.
For detailed information about each parameter, see the MAX Reference.
The Ch N parameters are repeated for each channel in the line. (There are 23 channels if you
use PRI signaling and 24 channels if you use robbed-bit signaling.)
The Ch N # parameter is an add-on number associated with each switched channel (as
described in “Add-on numbers” on page 3-5).
Associating a channel with a slot/port in the MAX unit
With the Ch N Slot and Ch N Prt/Grp parameters, you can assign a switched channel to a slot or
slot/port combination for a digital modem, AIM port, or Ethernet network. This configuration
affects both inbound call routing and outbound calls. In effect, it reserves the channel for calls
to and from the specified slot or port. (For details, see “Configuring inbound calls” on
page 3-59 and “Configuring outbound calls” on page 3-69.)
Assigning nailed channels to groups
If the channel is nailed, Ch N Prt/Grp specifies a group number to which the channel belongs.
To make use of this nailed connection, a Connection or call profile references the group
number. You use a call profile to configure a Host interface. A call profile is analogous to a
Connection profile. A call profile is associated with a video-conferencing host. There can be
only one video call up at one time, so there is only one active call profile. The call profiles are
located in Host/Dual (or Host/AIM6) > PortN menu > Directory > any call profile.)
Assigning channels to trunk groups
You can assign trunk-group numbers 4–9 to channels to make them available for outbound
calls. (For details, see “Configuring outbound calls” on page 3-69.)
Assigning channels to hunt groups
If your carrier provides hunt-group server, you must set the Hunt-N# parameter to specify the
hunt group number that the carrier has configured on the CO switch. When dial-in clients
require additional bandwidth, the MAX forwards the hunt group number to the client. This
process is built into the bandwidth allocation protocols.
You can assign a hunt-group number (a telephone number) associated with the T1 line in a
specific Line N profile. Assign this value to the Hunt-N # parameter.
Typical T1 configurations, with examples
Typical T1-line configurations for MAX units include configurations for ISDN PRI services,
robbed-bit signaling, NFAS signaling, PRI-to-T1 conversion for a T1 PBX, and assigning
bandwidth to a nailed link.
3-12
MAX 6000/3000 Network Configuration Guide
Configuring WAN Access
Configuring T1 lines
Configuring a line for ISDN PRI service
When configuring ISDN PRI service for a MAX unit, you must configure ISDN signaling for
the line. Optionally, you can configure the unit to send either ISDN code 16 (Normal call
clearing) or code 17 (User busy) when the PRI switch servicing the unit triggers the T310
timer. Also, you can configure overlap receiving if you want the unit to obtain complete
called-number information from the network switch.
Configuring ISDN signaling
To configure a T1 line for ISDN signaling, proceed as follows:
1
Open a Net/T1 > Line Config > Line Config profile and, depending on which line you are
configuring, set the 1st Line or 2nd Line parameter to Trunk. For example:
Net/T1
Line Config
Line Config profile
Name=
1st Line=Trunk
2nd Line=Disabled
2
Open the subprofile for the line you have set to trunk service, and set the signaling mode
to ISDN. For example, if you set 1st Line to Trunk, set the Sig Mode parameter in the Line
1 subprofile:
Line 1...
Sig Mode=ISDN
3
In the same subprofile, specify the framing and encoding values. For example:
Framing Mode=ESF
Encoding=B8ZS
4
Exit the Line Config profile and, at the exit prompt, select the exit and accept
option.
If the profile you have configured is not the active profile, activate it as described in
“Activating a profile” on page 2-7.
Configuring the Pre-T310 timer
The ISDN Pre-T310 timer feature enables users calling into a MAX unit to get better
clarification of the reasons for call disconnects during the initial setup of the call. If a call is
presented to the unit, and there is an extended period of delay while the call is being set up (for
example, heavy local Ethernet traffic is slowing down RADIUS requests or DNS lookups),
you might want your users to get a disconnect indication other than the generic Normal call
clearing.
In compliance with CCITT Specification Q.931, the unit sends a Call Proceeding message to
the network switch for every call it accepts.
The network switch sets its T310 timer as it awaits further messages from the MAX unit. The
switch tears down the call if the T310 timer expires. In this event, the switch reports ISDN
code 16 (Normal call clearing) to the calling device.
MAX 6000/3000 Network Configuration Guide
3-13
Configuring WAN Access
Configuring T1 lines
To use the MAX ISDN Pre-T310 timer, it must be set to a time period less than that of the
T310 timer on the switch. Then, after the MAX unit’s Pre-T310 timer expires but before the
switch’s T310 timer expires, the MAX sends ISDN code 17 (User busy) and clears the call.
Note: Only calls presented on T1/PRI lines support the Pre-T310 timer feature.
To configure the Pre-T310 timer, proceed as follows:
1
Open a Net/T1 > Line Config > Line Config profile > Line N subprofile.
2
Set the Send Disc parameter to a value of from 0 to 60 seconds.
The parameter must be set to a value less than that of the switch’s T310 timer value, so
that it expires before the T310 timer.
3
Open the Ethernet > Mod Config > Auth subprofile.
4
Set the Timeout Busy parameter to Yes if you would like User Busy sent when the Send
Disc timer expires. Set Timeout Busy to No if you would like Normal call clearing sent.
Note: The Timeout Busy parameter replaces the CLID Timeout Busy parameter.
If the profile you have configured is not the active profile, activate it as described in
“Activating a profile” on page 2-7.
Overlap receiving for the MAX unit
Overlap receiving affects the incoming-call-establishment procedure at the MAX unit.
According to ITU’s Q.931 specifications, the receiving unit can use either the en-bloc
receiving procedure or the overlap receiving procedure to handle the incoming call. If en-bloc
receiving is in use, the Setup message contains all the information required by the called user
for processing the call. But if the carrier supports overlap receiving, the received Setup
message might contain incomplete called-number information. After the network receives the
Setup Acknowledge message, it sends the remainder of the call information (if any) in one or
more Information messages. In this case, you must set the Overlap Receiving parameter to Yes
so that the unit can gather the complete called number from the network switch, thus enabling
the use of features such as called-number authentication.
Example of ISDN PRI configuration
Following is an example of T1 configuration for ISDN PRI service. (Only the relevant
parameters are shown.)
Net/T1
Line Config
Line Config profile
Name=
1st Line=Trunk
2nd Line=Disabled
Line 1...
Sig Mode=ISDN
Framing Mode=D4
Encoding=AMI
Send Disc=0
Overlap Receiving=Yes
3-14
MAX 6000/3000 Network Configuration Guide
Configuring WAN Access
Configuring T1 lines
Ethernet
Mod Config
Auth
Timeout Busy=No
Configuring robbed-bit signaling
For robbed-bit signaling, set the line you are configuring to Trunk service, and set the signaling
mode and the robbed-bit control mechanism. To configure a T1 line for robbed-bit signaling,
proceed as follows:
1
Open a Net/T1 > Line Config > Line Config profile and, depending on which line you are
configuring, set the 1st Line or 2nd Line parameter to Trunk.
2
Open the subprofile for the line you have set to Trunk, and set Sig Mode to Inband.
3
In the same profile, specify the Rob Ctl parameter to specify the robbed-bit call-control
mechanism required by your carrier.
4
Set the Framing Mode parameter to specify the physical-layer frame format of the T1 line.
5
Set the Encoding parameter to specify the type of encoding that the line uses at the
physical-link layer.
6
Set the Send Disc parameter to specify the number of seconds the MAX unit waits, from
the time the call is presented, before clearing the call.
7
Set the Overlap Receiving parameter to enable the unit to gather the complete called
number from the network switch.
8
Exit the profile and, at the exit prompt, select the exit and accept option.
If the profile you have configured is not the active profile, activate it as described in
“Activating a profile” on page 2-7.
Example of robbed-bit configuration
Following is an example of T1-line configuration using all switched channels and the default
inband (robbed-bit) signaling mode. (Only relevant parameters are shown.)
NET/T1
Line Config
Swtchinbnd
Name=Swtchinbnd
1st Line=Trunk
2nd Line=Disabled
Line 1...
Sig Mode=Inband
Rob Ctl=Wink-Start
Framing Mode=D4
Encoding=AMI
Send Disc=0
Overlap Receiving=Yes
Using NFAS signaling
When you configure two T1 lines for NFAS signaling, they share a D channel. Configure one
line with a primary D channel and the other with a secondary D channel. The secondary D
MAX 6000/3000 Network Configuration Guide
3-15
Configuring WAN Access
Configuring T1 lines
channel is used only if the primary line goes down or if it receives a signal commanding a
change to the other D channel.
Note: On a MAX 6000 unit, both lines must be connected to the same slot. Also note that if
you were to configure both slots for NFAS signaling, you would have to assign different ID
numbers to the lines in the second slot.
To configure two T1 lines for NFAS, proceed as follows:
1
Open a Net/T1 > Line Config > Line Config profile and set both lines to Trunk:
Net/T1
Line Config
Line Config profile
Name=
1st Line=Trunk
2nd Line=Trunk
2
Open the Line 1 subprofile and set the signaling mode to NFAS:
Line 1...
Sig Mode=ISDN_NFAS
3
Keep the default NFAS ID.
NFAS ID num=1
4
Configure a channel as the primary NFAS D channel. For example:
Ch 24=NFAS-Prime
5
Close the Line 1 subprofile.
6
Open the Line 2 subprofile and set the signaling mode to NFAS:
Line 2...
Sig Mode=ISDN_NFAS
7
Keep the default NFAS ID:
NFAS ID num=2
8
Configure channel 24 as the secondary NFAS D channel:
9
Exit the profile and, at the exit prompt, select the exit and accept option.
Ch 24=NFAS-Second
If the profile you have configured is not the active profile, activate it as described in
“Activating a profile” on page 2-7.
Example of NFAS configuration
Following is a sample configuration of two T1 lines for NFAS signaling. (Only the relevant
parameters are shown.)
NET/T1
Line Config
NFASig
Name=NFASig
1st Line=Trunk
2nd Line=Disabled
Line 1...
Sig Mode=ISDN_NFAS
Framing Mode=D4
3-16
MAX 6000/3000 Network Configuration Guide
Configuring WAN Access
Configuring T1 lines
Encoding=AMI
Send Disc=0
Overlap Receiving=Yes
Enabling a robbed-bit PBX with PRI access lines (PRI-to-T1 conversion)
If your WAN uses ISDN PRI signaling on its T1 lines, a MAX unit can convert the signaling to
standard T1 for use with a PBX. With this configuration, the MAX emulates a WAN switch,
such as a Lucent 5ESS, connected to the PBX.
Note: In most cases, you cannot use this feature in combination with digital modems. Also,
the PBX must use two-state inband with DTMF signaling and must support Senderized (en
bloc) digital transmission, because the MAX unit has a preset time limit on received dialing
digits. In addition, the called number should be available from the switch. That is, you need
Dialed Number Identification Service (DNIS) or a called number information element.
On a MAX 6000 unit, T1 PBX must connect to line 2 of the unit’s second slot. That is, you
must configure line 2 in a profile in the 20-000 Net/T1 > Line Config menu. To configure the
Line Config profile that will support the PBX, set the 2nd Line parameter to Trunk. Then, open
the subprofile for the second line connected to the PBX and set the following parameters:
Parameter
Specifies
Sig Mode
The signaling mode. Select PBX T1.
Rob Ctrl
The robbed-bit call-control mechanism.
T1-Pri:PRI # Type
Type of calls placed by the PBX. Ask your PRI provider about
which settings are available to you.
T1-PRI:NumPlanID
NumberPlanID, needed by the carrier’s switch to properly
interpret a dialed number. Ask your PRI provider about which
settings are available to you.
PBX Type
The type of service the PBX expects on its T1 line. In most
installations the PBX expects voice-service calls with call
progress tones. The Data setting does not supply call progress
tones or information messages to the user.
Ans Service
The type(s) of call(s) that should be converted from PRI to
robbed-bit T1 signaling. Most installations select Voice. With this
setting, the unit converts voice-service calls arriving on the PRI
line to T1 voice calls for the PBX. Data-service calls undergo
normal incoming-call routing. They are not converted and sent to
the PBX.
Note that with Ans Service set to Voice, you cannot configure the
line for both PBX T1 support and digital modem operation,
because the voice-service modem calls are diverted to the PBX
and never reach the digital modems.
Ans #
A telephone number to be used for routing incoming calls from
the first T1 line to the second T1 line. Most installations leave this
setting blank. If specified, it can be an add-on number.
Delete Digits and Add
Number
Digits to be deleted and added, respectively, to convert a number
dialed through the PBX to ISDN PRI format.
MAX 6000/3000 Network Configuration Guide
3-17
Configuring WAN Access
Configuring T1 lines
Call by Call
The ISDN PRI call-setup request to add to calls dialed out from
the PBX.
For more information about each parameter, see the MAX Reference.
Other considerations for PRI-to-T1 conversion
On a MAX unit with multiple lines configured for ISDN (PRI), each outgoing call from the
PBX uses the first channel available on any PRI line. To specify a PRI line for outgoing calls,
the PBX must preface its dialed numbers with the dialing prefix specified by the Ch N
TrnkGrp parameter in the Line N profile for the line used by the PBX. Also, you must enable
trunk groups by setting the Sys Config profile’s Use Trunk Grps parameter to Yes.
For incoming calls, note that the MAX unit does not forward the called number to the PBX.
Example of PRI-to-T1 configuration
Following is an example of a configuration for PRI-to-T1 conversion. Only the relevant
parameters are shown. In this example, line 2 is connected to the PBX, and line 1 is configured
for normal ISDN signaling. (The complete line 1 configuration is not shown.)
Net/T1
Line Config
ISDN & PBX
Name=ISDN & PBX
1st Line=Trunk
2nd Line=Trunk
Line 1...
Sig Mode=ISDN
Line 2...
Sig Mode=PBX T1
Rob Ctl=Wink-Start
T1-PRI:PRI # Type=National
T1-PRI:NumPlanID=ISDN
PBX Type=Voice
Ans Service=Voice
Ans #=
Delete Digits=2
Add Number=923
Call-by-Call=2
Assigning bandwidth to a nailed link
A nailed link is always active. Both ends of the link must assign the same number of channels
to the link. However, channel assignments do not have to match. For example, a nailed link
that uses a single channel might have channel 1 nailed at the local end and channel 12 nailed at
the remote end.
To designate channels for a nailed line, open Net/T1 > Line Config > Line Config profile and
make sure that the line whose channels you are designating is set to Trunk (that is, 1st Line or
2nd Line must be set to Trunk). Then open the subprofile (Line 1 or Line 2) for that line, and
configure the nailed channels. For each channel that is to be nailed, set the Ch N parameter to
3-18
MAX 6000/3000 Network Configuration Guide
Configuring WAN Access
Configuring E1 lines
Nailed, and set the Ch N Prt/Grp parameter to specify the channel’s group number. For
example:
Ch
Ch
Ch
Ch
Ch
Ch
Ch
Ch
Ch
Ch
1=Nailed
1 Prt/Grp=3
2=Nailed
2 Prt/Grp=3
3=Nailed
3 Prt/Grp=3
4=Nailed
4 Prt/Grp=3
5=Nailed
5 Prt/Grp=3
In a Connection profile, you can use this permanent link by setting the Group parameter to
specify the nailed channels’ group number. In a Frame Relay profile, you can use a permanent
nailed link by setting the Nailed Group parameter to specify the group number.
If the profile you have configured is not the active profile, activate it as described in
“Activating a profile” on page 2-7.
Performing T1 line diagnostics
A MAX unit’s software provides the following T1 diagnostic commands:
Net/T1
Line Diag
Line LB1
Line LB2
Switch D Chan
Clr Err1
Clr Perf1
Clr Err2
Clr Perf2
You can use these commands to test the line configuration. For detailed information about each
command, see the MAX Reference.
Configuring E1 lines
A MAX 6000 unit that supports E1 lines has two E1 slots, each of which supports two E1
lines. Configure a Line Config profile for each of the two slots. You can also configure
additional Line Config profiles, but only one can be active for a given slot at a given time. For
a MAX 3000 unit, only one Line Config profile can be active at a given time. A Line Config
profile contains a few general parameters and two subprofiles, one for each line connected to
the slot. Each subprofile provides parameters for configuring the line’s connection to the
Central Office switch. You can customize the settings for call setup and DPNSS or DASS 2
switches. Other parameters apply to timing and telephone numbers. Each of the two
subprofiles also includes parameters for configuring individual channels within the line.
MAX 6000/3000 Network Configuration Guide
3-19
Configuring WAN Access
Configuring E1 lines
Setting the general parameters
To begin creating a new E1-line configuration, open the Net/E1 > Line Config menu and
display an available profile:
Net/E1
Line Config
Line Config profile
Name=
1st Line=
2nd Line=
back-to-back=
Line 1...
Line 2...
Line 3...
Set the Name parameter to assign a descriptive name to the configuration. (You can configure
multiple profiles for the same slot and activate a profile when it is needed. To activate a profile,
see “Activating a profile” on page 2-7.)
You can set 1st Line and 2nd Line to Trunk (indicating a standard E1 interface with signaling
information), Quiesced, or Disabled. For the second line connected to a MAX 6000 E1 slot,
you can also specify D&I (Drop-and-Insert) service. (A MAX 3000 unit has no D&I setting for
the 2nd Line parameter. Instead, line 3 can be used for D&I only.) Drop-and-Insert on the
second line specifies that some of the first line’s channels transparently move to the second
line. A device such as a PBX connected to the second line is not aware that the channels
actually pass through the MAX unit.
You can set the back-to-back parameter to configure DASS-2 and DPNSS lines in a
back-to-back connection. A crossover cable connects an E1 port of one MAX to an E1 port of
another MAX. No switch is required, and the connection is entirely local. One MAX should be
set up for DTE operation, and the other for DCE operation.
For more information about each parameter, see the MAX Reference.
Connecting to the Central Office switch
To configure a line’s connection to the Central Office switch, open the line’s subprofile in the
Line Config profile and set the following parameters:
Parameter
Specifies
Sig Mode
The signaling type for the line.
Switch Type
Type of switch (carrier specific) providing the ISDN service.
Framing Mode
Physical-layer frame format of the E1 line.
For detailed information about each parameter, see the MAX Reference.
Signaling mode
You must configure the signaling type (Sig Mode) for each E1 line.
3-20
MAX 6000/3000 Network Configuration Guide
Configuring WAN Access
Configuring E1 lines
If you set Sig Mode to ISDN_NFAS, you can also establish an interface ID or NFAS ID
number for this type of signaling. You must specify a different interface ID for each NFAS
line.
If you set Sig Mode to Inband signaling (also called robbed-bit signaling), you must set the
Rob Ctl parameter to specify a call-control mechanism.
Switch-specific settings
Set the Switch Type parameter to specify the network switch providing ISDN service on the
E1/PRI line. The carrier supplies the setting. You must also specify the physical-layer frame
format for the E1 line by setting the Framing Mode parameter.
Defining how the MAX unit responds during call setup
Each Line N profile includes parameters that configure the R2 signaling for call setup.
Typically, you set the Sig Mode parameter to R2, and all the correct tones are selected for you.
But if you are connecting to a nonstandard switch, you might need to adjust the R2 settings in
the Net/E1 > Line Config > Line Config profile > Line N subprofile. Following are the
parameters:
Parameter
Specifies
#Complete
Criteria for having received enough digits on an incoming call that
uses R2 signaling.
Grp B Answer Signal Group B signal that the MAX sends immediately before answering an
incoming call. Specify Signal B 1, Signal B 2, and so on, up to Signal
B 15. The default is Signal B 6, which is the recommended setting for
E1 R2 Israeli signaling. For information about the proper settings for
other countries, please contact your carrier.
Grp B Busy Signal
Group B signal that the MAX sends as a busy signal. Specify Signal B
1, Signal B 2, and so on, up to Signal B 15. The default is Signal B 3,
which is the recommended setting for E1 R2 Israeli signaling. For
information about the proper settings for other countries, please
contact your carrier.
Grp B No Match
Signal
With the Yes setting, the unit signals the switch if no configured
number matches the called number.
Grp II Signal
Grp II signal that the MAX unit sends on an outgoing call immediately
after the called end acknowledges that it has received all the necessary
address digits. For information about the proper settings for other
countries, please contact your carrier.
Answer Delay
Number of milliseconds the unit waits before answering an incoming
R2 call.
Caller ID
Whether or not the unit requests the Calling Line ID (CLID) and/or
Caller ID from the switch.
For detailed information about each parameter, see the MAX Reference.
MAX 6000/3000 Network Configuration Guide
3-21
Configuring WAN Access
Configuring E1 lines
Defining settings for DPNSS signaling on DASS 2 switches
If you are connecting a MAX unit to a standard DPNSS or DASS2 switch, you do not have to
change the DPNSS/DASS2 settings. But connection to a nonstandard switch could require
changes in these settings. Also, if you connect two units back-to-back, you have to change
settings for the unit that acts as the network (PBX) side. Following are the relevant parameters,
which are in each Net/E1 > Line Config > Line Config profile > Line N profile:
Parameter
Specifies
L3 End
Which call (outbound or inbound) the MAX unit’s CCITT Layer 3
software processes if a collision occurs. With the default setting
(x-side), the unit processes the outbound call and drops the inbound
call. The default setting (x-side) is required for connection to
DPNSS signaling on a DASS2 switch.
L2 End
How the MAX unit’s CCITT Layer 2 software differentiates between
the acting network (PBX) side and the acting user (ET) side of a
back-to-back DPNSS connection. On a functional level, the L2 End
parameter enables the DPNSS state machine to detect the difference
between Layer 2 command messages and Layer 2 response messages.
NL Value
Maximum number of retransmissions to send on an E1 line.
Connection to DPNSS signaling on a DASS2 switch requires the
default setting of 64.
LoopAvoidance
Maximum number of transit PBX devices through which a call can be
routed.
For detailed information about each parameter, see the MAX Reference.
Configuring DPNSS signaling
The MAX 3000 supports DPNSS signalling when connecting to a DASS2 switch. To
configure an E1 line for DPNSS signaling:
1
Open the Net/E1 > Line Config > Line Config profile > Line N subprofile for the line you
are configuring.
2
Set Sig Mode to DPNSS, and set Switch Type to specify the DPNSS-compatible switch.
For example:
Net/E1
Line Config
Line Config profile
Line 1...
Sig Mode=DPNSS
Switch Type=DASS2
Mercury is a variant of DPNSS.
3
Specify the framing mode required by your service provider. For example:
Framing Mode=2DS
Most E1 DPNSS providers in the U.K. require 2DS, which is a variant of G.703. If you
select G.703, the unit provides CRC-4 checking. If you select 2DS, it does not.
4
3-22
Make sure that the following parameters are set to their default values, as shown:
MAX 6000/3000 Network Configuration Guide
Configuring WAN Access
Configuring E1 lines
L3 End=x-side
L2 End=b-side
NL Value=64
LoopAvoidance=7
5
Exit the profile and, at the exit prompt, select the exit and accept option.
Enabling a line for Clock Source use
To specify which lines can provide Clock Source, set the following parameter located in
Net/E1 > Line Config > Line Config profile > Line N subprofile:
Parameter
Specifies
Clock Source
That the line can (Yes) or cannot (No) be used as the clock source for
timing synchronous transmissions between the sending and the
receiving device. A MAX unit only has one clock source. The first line
that comes up is the clock source for all the lines. If you set this
parameter to No, the MAX uses its internal clock.
For detailed information about each parameter, see the MAX Reference.
Setting triggers for call-completed information
If you enable the overlap receiving feature, your MAX unit can gather the complete called
number from the network switch through a series of information messages, and can therefore
support features such as called-number authentication. Provide information about the called
number itself by setting PRI Prefix # and Trailing Digits. Once the MAX receives the called
number, the PRI Prefix # value determines the number of digits the MAX matches as the prefix
to the number. The Trailing Digits number indicates the number of digits the MAX requires to
indicate the end of a called number. Open Net/E1 > Line Config > Line Config profile > Line N
profile and set the following parameters:
Parameter
Specifies
Overlap Receiving
Whether or not to determine if a called number is complete for
incoming calls.
PRI Prefix #
Portion of the line’s telephone number to be used when matching the
called number in the Setup message from the network.
Trailing Digits
Number of digits required to follow the prefix number for the unit to
consider the called number complete.
T302 Timer
Number of milliseconds the system waits for additional called number
information for an incoming call.
After receiving the call, the MAX begins collecting the trailing digit
information, and for each call setup message from the switch that does
not include the Sending Complete Information element, it starts the
T302 timer. The MAX stops the timer when it receives a message that
includes the Sending Complete Information element. The MAX
assumes there are no more trailing digit digits to collect when the
T302 timer stops or expires.
MAX 6000/3000 Network Configuration Guide
3-23
Configuring WAN Access
Configuring E1 lines
Using MAXDAX
MAXDAX enables you to route incoming calls from PRI lines to specific outgoing channels
on the same or different PRI lines. To implement MAXDAX, you must set parameters in the
Net2Net Incoming Calls and Net2Net ChanGroup ID profiles. In the Net2Net Incoming Calls
profile, you define parameters used in configuring channels on which the MAX unit receives
incoming calls. In the Net2Net ChanGroup ID profile, you define parameters used in
configuring channels for outbound calls.
For complete information about MAXDAX, see “Configuring MAXDAX” on page 3-74. Or,
for detailed information about each parameter, see the MAX Reference.
Following are the parameters you set in the Net/E1 > Line Config profile > Line N > Net2Net
Incoming Calls profile:
Parameter
Specifies
Ch N
A switched connection for MAXDAX. That is, you must set Ch N
to Switched.
Ch N Dest ChanGroup
The channel group number to which the MAX unit directs
outbound calls.
Ch N Dial Plan #
A Dial Plan profile for the calls received by this channel.
Ch N #DialPlanSelDigits The number of leading digits the unit strips from the called
number.
In the Net/E1 > Line Config > Line Config profile > Line N > Net2Net ChanGroup ID profile,
you set the following parameters:
Parameter
Specifies
Ch N
A switched connection for MAXDAX. That is, you must set Ch N
to Switched.
Ch N ChanGroup
The group to which the channel is assigned.
Configuring channels
Each built-in E1 connection supports 32 channels, each of which can support one
single-channel connection. Depending on the signaling mode used on the line, all 32 channels
are available for user data, or 31 channels are available for data and the 32nd channel is
reserved for signaling. Each channel can be either switched or nailed. You can assign a
switched channel to a slot/port combination. To make a nailed channel available to a
Connection or call profile, you assign the channel to a group. You can also assign channels to
hunt groups. (For the definition of call profile, see “Assigning nailed channels to groups” on
page 3-12.)
Each E1 line supports 32 channels, of which one is used for framing. Also, you can use one of
the channels for a PRI signalling. The Ch N parameters are repeated for each channel in the
line
3-24
MAX 6000/3000 Network Configuration Guide
Configuring WAN Access
Configuring E1 lines
Following are the relevant parameters, which are in each Net/E1 > Line Config > Line Config
profile > Line N subprofile. (In the parameter names, N represents a number distinguishing an
individual parameter from other parameters of the same type).
Parameter
Specifies
Ch N
Type of connection that uses the channel.
Ch N #
Any add-on telephone number associated with a switched channel
only. The Ch N parameters are repeated for each channel in the
line (as described in “Add-on numbers” on page 3-5).
Ch N Slot
A slot number for switched calls to be routed to and from this
channel.
Ch N Prt/Grp
For switched calls, a port number to be used with the Ch N Slot
parameter for call routing purposes. For nailed channels, the
group number of the nailed channels used for the connection.
Ch N Trnk/Grp
Trunk group to which a nailed channel is assigned to make it
available for outbound calls.
Hunt-N #
A hunt-group number (a telephone number) associated with the
E1 line in a specific Line N profile. Your carrier assigns the huntgroup number.
For detailed information about each parameter, see the MAX Reference.
Associating a channel with a slot/port in the MAX unit
With the Ch N Slot and Ch N Prt/Grp parameters, you can assign a switched channel to a slot or
slot/port combination for a digital modem, AIM port, or Ethernet network. This configuration
affects both inbound call routing and outbound calls. In effect, it reserves the channel for calls
to and from the specified slot or port. (For details, see “Configuring inbound calls” on
page 3-59 and “Configuring outbound calls” on page 3-69.)
Assigning nailed channels to groups
If the channel is nailed, Ch N Prt/Grp specifies a group number. To make use of this nailed
connection, a Connection or call profile references the group number. (For the definition of call
profile, see “Assigning nailed channels to groups” on page 3-12.)
You can assign trunk-group numbers 4–9 to channels to make them available for outbound
calls. (For details, see “Configuring outbound calls” on page 3-69.)
Assigning channels to hunt groups
You can assign a hunt-group number (a telephone number) associated with the E1 line in a
specific Line N profile. Assign this value to the Hunt-N # parameter.
Typical E1 configurations, with examples
Typical E1-line configurations for MAX units include configurations for ISDN signaling,
DPNSS signaling, and nailed connections.
MAX 6000/3000 Network Configuration Guide
3-25
Configuring WAN Access
Configuring E1 lines
Using ISDN signaling
To configure an E1/PRI line for ISDN signaling in Belgium, the Netherlands, Switzerland,
Sweden, Denmark, or Singapore:
1
Open the Net/E1 > Line Config > Line Config profile > Line N subprofile for the line you
are configuring, and set the Sig Mode parameter to ISDN. For example:
Net/E1
Line Config
Line Config profile
Line 1...
Sig Mode=ISDN
2
Set the Switch Type parameter to Net 5 (the standard used in these countries):
Switch Type=Net 5
3
Specify G.703 framing (the standard used by most E1 ISDN providers):
Framing Mode=G.703
Note: If you select G.703, the MAX unit provides CRC-4 checking. If you select 2 DS, it
does not.
4
Exit the profile and, at the exit prompt, select the exit and accept option.
If the profile you have configured is not the active profile, activate it as described in
“Activating a profile” on page 2-7.
Using DPNSS signaling
To configure an E1 line for DPNSS signaling:
1
Open the Net/E1 > Line Config > Line Config profile > Line N subprofile for the line you
are configuring.
2
Set the DPNSS signaling mode and a compatible switch type. For example:
Net/E1
Line Config
Line Config profile
Line 1...
Sig Mode=DPNSS
Switch Type=Mercury
Mercury is a variant of DPNSS.
3
Set the framing mode. For example:
Framing Mode=2DS
Most E1 DPNSS providers in the U.K. require 2DS, which is a variant of G.703. If you
select G.703, the unit provides CRC-4 checking. If you select 2DS, it does not.
4
Make sure that the following parameters are set to their default values, as shown:
L3 End=x-side
L2 End=b-side
NL Value=64
LoopAvoidance=7
5
3-26
Exit the profile and, at the exit prompt, select the exit and accept option.
MAX 6000/3000 Network Configuration Guide
Configuring WAN Access
Configuring E1 lines
If the profile you have configured is not the active profile, activate it as described in
“Activating a profile” on page 2-7.
Setting up a nailed connection
The number of nailed channels must be the same at both ends of the connection, but the
channel assignments do not have to match. For example, if there are five nailed channels at the
local end, there must be five nailed channels at the remote end, but channel 1 could be
switched at the local end and nailed at the remote end.
To use nailed channels, a Connection or call profile references the group number specified by
each channel’s Prt/Grp parameter. (For the definition of call profile, see “Assigning nailed
channels to groups” on page 3-12.) A total of 64 nailed connections can be defined.
To configure nailed channels on line 1 of an E1 slot:
1
Open the Net/E1 > Line Config > Line Config profile > Line 1 subprofile:
Net/E1
Line Config
Line Config profile
Name=
1st Line=Trunk
2nd Line=Disabled
Line 1...
Sig Mode=Inband
NFAS ID num=N/A
Rob Ctl=Wink-Start
2
Scroll to the Ch N parameters, and configure the nailed channels. For example, to assign
channels 1–5 to the same nailed connection:
Ch
Ch
Ch
Ch
Ch
Ch
Ch
Ch
Ch
Ch
3
1=Nailed
1 Prt/Grp=3
2=Nailed
2 Prt/Grp=3
3=Nailed
3 Prt/Grp=3
4=Nailed
4 Prt/Grp=3
5=Nailed
5 Prt/Grp=3
Exit the profile and, at the exit prompt, select the exit and accept option.
If the profile you have configured is not the active profile, activate it as described in
“Activating a profile” on page 2-7.
MAX 6000/3000 Network Configuration Guide
3-27
Configuring WAN Access
Configuring E1 lines
Performing E1 line diagnostics
A MAX unit’s software provides the following E1 diagnostic commands:
Net/E1
Line Diag
Line LB1
Line LB2
You can use these commands to test the line configuration. For detailed information about each
parameter, see the MAX Reference.
Network Terminating (NT) support for European ISDN PRI
You can configure MAX units as Network Terminating (NT) devices for European ISDN
E1/PRI connections. To configure the MAX for NT mode, you set the ISDN TE/NT Mode
parameter to NT.
ISDN call information
If the E1/PRI line switch type is German 1TR6 or Japan NTT, you can display information
about ISDN calls by invoking the terminal-server command line and entering the Show Calls
command. For example:
ascend% show calls
The command displays statistics about current calls. For example:
Call ID
Called Party ID Calling Party ID InOctets OutOctets
3
4
5104563434
4197654321
4191234567
5108888888
0
888888
0
99999
The Call ID column contains an index number specific to the call.
Called Party ID and Calling Party ID show the telephone number of the answering device and
calling device, respectively.
InOctets and OutOctets show the number of bytes received by the answering device and
transmitted by the calling device, respectively.
When an ISDN call disconnects from either a German 1TR6 switch or a Japan NTT switch, the
switch sends call billing information to the call originator as part of the call tear-down process.
This information is written to the eventCallCharge (eventEntry 17) SNMP object in the
Ascend Enterprise MIB events group (10). An SNMP manager can then read this object to
determine the cost of the call. The eventCallCharge object is a read-only integer and is
applicable only if eventType is callCleared (3). Otherwise, 0 is returned.
3-28
MAX 6000/3000 Network Configuration Guide
Configuring WAN Access
Configuring the serial WAN port
Configuring the serial WAN port
A MAX unit has a built-in V.35 serial WAN DB-44 port. A serial WAN port provides a
V.35/RS-449 WAN interface that typically connects to a Frame Relay switch. To configure the
serial WAN port, open the Serial WAN > Mod Config profile and set the following parameters:
Parameter
Specifies
Module Name
A descriptive name for the interface. (This parameter is optional.
Functionality is not affected if you do not enter a value.)
Nailed Grp
The group number that supports the serial WAN connection. Because a
serial WAN connection is nailed, you must assign a group number to each
nailed channel. More than one nailed channel can use the same group
number.
Activation
The signal or signals the system uses to indicate that the Data
Circuit-terminating Equipment (DCE) is ready to connect.
Ext. Clock * 1K
Maximum bandwidth that the unit uses for the nailed portion of a
Nailed/MP+ call. The externally generated clocking speed you specify is
multiplied by 1024 to calculate the bandwidth.
For detailed information about each parameter, see the MAX Reference.
Configuring a serial WAN connection
To configure the serial WAN interface to connect to a Frame Relay switch that uses static data
flow, proceed as follows:
1
Open a Net/T1 > Line Config > Line Config profile > Line N subprofile.
2
Make sure at least one Ch N Prt/Grp parameter has been set to specify a nailed group.
3
Exit the profile and, at the exit prompt, select the exit and accept option.
4
If the profile you have configured is not the active profile, activate it as described in
“Activating a profile” on page 2-7.
5
Open Serial WAN > Mod Config.
6
Assign a module name and a nailed group number.
7
Set the Activation parameter to Static to specify that the MAX unit will not use flow
control signals, because the DCE is always connected.
8
Exit the profile and, at the exit prompt, select the exit and accept option.
9
Configure a Frame Relay profile and specify the Nailed Grp number assigned to this port.
For more information about Frame Relay, see Chapter 5, “Configuring Frame Relay.”
Example of a serial WAN connection
Net/T1
Line Config
Don
Line 1...
Ch N Prt/Grp=3
MAX 6000/3000 Network Configuration Guide
3-29
Configuring WAN Access
Configuring digital modems
Serial WAN
Mod Config
Module Name=wan-serial
Nailed Grp=3
Activation=Static
Ethernet
Frame Relay
NNI
Name=NNI
Active=Yes
Call Type=Nailed
FR Type=NNI
Nailed Grp=3
...
Configuring digital modems
A digital modem is a device that connects to a digital line (such as an ISDN line) and
communicates with a modem that is connected to an analog line at the other end of the
connection.
A digital modem accepts an incoming call as a Pulse Coded Modulation (PCM) encoded
digital stream that is a digitized version of the waveform sent by an analog modem. The digital
modem also sends outgoing data as a PCM-encoded digital stream for transmission across the
WAN to an analog modem.
To configure digital modems, you can assign telephone numbers to specify routing to available
modems. When the MAX receives a modem call on a PRI line, the call’s ISDN call setup
message notifies the unit that the call is a modem call. Inband calls have no setup message, so
you must assign telephone numbers to route modem calls correctly. To shut the T1/PRI lines
down without disconnecting callers, you can quiesce digital-modem slot cards.
56K modem numbering
The digital modems on a K56Flex modem card are numbered for identification, but the
numbering is not in a continuous sequence. The numbering sequence for an 8-MOD modem
card does not use the number 4, 5, 8, or 9, and the sequence for a 12-MOD card does not use
number 10 or 11.
Note: 56K modem numbering only applies to units that support 8-MOD or 12-MOD cards.
8-MOD modem numbering
Modems in the 8-MOD modem card are numbered 0, 1, 2, 3, 6, 7, 10, 11.
For example, if you have an 8-MOD modem card in slot 8 in a MAX 6000 and all eight
modems are idle, the terminal-server Show Modems command displays the following output:
3-30
MAX 6000/3000 Network Configuration Guide
Configuring WAN Access
Configuring digital modems
ascend% show modems
slot:item
8:0
8:1
8:2
8:3
8:6
8:7
8:10
8:11
modem
1
2
3
4
5
6
7
8
status
idle
idle
idle
idle
idle
idle
idle
idle
12-MOD modem numbering
Modems in the 12-MOD K56Flex modem card are numbered 0, 1, 2, 3, 4, 5, 6, 7, 8, 9, 12, 13.
For example, if you have a 12-MOD K56Flex modem card in slot 8 in a MAX 6000 and all
eight modems are idle, the terminal-server Show Modems command displays the following
output:
ascend% show modems
slot:item
8:0
8:1
8:2
8:3
8:4
8:5
8:6
8:7
8:8
8:9
8:12
8:13
modem
1
2
3
4
5
6
7
8
9
10
11
12
status
idle
idle
idle
idle
idle
idle
idle
idle
idle
idle
idle
idle
Parameters for configuring digital modems
The name(s) of the profile(s) that contain(s) the parameters for configuring your digital
modems depend(s) on which modem card(s) you have installed. The Main Edit Menu lists the
profile for the card you have installed.
If you have V.32bis (on a MAX 6000 only) modems installed in your unit, the Main Edit Menu
shows the profile as LAN Modem. If you have K56 modems installed, depending on the
number of modems installed per modem slot card, the Main Edit Menu shows the profile as
K56 Modem-8, K56 Modem-12, or K56 Modem-16.
MAX 6000/3000 Network Configuration Guide
3-31
Configuring WAN Access
Configuring digital modems
Following are the parameters that appear for most of the cards available on the MAX unit:
Parameter
Specifies
Module Name
Your descriptive name for the Mod Config subprofile. (This parameter is
optional. Functionality is not affected if you do not enter a value.)
Ans N#
Telephone number for incoming-call routing. When the MAX receives
calls to this telephone number, it routes the call to the first available
modem.
ModemSlot
Enable/disable all the slots for modem use.
Modem #N
Enable/disable an individual slot for modem use. (If the card installed has
eight modems per modem slot card, there will be eight entries for this
parameter. If the card installed has 30 modems per modem slot card, there
will be 30 entries for this parameter.)
For detailed information about each parameter, see the MAX Reference.
Quiescing digital modems and returning them to service
If you set a Net/T1 or Net/E1 > Line Config > 1st Line or 2nd Line parameter to Quiesced, the
MAX disables all modems on the line without disrupting existing connections. When an active
call disconnects, that modem is added to the disabled modem list and is not available for use. If
all modems are on the disabled list, incoming callers receive a busy signal until the modems
have been restored for service. When you reenable a quiesced modem, a delay of up to 20
seconds might occur before the modem becomes available for service.
Note: Booting the MAX restores all quiesced lines, slots, and ports to service.
For more information about quiescing digital modems, see the 1st Line and 2nd Line
parameters, in the MAX Reference.
Sample configuration
Following is an example of configuring a V.90 S56 III Modem-30 module, (This modem card
contains 30 modems, but it is otherwise the same as a V.90 S56 III Modem-18 or V.90 S56 III
Modem-24 module.)
1
Open V.90 S56 III Modem-30 > Mod Config.
2
Specify the unique digits of the telephone numbers to be routed to digital modems.
For example:
V.90 S56 III Modem-30
Mod Config
Ans 1#=12
Ans 2#=13
Ans 3#=14
Ans 4#=15
3
3-32
Exit the profile and, at the exit prompt, select the exit and accept option.
MAX 6000/3000 Network Configuration Guide
Configuring WAN Access
Configuring V.110 modems
Configuring V.110 modems
A V.110 card, on a MAX 6000 or a MAX 3000 provides eight V.110 modems that each enable
the MAX unit to communicate with an asynchronous device over synchronous digital lines. An
asynchronous device such as an ISDN modem encapsulates its data in a V.110 protocol. A
V.110 modem removes the V.110 encapsulation and enables an asynchronous session (a
terminal-server session).
To configure a V.110 card, you assign answer numbers to the card, so that the MAX unit can
route calls to the card’s modem. The answer numbers can be add-on numbers assigned to some
of the MAX unit’s WAN lines. (For more information, see “Add-on numbers” on page 3-5.)
The V.110 modem processes the call and sends it to the MAX unit’s terminal-server software.
If the call does not contain PPP encapsulation, it is handled as a login call that can be routed
transparently to a Telnet host on the local network. PPP-encapsulated modem calls are passed
to the bridge/router as regular PPP connections.
Note: V.110 terminal adapters make asynchronous calls with CCITT V.110 encapsulation.
These calls require V.110 modem processing.
Routing calls to the V.110 modems
To configure V.110 modems, proceed as follows:
1
Open V.110 > Mod Config.
2
Optionally, specify a descriptive name for Module Name. (Functionality is not affected if
you do not enter a value.)
3
Set the V.110 module’s Ans N# parameters to specify the dial-in telephone numbers from
which incoming calls are to be routed to the module as terminal-server calls.
4
Exit the profile and, at the exit prompt, select the exit and accept option.
For detailed information about the relevant parameters, see the MAX Reference.
Example of a V.110 configuration
V.110
Mod Config
Module Name=v110card
Ans 1#=12
Ans 2#=13
Ans 3#=14
Ans 4#=15
MAX 6000/3000 Network Configuration Guide
3-33
Configuring WAN Access
Configuring Personal Handyphone System (PHS)
Configuring Personal Handyphone System (PHS)
Personal Handyphone System (PHS) is a mobile telephone service currently offered in Japan
and other Asian countries only. In addition to voice communication, PHS offers data
communication at a bandwidth of 32 Kbps, and can thus provide Internet access as well as
voice service.
A MAX unit supports PHS through PHS slot cards, each of which supports 8 or 16 concurrent
PHS users. The unit supports up to two cards on the MAX 3000 and up to six cards on the
MAX 6000.
You need to enable the software functionality on the MAX through a hash code upgrade. When
you have installed this hash code, the System Options menu displays PHS Installed.
Otherwise, the System Options menu displays PHS Not Installed. Contact your Lucent
sales representative for details about enabling PHS support.
No further configuration is necessary. For example, when you boot up a MAX 3000 with a
PHS card in slot 2 or 3 and the unit software enabled, the following menu appears:
Main Edit Menu
00-000 System
10-000 Net/T1
20-000 Empty
30-000 PIAFS-8
40-000 Ethernet
50-000 Ether Data
60-000 Serial WAN
70-000 V.90 S56 III Modem
Personal Internet Access Forum Standard (PIAFS) is a protocol designed to support
connection negotiation, data transfers, and error correction. In the example, the -8 refers to the
slot card’s support of eight concurrent PHS users. A card that supports 16 concurrent PHS
users is also available. That card appears as PIAFS-16 in the Main Edit Menu.
Note: MAX 6000 units support PIAFS protocol version 2.1 for PHS service. This PIAFS
version has an enhanced link-level protocol that supports dynamic switching of data
transmission rates. Depending on bandwidth availability, the protocol will select a 64 Kbps or
32 Kbps transmission rate. Support for PIAFS protocol version 2.1 is controlled with a
hashcode. (MAX 3000 units currently support up to 32 Kbps. However, the next release of the
MAX 3000 software will support PIAFS version 2.1, with 64 Kbps capability.)
Configuring ISDN BRI network cards
An ISDN Basic Rate Interface (BRI) network interface card supports eight BRI lines. These
lines can provide lower-cost connections to sites that do not require or have access to the
higher-bandwidth T1 or E1 lines. There are two types of BRI network cards: the U and the S
cards. Functionally, they are the same.
You can create multiple, alternative configurations for an ISDN BRI network card, storing
each configuration in a separate Net/BRI > Line Config profile. Only one such profile can be
active at a given time for a given Net/BRI slot. To activate a profile, see “Activating a profile”
on page 2-7. To create a Net/BRI configuration, open a Net/BRI > Line Config profile. You
3-34
MAX 6000/3000 Network Configuration Guide
Configuring WAN Access
Configuring ISDN BRI network cards
have to assign a profile name and set a couple of other parameters that apply to the entire
profile, but most parameters are specific to a single line. You have to open each Line N
subprofile and set a few basic operational parameters, parameters for configuring the B
channels, and parameters for configuring add-on numbers and SPIDs.
Specifying a name and other settings for the profile
To begin configuring an ISDN BRI network card, open one of the Net/BRI > Line Config
profiles and set the following parameters:
Parameter
Specifies
Name
Descriptive name for the profile. You can configure several profiles in a
Net/BRI slot and activate a profile when it is needed. (This parameter is
optional. Functionality is not affected if you do not enter a value.)
Switch Type
Type of switch (carrier-specific) that provides the ISDN service for the
MAX.
BRI Analog
Encode
Support for user-selectable analog encoding for the BRI interface. If you
are going to receive modem calls, you can set this parameter to specify
the encoding type.
Setting a line’s basic operational parameters
When you are ready to begin configuring a specific ISDN BRI line, open the line’s Line N
subprofile and set the following parameters:
Parameter
Specifies
Enabled
Availability of an ISDN BRI line. If you set the Enabled parameter to No,
the line is not available for use.
Clock Source
That the line can (Yes) or cannot (No) be used as the clock source for
timing synchronous transmissions between the sending and the receiving
device. A MAX unit only has one clock source. The first line that comes
up is the clock source for all the lines. If you set this parameter to No, the
MAX uses its internal clock.
Link Type
Whether the line is operating in point-to-point or multipoint mode.
In point-to-point mode, the MAX requires one telephone number and no
Service Profile Identifiers (SPIDS). In multipoint mode, the MAX
requires two telephone numbers and two SPIDS. All international switch
types except DBP Telecom, and all U.S. switch types except AT&T
5ESS, operate in multipoint mode.
For detailed information about each parameter, see the MAX Reference.
MAX 6000/3000 Network Configuration Guide
3-35
Configuring WAN Access
Configuring ISDN BRI network cards
Configuring the B channels
Each BRI line has two B channels for user data and one D channel for signaling. To configure
the B channels, open a Net/BRI > Line Config profile, then open the line’s Line N subprofile
and set the following parameters:
Parameter
Specifies
B1 Usage
Usage (Switched, Nailed, or Unused) of the first B channel.
B2 Usage
Usage (Switched, Nailed, or Unused) of the second B channel.
B1 Slot
Slot number for routing calls to the first B channel. Should have the same
setting as B2 Slot.
B2 Slot
Slot number for routing calls to the second B channel. Should have the
same setting as B1 Slot.
B1 Prt/Grp
For switched channels, a port number to be used with the B1 Slot
parameter for call routing purposes. For nailed channels, a group number,
which will be referenced from a call or Connection profile, assigning the
channels for a connection.
B2 Prt/Grp
For switched channels, a port number to be used with the B 2 Slot
parameter for call routing purposes. For nailed channels, a group number,
which will be referenced from a call or Connection profile, assigning the
channels for a connection.
B1 Trnk Grp
Trunk group to which to assign the first B channel. Makes the channel
available for outbound calls.
B2 Trnk Grp
Trunk group to which to assign the second B channel. Makes the channel
available for outbound calls.
For detailed information about each parameter, see the MAX Reference.
BN Slot and BN Prt/Grp parameters
With the BN Slot and BN Prt/Grp parameters, you can assign a switched channel to a slot or
slot/port combination for a digital modem, AIM ports, or the Ethernet port. The slot/port
combination configuration affects both inbound call routing and outbound calls. In effect, it
reserves the channel for calls to and from the specified slot or port. For details, see
“Configuring inbound calls” on page 3-59 and “Configuring outbound calls” on page 3-69.
Note: You cannot control whether an incoming call rings on the first or second B channel, so
set both BN Slot parameters to the same value.
If the channel is nailed, BN Prt/Grp is a Group number. To make use of this nailed connection,
the Group number is referenced in a Connection or call profile. (For the definition of call
profile, see “Assigning nailed channels to groups” on page 3-12.)
BN Trnk Grp parameter
You can set the BN Trnk Grp parameter to configure trunk-group dialing for outgoing calls on
BRI lines supported by the ISDN BRI card. You can assign trunk-group numbers 4–9 to
channels to make them available for outbound calls. You cannot combine PRI channels with
3-36
MAX 6000/3000 Network Configuration Guide
Configuring WAN Access
Configuring ISDN BRI network cards
BRI channels in the same trunk group. For details, see “Configuring outbound calls” on
page 3-69.
Configuring add-on numbers and SPIDs
The Pri Num and Sec Num parameters define additional telephone numbers for multichannel
calls, and SPIDs identify services provisioned for your ISDN line. For more details about
add-on numbers and SPIDs, see “Assigning telephone numbers” on page 3-5.
To configure add-on numbers and SPIDs for your ISDN BRI line, open a Net/BRI > Line
Config > Line Config profile, then open the line’s Line N subprofile and set the following
parameters:
Parameter
Specifies
Pri Num
Primary add-on number for the ISDN BRI line. If you configure the line
for point-to-point service, this is the only number associated with the line.
Pri SPID
Primary Service Profile Identifier (SPID) for ISDN BRI line.
Sec Num
Secondary add-on number for the ISDN BRI line. If you configure the
line for point-to-point service, Sec Num is not applicable.
Sec SPID
SPID (Service Profile Identifier) associated with the secondary telephone
number for the ISDN BRI line.
For detailed information about each parameter, see the MAX Reference. For more information
about SPIDs, see “SPIDS (for Net/BRI lines)” on page 3-6.
Note: After you have configured the line, you might need to configure the card for outbound
calls (as described in “Configuring the Net/BRI line for outbound calls” on page 3-38).
Typical Net/BRI configurations, with examples
Typical Net/BRI line configurations for MAX units include configurations for incoming
switched connections and for outbound calls.
Configuring incoming switched connections
The following procedure assumes that the MAX BRI lines connect to a NI-1 switch running in
multipoint mode:
1
Open a Net/BRI > Line Config profile.
2
Set the Name parameter to assign a name to the profile.
3
Set the Switch Type parameter to specify the carrier switch type.
4
Set the BRI Analog Encode parameter to specify analog encoding for modem calls.
5
Open the Line 1 subprofile, and set Enable to Yes to enable the line.
6
Set the Link Type parameter to specify multipoint mode.
7
Configure the B channels for switched usage and for routing to the local network.
8
Specify the primary and secondary add-on numbers and their associated SPIDs.
MAX 6000/3000 Network Configuration Guide
3-37
Configuring WAN Access
Configuring ISDN BRI network cards
9
Close the Line 1 subprofile and proceed to configure the other seven lines, repeating
step 5 through step 9 for each line.
10 Exit the profile and, at the exit prompt, select the exit and accept option.
If the profile you have configured is not the active profile, activate it as described in
“Activating a profile” on page 2-7.
Example of incoming switched connection configuration
Following is an example of a BRI-line configuration using incoming switched connections.
(Only relevant parameters are shown.)
Net/BRI
bri-net
Name=bri-net
Switch Type=NI-1
BRI Analog Encode=Mu-Law
Line 1...
Enabled=Yes
Link Type=Multi-P
B1 Usage=Switched
B1 Slot=9
B2 Prt/Grp=0
B1 Trnk Grp=
B2 Usage=Switched
B2 Slot=9
B2 Prt/Grp=0
B2 Trnk Grp=
Pri Num=555-1212
Pri SPID=01555121200
Sec Num=555-1213
Sec SPID=01555121300
Configuring the Net/BRI line for outbound calls
To configure a Net/BRI line for outbound calls, you must assign the line to a trunk group. To
enable an outbound caller to use the line, specify the trunk group in the caller’s Connection
profile.
Assigning lines to trunk groups
To enable local users to use BRI lines to initiate outbound connections, the MAX unit must be
configured for trunk groups. Proceed as follows:
3-38
1
Open the System > Sys Config profiles and set the Trunk Grps parameter to Yes to enable
trunk groups systemwide.
2
Exit the profile and, at the exit prompt, select the exit and accept option.
3
Open the Ethernet > Mod Config > WAN Options profile, and set the Dial Plan parameter
to Trunk Grp to specify that the digits following the first digit constitute an ordinary
telephone number.
By setting Dial Plan to Trunk Grp, you direct the MAX unit to use lines configured with
trunk groups for outbound calls.
MAX 6000/3000 Network Configuration Guide
Configuring WAN Access
Configuring ISDN BRI network cards
4
Exit the profile and, at the exit prompt, select the exit and accept option.
5
Open the Net/BRI > Line Config > Line Config profile > Line 1 subprofile.
6
Set the B1 Trnk Grp and B2 Trnk Grp parameters to assign both of the line’s channels to
trunk group N.
7
Repeat this trunk-group setting for the remaining BRI lines (lines 2–8), so that all BRI
lines are in the same trunk group.
8
Exit the profile and, at the exit prompt, select the exit and accept option.
Specifying a trunk group in a Connection profile
To configure a Connection profile to specify the trunk group you have assigned to the BRI
lines, proceed as follows:
1
Open the Connection profile (in the Ethernet > Connections menu).
2
Include the Net/BRI trunk-group number in the setting for the Dial # parameter. For
example, the following setting specifies trunk group 6:
Ethernet
Connections
Connections profile
Dial #=6-555-1212
When the first digit of the Dial # setting is a trunk-group number, the MAX unit uses the
channels in that trunk group to place the call.
3
Open the Telco Options subprofile and set the AnsOrig parameter to Call Only, or to Both,
to enable outbound dialing.
4
Exit the profile and, at the exit prompt, select the exit and accept option.
Note there are other ways to configure outbound calls. Other features that support outbound
calls are: immediate modem services and port-to-port dialing.
For a way to use Destination profiles to specify lines as backup channels if all WAN channels
are busy, see “Configuring outbound calls” on page 3-69. Instead of explicitly entering the dial
number in the Connection profile, you can reference a Destination profile that can specify up
to six different dial-out paths to a particular destination.
Displaying information about BRI calls
If the BRI line switch type is German 1TR6, you can display information about ISDN calls
from the terminal-server command line by entering the Show Calls command. For example:
ascend% show calls
The command displays statistics about current calls. For example:
Call ID
3
4
Called Party ID Calling Party ID InOctets OutOctets
5104563434
4191234567
0
0
4197654321
5108888888
888888
99999
The Call ID column contains an index number specific to the call. Called Party ID and Calling
Party ID show the telephone number of the answering device and calling device, respectively.
MAX 6000/3000 Network Configuration Guide
3-39
Configuring WAN Access
Configuring Host/BRI lines
InOctets and OutOctets show the number of bytes received by the answering device and
transmitted by the calling device, respectively.
Note: When an ISDN call disconnects in Germany, the ISDN switch sends call billing
information to the call originator as part of the call tear-down process. For lines that use the
German 1TR6 switch type, you can access ISDN call charges in the Ascend Enterprise MIB
through SNMP management utilities.
Configuring Host/BRI lines
The Host/BRI module provides up to eight local ISDN BRI lines. A line terminating one of
these local ISDN BRI lines might be a MAX unit (or any BRI device) on its own local Ethernet
segment, or a Desktop video device with its own BRI line and built-in terminal adapter. When
a MAX unit is connected to a Host/BRI line, it appears to be an AT&T switch.
Terminal Equipment devices on Host/BRI lines can call each other, making local
net-to-Net/BRI calls. These local calls never go out to the WAN. They make use of the BRI
bandwidth internally. They can also send and receive calls from the WAN. To the actual WAN
switch, the MAX unit appears as the call’s end point. Routing to the Host/BRI line is handled
internally.
Note: TAOS supports the European ISDN protocol for the eight-port Host/BRI card on MAX
units that are configured as Network Terminating (NT) devices (see ISDN TE/NT Mode
parameter in the MAX Reference). You can select this carrier switch type by setting the Switch
Type parameter to NET3.
To begin configuring Host/BRI lines, open a Host/BRI > Line Config profile and set the
following parameters:
Parameter
Specifies
Name
Descriptive name for the profile. You can configure several profiles in a
Host/BRI sot and activate a profile when it is needed. (This parameter is
optional. Functionality is not affected if you do not enter a value.)
Switch Type
Type of switch (carrier-specific) that provides the ISDN service for the
MAX.
BRI Analog
Encode
Support for user-selectable analog encoding for the BRI interface. If you
are going to receive modem calls, you can set this parameter to specify
the encoding type.
Then set the following parameters in each Line N subprofile:
3-40
Parameter
Specifies
Enabled
Availability of the ISDN BRI line. If you set the Enabled parameter to
No, the line is not available for use.
Dial Plan
Whether the module uses trunk groups or the extended dial plan to send
and receive calls. (For details about dial plans, see “Configuring
outbound calls” on page 3-69.)
MAX 6000/3000 Network Configuration Guide
Configuring WAN Access
Configuring Host/BRI lines
Ans N#
Telephone number for call routing.This number routes incoming WAN
calls to the local BRI lines connecting to the Host/BRI card. (For details,
see “Configuring outbound calls” on page 3-69.)
For detailed information about each parameter, see the MAX Reference.
Typical Host/BRI configurations, with examples
Ally has a personal computer connected to a Pipeline 85™ unit. The Pipeline 85 connects to a
port on a MAX unit’s Host/BRI card. The unit connects to an external site by way of a PRI
line. Users external to Ally’s site need to access resources on her computer, so you must
configure the MAX to accept incoming calls and route them to the Pipeline 85 connected to
Ally’s computer. Jim requires a similar configuration, but he also needs access to the Internet,
so he must enable outbound calls. Sheila must share data with a user who is connected to one
of the other BRI lines attached to the MAX unit, so you must configure the unit for local
BRI-to-BRI calls.
Routing inbound calls to the terminating device
To route inbound calls to the terminating device:
1
Open a Host/BRI > Line Config profile and set the Name parameter to assign a name to
the profile.
2
Open the Line 1 or Line 2 subprofile.
3
Set Enabled to Yes to enable the line.
4
Set at least one Ans N# parameter to specify an answer number. This can be an add-on
number, as described in “Add-on numbers” on page 3-5.
5
To configure the other Host/BRI modules, or to create alternative configurations for the
same module, repeat step 2 through step 4.
6
Exit the profile and, at the exit prompt, select the exit and accept option.
If the profile you have configured is not the active profile, activate it as described in
“Activating a profile” on page 2-7.
Example of routing inbound calls
With the following configuration, the MAX unit routes inbound WAN calls to the device
terminating the Host/BRI line. That device does not make outbound calls to the WAN. The
inbound caller dials 555-1212, and the MAX unit connects the caller to the equipment that
terminates BRI line 1.
Host/BRI
Line Config
local
Name=local
Line 1...
Enabled=Yes
Dial Plan=Trunk Grp
Ans 1#=1212
MAX 6000/3000 Network Configuration Guide
3-41
Configuring WAN Access
Configuring Host/BRI lines
Enabling the device to make outbound calls
Jim’s setup is similar to Ally’s, but he needs to access the Internet, so you must configure the
MAX unit to enable outbound calls. Proceed as follows:
1
Open System > Sys Config and enable trunk groups systemwide.
2
Exit the profile and, at the exit prompt, select the exit and accept option.
3
Open a Net/T1 (or Net/E1) profile and make sure that some of the line’s channels are
assigned to the same trunk group. Then, exit the profile and, at the exit prompt, select the
exit and accept option.
4
Open a System > Dial Plan profile.
5
Set the Data Service and PRI # Type parameters to Inherit.
6
Open a Host/BRI > Line Config > Line Config profile > Line N subprofile.
7
Set the Dial Plan parameter to Extended.
8
Exit the profile and, at the exit prompt, select the exit and accept option.
If the profiles you have configured are not the active Sys Config profiles and the active Line
Config profile, activate them as described in “Activating a profile” on page 2-7.
Example of configuring outbound calls
In this sample configuration, the terminating equipment on line 1 can make an outbound call
using trunk group 5 and Dial Plan profile 2. With this configuration, the caller at the Host/BRI
terminating equipment dials 502-408-555-1212 and connects to the device whose telephone
number is 408-555-1212 (trunk group 5, dial plan 2).
System
Sys Config
Use Trunk Grps=Yes
System
Dial Plan
Boston
Name=Boston
Call-by-Call=6
Data Svc=Inherit
PRI # Type=Inherit
Host/BRI
Line Config
local
Name=local
Line 1...
Enabled=Yes
Dial Plan=Extended
Ans 1#=1212
Ans 2#=
3-42
MAX 6000/3000 Network Configuration Guide
Configuring WAN Access
Configuring IDSL connections
Configuring local BRI-to-BRI calls
To enable trunk groups:
1
Open System > Sys Config and set Use Trunk Grps to Yes to enable trunk groups
systemwide.
2
Exit the profile and, at the exit prompt, select the exit and accept option.
3
Open the Host/BRI > Line Config > Line Config profile > Line N subprofile for the line
you are configuring, and set the Dial Plan parameter to Trunk Grp to specify the use of
trunk groups.
4
Exit the profile and, at the exit prompt, select the exit and accept option.
If the profile you have configured is not the active profile, activate it as described in
“Activating a profile” on page 2-7.
Example of configuring BRI-to-BRI calls
With the configuration in this example, the terminating equipment on one Host/BRI line can
connect to the terminating equipment connected to port 5 on the Host/BRI card installed in slot
4. To make the connection, the caller dials 345.
The first digit, called the dialing prefix, is 3. The second digit, 4, represents expansion slot 4,
and the third digit, 5, represents the device connected to port 5 on that card.
The dialing prefix of 3 is a trunk group number indicating to the MAX that the next two digits
represent a specific port on a specific slot card.
System
Sys Config
Use Trunk Grps=Yes
Host/BRI
Line Config
Line Config profile
Line 3...
Enabled=Yes
Dial Plan=Trunk Grp
Configuring IDSL connections
The ISDN Digital Subscriber Line (IDSL) card provides support for up to eight IDSL BRI
lines. In the Main Edit Menu, the menu item for an IDSL card appears as BRI/LT (Basic Rate
Interface/Line Terminator). To configure the IDSL connections, open a BRI/LT > Line Config
profile. Before you start configuring individual connections, you can set the Name parameter
to specify a name for the profile. You can configure multiple profiles, although only one
profile can be active. Typically, you should configure only one profile. If you do configure
multiple profiles, however, you should give each a descriptive name. Leaving the Name field
blank does not affect the functionality of any IDSL lines.
MAX 6000/3000 Network Configuration Guide
3-43
Configuring WAN Access
Configuring IDSL connections
When you are ready to configure the IDSL connections, set the following parameters in each
BRI/LT > Line Config >Line Config profile > Line N subprofile:
Parameter
Specifies
Enabled
Availability of the line. If you set the Enabled parameter to No, the line is
not available for use.
Dial Plan
Whether the port uses trunk groups or the extended dial plan to send and
receive calls. (For details about dial plans, see “Configuring outbound
calls” on page 3-69.)
Ans N#
Telephone number for call routing. This number routes incoming WAN
calls to the local BRI lines connecting to IDSL card. (For details, see
“Configuring outbound calls” on page 3-69).
Each line has two B channels for user data. To configure the B channels, open BRI/LT > Line
Config > Line Config profile > Line N and set the following parameters.
Parameter
Specifies
B1 Usage
Usage (Switched, Nailed, or Unused) of the first B channel. To support
IDSL, you must set this parameter to Nailed.
B2 Usage
Usage (Switched, Nailed, or Unused) of the second B channel. To support
IDSL, you must set this parameter to Nailed.
B1 Slot
Slot number for routing calls to the first B channel. Should have the same
setting as B2 Slot.
B2 Slot
Slot number for routing calls to the second B channel. Should have the
same setting as B1 Slot.
B1 Prt/Grp
For switched channels, a port number to be used with the B1 Slot
parameter for call routing purposes. For nailed channels, a group number,
which will be referenced from a call or Connection profile, assigning the
channels for a connection.
B2 Prt/Grp
For switched channels, a port number to be used with the B 2 Slot
parameter for call routing purposes. For nailed channels, a group number,
which will be referenced from a call or Connection profile, assigning the
channels for a connection.
B1 Trnk Grp
Trunk group to which to assign the first B channel. Makes the channel
available for outbound calls.
B2 Trnk Grp
Trunk group to which to assign the second B channel. Makes the channel
available for outbound calls.
For detailed information about each parameter, see the MAX Reference.
BN Slot and BN Prt/Grp parameters
With the BN Slot and BN Prt/Grp parameters, you can assign a channel to a slot or slot/port
combination for a digital modem, AIM port, or the Ethernet port. The slot/port combination
configuration affects both inbound call routing and outbound calls. In effect, it reserves the
3-44
MAX 6000/3000 Network Configuration Guide
Configuring WAN Access
Configuring IDSL connections
channel for calls to and from the specified slot or port. For details, see “Configuring inbound
calls” on page 3-59 and “Configuring outbound calls” on page 3-69.
Note: You cannot control whether an incoming call rings on the first or second B channel, so
set the BN Slot parameters to identical values.
With a nailed channel, BN Prt/Grp is a Group number. To make use of this nailed connection,
the Group number is referenced in a Connection or call profile. (For the definition of call
profile, see “Assigning nailed channels to groups” on page 3-12.)
Example of IDSL configuration
With the following configuration, when the MAX unit receives a switched call on telephone
number 555-1212 (from a device connected to an ISDN device or a modem), the unit routes
the call to the device connected to line 1 of the IDSL card:
1
Open a BRI/LT > Line Config profile and assign a name to it. For example:
BRI/LT
Line Config
idsl
Name=idsl
2
Open the Line 1 subprofile, enable the line, and assign an answer number.
Line 1...
Enabled=Yes
Dial Plan=Trunk Grp
Ans 1#=1212
BRI/LT diagnostics
A MAX unit’s software provides the following BRI/LT diagnostics:
BRI/LT
Line Diag
Line N...
EOC Address=0
Line LoopBack
Corrupt CRC
UnCorrupt CRC
Rq Corrupt CRC
UnRq Corrupt CRC
Clr NEBE
Clr FEBE
Sealing Current
For detailed information about each parameter, see the MAX Reference.
Configuring IDSL voice-call support
The IDSL card supports incoming and outgoing voice calls. To support outgoing voice calls,
the connected Terminal Equipment (TE) must send digits to the MAX unit by means of Q.931
en-bloc dialing, that is, it sends all dialed digits to the unit in one block, the ISDN Call Setup
message, rather than one digit at a time.
MAX 6000/3000 Network Configuration Guide
3-45
Configuring WAN Access
Configuring IDSL connections
The unit receives outgoing call requests from the device connected to the IDSL card and routes
voice calls to the Public Switched Telephone Network (PSTN) over a T1 line or ISDN PRI
line. The unit receives incoming voice calls on any attached T1 or PRI line, and uses Dialed
Number Identification Service (DNIS) to route the calls to devices connected to IDSL cards.
To configure IDSL voice-call support, open the System > Sys Config profile and set the
following parameters in each Line N subprofile:
Parameter
Specifies
Enabled
Availability of the line. If you set the Enabled parameter to No, the line is
not available for use.
Dial Plan
Whether or not a card uses trunk groups or the extended dial plan to send
and receive calls. The options are to use the extended dial plan or use
trunk groups. (For details about dial plans, see “Configuring outbound
calls” on page 3-69.)
For detailed information about each parameter, see the MAX Reference.
Configuring the MAX IDSL card for outgoing voice calls
To configure the MAX unit to accept voice calls from a device connected to the IDSL card and
route them to the PSTN:
1
Open the System > Sys Config profile.
2
Set Use Trunk Groups to Yes.
3
Exit the profile and, at the exit prompt, select the exit and accept option.
Perform the following steps if you want voice-call requests routed to a T1/PRI line:
1
Open the Net/T1 > Line Config > Line Config > Line N subprofile for the channel of the
T1/PRI line you want to make available to the IDSL card, and set the Ch N TrnkGrp
parameter to a value from 4 to 9.
You must prepend this value to the telephone number the TE device dials. When the MAX
unit receives a voice-call request from the IDSL device, the unit uses the trunk-group
number to route the call to a T1 channel with a matching trunk-group number. If trunk
groups are not used, the call request terminates at the unit and is not forwarded to the
PSTN.
2
Exit the profile and, at the exit prompt, select the exit and accept option.
If the profile you have configured is not the active profile, activate it as described in
“Activating a profile” on page 2-7.
For details of configuring your T1/PRI line, see “Configuring T1 lines” on page 3-7.
Configuring the MAX to route incoming voice calls to the IDSL card
You can use one of two different methods or a combination of both to configure the MAX unit
to accept voice calls from the PSTN and route them to devices connected to an IDSL card. You
can instruct the unit to route calls to an IDSL card on the basis of either the called number or
the T1 channel on which the unit receives calls.
3-46
MAX 6000/3000 Network Configuration Guide
Configuring WAN Access
Configuring IDSL connections
To instruct the unit to route calls to the IDSL card on the basis of the called number:
1
Open a BRI/LT > Line Config > Line Config profile > Line N subprofile.
2
Set Ans 1#, Ans 2#, or both to the called number that is dialed to reach the end user’s TE.
The Central Office (CO) switch must support DNIS, because the unit matches the DNIS
number of the incoming call to numbers specified by Ans N# parameters.
3
Repeat step 1 and step 2 for each line that can receive calls that should be routed to the
IDSL card.
To instruct the unit to route calls to the IDSL card on the basis of the T1 channel on which the
unit receives calls:
1
Open a Net/T1 > Line Config > Line Config profile > Line N subprofile.
2
If a MAX unit should route calls received on a specific channel to the IDSL card, set the
appropriate Ch N Slot parameter to the IDSL card’s slot number.
For example, if the unit is to route all calls received on channel 1 to an IDSL card in slot 7,
set Ch 1 Slot to 7.
3
Repeat step 1 and step 2 for each line that can receive calls that should be routed to the
IDSL card.
If the profile you have configured is not the active profile, activate it as described in
“Activating a profile” on page 2-7.
Performing loopback diagnostics for IDSL
The MAX unit supports loopback tests from the unit to any device on the IDSL connection.
For example, you can loop back the signal from the IDSL card to the remote device, or from
the IDSL card to any intermediate repeater. For example, with the connection shown in
Figure 3-3, you could set up a loopback test from the unit to any of the ISDN repeaters, or from
the unit all the way to the remote device at the end of the connection. This ability enables you
to isolate trouble anywhere in the connection.
Figure 3-3. IDSL connection with repeaters
MAX with
IDSL card
ISDN
repeater 1
ISDN
repeater 2
ISDN
repeater 3
ISDN TE
To configure a loopback test on the BRI lines supported by the IDSL card:
1
Open the BRI/LT > Line Diag > Line Diag profile > Line N, subprofile for the line you
want to loop back.
2
Set the EOC Address parameter to one of the following values to specify the EOC
Address of the device that is the terminating point for the loopback test:
–
0—The remote TE or MAX unit.
–
1—The repeater nearest the MAX unit.
–
2–6—Subsequent repeaters. The next repeater after 1 is 2, and so on.
–
7—All devices.
MAX 6000/3000 Network Configuration Guide
3-47
Configuring WAN Access
Configuring Host/AIM6 and Host/Dual ports
3
Select the Line LoopBack command and press Enter.
4
In the confirmation dialog box that appears, select 1=Line N LB.
While the line loops back, normal data transfer is disrupted.
5
Press Escape to cancel the loopback.
In a local loopback test, data originating at the local site loops back to its originating port
without going out over the WAN. It is as though a data mirror were held up to the data at the
WAN interface, and the data reflected back to the originator. The WAN interface is the port on
the MAX unit that connects to a WAN line.
For more information about loopback tests, see the MAX Administration Guide.
Enabling Loop Sealing Current
The BRI/LT > Line Diag > Line N > Sealing Current parameter is a toggle that turns the loop
sealing current on and off. Turn the loop sealing current on to retard oxidation on the DSL line.
If you toggle it on, the following message appears in the Main Edit Menu window:
Message #242
Loop Sealing Current
now ON
Disable Loop Sealing Current if you are not concerned about oxidation on the DSL line. If you
toggle the loop sealing current off, the following message appears in the Edit window:
Message #243
Loop Sealing Current
now OFF
Configuring Host/AIM6 and Host/Dual ports
You can connect a videoconferencing codec (coder/decoder) to a port supporting inverse
multiplexing to communicate over a point-to-point link. The MAX supports two types of
inverse multiplexing: Bandwidth ON Demand Interoperability Group (BONDING) and
Ascend Inverse Multiplexing (AIM). Both types are supported by V.35, RS-449, or X.21 port
on the MAX unit. Typically, inverse-multiplexed calls are between video codecs and other
devices that might need high bandwidth serial data over the WAN.
Inverse multiplexing uses pins for controlling the data flow through the port. A device sends a
signal through a pin and over the line to another device. The signal indicates the control-line
state. For example, when a device sends a signal indicating that it has data to send, the
control-line state is RTS (Request to Send). If the other device sends a signal to indicate that it
is ready to receive data, its control-line state is DTR (Data Transmit Ready). The process of
sending these synchronization signals between inverse multiplexing ports is called
handshaking.
You can install two types of inverse multiplexing cards on a MAX unit: Host/AIM6 and
Host/Dual. The Host/AIM6 card supports six ports and the Host/Dual card supports two ports.
Both cards support of the same dialing protocols: AIM/Bonding, RS-366, V.25 bis, and X.21.
Note: When you install a Host/AIM6 or Host/Dual card on the MAX unit, the card’s ports
become the default route for inbound data calls, taking precedence over the bridge/router
3-48
MAX 6000/3000 Network Configuration Guide
Configuring WAN Access
Configuring Host/AIM6 and Host/Dual ports
software. Make sure that your call-routing configuration accommodates calls destined for the
local Ethernet network. (For details, see “Configuring inbound calls” on page 3-59 and
“Configuring outbound calls” on page 3-69.)
An AIM port requires three levels of configuration:
•
Configure the AIM port itself
•
Configure the interface to the codec
•
Configure the WAN connections between serial hosts
The remainder of this chapter describes parameters, procedures and examples for configuring
the inverse-multiplexing port, the Host interface to the codec, inverse-multiplexing WAN
connections, bandwidth WAN connections, an AIM call, a FT1-B&O call, a single-channel call
and a dual-port call.
Configuring the inverse-multiplexing port
The Port Config profiles contain protocol and routing parameters for the port itself. To
configure an inverse-multiplex port, open Host/AIM6 (or Host/Dual) > PortN Menu > Port
Config and set the following parameters:
Parameter
Specifies
Port Name
Descriptive name for the port profile. (This parameter is optional.
Functionality is not affected if you do not enter a value.)
Dial Plan
Whether a card uses trunk groups or the extended dial plan to send and
receive calls. (For details about dial plans, see “Configuring outbound
calls” on page 3-69.)
Ans N#
A telephone number for call routing purposes. Calls received on the
specified number are routed to the port controlled by this profile.
Idle
Action that the MAX takes on the port when you turn on the power or
when no call is active. With the None setting, the port waits for you to
establish the call. With the Call setting, the port automatically
establishes an outbound call when you turn on the power or when a
call is active.
Dial
How a call originates at the port, whether it be by dialing through the
MAX unit’s user interface, or by using one of three dialing protocols
(RS-366, V.25 bis, or X.21) to dial from the AIM port.
Answer
The protocol the port associated with this profile uses when answering
calls.
Clear
Protocol that applies when the port receives a request to clear a call.
(With the Terminal setting, the MAX does not respond to control-line
requests to clear calls.)
Term Timing
Whether the MAX uses the Terminal Timing signal from the codec to
clock data it receives from the codec. Terminal Timing is a clock
signal specified for the V.35, X.21, and RS-449 serial interfaces. It
compensates for the phase difference between Send Data and Send
Timing.
MAX 6000/3000 Network Configuration Guide
3-49
Configuring WAN Access
Configuring Host/AIM6 and Host/Dual ports
Parameter
Specifies
RS-366 Esc
Escape character the MAX uses during RS-366 ext2 dialing or during
X.21 ext2 dialing.
Early CD
When the MAX unit is to activate the Carrier Detect (CD) signal at the
AIM port. When the unit receives a signal indicating that a sender has
data to transmit, it activates the CD signal. If Early CD is set to its
default value of None, the unit activates the CD signal after the
completion of handshaking and an additional short delay.
DS0 Min Rst
When (daily or monthly) the MAX should reset accumulated DS0
minutes to 0 (zero). A DS0 minute is the online usage of a single
56-Kbps or 64-Kbps switched channel for one minute. You can also
set this parameter to specify that the MAX should disable the timer
altogether.
Max DS0 Mins
Maximum number of DS0 minutes a call can be online. Applies to
calls from the AIM port within the specified time period. When the
usage exceeds the specified maximum, the MAX cannot place any
more calls, and it takes any existing calls offline.
Max Call Mins
Maximum number of minutes a call can be online at the port,
regardless of bandwidth, before the MAX disconnects it. This
maximum limits the usage of switched channels, even if the MAX
combines these channels with nailed ones. Although the MAX
disconnects the switched channels when a call exceeds the value of
this parameter, the nailed channels remain connected.
Port Password
Password for incoming AIM or BONDING calls. Authentication is
used only if the calling unit has a password defined in the Call profile.
For detailed information about each parameter, see the MAX Reference.
Configuring a Port Config profile
To configure an inverse multiplexing port, perform the following steps:
1
Open a Host/AIM6 > Port1 Menu > Port Config profile and set the Port Name parameter
to assign a name to the profile.
2
Set the Ans N# parameters to configure call routing.
3
Set the Dial, Answer, and Clear parameters appropriately for the codec.
4
Set the Dial Plan parameter to trunk group to specify that the digits following the first digit
constitute an ordinary telephone number, or set it to Extended to specify that the MAX
uses the extended dial plan.
5
Exit the profile and, at the exit prompt, select the exit and accept option.
Example of a Port Config profile
Host/AIM6
Port1 Menu
Directory
Port1
Port Name=Port1
Dial Plan=Trunk Grp
3-50
MAX 6000/3000 Network Configuration Guide
Configuring WAN Access
Configuring Host/AIM6 and Host/Dual ports
Ans 1#=1212
Ans 2#=1213
Ans 3#=1214
Ans 4#=1215
Dial=RS-366 ext1
Answer=Auto
Clear=Terminal
Port diagnostics
After configuring port, you can perform a local loopback test to verify the configuration. Select
the Host/AIM6 (or Host/Dual) > PortN Menu > Port Diag > Local LB command. When you
press the Right Arrow (or Enter) key to select the command, the serial host port begins looping
back toward the serial host.
The Local LB command and parameters that you can toggle while the loopback test is running
are described in the MAX Administration Guide.
Configuring the interface to the codec
A Host interface profile defines how the port or pair of ports interfaces with the codec. If your
MAX unit has a Host/AIM6 card, open the Host port parameters, in the Host/AIM6 > Mod
Config profile and set the following parameters:
Parameter
Specifies
Module Name
Descriptive name for the expansion card.
Port 1/2 Dual
Whether the MAX pairs ports 1 and 2 for dual-port or FT1-B&O calls
on a Host/AIM6 module.
Port 3/4 Dual
Whether the MAX pairs ports 3 and 4 for dual-port or FT1-B&O calls
on a Host/AIM6 module.
Port 5/6 Dual
Whether the MAX pairs ports 5 and 6 for dual-port or FT1-B&O calls
on a Host/AIM6 module.
Palmtop
Whether the MAX enables or disables access to inverse multiplexing
ports through a palmtop controller.
Palmtop Port #
Inverse multiplexing port to which a palmtop port has access if
palmtop access is restricted.
Palmtop Menus
Whether or not the user of a palmtop controller connected to a palmtop
port has access to the standard set of menus, the command-line
interface, or the simplified menus.
If your MAX unit has a Host/Dual card, open the Host/Dual > Mod Config profile and set the
following parameters:
Parameter
Specifies
Module Name
Descriptive name for the expansion card.
Dual Ports
Whether the MAX pairs ports 1 and 2 for dual-port or FT1-B&O calls
on a Host/Dual module.
MAX 6000/3000 Network Configuration Guide
3-51
Configuring WAN Access
Configuring Host/AIM6 and Host/Dual ports
Parameter
Specifies
Palmtop
Whether the MAX enables or disables access to inverse multiplexing
ports through the palmtop controller.
Palmtop Port #
Inverse multiplexing port to which a palmtop port has access if
palmtop access is restricted.
Palmtop Menus
Whether the user of a palmtop controller connected to a palmtop port
has access to the standard set of menus, the command-line interface, or
the simplified menus.
For detailed information about each parameter, see the MAX Reference.
Note: Lucent’s proprietary Palm Top controller can access the MAX 3000 T1 system menus
through the serial (UART) port on the Host/Dual card.
Pairing ports for dual-port calls
In a dual-port call, the codec performs its own inverse multiplexing on two channels so that a
call can achieve twice the bandwidth of a single channel. A pair of inverse multiplexing ports
on the MAX unit connects to the codec. The pair includes a primary and a secondary port.
Because the unit places the two calls in tandem and clears the calls in tandem, it considers
them a single call.
Creating a dual-port configuration does not prevent you from dialing any other type of call
from the primary host port of the pair, or from using either port for receiving any type of call.
Pairing ports does not disable RS-366 dialing at the secondary port.
Enabling dual-port calls
If you are configuring the interface to an older model codec that does not support inverse
multiplexing, you can pair two inverse multiplexing ports to provide double the bandwidth for
the videoconferencing call. A dual-port call requires a dual interface on the codec. The
following configuration pairs the first two inverse multiplexing ports in a Host/AIM6 card:
1
Open Host/Dual > Mod Config.
2
Assign a name (optional).
3
Set the Dual Port parameter to pair two ports. For example:
Host/Dual
Mod Config
Module Name=Dual Port Call
Port 1/2 Dual=Yes
Palmtop=Full
Palmtop Port #=No
Palmtop Menus=Standard
4
Exit the profile and, at the exit prompt, select the exit and accept option.
For more information, see “Configuring a dual-port call” on page 3-58.
3-52
MAX 6000/3000 Network Configuration Guide
Configuring WAN Access
Configuring Host/AIM6 and Host/Dual ports
Configuring inverse-multiplexed WAN connections
To configure inverse-multiplexed WAN connections, you not only set parameters based on the
provisioning of the line but also parameters that are defined in the specifications you receive
from the service provider’s Central Office (CO). The parameters are in call profiles, which are
the profiles in the Host/AIM6 (Host/Dual) > PortN Menu > Directory menu. (For the definition
of call profile, see “Assigning nailed channels to groups” on page 3-12.)
Set the following call profile parameters as appropriate for your provisioned line.
Parameter
Specifies
Name
Descriptive name for the profile. The value of the Name parameter
should be descriptive of the port.
Dial #
Number used to dial out on this connection. Defines the far-end
number and can specify the method of placing the call.
Call Mgm
The way that the MAX manages calls at an inverse multiplexing port
when AIM, FT1-AIM, FT1-B&O, or BONDING is the value for the
Call Type parameter.
Transit #
A dialing prefix the MAX uses when making an outbound call. You
can specify a string for use in the transit network IE for PRI calling
when the call goes through an InterExchange Carrier (IEC). Transit #
does not apply to outbound calls on inband T1 lines.
Group
The group number of a group of nailed channels assigned to the
connection. (A channel is assigned to a group in a Line N profile.)
FT1 Caller
Whether the local codec initiates an FT1-AIM, FT1-B&O, or
Nailed/MPP call, or whether it waits for the remote end to initiate
these types of calls.
Auto-BERT
That an automatic Bit Error Rate Test (Auto-BERT) begins as soon as
a call connects and runs for the number of seconds you specify. MAX
status windows display the results.
To set the following call-profile, you need some line information from your Central Office:
Parameter
Specifies
Call Type
Type of connection, such as switched or nailed, between the local and
remote codecs.
Data Svc
The type of data service the link uses, such as 56K, 56KR, or 64K. The
Data Svc parameter affects how much bandwidth is available for a
particular session, and how channels can be allocated to the call.
Force 56
Whether the MAX uses only the 56-Kbps portion of a channel, even
when all 64-Kbps appear to be available. If you receive calls from
Europe or the Pacific Rim, use this parameter when the complete path
cannot distinguish between the Switched-56 and Switched-64 data
services.
MAX 6000/3000 Network Configuration Guide
3-53
Configuring WAN Access
Configuring Host/AIM6 and Host/Dual ports
Parameter
Specifies
Call-by-Call
PRI service to use when using a Dial Plan, Connection or call profiles
to place a call. To set this parameter, contact your service provider,
who will supply you with the correct services information. (For the
definition of call profile, see “Assigning nailed channels to groups” on
page 3-12.)
Bill #
Telephone number to be used either as a billing suffix or the calling
party number.
Fail Action
The action that the MAX unit takes when it cannot establish the base
channels of a codec connection. When it cannot establish a call with
the number of channels specified by the Base Ch Count parameter, the
MAX unit can disconnect, reduce the bandwidth request, or establish a
lower bandwidth call and retry for the additional bandwidth.
PRI # Type
The type of telephone number, such as National, Intl, or Local, that the
MAX unit dials for the outgoing call.
NumPlanID
A value supplied by the provider of your PRI line so that the switch
can properly interpret the telephone number dialed.
For detailed information about each parameter, see the MAX Reference.
Configuring bandwidth WAN connections
A MAX unit can allocate WAN bandwidth dynamically. When establishing a connection, the
unit opens the number of channels you specify as the base number of channels. It can add or
remove channels as required by the amount of traffic. You specify the increment by which the
unit adds channels and the decrement by which it removes channels. You need to further
fine-tune the channel allocation routine to avoid keeping channels active unnecessarily but also
avoid closing them too quickly. (Typically, you incur a minimum charge for opening a new
channel.) You can choose the algorithm to use for dynamic channel allocation. Also, each of
the available algorithms is based on the Average Line Utilization (ALU), and you can set
parameters that affect the calculation of ALU.
To configure bandwidth parameters for a WAN connection, open a call profile in the
Host/AIM6 (Host/Dual) > PortN Menu > Directory menu, and set the following parameters:
3-54
Parameter
Specifies
Base Ch Count
Base number of channels to open when setting up the call. After the
base channels have been opened for an AIM, BONDING, or
multichannel PPP call, the channel count can be augmented.
Inc Ch Count
Number of channels the MAX unit adds as a bundle when bandwidth
changes either manually or automatically during a call. The unit adds
one bundle at a time.
Dec Ch Count
Number of channels the MAX units closes as a bundle when
bandwidth changes either manually or automatically during a call. The
unit removes one bundle at a time. You cannot clear a call by
decrementing channels.
MAX 6000/3000 Network Configuration Guide
Configuring WAN Access
Configuring Host/AIM6 and Host/Dual ports
Parameter
Specifies
Dyn Alg
The algorithm to use for calculating Average Line Utilization (ALU)
over the number of seconds specified by the Sec History parameter.
Sec History
A time period, in seconds, that serves as the basis for calculating ALU.
Add Pers
The time, in seconds, for which the ALU must exceed the value
specified for the (Host/AIM6 (Host/Dual) > PortN Menu > Directory >
call profile > Target Util parameter before the unit adds bandwidth.
Sub Pers
The time, in seconds, for which the ALU must fall below the value
specified for the (Host/AIM6 (Host/Dual), PortN Menu > Directory >
call profile > Target Util parameter before the unit subtracts
bandwidth.
Time PeriodN
The submenu parameters for dividing each AIM call are:
•
Activ—Specifies a call management time period for an AIM call.
•
Beg Time— Specifies the start-time of a dynamic AIM call’s time
period.
•
Min Ch Cnt—Specifies the minimum number of channels that can
be established for a multilink call.
•
MAX Ch Cnt—Specifies the maximum number of channels that
can be allocated to a multilink connection.
•
Target Util—Specifies a percentage of line utilization to use as a
threshold for determining when to add or subtract bandwidth.
For detailed information about each parameter, see the MAX Reference.
Call Password and Flag Idle parameters
A call profile includes a Call Password and a Flag Idle parameter. (For the definition of call
profile, see “Assigning nailed channels to groups” on page 3-12.) The Call Password
parameter specifies the password for outgoing AIM and BONDING calls. The Flag Idle
parameter specifies the bit pattern that a dynamic call to an AIM port uses as the idle indicator.
Select the Yes setting to specify the flag pattern or the No setting to specify the mark pattern.
Both patterns include enough 1 bits to maintain clock synchronization with the remote unit.
Both ends must use the same pattern. Receipt of the specified pattern indicates to the local unit
that the remote unit is not sending data.
For detailed information about each parameter, see the MAX Reference.
Configuring an AIM call
To configure an AIM call that uses dynamic bandwidth allocation to manage the call
dynamically:
1
Open a Host/AIM6 (Host/Dual) > PortN Menu > Directory > call profile.
2
Set the Dial # to specify the remote device, and set Call Type to AIM.
3
Set Call Mgm to Dynamic.
MAX 6000/3000 Network Configuration Guide
3-55
Configuring WAN Access
Configuring Host/AIM6 and Host/Dual ports
4
Set Base Ch Count to specify the base number of channels and set Inc Ch Count and Dec
Ch Count to specify the number of channels to be added or subtracted, respectively, when
bandwidth requirements change.
5
Set the bandwidth parameters, as described in “Configuring bandwidth WAN
connections” on page 3-54.
6
Exit the profile and, at the exit prompt, select the exit and accept option.
Example of an AIM call configuration
Host/AIM6
Port1 Menu
Directory
aim
Name=aim
Dial #=6-212-555-1212
Call Type=aim
Call Mgm=Dynamic
Base Ch Count=3
Inc Ch Count=2
Dec Ch Count=1
Dyn Alg=Quadratic
Sec History=60
Add Pers=20
Sub Pers=20
Time Period 1...
Activ=Enabled
Beg Time=00:00:00
Min Ch Cnt=1
MAX Ch Cnt=12
Target Util=70
Configuring the FT1-B&O call
While FT1 calls use nailed channels, FT1-AIM and FT1-B&O calls can combine switched
channels with nailed channels. For FT1-B&O calls, you must also set the B&O Restore
parameter. This parameter specifies automatic backup and overflow protection of nailed-up
circuits. It actually specifies how many seconds the MAX waits before restoring a nailed-up
channel to an FT1-B&O call.
Note: For FT1-AIM or FT1-B&O calls, you must set the Idle and Dial parameters in the Port
Config profile at both the local end and the remote end of the call. For the MAX unit to
connect the switched channels when you turn it on, set Idle to Call and Dial to Terminal. For
the unit to connect the switched channels when the host equipment at both ends activates DTR,
set Idle to None and Dial to DTR. In this latter configuration, the hosts at both ends of the
connection must activate DTR to make the unit connect the switched channels.
To configure an FT1-B&O call:
3-56
1
Open the call’s profile in the Host/AIM6 > PortN Menu > Directory menu.
2
Set the call type to FT1-B&O.
3
Set call management to Dynamic. This setting is required in the device that initiates the
FT1-B&O call.
MAX 6000/3000 Network Configuration Guide
Configuring WAN Access
Configuring Host/AIM6 and Host/Dual ports
4
Specify the Group number for the nailed channels.
5
Set the FT1 Caller parameter to Yes to specify that the MAX unit initiates the call.
If the other end of the link initiates the call, set this parameter to No. Only one side of the
link can initiate the call for FT1-AIM or FT1-B&O calls.
6
Exit the profile and, at the exit prompt, select the exit and accept option.
7
Open the Port Config profile, which in this case is Host/AIM6 > Port1 Menu > Port
Config.
8
Set the Idle and Dial parameters to specify how the switched channels connect.
These settings must be the same in the device at each end of the link. The settings shown
beginning with step 1 above connect the switched channels when the host equipment at
both ends sets DTR active. As an alternative, the settings for the second Host/AIM6
profile in the “Example of a FT1-B&O call” connect the channels at power-up.
9
Exit the profile and, at the exit prompt, select the exit and accept option.
Example of a FT1-B&O call
Host/AIM6
PortN Menu
Directory
ft1-bc
Name=ft1-bo
Call Type=FT1-B&O
Call Mgm=Dynamic
Group=3
FT1 Caller=Yes
Host/AIM6
Port1 Menu
Port Config
Idle=None
Dial=DTR
Host/AIM6
Port2 Menu
Port Config
Idle=Call
Dial=Terminal
Configuring a single-channel call
The following procedure provides a connection between two terminal adaptors connected to
two AIM ports on the MAX unit. A call between AIM ports on the same unit remains entirely
local. The MAX does not use any WAN channels. To configure a single-channel port-to-port
call:
1
Open a call profile in the Host/AIM6 (Host/Dual) > Port3 Menu > Directory menu.
2
Set the Dial # parameter to specify a value in a special three-digit format.
(For more information, see “Configuring outbound calls” on page 3-69.)
3
Set the Call Type parameter to specify a single-channel call type.
4
Exit the profile and, at the exit prompt, select the exit and accept option.
MAX 6000/3000 Network Configuration Guide
3-57
Configuring WAN Access
Configuring Host/AIM6 and Host/Dual ports
Example of configuring a single-channel call
Host/AIM6
Port3 Menu
Directory
terminal-adaptors
Name=terminal-adaptors
Dial #=241
Call Type=1 Chnl
Configuring a dual-port call
In a dual-port call, two inverse multiplexing ports on the MAX unit connect the call to the
serial host. The two ports are a primary port and a secondary port. However, the unit places the
two calls in tandem and clears the calls in tandem, and considers them a single call. The
following restrictions apply to dual-port connections:
•
The selected data service must be available end-to-end.
•
The answer number must be the same for both ports.
•
If trunk groups are in use, both channels of the call must be in the same trunk group.
In the following example, the Host interface profile must enable port pairing for dual-port
calls. (For details, see “Enabling dual-port calls” on page 3-52.) In addition, a T1 or E1 line has
two of its channels configured with the telephone number 1212 (a hunt group). To route the
call answered on the 1212 hunt group to the paired ports for a dual-port call:
1
Open Host/Dual > Port1 Menu > Port Config.
This is the Port profile for the primary port (Port 1).
2
Set the Ans 1# parameter to specify the hunt-group answer number.
Host/Dual
Port1 Menu
Port Config
Port Name=Port1
Ans 1#=1212
Note: Do not set the Ans # parameter for the secondary host port (Port 2).
3
Exit the profile and, at the exit prompt, select the exit and accept option.
To configure the dual-port call:
1
Open a call profile in the Host/Dual > Port1 Menu > Directory menu.
This is the call profile for the primary port (Port 1).
2
Set the Dial # parameter to specify the dial number of the remote codec. For example:
Host/Dual
Port1 Menu
Directory
hunt-groups
Name=hunt-groups
Dial #=6-201-555-7878
If the dual-port call requires two dial numbers, specify both numbers. Separate them with
an exclamation mark. For example:
Dial #=6-201-555-7878!6-201-555-7879
3-58
MAX 6000/3000 Network Configuration Guide
Configuring WAN Access
Configuring inbound calls
3
Set Call Type to 2 Chnl:
Call Type=2 Chnl
4
Exit the profile and, at the exit prompt, select the exit and accept option.
Configuring inbound calls
When a MAX unit receives a call on a WAN line, it performs CLID or DNIS authentication (if
available and configured), and answers the call. The unit then uses information in the call, and
information about the channel on which the call arrives, to determine which slot should receive
the call and to authenticate the call, build a session, and pass the data stream to the appropriate
module or host. If a call is routed to the Ethernet port, the bridge/router software forwards it to
a host or hosts according to packet addresses.
Setting up ISDN subaddressing
When you use ISDN subaddressing in routing mode, incoming calls include a subaddress
number as part of the telephone number. When routing a call, the MAX unit first checks for the
ISDN subaddress. If the unit finds one, it uses the subaddress to route the call. If not, it goes on
to the next comparison.
To set up ISDN subaddressing:
1
Open the System > Sys Config profile.
2
Set the Sub-Adr Routing parameter to Routing to specify that the called-party number
may or may not have a subaddress.
3
Set the Serial parameter to specify the ISDN subaddress associated with the MAX unit’s
ports.
4
Set the LAN parameter to specify the ISDN address associated with the MAX unit’s
bridge/router or terminal server.
5
Set the DM parameter to specify the subaddress associate with the MAX unit’s digital
modems.
6
Set the V.110 parameter to specify the subaddress associated with the MAX unit’s V.110
modems.
7
Exit the profile and, at the exit prompt, select the exit and accept option.
Example of ISDN subaddressing configuration
With the configuration in this example, a caller wants to dial into a V.110 card installed on a
MAX. The telephone number of the MAX is 510-555-1212. The subaddress of the V.110 card
is 4. To reach the V.110 card, the user must enter 5105551212,4 which is the telephone number
of the MAX with the subaddress. (The subaddress (4) follows the dialed number and is
separated by a comma).
MAX 6000/3000 Network Configuration Guide
3-59
Configuring WAN Access
Configuring inbound calls
System
Sys Config
Sub-Adr=Routing
Serial=0
LAN=0
DM=0
V.110=4
Specifying answer numbers for destination host ports
If the MAX unit does not find an ISDN subaddressing, it checks for answer-number
specifications. If it finds a matching answer number, it uses that number to route the call. If
not, the unit goes on to the next comparison.
Each host port can specify one or more answer numbers. When the MAX unit receives an
inbound call and no subaddress is in use, it matches the called number to these answer numbers
and routes the call to the port with the matching number. Following are the related parameters
(shown with sample settings):
K56 Modem-16
Mod Config
Ans 1#=1213
Ans 2#=1214
Ans 3#=1215
Ans 4#=1216
V.110
Mod Config
Ans 1#=1217
Ans 2#=1218
Ans 3#=1219
Ans 4#=1220
Host/BRI
Line Config
Line N...
Ans 1#=1230
Ans 2#=1231
BRI/LT
Line Config
Line N...
Ans 1#=1240
Ans 2#=1241
PortN Menu
Port Config
Ans 1#=1232
Ans 2#=1233
Ans 3#=1234
Ans 4#=1235
Ethernet
Mod Config
WAN Options...
Ans 1#=1236
3-60
MAX 6000/3000 Network Configuration Guide
Configuring WAN Access
Configuring inbound calls
Ans 2#=1237
Ans 3#=1238
Ans 4#=1239
Note: When a MAX unit has more than one digital modem slot card installed, the cards and
modems form a pool, and any modem can answer a call routed to any digital modem slot.
Specifying host ports’ slot and port numbers in WAN channel
configurations
A MAX unit checks for slot and port number specifications. If a slot is specified for the
channel on which the call arrives, it uses it to route the call. (If the unit also finds a port
number, it routes to that specific port on the slot number.) If not, the unit goes on to the next
comparison.
In the configuration of WAN lines, you can assign one or more channels to a slot card. In the
case of an AIM slot card, you can assign channels to a port on the card. This channel
configuration affects both inbound call routing and the placement of calls. In effect, the
configuration reserves the channel for calls to and from the specified slot or port.
Configure slot and port routing only when answer number and ISDN subaddress routing are
not specified. Following are the related parameters (shown with sample settings):
Net/T1
Line Config
Line Config profile
Line N...
Ch N=Switched
Ch N Slot=3
Ch N Prt/Grp=1
Net/E1
Line Config
Line Config profile
Line N...
Ch N=Switched
Ch N Slot=3
Ch N Prt/Grp=1
Net/BRI
Line Config
Line Config profile
Line N...
BN Usage=Switched
BN Slot=3
BN Prt/Grp=1
When a MAX unit receives an inbound call and no subaddress is in use or no matching answer
number is found, it evaluates the slot and port specifications and routes the call to the specified
destination. For example, for the MAX 6000 shown in Figure 3-1 on page 3-2:
•
0 (zero, the default) specifies that the Ch N Slot parameter is not used to route incoming
calls.
•
1 and 2 are invalid settings, because they represent the built-in slots for T1 or E1 lines.
MAX 6000/3000 Network Configuration Guide
3-61
Configuring WAN Access
Configuring inbound calls
•
3–8 represent expansion slots. When looking at the back panel of the unit, slot 3 is the
bottom slot in the left bank of slots, followed by 4 and 5 in ascending order. Slot 6 is the
bottom right slot, followed by 7 and 8 in ascending order.
•
9 represents the LAN. The unit routes calls to the bridge/router module.
Note: When a unit has more than one digital modem slot card installed, the cards and
modems form a pool, and any modem can answer a call routed to any digital modem slot.
Exclusive port routing
If a call comes in on an ISDN line and the MAX unit finds no explicit call-routing information,
the unit can route the call by means of bearer service information. By turning on exclusive port
routing, however, you can prevent the MAX unit from accepting calls for which it has no
explicit routing destination.
If you set the System > Sys Config > Excl Routing parameter to No (the default), the unit
routes the call on the basis of bearer service. It routes voice calls to a digital modem, routes
V.110 calls to a V.110 module, and routes data calls to an AIM port or, if no AIM ports are
available, to the bridge/router. If you set Excl Routing to Yes and none of the specified
call-routing comparisons are successful, the unit drops the call.
Using DNIS-related methods to limit incoming calls
You can limit the number of simultaneous incoming calls that a MAX unit accepts on each of
up to sixteen dialed numbers. You can also limit incoming calls to calls from modem callers,
V.110 callers, or HDLC callers. Three terminal-server commands are available to display
DNIS sessions and statistics.
Overview
You can configure the MAX unit to limit the number of incoming calls on the basis of:
•
Called number ID (DNIS) presented by calls
•
MAX resource that answers the call: modem, HDLC, or V.110
•
Combined maximum number of calls to modem, HDLC, and V.110 resources
Note: The MAX unit considers a call to be an HDLC call if it is not a modem call or a V.110
call.
The unit returns the cause Busy for rejected calls.
If the unit receives a call that does not specify a dialed number or that provides a dialed number
not specified by the DNIS #N parameters (where N=1 to 16), the unit considers the call as
having an Unspecified DNIS.
Call routing
When you set Ethernet > Mod Config > DNIS Options > DNIS Limitation to Yes, and the
MAX unit receives a call that provides a DNIS number specified by Ethernet > Mod Config >
DNIS Options > DNIS #N, the unit routes the call as follows:
3-62
MAX 6000/3000 Network Configuration Guide
Configuring WAN Access
Configuring inbound calls
1
The unit compares the value specified for the DNIS #N Max Calls parameter to the
number of calls that have already dialed the called number and are still active.
If the maximum has been reached, the unit rejects the call.
2
If the call is a modem call, the unit compares the value specified for the DNIS #N Max
Modem parameter to the number of active modem calls made to the called number.
If the maximum has been reached, the unit rejects the call.
3
If the call is a V.110 call, the unit compares the value specified for the DNIS #N Max V110
parameter to the number of active V.110 calls made to the called number.
If the maximum has been reached, the unit rejects the call.
4
If the call is not a modem or V.110 call, the unit considers it an HDLC call and compares
the value specified for the DNIS #N Max HDLC parameter to the number of active HDLC
calls made to the called number.
If the maximum has been reached, the unit rejects the call.
The unit answers the call if no maximum has been reached.
If the call does not provide DNIS information, or no specified DNIS #N value matches the
provided DNIS number:
1
The MAX unit compares the value specified for the Unspecified Max Calls parameter to
the number of unspecified active calls.
If the maximum has been reached, the MAX rejects the call.
2
If the call is a modem call, the unit compares the value specified for the Unspecified Max
Modem parameter to the number of unspecified active modem calls.
If the maximum has been reached, the unit rejects the call.
3
If the call is a V.110 call, the unit compares the value specified for the Unspecified Max
V110 parameter to the number of unspecified active V.110 calls.
If the maximum has been reached, the unit rejects the call.
4
If the call is not a modem or V.110 call, the unit considers it an HDLC call and compares
the value specified for the Unspecified Max HDLC parameter to the number of
unspecified active HDLC calls.
If the maximum has been reached, the unit rejects the call.
The unit answers the call if no maximum has been reached.
Limiting calls to specific dialed numbers
To limit calls to specific dialed numbers, proceed as follows:
1
Open the Ethernet > Mod Config > DNIS Options profile.
2
Set DNIS Limitation to Yes.
3
Set the DNIS #N parameter to a called number.
The MAX unit compares the called number to the DNIS #N value digit-by-digit, from
right to left. A match occurs if all the digits specified by DNIS #N match the digits at the
end of the called number. For example, if you set DNIS #N to 1235, the called number
8761235 matches, but 8762235 does not match.
MAX 6000/3000 Network Configuration Guide
3-63
Configuring WAN Access
Configuring inbound calls
4
Set the DNIS #N Max Calls parameter to specify the total number of simultaneous V.110,
HDLC, and modem calls to the called number specified by DNIS #N.
Note: You must set the DNIS #N Max Calls parameter even if you configure the unit to
limit calls on the basis of modem, V.110, or HDLC calls.
5
Set DNIS #N Max Modem if you want to limit the number of simultaneous modem calls
to the called number specified by DNIS #N.
6
Set DNIS #N Max HDLC if you want to limit the number of simultaneous synchronous
calls to the called number specified by DNIS #N.
7
Set DNIS #N Max V110 if you want to limit the number of simultaneous V.110 calls to the
called number specified by DNIS #N.
8
Exit the profile and, at the exit prompt, select the exit and accept option.
You can configure up to sixteen DNIS numbers with unique limiting configurations for each
DNIS number.
Limiting calls to unspecified dialed numbers
As with specified dialed numbers, you can limit the number of simultaneous modem, HDLC,
or V.110 calls. Open the Ethernet > Mod Config > DNIS Options profile, and set the following
parameters:
1
Set DNIS Limitation to Yes.
2
Set the Unspecified Max Calls parameter if you want to limit the total of simultaneous
V.110, HDLC, and modem calls to called numbers that do not match any specified by
DNIS #N.
Note: You must set Unspecified Max Calls even if you configure the unit to limit calls on
the basis of modem, V.110, or HDLC calls.
3
Set the Unspecified Max Modem parameter if you want to limit the number of
simultaneous modem calls to called numbers that do not match any specified by DNIS #N.
4
Set the Unspecified Max HDLC parameter if you want to limit the number of
simultaneous synchronous calls to called numbers that do not match any specified by
DNIS #N.
5
Set the Unspecified Max V110 parameter if you want to limit the number of simultaneous
V.110 calls to called numbers that do not match any specified by DNIS #N.
6
Exit the profile and, at the exit prompt, select the exit and accept option.
Examples of call routing
This section shows three sample configurations that limit incoming calls on the basis of DNIS
values.
Limiting all modem calls that do not specify a DNIS number
To specify that the MAX unit accepts ten simultaneous modem calls that do not specify a
DNIS number, set the following parameters as shown:
3-64
•
Unspecified Max Calls=10
•
Unspecified Max Modem=10
MAX 6000/3000 Network Configuration Guide
Configuring WAN Access
Configuring inbound calls
•
Unspecified Max HDLC=0
•
Unspecified Max V110=0
Limiting all calls that do not specify a DNIS number
To specify that the MAX unit accepts twenty calls, of any type, that do not specify a DNIS
number, set the following parameters as shown:
•
Unspecified Max Calls=20
•
Unspecified Max Modem=20
•
Unspecified Max HDLC=20
•
Unspecified Max V110=20
Limiting V.110 calls to a specific DNIS number
To specify that the MAX unit accepts fifteen simultaneous V.110 calls that specify a DNIS
number of 1212 and allows 100 simultaneous calls to any DNIS number except 1212, set the
following parameters as shown:
•
DNIS #1 Max Calls=15
•
DNIS #1 Modem=0
•
DNIS #1 HDLC=0
•
DNIS #1 V110=15
•
Unspecified Max Calls=100
•
Unspecified Modem Calls=100
•
Unspecified HDLC Calls=0
•
Unspecified V110 Calls=0
MAX 6000/3000 Network Configuration Guide
3-65
Configuring WAN Access
Configuring inbound calls
Incoming call routing state diagram
The following pages show detailed state information about inbound call routing in the MAX
unit. To understand these charts, you should be familiar with the parameters referenced in
many of the steps.
3-66
MAX 6000/3000 Network Configuration Guide
Configuring WAN Access
Configuring inbound calls
Does Sub-Adr=TermSel?
No
Yes
No
Does call have ISDN subaddress?
Do not answer.
Yes
Is call received on a channel whose telephone number parameter Yes
(Ch N #, Pri Num, Sec Num) does not match the called number?
Do not answer.
Telephone number matches or called number not provided.
Determine if call is net-to-net:
See MAXDAX section. Is the MAXDAX call net-to-net?
If Sub-Adr=Routing and the called number has an ISDN subaddress that matches
setting of V.110, DM, LAN, or Serial parameter, the call is not net-to-net.
If the called number (without subaddress) matches an Ans N# setting in an Ethernet
(Mod Config) or V.110 profile, or any digital modem profile, the call is not net-to-net.
If the called number (without subaddress) matches Ans # in a Net/T1 Line N profile, or
the call service matches Ans Svc in a Net/T1 Line N profile, or the call arrives on a
Leased 1:1 channel (see PBX Type parameter), it is net-to-net PBX.
If the called number (without subaddress) matches Ans N# in a Host/BRI or BRI/LT
profile or the call is answered on a channel whose slot (Ch N Slot, B1 Slot, B2 Slot)
parameter points to a Host/BRI or BRI/LT module, it is net-to-Net/BRI.
Is net-to-net
Route to indicated
T1 channel
or BRI line.
Is not net-to-net.
Does Sub-Adr=Routing?
No
Yes
Does subaddress match DM?
No
Does subaddress match V.110?
Yes
Yes
Is a digital modem available?
Is V.110 module available?
No
Does subaddress match LAN?
Yes
Is bridge/router module
available?
No
Reject call.
Yes Route call to it.
No
Reject call.
Yes Route call to it.
No
Reject call.
Yes Route call to it.
No
Does called number with/without Yes
subaddr. match Ans N# Port
If port available,
Config (invs-mux) profile
route call to it.
setting?
No
Otherwise, reject
call.
No
Yes
Is call answered on a channel whose slot (Ch N
If port (invs-mux)
Slot, B1 Slot, B2 Slot) and port (Ch N Prt/Grp,
available, route
B1 Prt/Grp, B2 Prt/Grp) parameters point to a
call to it. Otherserial-host port?
wise, reject call.
No
No
Is a serial-host (invs-mux) port
Reject call.
available?
Yes
Route call to it.
Continue next page: “A” Continue next page: “B”
Does subaddress match Serial?
MAX 6000/3000 Network Configuration Guide
Yes
3-67
Configuring WAN Access
Configuring inbound calls
From preceding page “A”
Perform the
following Ans N#
steps without
including the
subaddress in the
From preceding page: “B”
Does called number with
subaddress match Ans N# in
the Ethernet (Mod Config)
profile?
Yes
Is bridge/router module
available?
Yes
Route call to it.
No
Does called number with
subaddress match Ans N# in
a LAN Modem profile?
Yes
Is a digital modem
available?
No
Yes
Route call to it.
No
Yes
Does called number with
Is a V.110 module
subaddress match Ans N# in
available?
a V.110 profile?
No
Does called number with
subaddress match Ans N# in a
Port Config (invs-mux) profile?
No
Yes
Is the serial-host port
available?
No
Yes
Route call to it.
No
Yes
Route call to it.
No
Have the above four Ans N#
No steps been performed without
including the subaddress in
the match?
Yes
Is call answered on a channel whose slot and port
parameters (Ch N Slot, B1 Slot, B2 Slot) (Ch
N Prt/Grp, B1 Prt/Grp, B2 Prt/Grp) point to a
serial-host port (invs-mux) module, and is the port
Yes
Route call to port.
No
Is call answered on a channel whose slot parameter Yes
Route call to unit’s bridge/
(Ch N Slot, B1 Slot, B2 Slot) points to
router.
bridge/router module, and is the bridge/router
No
Is call answered on a channel whose slot parameter Yes Route call to any available
(Ch N Slot, B1 Slot, B2 Slot) points to a
digital modem.
digital modem module, and is a modem in any slot
available?
No
Is call answered on a channel whose slot
Yes
Route call to any available
parameter (Ch N Slot, B1 Slot, B2 Slot) points to
V.110 module.
a V.110 module, and is a V.110 module available?
No
Continue next page
3-68
MAX 6000/3000 Network Configuration Guide
Configuring WAN Access
Configuring outbound calls
From preceding page
Are both true: Excl Routing=No and the slot
parameter (Ch N Slot, B1 Slot, B2 Slot)=0 or null?
Is bearer service of call Voice and are digital
modems installed?
No
Yes
No
Is bearer service of call V.110?
Yes
Reject call.
Route to any available digital
modem. If none available, reject
call.
Route to any V.110 module.
If none available, reject call.
No
If unit is not waiting for a second call of a dual-port
pair (invs-mux), answer the call on the first
available serial-host port that is not a secondary port
of a dual-port pair.
If unit is waiting for a second call of a dual-port
pair, answer call on that port if it is available.
Configuring outbound calls
When a MAX unit dials out, it routes the outbound call from the originating slot to a WAN
channel to place the call. It looks for channels whose Ch N Trn Grp (or B1 Trnk Grp or B2
Trnk Grp) parameter matches the trunk-group prefix in the number dialed, that is, the prefix in
the Dial # setting of the Call profile used to place the call.
(Note that inverse mux calls have priority over other types of outgoing calls on those channels
whose Ch N Slot parameters point to invs-mux modules.) Inverse-mux calls are configured in
call profile, as described in “Assigning nailed channels to groups” on page 3-12. If no trunks
have available channels, the call is not placed.
Note: An available channel within the trunk group is one that is not assigned to any port (its
slot/numbers are zero) or is assigned to the port that originated the call. Channels assigned to
another port are not available.
Enabling trunk groups
A trunk group is a group of channels that has been assigned a number. If you enable trunk
groups, dial-out numbers must include a trunk-group number as a dialing prefix, and all
switched channels must be assigned a trunk-group number if they are to be available for
outbound calls. The following setting enables trunk groups:
System
Sys Config
Use Trunk Grps=Yes
Note: Trunk-group numbers 2 and 3 have special meaning, as described in the next two
sections. Only trunk groups 4–9 are available for assignment to channels.
MAX 6000/3000 Network Configuration Guide
3-69
Configuring WAN Access
Configuring outbound calls
Dialing through trunk group 2 (local port-to-port calls)
Use trunk group 2 for port-to-port calls within the MAX system. When 2 is the first digit in a
three-digit dial number, the MAX unit interprets the second and third digits as the slot and port
number of the called port. The second digit can be 0 or any number from 3 to 8. If it is zero, the
call goes to any available AIM port (the third digit is ignored in this case). If the second digit is
a number from 3 to 8, it represents an expansion slot number, and the third digit is the host port
on that card. Following are the related parameters (shown with sample settings):
Host/AIM6 (or Host/Dual)
PortN Menu
Directory
bonding
Name=bonding
Dial #=241
With Dial # set to 241, the unit places a call to the first port of a Host/AIM6 or Host/Dual card
in slot 4.
Dialing through trunk group 3 (Destination profiles)
When 3 is the first digit in a three-digit dialing prefix, the MAX unit interprets the next two
digits as the number of a Destination profile. Following are the related parameters (shown with
sample settings):
System
Destinations
outdial-1
Name=outdial-1
Option=1st Avail
Dial 1#=4-212-555-1212
System
Dial Plan
Dial Plan profile
Call-by-Call 1=1
PRI # Type=National
Transit #=
Bill #=
Host/AIM6 (or Host/Dual)
PortN Menu
Directory
call profile
Dial #=312
Ethernet
Connections
Connection profile
Dial #=312
With Dial # set to 312 in a call profile or Connection profile, the unit reads Destination profile
12. (The examples in this manual do not show profile numbers, because different MAX models
3-70
MAX 6000/3000 Network Configuration Guide
Configuring WAN Access
Configuring outbound calls
use different numbering. An actual display would include a profile number for the Destination
profile named outdial-1 in the example above.) Destination profiles let you instruct the
unit to use the first available channels to place the call, or to try one trunk group first, followed
by another if the first is unavailable. For example, if the Destination profile has Option set to
1st Avail, the unit takes the first available channels for the call. If the dial numbers specify
different trunk groups, the unit can use bandwidth from one switch as backup for another. For
example, trunk group 4 might contain channels serviced by Sprint while trunk group 5 might
be serviced by AT&T.
Dialing through trunk groups 4–9
In Line config profiles, you can assign trunk groups 4–9 to specify groups of channels that the
MAX unit uses for placing calls. If the group that a Connection or call profile specifies for a
call has no available channels, the call is not placed.
Trunk-group assignments limit the number of channels available to multichannel calls, because
only channels within the same trunk group can be aggregated. The unit uses trunk-group
assignments to group the channels from different types of lines. For example, when more than
one carrier services lines for the unit, you can assign trunk group 4 to a line serviced by one
carrier and trunk group 5 to a line serviced by another.
Note: A trunk group cannot include both BRI and PRI channels.
Following are the related parameters (shown with sample settings):
Net/T1
Line Config
Line Config profile
Line N...
Ch N=Switched
Ch N TrnkGrp=4
...
Net/E1
Line Config
Line Config profile
Line N...
Ch N=Switched
Ch N TrnkGrp=4
...
Net/BRI
Line Config
Line Config profile
Line N...
BN Usage=Switched
BN TrnkGrp=5
Ethernet
Mod Config
WAN Options...
Dial Plan=Trunk Grp
MAX 6000/3000 Network Configuration Guide
3-71
Configuring WAN Access
Configuring outbound calls
Ethernet
Connections
Connection profile
Dial #=5-555-1212
Host/AIM6 (or Host/Dual)
PortN Menu
Directory
call profile
Dial #=4-555-1217
Host/BRI
Line Config
Line Config profile
Line N...
Dial Plan=Trunk Grp
If Dial Plan=Trunk Grp in the Mod Config > WAN Options profile, and Dial # has a
single-digit dialing prefix from 4 to 9 in a Connection or call profile, the unit places the call
through channels in that trunk group.
Dialing through the extended dial plan
When the extended dial plan is specified for a particular port, the trunk-group number is the
first digit in a three-digit dialing prefix in which the next two digits are interpreted as the
number of a Dial Plan profile.
The extended dial plan relates only to PRI lines. It uses a specified trunk group, but accesses a
Dial Plan profile to obtain PRI parameters for the outbound call. The extended dial plan is
typically used to route calls from a terminating device on a Host/BRI line out to the WAN over
PRI channels. However, it can also be used to set up the PRI parameters for other outbound
calls. Following are the related parameters (shown with sample settings):
System
Dial Plan
host1
Name=host1
Call-by-Call=8
Data Svc=56KR
PRI # Type=National
Transit #=222
Bill #=
Host/BRI
Line Config
Line Config profile
Line N...
Dial Plan=Extended
The following example shows how to specify the extended dial plan from an AIM port or the
Ethernet network:
Host/AIM6 (or Host/Dual)
PortN Menu
Port Config
3-72
MAX 6000/3000 Network Configuration Guide
Configuring WAN Access
Configuring outbound calls
Dial Plan=Extended
Dial #=806-212-555-1217
Ethernet
Mod Config
WAN Options...
Dial Plan=Extended
Ethernet
Connections
Connection profile
Dial #=806-212-555-1212
With the dialing prefix 806, the first digit is a trunk-group number and the next two digits
instruct the unit to read Dial Plan profile 6. Placement of the call uses channels in trunk group
8 and the PRI settings in Dial Plan profile 6.
Matching slot and port specifications (reserved channels)
Whether or not you enable trunk groups, if you specify any slot/port numbers, the MAX unit
relies on slot/port specifications to place outbound calls. When a channel configuration
specifies a slot or slot/port combination, it effectively reserves the channel for calls to and from
the specified slot or port. Calls originating from a different slot or port do not find the channel
available. Following are the related parameters (shown with sample settings):
Net/T1
Line Config
Line Config profile
Line N...
Ch N=Switched
Ch N Slot=3
Ch N Prt/Grp=1
Net/E1
Line Config
Line Config profile
Line N...
Ch N=Switched
Ch N Slot=3
Ch N Prt/Grp=1
Net/BRI
Line Config
Line Config profile
Line N...
BN Usage=Switched
BN Slot=3
BN Prt/Grp=1
If the outbound call originates from a host on the Ethernet network, the destination address in
the packets brings up a Connection profile or RADIUS user profile that dials the call. If the call
does not go out through a digital modem, it originates from slot 9.
If the outbound call originates from a device connected to an inverse multiplexing port, the call
profile associated with that port dials the call. This type of call originates from the slot and port
of the inverse multiplexing card.
MAX 6000/3000 Network Configuration Guide
3-73
Configuring WAN Access
Configuring MAXDAX
If the outbound call originates from a terminal adapter connected to a Host/BRI or BRI/LT
port, the call originates from the slot and port of the Host/BRI or BRI/LT card.
If the outbound call originates from a terminal server user dialing out through a digital modem,
the digital modem slot is the source of the call. (No matter where the call originates, if it goes
out through a digital modem, the digital modem slot is the source of the call.)
When the MAX unit receives an outbound call, it evaluates the slot and port specifications as
part of identifying the channels available for placing the call:
•
If you set the slot and port specifications for a channel to zero (the default), the channel is
available for all outbound calls for which the Ch N TrnkGrp setting specifies the trunk
group assigned to the channel.
•
If the slot is nonzero and the port is zero, the channel is available to outbound calls
originating from that slot.
•
If you specify nonzero settings for both the slot and port numbers, the channel is available
only to outbound calls originating from that port.
Configuring MAXDAX
With MAXDAX enabled, on a MAX 6000 unit or a MAX 3000, you can route incoming
switched calls from inband T1, T1 PRI, or E1 PRI lines to specific outgoing channels on the
same or different inband T1, T1 PRI or E1 PRI lines. The unit selects outgoing channels on the
basis of parameters you configure for incoming channels.
Introduction
MAXDAX broadens the unit’s call-routing functionality by enabling you to route calls to
outgoing PRI lines.
A MAX unit can be configured to route incoming calls to inband T1 lines by means of either
T1 Drop and Insert or PRI-T1 conversion. With T1 Drop and Insert, the unit sends any calls
received on specifically configured channels of an inband T1 to another inband T1 that
connects to a PBX. With PRI-T1 conversion, the unit sends any voice calls received on
channels of a PRI line to an inband T1 line that connects to a PBX.
T1 Drop and Insert and PRI-T1 are both acceptable call-routing solutions, provided that you
are able to dedicate specific channels to the features and that you connect the MAX unit to a
PBX via an inband T1 line. MAXDAX retains both options, but broadens the unit’s
call-routing functionality by enabling you to route calls to outgoing PRI lines.
How the MAX determines outbound call routing
Basically, MAXDAX performs one function. When a MAX unit with MAXDAX enabled
receives a call from any PRI line, it routes that call to the same (or a different) PRI line. The
unit bases its routing decision on one of the following algorithms:
•
3-74
Direct mapping—The unit routes a call received on a specified channel to a channel
assigned to the configured destination channel-group. The called number on the incoming
call is used as the calling number on the outgoing call.
MAX 6000/3000 Network Configuration Guide
Configuring WAN Access
Configuring MAXDAX
•
Channel-specific Dial Plan profile—The unit routes a call received on a specific channel
to a channel assigned to the configured destination channel-group, and to a specified Dial
Plan profile. The Dial Plan profile either contains a dial number for the outgoing call or
enables you to specify digits that the unit prepends to the incoming calls’s called number.
In the latter case, the called number with prepended digits becomes the dial number for the
outgoing call.
•
Caller-defined Dial Plan profile—The unit routes a call received on a specified channel to
a channel assigned to the configured destination channel-group. You configure the unit to
strip either the first digit or the first two digits from the called number. The unit uses the
stripped digits to determine the Dial Plan profile for the call. For example, if you
configure the unit to strip the first two digits of the called number, and the unit receives the
called number 235551212, it uses Dial Plan profile 23 for the outgoing call.
You can specify that if the unit receives a call on a channel that has not been assigned an
outgoing channel, it routes the call on the basis of Answer Plan profiles. The unit then
compares the called number and the data service of the call to those configured in the Answer
Plan profiles. You do not need to configure an Answer Plan profile with both a number and a
data service, but if you do, both must match to have a successful comparison. If the unit makes
a successful comparison, it places the outgoing call on a channel assigned to the specified
destination channel-group.
MAXDAX call-routing flowchart
Figure 3-4 shows how a MAX unit, with MAXDAX enabled, routes an incoming call. If
MAXDAX does not route the call, the unit routes the call according to call routing as discussed
in “Configuring inbound calls” on page 3-59.
Note: Figure 3-4 does not include any greater than symbols. An angle bracket (>) points to
the next menu item in the path to a parameter.
MAX 6000/3000 Network Configuration Guide
3-75
Configuring WAN Access
Configuring MAXDAX
Figure 3-4. MAXDAX call routing
MAX makes call, on first
available channel assigned to
specified channel group, using
Dial Plan profile specified by the
leading digit (or two) of the
called number.
MAX receives a call on line A, channel N.
No
For line A, does Net/T1(E1) >
Line Config > Line Config
profile > Line N > Net2Net
Incoming Calls > Ch N Dest
ChanGroup=0?
No
Yes
Does Dial Plan #=0?
Does #DialPlanSelDigits=0?
No
Yes
MAX compares called number and
data service of the call to values in
first Answer Plan profile.
MAX makes call, on first
available channel assigned to
specified channel group, using
Dial Plan profile.
Yes
MAX makes call, on first
available channel assigned to
specified channel group, using
no Dial Plan profile.
Yes
MAX makes call, on first available channel
assigned to specified channel group, using
Dial Plan profile if specified.
Did either called number, data
service, or both match?
No
Yes
Checked all Answer Plan profiles?
MAX routes call according to call
routing as discussed in “Configuring
inbound calls” on page 3-59.
No
MAX compares called number
and data service of the call to
values in the next Answer Plan
profile.
Configuring channels on which the MAX unit sends outgoing calls
You can configure any channel to be available for outgoing calls, by assigning it a
channel-group number. A channel group can consist of a single channel or multiple channels.
To configure channels to be available for outbound calls, open the Net/T1 (Net/E1) > Line
Config > Line Config profile > Line N > Net2Net ChanGroup ID profile. For each outgoing
3-76
MAX 6000/3000 Network Configuration Guide
Configuring WAN Access
Configuring MAXDAX
channel you configure, the Ch N parameter to Switched and the Ch N ChanGroup parameter to
a value from 1–65536. These parameters function as follows:
Parameter
How it’s used
Ch N
N is a number representing a channel. For each channel used for
outbound calls, you must set Ch N to Switched, or MAXDAX does not
function.
Ch N ChanGroup
Assigns channel to a group. When the MAX unit receives a call, it
compares the value of the Ch N Dest ChanGroup parameter of the
incoming channel to the value of the Ch N ChanGroup parameters of
the available outgoing channels, and places the call on the first
outgoing channel that matches.
When finished configuring channels, save these changes, and exit the profile.
If the profile you have configured is not the active profile, activate it as described in
“Activating a profile” on page 2-7.
Configuring channels on which the MAX unit receives calls
To configure a channel on which the MAX unit receives incoming calls, you must specify a
destination channel-group. When the unit receives a call, it makes an outgoing call on the first
available channel assigned to the destination channel-group number you specify. You can
assign any number of channels to a channel group.
Note: Make sure you do not direct the unit to make an outbound call on the same channel on
which it receives the call.
If you configure the unit to use direct mapping, a specific Dial Plan profile, or a caller-defined
Dial Plan profile, you must set some or all of the following parameters:
Parameter
How it’s used
Ch N
N is a number representing a channel. For each channel you
configure for incoming calls, you must set Ch N to Switched, or
MAXDAX does not function.
Ch N Dest ChanGroup
Specifies the channel-group number to which the unit directs the
outgoing call. You assign channels to groups, to be used for
outgoing calls, by setting the Net/T1 (E1) > Line Config > Line
Config profile > Line N > Net2Net ChanGroup ID > Ch N
ChanGroup parameter.
Ch N Dial Plan #
Specifies a Dial Plan profile the unit applies to calls received on
this channel.
Ch N #DialPlanSelDigits
Specifies the number of leading digits the unit strips from the
called number. The unit uses stripped digits to determine the Dial
Plan profile to use for the received call.
You set additional parameters if you configure an Answer Plan profile.
MAX 6000/3000 Network Configuration Guide
3-77
Configuring WAN Access
Configuring MAXDAX
Configuring the MAX unit to directly map channels
To configure the MAX unit to map incoming calls to outgoing channel groups, without
specifying a Dial Plan profile:
1
Open Net/T1 (E1) > Line Config > Line Config profile > Line N > Net2Net Incoming
Calls.
2
For each incoming channel you configure:
3
–
Set the Ch N parameter to Switched.
–
Set the Ch N Dest ChanGroup parameter to a value that matches the number of a
group you created by setting Ch N ChanGroup parameters as described in
“Configuring channels on which the MAX unit sends outgoing calls” on page 3-76.)
–
Set the Ch N #DialPlanSelDigits parameter to 0 (zero), so that the unit interprets none
of the called-number digits as the number of a dial plan.
Exit the profile and, at the exit prompt, select the exit and accept option.
If the profile you have configured is not the active profile, activate it as described in
“Activating a profile” on page 2-7.
Configuring the MAX unit to use a specific Dial Plan profile
To configure a MAX unit to use a specific Dial Plan profile, you must first configure a
destination channel-group and then specify the Dial Plan profile. You must also configure the
specified Dial Plan profile if it has not already been configured. Proceed as follows.
1
Open Net/T1 (E1) > Line Config > Line Config profile > Line N > Net2Net Incoming
Calls.
2
For each channel you configure in the Net2Net Incoming Calls profile:
3
–
Set the Ch N parameter to Switched.
–
Set the Ch N Dest ChanGroup parameter to a value that matches the number of a
group you created by setting Ch N ChanGroup parameters as described in
“Configuring channels on which the MAX unit sends outgoing calls” on page 3-76.
–
Set the Ch N Dial Plan # parameter to a value from 1 to 32. The unit uses the Dial
Plan profile you specify for the outgoing call.
When finished configuring channels, save these changes and exit the profile.
If the profile you have configured is not the active profile, activate it as described in
“Activating a profile” on page 2-7.
To configure the Dial Plan profile:
3-78
1
Open a System > Dial Plan profile.
The last two digits in the menu-item number of the Dial Plan profile must match the value
you specified for Net/T1 (E1) > Line Config > Line Config profile > Line N > Net2Net
Incoming Calls > Ch N Dial Plan #.
2
Set the Call-by-Call parameter to the PRI service to use for the outgoing call.
Call-by-Call does not apply to outbound calls on inband T1 lines.
3
Set the Data Svc parameter to the data service to use for the outgoing call.
Data Svc does not apply to outbound calls on inband T1 lines.
MAX 6000/3000 Network Configuration Guide
Configuring WAN Access
Configuring MAXDAX
4
Set the PRI # Type parameter to the type of telephone number the unit dials for the
outgoing call:
–
National specifies telephone numbers within the United States.
–
Intl specifies telephone numbers outside the United States.
–
Local specifies telephone numbers within your Centrex group.
–
Inherit specifies the same PRI # Type value assigned to the incoming call.
PRI # Type does not apply to outbound calls on inband T1 lines.
5
Set the Transit # parameter to a dialing prefix the unit uses when making the outbound
call.
The default (null) directs the unit to use any available IEC for the long distance call. You
can also specify 288 (AT&T), 222 (MCI), or 333 (Sprint).
Transit # does not apply to outbound calls on inband T1 lines.
6
Set the Bill # parameter if you use a different telephone number for billing purposes.
In most cases, you can leave this setting blank. If you have questions, ask your service
provider.
7
Set the PrependDigits parameter to specify the digits that the unit prepends to the called
number before making the outgoing call.
8
Set the Dest # parameter to the telephone number to be dialed for the outgoing call.
9
Exit the profile and, at the exit prompt, select the exit and accept option.
When the unit receives a call on the channel you specified in the Net2Net Incoming Calls
profile, the unit makes the outgoing call on the first available channel in the channel group you
specify for the Ch N Dest ChanGroup parameter. To make the call, the unit uses the Dial Plan
profile you specify for the Ch N Dial Plan # parameter.
Configuring the MAX unit to use a caller-defined Dial Plan profile
You can allow callers to specify the Dial Plan profile the MAX unit uses for the outgoing call.
With this type of configuration, callers prepend the Dial Plan profile number to the telephone
number they dial. The unit strips either one or two digits from the called number, and uses
them to determine the Dial Plan profile.
To configure the unit to use a caller-defined Dial Plan profile, you must first configure a
destination channel-group and then specify the Dial Plan profile.
To configure a destination channel-group:
1
Open Net/T1 (E1) > Line Config > Line Config profile > Line N > Net2Net Incoming
Calls.
2
For each incoming channel for which you want to specify a caller-defined Dial Plan
profile:
–
Set the Ch N parameter to Switched.
–
Set the Ch N Dest ChanGroup parameter to a value that matches the number of a
group you created by setting Ch N ChanGroup parameters as described in
“Configuring channels on which the MAX unit sends outgoing calls” on page 3-76.
–
Set the Ch N Dial Plan # parameter to 0 (zero). The zero disables static channel
assignment of a Dial Plan profile on the unit.
MAX 6000/3000 Network Configuration Guide
3-79
Configuring WAN Access
Configuring MAXDAX
–
3
Set the Ch N #DialPlanSelDigits parameter to either 1 or 2. The MAX unit strips the
number of leading digits you specify, and uses them to identify the Dial Plan profile
for the outgoing call.
When finished with the Net2Net Incoming Calls profile, exit the profile and, at the exit
prompt, select the exit and accept option.
To configure the Dial Plan profile:
1
Open a System > Dial Plan profile.
The last two digits of the Dial Plan profile’s menu-item number must match the value you
specified for Net/T1 (E1) > Line Config > Line Config profile > Line N > Net2Net
Incoming Calls > Ch N Dial Plan #.
2
Set the Call-by-Call parameter to the PRI service to use for the outgoing call.
Call-by-Call does not apply to outbound calls on inband T1 lines.
3
Set the Data Svc parameter to the data service to use for the outgoing call.
Data Svc does not apply to outbound calls on inband T1 lines.
4
Set the PRI # Type parameter to the type of telephone number the MAX unit dials for the
outgoing call:
–
National specifies telephone numbers within the United States.
–
Intl specifies telephone numbers outside the United States.
–
Local specifies telephone numbers within your Centrex group.
–
Inherit specifies the same PRI # Type value assigned to the incoming call.
PRI # Type does not apply to outbound calls on inband T1 lines.
5
Set the Transit # parameter to a dialing prefix the unit uses when making the outbound
call.
The default (null) directs the unit to use any available IEC for the long distance call. You
can also specify 288 (AT&T), 222 (MCI), or 333 (Sprint).
Transit # does not apply to outbound calls on inband T1 lines.
6
Set the Bill # parameter if you use a different telephone number for billing purposes.
In most cases, you can leave this parameter blank. If you have questions, ask your service
provider.
7
Set the PrependDigits parameter to specify the digits that the MAX unit prepends to the
called number before making the outgoing call.
8
Set the Dest # parameter to the telephone number to be dialed for the outgoing call.
9
Exit the profile and, at the exit prompt, select the exit and accept option.
When the MAX unit receives a call on the channel you configured in the Net2Net Incoming
Calls profile, the unit makes the outgoing call on the first available channel in the channel
group you specify for the Ch N Dest ChanGroup parameter for outgoing calls. The unit uses
the specified number of leading digits to determine which Dial Plan profile to use for the
outgoing call. For example, if you set #DialPlanSelDigits to 2 and a caller dials
234155551212, the unit uses Dial Plan profile 23 for the outgoing call.
3-80
MAX 6000/3000 Network Configuration Guide
Configuring WAN Access
Configuring MAXDAX
Configuring the MAX unit to use Answer Plan profiles
With MAXDAX, you can define Answer Plan profiles, which the MAX unit checks if you
have set no channel-specific parameters. You configure the unit to compare called number,
data service of the call, or both, to values in the profiles. If the unit finds a match, it routes the
incoming call to the first available channel in the channel group specified in the Answer Plan
profile.
For example, if the MAX unit receives a call on channel 3, and the Net/T1 (E1) > Line Config
> Line Config profile > Line N > Net2Net Incoming Calls > Ch 3 Dest ChanGroup parameter is
set to 0 (zero), the unit compares the called number and data service of the incoming call with
configured Answer Plan profiles. If you configure an Answer Plan profile with values for
Answer # and Answer Data Svc, the values specified for these parameters must match the
values of the corresponding parameters of the incoming call for the unit to route the call to the
specified destination channel-group. If you set only the Answer # or the Answer Data Svc
parameter, only the parameter you have set is compared.
Note: Answer Data Svc applies only to calls received on PRI lines. With inband T1 lines,
there is no facility to pass data service information to a called unit. If your unit receives calls
on inband T1 lines, and you want to use Answer Plan profiles, make sure you leave the Answer
Data Svc parameter blank.
To configure an Answer Plan profile:
1
Open a System > Answer Plan profile.
2
Set the Ch N Dest ChanGroup parameter to a value that matches the number of a group
you created by setting Ch N ChanGroup parameters as described in “Configuring channels
on which the MAX unit sends outgoing calls” on page 3-76.
3
If you want the unit to select this Answer Plan profile on the basis of the called number of
the incoming call, set Answer #.
4
If you want the unit to select this Answer Plan profile on the basis of the data service of
the incoming call, set Answer Data Svc.
If you set both the Answer # parameter and the Answer Data Svc parameter, the incoming
call must match both parameters for the unit to use the specified Answer Plan profile.
5
Exit the profile and, at the exit prompt, select the exit and accept option.
If the profile you have configured is not the active profile, activate it as described in
“Activating a profile” on page 2-7.
Displaying MAXDAX configurations
A DO menu is a context-sensitive list of commands that appears when you press Ctrl-D. The
commands in the list vary on the basis of the menu the unit is displaying when you press
Ctrl-D. When the unit is displaying the Net/T1 (E1) > Line Config profile, or any subprofile
under Net/T1 > Line Config, and you press Ctrl-D, the unit displays the following command
listing:
DO...
0=Esc
P=Password
S=Save
C=Close TELNET
MAX 6000/3000 Network Configuration Guide
3-81
Configuring WAN Access
Configuring MAXDAX
E=Termsrv
D=Diagnostics
V=View ChanGroup/s
To display the current MAXDAX channel-group mappings, press V or select V=View
ChanGroup/s. The current MAXDAX configuration appears, including a
channel-by-channel listing of channel groupings.
For example:
S:P:Ch
>1:1:01
1:1:02
1:1:03
1:1:04
1:1:05
1:1:06
1:1:07
1:1:08
1:1:09
1:1:10
1:1:11
1:1:12
Dest
777
777
777
777
777
777
777
777
777
777
777
333
| ChanGroup
|
0
|
0
|
0
|
0
|
0
|
0
|
0
|
0
|
0
|
0
|
333
|
777
In the channel-group display:
•
S indicates the slot number. For a MAX 6000 unit, the slot number can be either 1 or 2.
For a MAX 3000 unit, the slot number is always 1.
•
P indicates the T1/E1 lines in the slot. The unit supports two T1/E1 lines per slot.
•
Ch indicates the channel number on the T1 line.
•
Dest indicates the value specified for Net/T1 (E1) > Line Config > Line Config profile >
Line N > Net2Net Incoming Calls > Ch N Dest ChanGroup.
•
ChanGroup indicates the value specified for Net/T1 (E1) > Line Config > Line Config >
Line N > Net2Net ChanGroup ID > Ch N ChanGroup for the specified channel.
ChanGroup is the group to which you have assigned the channel. When the unit receives a
call on a channel, it makes the outgoing call on the first available channel for which
Net/T1 (E1) > Line Config > Line Config profile > Line N > Net2Net ChanGroup ID > Ch
N ChanGroup matches Net/T1 (E1) > Line Config > Line Config profile > Line N >
Net2Net Incoming Calls > Dest ChanGroup for the channel on which the unit receives the
incoming call.
In the example, if the unit receives a call on channel 12 of the first line in the first slot, it places
the outgoing call on channel 11 of the first line in the first slot.
Note: The unit cannot make an outgoing call on the same channel on which it is receiving a
call. Make sure you do not configure a channel with identical channel-group and destination
channel-group numbers.
Examples of MAXDAX configuration (T1)
This section describes two MAXDAX environments, including specific parameter settings.
3-82
MAX 6000/3000 Network Configuration Guide
Configuring WAN Access
Configuring MAXDAX
Routing calls on the basis of called number
Figure 3-5 shows an example of a MAXDAX installation.
Figure 3-5. Sample MAXDAX (T1) installation
Video System C
Video System A
Serial line
MAX 1
MAX 2
PRI
Leased T1
PSTN
T1
Serial line
Pipeline 75
PBX
Video System B
On MAX 1, T1 Drop and Insert enables users connected to the PBX to make and receive calls.
The system administrator configures MAXDAX on MAX 2.
The system administrator uses Answer Plan profiles to direct incoming calls to the PRI line,
and therefore does not change any of the parameters in the Net/T1 > Line Config > Line Config
profile > Line N > Net2Net Incoming Calls profile from their default settings:
Net/T1
Line Config
Line Config profile
Line 1...
Net2Net Incoming Calls
Ch 1=Switched
Ch 1 Dest ChanGroup=1
Ch 1 Dial Plan #=0
Ch 1 #DialPlanSelDigits=2
Ch 2=Switched
Ch 2 Dest ChanGroup=1
Ch 2 Dial Plan #=0
Ch 2 #DialPlanSelDigits=2
Ch 3=Switched
Ch 3 Dest ChanGroup=0
Ch 3 Dial Plan #=0
Ch 3 #DialPlanSelDigits=0
To reach Video System C, a user dials the number (617) 555-1212. MAX 2 should only
redirect to the PRI line any calls received with a called number of 6175551212. The system
administrator configures the Answer Plan profile as follows:
MAX 6000/3000 Network Configuration Guide
3-83
Configuring WAN Access
Configuring MAXDAX
System
Answer Plan
Site C
Name=Site C
Answer #=6175551212
Answer Data Svc=
Dest ChanGroup=1
Dial Plan #=12
MAX 2 makes a call on the first available channel assigned to destination channel-group 1,
using Dial Plan profile 12. Because the system administrator leaves Answer Data Svc blank,
MAX 2 ignores the data service of the incoming call, and matches on the basis of called
number only.
Because the system administrator sets Dest ChanGroup to 1 in the Answer Plan profile, at least
one channel of the PRI line must belong to channel group 1. The system administrator
configures the line as follows:
Net/T1
Line Config
Line Config profile
Line 2...
Net2Net ChanGroup ID
Ch 1=Switched
Ch 1 ChanGroup=1
Ch 2=Switched
Ch 2 ChanGroup=1
The system administrator can assign more channels to channel group 1 if users, connected to
the PBX, require outbound dialing on the PRI line.
The Answer Plan profile also specifies that MAX 2 is to use Dial Plan profile 12 to make the
outbound call. The system administrator configures Dial Plan profile 12 as follows:
System
Dial Plan
PRI plan
Name=PRI plan
Call-by-Call=6
Data Svc=64K
PRI # Type=National
NumPlanID=ISDN
Transit #=
Bill #=
Dest #=
PrependDigits=
Because the system administrator leaves Dest # and PrependDigits blank, MAX 2 makes the
outbound call by using the called number from the incoming call.
3-84
MAX 6000/3000 Network Configuration Guide
Configuring WAN Access
Configuring MAXDAX
Routing calls on the basis of the channel on which MAX 2 receives the call
This example illustrates a different call-routing process for the MAX unit labeled MAX 2 in
Figure 3-5. The physical environment for this example is the same as displayed in Figure 3-5,
but MAX 2 routes calls on the basis of the channel on which it receives the call from MAX 1.
Note: Because MAX 2 considers Answer Plan profiles after determining whether it should
route on the basis of specific channels, the system administrator could leave the configuration
from the preceding example as it is.
The system administrator configures MAX 1 to deliver calls to MAX 2 on specific channels.
MAX 1 sends calls with calling number 1234 to channel 1 or 2 of the leased T1 line on
MAX 2. The system administrator configures the Net/T1 > Line Config > Line Config profile
> Line 1 > Net2Net Incoming Calls profile as follows:
Net/T1
Line Config
Line Config profile
Line 1...
Net2Net Incoming Calls
Ch 1=Switched
Ch 1 Dest ChanGroup=1
Ch 1 Dial Plan #=0
Ch 1 #DialPlanSelDigits=2
Ch 2=Switched
Ch 2 Dest ChanGroup=1
Ch 2 Dial Plan #=0
Ch 2 #DialPlanSelDigits=2
Ch 3=Switched
Ch 3 Dest ChanGroup=0
Ch 3 Dial Plan #=0
Ch 3 #DialPlanSelDigits=0
MAX 2 routes any call it receives on channel 1 or 2 to the first available channel assigned to
channel group 1. MAX 2 identifies the Dial Plan profile number by examining the leading two
digits of the called number.
Because the system administrator sets Dest ChanGroup to 1 in the Net2Net Incoming Call
profile, at least one channel of the PRI line must belong to channel group 1. The system
administrator configures the outgoing-calls profile as follows:
Net/T1
Line Config
Line Config profile
Line 1...
Net2Net ChanGroup ID
Ch 1=Switched
Ch 1 ChanGroup=1
Ch 2=Switched
Ch 2 ChanGroup=1
The system administrator can assign more channels to channel group 1 if users connected to
the PBX require outbound dialing on the PRI line.
MAX 6000/3000 Network Configuration Guide
3-85
Configuring WAN Access
Configuring MAXDAX
Users specify which Dial Plan profile MAX 2 uses for their calls. In this example, the system
administrator configures two Dial Plan profiles, 31 and 32, and tells the users which profile to
use for specific destinations. Dial Plan profile 31 has the following configuration:
System
Dial Plan
PRI plan
Name=PRI plan
Call-by-Call=6
Data Svc=64K
PRI # Type=National
NumPlanID=ISDN
Transit #=
Bill #=
Dest #=14155551212
PrependDigits=
Because the system administrator specifies a Dest # value of 14155551212, the MAX 2 dials
that number to make the outbound call.
Example of MAXDAX configuration (E1)
This section describes one MAXDAX environment, including specific parameter settings.
Routing calls on the basis of the channel on which MAX 2 receives the call
This example illustrates a call-routing process for the MAX unit labeled MAX 2 in Figure 3-6.
The physical environment for this example is the same as displayed in Figure 3-5, but MAX 2
routes calls on the basis of the channel on which it receives the call from MAX 1.
Figure 3-6 shows an example of a MAXDAX installation.
Figure 3-6. Sample MAXDAX (E1) installation
Video System A
Serial line
Video System C
MAX 1
MAX 2
PRI
PRI
PSTN
E1
Serial line
Pipeline 75
Video System B
3-86
MAX 6000/3000 Network Configuration Guide
Configuring WAN Access
Configuring MAXDAX
Note: Because MAX 2 considers Answer Plan profiles after determining whether it should
route on the basis of specific channels, the system administrator could leave the configuration
from the preceding example as it is.
The system administrator configures MAX 1 to deliver calls to MAX 2 on specific channels.
MAX 1 sends calls with calling number 1234 to channel 1 or 2 of the leased T1 line on
MAX 2. The system administrator configures the Net/T1 > Line Config > Line Config profile
> Line 1 > Net2Net Incoming Calls profile as follows:
Net/T1
Line Config
Line Config profile
Line 1...
Net2Net Incoming Calls
Ch 1=Switched
Ch 1 Dest ChanGroup=1
Ch 1 Dial Plan #=0
Ch 1 #DialPlanSelDigits=2
Ch 2=Switched
Ch 2 Dest ChanGroup=1
Ch 2 Dial Plan #=0
Ch 2 #DialPlanSelDigits=2
Ch 3=Switched
Ch 3 Dest ChanGroup=0
Ch 3 Dial Plan #=0
Ch 3 #DialPlanSelDigits=0
MAX 2 routes any call it receives on channel 1 or 2 to the first available channel assigned to
channel group 1. MAX 2 identifies the Dial Plan profile number by examining the leading two
digits of the called number.
Because the system administrator sets Dest ChanGroup to 1 in the Net2Net Incoming Call
profile, at least one channel of the PRI line must belong to channel group 1. The system
administrator configures the outgoing-calls profile as follows:
Net/T1
Line Config
Line Config profile
Line 1...
Net2Net ChanGroup ID
Ch 1=Switched
Ch 1 ChanGroup=1
Ch 2=Switched
Ch 2 ChanGroup=1
The system administrator can assign more channels to channel group 1 if users connected to
the PBX require outbound dialing on the PRI line.
Users specify which Dial Plan profile MAX 2 uses for their calls. In this example, the system
administrator configures two Dial Plan profiles, 31 and 32, and tells the users which profile to
use for specific destinations. Dial Plan profile 31 has the following configuration:
System
Dial Plan
PRI plan
MAX 6000/3000 Network Configuration Guide
3-87
Configuring WAN Access
Configuring MAXDAX
Name=PRI plan
Bill #=
Dest #=14155551212
PrependDigits=
Because the system administrator specifies a Dest # value of 14155551212, the MAX 2 dials
that number to make the outbound call.
3-88
MAX 6000/3000 Network Configuration Guide
Configuring Individual WAN Connections
4
Introduction to WAN links . . . . . . . . . . . . . . . . . . . . . . . . . . . . . . . . . . . . . . . . . . . . . . . 4-2
The Answer profile . . . . . . . . . . . . . . . . . . . . . . . . . . . . . . . . . . . . . . . . . . . . . . . . . . . . 4-3
The Connection profile . . . . . . . . . . . . . . . . . . . . . . . . . . . . . . . . . . . . . . . . . . . . . . . . 4-17
Configuring Names/Passwords profiles. . . . . . . . . . . . . . . . . . . . . . . . . . . . . . . . . . . . 4-42
Configuring PPP connections . . . . . . . . . . . . . . . . . . . . . . . . . . . . . . . . . . . . . . . . . . . 4-43
Configuring MP, MP+ and BACP connections . . . . . . . . . . . . . . . . . . . . . . . . . . . . . . 4-46
Configuring bidirectional CHAP support . . . . . . . . . . . . . . . . . . . . . . . . . . . . . . . . . . 4-63
Enhanced support for MS-CHAP . . . . . . . . . . . . . . . . . . . . . . . . . . . . . . . . . . . . . . . . 4-72
Configuring dial-in PPP for AppleTalk . . . . . . . . . . . . . . . . . . . . . . . . . . . . . . . . . . . . 4-72
Configuring AppleTalk connections from RADIUS . . . . . . . . . . . . . . . . . . . . . . . . . . 4-74
Configuring ARA connections. . . . . . . . . . . . . . . . . . . . . . . . . . . . . . . . . . . . . . . . . . . 4-75
Configuring terminal-server connections. . . . . . . . . . . . . . . . . . . . . . . . . . . . . . . . . . . 4-77
Configuring a Combinet connection . . . . . . . . . . . . . . . . . . . . . . . . . . . . . . . . . . . . . . 4-91
Configuring EU connections . . . . . . . . . . . . . . . . . . . . . . . . . . . . . . . . . . . . . . . . . . . . 4-93
Configuring DHCP services. . . . . . . . . . . . . . . . . . . . . . . . . . . . . . . . . . . . . . . . . . . . . 4-96
Configuring POTS capability on the MAX 6000 and MAX 3000 . . . . . . . . . . . . . . 4-100
Most of the parameters for configuring WAN connections are in the Answer profile and
Connection or Names/Passwords profiles. Most of the decisions you have to make depend on
which protocol you choose for encapsulating data transmitted over the connection. Point to
Point Protocol (PPP) supports dial-in connections between the MAX and modems or ISDN
devices. Three variants—Multilink Protocol (MP), Multilink Protocol Plus (MP+), and
Bandwidth Allocation Control Protocol (BACP)—support multichannel connections. If your
network supports AppleTalk, you can configure AppleTalk Remote Access (ARA) connections
to asynchronous modems, or you can enable AppleTalk clients to use PPP for dialing in. The
MAX terminal server provides a command-line interface for administrators, and can provide
access to local and remote users through a terminal-server interface.
Combinet bridging links two LANs so that they appear to be a single segment. EU is a type of
X.75 HDLC encapsulation commonly used in Europe.
MAX 6000/3000 Network Configuration Guide
4-1
Configuring Individual WAN Connections
Introduction to WAN links
The MAX unit provides a number of Dynamic Host Configuration Protocol (DHCP) services,
such as responses to DHCP requests from hosts that need to borrow IP addresses.
With a MAXPOTS FXS slot card installed, a MAX unit can initiate and receive Plain Old
Telephone Service (POTS) calls.
Introduction to WAN links
This chapter describes configuring various types of links across the WAN. It focuses on the
encapsulation issues for the following types of connections:
Connection type
Description
PPP
PPP enables single-channel, dial-in connections from modems or
ISDN devices. The remote devices must have PPP software.
MP, MP+, BACP
MP, MP+ and BACP encapsulation enable the MAX unit to
interact with MP-compliant equipment from other vendors to use
multiple channels for a call.
Challenge Handshake
Authentication Protocol
(CHAP) and Microsoft’s
extension of CHAP
(MS-CHAP)
CHAP authentication verifies the caller’s identity by using a
three-way handshake upon initial link establishment, and then by
repeating the handshake any number of times. MS-CHAP is a
close derivative of CHAP. Where CHAP authenticates
WAN-aware secure software, MS-CHAP supports remote
workstations, on which an insecure plain text login might be
required.
ARA
ARA enables a Macintosh user to access AppleTalk devices or IP
hosts via modem. The remote Macintosh must have ARA client
software and (if applicable) TCP/IP software.
Terminal server
The MAX unit terminal server processes asynchronous calls
from analog modems, ISDN modems (V.120 terminal adapters),
or raw TCP. You can log those calls into the terminal-server
interface or, if they contain PPP, pass the asynchronous calls to
the router.
Combinet
Combinet bridges two network segments at the link level, using
one or two channels. The remote device is another Combinet
bridge.
EU-UI and EU-RAW
EU-UI and EU-RAW are two different types of WAN
encapsulation protocols used primarily in Europe. The MAX unit
uses EU-UI when the equipment on the other side of the
connection requires the Data Circuit-Terminating Equipment
(DCE) and Data Terminal Equipment (DTE) address fields in the
packet header. When the connection does not require these
address fields, the MAX unit uses EU-RAW. EU-UI and
EU-RAW connections can be dial-in or dial-out.
EU-UI and EU-RAW encapsulation do not support an
authentication protocol. Use CLID authentication to match
incoming calls to the proper Connection profile when, for
example, you apply special filters to certain callers, or some
callers route IP and others bridge.
4-2
MAX 6000/3000 Network Configuration Guide
Configuring Individual WAN Connections
The Answer profile
Connection type
Description
Dynamic Host
Configuration Protocol
(DHCP)
DHCP is a TCP/IP protocol that enables a client to obtain a
temporary IP address from a central server (known as a DHCP
server).
This chapter does not describe RADIUS user profiles that serve the same function as resident
Connection profiles. For details about WAN connection security, see the MAX Security
Supplement.
The Answer profile
For incoming calls, the MAX unit always routes a call to the Answer profile (Ethernet >
Answer). The profile provides preliminary configuration information, such as the types of
encapsulation permitted, basic routing options, and call-setup parameters. If the call does not
comply with the specifications in the Answer profile, the unit drops the call. If it does comply,
the unit uses the appropriate Connection profile or RADIUS user profile to continue
negotiation with the calling unit.
The following six parameters specify the basic call setup values in the Answer profile:
Parameter
Specifies
Use Answer as
Default
Whether or not the Answer profile should override the factory defaults
when the unit uses RADIUS or TACACS to validate an incoming call.
Force 56
Whether or not the unit uses only the 56 kbps portion of a channel,
even when all 64 kbps appear to be available.
Use this feature when you receive calls from European or Pacific Rim
countries and the complete path cannot distinguish between the
Switched-56 and Switched-64 data services. This feature is not
required if you are receiving calls only from North America.
Profile Reqd
Whether or not the unit rejects incoming calls for which it could find
no Connection profile and no entry on a remote authentication server.
If you do not require a configured profile for all callers, the unit builds
a temporary profile for unknown callers. Many sites consider this a
security breach.
ID Auth
How Calling-Line ID (CLID) or Dialed Number Information Service
(DNIS) should be used for authentication. The called number
(typically the number dialed by the far end) and CLID (the far-end
device’s number) can be presented by the telephone company as part
of the call information and used in a first-level authentication process
before the MAX unit answers a call.
Assign Adrs
Enable/disable dynamic IP address assignment for incoming calls.
Framed Only
Whether or not the user is allowed access to all the terminal-server
commands or to a subset of them. The default of No specifies that
terminal-server users connecting through this profile have unlimited
access to the terminal-server commands. Yes specifies that terminalserver users connecting through this profile only have access to the
PPP, SLIP, CSLIP, and Quit terminal-server commands.
MAX 6000/3000 Network Configuration Guide
4-3
Configuring Individual WAN Connections
The Answer profile
For detailed information about each parameter, see the MAX Reference.
The Answer profile also includes the following subprofiles, for encapsulation, routing
protocols and options that support the incoming call:
Subprofile
Contains
Encaps
The encapsulation protocols the MAX unit can negotiate with
incoming callers.
IP Options
Preliminary IP routing parameters needed for initial negotiation for
incoming callers.
IPX Options
Preliminary IPX routing parameters needed for initial negotiation for
incoming callers.
AppleTalk Options
Preliminary AppleTalk routing parameters needed for initial
negotiation for incoming callers.
PPP Options
Preliminary PPP routing parameters needed for initial negotiation for
incoming callers.
COMB Options
Preliminary COMB routing parameters needed for initial negotiation
for incoming callers.
V.120 Options
Preliminary V.120 routing parameters needed for initial negotiation
for incoming callers.
X.75 Options
Options enabling dial-in access to the terminal server, using the X.75
protocol. (See the CCITT Blue Book Recommendation X series 1988
for full technical specifications for X.75.)
Session Options
Options that set default filters and timers to build connections that use
RADIUS (if you enable Use Answer as Default) or Names/Passwords
profiles.
DHCP Options
DHCP options that enable the unit to act as a DHCP server for a local
Pipeline unit for connections that use RADIUS (if you enable Use
Answer as Default) or Names/Passwords profiles.
PAD Options
Options that enable several terminals (or other asynchronous devices)
to share a single network line.
TCP-Clear Options
Options that support encapsulation performed by an application that
runs on top of TCP.
Encaps Options
The Encaps Options subprofile provides encapsulation types for incoming calls. You set the
values to Yes or No to accept or reject that encapsulation type. Following are the Encaps
Options parameters:
4-4
Call Type
Description
MPP
MP+ connections, which use PPP encapsulation with Lucent
extensions. MP+ enables the unit to establish a multiple-channel
connection to another unit, and to add or remove channels as traffic
dictates. Both sides of the connection must support MP+.
MAX 6000/3000 Network Configuration Guide
Configuring Individual WAN Connections
The Answer profile
Call Type
Description
MP
MP connections, which use RFC 1990 encapsulation. MP enables the
unit to interact with MP-compliant equipment from other vendors to
use multiple channels for a call. Both connection sides must support
MP.
PPP
Incoming PPP connections. PPP sessions are single-channel
connections to any remote device running PPP software.
COMB
Calls that use Combinet encapsulation and meet all other Answer
profile criteria. Combinet requires authentication by password and
MAC address.
FR
Frame Relay calls. A Frame Relay network provides high throughput
by handing monitoring functions to higher-level protocols. Frame
Relay is a very efficient standard, with a bandwidth of up to 2 Mbps. It
is ideal for situations in which periods of very high traffic are
interspersed with idle periods. Frame Relay is protocol independent,
and performs routing over Virtual Circuits (VCs).
X25/PAD
X.25/Packet Assembler/Disassembler calls (X.25/PAD). In an
X.25/PAD configuration, PAD-generated packets are encapsulated in
the X.25 protocol. The PAD assembles data from terminals into
packets for transmission to an X.25 network, and disassembles
incoming packets from the network into a separate data stream for
each terminal. In addition to this multiplexing function, the PAD
provides a nearly error-free connection.
X25/T3POS
X.25/T3POS calls. T3POS is a character-oriented, frame-formatted
protocol designed for Point-of-Service (POS) transactions using an
X.25 packet switched network. The T3POS protocol involves three
parties: The T3POS/DTE, the T3POS/PAD and the T3POS/Host. The
purpose of the protocol is to enable reliable and efficient data
transactions between a host (usually a transaction server) and a DTE
(usually a client).
EU-RAW
EU-UI
For a description of EU-UI and EU-RAW, see “EU-UI and EU-RAW”
on page 4-2.
V.120
Calls using V.120 encapsulation. V.120 is a standard for encapsulating
asynchronous data communication into synchronous ISDN data.
Using standard, asynchronous-only COM ports and a V.120 Terminal
Adapter (TA), two computers can communicate over an ISDN
connection.
X.75
Calls that use X.75 encapsulation. X.75 is the International
Telecommunication Union–Telecommunication Standardization
Sector (ITU-T) standard for connecting packet-switched networks.
Packet switching is a mode of data transfer in which packets are
transmitted from a specific source to a specific destination over any
available circuit. Packets can take different paths and might not arrive
in the order in which they were sent.
MAX 6000/3000 Network Configuration Guide
4-5
Configuring Individual WAN Connections
The Answer profile
Call Type
Description
TCP-Clear
Calls that use a proprietary encapsulation method and rely on raw TCP
sessions to a local host for processing that encapsulation. Raw TCP is
a method of supporting encapsulation performed by an application that
runs on top of TCP. Raw TCP must be understood by both the login
host and the caller. As soon as the connection is authenticated, the
MAX unit establishes a TCP connection to the host.
ARA
ARA enables a remote Macintosh workstation to gain access to an IP
network. You can use ARA over a modem or V.120 connection. You
can also use synchronous PPP when the calling unit is an
AppleTalk-enabled MAX unit. A client can dial in using ARA client
software or a PPP dialer that supports AppleTalk.
IP Options
Internet Protocol (IP) provides connectionless, nonguaranteed transmission of data packets. IP
fragments packets, enabling them to take different paths across the WAN, and then
reassembles them into the proper order at their destination.
The only parameter in the Ethernet > Answer > IP Options subprofile is the Metric parameter.
The Metric parameter specifies the RIP metric (a virtual hop count) of the IP link when the
MAX unit uses RADIUS or TACACS to validate an incoming call, and Use Answer as Default
is enabled. (A hop count indicates how many routers you have to go through to get to the
destination, and a metric is a value that determines how quickly a packet can reach its
destination.) The metric parameter specifies a virtual hop count. Unlike an actual hop count, it
does not include every switched link in the route.
If two routes have the same preference value, the unit chooses the route with the lowest metric.
If you enable Routing Information Protocol (RIP) across the WAN in a Connection profile or
an Answer profile, the hop count for the route can differ from the value of the Metric
parameter in the Route profile because the unit always uses the lower hop count.
IPX Options
The only parameter in Ethernet > Answer > IPX Options is the Peer parameter. The Peer
parameter specifies whether the remote IPX caller is a router or a dialin client. The Answer
profile > IPX Options > Peer parameter specifies how the MAX unit negotiates IPX with
callers that have no configured Connection profile, assuming them to be either IPX routers or
IPX clients. If there is no Connection profile for the caller, the unit needs to treat the caller as a
router (the default) or as a dialin client.
AppleTalk Options
The only parameter in the Ethernet > Answer > AppleTalk Options subprofile is the Peer
parameter. The Peer parameter specifies whether the remote AppleTalk caller is a router or a
dialin client (for a single-user PPP connection). The Peer parameter specifies how the MAX
unit negotiates AppleTalk with callers that have no configured Connection profile, assuming
them to be either AppleTalk routers or AppleTalk clients. If there is no Connection profile for
the caller, the MAX unit needs to treat the caller as a router (the default) or as a dialin client.
4-6
MAX 6000/3000 Network Configuration Guide
Configuring Individual WAN Connections
The Answer profile
PPP Options
Synchronous connections use an encapsulation protocol such as PPP to deliver packets from
one box to another. PPP sessions are single-channel connections to any remote device running
PPP software. Following are the Answer > PPP Options parameters that define what type of
routing or bridging protocol is supported over a PPP connection:
Parameter
Specifies
Route IP
Routing of IP data packets on the interface. IP routing must be enabled
on both sides of the connection, and the MAX unit must be configured
with an IP address in the Ethernet profile. To establish an inbound
connection, IP routing must also be enabled in the Answer profile.
Route IPX
Routing of IPX data packets on the interface. IPX routing must be
enabled on both sides of the connection, and the unit must be
configured with an IPX network address and frame type in the
Ethernet profile. Note that the unit routes and spoofs only one IPX
frame type. Other frame types will be bridged if bridging is enabled.
Route AppleTalk
Routing of AppleTalk data packets on the interface. AppleTalk routing
must be set on both sides of the connection.
Bridge
Link-level bridging. The unit bridges frames on the basis of the
frame’s destination MAC address.
Foundation parameters
The following Answer > PPP Options parameters define the foundation for the PPP session:
Parameter
Specifies
Recv Auth
Authentication protocol the MAX unit uses to receive and verify a
password for an incoming PPP connection.
MRU
Maximum number of bytes the unit can receive in a single frame.
Usually the default is the right setting, unless the far end requires a
lower number.
LQM
Whether or not the unit requests Link Quality Monitoring (LQM)
when answering a PPP call.
LQM Min
Minimum duration between link-quality reports for PPP connections,
measured in 10ths of a second.
LQM Max
Maximum duration between link-quality reports for PPP connections,
measured in 10ths of a second.
Link Comp
Link compression method for a PPP, MP, and MP+ call. Both sides of
the connection must set the same type of link compression.
VJ Comp
Whether or not Van Jacobson IP header compression should be
negotiated on incoming calls using encapsulation protocols that
support this feature.
CBCP Enable
How the unit responds to caller requests to support Callback Control
Protocol (CBCP). Microsoft’s CBCP is a Link Control Protocol (LCP)
option negotiated at the beginning of PPP sessions. CBCP
authenticates a caller by means of a user name and password.
MAX 6000/3000 Network Configuration Guide
4-7
Configuring Individual WAN Connections
The Answer profile
Parameter
Specifies
BACP
Enable/disable BACP. If BACP is enabled, a connection encapsulated
in MP uses BACP to manage dynamic bandwidth on demand. Both
sides of the connection must support BACP. (BACP uses the same
criteria as MP+ connection for managing bandwidth dynamically.)
Numeric parameters
The following Answer > PPP Options parameters specify bandwidth, line usage, and the
minimum and maximum number of channels in a multilink connection:
4-8
Parameter
Specifies
Dyn Alg
An algorithm for calculating average line utilization (ALU) over a
certain number of seconds (Sec History). For more information about
Dyn Alg, see “Dynamic algorithm for calculating bandwidth
requirements” on page 4-48.
Sec History
A number of seconds to use as the basis for calculating average line
utilization (ALU). The ALU is used in calculating when to add or
subtract bandwidth from a multichannel call that supports dynamic
bandwidth management. For more information about Sec History, see
“Time period for calculating average line utilization” on page 4-48.
Add Pers
Number of seconds that average line utilization (ALU) must persist
beyond the target utilization threshold before the MAX unit adds
bandwidth from available channels. When adding bandwidth, the unit
adds the number of channels specified in the Inc Ch Count parameter.
Sub Pers
Number of seconds for which the ALU (average link utilization) must
persist below the Target Util threshold before the unit subtracts
bandwidth.
Min Ch Count
Minimum number of channels that can be established for a multilink
call. If this number of channels is not available, the multilink session is
not established. For optimum performance, both sides of the multilink
connection should set this parameter to the same value.
Max Ch Count
Maximum number of channels that can be allocated to a multilink
connection. For optimum performance, both sides of the connection
should specify the same maximum channel count.
Target Util
Percentage of line utilization to use as a threshold for determining
when to add or subtract bandwidth. For example, if the value is 70%,
the device adds bandwidth when it exceeds a 70 percent utilization rate
and subtracts bandwidth when it falls below that number.
Idle Pct
Percentage of bandwidth utilization below which the MAX unit clears
an MP+ call. Bandwidth utilization must fall below this percentage on
both sides of the connection before the unit clears the call.
MAX 6000/3000 Network Configuration Guide
Configuring Individual WAN Connections
The Answer profile
Graceful shutdown and IPX Header Compression
The following PPP Options parameters define a choice for a graceful shutdown for a PPP
connection and a choice for the use of compression for the IPX header:
Parameter
Specifies
Disc on Auth Timeout Whether or not the MAX unit gracefully shuts down the PPP
connection on an external authentication server timeout.
IPX Header
Compression
Whether to use or disable IPX header compression in PPP sessions.
IPX Header Compression is enabled by default. This parameter is not
applicable if the unit does not route IPX.
COMB Options
Combinet is an encapsulation protocol that requires authentication by password and Media
Access Control (MAC) address. A MAC address is the address for a device as it is identified at
the Media Access Control layer in the network architecture. Following are the Answer >
COMB Options parameters:
Parameter
Specifies
Password Reqd
Whether a password will be required to authenticate Combinet
connections.
Interval
Number of seconds between the receipt or transmission of Combinet
line-integrity packets. If the unit does not receive a Combinet
line-integrity packet within three of these intervals, it disconnects the
call.
Compression
Whether data compression is on or off for a Combinet link. Both sides
of the link must enable compression for the algorithm to have any
effect. Compression is a process that reduces the quantity of
bandwidth or storage space required to encode a block of information.
V.120 Options
V.120 is an encapsulation protocol. The only parameter to set in the V.120 Options subprofile
is Frame Length. This parameter specifies the maximum number of bytes allowed in the
information field by V.120 or X.75 terminal adapters that call the MAX unit.
X.75 Options
The X.75 Options parameters apply to incoming calls that use X.75 encapsulation. Following
are the Answer > X.75 Options parameters:
Parameter
Specifies
K Window Size
Maximum number of data packets that can be outstanding in an X.75
connection before acknowledgment is required.
MAX 6000/3000 Network Configuration Guide
4-9
Configuring Individual WAN Connections
The Answer profile
Parameter
Specifies
N2 Retran Count
Retry limit—the maximum number of times the MAX unit can
retransmit a frame on an X.75 connection when the T1 Retran Timer
expires.
T1 Retran Timer
Maximum amount of time in ticks (1 tick=1/18th of a second) the
transmitter should wait for an acknowledgment before initiating a
recovery procedure.
Frame Length
Maximum number of bytes allowed in the information field by V.120
or X.75 terminal adapters that call the unit.
PAD Options
A PAD is an asynchronous terminal concentrator that enables several terminals (or other
asynchronous devices) to share a single network line. The PAD assembles data from terminals
into packets for transmission to a X.25 network, and disassembles incoming packets from the
X.25 network into a separate data stream for each terminal. In addition to this multiplexing
function, the PAD provides a nearly error-free connection. The MAX unit uses the following
parameters in Answer > PAD Options only if the incoming call is unauthenticated:
4-10
Parameter
Specifies
X.25 Prof
Name of an X.25 profile to use for this connection.
X.3 Param Prof
Default X.3 profile for setting up the PAD for this connection. Note
that a user can specify a profile using a PAD command. In this case,
the profile specified on the command line overrides this default for the
length of the current session.
VC Timer Enable
Virtual Call Establishment (VCE) timer on a per-user basis. The VCE
timer specifies the number of seconds to maintain a connection to a
character-oriented device (such as the terminal server) that has not
established a virtual call.
Auto-Call X.121
Addr
X.25 host to call immediately when an X.25/PAD session is
established via this Answer profile. If Auto-Call X.121 Addr specifies
an address, the PAD session can begin automatically. Otherwise, the
unit displays the terminal-server prompt, at which the user can issue
the pad command to begin a session.
Reverse Charge
Whether or not the call packet should include an X.25 reverse charge
request facility element.
RPOA
Set of Recognized Private Operating Agency (RPOA) user facilities to
use in the next call request. The RPOA facilities provide the data
network identification code for the requested initial RPOA transit
network in the form of four decimal digits.
MAX 6000/3000 Network Configuration Guide
Configuring Individual WAN Connections
The Answer profile
Parameter
Specifies
CUG Index
Closed user group (CUG) index/selection facility to use in the next call
request. The CUG selection/index facility is used to indicate to the
called switch the CUG selected for a virtual call. (A CUG is a calling
group to which access is restricted. A user can be a member of more
than one CUG. In general, members of a specific CUG can
communicate among themselves, but not with users outside the group.
In some cases, however, specific CUG members can originate calls to
destinations outside the group, or receive calls from outside the
group.)
NUI
Set of Network User Identification (NUI) related facilities to use in the
next call request. NUI provides information to the network for billing,
security, and network management, and to invoke subscribed facilities.
T3POS Options
T3POS is a character-oriented, frame-formatted protocol designed for Point-of-Service (POS)
transactions through an X.25-based packet-switched network. T3POS enables you to send data
over the ISDN D channel while continuing to send traffic over both B channels. The T3POS
protocol involves three parties: the T3POS DTE, the T3POS PAD, and the T3POS Host.
Following are the Answer > T3POS Options parameters:
Parameter
Description
X.25 Prof
Name of an X.25 profile to use for this connection.
Host Init. Mode
For host-initiated calls, this parameter specifies the default data
transfer mode. Note that the host can override this setting with a
control frame.
DTE Init. Mode
For DTE-initiated calls, this parameter specifies the default data
transfer mode. Note that the DTE can override this setting with a
opening frame.
ENQ Handling
Whether or not the PAD should expect to receive an ENQ from the
host when an X.25 virtual call is established. ENQ indicates that the
host is ready to receive data. ENQ is a control character that signifies a
request for identification or status on an X.25/T3POS connection.
Max Block Size
Maximum length of a transmission (including the length of the
opening frame) in bytes that the PAD must be able to accept and
process from the DTE or host.
Timer Options
The following parameters in Answer > T3POS Options subprofile define timing limits in the
communication between the DTE and the PAD:
Parameter
Specifies
T3POS T1
Maximum amount of time permitted between characters sent from the
DTE to the PAD. Also called the Char-to-Char timer.
MAX 6000/3000 Network Configuration Guide
4-11
Configuring Individual WAN Connections
The Answer profile
Parameter
Specifies
T3POS T2
Maximum amount of time permitted between the SYN signals sent
from the DTE to the PAD.This timer applies to opening frames in
Local or Bin-Local mode. Normally, the PAD sends SYN signals to
the DTE at the interval specified by the T2 timer to indicate that an
idle link is still alive. However, if the DTE sends a SYN signal to the
PAD before the PAD sends one to the DTE, the T2 timer specifies the
period of time the PAD expects SYN signals from the DTE. If the PAD
does not receive two SYN signals within the interval specified by the
T2 timer, it tries to restore the link. Also called the SYN-to-SYN timer.
T3POS T3
Amount of time the PAD waits for an ENQ from the host. Also called
the ENQ handling timer.
T3POS T4
Amount of time the PAD waits for a SYN from the DTE while the
PAD is waiting for a response from the DTE. The SYN signal
indicates that the response from the DTE is being delayed and also
indicates that the link is still alive. Also called the Response Timer.
T3POS T5
Maximum idle time the PAD allows for a T3POS call. This timer is
similar to the VC inactivity timer in the X25/PAD. The T5 timer
applies to transparent and blind mode only; it is disabled in both Local
mode and Bin-Local mode. Also called the DLE, EOT timer.
T3POS T6
Maximum amount of time allowed between the time a dial-up
connection is established and the first character of an opening frame is
received. Also called the Frame Arrival timeout.
For DTE-initiated calls
A Data Terminal Equipment (DTE) device is a device that an operator uses, such as a computer
or a terminal. The following Answer > T3POS Options parameters enable you to configure
DTE-initiated calls:
Parameter
Specifies
Direct Call X.121
Addr
Default host’s X.121 address.
Method of Host Notif How the host is notified of the mode of the call.
4-12
PID Selection
Which Protocol Identifier (PID) the PAD includes in the call request
packet it sends to the host.
ACK Suppression
Whether the PAD sends an acknowledgment when it receives an
opening frame from the DTE and when it establishes a virtual call with
the host.
MAX 6000/3000 Network Configuration Guide
Configuring Individual WAN Connections
The Answer profile
Miscellaneous
The last several parameters in the Answer > T3POS Options subprofile further help to define
the incoming calls that use T3POS encapsulation:
Parameter
Specifies
Data Format
Data format and parity checking/generation behavior of the PAD when
it validates opening frames and performs Local mode data transfer.
Link Access Type
Type of DTE connection—permanent, leased-line, or dial-up.
Retry Limit
Number of times in a row, per connection, that the PAD allows the
DTE to send a frame or frame acknowledgment in error before it
disconnects the call. For a dial-up connection, the Retry Limit
specifies how many times the PAD allows the DTE to try to establish a
call that fails because the X.25 virtual call to the host could not be
established. When the DTE exceeds the Retry Limit, the PAD
disconnects the call.
Listen X.121 Addr
Listen pattern for host-initiated calls.
Reverse Charge
Whether or not the call packet should include a reverse charge request
facility parameter.
RPOA
Set of Recognized Private Operating Agency (RPOA) user facilities to
use in the next call request. The RPOA facilities provide the data
network identification code for the requested initial RPOA transit
network in the form of four decimal digits.
CUG Index
Closed user group (CUG) index/selection facility to use in the next call
request. The CUG selection/index facility is used to indicate to the
called switch the CUG selected for a virtual call. (A CUG is a calling
group to which access is restricted. A user can be a member of more
than one CUG. In general, members of a specific CUG can
communicate among themselves, but not with users outside the group.
In some cases, however, specific CUG members can originate calls to
destinations outside the group, or receive calls from outside the
group.)
NUI
Set of Network User Identification (NUI) related facilities to use in the
next call request. NUI provides information to the network for billing,
security, and network management, and to invoke subscribed facilities.
Session Options
In the Answer > Session Options subprofile, the RIP parameter specifies whether the MAX
unit sends and/or receives RIP update packets on the interface.
The Session Options subprofile also includes filter-related parameters, timing parameters, and
a few miscellaneous parameters.
MAX 6000/3000 Network Configuration Guide
4-13
Configuring Individual WAN Connections
The Answer profile
Filter-related parameters
The Answer > Session Options subprofile contains the following filter-related parameters:
Parameter
Specifies
Data Filter
Number of a filter used to determine if packets should be forwarded or
dropped. If both a call filter and data filter are applied to a connection,
the MAX unit applies a call filter after applying a data filter. (Only
those packets that the data filter forwards can reach the call filter.)
Call Filter
Number of a filter used to determine if a packet should cause the idle
timer to be reset or a call to be placed. If both a call filter and data filter
are applied to a connection, the unit applies a call filter after applying a
data filter. (Only those packets that the data filter forwards can reach
the call filter.)
Filter Persistence
Whether or not the filter or firewall assigned to an Answer profile
should persist after the call has been disconnected.
Timing parameters
The Answer > Session Options timing parameters define how long a session can remain
inactive before a call is cleared, whether the MAX unit uses the terminal-server idle timer, and
how long a terminal server can remain idle before the session disconnects. Following are the
parameters:
Parameter
Specifies
Idle
Number of seconds the MAX unit waits before clearing a call when a
session is inactive.
TS Idle Mode
Whether or not the unit uses the terminal-server idle timer and, if so,
whether both the user and host must be idle before the unit disconnects
the session.
TS Idle
Number of seconds that a terminal-server connection must be idle
before the unit disconnects the session.
Miscellaneous Session Options parameters
The following Answer > Session Options parameters further define the session for an
incoming call:
4-14
Parameter
Specifies
Max Call Duration
Maximum duration in minutes of an established session for an
incoming call. The connection is checked once per minute, so the
actual time of the call is slightly longer (usually less than a minute
longer) than the actual time you set.
Preempt
Number of idle seconds the MAX unit waits before using one of the
channels of an idle link for a new call.
MAX 6000/3000 Network Configuration Guide
Configuring Individual WAN Connections
The Answer profile
Parameter
Specifies
IPX SAP Filter
A SAP filter applied to the LAN or WAN interface. You can apply an
IPX SAP filter to exclude or include certain remote services from the
MAX SAP table. If you apply a SAP filter in a Connection profile, you
can exclude or include services in both directions.
Framed Only
Whether or not the user is allowed access to all the terminal-server
commands or to a subset of them.
DHCP Options
Dynamic Host Configuration Protocol (DHCP) is a TCP/IP protocol that enables a client to
obtain a temporary IP address from a central server (known as a DHCP server). Following are
the Answer > DHCP Options parameters:
Parameter
Specifies
Reply Enabled
Whether or not the MAX unit processes DHCP packets and acts as a
DHCP server on this connection.
Pool Number
IP address pool to use to assign addresses to Network Address
Translation (NAT) clients.
Max Leases
Number of dynamic addresses to assign to NAT clients using this
connection.
TCP-Clear Options
The MAXunit does not process packet encapsulation for TCP-Clear connections. These
connections often use a proprietary encapsulation method, or encapsulation performed by an
application running on top of TCP. The unit redirects the connection’s data immediately to a
specified host, where encapsulation processing is assumed to occur.
Parameters in the Answer > TCP-Clear Options subprofile define the end of a packet, the
end-of-packet pattern, the maximum number of bytes to buffer, and the timer in milliseconds.
Following are the parameters:
Parameter
Specifies
Detect End of Packet Enable/disable packet buffering of incoming data. If this parameter is
set to Yes, the MAXunit begins buffering incoming data as soon as the
dialup session has been authenticated. It continues buffering until it
receives the specified End of Packet Pattern, or until it reaches the
specified timeout (Packet Flush Time) or maximum packet length
(Packet Flush Length), whichever comes first. If Detect End of Packet
is set to No (the default), none of the related parameters apply.
End of Packet Pattern Character pattern that signals the end of a packet. When the unit
matches this pattern in the buffered data, it immediately flushes the
buffer by writing all data up to and including the pattern out to TCP.
Note that the data is written before a match occurs if the specified
timeout (Packet Flush Time) or maximum packet length (Packet Flush
Length) is exceeded.
MAX 6000/3000 Network Configuration Guide
4-15
Configuring Individual WAN Connections
The Answer profile
Parameter
Specifies
Packet Flush Length
Maximum number of bytes to buffer. Valid values are from 1 to 8192.
The default value is 256. (Note that buffering large packets consumes
more system resources.) If the system has buffered the specified
number of bytes without matching the End of Packet Pattern, it flushes
the buffer by writing the data to TCP.
Packet Flush Time
Timer in milliseconds. Valid values are from 1 to 1000. The timer
begins counting down upon reception of the first byte of buffered data.
If the specified number of milliseconds has elapsed without any
buffered data matching the End of Packet Pattern, the system flushes
the buffer by writing the data to TCP.
Configuring an Answer profile
When a call first comes in, it is unauthenticated. The Answer profile lets you negotiate the PPP,
authentication, and encapsulation methods, and whether the call routes or bridges. After the
connection is authenticated, the MAX unit uses the appropriate Connection profile or RADIUS
user profile. To configure the Answer profile, proceed as follows:
1
Open the Ethernet > Answer profile and set the Profile Reqd parameter to Yes.
2
Specify a value for CLID or DNIS authentication, if required.
3
Enable dynamic assignment of IP addresses to callers, if appropriate.
4
Make sure you enable the encapsulation types you intend to support.
5
Enable routing and bridging and specify authentication requirements, as appropriate.
6
Set AppleTalk PPP dial-in options in the AppleTalk Options menu, if required.
7
Exit the profile and, at the exit prompt, select the exit and accept option.
Example of a configured Answer profile
Ethernet
Answer
Profile Reqd=Yes
Id Auth=None
Assign Adrs=No
Encaps
MPP=Yes
MP=Yes
PPP=Yes
COMB=Yes
FR=Yes
X25/PAD=Yes
EU-RAW=Yes
EU-UI=Yes
V.120=Yes
X.75=Yes
TCP-Clear=Yes
ARA=Yes
PPP Options
Route IP=Yes
4-16
MAX 6000/3000 Network Configuration Guide
Configuring Individual WAN Connections
The Connection profile
Route IPX=Yes
Route AppleTalk=Yes
Bridge=Yes
Recv Auth=Either
COMB Options
Password Reqd=Yes
The Connection profile
Connection profiles define specific connections for individual users. Whereas the Answer
profile specifies parameters for the initial negotiation of an incoming call, a Connection profile
specifies parameters that support authentication and detailed aspects of an individual
connection. Unlike the Answer profile, a Connection profile applies to both incoming and
outgoing calls.
Note: Settings in a Connection profile always override similar settings in the Answer profile.
Located in the Ethernet > Connections menu, Connection profiles include general parameters
and parameters that are grouped into subprofiles for various options.
General Parameters
General parameters in a Connection profile include basic setup parameters, telephone-number
parameters, and routing parameters. Following are the Ethernet > Connections > Connection
profile parameters that define the name of the connection, whether a profile or route is active,
the encapsulation protocol for the line, and a value switch needs to properly interpret the
telephone number dialed.
Basic setup parameters
Following are the basic setup parameters in a Connection profile:
Parameter
Specifies
Station
Name of the far-end device. If the connection uses Combinet
encapsulation, the MAC address of the far-end Combinet bridge is
used as the name.
Active
Activate/deactivate the profile. Activation makes it available for use.
A dash appears before each deactivated profile.
Encaps
The encapsulation method to use when exchanging data with a remote
network. Both sides of the link must use the same encapsulation for
the connection to be established. Note: The encapsulation type must be
enabled in the Answer profile.
PRI # Type
TypeOfNumber field in the called party’s information element. PRI #
Type is used for outbound calls made by the MAX unit on PRI lines so
that the switch can properly interpret the telephone number dialed.
Ask your PRI provider for details.
MAX 6000/3000 Network Configuration Guide
4-17
Configuring Individual WAN Connections
The Connection profile
Parameter
Specifies
NumPlanID
NumberPlanID field in the called party’s information element.
NumPlanID is used for outbound calls made by the unit on PRI lines
so that the switch can properly interpret the telephone number dialed.
Ask your PRI provider for details.
Telephone numbers
The following parameters in Ethernet > Connections > Connection profile define telephone
numbers to dial out from, telephone numbers of the calling device, and the telephone number
called to establish a connection:
Parameter
Specifies
Dial #
The number used to dial out on this connection. It can contain up to 24
characters, which can include a dialing prefix that directs the
connection to use a trunk group or dial plan; for example:
6-1-212-555-1212.
Calling #
The calling number (the far-end device's number). Many carriers
include the calling number (the far-end device's number) in each call.
Calling # is the caller ID number displayed on some phones and used
by the unit for CLID authentication.
Called #
The number called to establish this connection, which is typically the
number dialed by the far end. It is presented in an ISDN message as
part of the call when DNIS is in use. In some cases, the telephone
company might present a modified called number for DNIS. This
number is used for authentication and to direct inbound calls to a
particular device from a central rotary switch or PBX.
Routing
The following parameters in Ethernet > Connections > Connection profile define what type of
routing is supported by way of the Connection profile, whether users have access to some or all
of the terminal-server commands, whether link-level bridging is supported, whether the MAX
unit dials this connection when it receives Ethernet broadcast packets, and whether a user can
share a profile or session:
4-18
Parameter
Specifies
Route IP
Whether this Connection profile supports IP routing. IP routing must
be enabled on both sides of the connection, and the MAX unit must be
configured with an IP address in the Ethernet profile. To establish an
inbound connection, IP routing must also be enabled in the Answer
profile.
Route IPX
Whether this Connection profile supports IPX routing. IPX routing
must be enabled on both sides of the connection, and the MAX unit
must be configured with an IPX network address and frame type in the
Ethernet profile. Note that the unit routes and spoofs only one IPX
frame type. Other frame types will be bridged if bridging is enabled.
MAX 6000/3000 Network Configuration Guide
Configuring Individual WAN Connections
The Connection profile
Parameter
Specifies
Route AppleTalk
Whether this Connection profile supports AppleTalk routing.
AppleTalk routing must be set on both sides of the connection, and in
the AppleTalk options submenu for the profile.
Framed Only
Whether or not the user is allowed access to all the terminal-server
commands or to a subset of them. Terminal-server users connecting
through this profile can have unlimited access to the terminal-server
commands, or can have limited access with the PPP, SLIP, CSLIP, and
Quit commands.
Bridge
Whether link-level bridging is supported. The MAX unit bridges a
frame on the basis of the frame’s destination MAC address.
Dial Brdcast
Whether or not the unit dials this connection when it receives Ethernet
broadcast packets. A broadcast is a message to all users currently
logged into the network. By default, the unit does not dial on
broadcast; it relies on its internal bridging table to bring up specific
bridged connections.
Shared Prof
Whether or not multiple users can share a single Connection profile or
a single RADIUS user profile or whether or not a single user can have
multiple sessions active.
Overview of the Options subprofiles
The following Options subprofiles apply to incoming calls that use a particular encapsulation
or routing protocol, specify that the unit gathers accounting information for the incoming call,
or enable the MAX unit to act as a DHCP server:
Parameter
Specifies
Encaps Options
Parameters relevant to the selected encapsulation method.
IP Options
Connection profile parameters specific to IP routing.
IPX Options
Connection profile parameters specific to IPX routing.
AppleTalk Options
Connection profile parameters specific to AppleTalk routing.
Session Options
Options that set default filters and timers to build connections that use
RADIUS or Names/Passwords profiles.
OSPF Options
Connection profile parameters specific to the Open Shortest Path First
(OSPF) routing protocol.
Telco Options
Connection profile parameters specific to the call features the MAX
unit negotiates.
Accounting
Connection profile parameters specific to the type, host, port, timeout,
password and session ID of the call.
DHCP Options
Dynamic Host Configuration Protocol (DHCP) options that enable the
MAX unit to act as a DHCP server for a local Pipeline unit for
connections that use RADIUS (if you enable Use Answer as Default)
or Names/Passwords profiles.
For detailed information about each parameter, see the MAX Reference.
MAX 6000/3000 Network Configuration Guide
4-19
Configuring Individual WAN Connections
The Connection profile
Encaps Options
The Encaps Options subprofile parameters vary depending on whether you set the Encaps
parameter to MPP, MP, PPP, COMB, FR or FR_CIR, XI5PAD, X25/TSPOS, X25/IP, X.32,
TCP-Clear, or AR4.
Encaps=MPP
When Connections > Connection profile > Encaps=MPP, the following parameters appear in
the interface for Ethernet > Connections > Connection profile > Encaps Options and define
authentication-protocol values between the unit and the far-end device:
Parameter
Specifies
Send Auth
Authentication protocol that the unit uses to send a password to the far
end of a PPP connection.
Send Name
Name that the unit sends to the far end device during PPP
authentication. Authentication fails if the name does not match what
the far-end device expects. Also, authentication fails if either the
password or IP address (for IP-routed connections) for the Connection
profile does not match what the far-end device expects. You can
specify up to 16 characters. The default is null.
Send PW
Password that the unit sends to the far end while the connection is
being authenticated. If this password is not received by the far-end
device, authentication fails. If the link uses Combinet bridging and the
far-end Answer profile specifies that a password is required (Password
Reqd=Yes), you must enter a password using all lowercase letters.
Aux Send PW
Password the unit sends when it adds channels to a multichannel PPP
call that uses PAP-TOKEN-CHAP authentication. The unit obtains
authentication of the first channel of this call from the user’s hand-held
security card.
Recv PW
Password that the unit expects to receive from the far end while the
connection is being authenticated. If this password is not sent by the
far-end device, authentication fails. For PPP links, the password can
contain up to 20 characters.
The Encap=MPP setting also makes available parameters for DBA monitoring and channel
allocation; MRV, LQM, and Compression; CBCP; and some miscellaneous parameters.
DBA monitoring and channel allocation parameters
The following parameters in Ethernet > Connections > Connection profile > Encaps Options
and define the monitoring of Dynamic Bandwidth Allocation (DBA) and the number of
channels used with MP+ calls:
4-20
Parameter
Specifies
DBA Monitor
How the unit monitors the traffic over an MP+ connection. Only the
initiating side of the call can add or subtract bandwidth. If both sides
of the link have DBA Monitor set to None, DBA is disabled.
MAX 6000/3000 Network Configuration Guide
Configuring Individual WAN Connections
The Connection profile
Parameter
Specifies
Base Ch Count
Number of channels to use to set up a session initially. If the session
uses MP, Base Ch Count specifies the total number of channels to be
used for the call. For an AIM, BONDING, or multichannel PPP call,
the channel count may be augmented.
Min Ch Count
Minimum number of channels that can be established for a multilink
call. If this number of channels is not available, the multilink session is
not established. For optimum performance, both sides of the multilink
connection should set this parameter to the same value.
Max Ch Count
Maximum number of channels that can be allocated to a multilink
connection. For optimum performance, both sides of the connection
should specify the same maximum channel count.
Inc Ch Count
Number of channels the unit adds when bandwidth changes either
manually or automatically during a call.
Dec Ch Count
Number of channels the unit removes when bandwidth changes either
manually or automatically during a call. You cannot clear a call by
decrementing channels.
MRU, LQM and Compression parameters
The following parameters in Ethernet > Connections > Connection profile > Encaps Options
define the number of bytes the MAX unit can receive in a single frame, Link Quality
Monitoring (LQM) values and link compression settings for packets and for headers:
Parameter
Specifies
MRU
Maximum number of bytes the unit can receive in a single frame.
Usually the default is the right setting, unless the far end requires a
lower number.
LQM
Whether or not the unit requests LQM when answering a PPP call.
LQM counts the number of packets sent across the link and
periodically asks the remote end how many packets it has received.
Discrepancies are evidence of packet loss and indicate link-quality
problems.
LQM Min
Minimum duration between link-quality reports for PPP connections,
measured in 10ths of a second.
LQM Max
Maximum duration between link-quality reports for PPP connections,
measured in 10ths of a second.
Link Comp
Link-compression method for a PPP, MP, and MP+ calls. Both sides of
the connection must set the same type of link compression or it is not
used.
VJ Comp
Whether or not Van Jacobson IP header compression should be
negotiated on incoming calls using encapsulation protocols that
support this feature. VJ Comp applies only to packets in TCP
applications, such as Telnet. Turning on header compression is most
effective in reducing overhead when the data portion of the packet is
small.
MAX 6000/3000 Network Configuration Guide
4-21
Configuring Individual WAN Connections
The Connection profile
CBCP parameters
The following parameters in Ethernet > Connections > Connection profile > Encaps Options
define callback features for incoming calls and trunk groups:
Parameter
Description
CBCP Mode
Specifies the method of callback the MAX unit offers the incoming
caller.
CBCP Trunk Group
Assigns the callback to a unit trunk group. This parameter is used only
when the caller is specifying the telephone number the unit uses for the
callback. The value in CBCP Trunk Group is prepended to the
caller-supplied number when the unit calls back.
Miscellaneous Encaps Options parameters
The following parameters in Ethernet > Connections > Connection profile > Encaps Options
define line utilization over time, the threshold and bandwidth for ALU, whether the link uses
header compression, and the user name and password:
4-22
Parameter
Specifies
Dyn Alg
An algorithm for calculating ALU over a certain number of seconds
(Sec History).
Sec History
A number of seconds to use as the basis for calculating ALU. The
ALU is used in calculating when to add or subtract bandwidth from a
multichannel call that supports dynamic bandwidth management.
Add Pers
The number of seconds that ALU must persist beyond the target
utilization threshold before the MAX unit adds bandwidth from
available channels. When adding bandwidth, the unit adds the number
of channels specified in the Inc Ch Count parameter.
Sub Pers
Number of seconds for which the ALU must persist below the Target
Util threshold before the unit subtracts bandwidth.
Target Util
Percentage of line utilization to use as a threshold for determining
when to add or subtract bandwidth. When the value is 70%, the device
adds bandwidth when it exceeds a 70 percent utilization rate, and
subtracts bandwidth when it falls below that number.
Idle Pct
Percentage of bandwidth utilization below which the unit clears an
MP+ call. Bandwidth utilization must fall below this percentage on
both sides of the connection before the unit clears the call.
IPX Header
Compression
Whether or not to use IPX header compression in PPP sessions. IPX
Header Compression is enabled by default. This parameter is not
applicable if the unit does not route IPX.
Split Code.User
Separation of the PIN and CODE values from a device’s USERNAME
by a period. If the CHAP field cannot accommodate the full
PIN+CODE.USER, you can enable this feature. The unit splits the
passcode into two pieces with the information following the period
becoming the CHAP Name, overriding the name of the router.
MAX 6000/3000 Network Configuration Guide
Configuring Individual WAN Connections
The Connection profile
Encaps=MP
When Connections > Connection profile > Encaps=MP, the following parameters appear in the
interface for Ethernet > Connections > Connection profile > Encaps Options:
Ethernet
Connections
Connection profile
Send Auth
Send Name
Send PW
Aux Send PW
Recv PW
Base Ch Count
Min Ch Count
Max Ch Count
Inc Ch Count
Dec Ch Count
MRU
LQM
LQM Min
LQM Max
Link Comp
VJ Comp
CBCP Mode
CBCP Trunk Group
BACP
Dyn Alg
Sec History
Add Pers
Sub Pers
Target Util
IPX Header Compression
Split Code.User
Encaps=PPP
When Connections > Connection profile > Encaps=PPP, the following parameters appear in
the interface for Ethernet > Connections > Connection profile > Encaps Options:
Ethernet
Connections
Connection profile
Send Auth
Send Name
Send PW
Recv PW
MRU
LQM
LQM Min
LQM Max
Link Comp
VJ Comp
MAX 6000/3000 Network Configuration Guide
4-23
Configuring Individual WAN Connections
The Connection profile
CBCP Mode
CBCP Trunk Group
IPX Header Compression
Split Code.User
Encaps=COMB
When Connections > Connection profile > Encaps=PPP, the following parameters appear in
the interface for Ethernet > Connections > Connection profile > Encaps Options:
Ethernet
Connections
Connection profile
Password Reqd
Send PW
Recv PW
Interval
Base Ch Count
Compression
Password Reqd
Whether a password will be required to authenticate the Combinet connection.
Interval
Number of seconds between the receipt or transmission of Combinet line-integrity packets. If
the MAX unit does not receive a Combinet line-integrity packet within three of these intervals,
it disconnects the call.
Compression
Whether data compression is on or off for a Combinet link. Both sides of the link must enable
compression for the algorithm to have any effect.
Encaps=FR and Encaps=FR_CIR
When Connections > Connection profile > Encaps=FR and when Connections > Connection
profile > Encaps=FR_CIR, the following parameters appear in the interface for Ethernet >
Connections > Connection profile > Encaps Options:
4-24
Parameter
Specifies
FR Prof
Name of the Frame Relay profile to use for forwarding this link on the
Frame Relay network.
DLCI
Frame Relay Data Link Connection Indicator (DLCI) number for a
gateway or circuit connection. A DLCI is a number between 16 and
991, which is assigned by the Frame Relay administrator. A DLCI is
not an address, but a local label that identifies a logical link between a
device and a Frame Relay switch. The switch uses the DLCI to route
frames through the network, and the DLCI may change as frames are
passed through multiple switches.
MAX 6000/3000 Network Configuration Guide
Configuring Individual WAN Connections
The Connection profile
Parameter
Specifies
Circuit
Alphanumeric name for a DLCI endpoint. When combined as a
circuit, the two DLCI endpoints act as a tunnel—data received on one
DLCI bypasses the Lucent router and is sent out on the other DLCI.
Encaps=X25/PAD
When Connections > Connection profile > Encaps=X25/PAD, the following parameters appear
in the interface for Ethernet > Connections > Connection profile > Encaps Options:
Parameter
Specifies
X.25 Prof
Name of an X.25 profile to use for this connection. To guard against
misconfiguration, the MAX unit does not allow you to save an active
Connection profile specifying X.25 encapsulation unless the named
X.25 profile is defined and active.
Recv PW
Password that the unit expects to receive from the far end while the
connection is being authenticated. If this password is not sent by the
far-end device, authentication fails. For X.25/PAD, the password can
contain 48 characters.
X.3 Param Prof
Default X.3 profile for setting up the PAD for this connection. Note
that a user can specify a profile using a PAD command. In this case,
the profile specified on the command line overrides the parameter
value for the length of the current session.
VC Timer Enable
Virtual Call Establishment (VCE) timer on a per-user basis. The VCE
timer specifies the number of seconds to maintain a connection to a
character-oriented device (such as the terminal server) that has not
established a virtual call.
Auto-Call X.121
Addr
X.25 host to call immediately when an X.25/PAD session is
established via this Connection profile. If Auto-Call X.121 Addr
specifies an address, the PAD session can begin automatically;
otherwise, the unit displays the terminal-server prompt, where the user
can issue the pad command to begin a session.
Reverse Charge
Whether or not the call packet should include a reverse charge request
facility element.
RPOA
Set of Recognized Private Operating Agency user facilities to use in
the next call request. The RPOA facilities provide the data network
identification code for the requested initial RPOA transit network. The
code contains four decimal digits.
CUG Index
Closed user group (CUG) index/selection facility to use in the next call
request. The CUG selection/index facility is used to indicate to the
called switch the closed user group selected for a virtual call. (A CUG
is a calling group to which access is restricted. A user can be a member
of more than one CUG. In general, members of a specific CUG can
communicate among themselves, but not with users outside the group.
In some cases, however, specific CUG members can originate calls to
destinations outside the group, or receive calls from outside the
group.)
MAX 6000/3000 Network Configuration Guide
4-25
Configuring Individual WAN Connections
The Connection profile
NUI and PAD parameters
The remainder of the parameters in Ethernet > Connections > Connection profile > Encaps
Options provide NUI and PAD settings:
Parameter
Specifies
NUI
Set of Network User Identification-related facilities to use in the next
call request. NUI provides information to the network for billing,
security, and network management, and to invoke subscribed facilities.
PAD Banner Msg
Banner message that the user or a calling device sees when starting an
X.25 PAD (Triple-X) session on the unit. The PAD user can be either a
user or a calling device running a script. You can specify up to 32
characters. The default is null.
PAD Prompt
PAD prompt. You can specify up to 12 characters. The default is null.
NUI Prompt
Network User Identification (NUI) prompt for a PAD application. You
can specify up to 15 characters. The default is null. The value of NUI
Prompt overrides any value entered in the NUI setting. Encaps must be
set to X25/PAD for NUI to be applicable.
NUI PW Prompt
NUI password prompt for a PAD application. You can specify up to 12
characters. The default is null. This parameter is used as Call User
Data in the outbound Call Request Packet.
PAD Alias #N
A string for single-command substitution. You can specify up to 40
characters. The default is null. For one command string (including a
space) to be treated as equivalent to another, you must enter a slash (/)
between the two strings. Encaps must be set to X25/PAD for PAD
Alias to be applicable.
Encaps=X25/T3POS
When Connections > Connection profile > Encaps=X25/T3POS, the following parameters
appear in the interface for Ethernet > Connection > Connection profile > Encaps Options:
Ethernet
Connections
Connection profile
x.25 Prof
Recv PW
Host init. mode
DTE init. mode
ENQ handling
Max. Block Size
T3POS T1
T3POS T2
T3POS T3
T3POS T4
T3POS T5
T3POS T6
4-26
MAX 6000/3000 Network Configuration Guide
Configuring Individual WAN Connections
The Connection profile
X.25 Prof
The X.25 Prof parameter specifies the name of an X.25 profile to use for this connection. To
guard against misconfiguration, the MAX unit does not allow you to save an active Connection
profile specifying X.25 encapsulation unless the named X.25 profile is defined and active.
Recv PW
The Recv PW parameter specifies the password that the unit expects to receive from the far
end while the connection is being authenticated. If this password is not sent by the far-end
device, authentication fails. For X.25/PAD, the password can contain 48 characters.
Encaps=X25/IP
When Connections > Connection profile > Encaps=X25/IP, the following parameters appear in
the interface for Ethernet > Connections > Connection profile > Encaps Options:
Ethernet
Connections
Connection profile
X.25 Prof
LCN
Encaps Type
Reverse Charge
RPOA
CUG Index
NUI
Max Unsucc. calls
Inactivity Timer
MRU
Call Mode
Answer X.121 Addr
Remote X.121 Addr
LCN
The LCN parameter specifies the Logical Channel Number (LCN) to use for a Permanent
Virtual Connection (PVC) using X.25. On an X.25 connection, an LCN is a unique number
assigned to each Virtual Circuit (VC). On a X.25 network, a VC is a bidirectional data path
between two endpoints.
Encaps Type
The Encaps Type parameter specifies which encapsulation to use when calling the remote IP
network across X.25.
Max Unsucc. Calls
The Max Unsucc. Calls parameter specifies the maximum number of unsuccessful X.25 calls
the unit tries to place before dropping the modem connection.
MAX 6000/3000 Network Configuration Guide
4-27
Configuring Individual WAN Connections
The Connection profile
Inactivity Timer
The Inactivity Timer parameter specifies the number of seconds to allow a connection to
remain inactive before dropping the virtual circuit.
Call Mode
The Call Mode parameter specifies whether or not the unit can initiate a call request on the
X.25 IP connection.
Answer X.121 Addr
The Answer X.121 Addr parameter specifies the X.121 address of the remote X.25 host to
which this profile connects. The remote host is assumed to support RFC1356 encapsulation of
IP packets.
Remote X.121 Addr
The Remote X.121 Address parameter specifies the X.121 address of the remote X.25 host to
which this profile connects. The remote host is assumed to support RFC1356 encapsulation of
IP packets.
Encaps=X.32
When Connections > Connection profile > Encaps=X.32, the parameter appears in the
interface for Ethernet > Connections > Connection profile > Encaps Options. This X.25 Prof
parameter specifies the name of an X.25 profile to use for this connection. To guard against
misconfiguration, the MAX unit does not allow you to save an active Connection profile
specifying X.25 encapsulation unless the named X.25 profile is defined and active.
Encaps=TCP-Clear
When Connections > Connection profile > Encaps=TCP-Clear, the following parameters
appear in the interface for Ethernet > Connections > Connection profile > Encaps Options:
Ethernet
Connections
Connection profile
Recv PW=
Login Host=
Login Port=0
Detect End of Packet=
End of Packet Pattern=
Max Packet Length=
Packet Flush Time=
Recv PW
The Recv PW parameter specifies the password that the MAX unit expects to receive from the
far end while the connection is being authenticated. If this password is not sent by the far-end
4-28
MAX 6000/3000 Network Configuration Guide
Configuring Individual WAN Connections
The Connection profile
device, authentication fails. For PPP links, the password can contain up to 20 characters. For
X.25/PAD, it can contain up to 48 characters.
Login Host
The Login Host parameter specifies the IP address or DNS hostname of the host to which raw
TCP connections will be directed.
Login Port
The Login Port parameter specifies the TCP port that the raw TCP connection uses to connect
to the specified host.
Detect End of Packet
The Detect End of Packet parameter specifies whether or not the MAX unit buffers incoming
data from TCP-Clear dial-in sessions that do not require V.120 processing.
End of Packet Pattern
The End of Packet Pattern parameter specifies a character pattern that signals the end of a
packet. When the pattern matches the buffered data, the system immediately flushes the buffer
by writing all data, up to and including the pattern, into TCP packets.
Max Packet Length
The Max Packet Length parameter specifies the maximum length of the packet that can be
buffered. If End Of Packet Detection is set to Yes and a packet has not been matched, the
buffered data is flushed to TCP once the number of bytes specified in Max Packet Length is
cleared. Max Packet Length does not apply unless Encaps is set to TCP-Clear in the
Connection profile or Detect End of Packet is set to Yes. Buffering a large packet size will
impact the overall performance of the system, and may run the risk of running out of memory.
Packet Flush Time
The Packet Flush Time parameter specifies the amount of time (in milliseconds) to buffer
TCP-Clear data that does not require V.120 processing. The timer begins counting down upon
receiving the first byte of buffered data. If the specified number of milliseconds elapses before
the buffered data matches the End of Packet Pattern value, the MAX unit flushes the buffer by
writing the data into TCP packets.
MAX 6000/3000 Network Configuration Guide
4-29
Configuring Individual WAN Connections
The Connection profile
Encaps=ARA
When Connections > Connection profile > Encaps=ARA, the following parameters appear in
the interface for Ethernet > Connections > Connection profile > Encaps Options:
Parameter
Specifies
Password
Password that an incoming ARA caller must supply (in a Connection
profile) or the password the foreign agent must specify under Ascend
Tunnel Management Protocol (ATMP) in order to access this unit (in
an Ethernet profile).
Max Time (min)
Maximum connect time in minutes for the ARA dial-in. The MAX
unit initiates an ARA disconnect when the specified time is up. The
ARA link goes down cleanly, but remote users are not notified. Users
find out the ARA link is gone only when they try to access a device.
IP Options
The Ethernet > Connections > Connection profile > IP Options subprofile includes the
following parameters that define IP addresses for the remote-end host, for the link’s remote
interface to the WAN, and for the MAX unit:
Parameter
Specifies
LAN Adrs
IP address of remote-end host or route.
WAN Alias
IP address of the link’s remote interface to the WAN. It is used to
identify a numbered interface at the remote end of the link.
IF Adrs
Numbered interface IP address for the MAX unit. Interface-based
routing allows the unit to operate like a multihomed Internet host. In
addition to the system-wide IP configuration, the unit and the far end
of the link have link-specific IP addresses. The unit address for this
connection is specified in the IF Adrs parameter. The far-end
numbered interface address is specified in the WAN Alias parameter.
Distance parameters
The following parameters in Ethernet > Connections > Connection profile > IP Options define
how quickly a packet reaches its destination, the shortest route to the destination, whether to
keep the route private, and the values for preference and metric when the WAN is down:
4-30
Parameter
Specifies
Metric
RIP metric (a virtual hop count) associated with the IP route. A metric
is a value that determines how quickly a packet can reach its
destination. The value you enter is a number between 1 and 15. The
default setting is 7. The higher the number you specify, the less likely
that the unit brings the link or route online.
MAX 6000/3000 Network Configuration Guide
Configuring Individual WAN Connections
The Connection profile
Parameter
Specifies
Preference
Preference value for a route. RIP is a distance-vector protocol, which
uses a hop count to select the shortest route to a destination network.
RIP keeps a database of routing information that it gathers from
periodic broadcasts by each router on a network. OSPF is a link-state
protocol, which means that OSPF can take into account a variety of
link conditions, such as the reliability or speed of the link, when
determining the best path to a destination network. Because these two
metrics are incompatible, the unit supports route preferences.
Private
Whether or not the unit discloses the existence of this route when
queried by RIP or another routing protocol. Private routes are used
internally but are not advertised.
DownPreference
Preference value for a route whose associated WAN connection is
down.
DownMetric
Metric for a route whose associated WAN connection is down.
SourceIP Check, RIP and Pool parameters
The following parameters in Ethernet > Connection > Connection profile > IP Options specify
security, routing, and IP address pool information:
Parameter
Specifies
SourceIP Check
That the system checks all packets received on the interface to ensure
that their source IP address matches the combination of address and
subnet mask specified by the Remote Address value, or the address
agreed upon in IPCP negotiation. If Remote Address specifies a
subnet, packets that originate on that subnet are accepted. If Remote
Address specifies a 32-bit mask, only packets from that host are
accepted. Packets sent from an address that does not match are
discarded. This function is also known as anti-spoof.
RIP
Support for RIP protocol. RIP keeps a database of routing information
that it gathers from periodic broadcasts by each router on a network.
Pool
An IP address pool from which the caller will be assigned an IP
address. If the Pool parameter is null but all other configuration
settings enable dynamic assignment, the unit gets IP addresses from
the first defined address pool.
MAX 6000/3000 Network Configuration Guide
4-31
Configuring Individual WAN Connections
The Connection profile
Multicast parameters
The following parameters in Ethernet > Connections > Connection profile > IP Options define
the ability of the MAX unit to respond to multicast clients, and the rate at which the unit
accepts multicast clients:
Parameter
Specifies
Multicast Client
Enable/disable the MAX unit to respond to multicast clients on the
WAN link. Multicast is a transmission method in which one device
communicates with destination hosts by means of a single
transmission to all recipients on a subscriber list. Clients cannot be
supported on the multicast interface, so another WAN link or the local
Ethernet supports a multicast router.
Multicast Rate Limit Rate at which the unit accepts multicast packets from clients on this
interface.
Client parameters
The following parameters in Ethernet > Connections > Connection profile > IP Options define
primary and secondary server addresses that the MAX unit sends to any client connecting to
the unit, whether or not the addresses appear during the negotiation, and a Connection-specific
default route to be used for forwarding packets received on the connection:
Parameter
Specifies
Client Pri DNS
Primary Domain Name System (DNS) server address to be sent to any
client connecting to the MAX unit. Client DNS has two levels: a
global configuration that applies to all PPP connections, and a
Connection-specific configuration that applies to that connection only.
The global client addresses are used only if none are specified in the
Connection profile. You can also choose to present your local DNS
servers if no client servers are defined or available.
Client Sec DNS
Secondary DNS server address to be sent to any client connecting to
the unit.
Client Assign DNS
Whether or not client DNS server addresses will appear while this
connection is being negotiated.
Client Gateway
A Connection-specific default route to be used for forwarding packets
received on this connection. The unit uses this default route instead of
the system-wide Default route in its routing table. This route is
Connection-specific, so it is not added to the routing table.
IPX Options
The Ethernet > Connections > Connection profile > IPX Options subprofile includes the
following parameters that define whether the remote IPX caller is a router or dialin client, how
4-32
MAX 6000/3000 Network Configuration Guide
Configuring Individual WAN Connections
The Connection profile
IPX RIP and IPX SAP handle RIP packets across the WAN, and whether the MAX unit sends
out queries for the nearest IPX server:
Parameter
Specifies
Peer
Whether or not the remote IPX caller is a router or a dialin client. The
Peer parameter specifies how the unit negotiates IPX with callers that
have no configured Connection profile, assuming them to be either
IPX routers or IPX clients.
IPX RIP
How RIP packets are handled across this WAN connection. IPX RIP
is set to Both by default, indicating that RIP broadcasts will be
exchanged in both directions. You can disable the exchange of RIP
broadcasts across a WAN connection, or specify that the unit only
sends or only receives RIP broadcasts on that connection.
IPX SAP
How SAP packets are handled across this WAN connection. IPX SAP
is also set to Both by default, indicating that SAP broadcasts will be
exchanged in both directions. If SAP is enabled to both send and
receive broadcasts on the WAN interface, the unit broadcasts its entire
SAP table to the remote network and listens for SAP table updates
from that network. Eventually, both networks have a full table of all
services on the WAN. To control which services are advertised and
where, you can disable the exchange of SAP broadcasts across a WAN
connection, or specify that the unit only sends or only receives SAP
broadcasts on that connection.
Dial Query
Whether or not the unit places a call to the location indicated in the
Connection profile when a workstation on the local IPX network looks
for the nearest IPX server. More than one Connection profile can have
this parameter set to Yes. As a a result, several connections can occur
at the same time.
IPX parameters
The following parameters in Ethernet > Connections > Connection profile > IP Options define
the network number of the remote-end router, the network number assigned to a point-to-point
link, whether there is server or client bridging, and the amount of time the MAX unit enables
clients to remain logged on:
Parameter
Specifies
IPX Net#
IPX network number of the remote-end router. If a number is
specified, the MAX unit creates a static route to the remote device.
The value is needed only when the remote-end router requires that the
unit know its network number before connecting.
IPX Alias#
IPX network number assigned to a point-to-point link. This parameter
is used only when the unit operates with a non-Lucent router that uses
a numbered interface. It does not apply if you are routing from one
unit to another, or to a router that does not use a numbered interface.
Handle IPX
IPX server bridging or IPX client bridging.
MAX 6000/3000 Network Configuration Guide
4-33
Configuring Individual WAN Connections
The Connection profile
Parameter
Specifies
Netware t/o
Number of minutes the unit enables clients to remain logged into a
NetWare server even though their IPX connections has been torn
down.
AppleTalk Options
For the MAX unit, you need to enable AppleTalk routing by setting Ethernet > Mod Config >
AppleTalk to Yes. For incoming switched calls, you have to configure the Answer profile to
enable AppleTalk routing. Then, you need to enable AppleTalk routing for each Connection
profile that supports it. You don’t have to enable AppleTalk routing in all Connection profiles
—only the connections that use it.
The Ethernet > Connections > Connection profile > AppleTalk Options subprofile includes
parameters that define whether the remote IPX caller is a router or a dialin client, the name of
the AppleTalk zone, the beginning and end of the zone range, the default zone for nodes, and
the name of the AppleTalk zone:
4-34
Parameter
Specifies
Peer
Whether the remote endpoint is a single PPP user or a router.
Zone Name
Name of the AppleTalk zone to which the MAX unit belongs. A zone
is a multicast address containing an arbitrary subset of the AppleTalk
nodes in an internet. Each node belongs to only one zone, but a
particular extended network can contain nodes belonging to any
number of zones. Zones provide departmental or other groupings of
network entities that a user can easily understand.
Net Start
Beginning of the zone range that defines the networks available for
packets that are to be routed to this static route. If the unit is an
AppleTalk router, it brings up the line when it receives packets
addressed to the network number (defined by Net Start and Net End)
or zone name specified for the remote connection, and routes packets
to the appropriate network or zone.
Net End
End of the zone range that defines the networks available for packets
that are to be routed to this static route.
Default Zone
Default zone for nodes on an AppleTalk seed router’s internet. (A seed
router is a AppleTalk router from which other routers learn their
network configurations.) All AppleTalk nodes on the seceded network
use the default zone until a user explicitly selects a different zone
name.
Zone Name #N
Name of the AppleTalk zone to which the unit belongs. If the local
Ethernet network supports an AppleTalk router with configured zones,
you can place the unit in one of those zones.
MAX 6000/3000 Network Configuration Guide
Configuring Individual WAN Connections
The Connection profile
Session Options
The Connections > Session Options parameters define the characteristics of the session and
filter specifications:
Parameter
Specifies
Data Filter
Number of a filter used to determine if packets should be forwarded or
dropped. If both a call filter and data filter are applied to a connection,
the unit applies a call filter after applying a data filter. (Only those
packets that the data filter forwards can reach the call filter.)
Call Filter
Number of a filter used to determine if a packet should cause the idle
timer to be reset or a call to be placed. If both a call filter and data filter
are applied to a connection, the unit applies a call filter after applying a
data filter. (Only those packets that the data filter forwards can reach
the call filter.)
Filter Persistence
Whether or not the filter or firewall assigned to a Connection profile
should persist after the call has been disconnected.
Timing parameters
The Connections > Session Options timing parameters define how long a session is inactive
before a call is cleared, whether the MAX unit uses the terminal-server idle timer, and how
long a terminal server must be idle before the session disconnects:
Parameter
Specifies
Idle
Number of seconds the unit waits before clearing a call when a session
is inactive.
TS Idle Mode
Whether or not the unit uses the terminal-server idle timer and, if so,
whether both the user and host must be idle before the unit disconnects
the session.
TS Idle
The number of seconds that a terminal-server connection must be idle
before the unit disconnects the session.
Miscellaneous Session Options parameters
The following Connections > Session Options parameters further define the session for an
incoming call:
Parameter
Specifies
Max Call Duration
Maximum duration (in minutes) of an established session for an
incoming call. The connection is checked once per minute, so the
actual time of the call is slightly longer (usually less than a minute
longer) than the actual time you set.
Preempt
Number of idle seconds the MAX unit waits before using one of the
channels of an idle link for a new call.
MAX 6000/3000 Network Configuration Guide
4-35
Configuring Individual WAN Connections
The Connection profile
Parameter
Specifies
IPX SAP Filter
A SAP filter to the LAN or WAN interface. You can apply an IPX SAP
filter to exclude or include certain remote services from the MAX SAP
table. If you apply a SAP filter in a Connection profile, you can
exclude or include services in both directions.
BackUp
Name of a backup Connection profile for a nailed connection. The
profile is intended as a backup if the far-end device goes out of
service, in which case the backup call is made. It is not intended to
provide alternative lines for getting to a single destination.
IP Direct
IP address of a local host to which all inbound IP packets on this link
will be directed. When you specify an address for this parameter, the
MAX unit bypasses all internal routing and bridging tables and sends
each packet received from the remote end of the connection to the
specified address. This setting does not affect outbound traffic. Note
that the IP direct host must be on the same local network as the unit.
Frame Relay parameters
The following Connections > Session Options parameters define whether the MAX unit
redirects incoming packets to the Frame Relay switch without processing, the name of the
Frame Relay profile, and the Frame Relay DLCI number to be used for FR Direct connections:
Parameter
Specifies
FR Direct
Whether or not the MAX unit redirects incoming packets to the Frame
Relay switch without processing. A FR Direct connection is a dial-in
IP routing connection (typically using PPP), for which the unit simply
forwards the packets automatically to the Frame Relay switch without
examining destination addresses or its routing table. In effect, the unit
passes on the responsibility of routing those packets to a later hop on
the Frame Relay network. This is known as FR Direct mode, and is not
commonly used.
FR Prof
Name of the Frame Relay profile to use for forwarding this link on the
Frame Relay network.
FR DLCI
Frame Relay DLCI number to be used for FR Direct connections.
Framed Only
The Ethernet > Connections > Connection profile > Framed Only parameter specifies whether
or not the user is allowed access to all the terminal-server commands or to only a subset of
them. The default setting of No specifies that terminal-server users connecting through this
profile have unlimited access to the terminal-server commands. Yes specifies that terminalserver users connecting through this profile have access only to the PPP, SLIP, CSLIP, and Quit
terminal-server commands.
4-36
MAX 6000/3000 Network Configuration Guide
Configuring Individual WAN Connections
The Connection profile
OSPF Options
The Ethernet > Connections > Connection profile > OSPF Options subprofile includes the
following parameters that define the OSPF area and type on the interface, timing issues for
OSPF packets, priority of the OSPF router, and authentication for validating OSPF packets:
Parameter
Specifies
RunOSPF
Enable/disable OSPF on the interface. When OSPF is active, the MAX
unit sends update packets out on the interface. These packets set the
correct link state for the interface and make sure that the local
link-state database is an exact copy of the database maintained by
other OSPF routers.
Area
OSPF area to which this interface belongs.
AreaType
Type of OSPF area to which this interface belongs. If a network is
large, the size of the database, time required for route computation,
and related network traffic become excessive. An administrator can
partition an Autonomous System (AS) into areas to provide
hierarchical routing connected by a backbone.
HelloInterval
Number of seconds between sending OSPF Hello packets on the
interface. OSPF routers use Hello packets to recognize when a router
is down.
DeadInterval
Number of seconds the unit waits before declaring its neighboring
routers down after it stops receiving Hello packets.
Priority
Priority of this router with respect to the designated router and backup
designated router elections. When two routers attached to a network
attempt to become the designated router, the one with the highest
Priority value takes precedence. A router whose Priority is set to 0
(zero) is ineligible to become the designated router on the attached
network.
AuthType
Type of authentication in use for validating OSPF packet exchanges:
Simple (the default) or None. Simple authentication is designed to
prevent configuration errors from affecting the OSPF routing database.
It is not designed for firewall protection.
Authentication parameters
The Ethernet > Connections > Connection profile > OSPF Options subprofile includes the
following parameters that define authentication features:
Parameter
Specifies
AuthKey
An authentication key (a password), typically a shared secret with the
authentication server.
KeyID
An authentication key (a password) used to allow OSPF routing.
KeyID is a number from 0 to 255 inserted into the OSPF packet
header. OSPF routers use KeyId to allow or exclude packets from an
area. The default value is 0.
MAX 6000/3000 Network Configuration Guide
4-37
Configuring Individual WAN Connections
The Connection profile
Parameter
Specifies
MD5 Key
An authentication key (a password) used to allow OSPF routing. MD5
Key is a number from 0 to 255 inserted into the OSPF packet header.
OSPF routers use MD5 Key to allow or exclude packets from an area.
The default value is 0. The key can contain as many as 16 characters.
More OSPF parameters
The following parameters in the Ethernet > Connections > Connection profile > OSPF Options
subprofile further define the OSPF link and the packets traveling on this link:
Parameter
Specifies
Cost
The cost of an OSPF link. The cost is a configurable metric that must
take into account the speed of the link and other issues. The lower the
cost, the more likely the interface will be used to forward data traffic.
ASE-Type
The OSPF ASE type of the Link-State Advertisement (LSA).
ASE-Tag
The OSPF ASE tag of this link. The tag is a 32-bit hexadecimal
number attached to each external route. This field is not used by the
OSPF protocol itself. It may be used by border routers to filter this
record.
TransitDelay
The estimated number of seconds it takes to transmit a Link State
Update (LSU) Packet over this interface. Before transmission, LSAs
contained in the LSU packet have their ages incremented by the
amount you specify.
Retransmit Interval
The number of seconds between retransmissions of OSPF packets.
OSPF uses this value for LSA transmissions and when retransmitting
Database Description and Link State Request packets.
NonMulticast
Whether all multicast packets are remapped to a directed neighbor
address.
Telco Options
The Ethernet > Connections > Connection profile > IPX Options subprofile includes the
following parameters that define whether the MAX unit enables incoming calls, outgoing calls,
or both for a connection, whether the unit calls back the remote end, whether the unit expects
outgoing calls, and the type of connection for the call:
4-38
Parameter
Specifies
AnsOrig
Whether or not the unit enables incoming calls, outgoing calls, or both,
for this connection.
Callback
The callback feature. When you enable the callback feature, the unit
hangs up after receiving an incoming call that matches the one
specified in the Connection profile. The unit then calls back the device
at the remote end of the link using the Dial # specified in the
Connection profile.
MAX 6000/3000 Network Configuration Guide
Configuring Individual WAN Connections
The Connection profile
Parameter
Specifies
Exp Callback
Whether or not the MAX unit expects outgoing calls to result in a
callback from the far-end device. Use this parameter when the remote
device requires callback security.
Call Type
Type of connection. For example; Nailed, Switched, Nailed/MP+,
Perm/Switched, or D-channel.
Group, FT1 Caller, Data Svc, Force 56 parameters
The following parameters in Ethernet > Connections > Connection profile > IPX Options
define a group of nailed channels to a connection, whether the MAX unit initiates an
FT1-AIM, FT1-B&O, or Nailed/MPP call, the data service provided over a WAN line, and
whether the unit uses only the 56-kbps portion of a channel:
Parameter
Specifies
Group
Group of nailed channels to a connection. For connections whose call
type is Nailed/MPP, you can concatenate group numbers by separating
them with a comma; for example, Group=1,3,5,7 assigns four groups
of nailed channels.
FT1 Caller
Whether or not the MAX unit initiates an FT1-AIM, FT1-B&O, or
Nailed/MPP call, or whether it waits for the remote end to initiate
these types of calls. If the remote end has FT1 Caller set to No, set it to
Yes on the local unit; by the same token, if the remote end has FT1
Caller set to Yes, set it to No on the local unit.
Data Svc
A data service that is provided over a WAN line and is characterized
by the unit measure of its bandwidth. A data service can transmit
either data or digitized voice. In a Call profile, Connection profile,
X.25, or Frame Relay profile, Data Svc specifies the type of data
service the link uses. In a Dial Plan profile, Data Svc specifies the data
service associated with the number the unit dials under the extended
dial plan.
Force 56
Whether or not the unit uses only the 56-kbps portion of a channel,
even when all 64 kbps appear to be available.
Bill #, Call-by-Call, Transit #, NAS Port Type parameters
The following parameters in Ethernet > Connections > Connection profile > IPX Options
define the billing telephone number, the ability to route calls from a local device through the
MAX unit to the network, a transit number to transmit long-distance calls, whether the
Connection profile can be used to dial out, and what kinds of calls can be received:
MAX 6000/3000 Network Configuration Guide
4-39
Configuring Individual WAN Connections
The Connection profile
Parameter
Description
Bill #
Specifies a telephone number to be used for billing purposes. If a
number is specified, it is used either as a billing suffix or the callingparty number. For robbed-bit lines, the MAX unit uses the billing
number as a suffix appended to each telephone number it dials for the
call.
Call-by-Call
In a T1 Line profile, specifies the call-by-call signaling value to set for
routing calls from a local device through the unit to the network. When
it is set in another profile, this parameter specifies the PRI service to
use when placing a call using that profile. The Call-by-Call setting in
the Dial Plan profile overrides the Call-by-Call setting in the call and
Connection profiles.
Transit #
Specifies a string for use in the transit network IE for PRI calling when
using an Interexchange Carrier (IEC). The default (null) causes the
unit to use any available IEC for long-distance calls.
Dialout OK
Specifies whether or not the Connection profile can be used to dial out
using one of the unit’s digital modems.
NAS Port Type
Determines the type of calls that can be received—analog, digital or
any.
Accounting Options
The Ethernet > Connections > Connection profile > Accounting Options parameters that define
features for the accounting server and for accounting requests:
4-40
Parameter
Specifies
Acct Type
Whether or not to use a connection-specific accounting server for
accounting related to this link. The MAX unit logs information to the
accounting server specified in the Ethernet profile, the Connection
profile, or both.
Acct Host
IP address of a connection-specific accounting server to use for
information related to this link.
Acct Port
User Datagram Protocol (UDP) port number that the MAX unit uses in
accounting requests. This parameter applies in a Connection profile
only if the Acct Type parameter specifies that connection-specific
accounting information will be used.
Acct Timeout
Amount of time the unit waits for a response to a RADIUS accounting
request. You can set this parameter globally and for each connection.
Acct Key
RADIUS or TACACS+ shared secret. A shared secret acts like a
password between the unit and the accounting server. This parameter
applies in a Connection profile only if the Acct Type parameter
specifies that connection-specific accounting information will be used.
MAX 6000/3000 Network Configuration Guide
Configuring Individual WAN Connections
The Connection profile
Parameter
Specifies
Acct-ID Base
Whether or not the numeric base of the RADIUS Acct-Session-ID
attribute is 10 or 16. It controls how the Acct-Session-ID attribute is
presented to the accounting server; for example, a base-10 session ID
is presented as 1234567890, and a base-16 ID as 499602D2. You can
set this parameter globally and for each connection.
DHCP options
DHCP is a TCP/IP protocol that enables a client to obtain a temporary IP address from a
central server (known as a DHCP server). The Ethernet > Connections > Connection profile >
DHCP Options subprofile includes the following parameters that define DHCP servers, IP
address pools and dynamic addresses:
Parameter
Specifies
Reply Enabled
Whether the MAX unit processes DHCP packets and acts as a DHCP
server on this connection.
Pool Number
IP address pool to use to assign addresses to NAT clients.
Max Leases
Number of dynamic addresses to assign to NAT clients using this
connection. When NAT is used, an initial dynamic address is
automatically assigned via the PPP negotiations. This value can be
used to perform address translation for a single client on the LAN.
When additional clients attempt to route packets through this
connection, they must first be assigned their own dynamic addresses.
The Max Leases parameter restricts the number of addresses to be
given out through this connection, thus limiting the number of clients
on the remote LAN who can access the Internet.
Configuring a Connection profile
Following are the relevant parameters for specifying session time limits in a Connection
profile:
1
Open Ethernet > Connections > Connection profile > Session Options.
2
Set the Call Filter and Data Filter parameters to specify a number to apply to the
connection.
3
Set the Filter Persistence parameter to specify whether or not the filter or firewall assigned
to a Connection profile should persist after the call has been disconnected.
4
Set the Idle parameter to specify the number of seconds the MAX unit waits before
clearing a call when a session is inactive.
5
Set the TS Idle Mode parameter to specify whether or not the unit uses the terminal- server
idle timer and, if so, whether both the user and host must be idle before the unit
disconnects the session.
6
Set the TS Idle parameter to specify the number of seconds that a terminal-server
connection must be idle before the unit disconnects the session.
MAX 6000/3000 Network Configuration Guide
4-41
Configuring Individual WAN Connections
Configuring Names/Passwords profiles
7
Set the Max Call Duration parameter to specify the maximum duration in minutes of an
established session for an incoming call. The connection is checked once per minute, so
the actual time of the call will be slightly longer (usually less than a minute longer) than
the actual time you set.
8
Exit the profile and, at the exit prompt, select the exit and accept option.
Example of setting time limits
Ethernet
Connections
sarah
Session Options
Call Filter=
Data Filter=
Filter Persistence=No
Idle=120
TS Idle Mode=Input
TS Idle=120
Max Call Duration=9
Configuring Names/Passwords profiles
Names/Passwords profiles provide simple name and password authentication for incoming
calls. They are used only if authentication is required in the Answer profile by the Recv Auth
setting. In that case, the MAX unit prompts the dial-in user for a name and password, matches
the input to a Names/Passwords profile, accepts the call, and uses the settings in the Answer
profile or a specified Connection profile to build the connection.
To configure a Names/Passwords profile that uses the Answer profile settings:
1
Open a Ethernet > Names/Passwords > Names/Passwords profile.
2
Specify the user’s name and password, and activate the profile.
3
Leave Template Connection # set to 0 (zero) to use Answer profile settings.
4
Exit the profile and, at the exit prompt, select the exit and accept option.
Note: To set up a dial-in AppleTalk PPP connection using a Names/Passwords profile, you
also need to set the Peer parameter in the AppleTalk Options profile to Dialin.
Example of a Names/Passwords profile configuration
Ethernet
Names/Passwords
Claire
Name=Claire
Active=Yes
Recv PW=brianpw
Template Connection #=0
4-42
MAX 6000/3000 Network Configuration Guide
Configuring Individual WAN Connections
Configuring PPP connections
Configuring PPP connections
A PPP connection is a temporary WAN connection brought up by a remote device dialing into
the MAX. It is the most common type of WAN connection, and can be configured in a local
Connection profile or in RADIUS. The next sections contain examples of both types of
configuration.
A PPP connections can be one of the following types:
•
PPP—A single-channel connection to any remote device running PPP software.
•
Multilink PPP (MP)—A multilink connection to an MP-compliant device from any
vendor.
•
MP with Bandwidth Allocation Control Protocol (MP with BACP)—An MP call that uses
BACP to increase or decrease bandwidth on demand.
•
Multilink Protocol Plus (MP+)—A multilink connection, to another MAX unit that uses
dynamic bandwidth allocation (DBA) to increase or decrease bandwidth on demand.
Note: MP+ supersedes MPP.
A multilink connection begins by authenticating a base channel. If the connection allows
additional bandwidth, the local or remote unit dials another link. For example, if a dial-in
Lucent Pipeline unit has a single-channel session at 56 Kbps or 64 Kbps and multilink PPP is
configured, a second call can combine the first B channel with the second for a transmission
rate of 112 Kbps or 128 Kbps.
MAX units can be stacked to distribute the bandwidth required for connections across multiple
units (as described in “Configuring a Combinet connection” on page 4-91).
Note: If a connection configured for MP or MP+ fails to establish multiple channels, it falls
back to a single-channel PPP session. In either case, you can use the PPP parameters as part of
the connection negotiation. Use the MP, BACP, and MP+ settings in addition to the
single-channel PPP settings.
Example of a single-channel PPP connection
This section describes how to set the parameters used for establishing a single-channel PPP
call. Following are the related parameters (shown with sample settings):
Ethernet
Answer
Encaps
PPP=Yes
PPP Options
Route IP=Yes
Route IPX=Yes
Route AppleTalk=Yes
Bridge=Yes
Recv Auth=Either
MRU=1524
LQM=No
LQM Min=600
LQM Max=600
Link Comp=Stac
MAX 6000/3000 Network Configuration Guide
4-43
Configuring Individual WAN Connections
Configuring PPP connections
VJ Comp=Yes
CBCP Enable=No
BACP=
Dyn Alg=
Sec History=
Add Pers=
Sub Pers=
Target Util
Ethernet
Connections
Connection profile
Encaps=PPP
Encaps Options
Send Auth=None
Send Name=N/A
Send PW=N/A
Recv PW=
MRU=1524
LQM=No
LQM Min=600
LQM Max=600
Link Comp=Stac
VJ Comp=Yes
CBCP Mode=N/A
CBCP Trunk Group=N/A
Split Code.User=N/A
Settings in a RADIUS profile
RADIUS uses the following attribute-value pairs for PPP connections:
Attribute
Value
Password (2)
Password expected from the caller for a dial-in connection.
Service-Type (6)
Type of services the link can use. Set to Framed for dial-in PPP
connections that do not use a terminal-server login, or Login for
async PPP connections. If not specified, the service type is
unrestricted.
Framed-Protocol (7)
Encapsulation protocol. Set to PPP (1) to enable a user to dial in
with PPP framing or dial in unframed and then change to PPP
framing.
Framed-MTU (12)
Maximum number of bytes the MAX TNT can send in a single
packet (from 1 to 1524, default 1524).
Ascend-Link-Compressio Link-compression method to use.
n (233)
4-44
MAX 6000/3000 Network Configuration Guide
Configuring Individual WAN Connections
Configuring PPP connections
Example of a PPP connection
Figure 4-1 shows the MAX unit with a PPP connection to a remote user who is running
Windows 95 with a TCP/IP stack and PPP dialup software. The dial-in user has a modem, so
the call is asynchronous and uses only one channel.
Figure 4-1. A PPP connection
WAN
MAX
Modem
Windows95
with TCP/IP
and PPP
To configure this PPP connection:
1
Make sure the Answer profile enables PPP encapsulation and has the appropriate routing,
bridging, and authentication settings. For example:
Ethernet
Answer
Encaps
PPP=Yes
PPP Options
Route IP=Yes
Route IPX=Yes
Bridge=Yes
Recv Auth=Either
2
Exit the profile and, at the exit prompt, select the exit and accept option.
3
Open an Ethernet > Connections > Connection profile.
4
Specify the name of the remote device and activate the profile. For example:
Ethernet
Connections
tommy
Station=tommy
Active=Yes
Note: Make sure that you specify the Station name exactly, including case.
5
Select PPP encapsulation and set the appropriate PPP Options. For example:
Encaps=PPP
Encaps Options
Send Auth=CHAP
Send PW=remotepw/A
Recv PW=localpw
The Send Auth parameter should be set to CHAP or PAP. Both sides of the connection
must support the selected authentication protocol and the selected compression methods.
6
Exit the profile and, at the exit prompt, select the exit and accept option.
Following is a comparable RADIUS profile:
tommy Password = "localpw"
Service-Type = Framed-User,
MAX 6000/3000 Network Configuration Guide
4-45
Configuring Individual WAN Connections
Configuring MP, MP+ and BACP connections
Framed-Protocol = PPP,
Framed-IP-Address = 10.2.3.31,
Framed-IP-Netmask = 255.255.255.0
Enabling PPP dial-out for V.110 modems
The MAX unit can make outgoing calls to a V.110 terminal-adapter client by means of the PPP
protocol. This feature also supports the callback feature via V.110 for the MAXLink Client
software product. For information about enabling dial-out through the unit’s digital modems,
see “Configuring dial-out options” on page 4-89.
To enable PPP dial-out for V.110 modems:
1
Open the Connection profile configured for asynchronous PPP.
2
Open the Telco Options subprofile and specify the following data service:
Ethernet
Connections
Connection profile
Telco Options
Data Svc=v110 19.2 56K
3
Exit the profile and, at the exit prompt, select the exit and accept option.
In the Data Svc settings, V.110 is the V.110 indicator, which tells the unit to communicate with
a V.110 terminal adapter (through the V.110 modem).
In this case, the connection to the remote terminal adapter (TA) uses a bit rate of 19.2 Kbps
over a line using the Switched-56 data service. If the unit cannot sync up with the remote TA at
the specified bit rate, it attempts to use one of the other bit rates. (For more detailed
information about the Data Svc parameter, see the MAX Reference.)
Configuring MP, MP+ and BACP connections
MP uses the encapsulation defined in RFC 1717. It enables the MAX unit to interact with
MP-compliant equipment from other vendors to use multiple channels for a call. MP
parameters include the PPP parameters described in “PPP Options” on page 4-7. MP without
BACP requires setting a few additional parameters. If you use MP with BACP, you have to set
a greater number of additional parameters. Following are the additional parameters required
for MP without BACP:
Ethernet
Answer
Encaps
MP=Yes
PPP=Yes
PPP Options
Min Ch Count=1
Max Ch Count=1
Ethernet
Connections
Connection profile
Encaps=MP
4-46
MAX 6000/3000 Network Configuration Guide
Configuring Individual WAN Connections
Configuring MP, MP+ and BACP connections
Encaps Options
Base Ch Count=1
(The settings shown for MP and PPP are required. The others are examples.)
If BACP is enabled, MP connections use BACP to manage dynamic bandwidth on demand.
Both sides of the connection must support BACP. In addition to the PPP parameters, MP
connections with BACP use the following parameters:
Ethernet
Answer
Encaps
MP=Yes
PPP=Yes
PPP Options
BACP=Yes
Dyn Alg=Quadratic
Sec History=15
Add Pers=5
Sub Pers=10
Target Util
Min Ch Count=1
Max Ch Count=1
Target Util=70
Ethernet
Connections
Connection profile
Encaps=MP
Encaps Options
BACP=Yes
Base Ch Count=1
Min Ch Count=1
Max Ch Count=2
Inc Ch Count=1
Dec Ch Count=1
Dyn Alg=Quadratic
Sec History=15
Add Pers=5
Sub Pers=10
Target Util=70
(The settings shown for MP and PPP are required. The others are examples.)
The MP and BACP parameters
This section provides some background information about MP and BACP configuration. For
detailed information about each parameter, see the MAX Reference.
MP without BACP
For MP connections without BACP, you can specify the base channel count, which must be
greater than or equal to the minimum count and less than or equal to the maximum count
MAX 6000/3000 Network Configuration Guide
4-47
Configuring Individual WAN Connections
Configuring MP, MP+ and BACP connections
specified in the Answer profile. The base channel count specifies the number of channels to
use to establish the connection, and this number of channels remains fixed for the whole
session. You can ignore the rest of the parameters discussed in this section.
Enabling BACP for MP Connections
Enable BACP in the Answer profile and in the Connection profile for each connection that
should use it. Open the PPP Options subprofile from the Answer profile and set BACP to Yes.
Open the Encaps Options subprofile from the Connection profile and set BACP to Yes. Both
sides of the connection must support BACP.
Specifying channel counts
In a Connection profile’s Encaps Options subprofile, the base channel count specifies the
number of channels to use to establish the call. Inc Ch Count and Dec Ch Count specify the
number of channels the connection can add and subtract at one time, respectively. You can also
specify a maximum and minimum number of channels that can be allocated to the call. For
additional information, see Parallel Dial in the MAX Reference.
Dynamic algorithm for calculating bandwidth requirements
In an Encaps Options subprofile, the Dyn Alg parameter specifies an algorithm for calculating
ALU during the period specified, in seconds, by the Sec History parameter. Figure 4-2 shows
how the available algorithms weight usage samples.
Figure 4-2. Algorithms for weighing bandwidth usage samples
quadratic
weight
linear
constant
1
0
time
0
1800 sec.
Quadratic (the default) gives more weight to recent samples of bandwidth usage than to older
samples taken during the specified period. The weighting grows at a quadratic rate.
Linear gives more weight to recent samples of bandwidth usage than to older samples taken
during the specified period. The weighting grows at a linear rate.
Constant gives equal weight to all samples taken during the specified period.
Time period for calculating average line utilization
Sec History specifies a number of seconds to use as the basis for calculating ALU.
4-48
MAX 6000/3000 Network Configuration Guide
Configuring Individual WAN Connections
Configuring MP, MP+ and BACP connections
Target utilization
Target Util specifies a percentage of line utilization (default 70%) to use as a threshold when
determining when to add or subtract bandwidth.
Adding or dropping links (Add Pers, Sub Pers, Inc Ch Count, Dec Ch Count)
Add Pers specifies a number of seconds that the ALU must persist beyond the Target Util
threshold before the MAX unit adds bandwidth. Sub Pers specifies a number of seconds that
the ALU must persist below the Target Util threshold before the unit subtracts bandwidth.
When adding bandwidth, the unit adds the number of channels specified in the Inc Ch Count
parameter. When subtracting bandwidth, it subtracts the number of channels specified in the
Dec Ch Count parameter, dropping the newest channels first.
Guidelines for configuring bandwidth criteria
When configuring DBA, keep the following guidelines in mind:
•
The values for the Sec History, Add Pers, and Sub Pers parameters should smooth out
spikes in bandwidth utilization that last for a shorter time than it takes to add capacity.
Over T1 lines, the unit can add bandwidth in less than ten seconds. Over ISDN lines, the
unit can add bandwidth in less than five seconds.
•
When the unit adds bandwidth, you typically incur a minimum usage charge. Thereafter,
billing is time sensitive. The Sub Pers value should at least allow the period to which the
minimum duration charge applies, plus one or two billing time increments. Typically,
billing is done to the next multiple of six seconds, with a minimum charge for the first
thirty seconds. Your carrier representative can help you understand the billing structure for
the switched tariffs.
•
You can add channels one at a time or in multiples. (For additional information, see the
Parallel Dial parameter in the MAX Reference).
•
Avoid adding or subtracting channels too quickly (less than 10-20 seconds apart) to reduce
the number of short duration calls, each of which incurs the carrier's minimum charge.
Adding or subtracting channels too quickly can also affect link efficiency, because the
devices on either end have to retransmit data when the link speed changes.
Settings in a RADIUS profile
RADIUS uses the following attribute-value pairs for MP connections:
Attribute
Value
Framed-Protocol (7)
Encapsulation protocol. MP (262) indicates Multilink Protocol.
Ascend-Base-Channel-C Base number of channels to use for a multilink PPP connection.
When a call is received, the MAX authenticates the first (base)
ount (172)
channels of the call and then determines the maximum and
minimum settings.
Ascend-Minimum-Chann Minimum number of channels available to a multilink PPP
els (173)
connection. In this release, MP does not make use of this value.
However, it’s value can apply to MP+ connections.
MAX 6000/3000 Network Configuration Guide
4-49
Configuring Individual WAN Connections
Configuring MP, MP+ and BACP connections
Attribute
Value
Ascend-Maximum-Chan Maximum number of channels available to a multilink PPP
nels (235)
connection. In this release, MP does not make use this value.
However, it’s value does apply to MP+ connections.
Note: If a RADIUS profile does not specify
Ascend-Maximum-Channels, the default value of 1 prevents the
client from establishing a multichannel call.
Example of a MP connection without BACP
To configure an MP connection without BACP:
1
Open the Ethernet > Answer profile.
2
Enable PPP and MP encapsulation and specify the appropriate routing, bridging, and
authentication values. For example:
Ethernet
Answer
Encaps
PPP=Yes
MP=Yes
PPP Options
Route IP=Yes
Route IPX=Yes
Bridge=Yes
Recv Auth=Either
3
Exit the profile and, at the exit prompt, select the exit and accept option.
4
Open a Connection profile, specify the name of the remote device, and activate the profile.
For example:
Ethernet
Connections
fred
Station=fred
Active=Yes
5
Select MP encapsulation, and open the Encaps Options subprofile.
6
Configure PPP authentication. For example:
Encaps=MP
Encaps Options
Send Auth=PAP
Send PW=remotepw
Aux Send PW=N/A
Recv PW=localpw
7
Set the base channel count and maximum channel count. For example, to use two channels
for this call:
Base Ch Count=2
Max Ch Count=2
Note: Both sides of the connection should specify the same number of channels.
8
4-50
Exit the profile and, at the exit prompt, select the exit and accept option.
MAX 6000/3000 Network Configuration Guide
Configuring Individual WAN Connections
Configuring MP, MP+ and BACP connections
Following is a comparable RADIUS profile:
fred Password = "localpw"
Service-Type = Framed-User,
Framed-Protocol = MP,
Framed-IP-Address = 10.10.1.2,
Framed-IP-Netmask = 255.255.255.255,
Ascend-Base-Channel-Count = 2,
Ascend-Maximum-Channels = 2
Example of a MP connection with BACP
To configure a MP connection that uses BACP:
1
Open the Answer profile.
2
Enable PPP and MP encapsulation and specify the appropriate routing, bridging, and
authentication values. For example:
Ethernet
Answer
Encaps
MP=Yes
PPP=Yes
PPP Options
Route IP=Yes
Route IPX=Yes
Bridge=Yes
Recv Auth=Either
3
Enable BACP to monitor bandwidth requirements on the basis of received packets:
BACP=Yes
4
Exit the profile and, at the exit prompt, select the exit and accept option.
5
Open a Connection profile, specify the name of the remote device, and activate the profile.
For example:
Ethernet
Connections
chloe
Station=chloe
Active=Yes
6
Select MP encapsulation and set the MP authentication options. For example:
Encaps=MP
Encaps Options
Send Auth=PAP
Send PW=remotepw
Aux Send PW=N/A
Recv PW=localpw
7
Enable BACP to monitor bandwidth requirements for packets transmitted on this
connection, and configure the Lucent criteria for bandwidth management. For example:
BACP=Yes
Base Ch Count=1
Min Ch Count=1
Max Ch Count=2
Inc Ch Count=1
MAX 6000/3000 Network Configuration Guide
4-51
Configuring Individual WAN Connections
Configuring MP, MP+ and BACP connections
Dec Ch Count=1
Dyn Alg=Quadratic
Sec History=15
Add Pers=5
Sub Pers=10
Target Util=70
Note: For optimum performance, both sides of a connection must set the channel count
parameters to the same values.
8
Exit the profile and, at the exit prompt, select the exit and accept option.
Configuring Lucent MP+ connections
Multilink PPP Plus (MP+) uses PPP encapsulation with Lucent extensions. MP+ enables the
MAX unit to use multiple channels for connecting to another MAX unit. BACP is not required,
because the Lucent criteria for adding or dropping a link are part of the MP+ extensions. In
addition to the PPP and MP parameters described earlier, use the following parameters for
MP+ connections (shown with sample settings):
Ethernet
Answer
Encaps
PPP=Yes
MP=Yes
MPP=Yes
PPP Options
Dyn Alg=Quadratic
Sec History=15
Add Pers=5
Sub Pers=10
Target Util
Min Ch Count=1
Max Ch Count=1
Target Util=70
Idle Pct=0
Ethernet
Connections
Connection profile
Encaps=MPP
Encaps Options
Aux Send PW=aux-passwd
DBA Monitor=Transmit
Base Ch Count=1
Min Ch Count=1
Max Ch Count=2
Inc Ch Count=1
Dec Ch Count=1
Dyn Alg=Quadratic
Sec History=15
Add Pers=5
Sub Pers=10
4-52
MAX 6000/3000 Network Configuration Guide
Configuring Individual WAN Connections
Configuring MP, MP+ and BACP connections
Target Util=70
Idle Pct=0
The MP+ parameters
This section provides some background information about MP+ connections. For detailed
information about each parameter, see the MAX Reference.
Channel counts and bandwidth allocation parameters
BACP and MP+ use the same criteria for increasing or decreasing bandwidth for a connection.
For details about the bandwidth allocation parameters, see“The MP and BACP parameters” on
page 4-47 and “Guidelines for configuring bandwidth criteria” on page 4-49.
Auxiliary password for added channels
The Aux Send PW parameter can specify another password for authenticating subsequent links
as they are dialed. For details, see the MAX Security Supplement.
Bandwidth monitoring
In a Connection profile’s Encaps Options subprofile, the DBA Monitor parameter specifies
whether bandwidth criteria for adding or dropping links are applied to traffic received across
the link, transmitted across the link, or both. If you set DBA Monitor to None on both sides of
the link, you disable bandwidth on demand.
Settings in a RADIUS profile
A RADIUS user profile can specify the following attributes:
Attribute
Value
Framed-Protocol (7)
Encapsulation protocol. MPP (256) indicates an MP+ connection
with another Ascend unit.
Ascend-History-Weigh-T Algorithm for calculating average line utilization (ALU) over a
ype (239)
certain number of seconds.
Ascend-DBA-Monitor
(171)
Criteria for adding or subtracting bandwidth from the connection.
You can specify DBA-Transmit (0), DBA-Transmit-Recv (1), or
DBA-None (3). If both sides of the link have
Bandwidth-Monitor-Direction set to None, DBA is disabled.
Ascend-Inc-Channel-Cou Number of channels the MAX can add at one time, subject to the
setting of the Parallel-Dialing parameter in the System profile.
nt (236)
Ascend-Dec-Channel-Co Number of channels the MAX can subtract at one time, dropping
the newest channels first.
unt (237)
Ascend-Seconds-Of-Hist Number of seconds to use as the basis for calculating average line
ory (238)
utilization (ALU).
Ascend-Add-Seconds
(240)
MAX 6000/3000 Network Configuration Guide
Number of seconds for which ALU must persist beyond the
Target-Utilization threshold before the MAX adds bandwidth.
4-53
Configuring Individual WAN Connections
Configuring MP, MP+ and BACP connections
Attribute
Value
Ascend-Remove-Seconds Number of seconds for which the ALU must persist below the
Target-Utilization threshold before the unit subtracts bandwidth.
(241)
Ascend-Target-Util (234) Percentage of line utilization (default 70%) to use as a threshold
when determining when to add or subtract bandwidth.
Ascend-Maximum-Chan Maximum number of channels available to a multilink PPP
nels (235)
connection. In this release, MP does not make use this value.
However, it’s value does apply to MP+ connections.
Note: If a RADIUS profile does not specify Ascend-Maximum-Channels, the default value
of 1 prevents the client from establishing a multichannel call.
Example of MP+ configuration
Figure 4-3 shows the MAX unit connected to a remote Pipeline unit with an MP+ connection.
Figure 4-3. An MP+ connection
WAN
MAX
Pipeline 25
To configure an MP+ connection with a remote MAX unit:
1
Open the Answer profile.
2
Set PPP and MP+ encapsulation to Yes and specify the appropriate routing, bridging, and
authentication values. For example:
Ethernet
Answer
Encaps
MPP=Yes
PPP=Yes
PPP Options
Route IP=Yes
Route IPX=No
Bridge=No
Recv Auth=Either
3
Exit the profile and, at the exit prompt, select the exit and accept option.
4
Open a Connection profile, specify the name of the remote device, and activate the profile.
For example:
Ethernet
Connections
fiona
Station=fiona
Active=Yes
5
4-54
Select MP+ encapsulation and set the MP+ authentication options. For example:
MAX 6000/3000 Network Configuration Guide
Configuring Individual WAN Connections
Configuring MP, MP+ and BACP connections
Encaps=MPP
Encaps Options
Send Auth=PAP
Send PW=remotepw
Aux Send PW=secondpw
Recv PW=localpw
6
Configure the DBA Monitor and the Lucent criteria for bandwidth management. For
example:
Encaps Options
DBA Monitor=Transmit-Recv
Base Ch Count=1
Min Ch Count=1
Max Ch Count=5
Inc Ch Count=1
Dec Ch Count=1
Dyn Alg=Quadratic
Sec History=15
Add Pers=5
Sub Pers=10
Target Util=70
Idle Pct=0
Note: For optimum performance, both sides of a connection must set the Base Ch Count,
Min Ch Count, and Max Ch Count parameters to the same values.
7
Exit the profile and, at the exit prompt, select the exit and accept option.
Following is a comparable RADIUS profile:
fiona Password = "localpw"
Service-Type = Framed-User,
Framed-Protocol = MPP,
Framed-IP-Address = 10.10.10.64,
Framed-IP-Netmask = 255.255.255.0,
Ascend-Base-Channel-Count = 1,
Ascend-Maximum-Channels = 5,
Ascend-DBA-Monitor = DBA-Transmit-Recv,
Ascend-Seconds-Of-History = 15,
Ascend-Add-Seconds = 5,
Ascend-Remove-Seconds = 10
Ascend-Target-Util = 70
Note: The RADIUS profile must specify Ascend-Maximum-Channels, or the default value of
1 prevents the client from establishing a multichannel call.
Configuring a nailed/MP+ connection
A nailed/MP+ connection is a nailed connection that can add switched channels for increased
bandwidth. The MAX unit dials switched channels when it receives an outbound packet for the
far end and cannot forward it across the nailed connection, either because those channels are
down or because they are being fully utilized.
If both the nailed and switched channels in a nailed/MP+ connection are down, the connection
does not reestablish itself until the nailed channels are brought back up or you dial the switched
channels.
MAX 6000/3000 Network Configuration Guide
4-55
Configuring Individual WAN Connections
Configuring MP, MP+ and BACP connections
The maximum number of channels for the nailed/MP+ connection is either the Max Ch Count
setting or the number of nailed channels in the specified group, whichever is greater. If a nailed
channel fails, the unit replaces that channel with a switched channel, even if the call is online
with more than the minimum number of channels.
Note: If you modify a nailed/MP+ Connection profile, most changes become active only after
the call is brought down and then back up. However, if you add a group number (for example,
changing Group=1, 2 to Group=1, 2, 5) and save the modified profile, the unit adds the
additional channels to the connection without having to bring it down and back up.
Configuring a Connection profile
To configure a nailed/MP+ connection:
1
Configure an MP+ connection, as described in the preceding section.
2
Open the Telco Options subprofile of the Connection profile.
3
Specify that the MAX unit is the designated caller for the switched part of the connection.
Ethernet
Connections
Connection profile
Telco Options
AnsOrig=Call Only
FT1 Caller=Yes
Note: On the far end of the connection, set the AnsOrig and FT1 Caller parameters for
answering only. Note that the DO Hangup command only works from the caller end of the
connection.
4
Specify the Nailed/MP+ call type, and the group number(s) of its nailed channels. For
example:
Call Type=Nailed/MPP
Group=1,2
5
Exit the profile and, at the exit prompt, select the exit and accept option.
Settings in a RADIUS profile
The following RADIUS attribute-value pairs are relevant to nailed connections:
4-56
Attribute
Value
Ascend-Dial-Number
(227)
Number to dial out for this connection.
Ascend-Backup (176)
Name of a profile to use if the nailed connection goes down.
Ascend-Call-Type (177)
Type of nailed call. Set to Nailed (1) for nailed connections.
Ascend-Group (178)
Group numbers of the dedicated channels for the connection. You
can specify multiple groups by separating the numbers with
commas, in which case the bandwidth of the connection is an
aggregate of all specified groups. Nailed bandwidth cannot be
shared by other connections.
MAX 6000/3000 Network Configuration Guide
Configuring Individual WAN Connections
Configuring MP, MP+ and BACP connections
When you have created or modified a nailed profile in RADIUS, you must reload the
information from the RADIUS server. To request a reload of all nailed profiles (permanent
connections) from the RADIUS server, select the command Sys > Sys Diag > Upd Rem Cfg.
Spanning multichannel calls across a stack of units
If you configure multiple MAX units to form a stack, the multiple channels of an MP or MP+
call can span the units in the stack, as shown in Figure 4-4.
Figure 4-4. A MAX stack for spanning MP or MP+ calls
MAX
MAX
WAN
MAX
MAX
Call spanning with a stack configuration can be effective when:
•
A MAX unit running MP+ asks for another telephone number, and has no available lines.
•
A rotary hunt group uses the same telephone number to access multiple units, making it
impossible to assume that the same unit that answered the original call answers a
subsequent call.
MP/MP+ call spanning is protocol independent and works with all protocols supported by the
unit.
Note: Stacking requires any MP caller to use the MP endpoint discriminator. The same is true
of MP+. All Lucent products and most other products that support MP or MP+ use an endpoint
discriminator, but the specification for MP does not require it.
How MP/MP+ call spanning works
A stack is a group of MAX units that have the same stack information and are on the same
physical LAN. There is no master unit. The MAX units in the stack use a directed-broadcast
Ethernet packet to locate each other. Directed broadcast packets usually cannot cross a router,
so the units in a single stack must be on the same physical LAN. MAX units running in a stack
can generate fairly high levels of network traffic, which is another reason to keep them on the
same physical LAN.
Bundle ownership
Although MAX stacks do not have a master MAX unit, each bundle of channels in a MP/MP+
configuration has a bundle owner. The unit that answers the first call in the MP/MP+ bundle is
the bundle owner. If a bundle spans more than one unit in a stack, an exchange of information
flows between the units in the bundle.
MAX 6000/3000 Network Configuration Guide
4-57
Configuring Individual WAN Connections
Configuring MP, MP+ and BACP connections
Stacking requires an endpoint discriminator. Every MP/MP+ call that comes to any member of
the stack is compared to all existing MP/MP+ calls in the MAX stack to determine whether it
is a member of an existing bundle. If the call belongs to an existing bundle, the unit that
answered and the bundle owner exchange information about the bundle. Furthermore, the unit
that answered the call forwards all incoming data packets over the Ethernet to the bundle
owner.
Outgoing data
To balance the load among all available WAN channels, outgoing data packets for the WAN
are assigned to available channels in a bundle on a rotating basis. If the unit assigns an
outgoing packet to a channel that is not local to the bundle owner, the bundle owner forwards
the packet over the Ethernet to the unit that owns the nonlocal channel.
Real and stacked channels
For the purpose of this description, real channels are those channels that connect directly to the
MAX unit that owns the bundle. Stacked channels connect to a unit that transfers the data to or
from the unit that owns the bundle.
For example, assume the initial call through an MP/MP+ bundle connects to MAX #1. This
connection is a real channel. Next, the second call of the bundle connects to MAX #2. This
connection is a stacked channel. MAX #1 is the bundle owner, and it manages the traffic for
both channels of the bundle. MAX #2 forwards any traffic from the WAN to MAX #1, for
distribution to the destination, as shown in Figure 4-5.
Figure 4-5. Packet flow from the slave channel to the Ethernet
WAN
A
MAX #1
(master)
3
1
2
MAX #2
(slave)
Ethernet
Note: Figure 4-5 does not illustrate traffic from the master MAX unit. WAN traffic received
on the master channel by MAX #1 is forwarded directly to the destination.
Likewise, MAX #1 receives all Ethernet traffic destined for the bundle, and disperses the
packets between itself and MAX #2, as shown in Figure 4-6. MAX #1 forwards some of the
packets across the WAN through a real channel. MAX #2 sends the rest of them through a
stacked channel.
4-58
MAX 6000/3000 Network Configuration Guide
Configuring Individual WAN Connections
Configuring MP, MP+ and BACP connections
Figure 4-6. Packet flow from the Ethernet
WAN
MAX #1
(master)
A
1
1
64K
3
2
64K
MAX #2
(slave)
Ethernet
10Mbps
Connection profiles within a stack
A stack does not support sharing of local Connection profiles between the MAX units in the
stack. Every MAX unit that is set up to use internal authentication must retain all
authentication information for every call. You can eliminate this requirement by using a
centralized authentication server, such as RADIUS.
Telephone numbers for new MP+ and MP-with-BACP channels
When a MAX unit has to add a channel for an MP+ or MP-with-BACP call, it provides a local
telephone number for the new channel. However, sometimes the unit that answers the call
cannot provide a local telephone number for the additional channel because all the channels
that connect directly to it are busy. In that case, the unit requests other members of the stack to
supply a telephone number for the additional channel.
An MP call does not pass telephone numbers when it adds a channel. If each unit in the stack is
accessed through a different telephone number, the originator of the call must know all of the
possible telephone numbers. An alternative in this instance is to use BACP or MP+ to obtain
the telephone number from a unit with a free channel.
Performance considerations for MAX stacking
There is no limit to the number of stacked channels in single call or in a stack of MAX units,
other than the limit for each individual unit. The MAX 6000 and the MAX 3000 units support
up to 40 stacked channels. A unit that can handle n real channels can handle n/3 stacked
channels.
There is no theoretical limit to the number of MAX units in a stack, other than performance
considerations. Because all data from stacked channels crosses the LAN, performance could
suffer with a large number of MAX units in the stack and many stacked channels in use.
Performance overhead increases when stacked bundles span multiple boxes. In a bundle of six
channels, four of which are real and two are stacked, the overhead is the actual bandwidth of
the two stacked channels (2 x 64=128K). The actual payload data of the six channels with 2:1
data compression is 6 x 2 x 64=768K. The overhead is 128 over 768, or 16%. In a two-channel
bundle with one real and one stacked channel, with the same compression, the overhead is
25%.
MAX 6000/3000 Network Configuration Guide
4-59
Configuring Individual WAN Connections
Configuring MP, MP+ and BACP connections
Take into account that you do not know ahead of time how many bundles span the stack, or
how many multi- or single-channel calls you are going to get. You can base an estimate on
your traffic expectations. But in most situations, the majority of bundles are on a single unit,
for which there is no overhead.
Suggested LAN configurations
Total Ethernet usage is approximately 5116Kbps for a MAX stack handling 82 single-channel
calls, 41 two-channel stacked calls, and 41 two-channel nonstacked calls. Because Ethernet
capacity generally does not achieve more than 50% utilization, this configuration uses up the
available Ethernet bandwidth.
The total number of channels in this configuration is 246. Therefore, a stack of three MAX
units, each having three T1 lines with this usage profile, uses all of the Ethernet bandwidth.
The basic limitation from the above examples is the speed of the LAN. One way to increase the
speed of your LAN is to attach each unit to a separate port of a 10/100 Ethernet switch, and
then use a 100Mbps connection to the backbone LAN. This configuration enables each unit to
use up to a full 10Mbps of Ethernet bandwidth, and the entire stack combined can generate up
to a full 100Mbps of Ethernet data. Once again assuming that the 100Mbps is saturated at 50%
usage, you can use up to 51200Kbps of bandwidth, or 10 times more than in the preceding
example. The mixed environment of single-channel and two-channel calls now results in a
maximum of 2460 channels or 102 T1 lines, or no more than 34 MAX units in a stack. Note
that the success of this strategy depends on limiting stacked channels per MAX unit to the n/3
limit mentioned above.
Suggested hunt group configurations
Whenever you stack MAX units, it is important to limit the number of multichannel calls that
are split between them. The following suggested configurations reduce the overhead for a
multichannel call by keeping as many channels as possible on the same unit.
MP+ and MP-with-BACP calls
Figure 4-7 shows the suggested hunt group setup for a typical MAX stack that receives only
PPP, MP+, or MP-with-BACP calls. Each MAX unit has three T1 lines. All the T1 lines in a
MAX unit share a common telephone number and they are in a hunt group that does not span
MAX units. The illustration shows these three local hunt groups with telephone numbers
555-1212, 555-1213, and 555-1214. In addition, a global hunt group, 555-1215, spans all the
T1s of all the MAX units in the stack.
Users that access the MAX unit dial 555-1215, the global hunt group number. The telephone
company sets up the global hunt group to distribute incoming calls equally among the MAX
units. Namely, the first call dialing 555-1215 goes to MAX #1, the second call to MAX #2, and
so on. If you use this configuration, you must configure each of the MAX unit’s Line N
profiles with the local hunt group numbers. For example, for MAX #1 in Figure 4-7, you
would set the Ch N # parameters to 12 (the last two digits of the 555-1212 hunt group number).
You can achieve the same distribution without a global hunt group by having one third of the
users dial 555-1212, one third dial 555-1213, and one third dial 555-1214. You can leave the
Ch N # parameters at their default setting (null) if you do not have a global hunt group.
4-60
MAX 6000/3000 Network Configuration Guide
Configuring Individual WAN Connections
Configuring MP, MP+ and BACP connections
Figure 4-7. Hunt groups for a MAX stack handling both MP and MP+ calls
Three T1 lines, all in 555-1212
and 555-1215 hunt groups
Three T1 lines, all in 555-1213
and 555-1215 hunt groups
MAX #1
MAX #2
MAX #3
Three T1 lines, all in 555-1214
and 555-1215 hunt groups
In Figure 4-7, suppose an MP+ call is connected to MAX #1. When that call needs to add a
channel, it requests an add-on number from the MAX unit, and the unit returns 12 (for
555-1212) as long as a channel in the local T1 lines is available. That is, the bundle does not
span multiple MAX units as long as a channel is available in the local hunt group.
The Figure 4-7 configuration tends to break down if MAX units receive MP-without-BACP
calls. Spreading the calls across the MAX stack (by dialing the global hunt group) results in the
worst possible performance, because MP without BACP must know all of the telephone
numbers before the caller places the first call.
MP-without-BACP calls
Figure 4-8 shows a site that supports only MP-without-BACP calls. For this site, the telephone
company has set up a global hunt group that first completely fills MAX #1, then continues to
MAX #2, and so on. This arrangement tends to keep the channels of a call from being split
across multiple MAX units, keeping overhead low.
Figure 4-8. Hunt groups for a MAX stack handling only MP-without-BACP calls
MAX #1
Three T1 lines, all in 555-1212 hunt group
Three T1 lines, all in 555-1212 hunt group MAX #2
MAX #3
Three T1 lines, all in 555-1212 hunt group
MP+ calls and MP calls with or without BACP
For a MAX unit that receives MP+ calls and MP calls with or without BACP, you can use a
configuration similar to the one shown in Figure 4-8. In this case, however, you set up the
global hunt group differently than explained in “MP+ and MP-with-BACP calls.” You set up
the global hunt group to help prevent MP-without-BACP calls from being split across multiple
MAX 6000/3000 Network Configuration Guide
4-61
Configuring Individual WAN Connections
Configuring MP, MP+ and BACP connections
MAX units in the stack. As in “MP without BACP” on page 4-47 calls dialing 555-1215 first
completely fill the channels of MAX #1, then continue to MAX #2, and so on.
Both MP+ and MP callers dial the global hunt group number to connect to the stack.
MP+ and MP-with-BACP callers do not have to dial the global hunt group numbers to connect.
Only the MP-without-BACP callers need to dial the global hunt group. You can achieve an
even distribution of MP+ and MP-with-BACP calls by having one third dial 555-1212, one
third dial 555-1213, and one third dial 555-1214. You can leave the Ch N # parameters at their
default setting (null) in this situation.
The stacking parameters
This section provides some background information about the stack parameters that appear in
Ethernet > Mod Config > Stack Options:
Parameter
Description
Stacking Enabled
Enables the MAX unit to communicate with other members of the
same stack. A unit can belong to only one stack. All members of the
stack use the same stack name and UDP port.
Stack Name
Specifies a stack name. Add a MAX unit to an existing stack by
specifying that name. Create a new stack by specifying a new stack
name.
Stacked MAX units communicate with other members of the stack by
using a directed-broadcast Ethernet packet on the specified UDP port.
Because directed-broadcast packets are unlikely to cross a router, and
because of the high traffic demands created by a multilink call that
spans MAX units, all members of a stack must reside on the same
physical LAN.
A valid, class D address, which enables IP multicasting in a
stacked-MAX environment.
UDP Port
Multicast Addr
For complete details about each parameter, see the MAX Reference.
Configuring a MAX stack
This section shows how to configure a stack of two MAX units. It does not show the details of
configuring hunt groups, which is an important factor for stacked MP connection. For details
about hunt groups, see Chapter 3, “Configuring WAN Access.”
To configure a MAX stack, proceed as follows for each MAX in the stack:
1
Open the Ethernet > Mod Config menu and select Stack Options. For example:
Ethernet
Mod Config
RADIUS Server
Log
ATMP
Modem Ringback=Yes
AppleTalk
SNTP Server
4-62
MAX 6000/3000 Network Configuration Guide
Configuring Individual WAN Connections
Configuring bidirectional CHAP support
Stack Options
UDP Checksum=No
When you press Enter, the Ethernet > Mod Config > Stack Options subprofile appears. For
example:
Ethernet
Mod Config
Stack Options
Stacking Enabled=Yes
Stack Name=maxstack-1
UDP Port=6000
Multicast Addr=
2
Set the Stacking Enabled parameter to Yes.
3
Set the Stack Name parameter to a unique name for the stack.
A stack name has 16 characters or less. This is the name members of a stack use to identify
other members of the same stack. The stack name must be unique among all MAX units
that communicate with each other, even if they are not on the same LAN.
If a MAX unit receives calls from two units on different LANs, and the two units are
members of different stacks with the same stack name, the unit receiving the calls assumes
the two MAX units with the same stack name are in the same bundle.
Note: Multiple stacks can exist on the same physical Ethernet LAN if the stacks have
different names.
4
Specify the UDP port parameter.
This is a reserved UDP port for intrastack communications. The UDP port must be
identical for all members of a stack, but is not required to be unique among all stacks.
5
Exit the profile and, at the exit prompt, select the exit and accept option.
Disabling a MAX stack
To disable a stack, specify Stacking Enabled=No for each of the MAX units in the stack.
Adding and removing a MAX
You can add a MAX unit to an existing stack at any time without rebooting the unit or affecting
stack operation. Because a stack is a collection of peers, none keeps a list of the stack
membership. The units in a stack communicate when they need a service from the stack.
Removing a unit from a stack requires care, because any calls using a channel between the unit
to be removed and another unit in the stack could be dropped. There is no need to reboot a unit
removed from a stack.
Configuring bidirectional CHAP support
You can set up bidirectional CHAP authentication between the calling PPP device and the
called PPP device. The bidirectional CHAP feature increases compliance with the RFC 1994
standard for PPP CHAP authentication. Note that the feature is not implemented for
PAP-based authentication (PAP, PAP-TOKEN, or PAP-TOKEN-CHAP).
MAX 6000/3000 Network Configuration Guide
4-63
Configuring Individual WAN Connections
Configuring bidirectional CHAP support
For incoming calls, the MAX first challenges the caller for its username and password, then the
MAX compares the username and password to those in Connection profiles or RADIUS
profiles. A user can have either a Connection profile defined or a RADIUS profile defined, but
not both. For outgoing calls, the MAX dials the called device and it is the caller’s
responsibility to challenge the MAX for authentication.
Configuring bidirectional CHAP on the MAX unit
Set up the directional CHAP for all or selected incoming calls and for outgoing calls. For
authentication of incoming calls, the MAX sends its system name unless you specify a
different name.
Setting up bidirectional CHAP on the MAX unit for all incoming calls
Figure 4-9 shows a configuration in which a MAX unit and its dial-in clients authenticate each
other by means of bidirectional CHAP. One or more clients can dial into the MAX unit. The
MAX unit authenticates the calling device by means of a Connection profile, and each dial-in
client authenticates the MAX unit by means of the Send PW value.
Figure 4-9. Bidirectional CHAP for all incoming calls to the MAX unit
Recv PW sent
Pipeline unit
WAN
MAX unit
Send PW sent
Dial-in clients
To configure bidirectional CHAP on the MAX unit for all incoming calls, proceed as follows:
1
Open the Ethernet > Answer > PPP Options submenu.
2
Set the Receive Auth parameter to Either, CHAP, or MS-CHAP.
3
Set the Bi-Dir Auth parameter to Required or Allowed. Required specifies that
bidirectional authentication must be carried out or the call is dropped. Allowed specifies
that authentication can be bidirectional. The MAX unit identifies the calling device, and
the calling device can identify the MAX unit, but the calling device need not do so for the
call to be accepted.
4
Exit the profile and, at the exit prompt, select the exit and accept option.
5
For each incoming call, open a Ethernet > Connections > Connection profile > Encaps
Options subprofile.
6
Set the Send PW parameter to any text string. The password you specify is the one sent to
the calling unit during the authentication initiated by the calling unit.
7
Set the Recv PW parameter to any text string. The password you specify is the one sent by
the calling unit during the authentication initiated by the MAX unit.
8
Exit the profile and, at the exit prompt, select the exit and accept option.
Note: When you set the Recv-Auth parameter to Any, the MAX unit can accept both PAP and
CHAP authentication. The Bi-Dir Auth setting will be used only if a form of CHAP
authentication has been negotiated during LCP negotiation. If any form of PAP authentication
4-64
MAX 6000/3000 Network Configuration Guide
Configuring Individual WAN Connections
Configuring bidirectional CHAP support
has been negotiated, and Bi-Dir Auth is set to Required, the authentication takes place in only
one direction. The calling unit authenticates the MAX unit.
Setting up bidirectional CHAP on the MAX unit for selected incoming calls
Figure 4-10 shows a configuration in which the MAX unit authenticates the calling device by
means of CLID or DNIS authentication. The MAX unit and the dial-in client then authenticate
each other by means of CHAP.
Figure 4-10. Bidirectional CHAP for selected calls to the MAX unit
Recv PW sent
Pipeline unit
WAN
MAX unit
Dial-in client
Louie
Send PW sent
To configure selective bidirectional CHAP on the MAX unit for selected incoming calls,
proceed as follows:
1
Open the Ethernet > Answer profile.
2
Set the Profile Reqd parameter to Yes.
3
Set the Id Auth parameter to Prefer, Require, Called Require, Called Prefer, or Called
First.
4
Open the PPP Options subprofile.
5
Set the Bi-Dir Auth parameter to None or Allowed.
6
Exit the profile and, at the exit prompt, select the exit and accept option.
7
Open the Ethernet > Connections > Connection profile for which you want to set up
bidirectional CHAP.
8
If you are using CLID authentication, set the Calling # parameter to CLID.
9
If you are using DNIS authentication, set the Called # parameter to the number the calling
party dials.
10 Open the PPP Options subprofile.
11 Set the Send Auth parameter to CHAP. This value indicates the mode for both incoming
and outgoing authentication.
12 Set the Bi-Dir Auth parameter to Required or Allowed. Required specifies that
bidirectional authentication must be carried out or the call is dropped. Allowed specifies
that authentication can be bidirectional. The MAX unit identifies the calling device, and
the calling device can identify the MAX unit, but the calling device need not do so for the
call to be accepted.
13 Open the Encaps Options subprofile.
14 Set Send PW to any text string. The password you specify is the one sent to the calling
unit during the authentication initiated by the calling unit.
15 Set Recv PW to any text string. The password you specify is the one sent by the calling
unit during the authentication initiated by the MAX unit.
MAX 6000/3000 Network Configuration Guide
4-65
Configuring Individual WAN Connections
Configuring bidirectional CHAP support
16 Exit the profile and, at the exit prompt, select the exit and accept option.
Setting up bidirectional CHAP on the MAX unit for outgoing calls
To set up bidirectional CHAP on the MAX unit for outgoing calls, proceed as follows:
1
Open the dialout Connections > PPP Options subprofile.
2
Set the Send Auth parameter to CHAP, MS-CHAP, or Cache-Token. If you specify any
other mode, bidirectional authentication does not take place, even if Bi-Dir Auth is set to
Allowed or Required.
3
Set the Bi-Dir Auth parameter to Required or Allowed. Required specifies that
bidirectional authentication must be carried out or the call is dropped. Allowed specifies
that authentication can be bidirectional. The MAX unit identifies the called device, and
the called device can identify the MAX unit, but the called device need not do so for the
call to be accepted.
4
Set the Send PW parameter to a text string specifying the password sent to the called
device during the authentication initiated by the MAX unit.
5
Set the Recv PW parameter to a text string specifying the password sent by the called unit
during the authentication initiated by the called unit.
6
Set the Recv Name parameter to a text string. The MAX compares the called party’s name
against the value you specify. If the called party’s name is different, the MAX tears down
the call. If you do not specify a value for Recv Name, the called party’s name is compared
against the dialout profile name.
7
Exit the profile and, at the exit prompt, select the exit and accept option.
Setting alternative name for CHAP authentication
For incoming and outgoing calls, the MAX unit uses CHAP authentication. The MAX unit
uses the system name (System > Sys Config > Name) during CHAP authentication.
Alternatively, you can set the Send Name parameter, in Ethernet Answer > PPP Options, to
specify a name to be used during CHAP authentication. If you set the Send Name parameter,
the MAX ignores the value of the System > Sys Config > Name parameter.
Configuring bidirectional CHAP in RADIUS
The following sections describe how to configure bidirectional CHAP in RADIUS. You can
use one of the following configurations:
•
Setting up bidirectional CHAP for incoming calls
•
Setting up bidirectional CHAP for outgoing calls
•
Setting up selective bidirectional CHAP with callback
•
Setting up bidirectional CHAP for double RADIUS lookups in multiprovider networks
Setting up bidirectional CHAP in RADIUS for incoming calls
You can configure selective bidirectional authentication by using CLID or DNIS
pre-authentication in a pseudo-user profile, and then specifying two passwords in the user
profile.
4-66
MAX 6000/3000 Network Configuration Guide
Configuring Individual WAN Connections
Configuring bidirectional CHAP support
In the pseudo-user profile, specify CLID or DNIS authentication, and then set the
Ascend-Bi-Directional-Auth attribute to Bi-Directional-Auth-Allowed or
Bi-Directional-Auth-Required:
•
Bi-Directional-Auth-Allowed specifies that authentication can be bidirectional. The MAX
unit identifies the calling device. The system also allows the calling device to authenticate
the MAX unit, but this authentication is not mandatory. Therefore, if the calling device
does not authenticate the MAX unit, the MAX unit can still accept the call.
•
Bi-Directional-Auth-Required specifies that authentication must be bidirectional.
In the following pseudo-user profile, bidirectional authentication is required:
111886067 User-Password="Ascend-CLID", Service-Type=Framed-User
Ascend-Require-Auth=Require-Auth,
Ascend-Auth-Type=Auth-CHAP,
Ascend-Send-Auth=Send-Auth-CHAP,
Ascend-Bi-Directional-Auth=Bi-Directional-Auth-Required
In the user profile, Ascend-Send-Secret is set to the password sent to the called device during
the authentication initiated by the MAX unit:
Mike1
User-Password="passin"
Service-Type=Framed-User,
Ascend-Send-Secret="passout",
Framed-Protocol=PPP,
Framed-Address=111.5.1.1,
Framed-Netmask=255.255.255.255,
Ascend-Data-Svc=Switched-64K,
Ascend-Route-IP=Route-IP-Yes
Note that the Answer or Answer-Defaults profile must contain the desired bidirectional
authentication mode (None, Required, or Allowed). If CLID or DNIS pre-authentication is not
in use, the pseudo-user profile must be suppressed, and the second-tier user profile must
contain the Ascend-Bi-Directional-Auth attribute.
Setting up bidirectional CHAP in RADIUS for outgoing calls
To configure a RADIUS dialout profile that makes use of bidirectional authentication, proceed
as follows:
1
Set the User-Name parameter to the name of the called party, and User-Password to
ascend.
2
Set the Ascend-Send-Auth parameter to Send-Auth-CHAP.
3
Set the Ascend-Send-Secret parameter to the text of the secret sent to the called device.
4
Set the Ascend-Receive Secret parameter to the text of the secret received from the called
device.
5
Set the Ascend-Bi-Directional-Auth parameter to Bi-Directional-Auth-Allowed or
Bi-Directional-Auth-Required.
6
Set the Ascend-Recv-Name parameter to the name of the called party.
For example:
MAX 6000/3000 Network Configuration Guide
4-67
Configuring Individual WAN Connections
Configuring bidirectional CHAP support
Mike1-out
User-Password="ascend" Service-Type=Outbound-User,
User-Name="Mike1",
Framed-Protocol=PPP,
Framed-IP-Address=111.5.1.1,
Framed-IP-Netmask=255.255.255.0,
Ascend-Dial-Number=90492386067,
Ascend-Data-Svc=Switched-64K,
Ascend-Send-Auth=Send-Auth-CHAP,
Ascend-Send-Secret="passout",
Ascend-Receive-Secret="passin",
Ascend-Bi-Directional-Auth=Bi-Directional-Auth-Required
Ascend-Route-IP=1
route-tnt-pat-1 User-Password="ascend", Service-Type=Outbound-User
Framed-Route="111.5.1.0/30 111.5.1.1 1 n Mike1-out"
Setting up selective bidirectional CHAP with callback
To configure bidirectional CHAP with callback, proceed as follows:
•
Create a first-tier pseudo-user profile.
•
Create a second-tier user profile.
In the first-tier pseudo-user profile, proceed as follows:
1
Set the User-Name parameter to the name of the called party, and User-Password to
ascend.
2
Set the Ascend-Require-Auth parameter to Require-Auth.
3
Set the Ascend-Send-Auth parameter to Send-Auth-CHAP.
4
Set the Ascend-Bi-Directional-Auth parameter to Bi-Directional-Auth-Allowed or
Bi-Directional-Auth-Required.
In the second-tier user profile, proceed as follows:
1
Set the Ascend-Send-Auth parameter to Send-Auth-CHAP.
2
Set the Ascend-Bi-Directional-Auth parameter to Bi-Directional-Auth-Allowed or
Bi-Directional-Auth-Required.
3
Set the Ascend-Callback parameter to Callback-Yes.
For a global bidirectional CHAP callback, the first-tier pseudo-user profile must be
suppressed. The following example shows the configuration required for callback. In the
first-tier pseudo-user profile, bidirectional authentication is selectively determined during
DNIS pre-authentication, and the system performs bidirectional authentication for both
incoming and outgoing calls. The second-tier user profile is configured for bidirectional CHAP
with callback.
8940
Mike1_cb
4-68
User-Password="Ascend-DNIS", Service-Type=Outbound-User
Ascend-Require-Auth=Require-Auth,
Ascend-Auth-Type=Auth-CHAP,
Ascend-Send-Auth=Send-Auth-CHAP,
Ascend-Bi-Directional-Auth=Bi-Directional-Auth-Required
User-Password="passin", Service-Type=Framed-User,
Ascend-Send-Secret="pass",
Framed-Protocol=MP,
MAX 6000/3000 Network Configuration Guide
Configuring Individual WAN Connections
Configuring bidirectional CHAP support
Ascend-Base-Channel-Count=2,
Ascend-Minimum-Channels=1,
Ascend-Maximum-Channels=2,
Framed-Address=111.5.1.1,
Framed-Netmask=255.255.255.255,
Ascend-Dial-Number=90492386067,
Ascend-Data-Svc=Switched-64K,
Ascend-Send-Auth=Send-Auth-CHAP,
Ascend-Bi-Directional-Auth=Bi-Directional-Auth-Required,
Ascend-Callback=Callback-Yes,
Ascend-Callback-Delay=10,
Ascend-Route-IP=1
Setting up an outgoing call with double RADIUS lookups
This section discusses the following:
•
The circumstances under which you might use double RADIUS lookups.
•
The procedure for setting up RADIUS lookups.
•
The message sequence during RADIUS lookups.
Using double RADIUS lookups in multiprovider networks
In larger networks, several ISPs may be hosted on a single physical network. Each ISP
typically has its own RADIUS server, while the network provider uses a proxy RADIUS
server. The MAX unit interacts only with the proxy RADIUS server. The proxy server can
answer some requests locally, and forward other requests to the RADIUS server of an ISP.
Typically, an ISP requires that all of its users be authenticated by its own RADIUS server, and
not by the network provider’s equipment.
MAX 6000/3000 Network Configuration Guide
4-69
Configuring Individual WAN Connections
Configuring bidirectional CHAP support
Consider the network in Figure 4-11:
Figure 4-11. Multiprovider network
Ethernet
PRI
PSTN
BRI
Pipeline unit
MAX unit
Proxy
RADIUS
ISP #1
RADIUS
server #1
ISP #2
RADIUS
server #2
ISP #3
RADIUS
server #3
During an outgoing call with bidirectional authentication, the MAX unit first recovers the
dialout profile. Once the call is brought up, the MAX unit needs to authenticate the called
party, in this case a Pipeline unit. The authentication decision must be made by the ISP’s
RADIUS server, requiring a second RADIUS lookup.
How to configure double RADIUS lookups
When you set up double RADIUS lookups, the dialout profile is split into two profiles—the
first-tier dialout profile and the second-tier user profile. The dialout profile contains all dialout
parameters needed to establish the outgoing call, and the user profile contains information for
authenticating the called device.
Consider the following first-tier dialout profile, configured for bidirectional CHAP
authentication:
pipe-pat-outUser-Password="ascend"
Service-Type=Outbound-User,
Framed-Protocol=PPP,
Framed-IP-Address=10.4.8.8,
4-70
MAX 6000/3000 Network Configuration Guide
Configuring Individual WAN Connections
Configuring bidirectional CHAP support
Framed-IP-Netmask=255.255.255.0,
Ascend-Dial-Number=90492386067,
Ascend-Data-Svc=Switched-64K,
Ascend-Send-Auth=Send-Auth-CHAP,
Ascend-Send-Secret="passin",
Ascend-Bi-Directional-Auth=Bi-Directional-Auth-Required,
Ascend-Recv-Name="pipe-pat",
Ascend-Route-IP=1
To enforce the second RADIUS lookup, the dialout profile name (pipe-pat-out in this
example) must be different from the name of the called device in the user profile. The
Ascend-Recv-Name attribute specifies the name of the called device, in this case pipe-pat.
In the following second-tier user profile, called party’s name is pipe-pat and the
receive-password is pass.
pipe-patUser-Password="pass"
Service-Type=Outbound-User,
Ascend-Route-IP=1"
You can disable the double RADIUS lookup by naming the dialout profile with the peer’s
name and by omitting the Ascend-Recv-Name attribute. Use the User-Name attribute to
rename the profile (in this case to pipe-pat):
pipe-pat-outUser-Password="ascend"
User-Name="pipe-pat",
Service-Type=Outbound-User,
Framed-Protocol=PPP,
Framed-IP-Address=10.4.8.8,
Framed-IP-Netmask=255.255.255.0,
Ascend-Dial-Number=90492386067,
Ascend-Data-Svc=Switched-64K,
Ascend-Send-Auth=Send-Auth-CHAP,
Ascend-Send-Secret="passin",
Ascend-Bi-Directional-Auth=Bi-Directional-Auth-Required,
Ascend-Receive-Secret="pass",
Ascend-Route-IP=1
Message sequence during an outgoing call using two RADIUS lookups
A call using two RADIUS lookups passes through the follow messaging sequence:
1
The MAX unit requests a dialout profile from RADIUS.
2
RADIUS sends the dialout profile to the MAX unit.
3
The MAX unit makes an ISDN call to the remote device.
4
The ISDN call is connected.
5
The MAX unit and the called party perform LCP exchanges.
6
The called party sends a challenge request to the MAX unit.
7
The MAX unit responds with a challenge response.
8
The called party informs the MAX unit about whether the first level of authentication has
been successful.
MAX 6000/3000 Network Configuration Guide
4-71
Configuring Individual WAN Connections
Enhanced support for MS-CHAP
9
If the first authentication was successful, the MAX unit sends a challenge request to the
called party.
10 The called party responds with a challenge response.
11 The MAX unit sends the authentication request to RADIUS, which performs the second
lookup.
12 The RADIUS server informs the MAX unit about whether the authentication was
successful.
13 If the authentication was successful, the MAX unit informs the called party that it has been
authenticated.
For detailed information about each attribute, see the TAOS RADIUS Guide and Reference.
Enhanced support for MS-CHAP
Support for the LAN Manager version of MS-CHAP enables you to specify MS-CHAP
authentication in RADIUS.
LAN Manager MS-CHAP support
LAN Manager and Windows 95 support a DES-based form of MS-CHAP. In the past, the
MAX unit was unable to support this form of authentication because it lacked knowledge of
the key used in password encryption. The MAX unit provides a key for encrypting passwords
by means of DES.
RADIUS support for MS-CHAP
RFC 2548 defines the VSA attributes necessary for supporting MS-CHAP authentication by
means of RADIUS. Two new VSA attributes are supported:
•
MS-CHAP-Challenge
•
MS-CHAP-Response
For detailed information about each attribute, see the TAOS RADIUS Guide and Reference.
Configuring dial-in PPP for AppleTalk
You can configure a MAX unit so that individual users can dial into an AppleTalk network by
using a PPP dialer, such as AppleTalk Remote Access 3.0 or Pacer PPP. The MAX unit does
not need to be set up as an AppleTalk router to support dial-in PPP to AppleTalk.
You can set up a unit to enable an AppleTalk client to dial in using PPP in two ways:
4-72
•
With a Connection profile
•
With a Names/Passwords profile
MAX 6000/3000 Network Configuration Guide
Configuring Individual WAN Connections
Configuring dial-in PPP for AppleTalk
Configuring an AppleTalk PPP connection with a Connection profile
To use a Connection profile to configure an AppleTalk PPP connection:
1
Open the Ethernet > Mod Config subprofile.
2
Set the Appletalk parameter to Yes.
3
Open the appropriate Connection profile.
4
Set the Route Appletalk parameter to Yes.
5
Open the AppleTalk Options subprofile.
90-103 apple
AppleTalk Options
Peer=Dialin
Zone Name=N/A
Net Start=N/A
Net End=N/A
6
Set the Peer parameter to indicate whether the connection for this profile is a single-user
PPP connection or a router.
Peer=Dialin specifies that the profile is for a single-user PPP connection. All other
parameters in the AppleTalk Options menu are N/A. Peer=Router specifies that the profile
is for a connection with a router (such as a Pipeline unit).
7
If you selected Peer=Dialin, you have completed the configuration. Close the AppleTalk
Options menu and save your changes. If you selected Peer=Router, you need to configure
the other parameters in the AppleTalk Options menu.
8
Exit the profile and, at the exit prompt, select the exit and accept option.
Configuring an AppleTalk PPP connection with a Names/Passwords
profile
To use a Names/Passwords profile to configure an AppleTalk PPP connection:
1
Open the Ethernet> Mod Config profile.
2
Set the Appletalk parameter to Yes.
3
In the Answer profile, open the PPP Options subprofile.
4
Set the Route Appletalk parameter to Yes.
5
Open the PPP Options profile’s Appletalk Options subprofile.
6
Set the Peer parameter to indicate whether the connection for this profile is a single-user
PPP connection or a router.
Peer=Dialin specifies that the profile is for a single-user PPP connection. All other
parameters in the AppleTalk Options menu are N/A. Peer=Router specifies that the profile
is for a connection with a router (such as a Pipeline unit).
7
If you selected Peer=Dialin, you have completed the configuration. Close the AppleTalk
Options menu and save your changes. If you selected Peer=Router, you need to configure
the other parameters in the AppleTalk Options menu.
If you selected Peer=Router in step 7 of the preceding procedure:
1
Configure the AppleTalk zone name for the MAX unit in the AppleTalk Options
subprofile of the Ethernet profile.
MAX 6000/3000 Network Configuration Guide
4-73
Configuring Individual WAN Connections
Configuring AppleTalk connections from RADIUS
If there are other AppleTalk routers on the network, you must configure the zone names
and network ranges to coincide with the other routers on the LAN.
The default for the Zone Name parameter is blank. Enter up to 33 alphanumeric characters
to identify the zone name for the unit you are configuring.
Note: These parameters are N/A if you have not enabled AppleTalk in the Ethernet
profile. menu
2
Set the AppleTalk Router parameter to specify whether the MAX unit is a seed or nonseed
router. The default setting is Off, which disables AppleTalk routing.
A seed router must be assigned a network range and zone name. There must be at least one
seed router on a routed AppleTalk network. Select AppleTalk Router=Seed for this option.
A nonseed router learns network number and zone information from other routers. Set the
AppleTalk Router parameter to Non-Seed for this option. If you choose Non-Seed or Off,
then the parameters Net Start, Net End, Default Zone, and Zone Name #N are N/A.
If you are configuring a nonseed router and are using Names/Passwords, go to
“Configuring an AppleTalk PPP connection with a Names/Passwords profile” on
page 4-73.
3
If you are configuring the MAX unit as a seed router, specify the network range for the
network to which the MAX unit is attached.
Net Start and Net End define the network range for nodes attached to this network. Valid
entries for these parameters are in the range from 1 to 65199. If there are other AppleTalk
routers on the network, you must configure the network ranges to coincide with the other
routers.
4
Specify the default zone name for nodes on the MAX unit’s internet.
Enter up to 33 alphanumeric characters for the default zone name. The default for the
Default Zone parameter is blank.
The default zone is the one used by a node for which you are configuring the Connection
profile until another zone name is explicitly selected by the node.
5
Specify the zone names that the platform can seed.
The unit can seed up to 32 zones, and the Pipeline unit can seed up to 5. Enter up to 33
alphanumeric characters in each Zone Name #N field.
6
Exit the profile and, at the exit prompt, select the exit and accept option.
Configuring AppleTalk connections from RADIUS
You can set up an AppleTalk connection in a RADIUS user profile and configure static
AppleTalk routes in a RADIUS pseudo-user file. For detailed information, see the TAOS
RADIUS Guide and Reference.
4-74
MAX 6000/3000 Network Configuration Guide
Configuring Individual WAN Connections
Configuring ARA connections
Configuring ARA connections
ARA uses V.42 Alternate Procedure as its data link, so ARA can be used only over
asynchronous modem connections.
Example of an ARA configuration
To configure ARA connections, you set the following parameters (shown with sample
settings):
Ethernet
Mod Config
Appletalk=Yes
AppleTalk
Zone Name=*
Ethernet
Answer
Profile Reqd=Yes
Encaps
ARA=Yes
Ethernet
Connections
Encaps=ARA
Encaps Options
Password=*SECURE*
Max. Time (min)=0
AppleTalk Options
Peer=Dialin
Zone Name=
AppleTalk Router=Seed
Net Start=300
Net End=309
Default Zone=
Zone Name #1=
Zone Name #2=
Zone Name #3=
Zone Name #4=
Example of ARA configuration that enables IP access
This section shows an example of an ARA configuration that enables a Macintosh with an
internal modem to dial into the MAX unit by means of ARA Client software and communicate
with an IP host on the Ethernet. A connection that does not require IP access would be a subset
of this example. Figure 4-12 shows the sample network.
MAX 6000/3000 Network Configuration Guide
4-75
Configuring Individual WAN Connections
Configuring ARA connections
Figure 4-12. An ARA connection enabling IP access
Macintosh
with ARA
Client and
Open Transport
WAN
MAX
Note: If you do not require IP access, the Connection profile does not need IP routing and the
Macintosh client does not need a TCP/IP configuration. For ARA connections that support IP
access, the unit receives IP packets encapsulated in AppleTalk’s DDP protocol. It removes the
DDP headers and routes the IP packets normally.
Configure the Macintosh ARA Client software as follows:
•
Set the appropriate modem parameters in the ARA Client software to enable the user’s
asynchronous modem to establish a connection with the unit.
•
Specify the dial-in number in the ARA Client software.
Configure the Macintosh TCP/IP software as follows:
1
Configure Open Transport.
The TCP/IP Control Panel has an option to connect by using MacIP. DDP-IP
encapsulation requires MacIP. This Control Panel also has an option to configure its IP
address manually, via BOOTP, DHCP, or RARP. If you assign the Macintosh a permanent
IP address, choose Manually. If the unit assigns an address to the Macintosh from a pool
of allocated addresses, choose BOOTP.
2
Configure MacTCP.
The MacTCP Control Panel should have an icon for ARA. That icon must be selected for
DDP-IP encapsulation. This Control Panel also has an option to configure its IP address
manually or from a server. If you assign the Macintosh a permanent IP address, choose
Manually. If the unit assigns an address from a server, choose Server. Do not choose
Dynamically in the MacTCP Control Panel. The unit does not support Dynamically.
Note: The MAX unit must be configured as an IP router. At a minimum, the unit’s Ethernet
interface should be configured with an IP address and a DNS server address. If the ARA client
obtains an IP address from the server, you must also configure the unit for dynamic IP address
assignment. (For more information, see Chapter 9, “Configuring IP Routing.”)
If you configure the unit for IP routing (in the Ethernet profile), you can configure an ARA
connection that enables IP access, as in the following example:
1
Open the Ethernet > Mod Config profile and set the AppleTalk parameter to Yes.
2
If applicable, specify the AppleTalk zone in which the unit resides.
Ethernet
Mod Config
Appletalk=Yes
AppleTalk
Zone Name=Engineering
3
4-76
Exit the profile and, at the exit prompt, select the exit and accept option.
MAX 6000/3000 Network Configuration Guide
Configuring Individual WAN Connections
Configuring terminal-server connections
4
Open a Connection profile, specify the dial-in user’s name, and activate the profile.
Ethernet
Connection
margaret
Station=margaret
Active=Yes
5
Select ARA encapsulation and configure the ARA options.
Encaps=ARA
Encaps Options
Password=localpw
Max. Time (min)=0
6
Configure the connection for IP routing.
For example, the following settings are for a Macintosh with a hard-coded IP address:
Route IP=Yes
IP Options
LAN Adrs=10.2.3.4/24
The following settings are for a Macintosh that expects dynamic IP address assignment:
Route IP=Yes
IP Options
LAN Adrs=0.0.0.0/0
Pool=1
7
Exit the profile and, at the exit prompt, select the exit and accept option.
Configuring terminal-server connections
Terminal-server connections are host-to-host connections that use an analog modem, ISDN
modem (such as a V.120 terminal adapter), or raw TCP. If you use one of these methods to
initiate a call but the call contains PPP encapsulation, the terminal server forwards the call to
the MAX router. These are asynchronous PPP calls, and aside from the initial processing, the
MAX unit handles asynchronous PPP calls like regular PPP sessions (as described in
“Configuring PPP connections” on page 4-43).
Figure 4-13 shows a user dialing in via analog modem with dial-up software that does not
include PPP. The unit first routes this type of call to a digital modem, then forwards the call
automatically to the terminal server.
Figure 4-13. Terminal-server connection to a local Telnet host
WAN
Telnet host
MAX
Modem
Windows95
runningSoftCom
Terminal-server connections can be authenticated by way of Connection or Names/Passwords
profiles, or through a third-party authentication server, such as RADIUS.
Note: Like PPP connections, terminal-server connections rely on the Answer profile for
default settings and enabling of the encapsulation type. For information about the Telco
MAX 6000/3000 Network Configuration Guide
4-77
Configuring Individual WAN Connections
Configuring terminal-server connections
Options in a Connection profile, see “Introduction to WAN links” on page 4-2. These Telco
options apply equally to PPP and terminal-server calls.
Connection authentication issues
When the terminal server receives a forwarded call, it waits briefly to receive a PPP packet. If
the terminal server times out waiting for PPP, it sends its login prompt. When the terminal
server receives a name and password, it authenticates them against the Connection profile.
If the terminal server receives a PPP packet, instead of sending a Login prompt, it responds
with a PPP packet and LCP negotiation begins, including PAP or CHAP authentication. The
terminal server then establishes the connection as a regular PPP session.
Note: If you do not want your users to share profiles, set the Shared Prof parameter to No.
This parameter can be set in Ethernet > Mod Config for all users or in Ethernet > Connections
> Connection profile for a single user. For more details about the Shared Prof parameter, see
the MAX Reference. To specify shared profiles per user in RADIUS, see the
Ascend-Shared-Profile-Enable attribute in the TAOS RADIUS Guide and Reference.
Recommended settings for callers with modems and terminal adapters depend on the type of
device and whether the connection uses PPP.
Analog modems and async PPP connection
If the Connection profile specifies PAP or CHAP authentication for connections through an
analog modem, the caller’s PPP software should not be configured with any expect-send
scripts, because the software must start negotiating PPP when the modems connect.
If the Connection profile does not specify PAP or CHAP authentication, configure the caller’s
PPP software with an expect-send script (expect > Login: send <$username> expect
Password: send <$password:>). When the MAX unit authenticates the connection, the
software starts sending PPP packets.
V.120 terminal adapters and PPP connections
If you configure a V.120 terminal adapter to run the PPP protocol, the V.120 terminal adapter
handles PAP or CHAP authentication and whatever other PPP or MP features the terminal
adapter supports. Typically, the Connection profile requires PAP or CHAP.
V.120 terminal adapters with PPP turned off
If you configure a V.120 terminal adapter to run without PPP, it does not support PAP or CHAP
authentication. If the Connection profile requires PAP or CHAP authentication, the connection
fails.
Modem connections
This section shows sample Connection profiles for a terminal-server connections established
via analog modem. The following example uses only the required parameters for
authenticating a terminal-server modem connection:
4-78
MAX 6000/3000 Network Configuration Guide
Configuring Individual WAN Connections
Configuring terminal-server connections
Ethernet
Connections
joshua
Station=joshua
Active=Yes
Encaps=PPP
Encaps Options
Recv PW=localpw
The following example includes optional parameters for bringing down the terminal-server
connection after a specified amount of idle time:
Ethernet
Connections
catherine
Station=catherine
Active=Yes
Encaps=PPP
Encaps Options
Recv PW=localpw
Session Options
TS Idle Mode=Input/Output
TS Idle=60
For information about the parameters, see “Session Options” on page 4-35 and “Example of a
single-channel PPP connection” on page 4-43.
V.120 terminal-adapter connections
V.120 terminal adapters (also known as ISDN modems) are asynchronous devices that use
CCITT V.120 encapsulation. The values that work best for V.120 operation are:
•
Maximum information field size for send and receive packets=260 bytes.
•
Maximum number of retransmissions (N200) =3.
•
Logical link ID (LLI)=256.
•
Idle timer (T203)=30 seconds.
•
Maximum number of outstanding frames=7.
•
Modulo=128.
•
Retransmission timer (T200)=1.5 seconds.
•
Types of frames accepted=UI, I. (I-type frames are recommended.).
•
Call placement: The MAX unit can receive V.120 calls, but cannot place them..
Note: If the connection uses PAP or CHAP authentication, the ISDN terminal adapter should
be configured for async-to-sync conversion. In this case, V.120 encapsulation is not required in
the Connection profile. For more information, see “Connection authentication issues” on
page 4-78.
The V.120 device must be correctly configured to place calls to the unit. The settings required
for compatible operation of a V.120 device and the unit are listed below. For information about
entering these settings, see the V.120 manual.
•
V.120 maximum transmit frame size=260 bytes.
MAX 6000/3000 Network Configuration Guide
4-79
Configuring Individual WAN Connections
Configuring terminal-server connections
•
V.120 maximum receive frame size=260 bytes.
•
Logical link ID=256.
•
Modulo=128.
•
Line channel speed: Select 56K if the unit accepts calls from the V.120 device on a T1
line, or if you are not sure that you have 64-Kbps channel speed end-to-end.
After checking the configuration of the V.120 device, make sure you enable V.120 calls in the
Answer profile. For example:
Ethernet
Answer
Encaps
V.120=Yes
V.120 Options
Frame Length=260
To configure a connection that uses a V.120 terminal adapter, create a Connection profile. For
example:
Ethernet
Connections
abby
Station=abby
Active=Yes
Encaps=PPP
Encaps Options
Recv PW=localpw
Session Options
TS Idle Mode=Input
TS Idle=60
For information about these parameters, see “Session Options” on page 4-35 and “Example of
a single-channel PPP connection” on page 4-43.
TCP-Clear connections
Use a TCP-Clear connection for username logins or TCP modem connections. In most cases,
use TCP-Clear to transport custom-encapsulated data understood by the host and the caller. For
example, customers who log in from an ISDN device typically use a TCP-Clear connection to
tunnel their proprietary encapsulation method in raw TCP/IP packets, as shown in Figure 4-14.
Figure 4-14. A TCP-Clear connection
WAN
MAX
User with
ISDN modem installed
Note: A TCP-Clear connection is host-to-host. As soon as the MAX unit authenticates the
connection, the host establishes a TCP connection as specified in the Connection profile.
4-80
MAX 6000/3000 Network Configuration Guide
Configuring Individual WAN Connections
Configuring terminal-server connections
First, make sure you enable TCP-Clear calls in the Answer profile:
Ethernet
Answer
Encaps
TCP-Clear=Yes
Then, to configure a TCP-Clear connection, set the parameters shown in the following
example:
Ethernet
Connections
louie
Station=louie
Active=Yes
Encaps=TCP-Clear
Encaps Options
Recv PW=localpw
Login Host=techpubs
Login Port=23
Session Options
TS Idle Mode=Input
TS Idle=60
If you configure DNS, you can enter a hostname for the Login host (such as the techpubs
example above). Otherwise, specify the host’s IP address. The port number is the TCP port on
the host to use for the connection. A port number of zero means any port.
For related information, see “Session Options” on page 4-35 and “TCP-modem connections
(DNIS Login)” on page 4-82.
Settings in a RADIUS profile
RADIUS profiles can specify up to four Login-IP-Host and Login-TCP-Port attributes. The
MAX validates the number of these attributes in an Access-Accept packet returned by
RADIUS. If it finds more than four, the MAX logs an error in RADIF debug output and
processes only the first four specifications.
If the TCP connection to the first specified host/port combination fails while the TCP-Clear
session is being established, the system attempts to connect to the next specified host, and so
forth. If all connection attempts fail, the session terminates and the MAX returns a TCP
connection error to the dial-in client.
Following are the RADIUS profile attributes related to TCP-Clear:
Attribute
Value
Login-Service (15)
Type of login service allowed to the caller. Set to TCP-Clear (2).
Login-IP-Host (14)
IP address of a TCP login host.
Login-TCP-Port (16)
Destination TCP port on the specified login host (an integer from 1
to 65535). The default is 23.
Service-Type (6)
Specifies whether the link can use framed or unframed services.
MAX 6000/3000 Network Configuration Guide
4-81
Configuring Individual WAN Connections
Configuring terminal-server connections
Following is a sample RADIUS profile:
tcpapp1 Password = "localpw"
Service-Type = Login-User,
Login-Service = TCP-Clear,
Login-IP-Host = 10.10.10.1,
Login-TCP-Port = 23,
Login-IP-Host = 10.10.10.2,
Login-TCP-Port = 125
TCP-modem connections (DNIS Login)
The TCP-modem feature enables the MAX unit to accept connections through the Ethernet
interface though as they were modem connections. You can enable or disable TCP-modem
access to the unit, and you can configure the default port for TCP modem access. You can
disable TCP-modem connections to the unit. In addition, you can change the TCP port used for
these connections. The default port for TCP-modem is 6150.
Figure 4-15 illustrates an example of a TCP-modem setup. A user dialing into an ISP first
connects to the telephone switch and then establishes a connection to MAX 1. MAX 1 has a
TCP-Clear connection configured in RADIUS to a unit at an ISP. Typically, this connection is
over Frame Relay. The remote user appears to be directly connected to the ISP MAX. MAX 1
merely passes the data through. The ISP MAX typically authenticates remote users.
Figure 4-15. Sample TCP-modem connection
RADIUS
PSDN
ISP MAX
TCP-modem
connection
MAX 1
The terminal-server interface
The terminal server can provide a command-line interface (terminal mode) or a menu of Telnet
hosts that dial-in users can log into (menu mode). Or, you can configure an immediate mode to
automatically present the user with a login prompt to a host, bypassing the terminal-server
interface altogether.
Terminal mode
In terminal mode, users have access to the command line and can see information about your
network by using administrative terminal-server commands. You can also enable them to
initiate their own Telnet, Rlogin, or TCP connections to hosts.
4-82
MAX 6000/3000 Network Configuration Guide
Configuring Individual WAN Connections
Configuring terminal-server connections
Menu mode
The menu interface lists up to four local hosts. Users select a hostname to initiate a Telnet
session to that host. The menu interface with four hosts looks like this:
Up to 16 lines of up to 80 characters each
will be accepted. Long lines will be truncated.
Additional lines will be ignored
1. host1.abc.com
2. host2.abc.com
3. host3.abc.com
4. host4.abc.com
Enter Selection (1-4, q)
Immediate mode
In immediate mode, the terminal server initiates a Telnet, Rlogin, or TCP connection to one
specified host without giving the dial-in user a choice. The host requires the login name and
password to be entered by the user, not by the terminal server.
Enabling terminal-server calls and setting security
To enable the MAX unit’s terminal servers, open Ethernet > Mod Config > TServ Options and
set the TS Enabled parameter to Yes.
In the same profile, you can set the terminal-server Security parameter to None, Partial, or Full.
The setting determines whether users are prompted for a login name and password before
entering the terminal server. Its meaning is partly dependent on whether users log into menu
mode or terminal mode, and whether they are allowed to toggle between these two modes:
•
With the Security parameter set to None, no prompt appears for a login name and
password.
•
With the Security parameter set to Partial, a prompt for a name and password appears
when a user enters terminal mode. The prompt does not appear in menu mode.
•
With the Security parameter set to Full, a prompt for a name and password appears upon
initial login, regardless of the interface.
The modem parameters
Calls from analog modems are directed first to the MAX digital modems, where the
connections must be negotiated before being directed to the terminal-server software.
MAX 6000/3000 Network Configuration Guide
4-83
Configuring Individual WAN Connections
Configuring terminal-server connections
To influence the outcome for modem negotiation and data packetizing, you can set the
following parameters in Ethernet > Mod Config > Tserv Options:
Parameter
Specifies
V42/MNP
How the digital modems negotiate LAPM/MNP error control with the
analog modem at the other end of the connection. The modems can
request LAPM/MNP and accept the call anyway if it is not provided,
request it and drop the call if it is not provided, or not use LAPM/MNP
error control at all.
Max Baud
The highest possible baud rate (3360). The MAX unit negotiates down
to the rate accepted by the far-end modem. You can adjust the
maximum rate to bypass some of the negotiation cycles, provided that
no inbound calls use a baud rate higher than what you specify here.
Modem transit level, which is the amount of attenuation in decibels the
MAX should apply to the line. When a modem calls the MAX, the unit
attempts to connect at the transmit attenuate level you specify.
Generally, you do not need to change the transmit level. However, if
the carrier becomes aware of line problems or irregularities, you might
need to alter the modem transmit level.
MDM Trn Level
MDM Modulation
Cell First
Cell Level
7-Even
Packet Wait Time
Packet characters
Users can change the default settings for their specific connections.
Increasing the attentuation level helps certain modems with near-end
echo problems.
Modulation to use when answering calls on the unit’s 56K modems.
The possible settings are K56, V.34, and V.90.
Whether or not the unit first attempts cellular modem or conventional
modem negotiation when answering incoming calls. If the first
negotiation fails, the unit attempts the other negotiation.
Gain level of the cellular modem.
7-bit even parity on outbound data. Most applications do not use 7-bit
even parity.
Maximum amount of time, in milliseconds, that any received data can
wait before being passed up the protocol stack for encapsulation.
Minimum number of bytes of received data that should accumulate
before the data is passed up the protocol stack for encapsulation.
For detailed information about each parameter, see the MAX Reference.
Example of a modem configuration
To set the maximum negotiable baud rate for incoming calls from analog modems:
1
Open Ethernet > Mod Config > TServ Options.
2
Set the maximum negotiable baud rate to 26400:
Ethernet
Mod Config
TServ Options
Max Baud=26400
3
4-84
Exit the profile and, at the exit prompt, select the exit and accept option.
MAX 6000/3000 Network Configuration Guide
Configuring Individual WAN Connections
Configuring terminal-server connections
Configuring terminal mode
When a user communicates with the terminal server itself (rather than with a host, in
immediate mode), the MAX unit establishes a session between the remote user’s PC and the
terminal server. The following parameters in Ethernet > Mod Config > TServ Options affect
the session the unit establishes and what commands are available to the user:
Parameter
Description
Silent
Whether or not status messages appear while the MAX tries to
establish the connection.
Clr Scrn
Clearing of the MAX screen when it establishes a connection.
Passwd
A terminal-mode password of up to 15 characters. This is the
password terminal-server users are prompted for when establishing a
connection to the terminal server itself.
Displays the banner “**Ascend Terminal Server **” (or a
different banner you have configured) when the MAX establishes the
terminal-server session.
What the user sees while logging in.
Banner
Login Prompt
Passwd Prompt
A multiline prompt. The Login prompt can be up to 80 characters and
consist of more than one line if Prompt Format is set to Yes.
What the user sees while logging in.
Prompt
The command-line prompt, which by default is ascend%
Term Type
A default terminal type, such as the VT100.
Login Timeout
Telnet
The number of seconds that the MAX unit disconnects users if they
have not completed logging in when value set in this parameter has
elapsed.
The use of this command at the terminal-server command line.
Rlogin
The use of this command at the terminal-server command line.
Def Telnet
The terminal server to interpret unknown command strings as the
name of a host for a Telnet session.
Whether or not the connection terminates when the user terminates a
Telnet or Rlogin session.
Whether or not binary, ASCII, or transparent mode is the default for
Telnet sessions.
A global default for echoing characters locally. The default can be
changed for an individual session within Telnet.
Whether or not the terminal-server buffers input characters for 100
milliseconds before forwarding them to the host, or sends the
characters as they are received.
Another login prompt.
Prompt Format
Clear Call
Telnet mode
Local Echo
Buffer Chars
3rd Prompt
3rd Prompt Seq
IP Addr Msg
Whether or not the third prompt appears before or after the regular
terminal-server login prompts.
User’s address with the terminal-server displaying Your IP address is,
followed by the assigned address. You can change this default
message.
MAX 6000/3000 Network Configuration Guide
4-85
Configuring Individual WAN Connections
Configuring terminal-server connections
Example of terminal-mode configuration
This example shows how to configure the password and make the Rlogin option available to
dial-in users.
1
Open Ethernet > Mod Config > TServ Options.
2
Specify the terminal-server password.
Passwd=tspasswd
3
Set the Telnet parameter to Yes.
4
Configure a multiline login prompt.
Ethernet
Mod Config
TServ Options
Login Prompt=Welcome to Ascend Remote Server\Enter your
name:
Prompt Format=Yes
5
Enable the use of the Rlogin command in terminal mode:
Rlogin=Yes
6
Exit the profile and, at the exit prompt, select the exit and accept option.
Configuring immediate mode
When dial-in calls are directed immediately to a host, the MAX unit establishes a session
between the remote user’s PC and that host via Rlogin, Telnet, or TCP. The following
parameters in Ethernet > Mod Config > TServ Options affect the session the unit establishes:
Parameter
Specifies
Immed Service
A particular type of service for establishing an immediate host
connection for dial-in users. You can specify Telnet, Raw-TCP,
Rlogin, or X25-PAD. For details about X.25, see Chapter 6,
“Configuring X.25.”
Immed Host
The hostname or address to which users connect in terminal-server
immediate mode.
A TCP port number to use for the connections.
Immed Port
Telnet Host Auth
Whether the MAX unit bypasses terminal-server authentication and
goes right to a Telnet login prompt.
Example of immediate-mode configuration
To configure immediate Telnet service relying on the Telnet host for authentication:
4-86
1
Open Ethernet > Mod Config > TServ Options.
2
Set the Immed Service parameter to Telnet.
3
Specify the name or IP address of the Telnet host.
4
If appropriate, specify the TCP port to use on the Telnet host.
5
Set the Telnet Host Auth parameter to Yes.
MAX 6000/3000 Network Configuration Guide
Configuring Individual WAN Connections
Configuring terminal-server connections
6
Exit the profile and, at the exit prompt, select the exit and accept option.
Following is an example of this configuration:
Ethernet
Mod Config
TServ Options
Immed Service=Telnet
Immed Host=host1.abc.com
Immed Port=23
Telnet Host Auth=Yes
Configuring menu mode
You can set up the terminal server to display a menu of up to four Telnet hosts that dial-in users
can select for logging in. You can set up menu mode with the following parameters in
Ethernet > Mod Config > TServ Options:
Parameter
Specifies
Initial Scrn
Whether or not the terminal server brings up a menu interface first for
interactive users initiating connections.
Whether users can switch to the command-line interface from menu
mode and vice versa.
That the RADIUS server supplies the terminal-server menu and list of
hosts.
An IP address for up to four Telnet hosts that appear in the menu
interface.
A hostname for up to four Telnet hosts that appear in the menu
interface.
Toggle Scrn
Remote Conf
Host #N Addr
Host #N Text
Example of menu-mode configuration
Configuration of this example enables the menu to appear at login, and specifies four hosts.
The user does not have access to the command line. To implement the configuration:
1
Open the Ethernet > Mod Config > TServ Options profile.
2
Specify that the dial-in users are in menu mode initially:
Ethernet
Mod Config
TServ Options
Initial Scrn=Menu
3
Specify the IP addresses and hostnames of up to four hosts to appear in the menu.
Ethernet
Mod Config
TServ Options
Host #1 Addr=10.2.3.4
Host #1 Text=host1.abc.com
Host #2 Addr=10.2.3.57
Host #2 Text=host2.abc.com
Host #3 Addr=10.2.3.121
Host #3 Text=host3.abc.com
MAX 6000/3000 Network Configuration Guide
4-87
Configuring Individual WAN Connections
Configuring terminal-server connections
Host #4 Addr=10.2.3.224
Host #4 Text=host4.abc.com
Dial-in users are able to Telnet to these hosts by selecting the hostname or IP address.
4
Exit the profile and, at the exit prompt, select the exit and accept option.
Configuring PPP mode
Users who are logged into the terminal server in terminal mode can invoke an asynchronous
PPP session by using the PPP command to initiate PPP mode. Or, even if users do not have
access to the command line, they can begin an asynchronous PPP session from an application
such as Netscape Navigator or Microsoft Explorer. For example, if a user initiates a session
from Windows 95, which has a resident TCP/IP stack, the asynchronous PPP session can begin
immediately, without the user entering the terminal-server interface. The following parameters
in Ethernet > Mod Config > TServ Options configure PPP mode:
Parameter
Specifies
PPP
The initiation of PPP sessions.
PPP Delay
The number of seconds the terminal server waits before transitioning
to packet-mode processing.
Whether to start PPP negotiation immediately after a user enters the
PPP command in the terminal-server interface or to wait to receive a
PPP packet from an application. (Some applications expect to receive
a packet first.)
One of the three messages to inform users that they are in PPP mode.
The selections are None (no message), PPP Mode, and PPP Session.
PPP Direct
PPP Info
Example of PPP configuration
The configuration in this example enables PPP direct mode. To implement the configuration:
1
Open the Ethernet > Mod Config > TServ Options profile.
2
Enable the use of the PPP command in terminal mode.
3
Enable PPP direct negotiation:
Ethernet
Mod Config
TServ Options
PPP=Yes
PPP Direct=Yes
4
Exit the profile and, at the exit prompt, select the exit and accept option.
Configuring Serial Line IP (SLIP) mode
If you enable SLIP mode in the terminal server, users can initiate a SLIP session and then run
an application, such as FTP, in that session. SLIP mode configuration uses the following
parameters in Ethernet > Mod Config > TServ Options:
4-88
Parameter
Specifies
SLIP
SLIP sessions.
MAX 6000/3000 Network Configuration Guide
Configuring Individual WAN Connections
Configuring terminal-server connections
Parameter
Specifies
SLIP BOOTP
That the terminal server responds to BOOTP within SLIP sessions. A
user who initiates a SLIP session can then get an IP address from the
designated IP address pool via BOOTP. If the parameter is set to No,
the terminal server does not run BOOTP. Instead, the user is prompted
to accept an IP address at the start of the SLIP session.
Text message the MAX unit displays before the netmask field in the
SLIP session startup message. You can enter up to 64 characters. (IP
Netmask Msg does not apply unless you set SLIP Info to Advanced.)
Text the unit displays before the unit IP address field in the SLIP
session startup message. You can enter up to 64 characters. (IP
Gateway Addr Msg does not apply unless you set SLIP Info to
Advanced.)
IP Netmask Msg
IP Gateway Addr
Msg
Slip Info
That the MAX unit reports the SLIP user’s IP address and the
Maximum Transmission Unit (MTU), or reports the SLIP user’s IP
address, the MTU, the Netmask, and the Gateway to SLIP users.
Example of SLIP configuration
The configuration in this example enables SLIP sessions and ensures the terminal server’s
response to BOOTP in SLIP sessions. To implement the configuration:
1
Open a Ethernet > Mod Config > TServ Options subprofile.
2
Enable the use of the SLIP command:
SLIP=Yes
3
Enable the use of BOOTP in SLIP sessions.
4
Exit the profile and, at the exit prompt, select the exit and accept option.
Configuring dial-out options
The terminal server has access to the MAX unit digital modems, and can be configured to
enable users on the local network to dial through the digital modems. To enable local dial-out,
you set the following parameters in Ethernet > Mod Config TServ Options:
Ethernet
Mod Config
TServ Options
Modem dialout=Yes
Immediate Modem=N/A
Imm. Modem port=N/A
Imm. Modem Pwd=N/A
How to use nonimmediate-modem dial-out
If you enable dial-out (not immediate modem), users can access a modem after connecting to
the MAX unit from a workstation by means of Telnet. For example:
Telnet max01
Once you establish the Telnet session, the user proceeds as follows:
MAX 6000/3000 Network Configuration Guide
4-89
Configuring Individual WAN Connections
Configuring terminal-server connections
1
Invoke the terminal-server command-line interface (System > Sys Diag > Term Serv).
The user sees the terminal-server prompt. For example:
ascend%
2
Enter the terminal-server Open command.
ascend% open
Without an argument, the Open command sets up a virtual connection to the first available
digital modem. Alternatively, the user can specify a particular modem by including its slot
and item number as an argument to the command. For example:
ascend% open 7:1
3
Use the standard Rockwell AT commands to dial out on the modem, just as if using a
modem connected directly to a workstation. For example:
ATDT 1V1 ^M
4
To suspend a virtual connection to a digital modem and return to the terminal-server
prompt, press Ctrl-C three times.
5
To resume the suspended virtual connection, enter the Resume command:
ascend% resume
6
To terminate a virtual connection, enter the Close command:
ascend% close
How to use immediate-modem dial-out
Immediate-modem dial-out enables users to access a modem directly by making a Telnet
connection to the specified port. For example, users can access a modem as follows:
1
Telnet to the MAX unit from a workstation, specifying the immediate-modem port
number on the command line. For example:
Telnet max01 5000
where max01 is the system name of the unit and 5000 is the immediate-modem port.
2
Use the standard Rockwell AT commands to dial out on the modem, just as if using a
modem connected directly to a workstation. For example:
ATDT 1V1 ^M
3
Press Ctrl-C to terminate the connection.
Example of dial-out configuration
The configuration in this example enables direct access (immediate modem) on port 5000. To
implement the configuration:
1
Open the Ethernet > Mod Config > TServ Options profile.
2
Enable the use of the modem dial-out and direct-access (immediate-modem) features. For
example:
Ethernet
Mod Config
TServ Options
Modem dialout=Yes
Immediate Modem=Yes
4-90
MAX 6000/3000 Network Configuration Guide
Configuring Individual WAN Connections
Configuring a Combinet connection
3
Specify the port on which the immediate-modem feature functions, and specify a
password for modem access. For example:
Ethernet
Mod Config
TServ Options
Imm. Modem port=5000
Imm. Modem Pwd=dialoutpwd
4
Exit the profile and, at the exit prompt, select the exit and accept option.
Configuring a Combinet connection
The MAX unit supports Combinet bridging to link two LANs as if they were one segment. For
a Combinet connection to work, bridging must be enabled at the system level (as described in
Chapter 14, “Configuring Packet Bridging”). Figure 4-16 shows a Combinet connection.
Figure 4-16. A Combinet connection
WAN
MAX
Combinet unit
Combinet configuration involves the following parameters (shown with sample settings):
Ethernet
Mod Config
Bridging=Yes
Ethernet
Answer
Encaps
COMB=Yes
COMB Options
Password Reqd=Yes
Interval=10
Compression=Yes
Ethernet
Connections
000145CFCF01
Station=000145CFCF01
Encaps=COMB
Bridge=Yes
Encaps Options
Password Reqd=Yes
Send PW=remotepw
Recv PW=localpw
Interval=10
Base Ch Count=2
Compression=Yes
MAX 6000/3000 Network Configuration Guide
4-91
Configuring Individual WAN Connections
Configuring a Combinet connection
The Combinet bridging parameters
This section provides some background information about a Combinet configuration.
Specifying the hardware address of the remote Combinet bridge
The (Connection profile) Station parameter must specify the MAC address of the remote
Combinet bridging device.
Enabling bridging
A Combinet connection is always a bridging connection, so the Bridge parameter in the
Connection profile must be set to Yes. If the Bridge parameter is N/A, bridging has not been
enabled in the Ethernet profile (as described in Chapter 14, “Configuring Packet Bridging”).
Requiring a password from the remote bridge
The Password Reqd parameter specifies that a password will be required to authenticate
Combinet connections.You can specify that an individual Combinet connection does not
require a password exchange, even if the Answer profile specifies that Combinet passwords
are required.
Specifying passwords to exchange with the remote bridge
The Send PW parameter specifies the password sent to the remote device. It must match the
password expected from the MAX unit. The Recv PW parameter specifies the password sent to
the unit from the remote device.
Configuring line-integrity monitoring
The (Answer profile) Interval parameter specifies the number of seconds between
transmissions of Combinet line-integrity packets. You can specify a number between 5 and 50.
If the MAX unit does not receive a Combinet line-integrity packet within the specified
interval, it disconnects the call.
Base channel count
The (Connection profile) Base Ch Count parameter specifies the base number of channels to
use when setting up the call. It can be set to 1 (for 64 Kbps) or 2 (for 128 Kbps).
Compression
The (Connection profile) Compression parameter enables or disables STACKER LZS
compression/decompression. Both sides of the link must enable compression or it is not used.
4-92
MAX 6000/3000 Network Configuration Guide
Configuring Individual WAN Connections
Configuring EU connections
Example of Combinet configuration
To configure a Combinet connection:
1
Open a Connection profile.
2
Specify the MAC address of the remote device as the value for the Station parameter, and
activate the profile. For example:
Ethernet
Connection
000145CFCF01
Station=000145CFCF01
Active=Yes
3
Configure bridging options as follows:
Bridge=Yes
Dial Brdcast=Yes
4
Select Combinet encapsulation and then configure COMB options for this connection.
(Leave the default values for Compression and Interval.) For example:
Encaps=COMB
Encaps Options
Password Reqd=Yes
Send PW=*SECURE*
Recv PW=*SECURE*
Interval=10
Base Ch Count=2
Compression=Yes
5
Exit the profile and, at the exit prompt, select the exit and accept option.
Configuring EU connections
EU encapsulation is a type of X.75 HDLC encapsulation commonly used in European
countries. Like PPP, EU runs over synchronous lines. It has no asynchronous mode for
connecting to modems. EU encapsulation differs from a PPP or MP+ connections in that it
does not support password authentication, IP/IPX address pools, or DBA. It does support
routing and bridging connections.
EU-RAW and EU-UI do not provide password authentication of incoming calls, so another
mode of authentication is typically used to verify the caller when the call is end-to-end ISDN.
For details, see the MAX Security Supplement.
EU configuration involves the following parameters (shown with sample settings):
Ethernet
Answer
Id Auth=Called Reqd
Encaps
EU-UI=Yes
EU-RAW=Yes
Ethernet
Connections
Connection profile
Calling #=555-7878
MAX 6000/3000 Network Configuration Guide
4-93
Configuring Individual WAN Connections
Configuring EU connections
Called #=555-1212
Encaps=EU-RAW
Encaps Options
MRU=1524
Ethernet
Connections
Connection profile
Calling #=555-7878
Called #=555-1212
Encaps=EU-UI
Encaps Options
MRU=1524
DCE Addr=1
DTE Addr=3
The EU parameters
This section provides some background information on EU parameters. For detailed
information about each parameter, see the MAX Reference.
EU-RAW and EU-UI
EU-RAW is a type of X.75 encapsulation in which IP packets are HDLC encapsulated with a
CRC field. EU-UI uses the same encapsulation, but contains a smaller header that can contain
one value for packets from the caller and another value for packets from the called unit. Most
EU connections use EU-RAW.
Maximum Receive Unit (MRU)
The MRU parameter, in a Connection profile’s Encaps Options profile, specifies the maximum
number of bytes the MAX unit can receive in a single packet on an EU link. Usually the
default of 1524 is the right setting, unless the far-end device requires a lower number. If the
administrator of the remote network specifies that you must change this value, enter a number
lower than 1524.
DCE address (DCE Addr)
The DCE Addr parameter specifies a value for the calling unit in the EU-UI header. The caller
needs to obtain the number you specify and configure the calling unit accordingly.
DTE address (DTE Addr)
The DTE Addr parameter specifies a value for the called unit in the EU-UI header. The caller
must use the same value for the called unit.
4-94
MAX 6000/3000 Network Configuration Guide
Configuring Individual WAN Connections
Configuring EU connections
Example of an EU connection
Figure 4-17 shows three connections that use EU encapsulation with CLID authentication.
Figure 4-17. EU Connection
Connection #1
MAX
Switched
network
with CLID
Connection #2
Connection #3
To configure a connection that uses EU-RAW framing:
1
Open the Answer profile and make sure that EU-RAW encapsulation is enabled.
2
Set Id Auth to Calling Reqd (CLID authentication):
Ethernet
Answer
Id Auth=Calling Reqd
Encaps
EU-RAW=Yes
3
Close the Answer profile.
4
Open a Connection profile, specify the name of the remote device, and activate the profile:
Ethernet
Connections
remote-device
Station=remote-device
Active=Yes
5
Specify the calling-line number. For example:
Calling #=555-1212
6
Select the EU-RAW encapsulation type and, if necessary, configure the MRU in the
Encaps Options subprofile. For example:
Encaps=EU-RAW
Encaps Options
MRU=1524
7
Exit the profile and, at the exit prompt, select the exit and accept option.
Example of an EU-UI connection
To configure a connection using EU-UI encapsulation:
1
Open the Answer profile and make sure that EU-UI encapsulation is enabled.
2
Set Id Auth to Calling Reqd (CLID authentication):
MAX 6000/3000 Network Configuration Guide
4-95
Configuring Individual WAN Connections
Configuring DHCP services
Ethernet
Answer
Id Auth=Calling Reqd
Encaps
EU-UI=Yes
3
Close the Answer profile.
4
Open a Connection profile, specify the name of the remote device, and activate the profile.
For example:
Ethernet
Connections
Connection profile
Station=remote-device
Active=Yes
5
Specify the calling-line number. For example:
Calling #=555-1212
6
Select the EU-UI encapsulation type:
Encaps=EU-UI
7
In the Encaps Options subprofile, set the DCE and DTE addresses. For example:
Encaps Options
MRU=1524
DCE Addr=1
DTE Addr=3
8
Exit the profile and, at the exit prompt, select the exit and accept option.
Configuring DHCP services
A MAX unit performs a number of DHCP services, including responding to DHCP requests to
borrow IP addresses, managing Plug and Play requests, and DHCP spoofing.
A unit can respond to DHCP requests for up to 43 clients at any given time. DHCP server
responses provide an IP address and subnet mask. You can define two address pools of up to 20
IP addresses each. Additionally, up to three hosts, identified by their MAC (Ethernet)
addresses, can each have an IP address reserved for its exclusive use.
The Plug and Play management feature responds to requests for TCP/IP configuration settings
from computers using Microsoft Windows 95 or Windows NT.
A DHCP spoofing response supplies a temporary IP address for a single host. The IP address
supplied is always one greater than that of the unit. The IP address is good for only 60
seconds—just long enough to enable a security-card user to acquire the current password from
an ACE or SAFEWORD server and bring up an authenticated dial-up session. Once the unit
establishes the dial-up session, an official IP address can be retrieved from a remote DHCP or
BOOTP server. The ability to retrieve an IP address, together with Network Address
Translation (NAT), enables a single computer to connect to a remote network that assigns IP
addresses dynamically.
4-96
MAX 6000/3000 Network Configuration Guide
Configuring Individual WAN Connections
Configuring DHCP services
How the MAX assigns IP addresses
When you configure a MAX unit to be a DHCP server and it receives a DHCP client request, it
assigns an IP address by means of Plug and Play, reserved address, lease renewal, or
assignment from a pool.
Plug and Play
When you enable the Plug and Play option (DHCP PNP Enabled=Yes), the MAX unit takes its
own IP address, increments it by one, and returns it in the BOOTP reply message along with IP
addresses for the Default Gateway and Domain Name Server. Plug and Play works with
Microsoft Windows 95 (and possibly with other IP stacks) to assign an IP address and other
wide-area networking settings to a requesting device automatically. With Plug and Play, you
can use the unit to respond to distant networks without having to configure an IP address first.
Reserved address
If there is an IP address that is reserved for the host, the MAX unit assigns the reserved
address.
Lease renewal
If the host is renewing the address it currently has, the unit assigns the host the same address.
When a host gets a dynamically assigned IP address from one of the address pools, it
periodically renews the lease on the address until it has finished using it, as defined by the
DHCP protocol. If the host renews the address before its lease expires, the unit always
provides the same address.
Assignment from a pool
If the host is making a new request and there is no IP address reserved for the host, the unit
assigns the next available address from its address pools. It can draw from up to two
20-address pools of contiguous IP addresses. Addresses are assigned by using the first
available address from the first pool or, if there are no available addresses in that pool and there
is a second pool, the first available address in the second pool.
Configuring DHCP services
To configure a DHCP service, open Ethernet > Mod Config > DHCP Spoofing. Although the
name of this menu is DHCP Spoofing, it contains parameters for all DHCP services, including
DHCP Spoofing, DHCP Server, and Plug and Play:
Ethernet
Mod Config
DHCP Spoofing
DHCP Spoofing=Yes
DHCP PNP Enabled=Yes
Renewal Time=10
Become Def. Router=No
Dial If link down=No
Always Spoof=Yes
Validate IP=Yes
MAX 6000/3000 Network Configuration Guide
4-97
Configuring Individual WAN Connections
Configuring DHCP services
Maximum no reply wait=5
IP group 1=181.100.100.100/16
Group 1 count=1
IP group 2=0.0.0.0/0
Group 2 count=0
Host 1 IP=181.100.100.120
Host 1 Enet=0080c75Be95e
Host 2 IP=0.0.0.0/0
Host 2 Enet=000000000000
Host 3 IP=0.0.0.0/0
Host 3 Enet=000000000000
For detailed information about each parameter, see the MAX Reference.
Set each parameter according to the function it provides, as follows:
1
Set the DHCP Spoofing parameter to Yes to enable any DHCP service. If you set it to No,
other settings in this menu are ignored.
2
Set the DHCP PNP Enabled parameter to Yes to enable Plug and Play. Setting this
parameter to Yes and DHCP Spoofing to Yes enables Plug and Play support.
3
Set the Renewal Time parameter to specify how long a DHCP IP address lives before it
needs to be renewed. This value applies to both DHCP spoofed addresses and DHCP
server replies. If the host renews the address before it expires, the MAX unit provides the
same address. Plug and Play addresses always expire in 60 seconds.
4
The Become Default Router parameter is an option you can set to advertise the address of
your unit as the default router for all DHCP request packets.
5
The Dial If Link Down parameter is used with DHCP spoofing in conjunction with
BOOTP Relay. This parameter applies when both DHCP spoofing and BOOTP relay are
enabled. If no WAN links are active, the unit performs DHCP spoofing. If the parameter is
set to Yes, as soon as the dialed link is established, the unit stops DHCP spoofing and acts
as a BOOTP relay agent.
6
Set the Always Spoof parameter to Yes or No, to enable either the DHCP server or DHCP
spoofing:
–
Yes enables the DHCP server. A DHCP server always supplies an IP address for
every request, until all IP addresses are exhausted.
–
No enables DHCP spoofing. DHCP spoofing only supplies an IP address for a single
host on the network. It does not respond to all requests.
7
Set the Validate IP parameter to Yes to check on whether a spoofed address that is about to
be assigned is already in use, and if it is, automatically assign another address.
8
Set the Maximum No-Reply Wait parameter only if you are validating IP addresses. To
validate the IP address, DHCP sends an ICMP echo (Ping) to determine whether the
address is in use. The maximum time it waits for a reply depends on this setting. The
default is 10 seconds.
9
To assign IP addresses dynamically, set the IP Group 1 parameter to the first address for
the IP address pool.
10 Set the Group 1 Count parameter to the number of addresses in the pool. The pool can
contain up to 20 addresses.
4-98
MAX 6000/3000 Network Configuration Guide
Configuring Individual WAN Connections
Configuring DHCP services
11 To define an additional address pool for dynamic address assignment, set the IP Group 2
parameter to the first address for the second IP address pool.
12 Set the Group 2 Count parameter to the number of addresses in the pool. The second pool,
which can also contain up to 20 addresses, is used only if there are no addresses available
in the first pool.
13 To reserve an IP address for a particular host, set the Host 1 IP parameter to the IP address
for the host.
14 Set the Host 1 Enet parameter to the MAC (Ethernet) address of the host. The MAC
address is normally the Ethernet address of the network interface card that the host uses to
connect to the LAN. When the DHCP server receives an IP-address request from the host
with this MAC address, it assigns that host the IP address you specified for the Host 1 IP
parameter.
15 To reserve an IP address for another host, set the Host 2 IP parameter to the IP address for
the host and set the Host 2 Enet parameter to the MAC (Ethernet) address of the host.
16 To reserve an IP address for another host, set the Host 3 IP parameter to the IP address for
the host and set the Host 3 Enet parameter to the MAC (Ethernet) address of the host.
Setting up a DHCP server
To set up a DHCP server, set these required parameters:
DHCP Spoofing
DHCP Spoofing=Yes
Always Spoof=Yes
IP group 1=nnn.nnn.nnn.nnn/nn
Group 1 count=n
Additionally, you can set these parameters:
Renewal Time=nn
IP group 2=0.0.0.0/0
Group 2 count=0
Host 1 IP=nnn.nnn.nnn.nnn/nn
Host 1 Enet=0080c75Be95e
Host 2 IP=0.0.0.0/0
Host 2 Enet=000000000000
Host 3 IP=0.0.0.0/0
Host 3 Enet=000000000000
Setting up Plug and Play support
To set up Plug and Play, you must set the following parameters:
DHCP Spoofing
DHCP Spoofing=Yes
DHCP PNP Enabled=Yes
Setting up DHCP spoofing
To set up DHCP spoofing, you must set the following parameters:
MAX 6000/3000 Network Configuration Guide
4-99
Configuring Individual WAN Connections
Configuring POTS capability on the MAX 6000 and MAX 3000
DHCP Spoofing
DHCP Spoofing=Yes
Always Spoof=No
Additionally, you can set the following parameters:
Renewal Time=nn
Become Def. Router=Yes|No
Dial If Link Down=Yes|No
Validate IP=Yes
Maximum no reply wait=n
For detailed information about each parameter, see the MAX Reference.
Configuring POTS capability on the MAX 6000 and
MAX 3000
The MAXPOTS FXS slot card provides Plain Old Telephone Service (POTS) functionality to
the MAX. The Foreign Exchange Station (FXS) designation indicates that the POTS ports
provide subscriber loop functionality, including loop current, supervision, and signaling,
similar to that provided by the telephone company’s Central Office.
The expansion card (Figure 4-18) provides eight RJ11 POTS ports for the attachment of
telephones, fax machines, and answering machines.The MAXPOTS FXS slot card enables
users to place calls between POTS ports and T1 trunks (inband signaling or PRI), POTS ports
and E1 trunks (PRI or R2), or between two POTS ports. Up to four MAXPOTS FXS slot cards
can be installed in a MAX 6000-T1 or a MAX 6000-E1. The MAXPOTS FXS card is also
available on the MAX 3000 T1, E1 and BRI.
Figure 4-18. MAXPOTS card
You must configure the MAX to route outbound calls to the Public Switched Telephone
Network (PSTN) and to route incoming calls to POTS devices connected to the MAXPOTS
card.
!
4-100
Caution: You must insert any expansion card with its label facing down. You can damage a
MAX unit by incorrectly installing a slot card.
MAX 6000/3000 Network Configuration Guide
Configuring Individual WAN Connections
Configuring POTS capability on the MAX 6000 and MAX 3000
FXS line profiles
There are five possible slot profiles for each MAXPOTS slot card. The first profile (default) is
always the active profile. You can save alternative configurations in the other four profiles.
Configuring an FXS line profile
To configure a slot (or line) profile in Main > Analog FXS > FXS Config > FXS Configuration
profile > Line profile, use the following parameters:
Parameter
Specifies
Name
Name of the profile.
Dial-Enabled
Enable/disable outbound dialing through this profile’s POTS port.
Inc CallerID Info
Include/do not include CallerID information for calls from this port.
Clid Number
Telephone number of the caller.
Answer-Enabled
Enable/disable answering of calls on this profile’s POTS port.
CallerID
Do/do not forward caller-ID information to the POTS port. MAXPOTS
only supports the Bellcore Type I callerID format which might not be
supported in all countries.
Forward Disc
Far-end disconnect indication is/is not forwarded to the POTS port.
Rx Gain
Gain applied to the signal received from the connected equipment.
Tx Gain
Gain of the signal transmitted to the equipment.
Signalling
The signaling used on an analog loop. Regular telephones use Loopstart.
GndStart Ring
Apply/do not apply ringing voltage to the ground start line.
Saving alternative configurations
To copy the active profile to one of the alternate live profiles, proceed as follows:
1
From Analog FXS > FXS Config, select the active profile.
The active profile appears.
2
Press Ctrl-D to access the DO menu.
The DO menu appears.
3
Select S (Save).
4
Select the alternate live profile by using the Up Arrow and, Down Arrow keys, and press
Enter.
The active profile is saved to the specified alternative profile.
Activating an alternative profile
To activate one of the alternative profiles, copy any alternative profile to the active profile,
proceed as follows:
1
From Analog FXS > FXS Config, select the alternative (101, 102, 103, or 104) profile you
want to activate.
MAX 6000/3000 Network Configuration Guide
4-101
Configuring Individual WAN Connections
Configuring POTS capability on the MAX 6000 and MAX 3000
The alternative profile appears.
2
Press Ctrl-D to access the DO menu.
The DO menu appears.
3
Select L (Load).
Note: The Load option does not appear when you are in the active profile.
4
The alternative profile becomes the active profile.
Call Routes profile
You must configure a Call Routes profile to specify how the MAX unit handles the call. In the
System profiles, you can configure up to 64 Call Routes profiles. The MAX uses the profiles to
control the routing of POTS calls. When a call matches Phone Number, Src Slot, Src Port and
Call Rte Type, the unit routes the call as specified by the other parameters in that profile.
In each System > Call Routes profile, set the following parameters to identify and activate the
profile:
Parameter
Specifies
Name
Name of the profile.
Active
Profile is active if this parameter is set to Yes.
Every call will be matched against the following parameters:
Phone
Number
Destination telephone number of the call.
Src Slot
Call’s source slot number.
Src Port
Call’s source port number.
Call Rte Type Call’s type of call to which this call route applies.
Set the following parameters to specify how the MAX routes calls that match the profile:
Dst Chan Grp Call’s destination MAXDAX channel group.
Dst Trnk Grp
Call’s destination trunk group.
Dst Slot
Call’s destination slot.
Dst Port
Call’s destination port.
Dial Plan
Number that identifies the Dial Plan profile to apply to the call.
Rewrt Pattn
Telephone number that the unit compares to a number entered by a POTS
user.
Rewrt Replce
Telephone number that replaces the number entered by a POTS user.
Viewing Call Routes with the DO command
The View Call Routes DO command (Ctrl-D, K) displays several fields of currently active call
routes (in the order in which they would be searched). This display also shows the specific call
route profile (in System > Call Routes) that was used to generate the call route.
4-102
MAX 6000/3000 Network Configuration Guide
Configuring Individual WAN Connections
Configuring POTS capability on the MAX 6000 and MAX 3000
For example, with MAXDAX and Trunk Groups enabled and the following call routes
defined:
System > Call Routes
901->
Active=Yes
Phone=
Src Slot=0
Src Port=0
Call Rte Type=Trunk-Any
Dst Chan Grp=9999
Dst Trnk Grp=9
Dst Slot=3
Dst Port=1
902->
Active=Yes
Phone=85000
Src Slot=0
Src Port=0
Call Rte Type=Trunk-Any
Dst Chan Grp=9999
Dst Trnk Grp=9
Dst Slot=3
Dst Port=1
903->
Active=Yes
Phone=85001
Src Slot=0
Src Port=0
Call Rte Type=Trunk-Any
Dst Chan Grp=9999
Dst Trnk Grp=9
Dst Slot=0
Dst Port=0
MAX 6000/3000 Network Configuration Guide
4-103
Configuring Individual WAN Connections
Configuring POTS capability on the MAX 6000 and MAX 3000
Viewing the call routes with the DO command displays the following screen:.
The columns on the Call Routes screen are:
#
Call route profile number in System > Call Routes.
phone #
Phone # filter in the call route profile. Note that if the phone # is > 11 digits,
then the first 10 digits are displayed followed by the abbreviation indicator ~
SSP
Source slot and port filter.
T
Call route type filter (T=trunk-any, D=trunk-digital, V=trunk-voice)
Dest
Destination of call route (C12=Channel Group 12, T5=Trunk Group 5,
T#=Trunk Group from dialed number, 3:1=Dest slot/port 3:1, FA=first
available)
Internal sorting of call routes
You can route your POTS calls in one of two ways: to the first matching route, or to the port
that has been available the longest. Specify your choice by setting the System > Sys Config
profile’s Call Distrib Type parameter to First Avail (the default) or to Fair Share.
First Avail routing
With First Avail routing, incoming calls are always routed to the first available port. Call routes
are sorted in the following order, ensuring that the first match is also the most specific match:
4-104
Parameter
Sort order within the parameter
Phone Number
First with the exact phone number (beginning with ^ and ending with $),
then followed by reverse-lexical ordering (3, 211, 2, 1) among actual phone
numbers, followed by no phone number.
Src Slot
From the most specific to the least specific.
Src Port
From the most specific to the least specific.
Call Rte Type
Trunk-Digital, Trunk-Voice and then Trunk-Any.
Dst Slot
From the most specific to the least specific.
MAX 6000/3000 Network Configuration Guide
Configuring Individual WAN Connections
Configuring POTS capability on the MAX 6000 and MAX 3000
Parameter
Sort order within the parameter
Dst Port
From the most specific to the least specific.
You can configure the most specific slot and port by setting values other than zero. You can
configure the least specific slot and port by setting zero values. Table 4-1 shows the full-group
ordering from most specific to least specific.
Table 4-1. Full-group ordering of slot and port numbers
nonzero slot
nonzero port
nonzero slot
zero port
zero slot
zero port
As shown in Table 4-1, calls whose destination is a nonzero slot and a nonzero port are at the
top of the sort order, and calls to a zero slot and a zero port are at the bottom of the order. If a
match is within the same group in Table 4-1, the lower-numbered slot comes first, but if slots
are equal, the lower-numbered port comes first.
Table 4-2 shows the sorting order of a list of call routes, regardless of the order in which they
were initially entered. Field values that are not needed for this sorting (in this example) are not
shown.
Table 4-2. Example of sorting order
Phone
Number
Src Slot/
Src Port
Call Rte
Type
Dst Slot/
Dst Port
^5551212$
66
5551212
3/1
5551212
3/2
Trunk-Digital
5551212
3/2
Trunk-Voice
5551212
3/2
Trunk-Any
4/1
5551212
3/2
Trunk-Any
4/2
5551212
3/2
Trunk-Any
5/1
5551212
3/2
Trunk-Any
2/0
5551212
2/0
5551212
4/0
5551212
0/0
MAX 6000/3000 Network Configuration Guide
4-105
Configuring Individual WAN Connections
Configuring POTS capability on the MAX 6000 and MAX 3000
Table 4-2. Example of sorting order (continued)
Phone
Number
Src Slot/
Src Port
Call Rte
Type
Dst Slot/
Dst Port
5551
““
Fair Share routing
You can set the Call Distrib Type parameter to Fair Share so that a call is routed to the
available port that has been idle the longest. This value distributes the calls among several
destinations. In addition to routing a call by Phone Number, Src Slot, Src Port, and Call Rte,
Fair Share further sorts the call by Dst Slot and Dst Port. The existing internal routing criteria
for sorting still apply. You can configure the most specific slot and port by setting values other
than zero. You can configure the least specific slot and port by setting zero values. Table 4-3
shows the full-group ordering from most specific to least specific.
Table 4-3. Full-group ordering of slot and port numbers
nonzero slot
nonzero port
nonzero slot
zero port
zero slot
zero port
As shown in Table 4-3, calls whose destination is a nonzero slot and a nonzero port are at the
top of the sort order, and calls to a zero slot and a zero port are at the bottom of the order. If a
match is within the same group, the MAX unit routes the call to the port that has been idle the
longest first, and the least idle port comes last.
For example, the sort order for the calls in Table 4-4 is from the top of the table to the bottom.
Table 4-4. Example of Fair Share routing order
Phone
Number
Src Slot/
Src Port
Call Rte
Type
Dst Slot/
Dst Port
5551212
3/1
Trunk-Any
8/0
5551212
Trunk-Any
7/1
5551212
Trunk-Any
8/2
5551212
Trunk-Any
6/0
5551212
Trunk-Any
5/0
For example, both the second and third rows of Table 4-4 show nonzero slots and nonzero
ports (Slot 7, Port 1 for row two and Slot 8, Port 2 for row three). If the MAX finds the
slot/port combination (7/1 or 8/2) that has been idle the longest gets the call. If one
4-106
MAX 6000/3000 Network Configuration Guide
Configuring Individual WAN Connections
Configuring POTS capability on the MAX 6000 and MAX 3000
combination is busy, the other gets the call. If both are busy, the longest idle among all ports in
Slots 6 and 5 gets the call and so on.
Numbering Plan profile
Numbering Plan profiles enable you to optimize the placement of outgoing calls. You can fine
tune the point at which the MAX assumes it has received all the dialed digits, and you can
provide callers with a more familiar dialing procedure. If you do not configure a Numbering
Plan profile, callers must either press the # key or wait the specified number of seconds set in
the POTS Digit Timeout parameter (System > Sys Config > POTS Digit Timeout) before the
unit places the call.
The Numbering Plan profiles are global to the system. The Numbering Plan profile menu, in
the System profile, supports up to 32 Numbering Plan profiles. The first Numbering Plan
profile is the default. The unit uses the default profile when no active profile matches the
dialed number. Each Numbering Plan profile includes the following parameters:
Parameter
Specifies
Name
Name of the profile.
Active
This profile is available/not available for use.
Dial Prefix
Leftmost digits of the dialed phone number.
Number Digits Exact number of digits in a phone number that has a prefix matching this
entry’s Dial Prefix setting.
Routing outbound calls
The MAX routes an outgoing call initiated by the POTS device to a WAN T1/E1/PRI/BRI line.
For example, an analog phone could dial into a port on the MAXPOTS card and that call gets
routed out the T1 line:
Analog
interface: FXS
Phone, or fax
WAN trunk: T1,
E1, PRI, BRI
WAN
MAX
You can route outbound (and inbound) calls by configuring the Call Routes profile. Examples
of Call Routes profiles follow. In addition, examples of MAXPOTS rollover functionality is
shown and a Numbering Plan profile.
Note: MAXPOTS supports both DTMF and pulse dialing (7.5 pps to 12 pps) IRURXWERXQG
FDOOGLDOLQJ
Examples of Call Routes configurations
Following are four sample configurations. With the first configuration, the MAX automatically
prepends a trunk digit to each outbound call. With the second, it strips a trunk digit from each
outbound call. With the third and fourth configurations, the unit routes on the basis of area
code and call-setup parameters, respectively.
MAX 6000/3000 Network Configuration Guide
4-107
Configuring Individual WAN Connections
Configuring POTS capability on the MAX 6000 and MAX 3000
Automatically prepend trunk digit
If you configure the MAX to use trunk groups and the callers do not enter a trunk digit when
dialing, you must configure a Call Routes profile to direct the unit to prepend a trunk digit.
With the following configuration, for example, the unit prepends a 9 to each outgoing call:
System
Sys Config
Use Trunk Grps=Yes
System
Call Routes
CRprofile1
Name=CRprofile 1
Active=Yes
Phone Number=
Src Slot=0
Src Port=0
Call Rte Type=Trunk-Voice
Dst Chan Grp=N/A or 0
Dst Trnk Grp=9
Dst Slot=0
Dst Port=0
Dial Plan=0
Rewrt Pattn=
Rewrt Replce=
Automatically strip trunk digit
If you configure the MAX not to use trunk groups and the callers manually enter a trunk digit
when dialing, you must configure a Call Routes profile to strip the trunk digit, as in the
following example:
System
Sys Config
Use Trunk Grps=No
System
Call Routes
CRprofile1
Name=CRprofile1
Active=Yes
Phone Number=
Src Slot=0
Src Port=0
Call Rte Type=Trunk-Voice
Dst Chan Grp=N/A or 0
Dst Trnk Grp=0
Dst Slot=0
Dst Port=0
Dial Plan=0
Rewrt Pattn=^.
Rewrt Replce=
4-108
MAX 6000/3000 Network Configuration Guide
Configuring Individual WAN Connections
Configuring POTS capability on the MAX 6000 and MAX 3000
Route by area code
To route MAXPOTS calls on the basis of area codes, configure Call Routes profiles with Dial
Prefix Filter and New Trunk Group settings. Also make sure that the MAX unit is using trunk
groups and that the trunk groups are defined. For example, the following configuration routes
POTS calls to area code 201 through the first T1 line and all other POTS calls (including local
calls) through the second T1 line:
System
Sys Config
Use Trunk Grps=Yes
Net/T1, Net/E1
Line Config
LCprofile1
Name=LCprofile1
1st Line=Trunk
2nd Line=Trunk
Ch 1 TrnkGrp=7
Ch 2 TrnkGrp=7
...
...
Ch 24 TrnkGrp=7
2nd Line=Trunk
Ch 1 TrnkGrp=8
Ch 2 TrnkGrp=8
...
...
Ch 24 TrnkGrp=8
Call Routes
Call Routes
CRprofile1
Name=CRprofile1
Active=Yes
Phone Number=^1201.......
Src Slot=0
Src Port=0
Call Rte Type=Trunk-Voice
Dst Chan Grp=N/A or 0
Dst Trnk Grp=7
Dst Slot=0
Dst Port=0
Dial Plan=0
Rewrt Pattn=
Rewrt Replce=
Call Routes
Call Routes
CRprofile2
Name=CRprofile2
Active=Yes
MAX 6000/3000 Network Configuration Guide
4-109
Configuring Individual WAN Connections
Configuring POTS capability on the MAX 6000 and MAX 3000
Phone Number=
Src Slot=0
Src Port=0
Call Rte Type=Trunk-Voice
Dst Chan Grp=N/A or 0
Dst Trnk Grp=8
Dst Slot=0
Dst Port=0
Dial Plan=0
Rewrt Pattn=
Rewrt Replce=
Use call-setup parameters
To configure call-setup parameters for a PRI line, set the Use Dial Plan parameter in one or
more Call Routes profiles, and define the dial plan (or plans). For example:
System
Sys Config
System
Dial Plan
DPprofile1
Name=DPprofile1
Call-By-Call=1
System
Call Routes
CRprofile1
Name=CRprofile1
Active=Yes
Phone Number=
Src Slot=0
Src Port=0
Call Rte Type=Trunk-Voice
Dst Chan Grp=N/A or 0
Dst Trnk Grp=0
Dst Slot=0
Dst Port=0
Dial Plan=1
Rewrt Pattn=
Rewrt Replce=
4-110
MAX 6000/3000 Network Configuration Guide
Configuring Individual WAN Connections
Configuring POTS capability on the MAX 6000 and MAX 3000
Port-to-port routing
This routing allows the routing of calls from one POTS port on a MAX to another POTS port
on the same MAX. The ports do not need to be on the same MAXPOTS slot card, and no other
trunks are necessary. You can configure calls 4001 and 4002 to be routed to POTS ports 1 and
2, respectively, on MAXPOTS slot 3 card. For example:
System
Sys Config
System
Call Routes
CRprofile1
Name=CRprofile1
Active=Yes
Phone Number=4001
Src Slot=0
Src Port=0
Call Rte Type=Trunk-Any
Dst Chan Grp=0
Dst Trnk Grp=0
Dst Slot=3
Dst Port=1
System
Call Routes
CRprofile2
Name=CRprofile2
Active=Yes
Phone Number=4002
Src Slot=0
Src Port=0
Call Rte Type=Trunk-Any
Dst Chan Grp=0
Dst Trnk Grp=0
Dst Slot=3
Dst Port=2
You can define the call route to allow calls from POTS port 8, dialing telephone number 4001
to connect to POTS port 4. For example:
System
Call Routes
CRprofile3
Name=CRprofile3
Active=Yes
Phone Number=4001
Src Slot=3
Src Port=8
Call Rte Type=Trunk-Any
Dst Chan Grp=0
Dst Trnk Grp=0
MAX 6000/3000 Network Configuration Guide
4-111
Configuring Individual WAN Connections
Configuring POTS capability on the MAX 6000 and MAX 3000
Dst Slot=3
Dst Port=4
Examples of Rollover configurations
With MAXPOTS, if a port is busy, the MAX can roll over a call to another port or send the
far-end a busy signal. Following are four sample configurations. With the first configuration,
the MAX rolls over a phone call to one port. With the second, the MAX rolls over a call to a
second available port. With the third and fourth configurations, the MAX routes calls to
lower-numbered available slots if the initial port was busy.
Simple rollover
The simplest example of this configuration is shown here. The MAX routes call 5783101 to
MAXPOTS port 1 if it is idle. There are no other profiles that match this phone number, so if
MAXPOTS port 1 is busy, the far-end receives a busy signal.
System
Sys Config
System
Call Routes
Call Routes profile
Active=Yes
Phone Number=5783101
Dst Slot=3
Dst Port=1
Automatic rollover calls
The MAX routes calls from one MAXPOTS port to another. In the following example, System
> Sys Config > Call Distrib Type is set to First Avail. The MAX routes 5551212 calls to
MAXPOTS port 1 or, if this port is busy, the MAX looks for another matching profile, in this
case MAXPOTS port 2. If both ports are busy, the far end receives a busy signal.
System
Sys Config
Call Distrib Type=First Avail
Analog FXS
FXS Config
FXS Config profile 1
Line 1
Answer-Enabled=Yes
Line 2
Answer-Enabled=Yes
System
Call Routes
Call Routes profile 1
4-112
MAX 6000/3000 Network Configuration Guide
Configuring Individual WAN Connections
Configuring POTS capability on the MAX 6000 and MAX 3000
Active=Yes
Phone Number=^5551212$
Dst Slot=3
Dst Port=1
System
Call Routes
Call Routes profile 2
Active=Yes
Phone Number=^5551212$
Dst Slot=3
Dst Port=2
If Call Distrib Type were set to Fair Share, in this example the MAX would route 5551212
calls to port 1 or port 2, whichever had been idle the longest. If both ports are busy, the far end
receives a busy signal.
Automatic wildcard rollover
The MAX routes calls from one MAXPOTS port to another if one is busy. In the following
example, with System > Sys Config > Call Distrib Type set to First Avail, the MAX routes
5551212 calls to the lowest-numbered slot first (in order): 1, 2, ...8. If all MAXPOTS ports are
busy, the far end receives a busy signal.
System
Sys Config
Call Distrib Type=First Avail
Analog FXS
FXS Config
FXS Config profile 1
Line 1
Answer-Enabled=Yes
...
...
Line 8
Answer-Enabled=Yes
System
Call Routes
Call Routes profile 1
Active=Yes
Phone Number=^5551212$
Dst Slot=3
Dst Port=0
If System > Sys Config > Call Distrib Type were set to Fair Share, the MAX would route
5551212 calls to the port that has been idle the longest in slot 3. If that port were busy, the
MAX would try to route the call to the next-longest-idle port and so on. If all MAXPOTS ports
were busy, the far end would receive a busy signal.
MAX 6000/3000 Network Configuration Guide
4-113
Configuring Individual WAN Connections
Configuring POTS capability on the MAX 6000 and MAX 3000
Example of a Numbering Plan profile
With the following configuration, the MAX expects eleven digits for all phone numbers
beginning with a 1, and seven digits otherwise. Callers do not need to press the # key after
entering the phone number.
System
Numbering Plan
NPprofile1
Name=NPprofile1
Active=Yes
Dial Prefix=N/A
Number Digits=7
System
Numbering Plan
NPprofile2
Name=NPprofile2
Active=Yes
Dial Prefix=1
Number Digits=11
MAXDAX
MAXDAX routing provides increased flexibility in routing network-to-network calls. This
release extends this flexibility to calls originated from POTS ports.
To use the MAXDAX functionality for POTS calls, proceed as follows:
1
Assign channel group numbers to each channel that can be used for an outgoing call. For
example:
Net/T1
Line Config
Line Config profile
Line 1
Net2Net ChanGroup ID
Ch 1=Switched
Ch 1 ChanGroup=2
Ch 2=Switched
Ch 2 ChanGroup=4
2
Create a Call Routes profile that will match all calls to which you want to apply the
MAXDAX functionality. Within this profile, define the appropriate destination channel
group. For example:
System
Call Routes
CRprofile1
Name=CRprofile1
Active=Yes
Dst Chan Grp=2
System
Call Routes
CRprofile 2
Name=CRprofile 2
4-114
MAX 6000/3000 Network Configuration Guide
Configuring Individual WAN Connections
Configuring POTS capability on the MAX 6000 and MAX 3000
Active=Yes
Dst Chan Grp=4
For more information about MAXDAX functions, see the MAX Reference.
Routing inbound calls
When the MAX receives a call on a WAN line, it performs CLID or DNIS authentication (if
configured), answers the call, and routes the call to the MAXPOTS card. The following are
examples of incoming call routing.
Answer Number Routing
You can configure the MAX to route incoming MAXPOTS calls on the basis of dialed
telephone numbers. For example, consider a T1 line with DNIS numbers 555-6601 and
555-6602. The following configuration routes a call received at 555-6601 to Port 1 on the
MAXPOTS card (located on slot 3), and a call received at 555-6602 to Port 2 on the
MAXPOTS card (located on slot 3). (If the port is busy, the far-end will get a busy signal):
System
Sys Config
Net/T1
Line Config
Line Config profile
Line 1
Signalling=Inc-W-200 or Inc-W-400
Collect DNIS/ANI=Yes
Analog FXS
FXS Config
FXS Config profile 1
Line 1
Answer-Enabled=Yes
Analog FXS
FXS Config
FXS Config profile 2
Line 2
Answer-Enabled=Yes
Call Routes
Call Routes
Call Routes profile 1
Active=Yes
Phone Number=5556601
Dst Slot=3
Dst Port=1
Call Routes
Call Routes
Call Routes profile 2
Active=Yes
MAX 6000/3000 Network Configuration Guide
4-115
Configuring Individual WAN Connections
Configuring POTS capability on the MAX 6000 and MAX 3000
Phone Number=5556602
Dst Slot=3
Dst Port=2
Line Status
From Main Status Menu > Analog FXS > Line Status, you can monitor the activity of each
port. Each port can be represented by one of the following characters.
Character
Description
– (dash)
idle
. (period)
off-hook
D
dialing
R
ringing
=
connected
For example, the status windows in Figure 4-19 indicate that all 8 POTS ports are idle.
Figure 4-19. MAXPOTS Line Status display
Call Detail Reporting
The MAX logs the standard Call Detail Reporting (CDR) records. Specifically, the unit
supports the ANSWER, ORIGINATE, and CLEAR records. Note that the standard method
applies for identifying calls that are not picked up, that is, the unit logs a CLEAR record
without an associated ANSWER record.
For more information about Call Detail Reporting, see the MAX Administration Guide.
4-116
MAX 6000/3000 Network Configuration Guide
Configuring Frame Relay
5
Introduction . . . . . . . . . . . . . . . . . . . . . . . . . . . . . . . . . . . . . . . . . . . . . . . . . . . . . . . . . . 5-1
Configuring nailed bandwidth for Frame Relay . . . . . . . . . . . . . . . . . . . . . . . . . . . . . . 5-4
Defining Frame Relay link operations . . . . . . . . . . . . . . . . . . . . . . . . . . . . . . . . . . . . . . 5-4
Configuring a DLCI logical interface . . . . . . . . . . . . . . . . . . . . . . . . . . . . . . . . . . . . . 5-13
Concentrating incoming calls onto Frame Relay . . . . . . . . . . . . . . . . . . . . . . . . . . . . . 5-19
Configuring the MAX as a Frame Relay switch . . . . . . . . . . . . . . . . . . . . . . . . . . . . . 5-25
Configuring switched Frame Relay connections . . . . . . . . . . . . . . . . . . . . . . . . . . . . . 5-33
Configuring 64 switched Frame Relay connections . . . . . . . . . . . . . . . . . . . . . . . . . . 5-36
Frame Relay (FR) is a form of packet-switching, using smaller packets and less error checking
than traditional forms of packet switching. For every FR interface, you must configure a
dedicated line. You can obtain administrative information about the status of the FR interface
by defining link management frames, specifically assigning a unique Data Link Connection
Identifier (DLCI) address. By setting parameters for IP Routing, you can configure a gateway
for all incoming FR calls. You can configure the MAX as a FR switch so that the MAX can
receive frames on one interface and transmit them onto another interface. You can enable the
MAX to support a FR switched connection over ISDN BRI or PRI connections.
You can set all these configurations (except for the last) in either the Connection profiles or the
RADIUS profiles.
Introduction
In the Frame Relay network, every access point connects directly to a switch. Frame Relay
virtual circuits (VCs) are bidirectional data paths between two endpoints. An established
permanent virtual circuit (PVC) is a connection between two endpoints, which can include a
number of hops in between.
Depending on how a device such as the MAX is integrated into a Frame Relay network, it can
operate as a Frame Relay terminating unit (Customer Premise Equipment or CPE) or as a
Frame Relay switch.
A CPE is the source or destination of data traversing the Frame Relay service. For example, the
MAX labeled MAX-02 in Figure 5-1 terminates the data stream to its PPP callers. When it is
MAX 6000/3000 Network Configuration Guide
5-1
Configuring Frame Relay
Introduction
configured with a User-to-Network (UNI) interface to Frame Relay, the MAX acts as the user
side (UNI-DTE) communicating with the network side (UNI-DCE) of a switch.
The network-side device connects the CPE device to a Frame Relay network. For example, the
MAX labeled MAX-01 in Figure 5-1 receives Frame Relay encapsulated frames from a CPE
and forwards them on to another Frame Relay switch. When it is configured with a UNI-DCE
interface to Frame Relay, the MAX acts as the network side (UNI-DCE) communicating with
the user side (UNI-DTE) of a Frame Relay device.
Figure 5-1. Frame Relay network
PPP callers
Private LAN
CPE
router
DTE
MAX-01
DCE
NNI
MAX-02
NNI
NNI
NNI
DCE
DTE
A Frame Relay switch is another kind of network-side device, which switches frames from one
interface to another and exchanges status information with its peer switch. For example, the
MAX labeled MAX-01 in Figure 5-1 receives frames from its peer switch and switches them
to its other Frame Relay interface. When it is configured with a Network-to-Network (NNI)
interface to Frame Relay, the MAX acts as a Frame Relay switch. Switch-to-switch
communication includes both user side (NNI-DTE) and network side (NNI-DCE) functions.
Frame Relay link management
Frame Relay link management enables administrators to retrieve information about the status
of the Frame Relay interface via special management frames with a unique Data Link
Connection Identifier (DLCI) address. (DLCI 0 is the default for link management frames.)
Link management frames are used to monitor the interface and provide information about
DLCI status.
On a UNI interface to Frame Relay, link management procedures occur in one direction. The
UNI-DTE device requests information and the UNI-DCE device provides it.
On an NNI interface, link management procedures are bidirectional. Switches perform both the
NNI-DTE and NNI-DCE link management functions, since both sides of the connection
request information from their peer switches.
Using the MAX as a Frame Relay concentrator
As a Frame Relay concentrator, the MAX forwards many lower-speed PPP connections onto
one or more high-speed Frame Relay interfaces, as shown in Figure 5-2:
5-2 Preliminary January 4, 2001
MAX 6000/3000 Network Configuration Guide
Configuring Frame Relay
Introduction
Figure 5-2. Frame Relay concentrator
Frame Relay
PPP
DLCI 50
In this kind of configuration, the decision to forward frames onto the Frame Relay interface
can be made through OSI layer 3 (routing), or by Frame Relay Direct.
Using the MAX as a Frame Relay switch
As a Frame Relay switch, the MAX receives frames on one interface and transmits them on
another interface. The decision to forward frames onto the Frame Relay interface is made
through the assignment of circuit names. The MAX router software is not involved.
To use the MAX as a switch, you must configure a circuit that pairs two Frame Relay DLCI
interfaces. Instead of going to the layer 3 router for a decision on which interface to forward
the frames, it relies on the circuit configuration to relay the frames received on one interface to
its paired interface. A circuit is defined in two Connection or RADIUS user profiles.
Figure 5-3 shows the MAX operating as a Frame Relay switch:
Figure 5-3. Frame Relay switch
FR switch-2
FR switch-3
DLCI 100
FR switch-1
DLCI 200
Components of a Frame Relay configuration
The physical link to another Frame Relay device must be nailed (similar to a dedicated leased
line). The administrator allocates nailed bandwidth in a line profile (the profile of a T1, E1,
SWAN, or other network line).
The link interface to the Frame Relay device, which is also called a datalink, references
specific nailed bandwidth in the MAX and defines the operations and link management
functions the MAX performs on the interface. The administrator specifies these settings in a
Frame Relay profile or RADIUS frdlink pseudo-user profile.
MAX 6000/3000 Network Configuration Guide
Preliminary January 4, 2001 5-3
Configuring Frame Relay
Configuring nailed bandwidth for Frame Relay
The logical interface is a PVC endpoint, which requires a DLCI. DLCIs uniquely identify the
logical endpoints of a virtual circuit (a specific end device). Administrators obtain DLCIs from
Frame Relay providers and assign them in Connection profiles or RADIUS user profiles.
Configuring nailed bandwidth for Frame Relay
Each Frame Relay interface in the MAX requires its own nailed bandwidth, which is similar to
a dedicated leased line.
Note: If you configure the bandwidth on nailed T1, make sure that the number of channels
the MAX uses for the link matches the number of channels used by the device at the other end
of the link, and that only one line profile specifies the Nailed-Group number to be used by the
Frame Relay datalink.
Following are some examples of relevant parameters, shown with sample settings:
Net/T1 > Line Config > Line 1 > Ch 2=Nailed
Net/T1 > Line Config > Line 1 > Ch 2 Prt/Grp=1
Net/E1 > Line Config > Line 1 > Ch 2=Nailed
Net/E1 > Line Config > Line 1 > Ch 2 Prt/Grp=1
Serial WAN > Mod Config > Nailed Grp=1
Parameter
Specifies
Ch N
Switched or Nailed channel usage. To configure nailed bandwidth
on a channelized T1 or E1 card, set to Nailed 64-Channel (a clearchannel 64K circuit). On unchannelized cards, this parameter does
not apply.
Ch N Prt/Grp
Nailed Grp
A number from 1 to 1024, used to identify nailed bandwidth.
Frame Relay profiles or RADIUS frdlink pseudo-user profiles
specify this number to use the associated bandwidth.
For more details about configuring T1, see the Installation and Basic Configuration Guide for
your MAX.
Defining Frame Relay link operations
A Frame Relay profile defines datalink operations, including link management functions. The
same settings can be specified in a RADIUS frdlink pseudo-user profile.
Note: Link management settings are optional. It is possible to set up a Frame Relay interface
and pass data across it without setting these parameters. However, link management
parameters provide a mechanism for retrieving information about the status of the interface
and its DLCIs.
5-4 Preliminary January 4, 2001
MAX 6000/3000 Network Configuration Guide
Configuring Frame Relay
Defining Frame Relay link operations
The Ethernet > Frame Relay > Frame Relay profile includes the following parameters that
define the name of the Frame Relay profile and make it available for use, the type of call
connection, and the type of frame relay for the switch:
Parameter
Specifies
Name
Name of the Frame Relay profile to use for forwarding this link on the
Frame Relay network. The name must be unique and cannot exceed 15
characters.
Active
A profile, making it available for use. A dash appears before each
deactivated profile.
Call Type
Type of connection, such as switched, or nailed. You can set the Call
Type parameter to specify the type of connection between the local
and remote codecs.
FR Type
You can set the FR Type parameter to NNI (for an NNI interface to the
switch), DCE (for a UNI-DCE interface), or DTE (for a UNI-DTE
interface).
Nailed Grp
Assigns those channels to the link represented by the profile. Only one
active link can be assigned to use a particular group number.
Data Svc
A data service provided over a WAN line and is characterized by the
unit measure of its bandwidth. A data service can transmit either data
or digitized voice. In a Call profile, Connection profile, X.25, or
Frame Relay profile, Data Svc specifies the type of data service the
link uses. In a Dial Plan profile, Data Svc specifies the data service
associated with the number the MAX dials under the extended dial
plan.
Dialing, billing and signaling parameters
The next set of parameters in Ethernet > Frame Relay > Frame Relay profile define the types
of outbound calls the MAX makes, the number used to dial out this connection, telephone
billing number, the signaling value the PRI uses when placing a call and a dialing prefix for
PRI calling, and a string for use in the transit network IE:
Parameter
Specifies
PRI # Type
Outbound calls made by the MAX on PRI lines so that the switch can
properly interpret the phone number dialed. Ask your PRI provider for
details on when to use each of the following settings. This parameter
specifies the TypeOfNumber field in the called party’s information
element.
Dial #
Number used to dial out this connection. It can contain up to 24
characters, which may include a dialing prefix that directs the
connection to use a trunk group or dial plan; for example: 6-1-212-5551212.
Bill #
A telephone number to be used for billing purposes. If a number is
specified, it is used either as a billing suffix or the calling party number.
For robbed-bit lines, the MAX uses the billing-number as a suffix that
is appended to each phone number it dials for the call.
MAX 6000/3000 Network Configuration Guide
Preliminary January 4, 2001 5-5
Configuring Frame Relay
Defining Frame Relay link operations
Call-by-Call
A signaling value the PRI service uses when placing a call using that
profile.
Transit #
A dialing prefix for use in the transit network IE for PRI calling when
going through an Interexchange Carrier (IEC). The default (null)
causes the MAX to use any available IEC for long-distance calls.
Link parameters
The next two parameters in Ethernet > Frame Relay > Frame Relay profile define the link
status of the FR datalink and the link protocol to use between the MAX and the FR switch:
Parameter
Specifies
Link Status Dlci
The DLCI to use for link status on the Frame Relay datalink. Specify
DLCI0 (the default) or DLCI1023.
Link Mgmt
Link management protocol to use between the MAX and the Frame
Relay switch. The Frame Relay administrator or service provider can
tell you which value to use.
Timers and event count parameters
The functions of Frame Relay timers and event counts include the following parameters in
Ethernet > Frame Relay > Frame Relay profile:
Parameter
Specifies
N391
Interval at which the MAX requests a Full Status Report (from 1 to
255 seconds). Is N/A if FR Type is DCE.
DTE N392
Number of errors, during DTE N393 monitored events, that cause the
user side to declare the network-side procedures inactive. The value
should be less than that of DTE N393 (from 1 to 10). DTE N.392 is N/
A when FR Type is DCE.
DTE N393
Number of DTE monitored events per testing cycle (from 1 to 10). It is
N/A when FR Type is DCE.
DCE N392
Number of errors, during DCE N393 monitored events, that causes the
network side to declare the user-side procedures inactive. The value
should be less than that of DCE N393 (from 1 to 10). DCE N392 is N/
A when FR Type is DTE.
DCE N393
DCE monitored event count (from 1 to 10). It is N/A when FR Type is
DTE.
T391
Link Integrity Verification polling timer (from 5 to 30 seconds). The
value should be less than that of T392. T391 is N/A when FR Type is
DCE.
5-6 Preliminary January 4, 2001
MAX 6000/3000 Network Configuration Guide
Configuring Frame Relay
Defining Frame Relay link operations
Parameter
Specifies
T392
Interval for Status Enquiry messages (from 5 to 30 seconds). The
MAX records an error message if it does not receive an Status Enquiry
message within T392 seconds. This parameter is N/A when FR Type is
DTE.
MRU
Maximum Receive Units. Maximum number of bytes the MAX can
receive in a single packet across this link. Usually the default of 1532
is the right setting, unless the far end device requires a lower number.
For detailed information about each parameters, see the MAX Reference.
Settings in a Frame Relay profile
Following are the Frame Relay profile parameters, shown with sample settings:
Ethernet
Frame Relay
Frame Relay profile
Name*=""
Active=Yes
Call Type=Nailed
FR Type=NNI
Nailed Grp=1
Data Svc=56KR
PRI # Type=N/A
Dial #=N/A
Bill #=N/A
Call-by-Call=N/A
Transit #=N/A
Link Status Dlci=0
Link Mgmt=T1.617D
N391=6
DTE N392=3
DTE N393=4
DCE N392=3
DCE N393=4
T391=10
T392=15
MRU=1532
Settings in a RADIUS frdlink profile
An frdlink profile is a pseudo-user profile in which the first line has this format:
frdlink-name-N Password="ascend", User-Service=Dialout-Framed-User
The name argument is the MAX system name (specified by the Name parameter in the System
profile), and N is a number in a sequential series, starting with 1. Make sure there are no
missing numbers in the series specified by N. If there is a gap in the sequence of numbers, the
MAX stops retrieving the profiles when it encounters the gap in sequence.
MAX 6000/3000 Network Configuration Guide
Preliminary January 4, 2001 5-7
Configuring Frame Relay
Defining Frame Relay link operations
The following attributes can be used to define a frdlink pseudo-user profile:
Attribute
Value
Ascend-FR-ProfileName (180)
A Frame-Relay profile name (up to 15 characters), to be
referenced in user profiles that make use of this datalink.
Ascend-FR-Nailed-Grp
(158)
Group number assigned to nailed bandwidth in a line profile, such
as a T1 or E1 profile. The default is 1. Make sure the Frame-Relay
profile specifies the correct group number. If the channels are on
nailed T1, make sure that the number of channels the MAX uses
for the link matches the number of channels used by the device at
the other end of the link, and that only one T1 profile specifies the
Nailed-Group number to be used by the Frame Relay datalink.
Ascend-Call-Type (177)
Type of nailed connection: Nailed (1), Nailed/Mpp (2), or Perm/
Switched (3). Nailed is the default.
Ascend-Data-Svc (247)
Type of data service on the nailed link.Typically set to Nailed-64K
for a Frame Relay datalink.
Ascend-FR-Link-Mgt
(160)
The link management protocol. Settings are Ascend-FR-No-LinkMgt (0) (link management protocol is disabled), Ascend-FR-T1617D (1) (Annex D), and Ascend-FR-Q-933A (2)(CCITT Q.933
Annex A). Ascend-FR-No-Link-Mgt is the default.
To ensure interoperability with equipment from different vendors,
the same version of management protocol must be used at each
end of the Frame Relay link.
Ascend-FR-Type (159)
Type of operations performed by the MAX on this interface.
Settings are Ascend-FR-DTE (0), Ascend-FR-DCE (1), or
Ascend-FR-NNI (2). Ascend-FR-DTE is the default. (For more
information, see “Examples of a UNI-DTE link interface” on page
5-9, “Examples of a UNI-DCE link interface” on page 5-10, and
“Examples of an NNI link interface” on page 5-12.)
Ascend-FR-N391 (161)
Number of T391 polling cycles between full Status Enquiry
messages. The default is 6, which indicates that after 6 status
requests spaced Ascend-FR-T391 seconds apart, the UNI-DTE
device requests a Full status report. Does not apply when AscendFR-Type is Ascend-FR-DCE.
Ascend-FR-DTE-N392
(163)
Number of errors which, if occurring in the number of DTE
monitored events specified by Ascend-FR-DTE-N393, causes the
user-side to declare the network-side procedures inactive. The
value should be less than that of Ascend-FR-DTE-N393l (which
can be from 1 to 10). The default value is 3. Does not apply when
Ascend-FR-Type is Ascend-FR-DCE.
Ascend-FR-DTE-N393
(165)
DTE monitored event count (from 1 to 10). The default is 4. Does
not apply when Ascend-FR-Type is Ascend-FR-DCE.
5-8 Preliminary January 4, 2001
MAX 6000/3000 Network Configuration Guide
Configuring Frame Relay
Defining Frame Relay link operations
Attribute
Value
Ascend-FR-T391 (166)
Link Integrity Verification polling timer. The value should be less
than that of Ascend-FR-T392. The default is 10, which indicates
that after Ascend-FR-N391 status requests spaced 10 seconds
apart, the UNI-DTE device requests a Full status report. Does not
apply when Ascend-FR-Type is Ascend-FR-DCE.
Ascend-FR-T392 (167)
Interval in which Status Enquiry messages should be received
(from 5 to 30 seconds). The default T392 value is 15. An error is
recorded if no Status Enquiry is received within the specified
number seconds. Does not apply when Ascend-FR-Type is
Ascend-FR-DTE.
Framed-MTU (12)
Maximum number of bytes the MAX can transmit in a single
packet across the link interface. Usually the default of 1532 is the
right setting. However, the far-end device might require a lower
number.
Ascend-FR-DCE-N392
(162)
Number of errors which, if occurring in the number of DCE
monitored events specified by Ascend-FR-DCE-N393, causes the
network-side to declare the user-side procedures inactive. The
value should be less than that of Ascend-FR-DCE-N393 (which
can be from 1 to 10). Does not apply when Ascend-FR-Type is
Ascend-FR-DTE.
Ascend-FR-DCE-N393
(164)
DCE monitored event count (from 1 to 10). The default is 4. Does
not apply when Ascend-FR-Type is Ascend-FR-DTE.
Ascend-FR-Link-Status- DLCI to use for LMI link management on the Frame Relay
Dlci (106)
datalink. Valid values are DLCI0 (the default) and DLCI1023.
Examples of a UNI-DTE link interface
On a UNI-DTE interface, the MAX acts as the user side communicating with the network side
DCE switch. It initiates link management functions by sending a Status Enquiry to the UNIDCE device. Status Enquiries may include queries about the status of PVC segments the DTE
knows about, as well as the integrity of the datalink between the UNI-DTE and UNI-DCE
interfaces.
The UNI-DTE uses the values of the N391, N392, N393, and T391 parameters in the FrameRelay profile to define the timing of its Status Enquiries to the DCE and its link integrity
parameters. (These correspond to the Ascend-FR-N391, Ascend-FR-DTE-N392, Ascend-FRDTE-N393, and Ascend-FR-T391 attributes in a RADIUS profile.)
Figure 5-4 shows an example of the MAX with a UNI-DTE interface.
MAX 6000/3000 Network Configuration Guide
Preliminary January 4, 2001 5-9
Configuring Frame Relay
Defining Frame Relay link operations
Figure 5-4. Frame Relay DTE interface
Frame Relay
FR switch
DCE
DTE
The following parameters specify nailed group 11 as the bandwidth for the sample DTE
interface. Make sure that the Frame-Relay profile specifies the correct nailed group.
Ethernet
Frame Relay
Frame Relay profile
Active=Yes
FR Type=DTE
Nailed Grp=11
Link Mgmt=Q.933A
With these link management settings, the MAX uses the CCITT Q.933 Annex A link
management protocol to communicate with the Frame Relay DCE. It initiates link
management functions by sending a Status Enquiry to the DCE every 10 seconds.
On a UNI-DTE interface, the state of a DLCI is determined by the Full status report from the
DCE or by an async PVC update. The Full status report from the DCE specifies active and
inactive and new DLCIs. If the DCE does not specify a DLCI as active or inactive, the DTE
considers it inactive.
Following is a comparable RADIUS profile:
frdlink-max-1 Password="ascend", User-Service=Dialout-Framed-User
Ascend-FR-Profile-Name="fr-dte",
Ascend-Call-Type=Nailed,
Ascend-FR-Type=Ascend-FR-DTE,
Ascend-FR-Nailed-Grp=11,
Ascend-FR-Link-Mgt=Ascend-FR-Q-933A,
Ascend-Data-Svc=Nailed-64K
Examples of a UNI-DCE link interface
On a UNI-DCE interface, the MAX acts as the network side communicating with the user side
(UN-DTE) of a Frame Relay terminating unit.
The UNI-DCE uses the values of the T392, DCE N392, and DCE N393 parameters in the
Frame Relay profile to define the parameters of the Status Enquiries expected from the DTE.
(These correspond to the Ascend-FR-T392, Ascend-FR-DCE-N392, and Ascend-FR-DCEN393 attributes in a RADIUS profile.)
5-10 Preliminary January 4, 2001
MAX 6000/3000 Network Configuration Guide
Configuring Frame Relay
Defining Frame Relay link operations
For example, if the MAX expects a Status Enquiry from the DTE every ten seconds, it records
an error if it does not receive a Status Enquiry in ten seconds.
Figure 5-5 shows an example of the MAX with a UNI-DCE interface.
Figure 5-5. Frame Relay DCE interface
Frame Relay
CPE endpoint
DTE
DCE
The following parameters specify nailed group 36 as the bandwidth for the sample DCE
interface. Make sure that the Frame-Relay profile specifies the correct nailed group.
Ethernet
Frame Relay
Frame Relay profile
Active=Yes
FR Type=DCE
Nailed Grp=36
Link Mgmt=Q.933A
T392=15
With these link management settings, the MAX uses the CCITT Q.933 Annex A link
management protocol to communicate with the CPE endpoint. It expects a Status Enquiry at
intervals less than seven seconds.
On a UNI-DCE interface, if the datalink is up, the DLCI is considered to be up as well. In the
DCE Full status response to the DTE, if a PVC segment terminates within the DCE, it is
reported as active. If the PVC segment is not terminated, the DCE has to request further
information on the Frame Relay network. In that case, it requests information about the DLCI
from the next hop switch, and reports back to the DTE when the segment is confirmed to be
active or inactive.
Following is a comparable RADIUS profile:
frdlink-max-2 Password="ascend", User-Service=Dialout-Framed-User
Ascend-FR-Profile-Name="fr-dce",
Ascend-Call-Type=Nailed,
Ascend-FR-Type=Ascend-FR-DCE,
Ascend-FR-Nailed-Grp=36,
Ascend-FR-Link-Mgt=Ascend-FR-Q-933A,
Ascend-Data-Svc=Nailed-64K,
Ascend-FR-T392=15
MAX 6000/3000 Network Configuration Guide
Preliminary January 4, 2001 5-11
Configuring Frame Relay
Defining Frame Relay link operations
Examples of an NNI link interface
An NNI interface implements procedures used by Frame Relay switches to communicate
status between them. The MAX uses these procedures to inform its peer switch about the status
of PVC segments from its side of the Frame Relay network, as well as the integrity of the
datalink between them. The procedure is bidirectional. The switches act as both the user side
(DTE) and network side (DCE) in that they both send Status Enquiries and respond to them.
Because NNI is bidirectional, all of the link management values defined in the Frame-Relay
profile are used. The values of the N391, N392, N393, and T391 parameters define the user
side of the NNI. These values define the timing of the status enquiries the MAX MAX sends to
its peer switch and the boundary conditions that define link integrity. The values of the T392l,
DCE N392, and DCE N393 parameters are used by the network side of the NNI to define the
parameters of the Status Enquiries it expects from the its peer switch.
Figure 5-6 shows a MAX with an NNI interface:
Figure 5-6. Frame Relay NNI interface
FR switch-2
FR switch-3
NNI
NNI
To operate as a switch, the MAX requires a hard-coded circuit configuration in two
Connection profiles. It relies on the circuit configuration to relay the frames received on one of
the circuit endpoints to the other circuit endpoint. For details about circuit configuration, see
“Configuring the MAX as a Frame Relay switch” on page 5-25.
Note: The two Frame Relay endpoints that make up the circuit do not require NNI interfaces.
The following parameters specify the nailed group 52 as the bandwidth for the NNI interface to
Switch-3 (Figure 5-6). Make sure that the Frame-Relay profile specifies the correct nailed
group.
Ethernet
Frame Relay
Frame Relay profile
Active=Yes
FR Type=NNI
Nailed Grp=52
Link Mgmt=T1.617D
N391=6
T391=10
T392=15
With these link management settings, the MAX uses the ANSI Annex D link management
protocol to communicate with Switch-3. It sends a Status Enquiry for Link Integrity
Verification to Switch-3 every 10 seconds, and requests a Full status report every sixth enquiry
5-12 Preliminary January 4, 2001
MAX 6000/3000 Network Configuration Guide
Configuring Frame Relay
Configuring a DLCI logical interface
(every 60 seconds). It also sends a Full Status report in response to requests from the other
switch. If it does not receive a Status Enquiry within a 15-second interval (T392), it records an
error.
Following is a comparable RADIUS profile:
frdlink-max-3 Password="ascend", User-Service=Dialout-Framed-User
Ascend-FR-Profile-Name="switch-3",
Ascend-Call-Type=Nailed,
Ascend-FR-Type=Ascend-FR-NNI,
Ascend-FR-Nailed-Grp=52,
Ascend-FR-Link-Mgt=Ascend-FR-T1-617D,
Ascend-Data-Svc=Nailed-64K,
Ascend-FR-N391=6,
Ascend-FR-T391=10,
Ascend-FR-T392=15
Configuring a DLCI logical interface
A Connection profile defines a DLCI interface. The same settings can be specified in a
RADIUS permconn pseudo-user profile.
Overview of DLCI interface settings
Administrators configure a Connection or RADIUS permconn profile that specifies a
connection to a far end device across Frame Relay. The first hop of the connection is known by
the DLCI assigned in the profile.
A DLCI is an integer between 16 and 991 that uniquely identifies a specific endpoint in the
Frame Relay network. The Frame Relay administrator must provide a valid DLCI for each
logical interface to a Frame Relay network.
Settings in a Connection profile
All connections that use Frame Relay must specify the name of a configured Frame Relay
profile that defines the data link between the MAX and the Frame Relay network. Forwarded
or routed connections over the Frame Relay link use the following sets of parameters (shown
with sample settings):
Ethernet
Answer
Encaps...
PPP=Yes
FR=Yes
PPP Options...
Route IP=Yes
MAX 6000/3000 Network Configuration Guide
Preliminary January 4, 2001 5-13
Configuring Frame Relay
Configuring a DLCI logical interface
For gateway connections:
Ethernet
Connections
Connection profile
Encaps=FR
Encaps options...
FR Prof=pacbell
DLCI=16
Circuit=N/A
Route IP=Yes
Ip options...
LAN Adrs=10.2.3.4/24
For Frame Relay circuits:
Ethernet
Connections
Connection profile
Encaps=FR_CIR
Encaps options...
FR Prof=pacbell
DLCI=16
Circuit=circuit-1
For FR Direct connections:
Ethernet
Connections
Connection profile
Encaps=PPP
Route IP=Yes
Ip options...
LAN Adrs=10.2.3.4/24
Session options...
FR Direct=Yes
FR Prof=pacbell
DLCI=16
The Frame Relay connection parameters
This section provides some background information about the Frame Relay connection
parameters. For detailed information about each parameter, see the MAX Reference.
Gateway connections (Encaps=FR)
Gateway connections require FR encapsulation, a Frame Relay profile name, and a DLCI.
Your Frame Relay provider tells you the DLCI to assign to each connection.
A Connection profile that specifies Frame Relay encapsulation must include a DLCI to
identify the first hop of a permanent virtual circuit (PVC). The MAX does not allow you to
enter duplicate DLCIs, except when they are carried by separate physical links specified in
different Frame Relay profiles.
5-14 Preliminary January 4, 2001
MAX 6000/3000 Network Configuration Guide
Configuring Frame Relay
Configuring a DLCI logical interface
Frame Relay circuits (Encaps=FR_CIR)
A circuit is a PVC segment configured in two Connection profiles. Data coming in on the
DLCI configured in one Connection profile is switched to the DLCI configured in the other.
Data gets dropped if the circuit has only one DLCI. If more than two Connection profiles
specify the same circuit name, the MAX uses only two DLCIs.
In a circuit, both Connection profiles must specify FR_CIR encapsulation and the same circuit
name. Each profile must specify a unique DLCI. The MAX does not allow you to enter
duplicate DLCIs, except when separate physical links specified in different Frame Relay
profiles carry duplicate DLCIs.
FR Direct connections (FR Direct=Yes)
In an FR Direct connection, the MAX simply attaches a Frame Relay PVC to multiple
Connection profiles. It does so in the Session Options subprofile, by enabling FR Direct,
specifying a Frame Relay profile, and setting a DLCI for the PVC endpoint in the FR DLCI
parameter. Any packet coming into the MAX on these connections gets switched out on the
DLCI. In this mode, the MAX allows multiple Connection profiles to specify the same PVC
(the same DLCI).
FR Direct is an unusual mode, in that the MAX ignores the destination of the packets. It
assumes that some device at the far end of the PVC makes the routing decisions. The
Connection profile, however, must use IP routing to enable the MAX to route data back to the
client.
Settings in a RADIUS profile
A permconn profile is a pseudo-user profile in which the first line has this format:
permconn-name-N Password="ascend", User-Service=Dialout-Framed-User
The name argument is the MAX system name (specified by the Name parameter in the System
profile), and N is a number in a sequential series, starting with 1. Make sure there are no
missing numbers in the series specified by N. If there is a gap in the sequence of numbers, the
MAX stops retrieving the profiles when it encounters the gap in sequence.
The following attributes can be used to define a permconn pseudo-user profile that uses Frame
Relay:
Attribute
Value
User-Name (1)
Name of the far end Frame Relay device.
Framed-Protocol (7)
The encapsulation protocol. Must be set to FR (261).
Ascend-FR-ProfileName (180)
Name of the Frame-Relay profile that defines the data link.
Ascend-FR-DLCI (179)
A DLCI for this PVC endpoint.The DLCI must be obtained from
a Frame Relay provider. The MAX does not allow you to enter
duplicate DLCIs, except when they are carried by separate
physical links specified in different Frame-Relay profiles.
MAX 6000/3000 Network Configuration Guide
Preliminary January 4, 2001 5-15
Configuring Frame Relay
Configuring a DLCI logical interface
Attribute
Value
Ascend-Backup (176)
Name of a backup Connection profile to the next hop (optional).
See “Examples of backup interfaces for nailed Frame Relay links”
on page 5-17.
Examples of a DLCI interface configuration
In the following example, the MAX has a connection to a Frame Relay switch that also
supports IP routing, as shown in Figure 5-7:
Figure 5-7. Frame Relay PVC
Frame Relay
10.11.12.3/24
DLCI 100
The following set of parameters configures the Connection profile, assigning DLCI 100:
Ethernet
Connections
Connection profile
Active=Yes
Encaps=FR
IP options
LAN Adrs=10.11.12.3/24
Encaps options
FR Prof=fr-dce
DLCI=100
Telco options
Call Type=Nailed
Following is a comparable RADIUS profile:
permconn-max-1 Password="ascend", User-Service=Dialout-Framed-User
User-Name="max-switch",
Framed-Protocol=FR,
Framed-Address=10.11.12.3,
Framed-Netmask=255.255.255.0,
Ascend-Route-IP=Route-IP-Yes,
Ascend-FR-DLCI=100,
Ascend-FR-Profile-Name="fr-dce"
Note: When IP routing is enabled, the MAX creates a route for this destination.
Administrators can choose to add static routes to other subnets or to enable RIP updates to or
from the router across Frame Relay. The usual considerations for IP routing connections apply
(see Chapter 9, “Configuring IP Routing.”)
5-16 Preliminary January 4, 2001
MAX 6000/3000 Network Configuration Guide
Configuring Frame Relay
Configuring a DLCI logical interface
Examples of backup interfaces for nailed Frame Relay links
On UNI-DTE and NNI interfaces, the MAX issues Status Enquiries that check the state of the
other end of PVC segments on the interface. If a DLCI becomes inactive, and the profile
configuring its nailed interface specifies a backup connection, the MAX uses the backup
connection to provide an alternate route to the other end.
In the sample profiles that follow, the primary interface is a Frame Relay DLCI interface
defined in a profile named fp7, and the backup interface is another DLCI interface defined in
a profile named pvc. In this example, the remote IP address of the primary and the backup
connection are different.
The following set of parameters defines the primary and backup interfaces in local Connection
profiles:
Ethernet
Connections
fp7
Name=fp7
Active=Yes
Encaps=FR
IP options
LAN Adrs=10.168.7.9/24
Encaps options
FR Prof=frt2-7
DLCI=18
Telco options
Call Type=Nailed
Session Options
BackUp=
Ethernet
Connections
pvc
Name=pvc
Active=Yes
Encaps=FR
IP options
LAN Adrs=10.168.7.11/24
Encaps options
FR Prof=frt1-7
DLCI=16
Telco options
Call Type=Nailed
Following are comparable RADIUS profiles:
permconn-max1-1 Password="ascend", User-Service=Dialout-Framed-User
User-Name="fp7",
Framed-Protocol=FR,
Framed-Address=10.168.7.9,
Framed-Netmask=255.255.255.0,
MAX 6000/3000 Network Configuration Guide
Preliminary January 4, 2001 5-17
Configuring Frame Relay
Configuring a DLCI logical interface
Ascend-Route-IP=Route-IP-Yes,
Ascend-Backup="pvc",
Ascend-Metric=7,
Ascend-FR-DLCI=18,
Ascend-FR-Profile-Name="radius-frt2-7",
Framed-MTU=1524,
Ascend-Call-Type=Nailed
permconn-max1-2 Password="ascend", User-Service=Dialout-Framed-User
User-Name="pvc",
Framed-Protocol=FR,
Framed-Address=10.168.7.11,
Framed-Netmask=255.255.255.0,
Ascend-Route-IP=Route-IP-Yes,
Ascend-Metric=7,
Ascend-FR-DLCI=16,
Ascend-FR-Profile-Name="radius-frt1-7",
Framed-MTU=1524,
Ascend-Call-Type=Nailed
When the MAX brings up the two Frame Relay PVC, the routing table includes entries such as
this:
...
10.168.7.0/24
10.168.7.0/24
10.168.7.9/32
10.168.7.9/32
10.168.7.11/32
10.168.7.11/32
...
10.168.7.9
10.168.7.9
10.168.7.9
10.168.7.9
10.168.7.11
10.168.7.11
wan33
wan33
wan33
wan33
wan32
wan33
rGT
*SG
rT
*
rT
*S
60
120
60
120
60
120
1
7
1
7
1
1
0
0
0
0
89
198
89
198
51
89
At this point, both nailed connections are up, and the output of the Ifmgr command contains
entries such as the following:
bif slot sif u m p ifname
host-name remote-addr
local-addr
-------------------------------------------------------------------032 1:03 001 *
p wan32
pvc
10.168.7.11/32
11.168.6.234/32
033 1:03 002 *
p wan33
fp7
10.168.7.9/32
11.168.6.234/32
If the primary PVC becomes unavailable, the routing table does not change, but the entries in
the output of the Ifmgr command look like the following output:
bif slot sif u m p ifname host-name remote-addr
local-addr
-------------------------------------------------------------------032 1:03 001 *
p wan32
pvc
10.168.7.11/32
11.168.6.234/32
033 1:17 000 +
p wan33
fp7
10.168.7.9/32
11.168.6.234/32
Notice that fp7 is shown with a plus-sign (+) to show that it is in the Backup Active state (that
it is backed up by another connection). When the primary PVC comes up again, the data flow
is directed to that interface again. At that point, the Ifmgr command output again shows both
interfaces as up.
5-18 Preliminary January 4, 2001
MAX 6000/3000 Network Configuration Guide
Configuring Frame Relay
Concentrating incoming calls onto Frame Relay
Concentrating incoming calls onto Frame Relay
A common way to concentrate incoming connections onto a Frame Relay link is by making
use of OSI layer 3 (IP routing). For this purpose, the MAX requires ordinary profiles for the
callers, and a DLCI logical interface that specifies a destination IP router. When clients dial in
to reach the destination router, the MAX consults its routing table to forward the packets onto
Frame Relay. In this type of configuration, the MAX acts as a Frame Relay gateway.
For incoming PPP connections, Frame Relay Direct is another way to concentrate the calls
onto a Frame Relay link. Frame Relay Direct aggregates multiple PPP connections and
forwards them as a combined data stream solely on the basis of the FR-Direct specifications.
The assumption is that an upstream device will examine the packets and route them
appropriately.
Note: A Frame Relay Direct connection is not a full-duplex tunnel between a PPP dial-in and
a far-end device. Although the MAX does not use the router to forward packets onto the Frame
Relay link, it must use the router to send packets received across Frame Relay back to the
appropriate PPP caller. For this reason, Frame Relay Direct connections must enable IP
routing.
Setting up a Frame Relay gateway
To act as a Frame Relay gateway, the Frame Relay DLCI profile must specify a destination
router. Incoming connections are routed in the usual way, and all of the usual options apply.
Administrators can choose to create static routes, enable or disable RIP, and so forth. For
details, see Chapter 9, “Configuring IP Routing.”
For background information about specifying a DLCI interface, see “Configuring a DLCI
logical interface” on page 5-13.
Routing parameters in the DLCI profile
In addition to the Frame Relay settings described in “Overview of DLCI interface settings” on
page 5-13, the following Connection parameters are relevant to a gateway DLCI profile:
Ethernet
Connections
Connection profile
Route IP=Yes
IP options
LAN Adrs=0.0.0.0/0
Parameter
Specifies
Route IP
Enables/disables IP routing for this connection. It is enabled by
default, and must be enabled for a Frame Relay gateway.
LAN Adrs
Destination IP address, which lies at the end of a PVC whose first
hop is known by the specified DLCI.
MAX 6000/3000 Network Configuration Guide
Preliminary January 4, 2001 5-19
Configuring Frame Relay
Concentrating incoming calls onto Frame Relay
Routing parameters in RADIUS
In addition to the attributes described in “Overview of DLCI interface settings” on page 5-13,
the following attribute-value pairs must be specified in the permconn profile of a Frame Relay
gateway:
Attribute
Value
Ascend-Route-IP (228)
Enables/disables IP routing for this connection. (IP is enabled by
default. If this attribute is present, it must be set to Route-IP-Yes
for Frame Relay gateway connections.)
Framed-Address (8)
Destination IP address, which lies at the end of a PVC whose first
hop is known by the specified DLCI.
Framed-Netmask (9)
A subnet mask for Framed-Address.
Examples of a gateway configuration
In the following example, the MAX acts as a gateway between a client that dials in with the
address 10.1.2.3/29, and a remote router that is reachable across Frame Relay, as shown in
Figure 5-8:
Figure 5-8. Frame Relay gateway
Frame Relay
10.9.8.7/24
DLCI 55
10.1.2.3/29
The following set of parameters configures an MP+ Connection profile for the dial-in client in
Figure 5-8:
Ethernet
Connections
mpp-client
Name=mpp-client
Active=Yes
Encaps=MPP
Encaps options
Recv PW=clientpw
IP options
LAN Adrs=10.1.2.3/29
Following is a comparable RADIUS profile:
mpp-client Password="clientpw", User-Service=Dialout-Framed-User
Framed-Protocol=MPP,
Framed-Address=10.10.1.3,
Framed-Netmask=255.255.255.248
5-20 Preliminary January 4, 2001
MAX 6000/3000 Network Configuration Guide
Configuring Frame Relay
Concentrating incoming calls onto Frame Relay
The next set of parameters configures a DLCI Connection profile to the CPE router:
Ethernet
Connections
cpu-router
Station=cpe-router
Active=Yes
Encaps=FR
IP options
LAN Adrs=10.9.8.7/24
Encaps options
FR Prof=fr-dte
DLCI=55
Following is a comparable RADIUS profile:
permconn-max-2 Password="ascend", User-Service=Dialout-Framed-User
User-Name="cpe-router",
Framed-Protocol=FR,
Framed-Address=10.9.8.7,
Framed-Netmask=255.255.255.0,
Ascend-Route-IP=Route-IP-Yes,
Ascend-FR-DLCI=55,
Ascend-FR-Profile-Name="fr-dte"
Note: The MAX unit creates a route for this destination and uses it to forward packets from
PPP clients. Administrators can choose to add static routes to other subnets or to enable
dynamic routing updates to or from the router across Frame Relay. The usual considerations
for IP routing connections apply (see “Configuring IP Routing” on page 9-1).
Configuring Frame Relay Direct
When a PPP Connection profile specifies FR Direct, the MAX simply forwards the data stream
out on a specified DLCI interface. It leaves the task of routing the packets to an upstream
device.
For background information about specifying a DLCI interface, see “Configuring a DLCI
logical interface” on page 5-13.
Settings in a Connection profile
Following are the relevant FR-Direct parameters, shown with sample settings:
Ethernet
Connections
Connection profile
Active=Yes
Encaps=PPP
Route IP=Yes
Encaps options
Recv PW=clientpw
IP options
MAX 6000/3000 Network Configuration Guide
Preliminary January 4, 2001 5-21
Configuring Frame Relay
Concentrating incoming calls onto Frame Relay
LAN Adrs=10.111.112.113/24
Session options
FR Direct=Yes
FR Prof=
FR Dlci=16
Parameter
Specifies
Encaps
Specifies the supported encapsulation protocol. Must be set to
PPP, MP, or MPP for Frame Relay Direct connections.
FR Direct
Enables/disables FR-Direct mode for this connection.
FR Prof
Specifies the name of the Frame Relay profile that defines the
datalink.
FR Dlci
DLCI assigned in a Connection profile to a next hop on the
specified interface. Multiple FR-Direct Connection profiles can
refer to the same DLCI in this setting.
Route IP
Enables/disables IP routing for this connection. Must be enabled
for the MAX to send data back to the appropriate PPP caller.
LAN Adrs
Specifies the PPP caller’s IP address. As the MAX receives return
packets for many Frame Relay Direct connections on the same
DLCI, it uses this address to determine which PPP caller should
receive the return packets.
Settings in a RADIUS profile
Following are the relevant RADIUS attributes for FR Direct connections:
Attribute
Value
Framed-Protocol (7)
The encapsulation protocol. Must be set to PPP (1), MP (262), or
MPP (256) for FR-Direct connections.
Ascend-FR-Direct (219)
Enables/disables FR-Direct mode for this connection. FR-DirectNo (0) is the default. Set to FR-Direct-Yes (1) for FR-Direct
connections.
Ascend-FR-DirectProfile (220)
Name of the Frame-Relay profile that defines the datalink.
Ascend-FR-DirectDLCI (221)
DLCI assigned in a Connection profile to a next hop on the
specified interface. Multiple FR-Direct Connection profiles can
refer to the same DLCI in this setting.
Ascend-Route-IP (228)
Enables/disables IP routing for this connection. (IP is enabled by
default. If this attribute is present, it must be set to Route-IP-Yes
to enable the MAX to send data back to the appropriate PPP
caller.
5-22 Preliminary January 4, 2001
MAX 6000/3000 Network Configuration Guide
Configuring Frame Relay
Concentrating incoming calls onto Frame Relay
Attribute
Value
Framed-Address (8)
PPP caller’s IP address. As the MAX receives return packets for
many Frame Relay Direct connections on the same DLCI, it uses
this address to determine which PPP caller should receive the
return packets.
Framed-Netmask (9)
A subnet mask for Framed-Address.
Examples of FR Direct connections
In the following example, the MAX forwards the data stream from two PPP dial-in hosts
across Frame Relay on the same DLCI interface, as shown in Figure 5-9:
Figure 5-9. Frame Relay Direct
Caller-1
10.5.6.7/32
frswitch-1
10.10.10.10
DLCI 72
Caller-2
10.7.8.9/32
The following parameters specify the DLCI interface to frswitch-1 in Figure 5-9:
Ethernet
Connections
frswitch-1
Name=frswitch-1
Active=Yes
Encaps=FR
IP options
LAN Adrs=10.10.10.10/24
Encaps options
FR Prof=fr-dte
DLCI=72
Following is a comparable RADIUS profile:
permconn-max-3 Password="ascend", User-Service=Dialout-Framed-User
User-Name="frswitch-1",
Framed-Protocol=FR,
Framed-Address=10.10.10.10,
Framed-Netmask=255.255.255.0,
Ascend-Route-IP=Route-IP-Yes,
Ascend-FR-DLCI=72,
Ascend-FR-Profile-Name="fr-dte"
MAX 6000/3000 Network Configuration Guide
Preliminary January 4, 2001 5-23
Configuring Frame Relay
Concentrating incoming calls onto Frame Relay
The following set of parameters configures FR Direct Connection profiles for the incoming
calls:
Ethernet
Connections
caller-1
Station=caller-1
Active=Yes
Encaps=PPP
Encaps options
Recv PW=caller1*3
IP options
LAN Adrs=10.5.6.7/32
Session options
FR Direct=Yes
FR Prof=fr-dte
FR Dlci=72
Ethernet
Connections
caller-2
Station=caller-2
Active=Yes
Encaps=PPP
Route IP=Yes
Encaps options
Recv PW=caller2!!8
IP options
LAN Adrs=10.5.6.7/32
Session options
FR Direct=Yes
FR Prof=fr-dte
FR Dlci=72
Following are comparable RADIUS profiles:
caller-1 Password="caller1*3", User-Service=Framed-User
Framed-Protocol=PPP,
Framed-Address=10.5.6.7,
Framed-Netmask=255.255.255.255
Ascend-FR-Direct=FR-Direct-Yes,
Ascend-FR-Direct-Profile="fr-dte",
Ascend-FR-Direct-DLCI=72
caller-2 Password="caller2!!8", User-Service=Framed-User
Framed-Protocol=PPP,
Framed-Address=10.7.8.9,
Framed-Netmask=255.255.255.255
Ascend-FR-Direct=FR-Direct-Yes,
Ascend-FR-Direct-Profile="fr-dte",
Ascend-FR-Direct-DLCI=72
5-24 Preliminary January 4, 2001
MAX 6000/3000 Network Configuration Guide
Configuring Frame Relay
Configuring the MAX as a Frame Relay switch
Configuring the MAX as a Frame Relay switch
As a Frame Relay switch, the MAX receives frames on one DLCI interface and transmits them
on another one. The decision to forward frames is made on the basis of circuit name
assignments.
To use the MAX as a switch, you must configure a circuit that pairs two DLCI interfaces.
Instead of going to the layer 3 router for a decision on which interface to forward the frames, it
relies on the circuit name to relay the frames to the paired interface. A circuit is defined in two
Connection profiles, one for each endpoint of the circuit.
Note: When it is operating as a switch, the MAX relays all frames received on one endpoint
of the circuit to the other endpoint of the circuit. It does not examine the packets at OSI layer 3.
Overview of circuit-switching options
With a Frame Relay circuit configuration, the MAX can operate as a switch on UNI-DCE
interfaces, NNI interfaces, or a combination of the two. NNI is not required.
Routing parameters or attributes should be disabled for switched connections.
Note: Make sure that the Enabled parameter is set to Yes in the Answer-Defaults FR-Answer
subprofile.
Settings in a Connection profile
Following are the relevant circuit parameters, shown with sample settings:
Ethernet
Connections
caller-1
Station=caller-1
Active=Yes
Encaps=FR-Cir
Encaps options
FR Prof=max
DLCI=100
FR Circuit=frcir1
Parameter
Specifies
Encaps
Encapsulation protocol. Both endpoints of the circuit must specify
Frame-Relay-Circuit encapsulation.
FR Prof
Name of the Frame Relay profile that defines the datalink.
DLCI
A DLCI for this PVC endpoint.The DLCI must be obtained from
a Frame Relay provider. The MAX does not allow you to enter
duplicate DLCIs, except when they are carried by separate
physical links specified in different Frame Relay profiles.
MAX 6000/3000 Network Configuration Guide
Preliminary January 4, 2001 5-25
Configuring Frame Relay
Configuring the MAX as a Frame Relay switch
Parameter
Specifies
FR Circuit
Circuit name (up to 16 characters). The other endpoint must
specify the same circuit name. If only one profile specifies a
circuit name, data received on the specified DLCI is dropped. If
more than two profiles specify the same circuit name, only two of
the profiles will be used to form a circuit.
Settings in a RADIUS profile
Following are the RADIUS attributes for configuring a Frame Relay circuit:
Attribute
Value
Framed-Protocol (7)
Encapsulation protocol. Both endpoints of a circuit must specify
FR-CIR (263) encapsulation.
Ascend-FR-ProfileName (180)
Name of the Frame-Relay profile that defines the datalink.
Ascend-FR-DLCI (179)
A DLCI for this PVC endpoint. The MAX does not allow you to
enter duplicate DLCIs, except when they are carried by separate
physical links specified in different Frame-Relay profiles.
Ascend-FR-CircuitName (156)
Circuit name (up to 16 characters). The other endpoint must
specify the same circuit name. If only one profile specifies a
circuit name, data received on the specified DLCI is dropped. If
more than two profiles specify the same circuit name, only two of
the profiles will be used to form a circuit.
Examples of a circuit between UNI interfaces
Figure 5-10 shows a circuit configuration using UNI-DCE interfaces in the MAX.
Figure 5-10. Frame Relay circuit with UNI interfaces
P130-West
MAX
P130-East
DLCI 100
DTE
DCE
DTE
DLCI 200
DCE
DCE
DTE
Using local profiles
The following parameters on the MAX define the datalinks to the MAX and to the Pipeline
130 (P130-East):
Ethernet
Frame Relay
max
Name=max
Active=Yes
FR Type=DCE
5-26 Preliminary January 4, 2001
MAX 6000/3000 Network Configuration Guide
Configuring Frame Relay
Configuring the MAX as a Frame Relay switch
Nailed Grp=111
Ethernet
Frame Relay
p130east
Name=p130east
Active=Yes
FR Type=DCE
Nailed Grp=222
The next set of parameters specifies the circuit between the two Frame Relay interfaces:
Ethernet
Connections
max6
Station=max6
Active=Yes
Encaps=FR-Cir
Route IP=No
Encaps options
FR Prof=max
DLCI=100
FR Circuit=frcir1
Ethernet
Connections
p130
Name=p130
Active=Yes
Encaps=FR-Cir
Encaps options
FR Prof=p130east
DLCI=200
FR Circuit=frcir1
Using RADIUS profiles
The following RADIUS frdlink pseudo-user profiles define the datalinks to the MAX and to
the Pipeline 130 (P130-East):
frdlink-max-21 Password="ascend", User-Service=Dialout-Framed-User
Ascend-FR-Profile-Name="max",
Ascend-Call-Type=Nailed,
Ascend-FR-Type=Ascend-FR-DCE,
Ascend-FR-Nailed-Grp=111
frdlink-max-22 Password="ascend", User-Service=Dialout-Framed-User
Ascend-FR-Profile-Name="p130east",
Ascend-Call-Type=Nailed,
Ascend-FR-Type=Ascend-FR-DCE,
Ascend-FR-Nailed-Grp=222
MAX 6000/3000 Network Configuration Guide
Preliminary January 4, 2001 5-27
Configuring Frame Relay
Configuring the MAX as a Frame Relay switch
The next set of profiles specifies the circuit between the two Frame Relay interfaces:
permconn-max-10 Password="ascend" , User-Service=Dialout-Framed-User
User-Name="max6",
Framed-Protocol=FR-CIR,
Ascend-Route-IP=Route-IP-No,
Ascend-FR-DLCI=100,
Ascend-FR-Profile-Name="max",
Ascend-FR-Circuit-Name="fr-cir1"
permconn-max-11 Password="ascend", User-Service=Dialout-Framed-User
User-Name="p130",
Framed-Protocol=FR-CIR,
Ascend-Route-IP=Route-IP-No,
Ascend-FR-DLCI=200,
Ascend-FR-Profile-Name="p130east",
Ascend-FR-Circuit-Name="fr-cir1"
Examples of a circuit between NNI interfaces
Figure 5-11 shows a circuit configuration that uses NNI interfaces.
Figure 5-11. Frame Relay circuit with NNI interfaces
FR-Asnd-A
FR-Asnd-B
DLCI 200
DLCI 100
NNI
NNI
NNI
NNI
Using local profiles
The following parameters on the MAX define the datalinks to the two switches labeled FRAsnd-A and FR-Asnd-B:
Ethernet
Frame Relay
fr-asnd-a
Name=fr-asnd-a
Active=Yes
FR Type=NNI
Nailed Grp=333
Ethernet
Frame Relay
fr-asnd-b
Name=fr-asnd-b
Active=Yes
FR Type=NNI
Nailed Grp=444
The next set of parameters specifies the circuit between the two Frame Relay interfaces:
5-28 Preliminary January 4, 2001
MAX 6000/3000 Network Configuration Guide
Configuring Frame Relay
Configuring the MAX as a Frame Relay switch
Ethernet
Connections
asnd-a
Station=asnd-a
Active=Yes
Encaps=FR-Cir
Route IP=No
Encaps options
FR Prof=fr-asnd-a
DLCI=100
FR Circuit=pvc-pipe
Ethernet
Connections
asnd-b
Station=asnd-b
Active=Yes
Encaps=FR-Cir
Route IP=No
Encaps options
FR Prof=fr-asnd-b
DLCI=200
FR Circuit=pvc-pipe
Using RADIUS profiles
The following frdlink pseudo-user profiles define the datalinks to the two switches labeled FRAsnd-A and FR-Asnd-B:
frdlink-max-23 Password="ascend", User-Service=Dialout-Framed-User
Ascend-FR-Profile-Name="fr-asnd-a",
Ascend-Call-Type=Nailed,
Ascend-FR-Type=Ascend-FR-NNI,
Ascend-FR-Nailed-Grp=333
frdlink-max-24 Password="ascend", User-Service=Dialout-Framed-User
Ascend-FR-Profile-Name="fr-asnd-b",
Ascend-Call-Type=Nailed,
Ascend-FR-Type=Ascend-FR-NNI,
Ascend-FR-Nailed-Grp=444
The next set of profiles specifies the circuit between the two Frame Relay interfaces:
permconn-max-12 Password="ascend", User-Service=Dialout-Framed-User
User-Name="asnd-a",
Framed-Protocol=FR-CIR,
Ascend-Route-IP=Route-IP-No,
Ascend-FR-DLCI=100,
Ascend-FR-Profile-Name="fr-asnd-a",
Ascend-FR-Circuit-Name="pvc-pipe"
permconn-max-13 Password="ascend", User-Service=Dialout-Framed-User
User-Name="asnd-b",
Framed-Protocol=FR-CIR,
MAX 6000/3000 Network Configuration Guide
Preliminary January 4, 2001 5-29
Configuring Frame Relay
Configuring the MAX as a Frame Relay switch
Ascend-Route-IP=Route-IP-No,
Ascend-FR-DLCI=200,
Ascend-FR-Profile-Name="fr-asnd-b",
Ascend-FR-Circuit-Name="pvc-pipe"
Examples of circuits that use UNI and NNI interfaces
Figure 5-12 shows circuit configurations that use one UNI-DCE and one NNI interface.
Figure 5-12. Frame Relay circuit with UNI and NNI interface
MAX-42
MAX-39
MAX
P130
DLCI 100
DTE
DLCI 200
DCE
NNI
DLCI 300
NNI
DCE
DTE
Using local profiles
The following parameters on MAX-42 define the datalinks to the MAX and MAX-39:
Ethernet
Frame Relay
dce-max
Name=dce-max
Active=Yes
FR Type=DCE
Nailed Grp=555
Ethernet
Frame Relay
nni-39
Name=nni-39
Active=Yes
FR Type=NNI
Nailed Grp=999
5-30 Preliminary January 4, 2001
MAX 6000/3000 Network Configuration Guide
Configuring Frame Relay
Configuring the MAX as a Frame Relay switch
The next set of parameters on MAX-42 specifies the circuit between its two Frame Relay
interfaces:
Ethernet
Connections
max
Station=max
Active=Yes
Encaps=FR-Cir
Route IP=No
Encaps options
FR Prof=dce-max
DLCI=100
FR Circuit=cir-42
Ethernet
Connections
max39
Name=max39
Active=Yes
Encaps=FR-Cir
Route IP=No
Encaps options
FR Prof=nni-39
DLCI=200
FR Circuit=cir-42
The following parameters on MAX-39 define the datalinks to MAX-42 and to the Pipeline
130:
Ethernet
Frame Relay
nni-42
Name=nni-42
Active=Yes
FR Type=NNI
Nailed Grp=777
Ethernet
Frame Relay
dce-p130
Name=dce-p130
Active=Yes
FR Type=dce
Nailed Grp=888
MAX 6000/3000 Network Configuration Guide
Preliminary January 4, 2001 5-31
Configuring Frame Relay
Configuring the MAX as a Frame Relay switch
The next set of parameters on MAX-39 specifies the circuit between its two Frame Relay
interfaces:
Ethernet
Connections
max42
Name=max42
Active=Yes
Encaps=FR-Cir
Route IP=No
Encaps options
FR Prof=nni-42
DLCI=200
FR Circuit=cir-39
Ethernet
Connections
max39
Name=max39
Active=Yes
Encaps=FR-Cir
Route IP=No
Encaps options
FR Prof=dce-p130
DLCI=300
FR Circuit=cir-39
Using RADIUS profiles
The following profiles define the datalinks from MAX-42 to the MAX and MAX-39:
frdlink-max-25 Password="ascend", User-Service=Dialout-Framed-User
Ascend-FR-Profile-Name="dce-max",
Ascend-Call-Type=Nailed,
Ascend-FR-Type=Ascend-FR-DCE,
Ascend-FR-Nailed-Grp=555
frdlink-max-26 Password="ascend", User-Service=Dialout-Framed-User
Ascend-FR-Profile-Name="nni-39",
Ascend-Call-Type=Nailed,
Ascend-FR-Type=Ascend-FR-NNI,
Ascend-FR-Nailed-Grp=999
The next set of profiles specifies the circuit on MAX-42:
permconn-max-14 Password="ascend", User-Service=Dialout-Framed-User
User-Name="max"
Framed-Protocol=FR-CIR,
Ascend-Route-IP=Route-IP-No,
Ascend-FR-DLCI=100,
Ascend-FR-Profile-Name="dce-max",
Ascend-FR-Circuit-Name="cir-42"
5-32 Preliminary January 4, 2001
MAX 6000/3000 Network Configuration Guide
Configuring Frame Relay
Configuring switched Frame Relay connections
permconn-max-15 Password="ascend", User-Service=Dialout-Framed-User
User-Name="max39",
Framed-Protocol=FR-CIR,
Ascend-Route-IP=Route-IP-No,
Ascend-FR-DLCI=200,
Ascend-FR-Profile-Name="nni-39",
Ascend-FR-Circuit-Name="cir-42"
The following profiles define the datalinks from MAX-39 to MAX-42 and the Pipeline 130:
frdlink-max-27 Password="ascend", User-Service=Dialout-Framed-User
Ascend-FR-Profile-Name="nni-42",
Ascend-Call-Type=Nailed,
Ascend-FR-Type=Ascend-FR-NNI,
Ascend-FR-Nailed-Grp=777
frdlink-max-28 Password="ascend", User-Service=Dialout-Framed-User
Ascend-FR-Profile-Name="dce-p130",
Ascend-Call-Type=Nailed,
Ascend-FR-Type=Ascend-FR-DCE,
Ascend-FR-Nailed-Grp=888
The next set of profiles specifies the circuit on MAX-39:
permconn-max-16 Password="ascend", User-Service=Dialout-Framed-User
User-Name="max42"
Framed-Protocol=FR-CIR,
Ascend-Route-IP=Route-IP-No,
Ascend-FR-DLCI=200,
Ascend-FR-Profile-Name="nni-42",
Ascend-FR-Circuit-Name="cir-39"
permconn-max-17 Password="ascend", User-Service=Dialout-Framed-User
User-Name="p130",
Framed-Protocol=FR-CIR,
Ascend-Route-IP=Route-IP-No,
Ascend-FR-DLCI=300,
Ascend-FR-Profile-Name="dce-p130",
Ascend-FR-Circuit-Name="cir-39"
Configuring switched Frame Relay connections
You can enable the MAX to support Frame Relay switched connections over ISDN BRI or PRI
connections. A switched Frame Relay connection provides either a 56K or 64K connection,
depending on the ISDN network configuration.
Overview
When a Frame Relay profile and an associated Connection profile are configured for a
switched Frame Relay connection, the Connection profile can establish a Frame Relay session
either by placing an outgoing call or by matching the CLID or DNIS of an incoming call. Once
the session is established, it behaves just like a nailed Frame Relay connection with an access
MAX 6000/3000 Network Configuration Guide
Preliminary January 4, 2001 5-33
Configuring Frame Relay
Configuring switched Frame Relay connections
rate of 64K or 56K, depending on the ISDN network configuration. Authentication can be by
DNIS and CLID.
Switched Frame Relay connections support the same logical interfaces as do nailed
connections: NNI, DTE, and DCE.
Keep the following information in mind:
•
Your Frame Relay service provider must allow switched Frame Relay connections.
•
A switched Frame Relay connection is a point-to-point connection and supports only one
DLCI.
•
Verify that the Committed Information Rate of the DLCI(s) using switched connections
allow 56K or 64K connections.
Configuring a switched Frame Relay connection
To set up a switched Frame Relay connection, you must perform the following general steps:
1
2
3
Set up a Frame Relay profile as follows:
–
Call Type set to Switched
–
FR Type set to NNI, DTE, or DCE, depending on the network configuration
–
FR Prof set to the name of the Frame Relay encapsulated Connection profile
–
Data link information specified as given to you by your service provider
Set up a Frame Relay encapsulated Connection profile as follows:
–
Encaps set to FR
–
Call Type set to Switched
–
Dial#, Calling# and Called# specified if you are authenticated with CLID or DNIS
Set up the Answer profile as follows:
–
FR set to Yes
–
Profile Reqd set to Yes
–
Id Auth set to Require (for CLID) or set to Called Require (for DNIS), depending on
the authentication
Configuring a Frame Relay profile
The following example shows how to configure a switched Frame Relay NNI connection, but
you configure a switched DCE or DTE connection similarly.
To configure a Frame relay profile for a Frame Relay switched connection, proceed as in the
following example:
1
Open Ethernet > Frame Relay> any profile
2
Specify a Name. For example:
Station=fr-sw-fr
3
Set Active to Yes.
4
Set Call Type to Switched.
5-34 Preliminary January 4, 2001
MAX 6000/3000 Network Configuration Guide
Configuring Frame Relay
Configuring switched Frame Relay connections
5
Set FR Type=NNI.
6
Specify the data link information as given to you by your Frame Relay Service provider.
7
Exit the profile and, at the exit prompt, select the exit and accept option.
Configuring a Connection profile
Next, to configure a Connection profile for a Frame Relay switched connection, proceed as in
the following example:
1
Open Ethernet > Connections > any profile
2
Specify a Station name. For example:
Station=fr-sw-conn
3
Set Active to Yes.
4
Set Encaps to FR.
5
Open the Encaps Options submenu.
6
Specify the name of the Frame Relay profile that uses this Connection profile. For
example:
FR Prof=fr-sw-fr
7
Specify the DLCI for this Frame Relay connection. For example:
DLCI=165
8
Open the Telco Options submenu.
9
Set Call Type to Switched.
You can only set Call Type to Switched if the Frame Relay Profile associated with it also
has Call Type set to Switched.
10 If necessary, set AnsOrig to control whether the MAX establishes the Frame Relay
connection for incoming or outgoing connections.
11 Exit the Telco Options submenu.
12 If you are authenticating with CLID or DNIS, specify a Dial#, Calling# and Called#.
13 If necessary, open the Session options submenu and set the Idle parameter to the number
of seconds inactive sessions remain connected. For example:
Idle=120
14 Exit the profile and, at the exit prompt, select the exit and accept option.
Configuring the Answer profile
To allow incoming calls to bring up the Frame Relay connection, configure the Answer profile
as in the following example:
1
Open Ethernet > Answer.
2
Set Profile Reqd=Yes.
3
If necessary, set the Id Auth parameter as follows:
–
Require (for CLID)
–
Called Require (for DNIS)
4
Open the Encaps Options submenu.
5
Set FR to Yes.
MAX 6000/3000 Network Configuration Guide
Preliminary January 4, 2001 5-35
Configuring Frame Relay
Configuring 64 switched Frame Relay connections
6
Exit the profile and, at the exit prompt, select the exit and accept option.
Establishing the connection
To bring up the Frame Relay manually, open the Connection profile and press Ctrl-D, then
select 1=Dial.
If you configure an Answer profile, an incoming call with the correct CLID or DNIS brings up
the session.
Configuring 64 switched Frame Relay connections
You can configure RADIUS to enable the MAX unit to support up to 64 switched Frame Relay
profiles. The unit authenticates and matches callers to switched Frame Relay profiles by
comparing DNIS or CLID information. The MAX unit dials outbound switched Frame Relay
connections on the basis of destination addresses of received packets. Previously, you could
configure Frame Relay profiles only from the VT100 interface.
Examples of RADIUS switched Frame Relay connections
Sample RADIUS Frame Relay Data Link profile
The following sample profile corresponds to both the example in “Sample RADIUS DNIS
profile” on page 5-36 and the example in “Sample RADIUS CLID profile” on page 5-37:
SWITCHED-FR-DTE Password="ascend", User-Service=
Framed-User
Ascend-FR-Profile-Name="SWITCHED-FR-DTE",
Ascend-Call-Type=Switched,
Ascend-FR-Type=Ascend-FR-DTE,
Ascend-FR-Link-Mgt=Ascend-FR-T1-617D,
Ascend-FR-N391=6,
Ascend-FR-DTE-N392=3,
Ascend-FR-DTE-N393=4,
Ascend-FR-T391=10
Dialout-
You must set Ascend-Call-Type to Switched. Also, the Frame Relay Data Link
profile’s name must match the value specified in the Ascend-FR-Profile-Name attribute
of the DNIS or CLID profile.
Sample RADIUS DNIS profile
Following is a sample RADIUS DNIS profile:
3762
Password=“Ascend-DNIS”
Ascend-Require-Auth=Not-Require-Auth
User-Service=Framed-User,
Framed-Protocol=FR,
Framed-Address=10.10.10.212,
Framed-Netmask=255.255.255.0,
Ascend-Route-IP=Route-IP-Yes,
5-36 Preliminary January 4, 2001
MAX 6000/3000 Network Configuration Guide
Configuring Frame Relay
Configuring 64 switched Frame Relay connections
Ascend-Metric=2,
Ascend-FR-DLCI=16,
Ascend-FR-Profile-Name="SWITCHED-FR-DTE",
Ascend-Bridge=Bridge-No,
Ascend-Call-Type=Switched,
Ascend-Idle-Limit=120
Be sure to:
•
Set Ascend-Require-Auth to Not-Require-Auth.
•
Specify the corresponding Frame Relay Data Link profile in the Ascend-FRProfile-Name attribute.
•
Set Ascend-Call-Type to Switched.
Sample RADIUS CLID profile
Following is a sample RADIUS CLID profile:
3757
Password=“Ascend-CLID”
Ascend-Require-Auth=Not-Require-Auth
User-Service=Framed-User,
Framed-Protocol=FR,
Framed-Address=10.10.10.212,
Framed-Netmask=255.255.255.0,
Ascend-Route-IP=Route-IP-Yes,
Ascend-Metric=2,
Ascend-FR-DLCI=16,
Ascend-FR-Profile-Name="SWITCHED-FR-DTE",
Ascend-Bridge=Bridge-No,
Ascend-Call-Type=Switched,
Ascend-Idle-Limit=120
Be sure to:
•
Set Ascend-Require-Auth to Not-Require-Auth.
•
Specify the corresponding Frame Relay Data Link profile in the Ascend-FRProfile-Name attribute.
•
Set Ascend-Call-Type to Switched.
Configuring a switched Frame Relay connection for an outbound call
To support users that use switched Frame Relay connections for outbound calls, you must
create a Route profile, a Frame Relay Data Link profile, and a user profile.
Sample RADIUS Route profile
The MAX retrieves the following example RADIUS Route profile when it powers up or when
you update routes by executing the Sys > Sys Diag > Upd Rem Cfg command:
route-My-MAX4000-1 Password="ascend",User-Service=Dialout-Framed-User
Framed-Route="10.10.10.0/24 10.10.10.212 1 n switched-dte1-out"
MAX 6000/3000 Network Configuration Guide
Preliminary January 4, 2001 5-37
Configuring Frame Relay
Configuring 64 switched Frame Relay connections
Sample RADIUS Frame Relay Data Link profile
The following example profile corresponds to the user profile in “Sample RADIUS user
profile” on page 5-38:
SWITCHED-FR-DTE Password="ascend", User-Service=
Framed-User
Ascend-FR-Profile-Name="SWITCHED-FR-DTE",
Ascend-Call-Type=Switched,
Ascend-FR-Type=Ascend-FR-DTE,
Ascend-FR-Link-Mgt=Ascend-FR-T1-617D,
Ascend-FR-N391=6,
Ascend-FR-DTE-N392=3,
Ascend-FR-DTE-N393=4,
Ascend-FR-T391=10
Dialout-
You must set Ascend-Call-Type to Switched. Also, the Frame Relay Data Link
profile’s name must match the value specified in the Ascend-FR-Profile-Name attribute
of the DNIS or CLID profile.
Sample RADIUS user profile
The following User profile enables the user switched-dte1 to access the destination
specified by route-My-MAX4000:
switched-dte1-out Password="ascend", User-Service=Dialout-Framed-User
User-Name="switched-dte1",
Ascend-Dial-Number=953757,
Framed-Protocol=FR,
Framed-Address=192.168.166.212,
Framed-Netmask=255.255.255.0,
Ascend-Route-IP=Route-IP-Yes,
Ascend-Metric=2,
Ascend-FR-DLCI=16,
Ascend-FR-Profile-Name="SWITCHED-FR-DTE",
Ascend-Bridge=Bridge-No,
Ascend-Call-Type=Switched,
Ascend-Data-Svc =Switched-56K,
Ascend-Idle-Limit=120
Make sure that:
•
The value in User-Name matches the name specified in the associated Route profile.
•
The value in Ascend-FR-Profile-Name matches the name of the associated Frame
Relay Data Link profile.
•
You set Ascend-Call-Type to Switched.
5-38 Preliminary January 4, 2001
MAX 6000/3000 Network Configuration Guide
Configuring X.25
6
Introduction to Lucent X.25 implementation. . . . . . . . . . . . . . . . . . . . . . . . . . . . . . . . . 6-2
Configuring the logical link to an X.25 network . . . . . . . . . . . . . . . . . . . . . . . . . . . . . . 6-2
Configuring X.25 IP connections. . . . . . . . . . . . . . . . . . . . . . . . . . . . . . . . . . . . . . . . . . 6-8
Configuring X.25 PAD connections . . . . . . . . . . . . . . . . . . . . . . . . . . . . . . . . . . . . . . 6-11
Setting up X.25 PAD sessions . . . . . . . . . . . . . . . . . . . . . . . . . . . . . . . . . . . . . . . . . . . 6-14
Configuring X.25 PAD users from RADIUS. . . . . . . . . . . . . . . . . . . . . . . . . . . . . . . . 6-24
Customizing script support for X.25 PAD . . . . . . . . . . . . . . . . . . . . . . . . . . . . . . . . . . 6-25
Configuring X.32 profiles for incoming switched X.25 connections . . . . . . . . . . . . . 6-27
Setting up ISDN D channel X.25 support . . . . . . . . . . . . . . . . . . . . . . . . . . . . . . . . . . 6-30
Always On/Dynamic ISDN (AO/DI). . . . . . . . . . . . . . . . . . . . . . . . . . . . . . . . . . . . . . 6-35
The X.25 protocol operates at the network layer to provide virtual circuits and deliver such
services as multiplexing, in-sequence delivery of packets, transfer of addressing information,
segmentation and reassembly, flow control, error control, reset, and restart. Allocation of
logical channels can be either static (a permanent virtual circuit-PVC) or dynamic (a switched
virtual circuit-SVC).
X.25 is not as fast as newer protocols that operate at the data-link layer, leaving network-layer
functions to the processors at each end of the connection. However, X.25 became widely
established, especially in Europe, and remains in widespread use in many geographical areas.
The MAX unit supports a single physical X.25 connection. You must configure a physical link
and at least one logical link to an X.25 switch. Once you have configured a logical link in an
X.25 profile, depending on the applications (i.e., Connection profile for IP/X.25 or AO/DI),
you can configure individual IP-routing connections in Connection profiles.
The unit enables several terminals to share a single network line by performing the functions of
an X.25 Packet Assembler/Disassembler (PAD). The MAX PAD supports a unique command
X.28 interface, and you can configure an X.3 profile to fine-tune PAD settings.
If you use X.25 on an ISDN connection, you can configure the D channel to transmit X.25
data. For example, Always On/Dynamic ISDN (AO/DI) can send low-bandwidth
transmissions over the D channel and add switched B channels as bandwidth requirements
increase. (For example, the D channel is usually sufficient for email transmissions, but not for
MAX 6000/3000 Network Configuration Guide
6-1
Configuring X.25
Introduction to Lucent X.25 implementation
WWW pages with graphics, or X.25 Transaction Processing Protocol for Point of Service
(T3POS) sends transaction data over the D channel.)
Introduction to Lucent X.25 implementation
This chapter describes how the MAX unit supports X.25. The CCITT Blue Book
Recommendation X series 1988 has full technical specifications for X.25, X.3, X.28, X.29, and
Link Access Protocol–Balanced (LAPB). IETF RFC 1356 has the technical specification for
IP over X.25 (X25/IP).
X.25 is a connection oriented (virtual circuits) protocol, providing services such as
multiplexing, in-sequence delivery, transfer of addressing information, segmenting and
reassembly, flow control, error control, reset, and restart. Allocation of logical channels can be
either static (PVC) or dynamic (SVC).
Configuring the unit to communicate with an X.25 network involves the following elements:
•
A physical interface to the X.25 network. This can be a nailed serial-WAN, one of the D
channels in T1 or E1 PRI, or a BRI D channel connection. The MAX unit supports only
one physical X.25 connection. (To configure the interface, see Chapter 3, “Configuring
WAN Access.”)
•
A logical data link to the X.25 network. Defined in an X.25 profile, the link should
normally be set in DTE.
•
Dial-in connections (defined in Connection profiles) may use X.25. The application layer
of an X.25 connection can be a TCP/IP network connection or terminal emulation using
X.25 Packet Assembler/Disassembler (PAD).
The unit supports PPP encapsulation over X.25 as defined in RFC 1598. Using PPP/X.25
instead of IP/X.25, offers several advantages, in that it supports:
•
STAC compression
•
PAP/CHAP authentication
•
Multiprotocol encapsulation, including: IP routing, IPX routing, Appletalk routing, and
bridging
Configuring the logical link to an X.25 network
An X.25 profile defines the logical data link between the MAX unit and a remote X.25
network. The Ethernet > X.25 > X.25 profile includes the following parameters that define
setting the profile’s name, making the profile available for use, setting the type of connection
for the call, defining a group number for the serial WAN connection, the data service type for
the link:
6-2
Parameter
Specifies
Name
The profile’s name. The name must be unique and cannot exceed 15
characters.
Active
That the profile is available for use.
MAX 6000/3000 Network Configuration Guide
Configuring X.25
Configuring the logical link to an X.25 network
Call Type
Type of connection, such as switched, or nailed. You can set the Call
Type parameter to specify the type of connection between the local and
remote codecs. (A codec–COder/DECoder– is a device that encodes
analog data into a digital signal for transmission over a digital medium.
Codecs are often used for videoconferencing.)
Nailed Grp
The group number that supports the serial WAN connection. When you
configure a nailed connection, you must assign a group number to each
nailed channel. Nailed channels can share group numbers.
Data Svc
The type of data service the link uses, such as 56K, 56KR, or 64K. The
Data Svc parameter affects how much bandwidth is available for a
particular session, and how channels can be allocated to the call. You
can set this parameter to specify the type of data service the link uses.
Dialing, billing and signaling parameters
The next set of parameters in Ethernet > X.25 > X.25 profile includes defining the types of
outbound calls the MAX makes, the number used to dial out this connection, telephone billing
number, the signaling value the PRI uses when placing a call and a dialing prefix for PRI
calling:
Parameter
Specifies
PRI # Type
Outbound calls made by the MAX on PRI lines so that the switch can
properly interpret the phone number dialed. Ask your PRI provider for
details on when to use each of the following settings. This parameter
specifies the TypeOfNumber field in the called party’s information
element.
Dial #
Number used to dial out this connection. It can contain up to 24
characters, which may include a dialing prefix that directs the
connection to use a trunk group or dial plan; for example:
6-1-212-555-1212.
Bill #
A telephone number to be used for billing purposes. If a number is
specified, it is used either as a billing suffix or the calling party number.
For robbed-bit lines, the MAX uses the billing-number as a suffix that
is appended to each phone number it dials for the call.
Call-by-Call
A signaling value the PRI service uses when placing a call using that
profile.
Transit #
A dialing prefix for use in the transit network IE for PRI calling when
going through an Interexchange Carrier (IEC). The default (null)
causes the MAX to use any available IEC for long-distance calls.
LAPB parameters
Link Access Procedure (LAP) is a protocol containing a subset of High-Level Data Link
Protocol (HDLC) features. In order to maintain compatibility with HDLC, LAP was changed
to create Link Access Procedure, Balanced (LAPB) which is a protocol for B channels that use
packet-switching mode.
MAX 6000/3000 Network Configuration Guide
6-3
Configuring X.25
Configuring the logical link to an X.25 network
The next set of parameters in Ethernet > X.25 > X.25 profile includes defining the maximum
number of seconds before recovery procedures begin, how many times the MAX can resend
frames when the timer expires, and the maximum number of sequentially numbered frames
that can be unacknowledged:
Parameter
Specifies
LAPB T1
Maximum number of seconds the transmitter waits for
acknowledgment before initiating a recovery procedure (Response
timeout). The default is 3 seconds.
LAPB N2
How many times the MAX can resend a frame when the LAPB T1
timer expires. The default is 20. This relatively high value increases the
probability of a correct transfer of data.
LAPB k
Maximum number of sequentially numbered frames that can be
unacknowledged at a given time. This value is also called the Level 2
Window Size or the Frame Window Size. The default is 7. Higher
values enable faster throughput.
X.25 profile parameters
The next set of parameters in Ethernet > X.25 > X.25 profile includes defining features on a
X.25 connection, such as the minimum and maximum X.25 packet size to the duration of
timers to receive or send X.25 packets:
6-4
Parameter
Specifies
X.25 Seq Number
Mode
The number of frames a sender can transmit before requiring an
acknowledgment of the first frame. The protocol increments a
sequence number in the frame header, and places the value into the
next outgoing frame. The sequence number identifies each frame that
has not yet been acknowledged.
X.25 Link Setup
Mode
Whether or not the X.25 link comes up in active- or passivedisconnect mode. In active-disconnect mode (the default), the link
layer sends a DISC, and the packet layer sends a Restart-Request
packet, upon initialization. In passive-disconnect mode, the link layer
sends SABM(E) upon initialization and issues a restart to the network
only upon receipt of a Restart-Request packet. It does not issue a
Restart-Request packet upon initialization, but responds to Restart
packets it receives.
X.25 Node Type
Whether or not the MAX interacts with the remote end of the
connection as a DTE (the default) or a DCE (when emulating the X.25
network). Data Terminal Equipment (DTE) is a device that an operator
uses, such as a computer or a terminal. Data Circuit-Terminating
Equipment (DCE) is a device that connects the DTE to a
communications channel.
X.25 window size
The default for maximum number of outstanding data packets that can
accumulate before the MAX requires an acknowledgment. The default
is 2.
MAX 6000/3000 Network Configuration Guide
Configuring X.25
Configuring the logical link to an X.25 network
Parameter
Specifies
X.25 pkt size
The default (128) maximum, and minimum number of bytes in the
data field of a data packet.
X.25 Min pkt size
Minimum number of bytes in the data field of a data packet when
negotiating the packet size with a remote X.25 switch.
X.25 Max pkt size
Maximum number of bytes in the data field of a data packet when
negotiating the packet size with a remote X.25 switch. Note that a
large packet size improves throughput by reducing the overhead
associated with header transmission. However, a large packet size also
increases the probability of transmission errors, causes increased
transmission delays on the network, and is associated with processing
delays at the host.
X.25 lowest PVC
The X.25 Lowest PVC and X.25 Highest PVC parameters define a
range of PVCs from 1 to 4096. If the lowest PVC number is zero, no
PVCs are supported.
X.25 highest PVC
X.25 lowest SVC
X.25 highest SVC
The X.25 Lowest SVC and X.25 Highest SVC parameters define a
range of SVCs from 1 to 4096. If the lowest SVC number is zero, no
SVCs are supported.
X.25 Clear/Diag
Whether or not Clear-Request packets include the diagnostic field. The
default is No.
X.25 Reset/Diag
Whether or not Reset-Request packets include the diagnostic field.
The default is No.
X.25 Restart/Diag
Whether or not Restart-Request packets include the diagnostic field.
The default is No.
X.25 Options
None (no options) or NPWS (specifying that the MAX negotiates
packet and window size). The default is None.
X.25 Rev Charge
Accept
Whether or not the MAX accepts packets that request charge reversal.
The default is No.
X.25 Network Type
Type of network used by the link. At present, the MAX supports only
the CCITT network type.
X.25 T20
The duration of the Restart timer (the number of one-second ticks the
MAX waits before retransmitting a Restart-Request packet).
X.25 R20
The number of Restart-Request retransmits the MAX sends before
waiting indefinitely for a response.
X.25 T21
The duration of the Call-Request timer (the number of one-second
ticks the MAX waits before clearing an unacceptable outgoing call).
X.25 T22
Sets the duration of the Reset-Request timer (the number of
one-second ticks the MAX waits before retransmitting a
Reset-Request packet).
X.25 R22
The number of times the MAX retransmits a Reset-Request packet
before clearing a call.
X.25 T23
The duration of the Clear-Request timer (the number of one-second
ticks the MAX waits before retransmitting a Clear-Request packet).
X.25 R23
The number of Clear-Request retransmits the MAX sends before
waiting indefinitely for a response.
MAX 6000/3000 Network Configuration Guide
6-5
Configuring X.25
Configuring the logical link to an X.25 network
X.121 and VCE Timer Val parameters
The last two parameters in to set values for in Ethernet > X.25 > X.25 profile is the X.121 src
addr parameter and the VCE Timer Val parameter.
The X.121 Src Addr parameter specifies the MAX source address for logical links defined in
the X.25 profile. An X.121 address contains from 1 to 15 decimal digits (for example,
031344159782738). The VCE Timer Val parameter specifies the number of seconds to
maintain a connection to a character-oriented device, such as a terminal server, that has not
established a virtual call.
For detailed information about each parameter, see the MAX Reference.
Type of connection
Both IP/X.25 and AO/DI only use nailed X.25 connections. The Call Type parameter specifies
the type of physical connection, which can be nailed or switched (X.25 PAD requires nailed).
Example of an X.25 profile configuration
This example focuses on an X.25 profile that establishes the logical link to an X.25 switch. It
does not show how to configure the nailed channels used for the physical connection to the
switch. For details about how to configure physical nailed connections, see Chapter 3,
“Configuring WAN Access.”
You must obtain a copy of the telco’s subscription form containing the values provisioned in
the switch and then configure the MAX X.25 profile to comply with those values.
Table 6-1 shows a sample telco subscription form and the corresponding settings to enter in an
X.25 profile.
Table 6-1. Sample telco subscription form
6-6
Subscription-item
Value
X.25 profile setting
Maximum seconds the transmitter waits for
acknowledgment before starting recovery
procedure (T1)
3
LAPB T1=3
Maximum times to resend a frame after the
T1 timer expires (N2)
10
LAPB N2=10
Maximum sequentially numbered frames
that a given DTE/DCE link can have
unacknowledged at any given time (K)
7
LAPB K=7
Is the X.25 node a DTE or DCE?
DTE
X.25 Node Type=DTE
Is the link SVC or PVC?
SVC
X.25 Link Setup Mode=Active
X.25 Lowest PVC=1
X.25 Highest PVC=8
Maximum packet size
1024
X.25 Max Pkt Size=1024
MAX 6000/3000 Network Configuration Guide
Configuring X.25
Configuring the logical link to an X.25 network
Table 6-1. Sample telco subscription form (continued)
Subscription-item
Value
X.25 profile setting
Maximum number of outstanding data
packets allowed between a DTE and a DCE
before acknowledgment is required (W)
2
X.25 Window Size=2
Number of PVCs
0
X.25 Lowest PVC=0
Highest PVC channel number
0
X.25 Highest PVC=0
Default packet size
128
X.25 Pkt Size=128
Minimum packet size
64
X.25 Min Pkt Size=64
Maximum packet size
1024
X.25 Max Pkt Size=1024
To configure the X.25 profile to comply with the subscription form in this example:
1
Open the X.25 profile, assign the profile a name, and activate it:
Ethernet
X.25...
X.25 profile
Name=ATT
Active=Yes
2
Set Call Type to Nailed and specify the nailed group number:
Call Type=Nailed
Nailed Grp=7
3
Set the LAPB parameters to comply with the settings in the subscription form:
LAPB T1=3
LAPB N2=10
LAPB k=7
4
Set the X.25 Node Type to DTE, as specified in the subscription form:
X.25 Node Type=DTE
5
Configure the profile to support up to eight Switched Virtual Circuits:
X.25
X.25
X.25
X.25
X.25
6
Configure packet sizes and flow control:
X.25
X.25
X.25
X.25
7
Link Setup Mode=ACTIVE
lowest PVC=0
highest PVC=0
lowest SVC=1
highest SVC=8
window size=2
pkt size=128
Min pkt size=64
Max pkt size=1024
Specify the X.121 source address to use on this link:
X.121 src addr=031344159782738
8
Exit the profile and, at the exit prompt, select the exit and accept option.
MAX 6000/3000 Network Configuration Guide
6-7
Configuring X.25
Configuring X.25 IP connections
Configuring X.25 IP connections
This section describes how to configure the MAX to exchange IP datagrams over the X.25
network connection specified in an X.25 profile. X.25 IP connections must be routed. They
cannot be bridged.
You must first set Ethernet > Answer > Encaps...> X25/IP=Yes, and Ethernet > Connection >
Connection profile > Encaps=X25/IP. The Encaps parameter specifies the encapsulation
method to use when exchanging data with a remote network. Both sides of the link must use
the same encapsulation for the connection to be established.
Then you can configure the related parameters located in Ethernet > Connection > Connection
profile > Encaps Options. These parameters define a X.25 profile name, a logical channel
number, an encapsulation type for calling the remote site, whether the call packet should have
a reverse charge element, and a network id:
6-8
Parameter
Specifies
X.25 Prof
A 15-character text field containing the name of an X.25 profile that
the MAX uses for the logical connection. If the specified X.25 profile
cannot be found, the MAX does not start a session for this Connection
profile. As a safeguard against such misconfiguration, an active
Connection profile specifying X.25 encapsulation cannot be saved
unless you define the named X.25 profile and make it active.
LCN
The logical channel number (LCN) to use in the case of a Permanent
Virtual Circuit (PVC). The default of 0 (zero) specifies that the MAX
does not provide a logical channel number, so the connection is not a
PVC.
Encaps Type
Which encapsulation to use when calling the remote site. When
receiving a call, the MAX accepts any of the three types of
encapsulation. The default is RFC 877.
Reverse Charge
Whether or not the call packet should include an X.25 reverse charge
request facility element. The default is No.
RPOA
The set of Recognized Private Operating Agency (RPOA) user
facilities to use in the next call request. The RPOA facilities provide
the data network identification code for the requested initial RPOA
transit network. You can specify up to four digits. The default is null.
CUG Index
The Closed User Group (CUG) index facility to use in the next call
request. The CUG index facility specifies, for the called switch, the
closed user group selected for a virtual call. You can specify up to two
digits. The default is null.
NUI
A name/password combination that gives you access to a commercial
packet-switched network. The set of Network User Identification
(NUI) related facilities to use in the next call request. NUI provides
information to the network for billing, security, network management
purposes, and activation of subscribed facilities. You can specify the
NUI, consisting of up to six digits, to use in the next call request. The
default is null.
MAX 6000/3000 Network Configuration Guide
Configuring X.25
Configuring X.25 IP connections
Max Unsucc. calls, Inactivity Timer, and MRU parameters
The next set of parameters in Ethernet > Connections > Connection profile > Encaps Options
define the maximum number of calls, the number of seconds the MAX allows a connection to
remain inactive, and the maximum number of bytes the MAX can receive in a single IP packet:
Parameter
Specifies
Max Unsucc. calls
The maximum number of unsuccessful X.25 calls that the MAX can
attempt before it drops the modem connection. The default of 0 (zero)
allows an unlimited number.
Inactivity Timer
The number of seconds the MAX allows a connection to remain
inactive before it drops the virtual circuit.
MRU
The maximum number of bytes the MAX can receive in a single IP
packet on the X.25 link. If the setting is larger than the X.25 packet
size, the IP packet is further fragmented to fit the maximum X.25
packet size. The default is 1500 bytes.
Call Mode and X.121 parameters
The following parameters in Ethernet > Connection > Connection profile > Encaps Options
define whether the MAX can initiate a call request, the X.121 src addr parameter of the X.25
profile on the MAX and the X.121 address of the remote host to which the profile connects:
Parameter
Specifies
Call Mode
Whether the MAX can initiate a call request on the connection.
Answer X.121 Addr The value specified in the X.121 src addr parameter of the X.25 profile
on the MAX, although the value might be different because the MAX
unit’s X.25 connection can have more than one X.121 address. You
should not leave Answer X.121 address blank if Call Mode specifies
either Both or Incoming.
You can substitute the beginning portion of the address with the
wildcard * which indicates that the MAX should accept any value,
requiring a match only on the trailing digits that you specify after the
wildcard character.
Remote X.121 Addr The value specified in the X.121 source address of the remote X.25
host to which the profile connects. You should not leave Remote X.121
addr blank if you set Call Mode to Both or Outgoing. If you configure a
value for Remote X.121 address, the MAX attempts to match the
incoming call to Remote X.121 address as well as Answer X.121
address.
You can substitute the beginning portion of the address with the
wildcard * which indicates that the MAX should accept any value,
requiring a match only on the trailing digits that you specify after the
wildcard character. For outgoing calls, the MAX dials only the trailing
digits specified, ignoring the beginning wildcard character.
MAX 6000/3000 Network Configuration Guide
6-9
Configuring X.25
Configuring X.25 IP connections
Route IP and LAN Adrs
The last two parameters to set values for are the Route IP parameter and the LAN Adrs
parameter.
The Ethernet > Connections > Connection profile > Route IP parameter specifies the routing of
IP data packets on the interface. IP routing must be enabled on both sides of the connection,
and the MAX unit must be configured with an IP address in the Ethernet profile. To establish
an inbound connection, IP routing must also be enabled in the Answer profile.
The Ethernet > Connections > Connection profile > IP Options > LAN Adrs parameter
specifies the IP address of remote-end host or router. The IP configuration for an X.25 IP
connection is identical to that of an IP routing connection that uses PPP encapsulation. You
must set the LAN Adrs parameter to the address of the remote unit. If you are using numbered
interfaces, you can also specify a local IF Adrs and a remote WAN Alias value. For details
about IP routing configurations, see Chapter 9, “Configuring IP Routing.”
For detailed information about each parameter, see the MAX Reference.
Example of an X.25 IP configuration
This section shows a sample configuration that enables two IP networks to connect through a
Public or Private Packet Switched Network, as shown in Figure 6-1.
Figure 6-1. Example of an X.25 IP connection
PSPDN
MAX
10.1.2.3/24
MAX
10.65.212.226/24
To configure this sample connection:
1
Open the Answer profile and enable X.25 IP encapsulation:
Ethernet
Answer
Encaps...
X25/IP=Yes
2
Open a Connection profile, name it, and activate the profile:
Ethernet
Connections
Connection profile
Station=newyork
Active=Yes
3
Enable IP routing and specify the IP address of the answering unit:
Route IP=Yes
Ip options...
LAN Adrs=10.65.212.226/24
6-10
4
Enable X.25/IP encapsulation and then open the Encaps Options subprofile.
5
Specify the name of the X.25 profile that carries this connection:
MAX 6000/3000 Network Configuration Guide
Configuring X.25
Configuring X.25 PAD connections
Encaps=X25/IP
Encaps options...
X.25 Prof=ATT
6
Set the inactivity timer (to 30 seconds, for example):
Inactivity Timer=30
7
Set the call mode and the local and remote X.121 addresses:
Call Mode=Both
Answer X.121 Addr=031344159782111
Remote X.121 Addr=031344159782111
8
Exit the profile and, at the exit prompt, select the exit and accept option.
Configuring X.25 PAD connections
An X.25 Packet Assembler/Disassembler (PAD) is an asynchronous terminal concentrator that
enables several terminals to share a single network line. It has its own command interface and
uses an X.3 profile to fine-tune its parameters.
When a user calls an X.25 PAD through a modem, a digital modem processes and forwards the
call to the terminal server. The terminal server authenticates the call, using the password
specified in the caller’s Connection profile, and establishes the session. If the MAX does not
authenticate the session, either because an unauthenticated user enters the PAD command at
the terminal-server prompt or because you use the terminal server’s immediate X25/PAD
services, the MAX uses the X.25 parameters specified in the Answer profile.
When the MAX establishes the session, the caller can see the terminal-server command line or
is directed immediately to an X.121 host. If the connection auto-calls an X.121 host, the initial
session display is similar to the following:
ATDT 555-1212
CONNECT 9600
*
If the MAX directs the user to the terminal-server command line, the user sees the
terminal-server login banner. The user can then establish a PAD session by using the PAD
command. For example:
ascend% pad
*
(The asterisk is the PAD prompt for input.) The user can then place a call. For example:
*call 031344159782738
For more details, see “X.25 PAD commands” on page 6-18.
X.25 PAD parameters
This section lists the parameters related to configuring X.25 PAD connections located in both
the Ethernet > Answer > PAD Options and Ethernet > Connections > Connection profile >
Encaps Options. (These parameters are described on page 6-8 and following the list below.)
MAX 6000/3000 Network Configuration Guide
6-11
Configuring X.25
Configuring X.25 PAD connections
Note that you must set Encaps to X.25/PAD in the Connection profile to access the X.25/PAD
parameters in Encaps Options:
Ethernet
Connections
Connection profile
Encaps=X.25/PAD
Encaps options
X25 Prof
X.3 Param Prof
VC Timer enable
Auto-Call X.121 addr
Reverse Charge
RPOA
CUG Index
NUI
X.3 Param Prof
The X.3 Param Prof parameter specifies a default X.3 profile for the connection. You can also
use a PAD command to specify a profile. A profile specified on the command line overrides
the default profile for the length of the current session. Table 6-3 on page 6-17 lists supported
X.3 profiles.
VC Timer enable
The VC Timer enable parameter specifies the Virtual Call Establishment (VCE) timer on a
per-user basis. It also specifies the number of seconds to maintain a connection to a
character-oriented device (such as the terminal server) that has not established a virtual call. If
the X.25 profile disables this parameter, it has no effect in a Connection profile.
Auto-call X.121 addr
The Auto-call X.121 addr parameter specifies a X.25 host to call immediately when the MAX
uses the x or x profile in which you set the parameter to establish an X.25/PAD session. If you
set this parameter to specify an address, the PAD session can begin automatically. Otherwise,
the MAX displays the terminal-server prompt, at which the user can enter the PAD command
to begin a session.
In addition to the parameters listed above, the remaining parameters in Encaps Options are:
6-12
Parameter
Specifies
Recv PW
A case-sensitive password for authenticating the caller.
PAD banner
msg
The banner message that the user or a calling device sees when starting an
X.25 PAD (Triple-X) session on the MAX. The PAD user can be either a
user or a calling device running a script. You can specify up to 32 characters.
The default is null.
MAX 6000/3000 Network Configuration Guide
Configuring X.25
Configuring X.25 PAD connections
Parameter
Specifies
PAD prompt
The PAD prompt parameter specifies the prompt the user or the calling
device sees when running an X.25 (Triple-X) PAD session on the MAX.
The PAD user can either be a human user or a calling device running a
script. You can specify up to 12 characters. The default is null. (Packet
Assembler/Disassembler (PAD) is an asynchronous terminal concentrator
that enables several terminals (or other asynchronous devices) to share a
single network line. PAD-generated packets are transported using the X.25
protocol.)
NUI prompt
The message that prompts for the user’s Network User Identification (NUI)
to begin an X.25 (Triple-X) PAD session on the MAX. The PAD user can
either be a person or a calling device running a script. You can specify up to
15 characters. The default is null. A value in NUI prompt overrides any
value entered in the NUI setting.
NUI PW
prompt
The NUI password prompt for a PAD application. The value in this
parameter prompts for the user’s Network user Identification (NUI)
password to begin an X.25 (Triple-X) PAD session on the MAX. The PAD
user can either be a human user or a calling device running a script. You can
specify up to 12 characters. The default is null.
PAD Alias #N
Each of the three parameters each can declare an alias for an X.25
command. When the calling device uses a script to communicate with the
X.25 (Triple-X) PAD of the MAX, the script might send X.25 commands
using terminology that the MAX must interpret. If the MAX receives an
X.25 command that contains an alias established by a PAD Alias #N it
interprets the command as set in the parameter. You can specify up to 40
characters. The default is null. For one command string (including a space)
to be treated as equivalent to another, you must insert a slash (/) must be
placed between the two strings.
For detailed information about each parameter, see the MAX Reference.
Configuring an X.25 PAD connection
This section shows a sample configuration in which the MAX immediately directs the X.25
modem caller to a PAD interface on the host whose X.121 address appears in Figure 6-2.
Figure 6-2. Example of a X.25 PAD connection
WAN
311021755555
MAX
To configure this sample X.25 PAD connection.
1
Open the Answer profile and enable X.25/PAD encapsulation.
2
Open a Connection profile, name it, and activate the profile.
3
Enable X.25/PAD encapsulation.
MAX 6000/3000 Network Configuration Guide
6-13
Configuring X.25
Setting up X.25 PAD sessions
4
Open the Encaps Options subprofile and specify the name of the X.25 profile that carries
this connection.
5
Specify the password that authenticates the user connection.
6
Specify a default X.3 parameter profile for this connection.
7
Specify the X.121 address and password for automatic calling.
8
Exit the profile and, at the exit prompt, select the exit and accept option.
Example of X.25 PAD
Ethernet
Answer
Encaps...
X25/PAD=Yes
Ethernet
Connections
rchan
Name=rchan
Active=Yes
Encaps=X25/PAD
Encaps options...
X.25 Prof=ATT
Recv PW=localpw
X.3 Param Prof=CRT
Auto-Call X.121 Addr=031344159782111 *Dpassword
Setting up X.25 PAD sessions
This section describes some of the PAD commands and X.3 parameter profiles that can affect
how users’ terminal sessions operate.
X.3 parameters and profiles
By setting one or more X.3 parameters or by applying an X.3 profile, the user’s terminal or
host DTE can modify PAD operations. This section lists the X.3 parameters and profiles and
then describes how to set them from the PAD. Table 6-2 lists the X.3 parameters, numbered
1–22.
Table 6-2. X.3 parameters
6-14
Parameter
Description
Possible values
1
PAD recall
0—Escape not allowed
1—Escape allowed (the default)
2
Echo
0—No echo
1—Echo (the default)
MAX 6000/3000 Network Configuration Guide
Configuring X.25
Setting up X.25 PAD sessions
Table 6-2. X.3 parameters (continued)
Parameter
Description
Possible values
3
Data forwarding
characters
0—None (full packet)
1—Alphanumeric
2—Carriage return (the default)
4—ESC, BEL, ENQ, ACK
8—DEL, CAN, DC2
16—ETX, EOT
32—HT, LT, VT, FF
64—All other characters in columns 0 and 1
of International Alphabet #5
4
Idle timer delay
0—No timer
1–255—Delay value in twentieths of a second
5
Ancillary device
control
0—Not operational
1—Use X-ON (DC1 of International Alphabet
#5) and X-OFF (DC3 of International
Alphabet #5)
6
PAD service and
command signals
0—Do not transmit service signals
1—Transmit service signals
7
PAD operation on
receipt of break
signal from the
start-stop mode
DTE
0—No action
1—Transmit Interrupt packet
2—Reset
4—Indication of break (PAD message)
8—Escape from data transfer
16—Discard output to DTE-C
21—Combine actions 1, 4, and 16
8
Discard output
0—Normal data delivery (the default)
1—Discard output to DTE-C
9
Padding after
carriage return
0—No padding
1–7—Number of padding characters inserted
after the carriage return
10
Line folding
0—No line folding (the default)
1–255—Number of characters per line
11
Terminal-server
access speed
10—50 bps
5—75 bps
9—100 bps
0—110 bps
1—134.5 bps
6—150 bps
8—200 bps
2—300 bps
...
MAX 6000/3000 Network Configuration Guide
6-15
Configuring X.25
Setting up X.25 PAD sessions
Table 6-2. X.3 parameters (continued)
Parameter
Description
Possible values
11
(continued)
Terminal-server
access speed
The following values are dependent on the
PAD type:
4—600 bps
3—1200 bps
7—1800 bps
11—75 bps from, 1200 bps to DTE-C.
12—2400 bps
13—4800 bps
14—9600 bps
15—19200 bps
16—48000 bps
17—56000 bps
18—64000 bps
6-16
12
Flow control of the
PAD by the
start-stop mode
DTE
0—Not operational
1—Use X-ON and X-OFF (DC1 and DC3 of
International Alphabet #5)
13
Linefeed insertion
after carriage
return
0—Option not selected
1—Linefeed insertion after a carriage return in
data the PAD sends to DTE-C
2—Linefeed insertion after a carriage return in
data the PAD receives from DTE-C
4—Linefeed insertion after echo of each
carriage return to DTE-C
14
Linefeed padding
0—No padding
1–7—Number of padding characters inserted
after the linefeed
15
Editing
0—No editing in data transfer
1—Editing in data transfer
16
Character delete
0–127 (a character from International
Alphabet #5)
17
Line delete
0–127 (a character from International
Alphabet #5)
18
Line display
0–127 (a character from International
Alphabet #5)
19
Editing PAD
service signals
0—No editing PAD service signals
1—Editing PAD service signals
MAX 6000/3000 Network Configuration Guide
Configuring X.25
Setting up X.25 PAD sessions
Table 6-2. X.3 parameters (continued)
Parameter
Description
Possible values
20
Echo mask
0—None (full packet)
1—Alphanumeric
2—Carriage return (the default)
4—ESC, BEL, ENQ, ACK
8—DEL, CAN, DC2
16—ETX, EOT
32—HT, LT, VT, FF
64—All other characters in columns 0 and 1
of International Alphabet #5
21
Parity treatment
0—No parity checking or generation
1—Parity checking
2—Parity generation
22
Page wait
0—No page wait
1–255—The number of linefeed characters
sent by the PAD before page wait condition
Table 6-3 lists the permanent (noncustom) X.3 profiles and the settings of their parameters.
Table 6-3. X.3 profiles
X.3 profile
Contents
CRT
1:64, 2:1, 3:2, 4:0, 5:0, 6:5, 7:2, 8:0, 9:0, 10:0, 11:0, 12:1,
13:4, 14:0, 15:1, 16:8, 17:24, 18:18, 19:2, 20:0, 21:3, 22:0
INFONET
1:1, 2:0, 3:2, 4:0, 5:0, 6:0, 7:21, 8:0, 9:2, 10:0, 12:1, 13:0,
14:2, 15:1, 16:8, 17:24, 18:18, 19:0, 20:0, 21:0, 22:0
SCEN
1:64, 2:1, 3:2, 4:0, 5:1, 6:5, 7:21, 8:0, 9:0, 10:0, 12:1, 13:4, 14:0,
15:1, 16:127, 17:24, 18:18, 19:1, 20:0, 21:0, 22:0
CC_SSP
1:1, 2:1, 3:126, 4:0, 5:1, 6:1, 7:2, 8:0, 9:0, 10:0, 12:1, 13:0, 14:0,
15:0, 16:127, 17:24, 18:18, 19:1, 20:0, 21:0, 22:0
CC_TSP
1:0, 2:0, 3:0, 4:20, 5:0, 6:0, 7:2, 8:0, 9:0, 10:0, 12:0, 13:0, 14:0, 15:0,
16:127, 17:24, 18:18, 19:1, 20:0, 21:0, 22:0
HARDCOPY
1:64, 2:1, 3:2, 4:0, 5:2, 6:5, 7:21, 8:0, 9:5, 10:80, 12:1, 13:4, 14:5,
15:1, 16:8, 17:24, 18:18, 19:1, 20:0, 21:3, 22:0
HDX
1:1, 2:1, 3:2, 4:0, 5:2, 6:5, 7:2, 8:0, 9:0, 10:0, 12:1, 13:4, 14:0, 15:1,
16:8, 17:24, 18:18, 19:2, 20:0, 21:3, 22:0
SHARK
1:0, 2:0, 3:2, 4:0, 5:0, 6:0, 7:2, 8:0, 9:0, 10:0, 12:0, 13:0, 14:0, 15:0,
16:0, 17:0, 18:0, 19:0, 20:0, 21:0, 22:0
MAX 6000/3000 Network Configuration Guide
6-17
Configuring X.25
Setting up X.25 PAD sessions
Table 6-3. X.3 profiles (continued)
X.3 profile
Contents
DEFAULT
(MINIMAL)
1:64, 2:1, 3:2, 4:0, 5:2, 6:5, 7:2, 8:0, 9:25, 10:72, 12:1, 13:5, 14:25,
15:1, 16:8, 17:24, 18:18, 19:1, 20:0, 21:0, 22:0
NULL
1:0, 2:0, 3:0, 4:0, 5:0, 6:0, 7:0, 8:0, 9:0, 10:0, 12:0, 13:0, 14:0,15:0,
16:0, 17:0, 18:0, 19:0, 20:0, 21:0, 22:0
X.25 PAD commands
This section describes the X.25 PAD user commands in two categories: those that manage calls
from the PAD and those that affect X.3 profile and parameter settings for the local or remote
PAD. In the following section, underlined letters in a command indicate the minimum string
you have to enter to execute the command. Otherwise, commands in bold indicate the
command you must enter to execute the command.
Commands for working with X.3 parameters and profiles
Following are the commands you can enter at the PAD prompt (*) to change an X.3 parameter
setting or profile:
•
help
The help command displays a list of all X.25 PAD commands and syntaxes.
•
par? [param1[,param2,...]]
The Par? command displays the current values of the specified X.3 parameters. Or, if you
specify no parameters, the command displays all current X.3 settings. For example:
par 2
•
prof [profile | ?]
The Prof command activates the X.3 profile (specified by the name shown in Table 6-3 on
page 6-17), or if you use this command with the question mark (?) keyword, it displays the
currently active profile followed by a list of available profiles. If you do not specify any
arguments, the Prof command displays the currently active profile. For example:
prof infonet
•
set [param1:value1 [,param2:value2,...]]
The Set command sets one or more X.3 parameter values. For example:
set 1:0, 2:1
6-18
•
set? [param1:value1 [,param2:value2,...]]
The Set command is identical to the Set command, except that it displays all X.3
parameter values after setting those specified on the command line.
•
tabs [LCL num1][REM num2][EXP num3]
The Tabs command sets and reads three nonstandard X.3 parameters that control tab
expansion. You cannot access these parameters by the remote host using Q-bit packet PAD
commands on the remote host. You must keep the PAD’s view of the current screen
position accurate by setting EXP to 0 and LCL to the number of columns to which your
terminal expands tabs. The settings enable the PAD to perform correct line folding, line
deletion, and character deletion. The keywords function as follows:
MAX 6000/3000 Network Configuration Guide
Configuring X.25
Setting up X.25 PAD sessions
–
LCL sets the number of columns to which tabs are expanded locally (num1). If the
EXP keyword disables local tab expansion, LCL num1 specifies the number of
columns to which the asynchronous device expands tabs sent to it. You can specify a
number from 0 to 16. Zero specifies that no expansion takes place.
–
REM sets the number of columns to which tabs are expanded remotely (num2), that
is, on input from the terminal to the network. You can specify a number from 0 to 16.
Zero specifies that no expansion takes place.
–
EXP enables (1) or disables (0) tab expansion locally. If you specify 1 after this
keyword, the MAX expands tabs according to the LCL specification.
Following are similar commands for changing X.3 settings on the remote PAD:
•
rpar? [param1[,param2,...]]
The Rpar? command displays the current values of the specified X.3 parameters on the
remote PAD. Or, if you specify no parameters, the command displays all current X.3
settings. For example:
rpar 2
•
rprof [profile | ?]
The Rprof command activates the X.3 profile for the remote PAD. Or, if you use this
command with the question mark (?) keyword, it displays the currently active profile
followed by a list of available profiles. If you do not specify any arguments, the Rprof
command displays the currently active profile. For example:
rprof infonet
•
rset [param1:value1 [,param2:value2,...]]
The Rset command sets one or more X.3 parameter values for the remote PAD. For
example:
set 1:0, 2:1
•
rset? [param1:value1 [,param2:value2,...]]
The Rset? command is identical to the Rset command, except that it displays all X.3
parameter values after setting those specified on the command line.
X.25 PAD commands for managing calls
You can enter the following commands at the X.25 PAD prompt to generate calls, specify a
matching pattern for incoming calls, and perform related functions:
•
call [?] | [[address][*P|*D|*F data]]
The Call command generates a call by sending a Call-Request packet. If you enter the Call
command with only a question mark (?), the MAX displays the address the PAD would
use if you entered the Call command with no address.
The address argument specifies the X.121 address to which the MAX makes the call.
The address can contain up to 15 characters. If you do not specify a value for address,
the MAX makes the call request for the last address specified.
The MAX inserts the data following the *P and *D keywords into the last 12 bytes of
the user data field. If you specify *P, the screen does not echo the data as you enter it, even
if you set X.3 parameter number 2 to Echo. This specification is useful for entering
passwords. If you specify *D, the screen echoes the data as you enter it.
MAX 6000/3000 Network Configuration Guide
6-19
Configuring X.25
Setting up X.25 PAD sessions
If you specify *F, the MAX inserts all the data into the user data portion of the call
packet (with a maximum length of 124 bytes), and the MAX flags the packet as a fast
select call.
6-20
•
clr
The Clr command clears a virtual circuit by sending a Clear-Request packet (from a DTE)
or a Clear-Indication packet (from a DCE).
•
facilities [ * | facilities ]
The Facilities command specifies which facilities to use in subsequent Call commands. If
you enter the Facilities command with no arguments, the MAX displays the current
facilities.
–
If you specify an asterisk (*), the command clears the current facilities and resets
them to their default values. The default facilities are window size 2 and packet size
128 (420202430707).
–
The facilities argument can consist of up to 63 hexadecimal digits. The MAX
converts the specified value you specify from hexadecimal format, and it becomes the
byte sequence inserted in the Facilities field of outgoing Call-Request packets.
•
full
The Full command selects full-duplex mode.
•
half [*] | [[-] <ch1>, <ch2>,...]
The Half command selects half-duplex mode and specifies the characters echoed. In
half-duplex mode, the MAX does not echo most characters. In half-duplex mode with
echo enabled, the PAD does most of the work of echoing and then discards the data
instead of sending it to the asynchronous device. The PAD can therefore provide line
folding, tab expansion, linefeed insertion, carriage return and linefeed padding, and
character and line deletion. For more information about these features, see “X.3
parameters and profiles” on page 6-14.
If you disable echo, the amount of processing the PAD must perform on every character
decreases substantially, and the PAD cannot perform line folding, tab expansion, or other
actions described in the previous paragraph. This mode is most efficient for file transfers.
The command’s arguments function as follows:
–
If you specify an asterisk (*), the MAX does not echo any characters.
–
If you specify only a list of characters (ch1, ch2, and so on), the MAX echoes only
these characters.
–
You must specify each character in decimal format.
–
If you insert a hyphen (-) before the list of characters, only the characters you specify
are not echoed.
–
If you enter the Half command with no arguments, the command sets half-duplex
mode without altering the characters selected for echo by any previously entered Half
command.
•
interrupt
The Interrupt command generates an Interrupt packet. An Interrupt packet can transmit
from 1 to 32 bytes of data to the remote DTE without being subject to flow control. The
exchange of Interrupt packets does not affect the exchange of data packets or flow-control
packets.
•
listen [addr=<address> | data=data]
MAX 6000/3000 Network Configuration Guide
Configuring X.25
Setting up X.25 PAD sessions
The Listen command specifies the match pattern for accepting an incoming call. It uses
the following syntax:
–
The MAX matches the address argument against the subaddress specified by the
incoming call. If the subaddresses match, the MAX accepts the incoming call.
–
The MAX matches the data against the last 12 bytes of the user data field of
incoming calls. If the data matches, the MAX accepts the incoming call.
•
reset
The Reset command resets a virtual circuit by generating a Reset-Request packet with 0
cause (DTE originated) and 0 diagnostic.
•
status
The Status command requests the status of a virtual call placed to a remote DTE.
PAD service signals
The PAD acknowledges commands and informs the user about the internal state of the PAD by
transmitting PAD service signals to the terminal server. The terminal-server user can suppress
the reception of PAD service signals by setting PAD parameter #6 to 0. Table 6-4 lists the PAD
service signals.
Table 6-4. PAD service signals
Service signal
Description
RESET DTE
The remote DTE has reset the virtual circuit.
RESET ERR
A reset has occurred because of a local procedure error.
RESET NC
A reset has occurred because of network congestion.
COM
A call has been connected.
PAD ID
Precedes a string that identifies the PAD.
ERROR
The terminal-server user used faulty syntax when entering an X.25/PAD
command.
CLR
A virtual circuit has been cleared.
ENGAGED
In response to the Status command, this signal indicates that a virtual
call is up.
FREE
In response to the Status command, this signal indicates that a virtual
call has been cleared.
PAR with X.3
parameter
reference
numbers and
their current
values
This string is a response to the Set? command.
MAX 6000/3000 Network Configuration Guide
6-21
Configuring X.25
Setting up X.25 PAD sessions
X.25 clear cause codes
Table 6-5 shows hexadecimal X.25 clear cause codes.
Table 6-5. Clear cause codes
Hex
value
Cause code
00
DTE Clear
01
Number busy
03
Invalid facility request
05
Network congestion
09
Out of order
0B
Access barred
0D
Not obtainable
11
Remote procedure error
13
Local procedure error
15
RPOA out of order
19
Reverse charging acceptance not subscribed
21
Incompatible destination
29
Fast select acceptance not subscribed
39
Ship absent
C1
Gateway-detected procedure error
C3
Gateway congestion
X.25 diagnostic field values
Table 6-6 shows the meanings of the X.25 diagnostic codes.
Table 6-6. X.25 diagnostic field values
6-22
Hex
value
Dec
value
Diagnostic
0
0
No additional information
1
1
Invalid P(S)
MAX 6000/3000 Network Configuration Guide
Configuring X.25
Setting up X.25 PAD sessions
Table 6-6. X.25 diagnostic field values (continued)
Hex
value
Dec
value
Diagnostic
2
2
Invalid P(R)
10
16
Packet type invalid
11
17
For state r1
12
18
For state r2
13
19
For state r3
14
20
For state p1
15
21
For state p2
16
22
For state p3
17
23
For state p4
18
24
For state p5
19
25
For state p6
1A
26
For state p7
1B
27
For state d1
1C
28
For state d2
1D
29
For state d3
20
32
Packet not allowed
21
33
Unidentifiable packet
22
34
Call on one-way LC
23
35
Invalid packet type on a PVC
25
37
Reject not subscribed to
26
38
Packet too short
27
39
Packet too long
29
41
Restart packet with nonzero LC
2B
43
Unauthorized interrupt confirmation
2C
44
Unauthorized interrupt
2D
45
Unauthorized reject
MAX 6000/3000 Network Configuration Guide
6-23
Configuring X.25
Configuring X.25 PAD users from RADIUS
Table 6-6. X.25 diagnostic field values (continued)
Hex
value
Dec
value
Diagnostic
30
48
Timer expired
31
49
For incoming call (or for DTE timer expired for call
request)
32
50
For clear indication (or for DTE timer expired or
retransmission count surpassed for clear request)
33
51
For reset indication (or for DTE timer expired or
retransmission count surpassed for reset request)
34
52
For restart indication (or for DTE timer expired or
retransmission count surpassed for restart request)
40
64
Call setup, call clearing, or registration problem
41
65
Facility/registration code not allowed
42
66
Facility parameter not allowed
43
67
Invalid called address
44
68
Invalid calling address
45
69
Invalid facility/registration length
46
70
Incoming call barred
47
71
No logical channel available
48
72
Call collision
49
73
Duplicate facility requested
4A
74
Nonzero address length
4B
75
Nonzero facility length
4C
76
Facility not provided when expected
Configuring X.25 PAD users from RADIUS
Using DNIS/CLID, you can now authenticate X.25 PAD users by means of RADIUS. This
feature is useful when you require more than 3 X.25 connection profiles. A RADIUS user can
set the attribute Ascend-X25-Pad-X3-Profile to Custom and use the
Ascend-X25-Pad-Parameters attribute to configure the PAD X.3 parameters on a per-user
basis. However, when the PAD users are configured from RADIUS, the ability to store a
6-24
MAX 6000/3000 Network Configuration Guide
Configuring X.25
Customizing script support for X.25 PAD
command-line modified profile (with the storeprof command) is no longer available. Since the
X.3 profile is stored in RADIUS, there is no method to write the new profile back to RADIUS.
Customizing script support for X.25 PAD
The MAX X.25 PAD provides additional flexibility to work with a variety of devices that have
their own expectations of banner messages, PAD prompts, PAD commands, and PAD signals.
You can configure the banner messages, PAD prompts, and PAD commands to meet these
expectations.
Also referred to as a Triple-X PAD, the MAX X.25 PAD supports the X.3, X.28, and X.29
protocols.
Parameters and commands
Five parameters and three commands enable you to configure the MAX X.25 PAD to meet the
expectations of devices to which it might connect.
The five parameters appear in the Ethernet > Connections > Connection profile > Encaps
Options submenu for an X.25/PAD connection. (Note that you must set Encaps to X.25/PAD in
the Connection profile to access the X.25/PAD parameters in Encaps Options.) The parameters
as described on page 6-12 are:
•
PAD banner msg
•
PAD prompt
•
NUI prompt
•
NUI PW prompt
•
PAD Alias #n (where n=1–3)
One terminal server command:
•
X28
Two X.25 PAD commands:
•
Storepro
•
Call
X28 terminal–server command
X28 which appears in the list of terminal-server commands, accesses the PAD. It is not case
sensitive. To access the PAD, enter the X28 command at the terminal-server prompt:
% X28
Alternatively, you can enter the PAD command, which is identical to the X.28 command.
X.25 PAD commands
The two X.25 PAD commands are Storeprof and Call.
MAX 6000/3000 Network Configuration Guide
6-25
Configuring X.25
Customizing script support for X.25 PAD
Storeprofile
Use the Storeprof command to store the current settings of the PAD parameters in a specified
X.3 profile.
Note: At the moment, you can store the current settings only in the X.3 profile named
Custom.
To store the current settings of the PAD parameters in the X.3 profile named Custom, use the
following syntax to enter the Storeprof command at the PAD prompt:
storeprof custom
For instructions on how to set the X.3 parameters, see “X.25 PAD commands” on page 6-18.
The table listing the 10 named X.3 profile should include the X.3 profile named custom noting
that the settings of the X.3 parameters is not preset, but accomplished through X.25
commands.
Call
In the Call command, if you enter a comma after the called address, the command accepts up to
12 characters after the comma as Call User Data (CUD).
Accessing the PAD by using the PAD script support feature
When the calling device accesses the PAD as a result of matching an X25/PAD profile during
CLID, DNIS, or password authentication, the PAD must prompt the calling device for the
optional NUI and NUI password. If the input is valid, the PAD must include the NUI input as
an NUI facility, and the NUI password input as Call User Data, for all subsequent outgoing
calls for the calling device.
For example, assume that the following aliases have been established by the following
parameter settings:
PAD Alias #1=call/n
PAD Alias #2=prof CUSTOM/profile 6
PAD Alias #3=storeprof CUSTOM/storeprofile 6
Assume that a calling device, such as a PC with a modem attached, dials into the MAX,
matched with a Connection profile that uses X25/PAD encapsulation. The user at the calling
device can enter a series of commands, as in the following example. (Note that the user at the
calling end could be an application running a PAD script.)
% atd1234567
CONNECTED
THIS IS A BANNER MESSAGE
ENTER NUI:
% 123456
123456
ENTER NUI PASSWORD:
% 654321
6-26
MAX 6000/3000 Network Configuration Guide
Configuring X.25
Configuring X.32 profiles for incoming switched X.25 connections
******
PROMPT>
PROMPT> profile 6 */User loads the CUSTOM profile. */
PROMPT> set 1:1 /* User sets the Escape char to ctrl-P */
PROMPT> n 031454159782738 /* User places X.25 call. */
PROMPT>
COM /* X.25 call connected. */
PROMPT> <ctrl-P> /* After exchanging some data with the called host,
the user escapes to command mode. */
PROMPT>
PROMPT> clr /* User clears the X.25 call. */
CLR CONF
PROMPT>
PROMPT> storeprofile 6 /* User saves the changed parameters to the
CUSTOM profile */
PROMPT>
PROMPT>+++ /* User quitting modem call */
OK
% ath
OK
Configuring X.32 profiles for incoming switched X.25
connections
For MAX 6000 units, X.32 profiles include a parameter called Appl Mode (Ethernet >
Connections > Connection profile > X.32 > Encaps Options > Appl Mode), which has two
settings. The first setting, Net2Net (the default), enables you to route incoming calls to the
nailed X.25 connection. The other setting, ISDN Pkt Mode, enhances AO/DI functionality
by enabling the MAX unit to accept the ISDN packet-mode call and establish an on-demand
packet-mode X.25 connection supporting up to two X.25 sessions.
MAX 6000/3000 Network Configuration Guide
6-27
Configuring X.25
Configuring X.32 profiles for incoming switched X.25 connections
Net2Net circuit mode
With traditional X.25 connections, you configure one X.25 switched connection per client, as
in Figure 6-3.
Figure 6-3. Traditional X.25 connection
sX.25
DTE
DCE
sX.25
DCE
DTE
X.25 switch
Client
DCE
Client
sX.25
DTE
Client
But a MAX 6000 unit can enable several X.25 clients to share a single connection to an X.25
network. In Figure 6-4, the X.25 switch connects to the MAX 6000. The X.25 switch sees the
MAX 6000 as a terminating device—Data Terminal Equipment (DTE). The clients see the
MAX 6000 as an X.25 switch—Data Communications Equipment (DCE).
Figure 6-4. Net2Net circuit mode
MAX 6000
Nailed X.25
DCE
X.25 switch
sX.25
DTE
DTE
DCE
Client
DTE
Client
To configure Net2Net circuit mode, proceed as follows for each client:
1
Open the Ethernet > Connections > client’s profile > X.32 profile.
2
Set Encaps to X.32.
3
Set Calling # to the client’s number.
4
Set Called # to the number of the MAX ISDN line.
5
Set the Encaps Options > X.25 Prof parameter to the name of a profile in the Ethernet >
X.25 menu, that is, to the name of the X.25 profile to be used for this client.
6
Set the Appl Mode parameter to Net2Net.
7
Exit the profile and, at the exit prompt, select the exit and accept option.
8
Open the Ethernet > X.25 profile to be used for this client.
9
Set Active to Yes.
10 Set Call Type to Switched.
6-28
MAX 6000/3000 Network Configuration Guide
Configuring X.25
Configuring X.32 profiles for incoming switched X.25 connections
11 Set X.25 Node Type to DCE.
Note: The X.25 Node Type parameter specifies the X.25 application and manner in
which the MAX unit uses the switched-B channel(s) to support that application.
12 Set the other parameters to match the requirements of the calling X.25 DTE.
13 Exit the profile and, at the exit prompt, select the exit and accept option.
ISDN packet mode (on-demand X.25)
MAX 6000 units support switched X.25 connections in addition to nailed X.25 connections.
Typically, there is a nailed X.25 connection between the client and the X.25 switch and
between the X.25 switch and the MAX unit. MAX units also support packet-mode X.25
connections. Figure 6-5 shows a client dialing in to a MAX 6000 unit over a switched X.25
connection. This client also has an always on/dynamic ISDN (AO/DI) connection to the MAX
unit. When requesting extra bandwidth, the client dials ISDN calls to the MAX unit.
Figure 6-5. ISDN packet mode
X.25 switch
Client
MAX 6000
s X.25
s X.25
ISDN
Internet
ISDN
PSTN
To configure ISDN packet mode (on-demand X.25), proceed as follows for each client:
1
Open the Ethernet > Connections > client’s profile > X.32 profile.
2
Set Encaps to X.32.
3
Set Calling # to the client’s number.
4
Set Called # to the number of the MAX ISDN line.
5
Set the Encaps Options > X.25 Prof parameter to the name of a profile set in the Ethernet
> Connections > X.25 menu, that is, to the name of the X.25 profile to be used for this
client.
6
Set the Appl Mode parameter to ISDN Pkt Mode.
7
Exit the profile and, at the exit prompt, select the exit and accept option.
8
Open the Ethernet > X.25 profile to be used for this client.
9
Set Active to Yes.
10 Set Call Type to Switched.
11 Set X.25 Node Type to DTE.
Note: The X.25 Node Type parameter specifies the X.25 application and how the MAX
unit uses the switched-B channel(s) to support that application.
12 Set the other parameters to match the line provisioning from the X.25 network.
13 Exit the profile and, at the exit prompt, select the exit and accept option.
MAX 6000/3000 Network Configuration Guide
6-29
Configuring X.25
Setting up ISDN D channel X.25 support
Setting up ISDN D channel X.25 support
This section discusses support of nailed X.25 connection over the D channel, but T3POS,
X25/PAD, X25/IP, X25/PPP, and X25/MP (AO/DI) protocols are also supported over any
channel that supports nailed X.25 connections (for example, B channel and serial WAN).
Configuring ISDN D channel X.25 support
To configure the MAX to support X.25 over the signaling D channel:
1
Open Ethernet > X25 > any X25 profile.
2
Set TEI to the value specified by your X.25 carrier.
You can set TEI to any value from 1 to 63 for fixed TEI. The default is 21. If you set TEI
to 0 (zero), the MAX will use a TEI assigned by the network.
3
Set Call Type to D channel.
4
Exit the profile and, at the exit prompt, select the exit and accept option.
Customized X.25 T3POS support
MAX units with X.25 support X25 Transaction Processing Protocol for Point-of-Service
(T3POS), which can be used to send point-of-sale (POS) data over the ISDN D channel.
T3POS is a character-oriented, frame-formatted protocol designed for POS transactions
through an X.25-based packet switched network. T3POS enables you to send data over the
ISDN D channel while continuing to send traffic over both B channels. The T3POS protocol
involves three parties: the T3POS DTE (DTE), the T3POS PAD (PAD) and the T3POS Host
(host), as shown in Figure 6-6.
Figure 6-6. T3POS setup
Asynchronous
connection
X.25 connection
PSDN
T3POS DTE
T3POS PAD
T3POS Host
A typical use of T3POS is performing credit card authorization over the D channel while using
the B channels to transmit inventory control data and other traffic. Figure 6-7 shows an
example of a T3POS setup.
6-30
MAX 6000/3000 Network Configuration Guide
Configuring X.25
Setting up ISDN D channel X.25 support
Figure 6-7. Example of a T3POS configuration
Cash registers / kiosks
PC or terminal
server
Retail outlet
Asynchronous lines
Ethernet
X.25/T3 POS traffic
(D channel)
PSTN
PSDN
Credit card
transaction center
PPP/MPP traffic
(B channels)
Corporate site
The Lucent T3POS implementation supports the following T3POS features:
•
Local, Transparent, Blind, and Binary-Local mode
•
T1-T6 timers
•
All the control characters, described in Bellcore GR-2803
•
Error recovery procedures, described in Bellcore GR-2803 and EIS 1075-V2.1
•
DTE-initiated calls
•
Host-initiated calls
Protocol summary
This section provides a brief summary of the T3POS protocol. For complete details about the
protocol and the MAX X.25 PAD, see to the documents listed in “References” on page 6-33.
The T3POS protocol provides reliable and efficient data interchange (transactions) between a
host (usually a transaction server) and a DTE (usually a client). The T3POS DTE is usually a
client device communicating through an asynchronous port, while the T3POS host is a
mainframe or server communicating through an X.25 packet network. The T3POS PAD (the
MAX) converts data arriving from a T3POS DTE to a format that can be transmitted over a
packet network. It also ensures reliability and efficiency as described in the protocol
specifications.
Note that the T3POS PAD does not alter, check, or convert the parity of characters it receives
from or sends to the X.25 network or the T3POS DTE. T3POS essentially uses a data format of
8 bits, no parity. The format is actually 7 bits, 1 parity, but the MAX ignores the parity bit.
MAX 6000/3000 Network Configuration Guide
6-31
Configuring X.25
Setting up ISDN D channel X.25 support
Depending on the current state of a transaction or call, and the mode of operation selected,
T3POS uses different data formats and frame structures. The MAX supports four modes of
operation: Local, Binary-Local, Transparent, and Blind.
General frames
A general frame (or data frame) is any sequence of octets received from or sent to the DTE
within the period specified by the T1 timer (this timer is known as the Char-to-Char timer). In
Local and Binary-Local modes and in opening frames, general frames are encapsulated in the
following format:
STX [data] ETX XRC
where:
•
STX is the ASCII character \002.
•
Data is the user data being sent in this frame.
•
ETX the ASCII character \003.
•
XRC is the checksum. For all modes except Binary-Local, the checksum is a one character
Longitudinal Redundancy Check (LRC) checksum. For Binary-Local mode, the
checksum is a two character Cyclic Redundancy Check (CRC) checksum.
Control frames
The MAX uses a control frame only when establishing a call and not during data transfer. You
can use the VT-100 interface in the MAX to configure the T3POS modes and most of the
T3POS parameters for the T3POS PAD. However, use of a control frame can override the
operating mode, called number, call user data, and some user facilities. A control frame is a
supervisory frame with the following format:
SOH MSS CUD STX [data] ETX XRC
where:
•
SOH is the ASCII character \001.
•
MSS is the Mode Selection Signal, which can be (optionally) used to indicate the mode for
the call.
•
CUD is the Called User Data. It can contain an X.121 address, and user facilities or call
user data in an X.28 format.
•
Data is optional in the control frame. In Transparent and Blind modes, the T3POS PAD is
essentially restricted to passing data frames between the T3POS DTE and the T3POS host.
•
ETX is the ASCII character \003.
•
XRC is the checksum. For all modes except Binary-Local, the checksum is a one character
Longitudinal Redundancy Check (LRC) checksum. For Binary-Local mode, the
checksum is a two character Cyclic Redundancy Check (CRC) checksum.
T3POS Timers
The T3POS protocol defines six timers:
•
6-32
T1: Char-to-Char timer
MAX 6000/3000 Network Configuration Guide
Configuring X.25
Setting up ISDN D channel X.25 support
•
T2: SYN-to-SYN timer
•
T3: ENQ Handling timer
•
T4: Response timer
•
T5: DLE, EOT timer
•
T6: Frame Arrival timer
DTE-initiated calls
If the first T3POS frame (which can be either a general frame or a control frame) the MAX
receives is from the DTE, the session is qualified as DTE-initiated. When the MAX receives a
general frame from the DTE, it uses the settings in the Answer profile (or the Connection
profile) to trigger a call to the host. The MAX also triggers a call to the host when it receives a
control frame from the DTE. In this case, however, the MAX uses the mode and called address
(if any) specified in the control frame for the call, overriding any setting configured in the
MAX.
Host-initiated calls
The current implementation does not directly support incoming calls to the DTE. Instead, the
DTE answers any host-initiated calls by connecting to the T3POS PAD and listening for such
calls. The host must send a called address matching the pattern the DTE is listening for. The
pattern need not be a complete X.121 address, but can be a subpattern (including wildcard
characters). You configure the listening pattern by setting the Listen X.121 Addr parameter
(which is described in the MAX Reference).
Flow control
Flow control should not be an issue for the X25 T3POS implementation, because the T3POS
protocol has an effective window size of one (that is, every frame must be acknowledged
before another frame is sent) and because the MAX buffers all the frames before forwarding
them to the DTE or the host. However, you should chose the T2, T3, and T4 timers carefully,
because the MAX buffers the data before forwarding it. Note that the current Lucent modem
code performs continuous RTS/CTS flow control, which cannot be disabled.
References
The T3POS protocols are derived from several documents that have become de facto
standards:
•
GR-2803—“Generic requirements for a Packet Assembler/Disassembler Supporting
T3POS,” Bellcore GR-2803-CORE, Issue 2, Dec. 1995. This is the basic defining
document.
•
EIS 1075-V2.1—“External Interface Specification for Data-Terminal-Equipment Support
of T3POS,” Applied Digital Design, version 2.1, March 1994. Specifies error recovery
mechanisms between a T3POS DTE and a T3POS PAD on one side and a T3POS PAD
and the T3POS host on the other side.
MAX 6000/3000 Network Configuration Guide
6-33
Configuring X.25
Setting up ISDN D channel X.25 support
Configuring a T3POS connection
Configuring a T3POS PAD connection requires two general procedures:
•
Create a Connection profile for each authenticated user connecting to the T3POS, or
configure the Answer profile for unauthenticated users.
•
Create an X.25 profile that defines the X.25 connection the T3POS PAD uses.
For detailed information about the T3POS parameters, see the MAX Reference.
Note: The settings in the Connection or Answer profile can be overridden by the settings sent
in control frames.
To configure a T3POS Connection profile:
1
From the Main Edit Menu select Ethernet > Connections > any Connection profile.
2
Set Active to Yes.
3
Set Encaps to X25/T3POS.
4
Open the Encaps Options submenu.
5
Set X.25 Prof to the name of the X.25 profile that is to be used for this T3POS connection.
The X.25 profile must exist and be active before you can save this Connection profile.
6
Specify the Recv PW value used to authenticate the caller.
7
Set the parameters used for the T3POS connection.
8
Exit the profile and, at the exit prompt, select the exit and accept option.
To configure a T3POS Answer profile:
1
From the Main Edit Menu select Ethernet > Answer > Encaps.
2
Set X25/PAD to Yes and X25/T3POS to Yes.
3
Exit the Encaps submenu.
4
Select T3POS Options.
5
Set X.25 Prof to the name of the X.25 profile that is to be used for this T3POS connection.
The X.25 profile must exist and be active before you can save the Answer profile.
6
Set the parameters used for the T3POS connection.
7
Exit the profile and, at the exit prompt, select the exit and accept option.
Accessing the T3POS
Users can access the T3POS in any of the following ways:
6-34
•
Through a modem (for MAX units only).
•
Via a TCP/IP client to the default TCP modem port 6150 (or to the TCP modem port
configured on the unit).
•
Via a TCP/IP client to port 23 (for Telnet access) or to 513 (for Rlogin access).
MAX 6000/3000 Network Configuration Guide
Configuring X.25
Always On/Dynamic ISDN (AO/DI)
Accessing the T3POS from a dial-in connection
The following example describes how a user accesses the X.25/T3POS from a modem. The
X.25 data link is already up because it is a nailed physical connection. This scenario also
applies to Telnet users connecting to port 150 of the MAX.
Note: Telnet client programs should use 8-bit mode to connect to the MAX.
In this example:
1
A user dials in through a modem or through Telnet.
2
The user is authenticated against a Connection profile. If no Connection profile exists for
the user, the Answer profile is used (if configured).
Both the Connection and the Answer profile specify that the user is an X.25 user (that is,
Encaps is set to X25/T3POS). An X.25 profile specifies the physical interface where the
X.25 call is to be established. The X.25 profile determines the settings for the LAPB (or
LAPD) and packet level (for example, timers and window size). For LAPB, the X.25
profile also specifies the nailed group to use for the logical call.
3
The connection is then established on the basis of the settings in both the Connection
profile (or Answer profile) and the X.25 profile, and the call is directed to the T3POS.
4
The user then must use the normal X.25/PAD commands.
Accessing the T3POS from the MAX terminal-server interface
The following example describes how a user accesses the X.25/T3POS from the MAX
terminal-server interface or through Telnet.
1
At the terminal-server prompt, the user enters the T3POS command. For example:
ascend% t3pos
2
The user is directed to the T3POS PAD, and T3POS traffic can be transmitted.
Accessing the T3POS PAD through immediate mode
To allow access to the T3POS PAD immediately upon connecting, set Immediate Service to
X25/T3POS in the Ethernet > Mod Config > TServ Options submenu. Users typically use this
mode to connect to the T3POS PAD.
Lucent recommends that, when using immediate mode, you set the Banner parameter to
suppress the terminal-server banner, and reduce the PPP Delay parameter to its minimum
value. Both parameters are in the Ethernet > Mod Config > TServ Options submenu.
Always On/Dynamic ISDN (AO/DI)
The MAX supports Always On/Dynamic ISDN (AO/DI) which is described in the Internet
Engineering Task Force (IETF) draft titled Always On/Dynamic ISDN, dated October, 1997.
AO/DI enables you to send and receive data through a nailed X.25 connection (supported by
way of an ISDN D-channel or other forms of nailed connection), using switched ISDN
B-channels only when required on the basis of increased bandwidth utilization.
MAX 6000/3000 Network Configuration Guide
6-35
Configuring X.25
Always On/Dynamic ISDN (AO/DI)
Introduction
AO/DI is a networking service that enables you to send and receive data by means of an X.25
connection by way of an ISDN line (or leased-56k line) as well as by means of switched
B-channels. Through its use of X.25 and Bandwidth Allocation Control Protocol (BACP), the
MAX avoids dialup charges and usage of switched B-channels whenever it sends or receives
data by way of the X.25 connection.
In a traditional ISDN environment, data moves across B-channels, and signalling information
moves across the D-channel. Because signalling information uses a small percentage of
available D-channel bandwidth, AO/DI was developed to maximize bandwidth usage while
reducing the necessity that all data travel by way of B-channels. Lucent’s implementation of
AO/DI enables you to configure a nailed X.25 connection by way of serial WAN, nailed
B-channel, or nailed D-channel connections.
Among the functions that can take advantage of AO/DI are the following:
•
Transfer of email
•
Reception of news broadcasts and other pushed information
•
Automated collection of data
For all Lucent units, AO/DI enables you to use X.25 bandwidth up to 9600 bps. If data
transfers require more bandwidth, B-channels are dialed and combined using BACP. Although
MAX units support an X.25 by way of any dedicated or leased connection, the Pipeline units
support X.25 only through a serial WAN connection or nailed D-channel (for AO/DI). Contact
your carrier for more details.
How it works
When you configure AO/DI for a connection, data flows by way of the X25 connection as long
as bandwidth usage is less than the value specified in the Ethernet > Connections > any
Connection profile > Encaps options > X25 Chan Target Util parameter. The MAX dials a
B-channel if the Average Line Utilization (ALU) for the connection stays above the value in
X25 Chan Target Util for the amount of seconds specified in the Ethernet > Connections > Any
Connection profile > Encaps Options > Add Pers parameter. The MAX dials additional
B-channels if the ALU for the connection stays above the value in the Ethernet > Connections
> any Connection profile > Encaps options > Target Util parameter.
When the MAX adds bandwidth on the basis of dynamic bandwidth allocation (DBA), it
brings up a B-channel to transport data and stops sending data on the X.25 call. Because the
9600 bps bandwidth available by way of the X.25 connection is so small when compared to
that available through the B-channel, it is not efficient to continue to transfer data by way of
the nailed D-channel connection simultaneously.
When the device that originated the call (typically at the customer premises) requires an
additional B-channel, it requests a phone number from the MAX. The MAX sends the number
specified in the Ethernet > X.25 > Any X.25 profile > B Ch # parameter. If you do not specify a
number in B Ch #, the MAX dials the first active, available B-channel for which you specify
the:
6-36
•
Net/T1 > Line Config > Line profile > Line m > Ch n # parameter
•
Net/E1 > Line Config > Line profile > Line m > Ch n # parameter
MAX 6000/3000 Network Configuration Guide
Configuring X.25
Always On/Dynamic ISDN (AO/DI)
•
Net/BRI > Line Config > Line profile > Pri Num parameter
•
Net/BRI > Line Config > Line profile > Sec Num parameter
Note: If you do not specify a value for the B Ch # parameter, you must specify a phone
number for every B-channel that the MAX can use for additional AO/DI bandwidth.
When ALU for the connection drops below the value specified in the Target Util parameter for
the amount of seconds specified in the Sub Pers parameter, the MAX disconnects the switched
channel and data traffic flows again by way of the X.25 connection.
Configuring an AO/DI connection
Configuring an AO/DI connection consists of the following steps:
•
Create an X.25 profile that defines the X.25 connection.
•
Configure the Answer profile to enable BACP and MP support.
•
Create a Connection profile for each AO/DI connection.
Note: For more complete information about each of the X.25 and BACP parameters, see the
MAX Reference.
Configuring the X.25 profile
To configure the MAX to support the X.25 connection:
1
Open Ethernet > X25 > X25 profile.
2
Set Name to a descriptive name for the X.25 link.
3
Set Active to Yes.
4
Set TEI to the value specified by your X.25 carrier.
You can set TEI to any value from 0 to 63. The default value is 21.
Note: Not all carriers support a value of 0 which specifies that the Lucent unit requests
automatic TEI assignment from the network.
5
Set Call Type as follows:
–
Call Type=D-Channel if X.25 services are by way of the D-channel.
–
Call Type=Nailed if X.25 services are by way of either a B-channel or the leased-56k
line.
6
Set X.25 highest SVC as specified by your carrier.
7
Set X.25 lowest SVC as specified by your carrier.
8
Set X.121 src addr to the number that the MAX sends when establishing the X.25
connection with the remote device. Contact your carrier for the correct value.
9
Set any remaining X.25 parameters as your carrier specifies.
10 Exit the profile and, at the exit prompt, select the exit and accept option.
MAX 6000/3000 Network Configuration Guide
6-37
Configuring X.25
Always On/Dynamic ISDN (AO/DI)
Configuring the Answer profile
To configure the Answer profile to allow support of AO/DI:
1
From the main Edit menu, select Ethernet > Answer profile.
2
Open the Encaps submenu.
3
Set MP to Yes.
4
Set PPP to Yes.
5
Close the Encaps submenu.
6
Open the PPP options submenu.
7
Set BACP=Yes.
8
Exit the profile and, at the exit prompt, select the exit and accept option.
Configuring a Connection profile to support AO/DI
Before you configure a Connection profile to support AO/DI, you must understand each of the
X.25 parameters related to the Connection profile.
The following list displays the X.25 connection parameters whose descriptions appear
beginning on page 6-8.
Ethernet
Connections
Connection profile
Encaps=X.25/PAD
Encaps Options
X25 Prof
X25 Reverse Charge
RPOA
CUG Index
NUI
Call Mode
Answer X.121 Addr
Remote X.121 Addr
Configuring a Connection profile
To configure a Connection profile to support AO/DI:
6-38
1
From the main Edit menu select Ethernet > Connections > any Connection profile.
2
Set Active to Yes.
3
Set Encaps to MP.
4
Open the Telco options submenu
5
Set Call Type to AO/DI.
6
From the Connection profile menu, open the Encaps options submenu.
7
Set BACP to Yes.
8
Set both Base Ch Cnt and Max Ch Cnt parameters to the maximum number of channels
allowed for the connection.
9
Set InterfaceType to X.25.
MAX 6000/3000 Network Configuration Guide
Configuring X.25
Always On/Dynamic ISDN (AO/DI)
10 From the Connection profile main menu, open the Interface options submenu.
11 Set X.25 Prof to the name of the X.25 profile that the MAX uses for the connection.
12 Specify additional parameters for the X.25 connection as directed by the carrier.
If you set Call Mode to Incoming or Both, proceed as follows:
1
From the Connection profile menu, open the Interface options submenu.
2
Set Answer X.121 addr to the value specified in the X.121 src addr parameter of the X.25
profile on the MAX.
Note: You can substitute the beginning portion of the address with the wildcard * which
indicates that the MAX should accept any value, requiring a match only on the trailing
digits that you specify after the wildcard character.
If you set Call Mode to Outgoing or Both, proceed as follows:
1
From the Connection profile menu, open the Interface options submenu.
2
Set Remote X.121 addr to the value specified in the X.121 source address of the remote
X.25 host to which the profile connects. You should not leave Remote X.121 addr blank if
you set Call Mode to Both or Outgoing. Also, for incoming calls, the MAX attempts to
match the called number of the incoming call to Remote X.121 address (if specified) and
the calling number of the incoming call to Answer X.121 address (if specified).
Note: You can substitute the beginning portion of the address with the wildcard * which
indicates that the MAX should accept any value, requiring a match only on the trailing
digits that you specify after the wildcard character. For outgoing calls, the MAX dials only
the trailing digits specified, ignoring the beginning wildcard character.
Exit and save the Connection profile. If you set Call Mode to Outgoing, the MAX sends a call
request to the number specified in the Remote X.121 addr parameter when you enable the
Connection profile. If you set Call Mode to either Both, the X.25 connection stays idle until the
MAX receives a packet to be forwarded across the X.25 link.
Similar to switched connections, the MAX supports dynamic IP address assignment for AO/DI
connections.
When you set Call Mode to Outgoing and the session and profile are active, the Connection
profile displays an asterisk to the left of the profile name on the Ethernet > Connections
submenu which indicates that a call is up or is available for a call.
Note: When you modify a AO/DI-related X.25 profile or Connection profile, you must
disable the AO/DI-related profile and re-enable it.
Displaying AO/DI operation
To make sure AO/DI is installed and configured properly, you can display one status window
to indicate whether or not the MAX supports AO/DI, another to observe active AO/DI calls,
and a third to indicate how many packets the MAX processes for a particular AO/DI session.
Displaying whether or not the MAX supports AO/DI
The System > Sys Options window provides a read-only list that identifies the MAX and
names each of the features (including AO/DI) which it has been equipped. Press the tab key to
MAX 6000/3000 Network Configuration Guide
6-39
Configuring X.25
Always On/Dynamic ISDN (AO/DI)
highlight any status window, then use the left and right arrow keys to display the Sys Options
window.
When the MAX displays the Sys Options window, press the down arrow key until the AO/DI
feature appears. For example, the following screen indicates that the MAX supports AO/DI:
|-------------------|
|00-100 Sys Options |
|ISDN Sig Installed |
|AO/DI Installed
|
|Net Mgmt Installed |
|-------------------|
If you ordered AO/DI but the MAX displays AO/DI Not Inst, contact your authorized
Lucent reseller.
Displaying active AO/DI calls
The Ethernet > Dyn Stat window displays the name, quality, bandwidth, and bandwidth
utilization of each online connection. For example, when the MAX establishes an AO/DI
connection for AODI1, the following window appears:
|-------------------|
|AODI1
|
|Qual Good 05:07:00 |
|9k
1 channels |
|CLU 12% ALU 30% |
|-------------------|
For example, when the MAX adds a B-channel on the basis of bandwidth utilization, the
following window appears:
|-------------------|
|AODI1
|
|Qual Good 05:07:00 |
|56k
2 channels |
|CLU 50% ALU 34% |
|-------------------|
Although the connection contains two active channels, data passes only by way of the
B-channel as described in “How it works” on page 6-36.
For example, when the MAX adds a second B-channel on the basis of bandwidth utilization,
the following window appears:
|-------------------|
|AODI1
|
|Qual Good 05:07:00 |
|112k
3 channels |
|CLU 88% ALU 64% |
|-------------------|
The 112k indicates that data flows through the two B-channels only.
6-40
MAX 6000/3000 Network Configuration Guide
Configuring X.25
Always On/Dynamic ISDN (AO/DI)
Displaying packet processing for a specific session
The Ethernet > WAN Stat window displays the name, number of received packets, number of
transmitted packets, and number of CRC errors of each online connection. For example, when
the MAX establishes an AO/DI connection, the following window appears:
|-------------------|
|AODI1
|
|Rx Pkt:
7085 |
|Tx Pkt:
603 |
|
CRC:
0 |
|-------------------|
RADIUS support for Always On/Dynamic ISDN (AO/DI)
The MAX supports RADIUS accounting records for each active RADIUS dial-in AO/DI call
and provides RADIUS dial-in AO/DI profile support for PAP/CHAP authentication with a
fixed IP address or dynamic IP address assignment. However, the MAX does not ask for name
and PAP/CHAP password information when the X.25 Switched Virtual Circuit (SVC) is an
outgoing call. Some changes to the show users command apply as well.
Accounting records for each active AO/DI call
This section provides information about the contents of the Start and Stop records for an active
AO/DI call.
Start records
Because AO/DI is largely based on MP, the RADIUS accounting records for AO/DI look very
much like the accounting records for MP calls. The following example shows the details of a
RADIUS accounting Start record for an X.25 SVC session of an active AO/DI call:
Sun Jan 17 12:40:24 1999
User-Name="aodi1"
NAS-Identifier=12.12.6.212
NAS-Port=12508
NAS-Port-Type=Sync
Acct-Status-Type=Start
Acct-Delay-Time=0
Acct-Session-Id="285427838"
Acct-Authentic=RADIUS
Ascend-Multilink-ID=2
Ascend-Num-In-Multilink=1
Ascend-Modem-PortNo=3
Ascend-Modem-SlotNo=9
Framed-Protocol=MP
Framed-Address=13.13.1.201
MAX 6000/3000 Network Configuration Guide
6-41
Configuring X.25
Always On/Dynamic ISDN (AO/DI)
For AO/DI B-channel accounting records, an NAS-Port value such as 10123 should be
interpreted as:
•
1=digital service
•
01=line number
•
23=channel number
However, the NAS-Port value for an AO/DI X.25 SVC accounting record has a different
meaning. An NAS-Port value such as 10123 should be interpreted as:
•
1=digital service
•
01=X.25 nailed group
•
23=X.25 SVC channel number/Logical Channel Number (LCN)
For easy identification of each X.25 SVC call, Lucent recommends that the X.25 nailed group
be set to a number outside the PRI line number range (such as 25).
Stop records
The following example shows the details of a RADIUS accounting Stop record for an X.25
SVC session of an active AO/DI call:
Sun Jan 17 12:42:44 1999
User-Name="aodi1"
NAS-Identifier=12.12.6.212
NAS-Port=12501
NAS-Port-Type=Sync
Acct-Status-Type=Stop
Acct-Delay-Time=0
Acct-Session-Id="285427838"
Acct-Authentic=RADIUS
Acct-Session-Time=140
Acct-Input-Octets=2398
Acct-Output-Octets=12072
Acct-Input-Packets=55
Acct-Output-Packets=176
Ascend-Disconnect-Cause=1
Ascend-Connect-Progress=83
Ascend-Xmit-Rate=9600
Ascend-Data-Rate=9600
Ascend-PreSession-Time=1
Ascend-Pre-Input-Octets=194
Ascend-Pre-Output-Octets=157
Ascend-Pre-Input-Packets=9
Ascend-Pre-Output-Packets=9
Ascend-First-Dest=14.14.1.212
Ascend-Multilink-ID=2
Ascend-Num-In-Multilink=0
Ascend-Modem-PortNo=3
Ascend-Modem-SlotNo=9
Framed-Protocol=MP
Framed-Address=13.13.1.201
6-42
MAX 6000/3000 Network Configuration Guide
Configuring X.25
Always On/Dynamic ISDN (AO/DI)
While the AO/DI B-channel accounting records report the Ascend-Xmit-Rate and
Ascend-Data-Rate attributes as either 56K or 64K (as for an MP call), the AO/DI X.25 SVC
session always reports the Ascend-Xmit-Rate and Ascend-Data-Rate attributes as 9.6K.
Note that the input and output packets logged are the actual X.25 data packets. In addition, a
Stop record without a corresponding Start record containing the same Acct-Session-Id is a
record of a dial-in call that failed authentication.
AO/DI accounting example
In this example, the following events occur:
1
The Lucent unit received an X.25 call for AO/DI from LCN 1 of an X.25 nailed
connection, with the nailed group set to 25. The IP address for the AO/DI client is 1.2.3.4
and the session number for this call is 012345678. The following Start record is generated:
Wed Dec 23 16:12:48 1998
User-Name="aodi1"
NAS-Identifier=12.126.212
NAS-Port=12501
NAS-Port-Type=Sync
Acct-Status-Type=Start
Acct-Delay-Time=0
Acct-Session-Id="012345678"
Acct-Authentic=RADIUS
Ascend-Multilink-ID=1
Ascend-Num-In-Multilink=1
Ascend-Modem-PortNo=3
Ascend-Modem-SlotNo=9
Framed-Protocol=MP
Framed-Address=1.2.3.4
2
A B channel from line 1, channel 1, is added by the AO/DI client at IP address 1.2.3.4.
The session number for this B-channel call is 112345678. The following Start record is
generated:
Wed Dec 23 16:16:48 1998
User-Name="aodi1"
NAS-Identifier=12.126.212
NAS-Port=10101
NAS-Port-Type=Sync
Acct-Status-Type=Start
Acct-Delay-Time=0
Acct-Session-Id="112345678"
Acct-Authentic=RADIUS
Ascend-Multilink-ID=1
Ascend-Num-In-Multilink=2
Ascend-Modem-PortNo=4
Ascend-Modem-SlotNo=9
Framed-Protocol=MP
Framed-Address=1.2.3.4
3
A second B channel from line 1, channel 2, is added by the AO/DI client at IP address
1.2.3.4. The session number for this second B-channel call is 212345678. The following
Start record is generated:
MAX 6000/3000 Network Configuration Guide
6-43
Configuring X.25
Always On/Dynamic ISDN (AO/DI)
Wed Dec 23 16:20:48 1998
User-Name="aodi1"
NAS-Identifier=12.126.212
NAS-Port=10102
NAS-Port-Type=Sync
Acct-Status-Type=Start
Acct-Delay-Time=0
Acct-Session-Id="212345678"
Acct-Authentic=RADIUS
Ascend-Multilink-ID=1
Ascend-Num-In-Multilink=3
Ascend-Modem-PortNo=5
Ascend-Modem-SlotNo=9
Framed-Protocol=MP
Framed-Address=1.2.3.4
4
The AO/DI client drops a B channel from line 1, channel 2. The following Stop record is
generated:
Wed Dec 23 16:24:48 1998
User-Name="aodi"
NAS-Identifier=12.126.212
NAS-Port=10102
NAS-Port-Type=Sync
Acct-Status-Type=Stop
Acct-Delay-Time=0
Acct-Session-Id="212345678"
Acct-Authentic=RADIUS
Acct-Session-Time=200
Acct-Input-Octets=3471
Acct-Output-Octets=3507
Acct-Input-Packets=44
Acct-Output-Packets=45
Ascend-Disconnect-Cause=185
Ascend-Connect-Progress=83
Ascend-Xmit-Rate=56000
Ascend-Data-Rate=56000
Ascend-PreSession-Time=0
Ascend-Pre-Input-Octets=106
Ascend-Pre-Output-Octets=143
Ascend-Pre-Input-Packets=5
Ascend-Pre-Output-Packets=5
Ascend-Multilink-ID=1
Ascend-Num-In-Multilink=2
Ascend-Modem-PortNo=5
Ascend-Modem-SlotNo=9
Framed-Protocol=MP
Framed-Address=1.2.3.4
5
The AO/DI client drops the other B channel from line 1, channel 1. The following Stop
record is generated:
Wed Dec 23 16:28:48 1998
User-Name="aodi"
NAS-Identifier=12.126.212
NAS-Port=10101
NAS-Port-Type=Sync
6-44
MAX 6000/3000 Network Configuration Guide
Configuring X.25
Always On/Dynamic ISDN (AO/DI)
Acct-Status-Type=Stop
Acct-Delay-Time=0
Acct-Session-Id="112345678"
Acct-Authentic=RADIUS
Acct-Session-Time=200
Acct-Input-Octets=3471
Acct-Output-Octets=3507
Acct-Input-Packets=44
Acct-Output-Packets=45
Ascend-Disconnect-Cause=185
Ascend-Connect-Progress=83
Ascend-Xmit-Rate=56000
Ascend-Data-Rate=56000
Ascend-PreSession-Time=0
Ascend-Pre-Input-Octets=106
Ascend-Pre-Output-Octets=143
Ascend-Pre-Input-Packets=5
Ascend-Pre-Output-Packets=5
Ascend-Pre-Input-Octets=176
Ascend-Pre-Output-Octets=252
Ascend-Pre-Input-Packets=7
Ascend-Pre-Output-Packets=10
Ascend-Multilink-ID=1
Ascend-Num-In-Multilink=1
Ascend-Modem-PortNo=4
Ascend-Modem-SlotNo=9
Framed-Protocol=MP
Framed-Address=1.2.3.4
6
The AO/DI client drops the X.25 call. The following Stop record is generated:
Wed Dec 23 16:32:48 1998
User-Name="aodi1"
NAS-Identifier=12.126.212
NAS-Port=12501
NAS-Port-Type=Sync
Acct-Status-Type=Stop
Acct-Delay-Time=0
Acct-Session-Id="012345678"
Acct-Authentic=RADIUS
Acct-Session-Time=60
Acct-Input-Octets=321
Acct-Output-Octets=166
Acct-Input-Packets=11
Acct-Output-Packets=6
Ascend-Disconnect-Cause=1
Ascend-Connect-Progress=83
Ascend-Xmit-Rate=9600
Ascend-Data-Rate=9600
Ascend-PreSession-Time=1
Ascend-Pre-Input-Octets=194
Ascend-Pre-Output-Octets=157
Ascend-Pre-Input-Packets=9
Ascend-Pre-Output-Packets=9
Ascend-Multilink-ID=1
Ascend-Num-In-Multilink=0
Ascend-Modem-PortNo=3
MAX 6000/3000 Network Configuration Guide
6-45
Configuring X.25
Always On/Dynamic ISDN (AO/DI)
Ascend-Modem-SlotNo=9
Framed-Protocol=MP
Framed-Address=1.2.3.4
RADIUS dial-in AO/DI profile for PAP/CHAP with a fixed IP address
You can now configure an AO/DI DNIS-service profile. The first-tier dial-in setup uses the
new AO/DI value for Ascend-Call-Type. For example:
#
# AO/DI service-based DNIS profile. (12345 is the X.25 called address.)
#
12345
Password="Ascend-DNIS", User-Service=Dialout-Framed-User
#
# The Ascend-Call-Type attribute must be set to "AO/DI" to indicate the
# AO/DI call type and to imply that the network interface for the PPP
# link is a nailed channel on the X.25 network interface.
#
Ascend-Call-Type=AO/DI,
#
# To set the stage for the second-tier dial-in profile,
# Ascend-Require-Auth must be set to "Require-Auth".
#
Ascend-Require-Auth=Require-Auth
#
# By default, the system uses the same X.25 profile as the incoming
# X.25 SVC call.
#
For the second-tier dial-in, you can set up an individual user profile with PAP or CHAP
authentication and a fixed IP address. For example:
#
# AO/DI user/client profile for CHAP authentication.
#
aodi1
Password="aodi1"
User-Name="aodi1",
#
# The Framed-Protocol must be set to MP.
#
Framed-Protocol=MP,
#
# The Ascend-Call-Type attribute must be set to "AO/DI" to indicate the
# AO/DI call type and imply that the network interface for the first MP
# link is a nailed channel on the X.25 network interface.
#
Ascend-Call-Type= AO/DI,
#
# Ascend-Dial-Number specifies the B-channel number to dial when the
# unit needs to initiate the call for adding bandwidth.
#
Ascend-Dial-Number=953762,
6-46
MAX 6000/3000 Network Configuration Guide
Configuring X.25
Always On/Dynamic ISDN (AO/DI)
#
# For a client with a fixed IP address, the Framed-Address and the
# Framed-Netmask attributes must be set for the client’s IP address.
#
Framed-Address=13.13.1.201,
Framed-Netmask=255.255.255.0,
#
# If the unit must assign an IP address, replace the attributes that
# set the local and/or remote IP address with the Ascend-Assign-IP-Pool
# attribute. Note that if Ascend-Assign-IP-Pool is used, there must be
# an Ascend-IP-Pool-Definition attribute defining the IP pool you are
# using.
#
Ascend-Route-IP=Route-IP-Yes,
Ascend-Metric=2,
#
# Although this is a dial-in profile, the Ascend-Send-Auth and
# Ascend-Send-Passwd/Ascend-Send-Secret are also needed in case the
# unit needs to initiate a B-channel call to add bandwidth.
#
# If the Answer profile specifies PAP authentication,
# replace:
# Ascend-Send-Auth=Send-Auth-CHAP,
# Ascend-Send-Secret="aodi1",
# with:
# Ascend-Send-Auth=Send-Auth-PAP,
# Ascend-Send-Passwd="aodi1",
#
Ascend-Send-Auth=Send-Auth-CHAP,
Ascend-Send-Secret="aodi1",
#
# To allow bandwidth management, Ascend-BACP-Enable must be set to
# "BACP-Yes",
#
Ascend-BACP-Enable=BACP-Yes,
Ascend-Base-Channel-Count=1,
Ascend-Minimum-Channels=1,
Ascend-Maximum-Channels=3,
Ascend-Inc-Channel-Count=1,
Ascend-Dec-Channel-Count=1,
Ascend-Target-Util=50
Changes to show users command
The show users command now shows active AO/DI calls. The follow example shows an
inbound AO/DI call with the X.25 channel and two B channels up. The three channels and
calls are identified as answered by the same dial-in profile. The profile is specified by the
profile name (as shown by the User Name field), the caller’s IP address (as shown by the Host
Address field), or the mpID.
ascend% sh users
I Session
Line: Slot: Tx
MAX 6000/3000 Network Configuration Guide
Rx
Service
Host
User
6-47
Configuring X.25
Always On/Dynamic ISDN (AO/DI)
O ID
Chan Port
I 285427858 N/A
9:2
I 285427859 1:23 9:3
I 285427860 1:22 9:4
ascend%
Data Rate Type[mpID]
9600 9600 MP[2]
56K
56K
MP[2]
56K
56K
MP[2]
Address
13.13.1.201
13.13.1.201
13.13.1.201
Name
aodi1
aodi1
aodi1
Note that the X.25 channel reports N/A for the Line: Chan field, and reports 9.6k for both the
Tx Data and the Rx Data fields.
6-48
MAX 6000/3000 Network Configuration Guide
Configuring IP Fax
7
Store-and-forward IP fax . . . . . . . . . . . . . . . . . . . . . . . . . . . . . . . . . . . . . . . . . . . . . . . . 7-1
Configuring system parameters for IP fax modem usage . . . . . . . . . . . . . . . . . . . . . . . 7-2
Configuring IP fax options. . . . . . . . . . . . . . . . . . . . . . . . . . . . . . . . . . . . . . . . . . . . . . . 7-5
Atlas redialer and DID support on MAX 6000 units . . . . . . . . . . . . . . . . . . . . . . . . . . 7-12
Your MAX unit’s store-and-forward IP fax capability enables your corporate hub to use the
Internet to deliver faxes. You must configure some system parameters in addition to the IP fax
options. MAX 6000 units support autodialers and Direct Inward Dialing (DID).
Store-and-forward IP fax
The store-and-forward IP fax feature enables a MAX unit to interact with a third-party fax
server, such as the servers provided by Open Port Technology, Inc. Fax-over-IP technology
enables ISPs and corporate hubs to use the Internet to deliver faxes.
When the IP fax feature is enabled, the MAX unit acts as a remote access server (RAS),
accepting fax calls on the same ports and telephone lines used for dial-in modem connections.
The unit also performs modem dial-out functions to deliver faxes from the Internet to fax
machines on the Public Switched Telephone Network (PSTN).
Incoming IP faxes
Figure 7-1 shows the basic structure of an incoming IP fax operation. The MAX unit receives
an incoming fax from the PSTN and interacts with the fax server to transfer it to the Internet.
The transfer to the Internet is transparent to the person sending a fax, because a hardware
device called a redialer is connected to the fax machine. The redialer intercepts the number
dialed on the fax machine and initiates a call to the MAX unit instead. When the fax server
begins transferring the fax to the Internet, the redialer and the MAX unit become transparent
pipes for the fax data.
MAX 6000/3000 Network Configuration Guide
7-1
Configuring IP Fax
Configuring system parameters for IP fax modem usage
Figure 7-1. Incoming IP fax from fax machine to Internet
Fax server forwards fax on Internet...
Fax server
RAS
Internet
End user sends fax...
PSTN
INCOMING
Outgoing IP faxes
Figure 7-2 shows the basic structure of an outgoing IP fax operation. The fax server receives
an outgoing fax from the Internet and interacts with the MAX unit to transfer it to the PSTN.
The fax server logs in to the MAX unit and is authenticated before seizing one of the unit’s
modems for dial-out to the destination fax machine.
Figure 7-2. Outgoing IP fax from Internet to fax machine
End user sends fax...
Fax server
RAS
Internet
RAS dials fax machine...
PSTN
OUTGOING
Configuring system parameters for IP fax modem
usage
To send faxes, the fax server logs in to the MAX unit, gains control of one of its modems, and
dials out. The fax server configuration specifies the IP address of the MAX unit and
(optionally) one or more trunk groups for IP fax use. In addition to the IP fax login and port
parameters that enable the fax server to log in (described in “Configuring IP fax options” on
page 7-5, the following parameters in the System profile affect the resources available for
outgoing fax calls. (The settings shown are the defaults.)
System
Sys Config
Use Trunk Grps=No
Num Trunk Digits=1
Parallel Dial=2
Net/T1
Line Config
any profile
Ch 1 TrnkGrp=9
7-2
MAX 6000/3000 Network Configuration Guide
Configuring IP Fax
Configuring system parameters for IP fax modem usage
Net/E1
Line Config
any profile
Ch 1 TrnkGrp=9
System
Sys Config
Use Trunk Grps=0
Parameter
Specifies
Use Trunk Grps
Enable/disable the use of trunk groups in the MAX. With the
default setting of no, the Num Trunk Digits and
Trunk-Group settings do not apply. With the yes setting, all
channels must be assigned trunk-group numbers.
Num Trunk Digits
Number of digits to allow for trunk groups. Currently, the IP
fax server supports 2-digit trunk groups, but the
trunk-group-number specification must be within the range of
2 to 9. The MAX must agree with the fax server about the
number of digits in a trunk-group number, or telephone numbers are not parsed correctly and calls fail.
Parallel Dial
Total number of dial-out calls that the MAX can place at the
same time.
Ch N Trnk Grp
Assignment of a channel to a trunk group, making it available
for outbound calls. Dial numbers for connections can then be
directed to specific channels by specifying the trunk group as
a single-digit dialing prefix to the far-end phone number.
Assigning bandwidth for typical IP fax usage
After the fax server has control of a digital modem, it dials the call on any available channel
unless the fax server configuration specifies a trunk-group number. In that case, the fax server
uses an available channel within the specified trunk group. If no channels in that trunk group
are available, the MAX unit returns a Trunk Group Not Available code to the fax server, which
tries the call again later.
For example, the following commands configure the system to use 2-digit trunk groups, and
assign an entire a T1 line to trunk group 5. (Fewer than 24 channels can be assigned to a trunk
group if appropriate.) If the fax server configuration also specifies 2-digit trunk groups and
trunk group 5, the following channels are available for IP fax usage.
System
Sys Config
Use Trunk Grps
Num Trunk Digits
Net/T1
Line Config
any profile
MAX 6000/3000 Network Configuration Guide
7-3
Configuring IP Fax
Configuring system parameters for IP fax modem usage
Ch
Ch
Ch
Ch
Ch
Ch
Ch
Ch
Ch
Ch
Ch
Ch
Ch
Ch
Ch
Ch
Ch
Ch
Ch
Ch
Ch
Ch
Ch
Ch
1 Trnk Grp=5
2 Trnk Grp=5
3 Trnk Grp=5
4 Trnk Grp=5
5 Trnk Grp=5
6 Trnk Grp=5
7 Trnk Grp=5
8 Trnk Grp=5
9 Trnk Grp=5
10 Trnk Grp=5
11 Trnk Grp=5
12 Trnk Grp=5
13 Trnk Grp=5
14 Trnk Grp=5
15 Trnk Grp=5
16 Trnk Grp=5
17 Trnk Grp=5
18 Trnk Grp=5
19 Trnk Grp=5
20 Trnk Grp=5
21 Trnk Grp=5
22 Trnk Grp=5
23 Trnk Grp=5
24 Trnk Grp=5
Configuring a typical Call Route profile
After assigning the trunk group, you must create a Call Route profile to direct outbound calls
to the newly configured line. For example:
admin> new call-route { { { shelf-1 slot-5 7 } 0 } 0 }
CALL-ROUTE/{ { { shelf-1 slot-5 7 } 0 } 0 } read
admin> set trunk-group = 5
admin> set call-route-type = trunk-call
admin> write
CALL-ROUTE/{ { { shelf-1 slot-5 7 } 0 } 0 } written
Specifying the maximum number of parallel dial-outs
The Parallel Dial parameter limits the number of dial-out calls that the system can place at one
time. If the maximum number of dial-out calls is being processed and a dial-out request is
made, the system queues the request and processes it at the earliest possible opportunity.
7-4
MAX 6000/3000 Network Configuration Guide
Configuring IP Fax
Configuring IP fax options
This operation is transparent to the fax server, except that the modems can time out if a dial-out
request is delayed more than 30 to 40 seconds. Following is an example with Parallel Dial set
to the maximum value for T1:
System
Sys Config
Parallel Dial=64
Configuring IP fax options
Following are the IP fax parameters that enable the MAX to interact with a third-party fax
server. (The settings shown are the defaults.)
Ethernet
Mod Config
IP Fax Options
IP Fax Enabled=No
Outgoing Port=10001
Login=””
Password=””
Incoming Port=0
All Calls Are Fax=No
DNIS #1=
DNIS #2=
DNIS #3=
DNIS #4=
Server #1=0.0.0.0
Server #2=0.0.0.0
Server #3=0.0.0.0
Server #4=0.0.0.0
Server #5=0.0.0.0
Parameter
Specifies
IP Fax Enabled
Enable/disable IP fax support in the MAX. It is disabled by
default.
Outgoing Port
TCP port on which to accept outgoing fax data from a fax
server. (Outgoing fax data is received from the Internet and
requires a dial-out to a destination fax machine.) The default
is 10001.
Login
Password
Name and password used to authenticate the fax server as part
of an outgoing fax session. When the fax server receives a fax
from the Internet, it connects to the MAX unit and sends a
name and password. The MAX unit compares the values to
the Server-Login and Server-Password settings.
TCP port on which the fax server listens for incoming fax
data. (Incoming fax data is received from a fax machine
redialer.) The default is zero.
Incoming Port
MAX 6000/3000 Network Configuration Guide
7-5
Configuring IP Fax
Configuring IP fax options
Parameter
Specifies
All Calls Are Fax
Enable/disable the handling of all incoming calls as IP fax
calls. When this parameter is set to no (the default), the MAX
unit recognizes incoming fax calls by matching the caller’s
DNIS number to one of the Fax-DNIS numbers specified by
DNIS #N [N=1-4]. With the yes setting, IP fax service can be
supported where DNIS is not available.
DNIS #N [N=1–4]
Up to 4 DNIS numbers. The MAX unit compares the DNIS
number supplied in the PRI setup message of an incoming call
to the configured numbers. If the match is not exact, the unit
does not start the IP fax function.
Servers #N [N=1–5]
IP address of one of up to five fax servers. The fax server systems are typically on the local IP network, but local connectivity is not a requirement.
The MAX unit first tries to connect to the fax server at the
first specified address. If the unit receives no response, it tries
to connect to the second address. If the unit still receives no
response, it tries the third, and so forth. Once the MAX unit
connects to a fax server successfully, it continues to use that
address for subsequent connections until a connection attempt
fails, at which point it tries the next configured address.
Example of an IP fax configuration for incoming faxes
Figure 7-3 shows a MAX unit receiving an incoming fax across the PSTN. The unit then
initiates a TCP session with a fax server, which authenticates the incoming call. (The fax
server might use RADIUS, as shown in Figure 7-3, or a method proprietary to that server.) If
the fax server authenticates the call successfully, it dials out to the remote fax server on one of
the MAX unit’s modems. When the fax transmission is completed, the fax server terminates
the TCP session and the MAX unit regains control of its modem.
Figure 7-3. Receiving and forwarding incoming IP faxes
Fax is
received
Fax is
sent...
Redialer
PSTN
456-555-2222
123-555-1111
Internet
RAS
PSTN
RAS
Fax server
Fax server
10.1.2.34
7-6
RADIUS
Fax server
10.1.2.56
MAX 6000/3000 Network Configuration Guide
Configuring IP Fax
Configuring IP fax options
Following is an example of an IP fax configuration that enables the MAX unit to handle
incoming fax calls as shown in Figure 7-3:
Ethernet
Mod Config
IP Fax Options
IP Fax Enabled=Yes
Incoming Port=1234
DNIS #1=2222
Server #1=10.1.2.34
Server #2=10.1.2.56
With this configuration, an IP fax is processed as follows:
1
An end user sends a fax to 123-555-1111.
2
The sending fax machine receives a dial tone from the redialer (which is directly
connected to the fax machine) and dials 123-555-1111.
3
The redialer intercepts the call, stores the destination telephone number, and dials its
configured number for the MAX unit (456-555-2222).
4
The MAX unit receives the call and identifies it as a fax call by comparing the call’s DNIS
number to the DNIS #N values in the IP Fax Options profile.
5
If the DNIS numbers match (or if the unit is configured to treat all incoming calls as IP fax
calls), the MAX unit generates an answer tone at 400 Hz to initiate dual-tone
multifrequency (DTMF) communication with the redialer. Then the unit decodes the
incoming DTMF sequence from the redialer, which contains the account number of the
redialer and the destination telephone number 123-555-1111.
6
The MAX unit initiates a connection to the fax server, sending the caller’s account number
and destination telephone number in the first TCP packet.
7
If the fax server authenticates the call successfully with this information, the MAX unit
answers the incoming fax call. If authentication fails, the connection is cleared.
8
Following successful authentication, the MAX unit and fax server establish a TCP
session, and the MAX unit transfers control of an available modem to the fax server for
the incoming call. If no send or receive activity occurs for more than 2 minutes, the
session is terminated and resources are freed.
Note: For fax accounting, a fax session starts when a modem resource is allocated and stops
when a session is terminated.
Example of an IP fax configuration for outgoing faxes
Figure 7-4 shows a MAX unit forwarding a fax received by the fax server from the Internet.
The fax server logs in to the unit, entering the specified Login and Password parameters, and
initiates a modem dial-out session to forward the fax over the PSTN. When the fax
transmission is completed, the fax server terminates the TCP session and the MAX unit gains
control of its modem.
MAX 6000/3000 Network Configuration Guide
7-7
Configuring IP Fax
Configuring IP fax options
Figure 7-4. Sending an outgoing IP fax to a fax machine
Fax is
received
Fax is
sent...
PSTN
123-555-1111
PSTN
Internet
RAS
RAS
Fax
server
Fax
server
Following is an example of an IP fax configuration that enables the MAX unit to handle
outgoing fax calls as shown in Figure 7-4:
Ethernet
Mod Config
IP Fax Options
IP Fax Enabled=Yes
Login=ipfax
Password=works
With this configuration, the MAX unit processes an IP fax as follows:
1
The fax server on the local network receives fax data across the Internet from a remote fax
server.
2
The fax server initiates a connection to the MAX unit, sending its login name and
password in the first TCP packet.
3
If the login name and password match the Server-Login and Server-Password values,
respectively, in the IP-Fax profile, the MAX unit establishes a TCP session with the fax
server. If authentication fails, the connection is cleared.
4
After authentication, the MAX transfers control of an available modem to the fax server.
5
The fax server sends modem commands encapsulated in TCP packets, initiates a
connection to the destination fax machine, and sends the spooled data. If no send or
receive activity occurs for more than 2 minutes, the session is terminated and resources are
freed.
Note: For fax accounting, a fax session starts when a modem resource is allocated and stops
when a session is terminated.
Fax hangup codes and disconnect cause codes
Conexant supplies two fax hangup codes:
•
7-8
+FHNG 1—when fax tones are recognized but the handshake fails
MAX 6000/3000 Network Configuration Guide
Configuring IP Fax
Configuring IP fax options
•
+FHNG 11—when no fax tones are recognized at the far end
ISDN disconnect cause codes are returned when fax calls fail, if they are available as part of
the fax hangup codes. To avoid conflict with codes returned by modems and with codes
returned by other units, the fax cause codes add 1000 to the standard codes so that they are in
the range of 1000 through 1255. For example, Far End Busy (ISDN Code 17) is returned as
+FHNG 1017, and Far End Did Not Answer (go off-hook) is returned as +FHNG 1018.
IP fax call accounting
SNMP, RADIUS, and Syslog call-accounting information includes the following accounting
information for outgoing IP fax calls:
•
A call-connected timestamp, showing the length of the call
•
ServiceChangeEvent to report user name (in SNMP only)
•
The trunk group number used for particular channels on an outgoing call
•
The destination telephone number dialed from the MAX
•
The shelf, slot, line, and channel number at which the call originates
•
The total bytes sent and received (in SNMP and RADIUS only)
•
The transmit and receive baud rate (in SNMP and RADIUS only)
•
A call-clear timestamp, showing when the calls clears (in SNMP and RADIUS only)
Note: For accounting purposes, a fax session starts when a modem resource is allocated and
stops when the session is terminated.
SNMP information about IP fax operation
SNMP provides call information in the following fields:
MIB field name
Reports
eventCurrentService: ipFax Service ipFax is available for an IP fax call when the event type
(19)
is callOriginated(1).
eventTrunkGroup (24)
Trunk group used for outgoing calls only. This information is
available when the event type is callCleared (9).
eventCalledPartyID
Telephone number dialed for an outgoing call. Currently, the
eventCalledPartyID is equivalent to the DNIS Dialed Number
ID for an incoming call. On the outgoing call, this field represents the telephone number dialed. This information is available
when the event type is callCleared (9).
eventSlotNumber
Slot number at which the call originated. This information is
available when the event type is callCleared(3).
eventSlotLineNumber
Line at which the call originated. This information is available
when the event type is callCleared(3).
eventSlotChannelNumber
Channel at which the call originated. This information is available when the event type is callCleared(3).
MAX 6000/3000 Network Configuration Guide
7-9
Configuring IP Fax
Configuring IP fax options
MIB field name
Reports
eventTimeStamp
For an IP fax call, the time that the modem is reserved for an
outgoing call request. For any other type of call, this field
reports the actual connected time. This information is available
when the event type is callCleared(3).
eventInOctets
Total received bytes for the call. This information is available
when the event type is callCleared(3).
eventOutOctets
Total transmitted bytes for the call. This information is available
when the event type is callCleared(3).
eventXmitRate
Negotiated transmitted baud rate used throughout the call. This
information is available when the event type is callCleared(3).
For IP fax, transmitted and received baud rates are the same.
eventDataRate
Negotiated received baud rate used throughout the call. This
information is available when the event type is callCleared(3).
For IP fax, transmitted and received baud rates are the same.
eventUserIPAddress
User’s IP address. This information is available when the event
type is nameChanged(5).
eventUserName
Username. This information is available when the event type is
callOriginated(1).
eventModemSlotNumber
Slot in which the modem is located. This information is available when the event type is callOriginated(1).
eventModemOnSlot
Modem in use. This information is available when the event
type is callOriginated(1).
ssnActiveUserName
Active username.
ssnActiveUserIPAddress
Active user’s IP address.
ssnActiveCurrrentService:
ipFax(19)
ipFax(19) service is in use for an outgoing IP fax call.
RADIUS support for IP fax operation
The following RADIUS attributes, which appear in Accounting Stop packets, provide
outgoing and incoming call values for IP fax calls:
7-10
MAX 6000/3000 Network Configuration Guide
Configuring IP Fax
Configuring IP fax options
RADIUS attribute
Value
NAS-Port
Shelf, slot, line, and channel number from which the outgoing call
originates. The value appears in the following binary format:
FFSS SSLL LLLC CCCC
FF specifies the shelf number.
SSSS specifies the slot number.
LLLLL specifies the line number.
CCCCC specifies the channel number.
Each value is zero-based. For example, given the decimal number
13348, whose binary equivalent is 0011 0100 0010 0100:
00=shelf number 1
1101=slot number 14
00001=line number 2
00100=channel number 5
Acct-Session-Time
Total connection time for a call. For an outgoing IP fax call, the
time period begins when the modem is reserved and ends when the
call is terminated.
Client-Port-DNIS
Called number for an outgoing call.
Ascend-Modem-PortNo
Modem port used for the call.
Ascend-Modem-SlotNo
Number of the slot in which the modem card is physically located.
Ascend-Modem-ShelfNo Number of the shelf on which the modem card in located.
Acct-Input-Octets
Total received bytes for the call.
Acct-Output-Octets
Total transmitted bytes for the call.
Ascend-Xmit-Rate
Negotiated transmitted baud rate for the call. For IP fax, transmitted and received baud rates are the same.
Ascend-Data-Rate
Negotiated received baud rate for the call. For IP fax, transmitted
and received baud rates are the same.
In addition, the Ascend-CBCP-Trunk-Group attribute (115) applies to outgoing IP fax calls.
Attribute
Value
Ascend-CBCP-Trunk-Group
(115)
Assigns the callback or outgoing IP fax call to a MAX trunk
group. The value of Ascend-CBCP-Trunk-Group is
prepended to the number that the MAX unit dials for callback
or an outgoing fax call. Specify a trunk-group number from 1
to 9.
MAX 6000/3000 Network Configuration Guide
7-11
Configuring IP Fax
Atlas redialer and DID support on MAX 6000 units
Attribute
Value
Ascend-CBCP-Trunk-Group applies only if one or both of the
following conditions are true:
•
Calback Control Protocol (CBCP) is negotiated for a
connection.
•
The call is an outgoing IP fax call and trunk groups are
enabled in the System profile.
Syslog support for IP fax operation
The following Syslog message reflects the time at which a modem was reserved:
LOG info, Shelf 1, Controller, Time: 15:36:40-[1/1/13/0] [MBID 13] Assigned to Port
The following message displays the modem slot, modem number, dial-out number, and trunk
group when a call is placed:
LOG info, Shelf 1, Controller, Time: 15:37:07-[1/1/13/0] [MBID 13; ->97476799] Outgoing Call, 97476799, Trunk 8
When the call is connected, its shelf, slot, line, and channel are displayed in a message similar
to the following:
LOG info, Shelf 1, Controller, Time: 15:37:13-[1/14/2/5] [MBID 13; ->97476799] Call Connected
When the call is terminated, the time, modem slot, and modem number are displayed in the
following:.
LOG info, Shelf 1, Controller, Time: 15:38:00-[1/1/13/0] [MBID 13; ->97476799] Call Terminated
Redialer support on MultiDSP card for store-and-forward fax
When a redialer device is attached to a fax machine, it waits for a 400 Hz tone. After receiving
the tone, the redialer transmits the destination fax number to the MAX as DTMF digits. With
the current software version, the MultiDSP card transmits the 400-Hz tone and detects
incoming DTMF digits.
Atlas redialer and DID support on MAX 6000 units
TAOS 9.0 enhances IP fax functionality by adding the Dialer Type parameter to the Atlas
redialer. This release also introduces the DID #N and InCall Type parameters, which
provide support for Direct Inward Dialing (DID) with inbound IP fax calls.
7-12
MAX 6000/3000 Network Configuration Guide
Configuring IP Fax
Atlas redialer and DID support on MAX 6000 units
Specifying the type of redialer
You can select the type of redialer for incoming fax calls by setting the Dialer Type
parameter, in the IP Fax Options profile to specify Mitel or Atlas. In previous software
releases, MAX units supported only the Mitel redialer.
DID on inbound IP fax calls
Every DID subscriber, such as a network user or network device (such as a printer) receives a
DID number. To send a fax to a network user or device, senders simply dial the fax
subscriber’s DID number, and that call is connected to a MAX unit.
When a MAX unit detects an incoming fax call, it authenticates the call by comparing the DID
number received from the DID trunk to the DID numbers specified by the DID #N parameter
in the IP Fax Options profile. If the numbers match, the unit initiates a connection with the fax
server by sending an incoming fax authentication packet (IFAP) to the fax server for
authentication. The incoming fax authentication packet includes the following information:
•
Line identifier
•
DID number
•
Caller ID (if available)
In response to the IFAP, the fax server sends a fax connection response packet (FCRP) that
contains one of the following messages:
•
+ FCRP-NACK—The fax server is unable to handle the call.
•
+ FCRP-ACK—The fax server is able to handle the call.
After successfully establishing a connection with the fax server, the MAX unit forwards the
fax to the fax server.
If the first server fails to accept the call, the MAX unit attempts a connection with the next fax
server, and so forth. After a connection has been established with a fax server, the MAX unit
continues to use that particular fax server for subsequent calls until the connection to that fax
server fails. The MAX unit then attempts to connect to the next fax server specified by the
Server #N (N=1-5) parameter.
MAX 6000/3000 Network Configuration Guide
7-13
Configuring OSPF Routing
8
OSPF overview . . . . . . . . . . . . . . . . . . . . . . . . . . . . . . . . . . . . . . . . . . . . . . . . . . . . . . . 8-1
Configuring OSPF routing in the MAX. . . . . . . . . . . . . . . . . . . . . . . . . . . . . . . . . . . . . 8-9
To configure your MAX for Open Shortest Path First (OSPF) routing, you need to determine
the interfaces—LAN or WAN—you wish to support the protocol. To configure OSPF for a
LAN (Ethernet) interface, you use the Ether Options profile. To configure OSPF for a WAN
interface, you use a Connections profile. In addition, you can configure the MAX unit to add
routes from a remote router that does not support OSPF or, in a complex network, configure
the MAX unit as an OSPF internal router.
OSPF overview
OSPF is the next-generation Internet routing protocol designed to overcome the limitations in
Routing Information Protocol (RIP) that have occurred as a result of the growth of the Internet.
RIP is a distance-vector protocol, which uses a hop count to select the shortest route to a destination network. RIP always uses the lowest hop count, regardless of the speed or reliability of
a link. OSPF is a link-state protocol, which means that OSPF can take into account a variety of
link conditions, such as the reliability or speed of the link, and whether the link is up or down
when determining the best path to a destination network.
With RIP, a destination that requires more than 15 consecutive hops is considered unreachable,
which inhibits the maximum size of a network. OSPF has no hop limitation. You can add as
many routers to a network as you want.
RIP creates a routing table and then propagates it throughout the internet of routers, hop by
hop. With increasing Internet routing traffic, RIP convergence (the time it takes for all routers
to receive information about a topology change) is sometimes slow, resulting in routing loops
and errors.
A RIP router broadcasts its entire routing table every 30 seconds. On a 15-hop network, convergence can be as high as 7.5 minutes. In addition, a large table can require multiple broadcasts for each update, which consumes a lot of bandwidth. OSPF uses a topological database of
the network and propagates only changes to the database, which results in more efficient propogation.
MAX 6000/3000 Network Configuration Guide
8-1
Configuring OSPF Routing
OSPF overview
TAOS implementation of OSPF
The primary goal for the TAOS current implementation of OSPF is to enable the MAX to
communicate with other routers within a single Autonomous System (AS). The TAOS
implementation includes Area Border Router (ABR) capabilities and MD5 authentication.
The MAX does not function as a full AS Border Router (ASBR), although it performs ASBR
calculations for external routes such as WAN links that do not support OSPF. The MAX
imports external routes into its OSPF database and flags them as Autonomous System External
(ASE). It redistributes those routes by means of OSPF ASE advertisements, and propagates its
OSPF routes to remote WAN routers that are running RIP.
The MAX supports null and simple password authentication.
OSPF features
This section provides a brief overview of OSPF routing to help you properly configure the
MAX. For full details about how OSPF works, see RFC 1583, OSPF Version 2, 03/23/1994, J.
Moy.
An Autonomous System (AS) is a group of OSPF routers exchanging information, typically
under the control of one company. An AS can include a large number of networks, all of which
are assigned the same AS number. All information exchanged within the AS is interior.
Exterior protocols are used to exchange routing information between Autonomous Systems.
The protocols are referred to by the acronym EGP (Exterior Gateway Protocol). Border routers
can use the AS number to filter out certain EGP routing information. OSPF can make use of
EGP data generated by other border routers and added into the OSPF system as ASEs, and can
also use static routes configured in the MAX or RADIUS.
Security
All OSPF protocol exchanges are authenticated. This means that only trusted routers can
participate in the AS’s routing. A variety of authentication schemes are available. In fact,
different authentication types can be configured for each area. In addition, authentication
provides added security for the routers that are on the network. Routers that do not have the
password cannot gain access to the routing information, because authentication failure
prevents a router from forming adjacencies.
OSPF on the MAX supports the MD5 cryptographic authentication method. You can select the
MD5 authentication type to direct the MAX to validate OSPF packet exchanges using MD5
encryption and an authentication key of as many as 16 characters. The authentication key value
in the KeyID field is a number from 0 to 255.
For detailed information about the AuthType and the KeyID parameters, see the MAX
Reference.
Support for variable length subnet masks
OSPF enables the flexible configuration of IP subnets. Each route distributed by OSPF has a
destination and mask. Two different subnets of the same IP network number can have different
sizes (different masks). This capability is commonly referred to as Variable Length Subnet
8-2
MAX 6000/3000 Network Configuration Guide
Configuring OSPF Routing
OSPF overview
Masks (VLSM), or Classless Inter-Domain Routing (CIDR). The MAX routes a packet to the
best (longest, or most specific) match. The MAX considers host routes to be subnets whose
masks are all ones (0xFFFFFFFF).
Note: Although OSPF is very useful for networks that use VLSM, Lucent recommends that
you attempt to assign subnets as contiguously as possible, to prevent excessive link-state
calculations by all OSPF routers on the network.
Exchange of routing information
OSPF uses a topological database of the network and propagates only changes to the database.
Part of the SPF algorithm involves acquiring neighbors and forming an adjacency with one
neighbor, as shown in Figure 8-1.
Figure 8-1. Adjacency between neighboring routers
Router-1
Router-3
Adjacency
Router-2
An OSPF router dynamically detects its neighboring routers by sending Hello packets to the
multicast address All SPFRouters. It then attempts to form adjacencies with some of its
newly acquired neighbors.
Adjacency is a relationship formed between selected neighboring routers for the purpose of
exchanging routing information. Not every pair of neighboring routers becomes adjacent.
Adjacencies are established during network initialization in pairs, between two neighbors. As
the adjacency is established, the neighbors exchange databases and build a consistent,
synchronized database between them.
When an OSPF router detects a change on one of its interfaces, it modifies its topological
database and multicasts the change to its adjacent neighbor, which in turn propagates the
change to its adjacent neighbor until all routers within an area have synchronized topological
databases. The result is quick convergence among routers.
Designated and Backup Designated Routers
In OSPF terminology, a broadcast network is any network that has more than two OSPF
routers attached and that supports the capability to address a single physical message to all of
the attached routers.
MAX 6000/3000 Network Configuration Guide
8-3
Configuring OSPF Routing
OSPF overview
Figure 8-2. Designated and Backup Designated Routers
Router-1
Designated
Router (DR)
MAX
Backup
Designated
Router (BDR)
Router-2
To reduce the number of adjacencies each router must form, OSPF calls one of the routers the
Designated Router. A Designated Router is elected as routers are forming adjacencies, and
then all other routers establish adjacencies only with the designated router. This simplifies the
routing table update procedure and reduces the number of link-state records in the database.
The Designated Router also plays other important roles in reducing the overhead of OSPF
link-state procedures. For example, other routers send LSAs to only the Designated Router by
using the All-Designated-Routers multicast address of 224.0.0.6.
To prevent the Designated Router from becoming a serious liability to the network if it fails,
OSPF elects a Backup Designated Router at the same time. Other routers maintain adjacencies
with both the Designated Router and its backup router, but the backup router leaves as many of
the processing tasks as possible to the Designated Router. If the Designated Router fails, the
backup immediately becomes the Designated Router and a new backup is elected.
The administrator chooses which router is to be the Designated Router on the basis of the
processing power, speed, and memory of the system, and then assigns priorities to other routers
on the network in case the Backup Designated Router is also down at the same time.
Note: The MAX can function as a Designated Router (DR) or Backup Designated Router
(BDR). However, many sites choose to assign a LAN-based router for these roles in order to
dedicate the MAX to WAN processing.
Configurable metrics
The administrator assigns a cost to the output side of each router interface. The lower the cost,
the more likely the interface is to be used to forward data traffic. Costs can also be associated
with the externally derived routing data.
You can also use the OSPF cost for preferred path selection. If two paths to a destination have
equal costs, you can assign a higher cost to one of the paths, to configure it as a backup to be
used only when the primary path is not available.
Figure 8-3 shows how costs direct traffic over high-speed links. For example, if Router-2 in
Figure 8-3 receives packets destined for Host B, it routes them through Router-1, across two
T1 links (Cost=20), rather than across one 56Kbps B-channel to Router-3 (Cost=240).
8-4
MAX 6000/3000 Network Configuration Guide
Configuring OSPF Routing
OSPF overview
Figure 8-3. OSPF costs for different types of links
Cost = 10
Router-2
A
Router-1
T1
T1
56Kbps
Router-2
Cost = 10
Router-3
B
Router-3
Cost = 240
The MAX has a default cost of one for a connected route (Ethernet) and ten for a WAN link. If
you have two paths to the same destination, the MAX selects the one with the lower cost. You
might want to account for the bandwidth of a connection when assigning costs. For example,
for a single B-channel connection, the cost would be 24 times greater than for a T1 link.
Note: Be careful when assigning costs. Incorrect cost metrics can cause delays and
congestion on the network.
Hierarchical routing (areas)
If a network is large, the size of the database, time required for route computation, and related
network traffic can become excessive. An administrator can partition an AS into areas to
provide hierarchical routing connected by a backbone.
The backbone area is special and always has the area number 0.0.0.0. Other areas are assigned
area numbers that are unique within the AS.
Each area acts like its own network. All area-specific routing information stays within the area,
and all routers within an area must have a synchronized topological database. To tie the areas
together, some routers belong to the backbone area and to another area. These routers are Area
Border Routers (ABRs). In Figure 8-4, all of the routers are ABRs. If you set up the ABRs and
area boundaries correctly, link-state databases are unique to an area.
MAX 6000/3000 Network Configuration Guide
8-5
Configuring OSPF Routing
OSPF overview
Figure 8-4. Dividing an AS into areas
Area 1
Backbone
Area
ABR
Area 3
Area 2
ABR
ABR
Stub areas
For areas that are connected only to the backbone by one ABR (that is, the area has one exit
point), there is no need to maintain information about external routes. To reduce the cost of
routing, OSPF supports stub areas, in which a default route summarizes all external routes. A
stub area allows no Type-5 LSAs to be propagated into or throughout the area, and instead
depends on default routing to external destinations.
To prevent flooding of external routes throughout the AS, you can configure an area as a stub if
the area has a single exit point or if the choice of exit point need not be made on a
per-external-destination basis. You might need to specify a stub area with no default cost
(StubNoDefault) if the area has more than one exit point.
In a stub area, routing to AS-external destinations is based on a per-area default cost. The
per-area default cost is advertised to all routers within the stub area by a border router, and is
used for all external destinations.
Not So Stubby Areas (NSSAs)
The MAX supports OSPF Not So Stubby Areas (NSSAs) as described in RFC 1587. NSSAs
enable you to treat complex networks similarly to stub areas. This can simplify your network’s
topology and reduce OSPF-related traffic.
NSSAs are similar to stub areas, except that they enable limited importing of AS-external
routes. NSSAs use Type-7 LSAs to import external route information into an NSSA. Type-7
LSAs are similar to Type-5 LSAs except that:
8-6
•
NSSAs can originate and import Type-7 LSAs. Like stub areas, NSSAs cannot originate
or import Type-5 LSAs.
•
Type-7 LSAs can only be advertised within a single NSSA. They are not flooded
throughout the AS as are Type-5 LSAs.
MAX 6000/3000 Network Configuration Guide
Configuring OSPF Routing
OSPF overview
When you configure the MAX as an NSSA internal router, you define the Type-7 LSAs you
want to advertise throughout the NSSA as static routes.
You must also specify whether these Type-7 LSAs should be advertised outside the NSSA. If
you choose to advertise a Type-7 LSA, the NSSA Area Border Router (ABR) converts it to a
Type-5 LSA, which can then be flooded throughout the AS. If you choose not to advertise a
Type-7 LSA, it is not advertised beyond the NSSA.
(For complete information about NSSAs, see RFC 1587.)
The link-state routing algorithm
Link-state routing algorithms require that all routers within a domain maintain synchronized
(identical) topological databases, and that the databases describe the complete topology of the
domain. An OSPF router’s domain can be an AS or an area within an AS.
OSPF routers exchange routing information and build link-state databases. Link-state
databases are synchronized between pairs of adjacent routers (as described in “Exchange of
routing information” on page 8-3). In addition, each OSPF router uses its link-state database to
calculate a self-rooted tree of shortest paths to all destinations, as shown in Figure 8-5.
Figure 8-5. Sample network topology
Network-1
Router-1
Cost=20
Network-2
Router-2
Network-3
Router-3
Cost=30
Network-4
The routers then use the trees to build their routing tables, as shown in Table 8-1.
Table 8-1. Link-state databases for network topology in Figure 8-5
Router-1
Router-2
Router-3
Network-1/Cost 0
Network-2/Cost0
Network-3/Cost 0
Network-2/Cost 0
Network-3/Cost0
Network-4/Cost 0
Router-2/Cost 20
Router-1/Cost 20
Router-2/Cost 30
Router-3/Cost 30
Table 8-2, Table 8-3, and Table 8-4 show another example of self-rooted shortest-path trees
calculated from link-state databases, and the resulting routing tables. Actual routing tables also
contain externally derived routing data, which is advertised throughout the AS but kept
separate from the link-state data. Also, each external route can be tagged by the advertising
MAX 6000/3000 Network Configuration Guide
8-7
Configuring OSPF Routing
OSPF overview
router, enabling the passing of additional information between routers on the boundary of the
AS.
Table 8-2. Shortest-path tree and resulting routing table for Router-1
N-1
Destination
Next Hop
Metric
Network-1
Direct
0
Network-2
Direct
0
Network-3
Router-2
20
Network-4
Router-2
50
N-2
R-1
20
R-2
30
N-3
R-3
N-4
Table 8-3. Shortest-path tree and resulting routing table for Router-2
N-2
20
N-1
Next Hop
Metric
Network-1
Router-1
20
Network-2
Direct
0
Network-3
Direct
0
Network-4
Router-2
30
30
R-3
R-1
Destination
N-3
R-2
N-4
Table 8-4. Shortest-path tree and resulting routing table for Router-3
N-3
R-3
Destination
Next Hop
Metric
Network-1
Router-2
50
Network-2
Router-2
30
Network-3
Direct
0
Network-4
Direct
0
N-4
30
R-2
N-2
20
R-1
8-8
N-1
MAX 6000/3000 Network Configuration Guide
Configuring OSPF Routing
Configuring OSPF routing in the MAX
Configuring OSPF routing in the MAX
This section shows how to add a MAX to your OSPF network. It assumes that you know how
to configure the MAX with an appropriate IP address, (as described in Chapter 9, “Configuring
IP Routing.”)
The procedures in this section are examples based on Figure 8-6. To apply one or more of the
procedures to your network, enter the appropriate settings instead of the ones shown.
Figure 8-6. Example of an OSPF setup
Sun
Router-1
Sun
Nailed T1
T1
MAX-1
OSPF
Router-2
FR
MAX-2
FR
BRI
Router-3
Pipeline
Sun
In Figure 8-6, all OSPF routers are in the same area (the backbone area), so the units all form
adjacencies and synchronize their databases together.
Note: All OSPF routers in Figure 8-6 have RIP turned off. OSPF can learn routes from RIP
without the added overhead of running RIP.
Configuring OSPF on the Ethernet interface
The MAX Ethernet interface in Figure 8-6 is in the OSPF backbone area. Although there is no
limitation stated in the RFC about the number of routers in the backbone area, you should keep
the number of routers relatively small, because changes that occur in area zero are propagated
throughout the AS.
Another way to configure the same units would be to create a second area (such as 0.0.0.1) on
one of the existing OSPF routers, and add MAX-1 to that area. You could then assign the same
area number (0.0.0.1) to all OSPF routers reached through the MAX across a WAN link.
After you configure MAX-1 as an IP host on that interface, you can configure it, in the
Ethernet profile, as an OSPF router in the backbone area. To configure MAX-1 as an OSPF
router on Ethernet, you need to make sure that the MAX is configured as an IP host and then
configure OSPF features.
MAX 6000/3000 Network Configuration Guide
8-9
Configuring OSPF Routing
Configuring OSPF routing in the MAX
Make sure the MAX is configured as an IP host
To ensure the MAX is configured as an OSPF host, open Ethernet > Mod Config > Ether
Options, and make sure that the following parameters have been set with appropriate values for
your MAX:
Ethernet
Mod Config
Ether options...
IP Adrs=10.168.8.17/24
2nd Adrs=0.0.0.0
RIP=Off
Ignore Def Rt=Yes
Proxy Mode=Always
Filter=0
IPX Frame=N/A
Note that RIP is turned off, because it is not necessary to run both RIP and OSPF. Turning RIP
off reduces processor overhead. OSPF can learn routes from RIP, incorporate them in the
routing table, assign them external metrics, and tag them as external routes. (For more
information, see Chapter 9, “Configuring IP Routing.”)
Configure the MAX for OSPF
The following list summarizes the parameters used for configuring the MAX as an OSPF
router on Ethernet. For detailed information about any parameter, see the MAX Reference.
8-10
Parameter
Description
RunOSPF
OSPF is turned off by default. To enable it on the interface, set
RunOSPF to Yes.
Area
Sets the area ID for the interface. The format for this ID is dotted
decimal, but it is not an IP address. (For a description of areas,
see “Hierarchical routing (areas)” on page 8-5.)
AreaType
Specifies the type of area: Normal, Stub, or StubNoDefault. (For
descriptions, see “Stub areas” on page 8-6.)
HelloInterval
Specifies how frequently, in seconds, the MAX sends out Hello
packets on the specified interface.
DeadInterval
Specifies how many seconds the MAX waits before declaring its
neighboring routers down after it stops receiving their Hello
packets.
Priority
Specifies a value the routers in the network use to elect a Designated Router (DR) and Backup Designated Router (BDR). A setting of 1 or greater places the MAX on the list of possible DRs.
A setting of 0 excludes the MAX from becoming a DR/BDR.
The higher the priority value of the MAX relative to other OSPF
routers on the network, the better the chances that it will become
a BDR/DR.
MAX 6000/3000 Network Configuration Guide
Configuring OSPF Routing
Configuring OSPF routing in the MAX
Parameter
Description
AuthType
Type of authentication to use for validating OSPF packet
exchanges. With the None setting, no authentication is required.
If the parameter is set to Simple (the default), the router uses the
password supplied in the AuthKey parameter to validate OSPF
packet exchanges. With the MD5 setting, the router uses MD5
encryption and the authentication key ID supplied in the KeyID
parameter to validate OSPF packet exchanges.
AuthKey
Specifies the key the MAX looks for in packets to support OSPF
router authentication. (For more information, see “Security” on
page 8-2.)
KeyID
When AuthType is set to MD5, specifies the authentication key
(password) for OSPF.
Cost
Specifies the link-state or output cost of a route. Assign realistic
costs for each interface that supports OSPF. The lower the cost,
the higher the likelihood of using that route to forward traffic.
(For more information, see “Configurable metrics” on page 8-4.)
TransitDelay
Specifies the estimated number of seconds it takes to transmit a
Link State Update Packet over this interface, taking into account
transmission and propagation delays. On a connected route, you
can leave the default of 1.
RetransmitInterval
Specifies the number of seconds between retransmissions of
Link-State Advertisements, Database Description, and Link
State Request Packets.
To configure the MAX unit’s Ethernet interface for OSPF, follow the steps in this example,
substituting the appropriate parameter settings for your network:
1
Open Ethernet > Mod Config > OSPF Options and set RunOSPF to enable OSPF on the
interface:
RunOSPF=Yes
2
Set the Area parameter to specify the area ID number in dotted decimal format and set the
AreaType parameter to define the area type for the Ethernet:
Area=0.0.0.0
AreaType=Normal
In this case, the Ethernet is in the backbone area. (The backbone area number is always
0.0.0.0.) The backbone area is not a stub area, so leave the setting at its default. (For
background information, see “Stub areas” on page 8-6.)
3
Leave the HelloInterval, DeadInterval, and Priority parameters with values set to their
defaults:
HelloInterval=10
DeadInterval=40
Priority=5
4
If access to the backbone area requires authentication, set the AuthType parameter to
specify the authentication method and depending on which authentication method you
select, set either the AuthKey or KeyID parameter to specify the password. For example:
AuthType=Simple
AuthKey=lucent0
MAX 6000/3000 Network Configuration Guide
8-11
Configuring OSPF Routing
Configuring OSPF routing in the MAX
If authentication is not required, set AuthType to None.
5
Set the Cost parameter to specify the cost for the MAX to route into the backbone area.
For example:
Cost=1
Specify a value greater than zero and less than 16777215. By default the cost of an
Ethernet-connected route is 1.
6
Set the Transit Delay parameter to specify the expected transit delay for Link State Update
packets. For example:
TransitDelay=1
7
Set the RetransmitInterval parameter to specify the retransmit interval for OSPF packets.
For example:
RetransmitInterval=5
This parameter specifies the number of seconds between retransmissions of Link-State
Advertisements, Database Descriptions, and Link State Request Packets.
8
Exit the profile and, at the exit prompt, select the exit and accept option.
When you close the Ethernet profile, the MAX comes up as an OSPF router on that interface. It
forms adjacencies and begins building its routing table.
Configuring OSPF across the WAN
The WAN interface of the MAX is a point-to-point network. A point-to-point network is any
network that joins a single pair of routers. Such networks typically do not provide a
broadcasting or multicasting service, so all advertisements are sent point to point.
An OSPF WAN link has a default cost of ten. You can assign a higher cost to reflect a slower
connection or a lower cost to set up a preferred route to a certain destination. If the cost of one
route is lower than that of another to the same destination, the MAX does not select the
higher-cost route unless route preferences change the equation.
OSPF on the WAN link is configured in a Connection profile, using the same parameters
described in “Configuring OSPF on the Ethernet interface” on page 8-9. In the Connection
profile, however, the parameter values permitted vary somewhat from those permitted in the
Ether Options profile. For more information about any parameter, see the MAX Reference.
In this example, the MAX is connecting to another MAX unit across a T1 link (as in Figure 8-6
on page 8-9). To configure this interface:
1
Open the Connection profile for the remote MAX unit, enable the Route IP parameter, and
configure the IP routing connection. For example:
Ethernet
Connections
90-101 Cprofile1
IP options...
LAN Adrs=10.2.3.4/24
WAN Alias=0.0.0.0
IF Adrs=0.0.0.0
Metric=7
Preference=N/A
Private=No
8-12
MAX 6000/3000 Network Configuration Guide
Configuring OSPF Routing
Configuring OSPF routing in the MAX
RIP=Off
Pool=0
(For detailed information, see Chapter 9, “Configuring IP Routing.”)
2
Open the OSPF Options subprofile and enable the RunOSPF parameter.
RunOSPF=Yes
3
Set the Area parameter to specify the area ID number for the remote device and set the
AreaType parameter to specify the area type.
The area number must always be specified in dotted-quad format similar to an IP address.
For example:
Area=0.0.0.0
AreaType=Normal
You should use the same area number for the Ethernet interface of the MAX and each of
its WAN links. In this example, the Ethernet interface is in the backbone area (0.0.0.0).
You can use any area numbering scheme that is consistent throughout the AS and that uses
this format.
4
Leave the HelloInterval, DeadInterval, and Priority parameters with values set to their
defaults. Set the Priority parameter to configure the MAX as a DR or BDR.
HelloInterval=40
DeadInterval=120
Priority=5
5
If you require authentication to get into the backbone area, set the AuthType parameter to
specify the method of authentication and set the AuthKey parameter to specify the
password. For example:
AuthType=Simple
AuthKey=lucent0
If you do not require authentication, set AuthType to None.
6
Set the Cost parameter to specify the cost for the route to MAX-2.
For example, for a T1 link the cost should be at least ten.
Cost=10
7
Exit the profile and, at the exit prompt, select the exit and accept option.
8
Reset the MAX to start OSPF operations.
Note: The remote MAX unit must have a comparable Connection profile to connect to
MAX-1.
Configuring a WAN link that does not support OSPF
In this example, the MAX has a Connection profile to a remote Pipeline unit across a BRI link
(as in Figure 8-6 on page 8-9). The remote Pipeline is an IP router that uses RIP-v2 to transmit
routes. The route to the Pipeline unit’s network, and any routes the MAX learns about from the
remote Pipeline, are ASEs (external to the OSPF system).
To enable OSPF to add the RIP-v2 routes to its routing table, configure RIP-v2 normally in this
Connection profile. OSPF imports all RIP routes as Type-2 ASEs.
In this example, RIP is turned off on the link and ASE information is configured explicitly.
MAX 6000/3000 Network Configuration Guide
8-13
Configuring OSPF Routing
Configuring OSPF routing in the MAX
Parameters already introduced in previous sections are listed in “Configuring OSPF on the
Ethernet interface” on page 8-9. Additional parameters introduced in this section include:
Parameter
Description
ASE-Type and
Autonomous System External (ASE) routes are used only when
OSPF is turned off on a particular interface. When OSPF is
enabled, the ASE parameters are not applicable.
ASE-Tag
ASE-Type specifies the type of metric that the MAX advertises
for external routes. A Type-1 external metric is expressed in the
same units as the link-state metric (the same units as interface
cost). A Type-2 external metric is considered larger than any
link- state path. Use of Type-2 external metrics assumes that
routing between autonomous systems is the major cost of routing
a packet, and eliminates the need for conversion of external costs
to internal link-state metrics. ASE-Tag is a hexadecimal number
used to tag external routes for filtering by other routers.
Used only when OSPF is turned off on a particular interface.
When OSPF is enabled, the parameter is not applicable.
The following procedure describes how to configure the WAN link without OSPF support.
1
Open the Connection profile for the remote Pipeline unit, enable the Route IP parameter,
and configure the IP routing connection. For example:
Ethernet
Connections
90-101 Cprofile1
IP options...
LAN Adrs=10.2.3.4/24
WAN Alias=0.0.0.0
IF Adrs=0.0.0.0
Metric=7
Preference=N/A
Private=No
RIP=Off
Pool=0
(For detailed information, see Chapter 9, “Configuring IP Routing.”) Note that in a
Connection profile, the OSPF Options subprofile includes two ASE parameters that are
active only when OSPF is not running on a link. If you configure these parameters, the
route configured in the Connection profile is advertised whenever the MAX is up.
2
Open the OSPF Options subprofile and set RunOSPF set to No.
RunOSPF=No
3
Set the Cost parameter to specify the cost for the route to the remote Pipeline.
For example, a single-channel BRI link could have a cost approximately 24 times the cost
of a dedicated T1 link:
Cost=240
4
Set the ASE-type parameter to specify the ASE type for this route.
ASE-type=Type 2
This parameter specifies the type of metric to be advertised for an external route.
8-14
MAX 6000/3000 Network Configuration Guide
Configuring OSPF Routing
Configuring OSPF routing in the MAX
A Type-1 external metric is expressed in the same units as the link state metric (the same
units as interface cost). Type-1 is the default.
A Type-2 external metric is considered larger than any link-state path. Use of Type- 2
external metrics assumes that routing outside the AS is the major cost of routing a packet,
and eliminates the need for conversion of external costs to internal link-state metrics.
5
Set the ASE-tag parameter to specify an ASE tag for this route.
The ASE tag is a hexadecimal number that shows up in management utilities and flags this
route as external. It can also be used by border routers to filter this record. For example:
ASE-tag=cfff8000
6
Exit the profile and, at the exit prompt, select the exit and accept option.
Note: The remote Pipeline unit must have a comparable Connection profile to connect to the
MAX.
Configuring the MAX as an NSSA internal router
Because the MAX cannot be an Area Border Router, when you configure OSPF on the MAX
keep in mind that:
•
The area type must be the same on all MAX interfaces running OSPF.
•
The area ID (configured in the Area parameter) must be the same on all MAX interfaces
running OSPF.
To configure the MAX as an NSSA internal router:
1
Set Ethernet > Mod Config > OSPF options > AreaType to NSSA.
2
Exit the profile and, at the exit prompt, select the exit and accept option.
3
Select Ethernet > Static Rtes > any profile and configure a static route to the destination
outside the NSSA. For example:
Ethernet
Static Rtes
90-401 Static Rtes profile 1
Name=
Active=Yes
Dest=20.20.20.20
Gateway=10.10.10.10
...
...
NSSA-ASE7=Advertise
Note: Set the NSSA-ASE7 parameter to Advertise, or to DoNotAdvertise, to specify
whether you want to advertise this route outside the NSSA. The settings for the remaining
parameters depend on your environment.
Metric=
Preference=
Private=
Ospf-Cost=
LSA-type=
....
ASE-tag=
Third-Party=
MAX 6000/3000 Network Configuration Guide
8-15
Configuring OSPF Routing
Configuring OSPF routing in the MAX
8-16
4
Exit the profile and, at the exit prompt, select the exit and accept option.
5
Reset the MAX.
MAX 6000/3000 Network Configuration Guide
9
Configuring IP Routing
Introduction to IP routing on the MAX . . . . . . . . . . . . . . . . . . . . . . . . . . . . . . . . . . . . . 9-1
Configuring LAN interfaces . . . . . . . . . . . . . . . . . . . . . . . . . . . . . . . . . . . . . . . . . . . . . 9-7
Configuring system-level routing policies. . . . . . . . . . . . . . . . . . . . . . . . . . . . . . . . . . 9-10
Configuring WAN interfaces . . . . . . . . . . . . . . . . . . . . . . . . . . . . . . . . . . . . . . . . . . . . 9-31
Configuring IP routes. . . . . . . . . . . . . . . . . . . . . . . . . . . . . . . . . . . . . . . . . . . . . . . . . . 9-55
To configure the MAX unit for IP routing, you must configure the unit’s LAN and WAN
interfaces, establish network services and global routing policies, and configure routes.
Parameters for defining system-level and LAN characteristics are located in the Ethernet >
Mod Config profile and its subprofiles. Parameters for defining WAN connection-based
characteristics are located in the Connection profiles.
Introduction to IP routing on the MAX
Before you start to configure IP routing on your MAX unit, you need to understand the unit’s
requirements for IP address and subnet format and how the unit uses the routing table, Ethernet
interfaces, and WAN interfaces.
IP address and subnet mask usage in MAX units
In the MAX unit, you specify IP addresses in dotted decimal format (not hexadecimal), such as
198.5.248.40.
Default subnet masks
If you specify no subnet mask, the MAX unit assumes that the address contains the default
number of network bits for its class. Table 9-1 lists the number of network bits in the default
subnet mask for each class.
Table 9-1. IP address classes and number of network bits
Class
Address range
Network bits
Class A
0.0.0.0—127.255.255.255
8
MAX 6000/3000 Network Configuration Guide
9-1
Configuring IP Routing
Introduction to IP routing on the MAX
Table 9-1. IP address classes and number of network bits (continued)
Class
Address range
Network bits
Class B
128.0.0.0—191.255.255.255
16
Class C
192.0.0.0—223.255.255.255
24
For example, a class C address, such as 198.5.248.40, has 24 network bits, leaving eight bits
for the host portion of the address. If no subnet mask is specified for a class C address, the
MAX assumes the default mask of 24 bits, as shown in Figure 9-1.
Figure 9-1. Default mask for class C IP address
11111111111111111111111100000000
Default 24 bits
Subnet mask format
To specify a subnet mask, you append a modifier that specifies the number of network bits in
the address. For example:
198.5.248.40/29
In this example, the /29 indicates that 29 bits of the address are used to specify the network.
This is referred to as a 29-bit subnet. The three remaining bits specify unique hosts, as shown
in Figure 9-2.
Figure 9-2. A 29-bit subnet mask and the number of supported hosts
Number of host addresses
(2 of which are reserved)
255 128
64
32
16
8
4
2
11111111111111111111111111111000
Default 24 bits
5-bit subnet
Total network bits=29
In Figure 9-2, three available bits present eight possible bit combinations. Of the eight possible
host addresses, two are reserved, as follows:
000 — Reserved for the network (base address)
001
010
011
100
101
110
111—Reserved for the broadcast address of the subnet
9-2
MAX 6000/3000 Network Configuration Guide
Configuring IP Routing
Introduction to IP routing on the MAX
The broadcast address of any subnet has the host portion of the IP address set to all ones. The
network address (or base address) represents the network itself, because the host portion of the
IP address is all zeros. For example, if the MAX assigns the following address to a remote
router:
IP address=198.5.248.120/29
The Ethernet attached to that router has the following address range:
198.5.248.120 — 198.5.248.127
in which 198.5.248.120 is a network (base) address and 198.5.248.127 is a broadcast
address.
A host route is a special-case IP address with a subnet mask of /32. Host routes are required for
dial-in hosts. For example:
198.5.248.40/32
Table 9-2 shows standard subnet masks for a class C network and the subnet notation.
Table 9-2. Standard subnet masks and Lucent notation
Subnet mask
Number of host addresses
Subnet notation
255.255.255.0
254 hosts + 1 broadcast, 1 network (base)
/24
255.255.255.128
126 hosts + 1 broadcast, 1 network (base)
/25
255.255.255.192
62 hosts + 1 broadcast, 1 network (base)
/26
255.255.255.224
30 hosts + 1 broadcast, 1 network (base)
/27
255.255.255.240
14 hosts + 1 broadcast, 1 network (base)
/28
255.255.255.248
6 hosts + 1 broadcast, 1 network (base)
/29
255.255.255.252
2 hosts + 1 broadcast, 1 network (base)
/30
255.255.255.254
invalid subnet mask (no hosts)
/31
255.255.255.255
1 host—a host route
/32
Zero subnetworks
Early implementations of TCP/IP do not allow zero subnets, that is, subnetwork addresses in
which the last octet is zero. As a result, in early TCP/IP implementation, subnetworks are not
permitted to have the same base address that a class A, B, or C network would have. Lucent’s
implementation of RIP 2 and OSPF, like other modern implementations of TCP/IP, treat zero
subnetworks as they would any other network.
You should decide whether to support and configure zero subnetworks for your environment.
If you configure them in some cases and treat them as unsupported in other cases, you will
encounter routing problems.
MAX 6000/3000 Network Configuration Guide
9-3
Configuring IP Routing
Introduction to IP routing on the MAX
IP routing table
At system startup, a MAX unit builds an IP routing table that contains static routes established
in various types of configuration profiles. In addition, the MAX unit uses routing protocols
such as RIP or OSPF to learn additional routes from other IP routers and adds them to the
routing table. (For additional information about configuring static and dynamic routing, see
“Configuring routes for WAN connections” on page 9-31.)
In each routing table entry, the Destination field specifies a destination network address that
can appear in IP packets, and the Gateway field specifies the address of a next-hop router to
reach that destination. Each entry also has a preference value and a metric value, which the unit
evaluates when comparing multiple routes that reach the same destination.
A MAX unit relies on the routing table to forward IP packets, as follows:
•
If the unit finds a routing table entry whose Destination field matches a packet’s
destination address, it routes the packet to the specified next-hop router, whether through
the WAN interface or the Ethernet interface.
•
If the unit does not find a matching entry, it looks for the Default route, which is identified
in the routing table by a destination of 0.0.0.0. If that route has a specified next-hop
router, the unit forwards the packet to that router.
•
If the unit does not find a matching entry and does not have a valid Default route, it drops
the packet.
MAX IP interfaces
A MAX unit supports routing on Ethernet and WAN interfaces.
Ethernet interfaces
The routing table described in this section is typical of table created at startup by a MAX unit
in which the unit has been configured to enable IP routing, but for which no static routes or
Connection profiles have been defined. The unit’s Ethernet interface has the IP address
10.10.10.2 with a subnet mask of 255.255.0.0.
9-4
MAX 6000/3000 Network Configuration Guide
Configuring IP Routing
Introduction to IP routing on the MAX
Figure 9-3. Typical routing table
** Ascend MAX Terminal Server **
ascend% iproute show
Destination
10.10.0.0/16
10.10.10.2/32
127.0.0.0/8
127.0.0.1/32
127.0.0.2/32
224.0.0.0/4
224.0.0.1/32
224.0.0.2/32
224.0.0.5/32
224.0.0.6/32
224.0.0.9/32
255.255.255.255/32
Gateway
-
IF
ie0
local
bh0
local
rj0
mcast
local
local
local
local
local
ie0
Flg
C
CP
CP
CP
CP
CP
CP
CP
CP
CP
CP
CP
Pref
0
0
0
0
0
0
0
0
0
0
0
0
Met
0
0
0
0
0
0
0
0
0
0
0
0
Use
3
0
0
0
0
0
0
0
0
0
0
0
Age
222
222
222
222
222
222
222
222
222
222
222
222
At startup, a MAX unit creates the interfaces in the following list, which are represented in the
sample routing table in Figure 9-3.
Interface
Description
Ethernet IP
Always active, because it is always connected. You assign its IP
address in Ethernet > Mod Config > Ether Options.
The MAX creates two routing table entries: one with a destination of
the network (ie0), and the other with a destination of the MAX host
(local).
Black-hole (bh0)
Always up. The black-hole address is 127.0.0.0. Packets routed to this
interface are discarded silently.
Loopback (local)
Always up. The loopback address is 127.0.0.1/32.
Reject (rj0)
Always up. The reject address is 127.0.0.2. Packets routed to this
interface are discarded and an ICMP host unreachable message is sent
to the source address.
Multicast
Have a destination address with a value of 224 for the first octet. (For
information about multicast addresses, see Chapter 10, “Setting Up IP
Multicast Forwarding.”)
Inactive
(wanidle0)
(Not shown in the example.) When WAN connections are down, all
routes point to the inactive interface. The MAX creates this interface
when you configure a Connection profile.
WAN IP interfaces
A MAX unit creates WAN IP interfaces as they are brought up. WAN IP interfaces are labeled
wanN, where N is a number assigned in the order in which the interfaces become active. The
WAN IP address can be a local address assigned dynamically when the caller logs in, an
address on a subnet of the local network, or a unique IP network address for a remote device.
Assignment of interface addresses depends on whether you use system-based routing or
interface-based routing.
MAX 6000/3000 Network Configuration Guide
9-5
Configuring IP Routing
Introduction to IP routing on the MAX
System-based routing
With system-based routing, a MAX unit does not assign specific interface addresses to each
WAN connection. It routes packets to the remote network through the WAN interface it created
when the connection was brought up.
Interface-based routing
Interface-based routing uses numbered interfaces. Some routers or applications require
numbered interfaces. Also, some sites use them for troubleshooting leased point-to-point
connections and forcing routing decisions between two links going to the same final
destination. Interface-based routing enables the unit to operate in much the same way as a
multihomed Internet host.
Figure 9-4 illustrates an interface-based routing connection.
Figure 9-4. Interface-based routing example
10.2.3.5/24
Site A
Site B
10.7.8.9/24
10.2.3.4/24
WAN
10.5.6.7/24
10.5.6.8/24
10.7.8.10/24
At Site A, the MAX unit assigns IP addresses 10.5.6.7 and 10.5.6.8 to the WAN interfaces and
uses these interface addresses to route packets to the remote network 10.7.8.10.
Interface-based routing requires that, in addition to the systemwide IP configuration, the unit
and the far end of the link have link-specific IP addresses.
Alternatively, you can omit the remote side’s system-based IP address from the Connection
profile and use interface-based routing exclusively. This is an appropriate mechanism if, for
example, the remote system is on a backbone net that can be periodically reconfigured by its
administrators, and you want to refer to the remote system only by its mutually agreed-upon
interface address.
If a unit uses a numbered interface, note the following differences in operation as compared to
system-based routing:
9-6
•
IP packets generated in the unit and sent to the remote address have an IP source address
corresponding to the numbered interface, not to the systemwide (Ethernet) address.
•
The unit adds all numbered interfaces to its routing table as host routes.
•
The unit accepts IP packets addressed to a numbered interface, considering them to be
destined for the unit itself. (The packet can actually arrive over any interface, and the
numbered interface corresponding to the packet’s destination address need not be active.)
MAX 6000/3000 Network Configuration Guide
Configuring IP Routing
Configuring LAN interfaces
Configuring LAN interfaces
To configure the LAN interface for IP routing, you need to establish an IP address, enable
routing table updates, and configure Address Resolution Protocol (ARP) responses. The
parameters for configuring the LAN interface are located in the Ethernet menu’s profiles.
Configuring primary and secondary IP addresses for the LAN
The Ethernet > Mod Config > Ether Options > IP Adrs parameter specifies a primary IP
address for the LAN (Ethernet) interface. When you specify an IP address for a MAX unit, you
must assign a subnet mask or the MAX unit assigns a subnet mask based upon the class of the
IP address you assign.
You can also set the Ethernet > Static Rtes > Gateway parameter to assign the IP address of the
next-hop router that a packet must go through to reach a route’s destination.
You can specify two unique IP addresses for the single physical Ethernet port on the MAX
unit. Although devices connected to the same physical wire usually belong to the same IP
network, this feature, referred to as dual IP, gives the unit a logical interface on two networks
or subnets on the same backbone.
Dual IP is also used to distribute the routing of traffic to a large subnet, by assigning IP
addresses on that subnet to two or more routers on the backbone. When a router has a direct
connection to the subnet as well as to the backbone network, it routes packets to the subnet and
includes the route in its routing table updates.
In addition, you can use dual IP to enable a smooth transition when changing IP addresses. The
second IP address can act as a placeholder while you are making the transition in other network
equipment.
To configure dual IP, you use the 2nd Adrs parameter along with the IP Adrs parameter to
specify IP addresses for the two different networks or subnets. For example, Figure 9-5 shows
two IP addresses (12.1.1.1 and 13.9.7.5) assigned to the MAX unit’s Ethernet interface. The
unit routes between all displayed networks. Packets routed through 12.1.1.1 can be delivered to
hosts 12.1.1.2 and 12.1.13. Packets routed through 13.9.7.5 can be delivered to hosts 13.1.2.3
and 13.6.7.8. The host 12.1.1.2 and the host assigned 13.1.2.3 share a physical cable segment,
but do not communicate directly. The MAX unit must route traffic between the two networks.
Figure 9-5. Sample dual IP network
Address=12.1.1.2
Address=12.1.1.3
Address=13.1.2.3
Address=13.6.7.8
IP Adrs =12.1.1.1
2nd Adrs =13.9.7.5
MAX 6000/3000 Network Configuration Guide
9-7
Configuring IP Routing
Configuring LAN interfaces
Configuring routing table updates
By setting the Ethernet > Mod Config > Ether Options > RIP parameter, you can configure
each IP interface to send RIP updates (inform other local routers of its routes), receive RIP
updates (learn about networks that can be reached through other routers on the Ethernet), or
both.
Note: Lucent recommends that you run RIP version 2 (RIP-v2) if possible. You should not
run RIP-v2 and RIP-v1 on the same network in such a way that the routers receive each other’s
advertisements. RIP-v1 does not propagate subnet mask information. It assumes the
default-class network mask. RIP-v2 handles subnet masks explicitly. Running the two versions
on the same network can result in RIP-v1 class subnet mask assumptions overriding accurate
subnet information obtained through RIP-v2.
You can set the Ethernet > Mod Config > Ether Options > Ignore Def Rt parameter to
configure the MAX unit to ignore default routes advertised by routing protocols. When you
configure the unit to ignore the default route, RIP updates do not modify the MAX routing
table’s default routes, which are static routes to other IP routers.
Configuring Address Resolution Protocol (ARP) responses
You can configure a MAX unit to respond to an ARP request with its own MAC address.
Typically, you use the Ethernet > Mod Config > Ether Options > Proxy Mode parameter to
enable Proxy ARP when the unit supplies IP addresses dynamically to dial-in users and both of
the following conditions exist:
•
The MAX-supplied IP addresses are in the same local subnet as the MAX.
•
Hosts on the local subnet must send packets to the dial-in clients.
Normally, you should not need to enable Proxy ARP, because most routing protocols
(including those used over the Internet) are designed to propagate subnet mask information.
A MAX unit also supports Inverse Address Resolution Protocol (Inverse ARP). Inverse ARP
enables the unit to resolve the protocol address of another device when the hardware address is
known. The unit does not issue any Inverse ARP requests, but it does respond to Inverse ARP
requests that have the protocol type of IP (8000 hexadecimal), or in which the hardware
address type is the two-byte Q.922 address (Frame Relay). All other types are discarded. The
Inverse ARP response packet sent by the unit includes the following information:
•
ARP source-protocol address (the MAX unit’s IP address on the Ethernet network)
•
ARP source-hardware address (the Q.922 address of the local DLCI)
(For the details about Inverse ARP, see RFCs 1293 and 1490.)
Example of configuration of a MAX IP interface on a subnet
On a large corporate backbone, many sites configure subnets to increase the network address
space, segment a complex network, and control routing in the local environment. For example,
Figure 9-6 shows the main backbone IP network (10.0.0.0) supporting a Lucent GRF router
(10.0.0.17).
9-8
MAX 6000/3000 Network Configuration Guide
Configuring IP Routing
Configuring LAN interfaces
Figure 9-6. Creating a subnet for the MAX
GRF
10.0.0.17
WAN
10.0.0.0
MAX
10.2.3.1/24
You can place the MAX unit on a subnet of that network by including a subnet mask in the IP
address specification. For example:
1
Open Ethernet > Mod Config > Ether Options.
2
Set the IP Adrs parameter to specify the IP subnet address for the MAX on the Ethernet
network. For example:
Ethernet
Mod Config
Ether options…
IP Adrs=10.2.3.1/24
3
Set the RIP parameter to specify that the MAX receives RIP updates from the local GRF
router:
RIP-Recv=v2
4
Exit the profile and, at the exit prompt, select the exit and accept option.
With this subnet address, the MAX unit requires a static route to the backbone router on the
main network. Otherwise, it can only communicate with devices on the subnets to which it is
directly connected. To create the static route and make the backbone router the default route:
1
Open the Default IP Route profile in the Static Rtes menu.
2
Set the Gateway parameter to specify the IP address of a backbone router. For example:
Ethernet
Static Rtes
Default
Name=Default
Active=Yes
Dest=0.0.0.0/0
Gateway=10.0.0.17
Preference=100
Metric=1
DownPreference=140
DownMetric=7
Private=Yes
3
Exit the profile and, at the exit prompt, select the exit and accept option.
For more information about IP Route profiles, see “Configuring IP routes” on page 9-55.
To verify that the unit is connected to the local network, invoke the terminal-server interface
and Ping a local IP address or hostname. For example:
ascend% ping 10.1.2.3
MAX 6000/3000 Network Configuration Guide
9-9
Configuring IP Routing
Configuring system-level routing policies
You can terminate the Ping exchange at any time by pressing Ctrl-C.
Configuring system-level routing policies
Depending on the requirements of your network environment, you need to configure
system-global routing policies in addition to the LAN interface. Services available for the
MAX include:
•
Dynamic IP addressing
•
Boot Protocol (BOOTP) requests
•
Name resolution services: Domain Name System (DNS) and Windows Internet Name
Service (WINS)
•
Dynamic Host Configuration Protocol (DHCP)
•
Network Address Translation (NAT)
Additional system-level services include system time, Telnet password, shared Connection
profiles, suppression of dial-out route advertisement in redundant configurations when a trunk
fails, UDP checksums, and suppression of host route advertisements.
For detailed information about each parameter in the following sections, see the MAX
Reference.
Dynamic IP addressing for dial-in hosts
For dial-in PPP clients not running as IP routers, the MAX can assign each connection to a
local IP address on a first-come, first-served basis. After the connection is terminated, the
address that was assigned to that connection is returned to the pool for reassignment to another
connection.
Enabling dynamic address assignment
To enable the MAX for dynamic address assignment, you set the Assign Address parameter in
the Answer profile to Yes.
Specifying address pools
In addition, to enable dynamic addressing, you must set the address pool parameters in the
Ethernet > Mod Config > WAN Options menu. You can configure a MAX unit to contain as
many as 10 address pools of as many as 254 addresses for dynamic assignment, as described in
the following sections.
Set the Pool#N Start parameter to specify the first address in a block of contiguous addresses
on the local network or subnet. Set the Pool#N Count parameter to specify how many
addresses are in the pool (up to 254).
Addresses in a pool do not accept a subnet mask, because they are advertised as host routes. If
you allocate IP addresses on a separate IP network or subnet, make sure you inform other IP
routers about the route to that network or subnet, either by statically configuring those routes
or by configuring the unit to dynamically send updates.
9-10
MAX 6000/3000 Network Configuration Guide
Configuring IP Routing
Configuring system-level routing policies
Forcing callers configured for a pool address to accept dynamic assignment
During PPP negotiation, a caller can reject the IP address offered by the MAX unit and present
its own IP address for consideration. Connection profiles compare IP addresses as part of
authentication, so the unit would automatically reject such a request if the caller has a
Connection profile. Names/Passwords profiles have no such authentication mechanism,
however, and could potentially enable a caller to spoof a local address. You can set the Pool
Only parameter to instruct the MAX unit to hang up if a caller rejects the dynamic assignment.
Summarizing host routes in routing table advertisements
IP addresses assigned dynamically from a pool are added to the routing table as individual host
routes. You can summarize this network (the entire pool), cutting down significantly on route
flappage and the size of routing table advertisements.
The Pool Summary parameter enables or disables route summarization, which summarizes the
series of host routes in the pool into a single network route advertisement. The MAX unit
routes packets destined for a valid host address on the summarized network to the host, and the
MAX rejects packets destined for an invalid host address with an ICMP host unreachable
message.
To use the pool summary feature, you must set the Pool Summary parameter to Yes and create
a network-aligned pool.
To create a network-aligned pool, set the Pool #N Start parameter to specify the first host
address. Subtract one from the Pool #N Start setting to determine the network address (the zero
address on the subnet). The first and last address of a subnet are reserved, so you must set the
Pool #N Count parameter to specify a value that is two less than a power of two. For example,
you can use values 2, 6, 14, 30, 62, 126 or 254. The subnet mask includes a value that is two
greater than the Pool #N Count value. For example, with the following configuration:
Pool Summary=Yes
Pool#1 Start=10.12.253.1
Pool#1 Count=126
the network alignment address is (Pool #1 Start–1) 10.12.253.0 and the subnet mask is
(Pool #1 Count +2 addresses) 255.255.255.128. The resulting address-pool network is
10.12.253.0/25.
After you verify that every configured address pool is network-aligned, you must enter a static
route for each one.
If you do not use the pool summary feature, each address in a pool is advertised as a host route
with a subnet mask of /32. In that case, the pool does not have to be network aligned, so any
IP address that begins a block of free addresses can serve as a pool base address.
Example of how to set up address pools with route summarization
This example shows how to set up network-aligned address pools and use route
summarization. It also shows how to enter a static route for the pool subnet and make the
Connection profile route private, both of which are requirements when using route
summarization.
MAX 6000/3000 Network Configuration Guide
9-11
Configuring IP Routing
Configuring system-level routing policies
The address pool parameters enable the MAX unit to assign an IP address to incoming calls
that are configured for dynamic assignment. These addresses are assigned on a first-come,
first-served basis. After the unit terminates a connection, its address is freed up and returned to
the pool for reassignment to another connection. Figure 9-7 shows a host using PPP dial-in
software to connect to the unit.
Figure 9-7. Address assigned dynamically from a pool
WAN
MAX
IP Adrs=10.2.3.1/24
Modem
=10.2.3.212/32
Pool#1 Start=10.2.3.200
Pool#1 Count=55
This example shows how to set up network-aligned address pools and use route
summarization.
Following are the rules for network-aligned address pools:
•
The Pool#N Start address must be the first host address.
Subtract one from the Pool#N Start address for the base address for the subnet.
•
The Pool#N Count value must be two less than the total number of addresses in the pool.
Add two to Pool#N Count for the total number of addresses in the subnet, and calculate the
mask for the subnet on the basis of this total.
For example, the following configuration is network aligned:
Ethernet
Mod Config
WAN options...
Pool#1 start=10.12.253.1
Pool#1 count=62
Pool#1 name=Engineering Dept.
Pool Summary=Yes
Pool#1 Start is set to 10.12.253.1. When you subtract one from this address, you get
10.12.253.0, which is a valid base address for a subnet defined by a mask of 255.255.255.192.
Note that 10.12.253.64, 10.12.253.128, and 10.12.253.192 are also valid zero addresses for the
same mask. The resulting address pool subnet is 10.12.253.0/26.
Pool#1 Count is set to 62. When you add two to the value of Pool#1 Count, you get 64. The
subnet mask for 64 addresses is 255.255.255.192 (256–64=192). The subnet notation for a
255.255.255.192 mask is /26.
After verifying that every one of the configured address pools is network-aligned, you must
enter a static route for each of them. These static routes handle all IP address that have not been
given to users, by routing them to the reject interface or the black-hole interface (which are
defined in “MAX IP interfaces” on page 9-4).
Note: The MAX unit creates a host route for every address assigned from the pools, and host
routes override subnet routes. Therefore, packets whose destination matches an assigned IP
address from the pool are properly routed and not discarded or bounced. Because the unit
9-12
MAX 6000/3000 Network Configuration Guide
Configuring IP Routing
Configuring system-level routing policies
advertises the entire pool as a route, and only privately knows which IP addresses in the pool
are active, a remote network can improperly send the MAX unit a packet for an inactive IP
address. Depending on the static-route specification, these packets are either bounced with an
ICMP host unreachable message or silently discarded.
For example, the following static route specifies the black-hole interface, so it silently discards
all packets whose destination falls in the pool’s subnet. In addition to the Dest and Gateway
parameters that define the pool, be sure you have set the Metric, Preference, Cost, and Private
parameters as shown.
Ethernet
Static Rtes
pool-net
Name=pool-net
Active=Yes
Dest=10.12.253.0/26
Gateway=127.0.0.0
Preference=0
Metric=0
Cost=0
Private=No
The routing table contains the following lines:
Destination
Gateway
10.12.253.0/26
127.0.0.0/32
127.0.0.1/32
127.0.0.2/32
-
IF
Flg
bh0
bh0
lo0
rj0
Pref
C
CP
CP
CP
0
0
0
0
Met
Use
0
0
0
0
Age
0
0
0
0
172162
172163
172163
172163
When you configure Connection profiles to assign IP addresses from the pool, make sure you
set the Private parameter to Yes. For example:
Ethernet
Connections
Connection profile
Ip options...
LAN Adrs=0.0.0.0/0
WAN Alias=0.0.0.0
IF Adrs=0.0.0.0/0
Preference=100
Cost=0
Private=Yes
RIP=Off
Pool=1
Boot Protocol (BOOTP) requests to other networks
By default, a MAX unit does not relay Boot Protocol (BOOTP) requests to other networks.
You can enable it to do so by setting parameters in the Ethernet > Mod Config > BOOTP Relay
profile.
To configure the unit to enable BOOTP relay, you must set the Boot Relay Enable parameter to
Yes. In addition, you must disable Ethernet > Mod Config > TServ Options > SLIP BOOTP.
MAX 6000/3000 Network Configuration Guide
9-13
Configuring IP Routing
Configuring system-level routing policies
SLIP BOOTP makes it possible for a computer connecting to the unit over a SLIP connection
to use BOOTP. A MAX unit supports BOOTP on only one connection. If you enable both
SLIP BOOTP and BOOTP relay, you receive an error message.
You can specify the IP address of one or two BOOTP servers with the Server parameters.
If you specify two BOOTP servers, the unit that relays the BOOTP request determines when to
use each server. The order of the BOOTP servers in the BOOTP Relay profile does not
necessarily determine which server the unit tries first.
Name resolution service (DNS or WINS)
A MAX unit uses Domain Name System (DNS) or Windows Internet Name Service (WINS)
for translating host names into IP addresses. When the unit is configured for DNS or WINS
name resolution, Telnet and Rlogin users can specify hostnames instead of IP addresses.
The following parameters, located in the Ethernet > Mod Config > DNS profile, are used to
configure the MAX unit for DNS or WINS:
9-14
Parameter
Specifies
Domain Name
The local DNS domain name used for DNS lookups. When you give
the MAX unit a hostname to look up, it tries various combinations,
including the appending of the configured domain name to the hostname.
Sec Domain Name
A secondary domain that the unit can search after searching the
domain specified by the Domain Name parameter. The secondary
domain name can specify DNS or WINS name servers
Pri DNS
The IP address of the primary DNS domain name server. If you
configure a primary and secondary name server, the secondary server
is accessed only if the primary one is inaccessible.
Sec DNS
The IP address of the secondary DNS domain name server. If you
configure a primary and secondary name server, the secondary server
is accessed only if the primary one is inaccessible.
Pri WINS
The IP address of the primary WINS server. If you configure a primary and secondary name server, the secondary server is accessed
only if the primary one is inaccessible.
Sec WINS
The IP address of the secondary WINS server. If you configure a primary and secondary name server, the secondary server is accessed
only if the primary one is inaccessible.
Allow As Client
DNS
Whether local DNS servers should be made accessible to PPP connections if the client DNS servers are unavailable.
List Attempt
Whether the MAX can try to access consecutive entries in the DNS
list of hosts without having the WAN connection torn down when a
connection fails.
List Size
The maximum number of DNS addresses presented in the DNS host
list for a terminal server session in response to a DNS query.
MAX 6000/3000 Network Configuration Guide
Configuring IP Routing
Configuring system-level routing policies
Client Pri DNS
A primary DNS server address to be sent to any client connecting to
the MAX.
Client Sec DNS
A secondary DNS server address to be sent to any client connecting to
the MAX.
DNS lists
DNS can return multiple addresses for a hostname in response to a DNS query, but it does not
include information about availability of those hosts. Users typically attempt to access the first
address in the list. If that host is unavailable, the user must try the next host, and so forth.
However, if the access attempt occurs automatically as part of immediate services, the physical
connection is torn down when the initial connection fails. To avoid tearing down physical links
when a host is unavailable, you can set the List Attempt parameter to Yes. The List Size
parameter specifies the maximum number of hosts listed (up to 35).
Client DNS
Client DNS configurations define DNS server addresses that will be presented to WAN
connections during IPCP negotiation. They provide a way to protect your local DNS
information from WAN users. Client DNS has two levels: a global configuration that applies to
all PPP connections (defined in the Mod Config profile), and a connection-specific
configuration that applies only to the WAN connection (defined in the Connection profile).
The global client addresses are used only if none are specified in the Connection profile. You
establish Client DNS by setting the Client Pri DNS and Client Sec DNS parameters to specify
the IP addresses of the primary and secondary DNS servers in either the Mod Config profile
(for a global configuration) or in a Connection profile (for a connection-specific
configuration).
The following attribute-value pairs configure client DNS in RADIUS profiles:
Attribute
Value
Ascend-Client-PrimaryDNS (135)
Address of a client DNS server for the connection.
Ascend-ClientSecondary-DNS (136)
Address of a secondary client DNS server for the connection.
Ascend-Client-AssignDNS (137)
Enables/disables client DNS for the connection. If set to DNSAssign-Yes (1), the system presents client DNS server addresses
while negotiating the connection. The addresses it presents may be
specified in the RADIUS profile or IP-Global profile.
Example of address resolution configuration
Configuring the MAX unit for DNS or WINS address resolution enables the unit to use local
DNS or WINS servers to translate between hostnames and IP addresses.
The following examples illustrate procedures for configuring address resolution and managing
the DNS table.
MAX 6000/3000 Network Configuration Guide
9-15
Configuring IP Routing
Configuring system-level routing policies
Configure local DNS service
Note: In this example of a DNS configuration, client DNS is not in use. You can, however,
protect your DNS servers from callers by defining connection-specific client DNS servers and
specifying that Connection profiles use those client servers. For information about client DNS,
see “Client DNS” on page 9-15.
To configure the local DNS service:
1
Open Ethernet > Mod Config > DNS.
2
Set the Domain Name parameter to specify the local domain name.
3
If appropriate, set the Sec Domain Name parameter to specify a secondary domain name.
4
Set the Pri DNS and Sec DNS parameters to specify, respectively, the IP address of a
primary and secondary DNS server, and set the List Attempt parameter to enable the DNS
list attempt feature. For example:
Ethernet
Mod Config
DNS...
Domain Name=abc.com
Sec Domain Name=
Pri DNS=10.65.212.10
Sec DNS=12.20 7.23.51
Allow As Client DNS=Yes
Pri WINS=0.0.0.0
Sec WINS=0.0.0.0
List Attempt=Yes
List Size=35
Client Pri DNS=0.0.0.0
Client Sec DNS=0.0.0.0
Enable Local DNS Table=No
Loc.DNSTab Auto Update=No
5
Exit the profile and, at the exit prompt, select the exit and accept option.
Creating a local DNS table
You can create a local DNS table to provide a list of IP addresses for a specific hostname when
the remote DNS server fails to resolve the hostname. If the local DNS table contains the
hostname for the attempted connection, it provides the list of IP addresses.
You create the DNS table from the terminal server by using the DNStab command to enter the
hostnames and their IP addresses. A table can contain up to eight entries, with a maximum of
35 IP addresses for each entry. If you specify automatic updating, you only have to enter the
first IP address of each host. Any others are added automatically.
Automatic updating replaces the existing address list for a host each time the remote DNS
server succeeds in resolving a connection to a host that is in the table. You specify how many
of the addresses returned by the remote server can be included in the new list.
Valid hostnames must adhere to the following rules. Each name in the local DNS table:
9-16
•
Must be unique in the table.
•
Must start with an alphabetic character, which can be either uppercase or lowercase.
•
Must be less than 256 characters.
MAX 6000/3000 Network Configuration Guide
Configuring IP Routing
Configuring system-level routing policies
•
Can be a local name or a fully qualified name that includes the domain name.
Periods at the ends of names are ignored.
On a MAX unit, the DNS table provides additional information about each entry. The
information is in the following two fields, which the unit updates when the system matches the
table entry with a hostname not found by the remote server:
•
# Reads—The number of reads since the unit created the entry. The unit updates this field
each time it finds a local name query match in the local DNS table.
•
Time of Last Read.
You can check the list of hostnames and IP addresses in the table by entering the
terminal-server Show DNStab command.
Figure 9-8 shows an example of a DNS table on a MAX.
Figure 9-8. Local DNS table example
Local DNS Table
Name
IP Address
# Reads Time of last read
________________________ _______________ _______ __________________
1: ""
------
------
2: "server.corp.com."
200.0.0.0
2
Feb 10 10:40:44
3: "boomerang"
221.0.0.0
2
Feb 10
4:
5:
6
7:
---------------------
-------------------------
""
""
""
""
9:13:33
Configuring the local DNS table
To enable and configure the local DNS table:
1
Display the Ethernet > Mod Config > DNS profile.
2
Set the List Attempt parameter to either Yes or No.
3
Set the List Size parameter to specify the list size.
4
Set Enable Local DNS Table parameter to Yes.
The default is No.
5
Set the Loc.DNS Tab Auto Update parameter to either Yes or No.
6
Exit the profile and, at the exit prompt, select the exit and accept option.
Entering hostnames and IP addresses in the local DNS table
To enter IP addresses in a local DNS table, you use the DNS table editor from the terminal
server. While the editor is in use, the system cannot look up addresses in the table or perform
automatic updates. A table entry is one of the eight table indexes. It includes the hostname, IP
address (or addresses), and information fields.
MAX 6000/3000 Network Configuration Guide
9-17
Configuring IP Routing
Configuring system-level routing policies
To place the initial entries in the table:
1
At the terminal-server interface, enter:
dnstab edit
Before you make any entries, the table is empty. The editor initially displays zeros for
each of the eight entries in the table. To exit the table editor without making an entry, press
Enter.
2
Type an entry number and press Enter.
A warning appears if you type an invalid entry number. If the entry exists, the current
name for that entry appears in the prompt.
3
Type a valid name for the current entry.
If the system accepts the name, it places the name in the table and prompts you for the IP
address for the name that you just entered.
If you enter an invalid name, the system prompts you to enter a valid name.
4
Type the IP address for the entry.
If you enter an address in the wrong format, the system prompts you for the correct
format. If your format is correct, the system places the address in the table and the editor
prompts you for the next entry.
5
When you are finished making entries, type the letter O and press Enter when the editor
prompts you for another entry.
Editing the local DNS table
To edit the DNS table entries, you access the DNS table editor from the terminal server. While
the editor is in use, the system cannot look up addresses in the table or perform automatic
updates. A table entry is one of the eight table indexes. It includes the hostname, IP address (or
addresses), and information fields. To edit one or more entries in the local DNS table:
1
At the terminal-server interface, enter:
dnstab edit
If the table has already been created, the number of the entry last edited appears in the
prompt.
2
Type an entry number, or press Enter to edit the entry number currently displayed.
A warning appears if you type an invalid entry number. If the entry exists, the current
value for that entry appears in the prompt.
3
Replace, accept, or clear the displayed name, as follows:
–
To replace the name, type a new, valid name and press Enter.
–
To accept the current name, press Enter.
–
To clear the name, press the spacebar, then press Enter.
If you enter a valid name, the system places it in the table (or leaves it there if you
accept the current name) and prompts you for the corresponding IP address.
If you clear an entry name, all information in all fields for that entry is discarded.
4
9-18
Either type a new IP address and press Enter, or leave the current address and press Enter.
–
To change the IP address, type the new IP address.
–
If you are changing the name of the entry but not the IP address, just press Enter.
MAX 6000/3000 Network Configuration Guide
Configuring IP Routing
Configuring system-level routing policies
If the address is in the correct format, the system places it in the table and prompts you for
another entry.
5
When you are finished editing, type the letter O and press Enter when the editor prompts
you for another entry.
Deleting an entry from the local DNS table
To delete an entry from the local DNS table:
1
At the terminal-server interface, enter:
dnstab edit
The DNS table appears
2
Type the number of the entry you want to delete and press Enter.
3
Press the spacebar, then press Enter.
Configuring DHCP services
A MAX performs a number of Dynamic Host Configuration Protocol (DHCP) services,
including responding to DHCP requests to borrow IP addresses, managing Plug and Play
requests, and DHCP spoofing.
A MAX can respond to DHCP requests for up to 43 clients at any given time. DHCP server
responses provide an IP address and subnet mask. You can define two address pools of up to 20
IP addresses each. Additionally, up to three hosts, identified by their MAC (Ethernet)
addresses, can each have an IP address reserved for its exclusive use.
The Plug and Play management feature responds to requests for TCP/IP configuration settings
from computers using Microsoft Windows 95 or Windows NT.
A DHCP spoofing response supplies a temporary IP address for a single host. The IP address
supplied is always one greater than that of the MAX user. The IP address is good for only 60
seconds—just long enough to enable a security-card user to acquire the current password from
an ACE or SafeWord server and bring up an authenticated dial-up session. Once the MAX
establishes the dial-up session, an official IP address can be retrieved from a remote DHCP or
BOOTP server. The ability to retrieve an IP address, together with Network Address
Translation (NAT), enables a single computer to connect to a remote network that assigns IP
addresses dynamically.
How the MAX assigns IP addresses when acting as a DHCP server
When you configure a MAX to be a DHCP server and it receives a DHCP client request, it
assigns an IP address by means of Plug and Play, reserved address, lease renewal, or
assignment from a pool.
Plug and Play
When you enable the Plug and Play option (set DHCP PNP Enabled to Yes), the MAX takes its
own IP address, increments it by one, and returns it in the BOOTP reply message along with IP
addresses for the Default Gateway and Domain Name Server. Plug and Play works with
Microsoft Windows 95 (and possibly with other IP stacks) to assign an IP address and other
Wide Area Networking settings to a requesting device automatically. With Plug and Play you
MAX 6000/3000 Network Configuration Guide
9-19
Configuring IP Routing
Configuring system-level routing policies
can use the MAX to respond to distant networks without having to configure an IP address
first.
Reserved address
If there is an IP address that is reserved for the host, the MAX assigns the reserved address.
Lease renewal
If the host is renewing the address it currently has, the MAX assigns the host the same address.
When a host gets a dynamically assigned IP address from one of the address pools, it
periodically renews the lease on the address until it has finished using it, as defined by the
DHCP protocol. If the host renews the address before its lease expires, the MAX always
provides the same address.
Assignment from a pool
If the host is making a new request and there is no IP address reserved for the host, the MAX
assigns the next available address from its address pools. It can draw from up to two
20-address pools of contiguous IP addresses. Addresses are assigned by using the first
available address from the first pool or, if there are no available addresses in that pool and there
is a second pool, the first available address in the second pool.
Examples of DHCP service configuration
To configure a DHCP service, open the Ethernet > Mod Config > DHCP Spoofing profile.
Although the name of this profile is DHCP Spoofing, it contains parameters for configuring all
DHCP services, including DHCP spoofing, DHCP server, and Plug and Play.
If you need more information about a particular parameter, see the MAX Reference.
Enable DHCP services
To enable any DHCP service, set the DHCP Spoofing parameter to Yes. If you set it to No,
other settings in this menu are ignored.
Enable Plug and Play
To enable Plug and Play, set the DHCP PNP Enabled parameter to Yes. Setting this parameter
to Yes with DHCP Spoofing set to Yes is all that is required to enable Plug and Play support.
9-20
MAX 6000/3000 Network Configuration Guide
Configuring IP Routing
Configuring system-level routing policies
Enable and configure DHCP spoofing
Configuring DHCP spoofing assigns a temporary IP address for a host in order for a
security-card user to acquire a current password from a security server to bring up an
authenticated dial-up session. Set the following parameters:
Parameter
Specifies
Dial If Link Down
Used with DHCP spoofing in conjunction with BOOTP Relay. This
parameter applies when both DHCP spoofing and BOOTP relay are
enabled. If no Wide Area Network links are active, the MAX performs
DHCP spoofing. If the parameter is set to Yes, as soon as the dialed
link is established, the MAX stops DHCP spoofing and acts as a
BOOTP relay agent.
Always Spoof
The Yes setting enables the DHCP server. A DHCP server always supplies an IP address for every request, until all IP addresses are
exhausted.
The No setting enables DHCP spoofing. DHCP spoofing only supplies
an IP address for a single host on the network. It does not respond to
all requests.
Validate IP
If set to Yes, determines whether a spoofed address that is about to be
assigned is already in use, and if it is, automatically assigns another
address.
Maximum No-Reply Set only if you are validating IP addresses. To validate the IP address,
Wait
DHCP sends an ICMP echo (Ping) to determine whether the address is
in use. The maximum time it waits for a reply depends on this setting.
The default is 10 seconds.
Enable dynamic IP addressing
To enable DHCP to respond to requests to borrow IP addresses, you need to configure address
pools for dynamic assignment of IP addresses. Proceed as follows:
1
Set the IP Group 1 parameter to the first address for the IP address pool.
2
Set the Group 1 Count parameter to the number of addresses in the pool. The pool can
contain up to 20 addresses.
3
To define an additional address pool for dynamic address assignment, set the IP Group 2
parameter to the first address for the second IP-address pool.
4
Set the Group 2 Count parameter to the number of addresses in the pool. The second pool,
which can also contain up to 20 addresses, is used only if there are no addresses available
in the first pool.
MAX 6000/3000 Network Configuration Guide
9-21
Configuring IP Routing
Configuring system-level routing policies
Reserve IP addresses for specific hosts
You can configure the MAX reserve IP addresses for the exclusive use of as many as three
hosts, identified by their MAC addresses. Proceed as follows:
1
To reserve an IP address for a particular host, set the Host 1 IP parameter to the IP address
to be reserved for the host.
2
Set the Host 1 Enet parameter to the MAC (Ethernet) address of the host. The MAC
address is normally the Ethernet address of the network interface card that the host uses to
connect to the Local Area Network. When the DHCP server receives an IP-address
request from the host with this MAC address, it assigns that host the IP address you
specified for the Host 1 IP parameter.
3
To reserve an IP address for another host, set the Host 2 IP parameter to the IP address to
be reserved for the host, and set the Host 2 Enet parameter to the MAC (Ethernet) address
of the host.
4
To reserve an IP address for another host, set the Host 3 IP parameter to the IP address to
be reserved for the host, and set the Host 3 Enet parameter to the MAC (Ethernet) address
of the host.
Final DHCP settings
Additional settings you might choose to include specify the IP address longevity and whether
to advertise the MAX unit’s address as the default router for DHCP request packets.
The Renewal Time parameter specifies how long a DHCP IP address exists before it needs to
be renewed. The setting applies to both DHCP spoofed addresses and DHCP server replies. If
the host renews the address before it expires, the MAX provides the same address. Plug and
Play addresses always expire in 60 seconds.
To advertise the address of your MAX as the default router for all DHCP request packets,
enable the Become Def Router parameter.
Example of DHCP server configuration
This example of DHCP server configuration includes all the required and optional parameters.
The following parameters are required:
DHCP Spoofing...
DHCP Spoofing=Yes
Always Spoof=Yes
IP group 1=192.0.2.1/24
Group 1 count=n
The following parameters are optional:
Renewal Time=10
Become Def. Router=No
IP group 2=0.0.0.0/0
Group 2 count=0
Host 1 IP=192.0.2.2/24
Host 1 Enet=0080c75Be95e
Host 2 IP=0.0.0.0/0
Host 2 Enet=000000000000
9-22
MAX 6000/3000 Network Configuration Guide
Configuring IP Routing
Configuring system-level routing policies
Host 3 IP=0.0.0.0/0
Host 3 Enet=000000000000
Translating network addresses for a LAN
Network Address Translation (NAT) functionality makes it possible for the MAX unit to
translate private IP addresses on its local LAN to IP addresses temporarily supplied by a
remote access router.
To connect to the Internet or any other TCP/IP network, a host must have an IP address that is
unique within that network. The Internet and other large TCP/IP networks guarantee the
uniqueness of addresses by creating central authorities that assign official IP addresses.
However, many local networks use private IP addresses that are unique only on the local
network. To enable a host with a private address to communicate with the Internet or another
network that requires an official IP address, a MAX performs a service known as Network
Address Translation (NAT). The service works as follows:
•
When the local host sends packets to the remote network, the MAX automatically
translates the host’s private address on the local network to an official address on the
remote network.
•
When the local host receives packets from the remote network, the MAX automatically
translates the official address on the remote network to the host’s private address on the
local network.
NAT can be implemented to use a single address or multiple addresses. To use multiple IP
addresses, the MAX must have access to a DHCP server through the remote network. For
single-address NAT, you can configure port routing in Static Mapping profile. NAT supports
QuickTime audio/video streaming.
Single-address NAT and port routing
A MAX can perform single-address NAT in the following ways:
•
For more than one host on the local network, without borrowing IP addresses from a
DHCP server on the remote network.
•
When the remote network initiates the connection to the MAX.
•
By routing packets it receives from the remote network for up to 10 different TCP or UDP
ports to specific hosts and ports on the local network.
Note: You can use single-address NAT by setting the Ethernet > NAT > NAT > Lan
parameter to Single IP Addr.
With single-address NAT, the only host on the local network that is visible to the remote
network is the MAX.
Outgoing connection address translation
For outgoing calls, the MAX performs NAT for multiple hosts on the local network after
getting a single IP address from the remote network during PPP negotiation.
Any number of hosts on the local network can make any number of simultaneous connections
to hosts on the remote network. The number is limited only to the size of the translation table.
MAX 6000/3000 Network Configuration Guide
9-23
Configuring IP Routing
Configuring system-level routing policies
The translations between the local network and the Internet or remote network are dynamic
and do not need to be preconfigured.
Incoming connection address translation
For incoming calls, the MAX can perform NAT for multiple hosts on the local network by
using its own IP address. The MAX routes incoming packets for up to 10 different TCP or
UDP ports to specific servers on the local network. Translations between the local network and
the Internet or remote network are static and need to be preconfigured. You need to define a list
of local servers and the UDP and TCP ports each should handle. You can also define a local
default server that handles UDP and TCP ports not listed.
For example, you can configure the MAX to route all incoming packets for TCP port 80 (the
standard port for HTTP) to port 80 of a World Wide Web server on the local network. The port
you route to does not have to be the same as the port specified in the incoming packets. For
example, you can route all packets for TCP port 119, the well-known port for Network News
Transfer Protocol, to port 1119 on a Usenet News server on the local network. You can also
specify a default server that receives any packets that are not sent to one of the routed ports. If
you do not specify any routed ports but do specify a default server, the default server receives
all packets sent to the MAX from the remote network.
When you configure the MAX to route incoming packets for a particular TCP or UDP port to a
specific server on the local network, multiple hosts on the remote network can connect to the
server at the same time. The number of connections is limited by the size of the translation
table.
Note: NAT automatically turns RIP off, so the address of the MAX is not propagated to the
Internet or remote networks.
Translation-table size
NAT has an internal translation table limited to 500 active addresses. A translation-table entry
represents one TCP or UDP connection.
Note: A single application can generate many TCP and UDP connections.
A translation table entry is reused as long as traffic includes packets that match the entry. All
the entries for a connection are freed (expire) when the connection disconnects. For Nailed
connections, the connection is designed not to disconnect.
The MAX removes entries from the translation table on the basis of the following timeouts:
•
Non-DNS UDP translations time out after 5 minutes.
•
DNS times out in 1 minute.
•
TCP translations time out after 24 hours.
Multiple-address NAT
When translating addresses for more than one host on the local network, the MAX can perform
multiple-address NAT by borrowing an official IP address for each host from a DHCP server
on the remote network or accessible from the remote network.
9-24
MAX 6000/3000 Network Configuration Guide
Configuring IP Routing
Configuring system-level routing policies
The advantage of multiple-address NAT is that hosts on the remote network can connect to
specific hosts on the local network, not just specific services such as Web or FTP service. This
advantage can be realized only if the remote DHCP server is configured to assign the same
address whenever a particular local host requests an address. Another reason for using
multiple-address NAT is that network service providers might require it for networks with
more than one host.
When you use multiple-address NAT, hosts on the remote network can connect to any of the
official IP addresses that the MAX borrows from the DHCP server. If the local network must
have more than one IP address that is visible to the remote network, you must use
multiple-address NAT. If hosts on the remote network need to connect to a specific host on the
local network, you can configure the DHCP server to always assign the same address when
that local host requests an address.
When multiple-address NAT is enabled, the MAX attempts to perform IP address translation
on all packets received. (It cannot distinguish between official and private addresses.)
The MAX acts as a DHCP client on behalf of all hosts on the LAN and relies on a remote
DHCP server to provide addresses from a pool of addresses suitable for the remote network.
On the local network, the MAX and the hosts all have local addresses that are only used for
local communication between the hosts and the MAX over the Ethernet.
When the first host on the LAN requests access to the remote network, the MAX obtains an
address through PPP negotiation. When subsequent hosts request access to the remote
network, the MAX sends a DHCP request packet asking for an IP address from the DHCP
server. The server then sends an address from its IP address pool to the MAX. The MAX uses
the dynamic addresses it receives from the server to translate IP addresses on behalf of local
hosts.
As packets are received on the LAN, the MAX determines whether the source IP address has
been assigned a translated address. If so, the packet is translated and forwarded to the Wide
Area Network. If no translation has been assigned (and none is pending), the MAX issues a
DHCP request for the packet’s IP address. While waiting for an IP address to be offered by the
server, the MAX drops corresponding source packets. Similarly, for packets received from the
WAN, the MAX checks the destination address against its table of translated addresses. If the
destination address is in the table and is active, the MAX forwards the packet. If the destination
address is not in the table, or is not active, the MAX drops the packet.
IP addresses are typically offered by the DHCP server only for a limited duration, but the
MAX automatically renews the leases on them. If the connection to the remote server is
dropped, all leased addresses are considered revoked. Therefore, TCP sessions do not persist if
the WAN call disconnects.
The MAX itself does not have an address on the remote network. Therefore, the MAX can
only be accessed from the local network, not from the WAN. For example, you can Telnet to
the MAX from the local network, but not from a remote network.
In some installations, the DHCP server could be handling both NAT DHCP requests and
ordinary DHCP requests. In this situation, if the ordinary DHCP clients are connecting to the
server over a nonbridged connection, you must have a separate DHCP server to handle the
ordinary DHCP requests. The NAT DHCP server only handles NAT DHCP requests.
MAX 6000/3000 Network Configuration Guide
9-25
Configuring IP Routing
Configuring system-level routing policies
Configuring single- or multiple-address NAT
To configure NAT on the MAX:
1
Open the Ethernet > NAT > NAT profile. For example:
NAT
50-C01 NAT...
Routing=Yes
Profile=NATprofile
Lan=Single IP addr
FR address=10.10.10.10
Static Mappings...
Def Server=N/A
Reuse last addr=N/A
Reuse addr timeout=N/A
2
Enable NAT by setting the Routing parameter to Yes. Without this setting, no other setting
is valid.
3
Set the Profile parameter to specify the name of the Connection profile in which you want
to use NAT.
4
If applying NAT to Frame Relay connections, set FR Address and other parameters as
described in “NAT for Frame Relay” on page 9-26.
5
Optionally, configure NAT port routing in the Static Mapping NN subprofiles, as
described in “Configuring NAT port routing (Static Mapping subprofiles)” on page 9-27.
6
Optionally, set Def Server to the IP address of a local server to which the MAX routes
incoming packets that are not routed to a specific server and port. (For more information,
see “Routing all incoming sessions to the default server” on page 9-27.)
7
Optionally, set Reuse Last Addr to Yes to continue to use a dynamically assigned IP
address. The Reuse Addr Timeout value specifies the time for which to use the address.
Set it to a number of minutes (up to 1440). Limitations apply, as described in the MAX
Reference.
8
Exit the profile and, at the exit prompt, select the exit and accept option.
Note: If you have additional routers on your Local Area Network, open Ethernet > Mod
Config > Ether Options, and set the value of Ignore Def Rt to Yes. This setting avoids the
possibility that a default route from the ISP overwrites the NAT route.
NAT for Frame Relay
The single-IP address implementation of NAT extends to Frame Relay. For connections using
Frame Relay encapsulation, a MAX running single-IP address NAT translates the local
addresses into a single, official address specified by the FR Address parameter. You must set
the Routing parameter in the NAT profile to enable NAT, set the Lan parameter to Single IP
Addr, and set FR Address to a valid, official IP address. For example:
50-C00 NAT
50-C01 NAT...
Routing=Yes
Profile=max4
Lan=Single IP addr
FR address=10.10.10.10
Static Mapping...
Def Server=181.81.8.1
9-26
MAX 6000/3000 Network Configuration Guide
Configuring IP Routing
Configuring system-level routing policies
Reuse last addr=No
Reuse addr timeout=N/A
Configuring NAT port routing (Static Mapping subprofiles)
The Static Mappings profile includes 10 Static Mapping NN subprofiles, where NN is a value
from 1 to 10. Each of these subprofiles contains parameters for controlling the translation of
the private IP addresses to TCP or UDP port numbers when operating in single-address NAT
mode. You only need to specify static mappings for connections initiated by devices calling
into the private LAN. For sessions initiated by hosts on the private LAN, the MAX generates a
mapping dynamically if one does not already exist in the Static Mappings parameters.
Each Static Mapping NN subprofile contains the following parameters (shown with sample
settings):
NAT
50-C01 NAT...
Static Mappings...
Static Mapping 01
Valid=Yes
Dst Port #=21
Protocol=TCP
Loc Port #=21
Loc Adrs=181.100.100.102
You can configure a NAT port routing, on the local private LAN, to define a default server to
which the MAX routes incoming packets whose destination port number does not match a port
number dynamically assigned when a local host initiates a TCP/UDP session (and does not
match a Static Mapping entry). You can create Static Mapping entries to define a list of up to
10 servers and services on the local private LAN. The MAX routes incoming packets to hosts
on the local private LAN when their destination port matches one of the 10 destination ports in
Static Mappings.
You need to configure port routing only for sessions initiated by hosts outside the private LAN.
For sessions initiated by hosts on the private LAN, the MAX generates the port mapping
dynamically.
Note: For port routing in single-address NAT to work, if firewalls are present, they must be
configured to enable the MAX to receive packets for the routed ports.
Routing all incoming sessions to the default server
To configure the MAX to perform NAT and to define a single server that handles all sessions
initiated by callers from outside the private LAN:
1
Open the Ethernet > NAT > NAT profile.
2
Set the Routing parameter to Yes.
3
Set the Profile parameter to the name of an existing Connection profile.
The MAX performs NAT whenever a connection is made with this Connection profile.
The connection can be initiated either by the MAX or by the remote network.
4
Set the Lan parameter to Single IP Addr.
MAX 6000/3000 Network Configuration Guide
9-27
Configuring IP Routing
Configuring system-level routing policies
5
To ensure that all incoming sessions are routed to the default server, open each Ethernet >
NAT > NAT > Static Mappings > Static Mapping NN subprofile (where NN is a number
from 1 to 10) and make sure that the Valid parameter in each subprofile is set to No.
6
Set the Def Server parameter to the IP address of the server, on the local network, that is to
receive all incoming packets from the remote network.
7
Exit the profile and, at the exit prompt, select the exit and accept option.
The changes take effect the next time a connection specified in the NAT profile is established.
To activate the changes immediately, close the connection specified by the Profile parameter
and then reopen it.
Routing incoming sessions to up to ten servers on the private LAN
To configure the MAX to perform NAT and to define up to ten servers, and optionally a default
server, to handle sessions initiated by callers from outside the private LAN:
1
Open the Ethernet > NAT > NAT profile.
2
Set the Routing parameter to Yes.
3
Set the Profile parameter to the name of an existing Connection profile.
The MAX performs NAT whenever a connection is made with this Connection profile.
The connection can be initiated either by the MAX or by the remote network.
4
Set the Lan parameter to Single IP Addr.
5
Open the Ethernet > NAT > NAT > Static Mappings profile.
6
Open a Static Mapping NN subprofile, where nn is a number from 1 to 10.
You use the parameters in each Static Mapping NN subprofile to specify routing for
incoming packets sent to a particular TCP or UDP port.
7
Set the Valid parameter to Yes.
This setting enables the port routing specified by the remaining parameters in the
subprofile. Setting this parameter to No disables routing for the specified port.
8
Set the Dst Port # parameter to the number of a TCP or UDP port that users outside the
private network can access.
Each Dst Port # setting corresponds to a service provided by a server on the local private
network. You can use the actual port number as specified by the Loc Port # parameter as
long as that address is unique for the local private network. For information about
obtaining port numbers, see “Configuring WAN interfaces” on page 9-31.
The MAX routes incoming packets for this port to the local server and port you are about
to specify.
9
Set the Protocol parameter to TCP or UDP.
This parameter determines whether the Dst Port # and Loc Port # parameters specify TCP
ports or UDP ports.
10 Set the Loc Port # to a port corresponding to a service provided by the local servers.
11 Set the Loc Adrs parameter to the address of the local server providing the service
specified by Loc Port #.
12 Exit and save the profile.
Repeat step 6 through step 12 for any additional ports whose packets you want to route to
a specific server and port on the local network.
9-28
MAX 6000/3000 Network Configuration Guide
Configuring IP Routing
Configuring system-level routing policies
13 Optionally, open the Ethernet > NAT > NAT profile and set the Def Server parameter to
the IP address of a server, on the local network, that is to receive any remaining incoming
packets from the remote network (that is, any that are not for ports you have specified in
Static Mapping NN subprofiles).
14 Exit the profile and, at the exit prompt, select the exit and accept option.
The changes take effect the next time a connection specified in the NAT profile is established.
To activate the changes immediately, close the connection specified by the Profile parameter
and then reopen it.
Disabling routing for specific ports
To disable routing of incoming packets destined for specific TCP or UDP ports:
1
Open the Ethernet > NAT > NAT > Static Mappings profile.
2
Open a Static Mapping NN subprofile, where NN is a number from 1 to 10.
The parameters in each Static Mapping NN subprofile specify the routing for incoming
packets sent to a particular TCP or UDP port.
3
Set the Valid parameter to No.
This setting disables routing for the port specified by the Dst Port # and Protocol
parameters in this subprofile.
4
Exit and save the subprofile.
Repeat step 2 through step 4 to disable routing for any additional ports.
5
Exit the profile and, at the exit prompt, select the exit and accept option.
The changes take effect the next time the MAX makes a connection specified in the NAT
profile. To activate the changes immediately, close the connection specified by the Profile
parameter and then reopen it.
Support for QuickTime audio/video streaming
The network address translation (NAT) feature also accommodates QuickTime audio/video
streams, which are in RTP/RTSP protocol. You can assume the following:
•
QuickTime clients are on the network behind NAT and the streaming servers are outside
the network.
•
NAT is configured as single-IP NAT (NAPT).
•
RTSP runs on TCP, and RTP runs on UDP.
Additional system-level services
You can configure additional services at the system level through the Ethernet > Mod Config
profile, including the system time, Telnet password, shared Connection profiles, suppression of
dial-out route advertisement in redundant configurations when a trunk fails, UDP checksums,
and suppression of host route advertisements.
Setting and maintaining system time
The MAX unit can use Simple Network Time Protocol (SNTP—RFC 1305) to set and
maintain its system time by communicating with an SNTP server. For the unit to use SNTP to
MAX 6000/3000 Network Configuration Guide
9-29
Configuring IP Routing
Configuring system-level routing policies
communicate with the server, you must set the Ethernet > Mod Config > SNTP Server > SNTP
Enabled parameter to Yes. In addition, you set the Time Zone parameter to specify your time
zone as an offset from Universal Time Coordinated (UTC). UTC is the same as Greenwich
Mean Time (GMT). Specify the offset in hours, using a 24-hour clock. Because some time
zones, such as Newfoundland, do not have an even hour boundary, the offset includes four
digits and is stated in half-hour increments. For example, in Newfoundland the time is 1.5
hours behind UTC and is represented as follows:
UTC -0130
For San Francisco, which is 8 hours behind UTC, the time would be:
UTC -0800
For Frankfurt, which is 1 hour ahead of UTC, the time would be:
UTC +0100
You can set the SNTP Host#N parameter to specify up to three server addresses. The MAX
unit polls the configured SNTP server at 50-second intervals. The unit sends SNTP requests to
the first address. It sends requests to the second only if the first is inaccessible, and to the third
only if the second is inaccessible.
Telnet password
The Telnet password is required from all users attempting to access the MAX unit by Telnet.
Users are allowed three tries to enter the correct password. If all three are unsuccessful, the
connection attempt fails. Set the Ethernet > Mod Config > Telnet PW parameter to specify a
password of 20 or fewer characters. If you leave the parameter blank, the MAX does not
prompt users for the password.
Shared Connection profiles
You can configure a MAX unit to allow more than one incoming call to share the same
Connection profile. In low-security situations, a shared Connection profile permits more than
one dial-in user to share a name and password for accessing the local network.
For routed IP callers, however, shared profiles must not result in two IP addresses reached
through the same profile. Consequently, the single Connection profile must be configured so
that either it does not assign an IP address or it specifies dynamic IP address assignment. When
the shared profile uses dynamic address assignment, each call is a separate connection that
shares the same name and password. The MAX assigns a separate IP address dynamically to
each caller.
To specify that shared connections are permitted, set the Ethernet > Mod Config > Shared Prof
parameter to Yes.
Dial-out routes in a redundant configuration
If you have another unit backing up the MAX unit in a redundant configuration on the same
network, you can set the Ethernet > Mod Config > Adv Dialout Routes parameter to instruct
the unit to stop advertising IP routes that use dial services if its trunks experience an alarm
condition. Unless you specify otherwise, the unit continues to advertise its dial-out routes,
which prevents the redundant unit from taking over the routing responsibility.
9-30
MAX 6000/3000 Network Configuration Guide
Configuring IP Routing
Configuring WAN interfaces
UDP checksums for ensuring data integrity
If data integrity is of the highest concern for your network, and having redundant checks is
important, you can turn on UDP checksums to generate a checksum whenever a UDP packet is
transmitted. UDP packets are transmitted for queries and responses related to ATMP,
SYSLOG, DNS, ECHOSERV, RADIUS, TACACS, RIP, SNTP, and TFTP.
Set Ethernet > UDP CKsum to Yes to turn on UDP checksums. Enabling this parameter might
cause a slight decrease in performance, but in most environments the decrease is not
noticeable.
Suppressing host route advertisements
The MAX unit creates host routes for Dial-in sessions and advertises them back to the
backbone. Dial-in sessions can cause excessive routing updates and, consequently, network
delays. You can set the Ethernet > Mod Config > Suppress Hosts Routes parameter to reduce
the routing updates caused by dial-in sessions.
Configuring WAN interfaces
To define a WAN interface, you need to enable IP routing and configure routes in Answer and
Connection profiles. In addition, you need to make sure that remote hosts are properly
configured.
This section introduces the basic requirements for each of these steps.and provides examples
illustrating the procedures for using the parameters to configure WAN interfaces.
In addition, this section explains how to configure the MAX to set priority bits and
Type-of-Service (TOS) classes (as defined in RFC 1349: Type of Service in the Internet
Protocol Suite) for customer applications.
For detailed information about each parameter and command in the following sections, see the
MAX Reference.
Enabling IP routing
To enable the MAX unit to negotiate an IP routing connection, you set Answer > PPP Options
> Route IP to Yes.
To enable IP packets to be routed for a WAN interface, set the Route IP parameter to Yes in the
Connection profile. When you enable IP routing, IP packets are always routed, never bridged.
Configuring routes for WAN connections
To configure routes for WAN connections, you need to specify addresses, and, if desired,
enable and configure dynamic IP addressing in Connection and/or Answer profiles.
MAX 6000/3000 Network Configuration Guide
9-31
Configuring IP Routing
Configuring WAN interfaces
Specify the remote IP address
In the Connections profile’s IP Options subprofile, the LAN Adrs parameter specifies the IP
address of the remote device. Before accepting a call from the far end, the MAX matches this
address to the source IP address presented by the calling device. The IP address of the remote
device can be one of the following values:
Value
How to specify
IP address of a router If the remote device is an IP router, specify its address, including its
subnet mask identifier. (For background information, see “IP address
and subnet mask usage in MAX units” on page 9-1.) If you omit the
mask, the MAX inserts a default subnet mask that makes the entire
far-end network accessible.
IP address of a dial-in If the remote device is a dial-in host running PPP software, specify its
host
address, including a subnet mask identifier of /32 (for example,
10.2.3.4/32).
The null address
(0.0.0.0)
If the remote device is a dial-in host that accepts dynamic address
assignment, leave the LAN Adrs parameter blank.
Note: The most common cause of trouble in initially establishing an IP connection is
incorrect configuration of the IP address or subnet specification for the remote host or calling
device.
Configuring numbered-interface routing
In the Connection profile’s IP Options subprofile, set the WAN Alias parameter to specify
another IP address for the remote device, used for numbered-interface routing. The WAN alias
address will be listed in the routing table as a gateway (next hop) to the LAN Adrs value. The
caller must use a numbered interface, and its interface address must agree with the WAN Alias
setting.
Specifying a local IP interface address
In the Connection profile’s IP Options subprofile, the IF Adrs parameter specifies another local
IP-interface address, to be used as the local numbered interface instead of Ethernet IP Adrs
(the default).
Enabling dynamic IP addressing
In the Answer profile, set the Assign Adrs parameter to Yes to enable the MAX unit to allocate
IP addresses dynamically from a pool of designated addresses on the local network. The
caller’s PPP software must be configured to accept an address dynamically. If the Pool Only
parameter is set to Yes in the Ethernet > Mod Config > WAN Options profile, the unit
terminates connections that reject the assigned address during PPP negotiation. For related
information, see “Configuring dynamic address assignment to a dial-in host” on page 9-36.
In the Connection profile’s IP Options subprofile, the Pool parameter specifies an IP-address
pool from which the unit assigns the caller an IP address. If the Pool parameter is null but all
other configuration settings enable dynamic assignment, the unit gets IP addresses from the
first defined address pool.
9-32
MAX 6000/3000 Network Configuration Guide
Configuring IP Routing
Configuring WAN interfaces
Assigning metrics and preferences
Connection profiles often represent switched connections, which have an initial cost that you
avoid if you use a nailed-up link to the same destination. To favor nailed-up links, you can
assign a higher metric to switched connections than to any of the nailed-up links to the same
destination.
Each connection represents a static route, which has a default preference of 100. (For other
preferences, see “Route preferences and metrics on a MAX unit” on page 9-56.) For each
connection, you can fine-tune the route preference or assign a completely different preference.
Note: In the Connection profile’s IP Options subprofile, you can set the DownMetric and
DownPreference parameters to assign different metrics or preferences to routes on the basis of
whether the route is in use or is down. You can direct the unit to use active routes, if available,
rather than choose routes that are down.
Configuring RIP on a WAN interface
In the Connection profile’s IP Options subprofile, you can set the RIP parameter to specify an
IP interface to send RIP updates, receive RIP updates, or both.
Lucent recommends that you run RIP version 2 (RIP-v2) if possible. Lucent does not
recommend running RIP-v2 and RIP-v1 on the same network in such a way that the routers
receive each other’s advertisements. RIP-v1 does not propagate subnet mask information. It
assumes the default mask for the network’s class. RIP-v2 propagates subnet masks explicitly.
Running the two versions on the same network can result in RIP-v1 guesses overriding
accurate subnet information obtained through RIP-v2.
In the Connection profile’s IP Options subprofile, the Private parameter specifies whether the
unit discloses the existence of the route when queried by RIP or another routing protocol. The
unit uses private routes internally. They are not advertised.
IP Direct configuration
An IP Direct configuration allows IP packets received from an incoming connection to bypass
the routing and bridging tables and be redirected to the next-hop router, which must be on the
same network as the MAX. Outgoing packets are routed as usual. They are not affected by the
IP Direct configuration.
To enable IP Direct, you set the IP Direct parameter in the Connection profile’s Session
Options to specify the IP address of the next-hop destination.
Note: Typically, you configure IP Direct connections with RIP turned off. If you set the IP
Direct configuration with RIP set to receive, the MAX unit forwards all RIP updates to the
specified address. Typically, this is not desirable, because RIP updates are designed to be
stored locally by the IP router (in this case, the MAX).
MAX 6000/3000 Network Configuration Guide
9-33
Configuring IP Routing
Configuring WAN interfaces
Settings in RADIUS profiles
The following attribute-value pairs configure IP options in a RADIUS profile:
Attribute
Value
Ascend-Route-IP (228)
Enables/disables IP routing for the interface. IP routing is enabled
by default.
Framed-Compression
(13)
Enables/disables Van Jacobsen prediction. You can specify VanJacobson-TCP-IP to turn on TCP/IP header compression. If you do
not specify this value, RADIUS uses the default of no header
compression.
Framed-IP-Address (8)
IP address of the calling device.
Framed-IP-Netmask (9)
Subnet mask of the caller’s address. If you do not specify a subnet
mask, the router assumes the default subnet mask based on address
class.
Ascend-PPP-Address
(253)
IP address assigned to the local side of a numbered-interface
connection.
Ascend-IF-Netmask
(153)
Subnet mask in use for the local side numbered interface.
Ascend-Metric (225)
RIP metric for the specified route (a number between 1 to 15,
default 7). If preference values are equal, the higher the metric, the
less likely that the MAX will use the route.
Ascend-Route-Preference A preference value for the route. Valid values are from 0 to 255. A
(126)
value of 255 prevents the use of the route.
Framed-Route (22)
A static route definition, which can be used to make a user profile
a private route.
Ascend-Assign-IP-Pool
(218)
Number of the address pool number from which to acquire an
address.
Ascend-Assign-IPGlobal-Pool (146)
Name of a global address pool.
Ascend-IP-Direct (209)
IP address of a host to which all IP packets received across the link
will be directed.
Framed-Routing (10)
Enables/disables RIP updates on the interface. RIP is disabled by
default. Valid values are None(0), Broadcast(1), Listen(2),
Broadcast-Listen(3), Broadcast-v2(4), Listen-v2(5), and
Broadcast-Listen-v2(6).
Ascend-Source-IPCheck (96)
Enables/disables anti-spoofing for the session. The default is
Source-IP-Check-No (0). If set to Source-IP-Check-Yes (1), the
system discards packets that do not originate on the subnet to
which the remote device is attached. The system determines the
subnet during IPCP negotiation. If Framed-IP-Netmask specifies a
subnet, packets that originate on that subnet are accepted. If
Framed-IP-Netmask specifies a 32-bit mask, only packets from a
single host are accepted. Packets sent from an address that does
not match are discarded.
Ascend-Multicast-Client Multicast forwarding option.
(155)
9-34
MAX 6000/3000 Network Configuration Guide
Configuring IP Routing
Configuring WAN interfaces
Attribute
Value
Ascend-Multicast-RateLimit (152)
Multicast forwarding option.
Ascend-MulticastGLeave-Delay (111)
Multicast forwarding option.
Ascend-Client-PrimaryDNS (135)
Client DNS option.
Ascend-ClientSecondary-DNS (136)
Client DNS option.
Ascend-Client-AssignDNS (137)
Client DNS option.
Ascend-Client-Gateway
(132)
Default route for traffic from this connection.
Ascend-IP-TOS (87)
Type of Service of the data stream. The value of this attribute sets
the four bits following the three most significant bits of the TOS
byte. which are used to choose a link based on the type of service.
One of the following values can be specified:
Ascend-IP-TOS IP-TOS-Normal (0): Normal service.
Ascend-IP-TOS IP-TOS-Disabled (1): Disables TOS.
Ascend-IP-TOS IP-TOS-Cost (2): Minimize monetary cost.
Ascend-IP-TOS IP-TOS-Reliability (4): Maximize reliability.
Ascend-IP-TOS IP-TOS-Throughput (8): Maximize throughput.
Ascend-IP-TOS IP-TOS-Latency (16): Minimize delay.
Ascend-IP-TOSPrecedence (88)
Priority level of the data stream. The three most significant bits of
the TOS byte are priority bits used to set precedence for priority
queuing. When TOS is enabled, those bits can be set to one of the
following values (most significant bit first):
IP-TOS-Precedence-Pri-Normal (0): Normal priority.
IP-TOS-Precedence-Pri-One (32): Priority level 1.
IP-TOS-Precedence-Pri-Two (64): Priority level 2.
IP-TOS-Precedence-Pri-Three (96): Priority level 3.
IP-TOS-Precedence-Pri-Four (128): Priority level 4.
IP-TOS-Precedence-Pri-Five (160): Priority level 5.
IP-TOS-Precedence-Pri-Six (192): Priority level 6.
IP-TOS-Precedence-Pri-Seven (224): Priority level 7 (the highest
priority).
Ascend-IP-TOS-ApplyTo (89)
In which direction TOS is enabled. If set to IP-TOS-Apply-ToIncoming (1024), which is the default, bits are set in packets
received on the interface. If set to IP-TOS-Apply-To-Outgoing
(2048), bits are set in outbound packets only. If set to IP-TOSApply-To-Both (3072), both incoming and outgoing packets are
tagged.
Remote host requirements for WAN connections
IP hosts, such as UNIX systems, Windows or OS/2 PCs, or Macintosh systems, must have
correctly configured TCP/IP software. A remote host calling into the local IP network must
also have PPP software.
MAX 6000/3000 Network Configuration Guide
9-35
Configuring IP Routing
Configuring WAN interfaces
UNIX software
UNIX systems typically include a TCP/IP stack, DNS software, and other software, files, and
utilities used for Internet communication. UNIX network administration documentation
describes how to configure these programs and files.
Windows or OS/2 software
PCs running Windows or OS/2 need TCP/IP networking software. The software is included
with Windows 95, but the user might need to purchase and install it separately if the computer
has an earlier version of Windows, or OS/2.
Macintosh software
Macintosh computers need MacTCP or Open Transport software for TCP/IP connectivity.
Apple system software versions 7.1 or later include MacTCP. To see if a Macintosh has the
software, the user should open the Control Panels folder and look for MacTCP or MacTCP
Admin.
TCP/IP software configuration
For any platform, the TCP/IP software must be configured with the host’s IP address and
subnet mask. If the host obtains its IP address dynamically from the MAX unit, the TCP/IP
software must be configured to enable dynamic allocation. If your local network supports a
DNS server, you should also configure the host software with the DNS server’s address.
Typically, the host software is configured with the MAX unit as its default router.
Examples of WAN interface configuration
This section provides sample WAN interface configurations. The examples presume that you
have configured the Ethernet interface correctly, as described in “Configuring LAN interfaces”
on page 9-7.
Configuring dynamic address assignment to a dial-in host
In this example, the dial-in host is a PC that accepts an IP address assignment from the MAX
unit dynamically. Figure 9-9 shows a sample network.
Figure 9-9. A dial-in user requiring dynamic IP address assignment
SiteB
MAX
Site A
MAX
WAN
IP Adrs=10.2.3.1/24
Modem
=10.2.3.212/32
Pool#1 Start=10.2.3.200
Pool#1 Court=55
In this example, Site A is a backbone network and Site B is a single dial-in host with a modem,
TCP/IP stack, and PPP software. The PPP software running on the PC at Site B must be
9-36
MAX 6000/3000 Network Configuration Guide
Configuring IP Routing
Configuring WAN interfaces
configured to acquire its IP address dynamically. For example, the following a sample software
configuration presumes that the PC has a modem connection to the MAX unit:
Username=victor
Accept Assigned IP=Yes
IP address=Dynamic (or Assigned or N/A)
Netmask=255.255.255.255 (or None or N/A)
Default Gateway=None or N/A
Name Server=10.2.3.55
Domain suffix=abc.com
Baud rate=38400
Hardware handshaking ON
VAN Jacobsen compression ON
Configuring pools using local profiles
To configure the MAX unit to accept dial-in connections from Site B and assign an IP address:
1
Open Ethernet > Mod Config > WAN Options.
2
Set the Pool#1 Start parameter to specify the start address of the pool, and set the Pool#1
Count parameter to specify the number of contiguous addresses the pool includes. For
example:
Ethernet
Mod Config
WAN options…
Pool#1 start=10.12.253.1
Pool#1 count=126
Pool#1 name=Engineering Dept.
Pool only=Yes
Pool Summary=Yes
3
Open the Ether Options subprofile, then set the Proxy Mode parameter to Yes.
Ether options…
Proxy Mode=Yes
4
Exit the profile and, at the exit prompt, select the exit and accept option.
5
Open the Answer profile and set the Assign Adrs parameter to enable dynamic address
assignment and set the PPP Options > Route IP parameter to enable IP routing:
Ethernet
Answer
Assign Adrs=Yes
PPP options…
Route IP=Yes
6
Exit the profile and, at the exit prompt, select the exit and accept option.
7
Open a Connection profile for the dial-in user.
8
Set the Station parameter to specify the user’s name, set the Active parameter to activate
the profile, and specify the desired encapsulation options. For example:
Ethernet
Connections
Connection profile
Station=victor
Active=Yes
Encaps=PPP
MAX 6000/3000 Network Configuration Guide
9-37
Configuring IP Routing
Configuring WAN interfaces
Encaps options...
Send Auth=CHAP
Recv PW=*SECURE*
9
Set the Route IP parameter to enable IP routing, and set the Pool parameter to specify the
IP address pool from which the caller is assigned an IP address:
Route IP=Yes
IP options…
LAN Adrs=0.0.0.0/0
RIP=Off
Pool=1
10 Exit the profile and, at the exit prompt, select the exit and accept option.
Configuring RADIUS pseudo-user profiles
You can define address pools in a RADIUS pools pseudo-user profile. A pools pseudo-user
profile uses the following format on its first line:
pools-name Password = "ascend", Service-Type = Outbound-User
The name argument is the MAX system name (specified by the Name parameter in the System
profile). Subsequent lines in the profile define IP address pools by using the
Ascend-IP-Pool-Definition (217) attribute. The value of the Ascend-IP-Pool-Definition
attribute uses the following syntax:
pool-num base-addr assign-count
Syntax element
Description
pool-num
Pool number. If you designate two pools by the same number, one
locally and one in RADIUS, the RADIUS definition takes
precedence. So if you have defined some pools in the IP-Global
profile and do not wish to override them, start numbering the pools
at the next number. For example, if you defined 10 pools in the IPGlobal profile, start with number 11 in RADIUS. Otherwise, start
with 1.
base-addr
The base address in a pool of contiguous addresses on the local
network or subnet.
assign-count
Number of addresses included in the pool.
Following is a RADIUS pools profile:
pools-max01 Password = "ascend", Service-Type = Outbound-User
Ascend-IP-Pool-Definition = "1 10.12.253.1 26
Configuring a host connection with a static address
A host connection with a static address enables the dial-in host to keep its own IP address when
logging into the MAX IP network. For example, if a PC user telecommutes to one IP network
and uses an ISP on another IP network, one of the connections can assign an IP address
dynamically and the other can configure a host route to the PC. This example shows how to
configure a host connection with a static address. (For details about the /32 subnet mask, see
“IP address and subnet mask usage in MAX units” on page 9-1.)
9-38
MAX 6000/3000 Network Configuration Guide
Configuring IP Routing
Configuring WAN interfaces
Figure 9-10. A dial-in user requiring a static IP address (a host route)
Site A
Site B
MAX
WAN
IP Adrs=10.2.3.1/24
IP Adrs=10.8.9.10
Host with ISDN
modem card installed
In this example, the PC at Site B is running PPP software that includes settings such as the
following:
Username=patti
Accept Assigned IP=N/A (or No)
IP address=10.8.9.10
Subnet mask=255.255.255.255
Default Gateway=N/A (or None)
Name Server=10.7.7.1
Domain suffix=abc.com
VAN Jacobsen compression ON
To configure the MAX to accept dial-in connections from Site B:
1
Open the Answer profile’s PPP Options subprofile and set the Route IP parameter to
enable IP routing:
Ethernet
Answer
PPP options…
Route IP=Yes
2
Close the Answer profile.
3
Open a Connection profile for the dial-in user.
4
Set the Station parameter to specify the user’s name, set the Active parameter to activate
the profile, and specify the desired encapsulation options. For example:
Ethernet
Connections
Connection profile 1
Station=patti
Active=Yes
Encaps=PPP
Encaps options...
Send Auth=CHAP
Recv PW=*SECURE*
5
Set the Route IP parameter to enable IP routing, and set the LAN Adrs parameter to
specify the IP address and subnet of the PC at Site B:
Route IP=Yes
IP options…
LAN Adrs=10.8.9.10/32
6
Exit the profile and, at the exit prompt, select the exit and accept option.
MAX 6000/3000 Network Configuration Guide
9-39
Configuring IP Routing
Configuring WAN interfaces
Configuring an IP Direct connection
You can configure a Connection profile to automatically redirect incoming IP packets to a
specified host on the local IP network without having the packets pass through the routing
engine on the MAX, as shown in Figure 9-11.
Figure 9-11. Directing incoming IP packets to one local host
Site B
Site A
IP Direct=10.2.3.11
IP Adrs=10.2.3.1/22
IP Adrs=10.8.9.10/22
WAN
MAX
Ethernet
Pipeline
Host=10.2.3.11
To configure an IP Direct connection:
1
Open the Answer profile’s PPP Options subprofile and set the Route IP parameter to
enable IP routing:
Ethernet
Answer
PPP options…
Route IP=Yes
2
Exit the profile and, at the exit prompt, select the exit and accept option.
3
Open a Connection profile for the dial-in connection.
4
Set the Station parameter to specify the user’s name, set the Active parameter to activate
the profile, and specify the desired encapsulation options. For example:
Ethernet
Connections
Connection profile 1
Station=Pipeline1
Active=Yes
Encaps=MPP
Encaps options...
Send Auth=CHAP
Recv PW=localpw
Send PW=remotepw
5
Set the Route IP parameter to enable IP routing, set the LAN Adrs parameter to specify the
IP address of the host to receive the redirected packets, and turn off RIP:
Route IP=Yes
IP options…
LAN Adrs=10.8.9.10/22
RIP=Off
Note: IP Direct connections typically turn off RIP. If the connection is configured to receive
RIP, all RIP packets from the far side are kept locally and forwarded to the IP address you
specify for IP Direct.
9-40
MAX 6000/3000 Network Configuration Guide
Configuring IP Routing
Configuring WAN interfaces
6
Open the Session Options subprofile and specify the IP Direct host. For example:
Session options…
IP Direct=10.2.3.11
7
Exit the profile and, at the exit prompt, select the exit and accept option.
Note: The IP Direct address you specify in Connections > any Connection profile > Session
Options is the address to which the MAX directs all incoming packets on this connection.
When you use the IP Direct feature, a user cannot Telnet directly to the MAX from the far side.
The MAX directs all incoming IP traffic to the specified address on the local IP network.
Configuring a router-to-router connection
In this example, the MAX unit connects to a corporate IP network and needs a switched
connection to another company that has its own IP configuration. Figure 9-12 shows the
network diagram.
Figure 9-12. A router-to-router IP connection
Site A
Site B
MAX
Ethernet
WAN
IP Adrs=10.2.3.1/22
Ethernet
Pipeline
LAN Adrs=10.9.8.10/22
This example assumes that the Answer profile in each of the two devices enables IP routing.
To configure the Site A MAX unit for a connection to Site B:
1
Open a Connection profile for the Site B Pipeline.
2
Set the Station parameter to specify the user’s name, set the Active parameter to activate
the profile, and specify the desired encapsulation options. For example:
Ethernet
Connections
Connection profile 1
Station=PipelineB
Active=Yes
Encaps=MPP
Encaps options...
Send Auth=CHAP
Recv PW=localpw
Send PW=remotepw
3
Set the Route IP parameter to enable IP routing, and set the LAN Adrs parameter to the IP
address of the Pipeline at Site B:
Route IP=Yes
IP options…
LAN Adrs=10.9.8.10/22
4
Exit the profile and, at the exit prompt, select the exit and accept option.
MAX 6000/3000 Network Configuration Guide
9-41
Configuring IP Routing
Configuring WAN interfaces
To configure the Site B Pipeline:
1
Open the Connection profile for the Site A MAX.
2
Set the Station parameter to specify the Site A MAX unit’s name, set the Active profile to
activate the profile, and specify the desired encapsulation options. For example:
Ethernet
Connections
Connection profile 1
Station=MAXA
Active=Yes
Encaps=MPP
Encaps options...
Send Auth=CHAP
Recv PW=localpw
Send PW=remotepw
3
Set the Route IP parameter to enable IP routing and set the LAN Adrs parameter to specify
the IP address of the MAX at Site A.
Route IP=Yes
IP options…
LAN Adrs=10.2.3.1/22
4
Exit the profile and, at the exit prompt, select the exit and accept option.
Following are comparable RADIUS profiles:
pipeline1 Password = "localpw"
Service-Type = Framed-User,
Framed-Protocol = PPP,
Framed-IP-Address = 10.9.8.10/22,
Framed-IP-Netmask = 255.255.252.0
route-max-1 Password = "ascend", Service-Type = Outbound-User
Framed-Route = "10.9.8.10/22 10.9.8.10 1 n pipeline1-out"
pipeline1-out Password = "localpw", Service-Type = Outbound-User
User-Name = "pipeline1",
Ascend-Dial-Number = "9-1-333-555-1212",
Framed-Protocol = PPP,
Framed-IP-Address = 10.9.8.10,
Framed-IP-Netmask = 255.255.252.0,
Ascend-Send-Auth = Send-Auth-PAP,
Ascend-Send-Password = "remotepw"
Configuring a router-to-router connection on a subnet
In the sample network illustrated in Figure 9-13, the MAX unit connects telecommuters with
their own Ethernet networks to the corporate backbone. The unit is on a subnet, and assigns
subnet addresses to the telecommuters’ networks.
9-42
MAX 6000/3000 Network Configuration Guide
Configuring IP Routing
Configuring WAN interfaces
Figure 9-13. A connection between local and remote subnets
Site A
GRF
10.4.4.133/24
Site B
10.7.8.232
WAN
MAX
10.4.5.1/24
Pipeline
10.7.8.200/24
10.7.8.204
This example assumes that the Answer profile in each of the two devices enables IP routing.
Because the MAX unit specifies a subnet mask as part of its own IP address, the unit must use
other routers to reach IP addresses outside that subnet. To forward packets to other parts of the
corporate network, the unit either must have a default route configuration to a router in its own
subnet (for example, the GRF router in Figure 5-12) or must enable RIP on Ethernet.
To configure the MAX unit at Site A with an IP routing connection to Site B:
1
Open a Connection profile for the Site B Pipeline.
2
Set the Station parameter to specify the Pipeline unit’s name, set the Active parameter to
activate the profile, and specify the desired encapsulation options. For example:
Ethernet
Connections
Connection profile 1
Station=PipelineB
Active=Yes
Encaps=MPP
Encaps options...
Send Auth=CHAP
Recv PW=localpw
Send PW=remotepw
3
Set the Route IP parameter to enable IP routing, and set the LAN Adrs parameter to the IP
address of the Pipeline at Site B:
Route IP=Yes
IP options…
LAN Adrs=10.7.8.200/24
4
Exit the profile and, at the exit prompt, select the exit and accept option.
To specify the local GRF router as the MAX unit’s default route:
1
Open the Default profile in the Static Rtes menu.
2
Set the Gateway parameter to specify the GRF router’s address as the gateway address:
Ethernet
Static Rtes
Default
Name=Default
Active=Yes
Dest=0.0.0.0/0
Gateway=10.4.4.133
Metric=1
Preference=10
Private=Yes
MAX 6000/3000 Network Configuration Guide
9-43
Configuring IP Routing
Configuring WAN interfaces
3
Exit the profile and, at the exit prompt, select the exit and accept option.
To configure the Site B Pipeline unit for a connection to Site A:
1
Open the Connection profile in the Pipeline unit for the Site A MAX.
2
Set the Station parameter to specify the Pipeline unit’s system name, set the Active
parameter to activate the profile, and specify the desired encapsulation options. For
example:
Ethernet
Connections
Connection profile 1
Station=MAXA
Active=Yes
Encaps=MPP
Encaps options...
Send Auth=CHAP
Recv PW=localpw
Send PW=remotepw
3
Set the Route IP parameter to enable IP routing, and set the LAN Adrs parameter to
specify the IP address and subnet of the MAX unit at Site A:
Route IP=Yes
IP options…
LAN Adrs=10.4.5.1/24
4
Exit the profile and, at the exit prompt, select the exit and accept option.
To make the MAX the default route for the Site B Pipeline unit:
1
Open the Default profile in the Static Rtes menu in the Site B Pipeline.
2
Set the Gateway parameter to specify the MAX unit at the far end of the WAN connection
as the gateway address:
Ethernet
Static Rtes
Default
Name=Default
Active=Yes
Dest=0.0.0/0
Gateway=10.4.5.1
Metric=1
Preference=100
Private=Yes
3
Exit the profile and, at the exit prompt, select the exit and accept option.
Configuring a numbered interface
In the following example, the MAX unit is a system-based router but supports a numbered
interface for one of its connections. (If you are not familiar with numbered interfaces, see
“Interface-based routing” on page 9-6.) The double-headed arrow in Figure 9-14 indicates the
numbered interface for this connection.
9-44
MAX 6000/3000 Network Configuration Guide
Configuring IP Routing
Configuring WAN interfaces
Figure 9-14. Example of a numbered interface
10.1.2.3/32
MAX
WAN
10.2.3.4/24
10.5.6.7/24
10.7.8.9/24
10.5.6.8/24
The numbered interface addresses are:
•
IF Adrs=10.5.6.7/24
•
WAN Alias=10.5.6.8/24
Figure 9-14 also shows an unnumbered interface. The 10.1.2.3/32 connection uses a
single system-based address for both the MAX itself and the dial-in user. To configure the
unnumbered and numbered interfaces:
1
Open Ethernet > Mod Config > Ether Options and verify that the IP Adrs parameter is set
to the IP address of the Ethernet interface of the MAX unit:
Ethernet
Mod Config
Ether options...
IP Adrs=10.2.3.4/24
2
Exit the profile and, at the exit prompt, select the exit and accept option.
3
Open the Connection profile and configure the required parameters, then open the IP
Options subprofile.
4
Set the LAN Adrs parameter to specify the IP address of the Ethernet interface of the
remote device:
Ethernet
Connections
numbered
IP options...
LAN Adrs=10.7.8.9/24
5
Set the WAN Alias parameter to specify the numbered interface address for the remote
device:
IP options...
WAN Alias=10.5.6.8/24
6
Exit the profile and, at the exit prompt, select the exit and accept option.
Following is a comparable RADIUS profile:
numbered Password = "localpw"
Service-Type = Framed-User,
Framed-Protocol = PPP,
Ascend-Route-IP = Route-IP-Yes,
Framed-IP-Address = 10.5.6.8,
Framed-IP-Netmask = 255.255.255.0,
MAX 6000/3000 Network Configuration Guide
9-45
Configuring IP Routing
Configuring WAN interfaces
Ascend-PPP-Addr = 10.5.6.7,
Ascend-IF-Netmask = 255.255.255.0
Type of service (TOS) support for selecting quality of service
Type of Service (TOS) support is an IP feature that enables the MAX unit to select a quality of
service for an application. Quality of service (QoS) is important in transmission of high
bandwidth audio and video data. TOS, specified by abstract values of precedence, delay,
throughput, reliability, and cost, is configured through setting of priority bits and
Type-of-Service (TOS) classes (as defined in RFC 1349: Type of Service in the Internet
Protocol Suite) on behalf of customer applications. The MAX unit establishes information for
use by upstream routers to prioritize and select links for particular data streams. It does not
implement priority queuing.
You can enable TOS by setting parameters that define a policy in a Connection profile or
RADIUS profile. The parameters in the profile set bits in the TOS byte of each IP packet
header that is received, transmitted, or both, on the WAN interface. You can then configure
other routers to interpret the bits accordingly.
You can also specify TOS policy in a TOS filter, which you apply to any number of
Connection or RADIUS profiles. Like other kinds of Lucent packet filters, a TOS filter can
affect incoming packets, outgoing packets, or both, depending on how you define the filter.
For a Connection profile or RADIUS profile that has both its own local policy and an applied
TOS filter, the policy defined in the TOS filter takes precedence. For example, applying a TOS
filter to a TOS-enabled connection allows you to specify one priority setting for incoming
packets on a connection and to define another policy for incoming packets addressed to a
particular destination specified in a TOS filter.
Defining TOS policy within a profile
To provide service-based TOS or to set precedence for the traffic on a particular WAN
connection, you can define the policy directly in a Connection profile or RADIUS profile.
Settings in a Connection profile
Following are the relevant Connection profile parameters, located in Ethernet > Connections >
any Connection profile > IP Options:
9-46
Parameter
Specifies
TOS Enabled
Enables/disables Type of Service (TOS) for this connection. If you set
TOS Enabled to No, none of the other TOS options apply.
MAX 6000/3000 Network Configuration Guide
Configuring IP Routing
Configuring WAN interfaces
Parameter
Specifies
Precedence
Priority level of the data stream. The three most significant bits of the
TOS byte are priority bits used to set precedence for priority queuing.
When you enable TOS, you can set the three most significant bits to
one of the following values (most significant bit first):
TOS
Apply To
•
000—Normal priority
•
001—Priority level 1
•
010—Priority level 2
•
011—Priority level 3
•
100—Priority level 4
•
101—Priority level 5
•
110—Priority level 6
• 111—Priority level 7 (the highest priority)
Type of Service of the data stream. When TOS is enabled, you can set
TOS to one of the following values:
•
Normal—Normal service
•
Cost—Minimize monetary cost
•
Reliability—Maximize reliability
•
Throughput—Maximize throughput
•
Latency—Minimize delay
Note: The four bits adjacent to the most significant bits of the TOS
byte specify Type of Service of the data stream.
Direction in which the MAX supports TOS. If you set Apply To to
Input, the MAX sets TOS bits in packets received on the interface. If
you set Apply To to Output, the MAX sets TOS bits in outbound
packets. If you set Apply To to Both, the MAX set TOS bits for
incoming and outgoing packets.
MAX 6000/3000 Network Configuration Guide
9-47
Configuring IP Routing
Configuring WAN interfaces
Settings in a RADIUS profile
Following are the relevant attribute-value pairs in RADIUS:
Attribute
Specifies
Ascend-IP-TOS (88) Type of Service (TOS) of the data stream. You can specify one of the
following values:
•
Ascend-IP-TOS IP-TOS-Normal (0)—Normal service
•
Ascend-IP-TOS IP-TOS-Disabled (1)—Disables TOS
•
Ascend-IP-TOS IP-TOS-Cost (2)—Minimize monetary cost
•
Ascend-IP-TOS IP-TOS-Reliability (4)—Maximize reliability
•
Ascend-IP-TOS IP-TOS-Throughput (8)—Maximize throughput
•
Ascend-IP-TOS IP-TOS-Latency (16)—Minimize delay
Note: The value of this attribute sets the four bits following the three
most significant bits of the TOS byte. The four bits can be used to
choose a link according to the type of service.
Ascend-IP-TOSPrecedence (89)
9-48
Priority level of the data stream. The three most significant bits of the
TOS byte are priority bits used to set precedence for priority queuing.
When you enable TOS, you can set the three most significant bits to
one of the following values (most significant bit first):
•
IP-TOS-Precedence-Pri-Normal (0)—Normal priority
•
IP-TOS-Precedence-Pri-One (32)—Priority level 1
•
IP-TOS-Precedence-Pri-Two (64)—Priority level 2
•
IP-TOS-Precedence-Pri-Three (96)—Priority level 3
•
IP-TOS-Precedence-Pri-Four (128)—Priority level 4
•
IP-TOS-Precedence-Pri-Five (160)—Priority level 5
•
IP-TOS-Precedence-Pri-Six (192)—Priority level 6
•
IP-TOS-Precedence-Pri-Seven (224)—Priority level 7 (the
highest priority)
Ascend-IP-TOSApply-To (90)
Direction in which the MAX supports TOS. If you set
Ascend-IP-TOS-Apply-To to IP-TOS-Apply-To-Incoming (1024),
which is the default, the MAX sets bits in packets received on the
interface. If you set the attribute to IP-TOS-Apply-To-Outgoing
(2048), the MAX sets bits in outbound packets. If you set the attribute
to IP-TOS-Apply-To-Both (3072), the MAX sets bits in both incoming
and outgoing packets.
Ascend-Filter (91)
A string-format filter, which can include an IP TOS filter specification.
Ascend-Filter will replace binary-based filters.
MAX 6000/3000 Network Configuration Guide
Configuring IP Routing
Configuring WAN interfaces
Defining TOS filters
To specify the QoS for all packets that match a specific filter specification, you can define a
TOS filter locally in a Filter profile, and then apply the filter to any number of Connection
profiles or RADIUS profiles. (The Filter-ID attribute can apply a local Filter profile to
RADIUS user profiles.) Administrators can also define TOS filters directly in a RADIUS user
profile by setting the Ascend-Filter attribute.
Examples of connection-based TOS configuration
The parameter settings in this example enable TOS for incoming packets on a WAN interface.
The profile sets the priority of the packets at 6, which specifies that an upstream router that
supports priority queuing will not drop the packets until it has dropped all packets of a lower
priority. The values shown set TOS to prefer maximum throughput, which specifies that an
upstream router that supports priority queuing will choose a high bandwidth connection if one
is available, even if it has higher cost or higher latency or is less reliable than another available
link.
Ethernet
Connections
Connection profile 1
IP options
LAN Adrs=10.168.6.120/24
TOS Enabled=Yes
Precedence=110
TOS=Throughput
Following is a comparable RADIUS profile:
sampleProf Password="mypasswd", User-Service=Framed-User
Framed-Protocol=PPP,
Framed-IP-Address=10.168.6.120
Framed-IP-Netmask=255.255.255.0
Framed-Routing=3
Ascend-IP-TOS=IP-TOS-Throughput
Ascend-IP-TOS-Precedence=IP-TOS-Precedence-Pri-Six
Ascend-IP-TOS-Apply-To=IP-TOS-Apply-To-Incoming
MAX 6000/3000 Network Configuration Guide
9-49
Configuring IP Routing
Configuring WAN interfaces
Specifying a QoS for all packets matching a local Filter profile
Following are the Ethernet > Filters parameters used in the example of specifying a QoS for all
packets matching a local Filter profile:
9-50
Parameter
Specifies
Src Mask
A subnet mask to apply to the Source-Address value before comparing
the result to the source address in a packet. The MAX translates both
the Source-Address-Mask and Source-Address values into binary
format and then uses a logical AND to apply the
Source-Address-Mask to the Source-Address. The mask hides the
portion of the Source-Address that appears behind each binary 0 (zero)
in the mask. A mask of all zeros (the default) masks all bits. If the
Source-Address value is also all zeros, all source addresses in packets
are matched. A mask of all ones (255.255.255.255) masks no bits, so
the full source address for a single host is matched.
Src Adrs
An IP address. After applying the Source-Address-Mask to this value,
the MAX compares the result to the source address in a packet.
Dst Mask
A subnet mask to apply to the Dest-Address value before comparing
the result to the destination address in a packet. The MAX translates
both the Dest-Address-Mask and Dest-Address values into binary
format and then uses a logical AND to apply the Dest-Address-Mask
to the Dest-Address. The mask hides the portion of the Dest-Address
value that appears behind each binary 0 (zero) in the mask. A mask of
all zeros (the default) masks all bits. If the Dest-Address value is also
all zeros, all destination addresses in packets are matched. A mask of
all ones (255.255.255.255) masks no bits, so the full destination
address for a single host is matched.
Dst Adrs
An IP address. After applying the Dest-Address-Mask to this value,
the MAX compares the result to the destination address in a packet.
Protocol
A TCP/IP protocol number. A value of zero matches all protocols. If
you specify a nonzero number, the MAX compares it to the Protocol
field in packets. For a complete list of protocol numbers, see RFC
1700.
Src Port Cmp
How the MAX compares the source port number in a packet to the
value specified in Source-Port. If you set Src Port Cmp to None, the
MAX makes no comparison. You can specify that the filter matches
the packet if the packet’s source port number is Less (less than), Eql
(equal to), Gtr (greater than), or Neq (not equal to) the Source-Port
value.
Src Port #
Port number that the MAX compares to the source port in a packet.
TCP and UDP port numbers are typically assigned to services. For a
list of all port numbers, see RFC 1700.
DstPortCmp
How the MAX compares the destination port number in a packet to the
value specified in Dest Port. If you set this parameter to None, the
MAX makes no comparison. You can specify that the filter matches
the packet if the packet’s destination port number is Less (less than),
Eql (equal to), Gtr (greater than), or Neq (not equal to) the Dest-Port
value.
MAX 6000/3000 Network Configuration Guide
Configuring IP Routing
Configuring WAN interfaces
Parameter
Specifies
Dst Port #
Port number that the MAX compares with the destination port in a
packet. See RFC 1700 for a list of port numbers.
Precedence
Priority level of the data stream. The three most significant bits of the
TOS byte are priority bits used to set precedence for priority queuing.
When TOS is enabled and the packet matches the filter, the bits can be
set to one of the following values (most significant bit first):
Type of Service
•
000—Normal priority
•
001—Priority level 1
•
010—Priority level 2
•
011—Priority level 3
•
100—Priority level 4
•
101—Priority level 5
•
110—Priority level 6
• 111—Priority level 7 (the highest priority)
Type of Service of the data stream. When TOS is enabled and the
packet matches the filter, you can specify one of the following values
in the packet:
•
Normal—Normal service
•
Cost—Minimize monetary cost
•
Reliability—Maximize reliability
•
Throughput—Maximize throughput
•
Latency—Minimize delay
Note: The four bits adjacent to the three most significant bits of the
TOS byte are used to choose a link according to the type of service.
If you are not familiar with Lucent packet filters, you can find background information in
Chapter 15, “Defining Static Filters.” Standard IP filters use many of the same settings as TOS
filters.
Settings in RADIUS
In RADIUS, a TOS filter entry is a value of the Ascend-Filter attribute. To specify a TOS filter
value, use the following format:
iptos dir [ dstip n.n.n.n/nn ] [ srcip n.n.n.n/nn ][ proto ]
[ destport cmp value ] [ srcport cmp value ][ precedence value ]
[ type-of-service value ]
MAX 6000/3000 Network Configuration Guide
9-51
Configuring IP Routing
Configuring WAN interfaces
Note: A filter definition cannot contain new lines. The syntax is shown here on multiple lines
for printing purposes only.
Keyword or argument Description
iptos
Specifies an IP filter.
dir
Specifies filter direction. You can specify in (to filter packets coming into the MAX) or out (to filter packets going out of the MAX).
dstip n.n.n.n/nn
If the dstip keyword is followed by a valid IP address, the TOS
filter sets bytes only in packets with that destination address. If a
subnet mask portion of the address is present, the MAX compares
only the masked bits. If the dstip keyword is followed by the zero
address (0.0.0.0), or if this keyword and its IP address specification
are not present, the filter matches all IP packets.
srcip n.n.n.n/nn
If the srcip keyword is followed by a valid IP address, the TOS
filter sets bytes only in packets with that source address. If a subnet
mask portion of the address is present, the MAX compares only the
masked bits. If the srcip keyword is followed by the zero address
(0.0.0.0), or if this keyword and its IP address specification are not
present, the filter matches all IP packets.
proto
Specifies a TCP/IP protocol number. A value of zero matches all
protocols. If you specify a nonzero number, the MAX compares it
to the Protocol field in packets. For a complete list of protocol numbers, see RFC 1700.
dstport cmp value
If the dstport keyword is followed by a comparison symbol and a
port, the MAX compares the specified port to the destination port
of a packet. The comparison symbol can be < (less-than), = (equal),
> (greater-than), or != (not-equal). The port value can be one of the
following names or numbers: ftp-data (20), ftp (21), telnet (23),
smtp (25), nameserver (42), domain (53), tftp (69), gopher (70),
finger (79), www (80), kerberos (88), hostname (101), nntp (119),
ntp (123), exec (512), login (513), cmd (514), or talk (517).
srcport cmp value If the srcport keyword is followed by a comparison symbol and
a port name or number, the MAX compares the specified port to the
source port of a packet. The comparison symbol can be <
(less-than), = (equal), > (greater-than), or != (not-equal). The port
value can be one of the following names or numbers: ftp-data (20),
ftp (21), telnet (23), smtp (25), nameserver (42), domain (53), tftp
(69), gopher (70), finger (79), www (80), kerberos (88), hostname
(101), nntp (119), ntp (123), exec (512), login (513), cmd (514), or
talk (517).
9-52
MAX 6000/3000 Network Configuration Guide
Configuring IP Routing
Configuring WAN interfaces
Keyword or argument Description
precedence value
type-of-service
value
Specifies the priority level of the data stream. The three most significant bits of the TOS byte are priority bits used to set precedence
for priority queuing. If a packet matches the filter, the three bits are
set to the specified value (most significant bit first):
•
000—Normal priority
•
001—Priority level 1
•
010—Priority level 2
•
011—Priority level 3
•
100—Priority level 4
•
101—Priority level 5
•
110—Priority level 6
•
111—Priority level 7 (the highest priority)
Specifies the Type of Service of the data stream. One of the following values can be specified:
•
Normal (0)—Normal service
•
Disabled (1)—Disables TOS
•
Cost (2)—Minimize monetary cost
•
Reliability (4)—Maximize reliability
•
Throughput (8)—Maximize throughput
•
Latency (16)—Minimize delay
Note: If a packet matches the filter, the system sets the four bits
following the three most significant bits of the TOS byte to the
specified value. Those four bits are used to choose a link according
to the type of service.
Example of defining a TOS filter
The parameter settings in this example define a TOS filter for TCP packets (protocol 6) that are
destined for a single host at 10.168.6.24. The packets must be sent on TCP port 23. For
incoming packets that match this filter, the priority is set at level 2. This relatively low priority
means that an upstream router that implements priority queuing can drop these packets when it
becomes loaded. The values shown also set TOS to prefer a low latency connection, which
means that the upstream router will choose a fast connection if one is available, even if it has
higher cost or lower bandwidth or is less reliable than another available link.
Ethernet
Filters
TOS Filter profile 4
Name=sampleTOS
Input Filters...
In filter 01
Valid=Yes
Type=IPTos
IPTos...
Src Mask=0.0.0.0
MAX 6000/3000 Network Configuration Guide
9-53
Configuring IP Routing
Configuring WAN interfaces
Src Adrs=0.0.0.0
Dst Mask=255.255.255.255
Dst Adrs=10.168.6.24
Protocol=6
Src Port Cmp=None
Src Port #=0
Dst Port Cmp=Eql
Dst Port #=23
Precedence=010
Type of service=Latency
Following is a RADIUS user profile that contains a comparable filter specification:
sampleProf Password="mypasswd", User-Service=Framed-User
Framed-Protocol=PPP,
Framed-IP-Address=10.168.6.120
Framed-IP-Netmask=255.255.255.0
Ascend-Filter="iptos in dstip 10.168.6.24/32
dstport=23 precedence 010 type-of-service latency"
Note: Filter specifications cannot contain new lines. The preceding example shows the
specification on two lines for printing purposes only.
Example of applying TOS filters to WAN connections
For a Connection or RADIUS profile that has an applied TOS filter, the system sets bits in the
TOS byte according to the filter specification.
Applying a filter to a Connection profile
You apply a TOS filter in a local Connection profile by specifying the number of the Filter
profile in which the TOS filter is defined. Use the TOS Filter parameter (in the Connection
profile’s IP Options subprofile) to specify the number of a Filter profile.
The following setting applies the TOS filter to a Connection profile. If the incoming data
stream contains packets destined for 10.168.6.24, as shown in “Example of defining a TOS
filter” on page 9-53, the TOS settings in the filter are set in those packets.
Ethernet
Connections
Connection profile 1
IP options...
TOS Filter=01
9-54
MAX 6000/3000 Network Configuration Guide
Configuring IP Routing
Configuring IP routes
Applying a TOS filter to a RADIUS profile
In a RADIUS profile, you can use one of the following attribute-value pairs to apply a TOS
filter:
Attribute
Specifies
Ascend-Filter (91)
A string-format filter, which can include an IP TOS filter specification
within a specific user profile.
Filter-ID (11)
Name of a local Filter profile that defines a TOS filter. The next time
the MAX accesses the RADIUS user profile in which this attribute
appears, the referenced TOS filter is applied to the connection.
For an example of defining a TOS filter in a user profile, see “Example of defining a TOS
filter” on page 9-53. The following profile uses the Filter-ID attribute to reference a local Filter
profile:
sampleProf Password="mypasswd", User-Service=Framed-User
Framed-Protocol=PPP,
Framed-IP-Address=10.168.6.120
Framed-IP-Netmask=255.255.255.0
Filter-ID=jfans-tos-filter
Configuring IP routes
The IP routing table contains routes static routes, which are configured manually, and dynamic
routes, are learned from routing protocols such as RIP or OSPF.
This section contains information about and examples of static route configuration, dynamic
routing configuration, and metrics and preferences.
For detailed information about the parameters in the sections that follow, see the MAX
Reference.
Static routes
A static route is a manually configured path from one network to another. It specifies the
destination network and the gateway (router) to use to get to that network. If a path to a
destination must be reliable, the administrator often configures more than one static route to
the destination. In that case, the MAX unit chooses the route on the basis of metrics and
availability. Each static route has its own Static Rtes profile.
The Ethernet > Mod Config profile specifies a static connected route, which states, in effect,
“to reach system X, send packets out this interface to system X.” Connected routes are lowcost, because no remote connection is involved.
Each IP-routing Connection profile specifies a static route that states, in effect, “to reach
system X, send packets out this interface to system Y,” where system Y is another router.
MAX 6000/3000 Network Configuration Guide
9-55
Configuring IP Routing
Configuring IP routes
Dynamic routes
A dynamic route is a path, to another network, that is learned from another IP router rather than
configured in one of the MAX unit’s local profiles. A router that uses RIP broadcasts its entire
routing table every 30 seconds, updating other routers about the usability of particular routes.
Hosts that run ICMP can also send ICMP Redirects to offer a better path to a destination
network. OSPF routers propagate link-state changes as they occur. Routing protocols such as
RIP and OSPF all use some mechanism to propagate routing information and changes through
the routing environment.
Route preferences and metrics on a MAX unit
A MAX unit supports configurable route preferences, because different protocols have
different criteria for assigning route metrics. For example, RIP is a distance-vector protocol,
which uses a real or virtual hop count as a metric to select the shortest route to a destination
network. OSPF is a link-state protocol, which employs a variety of link conditions, such as the
reliability or speed of the link, as a metric to determine the best path to a destination network.
When choosing a route to put into the routing table, the router first compares preference
values, preferring the lowest number. If the preference values are equal, the router compares
the metric fields and uses the route with the lowest metric. Following are the preference values
for the various types of routes:
Route
Default
preference
Directly connected
0
OSPF
10
CMP
30
RIP
100
Static
100
ATMP, PPTP
100
Note: You can configure the DownMetric and DownPreference parameters (located in the
Connection profile’s IP Options subprofile) to assign different metrics and preferences,
respectively, to routes on the basis of whether the routes are in use or are down. You can direct
the unit to use active routes, if available, rather than routes that are down.
Static route configuration
This section shows how to configure the default static route, define a static route to a remote
subnet, and make sure that the MAX uses a static route before a RIP route.
Settings in a Static Route profile
For sample Connection profile configurations, see “Configuring WAN interfaces” on
page 9-31. Each of the configurations shown in that section results in a static route. For an
example of the Ethernet > Mod Config profile configuration of the MAX unit’s local IP
interface, see “Configuring routing table updates” on page 9-8.
9-56
MAX 6000/3000 Network Configuration Guide
Configuring IP Routing
Configuring IP routes
The Static Rtes profile contains many of the parameters used to configure static routes,
including the following:
Parameter
Specifies
Name
The name of the IP route, used for indexing. You can assign any name
of 31 or fewer characters.
Active
Whether the route has been added to the routing table. A route must be
active to affect packet routing. If Active=No, the route is ignored.
Dest
The target network’s address as the destination address of a route (the
destination address in a packet). Packets destined for that host use this
static route to bring up the right connection. The zero address (0.0.0.0)
represents the default route (the destination to which packets are
forwarded when there is no route to the packet’s destination).
Gateway
IP address of the router or interface through which to reach the target
network.
Metric
RIP metric associated with the IP route.
Preference
Preference value of a route. RIP is a distance-vector protocol, which
uses a hop count to select the shortest route to a destination network.
OSPF is a link-state protocol, which means that OSPF can take into
account a variety of link conditions, such as the reliability or speed of
the link, when determining the best path to a destination network.
Because these two types of metrics are incompatible, the MAX
supports route preferences.
Private
Whether the MAX will disclose the existence of this route when
queried by RIP or another routing protocol. Private routes are used
internally but are not advertised. You can specify Yes or No. The
default is No.
Ospf-Cost
The cost of an OSPF link. Cost is a configurable metric that takes into
account the speed of the link and other issues. The lower the cost, the
more likely is the interface to be used to forward data traffic. (For
details, see Chapter 8, “Configuring OSPF Routing.”)
ASE-Type
The OSPF ASE type of this Link State Advertisement (LSA).
ASE-Tag
The OSPF ASE tag of this link. The tag is a 32-bit hexadecimal
number attached to each external route. The OSPF protocol does not
use the value of ASE-Tag. Border routers can use ASE-Tag to filter
this record. You can specify a 32-bit hexadecimal number.
C0:00:00:00 is the default.
In addition to the parameters in the Static Rtes profile, you must also set the Ethernet > Mod
Config > Ether Options > Route Pref > Rip Preference parameter to establish the preference
value for routes learned from the RIP protocol. When choosing which routes to put in the
routing table, the router first compares the Rip Preference values, preferring the lowest
number. If the Rip Preference values are equal, the router compares the Metric values, using
the route with the lowest Metric. You can specify a number from 0 to 255. The default value is
100. Zero is the default for connected routes (such as the Ethernet network). The value of 255
means do not use this route.
MAX 6000/3000 Network Configuration Guide
9-57
Configuring IP Routing
Configuring IP routes
Settings in a RADIUS route profiles
A route profile is a pseudo-user profile in which the first line has this format:
route-name-N Password = "ascend", Service-Type = Outbound-User
The name argument is the MAX system name (specified by the Name parameter in the System
profile), and N is a number in a sequential series, starting with 1. Make sure there are no
missing numbers in the series specified by N. If there is a gap in the sequence of numbers, the
MAX stops retrieving the profiles when it encounters the gap in sequence.
To specify routes that may be dialed out by more than one system, eliminate the name
argument. In that case, the first word of the pseudo-user profile is route-N.
Each pseudo-user profile specifies one or more routes with the Framed-Route (22) attribute.
The RADIUS protocol limits the number of Framed-Route definitions in a single route profile.
The limit varies with the exact contents of the routes. However, 25 Framed-Route definitions
per profile is the recommended maximum.
The value of the Framed-Route attribute uses the following syntax:
dest-addr gateway-addr metric [private] [profile][preference][VRouter]
Syntax element
Specifies
dest-addr
Destination IP address, which can include a subnet specification.
The default value is 0.0.0.0, which represents a default route.
gateway-addr
IP address of the next-hop router to reach the specified destination.
metric
RIP metric for the specified route (a number between 1 to 15,
default 8). If preference values are equal, the higher the metric, the
less likely that the MAX will use the route.
private
Enables/disables advertisement of the route when the router sends
RIP or OSPF updates. If set to Yes, the route is excluded from
update packets. Set to Y to make the route private.
profile
Name of the dialout user profile for the route. The default value is
null.
preference
Preference value of the route.
VRouter
Virtual router option.
Route settings in a RADIUS user profile
You can also include the Framed-Route (22) attribute in a RADIUS user profile to define a
static route. See “Settings in a RADIUS route profiles” on page 9-58 for details about
Framed-Route usage.
In a user profile, you can specify the zero address as the gateway-address. In this context, the
0.0.0.0 address is a wildcard entry the MAX replaces with the caller’s IP address.When
RADIUS authenticates the caller and sends the MAX an Access-Accept message with a value
of 0.0.0.0 for the router address, the MAX updates its routing tables with the Framed-Route
value, but substitutes the caller’s IP address for the router. This setting is useful when the MAX
assigns an IP address from an address pool and RADIUS cannot know the IP address of the
caller.
9-58
MAX 6000/3000 Network Configuration Guide
Configuring IP Routing
Configuring IP routes
If a Framed-Route definition in a user profile duplicates a route defined in a route or IP-Route
profile, the user profile definition takes precedence while the connection is active. For
example, suppose a static route to network 10.10.10.10 is defined in a local IP-Route profile
with a metric of 10. A RADIUS user profile in RADIUS defines a static route to 10.10.10.10
with a metric of 7. When the RADIUS user’s route is not in use, the routing table indicates that
the route has a metric of 10. When the route is in use, the MAX routing table indicates that the
route has a metric of 7, with an r in the flags column to indicate that the route came from
RADIUS. Furthermore, the route with a metric of 10 remains in the routing table, with an
asterisk (*) in the flags column, indicating that it is a hidden route.
Connection-specific private static routes (RADIUS only)
The following attribute-value pairs configure IP options in a RADIUS profile:
Attribute
Value
Ascend-Private-Route
(104)
A private framed route known only to the profile in which it is
specified. The value is a destination address and next-hop router
address (in that order).
Configuring the default route
If no routes exist for the destination address of a packet, the MAX forwards the packet to the
default route. Most sites use the default route to off-load routing tasks to other devices, such as
a local IP or a UNIX host running the route daemon.
Note: If the MAX does not have a default route, it drops packets for which it has no route.
To configure the default route:
1
Open the first IP Route profile (the route named Default) and activate it:
Ethernet
Static Rtes
Default
Name=Default
Active=Yes
Dest=0.0.0.0/0
Note: The name of the first Static Rtes profile is always Default, and its destination is
always 0.0.0.0. You cannot change these values.
2
Specify the router to use for packets with unknown destinations. For example:
Gateway=10.9.8.10
3
Specify a metric for this route, the route’s preference, and whether the route is private. For
example:
Metric=1
Preference=100
Private=Yes
4
Exit the profile and, at the exit prompt, select the exit and accept option.
Following is a comparable RADIUS default route:
route-max-1 Password = "ascend", Service-Type = Outbound-User
Framed-Route = "0.0.0.0 10.9.8.10 1 y 100"
MAX 6000/3000 Network Configuration Guide
9-59
Configuring IP Routing
Configuring IP routes
Defining a static route to a remote subnet
If the connection does not enable RIP, the MAX does not learn about other networks or subnets
that might be reachable through the remote device. The remote network shown in Figure 9-15
is an example of such a network.
Figure 9-15. Two-hop connection that requires a static route when RIP is off
Site B
Site A
Site C
MAX
Pipeline
WAN
Ethernet
Ethernet
10.9.8.10/22
IP Adrs=10.2.3.1/22
Subnet=10.4.5.0/22
To enable the MAX to route to Site C without using RIP, you must configure a Static Rtes
profile similar to the following example:
Ethernet
Static Rtes
Static Rtes profile 1
Name=SITEBGW
Active=Yes
Dest=10.4.5.0/22
Gateway=10.9.8.10
Metric=2
Preference=100
Private=Yes
Ospf-Cost=1
ASE-type=Type1
ASE-tag=c0000000
Following is a RADIUS profile that shows both the default route and a route to the remote
subnet:
route-max-1 Password = "ascend", Service-Type = Outbound-User
Framed-Route = "10.4.5.0/22 10.9.8.10"
Example of route preferences configuration
The procedure in the following example increases the preference value of RIP routes,
instructing the router to use a static route first if one exists:
1
Open Ethernet > Mod Config > Route Pref.
2
Set Rip Preference to 150:
Ethernet
Mod Config
Route Pref…
Rip Preference=150
3
9-60
Exit the profile and, at the exit prompt, select the exit and accept option.
MAX 6000/3000 Network Configuration Guide
Configuring IP Routing
Configuring IP routes
Dynamic route configuration
You can configure the MAX unit to modify the IP routing table dynamically. To do so, you
must configure each active interface to send or receive RIP or OSPF updates. You can also
configure the Ethernet interface to accept or ignore ICMP redirects.
The Ethernet > Mod Config > Ether Options profile contains several of the parameters for
configuring dynamic route updating:
Parameter
Specifies
RIP
How the MAX unit handles RIP updates on the Ethernet interface and
on each WAN interface. The RIP parameter in the Ethernet > Answer
> Session Options profile applies to local profiles and profiles
retrieved from RADIUS. Many sites turn off RIP on WAN connections
to keep their routing tables from becoming very large.
Note: The IETF considers RIP-v1 an historic protocol and its use is
no longer recommended. Lucent recommends that you upgrade all
routers to RIP-v2. If you must maintain RIP-v1, Lucent recommends
that you create a separate subnet for all RIP-v1 routers and hosts.
Ignore Def Rt
RIP Policy
RIP Summary
You can configure the MAX to ignore default routes advertised by
routing protocols. This configuration is recommended, because you
typically do not want the default route changed by a RIP update. The
default route specifies a static route to another IP router, which is often
a local router such as a GRF or another kind of LAN router. When you
configure the MAX to ignore the default route, RIP updates do not
modify the default route in the MAX routing table.
If the MAX is running RIP-v1, the RIP Policy parameter specifies a
split-horizon or poison- reverse policy to handle update packets that
include routes that were received on the same interface on which the
update is being sent. Split-horizon means that the MAX does not
propagate routes back to the subnet from which they were received.
Poison-reverse means that it propagates routes back to the subnet from
which they were received, but with a metric of 16.
This parameter has no affect on RIP-v2.
The RIP Summary parameter specifies whether to summarize subnet
information when advertising routes. If the MAX summarizes RIP
routes, it advertises a route to all the subnets in a network of the same
class. For example, the route to 200.5.8.13/28 (a class C address with a
subnet set to 28 bits) would be advertised as a route to 200.5.8.0. If the
MAX does not summarize information, it advertises each route in its
routing table as is. For the subnet in the preceding example, the MAX
would advertise a route only to 200.5.8.13.
This parameter has no affect on RIP-v2.
MAX 6000/3000 Network Configuration Guide
9-61
Configuring IP Routing
Configuring IP routes
ICMP Redirects
ICMP Redirect packets enable the MAX to dynamically find the most
efficient IP route to a destination, but they are one of the oldest and
least secure route discovery methods on the Internet. ICMP Redirect
packets can be counterfeited to change the way a device routes
packets. Therefore, the ICMP Redirects parameter is set to Ignore by
default. Change the setting to Accept if you want to accept these
packets.
If you set the Private parameter to Yes in a Connection profile, the router does not disclose its
route in response to queries from routing protocols.
Example of RIP and ICMP configuration
The following sample configuration instructs the MAX to ignore ICMP Redirect packets, to
receive (but not send) RIP updates on the Ethernet interface, and to send (but not receive) RIP
updates on a WAN connection.
1
Open Ethernet > Mod Config > Ether Options.
2
Configure the MAX to receive (but not send) RIP updates on the Ethernet interface:
Ethernet
Mod Config
Ether options…
RIP=Recv-v2
Receiving RIP updates on the Ethernet interface means that the MAX learns about
networks that are reachable through other local routers. However, it does not propagate
information about all of its remote connections to the local routers.
3
Exit the profile and, at the exit prompt, select the exit and accept option.
4
Set ICMP Redirects to Ignore:
ICMP Redirects=Ignore
5
Exit the profile and, at the exit prompt, select the exit and accept option.
6
Open the Connection profile in which the link is configured, open the IP Options
subprofile, and configure the MAX to send (but not receive) RIP updates on the link:
Ethernet
Connections
Connection profile 1
IP options...
RIP=Send-v2
Sending RIP on a WAN connection enables the remote devices to access networks that are
reachable through other local routers. However, the MAX does not receive information
about networks that are reachable through the remote router.
7
9-62
Exit the profile and, at the exit prompt, select the exit and accept option.
MAX 6000/3000 Network Configuration Guide
Setting Up IP Multicast Forwarding
10
Introduction to multicast forwarding . . . . . . . . . . . . . . . . . . . . . . . . . . . . . . . . . . . . . . 10-1
Configuring multicast forwarding . . . . . . . . . . . . . . . . . . . . . . . . . . . . . . . . . . . . . . . . 10-2
Examples of multicast forwarding configuration. . . . . . . . . . . . . . . . . . . . . . . . . . . . . 10-5
You can configure your MAX unit to act as a multicast forwarder, responding as a client to
IGMP packets from the Multicast Backbone (MBONE) router and acting as an MBONE router
by forwarding IGMP queries to clients, receiving their responses, and forwarding multicast
traffic.
To configure the unit for this role, you enable multicast forwarding, identify the MBONE
router, and identify and configure WAN and LAN interfaces for accepting multicast traffic.
Parameters for configuring the multicast system behavior are located in the Ethernet > Mod
Configure > Multicast profile. Parameters for configuring WAN interfaces (and the MBONE
router identification when it is located across a WAN) are located in Connection profiles for
the WAN.
Introduction to multicast forwarding
Video and audio transmissions use one-to-many and many-to-many communication, rather
than the point-to-point communications that many other types of network applications use.
This type of transmission is provided by the IP Multicast Backbone (MBONE) as a much
cheaper and faster way to communicate the same information to multiple hosts.
MBONE routers maintain multicast groups, in which hosts must register to receive a multicast
transmission. Multicast group functions are handled using the Internet Group Management
Protocol (IGMP). The MAX forwards IGMP version-1 or version-2 packets, including IGMP
MTRACE (multicast trace).
The interface to the MBONE router is the MBONE interface. The MAX can have one
MBONE interface, either a LAN or WAN IP interface, depending on where the MBONE
router is located.
When it is configured to act as a multicast forwarder, the MAX appears to MBONE routers as
a multicast client, because it responds as a client to IGMP packets. The MAX appears to
multicast clients to be an MBONE router, because it forwards IGMP queries to those clients,
receives their responses, and forwards multicast traffic.
MAX 6000/3000 Network Configuration Guide
10-1
Setting Up IP Multicast Forwarding
Configuring multicast forwarding
Configuring multicast forwarding
To configure the MAX unit to act as a multicast forwarder, you must enable multicast
forwarding and identify the MBONE interface. You also need to configure the local or WAN
interfaces that support multicast clients. Depending on your network requirements, you might
also configure heartbeat monitoring, which provides monitoring for connectivity problems.
Parameters used to configure multicast forwarding are located in the Ethernet > Mod Config >
Multicast profile and in Ethernet > Connections > any Connection profile > IP Options
profiles. For detailed information about each parameter, see the MAX Reference.
Enabling multicast forwarding
To enable multicast forwarding, you must set the Ethernet > Mod Config > Multicast >
Forwarding parameter to Yes. When you change the parameter from No to Yes, the multicast
subsystem reads the values in the Ethernet profile and initiates the forwarding function.
If you modify any other multicast value in the Ethernet profile, you must set the Forwarding
parameter to No and then back to Yes again to force a read of the new value.
Identifying the MBONE interface
The MBONE interface is the one on which the MBONE router resides. If it resides across the
WAN, you must set the Ethernet > Mod Config > Multicast > Mbone Profile parameter to
specify the name of a Connection profile to connect to that router. If the MBONE router
resides on the same LAN as the MAX unit, you leave the Mbone Profile parameter set to null
and the MAX assumes that its Ethernet is the MBONE interface.
Multicast forwarder polling activities
When you configure the MAXas a multicast forwarder, it forwards polling messages generated
by the multicast router and keeps track of active memberships from its client interfaces. To
configure the timeout value for deactivating memberships, you can set the Ethernet > Mod
Config > Multicast > Membership Timeout parameter to a value from 60 to 65535 seconds.
The factory default is six minutes.
Configuring the MAX to support multicast clients
To configure the MAX to support multicast clients, you need to specify which interfaces
should support them, the rate at which the MAX accepts multicast packets from clients, and
how the MAX responds to IGMP leave group messages.
Specifying the interfaces that support multicast clients
Each local or WAN interface that supports multicast clients must have the Ethernet > Mod
Config > Multicast > Client parameter set to Yes (or you can set the Multicast Client parameter
in each client’s Connection profile to Yes). With this setting, the MAX begins handling IGMP
requests and responses on the interface. It does not begin forwarding multicast traffic until you
set the Ethernet > Mod Config > Multicast > Rate Limit parameter.
10-2
MAX 6000/3000 Network Configuration Guide
Setting Up IP Multicast Forwarding
Configuring multicast forwarding
Specifying the rate which multicast clients accept packets
The Rate Limit parameter specifies the rate at which the MAX accepts multicast packets from
its clients. For a particular WAN connection, you can set the Multicast Rate parameter in the
Connection profile. The rate limit does not affect the MBONE interface. The default setting is
100, which disables multicast forwarding on the interface. The forwarder handles IGMP
packets, but does not accept packets from clients or forward multicast packets from the
MBONE router.
To begin forwarding multicast traffic on the interface, you must set the Rate Limit parameter to
a number less than 100. For example, if you set it to 5, the MAX accepts a packet from
multicast clients on the interface once every five seconds. The MAX discards any subsequent
packets received in that five-second window.
Because multiple multicast clients can have multiple active sessions for identical IGMP groups
via a single WAN interface on the MAX, you can configure the MAX to query each WAN
interface from which it receives a leave group message, to make sure there are no clients
with active multicast sessions for the same group on that interface.
Querying for active group members
When the MAX receives a leave group message for a WAN interface for which you
configure a value for Grp Leave Delay, it sends a query to the WAN interface, requesting that
any active members of the group respond. If the MAX receives a response within the time
period you specify in the Grp Leave Delay parameter, it does not forward the leave group
message to the MBONE. Otherwise, it sends a leave group message to the MBONE, and it
clears the IGMP group session from its tables.
Multicast interfaces
The MAX creates the following multicast interfaces at system startup:
Interface
Specified destination address
mcast
224.0.0.0/4. All multicast addresses, except for special addresses discussed in
this section, are directed to this interface.
local
224.0.0.1/32. Multicast address for all systems on the local subnet. The MAX
does not forward packets sent to this address.
local
224.0.0.2/32. Multicast address for all routers on the local subnet. The MAX
does not forward packets sent to this address.
local
224.0.0.5/32. Multicast address for all OSPF routers on the network. The MAX
does not forward packets sent to this address.
If you disable OSPF routing, this route changes from local to a black-hole
interface.
local
224.0.0.6/32. Multicast address for all OSPF Designated Routers on the network. The MAX does not forward packets sent to this address.
If you disable OSPF routing, this route changes from local to a black-hole
interface.
MAX 6000/3000 Network Configuration Guide
10-3
Setting Up IP Multicast Forwarding
Configuring multicast forwarding
Implicit priority setting for dropping multicast packets
For high-bandwidth data, voice, and audio multicast applications, the MAX supports
prioritized packet dropping. If the MAX is the receiving device under extremely high loads, it
drops packets according to a priority ranking, which the following UDP port ranges determine:
•
Traffic on ports 0–16384 (unclassified traffic) has the lowest priority (50).
•
Traffic on ports 16385–32768 (audio traffic) has the highest priority (70).
•
Traffic on ports 32769–49152 (whiteboard traffic) has medium priority (60).
•
Traffic on ports 49153–65536 (video traffic) has low priority (55).
Monitoring connectivity problems through heartbeat monitoring
When running as a multicast forwarder, the MAX continually receives multicast traffic.
Heartbeat-monitoring is an optional feature enables the administrator to monitor possible
connectivity problems by continuously polling for this traffic and generating an SNMP alarm
trap in the event of a traffic breakdown. Following is the SNMP alarm trap:
Trap type: TRAP_ENTERPRISE
Code: TRAP_MULTICAST_TREE_BROKEN (19)
Arguments:
1) Multicast group address being monitored (4 bytes),
2) Source address of last heartbeat packet received (4 bytes),
3) Slot time interval configured in seconds (4 bytes),
4) Number of slots configured (4 bytes),
5) Total number of heartbeat packets received before the MAX started
sending SNMP Alarms (4bytes).
To set up heartbeat monitoring, you configure several parameters that define the packets to be
monitored, how often and for how long to poll for multicast packets, and the threshold for
generating an alarm. Following are the parameters you use to specify these settings:
10-4
Setting
Parameters
Packets to be monitored
HeartBeat Address specifies a multicast address. If set, causes
the MAX to listen for packets to and from the specified
address.
HeartBeat UDP Port specifies a UDP port number. If set,
causes the MAX to listen only to packets received through the
specified port.
Source Addr and Source Mask specify an IP address and subnet mask. If you specify an address, the MAX ignores packets
from that source for monitoring purposes.
How often and for how long
to poll for multicast packets
HeartBeat Slot Time specifies an interval (in seconds). The
MAX polls for multicast traffic, waits for the duration of the
interval, then polls again.
HeartBeat Slot Count specifies how many times to poll before
comparing the number of heartbeat packets received to the
Alarm Threshold.
MAX 6000/3000 Network Configuration Guide
Setting Up IP Multicast Forwarding
Examples of multicast forwarding configuration
Setting
Parameters
Threshold for generating an
alarm
Heartbeat Alarm Threshold specifies a number. If the number
of monitored packets falls below this number, the MAX sends
the SNMP alarm trap.
Examples of multicast forwarding configuration
The examples in this section show how to configure MBONE routers on the Ethernet and on a
WAN. They also show how to configure multicast clients.
Forwarding from an MBONE router on Ethernet
Figure 10-1 shows a local multicast router on one of the MAX unit’s Ethernet interfaces, and
dial-in multicast clients.
Figure 10-1. MAX forwarding multicast traffic to dial-in multicast clients
Win95
MAXTNT POP
Ethernet
Analog
T1
T1
T1
WAN
Multicast router
Modem
MAX
MAX
T1
BRI
VAT
(Visual Audio Tools)
MAXTNT POP
Win95
ISDN
modem
Note: Heartbeat monitoring is an optional feature. You can operate multicast forwarding
without it if you prefer.
As an example of this type of multicast configuration, the following procedure specifies the
MBONE interface as the Ethernet port, and uses the heartbeat group address of 224.1.1.1:
1
Open Ethernet > Mod Config > Multicast and set Forwarding to enable multicast
forwarding. Leave the default values for the Mbone Profile, Client, and Rate Limit
parameters:
Ethernet
Mod Config
Multicast...
Forwarding=Yes
Membership Timeout=60
Mbone Profile=
Client=No
Rate Limit=5
2
Set the HeartBeat Addr and Heartbeat UDP parameters to specify a heartbeat group
address and UDP port for monitoring heartbeat packets. For example:
MAX 6000/3000 Network Configuration Guide
10-5
Setting Up IP Multicast Forwarding
Examples of multicast forwarding configuration
HeartBeat Addr=224.1.1.1
HeartBeat Udp Port=16387
3
Set the Heartbeat Slot Time, HeartBeat Slot Count, and Alarm Threshold parameters to
specify the time, count, and alarm threshold. For example:
HeartBeat Slot Time=10
HeartBeat Slot Count=10
Alarm threshold=3
Source Addr=0.0.0.0
Source Mask=0.0.0.0
4
Exit the profile and, at the exit prompt, select the exit and accept option.
To enable multicasting on WAN interfaces:
1
Open the Connection profile for a multicast client site.
2
Open the IP Options subprofile and set Multicast Client to Yes. If appropriate, set the
Multicast Rate Limit parameter to specify a rate limit other than the default of 5.
Ethernet
Connections
0-101 Crofile1
Ip options...
Multicast Client=Yes
Multicast Rate Limit=5
3
Exit the profile and, at the exit prompt, select the exit and accept option.
Forwarding from an MBONE router on a WAN link
Figure 10-2 shows a multicast router on the WAN with local and dial-in multicast clients. This
example presents a sample configuration for the local MAX unit in the figure. The
configuration specifies the MBONE interface as a WAN link accessed through a Connection
profile # 4.
Figure 10-2. MAX acting as a multicast forwarder on Ethernet and WAN interfaces
Multicast router
Win95
MAXTNT POP
Ethernet
T1
VAT
(Visual Audio Tools)
Analog
T1
Modem
T1
WAN
MAX
MAX
T1
BRI
VAT
(Visual Audio Tools)
MAXTNT POP
Win95
Win 95
ISDN
modem
Note: This example does not use heartbeat monitoring. If you want to configure the MAX for
heartbeat monitoring, see the sample settings in “Examples of multicast forwarding
configuration” on page 10-5.
10-6
MAX 6000/3000 Network Configuration Guide
Setting Up IP Multicast Forwarding
Examples of multicast forwarding configuration
Configuring the MAX to respond to multicast clients
To configure the MAX to respond to multicast clients on the Ethernet:
1
Open Ethernet > Mod Config > Multicast and set the Forwarding parameter to enable
multicast forwarding, set Mbone Profile to specify the number of the Connection profile
for the MBONE interface, and set Client to Yes:
Ethernet
Mod Config
Multicast...
Forwarding=Yes
Membership Timeout=60
Mbone Profile=20
Client=Yes
2
In the same profile, set Multicast Rate Limit to a number lower than the default of 100:
Rate Limit=5
3
Exit the profile and, at the exit prompt, select the exit and accept option.
Configuring the MBONE interface
To configure the MBONE interface:
1
Open the Connection profile for an MBONE interface (in this example, profile # 4).
2
Open the IP options subprofile and set Multicast Rate Limit to a number lower than the
default of 100:
Ethernet
Connections
90-104 Cprofile4
Ip Options...
Multicast Client=No
Multicast Rate Limit=5
3
Exit the profile and, at the exit prompt, select the exit and accept option.
Configuring multicasting on WAN interfaces
To enable multicasting on WAN interfaces:
1
Open the Connection profile for a multicast client site.
2
Open the IP options subprofile. Set the Multicast Client parameter to Yes and set the
Multicast Rate Limit parameter to a number lower than the default of 100:
Ethernet
Connections
90-106 Cprofile6
Ip options...
Multicast Client=Yes
Multicast Rate Limit=5
3
Exit the profile and, at the exit prompt, select the exit and accept option.
MAX 6000/3000 Network Configuration Guide
10-7
Setting Up Virtual Private Networks
11
Introduction to Virtual Private Networks. . . . . . . . . . . . . . . . . . . . . . . . . . . . . . . . . . . 11-1
Configuring ATMP tunnels . . . . . . . . . . . . . . . . . . . . . . . . . . . . . . . . . . . . . . . . . . . . . 11-2
Configuring PPTP tunnels for dial-in clients . . . . . . . . . . . . . . . . . . . . . . . . . . . . . . . 11-27
Configuring L2TP tunnels for dial-in clients . . . . . . . . . . . . . . . . . . . . . . . . . . . . . . . 11-31
Using Tunnel Options to support tunneling protocols . . . . . . . . . . . . . . . . . . . . . . . . 11-44
SNMP MIB for L2TP Added. . . . . . . . . . . . . . . . . . . . . . . . . . . . . . . . . . . . . . . . . . . 11-45
Configuring Virtual Routers. . . . . . . . . . . . . . . . . . . . . . . . . . . . . . . . . . . . . . . . . . . . 11-47
Introduction to Virtual Private Networks
Virtual Private Networks (VPNs) provide low-cost remote access to private LANs via the
Internet. The tunnel to the private corporate network can be from an ISP, enabling mobile
clients to dial in to a corporate network, or it can provide a low-cost Internet connection
between two corporate networks. Lucent currently supports three VPN schemes: Ascend
Tunnel Management Protocol (ATMP), Point-to-Point Tunneling Protocol (PPTP) and Layer 2
Tunneling Protocol (L2TP).
An ATMP session can occur only between two Lucent units and must use UDP/IP. The MAX
encapsulates all packets passing through the tunnel in standard Generic Routing Encapsulation
(GRE) as described in RFC 1701. ATMP creates and tears down a cross-Internet tunnel
between the two Lucent units. In effect, the tunnel collapses the Internet cloud and provides
what looks like direct access to a home network. The tunnels do not support bridging. All
packets must be routed with IP or IPX.
The Microsoft Corporation developed Point-to-Point Tunneling Protocol (PPTP) to enable
Windows 95 and Windows NT Workstation users to dial into a local ISP to connect to a private
corporate network across the Internet.
Version 8 of the Internet Engineering Task Force (IETF) draft titled Layer Two Tunneling
Protocol “L2TP,” dated November, 1997, specifies the Layer 2 Tunneling Protocol (L2TP).
L2TP enables you to connect to a private network by dialing into a local MAX, which creates
and maintains an L2TP tunnel between itself and the private network.
Note: Any MAX unit supporting PPTP or L2TP does not display a terminal-server prompt to
dial-in users, because all dial-in calls are immediately transferred to PPTP or L2TP servers.
MAX 6000/3000 Network Configuration Guide
11-1
Setting Up Virtual Private Networks
Configuring ATMP tunnels
Configuring ATMP tunnels
ATMP is a UDP/IP-based protocol for tunneling between two MAX units across an IP
network. Data is transported through the tunnel in Generic Routing Encapsulation (GRE), as
described in RFC 1701. (For a complete description of ATMP, see RFC 2107, Ascend Tunnel
Management Protocol - ATMP.)
This section describes how ATMP tunnels work between two MAX units. One of the units acts
as a Foreign Agent (typically a local ISP) and one as a Home Agent (which can access the
home network). A mobile client dials into the Foreign Agent, which establishes a
cross-Internet IP connection to the Home Agent. The Foreign Agent then requests an ATMP
tunnel on top of the IP connection. The Foreign Agent must use RADIUS to authenticate
mobile client dial-ins.
The Home Agent is the terminating part of the tunnel and provides most of the ATMP
intelligence. It must be able to communicate with the home network (the destination network
for mobile clients) through a direct connection, another router, or across a nailed connection.
For example, in Figure 11-1, the mobile node might be a sales person who logs into an ISP to
access his or her home network. The ISP is the Foreign Agent. The Home Agent has access to
the home network.
Figure 11-1. ATMP tunnel across the Internet
Home network
Mobile client
MAX
Foreign Agent
MAX
Home Agent
IP network
ATMP tunnel
RADIUS
How the MAX creates ATMP tunnels
The MAX establishes an ATMP connection as follows:
11-2
1
A mobile client dials a connection to the Foreign Agent.
2
The Foreign Agent uses a RADIUS profile to authenticate the mobile client.
The MAX, configured as a Foreign Agent, requires RADIUS authentication of the mobile
client, because only RADIUS supports the required attributes.
3
The Foreign Agent uses the Ascend-Home-Agent-IP-Addr attribute in the mobile client’s
RADIUS profile to locate a Connection profile (or RADIUS profile) for the Home Agent.
4
The Foreign Agent dials the Home Agent, and authenticates and establishes an IP
connection in the usual way.
5
The Foreign Agent informs the Home Agent that the mobile client is connected, and
requests a tunnel. The Foreign Agent sends up to 10 RegisterRequest messages at
MAX 6000/3000 Network Configuration Guide
Setting Up Virtual Private Networks
Configuring ATMP tunnels
two-second intervals, timing out and logging a message if it receives no response to the
requests.
6
The Home Agent requests a password before it creates the tunnel.
7
The Foreign Agent returns an encrypted version of the Ascend-Home-Agent-Password
value found in the mobile client’s RADIUS profile. This password must match the Home
Agent’s Password parameter in the ATMP configuration in the Ethernet profile.
8
The Home Agent returns a RegisterReply with a number that identifies the tunnel. If
registration fails, the MAX logs a message and the Foreign Agent disconnects the mobile
client. If registration succeeds, the MAX creates the tunnel between the Foreign Agent
and the Home Agent.
9
When the mobile client disconnects from the Foreign Agent, the Foreign Agent sends a
DeregisterRequest to the Home Agent to close the tunnel.
The Foreign Agent can send its request a maximum of ten times, or until it receives a
DeregisterReply. If the Foreign Agent receives packets for a mobile client whose
connection has been terminated, the Foreign Agent silently discards the packets.
Setting the UDP port
By default, ATMP agents use UDP port 5150 to exchange control information while
establishing a tunnel. If the Home Agent ATMP profile specifies a different UDP port number,
all tunnel requests to that Home Agent must specify that UDP port.
Note: A system reset is required for the ATMP subsystem to recognize the new UDP port
number.
Setting an MTU limit
The type of link that connects a Foreign Agent and Home Agent determines the Maximum
Transmission Unit (MTU). The link may be a dial-up connection, a Frame Relay connection,
or an Ethernet link, and it may be on a local network or routed through multiple hops. If the
link between devices is multihop (traverses more than one network segment), the path MTU is
the minimum MTU of the intervening segments.
Figure 11-2 shows an ATMP setup across an Ethernet segment, which limits the path MTU to
1500 bytes.
Figure 11-2. Path MTU on an Ethernet segment
WAN
PPP client
Foreign Agent
Home Agent
Home
router
Home network
To avoid packet fragmentation and reassembly, every segment of the link between the agents
must accommodate an MTU of at least smaller than 1528 bytes (unless the packets are
compressed). You can push fragmentation and reassembly tasks to connection end-points (a
mobile client and a device on the home network) by setting an MTU limit. Client software then
MAX 6000/3000 Network Configuration Guide
11-3
Setting Up Virtual Private Networks
Configuring ATMP tunnels
uses MTU discovery mechanisms to determine the maximum packet size, and fragments
packets before sending them.
How link compression affects the MTU
If any kind of compression is on (such as VJ header or link compression), the connection can
transfer larger packets without exceeding a link’s Maximum Receive Units (MRU). If
compressing a packet makes it smaller than the MRU, it can be sent across the connection,
whereas the same packet without compression could not.
How ATMP tunneling causes fragmentation
To transmit packets through an ATMP tunnel, the MAX adds an 8-byte GRE header and a
20-byte IP header to the frames it receives. The addition of these packet headers can make the
packet larger than the MTU of the tunneled link, in which case the MAX must either fragment
the packet after encapsulating it or reject the packet.
Fragmenting packets after encapsulating them has several disadvantages for the Foreign Agent
and Home Agent. For example, it degrades performance because both agents have extra
overhead. It also means that the Home Agent device cannot be a GRF switch. (To maintain its
very high aggregate throughput, Lucent’s GRF switch does not perform reassembly.)
Pushing the fragmentation task to connection end-points
To avoid the extra overhead incurred when ATMP agents perform fragmentation, you can
either set up a link between the two units that has an MTU greater than 1528 (which means it
cannot include Ethernet segments), or you can set the Ethernet > Mod Config > ATMP > GRE
MTU parameter to a value that is 28 bytes less than the path MTU.
If you set GRE MTU to zero (the default), the MAX might fragment encapsulated packets
before transmission. The other ATMP agent must then reassemble the packets.
If you set GRE MTU to a nonzero value, the MAX reports that value to the client software as
the path MTU, causing the client to send packets of the specified size. This pushes the task of
fragmentation and reassembly out to the connection end-points, lowering the overhead on the
ATMP agents.
For example, if the MAX is communicating with another ATMP agent across an Ethernet
segment, you can set the GRE MTU parameter to a value 28 bytes smaller than 1500 bytes, as
shown in the following example, to enable the unit to send full-size packets that include the
8-byte GRE header and a 20-byte IP header without fragmenting the packets:
GRE MTU=1472
With this setting, the connection end-point sends packets with a maximum size of 1472 bytes.
When the MAX encapsulates them, adding 28 bytes to the size, the packets still do not violate
the 1500-byte Ethernet MTU.
Forcing fragmentation for interoperation with outdated clients
To discover the path MTU, some clients normally send packets that are larger than the
negotiated Maximum Receive Unit (MRU) and that have the Don’t Fragment (DF) bit set.
Such packets are returned to the client with an ICMP message informing the client that the host
11-4
MAX 6000/3000 Network Configuration Guide
Setting Up Virtual Private Networks
Configuring ATMP tunnels
is unreachable without fragmentation. This standard, expected behavior improves end-to-end
performance by enabling the connection end-points to perform any required fragmentation and
reassembly.
However, some outdated client software does not handle this process correctly and continues
to send packets that are larger than the specified GRE MTU. To enable the MAX to
interoperate with these clients, you can configure the MAX to ignore the DF bit and perform
the fragmentation that normally should be performed by the client software. This function in
the MAX is sometimes referred to as prefragmentation. To enable it, set the Force
Fragmentation parameter to Yes. The MAX unit then prefragments the packets, before adding
the GRE and IP headers.
Note: Setting the Force fragmentation parameter to Yes causes the MAX to bypass the
standard MTU discovery mechanism and fragment larger packets before encapsulating them in
GRE. Because this changes expected behavior, it is not recommended except for ATMP
interoperation with outdated client software that does not handle fragmentation properly.
Router and gateway mode
The Home Agent can communicate with the home network through a direct connection,
through another router, or across a nailed connection. When the Home Agent relies on packet
routing to reach the home network, it operates in router mode. When it has a nailed connection
to the home network, it is in gateway mode.
Configuring the Foreign Agent
Following are the parameters (shown with sample settings) related to Foreign Agent
configuration:
Ethernet
Mod Config
ATMP options...
ATMP Mode=Foreign
Type=N/A
Password=N/A
SAP Reply=N/A
UDP Port=5150
GRE MTU=1472
Force fragmentation=No
Idle limit=N/A
ATMP SNMP Traps=No
Following are the parameters (shown with sample settings) for the IP routing connection to the
Home Agent:
Ethernet
Mod Config
Ether options...
IP Adrs=10.65.212.226/24
Ethernet
Connections
90-101 Connection profile 1
MAX 6000/3000 Network Configuration Guide
11-5
Setting Up Virtual Private Networks
Configuring ATMP tunnels
Station=name-of-home-agent
Active=Yes
Dial #=555-1212
Route IP=Yes
IP options...
LAN Adrs=10.1.2.3/24
Following are the parameters (shown with sample settings) for using RADIUS authentication:
Ethernet
Mod Config
Auth...
Auth=RADIUS
Auth Host #1=10.23.45.11/24
Auth Host #2=0.0.0.0/0
Auth Host #3=0.0.0.0/0
Auth Port=1645
Auth Timeout=1
Auth Key-=[]
Auth Pool=No
Auth Req=Yes
Password Server=No
Password Port=N/A
Local Profile First=No
Sess Timer=0
Auth Src Port=0
Auth Send Attr 6,7=Yes
Following are the parameters (shown with sample settings) for creating RADIUS user profiles
for mobile clients running TCP/IP:
node1 Password="top-secret"
Ascend-Metric=2,
Framed-Protocol=PPP,
Service-Type= * check these in this section
Ascend-IP-Route=Route-IP-Yes,
Framed-IP-Address=200.1.1.2,
Framed-IP-Netmask=255.255.255.0,
Ascend-Primary-Home-Agent=10.1.2.3,
Ascend-Home-Agent-Password="private"
Ascend-Home-Agent-UDP-Port=5150
Tunnel-Type=ATMP,
Tunnel-Server-Endpoint="atmp-ha1.example.com",
Tunnel-Password="tunnel-password"
Following are the parameters (shown with sample settings) for creating RADIUS user profiles
for mobile clients running NetWare:
node2 Password="ipx-unit"
User-Service=Framed-User,
Ascend-Route-IPX=Route-IPX-Yes,
Framed-Protocol=PPP,
Ascend-IPX-Peer-Mode=IPX-Peer-Dialin,
Framed-IPX-Network=40000000,
Ascend-IPX-Node-Addr=123456789012,
11-6
MAX 6000/3000 Network Configuration Guide
Setting Up Virtual Private Networks
Configuring ATMP tunnels
Ascend-Primary-Home-Agent=10.1.2.3,
Ascend-Home-Agent-Password="private"
Understanding the Foreign Agent parameters and attributes
This section provides some background information about configuring a Foreign Agent to
initiate an ATMP request to the Home Agent MAX. For detailed information about each
parameter, see the MAX Reference. For details about attributes and configuring external
authentication, see the TAOS RADIUS Guide and Reference.
Parameter(s)
Usage
ATMP Mode
For the Foreign Agent, the mode is Foreign, which makes
the Type, Password, and SAP Reply parameters not
applicable.
UDP Port
ATMP uses UDP port 5150 for ATMP messages between
the Foreign Agent and Home Agent. If you specify a
different UDP port number, make sure that the entire ATMP
configuration agrees.
GRE MTU
Specifies the Maximum Transmission Unit (MTU) for the
path between the Foreign Agent and Home Agent (as
described in “Setting an MTU limit” on page 11-3).
ATMP SNMP Traps
Specifies that the MAX sends ATMP-related SNMP traps.
IP configuration and Connection The cross-Internet connection to the Home Agent is an IP
profile parameters
routing connection that the MAX authenticates and
establishes in the usual way. (For details, see Chapter 9,
“Configuring IP Routing.”)
RADIUS authentication
attributes
The Foreign Agent must use RADIUS to authenticate
mobile clients, and the RADIUS server must be running a
version of the daemon that includes the ATMP attributes.
(For details, see the TAO RADIUS Guide and Reference.)
RADIUS user-profile attributes The RADIUS user profiles for mobile clients must include
ATMP attributes. The required attributes differ slightly,
depending on whether the mobile client and home network
run IP or IPX and whether the Home Agent MAX operates
in router mode or gateway mode.
Table 11-1 lists the RADIUS attributes required when the mobile client and home network are
routing IP, and Table 11-2 lists the required attributes when the mobile client and home
network are routing IPX. Descriptions of the attributes follow the tables.
Table 11-1.Required RADIUS attributes to reach an IP home network
Home Agent in router mode
Home Agent in gateway mode
Ascend-Primary-Home-Agent
Ascend-Primary-Home-Agent
Ascend-Home-Agent-Password
Ascend-Home-Agent-Password
MAX 6000/3000 Network Configuration Guide
11-7
Setting Up Virtual Private Networks
Configuring ATMP tunnels
Table 11-1.Required RADIUS attributes to reach an IP home network (continued)
Home Agent in router mode
Home Agent in gateway mode
Ascend-Home-Agent-UDP-Port
Ascend-Home-Agent-UDP-Port
Ascend-Home-Network-Name
Table 11-2.Required RADIUS attributes to reach an IPX home network
Home Agent in router mode
Home Agent in gateway mode
Ascend-IPX-Peer-Mode
Ascend-IPX-Peer-Mode
Framed-IPX-Network
Framed-IPX-Network
Ascend-IPX-Node-Addr
Ascend-IPX-Node-Addr
Ascend-Primary-Home-Agent
Ascend-Primary-Home-Agent
Ascend-Home-Agent-Password
Ascend-Home-Agent-Password
Ascend-Home-Agent-UDP-Port
Ascend-Home-Agent-UDP-Port
Ascend-Home-Network-Name
Following is a description of each Foreign Agent attribute:
11-8
Attribute
Description
Ascend-Primary-Home-Agent
IP address of the Home Agent, used to locate the
Connection profile (or RADIUS profile) for the IP
connection to the Home Agent.
Ascend-Home-Agent-Password
Used to authenticate the ATMP tunnel itself. Must
match the password specified in the Home Agent’s
Ethernet > Mod Config > ATMP Options subprofile.
All mobile clients use the same
ATMP-Home-Agent-Password.
Ascend-Home-Agent-UDP-Port
Must match the UDP port configuration in Ethernet >
Mod Config > ATMP Options. Required only for a port
number other than the default 5150.
Ascend-Home-Network-Name
Name of the Home Agent’s local Connection profile to
the home network. Required only when the Home
Agent is operating in gateway mode (when it has a
nailed WAN link to the home network). For details, see
“Configuring a Home Agent in gateway mode” on
page 11-15.
Ascend-IPX-Peer-Mode
Dial-in NetWare clients must specify IPX-Peer-Dialin.
This setting enables the Foreign Agent to handle RIP
and SAP advertisements and assign the mobile client a
virtual IPX network number.
MAX 6000/3000 Network Configuration Guide
Setting Up Virtual Private Networks
Configuring ATMP tunnels
Attribute
Description
Framed-IPX-Network
Virtual IPX network number. Assigned to dial-in
NetWare clients (mobile clients) to enable the Home
Agent to route back to the mobile client.
This IPX network number must be represented in
decimal, not hexadecimal, and it must be unique in the
IPX routing domain. (Note that you typically specify
IPX network numbers in hexadecimal.) All mobile
clients logging into an IPX home network through the
same Foreign Agent typically use the same virtual IPX
network number.
Ascend-IPX-Node-Addr
Represents the mobile client on the virtual IPX
network. Is represented as a 12-digit string that must be
enclosed in double-quotes.
Example of configuring a Foreign Agent (IP)
To configure the Foreign Agent and create a mobile client profile to access a home IP network:
1
Open Ethernet > Mod Config > Ether Options and verify that the LAN interface has an IP
address. For example:
Ethernet
Mod Config
Ether options...
IP Adrs=10.65.212.226/24
2
Open the ATMP Options subprofile and set ATMP Mode to Foreign:
ATMP options...
ATMP Mode=Foreign
Type=N/A
Password=N/A
SAP Reply=N/A
UDP Port=5150
3
Open the Auth subprofile and configure the Foreign Agent to authenticate through
RADIUS. For example:
Auth...
Auth=RADIUS
Auth Host #1=10.23.45.11/24
Auth Host #2=0.0.0.0/0
Auth Host #3=0.0.0.0/0
Auth Port=1645
Auth Timeout=1
Auth Key-=[]
Auth Pool=No
Auth Req=Yes
Password Server=No
Password Port=N/A
Local Profile First=No
Sess Timer=0
Auth Src Port=0
Auth Send Attr 6,7=Yes
For detailed information about each parameter, see the MAX Reference.
MAX 6000/3000 Network Configuration Guide
11-9
Setting Up Virtual Private Networks
Configuring ATMP tunnels
4
Exit the profile and, at the exit prompt, select the exit and accept option.
5
Open a Connection profile and configure an IP routing connection to the Home Agent. For
example:
Ethernet
Connections
90-101 Connection profile 1
Station=home-agent
Active=Yes
Encaps=MPP
Dial #=555-1212
Route IP=Yes
Encaps options...
Send Auth=CHAP
Recv PW=home-pw
Send PW=foreign-pw
IP options...
LAN Adrs=10.1.2.3/24
6
Exit the profile and, at the exit prompt, select the exit and accept option.
7
On the RADIUS server, open the RADIUS user profile and create an entry for a mobile
client. For example:
node1 Password="top-secret"
Ascend-Metric=2,
Framed-Protocol=PPP,
Ascend-IP-Route=Route-IP-Yes,
Framed-Address=200.1.1.2,
Framed-IP-Netmask=255.255.255.0,
Ascend-Primary-Home-Agent=10.1.2.3,
Ascend-Home-Agent-Password="private"
Ascend-Home-Agent-UDP-Port=5150
Ascend-Dial-Number="9-1-333-555-1212",
Ascend-Send-Auth=Send-Auth-CHAP,
Ascend-Send-Password="remotepw"
8
Close the user profile.
When the mobile client logs into the Foreign Agent with the password top secret, the
Foreign Agent uses RADIUS to authenticate the mobile client. It then looks for a profile with
an IP address that matches the Ascend-Home-Agent-IP-Addr value, so that it can bring up an
IP connection to the Home Agent.
Example of configuring a Foreign Agent (IPX)
The procedure for configuring a Foreign Agent to support IPX connections that use ATMP is
very similar to one for IP. The only difference is in the mobile client’s user profile, as shown in
the following example:
node2 Password="ipx-unit"
User-Service=Framed-User,
Ascend-Route-IPX=Route-IPX-Yes,
Framed-Protocol=PPP,
Ascend-IPX-Peer-Mode=IPX-Peer-Dialin,
Framed-IPX-Network=40000000,
Ascend-IPX-Node-Addr=123456789012,
11-10
MAX 6000/3000 Network Configuration Guide
Setting Up Virtual Private Networks
Configuring ATMP tunnels
Ascend-Primary-Home-Agent=10.1.2.3,
Ascend-Home-Agent-Password="private"
When the mobile client logs into the Foreign Agent with the password ipx-unit, the
Foreign Agent uses RADIUS to authenticate the mobile client. It then looks for a profile with
an IP address that matches the Ascend-Home-Agent-IP-Addr value, so that it can bring up an
IP connection to the Home Agent.
Configuring a Home Agent
To configure an ATMP Home Agent, you must set parameters in the ATMP profile, verify that
the Home Agent can communicate across an IP link with the Foreign agent, and configure the
connection to the home network.
The link to the Foreign agent can be any kind of connection (dial-up, nailed, or Frame Relay,
for example.) or an Ethernet link, and it can be a local network or a remote network, provided
the two units communicate through an IP network.
Because the Home Agent does not establish a WAN connection on the basis of receiving
tunneled data, the link to the home network cannot be a regular switched dial-up connection,
but can be a nailed connection, a switched incoming connection from the home network, or a
routed connection.
Configuring a Home Agent in router mode
When the ATMP tunnel has been established between the Home Agent and Foreign Agent, the
Home Agent in router mode receives IP packets through the tunnel, removes the GRE
encapsulation, and passes the packets to its bridge/router software. In its routing table, the
Home Agent adds a host route to the mobile client.
Figure 11-3. Home Agent routing to the home network
home
network
mobile client
MAX
MAX
Internet
WAN
Foreign
Agent
mobile client
Home
Agent
ATMP Tunnel
mobile client
RADIUS
The MAX requires settings for the IPX routing parameters in the Ethernet profile only if the
MAX is routing IPX. Following are the parameters (shown with sample settings) used for
configuring a Home Agent in router mode:
Ethernet
Mod Config
IPX Routing=Yes
Ether options...
MAX 6000/3000 Network Configuration Guide
11-11
Setting Up Virtual Private Networks
Configuring ATMP tunnels
IP Adrs=10.1.2.3/24
IPX Frame=802.2
IPX Enet #=00000000
ATMP options...
ATMP Mode=Home
Type=Router
Password=private
SAP Reply=No
UDP Port=5150
GRE MTU=1472
Force fragmentation=No
Idle limit=0
ATMP SNMP Traps=No
The IP routing connection to the Foreign Agent uses the following parameters (shown with
sample settings):
Ethernet
Connections
any Connection profile
Station=foreign-agent
Active=Yes
Encaps=MPP
Dial #=555-1213
Route IP=Yes
Encaps options...
Send Auth=CHAP
Recv PW=foreign-pw
Send PW=home-pw
IP options...
LAN Adrs=10.65.212.226/24
Understanding the ATMP router mode parameters
This section provides some background information about configuring a Home Agent in router
mode. For detailed information about each parameter, see the MAX Reference.
11-12
Parameter
Usage
ATMP Mode
For the Home Agent, the mode is Home.
Type
When you set Type to Router, the Home Agent relies on routing (not a
WAN connection) to pass packets received through the tunnel to the
home network.
Password
Used to authenticate the ATMP tunnel itself. Must match the password
specified in the Ascend-Home-Agent-Password attribute of each
mobile client’s RADIUS profile. (All mobile clients use the same
password for that attribute.)
MAX 6000/3000 Network Configuration Guide
Setting Up Virtual Private Networks
Configuring ATMP tunnels
Parameter
Usage
SAP Reply
Enables a Home Agent to reply to the mobile client’s IPX Nearest
Server Query if it knows about a server on the home network. If the
parameter is set to No, the Home Agent simply tunnels the mobile
client’s request to the home network.
UDP Port
ATMP uses UDP port 5150 for ATMP messages between the Foreign
Agent and Home Agent. If you specify a different UDP port number,
make sure that the entire ATMP configuration agrees.
Specifies the Maximum Transmission Unit (MTU) for the path
between the Foreign Agent and Home Agent as described in “Setting
an MTU limit” on page 11-3.
Enables/disables prefragmentation of packets that have the DF bit set
(as described in “Forcing fragmentation for interoperation with
outdated clients” on page 11-4).
Specifies the number of minutes the Home Agent maintains an idle
tunnel before disconnecting it.
The cross-Internet connection to the Foreign Agent is an IP routing
connection that the MAX authenticates and establishes in the usual
way. (For details, see Chapter 9, “Configuring IP Routing.”)
GRE MTU
Force fragmentation
Idle limit
IP configuration and
Connection profile
parameters
Routing to the mobile client
When the Home Agent receives IP packets through the ATMP tunnel, it adds a host route for
the mobile client to its IP routing table. It then handles routing in the usual way. When the
Home Agent receives IPX packets through the tunnel, it adds a route to the mobile client on the
basis of the virtual IPX network number assigned in the RADIUS user profile.
For IP routes, you can enable RIP on the Home Agent’s Ethernet to enable other hosts and
networks to route to the mobile client. Enabling RIP is particularly useful if the home network
is one or more hops away from the Home Agent’s Ethernet. If you turn RIP off, other routers
require static routes that specify the Home Agent as the route to the mobile client.
Note: If the Home Agent’s Ethernet is the home network (a direct connection), you should
turn on proxy ARP in the Home Agent so that local hosts can use ARP to find the mobile
client.
For details on IP routes, see Chapter 9, “Configuring IP Routing.” For information about IPX
routes, see Chapter 12, “Configuring IPX Routing.”
Example of configuring a Home Agent in router mode (IP)
To configure the Home Agent in router mode to reach an IP home network:
1
Open Ethernet > Mod Config > Ether Options and verify that the LAN interface has an IP
address. You can also set routing options. For example:
Ethernet
Mod Config
Ether options...
IP Adrs=10.1.2.3/24
RIP=On
2
Open the ATMP Options subprofile, set ATMP Mode to Home, and set Type to Router.
MAX 6000/3000 Network Configuration Guide
11-13
Setting Up Virtual Private Networks
Configuring ATMP tunnels
3
Specify the password used to authenticate the tunnel (Ascend-Home-Agent-Password).
For example:
ATMP options...
ATMP Mode=Home
Type=Router
Password=private
SAP Reply=No
UDP Port=5150
GRE MTU=1472
Force fragmentation=No
Idle limit=0
ATMP SNMP Traps=No
4
Exit the profile and, at the exit prompt, select the exit and accept option.
5
Open a Connection profile and configure an IP routing connection to the Foreign Agent.
For example:
Ethernet
Connections
any Connection profile
Station=foreign-agent
Active=Yes
Encaps=MPP
Dial #=555-1213
Route IP=Yes
Encaps options...
Send Auth=CHAP
Recv PW=foreign-pw
Send PW=home-pw
IP options...
LAN Adrs=10.65.212.226/24
6
Exit the profile and, at the exit prompt, select the exit and accept option.
Example of configuring a Home Agent in router mode (IPX)
To configure the Home Agent in router mode to reach an IPX network:
1
Open Ethernet > Mod Config > Ether Options and verify that the LAN interface has an IP
address (needed for communication with the Foreign Agent) and can route IPX.
Ethernet
Mod Config
IPX Routing=Yes
Ether options…
IP Adrs=10.1.2.3/24
IPX Frame=802.2
IPX Enet #=00000000
For details, see Chapter 12, “Configuring IPX Routing.”
11-14
2
Open the ATMP Options subprofile, set ATMP Mode to Home, and set Type to Router.
ATMP options...
ATMP Mode=Home
Type=Router
3
Specify the password used to authenticate the tunnel (Ascend-Home-Agent-Password).
MAX 6000/3000 Network Configuration Guide
Setting Up Virtual Private Networks
Configuring ATMP tunnels
4
Set SAP Reply to Yes, and leave the default for UDP port:
Password=private
SAP Reply=Yes
UDP Port=5150
5
Exit the profile and, at the exit prompt, select the exit and accept option.
6
Open a Connection profile and configure an IP routing connection to the Foreign Agent.
For example:
Ethernet
Connections
any Connection profile
Station=foreign-agent
Active=Yes
Encaps=MPP
Dial #=555-1213
Route IP=Yes
Encaps options...
Send Auth=CHAP
Recv PW=foreign-pw
Send PW=home-pw
IP options...
LAN Adrs=10.65.212.226/24
7
Exit the profile and, at the exit prompt, select the exit and accept option.
Configuring a Home Agent in gateway mode
When you configure the Home Agent in gateway mode, it receives GRE-encapsulated IP
packets from the Foreign Agent, strips off the encapsulation, and passes the packets across a
nailed WAN connection to the home network.
Figure 11-4. Home Agent in gateway mode
home network
CPE Router A
MAX
Home Agent
MAX
Foreign Agent
WAN
Internet
ATMP
tunnel
mobile clients
CPE Router B
RADIUS
home network
Note: To enable hosts and routers on the home network to reach the mobile client, you must
configure a static route in the Customer Premise Equipment (CPE) router on the home network
(not in the Home Agent). The static route must specify the Home Agent as the route to the
mobile client. That is, the route’s destination address specifies the Framed-Address of the
mobile client, and its gateway address specifies the IP address of the Home Agent.
MAX 6000/3000 Network Configuration Guide
11-15
Setting Up Virtual Private Networks
Configuring ATMP tunnels
Limiting the maximum number of tunnels
If you decide to limit the maximum number of tunnels a gateway will support, you should
consider the expected traffic per mobile-client connection, the bandwidth of the connection to
the home network, and the availability of alternative Home Agents (if any). For example, the
lower the amount of traffic generated by each mobile-client connection, the more tunnels a
gateway connection will be able to handle.
Enabling RIP on the interface to the home router
The router at the far end of the gateway profile must be able to route back to mobile clients.
The easiest way to accomplish this is by setting the ATMP RIP parameter to Send-v2. With this
setting, the Gateway Home Agent constructs a RIP-v2 Response(2) packet at every RIP
interval and sends it to the home network from all tunnels using the gateway profile. For each
tunnel, the Response packet contains the mobile client IP address, and subnet mask, and
indicates that the next hop is 0.0.0.0, and the metric is 1. RIP-v2 authentication and route tags
are not supported.
Note: The home network router should not send RIP updates, because the Home Agent does
not inspect them. The RIP updates would be forwarded to the mobile clients instead.
If you set ATMP RIP to Off, the administrator of the home network must configure a static
route to each mobile client. A static route to a mobile client can be specific to the client,
whereby the route’s destination is the mobile client IP address and the next-hop router is the
Home Agent address. For example, in the following route the mobile client is a router (this is
not a host route), and the Home Agent address is 2.2.2.2:
Dest=110.1.1.10/29
Gateway=2.2.2.2
Or, if the mobile clients have addresses allocated from the same address block (including
router mobile client addresses with subnet masks of less than 32 bits) and no addresses from
that block are assigned to other hosts, the home network administrator can specify a single
static route that encompass all mobile clients that use the same Home Agent. For example, in
the following route all mobile clients are allocated addresses from the 10.4.N.N block (and no
other hosts are allocated addresses from that block), and the Home Agent address is 2.2.2.2:
Dest=10.4.0.0/16
Gateway=2.2.2.2
Gateway-mode parameters
Configuring a Home Agent in gateway mode involves the following parameters (shown with
sample settings):
Ethernet
Mod Config
IPX Routing=Yes
Ether options...
IP Adrs=10.1.2.3/24
IPX Frame=802.2
IPX Enet #=00000000
ATMP options...
ATMP Mode=Home
11-16
MAX 6000/3000 Network Configuration Guide
Setting Up Virtual Private Networks
Configuring ATMP tunnels
Type=Gateway
Password=private
SAP Reply=No
UDP Port=5150
GRE MTU=1472
Force fragmentation=No
Idle limit=0
ATMP SNMP Traps=No
The IP routing connection to the Foreign Agent uses the following parameters (shown with
sample settings):
Ethernet
Connections
any Connection profile
Station=foreign-agent
Active=Yes
Encaps=MPP
Dial #=555-1213
Route IP=Yes
Encaps options...
Send Auth=CHAP
Recv PW=foreign-pw
Send PW=home-pw
IP options...
LAN Adrs=10.65.212.226/24
Or comparable settings in a RADIUS profile:
mclient Password = "local-password"
Service-Type = Framed-User,
Tunnel-Type = ATMP,
Tunnel-Server-Endpoint = "2.2.2.2:1234",
Tunnel-Password = "tunnel-password",
Tunnel-Private-Group-ID = "home-router"
The nailed connection to the home network uses the following parameters (shown with sample
settings):
Ethernet
Connections
any Connection profile
Station=homenet
Active=Yes
Encaps=MPP
Dial #=N/A
Calling #=N/A
Route IP=Yes
Route IPX=Yes
IP options...
LAN Adrs=5.9.8.2/24
MAX 6000/3000 Network Configuration Guide
11-17
Setting Up Virtual Private Networks
Configuring ATMP tunnels
Telco options...
Call Type=Nailed
Group=1,2
Session options...
ATMP Gateway=Yes
MAX ATMP Tunnels=0
ATMP RIP=Send-v2
The IPX routing parameters are required only if the MAX is routing IPX.
Understanding the ATMP gateway-mode parameters
This section provides some background information about configuring a Home Agent in
gateway mode. For detailed information about each parameter, see the MAX Reference.
Set the following parameters in the Mod Config profile’s ATMP Options subprofile:
Parameter
Usage
ATMP Mode
For the Home Agent, the mode is Home.
Type
When you set Type to Gateway, the Home Agent forwards packets
received through the tunnel to the home network across a nailed WAN
connection.
Password
Used to authenticate the ATMP tunnel itself. Must match the password
specified in the Ascend-Home-Agent-Password attribute of each
mobile client’s RADIUS profile. (All mobile clients use the same
password for that attribute.)
Enables a Home Agent to reply to the mobile client’s IPX Nearest
Server Query if it knows about a server on the home network. If the
parameter is set to No, the Home Agent simply tunnels the mobile
client’s request to the home network.
ATMP uses UDP port 5150 for ATMP messages between the Foreign
Agent and Home Agent. If you specify a different UDP port number,
make sure that the entire ATMP configuration agrees.
Specifies the Maximum Transmission Unit (MTU) for the path
between the Foreign Agent and Home Agent (as described in “Setting
an MTU limit” on page 11-3).
Enables/disables prefragmentation of packets that have the DF bit set,
(as described in “Forcing fragmentation for interoperation with
outdated clients” on page 11-4).
Specifies the number of minutes the Home Agent maintains an idle
tunnel before disconnecting it.
SAP Reply
UDP Port
GRE MTU
Force fragmentation
Idle limit
IP configuration and Connection profile
The cross-Internet connection to the Foreign Agent is an IP routing connection that the MAX
authenticates and establishes in the usual way. For details, see Chapter 9, “Configuring IP
Routing.”
11-18
MAX 6000/3000 Network Configuration Guide
Setting Up Virtual Private Networks
Configuring ATMP tunnels
Connection profile to the home network
The Connection profile to the home network must be a local profile. It cannot be specified in
RADIUS. The name of this Connection profile must match the name specified by the
Ascend-Home-Network-Name attribute in the mobile client’s RADIUS profile. In addition, the
Connection profile for connection to the home network must specify the following values:
•
Nailed call type. The Home Agent must have a nailed connection to the home network,
because it dials the WAN connection on the basis of packets received through the tunnel.
•
ATMP Gateway session option enabled. The ATMP Gateway parameter must be set to
Yes. This parameter instructs the Home Agent to send to the mobile client the data that it
receives back from the home network on this connection.
•
ATMP tunnel limit. The MAX ATMP Tunnels parameter specifies the number of ATMP
tunnels that the MAX as a Home Agent gateway can establish to a home network. The
maximum number of ATMP tunnels can be specified individually for each home network.
Also, the ATMP RIP parameter specifies whether or not the MAX includes mobile-client
routes in RIP-v2 responses to the home router.
Example of configuring a Home Agent in gateway-mode (IP)
To configure the Home Agent in gateway mode to reach an IP home network:
1
Open Ethernet > Mod Config > Ether Options and verify that the LAN interface has an IP
address. For example:
Ethernet
Mod Config
Ether options...
IP Adrs=10.1.2.3/24
2
Open the ATMP Options subprofile, set ATMP Mode to Home, and set Type to Gateway.
3
Specify the password used to authenticate the tunnel. It must match the
Ascend-Home-Agent-Password attribute of each mobile client’s RADIUS profile. For
example:
ATMP options...
ATMP Mode=Home
Type=Gateway
Password=private
SAP Reply=No
UDP Port=5150
GRE MTU=1472
Force fragmentation=No
Idle limit=0
ATMP SNMP Traps=No
4
Exit the profile and, at the exit prompt, select the exit and accept option.
5
Open a Connection profile and configure an IP routing connection to the Foreign Agent.
For example:
Ethernet
Connections
any Connection profile
Station=foreign-agent
Active=Yes
MAX 6000/3000 Network Configuration Guide
11-19
Setting Up Virtual Private Networks
Configuring ATMP tunnels
Encaps=MPP
Dial #=555-1213
Route IP=Yes
Encaps options...
Send Auth=CHAP
Recv PW=foreign-pw
Send PW=home-pw
IP options...
LAN Adrs=10.65.212.226/24
Or comparable settings in a RADIUS profile:
mclient Password = "local-password"
Service-Type = Framed-User,
Tunnel-Type = ATMP,
Tunnel-Server-Endpoint = "2.2.2.2:1234",
Tunnel-Password = "tunnel-password",
Tunnel-Private-Group-ID = "home-router"
6
Open a Connection profile and configure a nailed WAN link to the home network. For
example:
Ethernet
Connections
any Connection profile
Station=homenet
Active=Yes
Encaps=MPP
Dial #=N/A
Calling #=N/A
Route IP=Yes
IP options...
LAN Adrs=5.9.8.2/24
Telco options...
Call Type=Nailed
Group=1,2
Session options...
ATMP Gateway=Yes
MAX ATMP Tunnels=0
ATMP RIP=Send-v2
7
Exit the profile and, at the exit prompt, select the exit and accept option.
Example of configuring a Home Agent in gateway mode (IPX)
To configure the Home Agent in gateway mode to reach an IPX home network:
1
Open Ethernet > Mod Config > Ether Options and verify that the LAN interface has an IP
address (required for communication with the Foreign Agent) and can route IPX. For
example:
Ethernet
Mod Config
IPX Routing=Yes
Ether options…
IP Adrs=10.1.2.3/24
11-20
MAX 6000/3000 Network Configuration Guide
Setting Up Virtual Private Networks
Configuring ATMP tunnels
IPX Frame=802.2
IPX Enet #=00000000
For details, see Chapter 12, “Configuring IPX Routing.”
2
Open the ATMP Options subprofile, set ATMP Mode to Home, and set Type to Gateway.
3
Specify the password used to authenticate the tunnel. It must match the
Ascend-Home-Agent-Password attribute of each mobile client’s RADIUS profile.
4
Set SAP Reply to Yes. The profile now has the following settings:
ATMP options...
ATMP Mode=Home
Type=Gateway
Password=private
SAP Reply=Yes
UDP Port=5150
GRE MTU=1472
Force fragmentation=No
Idle limit=0
ATMP SNMP Traps=No
5
Exit the profile and, at the exit prompt, select the exit and accept option.
6
Open a Connection profile and configure an IP routing connection to the Foreign Agent.
For example:
Ethernet
Connections
any Connection profile
Station=foreign-agent
Active=Yes
Encaps=MPP
Dial #=555-1213
Route IP=Yes
Encaps options...
Send Auth=CHAP
Recv PW=foreign-pw
Send PW=home-pw
IP options...
LAN Adrs=10.65.212.226/24
7
Open a Connection profile and configure a nailed WAN link that routes IPX to the home
network. For example:
Ethernet
Connections
any Connection profile
Station=homenet
Active=Yes
Encaps=MPP
PRI # Type=National
Dial #=555-1212
Route IPX=Yes
(for ISDN PRI lines only)
Encaps options...
Send Auth=CHAP
Recv PW=homenet-pw
Send PW=my-pw
MAX 6000/3000 Network Configuration Guide
11-21
Setting Up Virtual Private Networks
Configuring ATMP tunnels
IPX options...
IPX RIP=None
IPX SAP=Both
NetWare t/o=30
Telco options...
Call Type=Nailed
Group=1,2
Session options...
ATMP Gateway=Yes
MAX ATMP Tunnels=0
ATMP RIP=Send-v2
8
Exit the profile and, at the exit prompt, select the exit and accept option.
Specifying the tunnel password
The Home Agent typically requests a password before establishing a tunnel. The Foreign
Agent returns an encrypted version of the password found in the mobile client’s profile.
If the password sent by the Foreign Agent matches the Password value specified in the ATMP
profile, the Home Agent returns a RegisterReply with a number that identifies the tunnel, and
the mobile client’s tunnel is established. If the password does not match, the Home Agent
rejects the tunnel, and the Foreign Agent logs a message and disconnects the mobile client.
Setting an idle timer for unused tunnels
When a mobile client disconnects normally, the Foreign Agent sends a request to the Home
Agent to close the tunnel. When a Foreign Agent restarts, however, tunnels that were
established to a Home Agent are not cleared normally, because the Home Agent is not
informed that the mobile clients are no longer connected. The unused tunnels continue to hold
memory on the Home Agent. To enable the Home Agent to reclaim the memory held by
unused tunnels, set an inactivity timer on a Home Agent by changing the Idle Limit parameter
to a nonzero value.
The inactivity timer runs only on the Home Agent side and specifies the number of minutes (1
to 65535) that the Home Agent maintains an idle tunnel before disconnecting it. A value of 0
disables the timer, which means that idle tunnels remain connected forever. The setting affects
only tunnels created after the timer was set.
Configuring the MAX as an ATMP multimode agent
You can configure the MAX to act as both a Home Agent and Foreign Agent on a
tunnel-by-tunnel basis. Figure 11-5 shows a sample network topology that has a MAX acting
as a Home Agent for Network B and a Foreign Agent for Network A.
11-22
MAX 6000/3000 Network Configuration Guide
Setting Up Virtual Private Networks
Configuring ATMP tunnels
Figure 11-5. MAX acting as both Home Agent and Foreign Agent
Home
Network A
Home
Network B
ATMP tunnel
Home Agent
for Network B
Internet
Home Agent for
Network B
Foreign Agent
for Network A
ATMP tunnel
Home Agent
for Network B
Mobile
Client A
Mobile
Client B
To configure the MAX as a multimode agent, set ATMP Mode to Both and complete both the
Foreign Agent and Home Agent specifications. Setting ATMP Mode to Both indicates that the
MAX will function as both a Home Agent and Foreign Agent on a tunnel-by-tunnel basis.
For example, to configure the MAX to operate as both a Home Agent and Foreign Agent, first
check the interface and set the ATMP options:
1
Open Ethernet > Mod Config > Ether Options and verify that the LAN interface has an IP
address. For example:
Ethernet
Mod Config
Ether options...
IP Adrs=10.65.212.226/24
2
Open the ATMP Options subprofile and set ATMP Mode to Both.
3
Configure the other home-agent settings as appropriate. For example, to use Gateway
mode and a password of private:
ATMP options...
ATMP Mode=Both
Type=Gateway
Password=private
SAP Reply=No
UDP Port=5150
GRE MTU=1472
Force fragmentation=No
Idle limit=0
ATMP SNMP Traps=No
Then set the Foreign Agent aspect of the multimode configuration:
1
Open the Auth subprofile and configure RADIUS authentication. For example:
Auth...
Auth=RADIUS
Auth Host #1=10.23.45.11/24
Auth Host #2=0.0.0.0/0
Auth Host #3=0.0.0.0/0
Auth Port=1645
Auth Timeout=1
Auth Key-=[]
MAX 6000/3000 Network Configuration Guide
11-23
Setting Up Virtual Private Networks
Configuring ATMP tunnels
Auth Pool=No
Auth Req=Yes
Password Server=No
Password Port=N/A
Local Profile First=No
Sess Timer=0
Auth Src Port=0
Auth Send Attr 6,7=Yes
For detailed information about each parameter, see the MAX Reference.
2
Exit the profile and, at the exit prompt, select the exit and accept option.
3
On the RADIUS server, open the RADIUS user profile and create an entry for a mobile
client. For example:
node1 Password="top-secret"
Ascend-Metric=2,
Framed-Protocol=PPP,
Ascend-IP-Route=Route-IP-Yes,
Framed-Address=200.1.1.2,
Framed-Netmask=255.255.255.0,
Ascend-Primary-Home-Agent=10.1.2.3,
Ascend-Home-Agent-Password="private"
Ascend-Home-Agent-UDP-Port=5150
Ascend-Home-Network-Name=home-agent
4
Close the user profile.
5
Open a Connection profile and configure an IP routing connection to the Network A
Home Agent. For example:
Ethernet
Connections
any Connection profile
Station=home-agent
Active=Yes
Encaps=MPP
Dial #=555-1212
Route IP=Yes
Encaps
Send
Recv
Send
options...
Auth=CHAP
PW=home-pw
PW=foreign-pw
IP options...
LAN Adrs=10.1.2.3/24
6
Exit the profile and, at the exit prompt, select the exit and accept option.
Finally, set the Home Agent aspect of the multimode configuration:
1
Open a Connection profile and configure an IP routing connection to the Network B
Foreign Agent. For example:
Ethernet
Connections
any Connection profile
Station=foreign-agent
Active=Yes
Encaps=MPP
11-24
MAX 6000/3000 Network Configuration Guide
Setting Up Virtual Private Networks
Configuring ATMP tunnels
Dial #=555-1213
Route IP=Yes
Encaps options...
Send Auth=CHAP
Recv PW=foreign-pw
Send PW=home-pw
IP options...
LAN Adrs=10.65.212.226/24
2
Open a Connection profile and configure a nailed WAN link to the Network B home
network. For example:
Ethernet
Connections
any Connection profile
Station=homenet
Active=Yes
Encaps=MPP
Dial #=N/A
Calling #=N/A
Route IP=Yes
IP options...
LAN Adrs=5.9.8.2/24
Telco options...
Call Type=Nailed
Group=1,2
Session options...
ATMP Gateway=Yes
MAX ATMP Tunnels=0
ATMP RIP=Send-v2
3
Exit the profile and, at the exit prompt, select the exit and accept option.
Supporting mobile client routers (IP only)
To enable an IP router to connect as a mobile client, the Foreign Agent’s RADIUS entry for the
mobile client must specify the same subnet mask as the one that identifies the home network.
For example, to connect to a home network whose router has the following address:
10.1.2.3/28
The Foreign Agent’s RADIUS entry for the remote router would contain lines such as the
following:
node1 Password="top-secret"
Ascend-Metric=2,
Framed-Protocol=PPP,
Ascend-IP-Route=Route-IP-Yes,
Framed-Address=10.168.6.21,
Framed-Netmask=255.255.255.240,
Ascend-Primary-Home-Agent=10.1.2.3,
Ascend-Home-Agent-Password="private"
MAX 6000/3000 Network Configuration Guide
11-25
Setting Up Virtual Private Networks
Configuring ATMP tunnels
With these Framed-Address and Framed-Netmask settings (equivalent to 10.168.6.21/28) for
the mobile client router, the connecting LAN can support up to 14 hosts. The network address
(or base address) for this subnet is 10.168.6.16. This address represents the network itself,
because the host portion of the IP address is all zeros.
The broadcast address (all ones in host portion of address) for this subnet is 10.168.6.31.
Therefore, the valid host address range is 10.168.6.17—10.168.6.30, which includes 14 host
addresses.
The MAX handles routes to and from the mobile client’s LAN differently, depending on
whether the Home Agent is configured in router mode or gateway mode.
Home Agent in router mode
If the Home Agent connects directly to the home network, set Proxy ARP to Always, which
enables the Home Agent to respond to ARP requests on behalf of the mobile client.
If the Home Agent does not connect directly to the home network, the situation is the same as
for any remote network: Routes to the mobile client’s LAN must either be learned dynamically
from a routing protocol or configured statically.
The mobile client always requires static routes to the Home Agent as well as to other networks
reached through the Home Agent. (It cannot learn routes from the Home Agent.)
Home Agent in gateway mode
If the Home Agent forwards packets from the mobile client across a nailed WAN link to the
home IP network, the answering unit on the home network must have a static route to the
mobile client's LAN.
In addition, because no routing information passes through the connection between the mobile
client and the Home Agent, the mobile client’s LAN can only support local subnets that fall
within the network specified in the RADIUS entry.
For example, using the previous sample RADIUS entry, the mobile client could support two
subnets with a mask of 255.255.255.248: one on the 10.168.6.16 subnet and the other on the
10.168.6.24 subnet. The answering unit on the home network would have only one route to the
router itself (10.168.6.21/28).
ATMP connections that bypass a Foreign Agent
If a Home Agent MAX has the appropriate RADIUS entry for a mobile client, the mobile
client connects directly to the Home Agent. An ATMP-based RADIUS entry that is local to the
Home Agent enables the mobile client to bypass a Foreign Agent connection, but it does not
preclude a Foreign Agent. If both the Home Agent and the Foreign Agent have local RADIUS
entries for the mobile client, the client can choose a direct connection or a tunneled connection
through the Foreign Agent.
For example, the following RADIUS entry authenticates a mobile NetWare client that connects
directly to the Home Agent. In this example, the Home Agent is in the gateway mode (it
forwards packets from the mobile client across a nailed WAN link to the home IPX network):
11-26
MAX 6000/3000 Network Configuration Guide
Setting Up Virtual Private Networks
Configuring PPTP tunnels for dial-in clients
mobile-ipx Password="unit"
User-Service=Framed-User,
Ascend-Route-IPX=Route-IPX-Yes,
Framed-Protocol=PPP,
Ascend-IPX-Peer-Mode=IPX-Peer-Dialin,
Framed-IPX-Network=40000000,
Ascend-IPX-Node-Addr=12345678,
Ascend-Home-Agent-IP-Addr=192.168.6.18,
Ascend-Home-Network-Name="homenet",
Ascend-Home-Agent-Password="pipeline"
Note: If you configure the Home Agent in router mode (which forwards packets from the
mobile client to its internal routing module), the Ascend-Home-Network-Name line is not
included in the user entry. The Ascend-Home-Network-Name attribute specifies the name of
the answering unit across the WAN on the home IPX network.
Configuring PPTP tunnels for dial-in clients
Point-to-Point Tunneling Protocol (PPTP) enables Windows 95 and Windows NT Workstation
users to dial into a local ISP to connect to a private corporate network across the Internet. To
the user dialing the call, the connection looks like a regular login to an NT server that supports
TCP/IP, IPX, or other protocols.
The MAX acts as a PPTP Access Controller (PAC), which functions as a front-end processor to
offload the overhead of communications processing. At the other end of the tunnel, the NT
server acts as a PPTP Network Server (PNS). All authentication is negotiated between the
Windows 95 or NT client and the PNS. The NT server’s account information remains the same
as if the client dialed in directly. No changes are needed.
Note: After logging in with your username and password, the MAX unit does not present the
terminal server prompt.
How the MAX works as a PAC
Currently, PPTP supports call routing and routing to the NT server by PPP-authenticated
connection on a per-line basis, or on the basis of the called number or calling number. The
following section describes how to dedicate an entire WAN access line for each destination
PNS address. For details about configuring WAN lines and assigning phone numbers, see
Chapter 3, “Configuring WAN Access.” For details about routing PPTP calls on the basis of
called or calling number, see the TAOS RADIUS Guide and Reference.
In the PPTP configuration, you specify the destination IP address of the PNS (the NT server),
to which all calls that come in on the PPTP-routed line will be forwarded. When the MAX
receives a call on that line, it passes the call directly to the specified IP address end-point,
creating the PPTP tunnel to that address if one is not already up. The PNS destination IP
address must be accessible by IP routing.
Note: The MAX handles PPTP calls differently than it does regular calls. No Connection
profiles are used for these calls, and the Answer profile is not consulted. The calls are routed
through the PPTP tunnel solely on the basis of the phone number dialed.
Following are the PPTP PAC configuration parameters (shown with sample settings):
MAX 6000/3000 Network Configuration Guide
11-27
Setting Up Virtual Private Networks
Configuring PPTP tunnels for dial-in clients
Ethernet
Mod Config
L2 Tunneling Options...
PPTP Enabled=Yes
Line 1 tunnel type=PPTP
Route line 1=10.65.212.11
Line 2 tunnel type=None
Route line 2=0.0.0.0
Line 3 tunnel type=None
Route line 3=0.0.0.0
Line 4 tunnel type=None
Route line 4=0.0.0.0
Understanding the PPTP PAC parameters
This section provides some background information about configuring PPTP. For detailed
information about each parameter, see the MAX Reference.
Enabling PPTP
When you enable PPTP, the MAX can bring up a PPTP tunnel with a PNS and respond to a
request for a PPTP tunnel from a PNS. You must specify the IP address of the PNS in one or
more of the Route Line parameters.
Specifying a PRI line for PPTP calls and the PNS IP address
The PPTP parameters include four Route Line parameters, one for each of the MAX unit’s
WAN lines. If you specify the IP address of a PNS in one of these parameters, that WAN line is
dedicated to receiving PPTP connections and forwarding them to that destination address.
The IP address you specify must be accessible via IP, but there are no other restrictions on it. It
can be across the WAN or on the local network. If you leave the default null address, that WAN
line handles calls normally.
Example of a PAC configuration
Figure 11-6 shows an ISP POP MAX unit communicating across the WAN with an NT Server
at a customer premise. Windows 95 or NT clients dial into the local ISP and are routed directly
across the Internet to the corporate server. In this example, the MAX unit’s fourth WAN line is
dedicated to PPTP connections to that server.
Figure 11-6. PPTP tunnel
Modem
Windows NT
server (PNS)
PAC
MAX
Pipeline
WAN
10.65.212.11
PPTP tunnel
11-28
Win95
WAN
ISP
POP
ISDN
modem
Win95
Win95
MAX 6000/3000 Network Configuration Guide
Setting Up Virtual Private Networks
Configuring PPTP tunnels for dial-in clients
To configure this MAX for PPTP:
1
Open Ethernet > Mod Config > PPTP Options.
2
Turn on PPTP, and set Route Line 4 to the PNS IP address.
Ethernet
Mod Config
L2 Tunneling Options...
PPTP Enabled=Yes
Line 1 tunnel type=None
Route line 1=0.0.0.0
Line 2 tunnel type=None
Route line 2=0.0.0.0
Line 3 tunnel type=None
Route line 3=0.0.0.0
Line 4 tunnel type=PPTP
Route line 4=10.65.212.11
3
Exit the profile and, at the exit prompt, select the exit and accept option.
Example of a PPTP tunnel across multiple POPs
Figure 11-7 shows an ISP POP MAX communicating through an intervening router to the PNS
that is the end point of its PPTP tunnel. The MAX routes the packets in the usual way to reach
the end-point IP address.
Figure 11-7. PPTP tunnel across multiple POPs
Modem
Windows NT
server (PNS)
PAC
MAX
MAX
WAN
10.65.212.11
WAN
WAN
ISP POP #2
Win95
Pipeline
ISP POP #1
ISDN
modem
#2
Win95
PPTP tunnel
Windows NT
In this example, the MAX at ISP POP #1 dedicates its second WAN line to PPTP connections
to the PNS at 10.65.212.11. To configure this MAX as a PAC:
1
Open Ethernet > Mod Config > PPTP Options.
2
Turn on PPTP, and specify the PNS IP address for Route Line 2.
Ethernet
Mod Config
L2 Tunneling Options...
PPTP Enabled=Yes
Line 1 tunnel type=None
Route line 1=0.0.0.0
Line 2 tunnel type=PPTP
Route line 2=10.65.212.11
Line 3 tunnel type=None
Route line 3=0.0.0.0
MAX 6000/3000 Network Configuration Guide
11-29
Setting Up Virtual Private Networks
Configuring PPTP tunnels for dial-in clients
Line 4 tunnel type=None
Route line 4=0.0.0.0
3
Exit the profile and, at the exit prompt, select the exit and accept option.
The PAC must have a route to the destination address, in this case a route through the ISP POP
#2. It does not have to be a static route. It can be learned dynamically by means of routing
protocols. The remaining steps of this procedure configure a static route to ISP POP #2:
4
Open an unused IP Route profile and activate it. For example:
Ethernet
Static Rtes
Name=pop2
Active=Yes
5
Specify the PNS destination address:
Dest=10.65.212.11
6
Specify the address of the next-hop router (ISP POP #2). For example:
Gateway=10.1.2.4
7
Specify a metric for this route, the route’s preference, and whether the route is private. For
example:
Metric=1
Preference=100
Private=Yes
8
Exit the profile and, at the exit prompt, select the exit and accept option.
Routing a terminal-server session to a PPTP server
You can initiate a PPTP session in which the terminal-server interface routes the session to a
PPTP server. The PPTP command gives you two options for selecting the tunnel the MAX
creates. You can specify either the IP address or hostname of the PPTP server. Normal PPTP
authentication proceeds once the MAX creates the tunnel.
Enter the command at the terminal-server prompt as follows:
pptp pptp_server
where pptp_server is the IP address or hostname of the PPTP server. When you enter the
command, the system displays the following text:
PPTP: Starting session
PPTP Server pptp_server
11-30
MAX 6000/3000 Network Configuration Guide
Setting Up Virtual Private Networks
Configuring L2TP tunnels for dial-in clients
Configuring L2TP tunnels for dial-in clients
L2TP enables you to dial into a local ISP and connect to a private corporate network across the
Internet. You dial into a local MAX, configured as an L2TP Access Concentrator (LAC), and
establish a PPP connection. Attributes in your RADIUS user profile specify that the MAX,
acting as an LAC, establishes an L2TP tunnel. The LAC contacts the L2TP Network Server
(LNS) that connects to the private network. The LAC and the LNS establish an L2TP tunnel
(via UDP), and any traffic your client sends is tunneled to the private network. Once the MAX
units establish the tunnel, the client connection has a PPP connection with the LNS and
appears to be directly connected to the private network.
You can configure the MAX to act as either an LAC, an LNS, or both. The LAC performs the
following functions:
•
Establishes PPP connections with dial-in clients.
•
Sends requests to LNS units, requesting creation of tunnels.
•
Encapsulates and forwards all traffic from clients to the LNS via the tunnel.
•
De-encapsulates traffic received from an established tunnel, and forwards it to the client.
•
Sends tunnel-disconnect requests to LNS units when clients disconnect.
The LNS performs the following functions:
•
Responds to requests by LAC units for creation of tunnels.
•
Encapsulates and forwards all traffic from the private network to clients via the tunnel.
•
De-encapsulates traffic received from an established tunnel, and forwards it to the private
network.
•
Disconnects tunnels on the basis of requests from the LAC.
•
Disconnects tunnels when the value you set for a user profile’s MAX-Connect-Time
attribute expires. You can also manually disconnect tunnels from the LNS by using SNMP,
the terminal-server Kill command, or the DO Hangup command (which you access by
pressing Ctrl-D).
Note: With the current software version, a MAX acting as an LNS cannot send Incoming Call
Requests to an LAC. Only an LAC can make requests for the creation of L2TP tunnels.
Note: By supporting hidden attributes, the MAX is in conformance with MAX Draft 16 of
the L2TP RFC. The MAX 6000 and MAX 3000 units parse and decrypt hidden attributes as
well as the random vector AVP. The SCCRQ command does not support a suppressed tunnel
ID AVP. The units do not suppress any attributes except under the control of a debug flag.
Elements of L2TP tunneling
This section describes how L2TP tunnels work between an LAC and an LNS. A client dials
into an LAC, from either a modem or ISDN device, and the LAC establishes a cross-Internet
IP connection to the LNS. The LAC then requests an L2TP tunnel via the IP connection.
The LNS is the terminating part of the tunnel, where most of the L2TP processing occurs. It
communicates with the private network (the destination network for the dial-in clients) through
a direct connection.
MAX 6000/3000 Network Configuration Guide
11-31
Setting Up Virtual Private Networks
Configuring L2TP tunnels for dial-in clients
Figure 11-8 shows an ISP POP MAX, acting as an LAC, communicating across the WAN with
a private network. Clients dial into the ISP POP and are forwarded across the Internet to the
private network.
Figure 11-8. L2TP tunnel across the Internet
Private network
Dial-in
clients
P50
LNS
LAC
Modem
Internet
L2TP tunnel
RADIUS server
How the MAX creates L2TP tunnels
The dial-in client, the LAC, and the LNS establish, use, and terminate an L2TP-tunnel
connection as follows:
1
A client dials, over either a modem or ISDN connection, into the LAC.
2
On the basis of dialed number or after authentication (depending on the LAC
configuration), the LAC communicates with the LNS to establish an IP connection.
3
Over the IP connection, the LAC and LNS establish a control channel.
4
The LAC sends an Inbound Call Request to the LNS.
5
Depending on the LNS configuration, the client might need to authenticate itself a second
time.
6
After successful authentication, the tunnel is established, and data traffic flows.
7
When the client disconnects from the LAC, the LAC sends a Call Disconnect Notify
message to the LNS. The LAC and LNS disconnect the tunnel.
Proxy LCP and authentication support for L2TP
If a PPP client’s profile is configured to initiate an L2TP tunnel, the MAX unit attempts to
open a tunnel (or reuse an existing one) following initial authentication of the connection. It
can open a tunnel after completing CLID or DNIS authentication or after authenticating the
caller’s name and password. If the LAC authenticates the initial dial-in call using a name and
password, it negotiates Link Control Protocol (LCP) with the client and opens the PPP Auth
state to determine who the client is, so it can contact the appropriate LNS.
With earlier versions of the system software, when the LAC contacted the LNS for a client
connection, it sent an empty LCP Config Request packet in the data stream. When the LNS
received the packet, it restarted LCP negotiations and authenticated the client. With currently
supported proxy LCP, instead of an empty LCP Config Request, the LAC sends the LNS the
following information:
11-32
•
The first LCP Config Request packet received from the client.
•
The last LCP Config Request packet received from the client.
MAX 6000/3000 Network Configuration Guide
Setting Up Virtual Private Networks
Configuring L2TP tunnels for dial-in clients
•
The last LCP Config Request packet the LAC sent to the client.
With this information, the LNS is not required to restart LCP negotiation.
The LAC implements proxy authentication for clients configured for PPP authentication on the
LAC. Following PPP authentication, the LAC sends the username and password to the LNS in
the appropriate L2TP AVPs.
Note: The current software version does not include support for proxy authentication for
terminal server authentication. The terminal server erases the username and password
immediately after authenticating the user.
LAC and LNS mode
The MAX unit can function as an LAC, an LNS, or both. L2TP supports multimode in which a
unit is both a LAC (foreign agent) and a LNS (home agent). As L2TP LNS, the unit terminates
the L2TP session and authenticates the user. If the user's profile on the LNS calls for an L2TP
tunnel, the LNS then switches that user's session. The unit acts as an L2TP LAC and originates
a new L2TP tunnel and session. The MAX unit operates as an LNS as far as the first LAC is
concerned, and as an LAC as far as the next hop is concerned.
Note: In L2TP switching, a MAX unit can be both a LNS and a LAC simultaneously for the
same session. The session arrives and is serviced by the unit acting as a LNS.
Tunnel authentication
You can configure the LNS to authenticate a tunnel during tunnel creation. You must enable
tunnel authentication on both the LAC and LNS.
On the LNS, you must create a Names/Passwords profile where:
•
The value in the Ethernet > Names/Passwords > Name parameter matches the value of the
System > Sys Config > Name parameter on the LAC.
•
The value of the Ethernet > Names/Passwords > Recv PW parameter matches the
password configured on the LAC.
On the LAC, you can specify the password with the Tunnel-Password attribute in the RADIUS
user profile for the connection initiating the session, or you can configure the password in a
Names/Passwords profile. If you create a Names/Passwords profile, the value of the Ethernet >
Names/Passwords > Name parameter must match the value of the System > Sys Config >
Name parameter on the LNS.
Conversely, you can configure the LAC and LNS to not require tunnel authentication.
Client authentication
Either the LAC, the LNS, or both, can perform PAP or CHAP authentication of clients for
which they create tunnels. If you configure the MAX to create tunnels on a per-line basis, only
the LNS can perform authentication, because the MAX automatically builds a tunnel to the
LNS for any call it receives on that line.
If you use RADIUS to configure L2TP on a per-user basis, and you specify the
Client-Port-DNIS attribute, the LAC does not perform PAP or CHAP authentication. If you
specify Client-Port-DNIS, the tunnel is created as soon as the LAC receives a DNIS number
MAX 6000/3000 Network Configuration Guide
11-33
Setting Up Virtual Private Networks
Configuring L2TP tunnels for dial-in clients
that matches a Client-Port-DNIS for any user profile. You can configure the LNS to perform
PAP or CHAP authentication after the LAC and LNS establish the tunnel.
If you use RADIUS to configure L2TP, but do not specify the Client-Port-DNIS attribute, the
LAC performs PAP or CHAP authentication before the tunnel is established. Once the tunnel is
up, the LNS can perform authentication again on the client. Each client sends the same
username and password during the authentication phase, so for each client, make sure you
configure the LAC and LNS to look for the same usernames and passwords.
You can also direct the MAX to create an L2TP tunnel, from the terminal server, by using the
L2TP command. You can configure authentication on the LNS, requiring users to authenticate
themselves when they manually initiate L2TP tunnels from the terminal server.
Flow control
The LAC and LNS automatically use a flow control mechanism that is designed to reduce
network congestion. You do not need to configure the mechanism.
You can, however, configure the maximum number of unacknowledged packets that the LAC
or LNS receives before it requests that the sending device stop sending data. You can configure
the LAC or LNS to receive up to 63 unacknowledged packets before refusing new data, or you
can disable flow control completely.
Using the Tunnel-Assignment-ID (82) RADIUS attribute for L2TP
Client sessions can be grouped into specific tunnels. For details, see
draft-ietf-radius-tunnel-auth-09.txt. RADIUS supports this feature by
means of the Tunnel-Assignment-ID (82) attribute which informs the L2TP access
concentrator (LAC) whether to assign a client session to an existing tunnel or to create a new
one.
RADIUS attribute
Value
Tunnel-Assignment-ID
(82)
Identification (name) assigned to tunnels to allow grouping of
sessions. A text string of up to 31 characters. The value has local
significance only. It is not transmitted to the remote tunnel
end point.
Example of configuring a tunnel assignment ID
In this example, the MAX unit is configured to perform tunnel authentication for L2TP
tunnels. The MAX unit that performs this function can be a MAX TNT or a MAX unit.
The two PPP clients shown in Figure 11-9 are configured to use different tunnels to the L2TP
network server (LNS) on the basis of their tunnel assignment IDs. The same clients could be
configured to use the same multiplexed tunnel by setting their tunnel assignment IDs to the
same string.
11-34
MAX 6000/3000 Network Configuration Guide
Setting Up Virtual Private Networks
Configuring L2TP tunnels for dial-in clients
Figure 11-9. L2TP tunnel setup using tunnel assignment IDs
10.1.1.1/24 (modem user)
tunnel named
modem-taid
LAC
IP
LNS
WAN
1.1.1.1
2.2.2.2
20.1.1.1/24 (ISDN user)
tunnel named
isdn-taid
1.1.1.2
2.2.2.3
Following are the RADIUS profiles that support the configuration described in Figure 11-9:
modemuser Password = "test"
User-Service = Framed-User,
Framed-Protocol = PPP,
Test-Idle-Limit = 0,
Tunnel-Type = L2TP :1,
Tunnel-Server-Endpoint = 1.1.1.1 :1,
Tunnel-Client-Auth-ID = taos-unit: 1,
Tunnel-Password = shared,
Tunnel-Assignment-ID = modem-taid:1
isdnuser Password = "test"
User-Service = Framed-User,
Framed-Protocol = PPP,
Test-Idle-Limit = 0,
Tunnel-Type = L2TP :1,
Tunnel-Server-Endpoint = 1.1.1.1 :1,
Tunnel-Client-Auth-ID = taos-unit: 1,
Tunnel-Password = shared,
Tunnel-Assignment-ID = isdn-taid:1
RADIUS accounting support
RADIUS accounting Stop records display the value for the Tunnel-Assignment-ID attribute
used for the user-session. For example:
Tue May 2 15:58:08 2000
User-Name = "modemuser"
NAS-Identifier = 2.2.2.2
NAS-Port = 11313
NAS-Port-Type = Async
Acct-Status-Type = Stop
Acct-Delay-Time = 0
Acct-Session-Id = "317658341"
Acct-Authentic = Local
Acct-Session-Time = 112
Acct-Input-Octets = 2155
Acct-Output-Octets = 513
Acct-Input-Packets = 23
Acct-Output-Packets = 14
MAX 6000/3000 Network Configuration Guide
11-35
Setting Up Virtual Private Networks
Configuring L2TP tunnels for dial-in clients
Ascend-Disconnect-Cause = 185
Ascend-Connect-Progress = 60
Ascend-Xmit-Rate = 28800
Ascend-Data-Rate = 33600
Ascend-PreSession-Time = 19
Ascend-Pre-Input-Octets = 0
Ascend-Pre-Output-Octets = 0
Ascend-Pre-Input-Packets = 0
Ascend-Pre-Output-Packets = 0
Ascend-Modem-PortNo = 1
Ascend-Modem-SlotNo = 7
Ascend-Modem-ShelfNo = 1
Caller-Id = "1119855510"
Client-Port-DNIS = "3826"
Tunnel-Type = L2TP
Tunnel-Server-Endpoint = "1.1.1.1"
Tunnel-Client-Auth-ID = "taos-unit"
Tunnel-Server-Auth-ID = "max6k-lns"
Tunnel-Assignment-ID = "modem-taid"
Configuration of the MAX as an LAC
An LAC is responsible for requesting L2TP tunnels to the LNS. You configure the LAC to
determine when a dial-in connection should be tunneled, and you can specify the LNS used for
the connection.
Understanding the L2TP LAC parameters
This section provides some background information about parameters used in configuring the
MAX as an LAC:
Parameter
How it’s used
L2TP Mode
Enables the MAX unit’s LAC functionality if you set L2TP Mode to
LAC or Both.
L2TP Auth
Enabled
You must either enable tunnel authentication for both the LAC and LNS
or enable it for neither. You configure a tunnel password in a
Names/Passwords profile.
L2TP RX Window Specifies the number of unacknowledged packets the MAX receives
(when configured as an LAC or a LNS) before requesting that the
sending device stop transmitting data.
11-36
Line N Tunnel
Type
Specifies whether the MAX should dedicate an entire WAN line to either
L2TP or PPTP. If you want the MAX to establish tunnels on a
connection-by-connection basis, set Line N Tunnel Type to None on all
lines.
Route Line N
Specifies the IP address of the LNS. This parameter applies only if you
dedicate an entire WAN line to tunneling with the Line N Tunnel Type
parameter. If you want the MAX to establish tunnels on a
connection-by-connection basis, leave Route Line N blank for all lines.
MAX 6000/3000 Network Configuration Guide
Setting Up Virtual Private Networks
Configuring L2TP tunnels for dial-in clients
Configuring the MAX
To configure the MAX as an L2TP LAC, you must first enable L2TP LAC on the MAX, then
specify how the MAX determines which connections are tunneled.
Configuring systemwide L2TP LAC parameters
To configure systemwide L2TP LAC parameters on the MAX:
1
Open the Ethernet > Mod Config > L2 Tunneling Options menu.
2
Set L2TP Mode to LAC or to Both.
3
If you require tunnel authentication, set L2TP Auth Enabled to Yes.
You must configure both the LAC and LNS identically, to either require or not require
authentication.
4
Set L2TP RX Window to the number of packets that the MAX should receive before it
requests that the sending device stop transmitting packets.
The default is seven. Set the parameter to 0 (zero) to disable flow control in the receiving
direction. The MAX continues to perform flow control for the sending direction regardless
of the value of L2TP RX Window.
Enabling L2TP tunneling for an entire WAN line
If you want the LAC to create L2TP tunnels for every call received on a specific WAN line:
1
Open the Ethernet > Mod Config > L2 Tunneling Options menu.
2
For the line for which you are configuring LAC functionality (Line N), set Line N Tunnel
Type to L2TP. For example, if you want to tunnel all calls received on the first WAN port
(labeled WAN 1 on the MAX back panel), set Line 1 Tunnel Type to L2TP.
3
Set Route Line N to the IP address of the LNS.
Enabling L2TP tunneling on a per-user basis
You can configure RADIUS to direct the MAX to create L2TP tunnels for specific users. To do
so, you use three standard RADIUS attributes: Tunnel-Type, Tunnel-Medium-Type, and
Tunnel-Server-Endpoint. Table 11-3 describes them.
Table 11-3.RADIUS attributes for specifying L2TP tunnels
Attribute
Description
Possible values
Tunnel-Type (64)
Specifies which tunneling protocol
to use for this connection.
PPTP or L2TP. You must set
this attribute to L2TP to direct
the MAX to create an L2TP
tunnel.
Tunnel-Medium-Type (65)
Specifies the protocol type, or
medium, used for this connection.
Currently, the MAX supports IP
only. Future software releases will
support additional medium types.
Currently, the only supported
value is IP. You must set this
attribute to IP.
MAX 6000/3000 Network Configuration Guide
11-37
Setting Up Virtual Private Networks
Configuring L2TP tunnels for dial-in clients
Table 11-3.RADIUS attributes for specifying L2TP tunnels (continued)
Attribute
Description
Possible values
Tunnel-Server-Endpoint (67)
Specifies the IP address or fully
qualified hostname of the LNS, if
you set Tunnel-Type to L2TP, or
PPTP Network Server (PNS), if
you set Tunnel-Type to PPTP.
If a DNS server is available,
you can specify the fully
qualified hostname of the
LNS. Otherwise, specify the IP
address of the LNS in dotted
decimal notation (N.N.N.N,
where N is a number from 0 to
255.) You must set this
attribute to an accessible IP
hostname or address.
Tunnel-Password (69)
Shared secret for authenticating
L2TP tunnels.
Using multiple L2TP system names
MAX units now support additional tunnel authentication settings to enable more flexible and
secure establishment of Layer 2 Tunneling Protocol (L2TP) and Layer 2 Forwarding (L2F)
tunnels. Previously, constraints caused by L2TP and RADIUS protocol requirements required
that every network access server (NAS) in the network used the same system name for tunnel
authentication, even when the network spanned multiple administrative domains.
With the current software version, each NAS sends a unique system name for tunnel
authentication purposes. The name can be specified on a per-connection or per-server basis. If
RADIUS accounting is enabled, the MAX unit reports the names used for tunnel
authentication in the Stop record.
Note: Tunnel authentication occurs before a tunnel is established between two end points. It
is negotiated between the MAX unit and a tunnel server and is independent of user
authentication. If tunnel authentication fails, all pending calls associated with the tunnel are
dropped.
For L2TP tunnels, because the LAC can now specify its name on a per-connection basis, you
can configure profiles to create parallel tunnels to the same destination. For example, some
sites use parallel tunnels to separate data streams that are directed to the same LNS but
destined for different networks.
Overview of RADIUS attribute-value pairs
RADIUS provides attribute-value pairs that support multiple L2TP system names. All of these
attribute-value pairs support tag fields, as described in RFC 2868. Each tag value (from 1 to
31) defines an independent tunnel attempt description. The Tunnel-Client-Auth-ID and
Tunnel-Server-Auth-ID attributes can be specified in Access-Response packets and are
generated in Accounting-Request packets. Following are the relevant attributes:
11-38
MAX 6000/3000 Network Configuration Guide
Setting Up Virtual Private Networks
Configuring L2TP tunnels for dial-in clients
RADIUS attribute
Value
Tunnel-Type (64)
Tunneling protocol(s) to be used. Must be set to L2TP (3) or L2F
(2) to use this feature.
Tunnel-Server-Endpoint
(67)
IP address or hostname of the tunnel end point. If a DNS lookup
returns several IP addresses, the system attempts to establish a
tunnel to each address in turn.
Tunnel-Password (69)
Shared secret for authenticating the tunnel.
Tunnel-Client-Auth-ID
(90)
Name sent to the tunnel end point by the system requesting the
tunnel (the NAS or LAC) during the tunnel authentication phase.
The name can contain up to 31 characters. See “How the system
name is selected” on page 11-42.
Tunnel-Server-Auth-ID
(91)
Name sent from the tunnel end point (the gateway or LNS) to the
system initiating the tunnel during the tunnel authentication phase.
The name can contain up to 31 characters.
Tunnel-Server-Auth-ID (91) does not apply unless the protocol
used to establish the tunnel is L2TP or L2F. The attribute can be
specified in access-response packets and is generated in
accounting-request packets.
Example of tunnel authentication
For the purposes of this example, a MAX authenticates the initial PPP dial-in by its dialed
number. (DNIS authentication is not required for tunnel authentication.) Another MAX
operates as an L2TP Network Server (LNS).
Figure 11-10. Example of L2TP tunnel authentication
L2TP tunnel
LAC
PPP client
WAN
1.1.1.2
LNS
IP
2.2.2.2
1.1.1.1
2.2.2.3
Example of connection-based tunnel authentication
The following settings configure a Connection profile for the PPP client and specify a Client
ID name:
Ethernet
Connections
maxprofile
Tunnel options...
Profile type=Mobile-client
Tunnel protocol=L2TP
MAX 6000/3000 Network Configuration Guide
11-39
Setting Up Virtual Private Networks
Configuring L2TP tunnels for dial-in clients
Max tunnels=N/A
ATMP HA RIP=N/A
UDP Port=N/A
Home Network Name=N/A
Pri. Tunnel Server=1.1.1.1
Sec. Tunnel Server=
Password=conn-pass
Client ID=conn-LAC
Tunnel VRouter=
There is no need to assign an IP address, because the IP address is assigned by the LNS.
Following is a comparable RADIUS profile:
001
Password="Ascend-DNIS", Service-Type=Call-Check
Tunnel-Type=L2TP,
Tunnel-Password=conn-pass
Tunnel-Client-Auth-ID=conn-LAC
The LAC uses DNIS to authenticate the PPP client’s dial-in call. It then initiates a tunnel to the
LNS if a tunnel to that end-point address does not already exist. When the MAX unit requests
the tunnel, it passes the LNS the string conn-LAC as its local system name, and uses
conn-pass as the password to authenticate the tunnel. The LNS uses the same strings to
authenticate the LAC before establishing the tunnel.
Example of server-based tunnel authentication
The following settings configure a Connection profile for the PPP client and do not specify a
password or a Client ID:
Ethernet
Connections
maxprofile
Tunnel options...
Profile type=Mobile-client
Tunnel protocol=L2TP
Max tunnels=N/A
ATMP HA RIP=N/A
UDP Port=N/A
Home Network Name=N/A
Pri. Tunnel Server=lns.example.com
Sec. Tunnel Server=
Password=
Client ID=
Tunnel VRouter=
Following is a comparable RADIUS profile:
001
Password="Ascend-DNIS", Service-Type=Call-Check
Tunnel-Type=L2TP,
Tunnel-Server-Endpoint=lns.example.com
The LAC uses DNIS to authenticate the PPP client’s dial-in call. It then initiates a tunnel to the
LNS if a tunnel does not already exists to that end-point address. If tunnel authentication is
enabled and no tunnel password is specified in the Connection profile, the unit looks for a
Tunnel Options profile before requesting the tunnel. If it finds a Tunnel Options profile for the
11-40
MAX 6000/3000 Network Configuration Guide
Setting Up Virtual Private Networks
Configuring L2TP tunnels for dial-in clients
LNS, the unit sends the Client ID to the LNS and the end points use the tunnel password (the
shared secret) to authenticate the tunnel. Following is a sample Tunnel Options profile that
specifies a password and local system name for use in tunnel authentication:
Ethernet
Connections
maxprofile
Tunnel options...
Profile type=Mobile-client
Tunnel protocol=L2TP
Max tunnels=N/A
ATMP HA RIP=N/A
UDP Port=N/A
Home Network Name=N/A
Pri. Tunnel Server=199.33.
Sec. Tunnel Server=
Password=ts-pass
Client ID= ts-lac
Tunnel VRouter=
Following is a comparable RADIUS profile:
lns.example.com Password = "", Service-Type=Dialout,
Tunnel-Password=ts-pass,
Tunnel-Client-Auth-ID=ts-LAC
Creating parallel L2TP tunnels to the same end point
After the LAC has authenticated a PPP client’s dial-in call, it looks for an existing tunnel that
matches both the tunnel-server end point and Client ID specified in the client’s profile. If the
LAC finds an established tunnel that matches these values, it uses the tunnel. If it does not find
a matching tunnel, it initiates a tunnel request. This process can be used to create parallel L2TP
tunnels by specifying different Client ID values in profiles.
How the system finds a matching tunnel
If the client’s profile specifies a hostname as the tunnel-server end point, the system must
match both the hostname and the server’s actual IP address to allow the client to use an
established tunnel.
If Client ID is specified in the caller’s profile, the system attempts to match the caller to an
existing tunnel by using the following values:
•
The tunnel server’s IP address (and hostname, if specified)
•
The Client ID
If no Client ID value is specified in the caller’s profile, the system attempts to match the caller
to an existing tunnel by using the tunnel server’s IP address (and hostname, if specified).
If it finds a match on the basis of those values, it uses the tunnel. If the MAX unit does not find
a matching tunnel entry, it initiates a new tunnel request.
MAX 6000/3000 Network Configuration Guide
11-41
Setting Up Virtual Private Networks
Configuring L2TP tunnels for dial-in clients
How the system name is selected
If tunnel authentication is enabled, when the MAX unit requests a new tunnel, it looks for a
system name to send to the LNS as follows:
1
If available, use the Client ID specified in the caller’s Connection profile. If no Client ID
value is specified in the Connection profile, go on to the next alternative.
2
If available, use the Client ID value specified in the Tunnel Options profile for the LNS. If
no Client ID value is specified in a Tunnel Options profile, go on to the next alternative.
3
If available, use the L2TP-System-Name value specified in the L2-Tunnel-Global profile.
If no L2TP-System-Name value is specified in that profile, go on to the next alternative.
4
If available, use the Name value specified in the unit’s System profile. If no Name value is
not specified in that profile, go on to the next alternative.
5
Send the string noname.
Example of how Client ID settings create parallel tunnels
In this example, the LNS system’s DNS hostname is a.example.com (a fully qualified
domain name), which resolves to two IP addresses, 1.1.1.1 and 1.1.1.2. The hostname
b.example.net also resolves to the 1.1.1.1 address. Table 11-4 shows existing tunnels to
the LNS, which were authenticated with different Client ID strings.
Table 11-4.Existing tunnels to the same LNS
11-42
Address
Client ID
Pri. Tunnel Server
Tunnel-ID
1.1.1.1
a1
a.example.com
102
1.1.1.1
a2
a.example.com
103
MAX 6000/3000 Network Configuration Guide
Setting Up Virtual Private Networks
Configuring L2TP tunnels for dial-in clients
Table 11-5 shows how the system matches the values in the clients’ profiles as it receives
incoming calls and whether the system uses an existing tunnel or creates a new one:
Table 11-5.Tunnels created based on profile settings for incoming callers
Values used to match tunnel:
Address
Client ID
Resulting action
Tunnel-ID
Pri. Tunnel
Server
1.1.1.1
a1
a.example.com
Reuse tunnel
102
1.1.1.1
a2
a.example.com
Reuse tunnel
103
1.1.1.1
b
b.example.net
Establish new
tunnel
104
1.1.1.1
b
a.example.com
Establish new
tunnel
105
a.example.com
Reuse tunnel
102
1.1.1.1
1.1.1.1
a2
b.example.net
Establish new
tunnel
106
1.1.1.2
a1
a.example.com
Establish new
tunnel
107
Note: If a caller that does not supply a Client ID string that matches the tunnel-server end
point, so the existing tunnel to that end point (Tunnel-ID 102) is reused.
Configuration of the MAX as an LNS
When the MAX acts as a LNS, it responds to requests by LAC units to establish tunnels. The
LNS does not initiate outgoing requests for tunnels, so configuration of the MAX is simple.
Proceed as follows:
1
Open the Ethernet > Mod Config > L2 Tunneling Options menu.
2
Set L2TP Mode to either LNS or Both.
3
If you require tunnel authentication, set L2TP Auth Enabled to Yes.
You must configure both the LAC and LNS identically, to either require or not require
authentication.
4
Set L2TP RX Window to the number of packets that the MAX should receive before it
requests that the sending device stop transmitting packets.
The default is 7. Set the parameter to 0 (zero) to disable flow control in the receiving
direction. The MAX continues to perform flow control for the sending direction regardless
of the value of L2TP RX Window.
MAX 6000/3000 Network Configuration Guide
11-43
Setting Up Virtual Private Networks
Using Tunnel Options to support tunneling protocols
Using DNS list attempts for L2F and L2TP
A MAX unit functioning as an L2F Network Access Server (NAS) or an L2TP Access
Concentrator (LAC) can execute a series of connection attempts based on a list of IP addresses.
In a configuration requiring the Layer 2 Forwarding (L2F), the MAX unit functions as an L2F
Network Access Server (NAS). In a configuration requiring the Layer 2 Tunneling Protocol
(L2TP), the unit functions as an L2TP Access Concentrator (LAC). On the network side of the
L2F tunnel, the MAX unit can serve as the L2F Endpoint. On the network side of the L2TP
tunnel, the unit