1
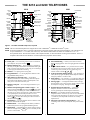
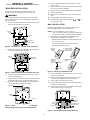
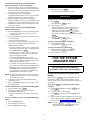
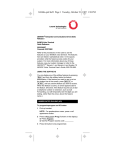
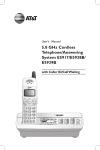
6218 and 6220 Telephones
Quick Reference
Document Ordering No. 555-230-713
Comcode 108504333
Issue 2, August 1999
IMPORTANT INFORMATION
SAFETY INSTRUCTIONS
SAVE THESE INSTRUCTIONS
The most careful attention has been devoted to quality standards
in the manufacture of your new telephone. Safety is a major
factor in the design of every set, but, safety is YOUR
responsibility too.
When you see this warning symbol on the
product, refer to these instructions packed with
the product for more information before
proceeding further in the installation process.
Please read carefully the helpful tips listed below and on the next
page. These suggestions will enable you to take full advantage of
your new telephone. Then, retain these tips for later use.
Use
When using your telephone equipment, the following safety
precautions should always be followed to reduce the risk of fire,
electric shock, and injury to persons.
•
•
•
•
•
•
•
Read and understand all instructions.
Follow all warnings and instructions marked on the telephone.
This telephone can be hazardous if immersed in water. To
avoid the possibility of electric shock, do not use it while you
are wet. If you accidentally drop the telephone into water, do
not retrieve it until you have first unplugged the line cord
from the modular jack. Then, call service personnel to ask
about a replacement.
Avoid using the telephone during electrical storms in your
immediate area. There is a risk of electric shock from
lightning. Urgent calls should be brief. Even though
protective measures may have been installed to limit electrical
surges from entering your business, absolute protection from
lightning is impossible.
If you suspect a natural gas leak, report it immediately, but use
a telephone away from the area in question. The telephone’s
electrical contacts could generate a tiny spark. While unlikely,
it is possible that this spark could ignite heavy concentrations
of gas.
Never push objects of any kind into the equipment through
housing slots since they may touch hazardous voltage points
or short out parts that could result in a risk of electric shock.
Never spill liquid of any kind on the telephone. If liquid is
spilled, however, refer servicing to proper service personnel.
To reduce the risk of electric shock, do not disassemble this
telephone. There are no user serviceable parts. Opening or
removing covers may expose you to hazardous voltages.
Incorrect reassembly can cause electric shock when the
telephone is subsequently used.
Service
•
Before cleaning, unplug the telephone from the modular wall
jack. Do not use liquid cleaners or aerosol cleaners. Use a
damp cloth for cleaning.
•
Unplug the telephone from the modular wall jack. Be sure to
refer servicing to qualified service personnel when these
conditions exist:
— If liquid has been spilled into the telephone.
— If the telephone has been exposed to rain or water.
— If the telephone has been dropped or the housing has
been damaged.
— If you note a distinct change in the performance of the
telephone.
!
OTHER INFORMATION
NOTICE
While reasonable efforts were made to ensure that the
information in this document was complete and accurate at the
time of printing, Lucent Technologies can assume no
responsibility for any errors. Changes or corrections to the
information contained in this document may be incorporated
into future issues.
TO ORDER COPIES OF THIS DOCUMENT
Contact:
Lucent Technologies BCS Publications Center
2855 N. Franklin Road
Indianapolis, IN 46219
Voice 1 800 457-1235
International Voice 317 322-6791
Fax 1 800 457-1764
International Fax 317 322-6699
Order:
Document No. 555-230-713
Issue 2, August 1999
For more information about related documents, see Business
Communications Systems Publications Catalog, 555-000-010.
TRADEMARKS
DEFINITY and MERLIN LEGEND are registered trademarks
of Lucent Technologies.
HEARING AID COMPATIBILITY
These telephones are Hearing Aid Compatible (HAC) and thus
have “HAC” printed on them.
ACKNOWLEDGMENT
This document was prepared by the BCS Product Publications
Department, Lucent Technologies, Middletown, NJ 07748-9972.
THE 6218 and 6220 TELEPHONES
6218
DATA
jack
Handset
Parking
Tab
Handset
Parking
Tab
10
Programmable
Dialing buttons
6218
Program
Program
button
Pause button
Pause
Flash
Redial
Redial
button
Hold
ABC
DEF
1
2
3
GHI
JKL
MNO
4
5
6
PQRS
TUV
WXYZ
7
8
9
*
Dial pad
Flash
button
Redial
button
LINE jack
(on bottom
of telephone)
Hold
button
6220
Program
Pause button
Pause
Tel.#
Message light
Handset/
Speakerphone
volume control
#
0
10
Programmable
Dialing buttons
Mute button
Handset
cord jack
Message light
Handset
volume
control
Flash
button
Ringer
volume control
Handset
Tel.#
Handset
cord jack
Personalized
Ring
DATA
jack
Ringer volume
control
Handset
Program
button
6220
Personalized
Ring
Mute
Spkr
ABC
Flash
Redial
Hold
Hold
button
Speakerphone
button
DEF
1
2
3
GHI
JKL
MNO
4
5
6
PQRS
TUV
WXYZ
7
8
9
*
0
#
Dial pad
LINE jack
(on bottom
of telephone)
Figure 1. The 6218 and 6220 Telephones, Top View
NOTE: The 6218 and 6220 telephones are designed for use with a DEFINITY® or MERLIN LEGEND® system.
NOTE: On all 6220 telephones, there is a smooth, indented area in the lower handset cradle (left of the Hold button). This indentation will
accept a standard 0.5” x 1.75” label, such as the Avery 5267 Return Address label. The labels are available on 8-1/2” x 11”
laser-printable sheets. The extension number, entire telephone number, or other information can be typed on the labels. There is a
template in Microsoft Word for Windows ‘97 that simplifies the preparation of these labels.
♦ DATA jack — For connecting a device such as a modem to
your telephone. This jack is labeled
♦ Handset Parking tab —
♦ Personalized Ring — Allows you to select one of two
.
different ringing patterns. This two ringing patterns are labeled
.
If your telephone is mounted on
the wall, you can place the handset on the Handset Parking tab
while you tend to other business. In this way you can interrupt
a call in progress without disconnecting.
♦ Ringer volume control — A 3-position switch to control
the volume for the tone ringer. Slide it up (away from you) for
a louder ring, down (toward you) for a quieter ring. The
volume control is labeled
.
♦ Handset — For placing and receiving calls.
♦ Program button — For storing telephone numbers on the
♦ 10 Programmable dialing buttons — The 10 buttons on
which you can program frequently dialed telephone numbers,
emergency numbers, or feature codes.
programmable dialing buttons.
♦ Mute button (on the 6220 only) — On the 6220
♦ Pause button — For inserting a 1.5-second pause delay into
telephone, this button is used for turning off the microphone
associated with the handset or built-in speakerphone so the
other person on the call cannot hear you.
a telephone number stored on a programmable dialing button.
♦ Message light — A red light that flashes when a message
♦ Handset cord jack — For connecting the handset to your
has been left for you or when a call is coming in (that is, when
the telephone is ringing). This light is labeled
.
telephone.
♦ Speaker button (on 6220 only) — On the 6220
♦ Handset and Speakerphone volume control — The
telephone, this button is used to access the built-in
two-way speakerphone and microphone combination.
volume control (labeled
on the 6218 and
on the 6220)
is used for raising or lowering the volume of the handset (on
the 6218), or for raising or lowering the volume of the handset
or the speakerphone (on the 6220), whichever is active.
To raise the volume level, press the upper half of the button
labeled
; to lower the volume, press the lower half of
the button labeled
.
♦ Dial pad — The standard 12-button pad for dialing
telephone numbers. The letters “Q” and “Z” have been added
to the appropriate dial pad keys for directory access, and the
“5” button on your dial pad has raised bars for visuallyimpaired users.
♦ Flash button — For using features such as Conference with
♦ LINE jack (on bottom of the telephone) — For
business communications system.
connecting a line cord to your telephone. This jack is labeled
LINE.
♦ Redial button — For redialing the last number you dialed
from the dial pad or from a programmable dialing button.
♦ Hold button — The Hold button is used for putting a call on
hold. The red light next to
you have a call on hold.
Hold
goes on to remind you that
1
—— INSTALLATION ——
6. Turn the telephone right-side up and place it on your
desk or table.
7. Plug one end of the coiled handset cord into the handset
jack on the side of the telephone.
8. Plug the other end of the handset cord into the handset.
9. Hang up the handset.
10. Plug the free end of the line cord into a modular wall
jack.
11. Lift the handset and listen for dial tone.
) to
12. Set the Ringer volume control (labeled
the setting you want.
TABLE/DESK INSTALLATION
Use the 14-foot straight line cord that came with your
telephone to connect the telephone to a modular jack.
!
WARNING:
Do not plug the handset cord into the line jack or the data
jack on your telephone since it could damage your handset
and the telephone.
1. Turn the telephone upside down so that you can see the
bottom of the telephone. See Figure 2.
WALL INSTALLATION
Use the following directions to mount the telephone on a
standard wallphone jack with mounting studs.
NOTE: For wall installation, use an 8-inch cord
Desktop
stand
(PEC: 2725-02A; Comcode: 103789293) rather than
the 14-foot cord that is packaged with the telephone.
1. You must reverse the handset tab (which holds the
handset when you hang up). See Figure 5.
• Hold down the switchhook and slide the handset tab
up and out of its slot.
• Turn the tab so that the curved end is facing up.
• Insert the tab back into its slot.
Line jack
4 holes for
wall mounting
Figure 2. The Bottom of the 6200 Series Telephones
a. Handset
retainer
in place
2. Remove the desk stand by sliding it to the left until it is
free of the telephone base. See Figure 3.
Desktop
stand
Slide stand
to left and lift
c. Reposition
handset
retainer
down
b. Press to release
and then remove
handset retainer
(up
position)
d. Replace handset
retainer
(down
position)
Figure 5. Reversing the Handset Hook
Figure 3. Sliding the Base from the Bottom of the Set
2. Turn the telephone upside down so that you can see the
bottom of the telephone.
3. Remove the mounting base by sliding the base to the
left until it is free of the telephone. See Figure 3.
4. Turn the base so the larger end is down.
5. Plug one end of the 8-inch line cord into the line jack on
the bottom of the telephone.
6. Slide the reversed base onto the telephone, to the right,
until it snaps into place. See Figure 6.
3. Plug one end of the line cord into the line jack on the
bottom of the telephone.
4. Align the other end of the line cord so that it is threaded
through the slot at the top of the stand. See Figure 4.
5. Reattach the stand to the telephone by sliding the stand
into the appropriate tabs and to the right.
Line cord
Desktop
stand
Invert stand
Line jack
LINE
Holes
for wall
mounting
Figure 4. Attaching the Line Cord and Threading It
Through the Slot at the Top of the Desktop Stand
Position stand
over 4 holes,
push stand down,
and slide to left
Figure 6. Installing the Stand for Wall Mounting
2
7. Plug one end of the coiled handset cord into the handset
jack on the side of the telephone.
8. Plug the free end of the line cord into a modular wall
jack.
9. Place the telephone against the wall jack mount and
push down so that the base locks into the slots on the
telephone.
10. Plug the free end of the coiled handset cord into the
handset and hang up the handset.
11. Lift the handset and listen for dial tone.
12. Set the Ringer volume control (labeled
) to
the settings you want.
MUTE (available only on the 6220 telephone)
To prevent the other party from hearing you
(To mute the microphone)
Press Mute .
• Red light next to Mute goes on, and the other party
cannot hear you.
To resume talking to the other party
(To turn on the microphone again)
Press Mute .
• Red light next to Mute goes off, and you can
resume conversation with other party.
—— PROCEDURES ——
PERSONALIZED RING and RINGER VOLUME
To select a personalized ringing pattern for your
telephone
There are two possible ringing patterns you may select for
your telephone.
1. Move the switch to either of the two settings,
.
To control the volume of the tone ringer
The Ringer volume control on your telephone is labeled
to remind you that there are three separate
volume settings.
1. To raise the volume of the ringer, slide the Ringer
volume control upwards; to lower the volume of the
ringer, slide the Ringer volume control downwards.
ANSWERING AND PLACING A CALL
To answer or place a call
NOTE: The Message light flashes when a call is coming in
(that is, when the telephone is ringing).
1. To place a call: On the 6218 telephone, lift the handset.
On the 6220 telephone, you can either lift the handset or
press Spkr .
To answer a call: On the 6218 telephone, lift the
handset. On the 6220 telephone, you can either lift the
handset or press Spkr .
NOTE: You can also use a programmable dialing button to
place a call if you have programmed a button for
that number.
• If you press Spkr (on the 6220 telephone), the light
next to the button goes on.
2. To place a call, next, dial the desired number.
3. To end the call: On the 6218, hang up the handset. On
the 6220 telephone, hang up the handset or press
Spkr , whichever is active.
PROGRAMMABLE DIALING
The 10 programmable dialing buttons are provided for
one-touch dialing of frequently dialed telephone numbers.
You can also store emergency numbers, such as 911, and
feature codes on these buttons.
Shipped with each telephone is a button designation card on
which you can write the names or numbers or codes stored
on each of the programmable dialing buttons. Use the
procedure below to label and then reinstall the designation
card.
NOTE: To raise the volume of the handset or speakerphone
(on the 6220), whichever is active, use the Volume
on the 6218 and
on the
control button labeled
6220. Press the top half of the Volume control
button labeled
; to lower the volume of the
handset, press the lower half of the Handset volume
control button labeled
.
Laser-printable paper Designation Cards are available for
labeling the Programmable Dialing buttons. They are
available in both 8-1/2” x 11” and A4 size sheets in three
different languages (English, Latin American Spanish, and
sets with icon-labeled buttons). Contact your Lucent
Technologies sales representative for ordering information.
HOLD
You can program up to 24 elements (digits and characters
such as a # or *) on a programmable dialing button. If the
number you want to store is longer than 24 elements, you can
do one of the following:
To put a call on hold
1. Press Hold .
• The red light next to Hold goes on.
To return to the held call
1. Press Hold , or, if you have hung up the handset,
pick up the handset again from the cradle.
• The red light next to Hold goes off.
• You are reconnected to the other party.
— Store up to 24 elements on one button; store the
remainder of the elements on a second button. To
place a call using these buttons, press the first button; when all of the elements have been dialed,
press the second button in the sequence.
— Store up to 24 elements on one button; dial the
remainder of the digits and characters manually.
MESSAGE
To retrieve a message when your Message light is
blinking
See your system manager for instructions about your local
message retrieval procedures.
NOTE: The Message light also flashes when a call is
coming in (that is, when the telephone is ringing).
3
To label and reinstall the programmable dialing
buttons designation card on your telephone
1. Remove the plastic card cover from the telephone by
placing your fingers at the top and bottom and flexing
the card outward. Then, lift the button designation card
from out of its cavity on the telephone.
2. In the blank space next to the appropriate
programmable dialing button, write or type the name or
telephone number that you want to store there.
3. Place the designation card back on the telephone.
Replace the plastic card cover over the designation card
by fitting the cover’s bottom tabs into the slots on the
telephone and pressing down, allowing the tabs on the
top to snap into place.
To program any of the 10 programmable dialing
buttons (while on-hook)
1. Press the Program button to enter programming mode.
• You hear a low continuous tone while you are in
programming mode.
2. Press programmable dialing button on which you want
to store the number.
• Tone is briefly interrupted twice.
3. Dial number you want to program on the button. You
can use up to 24 elements (digits and characters,
including Pause and Flash).
• The tone to remind you that you are in programming
mode is interrupted at each time you press a dial pad
key, the Pause button or Flash .
• You hear a rapid error tone if you try to enter more
than 24 elements, and you will exit Program mode
without saving the new number.
• You can use the Pause button to program a
1.5-second pause between a dialing access number,
such as 9, and the telephone number, and for certain
banking and long-distance services.
• For example, to put a pause between the dialing
access number, 9, and the telephone number, press the
Pause button, then 12125551234. Several depressions
of the Pause button will produce a multiple of a
1.5-second pause. (For instance, two depressions of
the Pause button would equal 3 seconds.)
REDIAL
To redial the last number that you dialed
1. While off-hook, press Redial .
• The telephone will redial up to 24 digits.
SPEAKERPHONE (available only on the
6220 telephone)
To place/answer a call without lifting the handset
1. Press Spkr .
• Red light next to Spkr goes on.
2. Place or answer call.
• Adjust speakerphone volume, if desired. On the
Volume control button (labeled
), do the
following: To raise the volume level, press the
upper half of the button labeled
; to lower
the volume, press the lower half of the button labeled
.
3. Press Spkr again to hang up.
• Red light next to Spkr goes off.
To change from speakerphone to handset
1. Pick up handset and talk.
• Red light next to Spkr goes off.
To change from handset to speakerphone
1. During a call using handset, press Spkr .
• Red light next to Spkr goes on.
2. Hang up handset.
FOR THE SYSTEM
MANAGER ONLY
The following procedures should be
performed only by the system manager.
Enabling and Disabling the System Hold
Feature
NOTE: Programmable dialing buttons can also be used to
program system features. See your system manager
for system feature codes.
4. To program another programmable dialing button,
repeat Steps 2 and 3.
5. Press the Program button when you are ready to exit
programming mode.
The Hold button ( Hold ) can be programmed, at each
individual set, either as the normal Hold feature or as an
alternate feature such as Call Park. The default setting is for
normal Hold.
To program Hold as an alternate feature such as
Call Park
1. Press the Program button; then press Flash ; then
press Hold .
2. Press “797 (SYS)” on the dial pad.
3. Press Flash again; then press the Program button
again.
4. Program the button with the feature access code of the
alternate feature (such as Call Park). For programming
instructions, see “Programmable Dialing.”
To dial a number with a programmable dialing button
1. Pick up handset or press Spkr .
2. When you hear dial tone, press the appropriate
programmable dialing button.
• Number programmed on the button is automatically
dialed.
To erase a number stored on a programmable dialing
button
1. Press the Program button.
2. Press the button to be cleared.
3. Press the Program button again.
NOTE: As long as
Hold is not being used for the Hold
feature, the light next to Hold will not go on
when the alternate feature is activated.
4
REPAIR INSTRUCTIONS
To program Hold for normal Hold (that is, the
feature which allows the user to put a call on hold)
1. Press the Program button; then press Flash ;
then press Hold .
2. Press Hold again; then press Flash again;
finally, press the Program button again.
If it is determined that your telephone is malfunctioning, the
FCC requires that it not be used and that it be unplugged from
the modular outlet until the problem is corrected. Repairs can
only be made by the manufacturer or its authorized agents or
by others who may be authorized by the FCC.
RIGHT OF THE TELEPHONE COMPANY
Locking and Unlocking the Programmable
Dialing Buttons
If telephone equipment is causing harm to the telephone
network, the telephone company may temporarily discontinue
your telephone service. If possible, they’ll notify you before
they interrupt service. If advance notice isn’t practical, you’ll
be notified as soon as possible. You’ll be given the
opportunity to correct the problem, and you’ll be informed of
your right to file a complaint with the FCC. Your telephone
company may make changes in its facilities, equipment,
operations or procedures that could affect the proper
functioning of your Lucent Technologies product. If such
changes are planned, you will be notified.
The system manager can lock the 10 programmable dialing
buttons so the numbers or features assigned to these buttons
CANNOT be changed.
To lock the Programmable Dialing buttons so that
their assignment cannot be changed
1. Press the Program button; then press Flash .
2. Press “752 (RLC)” on the dial pad.
3. Press Flash again; then press the Program button
again.
To unlock the Programmable Dialing buttons
1. Press the Program button; then press Flash .
2. Press “766 (RNO)” on the dial pad.
3. Press Flash again; then press the Program button
again.
INTERFERENCE INFORMATION
!
WARNING:
Some telephone equipment generates and uses radio
frequency energy and if not installed and used properly,
that is, in strict accordance with the manufacturer’s
instructions, may cause interference to radio and
television reception. These telephones have been type
tested and found to comply with the limits for a Class B
computing device in accordance with the specifications
in Subpart J of Part 15 of FCC Rules, which are
designed to provide reasonable protection against such
interference in a residential installation.
However, there is no guarantee that interference will not
occur in a particular installation. If this equipment does cause
interference to radio or television reception, which can be
determined by turning the equipment on and off, the user is
encouraged to try to correct the interference by one or more
of the following measures:
• Reorient the receiving television or radio antennae
where this may be done safely.
• To the extent possible, relocate the receiver with
respect to the telephone equipment.
• Where the telephone equipment requires ac power,
plug the telephone into a different ac outlet so that the
telephone equipment and receiver are on different
branch circuits.
— FCC Information —
FCC REGISTRATION AND REPAIR
INFORMATION
Your new Lucent Technologies telephone has been registered
with the Federal Communications Commission (FCC). This
product complies with standards in Part 68 of the FCC rules.
The FCC requires us to provide you with the following
information:
CONNECTION AND USE WITH THE
NATIONWIDE TELEPHONE NETWORK
The FCC requires that you connect your telephone equipment
to the nationwide telephone network through a modular
telephone outlet or jack. The modular telephone outlet or jack
to which the telephone must be connected is a USOC RJ11C
or RJ11W. The telephone may not be used on coin service
provided by the telephone company. Connection to party lines
is subject to state tariffs. (Contact your state public utility
commission or corporation commission for information.)
— Warranty Information –
LUCENT TECHNOLOGIES WARRANTY
INFORMATION
INFORMATION FOR THE TELEPHONE
COMPANY
WHAT IS COVERED: All terms and conditions specified
in your agreement with Lucent Technologies apply.
TO GET WARRANTY SERVICE FOR YOUR
TELEPHONE: Call the Lucent Technologies Customer
Service Support Operations toll-free at 1 800 242-2121 or
call the distributor from whom the product was purchased. If
you are directed to ship your telephone to an authorized
service location, you must prepay all shipping costs. We
suggest that you retain the original packing material in the
event you need to ship the unit. When sending your
telephone to a service location, include your name, address,
phone number, proof of purchase (or original shipping
receipt), and description of the operating problem. After
replacing your telephone, Lucent Technologies will ship it to
you at no cost to you
Upon request of your local telephone company, you are
required to provide them with the following information:
A.) Your phone number. B.) The telephone equipment’s FCC
registration number and ringer equivalence number (REN).
These numbers are on the back or bottom of your telephone
equipment. The REN is useful to determine how many
devices you may connect to your telephone line and still have
them ring when your telephone line is called. At most, but not
all areas, the sum of all REN’s should be 5 or less. You may
want to contact your local telephone company.
5
Prepared by
BCS Product Publications
Lucent Technologies
Middletown, NJ 07748-9972
Copyright © 1999
Lucent Technologies