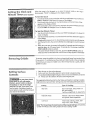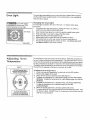
1
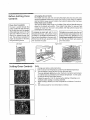
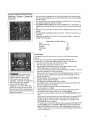
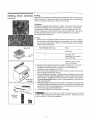
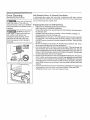
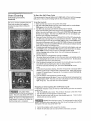
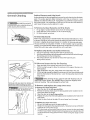
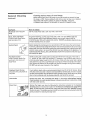
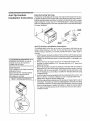
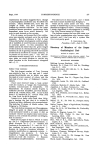
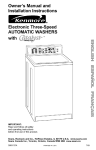
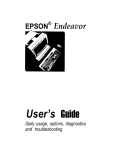
5303304549
I_ MP_4UFk
Read and Save These Instructions
RecycledPaner
Pi%-_
208283-1010
Rev !
Kenmore
Electric
Range
Thank you for choosing this appliance,
The information contained within this
Owner's Guide will instruct you on how to properly operate and care for your
range. The Cooking Guidewill help you to receive favorable results during cooking
and baking. Please read through the information contained in your literature pack
to learn more about your new appliance.
Record Your
Model
and Serial
Numbers
Record in the space provided below the model and serial numbers which are found
on the serial plate located along the upper left corner of the oven frame behind the
smaller oven door_
Model Number:
Serial Number:
Contents
This Owner's Guide contains general
operating instructions for your range
and feature information for several
models.. Your range may not have all
the described features
O t994 White Consolidated Industries
All rightsreserved
3-4
5
6
6
7
7-9
10
1!-12
t3-14
15
15
16
17-t9
20
Important Safety Instructions
Features
Setting the Clock & Minute Timer (some models)
Setting Surface Controls
Before Setting Oven Controls
Setting Oven Controls
Oven Cleaning (cleaning the porcelain enamel oven)
Oven Cleaning (self-cleaning instructions)
General Cleaning
Oven Light
Adjusting Oven Temperature
Anti-Tip Bracket Installation Instructions
Avoid Service Checklist
Warranty
2
BMPORTANT
SAFETY INSTRUCTIONS
Read all instructions
before
using this appliance.
This guide contains important safety symbols and instructions Please pay special attention
given Here is a brief explar_ation of the use of these symbols
_This
symbol wilt help alert you to situations that may
cause serious bodily harm, death or property damage,
• Remove all tape and packaging before using the range.
Destroy the carton and plastic bags after unpacking the
range. Never allow children to play with packaging materia[
, Proper Installation--Be
sure your appliance is properly
installed and grounded
by a qualified
technician in
accordance with the National Electrical Code ANSI Z223.1_
latest edition,
the National Electrical Code ANSl/NFPA Noo
70---latest edition and local code requirements.
Install only
per installation instructions provided in the literature package for
this range
Ask your dealer to recommend a qualified technician and an
authorized repair service agency. Know how to disconnect the
power to the range at the circuit breaker or fuse box in case qf an
emergency
° User Servicing--Do
not repair or replace any part of the
appliance unless specifically recommended
in the manuals,
All other servicing should be done only by a quatified technician
This will reduce the risk of personal injury and damage to the
range
* Never modify or alter the construction
c;f a range by
removing
leveling legs, panels, wire c_vers, anti-tip
brackets/screws,
or any other part of the product°
"ALL RANGES
CAN TIP
° INJURY TO
PERSONS
COULD
RESULT.
° INSTALL
ANTI-TIP
DEVICE
PACKED WITH
RANGE,
-SEE
INSTALLATION
INSTRUCTIONS
TO REDUCE
THE RISK OF TIPPING THE
RANGE, THE RANGE MUST
BE SECURED BY PROPERLY
INSTALLING THE ANTI-TIP
BRACKETS PROVIDED WITH
THE RANGE, TO CHECK IF
THE BRACKETS ARE
INSTALLED PROPERLY.
REMOVE THE LOWER PANEL
OR STORAGE DRAWER AND
VERIFY THAT THE ANTI-TIP
BRACKETS ARE ENGAGED
REFERTO THE
INSTALLATION
INSTRUCTIONS OR THIS
MANUAL FOR PROPERANTITIP BRACKET INSTALLATION
INSTRUCTIONS.
to these symbols and follow a!f instructions
_This
symbol wili help alert you to situations that
may cause bodily injury or property damage..
Storage in or on Appliance--Flammable
materials should
not be stored in an oven, pear surface elements or in the
storage drawer (if equipped).
This includes paper, plastic and
cloth items, such as cookbooks, plasticware and towels, as well
as flammable liquids. Do not store explosive containers, such as
aerosol cans, on or near the range
Do not store items of interest to children in
the cabinets above a range or on the backguard
of a range.
Children climbing on the range to reach items could be seriously
injured.
° Do not leave children alone--Ch!]dren
should not be left
alone or unattended
in the area where an appliance is in
use. They should never be allowed to sit or stand on any part of
the appliance.
• DO NOTTOUCH SURFACE UNITS, AREAS NEAR THESE
UNITS, HEATING ELEMENTS OR INTERIOR SURFACES OF
THE OVEN° Both surface units and oven heating elements maybe
hot even though they are dark in color Areas near surface units
may become hot enough to cause burns During and after use
do not touch, or let clothing or other flammable materials touch
these areas until they have had sufficient time to cool. Among
these areas are the cooktop, surfaces facing the cooktop, the
oven vent openings and surfaces near these openings, oven door
and window
o Wear Proper Apparel--Loose-fitting
or hanging garments
should never be worn while using the appliance., Do not
let clothing or other flammable materials contact hot surfaces
_
heating
Never us_ your appliance
for warming
or
the room.
- Do Not Use Water or Flour on Grease Fires_Smother
the
fire with a pan lid, or use baking soda, a dry chemical or
foam-type
extinguisher.
° When heating fat or grease, watch it closely. Fat or grease
may catch fire if a11owed to become too hot
, Use Only Dry Potholders_Moist
or damp potholders
on
hot surfaces may result in burns from steam. Do not let the
potholders touch hot heating elements Do not use a towel or
other bulky cloth instead of a potholder
° Do Not Heat Unopened Food Containers_Build-up
of
Stepping.
leaning or sitting on the doors or
pressure may cause the container to burst and result in
drawers of this range can result in serious injuries and may
injury.
also cause damage to the range,, Do not allow children to climb
° Remove the oven door from any unused range if it is to be
stored or discarded°
or play around the range, The weight of a child on an open door may
cause the range to tip, resulting in serious burns or other injury
-- tMPORTANT_Do
not attempt to operate the oven during
Do not use the oven for storage.
a power failure,, If the power faiis, always turn off the
oven. If the oven is not turned off and the power resumes, the
oven will begin to operate again Food left unattended could catch
fire or spoil
gMPORTANT
iMPORTANT
INSTRUCTIONS
SAFETY iNSTRUCTIONS
FOR USING
YOUR
COOKTOP
- Know which
o
-
o
-
°
o
knob controls each surface
etement_
Use Proper Pan Size---This appliance is
equipped with surface elements of different sizes,
Select utensils having flat bottoms large enough to cover the
surface element. The use of undersized utensils will expose a
portion of the heating element to direct contact and may result
in ignition of clothing
Proper relationship of utensil to element
will also' improve efficiency.
Utensil Handles Should Be Turned Inward and Not Extend
Over Adjacent Surface Elements--To
reduce the risk of
burns, ignition of flammable materials, and spillage due to
unintentional contact with the utensil, the handle of the utensil
should be positioned so that it is turned inward, and does not
extend over adjacent surface elements.
Never Leave Surface Elements Unattended at High Heat
Settings---Boilovers
cause smoking and greasy spillovers that
may ignite, or a pan that has boiled dry may melt
Do Not Immerse or Soak Removable Heating Elements-Heating elements should never be immersed in water.. Heating
elements clean themselves during normal operation.
Make sure Drip Pans or Drip Bowls Are in Place-Absence of these pans or bowls during cooking may subject
wiring or components underneath to damage.
Protective
Liners--Do
not use aluminum foil to line surface
unit drip pans, drip bowls or oven bottom_xcept
as
suggested in the Owner's Guide Improper installation of these
liners may interfere with heat and air distribution and damage
the range
Glazed Cooking Utensils--Only
certain types of glass,
glass/ceramic, ceramic, earthenware, or other glazed utensils are
suitable for rangetop service without breaking due to the
sudden change in temperature, Check the manufacturer's
recommendations
for rangetop use,,
IMPORTANT
OVEN
INSTRUCTIONS
FOR USING YOUR
o Use Care When Opening Door--Stand
to the side of the
range when opening the door of a hot oven. Let hot air or steam
escape before you remove or replace food in the oven..
- Keep Oven Vent Ducts Unobstructed_
The oven is vented
through the center of the left rear element for the left oven and
the center of the right rear element for the right oven. Touching
the surfaces in this area when the oven is operating may cause
severe burns, Also, do not place plastic or beat-sensitive items on
or near the oven vent These items could melt or ignite,,
o Do not cover or leave pots or pans on these surface
elements if they are not in use; moisture from a hot oven may
condense on the pan or pot bottom and accumulate inside the
range under certain conditions of use,,
(Continued)
• Placement of Oven Racks_ Always place oven racks in desired
location while oven is cool_ If rack must be moved while oven is
hot, use extreme caution Use potholders and grasp the rack
with both hands to reposition. Do not let potholders contact the
hot oven element or interior of the oven Remove all utensils from
the rack before moving
• Do not use the broiler pan without
its insert The broiler pan
and grid allow dripping fat to drain and be kept away from the
high heat of the broiler
• Do not cover the broiler grid with aluminum
foil. Exposed
fat and grease could ignite
IMPORTANT
INSTRUCTIONS
YOUR RANGE
FOR CLEANING
o Clean the range regularly
to keep all parts free of grease
that could catch fire. Pay particular attention to the area
underneath each surface element Exhaust fan ventilation hoods
and grease filters should be kept clean,, Do not allow grease to
accumulate, Greasy deposits in the fan could catch fire Refer to
the hood manufacturer's instructions for cleaning
Self-Cleaning
Ovens
Before self-cleaning the oven, remove
utensils or foods from the oven.
Clean Only Parts Listed
section.
the broiler
In This Manual
pan and any
in the self-cleaning
Do Not Use Oven Cleaners---No commercial oven cleaner or oven
liner protector coating of any kind should be used in or around any
part of the oven,
Do Not Clean Door Gasket--The
door gasket is essential for a
good seal, Care should be taken not to rub, damage or move the
gasket,
Note: The instructions appearing in this owner's guide are not
meant to cover every possible condition and situation that may
occur.. Common sense and caution must be practiced when
installing, operating and maintaining any appliance
SAVE THESE iNSTRUCTiONS
FEATURES
1
Model
and Seria! Numbers
2
Surface Unit Controls
3
Surface Unit's
8
Indicator
Light
6
7
5
11
4
2
28
9
26A
26
27
14
13
12
4
Oven Control
5
Right Oven Temp Control
6
Left Oven Temp Control
7
Right Oven Indicator
8
Left Oven Indicator Light
17A
9
Automatic
Oven Timer Clock and
Minute Timer
21
11
Oven Cleaning
12
Plug-In Surface Unit, (Z) 6 in., (Z)
8 in, (May be removed when
cleaning under unit.)
I3
One Piece Chrome Trim Ring and
Drip Pan. (Do not clean inS_IfClean oven, Discoloration may
16
24
29
Light
21
22
18
Light
Occur,,)
\
\
20
23
14
Oven Vent (Located under right
rear and left rear suface units.)
15
Oven Interior Light (Comes on
automatically when door is
opened.)
22
(2) Broiler Pans and inserts (Do
not clean in Self-Clean Oven,)
16
Surface Light Switch
23
Storage
17A
17B
Broil Unit
Broil Unit
24
Oven Light
25
Self-Cleaning
18
Bake Unit (in the right oven, may
be lifted gently for wiping oven
bottom.)
26
26A
Griddte
Griddle
19
(2) Oven Racks
27
Fluorescent
20
Left Oven Rack
28
Griddle
21
Oven Rack Supports
29
Oven Light/Self-clean
Drawer
Switch
Right Oven
Control
Indicator
Light
Surface
Light
Switch
Setting
Minute
When the range is first plugged in, or when the power
the Clock
disconnected, "O0:O0" is displayed in the display window
Timer (som models)
supply to the range i
To Set the Clock
t. Turn the set knob counter clockwise until the control beeps once and the wor(
TIME is displayed in the lower left corner of the display.
2. Turn the set knob clockwise or counterclockwise until correct time of day
appears in the display window
3.. Push start button, when correct time is reached, the control will beep once anc
the word TIME will disappear from the display window..
To Set the
Minute
Timer
!.
Turn the set knob clockwise until the word TIMER is displayed in the lower left
corner of display
2. Turn the set knob clockwise or counterclockwise until the desired time appears
in tile display
,,Display will increment in 5, 10, 30 and 60 second increments up to 99 minutes..
3. Push the start button, the control will beep once and begin to count time down
toO..
4. When time runs out, the control will sound for 3 seconds and will continue to
sound an alarm for I/2 second every 10 seconds for 15 minutes or until the
STOPICANCEL button is pushed.
,,To cancel minute minder at any time, push the STOP/CANCEL button or
rotate set knob counterclockwise until the time of day appears in the display.
Removing
Griddle
Setting Surface
Controls
Do not place plastic
items such as, salt and pepper
shakers, spoon holders or'plastic
wrappings
on top of the range
when it is in use. These items could
melt or ignite_ Potholders, towels or
wood spoons could catch fire if placed
too close to the element.
To remove, grasp the griddle in the front and gently pull away from terminal, then
lift up and out. To reinstall, grasp the griddle with both hands at the end opposite
the terminals and using the middle rod at the termina! end as a guide, push the
griddle into place
1.. Place the pan on the surface element.
2. Push in and turn the surface element control knob to desired setting
3o The surface indicatorlightwill
glow when one or more elements are turned
on. Always turn the element off before removing the pan.
The suggested settings found in the char_ below are based on cooking in mediumweight aluminum panswith lids. Settings mayvac¢ when using other t-ypesof pans
Setting
Type of Cooking
HIGH (HI)
Start most foods, bring water to a
boil, pan broiling
Continue a rapid boi!, fry, deep fat fry
!......
MEDIUM
Maintain a slow boi!, thicken sauces
and gravies, steam vegetables
(MED)
LOW (LO)
Keep foods cooking, poach, stew
Keep warm, melt, simmer
Note: The size and type of utensil used, and the amount and type of food being
cooked
wilt
influence
the
setting
needed
for
best
cooking
results
Before Setting
Controls
Oven
Vent
Oven
Locatii_n
The oven is vented through the
center of the left rear element
for the left oven and the center
of the right tea r element for the
right oven When an oven is on,
warm air is released through the
vent, This venting is necessary for
proper air circuIation in the oven
and good baking results
Left Oyen
Setting
Oven Controls
Arranging
Oven
Racks
The smaller oven has one oven rack and the larger oven has two oven rac_
ALWA Y,SARRANGE OVEN RACKS WHEN THE OVEN I5 COOL (PRIOR TO OPERA TING THE OVEtV), Always use pot holders when using the large and/or small oven
Offset Rack (some models)
This rack has slightly raised rungs on the sides of the rack and should always be
placed in the lowest rack position, These raised rungs allow for easy and safe
removal of foods from the lower rack position and helps prevent hands from
touching the hot oven door,
To remove an oven rack, pull the rack
forward until it stops. Lift up front of rack
and slide out,, To replace an oven rack, fit
the rack onto the guides on the oven walls,,
Tilt the front of the rack upward and slide
the rack back into place
To bake on one rack, place the rack
on the second rack position from the
bottom of the oven, To bake on two
racks (some models), place the racks
on the first and third rack positions
from the bottom
Right Oven
Bake
1,, Arrange oven racks as instructed above,
2, Push in and turn the Temperature Control to the desired temperature,
3, Turn the Selector Control to BAKE for the right oven only.
The oven indicator light glows when the oven is turned on and remains
on until the oven is preheated to the selected temperature. It then cycles
on and off with the lower bake element,.
4. Preheat the oven for t0 to 12 minutes before baking_ Preheating is not
necessarywhen roastingor cooking casseroles.
5_ When cooking is finished, turn the Temperature and Selector Controls to
OFF.
6, See Cooking Guide for more information on baking
Setting
Oven
Controls
(continued)
1.
Push in and turn the griddle control in either direction to the desired setting
Start most cooking operations on a higher setting; then turn to a lower setting
to finish cooking
2. The controls do not have to be set exactly on a particular mark Use the marks
as a guide and adjust the control as needed
3.. The griddle indicator light glows when the griddle is on,. A quick glance at
the light when cooking is finished is an easy check to be sure the control is turned
off.,
4
5
6
Preheat for a few minutes (until butter melts or beads of water dance on the
griddle).
Use only nylon or plastic spatulas, spoons, etc. Metal can scratch the nonstick finish.
Make sure the griddle is turned
griddle ON will damage it.
Approximate
Bacon
Grilled Sandwiches
Pancakes
Hamburgers
Eggs
Timed
Use precaution when
using the automatic timer. Use the
automatic timer to cook cured or
frozen meats and most fruits and
vegetables. Foods that can easily spoil,
such as milk, eggs, fish, poultry or
meat, should be chilled in the
refrigerator.
Even when chilled, they
should not stand in the oven for more
than two hou[s before cooking begins,
and should be removed promptly when
cooking is completed.
OFF when cooking is finished
Griddle
Leaving the
Settings
HI
HI
HI
MED-Ht
MED
Bake
The automatic timer will turn the oven on and off at the times you select in
advance
The oven can be programmed to start immediately
and shut off
automatically, or, to start at a delayed time and shut off automatically
!. Be sure that the clock shows the correct time of day
2. Place the food in the oven and close the door,.
3
Push and hold START button until the control beeps and the words
START TIME appear in the left side of the display.
4. Turn set knob clockwise until the desired starting time is reached, Time will
increase or decrease in 5 minute increments,
olf you want to start now and shut off automatically, then go to step #5 If
you want to stag at a delayed time and shut off automatically, you must
change the start time.
5. Push start button, control will beep once and the words STOP TIME will
appear in the left side of the display,
6. Turn SET knob until desired stop time is reached,
7. Push START button. The control will beep once and the word AUTO will
flash in the upper left of the display
8 Turn the temperature control to the desired temperature.
9
Turn the selector to T. BAKE,
°When desired start time is reached, the control will beep once and the
word AUTO wil! start flashing and remain on during baking.
°To cancel automatic baking at any time, push the STOPICANCEL button
twice
°At the end of automatic baking, the timer will sound for 3 seconds, AUTO
will flash rapidly to indicate the end of automatic cycle, The alarm wilt
continue to sound t/2 second every 10 seconds for t5 minutes or until
STOPICANCEL button is pushed.
-To review, start and stop time settings before automatic cycle begins, push
and hold START button until START TIME appears; push second time to
display STOP TIME and once more to return to automatic control mode
°When changing the start and stop times, time wilt increase and decrease in
5 minute increments
Setting
Oven
Controls
Broiling
Broiling is a quick method of cooking foods by direct heat under the upper broil
element of the oven, Results and cooking times will depend on the broil setting
used and the distance between the food and the element
(continued)
Preheating:
Preheating is suggested when searing rare steaks Remove the broiler pan and
grid before preheating, Foods will stick if placed on hot metaL. Turn both the
Temperature and Selector Controls to BROILwhen using the large oven Turn
onlythe Temperature Control tO BROILwhen using the small oven Wait for the
element to become red hot--about 2 minutes P.reheatingis not necessary
when broiling meats well done,,
To Broil:
t.. Placethe rack in the desired position close to the top of the oven. Position
the rack closer to the broiling element for rare steaks. For welt-done foods
such as chicken, lobster tails or thick cuts of meat, position the rack further
away from the broil element.
Broiler Grid
Rack Position
Br_iter
2
3,
4,
Broil Stop
Position
5
6
Broil Stop
Position
From Top
Food
1
Rare steaks
2
Ham slices, fish,
hamburgers, and medium
steaks and chops
3
Welt-done foods, such as
chicken and lobster
Broiling can be done in either the smaller or larger oven. Turn the
temperature control (small oven) to BROIL or turn the temperature
and selector controls (large oven) to BROIL,,
Place food on the cooi broiler grid, Be sure the grid is in place with the slots
down so grease will drain into the pan,
Place the broiler pan in the oven. If broiling is done in the larger oven, the door
should be opened to the broil stop position.
The door remains in this position
w!thout closing. If broifing is done in the smaller oven, leave the door open at
the broil stop position
(about 2 inches); a small resistance is felt when the
door is in this position,
Broil times vary, so watch the food closely Time depends on distance from
the element, thickness and aging of meat, fat content and the doneness level
selected,, The first side usually requires a few minutes longer than the second
Frozen meats atso require additional time
See Cooking Guide for more information on broiling
Shou d an oven fire occur, close the oven door and turn off all
controts If the fire continues, throw baking soda on the fire, DO NOT put water
or flour on the fire Flour may be explosive
Oven
(cleaning
_
Cleaning
Small Oven
the porcelain
Porcelain has a smooth finish and is a type of glass fused to metal. With porcelain,
commercial oven cleaners can be used on aElinterior surfaces..
ename!
oven)
Do NOTfl'ine the oven
walls, racks or bottom with aluminum
foil, Doing so will destroy heat
distribution and produce poor cooking
esults.
Adhere
to the following
cleaning
precautions:
, Allow the oven to cool before
cleaning
• Wear rubber gloves when cleaning the
range manually:
is a Porcelain
Enamel
Oven--A
General
Description
General Cleaning
Removesoils using hot, soapy water. Do not allow food spills with a high sugar or
acidcontent (such as milk, tomatoes, sauerkraut, fruitiuices orpie filling) to remain
on the surface as they may cause a dull sprit mien aft#r cleaning..
To Remove
Heavy
1, Allow a dish of
softened spots
2, If soil remains,
necessary, use
instructions
Soil
ammonia to sit in the oven overnight or for several hours, C lean
using hot, soapy water, Rinse welt with water and a clean cloth
use a soap-filled nylon scouring pad or a nonabrasive cleaner If
a commercial oven cleaner following manufacturer's
Adhere to the following
precautions
when using commercial
oven
cleaners:
1. Be careful where the oven cleaner is sprayed.
2
DO NOT spray on the electrical controls or switches because it could cause a
short circuit and result in sparking or fire..
3. DO NOT aglow a film from the cleaner to build up on the temperature sensing
bulb; it could cause the oven to heat improperly.
Note: One sensing bulb is
located in the upper left corner of the large oven and the other sensing bulb
is located in the upper right corner of the small oven. Carefully wipe the sensing
bulb clean after each oven cleaning, being careful not to move the bulb A
change in its position could affect how the oven bakes. Avoid bending the bulb
and capillary tube.
4, DO NOT spray any cleaner on the oven door trim or sea!, handles or any exterior
surfaces of the oven, wood or painted surfaces The cleaner can damage these
surfaces.
Cleaning
the Oven Bottom
Clean using hot, soapy water, a mild abrasive cleanser, a soap-tiffed nylon pad or
commercial oven cleaner following manufacturer's instructions_,
Cleaning
the
Griddle
Before denning, be sure all controls are OFF, For easier cleaning, clean the griddle
while it is still warm.. The griddle can be washed in the sink with a mild detergent
and plastic scouring pad., For greasy residue, use a grease-dissolving dishwashing
liquid and a nylon scrub brush
Avoidabrasivecteansersthatcanscratchthefinish_
dry before reinstalling into rangetop
10
Do not use oven cfeaners
Wipe
Oven
Cleaning
(self-cleaning
instructions)
_During
the self-cleaning
cycle, the outside of thelange can
become very hot to the touch_ DO NOT
leave smalt children unattended nearthe
appliance.,
DO NOT line the oven
walls, racks or bottom with aluminum
foil.. Doing so will destroy heat
distribution during cleaning, and the
aluminum foil will melt to the oven
finish (causing permanent damage to
the oven).
Self-Cleaning
Oven--A
General
Description
A self-cleaning oven cleans itself ,with high temperatures (well above cooking
temperatures) which eliminate soil completely or reduce it to a fine powdered ash
you can whisk away With a damp cloth..
Preparing
the Oven for Self-Cleaning
1 Adhere to the following cleaning precautions:
°Allow the oven to coo! before precleaning
•Wear rubber gloves when precleaning and while wiping up the residue after
the self-clean cycle.
• DO NOT use commercial oven cleaners or Oven protective coatings in or
around any part of the self-cleaning oven.
oDO NOT clean the oven door.. The woven gasket on the oven door is essential
for a good seat..Care shou!d be taken not to rub, damage or remove the seal.
-DO NOT use any commercial cleaning materials on the seal_ Doing so could
damage it.
2. Removethe broiler pan and insert, all utensils and any aluminum foil. These
items cannot withstand high cleaning temperature.
3. Oven racks may be left in the oven or may be removed. If they go through the
clean cycle their colorvvill turn slightly blue and the finish will be dull,, After the
cycleiscompleted and the oven has cooled, rub the sidesof the rackswith wax
paper or a cloth containing a small amount of baby oil or saladoil This will make
the racks glide easier onto the rack supports.
4. Removeany excessspilloversin the oven cavity before starting the self-cleaning
cycle..To clean, usehot soapy water and a cloth_ Large spilloverscan causeheavy
smoke or fire when subjected to high temperatures. DO NOT allow food spills
with a high sugar or acid content (such asmilk, tomatoes, sauerkraut, fruit juices
or pie filling) to remain on the surface asthey may cause a dull spot even after
cleaning
5. Clean any soil from the oven frame, the door liner outside the oven seal strip and
the small area at the front center of the oven bottom.. These areas heat
sufficiently to burn soil on.. Clean with soap and water.
11
Oven Cleaning
To Start the Self-Clean
(self-cleaning
continued)
*We recommend a 2 hour self-clean cycle for Fight soils, a 3 hour cycle for average
soils, and a 4 hour cycle for heavy soils (to assure satisfactory results)
instructions,
l Be sure to remove ever_hing from the
oven and complete the suggested
precteaning steps before setting the
controls.
To Set the Controls:
t. Make sure the clock is set to the correct time of day
2. Push and hold START button until the control beeps and the words START
TIME appear in the left side of the display.
3, Turn SET knob clockwise until desired starting time is reached
.If you want the clean cycle to start now and shut off automatically, push START
button, the control will beep once and the words STOP TIME will appear in the
left side of the display. Then the word AUTO will come on to indicate that
the clean cycle will begin immediately
4, If you want to start the clean cycle at a delayed time and shut off automatically,
turn SET knob until stop time is 3 hours later than start time,, Example: If the
start time and clock read 1:00, set the STOP TIME for 4:00. Push STARTbutton_
the control will beep once and the words STOP TIME will appear in the left side
of the display. Then the word AUTO will flash continuously to indicate that the
clean cycle will begin at a delayed time.,
5, To review start and stop time settings before automatic cycle begins, push and
hold START button until START TIME appears; push second time to display
STOP TIME and once more to return to automatic control mode,
.When changing start and stop times, time will increase and decrease in 5
minute increments
6. Turn the selector and temperature controls to CLEAN.
7. The motor driven lock wilt begin to close the oven door automatically and the
oven cleaning light will come on as soon as the controls are set (It takes about
t5 seconds for the lock to close the door)
8 After the desired cleaning time has elapsed, the control wilt beep once and the
word AUTO will stop flashing but stays on during cleaning
-To cancel automatic cleaning cycle, push the STOP/CANCEL button
twice
oAt the end of automatic cleaning, the timer will sound for 3 seconds, AUTO
will flash continuously to indicate end of automatic cycle. Alarm will continue
to sound 1[2 second every !0 seconds for 15 minutes or until STOP/CANCEL
button is pushed,
9 Turn the selector and temperature controls to OFF.
t0, The oven must now cool for about 1 hour or until the interior temperature has
dropped below 550°F, Then the oven door will unlock and the oven cleaning
light will go out, The oven door can now be opened
Stopping
Use caution when
opening the door after the self-cleaning
cycle, The oven may still be VERY HOT,
Note: Be sure to turn the Temperature
and Selector Controls to OFF when the
self-cleaning cycle is completed.,
Cycle
or Interrupting
the
Self-Clean
Cycle
If it becomes necessary to stop or interrupt a self-cleaning cycle due to excessive
smoke or fire:
1 Push the CANCEL button twice. This will return the clock to the time of day
2, Turn the selector and temperature controls to OFF.
3 Allow the oven to cool until the oven cleaning light goes out Then the door
unlocks and can now be opened
DO NOT force the door to open This can damage the door locking
system, Use caution when opening the door after the self-cleaning cycle has been
interrupted The oven may still be VERY HOT
4
5
Correct the condition which caused the smoking
Restart the self-clean cycle once all conditions have been corrected
12
General
Cleaning
Be careful not to bend
terminal ends when replacing elements
after cleaning the drip bowls
\
\
Surface Elements
and Drip Bowls
Surface elements can be unplugged and removed to make cleaning the drip bowls
easien The surface elements clean themselves when they are turned on Food
spilledon a hot element will burn off, Food spilled on a cool element may be cleaned
with a damp cloth--any remaining soil witl burn off the next time the element is
used Never immerse a surface element in water
To
t,
2.,
3
Remove Surface Elements
and Drip Bowls:
Lift up edge of surface element across from the terminal end
Gently slide the surface element out of the terminal plug
Lift the drip bow! up and out
To Clean
Drip
Bowls:
Wash in hot, soapywater or in the dishwasher. Rinse and drywhife still warm Hardto-remove, burned-on soil can be removed by soaking the drip bowls for about 20
minutes in a slightly diluted liquid cleanser or a solution of ammonia and water
(1/2 cup ammonia to one gallon of water). A nylon scrubber may be used after
soaking.. Do not use abrasive cleansers or steel wool, as theywill scratch the surface
Always rinse with clean water and polish dry with a soft cloth,
To Replace
I..
2..
3.
Drip
To Raise and
I..
2
3.
4.
Swing-up rod goes back into bottom of
burner box when lowering top down.,
_The
door isheavy,,Forsafe,
temporary storage, lay the door flat
Position
A
Bowls
and Surface
Elements:
Line up the opening of the drip bowl with the terminal plug
Hold the surface element as level as possible and slide the terminal end through
the opening and into the terminal plug.
The surface element must be level to reduce the hazard of pans
sliding off the element
Lower
the Top for Cleaning:
Grasp the sides of the cooktop and then lift from the front
Lift the top high enough to allow the swing-up rod to support the top in its
raised position,.
Clean underneath using hot, soapy water and a clean cloth; then, dry..
Lift the top high enough to release the swing-up rod, then lower swing-up rod,
back into the bottom of the burner box.. Lower the top gently down into the
range frame,
When lowering the top, grasp the sides with fingertips only.. Be
careful not to pinch fingers,, Also, DO NOT drop or bend the rangetop when
raising or lowering. This could damage the surface finish.
To Remove
and Replace the Large Oven Door:
To Remove the Large Oven Door:
I. Open the door to the full open position.
2. Remove the screws which secure the locking plates (some models) into the
oven frame above the hinges.
3. Open the door to the broil stop position.
4
Replace the screws from the locking plates (some models) into the holes in the
oven frame.
5. Grasp the door firmly at the sides, lift up and away from the range.
To Replace the Large Oven Door:
t.
Be sure the hinge arms are in the open position A..
2. Hingearmsmustgointotherangestotsevenly.
Thebottomcornersofthedoor
should be in as far as they can go
3
If the door does not line up with the oven frame, remove the door and repeat
the above steps.. Note: Reinstall hinge locking plates (some models) if door will
not be removed for a tong period of time or when moving the range to a new
location
13
General
Cleaning
Cleaning
(continued)
How
Surfaces
Aluminum
Vinyl
Various
Parts of Your
Range
Before cleaning any part of the range, be sure all controls are turned OFF and
the range is COOL, Remove spitfovers and stains as soon as they occur, REMOVE
SPILLOVERS AND HEAVY SOILING AS SOON AS POSSIBLE REGULAR
CLEANINGS WILL REDUCE THE NUMBER OF MAJOR CLEANINGS LATER
(Trim Pieces) &
to Clean
Use hot, soapy water
and a cloth. Dry with a clean cloth
Glass, Paint and Plastic
Control Knobs. Body Pieces,
and Decorative Trim
Forgeneral cleaning, use hot soapy water and a cloth For more difficultsoiJs and
built-up grease, apply a liquid detergent directly onto the soil. Leave on soil for
30 to 60 minutes Rinse with a damp cloth and dry DO NOT use abrasive cleaners on any
of these materials; they can scratch.
Control
Before cleaning the controlpanel, turn all controls to OFFand remove the control knobs
To remove,pull each knob straight off the shaft Clean asinstructed above, Be sure to wring
excesswater from the cloth before wiping the panel; especially when wiping around the
controlsr Excesswater in or around the controls may cause damage to the appliance. To
replace knobs after cleaning, line up the flat sides of both the knob and the shaft; then push
the knob(s) into place,
Panel
Porcelain Enamel
Under Cooktop, Broiler Pan
and Insert, Door Liner and
Body Pieces
Gentle scouring with a soapy nylon scouring pad will remove most spots. Rinse with a
I :i mixture of clear water and ammonia
If necessary, cover difficult spots with an
amrhonia-soaked paper towel for 30 to 40 minutes Rinse with clean water and a damp
clotl-i.,and then scrub with a soap4illed nylon scouring pad Rinse and wipe dry with a clean
clotk, Remove all cleaners or the porcelain may become damaged during future heating.
DO NOT use spray oven cleaners on the rangetop
Stainless Steel, Chrome
Decorative Trim, Drip Bowls or
Drip Pans
Cover stubborn spots with an ammonia-soaked paper towel for 30 to 40 minutes Rinse
with clean water and a cloth. Cleaners made especially for stainless steel, chrome or copper
are also recommended, Rinse all cleaners before operating range Bluish stains may result
(due to heat combined with the cleaning material), and cannot be removed
Oven Racks
Remove oven racks, See "Arranging Oven Racks" in the section called Before Setting
Oven Controls. Use a mild, abrasivecleaner, following manufacturer's instructions Rinse
with clean water and dry,
Oven
Remove the larger oven door by following the instructions provided in the General
Cleaning section in this Owner's Guide. See To Remove and Replace the Large Oven
Door. To clean oven door, wash with hot, soapy water and a clean cloth DO NOT immerse
the door in waten. The smaller oven door cannot be removed, but can be cleaned using the
same procedure for cleaning the larger oven
Door
14
Oven Light
The oven light automatically turns on when the door is opened (some models)
Use the switch (some models) located on the control panel to turn the light on
when the door is closed.
Changing
the Oven Light:
The oven light islocated at the rear of the oven, To replace, follow these
instructions:
Be sure the range is
unplugged and all parts are COOL
before replacing the oven light,,
- Wire Holder
t
Turn power off at the main source or unplug the range, BESUREALL
PARTSARECOOL BEFOREREMOVING BULB,
2,
3.,
4.
5.
6,,
7.,
Wear a leather-faced glove for protection against possible broken gfass,,
Presswire holder to one side to release the glass shield.
Replace bulb with a 40 watt appliance bulb
Replace glass shietd in socket and snap wire holder into place,,
Turn power back on at the main source (or plug the range back in)
The clock (if equipped) will then need to be reset, See Setting the Clock
and Minute Timer in this Owner's Guide,.
Glass Shield
Adjusting
Temperature
Oven
The temperature in the oven has been set at the factory.. When first using the oven,
, be sure to follow recipe times and temperatures, if you think the oven is too hot
'. "or too cool, the thermostat can be adiusted. Before adjusting the knob, test a recipe
by using a temperature set higher or lower than the recommended temperature.
The baking resultsshould help you to decide how much of an adjustment is needed.
The knob can be adjusted as indicated on the back of the disk.
Figure I
To
1,,
2o
3_
4_
Adjust the Oven Temperature:
Check to be sure the Temperature Control knob is in the OFF position,
Pull the knob straight off the shaft,
Loosen the two screws at the back of the disk (Figure 1),
To lower the temperature for a self-cleaning range, turn the disk counter
dock'wise. To raise the temperature for a self-deaning range, turn the disk
clockwise.
5.
7
USE THF._E ARROWS WHEN
ADJUSTING OVEN TEMPERATURE
ON NON-SELF CLEANING RANGE&
i .......
|
f
To lower the temperature for a standard range, turn the disk clockwise.
To raise the temperature for a standard range, turn the disk
counterdockwise.
6, When the desired adjustment is reached, tighten both screws_
7, To replace the knob, line up the fiat sides of both the knob and the shaft, Push
the knob into place, DO NOT force the Temperature Control knob onto the
shaft or you may damage it
lq
Anti-Tip Brackets
Installation
Instructions
Important
Safety Warning
To reduce the risk of tipping of the range, the range must be secured to the floor
by properly installed anti-tip brackets and screws packed with the range Failure to
install the anti-tip brackets could allow the range to accidentally tip over ff excessive
weight is placed on an open door or if a child climbs upon it. Serious injury might
result from spilled hot liquids or from the range itselL Referto the instructions below
for proper installation
_+r_mP
BP_o_r
!
ANt3.'_P'
BRAO<ET
IF THE RANGE IS EVER MOVED TO A
DIFFERENTLOCATION, the anti-tip
brackets must atso be moved and
installed with the range°
Tools+Required:
5/! 6" Nutddver or Flat Head Screwdriver
Adjustable Wrench
Electric Drill & 3/16" Diameter Drill Bit
3/16" Diameter Masonry Ddll Bit
:(if installing in concrete)
Figure 1: Leveling
Leg Instructions
Anti+Tip Brackets Installation
Instructions
The brackets attach to the floor at the back of the range to hold both rear leg
levelers,,When fastening to the floor, be sure that the screws do not penetrate
electrical Wiring or plumbing.. The screws provided will work in either wood or
concrete°
i., Unfold the paper template and place it flat on the floor with the back and side
edges positioned exactlywhere the back and sidesof range will be locatedwhen
installed,Use the illustrationabove to locate the brackets if a template is not
available,,
2. Mark on the floor the location of the four mounting holes shown on the
template° Foreasierinstallation, 3/16" diameter pilot holes, a t/2" deep can be
drilled into the floor_
3. Remove the template and place the brackets on the floor with the turned-up
flange to the front,, Line up the holes in the brackets with the marks on the floor
and attach with the screws provided,, The brackets must be secured to a solid
floor° tf attaching to a concrete floor, first drill 3/16" diameter pilot holes using
a masonry drill bit.
4., Levelthe range ff necessaryby adjusting the four leg levelerswith a wrench See
Figure 1, side box. A minimum clearance of 1/8" is required between the
bottom of the range and the rear leveling feet.
5. Slidethe range into place making sure the rear legsare trapped bythe ends of
the brackets. The range may need to be shifted slightly to one side as it is being
pushed back to allowthe rear legsto align with the brackets Remove the lower
panel or storage drawer to inspect the brackets, or grasp the top rear edge of
the range and carefully attempt to tilt it forward to make sure the range is
properly anchored.
16
Avoid
Service
Checklist
Before you calf for service, review this list It may save you time and expense The
list includes common occurrences that are not the result of defective workmanship
or materials in this appliance
OCCURRENCE
POSSIBLE
CAUSE
IN STALLATtON
Range is not level.
Poor installation.
SOLUTION
Place oven rack in center of oven Place
a level on the oven rack Adjust leveting
legs at base of range until level indicates
that the rack is level
When oven is level, cooktop may not
appear to be level with countertop,
Weak, unstable floor
Be sure floor is level and can adequately
support range,
Contact a carpenter to correct sagging or
sloping floor
Kitchen cabihet misalignment
may
make range appear to be unlevet,
Be sure cabinets are square and have
sufficient room for range clearance
Contact a cabinet maker to correct
problem,
Cannot move appliance
easily°
Appliance must be accessible for
service,
',, Cabinets not square or are built in too
tight,,
Carpeting
SURFACE ELEMENTS
Surface element
too
enough°
hot
or not
hot
interferes with range,
Incorrect control setting,
Lightweight
or warped
17
Contact builder or installer to make
appliance accessible
Provide sufficient space so range can be
lifted over carpet
Adjust control setting
Raise or lower
setting until proper amount of heat is
obtained, Dial markings are an indicator
of "relative" heat settings and wi!l vary
slightly,
pans,
Use only flat, evenly balanced, medium
or heavyweight cookware, Flat pans heat
better than warped pans Cookware
materials and weight of the material
affect heating,, Heavy and
medium-weight
pans heat evenly
Because lightweight pans heat unevenly.
foods may burn easily
SOLUTION
OCCURRENCE
POSSIBLE
CAUSE
SURFACE ELEMENTS (continued)
Surface element
does not heat_
No power to appliance
Check/reset circuit breaker or replace
fuse If the problem is a circuit overload,
have this situation corrcted by a qualified electrician,
Incorrect control turned on
Be sureto usethe correct control for the
element to be used,
Burned-out
Follow instructions under Oven [i'ght
(some models) to replace or tighten
bulb
OVEN ANDIOR LIGHTS (if equipped)
DO NOT WORK
Oven light
(some
models)
does not
of loose bulb
work.
Entire
oven does not operate.
Cord/Plug not plugged into the
wall/floor receptacle,
Make sure it is plugged tightly into outlet,
Service wiring not complete.
Contact
Power outage
Check house lights to be sure,, Call your
local electric company for service
Control(s) not set properly.
Followinstructions
under Setting
Controls to set the controls
Oven door closed,
Door should be opened
position,
Meat too close to the element.
Reposition the rack to provide proper
clearance between the meat and the
element Preheat broil element for quick
searing operation.
Meat not properly
Remove excess fat from meat. Slash
remaining fatty edges to prevent curling, but do not cut into lean
servicer or dealer
Oven
BROILING
Oven smokes
broiling°
excessively
POOR BAKING
during
prepared
to broil
stop
Grid on broiler pan wrong sideup., Grease does not drain into
broiler pan
Always place the grid on the broiler pan
with the ribs up and the slots down to
allow grease to drip into pan.
Oven needs to be cleaned Grease
has built up on oven surfaces
Regular cleaning is necessary when
broiling frequently Old grease or food
spatters cause excessivesmoking
Many factors
sults
See Baking in your Cooking
hints, causes and corrections
RESULTS
affect
18
baking
re-
Guide for
OCCURRENCE
POSSIBLE
CAUSE
SOLUTION
SELF-CLEANING INSTRUCTIONS
Self-cleaning
cycle does not work.
Controls not set properly
Follow instructions under Oven
Cleaning (self-cleaning
instructions).
Self-cleaning cycle was
interrupted.
Stop time must be set 3 to 4 hours
past the start time
Follow steps under "Stopping or
Interrupting the Self-Clean Cycle"
under Oven Cleaning
(self-cleaning instructions)
Soil not completely removed after
self-cleaning cycle.
Flames inside
vent.
oven or smoking
from
Failureto clean bottom, front top
of oven, frame of oven or door
area outside oven seal These
areas are not in the self-cleaning
area, but get hot enough to burn
on residue. Clean these areas
before the self-cleaning cycle is
started.
Burned-on residue may be cleaned
with a stiff nylon brush and water
or a nylon scrubber. Be careful not
to damage the oven seal
Excessivespillovers in oven.
Set self-clean cycle for a longer
cleaning time,.
, Excessivespiflovers in oven.
_9
This is normal, especially for pie
spilfovers or for large amounts of
grease on bottom of oven. Wipe
up excessivespitlovers before
starting cycle if flames or
excessivesmoke is present, stop
the self-clean cycle and follow
steps under "Stopping or
Interrupting the Self-Clean Cycle"
in the Oven Cleaning section
KENMORE
ELECTRIC
RANGE WARRANTY
FULL
Dear Customer:
Our constant
efforts
are
directed
toward
making
sure your new Kenmore
Range will arrive at your
home
in
perfect
part
feel
bility
you
As
of these
efforts,
we
it is our responsito provide
you with
this
warranty
range,
_ for
FULL
t
30-DAY
WARRANTY
ON GLASS
PARTS
AND
FINISH
PORCELAIN
ENAMEL,
PAINTE0
OR BRIGHT
METAL
FINISHED
PARTS
FULL
90-DAY
WARRANTY
ON MECHANICAL
For 90 days from the date of installation.
any" mechanical
adjustments
necessary
except for normal maintenance,
!
ADJUSTMENTS
Sears will provide, free of charge,
for proper operation
o( the range,
Warranty
applies
only
while
this
product
States, This warranty
gives you specific
legal
have other rights which vary from state to state
\-
WE SERVICE
We Self"
is in use
rights,
is our assurance
to you
WHAT
that
you
can
in the
and
SEARS, ROEBUCK
Oept 698/73t
A
Sears Tower
Chicago, IL 60684
J
What
you
TO FURTHER
ADD TO THE VALUE OF YOUR RANGE,
and CO
WE SELL
depend
on
Sears
1or service
because
BUY A SEARS
MAINTENANCE
Sears
are
designed,
manufactured
yi_ilr
2rld
W
and
tested
for years
of dependable
operation.
YeL
any
modern
appliance
may require
service
from time
to
time The Sears
warranty
plus the Sears
Maintenance
Agreement
provides
protection
from unexpected
repair
bills and assures you of enjoying maximum
range efficiency
w=,,_.lv
Here's a comparative
warranty
and Maintenance
Agreement chart showing
you the benefits
of a Sears Range
Maintenance
Agreement
Warrtl,nl,r
LOCAL
Nenmore.
Sold
by SEARS,
ROEBUCK
SEARS
MA
I
3rl:l Year
!
MA
MA
MA
i
3ooav_
I
Fill
!
MA
i
MA
MA
SERVICE
Solid
AND
Yeilr
MA
W -, Wllflltly
OR
by Sears
tools and
F_llt
MA
CONTACT
YOUR SEARS
SALESPERSON
SEARS MAINTENANCE
AGREEMENT.
service
AGREEMENT.
fill
Ranges
United
may also
Your Kenmore
Range has added
value when you consider
that Sears has a service
unit near you staffed
trained
technicians
..... professional
technicians
specifically
trained
on Sears appliances,
having the parts,
equipment
to ensure that we meet our pledge to you -- "We Service What We Sell!'
Kenmore
OF
WARRANTY
SERVICE
iS AVAILABLE
BY CONTACTING
THE NEAREST
SEARS
SERVICE
CENTER/DEPARTMENT
IN THE UNITED
STATES
This
"We Service
is nationwide,,
OF
If, within 30 days from the date of installation, any glass part or the
finish on any porcelain
enamel,
painted or bright metal part is defecfive in material or workmanship,
Sears will replace the parL free of charge,
i !
i I
I I
I I
i J
your
YEAR WARRANTY
ON THE FUNCTIONING
ALL PARTS EXCEPT
GLASS
PARTS
It, within one year from the date of installation,
any part. other than a
glass
part. fails to function
properly
due to a defect
in material
or
workmanship,
Sears wilt repair or replace it free of charge
|
|
|
! t
' t
condi-
tion
and will
give
proper
performance,
ONE
CO.., Chicago,
Mlt
CENTER
TODAY
aa
IL 60684
AND
--
Mlil,"iltfllnle
PURCHASE
MA
MA
A_Iri-_i_"_t
A