1
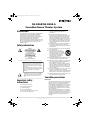
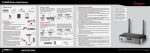
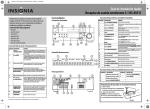
NS-SBAR_11-0299_MAN_V4.book Page i Thursday, March 31, 2011 7:49 AM
User Guide
Soundbar Home Theater System
NS-SBAR/NS-SBAR-A
NS-SBAR_11-0299_MAN_V4.book Page ii Thursday, March 31, 2011 7:49 AM
Contents
Introduction . . . . . . . . . . . . . . . . . . . . . . . . . . . . . . . . . . . . . . . . . . . . . . . . . . . . .1
Safety information . . . . . . . . . . . . . . . . . . . . . . . . . . . . . . . . . . . . . . . . . . . . . . .1
Important safety instructions . . . . . . . . . . . . . . . . . . . . . . . . . . . . . . . . . . . . .1
Soundbar precautions . . . . . . . . . . . . . . . . . . . . . . . . . . . . . . . . . . . . . . . . . . . .1
Placement . . . . . . . . . . . . . . . . . . . . . . . . . . . . . . . . . . . . . . . . . . . . . . . . . . . . . . . 1
Using close to a TV or computer . . . . . . . . . . . . . . . . . . . . . . . . . . . . . . . . . . 2
Features . . . . . . . . . . . . . . . . . . . . . . . . . . . . . . . . . . . . . . . . . . . . . . . . . . . . . . . . .2
Active Speaker System . . . . . . . . . . . . . . . . . . . . . . . . . . . . . . . . . . . . . . . . . . .
Rocketboost™ Wireless Card Ready . . . . . . . . . . . . . . . . . . . . . . . . . . . . . . .
What is Rocketboost™? . . . . . . . . . . . . . . . . . . . . . . . . . . . . . . . . . . . . . . . . . . .
Audyssey Technologies . . . . . . . . . . . . . . . . . . . . . . . . . . . . . . . . . . . . . . . . . .
2
2
2
2
Soundbar elements . . . . . . . . . . . . . . . . . . . . . . . . . . . . . . . . . . . . . . . . . . . . . .2
Package contents . . . . . . . . . . . . . . . . . . . . . . . . . . . . . . . . . . . . . . . . . . . . . . . .
Top panel . . . . . . . . . . . . . . . . . . . . . . . . . . . . . . . . . . . . . . . . . . . . . . . . . . . . . . .
Front panel . . . . . . . . . . . . . . . . . . . . . . . . . . . . . . . . . . . . . . . . . . . . . . . . . . . . . .
Back panel . . . . . . . . . . . . . . . . . . . . . . . . . . . . . . . . . . . . . . . . . . . . . . . . . . . . . . .
Remote control . . . . . . . . . . . . . . . . . . . . . . . . . . . . . . . . . . . . . . . . . . . . . . . . . .
2
3
4
4
5
Setting up your soundbar . . . . . . . . . . . . . . . . . . . . . . . . . . . . . . . . . . . . . . . .5
Connecting to an external sound source . . . . . . . . . . . . . . . . . . . . . . . . . .
Connecting a subwoofer . . . . . . . . . . . . . . . . . . . . . . . . . . . . . . . . . . . . . . . . .
Connecting power . . . . . . . . . . . . . . . . . . . . . . . . . . . . . . . . . . . . . . . . . . . . . . .
Installing the wall mount bracket . . . . . . . . . . . . . . . . . . . . . . . . . . . . . . . . .
Installing the soundbar feet . . . . . . . . . . . . . . . . . . . . . . . . . . . . . . . . . . . . . .
5
5
6
6
6
Using your soundbar . . . . . . . . . . . . . . . . . . . . . . . . . . . . . . . . . . . . . . . . . . . . .6
Turning on the power . . . . . . . . . . . . . . . . . . . . . . . . . . . . . . . . . . . . . . . . . . . .
Adjusting the Volume . . . . . . . . . . . . . . . . . . . . . . . . . . . . . . . . . . . . . . . . . . . .
Muting the sound . . . . . . . . . . . . . . . . . . . . . . . . . . . . . . . . . . . . . . . . . . . . . . . .
Selecting Inputs . . . . . . . . . . . . . . . . . . . . . . . . . . . . . . . . . . . . . . . . . . . . . . . . .
Adjusting Audyssey Dynamic Volume . . . . . . . . . . . . . . . . . . . . . . . . . . . .
6
6
7
7
7
Using Rocketboost . . . . . . . . . . . . . . . . . . . . . . . . . . . . . . . . . . . . . . . . . . . . . . .7
How can I use Rocketboost with the soundbar? . . . . . . . . . . . . . . . . . . .
Initial Rocketboost setup . . . . . . . . . . . . . . . . . . . . . . . . . . . . . . . . . . . . . . . . .
Listening to music from other Rocketboost products . . . . . . . . . . . . . .
Sending audio from the soundbar to other Rocketboost products .
Listening to the soundbar audio in another room or
through Rocketboost enabled headphones . . . . . . . . . . . . . . . . . . .
Additional Rocketboost setup information . . . . . . . . . . . . . . . . . . . . . . . .
7
7
7
8
8
8
Care and maintenance . . . . . . . . . . . . . . . . . . . . . . . . . . . . . . . . . . . . . . . . . . .9
Troubleshooting . . . . . . . . . . . . . . . . . . . . . . . . . . . . . . . . . . . . . . . . . . . . . . . . .9
Specifications . . . . . . . . . . . . . . . . . . . . . . . . . . . . . . . . . . . . . . . . . . . . . . . . . . . .9
Legal notices . . . . . . . . . . . . . . . . . . . . . . . . . . . . . . . . . . . . . . . . . . . . . . . . . . . . .9
One-year limited warranty . . . . . . . . . . . . . . . . . . . . . . . . . . . . . . . . . . . . . . 11
ii
www.insigniaproducts.com
NS-SBAR_11-0299_MAN_V4.book Page 1 Thursday, March 31, 2011 7:49 AM
NS-SBAR/NS-SBAR-A
Soundbar Home Theater System
Introduction
Congratulations on your purchase of a high quality
Insignia product. Your NS-SBAR or NS-SBAR-A
Home Theater Speaker System represents the
state-of-the-art in home theater soundbar design
and is designed for reliable and trouble-free
performance. It will provide outstanding
performance and years of listening enjoyment. Take
time to read through this manual to make sure you
get the maximum performance from your new
soundbar system.
Safety information
Warning
To reduce the risk of electric
shock, do not disassemble. No
user serviceable parts inside.
Refer servicing to qualified
service personnel.
To reduce the risk of fire or
electric shock, do not expose
your soundbar to rain or
moisture. Dangerous high
voltages are present inside the
enclosure.
Do not open the cabinet.
Caution
To prevent electric shock, match the wide blade on the power
cord plug to the wide slot on an electric outlet. If the plug does
not fit, consult a licensed electrician to replace the obsolete
outlet. Do not modify the power cord plug, or you will defeat this
safety feature.
When replacing the direct plug-in power supply or a separable,
cord-connected power supply, the replacement must be an exact
duplicate or one which has been recommended by the
manufacturer.
The lightning flash with arrowhead symbol within an equilateral
triangle is intended to alert you to the presence of uninsulated
dangerous voltage within your player’s enclosure that may be of
sufficient magnitude to constitute a risk of electric shock to
persons.
Important safety
instructions
1
2
3
4
5
6
7 Do not block any ventilation openings. Install in
accordance with the manufacturer's
instructions.
8 Do not defeat the safety purpose of the
polarized or grounding-type plug. A polarized
plug has two blades with one wider than the
other. A grounding type plug has two blades
and a third grounding prong. The wide blade or
the third prong are provided for your safety. If
the provided plug does not fit into your outlet,
consult an electrician for replacement of the
obsolete outlet.
9 Protect the power cord from being walked on or
pinched particularly at plugs, convenience
receptacles, and the point where they exit from
the apparatus.
10 Only use attachments/accessories specified by
the manufacturer.
11 Use only with the cart, stand,
tripod, bracket, or table specified
by the manufacturer, or sold with
the apparatus. When a cart is used,
use caution when moving the
cart/apparatus combination to
avoid injury from tip-over.
12 Unplug this apparatus during lightning storms
or when unused for long periods of time.
13 Refer all servicing to qualified service personnel.
Servicing is required when the apparatus has
been damaged in any way, such as
power-supply cord or plug is damaged, liquid
has been spilled or objects have fallen into the
apparatus, the apparatus has been exposed to
rain or moisture, does not operate normally, or
has been dropped.
14 To reduce the risk of fire or electric shock, do not
expose your soundbar to rain, moisture,
dripping, or splashing, and no objects filled with
liquids, such as vases, shall be placed on them.
15 The wall plug is the disconnecting device. The
plug must remain readily operable.
Soundbar precautions
Placement
Read these instructions.
Keep these instructions.
Heed all warnings.
Follow all instructions.
Do not use this apparatus near water.
Clean only with a dry cloth.
• The soundbar cabinet is made out of plastic and is
therefore sensitive to extreme temperatures and
humidity, do not put it in locations subject to
direct sunlight or in humid places, such as near an
air conditioner, humidifier, bathroom, or kitchen.
• Do not put water or other liquids close to the
soundbar. If liquid is spilled over the soundbar, it
may be damaged.
• The soundbar should be placed on a sturdy, flat
surface that is free from vibration, or mounted on
a wall (see “Installing the wall mount bracket” on
page 6). Do not put the soundbar on an uneven or
unstable surface, where it may fall and cause
damage.
www.insigniaproducts.com
1
NS-SBAR_11-0299_MAN_V4.book Page 2 Thursday, March 31, 2011 7:49 AM
NS-SBAR/NS-SBAR-A Soundbar Home Theater System
Using close to a TV or computer
Audyssey Technologies
Some older TVs and computer monitors are
magnetically sensitive devices and as such are likely
to suffer discoloration or picture distortion when
conventional speakers are placed nearby. If
discoloration problems persist, try moving the
soundbar away from your TV or monitor.
Features
Audyssey EQ corrects problems
that arise from speaker drivers
and enclosures and is calibrated to account for the
acoustical problems in a typical listening
environment.
Audyssey Dynamic EQ
When volume is turned down,
Audyssey Dynamic EQ keeps the
perceived bass response and tonal balance.
Active Speaker System
This unit provides high quality sound in a slim
design, which matches today's flat panel TVs.
Rocketboost™ Wireless Card Ready
Installing a Rocketboost ™ Wireless Card (card sold
separately) enables this product to send and
receive wireless audio with your other
Rocketboost™ products.
Audyssey Dynamic Volume
Audyssey Dynamic Volume
removes volume spikes, such as
blaring commercials or movie explosions, and turns
up soft dialogue so it is easier to hear.
Audyssey BassXT
Audyssey BassXT provides deeper
bass by intelligently monitoring
incoming audio signals and extending the bass to
its maximum limits. This enables the system to
produce lower frequencies than is usually possible.
Soundbar elements
What is Rocketboost™?
Rocketboost™ is expandable wireless digital audio.
• Products with Rocketboost™ technology let you
easily expand your listening experience
throughout your home.
• Rocketboost™ does not interfere with other
wireless products in your home.
• Rocketboost™ is uncompressed digital audio
compatible with all audio formats such as Dolby,
TrueHD, and DTS-HD Master Audio used with
Blu-ray.
When you see the Rocketboost™ logo on any
product, it has been designed to work with other
Rocketboost™ products, no matter who
manufactures them.
2
Audyssey EQ
Package contents
•
•
•
•
•
•
•
•
•
•
•
Soundbar
Soundbar feet (2)
Remote control
AAA batteries (2)
Wall Mounting Brackets
Wall Mounting Template
AC Power Cable
Power Supply
RCA Stereo Cable
INcontrol Cable
User Guide
www.insigniaproducts.com
NS-SBAR_11-0299_MAN_V4.book Page 3 Thursday, March 31, 2011 7:49 AM
NS-SBAR/NS-SBAR-A Soundbar Home Theater System
Top panel
#
1
Item
Description
Power/Standby/Wireless Device Joining button
Press to turn the soundbar on. Press again to turn the soundbar to standby.
Also used to join Rocketboost wireless devices.
The soundbar Power indicator lights green if the soundbar Hub Status switch is Enabled, and lights blue if the
soundbar Hub Status switch is Disabled.
Press to toggle between the audio devices connected to the sound bar (TV or AUX input).
If the Rocketboost Wireless card in installed, then pressing this toggles between TV, AUX, and Rocketboost inputs.
When using Rocketboost, press to switch between different Rocketboost sound sources.
Power indicator
2
Input button
3
Rocketboost Wireless Next Source button
4
Audyssey Dynamic Volume indicator
5
Volume Down
Three different colors indicate three levels of adjustment:
• No light indicates that Audyssey Dynamic Volume is off.
• Green indicates that Audyssey Dynamic Volume is set to light.
• Yellow indicates that Audyssey Dynamic Volume is set to medium.
• Red indicates that Audyssey Dynamic Volume is set to heavy.
Press to turn down the volume.
6
Volume Up
Press to turn up the volume.
www.insigniaproducts.com
3
NS-SBAR_11-0299_MAN_V4.book Page 4 Thursday, March 31, 2011 7:49 AM
NS-SBAR/NS-SBAR-A Soundbar Home Theater System
Front panel
# Item
Description
1 Remote control indicator Blinks red when remote control commands are received.
Accepts Rocketboost Wireless Card (sold separately). Remove the grill for access.
2 Rocketboost Wireless
Card Ready Slot
Back panel
INTERNAL
# Item
Description
1 Power connector
Plug the power supply cable into this jack.
2 Analog Subwoofer
Output jack
Connect a powered subwoofer (not included) to this jack.
3 Aux Device jack
Connect an external sound source, such as an MP3 player, to this jack.
4 AUDIO IN L/R
Connect the audio output from a TV or stereo to these jacks.
EXTERNAL
5 Subwoofer Mode switch Slide to the INTERNAL posistion when using the internal Audyssey BassXT powered subwoofer. Slide to the EXTERNAL position if you are using an
external subwoofer.
Enables/disables Rocketboost hub mode operation. See “ Initial Rocketboost setup” on page 7 for more information. (Note: this feature is only
6 Rocketboost Hub Status available when a Rocketboost card is installed.)
switch
Use the INcontrol cable supplied with the soundbar to connect between the INcontol jack on the soundbar and the INcontrol jack on the TV
7 INcontrol jack
4
www.insigniaproducts.com
NS-SBAR_11-0299_MAN_V4.book Page 5 Thursday, March 31, 2011 7:49 AM
NS-SBAR/NS-SBAR-A Soundbar Home Theater System
Remote control
# Item
Description
4 Rocketboost Wireless
Next Source button
When using Rocketboost, press to switch between
different Rocketboost sound sources.
5 Subwoofer Level –
Press to turn down the level of the subwoofer.
6 Subwoofer Level +
Press to turn up the level of the subwoofer.
7 Speaker Volume –
Press to turn down the volume of the soundbar.
8 Speaker Volume +
Press to turn up the volume of the soundbar.
9 Audyssey Dynamic
Volume Off
Press to turn off the Audyssey Dynamic Volume
control.
10 Audyssey Dynamic
Volume Light
Press to turn the Audyssey Dynamic Volume control to
light.
11 Audyssey Dynamic
Volume Medium
Press to turn the Audyssey Dynamic Volume control to
medium.
12 Audyssey Dynamic
Volume Heavy
Press to turn the Audyssey Dynamic Volume control to
heavy.
Setting up your soundbar
Connecting to an external sound source
To connect an external sound source:
1 Plug an audio cable (with RCA connectors) into
the AUDIO OUT L/R jacks on the TV, stereo, or
other sound source.
INTERNAL
EXTERNAL
2 Plug the other end of the cables into the AUDIO
IN L/R jacks on the soundbar. You can also
connect another audio source, such as an mp3
player, to the AUX device jack, using a 3.5 mm to
3.5 mm audio cable.
3 Press the INPUT button to select the sound
source you want.
Connecting a subwoofer
Note
The soundbar includes a built-in Audyssey BassXT
enabled subwoofer speaker that provides deep bass
response that meets most user's needs for music and
movies. For even more bass, you can add an external
subwoofer (sold separately).
# Item
Description
1
Press to turn on your soundbar. Press again to put your
soundbar in standby mode.
Press to toggle between the audio devices connected
to the sound bar (TV or AUX input).
If the Rocketboost Wireless card in installed, then
pressing this toggles between TV, AUX, and
Rocketboost inputs.
Press to mute the soundbar. Press again to resume
normal volume.
(Power)
2 INPUT
3 MUTE
To connect a subwoofer to the soundbar:
1 On the back of the soundbar, slide the
Subwoofer Mode switch to the EXTERNAL
position (See “Back panel” on page 4).
2 Plug your subwoofer into the Subwoofer
Output jack on the back of the soundbar.
www.insigniaproducts.com
5
NS-SBAR_11-0299_MAN_V4.book Page 6 Thursday, March 31, 2011 7:49 AM
NS-SBAR/NS-SBAR-A Soundbar Home Theater System
3 Turn on your subwoofer.
Note
With the Rocketboost Ready card accessory installed
(sold separately), you can use Rocketboost to
connect to a Rocketboost enabled subwoofer. See
“Using Rocketboost” on page 7, for more
information.
Wall
Connecting power
B
To connect power to your soundbar:
1 Connect the power supply to the power supply
jack on the soundbar.
2 Connect one end of the AC power cable to the
power supply and then plug the other end into
a power outlet. The standby indicator on the
soundbar turns on.
Installing the wall mount bracket
You can use the included wall mount brackets (A
and B) to mount this soundbar on a wall.
Warning
Improper installation can result in serious injury or
damage to your soundbar. If necessary, please seek
the assistance of a professional.
To install the soundbar on a wall:
1 Secure bracket parts A to the soundbar with
screws (included).
A
Soundbar
Installing the soundbar feet
If you do not mount the soundbar to a wall, you will
need to attach the feet (included) to the soundbar,
so that it will sit evenly on a flat surface.
To install the soundbar feet:
1 Turn the soundbar over.
2 Remove the protective paper from the
soundbar feet (2) to reveal the adhesive strip.
3 Align the posts on the soundbar feet with the
holes in the bottom of the soundbar, then press
the soundbar feet onto the bottom of the
soundbar
A
Soundbar
A
Soundbar foot
A
Soundbar foot
2 Use the bracket template to determine position
on wall for bracket parts B. Secure bracket parts
B to the wall with four screws (not included). You
must use suitable wall anchors if you are
mounting on drywall, concrete, or other wall
types.
Using your soundbar
Turning on the power
• Press the Power button on the top of the unit or
press the Power button on the remote control to
turn on the soundbar.
• Press the Power button on the top of the unit or
press the Power button on the remote control to
put the soundbar in Standby mode.
Wall
B
B
3 Fit the soundbar to the wall by sliding it down
and making sure of a secure fit between bracket
parts A and B.
6
B
Wall
B
A
Soundbar
A
Adjusting the Volume
Press the Volume Up button to increase the
volume or the Volume Down button to decrease
the volume.
- OrUsing the remote control, press the Volume +
button to increase the volume or the Volume –
button to decrease the volume.
www.insigniaproducts.com
NS-SBAR_11-0299_MAN_V4.book Page 7 Thursday, March 31, 2011 7:49 AM
NS-SBAR/NS-SBAR-A Soundbar Home Theater System
Muting the sound
Initial Rocketboost setup
Press the MUTE button on the remote control or on
the soundbar to mute the sound. Press the Volume
+ button or the MUTE button to restore sound.
Selecting Inputs
To choose from the available inputs of the
soundbar, press the INPUT button on the remote
control or on the top of the soundbar.
To select wireless audio sources on the Rocket
Boost network use the Wireless Next Source
button on the remote control or on the soundbar.
Remove the front speaker grill cover from the
soundbar and insert a Rocketboost Wireless Card
(RF-RBCARD, sold separately). To remove the grill
cover, grip the glossy edges of the grill cover with
each hand and pull forward evenly. The card
connector is keyed so it can only be installed one
way. When inserting the card, make sure that it is
oriented so the Rocketboost logo on the card is
facing you.
Note
Every Rocketboost network must contain a device
called a Hub, which directs network data traffic and
helps devices join the network. The network can
have only one hub, which is selected using the Hub
Status switch on the back of all Rocketboost senders.
Note
Only available when a Rocketboost card is installed.
Adjusting Audyssey Dynamic Volume
Audyssey Dynamic Volume removes volume spikes,
such as blaring commercials or movie explosions
and turns up soft dialogue so it is easier to hear.
Three levels of dynamic volume help you adjust to
different listening situations.
• Audyssey Dynamic Volume Light—This should
be used when you want to watch a movie with
the family. It will only tame the very loudest
explosions and boost only the very quietest
dialogue.
• Audyssey Dynamic Volume Medium—We
recommend this as the default choice. This level is
good for typical television viewing. The volume of
commercials and stations will sound the same.
• Audyssey Dynamic Volume Heavy—This has
the greatest impact on the volume. This is most
helpful when watching movies or television late
at night, while others are sleeping. Explosions are
dramatically reduced while the quiet moments
are increased.
Using Rocketboost
When you see the Rocketboost logo on any
product, it has been designed to work with other
Rocketboost products, no matter who
manufactures them.
How can I use Rocketboost with the
soundbar?
After you install the Rocketboost Wireless Card
(RF-RBCARD, sold separately) the soundbar can
receive any Rocketboost audio stream from your
other Rocketboost products. For example, you can
play music from audio sources that are in other
rooms.
Plus, the Rocketboost Wireless card can be used to
send audio from the soundbar. For example, you
can connect your subwoofer, by using Rocketboost
wireless instead of wires. You can learn more about
Rocketboost products at www.rocketboost.com.
If you are setting up your network for the first time
choose one of your Rocketboost senders to be your
hub by setting the Hub Status switch to Enable.
For example, if you want the soundbar to be the
hub, set the Hub Status switch on the soundbar to
Enable.
If you already have a Rocketboost network
established, set the Hub Status switch on the
soundbar to Disable.
The soundbar Power indicator lights green if the
soundbar Hub Status switch is Enabled, and lights
blue if the soundbar Hub Status switch is
Disabled.
Note
Every new Rocketboost device you add to your
Rocketboost network must be “joined” to your
Rocketboost hub device.
To establish communications with other
Rocketboost devices:
1 If possible, bring your existing Rocketboost Hub
device, or the new Rocketboost device to which
you’d like to join into the same room as the
soundbar.
2 Press the Power button on the soundbar to turn
it on.
3 Press the Power button on your other
Rocketboost device to turn it on.
4 Press and hold the Power/Join button on the
soundbar to initiate joining mode, then press
and hold the Power/Join button on your other
Rocketboost device (the devices will remain in
joining mode for 30 seconds). The power
indicator LEDs on both products will begin
blinking rapidly.
• When successfully joined, the power indicator
LEDs on both products will stop blinking and
stay on.
• If joining fails after 30 seconds, the power
indicator LED on the soundbar will begin
flashing at a slower rate. If this occurs, repeat
the above steps.
Listening to music from other Rocketboost
products
To listen to music from other Rocketboost
products:
1 Press the Power button on the soundbar to turn
it on.
www.insigniaproducts.com
7
NS-SBAR_11-0299_MAN_V4.book Page 8 Thursday, March 31, 2011 7:49 AM
NS-SBAR/NS-SBAR-A Soundbar Home Theater System
2 Turn on your other Rocketboost sender device
(sold separately) and make sure the audio
source connected to that device is active.
3 Press the Next Source button on the remote
control to select the Rocketboost input source.
• If there are multiple Rocketboost sources, you
may need to press the Next Source button on
the soundbar to find the source you want to
listen to. Each press will cycle through the
available Rocketboost sources.
Sending audio from the soundbar to other
Rocketboost products
The selected soundbar audio signal, from either the
Television or AUX, is automatically sent on the
Rocketboost network.
The soundbar sends two separate audio signals on
the Rocketboost network:
- One of the audio signals is designed for use with a
subwoofer. This signal is low bass frequency
content only and this signal's volume level is set to
the same volume as the soundbar. That way your
soundbar and subwoofer are correctly set to the
same volume level and the subwoofer volume level
is easily controlled by the soundbar volume control.
- The second audio signal is designed for listening
to the soundbar audio in a second room or with
headphones that have their own volume control.
This signal's volume level is fixed and does not
change with the soundbar volume control. For
example, you would use this signal if you are
listening to the soundbar's audio signal in another
room, and that room's amplifier has its own volume
control.
Both audio signals are automatically sent on the
Rocketboost network. Every Rocketboost receiver
can receive both of these signals. Press the Next
Source button on your other Rocketboost product
until you hear the signal you want (for example the
low frequency signal for the subwoofer.)
To connect a subwoofer using Rocketboost:
Note
You can wirelessly connect to a Rocketboost enabled
subwoofer or to a typical wired subwoofer. The
following instructions are for connecting to a typical
wired subwoofer. If you are using a Rocketboost
enabled subwoofer, refer the to the user guide for
that product.
1 Set the Subwoofer Mode Switch on the back of
the soundbar to the EXTERNAL position.
2 Connect a Rocketboost sender/receiver
(RF-RBAUX, sold separately) to your subwoofer.
Do this by connecting the output signal of
RF-RBAUX to the input signal of the subwoofer.
Note
You will need to use the dual RCA adapter cable
supplied with the RF-RBAUX. When using this
connect either the left (white) or the right (red) audio
signal to your subwoofer.
3 Follow the steps To establish communications
with other Rocketboost devices (see above) to
connect the RF-RBAUX to your Rocketboost
network.
8
4 Turn on your soundbar and subwoofer and play
music or a movie that you can easily hear the
bass sound on.
5 Press the Next Source button on the RF-RBAUX
to select the soundbar's subwoofer audio signal.
You may have to press Next Source multiple
times until you hear the soundbar's subwoofer
audio.
6 The soundbar sends both a subwoofer signal
(volume controlled by the soundbar) and a
second room audio signal (not volume
controlled by the soundbar). To confirm you are
connected to the subwoofer signal, use the
soundbar remote control to turn the volume up
and down, and listen to make sure that the
subwoofer volume level changes. If it does not,
press Next Source on the RF-RBAUX to select
the other audio signal from the soundbar. Also,
when the RF-RBAUX first connects to the
subwoofer signal, the Audyssey Dynamic
Volume Green Indicator LED will flash three
times.
Listening to the soundbar audio in another
room or through Rocketboost enabled
headphones
To listen to the soundbar audio in another room
or through Rocketboost enabled headphones:
1 Connect and setup your other Rocketboost
product (see user guide for that product for
more details).
2 Turn on your soundbar and play any audio.
3 Press the Next Source button on your other
Rocketboost device until you hear the
soundbar's audio signal. You may have to press
Next Source multiple times until you hear the
soundbar's audio. Also, when the RF-RBAUX first
connects to the soundbar’s audio signal, the
Audyssey Dynamic Volume Red Indicator LED
will flash three times.
Additional Rocketboost setup information
The soundbar is pre configured with both the
subwoofer and second room Rocketboost audio
signals turned on. For users that don't need these
signals sent on the Rocketboost network (for
example if you are not using the second room
audio signal from the soundbar) you can turn off
either of these signals.
To turn off the subwoofer signal:
1 On the soundbar, press both the Wireless Next
Source button and the Volume Up button for
five or more seconds.
2 The Audyssey Dynamic Volume Green indicator
LED will briefly flash on/off twice, to show that
the subwoofer signal is now off.
To turn on the subwoofer signal:
1 On the soundbar, press both the Wireless Next
Source button and the Volume Up button for
five or more seconds.
2 The Audyssey Dynamic Volume Green indicator
LED will briefly turn on to show that the
subwoofer signal is now on.
www.insigniaproducts.com
NS-SBAR_11-0299_MAN_V4.book Page 9 Thursday, March 31, 2011 7:49 AM
NS-SBAR/NS-SBAR-A Soundbar Home Theater System
To turn off the second room signal:
1 On the soundbar, press both the Wireless Next
Source button and the Volume Down button
for five or more seconds.
2 The Audyssey Dynamic Volume Red indicator
LED will briefly flash on/off twice, to show that
the second room signal is now off.
To turn on the second room signal:
1 On the soundbar, press both the Wireless Next
Source button and the Volume Down button
for five or more seconds.
2 The Audyssey Dynamic Volume Red indicator
LED will briefly turn on to show that the second
room signal is now on.
Length
Depth
Height
Total power
Power per channel
Speakers
38 in (965 mm)
4.6 in (117 mm) without wall mount bracket
5.5 in (139.7 mm) with wall mount bracket
3.4 in (86 mm) without mounting feet
4.3 in (109.2 mm) with mounting feet
120 W (< 3% THD+N)
30 W for L and R channels
60 W for subwoofer
2 x 0.75” tweeters
2 x 2.0” midranges
2 x 3.5” woofers
Legal notices
Care and maintenance
Use the following guidelines to maintain the
appearance of your soundbar:
• Use a soft, dry cloth to clean the soundbar.
• Avoid using harsh detergents or cleaning fluids.
• Do not vacuum any of the soundbar components,
because permanent damage could result.
Troubleshooting
Check the following information for the possible
cause and solution for a problem before contacting
the nearest service center or dealer for repairs.
Symptom
Specifications
Solution
The soundbar does not
turn on
• Securely connect the power supply cable from the
AC power supply to the soundbar and the AC
power cable from the AC power supply to an AC
power outlet.
No sound
• Make sure that all connections are correct.
• Press the Volume + button.
• Press the INPUT button to choose the right sound
source.
• If you are using Rocketboost input, press the Next
Source button to select another sound source.
No communication
between the soundbar
and your Rocketboost
device
• Make sure that the Hub Status switch on the
sender/receiver is set correctly.
• Make sure that the power indicators on the
sender/receiver and the soundbar turn solid
blue/green. If the power indicators blink slowly, it
means there is no active link between the devices.
Unplug the AC power cables, then plug them back
in and try to establish the link again. (See “To
establish communications with other Rocketboost
devices:” on page 7.)
The remote control
doesn't work
• Replace the batteries
• Operate the remote more closely to the soundbar.
The sound from the left
and right channels is
reversed
• Check the left and right channel connections and
connect them correctly.
FCC Part 15
This device complies with Part 15 of the FCC Rules. Operation of
this product is subject to the following two conditions: (1) this
device may not cause harmful interference, and (2) this device
must accept any interference received, including interference
that may cause undesired operation.
This equipment has been tested and found to comply within the
limits for a class B digital device, pursuant to Part 15 of the FCC
Rules. These limits are designed to provide reasonable
protection against harmful interference in a residential
installation. This equipment generates, uses, and can radiate
radio frequency energy and, if not installed and used in
accordance with the instructions, may cause harmful
interference to radio communications. However, there is no
guarantee that interference will not occur in a particular
installation. If this equipment does cause harmful interference to
radio or television reception, which can be determined by
turning the equipment off and on, the user is encouraged to try
to correct the interference by one or more of the following
measures:
• Reorient or relocate the receiving antenna.
• Increase the separation between the equipment and
receiver.
• Connect the equipment into an outlet on a circuit different
from that to which the receiver is connected.
• Consult the dealer or an experienced technician for help.
www.insigniaproducts.com
9
NS-SBAR_11-0299_MAN_V4.book Page 10 Thursday, March 31, 2011 7:49 AM
NS-SBAR/NS-SBAR-A Soundbar Home Theater System
10
www.insigniaproducts.com
NS-SBAR_11-0299_MAN_V4.book Page 11 Thursday, March 31, 2011 7:49 AM
NS-SBAR/NS-SBAR-A Soundbar Home Theater System
One-year limited warranty
Insignia Products (“Insignia”) warrants to you, the original
purchaser of this new product (“Product”), that the Product shall
be free of defects in the original manufacture of the material or
workmanship for a period of one (1) year from the date of your
purchase of the Product (“Warranty Period”). This Product must
be purchased from an authorized dealer of Insignia brand
products and packaged with this warranty statement. This
warranty does not cover refurbished Product. If you notify
Insignia during the Warranty Period of a defect covered by this
warranty that requires service, terms of this warranty apply.
How long does the coverage last?
The Warranty Period lasts for 1 year (365 days) from the date you
purchased the Product. The purchase date is printed on the
receipt you received with the Product.
What does this warranty cover?
During the Warranty Period, if the original manufacture of the
material or workmanship of the Product is determined to be
defective by an authorized Insignia repair center or store
personnel, Insignia will (at its sole option): (1) repair the Product
with new or rebuilt parts; or (2) replace the Product at no charge
with new or rebuilt comparable products or parts. Products and
parts replaced under this warranty become the property of
Insignia and are not returned to you. If service of Products or
parts are required after the Warranty Period expires, you must
pay all labor and parts charges. This warranty lasts as long as you
own your Insignia Product during the Warranty Period. Warranty
coverage terminates if you sell or otherwise transfer the Product.
How to obtain warranty service?
If you purchased the Product at a retail store location, take your
original receipt and the Product to the store you purchased it
from. Make sure that you place the Product in its original
packaging or packaging that provides the same amount of
protection as the original packaging. If you purchased the
Product from an online web site, mail your original receipt and
the Product to the address listed on the web site. Make sure that
you put the Product in its original packaging or packaging that
provides the same amount of protection as the original
packaging.
To obtain in-home warranty service for a television with a screen
30 inches or larger, call 1-888-BESTBUY. Call agents will diagnose
and correct the issue over the phone or will have an
Insignia-approved repair person dispatched to your home.
Should the Insignia-approved repair person not correct the issue
on the first call, an Insignia television (size and features to be
determined by Insignia) will be loaned to you until your TV is
repaired and returned, at no charge to you. This feature is only
available to Insignia television consumers residing in the United
States.
This warranty also does not cover:
• Damage due to incorrect operation or maintenance
• Connection to an incorrect voltage supply
• Attempted repair by anyone other than a facility
authorized by Insignia to service the Product
• Products sold as is or with all faults
• Consumables, such as fuses or batteries
• Products where the factory applied serial number has been
altered or removed
REPAIR REPLACEMENT AS PROVIDED UNDER THIS WARRANTY IS
YOUR EXCLUSIVE REMEDY. INSIGNIA SHALL NOT BE LIABLE FOR
ANY INCIDENTAL OR CONSEQUENTIAL DAMAGES FOR THE
BREACH OF ANY EXPRESS OR IMPLIED WARRANTY ON THIS
PRODUCT, INCLUDING, BUT NOT LIMITED TO, LOST DATA, LOSS
OF USE OF YOUR PRODUCT, LOST BUSINESS OR LOST PROFITS.
INSIGNIA PRODUCTS MAKES NO OTHER EXPRESS WARRANTIES
WITH RESPECT TO THE PRODUCT, ALL EXPRESS AND IMPLIED
WARRANTIES FOR THE PRODUCT, INCLUDING, BUT NOT LIMITED
TO, ANY IMPLIED WARRANTIES OF AND CONDITIONS OF
MERCHANTABILITY AND FITNESS FOR A PARTICULAR PURPOSE,
ARE LIMITED IN DURATION TO THE WARRANTY PERIOD SET
FORTH ABOVE AND NO WARRANTIES, WHETHER EXPRESS OR
IMPLIED, WILL APPLY AFTER THE WARRANTY PERIOD. SOME
STATES, PROVINCES AND JURISDICTIONS DO NOT ALLOW
LIMITATIONS ON HOW LONG AN IMPLIED WARRANTY LASTS, SO
THE ABOVE LIMITATION MAY NOT APPLY TO YOU. THIS
WARRANTY GIVES YOU SPECIFIC LEGAL RIGHTS, AND YOU MAY
ALSO HAVE OTHER RIGHTS, WHICH VARY FROM STATE TO STATE
OR PROVINCE TO PROVINCE.
Contact Insignia:
For customer service please call 1-877-467-4289
www.insigniaproducts.com
Distributed by Best Buy Purchasing, LLC
7601 Penn. Avenue South, Richfield, Minnesota, U.S.A.
55423-3645
© 2011 BBY Solutions, Inc.
All rights reserved. INSIGNIA is a trademark of BBY Solutions, Inc.
Registered in some countries. All other products and brand
names are trademarks of their respective owners.
Where is the warranty valid?
This warranty is valid only to the original purchaser of the
product in the United States, Canada, and Mexico.
What does the warranty not cover?
This warranty does not cover:
• Customer instruction
• Installation
• Set up adjustments
• Cosmetic damage
• Damage due to acts of God, such as lightning strikes
• Accident
• Misuse
• Abuse
• Negligence
• Commercial use
• Modification of any part of the Product, including the
antenna
• Plasma display panel damaged by static (non-moving)
images applied for lengthy periods (burn-in).
www.insigniaproducts.com
11
NS-SBAR_11-0299_MAN_V4.book Page -1 Thursday, March 31, 2011 7:49 AM
www.insigniaproducts.com
(877) 467-4289
Distributed by Best Buy Purchasing, LLC
7601 Penn Avenue South, Richfield, MN USA 55423-3645
© 2011 BBY Solutions, Inc.
All rights reserved. INSIGNIA is a trademark of BBY Solutions, Inc. Registered in some countries.
All other products and brand names are trademarks of their respective owners.
ENGLISH
11-0299