1
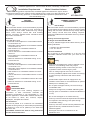
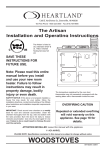
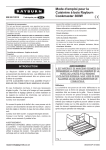
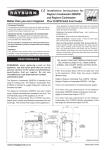
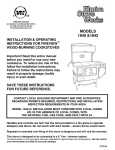
1050 Fountain St N. Cambridge, Ontario, Canada N3H-4R7
Business (519) 650-5775 Fax (519) 650-3773 Toll Free Phone: 1-877-650-5775 Toll Free Fax: 1-800-327-5609
The Artisan
Installation and Operating Instructions
The Artisan is listed to
ULC Standard S-627 &
UL 1482 by Warnock
Hersey Professional
Services Ltd
SAVE THESE
INSTRUCTIONS FOR
FUTURE USE.
Note: Please read these
instructions thoroughly
before attempting to install
this unit.
SAFETY NOTICE: If this stove is not properly installed, a
house fire may result, for your safety, follow the
installation directions, contact local building or fire officials
about restrictions and installation inspection requirements
in your area.
IMPORTANT: Check around oven chamber on a weekly
basis for soot and creosote accumulation. Clean the
chamber thoroughly from the top, side and bottom with
the rake provided. Burn the stove hot daily to reduce
creosote accumulation. Use only dry wood aged for one
year. Failure to do so could result in chimney fire and
void the warranty.
The temperature registered by the oven door
thermometer may not necessarily correspond with the
reading taken with a thermometer inside the oven
OVERFIRING CAUTION
Repeated or extended overfiring
will void warranty on this
appliance. See page 18 for
details.
ATTENTION INSTALLER: Leave this manual with the appliance.
© 2006 HEARTLAND APPLIANCES INC.
PLEASE NOTE: Specifications contained in this manual are subject to change without notice
WOODSTOVES
01/07 EINS 515000
FOR YOUR SAFETY
DO NOT STORE OR USE GASOLINE OR OTHER
FLAMMABLE VAPOURS OR LIQUIDS IN THE
VICINITY OF THIS STOVE.
Stove Location - If the stove must be located
near a window, avoid using long curtains which
could blow over the stove top, causing a fire
hazard.
Any openings in the wall behind the stove or in
the floor under the stove must be sealed.
Do not set unopened glass or metal containers
on the stove.
Grease accumulation is the cause of many
cooking fires. Clean the oven compartment
regularly.
Do not attempt to extinguish a grease fire with
water. Cover grease fires with a pot lid or
baking soda.
Avoid the use of aerosol containers near the
stove.
2
Artisan
CONSUMER WARRANTY
ENTIRE PRODUCT –LIMITED ONE YEAR WARRANTY
HEARTLAND warrants the replacement or repair of all parts of the Artisan which prove to be defective in
material or workmanship. Painted porcelain enamel finish or plated surfaces have a 90 day warranty from the
date of original purchase. Such parts will be replaced or repaired at the option of Heartland without charge,
subject to the terms and conditions set out below.
The warranty does not include normal wear or firebox parts or gaskets.
TERMS AND CONDITIONS
1. This warranty applies only for single family domestic use when the Wood Cookstove has been properly
installed according to the instructions supplied by Heartland and is connected to an adequate and proper
chimney and chimney connections. Damage due to faulty installation, improper usage and care, abuse,
accident, fire, flood, acts of God, commercial, business or rental use, and alteration, or the removal or
defacing of the serial plate, cancels all obligations of this warranty. Service during this warranty must
be performed by a factory Authorized Service Person.
2. Warranty applies to product only in the country in which it was purchased.
3. Heartland is not liable for any claims or damages resulting from any failure of the Wood Cookstove or from
service delays beyond their reasonable control.
4. To obtain warranty service, the original purchaser must present the original Bill of Sale, Model and Serial
number.
Components repaired or replaced are warranted through the remainder of the original warranty period only.
5. The warranty does not cover expense involved in making this appliance readily accessible for servicing.
6. This warranty gives you specific legal rights. Additional warranty rights may be provided by law in some
areas.
7. Adjustments such as calibrations, levelling, tightening of fasteners, or chimney and chimney connections
normally associated with original installation are the responsibility of the dealer or installer and not that of
the Company.
8. Overfiring of this appliance will void warranty. Some crazing may occur if the cast top surface is
quickly cooled by spillage of liquids and by overfiring of the cooker.
TO ENSURE PROMPT WARRANTY SERVICE, SEND IN YOUR WARRANTY CARD WITHIN 10 DAYS OF
PURCHASE.
If further help is needed concerning this warranty, contact:
Customer Service
Heartland Appliances Inc.
1050 Fountain St N.
Cambridge, Ontario, N3H-4R7
Business (519) 650-5775
Fax (519)650-3773
Toll Free Telephone1-877-650-5775
PLACE OF PURCHASE:
DATE OF PURCHASE:
SERIAL NUMBER:
MODEL NUMBER:
3
TABLE OF CONTENTS
1) Welcome ........................................................................................................................... Pg 5
2) Installation ......................................................................................................................... Pg 6
3) Installation Requirements ................................................................................................. Pg 7
4) Clearances Single Wall Connector .................................................................................. Pg 8
5) Clearances Double Wall Connector ................................................................................. Pg 9
6) Installing the Chimney Connector ..................................................................................... Pg 10
7) Chimney and Draft ............................................................................................................ Pg 11
8) Floor Protection ................................................................................................................ Pg 11
9) User Instructions ............................................................................................................... Pg 12
10) Door Operation ................................................................................................................. Pg 13
11) Lighting the Fire ................................................................................................................ Pg 13
12) Refuelling ...........................................................................................................................Pg 14
13) Break-In Fire ..................................................................................................................... Pg 15
14) Flue way Cleaning ............................................................................................................ Pg 16
15) Fresh Air Kit ...................................................................................................................... Pg 17
16) Understanding Combustion .............................................................................................. Pg 17
17) Over firing ......................................................................................................................... Pg 18
18) Trouble Shooting .............................................................................................................. Pg 19
19) Cooking Instruction ........................................................................................................... Pg 22
19) Contact Information .......................................................................................................... Pg 24
4
Welcome
Safety Notice: If your stove is not properly installed
and maintained, a house fire may result. For your
safety, follow all installation, operation and
maintenance directions. Contact local building
officials about restrictions and installation inspection
requirements in your area. (“Makeshift” compromises
in the installation may result in hazardous conditions,
including a house fire.)
Getting Acquainted
The Artisan stove is a time proven heating and cooking
appliance. Take your time to acquaint yourself with the
principles on which your new stove operates as a heater
and a cooking stove.
Familiarizing yourself with the primary principles of the air
intake controls, the oven damper, the flame path for the
fire and the relationship to the chimney will give you a very
comprehensive understanding of what you are trying to
accomplish with the stove.
Note: DO NOT connect to or use in conjunction with any
air distribution ductwork. This stove is not approved for
such installations.
DO NOT use chemical fluids to start the fire.
Save These Instructions
DO NOT burn garbage or flammable fluids such as
gasoline or engine oil.
Keep the manual available for future reference. The
manual is an important part of your stove. If your stove is
sold, deliver the manual to the new owner along with the
stove.
CAUTION: Stove is hot while in operation. Keep children,
clothing and furniture away. Contact may cause skin
burns.
The quality of the installation (especially the chimney
connector and chimney), and the quality of the fuel being
burned will affect the performance of your stove, but the
most important factor is the way you operate the stove.
With the help of this manual, you will learn how to
effectively heat and cook with your stove. Be sure to read
it entirely, including the terms of reference and function.
Spend some time becoming familiar with the various parts
of the stove by operating them before you burn your stove.
After a few weeks of operating the stove, re-read this
manual. Many of the procedures will become clearer after
you have had some experience with the stove.
In addition, your own experience will help you to learn the
role that the chimney plays in stove performance. The
Artisan has been tested and is listed by Warnock Hersey.
The test standards are ULC S-627 for Canada and UL
1482 for U.S.
The serial number is located on a pull-out plate at the
bottom right hand side of the front of the unit. The listed
rating plate is located on the back wall of the unit.
The Artisan is listed for burning wood only. Do not burn
other materials or garbage. The Artisan is not listed for
installation in mobile homes. Do not install the stove in
mobile homes.
5
Installation
Place the stove in the intended position and lift out the
hotplate, checking that the joint between the underside of
the hob and the top of the stove is intact. Any joints which
have opened should be made good with the fire cement
provided.
using to the clearances specified. Failure to do so will
result in an unsafe condition.
Unit must be placed on a continuous non-combustible pad
(floor tile with grouting or sheet metal pad) extending 21”
(540mm) in front and 8” (203mm) to the side and back.
Replace the hotplate making sure that it is seated evenly
on the soft rope and that it is approximately 0.1” (1.5mm)
higher than the enamelled top plate, with an equal space
all round. Fit the flue chamber which should have a rope
seal already installed. The flue chamber is screwed to the
stove making a good seal as any air leak at this point will
impede the working of the stove.
Air flowing between the stove pipe and nearby surfaces
carries away heat. Do not fill the empty space with any
insulating material.
A chimney approved to CSA B.365-01 in Canada or
NFPA 211 in the USA must be used to connect to the
stove pipe.
P/N - RS4M301136 A
Flue Chamber Box is located in Main Oven compartment
during shipment.
Remove all bubble wrap and protective film from inside of
oven doors prior to stove ignition.
Refer to Fig. 7 for definition of terms and installation
orientation of Flue Chamber.
a. Remove two screws (1/4” x 20) and fiber washers from
oven top cutout.
b. Prior to positioning Flue Chamber, ensure that
chamber damper is in its full open position to allow for
access to screw hole locations.
c. Position Flue Chamber on stove top ensuring that it is
nested as close as possible to the stove top, to allow
for a minimal gap - front and side.
d. Install fiber washers and 1/4” x 20 screws - ensuring
fasteners are tightly securing Flue Chamber.
e. Close Flue Chamber door.
Fig. 1
DESN 515137
Handrail:
The handrail brackets are held on the front ends of the
stove top-plate casting. Remove the travel nuts and
replace with the handrail brackets ensuring the fibre
protecting washers are in position. Insert the handrail with
fitted endcaps into the brackets, positioning them
correctly, and tighten the locating bolts (See Fig. 1). Do
not use handrail to move stove.
Open the firebox and ashpit doors and check that the
reciprocating bottom grate bars are in position. Make sure
the three restriction plates are in place on the bottom grate
- one at the front and two at the rear. The riddling lever will
not operate with restriction plates in place - it is intended
for cleaning purposes only.
Endcaps, brackets and hardware, referenced in Fig. 1 are
located in the lower warming drawer during shipment.
Handrail is located on Stovetop in a round tube during
shipment.
Be sure to read the sections on clearances, floor
protection and chimneys before actively starting the
installation.
Do not hang combustible material on handrail during
stove operation.
Warning
A woodburning stove radiates heat in all directions. Heat
directed toward living areas in front of the stove is usually
very welcome. However, heat radiating in other directions
will not be as welcome if it results in overheating nearby
walls, ceilings and floors.
An important part of planning a safe installation is to be
sure that the combustible material located near your stove
does not overheat.
Clearance is the distance between your stove and
stovepipe and nearby walls, ceilings and floors.
If there is adequate clearance, then the nearby surfaces
will not overheat.
The ashpit and firebox door must be closed
during normal use, except when lighting or
refuelling
Clearances must be maintained at all combustible
material. These include doors, trim, furniture, drapes,
newspapers and clothes. See local codes for a
description of combustible material.
Make sure that no floor or chimney supports will be cut
due to chimney installation.
Contact local building officials about restrictions and
installation inspection in your area.
It is very important that you match the stove pipe you are
6
Heartland Appliances Inc. 1050 Fountain St North, Cambridge, ON N3H 4R7
Installation Requirements
Model Heartland Artisan
Due to continuing product improvements, Heartland Appliances reserves the right to amend
specifications without notice. Please contact Heartland for the most up to date information, as it
applies to product being purchase, or download latest Site Preparation Specifications from
www.heartlandapp.com.
Help Desk
877-650-5775
CHIMNEY CONNECTOR
REQUIREMENTS
ARTISAN
REQUIREMENTS
How-to Steps
Note: Information herein is for recommendation purposes
only. All clearances are subject to local, Provincial or
State building and fire codes. Clearances may change
without notice. Always consult with local building
inspector. Improperly installed and/or maintained stove
may result in a house fire.
How-to Steps
Note: Information herein is for recommendation purposes
only. All clearances are subject to local, Provincial or State
building and fire codes. Clearances may change without
notice. Always consult with local building inspector.
Improperly installed and/or maintained stove may result in
a house fire.
Clearances
Single Wall Stove Pipe
z Left side of stove adjacent to combustible material:
6 inches/152.4 mm
z Right side of stove adjacent to combustible material:
6 inches/152.4 mm
z Rear clearance to combustible material: 6
inches/152.4mm
z Corner clearance to combustible material: 6 inches/
152.4mm
z Front clearance to combustible material: 36
inches/915mm
z Minimum clearance to combustible ceiling: 51.75
inches/1321mm
Chimney Connector Approvals
For Single and listed Double Wall
Use only 6” diameter approved and listed chimney to the
following standards:
z
z
Canada: ULC Standard S629
U.S.: UL 103 HT
Clearance Guidelines
Part of planning a safe installation is to be sure that
combustible materials located near your stove do not
overheat.
Safety
Double Wall Stove Pipe
z Left side of stove adjacent to combustible material:
3 inches/76.2 mm
z Right side of stove adjacent to combustible material:
3 inches/76.2mm
z Rear clearance to combustible material: 3 inches/
76.2mm
z Corner clearance to combustible material: 3 inches/
76.2mm
z Front clearance to combustible material: 36 inches/
915mm
z Minimum clearance to combustible ceiling: 51.75
inches/1321mm
z
z
z
z
WARNING
Combustible Walls
z
Please contact your local building inspector for
confirmation of what construction materials are
considered combustible or non-combustible in your
particular application. Combustible materials include, but
are not limited to, doors, trim, furniture, drapes,
newspapers, woodpiles and clothes.
z
z
Floor Protection
Unit must be placed on a continuous non-combustible
pad (floor tile with grouting or sheet metal pad) extending
21” (534mm) in front and 8” (203mm) to the sides and
back of the unit.
Hearth MUST extend to the walls if using clearances
less than these dimensions.
z
z
7
Clearances specified herein must be adhered to as a
minimum. Local building codes may require
additional spacing. Please confirm with your local
regulations before commencing any work.
Floor or ceiling supports must not be cut due to
chimney installation (adjust stove location accordingly
to avoid chimney interference with these critical
areas).
Certain States require fresh air supply kits to be
installed. Contact state or local authorities for specific
details prior to installing unit.
Do not pass stovepipe chimney connector through
combustible walls.
Always use an approved, insulated wall/ceiling pass
through (refer to CSA B365 in Canada and NFPA 211
in U.S.)
Do not use stovepipe as an outside chimney.
Chimney connector should be exposed and accessible
for inspection and cleaning (never pass through
combustible ceiling).
Chimney connector must be securely attached to the
pipe and chimney. Individual sections must be
attached together.
Stove pipe must not be connected to an air
distribution duct.
Clearances to Combustibles
Single Wall Chimney Connector
All measurements must be done before starting the installation.
Dimensions
All drawings are for reference only, showing approximate dimensions for rough-in purposes. In some
installations, two or more clearances to combustible walls may contradict each other. The clearances
with the greater numerical value is to be used.
Fig. 2
DESN 515002
Rough In Measurements
Non-combustible hearth must extend 8 inches (203mm) to the sides and back of the unit. Must extend 21
inches (534mm) to the front in Canada and 18 inches (458mm) to the front in U.S. Hearth must extend fully
to the wall if using clearances that are less than these dimensions.
Fig. 3
DESN 515004
8
Clearances to Combustibles
Listed Double Wall Chimney Connector
All measurements must be done before starting the installation.
Dimensions
All drawings are for reference only, showing approximate dimensions for rough-in purposes. In some
installations, two or more clearances to combustible walls may contradict each other. The clearance with
the greater numerical value must be used.
Fig. 4
DESN 515005
Rough In Measurements
Non-combustible hearth must extend 8 inches (203mm) to the sides and back of the unit. Must extend 21
inches (534mm) to the front in Canada and 18 inches (458mm) to the front in U.S. Hearth must extend fully
to the wall if using clearances that are less than these dimensions.
Fig. 5
DESN 515007
9
Guidelines for Installing
Chimney Connector
the
The chimney connector is a single-wall pipe or a listed and
approved double-wall pipe that connects the stove to the
chimney. Approved clearances change according to what
type of chimney connector you use. Consult the
clearances section of this manual for the proper
clearances. The stove’s flue collar accepts only 6”
chimney connector.
Follow the chimney manufacturer’s direction for
installation.
We recommend that prior to installing your stove into a
masonry chimney, you have the chimney inspected by a
qualified mason. Note: Canadian installations into a
masonry chimney MUST be fully relined with a listed solid
fuel chimney liner.
Connection Requirements
1. The chimney connector should be made of 24 gauge
or thicker sheet metal and should be 6” in diameter.
2. The last section of the chimney connector starting from
the stove should be screwed to the flue collar of the
stove with at least 3 self-tapping screws. Individual
sections of the chimney connector must be screwed
together with at least three sheet metal screws. The
last section should be securely attached to the
chimney. Be sure there are no “weak links” in the
system.
3. The crimped ends of pipe sections should point
downward toward the stove so that any soot or
creosote that falls from the inside of the pipe will be
funnelled into a clean out or fall into the stove.
Horizontal Connection
The Heartland Artisan has the ability to connect stove pipe
out the top of the flue box vertically or out the back of the
flue box horizontally.
4. A horizontal run of chimney connector should be no
longer than 10 inches. A vertical run of stovepipe to a
prefabricated metal chimney should be no longer than
8 ft.
To run horizontally out the back of the flue box, remove
plate from rear of the flue box by loosening 5/16” nut on
the inside of the flue box hold down. Ensure rope gasket
insulation is intact on plate perimeter. Remove flue collar
from top of flue box by removing one screw and small
bracket. Set screw and bracket aside and loosen only
screw on opposite side. Flue collar can now be removed.
Interchange position of the removed flue collar and the
flue plate. Ensure the two tabs on the flue collar are
securely tightened inside flue box. Ensure rope gasket is
tight on plate for proper seal. Tighten 5/16” nut on plate
hold down. Make sure all connections are tightly sealed.
5. Do not pass the stovepipe chimney connector through
a combustible wall if it can be avoided. If this cannot be
avoided, follow the recommendation in CSA B365 in
Canada and NFPA 211 in the U.S., recommendations
on Wall Pass-Throughs.
6. Do not use single wall chimney connector as an
outside chimney.
7. Never pass a chimney connector through a
combustible ceiling.
All horizontal stove pipe must slope slightly upwards a
minium of 1/4” per foot (6mm per 0.3m). This slope is to
allow water vapour to drain back into the stove. All
connections must be tight and secured by a minimum of
three equally spaced sheet metal screws. Under no
condition should the chimney connector have more than
one 90 degree bend or two 45 degree bends.
8. The whole chimney connector should be exposed and
accessible for inspection and cleaning.
9. Galvanized stovepipe should not be used. When
exposed to the temperatures reached by smoke and
exhaust gases, galvanized pipe may release toxic
fumes.
10.Horizontal runs of chimney connector should slope
upward 1/4” per foot going from the stove toward the
chimney.
11. During a chimney fire, the chimney connector may
vibrate violently. The connector must be securely
attached to the pipe and chimney, and individual
sections must be securely attached together.
12.This stove is not to be connected to an air distribution
duct.
10
Chimney and draft
Chimney Maintenance
The chimney is the most important element of a
successful stove operation. The chimney ‘drives’ the
system by producing the draft that draws in combustion air
and exhausts smoke and gases to outdoors.
Chimneys serving woodburning appliances must be
checked for creosote build-up. Until you are familiar with
the rate of creosote build-up in the system, check it often
- every couple of weeks.
When installing a new stove or upgrading an existing one,
give as much attention to the chimney as you do to the
appliance that it serves.
Creosote may be in the form of dry, flaky deposits clinging
to the liner of a shiny, glazed coating that resembles black
paint. Glazed creosote is the most dangerous kind and
indicates that one or a combination of the following
conditions exist.
A glowing red hot stove or chimney connector indicates
excessive draft. The stoves failure to get hot, or long burn
times may indicate poor draft conditions.
1. cold liner
2. smouldering fires
3. wet wood
Good draft in a cold chimney should be between 0.01”
and 0.1” of water column. Your dealer may be able to
check this for you.
Recommended Chimney Clearances
Glazed creosote should never exceed 1/8” (3mm
thickness). Dry flaky creosote should never exceed 1/4”
(6mm thickness) before it is removed.
The chimney must:
Floor Protection
1. extend at least 14 ft. above the collar of the stove.
When installing your woodstove on a combustible floor, a
non-combustible floor protector is required under the
stove to protect the floor from hot embers that may fall
when reloading. The floor pad must be a continuous, noncombustible pad (floor tile with grouting or a sheet metal
pad). A floor pad should not be placed on top of a carpet.
Pad must extend 21” (534mm) in front of the stove in
Canada and 18” (458mm) in front of stove in U.S.
Pad must extend 8” (203mm) to the sides and back of the
stove.
Pad must extend fully to the wall if using side and back
clearances less than these dimensions.
2. extend at least 3 ft. above the point where it passes
through the roof.
3. be at least 2 ft. above anything within 10 ft. radius of
the top of the pipe.
Pad extension must be fabricated from non-combustible
materials: 1/2” (13mm) thick minimum with thermal
conductivity factor “K” of 0.43 or lower (units of K =
btu/h/F/in).
To determine thickness of equivalent material required
use formula (“K” x 0.5) / 0.43 = thickness required (“K”
value can be obtained from manufacturer of floor
material).
Fig. 6
Effect of Extractor Fan
DESN 515013
It is not permissible to use an air extraction device in the
same room as the appliance, unless additional ventilation
is provided to compensate the equivalent capacity.
Anything that may cause a negative pressure can cause
gases or fumes to be pulled into the living area.
Illustration showing minimum heights required, depending
on the location of the chimney.
11
Users Instructions
General
Fuelling with Wood
WARNING: HOT SURFACES, use the tool supplied to
operate this appliance. When raising the dome lids, it
is recommended that the heatproof glove supplied
with the stove, is used.
Woodburning
The firewood used will make an important contribution to
successful operation. The best performance and overall
efficiency will be achieved by burning firewood that has
been split, stacked and air-dried undercover from the rain
for at least one year. Burning improperly seasoned or
“green” wood can be a frustrating experience leading to
poor performance, smoky fires and a build-up of creosote.
Do not burn saltwater driftwood refuse, rubber tires, etc.
Use of improper fuels can cause a fire hazard and lead to
a premature deterioration of the stove components,
voiding the warranty.
Air for combustion within the firebox is obtained by
the primary air intake on the ashpit door. The rate of
burning is determined by the manually operated
spinwheel control on the primary air intake.
Any air inlet grilles must be maintained and free from
blockage.
Failing to maintain your stove properly can lead to a
chimney fire. Combustible deposits (called creosote) are a
natural by-product of woodburning. A fire hazard exists if
1/4” of creosote (or more) coats the inner walls of the
chimney.
Burn dry wood because:
z
it gives up to 25% higher efficiency;
z
it produces less creosote;
z
it ignites faster and smokes less;
z
valuable heat is lost in the fire as it dries out wet
wood.
Getting to know the Stove
Fig. 7
DESN 515008
12
Door Operation
To open the doors. Use the utensil provided to turn the
door release screw 1/4 turn counter-clockwise.
OVEN DOOR OPERATION -
The screw will back off enough to open the door. It is not
possible to open the lower door without first opening the
upper door (See Fig. 10).
To close the doors. Close both doors tightly and the use
utensil to tighten both door release screws clockwise.
Ensure that both doors are secured tightly so that no air
will be able to fuel the fire through the fire doors.
To open the doors. Twist the handle slightly to lift up the
door catch from the locking spindle and pull the door
open. (See Fig. 8)
To close the doors. Gently push the door shut until the
door catch makes contact with the locking spindle.
Do not slam the fire door shut!
Fig. 8
DESN 512979
Fig. 10
FIREDOOR OPERATION
DESN 514177
Lighting the Fire
CAUTION: THESE DOORS ARE EXTREMELY HOT
DURING OPERATION. USE THE UTENSIL PROVIDED
TO OPEN AND CLOSE THE DOORS (See Fig. 9).
a.
b.
c.
d.
e.
f.
Fig. 9
g.
h.
i.
j.
13
Check the flue pipe is free of blockage.
Open the firebox door.
Open the ashpit door.
De-ash and remove the dead fuel from bottom grate .
Lift off cleaning door above the bottom grate and rake
fuel into the ashpan. Replace the cleaning door.
Remove the ashpan; empty and replace.
Fully open the ash spin wheel on the ashpan door
(primary air) and the flue chamber damper door.
Crumple 6-8 sheets of paper into loose balls and place
on the grate. Lay kindling on top of the paper and light
from the bottom. It may help to leave the firebox door
open a few seconds to establish the fire.
Close and lock theashpit door with the spin wheel
control open.
Close and lock the firebox door. The secondary air
slide setting is normally full open with this stove.
With the fire established, open the firebox door and fill
with fuel. Push the flue chamber damper back to the
position which gives the desired burning rate. Set the
spinwheel air intake to the position that gives the
desired burn rate.
Refuelling
Cleaning of the Bottom Grate
The firebox should be filled to the recommended level at
the middle of the firebox door opening.
Due to an accumulation of ash and other material, it may
not be possible to pass through the grate. Allow the fire to
burn out and then open the ashpit door. Lift off the
cleaning door (See Fig. 12) and insert a hooked poker to
draw out any offending accumulation. Replace cleaning
door after use.
When correctly fuelled, the stove will maintain the
maximum rated output for a minimum of 2 hours, including
intermittent cooking. Once re-fuelling has been
completed, close the firebox door immediately and open
only for re-fuelling charges.
The amount of accumulated debris is dependent on the
heating load and should be checked weekly for any buildup. Excessive build-up will lead to a fall in heating output
and reduction in life of the bottomgrate.
Restriction Plates
The unit comes supplied with three rectangular air
restriction plates on the bottomgrate. These should
always be in place during operation to control the amount
of air into the firebox. They should be removed to clean
the bottom grate and to use the riddling rod on the left
hand side of the unit but must be replaced after cleaning.
WARNING: Do not remove when alight.
Use of the Hotplate
The best results can be obtained by using machined base
cookware. The hottest part of the hotplate is immediately
above the fire, the other end being for simmering.
The circular plug in the hotplate (near the flue chamber
end) is for flue cleaning and must not be removed for
cooking.
Keep the hotplate clean with a wire brush.
De-ashing
NOTE: Should the bottom grate de-ashing fail to clear
an accumulation of ash and debris, it may be removed
as described in the section on removal of melted ash.
Continuous use of the oven with the hotplate covers down
may result in discolouration of the hotplate and the
chrome covers.
Open the ashpit door to give access to the ashpan which
must be emptied regularly. (See Fig. 11)
In winter this may be as much as three times daily
depending on weather severity.
NOTE: To obtain optimum hotplate performance for fast
boiling or hotplate cooking, fuel the firebox to a maximum
of the bottom edge of the firebox opening to a horizontal
level.
NOTE: Do not allow ash to accumulate in the ashpan
until it touches the underside of the bottom grate bars
or they will quickly burn out.
WARNING: The stove top plate surface around the
hotplate will become hot under use and care must be
observed. Please refer to the installation instructions on
Page 7 regarding minimum clearances to combustible
surfaces and materials.
Ensure the ashpan is in place otherwise the ashpit door
may not close and lock completely.
Fig. 11
Fig. 12
14
Break-In Fire
Flue Chamber Damper
SMOKE/SMELL EMITTED DURING INITIAL USAGE.
Some parts of the stove have been coated with a light
covering of protective oil. During initial operation of the
stove, this may cause smoke/smell to be emitted and is
normal and not a fault with the appliance, it is therefore
advisable to open doors and or windows to allow for
ventilation.
Lift the insulating lids to prevent staining the linings.
The adjustable flue chamber damper is for chimney draft.
The more it is closed, the easier it is to control the heat.
The line markings on the flue chamber enable you to
repeat the best settings to suit your chimney, from No. 1 in
a closed position to No. 6 fully open.
Open the damper fully before re-fuelling. Re-set the
damper to the position that has been found by experience
to give the best results with your chimney.
Do not try to obtain a fast increase in temperature by
opening the flue chamber damper to its fullest extent.
This results in most of the heat being wasted up the
chimney.
The firebox of your stove is made of superior materials cast iron and firebrick lining. Both materials can be broken
by a sharp blow or thermal shock. A little extra care should
be taken during the first six break-in fires. During this
period, it is important to let the cast iron and firebrick
slowly dry out and avoid thermal shock caused by strong,
hot fires.
The flue chamber box has a removable door on the front
for cleaning access to the flueway. The stove is not to be
operated with this door removed. This could result in a
dangerous backdraft condition.
Directions of Flueway in Stove
Fig. 14
DESN 515131
Chimney Sweeping
Fig. 13
DESN 515010
Sweep annually and inspect soot box at 3 monthly
intervals and remove any deposits. Stove must not be in
use and not had a fire for at least 16 hours.
NOTE: Sweep brushes must be of the type with wire
centres and guide wheels.
15
Flueway Cleaning
WARNING: HOT SURFACES, use the tool supplied to
operate this appliance. It is recommended to use the
heatproof glove supplied when raising the dome lids to
use the hotplate.
Following a prolonged shutdown of the appliance,
perhaps after the summer break, ensure the flueway is
free from obstruction prior to re-lighting.
Prolonged soot formation may result in flueways
becoming blocked and could give rise to the release of
carbon monoxide, a poisonous gas into the room. Failure
to ensure clean flueways, flue pipes and bends may lead
to emission of dangerous gases and an inferior
performance from your appliance.
Fig. 17
DESN 513999
Cleaning
Surface blemishes caused by spillage on the enamel are
easier to remove when the stove is cool, and a damp cloth
is usually all that is necessary.
This should not be done whilst the stove is hot.
Stove Flueway - Allow the fire to burn out, open the flue
chamber damper to its maximum and remove the flue
chamber door by lifting up on an angle. Brush the soot or
fly ash from the flue pipe allowing it to fall onto the top of
the oven. (See Fig. 15).
Remove the hotplate plug and rake the deposits forward,
pushing them into the firebox. (See Figs. 16 & 17).
Do not use abrasive pads, oven cleaner or cleaners
containing citric acid on porcelain surfaces.
IMPORTANT NOTE: Porcelain enamel is glass. Clean
porcelain surfaces with glass cleaner or polish and a soft
cloth. These cleaners are unsuitable for use on chrome
and stainless steel including the hand-rails and their
brackets.
The insulating covers should be cleaned regularly with a
NON-ABRASIVE mild detergent, applied with a soft
(coarse free) cloth and lightly polished up afterwards with
a soft (coarse free) duster or tissue to bring it back to its
original lustre
NOTE: The stove is designed and intended to be
under continuous firing but if it is not in use ashpit
and flue chamber door should be left open to ensure
free passage of air through the stove and avoid
condensation problems.
To Replace Bottomgrate Bars
Allow fire to burn out then open the ashpit door and lift off
the cleaning door. Remove dead fuel with hooked poker
into ashpan. Remove three restriction plates and then lift
up each individual bar, pulling forward to remove.
Fig. 15
NOTE: There are two types of bars assembled and the
replacement bars should be checked against
‘Replaced’ bars before replacement.
DESN 513997
Firebrick Replacement
Fig. 16
Damaged firebricks should be replaced as soon as
possible but it may be temporarily repaired with the stove
cement. The firebricks fitted to the Heartland Artisan are of
first quality manufacture, and providing the stove has
been installed and used correctly will have a reasonable
life. They are, however, expendable items and in time will
require renewal.
Replacement bricks either in sets or singular can be
obtained from your Heartland distributor. Always quote the
serial number.
The serial number, which will be found fixed to the
appliance, should be quoted if any question arises in
connection with the Heartland Artisan stove.
DESN 514998
16
Spares List
Part Number
1/16182 T
1/16182 B
RS4F301170
RS4F301171
RS4F301172
RS4F301173
RS4F301175
RS4F301176
RS4F301200
JPAD301221
JPAD301220
Understanding Combustion
Description
No
Bottomgrate bars top
Bottomgrate bars bottom
RH rear firebrick
Rear firebrick
LH rear firebrick
LH front firebrick
Front firebrick
Rear angle firebrick
RH front firebrick
Insulation board firebrick side
Insulation board firebrick front
Water: Up to half the weight of freshly cut logs is water.
After proper seasoning only about 20% of the weight is
wate. As the wood is heated in the firebox, this water boils
off, consuming heat energy in the wood, the more heat
energy is consumed. That is why wet wood hisses and
sizzles while dry wood ignites and burns easily.
Rep’d
6
5
1
2
1
1
1
1
1
1
1
Smoke (or flame): As the wood heats up above the
boiling point of water, it starts to smoke. The hydrocarbon
gases and tars that make up the smoke are combustible if
the temperature is high enough and oxygen is present.
When the smoke burns, it makes the bright flames that are
characteristic of a wood fire. If the smoke does not burn, it
will condense in the chimney forming creosote or exit the
chimney as air pollution.
Please contact your Heartland dealer for information.
Servicing
Charcoal: As the fire progresses and most of the gases
have vaporized, charcoal remains. Charcoal is almost
100% carbon and burns with very little flame or smoke.
Charcoal is a good fuel that burns easily and cleanly when
enough oxygen is present. Of the total energy content of
the wood you burn, about half is in the form of smoke, and
half is charcoal.
Always use a qualified service/heating engineer when
servicing is required. Use only authorised replacement
parts. Do not make unauthorised modifications.
Fume Emission Warning
Properly installed and operated, this stove will not emit
fumes.
Occasional fumes from de-ashing and re-fuelling may
occur but persistent fume emission must not be tolerated.
If fume emission does persist, then the following
immediate action should be taken:a. Open doors and windows to ventilate room.
b. Let the fire out or remove lit fuel from cooker.
c. Check for flue or chimney blockage, and clean if
required.
d. Do not attempt to re-light fire until cause of fume has
been identified and if necessary, seek professional
advice.
Fresh Air Kit
A fresh air kit enables you to use outside air, instead of
room air to fuel the fire. Using an outside source for
combustion air has its advantages. If your home is tight
and well insulated, the fire in the stove may be “starved”
of combustible air, it will be difficult maintaining a fire, and
you may have back drafting problems.
During the heating season, cold air (which is more dense
than warm air) will cause the fire to burn a little hotter,
resulting in more BTU’s from your wood, and less
creosote build-up. Please contact an authorized Heartland
dealer to purchase this option.
17
Overfiring - Caution!
Overfiring of your woodburning appliance represents a serious fire hazard
Overfiring can also warp your stove, break welds, permanently
discolour the enamel and cause premature burnout of your stove.
Repeated overfirings will void the warranty of the appliance.
To prevent overfiring:
1.
If the air intake has little effect on dampering the fire, excessive chimney draft is the
probable cause (especially on chimneys in excess of 20’). Normal chimney draft is
approximately 0.05” W.C.. NOTE: Open damper before opening door to prevent
smoking.
2.
Install a magnetic thermometer on top of your stove near the flue collar or a probe
type thermometer in the smoke pipe.
To prevent creosote build-up in the pipes, the stove should be run between 800°F and
900°F for 30-45 minutes each burning day.
3.
Except for the initial period after lighting (5-10 minutes), do not operate your stove with
the door open.
4.
Ensure the ashpan door is tightly closed during operation. An open ashpan door will
allow excess draft through the firebox, causing overfiring. When emptying ashes,
clean thoroughly behind the ashpan to allow complete closure.
5.
Clean your chimney regularly to remove creosote build-up. A chimney fire is a fire
hazard and will overfire your stove. See page 20, “What to do if you have a chimney
fire”.
6.
During operation, if any parts of the stove or pipe begin to glow the stove is overfired.
Do not add fuel. Close all doors, dampers and draft controls completely, until glowing
is eliminated and safe temperatures are restored. If overfiring conditions persist on
subsequent burnings, contact your dealer for remedial action.
18
Trouble Shooting
Chimney Height
Chimneys and Draft
Taller chimneys tend to produce stronger draft. We
recommend that the top of the chimney should be at least
36” (900mm) higher than the highest point at which it
contacts the roof and 24” (600mm) higher than any roofline or obstacle within a horizontal distance of 10 feet
(three metres). These figures produce the minimum
allowable chimney height. Chimneys higher than this are
often needed for performance reasons. A chimney serving
a cookstove located on the main floor of a single-storey
house or cottage may not be tall enough to perform well,
even though the minimum heights in the building code
have been followed. A good rule of thumb to use states
that the top of the chimney should be at least 16 feet (4.9
metres) higher than the floor on which the cookstove sits.
The performance of your woodburning system depends
more on the chimney than on any other single component.
The chimney ‘drives’ the system by producing the draft
that draws in combustion air and exhausts smoke and
gases to outdoors. Give as much attention to the chimney
as you do to the appliance that it serves.
How Chimneys Work
It is well known that hot air rises. This principle is at work
inside chimneys and is the key to understanding how
chimneys function.
The hot exhaust gases from the appliance are lighter than
the outside air. This buoyancy causes the gases to rise in
the chimney. As they rise, a slight negative pressure is
created inside the appliance. Air rushes into the appliance
through any available openings to balance this negative
pressure.
Negative Pressure in the House
The draft produced by chimneys is a weak force that can
be influenced by pressures inside the house. A
woodburning cookstove acts as an exhaust ventilator by
removing air for combustion from the house. A typical
house may have several other exhausts, clothes dryer,
gas or oil furnace, fireplace or central vacuum system.
When one or more of these other exhaust ventilators is
running, it may compete for the same air that the
woodburning appliance needs for combustion. This
competition for air supply can make a fire slow to kindle or
cause a stove to smoke when its door is opened.
Chimneys are often blamed for this type of performance.
The force caused by the rising gases is called draft. Draft
is created by the difference in temperature between the
gases in the chimney and the outside air. Greater
temperature differences produce stronger draft.
Factors That Effect Draft
There are several factors that interfere with draft and most
woodburning systems have one or more of these features.
It is usually a combination of conditions that make a
chimney fail to function properly.
Here are the main factors that influence draft:
Stack Effect in houses
In winter, the air intake is much warmer and, therefore
more buoyant than the outside air. The warm air in the
house tends to rise, creating slightly negative pressure in
the basement and slightly positive pressure at higher
levels. This negative pressure in the basement can
compete with chimney draft to a stove or furnace located
there.
Cold Chimney Liner
An uninsulated chimney that runs up the outside of a
house and is exposed on three sides is chilled by outside
cold. This means that the flue gases give up their heat
rapidly to the liner. As they cool, they lose their buoyancy
and draft is reduced. Insulation between the liner and the
chimney shell can help to reduce the heat loss, but a
chimney that is enclosed within the house is preferable.
Checking an Existing Chimney
Before an existing chimney is used to vent your new
cookstove, a thorough inspection should be done to
determine its suitability. The inspection should be
performed by an experienced professional because of the
many factors that must be considered. A reputable
chimney sweep or retailer can give you good advice on
the suitability of an existing chimney.
Large Liner
Chimney liners that are much larger than the flue collar of
the appliance allow flue gases to move too slowly. This
slow movement gives the gases more time to cool and
lose their buoyancy. Oversized liners are the reason that
many fireplace inserts vented through the fireplace
chimneys tend to perform poorly. Ideally the liner should
have the same internal areas as the flue collar of the
appliance.
19
Masonry chimneys should be checked for deterioration
including damaged bricks, crumbling and missing mortar,
cracks in the drip cap at the top of the chimney, and loose
flashings at the roof line. The liner should be checked for
cracks and mis-alignment. It must be at least 6” in size.
Safety Practices
An existing factory-built chimney needs a careful
inspection. Your new cookstove should be connected only
to factory-built chimneys approved to ULC Standard S629
in Canada and UL 103HT in the U.S.. Possible problems
with an older metal chimney can include a warped or
buckled liner caused by the heat of a chimney fire,
corrosion of the outer shell, a loose flashing, and a lack of
proper support. Any discolouration of the metal shell near
a joint indicates that the insulation has settled. A damaged
metal chimney should be replaced with a new approved
chimney which will be safe and will perform better
2. Call the fire department immediately.
What to do if you have a chimney fire
1. Close all the combustion air dampers on the appliance.
3. Be prepared to get everyone out of the house in case
the fire spreads.
4. Go outside and check to see that hot ashes do not
ignite shingles,.
5. Watch anything near the chimney that could catch fire
and burn.
6. After the fire has run its course and the chimney has
cooled, have the chimney thoroughly inspected to
determine if it sustained any damage.
7. Resolve to inspect and clean the chimney more often
to prevent another chimney fire.
20
1050 Fountain St N. Cambridge, Ontario, Canada N3H-4R7
Business (519) 650-5775 Fax (519) 650-3773 Toll Free Phone: 1-877-650-5775 Toll Free Fax: 1-800-327-5609
The Artisan
Cooking Instructions
The temperature registered by the oven door
thermometer may not necessarily correspond with the
reading taken with a thermometer inside the oven
WOODSTOVES
ATTENTION INSTALLER: Leave this manual with the appliance.
Cooking Instructions
Learning how to most effectively control the oven
temperature takes some time and experience. As a
general rule, the stove should be at the charcoal stage of
the combustion process before the oven is ready for
cooking.
Thoroughly de-ash the fire as described in the user
section, and re-fuel. Set the flue chamber damper to
halfway and open the spinwheel full. As soon as the fire
has become red all through, close the flue chamber
damper. Do not allow the fire to become white hot. The
temperature of the oven should now rise steadily. When it
reaches a point about 30°C (50°F) below that required,
close the spinwheel to approximately one turn open.
Thereafter control the temperature of the oven by
adjusting the spinwheel. When using the oven, best
results will be obtained by gradually modifiying the size of
the fire, and using only one or two logs at re-fuelling. Once
heated, a cast iron oven will lose heat very slowly. Fast
cooking on the hotplate will require a big fire.
The temperatures established on both the cooking surface
and in the oven are determined by three primary things:
1. The amount of draft in the chimney. As the spinwheel
air intake is opened, more air gets into the firebox
resulting in a hotter, faster fire.
2. The position of the flue damper. This will affect the
temperature of the firebox.
The oven may be cleaned with a stiff wire brush, when it
is very hot. Do not touch the oven - wear oven mitts.
3. The amount of wood in the firebox and at what stage
of the combustion process it is at.
The adjustable flue chamber damper is for reducing the
chimney draft. The line markings on the flue chamber
enable the best settings to be repeated to suit the
chimney. These settings can be found only by
experimenting as every chimney set-up is different. Set
the flue chamber damper fully open after re-fuelling and
re-set to position that has been found by practical
experience to give the best results.
Save These Instructions
Keep the manual available for future reference. The
manual is an important part of the stove. If the stove is
sold, deliver the manual to the new owner along with the
stove.
The quality of the installation (especially the chimney
connector and chimney), and the quality of the fuel being
burned will affect the performance of the stove, but the
most important factor is the way the stove is operated.
With the help of this manual, you will learn how to
effectively heat and cook with the stove. Be sure to read it
entirely, including the terms of reference and function.
Use of Stove Top Cooking
The Artisan is listed for burning wood only. Do not
burn other materials or garbage.
When getting used to cooking on the hotplate, remember
that the surface is cast iron and will retain its heat for a
long time after use.
The cast iron top provides an excellent large surface for
doing griddling, frying, basting and simmering. Cooking
directly on the hotplate is not recommended. A cast iron
cooking vessel with a flat bottom is recommended.
Successful stove top and oven cooking will result from
using a heated stove and baking the fire to retain the heat
required. Do not try to cook on this stove immediately after
lighting the fire.
The hottest part of the hotplate is immediately above the
fire. The heat will gradually decrease towards the flue box,
with the other end being suitable for simmering.
The correct adjustment of the spinwheel to obtain the
oven temperature required varies with the chimney draft,
and can be found only by experiment. The following is a
suggested method only, and may need modification to suit
local conditions.
The circular plug in the hotplate (near the flue box end) is
for cleaning the flueway and MUST be in place during
operation.
Suppose an oven temperature for roasting is desired, and
that the stove is idling:
Continuous use of the oven with the hotplate covers down
may result in discoloration of the hotplate and the chrome
covers.
Keep the hotplate clean with a wire brush.
WARNING: The stove top surface around the hotplate
will become hot under use. Care must be observed.
Do not hang combustible material over the handrail
during use.
22
Remember by opening the flue damper there is less
resistance on the flue and a faster hotter fire will result.
The cooking surface directly over the firebox will typically
get hotter. Always open the flue damper before opening
the firebox door for re-fuelling. Wait momentarily before
opening the doors to allow smoke in the firebox to be
drawn up the chimney.
Top Oven Cooking
The oven door thermometer registers the temperature at
the door only. Oven temperatures vary from top to bottom
and side to side. The only accurate check on oven
temperature is an oven thermometer alongside food being
roasted or baked.
Maintain the stove properly. The benefits in superior
performance and safety are well worth the time.
Once the stove has about 4” of red hot coals in the firebox,
it will become stable. The entire stove and the chimney
system is heated and running at a fairly constant
temperature. At this point, you may load a new charge of
wood following the instructions in the user manual.
Oven Temperatures
Hot: 220-260°C (400-500°F)
Moderate: 150-200°C (300-400°F)
Slow: 90-150°C (200-300°F)
Bottom Oven Cooking
It is not possible to control this oven, but during the course
of roasting, sufficient heat input allows the simmering of
dishes that have been taken from the roasting oven.
Oven Temperatures
Hot: 135°C (275°F)
Moderate: 95°C (203°F)
During slow cooking periods, the bottom oven is ideal for
pre-heating plates and keeping food warm.
The temperatures outlined in this manual are for guideline
purposes only. The temperatures in the oven will vary in
accordance to the temperature in the firebox.
Ideally, the woodstove will perform best if it is left running
constantly, keeping the entire system warm. Depending
on the wood and chimney conditions it would typically take
three or four charges of cord wood to establish a good
base for oven cooking, meaning 11/2 to 2 hours before
cooking from a cold start.
Always load a new charge of wood to a glowing hot
coalbed - waiting too long to load a new charge results in
extreme temperature swings and will make cooking
difficult. The objective is to maintain the coal bed at a
constant heat. Occasional tending or stirring of the
coalbed may be required. Keeping these principles in
mind and with a little experience, cooking will be easy and
trouble-free.
Woodstove cooking methods are as diverse as their
owners - there is no right or wrong way, only, in time, your
way.
23
Add on kits that are available for the Heartland Artisan:
Fresh Air Kit
If your home is tight and well insulated, the stove may be “starved” for combustible air,
then this kit is what you need!
Artisan Fresh Air Kit - #RN0001
If you have any questions or you need replacement parts, contact your dealer or call us
direct at 519-650-5775. Our office hours are from 8:30 am to 5.00 pm. est.
For our complete line of kitchen appliances, visit our website at www.heartlandapp.com or
phone 1-877-650-5775 and ask to speak to a sales representative
For pricing please call your dealer, or call Heartland Appliances (519) 650-5775
or Fax (519) 650-3773
24