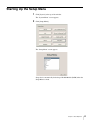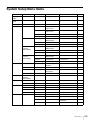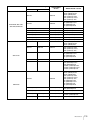
1
3-869-888-16 (1) Network Surveillance Recorder User’s Guide Before operating the unit, please read this manual thoroughly and retain it for future reference. NSR Series © 2006 Sony Corporation. All rights reserved. Contents Introduction Overview.......................................................................5 Features and Functions ..............................................8 Front ................................................................................ 8 Rear ............................................................................... 11 System Requirements...............................................14 Initial Configuring the System Overview.....................................................................15 Configuration Flow ....................................................15 System Configuration (First Time: Basic Initial Setup) .........................16 Basic Configuration ...................................................... 16 Camera IP Address Configuration and Registration to NSR ................................................................. 22 Modifying the System Configuration .......................25 Reconstructing Data Volume (Changing RAID Types) (Only the NSR-100/50) ........................................36 Basic Operation Overview.....................................................................39 Logging On to the NSR .............................................40 Basic Window Operations ........................................42 Changing the Password............................................44 Logging Off From the NSR .......................................45 Locking the NSR........................................................46 Shutting Down and Restarting the NSR ..................47 Saving and Restoring Configuration Data ..............47 Saving Configuration Data............................................ 47 Restoring Configuration Data ....................................... 48 Exporting Log Files ...................................................50 Starting Up the Setup Menu .....................................51 Monitoring Live Images Overview.....................................................................53 Monitoring Window Functions and Operation........53 Monitoring Window (Monitor 1).................................. 54 Monitoring Window (Monitor 2).................................. 57 Monitor Window........................................................... 57 Selecting the Live Images.........................................59 Selecting the Live Images ............................................. 59 Controlling Cameras ..................................................... 60 2 Monitoring in Sequence Mode .................................62 Displaying Camera Images in the Hot Spot Monitor Window ................................................................63 Displaying Images in the Hot Spot Monitor Window When There is Sensor Input or an Alarm ........... 63 Monitoring Audio From Cameras.............................63 Muting Sound From Cameras ....................................... 63 Recording Live Images .............................................64 Starting Recording ........................................................ 64 Stopping Recording....................................................... 64 Selecting a Camera From Recording Status and Stopping Recording ............................................. 65 Playing Back Recorded Images ...............................65 Selecting a Monitor Window and Starting Playback .... 65 Quick Search ................................................................. 67 Selecting From Recording List ..................................... 67 Searching for Recorded Images to Play Back............... 68 Exporting....................................................................71 Exporting Movies.......................................................... 71 Exporting Still Images .................................................. 75 Option Window (Auxiliary Function Area) ..............77 Alarm Log ..................................................................... 77 System Log ................................................................... 79 Alarm Output ................................................................ 80 Sensor Input .................................................................. 81 VMD (Recorder) ........................................................... 81 Manual Trigger ............................................................. 82 Settings Overview.....................................................................83 Configuration Window Basic Operation..................83 Advanced Configuration...........................................84 General .......................................................................... 84 Camera .......................................................................93 Setting IP Addresses after Detecting Cameras Automatically (Camera IP Setup)........................ 93 Detecting Cameras on the Network Automatically and Registering Multiple Cameras ............................. 97 Specifying the IP Address or Host Name of a Camera. 99 Deleting a Camera....................................................... 101 Configuring the Advanced Settings of Cameras......... 101 Sensor Input.............................................................121 Adding a Sensor Input Pin to the NSR ....................... 121 Deleting a Sensor Input Pin Created on the NSR ....... 122 Modifying Sensor Input Pin Settings on the NSR and the Camera ......................................................... 123 Setting a Video Motion Detection (Camera) Pin ........ 124 Alarm Output............................................................130 Modifying Alarm Output Pin Settings ........................ 130 3 Controlling Alarm Outputs Manually ......................... 131 Action .......................................................................131 Recording Schedule................................................135 Creating a New Recording Schedule .......................... 136 Modifying Schedule Settings ...................................... 142 Monitor .....................................................................145 Adding a Monitoring Sequence .................................. 149 User...........................................................................151 Creating a User............................................................ 151 Miscellaneous Functions Supported by the Remote Control Keys ...................................................................154 User Permissions ....................................................157 System Setup Menu Items ......................................159 Monitoring Setting Items ........................................160 STATUS LED ............................................................168 I/O Port......................................................................170 Pin Assignment of I/O Port......................................... 170 Using the I/O Receptacle ............................................ 171 Wiring Diagram 1 for Sensor Input ............................ 171 Wiring Diagram 2 for Sensor Input ............................ 171 Wiring Diagram for Alarm Output ............................. 172 Notes and Limitations .............................................173 Camera Resolution Details.......................................... 173 Camera Frame Rate Details ........................................ 175 Important Precautions (Read Carefully) ..................... 175 Notes ........................................................................... 176 Troubleshooting ......................................................181 Specifications ..........................................................184 Program ©2006 Wistron Corporation Documentation ©2006 Sony Corporation ©2006 Sony Corporation Trademarks • • • • • • • • “IPELA” and are trademarks of Sony Corporation. Microsoft and Windows are either registered trademarks or trademarks of Microsoft Corporation in the United States and/or other countries. Linux is either a registered trademark or trademark of Linus Torvalds in the United States and/or other countries. Red Hat is a registered trademark or trademark of Red Hat, Inc. in the United States and/or other countries. NFS is trademark of Sun Microsystems, Inc. in the United States and/or other countries. Adobe, Acrobat, and Acrobat Reader are either registered trademarks or trademarks of Adobe Systems Incorporated in the United States and/or other countries. Ethernet is a registered trademark of Fuji Xerox Co., Ltd. Other products or system names appearing in this document are trademarks or registered trademarks of their respective owners. Further, the ® or ™ symbols are not used in the text. 4 Introduction Chapter 1 Overview The NSR series is a dedicated surveillance recorder equipped with preinstalled surveillance software that runs on their dedicated operating system. The NSR allows you to monitor and record network camera images (JPEG or MPEG4). It also allows you to play back the recorded images and search through them, making the NSR a truly versatile monitoring tool. Surveillance room RealShot Manager Controller is used for surveillance and configuration. Machine room Monitor Keyboard Mouse Installing Network NSR Windows PC RealShot Manager Controller Software Surveillance cameras Notes • When using RealShot Manager as a remote controller for the NSR, select [Controller] during installation of RealShot Manager. • With two monitors connected to the NSR, you can perform settings and monitoring operations on monitor 1 and hot spot monitoring on monitor 2. Chapter 1 Introduction 5 Control compatible cameras from remote locations You can pan, tilt, and perform zoom operations of compatible cameras from the NSR network. The NSR provides control of focus and bright level, and also supports audio recording from network cameras. * Microphones and speakers sold separately. Compatible with analog cameras You can monitor and record images from analog cameras when you purchase and install an optional camera server (SNT-V704). The network ports supporting for gigabit (1000 Base-T) As the NSR-100/50 is equipped with three network ports, you can configure the system so that the camera network is kept separate, preventing the camera network data from being affected by the other network data. There is more than enough space to receive data from multiple cameras because the three ports support gigabit transfer rates. The NSR-25 is equipped with one network port supporting gigabit transfer rates. Large-capacity hard disks allow recording for long periods of time The NSR is equipped with large-capacity hard disks. The NSR-100 can record up to approximately 920 GB1) of data, the NSR-50 can record up to approximately 460 GB1) of data, and the NSR-25 can record up to approximately 230GB1) of data. For example, if you record images from 16 cameras at 1 fps2) (VGA, JPEG; one frame equals about 31 KB) with the NSR-100, you can record approximately a month’s worth of images (15 hours a day)3). 1) Includes the database capacity managed by the internal software. 2) fps: frames per second. 3) When set to RAID 0. Slim type (2U), space-saving 19-inch rack mounting model With the optional rack mounting kit (sold separately), the recorder can be installed in a standard universal pitch EIA 19-inch rack. High-resolution up to 480 fps (VGA, JPEG) recording The NSR-100 can support up to 64 cameras, the NSR-50 can support up to 32 cameras, and the NSR-25 can support up to 20 cameras1). The NSR-100 records images at a total frame rate of 480 fps2) (240 fps with the NSR-50, 120 fps with the NSR-25), VGA (640 × 480 pixels) resolution, JPEG (1 frame approx. 31 KB) image format, for a crisp image quality. 1) For cameras that support image sizes of 1,280 × 960 pixels or more, the NSR-100 can support up to 8 cameras, and the NSR-50/NSR-25 can support up to 4 cameras. 2) Maximum frame rate when 16 cameras are connected to the recorder. Each camera has a frame rate of approximately 30 fps. This frame rate may become less because of fragmentation on the internal hard disks. Values are based on Sony measurements. These values are not guaranteed, as performance may change due to the user’s operating environment. High reliability The NSR-100/50 offers high reliability through: • NSR-100: RAID 0, 1+0, and 5 • NSR-50: spanning1) and RAID 1 When used with a RAID 1, 1+0 or 5, the system can continue functioning even if one of the hard disks develops a malfunction. Similarly, because the system software and settings are stored on the internal flash memory of the NSR, if the system software develops a malfunction, lightning-quick restoration of the system is possible. The NSR also supports uninterruptible power supplies (UPS)2), making them extremely reliable systems. 1) Spanning: Function allowing several hard disks to be virtually seen as one. 2) Sony recommendation only. Chapter 1 Introduction 6 Notes • When you use RAID 0 with the NSR-100, spanning with the NSR-50, or the NSR-25 there is no data redundancy. Also, storage capacity varies according with the RAID level. • RAID is not available for the NSR-25. Easy monitoring operation by remote control In addition to using your keyboard and mouse to operate the NSR, but you can also use the joystick and buttons of the optional RM-NS10 remote control unit. Furthermore, the screen layout is based on equally split screen segments, and can be used seamlessly with a conventional recorder. Note You will need to use your keyboard and mouse to make initial NSR settings. Other features • You can monitor, record, play back, and operate images from cameras that support 1,280 × 960 pixel size. • You can display the images from up to 64 cameras (8 × 8 images) on one screen. • The NSR is capable of manual, scheduled, and alarm recording, among others. • The NSR is equipped with a motion detection function1) (Video Motion Detection (Recorder)). • Run searches for recorded images by camera name, date, alarm, and other methods. • Create privacy zones by using the dynamic masking functions2). Dynamic masking covers pan, tilt, and zoom. • Precise alarm processing is made possible by performing the various types of filtering3) that use the image processing results sent from the camera in the form of object information metadata. Because filtering can be applied to metadata that has already been recorded, you can also search for areas of interest after recording is finished. • With an internal drive, the NSR-100/50 is capable of writing data to DVD-R, DVD+R, or CD-R/RW media. The NSR-25 is capable of writing data to CD-R/RW media. • Audio recording and playback4) are also supported for compatible cameras. 1) Some functions are limited depending on the number of cameras connected. 2) Some functions are limited depending on which camera models are connected. 3) To perform motion detection and object detection using metadata, a camera that supports motion detection by metadata is required. The use of metadata is supported for up to 32 cameras. 4) The optional active speakers are required. Chapter 1 Introduction 7 Features and Functions Front NSR-100/50 1 2 POWER qg qf NETWORK qd 1 2 3 3 HDD 1 2 qs qa 0 9 3 4 4 STATUS 1 2 3 5 4 6 ERROR 8 REC 7 A Power LED Alternates between green and amber lights when the unit is starting up. Lights green when startup is complete. Lights amber when it is on standby. B Network LED (1 to 3) Lights green when there is activity at the corresponding LAN connector at the rear of the NSR. C HDD LED Blinks green when the internal hard disks are accessed. Lights amber when an error occurs with a hard disk. D Status LED (1 to 4) Lights in sequence (1, 2, 3, 4) when the NSR starts. When an error occurs, the corresponding status LED lights together with the error LED, which lights or blinks to indicate the type of error. For details, see “STATUS LED” (page 168). E Error LED Lights or blinks when an error occurs. F REC LED Lights when recording images. G DVD/CD drive Use this drive to write data from the NSR hard disks to DVD and CD. * For details on compatible media, refer to “Notes and Limitations” (page 173). H USB connector Use this connector to connect a USB keyboard, mouse, USB flash memory or the RM-NS10 remote control unit to the NSR. Chapter 1 Introduction 8 I Audio input connector* Use this connector to input audio from a peripheral audio device, such as a microphone. J Audio output connectors (L and R) Use these connectors to output audio to a peripheral audio device. K Video output connector Use this connector to output video to a peripheral video device, such as a VCR. The displayed images are the same as those for monitor connector 1. L Monitor connector 1 Use this connector to connect a monitor. M CompactFlash card slot Use this slot to save configuration data from the NSR hard disks to a CompactFlash card. N Lock Use this in conjunction with the supplied front panel key to lock the front bezel. When the front bezel is locked, you cannot pull out the front bezel. Also, do not lock the front bezel when the front bezel is pulled out. You can distinguish the locked position from the unlocked position by looking at the lock, as illustrated below. The front bezel is locked The front bezel is unlocked O Vent holes These openings allow air to flow from the front of the NSR to the rear. Do not block the vent holes, allow dust to accumulate in the inner mesh of the vent holes, or obstruct the airflow in any way. Obstructing the airflow allows heat to build up inside the NSR and may result in fire or damage. * This feature is not currently supported. NSR-25 1 POWER 9 8 2 NETWORK 1 2 3 3 HDD 1 2 3 4 4 STATUS 1 2 3 5 4 6 ERROR REC 7 Chapter 1 Introduction 9 A Power LED Alternates between green and amber lights when the unit is starting up. Lights green when startup is complete. Lights amber when it is on standby. B Network LED Lights green when there is activity at the corresponding LAN connector at the rear of the NSR. C HDD LED Blinks green when the internal hard disks are accessed. Lights amber when an error occurs with a hard disk. D Status LED (1 to 4) Lights in sequence (1, 2, 3, 4) when the NSR starts. When an error occurs, the corresponding status LED lights together with the error LED, which lights or blinks to indicate the type of error. For details, see “STATUS LED” (page 168). E Error LED Lights or blinks when an error occurs. F REC LED Lights when recording images. G Combo drive Use this drive to write data from the NSR hard disks to CD. H Lock Use this in conjunction with the supplied front panel key to lock the front bezel. When the front bezel is locked, you cannot pull out the front bezel. Also, do not lock the front bezel when the front bezel is pulled out. You can distinguish the locked position from the unlocked position by looking at the lock, as illustrated below. The front bezel is locked The front bezel is unlocked I Vent holes These openings allow air to flow from the front of the NSR to the rear. Do not block the vent holes, allow dust to accumulate in the inner mesh of the vent holes, or obstruct the airflow in any way. Obstructing the airflow allows heat to build up inside the NSR and may result in fire or damage. Chapter 1 Introduction 10 Rear NSR-100/50 1 2 3 qf 45 qd qs 6 7 qa 0 8 9 A Fan Take care not to obstruct the fan grille. If the grille is obstructed, heat may build up in the unit, leading to damage and/or fire. B Power switch Press the switch in the a position to turn on the unit. C Video output connector Use this connector to output video to a peripheral video device, such as a VCR. The displayed images are the same as those for monitor connector 1. D S-video output connector Use this connector to output video to a peripheral video device equipped with an S-video connector. The displayed images are the same as those for monitor connector 1. E Serial connector (RS-232C) Use this connector to connect the control line of the uninterruptible power supply (UPS). F Sensor input connector Use this connector to connect the sensor input lines. For connection details and wiring diagrams for sensor inputs, see the “I/O Port” (page 170). G Alarm output connector Use this connector to connect the alarm output lines. For connection details and a wiring diagram for alarm output, see the “I/O Port” (page 170). H Audio input connector* Use this connector to input audio from a peripheral audio device, such as a microphone. I SCSI connector* Use this connector to connect a peripheral SCSI device. Chapter 1 Introduction 11 J USB connector Use this connector to connect a USB keyboard, mouse, USB flash memory or the RM-NS10 remote control unit to the NSR. K LAN connectors (1 to 3) Use these connectors to connect 10 Base-T, 100 Base-TX, or 1000 Base-T network cables to the NSR. NIC1: Network cameras NIC2: Remote Clients NIC3: External storage devices** L Monitor connectors (1 and 2) Use these connectors to connect a monitor. M Audio output connectors (L and R) Use these connectors to output audio to a peripheral audio device. N Power supply connector Use this connector to connect the power cord. * This feature is not currently supported. ** External storage devices may not be supported depending on the software version. For details, consult your dealer. NSR-25 1 2 3 qa 0 9 4 8 5 6 7 A Fan Take care not to obstruct the fan grille. If the grille is obstructed, heat may build up in the unit, leading to damage and/or fire. B Power switch Press the switch in the a position to turn on the unit. C Serial connector (RS-232C) Use this connector to connect the control line of the uninterruptible power supply (UPS). D Sensor input connector Use this connector to connect the sensor input lines. For connection details and wiring diagrams for sensor inputs, see the “I/O Port” (page 170). Chapter 1 Introduction 12 E Alarm output connector Use this connector to connect the alarm output lines. For connection details and a wiring diagram for alarm output, see the “I/O Port” (page 170). F Audio input connector* Use this connector to input audio from a peripheral audio device, such as a microphone. G USB connector Use this connector to connect a USB keyboard, mouse, USB flash memory or the RM-NS10 remote control unit to the NSR. H LAN connectors Use these connectors to connect 10 Base-T, 100 Base-TX, or 1000 Base-T network cables to the NSR. I Monitor connectors (1 and 2) Use these connectors to connect a monitor. J Audio output connectors (L and R) Use these connectors to output audio to a peripheral audio device. K Power supply connector Use this connector to connect the power cord. * This feature is not currently supported. Chapter 1 Introduction 13 System Requirements The hardware required in order to use this recorder are as follows. • Sony network cameras Contact your dealer for details about compatible Sony network cameras. • Monitor1) • USB keyboard2) • USB mouse3) • Network switch • 1000Base-T/100Base-TX/10Base-T cable • CF (CompactFlash) card or USB memory device4) 1) For details about monitors supported by the NSR, contact your retailer. The following “Generic” type monitors can be selected. Frequency is indicated at the end of each line. - Generic LCD Display; LCD Panel 1024×768; 40-70 - Generic LCD Display; LCD Panel 1280×1024; 50-75 - Generic LCD Display; LCD Panel 1600×1200; 60 - Generic CRT Display; Monitor 1024×768; 50-70 - Generic CRT Display; Monitor 1280×1024; 50-90 - Generic CRT Display; Monitor 1600×1200; 50-90 The following resolutions can be specified. - XGA (1024×768) - SXGA (1280×1024) - UXGA (1600×1200) 2) Use a USB keyboard with a cable. However, keys other than the standard may not function. Wireless or infrared USB keyboards may also not function properly. 3) Use a USB mouse with a cable. However, three-button or wheel mice may not function properly. Wireless or infrared USB mice may also not function properly. 4) Required when backing up system information such as logs. - For CF, use a card that has been formatted in advance with VFAT. - For USB memory, use a device that supports general USB Mass Storage Class specifications. - CF cards are not compatible with the NSR-25. Chapter 1 Introduction 14 Initial Configuring the System Chapter 2 Overview When you first start the NSR, the system configuration window automatically appears. Refer to the section below and configure the necessary settings. Configuration Flow Initial configuration Modification Turn on the NSR. The system configuration window automatically appears. See “System Configuration” System Wizard (page 16). See below for additional settings The NSR restarts automatically. Logon screen For further configuration See below for additional settings Monitoring windw Modify the system settings. (page 25) Chapter 2 Initial Configuring the System 15 Initial configuration settings • Language • EULA • Keyboard Layout • Time Zone • Day and Time • Network Device • Monitor Model • Video Settings (only the NSR-100/50) • Host Name Additional settings • NTP • SNMP • UPS Note You can also modify the settings that you configured during the initial configuration. For details, see “Modifying the System Configuration” (page 25). System Configuration (First Time: Basic Initial Setup) When the NSR starts for the first time, you must perform the following procedure. Caution The remainder of this manual uses illustrations and screens of the NSR-100/50. Basic Configuration 1 Connect the USB keyboard and USB mouse to the unit, and turn on the power. The following screen appears, and a progress bar for hardware startup appears. Chapter 2 Initial Configuring the System 16 Then the following screen appears, and a progress bar for software startup appears. The unit starts and the system settings screen (Setup Wizard) appears. 2 Click [Next]. The [Select Language] screen appears. 3 Select the desired display language from the list, and then click [Next]. The [EULA] screen appears. 4 Read the user license agreement, click [Accept], and then click [Next]. The [Keyboard Layout] screen appears. Chapter 2 Initial Configuring the System 17 5 Select the type of USB keyboard connected to the unit from the list, and then click [Next]. The [Time Zone] screen appears. 6 Select the desired time zone from the list, and then click [Next]. * There is no option for enabling or disabling summer time. If you select a time zone in which time is adjusted for summer time, the time is adjusted for summer time automatically. The [Date and Time] screen appears. 7 Verify the date and time, and configure the correct date and time if necessary, then click [Next]. The [General Network Setting] screen appears. Chapter 2 Initial Configuring the System 18 8 Perform the following steps to configure the network settings. (1) Enter an IP address for each server in the [General Network Setting] screen, and click [Next]. Primary DNS Enter the primary DNS (Domain Name Server) IP address. When there is no primary DNS or one is not necessary, do not enter an IP address. Secondary DNS Enter the secondary DNS IP address. When there is no secondary DNS or one is not necessary, do not enter an IP address. Default Gateway Enter the default gateway IP address. When only the local network is used or connection to other networks is not necessary, do not enter an IP address. The [Network Device #1] screen appears. (2) Configure the [Network Device] settings for each of the LAN ports. When using the NSR-100/50, configure the settings for each of the three LAN ports (LAN1, LAN2, and LAN 3). When using the NSR-25, configure the settings for the single LAN port (LAN1). Note When using the NSR-100/50, connect the following devices to each of the LAN ports. LAN1: Network cameras LAN2: Remote clients LAN3: External storage devices (This may not be supported depending on the software version. For details, consult your dealer.) Chapter 2 Initial Configuring the System 19 When using a DHCP server to configure address settings automatically Select [DHCP]. When configuring addresses manually (1) Select [Static]. (2) Enter the following information. IP Address Enter the desired IP address. Caution • Before you enter the desired IP address, make sure that it is not already otherwise used on the network. Entering an IP address already in use may lead to erratic operation of the unit, but no error messages appear to indicate the fact. • Because of IP address attribution rules, setting an invalid address such as the ones below is not allowed. Example: 224.0.0.0 to 255.255.255.255 0.0.0.0 127.0.0.1, etc. Netmask Enter the subnet mask address. Note The default settings for network devices are as follows. IP Address: 192.168.[0/1/2]*.1 Netmask: 255.255.255.0 * The settings for each of the network devices #1, #2, and #3 (only network device #1 for the NSR-25). The [Monitor Model] screen appears. 9 Perform screen size settings depending on each monitor port, and then click [Next]. When two monitors are connected, clicking [Dual Head] displays the second monitor configuration screen. Select the appropriate monitor type and resolution (pixels) for your monitor. Notes • The default setting for monitors is as follows. Generic LCD Display; LCD Panel 1600×1200; 31.5-90; 60 Resolution 1024×768 • Most monitors will operate with [Generic Monitor], but you can select [Others] as required. Chapter 2 Initial Configuring the System 20 Caution When configuring settings for the second monitor, the second monitor must be connected when the NSR restarts. When using the NSR-100/50, the [Video Setting] screen appears. Proceed to step 10. When using the NSR-25, the [Host Name] screen appears. Proceed to step 11. 10 Select the appropriate video format, depending on your region, [NTSC] or [PAL], and then click [Next]. * This screen only appears when using the NSR-100/50. The [Host Name] screen appears. 11 Perform settings for each item, and then click [Next]. Host Name Enter the host name. Note Use only alphanumeric characters, underscores (_), and hyphens (-). Domain Name Enter the network domain name according to your network. Example: xxx.sony.co.jp When you do not register the NSR to the DNS, you do not need to change the default settings. The [Summary] screen appears. Chapter 2 Initial Configuring the System 21 12 Confirm the settings and then click [Next]. The [Warning] screen appears. 13 Click [Finish]. The NSR restarts automatically. Camera IP Address Configuration and Registration to NSR After restarting, the logon screen appears. Next, configure the IP addresses for cameras and register them to the NSR. 1 Enter your user name and password, and then click [Log On]. Default User Name: admin Default Password: admin The Camera screen appears in the Configuration window. Chapter 2 Initial Configuring the System 22 2 Click [Camera IP Setup]. If the IP addresses for the cameras have already been set, click [Register All] and proceed to Step 5. The Camera IP Setup window appears. 3 Perform the following settings. In the Camera IP Setup window, you can search for cameras on the same network by MAC address and configure their IP addresses all at once. (1) Select the network to search in the field labeled “1. Select Network Device for IP Setup.” Normally, Network 1 is selected as the camera network, and a list of the cameras found appears in the “Found Camera List.” The check boxes of all found cameras are selected. (2) Enter the following information in the field labeled “2. Set Camera network setting.” • The user name and password of the camera you are configuring settings for. • The range of IP addresses on the same network (default: 0 to 254) for which to perform automatic assignment. • The http port number (default: 80) for communicating with cameras. * If there is a fixed range of IP addresses that can be assigned to cameras, make sure to specify the correct range. Chapter 2 Initial Configuring the System 23 (3) Click [Set]. The information you entered is reflected in the “Found Camera List.” IP addresses are assigned within the specified range. Because the list does not expand to compensate if there are not enough IP addresses, make sure the list is set correctly by directly changing addresses in the list as needed. At this stage, the settings have not yet been applied to the camera. (4) Click [Apply]. This configures the camera settings using the information developed in the list. It takes a few moments for the settings to complete. 4 When the settings for each camera are complete, click [Register All]. The Register Cameras window appears. 5 Perform the following settings. In the Register Cameras window, a list of cameras that have not been registered to the NSR appears with the check box for each selected. (1) Verify the number of cameras selected for registration in the column labeled “Cameras to be registered”, and confirm the user name and password for each camera. Caution The user name and password for the cameras are not set by default. You can set the user name and password for the selected cameras simultaneously under “Register selected Cameras for NSR.” (2) Click [Register]. The selected cameras are registered to the NSR. * By clicking [Camera IP Setup], you can also return to the previous Camera IP Setup window. 6 When registration is complete, click [Close]. The Configuration window returns to the Camera screen. The registered cameras are listed. Chapter 2 Initial Configuring the System 24 7 If necessary, configure the individual settings for each camera. For details about settings, see “Settings” (page 83), Chapter 5. 8 When you have verified the settings for each camera, click [Monitoring]. The “Monitoring” window appears. By clicking [Configure], you can switch to the “Configuration” screen and make changes to the settings. Modifying the System Configuration 1 Click [System] at the top left of the Monitoring window, and then click [Setup Menu] in the [Setup Menu] screen that appears. The [Setup Menu] screen appears. Chapter 2 Initial Configuring the System 25 2 Select the [Language Display], and then click [Select]. The [Select Language] screen appears. 3 Select one of the languages displaying in the screen, and then click [Accept]. When you click [Accept], the [Setup Menu] screen returns. 4 Select the [Keyboard Layout], and then click [Select]. The [Keyboard Layout] screen appears. 5 Select the language for the USB keyboard connected to the NSR, and then click [Accept]. When you click [Accept], the [Setup Menu] screen returns. Chapter 2 Initial Configuring the System 26 6 Select the [Date and Time], and then click [Select]. The [Date and Time] screen appears. 7 Configure the date and time, and then click [Accept]. Year/Month/Day Enter the date. Hour/Min Enter the correct time, and then select [AM] or [PM]. Time Zone Select the time zone where you are located. * There is no option for enabling or disabling summer time. If you select a time zone in which time is adjusted for summer time, the time is adjusted for summer time automatically. When you click [Accept], the [Setup Menu] screen returns. 8 Select the [Network], and then click [Select]. The [Network Device Menu] screen appears. 9 Select the desired network device, and then click [Select]. The network settings consist of a “General Network Setting” and a “Network Device” that provides LAN ports. When using the NSR-25, only “Network Device 1” can be set. Chapter 2 Initial Configuring the System 27 Note When using the NSR-100/50, connect the following devices to each of the LAN ports. LAN 1: Network cameras LAN 2: Remote clients LAN 3: External storage devices (This may not be supported depending on the software version. For details, consult your dealer.) 10 To configure general settings, click [General Setting] and then [Select]. The [General Network Setting] screen appears. 11 Configure each item below, and then click [Accept]. Primary DNS Enter the IP address for the primary DNS (Domain Name Server). Skip this entry if a primary DNS is not available or not required. Secondary DNS Enter the IP address of the secondary DNS. Skip this entry if a secondary DNS is not available or not required. Default Gateway Enter the IP address of the default gateway. Skip this entry when only a local network is used or when connections to other networks are not required. Hosts Setting If a host name needs to be registered in the hosts file, enter the IP address and corresponding host name, and then click [Add] to add it to the list. 12 To configure each LAN port, click [Network Device] and then [Select]. Configure the “Network Device” settings for each of the LAN ports. The [Network Device] screen appears. Chapter 2 Initial Configuring the System 28 13 Configure each item, and then click [Accept]. Configure the settings depending on your network. When using a DHCP server to configure address settings automatically Select [DHCP]. When wanting to configure addresses manually (1) Select [Static]. (2) Enter the following information. IP Address Enter the desired IP address. Notes • Before you enter the desired IP address, make sure that it is not already used on the network. Entering an IP address already in use may lead to erratic operation of the unit, but no error messages appear to indicate the fact. • Because of IP address attribution rules, setting invalid addresses such as the ones below are not allowed. Example: 224.0.0.0 to 255.255.255.255 0.0.0.0 127.0.0.1, etc. Netmask Enter the subnet mask address. Note The default settings for network devices are as follows. IP Address:192.168.[0/1/2]*.1 Netmask: 255.255.255.0 * The settings for each of the network devices #1, #2, and #3 (only network device #1 for the NSR-25). Chapter 2 Initial Configuring the System 29 Route Setting Click if you need to configure a route to another network. Make the following settings on the [Route For Network Device 1] screen that appears. (1) Enter the network address, gateway, and net mask, and then click [Add] to add the new network to the list. For details, consult the network administrator. (2) Click [Accept]. When you click [Accept], the [Setup Menu] screen returns. 14 Select the [Monitor], and then click [Select]. The [Video Device Menu] screen appears. 15 Select the desired monitor, and then click [Select]. When two monitors are connected, the second monitor can be configured if [Dual Head] is clicked. Caution When configuring settings for the second monitor, the second monitor must be connected when the NSR restarts. The [Monitor Model] screen appears. Chapter 2 Initial Configuring the System 30 16 Select the model of monitor connected to the NSR and its resolution, and then click [Accept]. Note The default setting for monitors is as follows. Generic LCD Display; LCD Panel 1600x1200; 31.5-90;60 Resolution 1024×768 When you click [Accept], the [Setup Menu] screen returns. 17 When using the NSR-100/50, select [Video], and then click [Select]. The [Video Setting] screen appears. 18 Select the [PAL] or [NTSC] video output format, and then click [Accept]. (Only the NSR-100/50) When you click [Accept], the [Setup Menu] screen returns. 19 Select the [Host Name], and then click [Select]. The [Host Name] screen appears. 20 Enter the host name and the domain name of the NSR, and then click [Accept]. Chapter 2 Initial Configuring the System 31 Note Use only alphanumeric characters, underscores (_), and hyphens (-). When you click [Accept], the [Setup Menu] screen returns. 21 Select the [NTP], and then click [Select]. The [NTP Setting] screen appears. 22 When you want to acquire the current time from an NTP server, select [Enable], and enter the NTP server IP address, then click [Accept]. When you do not want to acquire the current time from an NTP server, select [Disable] and then click [Accept]. When you click [Accept], the [Setup Menu] screen returns. 23 Select the [SNMP], and then click [Select]. The [SNMP Menu] screen appears. Chapter 2 Initial Configuring the System 32 24 To configure an SNMP community, select [Agent]; to configure SNMP traps, select [Traps], and then click [Select]. 25 Configure each item below in the following screen, and then click [Accept]. When you select [Agent] Enable Select this check box to enable the SNMP Agent function. Disable Select this check box to disable the SNMP Agent function. Community Enter the name of the SNMP community in the text box. Contact Enter the administrator e-mail address. Location Enter the location of the NSR. Note You can acquire the “System” and “SystemUptime” MIB-2 objects that appear with the “.1.3.6.1.2.1.1” and “.1.3.6.1.2.1.25.1.1” object IDs. Chapter 2 Initial Configuring the System 33 When you select [Traps] Enable Select this check box to enable SNMP traps. Disable Select this check box to disable SNMP traps. Host IP Address Enter the trap’s host IP address. Community Enter the SNMP community name in the check box. Temperature Events Select this option to be notified of irregular temperatures of the unit. Voltage Events Select this option to be notified of irregular voltage activity. UPS Events Select this option if you are connected to a UPS and that you want to be notified of UPS power failures. Power Events Select this option to be notified when the NSR shuts down. Fan Events Select this option to be notified of irregular fan activity. RAID Events Select this option to be notified of RAID group rebuilds. HDD Events Select this option to be notified of hard disk malfunctions. When you click [Accept], the [Setup Menu] screen returns. 26 Select the [UPS Settings], and then click [Select]. The [UPS Settings] screen appears. Chapter 2 Initial Configuring the System 34 27 Configure each item below, and then click [Accept]. Enable Select this check box when you use a UPS. If you select this check box, select your UPS from the list. Disable Select this check box when you do not use a UPS. Power off In XXX Seconds Enter the time before shutting down the unit after a power interruption is detected. 28 When the settings are complete, click [Quit]. The completed system settings are saved to DiskOnModule (DOM). While the settings are being saved, a progress bar appears. When the process is complete, [OK] is enabled. Caution If the network settings have been modified, a network restart is performed. Be aware that during this period recording may not be possible for several seconds. 29 Click [Reboot] in the System Menu to restart the NSR manually. Chapter 2 Initial Configuring the System 35 Reconstructing Data Volume (Changing RAID Types) (Only the NSR-100/50) RAID constructions that can be set as data volumes differ depending on the model number of the NSR. * RAID is not available for the NSR-25. Model Type Approximate Redundcapacity ancy NSR-100 RAID-5 NSR-50 670 GB Yes RAID-1+0 450 GB Yes RAID-0 900 GB None Spanning 430 GB Partial RAID-1 210 GB Yes Default setting Yes Yes Caution • Be aware that all settings information and recorded images are deleted when reconstructing data volume. • When changing the settings is necessary, make sure to change the RAID construction beforehand. 1 Connect the USB keyboard and USB mouse to the NSR, and turn on the power. The following screen and a progress bar for hardware startup appear. 2 Press F12 on the keyboard while the progress bar is displayed. The screen similar to the following appears. Example: For the NSR-50 (there are 3 menu items for the NSR-100) * The number of devices and their names may differ from the following example screen. Boot Menu 1.QSI DVD+/–RW SDW-0826 2. WDC WD2500JD-22HBC0-(S1) 3. WDC WD2500JD-22HBC0-(S2) 4. PQI IDE DiskOnModule-(SM) <Enter Setup> Chapter 2 Initial Configuring the System 36 3 Use the arrow keys on the keyboard to select [IDE DiskOnModule], and press Enter. Startup from DiskOnModule (DOM) begins. After startup, the DOM menu appears. 4 Click the third item from the top, [Clean System Restore with Changing RAID Types]. The RAID Type selection screen appears. 5 Select the RAID Type, and click [OK]. Example: For the NSR-50 The confirmation screen appears. Chapter 2 Initial Configuring the System 37 6 Click [OK]. RAID reconstruction for data volume and full system restoration begins. This process can take up to about 5 hours. A progress bar appears during the process. When the process successfully completes, a notification screen appears. Example: For an NSR-50 with RAID 1 selected 7 Press Enter after the process completes and the message [Press any key to continue!] appears. The screen returns to the DOM menu. 8 Click [Reboot]. The NSR reboots, and the Setup Wizard appears. Chapter 2 Initial Configuring the System 38 Basic Operation Chapter 3 Overview This chapter presents NSR basics, such as how to log on to it, how to configure the system settings, how to use the various windows, how to modify the password, as well as how to turn the unit off and restart it. For details on monitoring operations, see “Monitoring Live Images” (page 53). For details on all the unit settings, see “Settings” (page 83). For details on other functions, see the following chart. Note With two monitors connected to the NSR, you can perform settings and monitoring operations on monitor 1 and hot spot monitoring on monitor 2. To perform the initial configuration Configuring the system “Configuring the system” (page 16) “Modifying the System Configuration” (page 25) Registering cameras “Camera” (page 93) Configuring cameras “Camera” (page 93) Configuring camera advanced settings “Configuring the Advanced Settings of Cameras” (page 101) To monitor live images Controlling cameras (“Selecting the Live Images” (page 59)) “Controlling Cameras” (page 60) Chapter 3 Basic Operation 39 To record Manual recording “Recording Live Images” (page 64) Scheduled recording “Recording Schedule” (page 135) Triggered recording Configuring Video Motion Detection (Recorder) “VMD (Recorder)” (page 112) Configuring sensor input “Sensor Input” (page 121) Configuring a Video Motion Filter “VMF” (page 114) To play back recorded images “Playing Back Recorded Images” (page 65) “Searching for Recorded Images to Play Back” (page 68) To use other functions Monitoring audio from a camera “Monitoring Audio From Cameras” (page 63) Exporting recorded images “Exporting” (page 71) Configuring alarm outputs “Alarm Output” (page 130) Configuring monitors “Monitor” (page 145) Logging On to the NSR Before you can use the NSR, you must first log on. Once you turn on the NSR, the logon screen appears. 1 At the rear of the NSR, press the power switch to the a position. Chapter 3 Basic Operation 40 NSR-100/50 NSR-25 The startup screen appears. Notes • About two seconds after you turn on the NSR, the fan starts emitting a loud noise, but this is not a malfunction. • If the NSR is not properly turned off, it may take some time for it to start the next time you turn it on. The logon screen appears. Chapter 3 Basic Operation 41 2 Enter your user name and password, and then click [Log On]. Note By default, the first time you turn on the NSR, only the administrator is registered on the system. The default administrator user name is as follows. User name: admin Password: admin Basic Window Operations This section presents an overview of the basic operations common in all windows. For details about all the windows, see “Monitoring Live Images” (page 53) and for details about all the settings, see “Settings” (page 83). The NSR has two windows: the Monitoring window for monitoring images and the Configuration window for configuring settings. Switch between them as necessary by clicking the corresponding button at the top of the window. Monitoring Window Configuration Window System Menu Screen When you click [Monitoring] The “Monitoring” window appears. In this window, you can monitor live images or recorded images. To switch between the live images and recorded images, click the display that you want to switch, and then use the [LIVE] and [PLAYBACK] buttons in the lower-left corner of the window. Chapter 3 Basic Operation 42 For details about monitoring, see “Monitoring Live Images” (page 53). Select a camera. Use these buttons to switch between live images and recorded images. When you click [Configuration] The “Configuration” window appears. These buttons change depending the available operations for the current screen. Select the settings that you want to change. Depending on your selections, various settings and information appear. Chapter 3 Basic Operation 43 When you click [System] The “System Menu” screen appears. You can click the buttons to perform basic system-related operations. Changing the Password The NSR password is essential to your system’s security. We recommend that you modify the default password after logging on to the NSR for the first time, and then to guard your password carefully. Notes • You can only change the user name of the user logged on currently. • When operating by remote control, enter only numbers for a password. • Passwords can contain up to 15 characters. 1 Click [System] at the top of the window. The “System Menu” screen appears. 2 Click [Change Password]. The “Change Password” screen appears. Chapter 3 Basic Operation 44 3 Change the necessary settings. User Enter the user name used when logging on to the NSR. Old Password Enter the current password. New Password Enter your new password. Confirm New Password Enter your new password again to confirm. 4 Click [OK]. The password modification is applied. Logging Off From the NSR 1 Click [System] at the top of the window. The “System Menu” screen appears. 2 Click [Log Off]. A message appears to confirm whether to log off. Chapter 3 Basic Operation 45 3 Click [Log Off]. You are logged off from the NSR and the “Logon” screen appears. To log on to the NSR again, simply type your user name and password, and then click [Log On]. Locking the NSR You can temporarily lock the screen in its current state. Use the lock if, for example, you need to leave your seat during operation. 1 Click [System] at the top of the window. The “System Menu” screen appears. 2 Click [Lock]. When operations are locked, the following screen appears. To unlock operations, enter your user name and password, and click [Unlock]. Note Operations can be unlocked by a logged-in user or a Level 4 user. Chapter 3 Basic Operation 46 Shutting Down and Restarting the NSR Make sure that you shut down and restart the NSR from the “System” screen. 1 Click [System] at the top of the window. The “System Menu” screen appears. 2 Click [Shutdown] or [Reboot]. A confirmation message appears, prompting you to confirm the operation. 3 Click [Shutdown] or [Reboot]. The NSR shuts down or restarts. Note Under normal conditions, the NSR shuts down or restarts after a few minutes. If the NSR does not shut down or restart after several minutes, shut it down manually by pressing the power switch located on the rear of the unit in the a position for more than five seconds. Saving and Restoring Configuration Data You can save NSR configuration data to external media or restore the configuration data to the NSR. Saving Configuration Data Caution Be aware that the following information is not saved: • Records • Network settings, date and time information, and other basic initial setup items (such as those set in “Basic Configuration” (page 16)) • Logs 1 Click [System] at the top of the window. The “System Menu” screen appears. Chapter 3 Basic Operation 47 2 Click [Save Configuration Data]. The “Save Configuration Data” screen appears. 3 Select the save destination, enter a name for the configuration data file, and then click [OK]. During backup of the configuration data, a progress bar appears. When backup is complete, the configuration data is saved. Note When the configuration data finishes saving, the following directory and file are created at the save destination: • A directory named “YearMonthDayHourMinuteSecond” • A file named “YearMonthDayHourMinuteSecond.itm” Ex) If the data is saved at 12:34:56 on January 1, 2007, a directory named “20070101123456” and a file named “20070101123456.itm” are created. Restoring Configuration Data Caution • Be aware that the following information is not restored: • Records • Network settings, date and time information, and other basic initial setup items (such as those set in “Basic Configuration” (page 16) • Logs • The settings on the external storage are not restored, and must be reconfigured to the same values as when the data was saved. • Information cannot be restored if the model or the first two digits of the current software version (e.g., the “a.b” of version “a.b.c”) differ from what they were when the configuration data was saved. Chapter 3 Basic Operation 48 • When configuration data is restored, any recording operations that were in progress automatically stop. If you set a recording schedule, recording restarts automatically after data is restored. If you were performing manual recording, you must restart manual recording again after data is restored. 1 Click [System] at the top of the window. The “System Menu” screen appears. 2 Click [Restore Configuration Data]. The “Restore Configuration Data” screen appears. 3 Select the location of the configuration data and the desired data, and then click [Restore]. A message appears notifying the user that this operation will require an NSR reboot. 4 Click [OK]. During restoration, a progress bar appears. When restoration is complete, the NSR reboots and the configuration data is restored. Chapter 3 Basic Operation 49 Exporting Log Files You can save NSR log files to external media. Log files include information such as system logs, alarm logs, and setting information. 1 Click [System] at the top of the window. The “System Menu” screen appears. 2 Click [Export Log Files]. The “Export Log Files” screen appears. 3 Select the save location for the log files, enter a comment for the log data, and then click [OK]. The log files are saved. Chapter 3 Basic Operation 50 Starting Up the Setup Menu 1 Click [System] at the top of the window. The “System Menu” screen appears. 2 Click [Setup Menu]. The “Setup Menu” screen appears. Setup data is automatically backed up to DiskOnModule (DOM) when the Setup Menu is exited. Chapter 3 Basic Operation 51 While the settings are being backed up, a progress bar appears. When the process is complete, [OK] is enabled. Chapter 3 Basic Operation 52 Monitoring Live Images Chapter 4 Overview In the “Monitoring” window, you can watch the live images from the cameras connected to the NSR, playback recorded images, control connected cameras, or export recorded images. Note With two monitors connected to the NSR, you can perform monitoring, settings, searches and all other operations on monitor 1 and hot spot monitoring on monitor 2. Monitoring Window Functions and Operation This section explains how to use every function and button when monitoring live images or playing back recorded images. For details about how to control cameras connected to the NSR, see “Controlling Cameras” (page 60). Chapter 4 Monitoring Live Images 53 Monitoring Window (Monitor 1) A B C D E F G H I 0 R Q P O N M L K A Monitor windows You can display live images and play back recorded images in each monitor window. To monitor live images, click the window in which you want to monitor live images and then click [LIVE]. t “Selecting the Live Images” (page 59) To play back a recorded image, click the monitor window in which you want to play it back and then click [PLAYBACK]. t “Playing Back Recorded Images” (page 65) For details on monitor windows, see “Monitor Window” (page 57). B [Export] button Click this button to export recorded images as files to an external storage media. t “Exporting” (page 71). C [Full Screen] button Display the current monitor layout (monitor window arrangement) over the full screen. Switching to full-screen display hides the operation buttons and other items. To return to normal-screen display, press the Esc key. D Monitor layout selection You can select a registered monitor layout or monitor sequence. Click [V] and then select a monitor layout name or monitor sequence name from the list that appears. t “Monitoring in Sequence Mode” (page 62), “Registering a New Monitor Layout” (page 146), and “Adding a Monitoring Sequence” (page 149) Chapter 4 Monitoring Live Images 54 E [Sequence] button Perform a sequence operation. This button is enabled when a monitor sequence is selected for 4 Monitor layout selection. t “Monitoring in Sequence Mode” (page 62) F Option window (Auxiliary function area) Click [V] and then select an item from the list that appears to display information about that item or perform the camera control operations. Any of the following items can be selected. 1. Camera Control : Allows you to control the cameras. 2. Recording Status: Displays a list of the cameras currently recording. 3. Recording List : Displays a list of recent recorded images. 4. Alarm Log : Displays logs related to alarms. 5. System Log : Displays logs related to system information and errors. 6. Alarm Output : Displays the current alarm output status. 7. Sensor Input : Displays the current sensor input status. 8. VMD (Recorder): Displays the current motion detection settings information. 9. Manual Trigger : Displays actions you can execute manually. * For details on these items, see “Option Window (Auxiliary Function Area)” (page 77). G Recording button Start recording. You can also select multiple monitor windows and then start recording. However, you can only start recording for monitor windows for which [LIVE] is selected. Recording cannot be started for monitor windows for which [PLAYBACK] is selected. t “Recording Live Images” (page 64) H Recording stop button Stop recording. You can also select multiple monitor windows and then stop recording. This button is only enabled when a monitor window in which recording is being performed is selected. t “Recording Live Images” (page 64) I [ALARM] lamp This lamp turns on when an alarm occurs. When the [4. Alarm Log] item is displayed in the Option window, the lamp turns off because the logs are considered to have been checked. The lamp turns on for a few seconds if an alarm occurs while the [Alarm Log] is displayed. To turn the lamp off, click [Refresh] in the [Alarm Log]. J [ERROR] lamp This lamp turns on when an error occurs. When the [5. System Log] item is displayed in the Option window, the lamp turns off because the logs are considered to have been checked. The lamp turns on for a few seconds if an error occurs while the [System Log] is displayed. To turn the lamp off, click [Refresh] in the [System Log]. K [Search] button Switch to the Search screen to search for recorded images. t“Searching for Recorded Images to Play Back” (page 68) Chapter 4 Monitoring Live Images 55 L Quick search button You can specify a date and time for the playback start position of a recorded image. t “Quick Search” (page 67) M Play speed Adjust the play speed for the recording by clicking [V] and then selecting a play speed from the list that appears. t “To search for recorded images” (page 68) N Play speed Control playback of the recorded images currently playing back. These buttons cannot be used for live images during monitoring. : Moves to the beginning of the recorded image. If the current recorded image is already at the beginning, moves to the beginning of the previous recorded images. : Plays back the recorded image in the reverse direction. : Pauses playback. : Plays back the recorded image in the forward direction. : Moves to the start of the next recorded image. The following buttons are for operations while playback is paused. Pressing either of these buttons during playback pauses the playback. : Moves back one frame from the current position. : Moves forward one frame from the current position. O Volume Adjust the volume of the sound output from the NSR. The sound of the selected camera (or camera selected last if multiple cameras are selected) is output. P Mute button Mute all sound output from the NSR. Click again to turn the sound back on. Q Camera list (camera selection) Select a camera whose images you wish to display in the monitor window. t “To monitor the images of another camera” (page 59) R [LIVE] button/[PLAYBACK] button Click [LIVE] to monitor live images in the selected monitor window and click [PLAYBACK] to play back recorded images in the selected monitor window. t “Selecting the Live Images” (page 59) and “Playing Back Recorded Images” (page 65) One of these buttons will light to indicate the current status when a monitor window is selected. If multiple monitor windows are selected and there is a combination of Live and Playback statuses, the button that indicates the status of the monitor window selected last will light. When multiple monitor windows are selected, the statuses of all selected monitor windows become Live if [LIVE] is clicked and the statuses of all selected monitor windows become Playback if [PLAYBACK] is clicked. Chapter 4 Monitoring Live Images 56 Monitoring Window (Monitor 2) When two monitors are connected to the NSR, a monitor layout specified as 1×1, 2×2, or 3×3 is displayed on the monitor connected to monitor connector 2. You can use monitor 2 as a hot spot monitor. Screen of Monitor 1 Screen of Monitor 2 The image displayed is the same as that of the monitor window selected in monitor 1. However, if there is a sensor input or motion detection, the image from the corresponding camera is displayed. When two monitors are connected, the NSR operates as follows: • Selected images, or images from cameras with a sensor input or motion detection event, are displayed in available monitor windows sequentially, from top left to top right, and then bottom left to bottom right. • Images that are already displayed in a monitor window do not appear again in a different monitor window. Notes • You cannot control a camera for a monitor window directory from monitor 2. • You cannot perform configuration operations from monitor 2. • When images are displayed on monitor 2, the performance of monitor 1 may decrease. Monitor Window 1 2 3 4 5 7 6 A Camera name Indicates the name of the camera. Chapter 4 Monitoring Live Images 57 B Status Indicates the recording type (MANUAL REC, ALARM REC, or NORMAL REC) during recording. Indicates the playback status (PAUSE, etc.) and play speed (+1x, –0.2x, etc.) during the playback of recorded images (“+” appears for the play speed when playback is in the forward direction and “–” appears for the play speed when playback is in the reverse direction). C Bandwidth Indicates the bandwidth used for transferring images via the network connection. D Number of frames received Indicates the camera image capture rate. E Number of frames displayed Indicates the rate at which camera images are refreshed on the monitor. F Live/Recorded image Displays a live image or a recorded image. Video Motion Detection (Recorder) object frames and VMF (Video Motion Filter) object and filter frames also appear. G Time Indicates the current date and time when live images are being monitored or recorded, or the recording date and time when recordings are being played back. You can configure the display format in the Configuration window. t “General” (page 84) Notes • When there is a sensor input or a specified sensor input, or a motion detection or VMF package alarm occurs, the image of the corresponding camera is displayed in the monitor window set for the hot spot. • If there is sensor input or a motion detection or VMF package alarm occurs, a red frame appears around the corresponding camera images. To switch the monitor window layout If you double-click a monitor window, the monitor layout switches to a 1 x 1 display of the images from the camera assigned to that monitor window. However, the display is not changed if 1 x 1 is disabled for the monitor layout currently in use. Note Double-clicking the monitor window again returns the monitor layout to the original layout. However, once the monitor layout is switched to a 1 x 1 display, if it is switched again by an action, monitoring sequence, or monitor layout change, then doubleclicking the monitor window again does not return the monitor layout to the original layout. To hide various information You can hide various information in a monitor window by right-clicking the monitor window and then clearing the check boxes in the menu that appears. This change is not reflected and saved in the monitor layout settings of the Configuration window. Chapter 4 Monitoring Live Images 58 About selecting multiple monitor windows You can select multiple monitor windows by clicking monitor windows while pressing the Shift key. Note If you perform an operation that cannot be performed on multiple monitor windows after you select multiple monitor windows, the operation is only performed on the monitor window selected last. Selecting the Live Images You can monitor live images in any of the monitor windows. In the “Monitoring” window, you can also control a selected camera. Selecting the Live Images 1 Select the monitor window in which to display the live images. You can select multiple monitor windows by clicking monitor windows while pressing the Shift key. 2 Click [LIVE] at the bottom left of the window. Click [LIVE]. The live images appear in the selected monitor window. To monitor the images of another camera 1 Select a monitor window. 2 Click [V] on the camera list at the bottom left of the window and then click a camera name from the list that appears. While the list is displayed, you can also select a camera by pressing the number key indicated on the left side of the camera name and then pressing the Enter key. Select a camera. Chapter 4 Monitoring Live Images 59 The camera of the monitor window is switched. Notes • You can also select multiple monitor windows and then switch cameras. • Selecting another camera in the camera list does not change the camera setting for “Monitor” of the Configuration window. Controlling Cameras You can monitor live images while controlling the camera. 1 Select a monitor window of your choice, and display the images from the camera you wish to control. Camera control is only enabled for cameras supported by the network. In addition, when multiple monitor windows are selected, the camera associated with the last monitor window selected is targeted for control. 2 Click [V] at the top right of the screen for the Option window and then click [1. Camera Control]. The Camera Control panel appears. 3 Using the buttons on the control panel, you can control the selected camera. Chapter 4 Monitoring Live Images 60 Pan/Tilt Move the camera up, down, left, or right. PRESET Recall a registered preset. ZOOM Adjust the zoom toward the “W” side for a wide angle, and the “T” side for telephoto. Clicking between the “W” and the “T” zooms to the absolute value. FOCUS Select [AUTO] when you want the focus to always be adjusted automatically. Clicking [–] or [+] cancels auto focus and enables you to adjust the focus manually. Adjust the focus toward the [–] side to focus on subjects that are near, and toward the [+] side to focus on subjects that are farther away. When you pan, tilt, or zoom the camera, [AUTO] is selected automatically. BRIGHT Select [AUTO] when you want the brightness level to always be adjusted automatically. Clicking [–] or [+] cancels auto brightness and enables you to adjust the brightness level manually. Adjust the brightness level toward the [+] side for bright images, and the [–] side for dark images. When you pan, tilt, or zoom the camera, [AUTO] is selected automatically. To performing pan, tilt, and zoom operations in monitor windows You can perform pan, tilt, and zoom operations in a monitor window without using the pan, tilt, and zoom controls on the Camera Control panel. Direct pan and tilt Click a point within a monitor window while pressing the Ctrl key to move the camera so that the selected point is in the center. Area zoom Drag the mouse within a desired area in a monitor window while pressing the Ctrl key to display a red frame, and then release the mouse button to zoom in on that area. Chapter 4 Monitoring Live Images 61 To the mouse wheel to zoom Rotate the mouse wheel in a forward direction while pressing the Ctrl key to zoom in and rotate the mouse wheel in a backward direction while pressing the Ctrl key to zoom out. Mouse operations in monitor windows Use your mouse and your keyboard simultaneously to control certain camera functions. Shortcut keys Operations Ctrl + left click Moves so that the selected point becomes the center. Ctrl + left click and drag A red frame appears and the image within the frame is magnified to fill the window when the mouse button is released. Ctrl + wheel (forward) Zoom in Ctrl + wheel (backward) Zoom out About presets The NSR enables you to configure camera settings beforehand and then register them as presets. For details on registering presets, see “Preset” (page 109) of “Advanced Configuration.” If you click [V] for preset and then click a preset from the list that appears, the camera is set in accordance with the settings configured for the preset. Note While the list is displayed, you can also select a preset by pressing the number key indicated on the left side of the preset name and then pressing the Enter key. Monitoring in Sequence Mode Sequence mode is a function for displaying multiple monitor layouts in sequence during a specified time period. To use sequence mode, a monitor sequence needs to be registered in advance. For details on registering monitor sequences, see “Adding a Monitoring Sequence” (page 149) of “Advanced Configuration.” 1 Click [V] for monitor layout selection at the top center of the window and then click a sequence name from the list that appears. 2 Click [Sequence] at the top center of the window. Sequential operation begins. Click [Sequence] again to end the sequence operation. Chapter 4 Monitoring Live Images 62 Displaying Camera Images in the Hot Spot Monitor Window If a monitor window is set as the hot spot, the same images from another monitor window you click will also be displayed in the hot spot monitor window. For details on setting a hot spot, see “Monitor” (page 145) of “Advanced Configuration.” Note When two monitors are connected to the NSR, monitor 2 normally functions as the monitor for the hot spot. For details on configuring the second monitor, see step 15 (page 30) of “Modifying the System Configuration.” Displaying Images in the Hot Spot Monitor Window When There is Sensor Input or an Alarm If a sensor input or a motion detection or VMF package alarm occurs, the images of the corresponding camera are displayed in the hot spot monitor window. While the images are displayed, a red frame emphasizes the monitor window to which the corresponding camera is assigned. Monitoring Audio From Cameras You can monitor audio input from cameras that support audio input. 1 Select the monitor window for which you want to monitor audio. The audio from the camera assigned to the selected monitor window is output. If multiple monitor windows are selected, the audio of the camera selected last is output. 2 Use the slider at the bottom right of the window to adjust the volume. Muting Sound From Cameras Click the Mute button at the bottom left of the window to mute. Mute button Chapter 4 Monitoring Live Images 63 When sound is muted, sound is not output for any monitor windows you select. To cancel mute, click the Mute button again. Recording Live Images You can record the images currently being captured by a camera. Starting Recording 1 Select the monitor window of the live images you want to record. You can select multiple monitor windows by clicking monitor windows while pressing the Shift key. 2 If a live image is not displayed, click the [LIVE] button at the bottom left of the window. 3 Click the record button at the bottom right of the window. Record button Recording starts. Notes • Recording continues even if you change the monitor layout. • Cameras currently recording are displayed in Recording Status of the Option window. Stopping Recording 1 Select the monitor window for which you want to stop recording. 2 Click the recording stop button. Recording stop button A message appears based on the recording type to confirm whether to stop recording. 3 Click [OK]. Recording stops. Chapter 4 Monitoring Live Images 64 Selecting a Camera From Recording Status and Stopping Recording You can select a camera that is recording but not displayed in the current monitor layout from Recording Status in the Option window, assign it to any monitor window, and then stop recording. Not only can you stop recordings in progress started manually, but also scheduled recordings. 1 Select any one of the monitor windows. 2 Click [V] at the top right for the Option window and then select [2. Recording Status]. Recording Status appears. 3 Double-click the name of the camera for which you want to stop recording. The specified camera is assigned to the monitor window selected in Step 1. If multiple monitor windows are selected, the camera is assigned to all monitor windows selected. 4 Click the recording stop button. Recording stops for the specified camera. Playing Back Recorded Images Play back saved recorded images. Selecting a Monitor Window and Starting Playback You can select a monitor window displayed in the current monitor layout and then start playback of recorded images. 1 Select the monitor window in which you want to play back the recorded images. You can select multiple monitor windows by clicking monitor windows while pressing the Shift key. Chapter 4 Monitoring Live Images 65 2 Click [PLAYBACK] at the bottom left of the window. [PLAYBACK] button The selected monitor window enters the playback state and displays the first frame of the last images recorded by the camera assigned to that monitor window. If multiple monitor windows are selected, all the selected monitor windows enter the playback state. Note If a camera is switched from the recording to the playback state, the last frame of recorded images available for playback is displayed. 3 Use the playback buttons to control playback. For details on the functions of the playback buttons, see “Monitoring Window (Monitor 1)” (page 54). Note If multiple monitor windows are selected, playback starts simultaneously in all selected monitor windows. 4 Select another monitor window and repeat Steps 1 to 3 to play back recordings from the camera assigned to that monitor window. 1 Select the monitor window playing the recording for which you want to change the play speed. To change the play speed You can select multiple monitor windows by clicking monitor windows while pressing the Shift key. 2 Click [V] for “PLAY SPEED” at the bottom center of the window and then click the desired play speed. The following play speeds can be selected. 0.1x, 0.2x, 0.5x, 0.75x, 1x, 2x, 5x, 10x, 20x, 50x, or 100x PLAY SPEED The play speed of the selected monitor window changes. Notes • If you select a monitor window playing recorded images, the current play speed is indicated by “PLAY SPEED.” • If multiple monitor windows playing recorded images are selected and then Steps 1 and 2 above are performed, the play speeds of all the selected monitor windows change. Chapter 4 Monitoring Live Images 66 Quick Search To perform a quick search, specify a date and time for the playback start position of a recorded image. 1 Select the monitor window in which you want to play back the recorded images. You can select multiple monitor windows by clicking monitor windows while pressing the Shift key. 2 Enter the date and time in the date and time boxes and then click [GO]. The playback start position moves to a position on or near the specified date and time. If there is no recorded image for the selected monitor on the specified date and time, the first frame of the next recorded images after the specified date and time is displayed. Note If there are multiple recorded images for the specified date and time, a selection is made according to the following priority order: alarm recording > manual recording > normal recording. 3 Click or to move the playback position frame by frame when you want to specify a playback start position more minutely. Selecting From Recording List You can select the recording of a monitor window not displayed in the current monitor layout from Recording List in the Option window, assign it to any monitor window, and then start playback. 1 Select any one of the monitor windows. 2 Click [V] at the top right for the Option window and then select [3. Recording List]. Recording List appears. Up to 300 recordings appear in order in the Recording List, starting with the most recent recording based on the date and time of the last update. Chapter 4 Monitoring Live Images 67 3 Double-click the recorded image you want to play back. The first frame of the specified recorded image is displayed in the monitor window selected in Step 1. Note If multiple monitor windows are selected, the frame is displayed in the monitor window selected last. 4 Use the playback buttons to control playback. Searching for Recorded Images to Play Back You can search for a recorded image by specifying a date and time or event. You can also specify a recording type (normal recording, alarm recording, or manual recording). In addition, with alarm recording, you can also specify a trigger. When recording metadata, you can perform searches by applying a Video Motion Filter (VMF), consisting of your motion detection and object detection criteria. To search for recorded images 1 Select any monitor window. 2 Click [Search] at the bottom right of the window. [Search] button The “Search” screen appears. Chapter 4 Monitoring Live Images 68 3 Enter the search criteria. Camera Select a camera. REC Type Select this option to search by recording type. When this is selected, you can search for a recorded image by specifying the recording type. Normal Search for a recorded image for which recording was started by a schedule. Alarm Search for a recorded image for which recording was started by an alarm. When [Alarm] is selected, the search conditions can be narrowed down by specifying an alarm type with the [Trigger] option that appears to the left. The types of alarm that can be specified are Device Input, System Input, VMD (Recorder), VMD (Camera), and VMF. Manual Search for a recorded image for which recording was started manually. VMF Select this option to apply a Video Motion Filter (VMF), consisting of your motion detection criteria, to recorded metadata and search for corresponding recordings. A VMF search can be performed either by using a preconfigured VMF package or by configuring a VMF package for temporary use. • When using a preconfigured VMF package, click [V] and select the VMF package to use for searching from the list that appears. • When configuring a temporary VMF package for searches, click [V] and select [Temporary Package] from the list that appears. Next, click [Edit] and configure the temporary VMF package on the screen that appears. Note [VMF] cannot be selected when “All” is selected for [Camera]. Chapter 4 Monitoring Live Images 69 From/To Specify the period to search for recorded images. The search collects any recorded images that fall within this specified period. 4 Click [Search]. While searching, the following screen appears. When the search finishes, a list of search results appears. Notes • When a VMF search in progress is cancelled, the results of the search up to that point are displayed. • During a VMF search, a confirmation message indicating the search may take a while appears along with a progress bar. To play back recorded images from the search results You can select and play back a recorded image from the search results list. The recording is played back in the monitor window selected before the Search screen was opened. 1 Select the recorded image you want to play from the search results list. For searches by recording type The first frame of the selected recording image appears in the preview area. Chapter 4 Monitoring Live Images 70 For searches by VMF At the moment an alarm is detected with the specified VMF package, the image appears in the preview area. 2 Click [Playback]. The Search screen closes and the specified recorded image appears in a paused state in the selected monitor window. 3 Use the playback buttons to control playback. Note When a recording is selected for playback from a VMF search, NSR plays back the first recording it finds within 10 seconds of the time selected. Exporting You can export saved recorded images as files. Movies are exported in a proprietary format (.cam file) and still images are exported in JPEG format. You can play back exported movies with an application that supports CAM file playback. Notes Multiple export processes cannot be performed simultaneously. Exporting Movies 1 Click [Export] at the top center of the window. If you want to export the recorded images currently playing, pause playback before clicking [Export] (when multiple monitor windows are selected, the last window to be selected is targeted for exporting). When playback is paused, the following screen appears. Otherwise, the “Movie Export - Record Search” screen appears. Go to step 3. Chapter 4 Monitoring Live Images 71 2 Select [Movie Export] and then click [OK]. The “Movie Export - Output” screen appears. Go to step 6. 3 Enter the search criteria. Camera Select a camera. REC Type Search for a recorded image by specifying the recording type. Normal Search for a recorded image for which recording was started by a schedule. Alarm Search for a recorded image for which recording was started by an alarm. When [Alarm] is selected, the search conditions can be narrowed down by specifying an alarm type with the [Trigger] option that appears to the left. The types of alarm that can be specified are Device Input, System Input, VMD (Recorder), VMD (Camera), and VMF. Manual Search for a recorded image for which recording was started manually. From/To Specify the period to search for recorded images. The search collects any recorded images that fall within this specified period. Chapter 4 Monitoring Live Images 72 4 Click [Search]. The search results list appears. 5 Select the recorded images you want to export from the search results list and then click [Select]. The “Movie Export - Output” screen appears. 6 Add the files for export to the [Files for Export] list. Selected records Displays the recorded images selected in the search results list. When playback is paused, only the recorded images in the monitor window targeted for exporting appear. Files of records Displays a list of the files included in the recorded image selected in the [Selected records] list. When playback is paused and a file is automatically added to the [Files for Export] list, the subsequent file (or preceding file, if no subsequent file exists) is selected when this list appears. Export with Audio Data Select this check box to export audio data with the recorded images. An asterisk (*) will appear under the [Storage] column for recorded images that include audio data. Summary of File sizes (MB) Displays the total size of all files included for the recording. Files for Export Displays a list of the files for export. When playback is paused, files that include the date and time of the currently paused image are automatically added. When you select a file from the [Files of records] list and click [Add], the file is added to this list. When you select a file from this list and click [Delete], the file is deleted from this list. Chapter 4 Monitoring Live Images 73 Capacity Requirement (MB) Displays the amount of space required for all the files selected for export. Output Select the location to export the files for export. Click [V] and then select Compact Flash, USB, or CD/DVD (only CD or USB memory for the NSR-25) from the list that appears. Status Displays the status of the output location. “Ready” is displayed for media which you can currently write on. Available (MB) Displays the available space on the output location. 7 Connect the media to use as the output location to the NSR. 8 Specify the media to use as the export location for [Output]. 9 Make sure “Ready” is displayed for [Status] and then click [Export]. Exporting starts. The Movie Export - Status screen is displayed for you to check the progress during exporting. Notes • If there is insufficient space on the media, a warning message appears and exporting stops. • If you click [OK] during exporting, the Monitoring window is redisplayed and exporting continues in the background. • If you redisplay the Monitoring screen during exporting and then click [Export], the “Movie Export - Status” screen appears. • The capacity displayed for [Capacity Requirement (MB)] on the “Movie Export - Output” screen is a rough estimate. Even if the capacity displayed for [Available (MB)] is greater than that for [Capacity Requirement (MB)], in rare cases the available space on the media may be insufficient and exporting may fail. • When exporting a recorded file to a CD or DVD, spaces ( ) included within the file name are replaced with underscores (_). • If a file is exported while being recorded, it may not play back properly. To export records while they are recording, export files other than the most recent. Chapter 4 Monitoring Live Images 74 The following appears when exporting ends. 10 Click [OK]. The Movie Export - Status screen closes. Exporting Still Images Export one scene of a recorded image as a still image file. 1 Select any monitor window and then play the recorded image containing the scene you want to export. 2 Pause the recorded image at the scene you want to export. Caution Live images cannot be exported as still images. 3 Click [Export] at the top center of the window. 4 Select [Still Image Export] and then click [OK]. The following screen appears. The “Still Image Export - Output” screen appears. Chapter 4 Monitoring Live Images 75 File name Enter the file name. If you enter a file name that already exists in the export location, the file may be exported under a file name different from the one you enter. Output Select the location to which to export the files for export. Click [V] and then select Compact Flash, USB, or CD/DVD (only CD or USB memory for the NSR-25) from the list that appears. Status Displays the status of the output location. “Ready” is displayed for media which you can currently write on. Available (MB) Displays the available space in the output location. 5 Connect the media to use as the output location to the NSR. 6 Enter a file name in the File name box. 7 Specify the media to use as the export location for Output. 8 Make sure “Ready” is displayed for [Status] and then click [Export]. Exporting starts. The Movie Export - Status screen is displayed for you to check the progress during exporting. Notes • If there is insufficient space on the media, a warning message appears and exporting stops. • If you click [OK] during exporting, the Monitoring window is redisplayed and exporting continues in the background. • If you redisplay the Monitoring screen during exporting and then click [Export], the “Still Image Export - Status” screen appears. The following appears when exporting ends. 9 Click [OK]. The Still Image Export - Status screen closes. Chapter 4 Monitoring Live Images 76 Option Window (Auxiliary Function Area) In the Option window of the [Monitoring] window (monitor 1), you can display the following information and perform camera control operations. 1. Camera Control : Allows you to control the cameras. (page 60) 2. Recording Status : Displays a list of the cameras currently recording. (page 65) 3. Recording List : Displays a list of recent recordings. (page 67) 4. Alarm Log : Displays logs related to alarms. 5. System Log : Displays logs related to system information and errors. 6. Alarm Output : Displays the current alarm output status. 7. Sensor Input : Displays the current sensor input status. 8. VMD (Recorder) : Displays the current motion detection information. 9. Manual Trigger : Displays actions you can execute manually. For details on [Camera Control], [Recording status], and [Recording List], see the reference pages mentioned above. Other items are described in this section. Alarm Log You can confirm the alarm status. 1 Click [V] at the top right for the Option window and then click [4. Alarm Log]. The alarm logs appear. Note The date and time format is always “day-month-year” regardless of the [Date/Time Format] setting of “Main” in the “General” screen. 2 Double-click the log for which you want to see the details. Chapter 4 Monitoring Live Images 77 The alarm log details appear. 3 Confirm the details and then click [OK]. The screen closes. Chapter 4 Monitoring Live Images 78 System Log You can confirm information on system errors. 1 Click [V] at the top right for the Option window and then click [5. System Log]. The system logs appear. Note The date and time format is always “day-month-year,” regardless of the [Date/Time Format] setting of “Main” in the “General” screen. 2 Double-click the log for which you want to see the details. The system log details appear. 3 Confirm the details and then click [OK]. The screen closes. Chapter 4 Monitoring Live Images 79 Alarm Output You can confirm whether alarm output is turned on or off for the NSR or cameras. You can also turn the alarm output on or off from the list. Note The list only displays items for which [Enable] is selected in “Alarm Output” (page 130) of the “Configuration” window. To display the current alarm output status list, click [V] at the top right for the Option window and then click [6. Alarm Output]. To turn alarm output on/off 1 Double-click the name of the alarm output you want to turn on/off. The following screen appears. 2 Click [OK]. The alarm output is turned on/off. Chapter 4 Monitoring Live Images 80 Sensor Input You can confirm whether sensor input is turned on or off for the NSR or cameras. Note The list only displays items for which [Enable] is selected in “Sensor Input” (page 121) of the “Configuration” window. To display the current sensor input status list, click [V] at the top right for the Option window and then click [7. Sensor Input]. VMD (Recorder) You can confirm whether motion detection is in operation. Note Only items for which motion detection has been set in the “REC Schedule” screen (page 135) and items for which motion detection is currently in operation are displayed. To display the current motion detection status list, click [V] at the top right of the Option window and then click [8. VMD (Recorder)]. Chapter 4 Monitoring Live Images 81 Manual Trigger You can execute registered actions manually. For details on how to register actions, see “Action” (page 131). 1 Click [V] at the top right for the Option window and then click [9. Manual Trigger]. The action list appears. 2 Double-click the action you want to execute. A confirmation screen appears. 3 Click [OK]. The specified action is executed. Chapter 4 Monitoring Live Images 82 Settings Chapter 5 Overview Configure the NSR settings in the “Configuration” window. To open the “Configuration” window, click [Configuration] at the top right of the window. Note When you connect two monitors to the NSR, you can only perform settings from monitor 1. Configuration Window Basic Operation This section outlines the basic operations common to basic and advanced settings that you can perform in the “Configuration” window. For details about each setting, see “Advanced Configuration” (page 84). To select a setting Click the element that you want to configure on the left side of the window, and then the settings appear on the right side. Chapter 5 Settings 83 These buttons change depending on the available operations for the current screen. Click the desired setting from the tree. The settings that appear here depend on your selection. Advanced Configuration The “Configuration” window contains the following items. General : Camera : Sensor Input : Alarm Output : Action : REC Schedule : Monitor : User : Allows you to configure basic settings for the NSR, storage settings, etc. Allows you to configure the advanced settings for cameras managed by the NSR and register new cameras. Allows you to configure camera and NSR sensor input settings. Allows you to configure camera and NSR alarm output settings. Allows you to configure the actions to events such as the generation of alarms. Allows you to create new recording schedules and modify the settings of existing recording schedules. Allows you to configure monitor windows and the monitor sequence display method. Allows you to register NSR users, configure user permissions, etc. General You can configure basic settings for the NSR in “General.” To display the “General” screen, click [General] in the tree on the left side of the window. The “General” item has the following submenus. Chapter 5 Settings 84 • • • • Main Network e-Mail (SMTP) Storage Main The “Main” settings are used to modify the unit’s name and date, modify available functions, and perform other basic settings. 1 In the “General” window, click [Main]. The “Main” screen appears and displays the current settings. 2 Configure each setting. Chapter 5 Settings 85 Name Displays the name of the NSR. This item cannot be modified on the “Main” screen. The name can be modified from the “Host Name” screen in the Setup Menu. For details, see “Modifying the System Configuration” (page 25). Serial Number Displays the unit’s serial number and cannot be modified. Model Displays the unit’s model and cannot be modified. Software Version Displays the unit’s software version and cannot be modified. Comment Enter any necessary comment. You can leave this text box blank. Date & Time: Date/Time Format Click [V] and select a date/time display format from the list that appears. You can select one of the following display formats. • Year/Month/Day hh:mm:ss • Month/Day/Year hh:mm:ss • Day/Month/Year hh:mm:ss This setting is applied to all NSR applications. NTP: Enable NTP Server Select this check box to use the NSR as the basis for time synchronization. Synchronize with NTP Server Select this check box to use another NTP server for time synchronization. When you select this check box, enter the address of the NTP server in the [Address] field. RSM Server RSM Controller Authentication: Set the user name and password to specify when connecting to the NSR from RSM Controller. Port: Specify the port number needed to connect from RealShot Manager Controller, etc. Options Alert: Enable System Alert Select this check box to send e-mail notification of camera “VIDEO LOSS” and “DISK FULL” system alerts. To use this function, system alert notification settings are required for cameras and storage devices. For details, see “Main” under “Configuring the Advanced Settings of Cameras” (page 101), and “Storage” under “General” (page 89). Chapter 5 Settings 86 FTP: Enable FTP Server Select this check box to acquire recorded image files (.cam files) or audio recording files (.aud files) by FTP. When this check box is selected, set a password (the user name cannot be changed). A password must be set the first time this check box is selected. Note Changes to the [Date/Time Format] and [RSM Server] settings will take effect at the next startup. Caution When using NTP settings, pay attention to the following: • When performing time synchronization with an NTP server, you must restart the NSR after selecting the [Synchronize with NTP Server] check box on the “Main” screen. In addition, the NTP server must be running normally when the NSR is restarted. • If the NTP settings on the NSR are enabled and DHCP is used to acquire the NSR address, the NTP server information provided by the DHCP server on the same network as the NSR is given priority over the NTP server information set with the NSR. • Once you set the time on the NSR manually, time synchronization with an NTP server may no longer be possible. • We recommend configuring the NTP settings from the “Main” screen, even though configuring them from the Setup Menu may sometimes result in the [Enable NTP Server] check box on the “Main” screen being selected. • When the [Synchronize with NTP Server] checkbox is cleared, “0.0.0.0” is entered in the [Address] field. 3 Once you have configured all the desired settings, click [Save] in the upperright corner of the window. The settings are applied. If you want to ignore all your setting modifications, click [Discard]. Network You can confirm the network settings for the NSR in “Network.” Configure the network settings in the System window. Network settings cannot be configured in “Network”. For details on the System window, see “Modifying the System Configuration” (page 25). To display the “Network” screen, click [Network] from the submenus of the “General” screen. Chapter 5 Settings 87 Example: For the NSR-100/50 DNS Displays the primary DNS and secondary DNS settings. Network Device Displays the following settings for the network devices. When using the NSR-25, only the settings input for Network Device 1 are displayed. DHCP This check box is selected when DHCP is set. IP address Displays the IP address for the network device. Subnet mask Displays the subnet mask for the network device. Gateway Displays the gateway for the network device. e-Mail (SMTP) The NSR has a function for sending a notification message to the registered SMTP client address when an event occurs. You can set the e-mail address of the recipient and other settings required for sending messages in [e-Mail (SMTP)]. Note To send e-mail notifications, action settings must be configured. For details, see “Action” (page 131). To configure e-Mail (SMTP) 1 Click [e-Mail (SMTP)] from the submenus of the “General” screen. Chapter 5 Settings 88 The “e-Mail (SMTP)” screen appears and displays the current settings. 2 Configure all the settings. Name Displays the name of the e-Mail (SMTP) settings. SMTP Server Enter the address of the SMTP server. Recipient Enter the e-mail address of the recipient of notifications. Sender Enter the e-mail address of the sender of notifications. Test Access Click this button to send a test message to verify the settings configured above. Notes • This function does not support SMTP-AUTH, user authentication such as POP before SMTP, encryption such as SSL, or proxies. • The NSR checks the operation of the following MTAs (Mail Transfer Agents). - sendmail - qmail - Microsoft Exchange Server • Enter an e-mail address for the recipient and the sender. 3 Once you have configured all the desired settings, click [Save] in the top right of the window. The settings are applied. To discard any modifications to the settings, click [Discard]. Storage Set a storage location for recorded images. Chapter 5 Settings 89 To change storage settings 1 Select the storage location you wish to configure under Storage in the tree on the left side of the window. 2 Configure all the settings. Name Enter the storage location name. Default, Alarm, Normal, and Manual have been provided as storage locations. The name of Default cannot be modified. Enable Select this check box if you want to use this storage location as the save destination. Cleanup Enable this function if you want to delete all recorded images that are older than the specified number of days to store recorded images when the remaining capacity of the storage location becomes lower than a specified amount. Run cleanup job when Select this check box to enable the function. Remaining capacity is lower than Enter the limit for the minimum remaining capacity. Specify % or MB. Cleanup files saved more than Enter the number of days to store recorded images from a range of 1 to 366. Recorded images are not deleted until the specified number of days has elapsed since recording. Data Overwriting Enable this function if you want to keep a certain amount of storage space available by having the files in the oldest record automatically deleted when the remaining capacity of the storage device becomes lower than a specified amount. Chapter 5 Settings 90 Enable Select this check box to enable the function. Caution Even if this setting is disabled, recording that is currently in progress on this storage device will continue. If recording is started after disabling this setting, recording to this storage device is not possible. Not to be less than Enter the limit for the minimum remaining capacity. Specify % or MB. Note Files on the NSR are deleted to maintain approximately 12 GB of available capacity, in addition to the capacity configured for each setting. For example, if the minimum capacity is set at 10 GB, deletion is executed so as to maintain approximately 22 GB of available capacity. Capacity Displays the storage capacity. This item cannot be modified. Free Space Displays the free space in bytes and as a percentage. Total Space Displays the total size of the storage location. Notice System Alert when Generates an insufficient free space system alert when the remaining capacity of the storage location becomes lower than a specified amount. Configure the actions to perform in response to system alerts in the “Action” screen (page 131). Notes • To enable this function, the [Enable System Alerts] check box must be selected on the “Main” screen in “General” (page 84). • When system alert notification is configured for external storage, an alarm can be set to trigger if the connection with the external storage is broken. Enable Select this check box to enable the function. Remaining capacity is lower than Enter the limit for the minimum remaining capacity for generating a system alert. Specify % or MB. 3 Once you have configured all the desired settings, click [Save] in the upperright corner of the window. The settings are applied. If you want to ignore all your setting modifications, click [Discard]. Caution • When setting “Cleanup,” make sure to estimate how much capacity is sufficient to record the images you want to save to storage, before setting the number of days to store recorded images. • When multiple overwrite settings are configured for a storage location, deletion may be biased toward a particular camera on the storage Chapter 5 Settings 91 location. We strongly recommend that you either configure a single overwrite setting, or that you estimate, in advance, the capacity you will use, based on the image size and required storage period specified for the camera, and configure the deletion settings for recordings accordingly. • When the recorded data of normal recordings is overwritten, multiple files in a single record are deleted at once. This may cause all the files of a particular camera to be deleted at once. By configuring the following settings, you can ensure that data from multiple cameras is deleted more uniformly. - In a recurrent schedule for normal recording, insert at least one second of blank space per day. Ex.) Start time: 00:00:00 End time: 23:59:59 Notes • If the recording capacity of the built-in hard disk is insufficient, you can expand it with external storage. For details about storage expansion, contact your dealer. • The following storage locations are defined by the NSR and cannot be deleted. - Default - Alarm - Manual - Normal The above four storage locations are actually located in the same partition but in different directories (folders). As a result, the capacity and total size of these storage locations are all the same, but deleting and overwriting are performed independently for each directory (folder). • For NSR storage locations, you can configure the main settings related to deletion and overwriting of recordings, and set the storage period for each type of recorded image. However, it is not possible to assign a capacity to each storage location. • The Default location is the default save location for each camera. To set different save locations for each camera, you can use the storage settings in “Main” under “Camera” on the Configuration screen. Four storage setting examples are provided below. Select a storage location according to your objective and the recording type selected in the camera storage settings. Examples: Default : Alarm : Manual : Normal : Delete -disable, data overwrite-enable (20%) Delete -enable (30%, 366 days), data overwrite -disable Delete -enable (40%, 7 days), data overwrite - disable Delete -enable (50%, 31 days), data overwrite - disable Descriptions: Default : When the remaining capacity for the storage location reaches 20% or below, recorded images are deleted in order, starting from the oldest images. Select this storage location when you have ample storage capacity remaining. Alarm : When the remaining capacity for the storage location reaches 30% or below, recorded images that are at least one year old are deleted. Recorded images that are less than a year old are never deleted. Select this storage location for recorded images that you wish to keep for at least one year. Manual : When the remaining capacity for the storage location reaches 40% or below, recorded images that are at least one week old Chapter 5 Settings 92 Normal : are deleted. Recorded images that are less than a week old are never deleted. Select this storage location for recorded images that you wish to keep for at least one week. When the remaining capacity for the storage location reaches 50% or below, recorded images that are at least one month old are deleted. Recorded images that are less than a month old are never deleted. Select this storage location for recorded images that you wish to keep for at least one month. Camera You can configure the advanced settings of cameras managed by the NSR and register new cameras. There are the following two ways to register a camera. • Specify the IP address or host name of the camera. • Detect cameras on the network automatically and then register multiple cameras. (This method can only be used for cameras on the same network segment as the NSR.) You can also set IP addresses before you detect cameras automatically and register multiple cameras. Setting IP Addresses after Detecting Cameras Automatically (Camera IP Setup) After automatic detection, you can set the IP addresses for the cameras. After setting the IP addresses, you can switch to the [Register Multiple Cameras] screen to register multiple cameras simultaneously. Caution You can also change the IP addresses of cameras already registered on the NSR, but the corresponding address settings ([Main] settings of the [Camera] screen) must then be updated manually in the registration information on the NSR. If the settings are not updated, the NSR will no longer be able to connect to the cameras. 1 Display the “Camera” screen and click [Camera IP Setup] at the top of the window. Cameras are detected automatically and the “Camera IP Setup” screen appears. A list of detected cameras is displayed in the “Camera IP Setup” screen. The results are displayed for each network device of the NSR. Chapter 5 Settings 93 Notes • To perform the automatic detection again, click [Refresh]. • A camera server (such as the SNT series) is detected as single camera server, regardless of the number of cameras connected. When registering multiple cameras, register them as different cameras based on their connection channels. 2 Configure all settings including the IP address settings. NSR Network Device To display IP information for a network port, click [V] and then select the network port from the list that appears. Found Cameras List Displays a list of detected cameras. To update the contents of the list, click [Refresh]. All input values except for user names and passwords of the camera administrators are overwritten by the information obtained by the IP Setup protocol. Camera names that are already registered on the NSR appear. Furthermore, if a host name is specified for “Address” in the “Main” settings of the “Camera” screen for a camera already registered on the NSR, the IP address is determined from the DNS, compared with detected camera IP addresses, and then a judgment is made. Check Select the check boxes of the cameras for which you want to set the IP addresses. To select all the check boxes, click [Select All]. Also select the registered cameras for which you want to change IP addresses. # Sequential numbers are assigned to the cameras in the order of detection. These numbers are added only for display purposes and are not for indicating anything like priority order. Network Displays the network device number of the NSR. Chapter 5 Settings 94 MAC Address Displays the MAC address of the camera. Detected by the IP Setup protocol. Model Displays the model of the camera. Detected by the IP Setup protocol. Serial No. Displays the serial number of the camera. Detected by the IP Setup protocol. DHCP After automatic detection, check boxes are selected for all cameras with DHCP set in the network settings. If you want to set IP addresses, the check boxes need to be cleared. IP address Set the IP address. After automatic detection, the IP addresses detected by the IP Setup protocol are displayed. If you want to set the IP addresses, the DHCP check boxes need to be cleared. Note You can set the IP addresses for multiple cameras simultaneously in [Set following settings to all selected Cameras] below the list. Port Set the port number of the camera. After automatic detection, the port numbers detected by the IP Setup protocol are displayed. Note You can set the port numbers for multiple cameras simultaneously in [Set following settings to all selected Cameras] below the list. User Set the user name of the camera administrator. Password Set the password of the camera administrator. Notes • The user name and password set here are used to access cameras. They are required when you set the IP address and port. • You can set the administrator user names and passwords for multiple cameras simultaneously in [Set following settings to selected Cameras] below the list. Version No. Displays the software version of the camera. Detected by the IP Setup protocol. Name Displays the camera name of a registered camera. Summary of the Lists Displays “Found Cameras”, “Registered Cameras”, and “Unregistered Cameras.” Set following settings for selected Cameras This function enables you to input the same settings for multiple cameras simultaneously. Chapter 5 Settings 95 Follow the procedure below. (1) In the “Check” column, select all the cameras for which you want to input settings. (2) Select the check boxes and input the item settings in “Set following settings for selected Cameras” that you want to set simultaneously. (3) Click [Set]. The setting values are input simultaneously for all the cameras with selected (1) check boxes. You can set the following items simultaneously in the “Camera IP Setup” screen. • Administrator/password • IP address Specify IP addresses with one of the following methods. Use following range of IP address to set IP address automatically for selected cameras To set IP Address automatically for selected cameras. IP addresses are assigned in order from the top of the list. If the number of IP addresses in the specified range is smaller than the number of selected cameras, a warning message appears and assignment stops. Furthermore, if the IP address of the NSR is included in the range, it is not assigned to a camera. Obtain IP address with DHCP IP addresses are obtained from a DHCP server. • HTTP port Specify the port number for accessing cameras. You can specify number 80 or any number in the range of 1024 to 65535. 3 Click [Apply]. The IP address settings are configured for the cameras. Note The subnet mask and default gateway addresses for the camera are set to the same values as the NSR settings. 4 After configuring the settings, click [Register Cameras] to switch to registering cameras on the NSR. The screen switches to the “Register Multiple Cameras” screen. If an administrator user name and password were input in the “Camera IP Setup” screen, the information is retained when the screen is switched. For details on configuring settings in the “Register Multiple Cameras” screen, see “Detecting Cameras on the Network Automatically and Registering Multiple Cameras” in the previous section. If you do not want to register multiple cameras simultaneously, click [Close] to close the “Camera IP Setup” screen. Chapter 5 Settings 96 Detecting Cameras on the Network Automatically and Registering Multiple Cameras Detect cameras automatically and then register them with IP addresses to the NSR. You can specify camera names, as well as the user name and password of the camera administrator. After detecting cameras automatically, switch to the [Camera IP Setup] screen if you want to set camera IP addresses prior to registration. For details, see “Setting IP Addresses after Detecting Cameras Automatically (Camera IP Setup)” (page 93). 1 Display the “Camera” screen and then click [Register Cameras] at the top of the window. Cameras are detected automatically and the “Register Multiple Cameras” screen appears. A list of detected cameras is displayed in the “Register Multiple Cameras” screen. The results are displayed for all network devices of the NSR. Note To perform the automatic detection again, click [Refresh]. 2 Configure all the settings. Found Cameras List Displays a list of detected cameras. To update the contents of the list, click [Refresh]. All input values except for user names and passwords of the camera administrators are overwritten by the information obtained by the IP Setup protocol. Cameras already registered on the NSR are not displayed. Furthermore, if a host name is specified for “Address” in the “Main” settings of the “Camera” Chapter 5 Settings 97 screen for a camera already registered on the NSR, the IP address is determined from the DNS, compared with detected camera IP addresses, and then a judgment is made. Check Select the check boxes of the cameras you want to register. To select all the check boxes, click [Select All]. # Sequential numbers are assigned to the cameras in the order of detection. These numbers are assigned only for display purposes and are not for indicating anything like priority order. Network Displays the network device number of the NSR. Name Displays the name assigned to the camera. CH If there are multiple channels as is the case with SNT-V704, each of the channels is considered to be a different camera and is indicated by a channel number. You can select whether to register each channel individually. DHCP Check boxes are selected for all cameras with DHCP set in the network settings. This item cannot be modified. IP address Displays the IP address settings of the cameras. Detected by the IP Setup protocol. This item cannot be modified. Port Displays the port number of the camera. Detected by the IP Setup protocol. This item cannot be modified. User Name Set the user name of the camera administrator. Password Set the password of the camera administrator. Notes • The user name and password set here are used to access cameras. • You can set the administrator user names and passwords for multiple cameras simultaneously in “Set following settings to selected Cameras” below the list. MAC Address Displays the MAC address of the camera. Detected by the IP Setup protocol. This item cannot be modified. Model Displays the model of the camera. Detected by the IP Setup protocol. This item cannot be modified. Serial Displays the serial number of the camera. Detected by the IP Setup protocol. This item cannot be modified. Chapter 5 Settings 98 Registered Cameras on this NSR Displays the number of cameras registered on the NSR. Cameras to be registered The number of cameras selected in the above list. The number is displayed in red if it is larger than the remaining number of cameras that can be registered on the NSR. If the number is red, [Register] is unavailable. Set following settings for selected Cameras This function enables you to input the same settings for multiple cameras simultaneously. You can enter the same administrator user name and password for multiple cameras simultaneously in the “Register Multiple Cameras” screen. Follow the procedure below. (1) In the “Check” column, select all the cameras for which you want to input settings. (2) Input the items in the “Register selected Cameras for NSR” section. (3) Click [Set]. 3 Click [Camera IP Setup] to set camera IP addresses prior to registration. The screen switches to the “Camera IP Setup” screen. If an administrator user name and password were input in the “Register Multiple Cameras” screen, the information is retained when the screen is switched. For details on configuring settings in the “Camera IP Setup” screen, see Step 2 and on of “Setting IP Addresses after Detecting Cameras Automatically (Camera IP Setup)” in the next section. If you do not want to set IP addresses, proceed to Step 4. 4 Once you have configured all the desired settings, click [Register]. The cameras selected in the “Check” column are registered on the NSR. Notes • During the registration process, a check is performed to see whether the number of cameras to register exceeds the limit. If it does, a warning appears to notify you of this point and the registration process stops. • Cameras are listed for registration according to their connection channels when a camera server (such as the SNT series) is detected during camera IP setup. Before performing registration, clear the check box under the “Check” column for cameras that do not need to be registered. Additional channels can be added later. When registration ends, the “Register Multiple Cameras” screen is updated. 5 Click [Close]. The “Register Multiple Cameras” screen closes. Specifying the IP Address or Host Name of a Camera 1 Click [Camera] in the tree on the left side of the window. The “Camera” screen appears. Chapter 5 Settings 99 2 Click [Add] at the top right of the window. The “Add Camera - Find By Address” screen appears. 3 Configure all the settings. Camera Name Enter the name of the camera to add. Use only alphanumeric characters, underscores (_), and hyphens (-). Camera Address Enter the host address (IP address) of the camera. Port Enter the HTTP server port number of the camera. The default setting is 80. Camera Administrator Set the camera administrator. User Name Enter up to 16 alphanumeric characters for the user name of the camera administrator. Password Enter up to 16 alphanumerical characters for the password of the camera administrator. Use Proxy If the camera will be accessed via a proxy server, select this check box and configure the following items. Address Enter the proxy server host address (host name). Port Enter the proxy server port number. Caution The user name and password of the camera administrator cannot be modified from the NSR. To modify them, access the camera directly from a Web browser on a computer. Chapter 5 Settings 100 If these settings are modified, the camera settings of the NSR also need to be modified. 4 Once you have configured all the desired settings, click [Connect]. The settings are used to connect to the camera and the camera is registered once it is detected. Caution If the specified IP address is the same as that of an already registered camera, a warning appears and the camera cannot be registered. Deleting a Camera 1 Click [Camera] in the tree on the left side of the window. The Camera screen appears. 2 Select the camera to delete, and click [Delete] at the top right of the screen. To delete multiple cameras, select the cameras while holding down the Shift key or Ctrl key. The delete confirmation screen appears. 3 Click [OK]. The camera is deleted. Note When a camera is deleted, “No Camera” appears in the monitor window of the layout. With the default layout, the next camera that you register will be assigned to the open monitor window. When a registered camera is deleted, data recorded during the registered period cannot be searched. In such a case, recorded data is not deleted. Recorded data can be deleted when the conditions for deletion from storage or data overwrite are met. For details on settings, see “Storage” under “General” of “Advanced Configuration” (page 84). Configuring the Advanced Settings of Cameras You can configure advanced settings such as the main, preset, mask, and motion detection settings for each camera individually. Chapter 5 Settings 101 Basic operations for configuration 1 Display the “Camera” screen and click the camera you want to configure in the tree on the left side of the window. The setting items appear below the camera. 2 Click the item you want to configure and then configure the item in the tree on the left. 3 Click [Save] at the top right of the window. For details on configuring individual items, see the following pages. • Main (page 102) • Preset (page 109) • Mask (page 110) • VMD (Recorder) (page 112) • VMF (page 114) Main Used to configure basic camera settings. Settings on the “Main” screen can be configured for multiple cameras at the same time. On the “Camera” screen, select the multiple cameras while holding down the Shift key or Ctrl key, and then click [Edit]. Also, NSR supports the “Generic Camera.” NSR obtains various information data from a camera when registering it and connects to the camera based on this information. Because the protocol and procedures for obtaining information from a Generic Camera are standardized, cameras sold in future will also be supported, provided that they follow the standard. For about the Generic Camera configuration method, see “Setting a Camera by Using Generic Camera” (page 106). Note When configuring multiple cameras simultaneously, some settings will differ from those available when configuring one camera. When setting multiple cameras, the following points may apply, depending on the settings. • Settings that differ for each camera configuration are blank. When saved in this state, the corresponding settings on each camera do not change. If you select a new list or enter a new value, the new setting is applied to all of the multiple cameras. • If the setting configuration for each camera differs when the setting item is a check box, a minus sign (–) appears to indicate that the state of the check box varies. To configure a common setting for multiple cameras, click the box again to select or deselect it. Chapter 5 Settings 102 • If a common value cannot be set for multiple cameras, the setting item deactivated so it cannot be modified. Change the combination of selected cameras and try setting the value again. The following section describes the settings in detail. [Update Generic Camera Information] button Retrieve the information from the camera. Note If the camera firmware was updated or other camera information has changed, click [Update Generic Camera Information] to retrieve information data from the camera again. In this case, control range settings may automatically change. Be sure to check all items again, to verify that all settings appropriate. [Select Generic Camera Functions] button Clicking this button brings up the screen (page 108) for choosing a function combination for Generic Camera. [Add Channel] button Add the camera settings for other channels. Name • When configuring one camera, enter the camera name. Use only alphanumeric characters, underscores (_), and hyphens (-). • When configuring multiple cameras simultaneously, the camera names are shown separated by commas (camera names cannot be edited). Model Displays the camera model name. When configuring multiple cameras simultaneously, the camera model names are shown separated by commas. User Enter the name of the camera’s administrator in 16 alphanumerical characters or less. Password Enter the camera’s administrator password in 16 alphanumerical characters or less. Chapter 5 Settings 103 Network Address Enter the camera’s IP address in this text box. This setting does not appear when configuring multiple cameras simultaneously. HTTP Port Enter the HTTP port number necessary to access the camera. Timeout (sec) Enter an access timeout for the camera in seconds. Use Proxy If you are using a proxy server to access the camera, select this check box. If you select this check box, configure the address and port number of the proxy server. SNT Settings These settings appear when the selected camera is from the SNT series. Configure settings specific to SNT models. Specify the channel if the camera is registered as an SNT with multiple channels. Furthermore, to register the cameras of each channel, click [Add Channel] and register them as new cameras. Camera Select a connected analog camera. For SNT-V304 : A camera cannot be specified. Note The “New Protocol 1” to “New Protocol 5” options that appear for the SNT-V704 are scheduled for future use. Channel Select the channel to use. For SNT-V704 or SNT-V304: Select from Channel 1, Channel 2, Channel 3, and Channel 4. For SNT-V501 : Fixed to Channel 1. This cannot be modified. Video Settings Configure the monitor and recording settings for images captured by the camera. Mount Angle Configure the angle for camera images. Select from 0 degrees, 90 degrees, 180 degrees, and 270 degrees. Caution VMF and Video Motion Detection (Camera) do not support the 90- and 270-degree mount angles. When using VMF or Video Motion Detection (Camera), always use the 0- or 180-degree mount angles. Video Codec Set the video codec for the camera. Select from JPEG or MPEG 4. FPS Specify the image frame rate for the camera. Resolution Specify a resolution for images imported from the camera. For some cameras, the resolution used will differ for NTSC and PAL. For details, refer to “Camera Resolution Details” (page 173). Chapter 5 Settings 104 Image Quality Set a percentage between 0% and 100%. Color Level Set a percentage between 0% and 100%. Raise system alert by “VIDEO LOSS” Select this check box when you want to generate a “VIDEO LOSS” notification as a system alert if images can no longer be obtained because the connection between the camera and network has been disconnected. Configure the action to perform in response to the notification in the “Action” screen. To enable this function, the [Enable System Alerts] check box must be selected on the “Main” screen in “General” (page 84). No VMD (Recorder) during PTZ movement Select this check box when you want to stop motion detection during pan, tilt, and zoom movement to avoid detection errors. Enabling Audio Select this check box if you want the NSR to monitor audio from the camera. To actually obtain audio, the microphone input on the camera needs to be enabled. Caution If audio is disabled by clearing this check box, playback is also disabled for audio that was recorded while this option was enabled. Playback can be enabled by selecting this check box and enabling audio again. Audio Codec Specify the audio quality. The audio standards G.711 (64 kbps) and G.726 (16/24/32/40 kbps) are supported. Sampling Frequency Specify the sampling frequency. VMF Support Select this check box to enable Video Motion Detection by camera image metadata using a VMF (Video Motion Filter). For details on configuring a VMF, see “VMF” (page 69). Caution • With NSR, VMF cannot be used in tandem with the Video Motion Detection (Camera) setting on the camera. If you select this check box, the Video Motion Detection (Camera) setting of the camera will be disabled. • Only one VMF package can be applied to a live camera image at one time. As a result, if this configuration is performed while an alarm recording schedule that uses VMF is being executed, the package for the alarm recording schedule will be overwritten with the package being configured. Note Object detection requires an approximately 40 second initialization period before starting. Default Package Select the VMF package to use. The default package is used when no VMF package has been configured in the schedule. When [None Selected] is selected and no VMF package is set in the recording schedule, motion detection metadata can be Chapter 5 Settings 105 received and recorded, but it cannot be displayed on the monitoring screen. Storage Settings You can specify the storage location the camera uses for each recording type. Alarm Select the storage location for the camera to save alarm recordings. Manual Select the storage location for the camera to save manual recordings. Normal Select the storage location for the camera to save normal recordings. Caution If the storage settings are modified, the new settings are reflected from the first recording to start thereafter. If a camera’s storage settings are modified while a recording is in progress, they are not reflected in the current recording. Setting a Camera by Using Generic Camera This version of NSR supports the “Generic Camera.” NSR obtains various information data from a camera when registering it and connects to the camera based on this information. Because the protocol and procedures for obtaining information from a Generic Camera are standardized, cameras sold in future will also be supported, provided that they follow the standard. Note This version of NSR supports Generic Camera version 1. Operation flow when using Generic Camera The procedure for registering and setting up a camera with the Generic Camera option is slightly different from regular camera registration. First, you must select a combination of functions and then perform setup. When you select the combination of functions, the setting range for each item is determined automatically. Therefore it is important to select the combination of functions carefully with regard to the intended use of the camera. 1 Registering a Generic Camera. r 2 Selecting a combination of functions. r 3 Making the required settings at the various setup screens. After setting, be sure to check all setting values. r 4 Starting operation. Caution • Available settings and setting value ranges will vary depending on the function combination. Be sure to make settings that are matched to the intended operation. Chapter 5 Settings 106 Example 1: When a certain codec is used, the motion detection function will not be available. Choose a combination with this codec only if motion detection function settings are not required. Example 2: When a combination with an available setting value range of 1 - 50 has been selected, the available range on the respective setup screens will be limited to 1 - 50 even if the camera setting range is 1 - 100. • Be sure to select the function combination first and then make the settings. If you change the function combination after starting to make settings, the available range for values will also change depending on the function combination, which may lead to earlier settings being altered. Example: 70 was selected for an item with an available range of 1 - 100, but the control range later became 1 - 50 because of a function combination change, and the setting was altered to 25. • After changing a setting, be sure to check all settings before starting operation. If the changed value is within the available range, there will be no problem, but if it is out of range, the setting will automatically be changed to a value within the range. Setting a Camera by Using Generic Camera 1 Click [Main] that you want to configure a camera in the tree on the left side of the window. 2 Click [Update Generic Camera Information] in the upper of the “Camera” window. The information retrieve from the camera. 3 Click [Select Generic Camera Functions]. The screen for choosing a function combination for Generic Camera appears. 4 Select functions in order of priority, a line at a time, starting from top left. Then click [Apply]. If you change a selected line, all lower lines will revert to the non-selected condition. Chapter 5 Settings 107 Note that the function combination selected here determines the setting range for the various setup screens. 1 Item Select the desired function. Parameter Select the desired value. Note The control range for values will be narrowed down according to the item selection sequence and parameters. Items and values selectable on subsequent lines will change accordingly. The screen returns to “Main” window. 5 Make the other settings. Make the required settings at the various setup screens. 6 After completing the setting procedure, check all items to make sure that setting values are appropriate. 7 Start operation. Generic Camera supports the following functions and items. • Codecs Only JPEG and MPEG4 are supported. • Resolution The following limitations apply. Horizontal: max. 1,280 pixels Vertical: max. 960 pixels (Portrait format not supported) • Frame rate max. 30 fps • Image quality JPEG: If image quality of camera is divided into n levels, 0 - 100% will be assigned to levels 1 - n. Chapter 5 Settings 108 • • • • • • MPEG: This software supports up to 2,048 kbps. This value is compared to the camera setting range, and the lower value of the two will be assigned to 0 - 100%. Color level Video Motion Detection (Camera) Up to 4 detection frames Motion detection/object detection metadata Sensor IN/Alarm Out Up to 16 inputs and 16 outputs Audio device Preset positions max. 64 Preset Configure preset positions for the camera. You can only configure presets for a camera with a preset position configuration function. If preset positions cannot be set for the camera, the items and buttons in the “Preset” screen are unavailable. To add new preset positions 1 Display the “Preset” screen and then select an unset (unnamed) preset position from the preset position list. 2 While checking the image in the preview, perform pan, tilt, and zoom operations to move the camera to the position you want to set. 3 Enter a name for the new preset position in the “Preset Name” field. The preset position is not configured if a name is not enter. 4 Click [Set]. The current camera position is saved as a preset position. To modify a preset position 1 Display the “Preset” screen, and then select the preset position that you want to modify. Chapter 5 Settings 109 To confirm a configured preset position, select the preset position and click [Recall] to move the camera to the preset position. 2 Perform pan, tilt, and zoom operations to move the camera and modify the position. 3 Click [Set]. The modified camera position is saved. To delete a preset position 1 Display the “Preset” screen and then select the preset position that you want to delete. 2 Click [Delete]. The preset is deleted and the name disappears from the preset position list. Mask Set a dynamic mask for the camera. You can set multiple masks. Caution If the mask for a camera is modified while a recording is in progress, it is not reflected in the current recording. Make any modifications to the mask configuration before you start recording. 1 Display the “Mask” screen. 2 Select a mask pattern in [Mask Type]. Masks can be filled with a single color or a pattern. Click [V], and select [Single Color] or a pattern from the list that appears. Notes • If you selected [Single Color], specify a fill color for the mask in the dialog box that appears. • If you selected a pattern, such as [Random Noise] or [Luminance (Gamma)], you can also specify a masking level. Chapter 5 Settings 110 Caution For [Gaussian Blur] and [Mosaic], because the blur size (in pixels) does not change as the image is zoomed, zoom out as far as possible before setting a mask with these patterns. Otherwise, the mask will not be visible until the image is zoomed in. 3 While checking the image in the preview, use the buttons to create and edit the mask. Buttons and functions (Move Polygon) Use this button to move a mask or to create a rectangular mask by dragging a mask edit point. (Edit Points) Use this button to add/delete edit points and to create masks in complex shapes. (Add Point) Use this button to divide a line at a specific location. You can also add an edit point to a mask by clicking a line. (Remove Point) Use this button to decrease the number of lines by one. You can also remove an edit point from a mask by clicking an edit point. (Bring to Front) Moves the selected mask to the top of a stack of overlapping masks. (Send to Back) Moves the selected mask to the bottom of a stack of overlapping masks. (Bring Forward) Moves the selected mask up one level in a stack of overlapping masks. (Send Backward) Moves the selected mask down one level in a stack of overlapping masks. (Delete Polygon) Deletes the selected mask. (Refresh Image) Refreshes the still image that includes all the masks. (Preview) Displays a live image from the camera that includes the masks. This allows you to confirm how the configured masks appear. 4 For a camera equipped with pan, tilt, and zoom functions, use these buttons to control the pan, tilt, and zoom of the camera, and to confirm whether the camera moves properly so as to hide the area you set. 5 Click [Save] at the top right of the window. Note A mask area configured for a camera with pan and tilt functions may shift when the camera is panned, tilted, or zoomed. When configuring the mask area, please allow for approximately 10% (of the full image size) additional space surrounding the object you wish to mask. In addition, be sure to position the Chapter 5 Settings 111 object you wish to mask to the center of the monitoring screen before configuring a mask area for a camera with pan and tilt functions. VMD (Recorder) Configure the motion detection area (Video Motion Detection (Recorder)). The camera and NSR are equipped with motion detection functions. With this setting, you can configure the NSR’s motion detection function. In addition, by using the camera-based motion detection function, you can lower the system load of the NSR. Select which mode to use in accordance with the number of registered cameras and your operating configuration for recording and monitoring. For details on configuring camera-based motion detection, see “Setting a Video Motion Detection (Camera) Pin” (page 124). 1 Display the “VMD (Recorder)” screen, and click [Add] at the top right of the screen. The VMD (Recorder) configuration screen appears. 2 Enter a name for the configuration area in the [Configuration Name] field. 3 Select the VMD mode. Always verify your operating environment first, because performance may vary depending on the mode. • Standard mode can perform motion detection on more cameras simultaneously than high-performance mode. • High-performance mode offers better detection accuracy. • Be aware that when the VMD mode is changed the default values for [Previous Frame] and [Candidate Frame] are configured separately for each mode. • With the MPEG4 codec, only high-performance mode is supported. Caution When the codec for cameras set to standard mode is changed to MPEG, the VMD mode is automatically switched to high-performance mode. In addition, [Previous Frame] and [Candidate Frame] are set to the default values for high-performance mode. Chapter 5 Settings 112 4 While checking the image in the preview, use the buttons to create and edit the motion detection area and configure items. Buttons and functions (Move Polygon) Use this button to move an area or to create a rectangular area by dragging an area edit point. (Edit Points) Use this button to add/delete edit points and to create areas in complex shapes. (Add Point) Use this button to divide a line at a specific location. You can also add an edit point to an area by clicking a line. (Remove Point) Use this button to decrease the number of lines by one. You can also remove an edit point from an area by clicking an edit point. (Bring to Front) Moves the selected area to the top of a stack of overlapping areas. (Send to Back) Moves the selected area to the bottom of a stack of overlapping areas. (Bring Forward) Moves the selected area up one level in a stack of overlapping areas. (Send Backward) Moves the selected area down one level in a stack of overlapping areas. (Delete Polygon) Deletes the selected area. (Refresh Image) Refreshes the still image that includes all the areas. (Preview) Displays a live image from the camera that includes the areas. This allows you to confirm how the configured areas appear. Setting items Area Mode Click [V], and from the list that appears, select whether to detect motion inside or outside the set area. To detect motion inside the set area, select [Include], and to detect motion everywhere outside the set area, select [Exclude]. Display Color Click the [Display Color] box, and specify a color to fill the motion detection area in the dialog box that appears. Preset Name To configure by preset positions, click [V], and from the list that appears, select a preset camera position to include in the configuration area. If this setting is configured, the camera moves to the specified preset position when motion detection starts. Threshold Set a value from 1 to 100 as the threshold for motion detection. Chapter 5 Settings 113 The motion detection processor uses this value as the standard value for determining whether motion has occurred between frames. Expert Mode Select this check box on to configure detailed settings for the motion detection area. When this check box is selected, you can configure the following items. Previous Frame Specify, by number of frames, the number of images to compare as a basis for determining that motion has occurred. Caution Setting this number high facilitates noise reduction, but processing speed decreases due to the increase in processing load and memory usage. Candidate Frame The number of detections needed to recognize a candidate image as moving is configured based on this value. The specified value is used as a parameter for calculating the number of detections needed to recognize a candidate image as moving. Block Size X Specify the horizontal length of the detection area in pixels. Block Size Y Specify the vertical length of the detection area in pixels. Max Object Size X Specify the maximum horizontal length of the detection area in percent. Max Object Size Y Specify the maximum vertical length of the detection area in percent. Min Object Size X Specify the minimum horizontal length of the detection area in percent. Min Object Size Y Specify the minimum vertical length of the detection area in percent. Min Objects For Alarm Specify the number of motion detection boxes for sending notification of an alarm. 5 For cameras equipped with pan, tilt, and zoom functions, use this to change the direction and zoom of the camera when configuring an area. 6 Once you have configured all the desired settings, click [Save] in the top right of the window. VMF When using a metadata-compatible camera, you need to configure VMF (Video Motion Filter) settings for motion detection by metadata. A VMF is a filter for detecting specific motion phenomena from motion-related metadata generated by the camera. VMFs are available in two types, Moving and Unattended, and up to three can be managed together as a VMF package. The filters in a VMF package can be combined either sequentially, whereby each filter must be satisfied in sequential order to trigger an alarm, or in parallel, whereby satisfying any one filter is sufficient to trigger an alarm. Chapter 5 Settings 114 Overview of Motion Detection by Camera Image Metadata Notes • [VMF] only appears when the camera supports motion detection by metadata. • To configure a VMF, the [VMF Support] check box must be selected on the “Main” screen in “General” (page 84). • To perform motion detection and object detection using metadata, a camera that supports motion detection by metadata is required. • When using VMF motion detection with the [Existing] filter type, the alarm state is maintained after object detection for as long as the object continues to be present. As a result, if a second alarm is triggered in this state, alarm recording will not start. To have NSR record the second alarm, select [Alarm End] in the recording schedule settings (page 139). This ensures that everything is recorded during the alarm period, including the second alarm. • When object detection metadata is processed, the object detection status is maintained for approximately three hours after detection, but the VMF detection status is cleared after approximately ten seconds. • A VMF package can only process the live camera image of one camera at a time. • When metadata is recorded, either motion detection metadata or non-motion detection metadata is selected, based on the VMF being applied at the time. The order of priority is determined as follows: 1If something has been specified in the schedule, priority is determined by whether the VMF package is “Moving” or “Unattended”. 2If a VMF package is not specified, priority is determined based on the default package. 3If a default package is not specified either, the metadata is recorded as motion detection metadata. Caution Object detection requires an approximately 40 second initialization period before starting. Also, moving objects that have remained still for approximately 40 seconds are regarded as unattended. These times may be extended depending on the circumstances. Chapter 5 Settings 115 1 Display the “VMF” screen, and click [Add] at the top right of the screen. The “Add VMF Package” screen appears. 2 Select a “Moving” package or an “Unattended” package, and then click [OK]. The package is added to the list, and the VMF configuration screen appears. Note The package name is created automatically at this point. 3 Configure each item. A VMF package consists of a combination of up to 3 filters (motion detection criteria), with advanced settings for each filter, and up to 6 inactive areas. Follow the steps below to configure filters and inactive areas. (1) Set the filter name and filter type (1). (2) Click (2) under area 1, and configure the criteria in area 3. Make sure to click under the desired filter or inactive area before configuring criteria. Clicking (Off) switches the button to (On), which enables you to configure the filter criteria. Chapter 5 Settings 116 1 2 3 Pulse Setting Configure this setting when you wish to specify a pulse duration and input a pulse. Pulse Select this check box when you wish to specify a pulse duration and input a pulse. If you select this check box, enter a value for [Pulse Duration]. Pulse Duration Enter the duration in milliseconds to sustain pulse input once it is turned on. For details on signal specifications, see the operating instructions for the camera and sensor. Sequential Select this option to detect specific phenomena by applying the filters in sequential order. The filters are applied sequentially from the left. When this option is selected, you can set the time and sequence in which to apply the filters. [Sequential] cannot be specified when setting an “Unattended” package. Parallel Select this option to detect specific phenomena by applying all detection criteria simultaneously. Caution To switch between [Sequential] and [Parallel], the button for each filter and inactive area must be turned off. When the button is (On), click it to turn it (Off). To enable this filter, select the check box beside the filter name. Chapter 5 Settings 117 Filter Name Enter a name for the filter. When [Sequential] is selected, this option allows you to enter, in seconds, how long to apply the filter on the left (before moving to the next filter). Caution To set the time, the button for each filer and inactive area must be turned off. When the button is (On), click it to turn it (Off). Type Click [V] and select the filter type to use from the list that appears. The filters that can be set differ depending on the package type (“Moving” or “Unattended”). x Moving Appearance Detects the appearance of objects that match the detection criteria within the configured area. Disappearance Detects the disappearance of objects that match the detection criteria within the configured area. Existing Detects when objects that match the detection criteria remain within the configured area. Capacity Detects when the number of objects that match the detection criteria has exceeded the specified number within the configured area. Passing Detects when objects that match the detection criteria cross a configured line. x Unattended Unattended/Removed Detects when an object is not moving or has been removed. Switches the order of the filters to the left and right. Use these buttons to create and edit filters or inactive areas for the image on the preview screen. Notes • Up to eight vertices can be set for a polygonal area. • When the filter type is set to [Passing], set the direction along which to detect the object’s passing. After setting the end points, click near the center of the line to set the arrow indicating the direction of passage. With each click, the Chapter 5 Settings 118 orientation of the arrow changes as follows: both directions t one direction only t other direction only t both directions… (Move Polygon) Use this button to move an existing figure or line, or to create a rectangular figure by clicking and dragging. (Edit Points) Use this button to add/delete edit points and to create complex figures or lines. (Add Point) Use this button to divide a line at a specific location. You can also add an edit point to a figure or line by clicking it. (Remove Point) Use this button to decrease the number of points by one. You can also remove an edit point from a figure or line by clicking it. (Delete Polygon) Deletes the selected figure or line. Object Size Set the size of objects to be detected. MIN Sets a minimum size for the object to be detected. Drag the light blue frame that appears on the configuration screen with your mouse to change the size of the frame. MAX Sets a maximum size for the object to be detected. Drag the blue frame that appears on the configuration screen with your mouse to change the size of the frame. Object Speed Set the speed of objects to be detected. Click [MIN], and enter a maximum speed for the object to be detected. When you draw a line segment on the configuration screen with the mouse, a value is entered in the [pixel] box. Set how many seconds it should take to move that distance. In the default state, the minimum speed is set to the minimum value for the system. To restore the minimum value once the setting has been changed, click the shape indicating the speed, and then click . Click [MAX], and enter a maximum speed for the object to be detected. When you draw a line segment on the configuration screen with the mouse, a value is entered in the [pixel] box. Set how many seconds it should take to move that distance. In the default state, the maximum speed is set to the maximum value for the system. To restore the maximum value once the setting has been changed, click the shape indicating the speed, and then click . Chapter 5 Settings 119 (Preview) Click this button to confirm the operation of the filtering used in the configured package. Duration ([Existing] and [Unattended/Removed] Filter Types Only) When using the [Existing] filter type, enter the amount of time for RealShot Manager to wait before triggering an alarm, after an object is detected as moving. The default value is 0. When using the [Unattended/Removed] filter type, enter the amount of time for RealShot Manager to wait before triggering an alarm, after an object is detected as unattended. Note When an object is detected as unattended, its non-motion status is maintained and the detection frame continues to be displayed for about 3 hours. Capacity ([Capacity] Filter Type Only) Enter the maximum number of objects that can be detected in the configured area before an alarm is triggered. Collision ([Passing] Filter Type Only) Click [V], and from the list that appears, select the object’s center of gravity or the side of the object that will trigger an alarm when it crosses the configured line. [LIVE] Button Click this button to display the live camera image. When you click this button, the camera control panel appears. For a camera equipped with pan, tilt, and zoom functions, use these buttons to control the pan, tilt, and zoom of the camera; to change the direction and zoom of the camera for easier configuration of detection areas; and to confirm whether the camera moves properly in the detection area you set. [PRESET] Button To move the camera to a preset position, click [V], and select a preset from the list that appears. Caution You can only move the camera to a preset position with this option. You cannot set a VMF package for each preset position. Chapter 5 Settings 120 [PLAYBACK] Button Click this button to display recorded images stored on the camera. When you click this button, the playback control buttons and quick search buttons appear. This toolbar is used to play back recordings. For details on the use of each button, see “qf Play speed” under “Monitoring Window (Monitor 1)” (page 54). This toolbar is used to specify the playback position of a recorded image by date and time when performing a quick search. For details, see “Quick Search” (page 67). 4 After setting each item, click [Save] at the top right of the screen. Sensor Input You can configure sensor input pins and Video Motion Detection (Camera) pins for the NSR and cameras with “Sensor Input”. Adding a Sensor Input Pin to the NSR By adding a logical sensor input pin to the NSR, you can link to external devices. You can trigger the performance of recording or actions by having an external device operate (turn on or off) the added sensor input pin. 1 Click [Sensor Input] in the tree on the left side of the window. 2 Select the NSR below [Sensor Input]. Chapter 5 Settings 121 3 Click [Add]. The “Sensor Input” screen appears. 4 Configure each item. Name Enter a name for the sensor input pin. Invert Select this check box to invert the pulse polarity (e.g., when inverting High t Low to Low t High). Enable Select this check box to enable the sensor input pin. 5 After setting each item, click [Save]. The settings are enabled. To discard your changes and return to the original settings, click [Discard]. Deleting a Sensor Input Pin Created on the NSR Note Sensor inputs that exist by default cannot be deleted. 1 Click [Sensor Input] in the tree on the left side of the window. Chapter 5 Settings 122 2 Select the NSR, and click the sensor input to delete. 3 Click [Delete]. A confirmation screen appears. 4 Click [Yes]. The sensor input is deleted. Modifying Sensor Input Pin Settings on the NSR and the Camera 1 Click [Sensor Input] in the tree on the left side of the window. The “Sensor Input” screen appears. 2 Configure each setting. Chapter 5 Settings 123 Name Enter the sensor input name in this text box. Invert Select this check box when you want to invert the pulse polarity (for example, when you want to invert high t low to low t high). Enable Select this check box when you want to enable the sensor input. 3 Once you have configured all the desired settings, click [Save] in the upperright corner of the window. The settings are applied. If you want to ignore all your setting modifications, click [Discard]. Setting a Video Motion Detection (Camera) Pin To use the camera-based motion detection and object detection functions (Video Motion Detection (Camera)), follow the steps below to configure a Video Motion Detection (Camera) pin and a motion detection or object detection area. The settings available for motion detection and object detection areas will differ depending on your camera. Notes • Whether Video Motion Detection (Camera) supports both motion detection and object detection differs depending on the camera. • Video Motion Detection (Camera) cannot be used with the SNT-V304 and the SNT-V501. Caution • With NSR, metadata transmission from a camera cannot be used in tandem with the Video Motion Detection (Camera) setting on that camera. If the Video Motion Detection (Camera) setting is enabled, the Video Motion Filter setting of the camera will be disabled. • Object detection requires an approximately 40 second initialization period before starting. 1 Click [Sensor Input] in the tree on the left side of the window. 2 Select the camera below [Sensor Input], and click the Video Motion Detection (Camera) pin you want to configure. The “Sensor Input” screen appears. Chapter 5 Settings 124 3 Configure each item. Name Enter a name for the pin. Pulse Select this check box when you wish to specify a pulse duration and input a pulse. If you select this check box, enter a value for [Pulse Duration]. Pulse Duration Enter the duration in milliseconds to sustain pulse input from the VMD (Camera) pin once it is turned on. Invert Select this check box to invert the pulse polarity. Enable Selecting this check box enables use of the VMD (Camera) pin. 4 Click [Set VMD (Camera)]. The screen for configuring motion detection and object detection areas appears. The configuration screen and settings available for this item will differ depending on the camera. Caution When the configuration screen is opened, the Video Motion Filter settings for the camera are disabled. Note For a camera equipped with pan, tilt, and zoom functions, use the camera control panel to control the pan, tilt, and zoom of the camera; to change the direction and zoom of the camera for easier configuration of detection areas; and to confirm whether the camera moves properly in the detection area you set. Chapter 5 Settings 125 x For the SNC-RZ30 and similar cameras Drag the red frame with your mouse to configure a motion detection area. By dragging each edge of the detection area, you can change its size. Detection areas cannot be deleted. Caution The VMD (Camera) setting cannot be configured when the mount angle is set to 90 or 270 degrees. Threshold Enter a value from 0 to 255 as the threshold for motion detection. The motion detection processor uses this value as the standard value for determining whether motion has occurred between two video frames. Sensitivity Enter a value from 0 to 8 as the sensitivity level. Normally, you do not need to configure this setting. x For the SNC-P1 and similar cameras You can set up to four motion detection areas. The name of the area being configured is displayed in blue. Drag the red frame with your mouse to configure a motion detection area. By dragging each edge of the detection area, you can change its size. Chapter 5 Settings 126 Detection areas cannot be deleted. Caution • The VMD (Camera) setting cannot be configured when the mount angle is set to 90 or 270 degrees. • The VMD (Camera) setting is only active when the codec setting is MPEG. Sleep time after detection (sec) Enter a duration from 1 to 30 seconds to pause motion detection after motion has been detected. Area1 to Area4 Select the check boxes of the detection areas to enable. Threshold Enter a value from 1 to 2,000 as the threshold for motion detection. The motion detection processor uses this value as the standard value for determining whether motion has occurred between two video frames. Sensitivity Enter a value from 0 to 20 as the sensitivity level. Normally, you do not need to configure this setting. x For the SNC-V704 and similar cameras You can set up to two motion detection areas. The name of the area being configured is displayed in blue. Drag the red frame with your mouse to configure a motion detection area. By dragging each edge of the detection area, you can change its size. Detection areas cannot be deleted. Chapter 5 Settings 127 Caution The VMD (Camera) setting cannot be configured when the mount angle is set to 90 or 270 degrees. Area1 to Area2 Select the check boxes of the detection areas to enable. Sensitivity Set a value from 1 to 9 as the sensitivity level. Normally, you do not need to configure this setting. x For the SNC-RX550, Generic Camera, and similar cameras You can set up to four motion detection or object detection areas. The name of the area being configured is displayed in blue. Drag the red frame with your mouse to configure a motion detection area. By dragging each edge of the detection area, you can change its size. Detection areas cannot be deleted. Caution The VMD (Camera) setting cannot be configured when the mount angle is set to 90 or 270 degrees. Chapter 5 Settings 128 Camera Position Select the camera position to configure. Current Position Select this option to configure settings for the current camera position. Preset Position Select this option to configure settings for each preset position. If you select this option, Click [V], and select a preset from the list that appears, to move the camera to the preset position. When the camera moves to the specified preset position, the settings for that position are enabled. The settings for one preset position cannot be used for another preset position. Object Type Select [Moving] or [Unattended]. The following options differ for [Moving] and [Unattended]. You can select [Moving] or [Unattended] for each screen, but not both. x With [Moving] Threshold Enter a value from 0 to 99 as the threshold for motion detection. x With [Unattended] Detection Time Enter a duration from 40 to 43,200 seconds to wait after an object stops moving before detecting non-motion and triggering an alarm. The countdown is reset if the object starts moving again during the specified duration. Caution After an unattended object is detected (after the alarm occurs), another unattended object may not be detected for up to one minute. Note To facilitate configuration, the [Detection Time] item for object detection appears for both [Current Position] and [Preset Position], but overall only one value can be set for [Detection Time]. Area1 to Area4 Select Active or Inactive for each detection area. Minimum Detectable Object Size Enter a minimum size for the object to be detected. Or, use the mouse to configure the minimum size by dragging the edges of the (light blue) setting frame for minimum detectable object size. You can change the size of the frame by dragging each edge. The setting frame cannot be deleted. Chapter 5 Settings 129 Maximum Detectable Object Size Enter a maximum size for the object to be detected. Or, use the mouse to configure the maximum size by dragging the edges of the (blue) setting frame for maximum detectable object size. You can change the size of the frame by dragging each edge. The setting frame cannot be deleted. 5 After setting each item, click [Close]. The settings are enabled. To discard your changes and return to the original settings, click [Discard]. Alarm Output You can configure camera and NSR alarm output settings with “Alarm Output”. Modifying Alarm Output Pin Settings Caution Before using the alarm output of the camera, you need to connect to the camera from your Web browser and enable the camera settings. 1 Click [Alarm Output] in the tree on the left side of the window. The “Alarm Output” screen appears. 2 Configure each setting. Name Enter the alarm output name in this text box. Enable Select this check box when you want to enable the alarm output. Chapter 5 Settings 130 Pulse Select this check box to reset the output pin to off at the specified time, when it has been turned on. Pulse Duration Enter the duration to leave the output pin turned on. Invert Select this check box when you want to invert the polarity of the output pin. Enabling inversion does not change the state of the output pin. If the output pin is turned on/off while inverted, the actual output signal is inverted to off/on. In addition, the output pin of the NSR is initialized according to the inversion setting at startup (inversion enabled: turned on at startup; inversion disabled: turned off at startup). 3 Once you have configured all the desired settings, click [Save] in the upperright corner of the window. The settings are applied. If you want to ignore all your setting modifications, click [Discard]. Controlling Alarm Outputs Manually You can confirm the current alarm output status and turn alarm output on or off in “Alarm Output” of the Option window. For details on the operating procedure, see “Alarm Output” of “Option Window (Auxiliary Function Area)” (page 77). Action You can configure the actions to perform upon detection of events such as sensor input, VMD (Recorder), VMF, hardware failures, system alerts, and manual triggers in “Action”. To add a new action 1 Click [Action] in the tree on the left side of the window. The “Action” screen appears. 2 Click [Add] at the top right of the window. The following screen appears. Chapter 5 Settings 131 3 Configure each setting. Name Enter the name of the action in this text box. Comment Enter a comment for the action. Event Select the type of event to trigger the action. Sensor Input Select this option when you want the sensor input to trigger the action. When you select this option, you must also specify the following: • The sensor input name. • Whether the sensor input pin is active, and whether it is on. VMD (Recorder) Specify the camera to use as a trigger for the action. Motion detection on the specified camera triggers execution of the action. VMF Select this option to perform an action when an alarm is triggered by the VMF package. If you select this option, specify the following items. • Select the VMF package. • Select whether to activate (turn from off to on) or deactivate (turn from on to off) the trigger. Hardware Failure Select this option when you want a hardware failure to trigger the action. Problems occurring with the hard disk, fan, voltage, or temperature are regarded as failures. System Alert Select this option when you want a system alert to trigger the action. Manual Trigger Select this option when you want to trigger the action manually. When you select this option, you can trigger the action manually from the option window of the monitoring window. Chapter 5 Settings 132 Action Select the type of action to perform upon triggering from the pull-down list. Select from [Report By Mail], [Start Beep], [Stop Beep], [Change Monitor Layout], [Activate Alarm Out], [Deactivate Alarm Out], and [Recall Preset]. The settings that appear subsequently vary depending on the action you select here. • When [Report By Mail] is selected You can select whether to send a still image attachment in response to a trigger. When there is an event such as a hardware failure or system error, basic information about the error is included in the body text of the message. E-Mail (SMTP) The recipient cannot be set here. Use “e-Mail” on the General screen to enter a recipient address. Caution Configure the e-mail settings before configuring actions. If you modify the e-mail settings after configuring an action, you need to resave the corresponding action for the new settings to take effect. Send Still Image Select this check box to send a still image attached to the message. However, when a still image cannot be generated, no still image is attached to the message sent even if this check box is selected. Camera Select the camera to capture the still image. • When [Start Beep] is selected Duration (sec) Specify the length of the beep in seconds. Chapter 5 Settings 133 Indefinitely Select this option if you want to let the NSR beep until another event stops it. You must, however, select what events will stop the beep beforehand. • When [Stop Beep] is selected This option is just for stopping the beep. There are no settings to configure. Caution While the beep is sounding, audio monitoring from the camera is paused. However, audio recording is performed as normal. • When [Change Monitor Layout] is selected Monitor Layout Select the monitor layout to display on monitor 1. Change to previous layout Select this check box to return to the original, unchanged layout after an action is triggered. After event Select this option to return to the original layout when the event ends. Duration Select this option to return to the original layout after a specified duration. • When [Activate Alarm Output] is selected Alarm Out Select the alarm output name for which to turn on the alarm output. Note When you set the time for the alarm output to go on, also set the pulse interval in the alarm output settings. Chapter 5 Settings 134 • When [Deactivate Alarm Output] is selected Alarm Out Select the alarm output name for which to turn off the alarm output. • When [Set Preset] is selected Camera Select the camera for which to recall the preset. Preset name Select a preset. 4 Once you have configured all the desired settings, click [Save] in the upperright corner of the window. The settings are applied. If you want to ignore all your setting modifications, click [Discard]. Recording Schedule You can create new recording schedules and modify the settings of existing recording schedules in [REC Schedule]. Record Segmenting in Continuous Long-Term Recording When you record continuously over a long period (such as from 00:00 to 24:00 every day for a long time), the number of configuration files for a record may exceed 10,000*. When this happens, the record is segmented, and subsequent data is recorded as a new record. When a record is segmented, the parts appear as separate records during searches, etc. * The number 10,000 is the total number of files since recording started. It includes files that are deleted with the cleanup and data overwrite functions. The time period segmented will differ depending on the frame rate and resolution. Ex.) Chapter 5 Settings 135 Conditions Time until segmentation Codec : JPEG Resolution : VGA Frame rate : 10 fps Image quality : 50% Approx. 19 days When recording continuously over long periods, we recommend segmenting the record by setting a recording schedule that inserts a 1-second recording break each day. For details, refer to “Creating a New Recording Schedule” (page 136). Creating a New Recording Schedule 1 Click [REC Schedule] in the tree on the left side of the window. The “REC Schedule” screen appears. 2 Click [Add] at the top right of the window. The schedule type selection screen appears. 3 Select whether to configure a recurring schedule or a date/time schedule and then click [OK]. 4 Configure all the settings. The settings that appear in the “REC Schedule” screen vary depending on whether you select a recurring schedule or a date/time schedule. Chapter 5 Settings 136 • To configure a recurring schedule Name Enter the name of the recording schedule. Camera Select the check boxes of the cameras to target. When multiple cameras are selected, the same settings are applied to all of the selected cameras. However, Generic Cameras cannot be used together with other cameras for this setting. Show All Click this button to select the check boxes of all the displayed cameras. Week days Specify the days you want the schedule to be active. This setting only appears for weekly schedules. Start Time Specify the time you want the schedule to start. You can specify any time ranging from 00:00:00 to 24:00:00 (hours, minutes, seconds). The display format of the date and time is in accordance with the [Date/ Time Format] setting of “Main” in the “General” pane (page 84). End Time Specify the time you want the schedule to end. The display format of the date and time is in accordance with the [Date/ Time Format] setting of “Main” in the “General” screen (page 84). Duration Displays the duration calculated from the start time and end time. You can also set the end time by specifying a duration. You can specify any duration ranging from 00:00:01 to 24:00:00 (hours, minutes, seconds). If you specify 00:00:00 or if the end time calculated from the start time exceeds 24:00:00, then 24:00:00 is considered to have been specified for the end time and the value is modified accordingly. The display format of the date and time is in accordance with the [Date/ Time Format] setting of “Main” in the “General” screen (page 84). Chapter 5 Settings 137 Normal Recording Select this check box for normal recording and then configure the following settings. Note When normal recording and alarm recording times overlap, if the resolution is set to 360 × 288 dpi for normal recording and 720 × 576 dpi for alarm recording, the resolution of images imported from the camera becomes 720 × 576 dpi. Normally, images imported from cameras use the maximum frame rate and resolution values for all actions during operation. [Frame/second], [Resolution], [Quality], and [Color Level] Configure the image quality settings to send to the camera at the schedule start time. Caution Because the available frame rates differ depending on the camera and codec, click [V] next to [Frames/second], and select a frame rate available for the camera from the list that appears. Make sure to confirm operation before operating NSR. For Generic Camera, a list of available frame rate and resolution settings for the camera will be shown. Alarm Recording Select this check box for alarm recording and then configure the following settings. Caution If the camera properties for alarm recording or normal recording are different from the camera properties for monitoring, the camera image stops updating for several seconds when recording starts and stops. Make sure to confirm your settings before operating NSR. [Frame/second], [Resolution], [Quality], and [Color Level] Configure the image quality settings to send to the camera at the schedule start time. Caution Because the available frame rates differ depending on the camera, click [V] next to [Frames/second], and select a frame rate available for the camera from the list that appears. Make sure to confirm operation before operating NSR. For Generic Camera, a list of available frame rate and resolution settings for the camera will be shown. Pre Alarm If upon occurrence of an alarm, you want to go back and record the images prior to the alarm, configure the following settings. Frame/second Specify the frame rate (fps) for recording pre-alarm images. Chapter 5 Settings 138 Caution Because the available frame rates differ depending on the camera, click [V] next to [Frames/second], and select a frame rate available for the camera from the list that appears. Make sure to confirm operation before operating NSR. Note For MPEGs, when the frame rate set here is less than the frame rate set under “Main” in “Camera,” the latter is applied. Pre Duration Specify from how far back prior to the alarm to record images. Caution Pre Alarm recording cannot be performed for audio. Note The maximum Pre Alarm recording time is subject to both of the following restrictions: • Total number of frames: 1,500 frames • Data size: 5 MB1) 2) 1) Under the following conditions, about 6 seconds of Pre Alarm recording can be performed for every 1 MB. • VGA, JPEG at 5 fps 2) When Generic Camera is selected under the following conditions, the maximum data size increases to 20 MB in order to accommodate the Pre Alarm recording time. • Horizontal image resolution: 1,280 pixels or more • Pre Alarm recording time: 3 seconds or more • Frame rate: 5 fps or more Post Alarm If you want to record the images after the alarm occurs, configure the following settings. Duration Specify the duration for post alarm recording. Fixed Duration Select the starting point for the post alarm duration. • When [Alarm Start] is selected, recording is performed for the specified duration from the moment an alarm starts. • When [Alarm End] is selected, recording is performed for the specified duration from the moment an alarm ends. Chapter 5 Settings 139 Note The pre-alarm, alarm, and post-alarm periods have the following relationship. 1 Pre-Alarm Period The period of time before the alarm occurred, as set in [Duration] under [Pre Alarm]. 2 Alarm Period The alarm signal is active during this period. 3 Post-Alarm Period The period of time after the alarm is stopped, as set in [Duration] under [Post Alarm]. The post-alarm period can be set as the period starting from either the point the alarm is triggered or the point the alarm ends. 4 Alarm Triggered The alarm signal was activated at this moment. Inputs Configure properties relating to the input source. Sensor Input If you want to select a sensor input name as a trigger for alarm recording, select this check box and then select a sensor input name. You can select multiple sensor input names. When the [Show all] check box is selected, all the sensor inputs enabled for the camera are displayed. When the check box is cleared, only the sensor inputs for the targeted camera are displayed. The sensor input names of all cameras and the NSR are available for selection if [Enable] is set for them. VMD (Recorder) Select this check box to select motion detection as a trigger for alarm recording. You must configure the motion detection settings to use this function. Caution When configuring a schedule for multiple cameras, unlike sensor inputs, each camera’s own motion detection is treated as an input. Video Motion Filter To select a VMF package as the trigger for alarm recording, select this check box and then select a VMF package. Chapter 5 Settings 140 When the [Show All] check box is selected, all the VMF packages for the camera are displayed. When the check box is cleared, only the VMF packages for the targeted camera are displayed. Caution Uses a VMF package (Unattended), an initialization period of approximately 40 seconds is required at the start time of the schedule. Detection is not performed during initialization, so be careful when configuring the schedule. VMD (Recorder) Enable motion detection. VMD (Recorder) Configuration Select setting information for motion detection. • To configure a date/time schedule Except for the way the start/end date and time are specified, the configuration method is the same as that of a recurring schedule. Start Date Specify the date and time you want the schedule to start. The display format of the date and time is in accordance with the [Date/ Time Format] setting of “Main” in the “General” screen (page 84). End Date Specify the date and time you want the schedule to end. The display format of the date and time is in accordance with the [Date/ Time Format] setting of “Main” in the “General” screen (page 84). 5 Once you have configured all the desired settings, click [Save] in the upperright corner of the window. The settings are applied. If you want to ignore all your setting modifications, click [Discard]. Note When you register recording schedules one after another, the configurations for a previously registered schedule are set as the default values for each new schedule you create. Chapter 5 Settings 141 Modifying Schedule Settings Schedules can be modified using one of the following methods: • Modifying from the schedule list • Modifying from the recurrent schedule list • Modifying from the date/time schedule list Modifying From the Schedule List 1 Click [REC Schedule] in the tree on the left side of the window. The “REC Schedule” screen appears. 2 Click [List]. The schedule list appears. When the same schedule is configured on different cameras, it is displayed as a single schedule. In this case, the camera names are listed in the [Camera] column. 3 Double-click the schedule you want to modify. The schedule configuration screen appears. 4 Modify the settings you want to change. Chapter 5 Settings 142 For details on each setting, see “Creating a New Recording Schedule” (page 136). Modifying From the Recurrent Schedule List 1 Click [REC Schedule] in the tree on the left side of the window. The “REC Schedule” screen appears. 2 Click [Recurrent]. The recurrent schedule list appears. 3 Double-click the schedule you want to modify. If you single-click the schedule, schedule times and other relevant information appear at the bottom of the window. The recurrent schedule configuration screen appears. 4 Modify the settings you want to change. Chapter 5 Settings 143 For details on each setting, see “To configure a recurring schedule” in step 4 of “Creating a New Recording Schedule” (page 136). Modifying From the Date/Time Schedule List 1 Click [REC Schedule] in the tree on the left side of the window. The “REC Schedule” screen appears. 2 Click [Date/Time]. The date/time schedule list appears. 3 Double-click the schedule you want to modify. The date/time schedule configuration screen appears. 4 Modify the settings you want to change. Chapter 5 Settings 144 For details on each setting, see “To configure a date/time schedule” in step 4 of “Creating a New Recording Schedule” (page 136). Monitor You can configure the monitor layout display method in [Monitor]. The settings are as follows. • Registering monitor layouts • Adding monitor sequences If you configure a monitor sequence, you can sequence through each display at a preset time during monitoring. Chapter 5 Settings 145 Registering a New Monitor Layout You can register a new monitor layout configuration. Use a template when registering a new monitor layout. The following types of templates are provided. Choose one that suits your needs, and then configure the monitor layout by assigning cameras. Predefined configuration templates 1×1 2×2 3×3 4×4 5×5 6×6 7×7 8×8 Custom configuration templates 1 Custom1 Custom2 Custom3 Custom4 Custom5 Custom6 Custom7 Custom8 Custom9 Custom10 Custom11 Custom12 Click [Monitor] in the tree on the left of the window. The “Monitor” screen appears. Chapter 5 Settings 146 2 Click [Add] in the upper right part of the window. The “Select Type” screen appears. 3 Click [Add Monitor Layout]. The “Select Template” screen appears. 4 Select a template, and then click [OK]. 5 Configure all the settings. Chapter 5 Settings 147 Name Enter the name of the monitor layout in the text box. Template This field displays the template selected in Step 4, above. When configuring a second monitor, click [V], and select the template to use from the list that appears. You can select a 1×1, 2×2, or 3×3 monitor layout. In addition, multiple hot spot monitor windows can be defined for the second monitor. Select the number of hot spot monitor windows for the second monitor here. Enable Select this check box when you want to use the monitor layout configurations that are set currently. If this check box is not selected, the monitor layouts cannot be used in the “Monitoring” window. In addition, this option cannot be changed for the monitor window of the default layout or the second monitor. Monitor Window Click [V] and select the monitor window to configure from the list that appears. Camera Select the source camera. If you do not select a camera, when you open the monitoring window, it does not display anything. In addition, the camera cannot be specified for the monitor windows designated for the hotspot monitor window or the monitor window of the default layout. Hot Spot Monitor WIndow Set this when you want the images of a monitor window to also appear on the monitor window set as the hot spot when the monitor window is clicked or an alarm occurs. In addition, this option cannot be changed for the monitor window of the default layout or the second monitor. Show Information Specify the information to display on the selected monitor window. Select the check boxes of only the items below that you want to display. Camera name Status : Indicates the name of the camera. : Indicates the recording type (MANUAL REC, ALARM REC, or NORMAL REC) during recording. Indicates the playback status (PAUSE, etc.) and play speed (+1x, –0.2x, etc.) during the playback of recordings (“+” appears for the play speed when playback is in the forward direction and “–” appears for the play speed when playback is in the reverse direction). Time : Indicates the current date and time or the recording date and time. The display format is in accordance with the [Date/Time Format] setting (page 86) of “Main” in the “General” screen. Reception frame number : Indicates the camera image capture rate. Bandwidth : Indicates the bandwidth used for transferring images via the network connection. Display frame rate : Indicates the refresh rate for displaying camera images on the monitor. Chapter 5 Settings 148 VMD (Recorder) : Displays a frame around the subject for which motion was detected. Apply to all monitor windows When you click this button, the settings in the information display are applied to all of the monitor windows. Video Motion Filter Specify the Video Motion Filter information to display in the selected monitor window. Of the items below, only those with a selected check box are displayed. Object Frame Displays the object frame. Alarm Object Frame Displays the object frame for triggering alarms. Filter Frame Displays the filter frame. Inactive Area Frame Displays the inactive area frame. Object ID Displays the object ID. This item is only enabled when [Show Object Frame] is selected. Object Duration Displays the duration that an object was recognized as moving, or the duration that an object was recognized as unattended or removed. This item is only enabled when [Show Object Frame] is selected. Filtered Count Displays the number of times the filter conditions are satisfied. This item is only enabled when [Show Filter Frame] is selected. Comment Enter a comment about the monitoring layout. 6 Once you have configured all the desired settings, click [Save] in the upperright corner of the window. The settings are applied. If you want to ignore all your setting registration, click [Discard]. Adding a Monitoring Sequence When you configure a monitoring sequence, at a specified time you can sequence through all displays during monitoring. 1 Click [Monitor] in the tree on the left of the window. The “Monitor” screen appears. Chapter 5 Settings 149 2 Click [Add] in the upper right part of the window. The “Select Type” screen appears. 3 Click [Add Monitor Sequence]. 4 Configure all the settings. Name Enter the name of the monitoring sequence. Enable Select this check box to use the current monitoring sequence. Monitoring layout list Register the monitor layouts you want to use with the monitor sequence you are currently configuring. Registered monitor layouts appear in the list. To add a Monitor Layout (1) Click [Add]. The following screen appears. Chapter 5 Settings 150 (2) Select the monitoring layout that you want to add from the pulldown list, and then enter how long you want it to be displayed onscreen (in seconds). (3) Click [OK]. To delete a Monitor Layout Select the monitor layout you want to delete in the monitor layout list and then click [Delete]. To change the Monitor Layout Order Select a monitor layout in the monitor layout list and then click [Up] or [Down] to change the order. Comment Enter a comment about the monitoring sequence. 5 Once you have configured all the desired settings, click [Save] in the upperright corner of the window. The settings are applied. If you want to ignore all your setting registrations, click [Discard]. User Use the “User” settings to register users and assign permissions. Creating a User 1 Click [User] in the tree on the left of the window. The “User” screen appears. Chapter 5 Settings 151 2 Click [Add] at the top right of the window. 3 Configure all the settings. Name Enter the user name. The name is not case sensitive when logging on. Password Enter the password. To change the password later, edit this field. Retype Password Enter the password again for confirmation. Group Select the level of privileges to assign to the user. For details on each privilege level, see “User Permissions” in the “Miscellaneous” section (page 157). Comment Attach a comment for the user. Note For users operating by remote control, create names and passwords consisting entirely of numerals, because only numerals can be entered from the remote control. Chapter 5 Settings 152 4 Once you have configured all the desired settings, click [Save] at the top of the window. The user is created. To not create the user and discard any modifications, click [Discard]. Chapter 5 Settings 153 Miscellaneous Functions Supported by the Remote Control Keys Key Function Monitor Layout Switch Functions (1x1) Switches the monitor layout to 1x1 (1 monitor window). A subsequent press of the key switches back to the original layout. However, once the monitor layout is switched to 1x1, if it is switched again by an action, monitoring sequence, or monitor layout change, then subsequent presses of the key switch the camera display in order of the cameras registered to the 1x1 layout. (2x2) Switches the monitor layout to 2x2 (4 monitor windows). Subsequent presses of the key switch the camera display in order of the cameras registered to the 2x2 layout. (3x3) Switches the monitor layout to 3x3 (9 monitor windows). Subsequent presses of the key switch the camera display in order of the cameras registered to the 3x3 layout. (4x4) Switches the monitor layout to 4x4 (16 monitor windows). Subsequent presses of the key switch the camera display in order of the cameras registered to the 4x4 layout. (5x5)* Switches the monitor layout to 5x5 (25 monitor windows). Subsequent presses of the key switch the camera display in order of the cameras registered to the 5x5 layout. (6x6)* Switches the monitor layout to 6x6 (36 monitor windows). Subsequent presses of the key switch the camera display in order of the cameras registered to the 6x6 layout. (7x7)* Switches the monitor layout to 7x7 (49 monitor windows). Subsequent presses of the key switch the camera display in order of the cameras registered to the 7x7 layout. (8x8)* Switches the monitor layout to 8x8 (64 monitor windows). Subsequent presses of the key switch the camera display in order of the cameras registered to the 8x8 layout. Switches the monitor layout to a custom registered layout. Subsequent presses of the key switch custom registered layouts in order. Turns on/off the sequence defined for the current monitor. * When SHIFT LOCK is ON. Miscellaneous 154 Key Function Camera Selection and Control Functions Enables you to select the camera to control (pan, tilt, zoom, focus, etc.). After pressing this key, select the camera by entering the camera number (0 to 9) with the numeric keypad and then pressing the [Enter] key. Increases or decreases the zoom value of the camera selected currently. Increases or decreases the focus value of the camera selected currently. Increases or decreases the brightness level of the camera selected currently. Turns on the auto focus of the camera selected currently. Turns on the auto brightness level of the camera selected currently. * CAMERA PRESET Enables you to recall a preset position for the camera selected currently. CAMERA PRESET Enables you to delete a preset position for the camera selected currently. (currently not supported) CAMERA PRESET Enables you to set the position (settings) of the camera selected currently as a preset. (currently not supported) Returns all registered cameras to their home positions (preset settings) and then starts recording images. (currently not supported) * Search and Play/Record Functions Starts a quick search. * Displays the search menu for a recorded image. Displays a list of saved recordings. Records the images of the camera selected currently. Stops recording the images of the camera selected currently. Increases or decreases the speed of forward or reverse playback. Starts reverse playback or forward playback. / Pauses playback. Moves to the beginning of the previous or next recorded image. / / * Rewinds or forwards by 1 frame. Other Functions Switches the mode (Live/Playback) of the monitor window of the camera selected currently. * When SHIFT LOCK is ON. Miscellaneous 155 Key Function Switches between the [Monitoring] window and the [Configuration] window. (currently not supported) * Logs off the user operating the NSR currently. Prohibits key operations. * Copies recorded camera images to a DVD/CD. (See “Remote Control Operations” under “Notes” (page 179).) Turns on/off the microphone (audio). (currently not supported) Mutes audio from the speakers. Pressing again cancels the muting. * Displays just the images in full screen. * / * Increases or decreases the microphone volume (audio output). (currently not supported) * Increases or decreases the speaker volume (audio output). Moves to the previous or next setting item. Applies the function settings. Selects multiple buttons and monitor windows in the setting items. Cancels an input. to Digit keys for logging on, entering camera numbers and other values. Switches the Option window. Updates the Option window. Switches to camera control. Use these keys to access preset functions. (currently not supported) * When SHIFT LOCK is ON. Note The functions for each key are subject to change. Miscellaneous 156 User Permissions The following are the permissions you can set for users. There are four levels of user permissions. Level 1: Allows a user to perform monitoring and reference the option window. Level 2: In addition to Level 1 privileges, this level allows a user to perform camera controls such as pan, tilt, and zoom and to search and play back recorded images. Level 3: In addition to Level 2 privileges, this level allows users to perform option window operations other than starting, stopping, exporting, and referencing recorded images. Level 4: Allows a user to perform any setting or operation. Window Monitoring Operation Monitoring Button name / mouse operation Remote control operation View screen — Camera selection CAMERA SELECT Change layout, sequence, double-click window MONITOR LAYOUT, SEQUENCE Adjust focus by clicking window, multiple selection Joystick operation, CHECK Level Level Level Level 4 3 2 1 Yes Yes Yes Yes Yes Yes Yes Yes Yes Yes Yes None [Configuration]/[System] button Option Window operation (reference only) Camera Control Full Screen Full Screen Audio control F1, SPEAKER VOLUME, MUTING 2. Recordings Status (double-click enabled) F1 3. Recording List (double-click disabled) F1, F2 4. Alarm Log (double-click enabled) F1, F2 5. System Log (double-click enabled) F1, F2 6. Alarm Output (double-click disabled) F1, F2 7. Sensor Input F1, F2 8. VMD (Recorder) F1, F2 9. Manual Trigger (double-click disabled) F1 Camera control F1, F3, PTZ, (auto) FOCUS/BRIGHT CAMERA PRESET (recall) Mic control (currently not supported) Playback MIC VOLUME PLAY, REVERSE, PAUSE, Various operation Play Speed, Next/Prev buttons Frame, Nex/Prev Record Miscellaneous 157 Window Monitoring (Continued) Button name / mouse operation Operation Searches Remote control operation Quick Search QUICK SEARCH Search Menu SEARCH MENU Level Level Level Level 4 3 2 1 Yes Yes Yes None Yes Yes None None Yes Yes Yes Yes Yes None None Yes None None None Yes Yes Yes Yes Yes Yes Yes None Yes Yes None None Yes None None None Play back from Record List F1, F2 (double-click enabled) Configuration Start Recording (Manual) REC START REC Stop Recording (Manual) REC STOP (Manual only) REC STOP Stop Recording (Schedule) REC STOP (Schedule only) REC STOP Export Export (still image) EXPORT Export (movie) EXPORT Option Window operation (nonreference) Manual trigger (doubleclick enabled) ON/OFF F1 Alarm output (double-click enabled) ON/OFF F1, F2 Camera control (Preset configurations) Configure/delete camera presets from monitor windows CAMERA PRESET (set/delete) (currently not supported) Configuration [Configuration] button — System Menu [System] button — Configuration General settings (General) — Yes Camera settings (Camera) — System Sensor input settings (Sensor Input) — Alarm output settings (Alarm Output) — Action settings (Action) — Schedule settings (REC Schedule) — Monitor layout settings (Monitor) — User settings (User) — Log On, Log Off Log On Screen, System Menu — Lock Screen System Menu, Lock — Change Password System Menu — Export Log Files System Menu — Reboot/Shutdown System Menu — Save Configuration Data System Menu — Setup Menu System Menu — Restore Configuration Data System Menu — Note The user permissions are subject to change. Miscellaneous 158 System Setup Menu Items Main heading Subheading 1 Subheading 2 Description Default Required Language Display — — Language setting English — Keyboard Layout — — Keyboard setting English — Date and Time — — Date/Time setting — — Network General Primary DNS Primary Domain Name server — — Secondary DNS Secondary Domain Name server — — Default Gateway Default Gateway — — Hosts Setting — — Network Device 1 IP Address IP address of Port 1 192.168.0.1 (DHCP/static) Yes Netmask Subnetmask 255.255.255.0 Yes Route Setting Route table setting — — Network Device 2 IP Address (Only the NSR-100/50) Netmask Route Setting Network Device 3 IP Address (Only the NSR-100/50) Netmask Route Setting Monitor /etc/hosts setting Dual Display IP address of Port 2 192.168.1.1 (DHCP/static) — Subnetmask 255.255.255.0 — Route table setting — — IP address of Port 3 192.168.2.1 (DHCP/static) — Subnetmask — 255.255.255.0 Route table setting — — When using two monitors Not checked — Generic Monitor Display Types Monitor type LCD 1600×1200 Yes Others Display Types Monitor type other than generic — — Resolution — Output resolution 1024×768 Yes Video — (Only the NSR-100/50) — PAL/NTSC PAL Yes Hostname Host Name — Host name NSRnnn_XXXX — Domain Name — Domain name Localdomain — NTP SNMP Enable/Disable — Enable/disable NTP Disable — Server1 — NTP server 1 — — Server2 — NTP server 2 — — Server3 — NTP server 3 — — Agent Enable/Disable SNMP agent setting Disable — Community — public — Contact — contact@localhost. localdomain — Location — office — Miscellaneous 159 Main heading Subheading 1 Subheading 2 Description Default Required SNMP (Continued) Traps Enable/Disable SNMP trap setting Disable — Host IP Address — 127.0.0.1 — Community — public — Temperature Events — Checked — Voltage Events — Checked — UPS UPS Events — Checked — Power Events — Checked — Fan Events — Checked — RAID Events — Checked — HDD Events — Checked — Enable/Disable — UPS setting Disable — UPS models — Basically APC required — — Power off seconds — Time setting after power interruption 300 — Note The following are characters that can be used for the host, domain, and server names: a-z, A-Z, 0-9, - (hyphen), and _ (underscore). Monitoring Setting Items Main heading Subheading 1 Subheading 2 General Main Network Detailed setting / (*) Description Default Comment — — Date/Time Format — YY/MM/DD hh:mm:ss Enable NTP Server — Not checked Synchronize with NTP Server — Not checked RSM Server User/Pass (*) Up to 15 characters (a-z, A-Z, 0-9) each for both User and Password. admin/admin Port 80 or 1024 - 65535 8081 Enable System Alert — Not checked Enable FTP Server — Not checked FTP Password (*) Up to 15 characters (a-z, A-Z, 0-9) — Nothing — — — — Recipient (To Address) (*) Up to 255 characters. Separate multiple addresses by commas (,). — Sender (From Address) — — e-Mail (SMTP) SMTP Server (Mail Server) Miscellaneous 160 Main heading Subheading 1 Subheading 2 Detailed setting / (*) Description Default General (Continued) Enable/Disable Enable Run cleanup job when: Disable Run Cleanup job when Remaining Capacity is lower than 32,767 MB Run Cleanup job when Cleanup files saved more than 30 days Data Overwriting Enable/Disable Enable When Enable Not to be less than 30,720 MB Notify System Alert Disable Storage Default When Remaining Capacity is lower than 30,720 MB Alarm Enable/Disable Enable Run cleanup job when: Disable Run Cleanup job when Remaining Capacity is lower than 32,767 MB Run Cleanup job when Cleanup files saved more than 100 days Data Overwriting Enable/Disable Enable When Enable Not to be less than 1,536 MB Notify System Alert Disable When Remaining Capacity is lower than 0 MB Manual Enable/Disable Enable Run cleanup job when: Disable Run Cleanup job when Remaining Capacity is lower than 32,767 MB Run Cleanup job when Cleanup files saved more than 50 days Data Overwriting Enable/Disable Enable When Enable Not to be less than 12,288 MB Notify System Alert Disable When Remaining Capacity is lower than 0 MB Normal Enable/Disable Enable Run cleanup job when: Disable Run Cleanup job when Remaining Capacity is lower than 32,767 MB Run Cleanup job when Cleanup files saved more than 30 days Data Overwriting Enable/Disable Enable When Enable Not to be less than 30,720 MB Notify System Alert Disable When Remaining Capacity is lower than 0 MB Camera Main Camera Name (*) Up to 50 characters. Alphanumeric characters, - (hyphens), and _ (underscores) only. — User Name — — Password — — Address — — Port — 80 Timeout — 15,000 Miscellaneous 161 Main heading Subheading 1 Subheading 2 Detailed setting / (*) Description Default Camera (Continued) Address — Port — SNT Settings Video in setting — Channel — Video Settings Mount Angle 0 Video Codec — FPS — Main (Continued) Use Proxy Audio Settings VMF Settings Storage Settings Presets Mask VMD (Recorder) Preset Name Resolution — Image Quality 50 Color Level 50 Notify System Alert by “VIDEO LOSS” Not checked No VMD (Recorder) during PTZ movement Not checked Enabling Audio Not checked Audio Codec — Sampling Frequency — VMF Support Not checked Default Package Not checked Alarm Recording Default Manual Recording Default Normal Recording Default (*) Up to 32 characters. Alphanumeric characters only. May depend on the camera. — Mask Type (Single Color) RGB Color 0-0-0 Mask Type (Gaussian Blur) Radius (1-18) 3 Mask Type (Mosaic (Average)) DeltaX/DeltaY 10/10 Mask Type (Mosaic (Duplicate)) DeltaX/DeltaY 10/10 Mask Type (Random Noise) Amplitude (1-1024) 256 Mask Type (Luminance (Gamma)) Level (10-1000%) 150 Mask Type (Border) RGB Color/Width (1-255) 254-0-0/2 Configuration Name (*) Up to 50 characters. Alphanumeric characters, - (hyphens), and _ (underscores) only. — Area Mode — Include VMD Mode Normal Not checked High-Performance Checked RGB 0-254-0 Display Color Preset Name — — Threshold — 30 Miscellaneous 162 Main heading Subheading 1 Subheading 2 Detailed setting / (*) Description Default Camera (Continued) — Not checked Previous Frame 10 Candidate Frame 10 Block Size X 4 Block Size Y 4 Max Object Size X 100 Max Object Size Y 100 Min Object Size X 0 Min Object Size Y 0 Min Objects For Alarm 1 Package Name (*) Up to 32 characters. Alphanumeric characters and spaces only. — Pulse — Not checked Pulse Duration — — Package Type Sequential/Parallel Parallel Filter 1 to 3 Enable/Disable Not checked Filter Name Not checked VMD (Recorder) (Continued) VMF Expert Mode Check 0 sec. Time to apply the filter (*) When [Sequential]. Up to 32 characters. Alphanumeric characters, - (hyphens), and spaces only. Object Size Sensor Input Alarm Output Action Input N Output N Action N Filter Type Existing Minimum Size/Maximum Size — Object Speed Minimum Speed/Minimum Speed 0 pixel/1 sec. Duration (*) When [Existing] and [Unattended/ Removed] filter types — Name (*) Up to 50 characters. Alphanumeric characters, - (hyphens), and _ (underscores) only. — Invert Check — Not checked Enable Check — Not checked Name (*) Up to 50 characters. Alphanumeric characters, - (hyphens), and _ (underscores) only. — Pulse Check — Not checked Pulse Duration (*) 1-60000 ms 500 ms Invert Check — Not checked Enable Check — Not checked Name (*) Up to 127 characters. Alphanumeric characters, - (hyphens), and _ (underscores) only. — Comment — — Event Sensor Input (Sensor Name, Active/ Inactive) — VMD (Recorder) (Camera Name) — Hardware Failure — System Alert — Manual Trigger Checked Miscellaneous 163 Main heading Subheading 1 Subheading 2 Detailed setting / (*) Description Default Action (Continued) Report By Mail (Send Still Image, Camera Name) — Start Beep (Duration) — Stop Beep (*) 0 - 2,147,483 sec. — Change Monitor Layout (Layout Name, Change to previous layout, After event, Duration (1-2147483646)) — Active Alarm Out (Alarm Out Name) — Deactive Alarm Out (Alarm Out Name) — Recall Preset (Camera, Preset) — Name (*) Up to 50 characters. Alphanumeric characters, - (hyphens), and _ (underscores) only. — Camera — — Action N (Continued) REC Schedule Recurrent Schedule N Action Weekdays Start Time (HH/MM/SS) Monday Checked Tuesday Checked Wednesday Checked Thursday Checked Friday Checked Saturday Checked Sunday Checked — End Time (HH/MM/SS) — Duration (HH/MM/SS) — Normal Recording — Checked Frame/Second All Resolution CIF (360*288) Auto Quality 50% Color Level 50% — Not checked Frame/Second All Resolution CIF (360*288) Auto Quality 50% Color Level 50% Pre Alarm Frame/second All Pre Alarm Duration (second) 0 Post Alarm Duration (second) 10 Post Alarm Rec from (alarm start/end) Alarm end Alarm Recording Sensor Input Not checked Sensor Name — Video Motion Filter Not checked VMF Package Name — VMD (Recorder) Not checked Miscellaneous 164 Main heading Subheading 1 Subheading 2 Detailed setting / (*) Description Default REC Schedule Recurrent (Continued) Schedule N (Continued) — Not checked VMD (Recorder) Setting name Name (*) Up to 50 characters. Alphanumeric characters, - (hyphens), and _ (underscores) only. — Camera — — Start Date (YY/MM/DD HH/MM/SS) — End Date (YY/MM/DD HH/MM/SS) — Date/Time Schedule N VMD (Recorder) Normal Recording Alarm Recording VMD (Recorder) — Checked Frame/Second All Resolution CIF (360*288) Auto Quality 50% Color Level 50% — Not checked Frame/Second All Resolution CIF (360*288) Auto Quality 50% Color Level 50% Pre Alarm Frame/second All Pre Alarm Duration (second) 0 Post Alarm Duration (second) 10 Post Alarm Rec from (alarm start/end) Alarm end Sensor Input Not checked Sensor Name — Video Motion Filter Not checked VMF Package Name — VMD (Recorder) Not checked — Not checked VMD (Recorder) Setting name Miscellaneous 165 Main heading Subheading 1 Subheading 2 Detailed setting / (*) Description Default Monitor — — Enable Enable/Disable Checked Display Camera Name Checked Status Checked Date & Time Checked Frames Per Second Not checked Bandwidth Not checked Display Images Per Second Not checked VMD (Recorder) Checked Object Frame Not checked Alarm Object Frame Not checked Filter Frame Not checked Inactive Area Frame Not checked Object ID Not checked Object Duration Not checked Default Layout Name Filtered Count Monitor 2 Custom Layout Not checked Hot Spot Monitor Window — Checked Template 1×1/2×2/3×3 — Display Camera Name Checked Status Checked Date & Time Checked Frames Per Second Not Checked Bandwidth Not Checked Display Images Per Second Not Checked VMD (Recorder) Checked Object Frame Not checked Alarm Object Frame Not checked Filter Frame Not checked Inactive Area Frame Not checked Object ID Not checked Object Duration Not checked Filtered Count Not checked Name (*) Up to 63 characters. Alphanumeric characters, - (hyphens), and _ (underscores) only. — Enable Enable/Disable Hot Spot Monitor Window — Display Camera Name Status Checked Not checked Checked Checked Date & Time Checked Frames Per Second Not Checked Bandwidth Not Checked Display Images Per Second Not Checked Miscellaneous 166 Main heading Subheading 1 Subheading 2 Monitor (Continued) Custom Layout (Continued) Monitor Sequence User Level N Detailed setting / (*) Description Hot Spot Monitor Window VMD (Recorder) Display Object Frame (Continued) Alarm Object Frame Name Default Checked Not checked Not checked Filter Frame Not checked Inactive Area Frame Not checked Object ID Not checked Object Duration Not checked Filtered Count Not checked (*) Up to 63 characters. Alphanumeric characters, - (hyphens), and _ (underscores) only. — Enable/Disable — Disable Sequence List Monitor Layout — Duration 5 Comment — — — (*) Level 1-4 — Name (*) Up to 63 characters. Alphanumeric characters only. — Password (*) Up to 15 characters. Alphanumeric characters only. — Comment — — Note The setting items are subject to change. Miscellaneous 167 STATUS LED When an error occurs, the STATUS and ERROR LED light or flash. STATUS 1 2 3 4 ERROR The STATUS LED indicates the following error situations. Error codes displayed during boot stage (The ERROR LED blinks when an error occurs during boot.) Error code STATUS LED ERROR LED Possible Cause 1 1 2 3 4 Blinking Voltage power supply failure 2 1 2 3 4 Blinking CPU fan failure 3 1 2 3 4 Blinking Defective memory module 4 1 2 3 4 Blinking CMOS battery failure 5 1 2 3 4 Blinking Video random access memory (RAM) or controller failure 6 1 2 3 4 Blinking Hard disk controller failure 7 1 2 3 4 Blinking No bootable device found 8 1 2 3 4 Blinking No bootable Operating System found 9 1 2 3 4 Blinking One or more hard disk failure A 1 2 3 4 Blinking RAID OS volume failure B 1 2 3 4 Blinking Failure to start the X11 server C 1 2 3 4 Blinking Failure to start the application D 1 2 3 4 Blinking Reserved for future use E 1 2 3 4 Blinking Reserved for future use F 1 2 3 4 Blinking RAID data volume failure Miscellaneous 168 Error codes displayed during operation stage (The ERROR LED lights when an error occurs during operation.) Error code STATUS LED ERROR LED Possible Cause 1 1 2 3 4 On Critical temperature 2 1 2 3 4 On CPU fan failure 3 1 2 3 4 On Power supply fan failure 4 1 2 3 4 On Voltage power supply failure 5 1 2 3 4 On Hard disk drive fan 1 failure 6 1 2 3 4 On Hard disk drive fan 2 failure 7 1 2 3 4 On Hard disk drive is damaged. 8 1 2 3 4 On Reserved for future use 9 1 2 3 4 On Reserved for future use A 1 2 3 4 On Reserved for future use B 1 2 3 4 On Reserved for future use C 1 2 3 4 On Application functioning failure. D 1 2 3 4 On Reserved for future use E 1 2 3 4 On RAID data volume failure F 1 2 3 4 On Resync operation in RAID data volume* * A degradation in system performance will occur when a read error occurs while the resync operation is in progress. Miscellaneous 169 I/O Port Pin Assignment of I/O Port Sensor In Pin NO. SENSOR IN 1 3.3 v 2 IN_8– 3 IN_8+ 4 IN_7– 5 IN_7+ 6 IN_6– 7 IN_6+ 8 IN_5– 9 IN_5+ 10 IN_4– 11 IN_4+ 12 IN_3– 13 IN_3+ 14 IN_2– 15 IN_2+ 16 IN_1– 17 IN_1+ 18 GND Alarm Out Pin NO. ALARM OUT 1 GND 2 OUT_8– 3 OUT_8+ 4 OUT_7– 5 OUT_7+ 6 OUT_6– 7 OUT_6+ 8 OUT_5– 9 OUT_5+ 10 OUT_4– 11 OUT_4+ 12 OUT_3– 13 OUT_3+ 14 OUT_2– 15 OUT_2+ 16 OUT_1– 17 OUT_1+ 18 3.3 v Miscellaneous 170 Using the I/O Receptacle Insert a small slotted screwdriver into the upper or lower slot of the hole you want to connect a wire to (AWG No. 28 to 18). Hold down the screwdriver and insert the wire, then release the screwdriver. Caution Do not use excessive force when inserting the screwdriver into the slot. Doing so may result in damage. 1 2 3 Repeat this procedure to connect all required wires. Wiring Diagram 1 for Sensor Input Inside of this unit Outside 3, 5, 7, 9, 11, 13, 15, 17 pin (SENSOR IN+) 2.35 kΩ Sensor device Output: 3.3 to 24 V DC 2, 4, 6, 8, 10, 12, 14, 16 pin (SENSOR IN-) Wiring Diagram 2 for Sensor Input Inside of this unit Outside 1 pin (VDD) (200 mA max) 3, 5, 7, 9, 11, 13, 15, 17 pin (SENSOR IN+) Wire 2.35 kΩ Mechanical switch 2, 4, 6, 8, 10, 12, 14, 16 pin (SENSOR IN-) 18pin (GND) GND or Open collector output device Note When the wiring diagram 2 is used, the NSR is not electrically isolated, so be sure to construct external circuits that will not produce noise, excess voltage, or overcurrents. Miscellaneous 171 Wiring Diagram for Alarm Output Inside of this unit 3, 5, 7, 9, 11, 13, 15, 17 pin (ALARM OUT+) Magnet relay 24 V AC/24 V DC, 1 A or less Outside 5V Circuit example 2, 4, 6, 8, 10, 12, 14, 16 pin (ALARM OUT-) GND Miscellaneous 172 Notes and Limitations Camera Resolution Details Camera Resolution Setting NTSC SNC-RX530, SNC-RX550, SNC-RX570, SNC-RZ50, SNC-CS50, SNC-DF50, SNC-DF80 SNC-P1, SNC-P5, SNC-DF40, SNC-DF70, SNC-RZ25, SNC-CS10, SNC-CS11 PAL “Camera-Main” Screen “REC Schedule” Screen 160×120 (Auto) 160×120 SQCIF (90×60) Field SQCIF (90×60) Frame SQCIF (90×60) Auto QCIF (180×144) Field QCIF (180×144) Frame QCIF (180×144) Auto 320×240 (Auto) 320×240 CIF (360×288) Field CIF (360×288) Frame CIF (360×288) Auto 640×480 (Auto) 640×480 4CIF (640×480) Field 4CIF (640×480) Frame 4CIF (640×480) Auto Full Size (720×576) Field Full Size (720×576) Frame Full Size (720×576) Auto 384×288 384×288 CIF (384×288) Mode 160×120 160×120 SQCIF (90×60) Field SQCIF (90×60) Frame SQCIF (90×60) Auto QCIF (180×144) Field QCIF (180×144) Frame QCIF (180×144) Auto 192×144 192×144 − 224×168 224×168 − 256×192 256×192 − 320×240 320×240 352×264 352×264 384×288 384×288 416×312 416×312 − 448×336 448×336 − 480×360 480×360 − 512×384 512×384 − 544×408 544×408 − 576×432 576×432 − 640×480 640×480 CIF (360×288) Field CIF (360×288) Frame CIF (360×288) Auto − CIF (384×288) Mode 4CIF (640×480) Field 4CIF (640×480) Frame 4CIF (640×480) Auto Full Size (720×576) Field Full Size (720×576) Frame Full Size (720×576) Auto Miscellaneous 173 Camera Resolution Setting NTSC PAL “REC Schedule” Screen 160×120 SQCIF (90×60) Field SQCIF (90×60) Frame SQCIF (90×60) Auto QCIF (180×144) Field QCIF (180×144) Frame QCIF (180×144) Auto 320×240 320x240 CIF (360×288) Field CIF (360×288) Frame CIF (360×288) Auto CIF (384×288) Mode 640×480 (Auto) 640×480 (Auto) 4CIF (640×480) Auto 640×480 (Frame) 640×480 (Frame) 4CIF (640×480) Frame 640×480 (Field) 640×480 (Field) 4CIF (640×480) Field 736×544 (Auto) 736×544 (Auto) Full Size (720×576) Auto 160×120 SNC-RZ30, SNC-CS3, SNC-Z20, SNT-V501 “Camera-Main” Screen 736×544 (Frame) 736×544 (Frame) Full Size (720×576) Frame 736×544 (Field) 736×544 (Field) Full Size (720×576) Field 90×60 90×72 90×72 SQCIF (90×60) Field SQCIF (90×60) Frame SQCIF (90×60) Auto 180×121 180×144 180×144 QCIF (180×144) Field QCIF (180×144) Frame QCIF (180×144) Auto 360×243 360×288 360×288 CIF (360×288) Field CIF (360×288) Frame CIF (360×288) Auto CIF (384×288) Mode 720×243 720×288 720×288 720×486 720×576 720×576 SNC-VL10 − 4CIF (640×480) Field 4CIF (640×480) Frame 4CIF (640×480) Auto Full Size (720×576) Field Full Size (720×576) Frame Full Size (720×576) Auto 320×240 320×240 SQCIF (90×60) Field SQCIF (90×60) Frame SQCIF (90×60) Auto QCIF (180×144) Field QCIF (180×144) Frame QCIF (180×144) Auto CIF (360×288) Field CIF (360×288) Frame CIF (360×288) Auto CIF (384×288) Mode 640×480 (Frame) 640×480 (Frame) 4CIF (640×480) Frame 4CIF (640×480) Auto 640×480 (Field) 640×480 (Field) 4CIF (640×480) Field SNT-V704 720×480 (Frame) 720×576 (Frame) 720×480 (Frame) Full Size (720×576) Frame Full Size (720×576) Auto 720×480 (Field) Full Size (720×576) Field 720×576 (Field) 720×480 (Field) Miscellaneous 174 Camera Resolution Setting NTSC SNT-V304 PAL “Camera-Main” Screen “REC Schedule” Screen 176×112 176×144 Half Size SQCIF (90×60) Auto QCIF (180×144) Auto 176×112 176×144 Half Size (160×120) SQCIF (90×60) Field QCIF (180×144) Field 176×112 176×144 Half Size (176x144) SQCIF (90×60) Frame QCIF (180×144) Frame 352×240 352×288 Full Size CIF (360×288) Auto 352×240 352×288 Full Size (320×240) CIF (360×288) Field 352×240 352×288 Full Size (352×288) CIF (360×288) Frame CIF (384×288) Mode 704×480 704×576 Huge Size 4CIF (640×480) Auto Full Size (720×576) Auto 704×480 704×576 Huge Size (640×480) 4CIF (640×480) Frame 4CIF (640×480) Field 704×480 704×576 Huge Size (704×576) Full Size (720×576) Frame Full Size (720×576) Field Camera Frame Rate Details The frame rates (frames/second) available for selection on the “REC Schedule” screen are common to all cameras, but some cameras may not support some values. A message appears when the selected frame rate is not supported by the camera you are configuring. For a Generic Camera, available frame rate settings are listed in the “CameraMain” and “REC Schedule” windows. Caution When using the SNT-V704, you can set frame rates compatible with either NTSC or PAL under [FPS] on the “Camera-Main” screen. The following values can be set for the SNT-V704 under [FPS] on the “CameraMain” screen and under [Frames/second] on the “REC Schedule” screen. “Camera-Main” Screen “REC Schedule” screen NTSC 1, 2, 3, 4, 5, 6, 7, 10, 15, MAX PAL 1, 2, 3, 4, 5, 6, 8, 12, MAX 1, 2, 3, 4, 5, 6, 8, 12, All Maximum Frame Rate 1, 2, 3, 4, 5, 6, 7, 10, 15, All 30 fps 25 fps Important Precautions (Read Carefully) This section describes important precautions regarding the operation and configuration of the NSR. The content of this section is subject to change without notice. There may also be important details on limitations other than the ones described below. Be sure to consult your dealer before use. • If the length of time for a recording is exceedingly short, a recording with a duration of “0” may be created. This is more likely to occur when MPEG 4 is selected for the video codec setting. You cannot play back recorded images with durations of “0.” To prevent this problem from occurring during scheduled Miscellaneous 175 • • • • • alarm recordings, specify a duration longer than 10 seconds after an alarm under “Post Alarm” of the alarm recording settings. (The default duration is 10 seconds for newly added schedules, so be sure to specify a longer duration.) If you specify a value exceeding the limit for the total frame rate or the system’s processing load is exceedingly high, operations in the recording schedule settings screen may become slow, and the changing or addition of settings may not be possible. In this situation, remove the LAN cable connected to the camera before configuring the settings. In situations where connection to the camera is necessary (such as configuration of camera settings), change the time settings for the schedule, and change the other settings so that recording and motion detection are stopped before configuring the camera settings. Changing and deleting recording schedules may also be possible by connecting a remote client (RealShot Manager Controller). If the Error LED and 1 and 2 of the Status LED on the front panel of the NSR are lit, the NSR may be in a state in which recording is not possible. If recording is not possible even after restarting the unit, refer to “Troubleshooting” in the Installation Manual. If the problem is still not resolved, restart the unit using the supplied NSR Series Recovery CD, and execute “Check file system.” If “Check file system” fails, consult your dealer. When connecting to RealShot Manager Controller (a remote client), always use the Network Device 2 network on the NSR-100/50. If the HDD LED on the front panel of the unit indicates a hard disk malfunction when using the NSR-50, do not remove the hard disk, and contact your dealer. The problem will not be resolved by replacing the hard disk while the unit is powered on and running, and doing so risks damage beyond repair. When the NSR is used for long-term monitoring, the screen may refresh periodically, depending on the settings. Although the screen goes dark for several seconds to several tens of seconds while it is refreshed, this has absolutely no effect on recording. However, because the screen returns to the default monitoring state after refreshing, it does not preserve the playback status of recorded images or any temporary camera selections for monitor windows. It is also necessary to restart any monitoring sequences that were running before the screen refreshed. Notes This section describes some notes on the operation and configuration of the NSR. The content of this section is subject to change without notice. There may also be limitations other than the ones described below. Be sure to consult your dealer before use. Monitoring Window • When you move the mouse focus off of a popup window, the item currently in focus cannot be determined. Move the mouse cursor back onto the popup window to confirm. • If you continuously click on a drop down menu button too quickly, the menu may not open. If this occurs, move the mouse focus away from the button temporarily before clicking again. • You can perform camera control operations while displaying monitor layouts in sequence, but control may become unstable if the monitor layout transitions in the middle of a control operation. When performing camera control operations, disable sequence display beforehand. • Depending on the size of a monitor window, additional information such as the date and time, number of frames received, and number of frames displayed may not fit into the window frame, and the information may be cut off or not Miscellaneous 176 • • • • display. Reduce the number of display items, or select a layout with fewer monitor windows. You can also try shortening the camera name. During playback, a large value appears momentarily for the bandwidth and number of frames received. Refer to the number of frames displayed to confirm playback performance. The number of incoming frames is not displayed for layouts with 17 or more camera images. The number of frames recorded is maintained, but the number of frames displayed is limited. Confirm the number of incoming frames with a layout of 16 or fewer cameras. When the NSR is experiencing a high processing load, video images may freeze momentarily, and response time for button functions such as camera control operations (PTZ) may become slow. There may also be a delay in the image display of the NSR unit when compared to the image display of a remote client. When you select Border for the mask type, be aware that part of the mask may be cut off depending on the size of the monitor window. If this occurs, increase the width of the mask to make sure it displays correctly. Camera Control • After you register a camera, the AUTO buttons under Camera Control light up when focus/brightness adjustment is available. If the actual focus/brightness settings are not that of the auto settings, click the [–] or [+] button and then click the AUTO button to adjust to the auto settings. • When you perform camera control operations (PTZ) while dynamic masking is active, the processing speed for mask tracking may decrease, exposing the masked area. Be sure to cover a sufficient area when configuring the masking settings. • Direct pan and tilt, area zoom, and zoom operations with the mouse wheel can only be performed while pressing the Ctrl key on the left side of the keyboard. The Ctrl key on the right side of the keyboard does not work for these operations. Recording, Playback, and Searches • When you activate alarm recording in a recording schedule, any alarms that occur during an alarm recording will be ignored until the first alarm recording process completes. • When you stop recording for multiple cameras simultaneously, some of the recordings may fail to stop if the NSR is experiencing a high processing load. If recording does not stop, perform the stop operation again. • Searches for recorded images (quick search, PLAYBACK button, search screen) may time out when the NSR experiences a high processing load. If this happens, switch to the live image, and perform the search for recorded images again. If the search still times out, lower the processing load of the NSR, such as by reducing the number of monitor windows displayed, and then perform the search for recorded images again. • Up to 5,000 results matching the specified search criteria are displayed in the Search screen. If there are more than 5,000 recorded images matching the criteria, narrow the criteria, and perform the search again. Be aware that the number of search results is not displayed. • Image updating stops temporarily when searches (quick search, PLAYBACK button, Search screen, Export screen) are in progress. Updates resume once a search is complete. • If you enable cleanup for a storage location, a system alert will not be generated when the remaining capacity for that location is lower than the value set for the alert function. • The maximum duration for a pre-alarm of a schedule can be as long as the buffer for recorded images (approximately 5 MB) allows. The maximum duration available for pre-alarm recording can be determined from the recorded image size and frame rate. Miscellaneous 177 Settings • Do not change settings from both the NSR unit and RealShot Manager Controller at the same time. • When registering multiple cameras at once, an error message appears if any of the settings are configured improperly. Only the cameras configured correctly will be registered. Cameras that have not been configured correctly will reappear on the list, so you will need to register them again. • If you change the mount angle of a camera after configuring a motion detection area with the NSR, the motion detection area does not change accordingly. You must reconfigure the motion detection area. • You cannot use quotation marks (“) when naming a preset, but you can name a preset using only spaces. Be aware, however, that presets named using only spaces appear as if they have not been configured when displayed. • When you change the mount angle (from 90 degrees to 270 degrees for example) in the “Main” settings of the “Camera” screen, the aspect ratios of preview images that appear when searching for and exporting recorded images do not display correctly. The aspect ratios display correctly, however, when the recorded images are played back or when the exported movies or still images are stored on media. • When you add a camera and assign it to a monitor window displaying images with a “No Camera” status under the default monitor layout, the display does not automatically switch over to the images from the assigned camera. To display the images from the assigned camera in the monitor window, switch the monitor layout. • Even when “Send Still Image” is selected as an action setting under “Report By Mail,” still images will not be attached in the following cases. - Video codec for the camera sending the still image is not set to JPEG - Masking is configured on the camera sending the still image - Still image capture failed due to high processing load • When you click [Register] during multiple camera registration, a message indicating that registration is in progress appears along with a [Cancel] button. The [Cancel] button is not for cancelling camera registration mid-progress. If an error occurs while registration is in progress, the [Cancel] button is used to close the message window. It is not used under normal circumstances. • When editing and saving user settings in the Configuration window, reenter the password even if you do not wish to change it. When the password is saved correctly, the password text box appears empty. Be aware that this does not signify a “no password” status. • During multiple camera registration, an error message may appear while configuring camera settings. This may mean that you have not set a user name or password, so be sure to confirm. • When a PAL camera is connected to the SNT-V704, the maximum resolution on the “Main” screen is shown as “720 × 480,” but this corresponds to “720 × 576” on the SNT-V704. • With a PAL camera, the position of a motion detection area may shift. Make sure to configure the motion detection area before using motion detection. Option Window • When the system alert detects a VIDEO LOSS, the event is recorded in the System Log. You cannot confirm the camera for which the VIDEO LOSS occurred by name with the System Log. To confirm the camera name, open the corresponding log record in the Alarm Log. Exporting • The NSR does not include a function to format CD/DVD media to be used for exporting or a function to make them blank. Use media that is already blank. Miscellaneous 178 • When using external media, do not insert a CF (CompactFlash) card and USB memory device at the same time. • When exporting recorded image or log files, an export in progress is cancelled if you click [Abort] in the Status dialog box. A warning message to confirm cancellation does not appear. The export will be cancelled once copying of the file that was to be exported completes. • The NSR supports the following external media formats. - CF (CompactFlash) (only NSR-100/50) - USB memory - CD-R/RW - DVD-R (only NSR-100/50) - DVD+R (only NSR-100/50) Caution • Depending on the external media, it may not be supported. • Errors may occur when writing onto CD/DVD media. If an error occurs, do not eject the CD/DVD, and try writing onto it again. • Do not write on media that has been previously written on. If an error occurs while writing for the second time, previously written data may become unreadable. • DL (Dual Layer) DVDs are not supported. • When multiple files are written onto a CD/DVD with the NSR, only a portion of the files may be readable, depending on the CD/DVD drive or OS (Operating System). (Confirm multi session and multi border support.) System Menu • Second monitors continue to display images while you use the Setup Menu and during shutdown and reboot procedures. • When a route setting for a port that does not have a network cable connected to it is configured during network configuration in the Setup Menu, an error message indicating that the network is unreachable appears. Connect the network cable before configuring the settings. • When creating host and server names for the NSR with the Setup Wizard or Setup Menu, use only alphanumeric characters, underscores (_), and hyphens (-). Remote Control Operations • You can operate the export function from a remote control unit, but the operation may be difficult without the aid of a mouse. • If you use the mouse or F1 key on the remote control unit to switch the Option window to a mode other than Camera Control in the middle of performing pan and tilt operations with the remote control unit, the camera may continue to pan and tilt on its own. Reset the Option window to Camera Control and operate the joystick to regain control of the camera. • When you press the SHIFT button on the remote control unit, the SHIFT LOCK LED lights blue, and the Shift Lock function is enabled. Be aware that the functions printed below each button are active in this state. (This does not include the numeric keys and the CANCEL, ENTER, and CAMERA SELECT buttons.) • You cannot move columns in lists such as those displayed in the Option window with the remote control unit. Use a mouse to select and sort columns. • When the NSR is experiencing a high processing load, some remote control operations may not register immediately. These operations may later execute all at once. • When a monitor window with no camera assigned to it (“No Camera” status displayed) is selected in a multiple window layout, pressing the [1×1] button Miscellaneous 179 on the remote control unit will not change the layout. To change the layout, select a monitor window with a camera assigned to it, and then press the [1×1] button. Remote Clients • To connect to the NSR unit from RealShot Manager Controller, perform the following steps after starting up RealShot Manager Controller. 1 Click [Remote Server]. 2 Click [+] (Add). 3 Select “device type (Remote PC Interrogator),” enter the name, IP address, and port number, and perform registration. 4 After registration is finished, click the [Remote PC] tab, and enter the RealShot Manager connection user name and password for the NSR unit. • In general, perform camera configurations from the NSR unit. When performing, underscores (_), and hyphens (-) configurations from RealShot Manager Controller, use only alphanumeric characters for settings such as the name. Other characters can be registered, but they will not display properly. • The addition, changing, or deletion of an audio device cannot be performed from RealShot Manager Controller. Cameras and audio devices are registered simultaneously under the same name on the NSR unit when necessary. • When you register a camera supporting audio, an audio device is automatically registered as well. As “Default” is automatically assigned as the storage location for the audio device’s recordings during registration, selecting “Default” as the storage location from RealShot Manager Controller will cause the same device name to appear twice. • When recording with the audio function enabled, two recordings (image and audio) are created. You can differentiate between image and audio recordings in the Search screen by filtering them. • The addition, changing, and deletion of a storage location for recordings cannot be performed from RealShot Manager Controller. • The addition and deletion of cameras assigned to the motion detection pin cannot be performed from RealShot Manager Controller. • You cannot register a remote PC with the NSR from RealShot Manager Controller. • You cannot register the following devices from RealShot Manager Controller. - SNT-V504 - SNC-VL10 - BarioNet - Annuncicom - Instreamer • There are some settings that can be configured from RealShot Manager Controller that cannot be configured (or displayed) on the NSR. Examples: - A clean up schedule set on RealShot Manager Controller will not appear on the NSR. - Audio output pins added on RealShot Manager Controller will not appear on the NSR. • You can select MPEG4-JPEG or JPEG-MEPG4 for the video codec of multicodec cameras such as the CS50 or RX550, but multiple error messages will appear when you click [Apply]. Because the NSR does not use the alarm buffer function, the multi-codec setting is not available on the NSR. The error messages will not appear if you select a single codec setting (JPEG or MPEG4). • If you click an assigned camera under Object Detection Pin directly while setting Object Detection for cameras from RealShot Manager Controller, images from a different camera may be displayed, and RealShot Manager Controller may abort in the middle of operations. If this occurs, click and Miscellaneous 180 select a camera above Object Detection Pin first, then select and configure the camera you wish to set Object Detection for. Be sure to confirm that the camera name for the images displayed is that of the camera you wish to configure. • Auto pan & tilt speed is turned off by default. When using RealShot Manager Controller, we recommend selecting the [Auto Pan & Tilt Speed] check box on the [Camera] tab in the “Setup Manager” window or “Device Properties” dialog box. • When using the SNT-V704, do not turn stream mode off. When using RealShot Manager Controller, make sure the [Stream Mode] check box is selected on the [Picture] tab in the “Setup Manager” window or “Device Properties” dialog box. Miscellaneous • You can specify the amount of time between a power interruption and the start of the shutdown process in the UPS settings (default setting: 5 minutes). Shutdown will also be performed under the following conditions. - When the battery level is below 15% - When less than 5 minutes are left for the remaining battery time • If one of the hard disks develops a malfunction, restoration is possible by switching hard disks when the RAID-1, 1+0, and 5 settings are configured, but image recording during the restoration process is not guaranteed. • Shutdown and rebooting for the NSR may take longer when recording in high levels. Temporarily remove the network cables connecting the cameras or stop recording before shutting down or rebooting. • Be sure to reboot after changing RAID settings in the DOM menu. If you change the RAID settings again without rebooting, an error message will appear. Troubleshooting Before contacting your retailer or a Sony Support Center, please check the following items. If the problem persists, contact them. The NSR does not work. • • • • Verify that the power switch is turned on. Verify that the power cable is connected correctly. Make sure the wall outlet has power. Test it by plugging another device. Verify that the hard disk drives are not being accessed (the HDD LEDs on the front of the recorder do not blink), and then turn it off forcibly by pressing and holding the power switch at the rear of the unit for approximately 10 seconds. Restart the NSR. • During the startup procedure, the NSR checks the file system. The length of this check varies depending on the amount of data on the NSR (in some extreme case, it can take as long as two hours). During the file system check, the HDD LEDs on the front of the recorder blink. • If the NSR does not start correctly, the following screen may appear. Miscellaneous 181 Example: For the NSR-100/50 When it does, proceed as follows. 1 Click [Shutdown] and turn off the NSR. 2 Referring to “Cannot access the hard drive.”, verify whether the NSR hard disks are correctly connected. 3 Restart the NSR and verify whether it starts. 4 If the same screen as above appears again, insert the supplied NSR Series Recovery CD into the CD and DVD drive, and then turn off the NSR. In this state, restart the NSR, and select “2. Check file System” when the following screen appears. Checking the file system may take several hours. 5 When the check is finished, select “7. Shutdown the system”, and turn off the recorder. In addition, do not use any menu option other than “2. Check file system” or “7. Shutdown the system”, as the others are for maintenance purposes. 6 Restart the NSR and immediately eject the NSR Series Recovery CD. Then verify whether the NSR starts correctly. The monitor remains blank. • Verify whether the NSR is on. • Verify whether the power cord is correctly connected. • Verify whether the monitor cable is correctly connected. Confirm that the monitor is connected to VGA connector 1. • If you configure the wrong monitor resolution, the “Out of range” message may appear when the monitor resolution is too low compared to the monitor output. Press CTRL+ALT+MINUS SIGN as many times as necessary to lower the resolution of the output video. When the output image resolution reaches the resolution of the monitor, the image appears. Subsequently, Miscellaneous 182 reconfigure your monitor resolution. For details, see “Modifying the System Configuration” (page 25). The new external hardware is not working properly. • Make sure the cables for the new external device are firmly connected and the pins are not bent. An external device connected to a USB connector does not work. • Reduce the number of external devices connected to USB ports. • Refer to the documentation that came with the device. System cannot read the DVD/CD information. • Make sure that you are using the correct type of disc. • Make sure the DVD/CD is properly inserted in the drive. • Check if the DVD/CD is clean and not scratched. The DVD/CD tray cannot be ejected. • Make sure that the NSR is turned on. • Slowly insert the tip of a pen or paperclip into the eject hole on the DVD/CD drive. Pull the tray out from the drive then remove the disc. The NETWORK LED does not light up. • Check the cabling and network equipment for the proper connection. Cannot access the hard disk drive. • Make sure the hard disk drive is properly inserted. • Check the HDD LEDs on the front panel of the system. Identify the defective hard disk drive by reading the drive LEDs. A defective HDD LED does not light up. • Due to rapid flashing during frequent access to the hard disk drive, the HDD LED may appear unlit in bright environments. Cannot access the CompactFlash card. (Only the NSR-100/ 50) • Make sure the CompactFlash card is properly inserted. • Make sure the CompactFlash card is formatted as VFAT file system. • Make sure the CompactFlash card is not removed within 10 seconds after accessing the card. If you remove the card while files are being accessed or transferred, the NSR may become unstable. You must restart the system in order to access the CompactFlash card. Cannot access NSR from a remote client. • Make sure the NSR is operating properly (there should be no abnormalities with the hard disk drive, network, software or other items). • Make sure the correct user name, password, and connection port are set in RealShot Manager. • Refer to the troubleshooting section of the user’s guide for the RealShot Manager. The NSR heats up quickly • Make sure that nothing is blocking the ventilation openings on the front, sides, and rear of the unit and dust has not accumulated in them. Miscellaneous 183 Specifications Recording device Internal hard disk drives 4 (NSR-100), 2 (NSR-50), 1 (NSR-25) DVD/CD drive 1 drive Compatible media: NSR-100/50: DVD+R, DVD-R, CD-R, CD-RW, and CD-ROM NSR-25: CD-R, CD-RW, and CD-ROM External connectors Rear Monitor output analog RGB (mini D-SUB 15 pins, 2) S-Video output (1) (Only the NSR-100/50) Video output (1) (Only the NSR-100/50) Audio output (L, 1) Audio output (R, 1) LAN 1000Base-T/100Base-TX/10Base-T (RJ-45) NSR-100/50: (3) NSR-25: (1) Hi-speed USB (2) SCSI (LVD/SE, 1) (Only the NSR-100/50) RS-232C (1) Microphone input (1) Sensor input (compatible with 3.3 V to 24 V DC devices, photo coupler input, insulated from main unit, 8) Alarm output (maximum 24 V DC, 1 A, mechanical relay output, insulated from main unit, 8) Front CompactFlash slot (1) (Only the NSR-100/50) Monitor output analog RGB (mini D-SUB 15 pins, 1) (Only the NSR-100/50) Video output (1) (Only the NSR-100/50) Microphone input (1) (Only the NSR-100/50) Audio output (L, 1) (Only the NSR-100/50) Audio output (R, 1) (Only the NSR-100/50) Hi-speed USB (2) (Only the NSR-100/50) Operating environment Temperature range: 5 to 40 °C (41 to 104 °F) Humidity range: 20 to 80% (maximum wet-bulb temperature 30 °C, noncondensing) Power and miscellaneous Power Power consumption Dimensions 100 to 127 V AC/200 to 240 V AC (50/60 Hz) max. 350 W 16.9 in. (W) × 3.4 in. (H) × 16.4 in. (D) 430 (W) × 87 (H) × 417 (D) mm (excluding projections) Miscellaneous 184 Mass NSR-100: Approx. 31.1 lb./ 14 kg NSR-50: Approx. 26.7 lb./ 12 kg NSR-25: Approx. 24.2 lb./ 11 kg The appearance and specifications of this device are subject to change without notice in the interest of product improvement. Notes • Always make a test recording, and verify that it was recorded successfully. SONY WILL NOT BE LIABLE FOR DAMAGES OF ANY KIND INCLUDING, BUT NOT LIMITED TO, COMPENSATION OR REIMBURSEMENT ON ACCOUNT OF FAILURE OF THIS UNIT OR ITS RECORDING MEDIA, EXTERNAL STORAGE SYSTEMS OR ANY OTHER MEDIA OR STORAGE SYSTEMS TO RECORD CONTENT OF ANY TYPE. • Always verify that the unit is operating properly before use. SONY WILL NOT BE LIABLE FOR DAMAGES OF ANY KIND INCLUDING, BUT NOT LIMITED TO, COMPENSATION OR REIMBURSEMENT ON ACCOUNT OF THE LOSS OF PRESENT OR PROSPECTIVE PROFITS DUE TO FAILURE OF THIS UNIT, EITHER DURING THE WARRANTY PERIOD OR AFTER EXPIRATION OF THE WARRANTY, OR FOR ANY OTHER REASON WHATSOEVER. Miscellaneous 185 Sony Corporation 1-7-1 Konan, Minato-ku, Tokyo, 108-0075, Japan