1
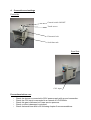
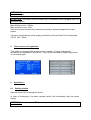
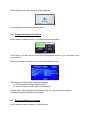
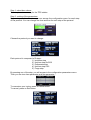
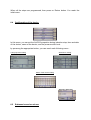
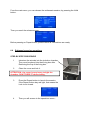
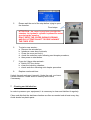
User Manual
CO2 Euthanasia Electronic station
Ref. TEG
Date
23/07/2013
Document
Manuel TEG
REV
02
Page
1/16
General Information
Labelling:
Read carefully documentation before use
Electrical hazard : always disconnect power supply before opening
parts where this mark is applied.
Chimical hazard : always take appropriated precautions before opening
parts where this mark is applied.
Suffocation hazard : always pay attention to the right ventilation of
room and safety procedures when this mark is applied.
Disposal of waste :
All consumable must follow hospital waste treatment procedure (soda lime).
Consumable References :
Référence:
Désignation:
2175
soda lime
1
General Use :
This station is dedicated to labs staff to perform CO2 euthanasia for rodents during
authorized experimentation programs.
It has been designed to work only in labs and be used by trained people complying
with ethical consideration and regulations.
ATTENTION : all use except veterinarian purpose is strictly forbidden.
2
Operation Principle :
This station is able to drive a CO2 process induction with following steps:
1) Rodent induction
2) Rodent euthanasia by CO2 saturation
3) Purge
Many protocols are memorized. More protocols can be added by the authorized user
if necessary.
3
Regulations compliance of the device :
EN 61010 for electric safety of labs device;
EN 61326-1 : class B for emission of EMC;
EN 61558-2 for TBTS power supply;
RoHS for electronic parts;
Stainless steel classification and regulation of use;
NF C15-100 electrical conformity;
European Directive 98/24/CE (protection of people against chemical risks);
ISO 14644-1 for clean and controlled environments;
4
Connection and settings
Front side
General switch ON/OFF
Touch screen
Electronic lock
Soda lime rack
Rear Side
CO2 input
Precautions before use:
-
Check the device is connected to 220V power supply with ground connection.
Check the CO2 input is connected to a network or a CO2 bottle.
Check this gas is delivered at 3 bars service pressure.
Check no tube is damaged or pinched.
Check that soda lime rack is full following chapter 8 recommendations.
ATTENTION : never change the internal pressure limitation device, this will occur
device damages.
ATTENTION : this station must be used only in euthanasia room equipped with CO2
detection system.
Max Altitude of use : 2000m
Max humidity of use : 80%
This device must be used only inhouse and must be protected against flood and
liquids.
It must be connected on power supply protected by Ground Fault Circuit Interrupter
(GFCI) 16A - 30mA
5
Touch screen and symboles :
This station is equipped with a touch screen interface. Tuning, settings and
operations are represented by buttons. They can be activated by single finger touch
or non-sharp stylet.
6
6.1
Operations :
Getting started
General switch ON is starting the device.
In case of emergency, the same general switch will immediately stop the power
supply.
ATTENTION : never switch OFF the device during an euthanasia session or purge
session!
When switching on, the following screen appears :
It provides the software embedded version.
6.2
Program Selection and tuning
When station is ready to work, you have the following screen :
In this menu, you can choose one of the memorized protocols, or you can define your
own protocol.
When you select one protocol, you have the following menu :
This screen shows the last settled parameters
1) CO2 proportion during induction step
2) Time and flow for each step of the protocol
Please check if the settings are fitting and then you can release the session.
Otherwise, please follow the next chapter.
6.3
Protocol definition or change
In the previous screen, press on Config button.
Step 1: select box volume
This step is not necessary for the TEG station.
Step 2 : setting of the parameters
By pressing on Animal button, you can access the configuration menu for each step
of the protocol. You can change the time and flow for each step of the protocol
Choose the protocol you want to change :
Each protocol is composed of 5 steps :
1) induction step
2) Hold-on step Air/CO2
3) Euthanasia step
4) Hold-on step CO2
5) Purge step
By pressing one of the step, you will access to the configuration parameters menu.
Then you can tune time parameter and flow parameter :
To memorize your tuning, press on Valide button.
To cancel, press on Esc button.
When all the steps are programmed, then press on Return button. You reach the
initial menu.
6.4
Configuration of the device
In this menu, you can set the Air/CO2 proportion during induction step, time and date
of the device, name of the device, and the pressure alert level.
by pressong the appropriate button, you can reach each following menu :
CO2 proportion setting
Date/heure setting
Name of the device setting
Pressure alert level
6.5
Euthanasia session release
From the main menu, you can release the euthanasia session, by pressing the Valid
button.
Then you reach the release screen.
Before pressing on Depart button, please check all connections are ready.
6.6
Euthanasia session operations
STEP-BY-STEP PROCEDURE
1
Introduce the animals into the induction chamber.
They must be placed into their living box after
Removing the top of the living box.
2
Close the cover and lock it.
ATTENTION : the cover is very heavy to tight the
chamber. DON’T DROP IT when closing.
3
Press the Depart button to launch the session.
If the Depart button stay red light, that means the
Lock is not closed.
4
Then you will access to the operations menu :
This menu shows the step in progress, the remaining time for this step, the
real-time flow and internal pressure.
DO NOT TRY TO OPEN THE CHAMBER DURING THIS STEP.
In case of emergency, please use the STOP button, then you reach the
following menu :
If you press on Valid button, you will immediately move to the purge step.
At the end of induction step, you will move (if programmed) to Hold-on
AIR/CO2 step:
DO NOT TRY TO OPEN THE CHAMBER DURING THIS STEP.
In case of emergency, please use the STOP button following the same
process that previously.
At the end of this step, you will move to Euthanasia step.
DO NOT TRY TO OPEN THE CHAMBER DURING THIS STEP.
In case of emergency, please use the STOP button following the same
process that previously.
At the end of euthanasia step, you will move (if programmed) to Hold-on
CO2 step:
DO NOT TRY TO OPEN THE CHAMBER DURING THIS STEP.
In case of emergency, please use the STOP button following the same
process that previously.
At the end of this end, you will move to purge step.
5
Please wait the end of the step before trying to open
the chamber.
Fixed stops
ATTENTION : the cover is very heavy to tight the
chamber. An hydraulic cylinder is presnet to assist
you during the opening.
DON’T DROP THE COVER DURING OPENING
AND PAY ATTENTION NOT TO DROP AGAINST
THE FIXED STOP.
6
To start a new session :
a. Remove the animals box,
b. Introduce a new box of animals,
c. Close the cover and lock it,
d. check the soda lime color following next chapter procedure,
e. then press on start button.
7
If you don’t have other animals :
a. Switch OFF the device.
b. clean the induction chamber,
c. check soda lime following next chapter procedure.
8
Replace used soda lime :
Unlock the rack and open it smootly. Under the rack, you have
a water collector. Please check it carefully and clean it
if necessary.
7
Cleaning and disinfection :
In order to preserve your equipment, it is necessary to clean and disinfect it regularly.
Clean and disinfect the stainless chamber as often as needed and at least every day.
Avoid alcohol on plastic parts.
8
RECOMMENDATIONS FOR CO2 SODA LIME USE
(Soda lime type Medisorb® or other)
Indications
Carbon dioxyde absorber for CO2 .
Precautions and attention
The CO2 soda lime absorbant is only used with Air, oxygen, heliox, Nitrogen
protoxyde, and halogen agents.
Don’t use when using chloroform or trichloroethylene.
Don’t have any contact (skin or eyes) with the product or its packing.
In case of contact with skin or eyes, immediatly rinse with clear water and contact a
doctor.
The use of this soda lime must be supervised by authorized person.
The dust of soda lime is caustic and can burn the respiratory organs in case of
inhalation.
Use gloves and protection glasses during filling and emptying of soda lime.
Don’t use the end of the soda lime packing because much more dust at the bottom of
the bottle.
Instructions of use
Please read it carefully before use.
Soda lime replacement frequency
CO2 absorption by soda lime occurs a progressive color change of the raw material.
Depending of brand of products, soda lime generally move from white to purple, or
from pink to white.
Note
Used soda lime should be immediatly removed. Otherwise, after several hours, it will
take back its original color and give an wrong information about its status.
Destruction
Do not incinerate soda lime because it contains inflammable raw materials like
cyclopropane, ethylene or ether.
Even if used soda lime can keep some alcaline characteristics, it can be treated as
every organic waste.
Storage
It must be stored in its intact packing in clean and dry environment, at a temperature
of 0/+32°C. Avoid direct sunshine.
Protect it from choc and water.
Stored as described, it can keep generally during two years.
Expiration date is mentioned on the packing.
Technical data
Active componants
Hydroxyde de calcium
Hydroxyde de sodium
Water
Soda lime
size of granula: 2,5-5,0 mm
humidity: 12 -19%
pH (during use): 10
pH (before use): 12 à 14
9
Technical Specifications:
SIZE
WEIGHT
140 mm x 360 mm x 250 mm
3 kg
FLOWMETERS
2 electronic flowmeters Air and CO2 from 20 to 200
L/min. Servicing pressure from 3 to 4 bars,
recommended 3.5 bars, power supply 24 VDC
EUTHANASIA GAS
CO2
PRESSURE SENSOR
From 0 to 30 cm H2O
GENERAL POWER SUPPLY
POWER (CONSUMPTION)
230V 50Hz
max under 24V : 50W
USE TEMPERATURE
From 20° to 24°C optimal 22°C
10 Servicing and Repair :
The device should be checked every year by qualified people. Servicing report must
be keep during several years.
Each year :
- change all the tubes, control and change if necessary the air-tight join.
Malfunction
Nothing happen
when switching
ON
CAUSE
no power supply
Resolution
check power supply
check GFCI
GFCI is down
Call supplier
electronic board is
defective
When switching
ON, green light is
OK but nothing
appears on screen
or defective light
on the screen
Touchscreen is
not answering
Pressure alert
turns red during
session
Flow alert turns
Red during
session
Animaux still
sleeping or
awaking at the end
of session
electronic board is
defective
call supplier
touchscreen is
decalibrated
Touch screen calibration :
Switch off the device, then switch
on. When logo appears, press on
the screen.
Etalonnage 1/5 appears: press
several times until the word
Haut/gauche appears. Then press
on the top/left part of the screen.
Then Top/right then bottom/left and
bottom/right.
Touchscreen is defective
Call supplier
Soda lime is too wet
change soda lime
sensor is defective
the flow of gas is not
available
Call supplier
Check gas inlet is open, bottle is not
empty.
Time and/or flow
parameters are not good
Increase the flow if possible with
your network, or increase time of
session.
11 Terms of Warranty :
Warranty field
This manufacturer warranty covers only TEG device from TEM SEGA. It doesn’t
include all parts used as interface or connection if not provided by TEM SEGA.
This warranty doesn’t apply if the damages result from bad use, accident, negligence,
from any modification, servicing or repair not made by TEM SEGA technicians.
Warranty covering
TEM SEGA warranties that this device is complying to its specifications and that
every issue due to manufacturing, conception or defective parts will be repaired or
replaced at manufacturer choice by himself, free of charge for the client, for a two
years period after the delivery date.
This warranty will stop immediately after this period without any advertisement for the
manufacturer.
This warranty is back to manufacturing, that means the shipping cost back to
manufacturer are under client responsibility.
The manufacturer will take in charge the re-shipping to client after repair.
ALWAYS READ THIS USER MANUAL WITH ATTENTION BEFORE USE.
This could prevent from wrong manipulation that could cause damage to the device.
These damages will not be covered by the manufacturer warrant.