1
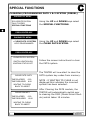
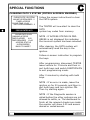
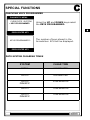
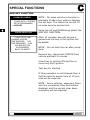
9
FORD
FORD MANUAL
CONTENTS
APPLICATIONS
GENERAL OPERATION
SPECIAL FUNCTIONS
TIPS & HINTS
REMOTE CONTROL PROGRAMMING
CODED ACCESS SYSTEMS
9
APPLICATIONS
VEHICLE
TYPE
KEYS
YEAR
SYSTEM
CABLE
KA
PETROL
3 KEYS & 96/97
2 KEYS
97/98
99>
2002 >
PATS
PATS
PATS
PATS
2
3
3
3
ISO
ISO
SCP
CAN
ADC110-B
ADC110-B
ADC110-B
ADC110-B
FIESTA/
COURIER
PETROL
3 KEYS & 93 > 96
2 KEYS
96/97
97/98
98 >
PATS
PATS
PATS
PATS
1
2
3
3
ISO
ISO
ISO
SCP
ADC111
ADC110-B
ADC110-B
ADC110-B
FIESTA/
COURIER
DIESEL
3 KEYS & 95 > 97
2 KEYS
97 >
PATS 2 ISO
PATS 3 ISO
ADC111
ADC110-B
FIESTA
(NEW)
ALL
2 KEYS
2002 >
PATS 3 CAN
ADC110-B
PUMA
PETROL
2 KEYS
2 KEYS
1.7 ZETEC 96>
1.4 ZETEC 97 >
PATS 3 ISO
PATS 3 ISO
ADC110-B
ADC110-B
ESCORT/
ORION
PETROL
3 KEYS
3 KEYS
93 > 97
97 >
PATS 1 ISO
PATS 2 ISO
ADC111
ADC110-B
ESCORT/
ORION
DIESEL
3 KEYS
94 > 97
PATS 2 ISO
ADC111
ADC110-B
FALCON
PETROL/
LPG
2 KEYS
ALL
PATS 2.5
ADC110-B
FOCUS
PETROL
2 KEYS
98 >
PATS 3 SCP
ADC110-B
FOCUS
DIESEL
2 KEYS
98 >
PATS 3 SCP
ADC110-B
MONDEO
PETROL
(MANUAL)
3
3
2
2
KEYS
KEYS
KEYS
KEYS
94 > 96
96/97
97/98
98 >
PATS
PATS
PATS
PATS
ISO
ISO
ISO
SCP
ADC111
ADC110-B
ADC110-B
ADC110-B
MONDEO
PETROL
(AUTO)
3 KEYS
2 KEYS
2 KEYS
94 > 96
96/97
97 >
PATS 1 ISO
PATS 2 ISO
PATS 3 SCP
ADC111
ADC111
ADC110-B
MONDEO
DIESEL
3 KEYS
2 KEYS
2 KEYS
96/97
97/98
98 >
PATS 2 ISO
PATS 3 ISO
PATS 3 SCP
ADC110-B
ADC110-B
ADC110-B
COUGAR
PETROL
2 KEYS
ALL
PATS 3 ISO
ADC110-B
GRANADA/ PETROL
SCORPIO
(MANUAL)
3 KEYS
2 KEYS
> 97
97 >
PATS 2 ISO
PATS 3 ISO
ADC110-B
ADC110-B
GRANADA/ PETROL
SCORPIO
(AUTO)
3 KEYS
2 KEYS
> 97
97 >
PATS 2 ISO
PATS 3 SCP
ADC110-B
ADC110-B
GRANADA/ DIESEL
SCORPIO
3 KEYS
2 KEYS
95/96
96/97
97 >
PATS 2 ISO
PATS 3 ISO
PATS 3 SCP
ADC110-B
ADC110-B
ADC110-B
9
1
2
3
3
APPLICATIONS
VEHICLE
TYPE
KEYS
YEAR
SYSTEM
CABLE
GALAXY
PETROL
V6
TYPE 1
TYPE 2
3 KEYS
2 KEYS
2 KEYS
> 97
97 > 00
00 >
PATS 2
PATS 3
ADC110-B
ADC110-B
ADC110-B
ADC110-B
GALAXY
DIESEL
2 KEYS
2 KEYS
2 KEYS
> 97
97 > 00
00 >
PATS 2
PATS 3
PATS 3
ADC110-B
ADC110-B
ADC110-B
WINDSTAR
ALL
2 KEYS
2 KEYS
2 KEYS
> 97
97/98
98 >
PATS 2
PATS 3
PATS 3
ADC110-B
ADC110-B
ADC110-B
EXPLORER
ALL
2 KEYS
00 >
PATS 3
ADC110-B
TRANSIT
PETROL
3 KEYS
2 KEYS
2 KEYS
94 > 97
97 > 00
00 >
PATS 2
PATS 3
PATS 3
ADC110-B
ADC110-B
ADC110-B
TRANSIT
DIESEL
3
3
3
2
2
2
2
94/95
95/96
96/97
97 > 00
00 >
TYPE 1
TYPE 2
PATS
PATS
PATS
PATS
PATS
PATS
PATS
2
2
2
3
3
3
3
ADC110-B
ADC110-B
ADC110-B
ADC110-B
ADC110-B
ADC110-B
ADC110-B
TRANSIT
EPIC
3 KEYS
3 KEYS
2 KEYS
95 > 97
97 > 97.5
97.5 >
PATS 2
PATS 2
PATS 3
ADC110-B
ADC110-B
ADC110-B
MAVERICK
PETROL
NA
ALL
NATS
ADC110-B
MAVERICK
DIESEL
NA
ALL
NATS
ADC110-B
SYSTEM
KEYS
KEYS
KEYS
KEYS
KEYS
KEYS
KEYS
TYPE
KEYS
YEAR
VEHICLE
GENERAL
LDV
DIESEL
3 KEYS
TO 2000
CONVOY
BOSCH DIESEL DSM
SYSTEM
LDV
EPIC
3 KEYS
TO 2000
CONVOY TURBO
LUCAS EPIC DIESEL
SYSTEM
LDV
LPG
2 KEYS
2000 ON
CONVOY LPG/
PETROL ENGINE
FORD EECV EFH
SYSTEM
LDV
DIESEL
2 KEYS
2002 ON
CONVOY DIESEL
DURATORQUE
9
GENERAL OPERATION
INTRODUCTION
The FORD PATS systems were introduced on Ford vehicles on 94.5
M.Y. vehicles , and was available from March 1994.
9
There have been many variations on the original system fitted. This
system has a separate PATS Amplifier, however on subsequent
systems the PATS module was incorporated into the Engine
Management ECU.
SYSTEM OPERATION
The PATS system is a PASSIVE Anti-theft system which requires no
special procedures for the driver to arm or disarm the system. The
system is operated by a transponder fitted within the
ignition key’s body, which communicates with the PATS module ignition transceiver mounted around the lock barrel.
The easy method of identifying a PATS vehicle is if the key has a
small imprint showing where the transponder is fitted. The code for
the transponder is stored in memory within the PATS
amplifier or the Engine Management ECU.
The PATS system reads the code when the ignition key is turned
from position 0 to position 1. If the correct code is received then the
engine will start.
When vehicles are fitted with Diesel Smart Modules or EPIC, the
PATS code is stored in these systems as well, and requires clearing
when new keys are programmed.
KEY OPERATION - UP TO 98 ¼ MY
Three keys are allocated to each vehicle, the first key which is
inserted is known as the master and is usually identified by it’s RED
colour. The other keys that are used are known as slave keys and
are usually BLACK with a RED insert. Up to 16 keys can be
programmed into the PATS system.
GENERAL OPERATION
KEY OPERATION - 98¼ MY ONWARDS
The newer systems are only supplied with 2 keys. Both keys are
required to program further slave keys. Up to a maximum of 8 keys
can be programmed to this PATS system.
KEY PROGRAMMING - UP TO 98 ¼ MY
NOTE : Clear ALL Fault codes before programming.
A new master key can only be programmed using the FDS2000 or
the AD PROGRAMMING systems. Further slaves can be added
without any specialist equipment as follows :1. Insert master key, and turn to Position 2. PATS LED should
illuminate.
2. Turn ignition from Position 2 to Position 0, and remove key. PATS
LED will illuminate for 2 seconds. PATS system is now in
programming mode for 10 seconds.
3. Insert the new slave key, and turn from Position 0 to Position 2.
PATS LED will flash once if successful.
4. Repeat for all new slave keys.
NOTE : The Immobiliser receiver does not need reprogramming
when replaced.
9
GENERAL OPERATION
KEY PROGRAMMING - 98¼ MY ONWARDS
NOTE : Clear ALL Fault codes before programming.
Master keys can only be programmed using the 2 PATS keys (A and
B) the FDS2000 or the AD PROGRAMMING SYSTEM system.
9
NOTE : In some cases the vehicle doors must be closed to perform
the re-programming sequence.
Further slaves can be added without any specialist equipment as
follows :1. Insert key A, and turn to Position 2.
2. Turn back to Position 0, and remove key A.
3. Insert key B, and turn to Position 2.
4. Turn back to Position 0, and remove key B.
5. Insert the new slave key and turn to Position 2.
6. Remove new key. Key is now programmed.
7. Procedure can be repeated after 20 seconds, for up to 8 slave
keys.
NOTE : If programming is unsuccessful, the PATS LED will flash
when the key is inserted.
PATS LED INDICATOR
The LED indicator is used for the PATS system and also other Antitheft systems fitted to the Ford vehicle range. When the ignition is
switched ON, the PATS LED will illuminate for 3 seconds while it
performs a self-test, after which it extuingishes. When the PATS
system is armed and immobilised the vehicle, the PATS LED will flash
quickly.
If there is a fault on the PATS system, and the engine can start, the
PATS LED will illuminate for 60 seconds continuously, and then flash
the PATS fault code 10 times. If the engine is unable to start and
disabled by the PATS system, then the PATS LED will FLASH for 60
seconds and then flash the PATS fault code 10 times. PATS LED is
mounted either in the front headlining or next to the heater controls/
clock.
GENERAL OPERATION
PATS SYSTEM - PROBE ONLY
The PATS system fitted to the Probe is unlike the other systems. The
main difference is the system cannot be diagnosed with the FDS2000
or the AD PROGRAMMING SYSTEM. Additional keys and reprogramming of new keys are performed in a different procedure as
well.
PROGRAMMING NEW/ADDITIONAL KEYS (2 or more keys
available)
1. Using one of the existing keys (This becomes KEY 1), insert into
ignition switch.
NOTE : When requested to turn the key ON or OFF, the time
should not be less than 1 Second or more than 2 Seconds between
operations. Unless stated otherwise.
2. Turn the Key to IGNITION ON and then OFF five times, stopping
at the OFF position.
NOTE : PATS LED Should remain ON with the key in the OFF
position.
3. Turn the IGNITION ON using KEY 1., within 15 seconds of step 2.
4.. Turn the IGNITION OFF and remove KEY 1.
5. Insert KEY 2 within 60 seconds of PATS LED illuminating.
6. Turn IGNITION ON and start engine with KEY 2. PATS LED will
extinguish after 1-2 seconds and engine remain running if key is
accepted.
7. Turn IGNITION OFF and remove KEY 2.
8. Insert KEY 3 within 15 seconds of removing KEY 2.
9. Turn IGNITION ON and start engine with KEY 3. PATS LED will
extinguish after 1-2 seconds and engine remain running if key is
accepted.
10. Turn IGNITION OFF and remove KEY 3. Repeat as necessary for
additional keys.
PROGRAMMING NEW/ADDITIONAL KEYS (No keys available)
Programming new key(s) when no keys are available can only be
completed by a FORD dealer.
9
SPECIAL FUNCTIONS
CLEARING/PROGRAMMING PATS 1 & 2 SYSTEM (PETROL)
DIAGNOSTIC MENU
ECU IDENTIFICATION
FAULT CODES
SPECIAL FUNCTIONS
9
Using the UP and DOWN keys select
the
SPECIAL FUNCTIONS.
PRESS ENTER KEY
DIAGNOSTIC MENU
> CLEAR PATS 1 SYSTEM
KEYS PROGRAMMED
Using the UP and DOWN keys select
the CLEAR PATS SYSTEM.
PRESS ENTER KEY
CLEAR PATS 1 SYSTEM
SWITCH IGNITION ON
IGNITION STATUS OFF
CLEAR PATS 1 KEY
TIME ELAPSED
TIME REQUIRED
0:50
8:00
WAITING TO CLEAR
BACK TO ABORT
CLEAR PATS 2 SYSTEM
ALL KEYS CLEARED
KEYS PROGRAMMED : 1
PRESS ENTER KEY
Follow the screen instructions to clear
the PATS system.
The TESTER will now start to clear the
PATS system key codes from memory.
NOTE : If WAITING TO CLEAR is not
displayed this indicates the incorrect
system has been selected.
If successful the TESTER will display
all keys cleared and how many keys are
programmed.
SPECIAL FUNCTIONS
CLEARING/PROGRAMMING PATS 1 & 2 SYSTEM (PETROL)
PROGRAM KEYS
3 KEYS REQUIRED
PRESS ENTER KEY
The key in the ignition is now programmed as the master key.
After the Master key has been programmed additional keys can be added
in the normal manual procedure as described in the previous section
9
SPECIAL FUNCTIONS
CLEARING/PROGRAMMING PATS 1 & 2 SYSTEM (DIESEL)
DIAGNOSTIC MENU
ECU IDENTIFICATION
FAULT CODES
SPECIAL FUNCTIONS
Using the UP and DOWN keys select
the SPECIAL FUNCTIONS.
9
PRESS ENTER KEY
DIAGNOSTIC MENU
> CLEAR PATS 2 SYSTEM
KEYS PROGRAMMED
Using the UP and DOWN keys select
the CLEAR PATS SYSTEM.
PRESS ENTER KEY
CLEAR PATS 2 SYSTEM
SWITCH IGNITION ON
IGNITION STATUS OFF
CLEAR PATS 2 KEY
TIME ELAPSED
TIME REQUIRED
0:50
8:00
WAITING TO CLEAR
BACK TO ABORT
CLEAR DSM KEY
TIME ELAPSED
TIME REQUIRED
0:50
15:00
WAITING TO CLEAR
BACK TO ABORT
Follow the screen instructions to clear
the PATS system.
The TESTER will now start to clear the
PATS system key codes from memory.
NOTE : If WAITING TO CLEAR is not
displayed this indicates the incorrect
system has been selected.
After Clearing the PATS module, the
TESTER will automatically switch over
to clearing the DSM (Diesel Smart Module) which takes 15 minutes.
SPECIAL FUNCTIONS
CLEARING/PROGRAMMING PATS 1 & 2 SYSTEM (DIESEL)
CLEAR PATS 2 SYSTEM
ALL KEYS CLEARED
KEYS PROGRAMMED : 1
PRESS ENTER KEY
PROGRAM KEYS
NOTE : If CONDITIONS INCORRECT is
displayed then check the connection to
the diesel pump, and clean the connections.
NOTE : If the time continues after 15
minutes and does not clear, then check
to ensure the system selected is correct or check the connection to the diesel pump, and clean the connections.
3 KEYS REQUIRED
PRESS ENTER KEY
NOTE : If WAITING TO CLEAR is not
displayed this indicates the incorrect
system has been selected.
If successful the TESTER will display
all keys cleared and how many keys
are programmed.
The key in the ignition is now programmed as the master key.
After Master key has been programmed
additional keys can be added in the
normal manual procedure as described
in the previous section
9
SPECIAL FUNCTIONS
CLEARING PATS 3 SYSTEM (PETROL & DIESEL ENGINES)
CLEAR PATS 3 SYSTEM
MIN KEYS REQUIRED : 2
TIMED ACCESS
CLEAR TIME 10:00
KEYS PROGRAMMED : 2
9
PRESS ENTER KEY
CLEAR PATS 3 KEY
GAINING ACCESS
TIME ELAPSED
0:50
TIME REQUIRED 10:00
ACCESS STATUS
IN PROGRESS
BACK TO ABORT
Follow the screen instructions to clear
the PATS system.
The TESTER will now start to clear the
PATS
system key codes from memory.
NOTE : If ACCESS STATUS IN PROGRESS is not displayed this indicates
the incorrect system has been selected.
After clearing, the PATS system will
automatically read the key in the
ignition.
Follow on screen instruction to program
the keys.
After programming, disconnect TESTER
leave vehicle for 1 minute and then insert both keys and switch IGNITION ON
to exit programming mode.
After 2 minutes try starting with both
keys.
NOTE : If an error is made, leave the
ignition on for 20 seconds, and then insert both keys and turn ignition ON.
Then try starting again.
NOTE : If the Diagnostic session is
called before the other systems are not
allowed to settle, ie. The dashboard to
finish all the relevant checks are made
the counter will show 0.00 and access
denied or coded access.
SPECIAL FUNCTIONS
CLEARING PATS SYSTEM (FALCON)
DIAGNOSTIC MENU
NOTE : Minimum 2 keys required.
> B.E.M.
P.C.M.
NOTE : Ensure all vehicle doors remain
closed at all times.
PRESS ENTER KEY
FALCON B.E.M. PATS
Connect TESTER to vehicle diagnostic
connector, select Ford Falcon.
Select BEM first and press ENTER.
DO NOT TURN IGNITION ON when
screen requests to.
PRESS ENTER KEY
DIAGNOSTIC MENU
Press ENTER and continue.
Select SPECIAL FUNCTIONS and press
ENTER.
SPECIAL FUNCTIONS
Select CLEAR PATS 3 SYSTEM and
press ENTER key.
PRESS ENTER KEY
DIAGNOSTIC MENU
> CLEAR PATS 3 SYSTEM
PARAMETER RESET
PRESS ENTER KEY
NOTE : Doors locks will automatically
lock.
Within 5 seconds insert the first key to
be programmed and turn the IGNITION
ON.
The door locks will UNLOCK and LOCK.
Remove the first key from the ignition.
DIAGNOSTIC MENU
B.E.M.
> P.C.M.
PRESS ENTER KEY
Within 5 seconds insert the second key
to be programmed and turn the
IGNITION ON.
The doors will UNLOCK and LOCK.
Remove second key from ignition.
9
SPECIAL FUNCTIONS
CLEARING PATS SYSTEM (FALCON)
FALCON P.C.M. PATS
9
PRESS ENTER KEY
DIAGNOSTIC MENU
Wait for door locks to cycle and then
press ENTER key.
Disconnect TESTER from vehicle.
Wait 30 seconds after disconnecting
TESTER
Insert one of the keys into the ignition
and turn IGNITION ON.
SPECIAL FUNCTIONS
Wait a further 30 seconds and the connect TESTER to vehicle again.
PRESS ENTER KEY
DIAGNOSTIC MENU
CLEAR PATS 3 SYSTEM
>PARAMETER RESET
Continue to the same screen as previously but select P.C.M. And press
ENTER.
Screen will display PCM PATS system.
Select SPECIAL FUNCTIONS and Press
ENTER key. Select PARAMETER RESET
and press ENTER key.
PRESS ENTER KEY
Follow on screen instructions, as the system will take the required Ford Timed
access security wait time.
At the end of the time, the doors will cycle from LOCKED to UNLOCKED.
Disconnect TESTER.
Switch Ignition to the OFF position, and
then switch IGNITION to the ON position
with the same key.
The door locks will again cycle from
LOCKED to UNLOCKED.
SPECIAL FUNCTIONS
CHECKING KEYS PROGRAMMED
DIAGNOSTIC MENU
CLEAR PATS 1 SYSTEM
> KEYS PROGRAMMED
Using the UP and DOWN keys select
the KEYS PROGRAMMED.
9
PRESS ENTER KEY
KEYS PROGRAMMED 3
The number of keys stored in the
Immobiliser ECU will be displayed.
PRESS ENTER KEY
PATS SYSTEM CLEARING TIMES
SYSTEM
CLEAR TIME
PATS 1
8:00 MINUTES
PATS 2
8:00 MINUTES
PATS 2
DSM/EPIC
23:00 MINUTES
PATS 3
10:00 MINUTES
PATS 3
DSM/EPIC
10:00 MINUTES
SPECIAL FUNCTIONS
ADD KEY FUNCTION
DIAGNOSTIC MENU
CLEAR PATS 1 SYSTEM
KEYS PROGRAMMED
> ADD KEY
9
PRESS ENTER KEY
CLEAR PATS 3 KEY
GAINING ACCESS
TIME ELAPSED
0:50
TIME REQUIRED 10:00
ACCESS STATUS
IN PROGRESS
BACK TO ABORT
NOTE : On some vehicles a function is
available to add a key without deleting
the old keys. This takes the normal 10
minutes security access time.
Using the UP and DOWN keys select the
ADD KEY FUNCTION.
After 10 minutes, security access is
gained and the key in the ignition will
be added.
NOTE : Do not start the car after procedure.
Remove key, disconnect TESTER from
vehicle and wait 2 minutes.
Insert key to ignition ON and the remove key from ignition.
Test key for starting.
If this procedure is not followed then a
further security access time of 10 minutes will be required.
NOTE : Some vehicles, especially fleets
and hire companies have this feature
disabled, and the normal clear down
procedure will be required.
TIPS & HINTS
SYSTEM TYPES
3 KEY SYSTEM—RED CHIP MASTER KEY SYSTEM (4C GLASS TRANSPONDERS)
For this system, connect TESTER before switching ignition ON.
2 KEY SYSTEM—2 RED CHIP KEY SYSTEM (4C GLASS TRANSPONDERS)
For this system, connect TESTER before switching ignition ON
2 KEY SYSTEM—2 BLUE CHIP KEY SYSTEM (4D GLASS TRANSPONDER)
For this system switch IGNITION ON, and wait until the RED Security LED has finished Flashing Fast (Approx 20 seconds) before connecting TESTER
2 KEY SYSTEM—2 CARBON CHIP KEY SYSTEM (4D CARBON TRANSPONDER)
For this system switch IGNITION ON, and wait until the RED Security LED has finished Flashing Fast (Approx 20 seconds) before connecting TESTER
GALAXY SYSTEMS
When Galaxy systems are cleared, the time allowed to cycle the keys after the 10
Minutes clear down is very quick.
MAKE SURE YOU HAVE THE SECOND KEY AVAILABLE AND READY TO CYCLE
YOU HAVE ONLY 5 SECONDS AFTER CLEARING TO PROGRAM THE SECOND KEY
9
TIPS & HINTS
GENERAL
If communication is made with the vehicle, and then no communication is
experienced later or the communication is random, check battery voltage
and ensure it is at least 12.2 volts. This is particularly important on the
SCP vehicles, and all Transit models.
9
A new function has been introduced on the WDS which enables the dealer
to disable the additional key function. This is mainly used on fleet vehicles
and hire companies to stop unauthorized key’s being added. If a system
will not accept additional keys, it may be because this has been enabled.
Fleet mode (unable to add a key) can be removed by clearing
the PATS and DSM (diesel only) and reprogramming all keys.
When Programming on SCP Systems, turn IGNITION ON before
connecting TESTER or ADC110B to Diagnostic socket, then wait for the
dashboard lights to settle, then connect TESTER.
Intermittent start with fault code 12- replace faulty aerial pick up
If an incorrect key is used to try and start the engine, the correct key
must be inserted and left in the IGN position for at least 20 seconds, then
switched OFF then back ON before the vehicle starts.
Fault Code 0 is an ECU trouble code, if this is set and cannot be cleared,
then there is a problem with the ECU. Normally the only way to fix this is
to return the ECU for testing or replace it.
Fault Code 1000 is an ECU trouble code. This code can be set automatically if the vehicle has not been driven. The code refers to the OBD drive
cycle. In some instances it is not possible to program new keys if this
code is set. Please follow the following instructions if the code cannot be
cleared or the keys cannot be programmed.
The OBD drive cycle code P1000 is the monitor code which monitors a
number of the OBD parameters. This code can be cleared by driving the
vehicle or running the engine for around 5 minutes at a steady RPM and
acceleration cycles. The smoother the driving condition the quicker the
code will be cleared.
If no keys are available, then the ECU can be disconnected for 30-45
minutes, which will also reset the system.
TIPS & HINTS
Example Code : 31
A
B
C
D
9
The PATS system has it’s own self diagnosis test procedure which flashes
codes. The PATS LED will flash quickly for 1 minute, and then start flashing the fault code as follows:A = 3 Flashes B = 1 Flash C = Three seconds delay
D = Repeat of code for 10 times
Code
Code
Code
Code
Code
Code
Code
Code
Code
Code
Code
11
12
13
14
15
21
22
23
31
32
34
Transceiver not connected
Transceiver
No key data received
Part of the transponder code received
Wrong transponder key
Less than the minimum keys required programmed
Failed diesel pump control unit identification
The response code between pump control unit & powertrain
DSM Communication
DSM Communication
DSM Communication
LED = Always ON or OFF
Check the fuse 15 (5 amp)
NOTE : If there are no fault codes, DO NOT clear fault codes as this
can cause fault 1000 to be enabled.
Ford Escort, no communication with TESTER, switched Ignition OFF
and ON very quickly, and communication gained. Conclusion was bad
connection on ignition switch.
DO NOT insert a blue chip transponder key into a red key
system.
REMOTE CONTROL PROGRAMMING
Fiesta 96> & Escort 98> (Radio 3 Button)
9
Procedure
1. Insert Key and turn to II, then Turn Key from II to I and back to II four times within 3 seconds
2. The PATS LED should light. Turn Key to Position 0.
3. Press the Unlock button and keep it pressed until the PATS LED flashes 4 times.
4. Add additional fobs the same way. Turn to II and back to 0 to end.
Focus (Radio 3 Button)
Procedure
1. Switch Ignition On/Off (II/0) 4 times within 6 seconds until a sound is made.
2. Press any button on Remote until a sound is made.
3. To program additional Remotes, repeat after 2 seconds after the sound.
4. Turn Ignition On/Off to exit.
5. A maximum of 4 remotes can be programmed.
Mondeo 96> Scorpio > 98 (Radio 2 Button)
Procedure
1. Turn Ignition to II, then turn ignition from II to I and back 4 times within 3 seconds.
2. The PATS LED on dash should light.
3. Turn Ignition to 0. Then press Unlock button and keep it pressed until the PATS LED
flashes 4 times (new fob first, then old)
4. Turn Ignition to II, then back to 0 to end.
Transit (2000.5MY)
Procedure
1. Close all the doors.
2. Turn Ignition key from position 0 to II eight times within 10 seconds.
3. Make sure the vehicle locks and unlocks the doors.
4. Press the remote transmitter button within 20 seconds., and make sure the vehicle locks
and unlocks all the doors.
5. Up to 20 seconds is allowed to programme the next remote transmitter.
6. To programme additional remote transmitters, repeat steps 4 and 5.
7. Turn the ignition key to position 0 to exit the programming mode.
Note : Maximum 4 remote transmitters may be programmed.
Note : . Ensure the vehicle battery is fully charged and the anti-theft alarm system is not
armed or triggered.
Note : If programming ends with no new remote transmitters, the originals are retained.
Note : The anti-theft alarm and double locking module will exit programming mode automatically if four new remote transmitters have been programmed or if no new remote transmitters been programmed within the 20 second programming mode.
REMOTE CONTROL PROGRAMMING
Fiesta 96, Puma (Infrared 2 Button)
Procedure
1. Turn Ignition switch to Position I and back to 0 as soon as the PATS LED in the clock
lights (The system is now ready for programming, to a maximum time limit of 30 seconds)
2. Remove Key from Ignition, hold the FOB towards the Interior Light, and press and hold
the Single Arrow. Wait until the light on the Key flashes, then press the Double Arrow 3
times., release the Single Button
3. Both LEDs (Key & Clock) should flash to acknowledge programming is successful
4. To exit learn Mode, turn Ignition to II and then 0
5. A Maximum of 4 Remotes are possible
Mondeo 93> Mondeo 96> (Infrared 2 Button)
Procedure
1. Unlock Vehicle, and turn ignition to position 1.
2. Wait until the PATS LED illuminates (app 10 seconds)
3. Switch Ignition to 0 – within 5 seconds – LED will remain on
4. Point the Remote at one of the front Receivers
5. Press a button and keep pressed – within 20 seconds of step 3
6. When the LED on the Key lights press the other button 3-5 times
7. Release both buttons while still aiming at the receiver
8. If successful, both LED’s will flash 5 times
9. Repeat 5—9 for additional transmitters (within 30 seconds)
10 .When completed, Turn Ignition to II then 0 to store the Keys
Mondeo 98½> Scorpio 95> (Radio 3 Button):
Procedure
1. Turn Ignition 4 times from 0 to I, ending at position I. A tone should sound.
2. Press the Remote Unlock button – another tone should sound.
3. Additional Remotes can be added by repeating Step 2, within ten seconds of each remote.
4. To exit turn Ignition to 0 – another audible sound should be made.
Cougar (Radio 3 Button)
Procedure
1. Turn Ignition On (II) and Off (0) 4 times within 6 seconds
2. With the Ignition at 0 the PATS LED should light continuously.
3. Press any button on the Radio Remote within 10 seconds
4. The LED should flash to acknowledge
5. Further Remotes (max. 4) can be added by pressing any button.
6. Program mode will end if Ignition turned on, or no new Remote Detected within 10 seconds
NOTE : The first Cougars were 3 seconds instead of 6, and 20 seconds instead of 10.
9
REMOTE CONTROL PROGRAMMING
Scorpio 95> (Radio 3 Button)
1. Turn Ignition 4 times from 0 to I, ending at position I. An audible tone should be heard
2. Press the Remote Unlock button – there should be another audible tone
3. If more than one Remote then Step 2 should be repeated for each remote in turn, within
ten seconds of each other.
To End turn Ignition to 0 – there should be another audible tone.
9
Galaxy (Radio 2 button)
1. Make sure all doors and windows are closed.
2. Turn the key in the drivers door lock, 3 times to the unlock position for at least half a second and within a total of 5 seconds.
3. The system should now enter programming mode, this is shown by the LED illuminating
continuously for the next 15 secs- during which the key should be programmed as follows.
4. Press one of the buttons on the key and whilst holding it pressed, simultaneously press
the other button 3 times.
5. Release both buttons.
The key should now flash 5 times and the LED in the door should also flash, six times.
Additional Information
A maximum of four keyless entry remote transmitters can be programmed to the central security module (CSM). Programming must be done at the same time for all the transmitters.
Note:To enter programming mode, make sure that the vehicle battery is fully charged and
the anti-theft system is not armed or triggered (if equipped).
1. Close all doors and fasten the safety belts to make sure conflicting chimes do not sound
during programming.
2. Turn the ignition switch from position I to position II at least four times in six seconds.
3. Turn the ignition switch to position I.
4. The CSM is now in the learning mode.
5. Press and hold one of the buttons on the remote transmitter until a chime sounds. This indicates a new transmitter code has successfully received.
6. After each successful programming is completed, another 10 second learning mode is
automatically entered, up to a maximum of four times.
7. To program additional transmitters, repeat from step 5.
8. The system will leave the learning mode after the ignition switch is turned to position III, or
if no new transmitter is programmed during the 10 seconds, or if four remote transmitters
have been programmed.
Note:An incorrect programming procedure does not effect the stored codes.
9. After successful programming, only the new programmed transmitters will be accepted.
10. Test all the programmed transmitters, by activating and deactivating the locking/
unlocking functions.
REMOTE CONTROL PROGRAMMING
Focus Built from 12.2000 Onwards
Note:The ignition must be turned off before attempting to reprogram the key fob.
11. The unlocking mode can be changed by pressing the locking and unlocking buttons on
the remote transmitter simultaneously for a minimum of four seconds.
12. The change is indicated by the turn signal lamps flashing twice.
13. The mode can be carried out as often as required by repeating step 11.
Mondeo 2001 onwards
Note:The ignition must be turned off before attempting to reprogram the key fob.
14. The unlocking mode can be changed by pressing the locking and unlocking buttons on
the remote transmitter simultaneously for a minimum of four seconds.
15. The change is indicated by the turn signal lamps flashing twice.
16. The mode can be carried out as often as required by repeating step 14.
Programming the transmitters.
1. Insert the ignition key and turn it from position II to position 0 and back four times within
three seconds.
2. Remove the ignition key. The module remains in learning mode for 20 seconds and the
anti-theft warning system light stays on continuously.
3. Press one of the transmitter buttons. The signal is learned by the module and indicated by
a flashing anti-theft warning system light. If necessary, repeat the procedure for other transmitters after two seconds.
4. Wait until the module programming is complete, or switch the ignition to ON.
Note:A maximum of four keyless entry remote transmitters can be programmed to the central security module. Programming must be done at the same time for all the transmitters.
Note:To enter programming mode, make sure that the vehicle battery is fully charged and
the anti-theft system is not armed or triggered (if equipped).
Note:Close all doors and fasten the safety belts to make sure conflicting chimes do not
sound during programming.
5.Turn the ignition switch from the OFF position to the ON position four times within three
seconds to enter the learning mode. Turn the ignition switch from the OFF position. The
central security module will remain in the learning mode for 20 seconds indicated by the
LED in the instrument panel being illuminated continuously.
6. Press any button on the remote transmitter being programmed. When the signal from the
remote transmitter is accepted by the central security module, the LED will flash.
7. To program additional transmitters, repeat from step 6, with a two second delay after the
LED flashes.
8. To exit the learning mode, turn the ignition switch to the ON position. If no transmitter signal is received by the central security module for 20 seconds, the system will automatically
exit the learning mode.
9. Test all the programmed transmitters, by activating and deactivating the locking functions.
9
FORD CODED ACCESS
INTRODUCTION
The Ford coded access system was introduced in the year 2002, and the first vehicle that
had this system was the FORD KA.
The system replaces the TIMED ACCESS, which was first used in 1994.
9
The new system replaces the TIMED ACCESS countdown timer with a security algorithm
which will display an outcode when you try to program keys. This outcode needs converting
and an incode is required.
Advanced Diagnostics have developed a system which uses this incode and outcode system, however the way the system works means that it is not 100% accurate and some vehicles cannot be programmed until the codes have been checked.
The system uses an internet system as described on the following pages, and requires web
access when you are at the vehicle, Advanced Diagnostics Forum access and a valid
AD100, MVP, TCODE, Codeseeker or DM100 serial number and passcode to use the system.
FORD CODED ACCESS
9
PLEASE FOLLOW THESE INSTRUCTIONS CAREFULLY ....
1.
3.
PLEASE FIRST ENSURE YOU HAVE YOUR FORUM USERNAME AND PASSWORD BEFORE
YOU START.
PLEASE ENSURE YOU HAVE FORD/MAZDA CODED SOFTWARE ENABLED AND LOADED
ON YOUR TESTER.
PLEASE SELECT ‘FORD CODED’ FROM THE MAIN MENU
4.
THE FOLLOWING FORD & MAZDA CODED PAGE WILL BE SHOWN ...
2.
FORD CODED ACCESS
9
5.
6.
7.
8.
9.
10.
INSERT
INSERT
INSERT
INSERT
INSERT
SELECT
11.
USING THE AD100, MVP, TCODE, DM100 OR CODESEEKER CONNECT TO THE VEHICLE
AS DESCRIBED IN THE MANUAL.
AFTER YOU HAVE SELECTED ‘ADD KEY’ OR ‘CLEAR PATS SYSTEM’ FOLLOW THE ON
SCREEN INSTRUCTIONS UNTIL YOU GET TO THE FOLLOWING SCREEN :-
12.
13.
14.
FORUM USER NAME
FORUM PASSWORD
TESTER SERIAL NUMBER
TESTER PASSCODE
VEHICLE VIN NUMBER
VEHICLE MODEL
SELECT THE NUMBER 2. ADVANCED DIAGNOSTICS.
THE FOLLOWING EXAMPLE INFORMATION WILL NOW BE DISPLAYED.
FORD CODED ACCESS
9
15.
INSERT THE DETAILS FROM THE TESTER INTO THE WEB PAGE AS FOLLOWS ...
16.
17.
ONCE ALL DETAILS HAVE BEEN ENTERED CORRECTLY PRESS THE SUBMIT BUTTON.
THE SYSTEM WILL THEN TRY AND CALCULATE THE INCODE.
NOTE : THIS WILL TAKE 5 MINUTES TO CALCULATE.
18.
PLEASE CHECK THE PAGE DISPLAYS THIS MESSAGE ...
FORD CODED ACCESS
9
19.
AFTER 5 MINUTES THE FOLLOWING SCREEN WILL BE DISPLAYED ...
20.
INSERT THE CODE FROM OPTION 1 INTO THE TESTER.
21.
THE TESTER SHOULD EITHER ACCEPT THE CODE AND SAY ‘ACCESS GRANTED’ OR
‘INCORRECT INVALID’
IF THE CODE FAIL’S, DISCONNECT THE TESTER.
CYCLE THE IGNITION ON AND OFF FOR 6 TIMES, TO RESET THE SYSTEM.
CONNECT TESTER AND REPEAT THE PROCEDURE AGAIN.
22.
23.
24.
NOTE : THE INCODES ABOVE CANNOT BE USED AGAIN, YOU MUST START FROM THE
BEGINNING IF THESE DO NOT WORK.
25.
26.
27.
28.
WHEN THE NEXT BATCH OF OPTIONS ARE DISPLAYED, THIS TIME USE OPTION 2.
IF OPTION 2 FAILS, THEN REPEAT THE WHOLE PROCEDURE AGAIN, BUT USE OPTION
3.
IF OPTION 3 FAILS, THEN REPEAT THE WHOLE PROCEDURE AGIN, BUT USE OPTION 1.
IF THIS FAILS, THEN REPORT THE CODE USING THE ‘SEND THIS CODE AS A WRONG
ANSWER’ BUTTON.