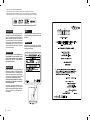
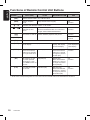
1
Owner’s manual
Mode d’emploi
Bedienungsanleitung
Istruzioni per l’uso
Gebruiksaanwijzing
Manual de instrucciones
Bruksanvisning
Manual de instruções
CD/USB/MP3/WMA RECEIVER
RECEPTEUR CD/USB/MP3/WMA
CD/USB/MP3/WMA RECEIVER
RICEVITORE CD/USB/MP3/WMA
CD/USB/MP3/WMA ONTVANGER
RECEPTOR PARA CD/USB/MP3/WMA
CD/USB/MP3/WMA MOTTAGARE
RECEPTOR PARA CD/USB/MP3/WMA
Clarion Co., Ltd.
All Rights Reserved. Copyright © 2007: Clarion Co., Ltd.
Printed in Malaysia / Imprimé en Malaisie / Gedruckt in Malaysia / Stampato in Malaysia
Gedrukt in Maleisi / Impreso en Malasia / Tryckt i Malaysia / Impresso na Malásia
PE-2973E
280-8528-00
280-8346-00
Thank you for purchasing this Clarion product.
∗ Please read this owner’s manual in its entirety before operating this equipment.
∗ After reading this manual, be sure to keep it in a handy place (e.g., glove compartment).
∗ Check the contents of the enclosed warranty card and keep it carefully with this manual.
CAUTIONS:
This appliance contains a laser system and is
classified as a “CLASS 1 LASER PRODUCT”.
To use this model properly, read this Owner’s
Manual carefully and keep this manual for
your future reference. In case of any trouble
with this player, please contact your nearest
“AUTHORIZED service station”. To prevent
direct exposure to the laser beam, do not try
to open the enclosure.
!CAUTION
USE OF CONTROLS OR ADJUSTMENTS OR
PERFORMANCE OF PROCEDURES OTHER
THAN THOSE SPECIFIED IN THE OWNER’S
MANUAL MAY RESULT IN HAZARDOUS
RADIATION EXPOSURE.
ADVARSEL.
Denne mærking er anbragt udvendigt på
apparatet og indikerer, at apparatet arbejder
med laserstråler af klasse 1, hvilket betyder, at
der anvendes laserstråler af svageste klasse,
og at man ikke på apparatets yderside kan
blive udsat for utilladelig kraftig stråling.
APPARATET BØR KUN ÅBNES AF FAGFOLK
MED SÆRLIGT KENDSKAB TIL APPARATER
MED LASERSTRÅLER!
Indvendigt i apparatet er anbragt den her
gengivne advarselsmækning, som advarer
imod at foretage sådanne indgreb i apparatet,
at man kan komme til at udsaætte sig for
laserstråling.
2
DUB278RMP
OBS!
Apparaten innehåller laserkomponenten som
avger laserstrålning överstigande gränsen för
laserklass 1.
VAROITUS
Suojakoteloa si saa avata. Laite sisältää
laserdiodin, joka lähettää näkymätöntä silmille
vaarallista lasersäteilyä.
Contents
1. PRECAUTIONS ..............................................................................................................................3
Handling Compact Discs .................................................................................................................4
2. CONTROLS ....................................................................................................................................5
3. NOMENCLATURE ..........................................................................................................................6
Names of the Buttons and Their Functions ...................................................................................... 6
Display Items ...................................................................................................................................8
LCD Screen .....................................................................................................................................8
4. REMOTE CONTROL ......................................................................................................................9
Inserting the Battery .........................................................................................................................9
Functions of Remote Control Unit Buttons ..................................................................................... 10
5. OPERATIONS ............................................................................................................................... 11
Basic Operations ........................................................................................................................... 11
Radio Operations ...........................................................................................................................14
RDS Operations ............................................................................................................................15
CD/MP3/WMA Operations .............................................................................................................19
USB Operations .............................................................................................................................22
CD/USB Common Operations .......................................................................................................24
Operations Common to Each Mode ...............................................................................................27
6. TROUBLESHOOTING ..................................................................................................................32
7. ERROR DISPLAYS ......................................................................................................................33
8. SPECIFICATIONS ........................................................................................................................33
English
English
Display Items
Handling Compact Discs
This unit has been designed specifically for playback of compact discs bearing the
mark.
No other discs can be played.
To remove the compact disc from its storage
case, press down on the center of the case
and lift the disc out, holding it carefully by the
edges.
Always handle the compact disc by the edges.
Never touch the surface.
To remove fingermarks and dust, use a soft
cloth, and wipe in a straight line from the center
of the compact disc to the circumference.
Never stick labels on the surface of the compact
disc or mark the surface with a pencil or pen.
Do not use any solvents such as commercially
available cleaners, anti-static spray, or thinner
to clean compact discs.
Do not use compact discs that have large
scratches, are misshapen, or cracked, etc.
Use of such discs will cause misoperation or
damage.
1. PRECAUTIONS
1. During extreme cold temperatures, condensation may form on the disc and/or the optical part
of the player. If the disc exhibits condensation,
carefully wipe off the disc with a soft cloth. In
the event the disc still does not play properly,
eject the disc and allow the condensation to
disappear naturally from the optical parts of the
player. Radio, Auxiliary and USB functions can
still be used during this time which may take
up to an hour.
Note on compact discs
2. Driving on extremely bumpy roads may cause
the CD to skip.
3. This unit is applicable for on-road 4 wheel vehicle purpose only. Use for tractor, fork truck,
bulldozer, off road vehicle, 2 or 3 wheel motor
bicycle, marine boat or other special purpose
vehicle is not appropriate.
New discs may have some roughness around
the edges. The unit may not work or the sound
may skip if such discs are used. Use a ball-point
pen, etc. to remove roughness from the edge
of the disc.
Do not expose compact discs to direct sunlight
or any heat source.
INFORMATION FOR USERS:
CHANGES OR MODIFICATIONS TO THIS PRODUCT NOT APPROVED BY THE MANUFACTURER WILL VOID THE WARRANTY.
LCD Screen
Note:
Do not use commercially available CD protection sheets or discs equipped with stabilizers, etc. These
may get caught in the internal mechanism and damage the disc.
In extreme cold, the screen movement may slow down and the screen may darken, but this is normal.
The screen will recover when it returns to normal temperature.
8
DUB278RMP
DUB278RMP
3
4
Be sure to unfold and read the next page. / Veuillez déplier et vous référer à la page suivante.
Bitte ausbreiten und die nächste Seite lesen. / Assicurarsi di aprire e leggere la pagina successiva.
Volgende pagina uitvouwen en doorlezen a.u.b. / Cerciórese de desplegar y de leer la página siguiente.
Glöm inte att vika ut och läsa nästa sida. / Não deixe de abrir e ler a próxima página.
DUB278RMP
Deutsch
Names of the Buttons and Their Functions
[SRC] button
CD insertion slot.
[
] button
Eject a CD when it is loaded in the unit.
Italiano
Press the button to turn on the power.
Press and hold the button for 1 second or longer
to turn off the power.
Switch the Operation mode among the Radio
mode, etc.
[COLOR] button
Press to change display color.
[ROTARY] knob
Nederlands
Adjust the volume by turning the knob clockwise
or counterclockwise.
Use the knob to perform various settings.
[TITLE] button
Español
Press the button to switch the track titles, while
in the MP3/WMA mode.
Press and hold the button for 1 second or longer
to scroll the title during title display, while in the
MP3/WMA mode.
Svenska
Português
Note: Be sure to unfold this page and refer to the front diagrams as you read each chapter.
Remarque: Veuillez déplier cette page et vous référer aux schémas quand vous lisez chaque chapitre.
Hinweis: Bitte diese Seite ausfalten und beim Lesen der einzelnen Kapital die Frontdiagramme beachten.
Nota: Assicurarsi di aprire questa pagina e fare riferimento a questi diagrammi quando si legge ciascun capitolo.
Opmerking: Vouw deze pagina uit en zie tevens de afbeeldingen van het voorpaneel tijdens het doorlezen van de volgende hoofdstukken.
Nota: Cuando lea los capítulos, despliegue esta página y consulte los diagramas.
Observera: Vik ut denna sida för att kunna se figurerna över bilstereons framsida medan du läser de olika kapitlen.
Nota: Certifique-se de abrir esta página e consulte os diagramas frontais conforme realiza a leitura de cada capítulo.
5
DUB278RMP
[
,
] buttons
Select a station while in the Radio mode or
select a track when listening to a CD/USB.
These buttons are used to make various
settings.
Press and hold the button for 1 second or longer
to enter the fast-forward or fast-backward in
CD/USB mode.
[DISP] button
During Radio/CD-DA/AUX mode, switch
the display indication ( Main display, Clock
display).
During MP3/WMA mode, switch the display
indication in the following order:
Track No./Play time Folder No./Track No.
Title Display Clock Display Track No./
Play time...
6
DUB278RMP
[
] button
Perform preset scan while in the Radio mode.
Press and hold the button for 2 seconds or
longer to perform auto store.
Play or pause a track while in the CD/USB
mode.
[BAND] button
Switch the band, seek tuning or manual tuning
while in the Radio mode.
Play the first track while in the CD/USB mode.
[A-M] button
Press the button to switch to the Audio mode
(Bass, Treble, Balance, Fader).
Press and hold for 1 second or longer to turn
on or off the M-B EX mode.
[SENSOR]
[Z-EHCR] button
[USB PORT]
[ADJ] button
Receiver for remote controller.
Operating range: 30° in all directions.
USB memory device insertion port.
[AUX] input
Auxiliary jack insertion.
[PUSH OPEN] cover
Push to open the flip down cover.
[SCN] button
Perform scan play for 10 seconds of each track
while in the CD-DA/MP3/WMA mode.
Press and hold the button for 1 second or longer
to perform all scan play while in the MP3/WMA
mode.
English
Note:
Be sure to read this chapter referring to the front diagrams of chapter “2. CONTROLS” on page 5 (unfold).
[CD SLOT]
With the FLIP DOWN COVER opened
COUVERCLE INCLINABLE ouvert
Mit geöffnetem EINSCHNAPP-Deckel
Con il FRONTALINO ESTRAIBILE aperto
Met geopend NEERKLAPPANEEL
Con el PANEL ABATIBLE abierto
Med FLIP DOWN COVER
(det nedvikningsbara locket) öppet
Com a TAMPA ARTICULADA aberta
Names of the Buttons and Their
Functions
3. NOMENCLATURE
Français
MAIN UNIT / APPAREIL PRINCIPAL / HAUPTGERÄT
/ APPARECCHIO PRINCIPALE / HOOFDTOESTEL
/ UNIDAD PRINCIPAL / HUVUDENHET / UNIDADE PRINCIPAL
English
English
CONTROLS / LES COMMANDES / REGLER / CONTROLLI
2. REGELAARS / CONTROLES / KONTROLLER / CONTROLOS
Press the button to select one of the 3 types
of sound characteristics already stored in
memory.
Press the button to switch to the ADJ mode.
Press and hold the button for 1 second or longer
to enter RDS ADJ mode.
[TA] button
Use the button to set the TA ( Traffic
Announcement) standby mode.
[DIRECT] buttons
Store a station into memory or recall it directly
while in the Radio mode.
[RPT] button
Perform repeat play while in the CD-DA/MP3/
WMA mode.
Press and hold the button for 1 second or longer
to perform all repeat play while in the MP3/WMA
mode.
[RDM] button
Perform random play while in the CD-DA/MP3/
WMA mode.
Press and hold the button for 1 second or
longer to perform all random play while in the
MP3/WMA mode.
[F-UP], [F-DN] buttons
Select the folder in MP3/WMA disc or USB
memory device.
Press the button to select CD-DA or MP3/WMA
playback on a multi-session disc.
DUB278RMP
7
Contents
1. PRECAUTIONS ..............................................................................................................................3
Handling Compact Discs .................................................................................................................4
2. CONTROLS ....................................................................................................................................5
3. NOMENCLATURE ..........................................................................................................................6
Names of the Buttons and Their Functions ...................................................................................... 6
Display Items ...................................................................................................................................8
LCD Screen .....................................................................................................................................8
4. REMOTE CONTROL ......................................................................................................................9
Inserting the Battery .........................................................................................................................9
Functions of Remote Control Unit Buttons ..................................................................................... 10
5. OPERATIONS ............................................................................................................................... 11
Basic Operations ........................................................................................................................... 11
Radio Operations ...........................................................................................................................14
RDS Operations ............................................................................................................................15
CD/MP3/WMA Operations .............................................................................................................19
USB Operations .............................................................................................................................22
CD/USB Common Operations .......................................................................................................24
Operations Common to Each Mode ...............................................................................................27
6. TROUBLESHOOTING ..................................................................................................................32
7. ERROR DISPLAYS ......................................................................................................................33
8. SPECIFICATIONS ........................................................................................................................33
English
English
Display Items
Handling Compact Discs
This unit has been designed specifically for playback of compact discs bearing the
mark.
No other discs can be played.
To remove the compact disc from its storage
case, press down on the center of the case
and lift the disc out, holding it carefully by the
edges.
Always handle the compact disc by the edges.
Never touch the surface.
To remove fingermarks and dust, use a soft
cloth, and wipe in a straight line from the center
of the compact disc to the circumference.
Never stick labels on the surface of the compact
disc or mark the surface with a pencil or pen.
Do not use any solvents such as commercially
available cleaners, anti-static spray, or thinner
to clean compact discs.
Do not use compact discs that have large
scratches, are misshapen, or cracked, etc.
Use of such discs will cause misoperation or
damage.
1. PRECAUTIONS
1. During extreme cold temperatures, condensation may form on the disc and/or the optical part
of the player. If the disc exhibits condensation,
carefully wipe off the disc with a soft cloth. In
the event the disc still does not play properly,
eject the disc and allow the condensation to
disappear naturally from the optical parts of the
player. Radio, Auxiliary and USB functions can
still be used during this time which may take
up to an hour.
Note on compact discs
2. Driving on extremely bumpy roads may cause
the CD to skip.
3. This unit is applicable for on-road 4 wheel vehicle purpose only. Use for tractor, fork truck,
bulldozer, off road vehicle, 2 or 3 wheel motor
bicycle, marine boat or other special purpose
vehicle is not appropriate.
New discs may have some roughness around
the edges. The unit may not work or the sound
may skip if such discs are used. Use a ball-point
pen, etc. to remove roughness from the edge
of the disc.
Do not expose compact discs to direct sunlight
or any heat source.
INFORMATION FOR USERS:
CHANGES OR MODIFICATIONS TO THIS PRODUCT NOT APPROVED BY THE MANUFACTURER WILL VOID THE WARRANTY.
LCD Screen
Note:
Do not use commercially available CD protection sheets or discs equipped with stabilizers, etc. These
may get caught in the internal mechanism and damage the disc.
In extreme cold, the screen movement may slow down and the screen may darken, but this is normal.
The screen will recover when it returns to normal temperature.
8
DUB278RMP
DUB278RMP
3
4
Be sure to unfold and read the next page. / Veuillez déplier et vous référer à la page suivante.
Bitte ausbreiten und die nächste Seite lesen. / Assicurarsi di aprire e leggere la pagina successiva.
Volgende pagina uitvouwen en doorlezen a.u.b. / Cerciórese de desplegar y de leer la página siguiente.
Glöm inte att vika ut och läsa nästa sida. / Não deixe de abrir e ler a próxima página.
DUB278RMP
English
4. REMOTE CONTROL
Inserting the Battery
1. Turn over the remote control unit and slide the
cover in the direction indicated by the arrow in
the illustration.
2. Insert the battery (CR2025) into the insertion
guides, with the printed side (+) facing upwards.
3. Press the battery in the direction indicated by
the arrow so that it slides into the compartment.
4. Replace the cover and slide in until it clicks into
place.
Notes:
Misuse may result in rupture of the battery, producing leakage of fluid and resulting in personal injury
or damage to surrounding materials. Always follow
these safety precautions:
Use only the designated battery.
When replacing the battery, insert properly, with
+/- polarities oriented correctly.
Do not subject battery to heat, or dispose of in fire or
water. Do not attempt to disassemble the battery.
Dispose of used batteries properly.
DUB278RMP
9
English
Functions of Remote Control Unit Buttons
Button
Mode
Radio (RDS)
CD-DA
[SRC]
Switch between Radio, CD, USB and AUX.
[BND]
Switch reception
band.
],[
[
]
],[
[
[
MP3/WMA and USB
Play the first track. Top play.
AUX
No
function.
Increase and decrease volume (in all modes).
]
]
Move preset
channels up and
down.
Move tracks up and down.
Press and hold the button for 1 second or
longer: Fast-forward/fast-backward.
Turn mute on and off.
Switch between playback and pause.
[MUTE]
[TA]
[DISP]
No
function.
No
function.
Turn mute on
and off.
TA on and off.
Switch among main display and
clock display.
Switch among main
display, title display
and clock display.
Switch among
main display and
clock display.
[PS/AS]
Preset scan.
Press and hold the
button for 2 seconds
or longer: Auto store.
Scan play.
Scan play.
Press and hold the
button for 1 second
or longer to perform
all scan play.
No
function.
[AF]
AF function on and
off, when pressed
and held for 1 second: REG function on
and off.
Repeat play.
Repeat play.
Press and hold the
button for 1 second
or longer to perform
all repeat play.
No
function.
PTY stand by mode
on and off.
Random play.
Random play.
Press and hold the
button for 1 second
or longer to perform
all random play.
No
function.
[PTY]
∗ Some of the corresponding buttons on the main unit and remote control unit have different functions.
10
DUB278RMP
Note: Be sure to read this chapter referring to the front diagrams of
chapter “2. CONTROLS” on page 5 (unfold).
Basic Operations
Switching the display
! CAUTION
Be sure to lower the volume before switching off the unit power or the ignition key. The
unit remembers its last volume setting. If
you switch the power off with the volume up,
when you switch the power back on, the sudden loud volume may hurt your hearing and
damage the unit.
Turning on/off the power
Note:
Be careful about using this unit for a long time
without running the engine. If you drain the car’s
battery too much, you may not be able to start the
engine and this can reduce the service life of the
battery.
1. Press the [SRC] button.
2. The illumination and display on the unit light
up. The unit automatically remembers its last
Operation mode and will automatically switch
to display that mode.
3. Press and hold the [SRC] button for 1 second
or longer to turn off the power for the unit.
Selecting a mode
1. Press the [SRC] button to change the Operation mode.
2. Each time you press the [SRC] button, the Operation mode changes in the following order:
(USB mode)
Radio mode
CD mode
AUX mode
Radio mode...
The 3-digit message knob indication will display
the correspondence mode as the following:
Radio mode :
CD mode
:
,
,
English
5. OPERATIONS
,
1. Press the [DISP] button to select the desired
display.
2. Each time you press the [DISP] button, the
display switches in the following order:
Radio/CD (CD-DA)/AUX Mode:
Main display
Main display
MP3/WMA (Disc and USB) Mode:
Main-1 display (Track No., play time)
Main-2 Display (Folder No., Track No.)
Title Display Clock Display
Main-1 Display....
∗ Once selected, the preferred display becomes the
display default. When a function adjustment such
as volume is made, the screen will momentarily
switch to that function’s display, then revert back
to the preferred display several seconds after the
adjustment.
Adjusting the volume
Turning the [ROTARY] knob clockwise increases
the volume; turning it counterclockwise decreases the volume.
"VOLUME:XX" will be shown in the display while
“VXX” will be displayed in the message knob
indication where“XX” is the volume level from 0
(minimum) to 33 (maximum).
∗ The factory default setting for volume is "17".
Displaying additional buttons
1. Push the [PUSH OPEN] cover to open the
flip down cover that consists of the following
buttons:
[DIRECT]
[BAND]
USB mode :
[A-M]
Notes:
If the CD mode is selected when no disc is inserted,
the display shows “NO DISC”.
[ADJ]
AUX mode :
Clock display
[Z-EHCR]
[TA]
If no USB drive is inserted, USB mode will not be
displayed.
DUB278RMP
11
English
Basic Operations
Note:
Try to avoid pushing down the cover further after
flipping down.
Audio mode adjustments
1. Press the [A-M] button to select the Adjustment
mode. The mode switches as follows each time
the [A-M ] button is pressed:
BASS TREB
display.
BAL
FAD
previous
2. Turning the [ROTARY] knob to adjust the
selected Audio mode.
BASS (Bass) : Adjustment range : -7 to +7
TREB (Treble): Adjustment range : -7 to +7
BAL (Balance): Adjustment range : L12 to R12
FAD (Fader) : Adjustment range : F12 to R12
∗ The display returns to the previous mode 7
seconds after the adjustment.
Note:
Bass and Treble can only be adjusted when the
“Z-Enhancer” is off.
2. Close the cover properly when not in use.
Note:
If you accidently push down the cover further after
flipping down, you can close the cover back and
push 2 sides of the cover to return to normal condition.
3. When the adjustment is complete, press the
[A-M ] button several times until the Function
mode is reached.
Adjusting the bass
1-1 Press the [A-M ] button and select “BASS
0”.
2-1. Turning the [ROTARY] knob clockwise emphasizes the bass; turning it counterclockwise attenuates the bass.
∗ The factory default setting is “BASS 0”.
Adjusting the treble
1-1. Press the [A-M ] button and select “TREB
0”.
2-1. Turning the [ROTARY] knob clockwise emphasizes the bass; turning it counterclockwise attenuates the bass.
∗ The factory default setting is “BASS 0”.
Adjusting the balance
1. Press the [A-M ] button and select “BAL 0”.
2. Turning the [ROTARY] knob clockwise emphasizes the sound from the right speaker;
turning it counterclockwise emphasizes the
sound from the left speaker.
∗ The factory default setting is “BAL 0”.
12
DUB278RMP
Adjusting the fader
CT (Clock Time) function
2. Turning the [ROTARY] knob clockwise emphasizes the sound from the front speakers;
turning it counterclockwise emphasizes the
sound from the rear speakers.
∗ If a CT data is not being received, “CT--:--” appears
in the display.
1. Press the [A-M ] button and select “FAD 0”.
∗ The factory default setting is “FAD 0”.
Setting the Z-Enhancer
This unit is provided with 3 types of sound tone
effects stored in memory. Select the one you
prefer.
∗ The factory default setting is “Z-EHCR OFF”.
Each time you press the [Z-EHCR] button, the
tone effect changes in the following order:
(Z-EHCR OFF)
(Z-EHCR 1)
(Z-EHCR 3)
(Z-EHCR OFF)
Z-EHCR 1
(Z-EHCR 2)
: bass emphasized
Z-EHCR 2
: treble emphasized
Z-EHCR 3
: bass and treble emphasized
Z-EHCR OFF : no sound effect
Adjusting MAGNA BASS EX
The CT function receives CT data sent from an
RDS station and displays the time. Press the
[DISP] button to switch to the CT display.
English
Basic Operations
Note:
CT data is not transmitted in some countries and
by some broadcast stations. Also, in some areas,
the CT display may not accurate.
AUX function
This system has an external jack input in the front
panel where you can listen to sounds and music
from external devices connected to this unit.
1. Connect the external music player to the [AUX]
input. Display will automatically switch to AUX
mode. Alternately, user can press the [SRC]
button to select the AUX mode.
Notes:
Use only the 3.5mm stereo jack for the AUX jack
input.
Volume can be adjusted through the unit. If you
face difficulties of hearing sound even after volume
has been adjusted, please refer section “Selecting
AUX IN sensitivity” on page 27 for details.
Remove the audio jack from [AUX] input during
AUX mode will revert to Radio mode automatically.
The MAGNA BASS EX does not adjust the low
sound area like the normal sound adjustment
function, but emphasizes the deep bass sound
area to provide you with a dynamic sound.
∗ The factory default setting is off.
1. Press and hold the [A-M ] button for 1 second
or longer to turn on the MAGNA BASS EX
effect.
lights in the display.
2. Press and hold the [A-M ] button for 1 second
or longer to turn off the MAGNA BASS EX
effect.
goes off from the display.
DUB278RMP
13
English
Radio Operations
Listening to the radio
Manual tuning
2. To select a preset band, press the [BAND] button, then select one of the preset bands such
as FM1, FM2, FM3 or AM (MW/LW). Every time
the [BAND] button is pressed, the display will
change as:
When you are in the step Tuning mode, the frequency changes one step at a time. In the quick
Tuning mode, you can quickly tune the desired
frequency.
1. Press the [SRC] button and select the Radio
mode, then the radio will be on.
FM1
FM2
FM3
,
3. Press the [
desired station.
AM (MW/LW)
FM1...
] button to tune in the
There are 2 ways available: Quick tuning and
step tuning.
1. Press the [BAND] button and select the desired
band (FM or AM (MW/LW)).
∗ If
is not lit in the display, press and hold
the [BAND] button for 1 second or longer.
is lit in the display and manual tuning is
now available.
Seek tuning
There are 2 types of seek tuning: DX SEEK and
LOCAL SEEK.
2. Tune into a station.
Quick tuning:
DX SEEK can automatically tune in to receivable
broadcast stations; LOCAL SEEK can tune in to
only broadcast stations with a good reception
sensitivity.
] button for 1 second
Press and hold the [
,
or longer to begin station tuning.
∗ If
is lit in the display, press and hold the
[BAND] button for 1 second or longer.
∗ If no operation is performed for more than 7 seconds, manual tuning is cancelled and the display
returns to the previous mode.
1. Press the [BAND] button and select the desired
band (FM or AM (MW/LW)).
in the display goes off and seek tuning
is now available.
∗ If “TA” is lit in the display, TP stations are automatically sought.
,
2. Press the [
station tuning.
] button to start automatic
DX SEEK
] button is pressed, search will be
When the [
performing in the direction of higher frequencies.
] button is pressed, search will be
When the [
performed in the direction of lower frequencies.
∗ When seek tuning starts, “DX” appears in the
display.
LOCAL SEEK
If the button is pressed and held in position for
1 second or longer, local seek tuning will be enabled. Broadcast stations with good reception
sensitivity are selected.
∗ When local seeking starts, “LO” appears in the
display.
14
DUB278RMP
Step tuning:
Press the [
tuning.
] button to perform manual
,
Preset memory function
Preset memory function can store up to 24 stations:
Six stations for each of FM1, FM2, FM3 and AM
(MW/LW).
Manual memory function
1. Press the [BAND] button, to select a band you
want to store in the memory.
2. Press the [
station.
,
] button to tune into a desired
3. Press and hold one of the [DIRECT] buttons for
2 seconds or longer to store the current station
into preset memory.
RDS Operations
Auto store
RDS (Radio Data System)
Auto store is a function for storing up to 6 stations
that are automatically tuned in sequentially. If 6
receivable stations cannot be received, a previously stored station remains un-overwritten at
the memory position.
1. Press the [BAND] button and select the desired
band (FM or AM (MW/LW)).
] button for 2 seconds
2. Press and hold the [
or longer. The stations with good reception are
stored automatically to the preset channels.
∗ If auto store is performed in the FM bands, the
stations are stored in FM3 even if FM1 or FM2
was chosen for storing stations.
Preset scan
Preset scan receives the stations stored in preset
memory in order. This function is useful when
searching for a desired station in memory.
1. Press the [
] button.
2. When a desired station is tuned in, press the
[
] button again to continue receiving that
station.
Note:
] button
Be careful not to press and hold the [
for 2 seconds or longer, otherwise the auto store
function is engaged and the unit starts storing
stations.
Recalling a preset station
A total of 24 preset positions (6-FM1, 6-FM2,
6-FM3, 6-AM) exists to store individual radio
stations in memory. Pressing the corresponding
[DIRECT] button recalls the stored radio frequency automatically.
1. Press the [BAND] button and select the desired
band (FM or AM (MW/LW)).
2. Press the corresponding [DIRECT] button to
recall the stored station.
∗ Press and hold one of the [DIRECT] buttons
for 2 seconds or longer to store that station into
preset memory.
This unit has a built-in RDS decoder system that
supports broadcast stations transmitting RDS
data.
English
Radio Operations
This system can display the name of the broadcast station being received (PS) and can automatically switch to the broadcast station with the
best reception as you move long distances (AF
switching).
Also, if a traffic announcement or programme
type is broadcast from an RDS station, no matter
what mode you are in, this broadcast is received.
Additionally, if EON information is received, this
information enables automatic switching of other
preset stations on the same network and interruption of the station being received with traffic
information from other stations (TP). This function is not available in some areas.
When using the RDS function, always set the
radio to FM mode.
AF
: Alternative Frequency
PTY
: Programme Type
PS
EON
TP
: Programme Service Name
: Enhanced Other Network
: Traffic Programme
∗ RDS interrupt does not function during AM radio
reception.
∗ When set receives RDS signal, and can read PS
data, PS appears in the display.
AF function
The AF function switches to a different frequency
on the same network in order to maintain optimum reception.
∗ The factory default setting is “ON”.
1. Press and hold the [ADJ] button for 1 second
or longer to switch to the RDS adjustment
selection display.
2. Press the [
,
] button to select “AF”.
3. Turn the [ROTARY] knob to select “ON” or
“OFF”.
ON:
“AF” in the display lights and AF function turns on.
OFF:
“AF” in the display goes off and AF function turns off.
DUB278RMP
15
English
RDS Operations
4. Press the [ADJ] button to return to the previous
mode.
∗ If the reception of the current broadcast station
deteriorates, “SEARCH” appears in the display
and the radio searches for the same programme
on another frequency.
REG (Regional programme) function
When the REG function is ON, the optimum regional station can be received. When this function is OFF, if the regional station area switches
as you drive, a regional station for that region is
received.
∗ The factory default setting is “OFF”.
Notes:
This function is disabled when a national station
such as BBC R2 is being received.
The REG function ON/OFF setting is valid when
the AF function is ON.
1. Press and hold the [ADJ] button for 1 second
or longer to switch to the RDS adjustment
selection display.
2. Press the [
,
] button to select “REG”.
3. Turn the [ROTARY] knob to select “ON” or
“OFF”.
ON:
“REG” in the display lights and REG function turns
on.
OFF:
“REG” in the display goes off and REG function
turns off.
4. Press the [ADJ] button to return to the previous
mode.
Manually tuning a regional station
in the same network
1. This function is valid when the AF function is
ON and the REG function is OFF.
Note:
This function can be used when a regional broadcast of the same network is received.
2. Press any one of the [DIRECT] buttons to call
out the regional station.
3. If the reception condition of the called out station is bad, press the [DIRECT] button of the
same number. The unit receives a local station
on the same network.
16
DUB278RMP
TA (Traffic Announcement)
In the TA standby mode, when a traffic announcement broadcast starts, the traffic announcement
broadcast is received as top priority regardless of
the Function mode so you can listen to it. Traffic
programme (TP) automatic tuning is also possible.
∗ This function can only be used when “TP” is lit in
the display. When “TP” is lit, this means that the
RDS broadcast station being received has traffic
announcement programmes.
Setting the TA standby mode
If you press the [TA] button when only “TP” is lit in
the display, “TP” and “TA” light in the display and
the unit is set into the TA standby mode until a
traffic announcement is broadcast. When a traffic
announcement broadcast starts, “TRA INFO” appears in the display. If you press the [TA] button
while a traffic announcement broadcast is being
received, the traffic announcement broadcast reception is cancelled and the unit goes into the TA
standby mode.
Cancelling the TA standby mode
As “TP” and “TA” lit in the display, press the [TA]
button. The “TA” in the display goes off and the
TA standby mode is cancelled.
∗ If “TP” is not lit, pressing the [TA] button searches
for a TP station.
Searching for a TP station
When “TP” is not lit, if you press the [TA] button,
“TA” in the display lights and the unit automatically receives a TP station.
Note:
If a TP station is not received, the unit continues
the search operation. Pressing [TA] button again
goes off “TA” in the display and stops TP station
searching.
Auto store function for TP stations
You can automatically store up to 6 TP stations
into preset memory. If the number of TP can be
received less than 6, broadcast stations already
stored in memory and left without being overwritten.
]
As “TA” lit in the display, press and hold the [
button for 2 seconds or longer. The TP stations
with the good reception sensitivity are stored into
preset memory.
∗ Even if you select FM1 or FM2, a TP station is
stored into memory for FM3.
RDS MODE adjustment
Press and hold the [ADJ] button for 1 second or
longer to select the RDS MODE.
The mode switches as follows each time the
[
] button is pressed:
,
PTY ON
REG ON∗2
PTY-S<E>∗1
PTY ON ....
AF ON
Press [ADJ] button to exit RDS MODE.
Notes:
∗1 “PTY-S<E>” only available when “PTY ON”.
∗2
“REG ON” only available when “AF ON”.
PTY
This function enables you to listen to a broadcast
of the selected programme type even if the unit is
on a Function mode other than radio.
∗ Some countries do not yet have PTY broadcast.
∗ In the TA standby mode, a TP station has priority
over a PTY broadcast station.
∗ The factory default setting is “OFF”.
1. Press and hold the [ADJ] button for 1 second
or longer to switch to the RDS adjustment
selection display.
2. Press the [
,
] button to select “PTY”.
3. Turn the [ROTARY] knob to select “ON” or
“OFF”.
ON:
“PTY” in the display lights and PTY standby mode is
turned on. When the selected PTY broadcast starts,
the PTY item name appears in the display.
English
RDS Operations
OFF:
“PTY” in the display goes off and PTY standby mode
is cancelled.
4. Press the [ADJ] button to return to the previous
mode.
Cancelling a PTY interrupt broadcast
Press the [SRC] button during the PTY interrupt
broadcast, the PTY interrupt is cancelled and the
unit returns to PTY standby mode.
Selecting PTY
1. Press and hold the [ADJ] button for 1 second
or longer to switch to the RDS adjustment
selection display.
2. Press the [
<E>”.
] button to select “PTY-S
,
3. Press the [
] button.
4. Press any one of the [ DIRECT ] buttons.
Alternatively, turn the [ROTARY] knob to select
the desired PTY.
5. Press the [ADJ] button to return to the previous
mode.
∗ Below are the factory default settings stored for
the [DIRECT] buttons.
Preset
number
1
2
3
4
5
6
PTY item
ENGLISH Contents
News
Info
Pop M
Sport
Classics
Easy M
News
Information
Pop Music
Sport
Serious Classical Music
Easy Listening Music
∗ The PTY select mode is cancelled automatically 7
seconds after a PTY is selected.
DUB278RMP
17
English
RDS Operations
PTY seek
1. Press and hold the [ADJ] button for 1 second
or longer to switch to the RDS adjustment
selection display.
2. Press the [
<E>”.
,
3. Press the [
] button to select “PTY-S
] button.
] button to search for a PTY
4. Press the [
broadcast in the direction of higher frequen] button to search in the
cies; press the [
direction of lower frequencies.
∗ If no station with the selected PTY broadcast
can be received, the unit returns to the previous receiving station.
PTY preset memory
1. Press and hold the [ADJ] button for 1 second
or longer to switch to the RDS adjustment
selection display.
2. Press the [
<E>”.
3. Press the [
,
] button to select “PTY-S
] button.
4. Turning the [ROTARY] knob to select the desired PTY.
The 29 types of PTY below can be selected.
5. If you press and hold any one of the [DIRECT]
buttons for 2 seconds or longer, the selected
PTY is stored into that preset channel memory.
ENGLISH
News
Affairs
Info
Sport
Educate
Drama
Culture
Science
Varied
Pop M
Rock M
Easy M
Light M
Classics
Other M
Weather
Finance
Children
Social
Religion
Phone In
Travel
Leisure
Jazz
Country
Nation M
Oldies
Folk M
Document
PTY item
Contents
News
Today’s events
Information
Sports
Education
Drama
Culture
Science
Variety
Pop music
Rock music
Easy music
Light music
Classics
Other music
Weather
Finance
For children
Social
Religion
Phone in
Travel
Leisure
Jazz
Country
Nation music
Oldies
Folk music
Documentaries
Emergency broadcast
If an emergency broadcast is received, all the
function mode operations are stopped.
“ALARM” appears in the display and the emergency broadcast can be heard.
Cancelling an emergency broadcast
If you press the [SRC] button, emergency broadcast reception is cancelled.
18
DUB278RMP
CD/MP3/WMA Operations
Volume setting of TA, emergency
broadcast (ALARM) and PTY
What is MP3?
The volume for TA, ALARM and PTY interrupts
can be set during TA, ALARM or PTY interrupt.
∗ The factory default setting for this volume is “19”.
During a TA, ALARM or PTY interrupt, turn the
[ROTARY] knob to set the volume to the desired
level (0 to 33).
∗ When the TA, ALARM or PTY interrupt ends,
the volume returns to the level it had before the
interrupt.
MP3 is an audio compression method and classified into audio layer 3 of MPEG standards. This
audio compression method has penetrated into
PC users and become a standard format. This
MP3 features the original audio data compression to about 12 percent of its initial size with a
high quality sound. This means that about 10
music CDs can be recorded on a CD-R disc or
CD-RW disc to allow a long listening time without
having to change CDs.
English
RDS Operations
What is WMA?
WMA is the abbreviation of Windows Media Audio, an audio file format developed by Microsoft
Corporation.
Notes:
If you play a file with DRM (Digital Rights Management) enabled for WMA, no audio is output. “--:--”
will be blinking for several seconds before it skips
to next track.
Windows Media™, and the Windows® logo are
trademarks, or registered trademarks of Microsoft
Corporation in the United States and/or other
countries.
To disable DRM (Digital Rights Management):
1. When using Windows Media Player 8, click
on TOOLS
OPTIONS
COPY MUSIC
tab, then under COPY SETTINGS unclick the
check box for PROTECT CONTENT. Then,
reconstruct files.
2. When using Windows Media Player 9, click
on TOOL
OPTIONS
MUSIC RECORD
tab, then under Recording settings, unclick the
check box for RECORD PROTECTED MUSIC.
Then, reconstruct files.
3. When using Windows Media Player 10, click on
TOOL
OPTIONS
RIP MUSIC tab, then
under Rip settings, unclick the check box for
COPY PROTECT MUSIC. Then, reconstruct
files.
Notes:
Personally constructed WMA files are used at your
own responsibility.
Disabling DRM can be done if the file is ripped from
CD.
DUB278RMP
19
English
CD/MP3/WMA Operations
Precautions when creating MP3/WMA
disc
Usable sampling rates and bit rates:
MP3
Number of files or folders
Decode Format MPEG 1, 2 and 2.5 - Layer 3
Sampling rate
MPEG-1 : 32, 44.1, 48
(kHz)
MPEG-2 : 16, 22.05, 24
MPEG-2.5 : 8, 12
Bit-rate (kbps) MPEG-1 : 32 - 320
MPEG-2 : 8 - 160
MPEG-2.5 : 8 - 160
VBR
1. Up to 255 files can be recognized per folder.
Up to 255 files can be played.
CD-ROM
Format
ISO 9660 Level 1, 2, Romeo
and Joliet
4. Some noise may occur depending on the type
of encoder software used while recording.
Sampling rate
(kHz)
8, 16, 22.05, 32, 44.1
CD-DA/MP3/WMA selection on
multi-session CD
CD-ROM
Format
ISO 9660 Level 1, 2, Romeo
and Joliet
WMA
Bit-rate (kbps)
48, 64, 80, 96, 128, 160, 192
File extensions
Always add a file extension “.MP3” or “.WMA” to
MP3 or WMA file by using single byte letters. If
you add a file extension other than specified or
forget to add the file extension, the file cannot
be played.
Logical format (File system)
1. When writing MP3/WMA file on a CD-R disc or
CD-RW disc, please select “ISO9660 level 1, 2
or JOLIET or Romeo” as the writing software
format. Normal play may not be possible if the
disc is recorded on another format. such as
packet write disc (UDF) format.
2. The folder name and file name can be displayed as the title during MP3/WMA play but
the title must be within 28 single byte alphabetical letters and numerals (including an extension).
3. Do not affix a name to a file inside a folder
having the same name.
20
Folder structure
1. A disc with a folder having more than 8 hierarchical levels will be impossible.
DUB278RMP
2. Up to a maximum of 255 folders can be supported. However, actual folders support will still
be depended on total files.
3. Tracks are played in the order that they were
recorded onto a disc. (Tracks might not always
be played in the order displayed on the PC.)
If a multi-session CD which contains CD-DA and
MP3/WMA files is being inserted, user can select
either CD-DA or MP3/WMA files to be played.
Notes:
CD-DA files will always be the first to be played
while MP3/WMA files will be playing subsequently.
The first folder is always CD-DA files (CD-extra or
mixed CD).
If there is no MP3/WMA files in CD-extra/mixed CD,
the unit may mute for a while and start to play from
top (CD-DA files).
1. Press the [F-UP] button will move to the next
folder and MP3/WMA files to be played.
2. Press the [F-DN] button will move to the previous folder (if it is first folder) and CD-DA files
to be played.
Loading a CD
! CAUTION
Do not try to put your hand or fingers in the
disc insertion slot. Also never insert foreign
objects into the slot.
Do not insert discs where adhesive comes
out from cellophane tape or a rental CD
label, or discs with marks where cellophane
tape or rental CD labels were removed. It
may be impossible to extract these discs
from the unit and they may cause the unit
to break down.
This unit is designed for play of 12cm compact disc only. Do not attempt to use 8cm
CD singles in this unit, either with or without
an adaptor, as damage to the player and/or
disc can occur. Such damage will not be
covered by the warranty on this product.
Do not insert transparent disc as it would
not be detected by the unit. It may cause
difficulties of loading/ejecting the disc even
if it is detected.
Backup eject function
Just pressing the [ ] button ejects the disc even
if the power to the unit was not turned on. Remove the disc after it is ejected.
Notes:
If you force a CD into before auto reloading, this
can damage the CD.
If a CD (12 cm) is left in the ejected position for 15
seconds, the CD is automatically reloaded. (Auto
reload). Listening to a disc already loaded
Insert a CD into the center of the CD SLOT with
the labeled side facing up. “LOADING” appears
in the display, the CD plays automatically after
loading.
English
CD/MP3/WMA Operations
indicator will lit on if the current audio file is
MP3 format while
indicator will lit on if the
current audio file is WMA format.
Notes:
Never insert foreign objects into the CD SLOT.
If the CD is not inserted easily, there may be another CD in the mechanism or the unit may require
service.
Discs not bearing the
mark and CD-ROMs
cannot be played by this unit.
Some CDs recorded in CD-R/CD-RW mode may
not be usable.
Ejecting the CD
Press the [
ed.
] button, then the CD will be eject-
Notes:
If there is no disc loaded, the indication "NO DISC"
appears in the display and return to Radio mode
after 4 seconds.
If the CD is not removed after ejecting, CD will
be automatically reloaded after 15 seconds and
this will not automatically switch to CD/MP3/WMA
mode.
For CD/MP3/WMA playback, please refer to
“CD/USB Common Operations”.
Listening to a disc already loaded
in the unit
Press the [SRC] button to select the CD mode.
When the unit enters the CD mode, play starts
automatically.
If there is no disc loaded, the indication “NO
DISC” appears in the title display.
Radio
CD
(USB)
AUX
Radio...
DUB278RMP
21
English
USB Operations
USB memory device operation
Note:
The following operations are available in USB
mode
∗ Pause
∗ Track selection
∗ Fast-forward/fast-backward
∗ Top function
∗ Scan play
∗ Repeat play
∗ Random play
∗ Folder selection
See “CD/USB Common Operations” on page
24.
About USB
USB is the abbreviation of Universal Serial
Bus, an external bus standard that supports
data transfer rates of 12Mbps. The main unit
is compatible with USB 1.1/2.0 with maximum
data transfer rates of 12Mbps (Full Speed).
USB memory devices that can be played by
connecting to the unit’s USB cable are limited
to those recognized as “USB mass storage
class devices”; operation is not guaranteed
with all USB memory devices. For USB
memory devices compatibility, please consult
Clarion dealer for more information.
∗ Devices compatible with “USB Mass Storage Class” can be used merely by connecting to the host device, without need for
special drivers or application software.
Consult the manufacturer of your USB memory
device for information regarding whether it is
supported by “USB Mass Storage Class” standards. Please take note that iPod shuffle/nano
and harddisk drive (HDD) is not supported.
To prevent the accidental loss of data, always
back up important data to your computer.
This unit does not support connections to
a computer. In addition, connections made
through a USB hub device are also not supported.
If the USB memory device supports multiple partitions, only the first partition will be
supported.
22
DUB278RMP
The order in which tracks are recorded may
differ depending on the USB memory device
connected (the actual playback order may
not be the same as that indicated on your
computer’s display).
More than 480mA DC to extenal USB memory
device is not supported.
Audio files playable on this unit are limited
to MP3/WMA files. For further information on
MP3/WMA playback, please refer to “CD/USB
Common Operations”.
! CAUTION
Do not try to put your hand or fingers in
the USB insertion port. Also never insert
foreign objects into the port.
USB memory device insertion may result
in protruding as it might be dangerous
to the user while driving. For safety
purposes, it is advisable to use an USB
extension cable to connect between the
USB memory device and the USB port
on the main unit.
Do not leave a USB memory device unattended in an automobile. Exposure to
direct sunlight or high temperatures may
cause deformation or other malfunction
of the USB memory device.
When the device is subjected to static
electricity or electric noise, this may
result in the loss of data.
Folder structure
1. An USB memory device with a folder having
more than 8 hierarchical levels will be impossible.
Number of files or folders
1. Up to 15,000 files can be recognized per
folder.
Up to 15,000 files can be played.
Note:
Exceeding the files limitation may cause
unexpected operation failure.
2. Up to a maximum of 225 folders can be supported. However, actual folders support will still
be depended on total files.
Precautions when creating MP3/WMA on
USB memory device
Usable sampling rates and bit rates:
Note:
Do not forcibly connect the USB memory device to
the port with incorrect direction as this will damage
the USB memory device as well as the USB port.
English
USB Operations
MP3
Decode Format MPEG 1, 2 and 2.5 - Layer 3
Sampling rate
MPEG-1 : 32, 44.1, 48
(kHz)
MPEG-2 : 16, 22.05, 24
MPEG-2.5 : 8,12
Bit-rate (kbps) MPEG-1 : 32 - 320
MPEG-2 : 8 - 160
MPEG-2.5 : 8 - 160
VBR
WMA
Sampling rate
(kHz)
Bit-rate (kbps)
8, 16, 22.05, 32, 44.1
48, 64, 80, 96, 128, 160, 192
Hot plugging function
This unit has the ability to recognize the changes
of connecting and disconnecting an USB memory device.
When the unit is powered on, this function allows
you to start playing the tracks automatically when
the USB memory device is inserted.
Connecting a USB memory device
1. Open the USB cover at the USB port.
2. Connect the USB memory device into the
port with the correct direction. The
indicator will lit on.
or
indicator will lit on
according to the audio format of the current
track.
Playback will begin from the first track on the
USB memory device.
∗ Always insert the USB memory device fully into
Listening to a track with USB
memory device already connect to
the unit
Press the [SRC] button to select the USB mode.
When the unit enters the USB mode, track will
start to play automatically.
If there is no USB memory device inserted, USB
mode will not be shown for selection.
∗ The mode changes each time the [SRC] button is
pressed.
(USB)
Radio
CD
AUX
Radio...
Unplug the USB memory device
Remove the USB memory device from the port
during USB mode, the unit will revert to Radio
mode automatically.
Alternately, user can remove USB memory device at any mode.
Note:
It is safe to remove USB memory device during
track playing.
the port. Incomplete connections may cause
the USB memory device not be recognized.
∗ Depending on the number of tracks recorded,
some amount of time may be required until all
tracks are read into the unit.
∗ USB memory devices may have different shape
depends on brands. Some USB memory devices may not be able to plug into the port due
to the shape design. Please use an extension
cable instead.
∗ Please reconnect the USB memory device
when it cannot be detected properly.
DUB278RMP
23
English
CD/USB Common Operations
Note: CD-DA disc and MP3/WMA disc/USB drive will have different functionalities in some cases. Please read
carefully where differences applied.
Pausing play
Title display mode
2. To resume track play, press the [
again.
1. There are 5 types of display for the Title Display
mode.
2. To select the next type, press the [TITLE]
button for less than 1 second.
] button to pause play. “PAUSE”
1. Press the [
appears in the display.
] button
Display selection
MP3/WMA:
The arrangement is shown below.
1. You can choose the display type by pressing
the [DISP] button.
2. To select the next type, press the [DISP] button
again.
CD-DA:
The arrangement is shown below.
MP3/WMA:
The arrangement is shown below.
3. The displayed item can be scrolled by pressing
the [TITLE] button for more than 1 second.
4. If a MP3/WMA file encode with ID3 TAG header
but not consist of any TAG information, the
following will be displayed respectively.
“NO ALBUM NAME” for Album Tag
“NO ARTIST NAME” for Artist Tag
“NO SONG NAME” for Title Tag
Notes:
For MP3, supports ID3 Tags V2.4/2.3/2.2/1.1/1.0.
The MP3 player decodes each file ID3 TAG ver 2
by default, if ID3 TAG ver 2 is unavailable, ID3 TAG
ver 1 will be decoded.
In the case of album Tags for WMA, the information
written into the extension header is displayed.
Only ASCII characters can be displayed in Tags.
∗ For track number more than 999, only the last 3
digits will be displayed.
24
DUB278RMP
The folder name will be displayed as “ROOT” which
the file allocates in the root folder.
UNICODE ID3 (Chinese, Japanese and etc) is not
supported.
If ID3 TAG has Japanese, Chinese character or
other non supported characters, “∗” will be displayed as substitution.
Selecting a track
English
CD/USB Common Operations
Example of a medium’s folder/file hierarchy.
Track-up
] button to move to the begin1. Press the [
ning of the next track.
] button is pressed, playback
2. Each time the [
proceeds to another track in the advancing
direction.
Track-down
] button to move to the beginning
1. Press the [
of the current track.
] button twice to move to the
2. Press the [
beginning of the previous track.
Fast-forward/fast-backward
Fast-forward
Press and hold the [
longer.
Fast-backward
Press and hold the [
longer.
] button for 1 second or
] button for 1 second or
] button for 1
∗ For CD-DA, pressing the [
,
second or longer will move forward or backward 5
times faster than normal play, and pressing it for
3 seconds or longer will do the operation 30 times
faster.
,
] button for
∗ For MP3/WMA, pressing the [
1 second or longer will move forward or backward
10 times faster than normal play per second.
MP3/WMA playing order
When selected for playing folder up down functions, files and folders are accessed in the order
in which they were written by the CD-ROM writer
or USB memory device. Because of this, the order in which they are expected to be played may
not match the order in which they are actually
played. You may be able to set the order in which
MP3/WMA are to be played by writing them onto
a medium such as a CD-R/USB memory device
with their file names beginning with play sequence numbers such as “01” to “99”, depending
on your CD writer (CD).
Folder Select
This function allows you to select a folder containing MP3/WMA files and start playing from the
first track in the folder.
1. Press the [F-UP] button to move the next
folder.
2. Press the [F-DN] button to move the previous
folder.
For example, a medium with the following folder/
file hierarchy is shown below.
DUB278RMP
25
English
CD/USB Common Operations
Notes:
Press the [F-UP] button while in the final folder will
shift to the first folder.
Folder without a MP3/WMA file is not selectable.
The first track will always be selected when shifting
to next/previous folder.
Top function
Press the [BAND] button, then the CD/USB will
start playing from the top.
CD-DA:
Start to play the first track of the disc.
MP3/WMA:
Start to play the first track of current folder.
Other various play functions
Scan play
CD-DA :
This function allows you to locate and play the
first 10 seconds of all the tracks recorded on a
disc.
MP3/WMA :
This function allows you to locate and play the
first 10 seconds of all the tracks in current folder.
1. Press the [SCN] button to perform scan play.
The
indicator lights in the display.
∗ Scan play starts from the next track after the
track currently being played.
All scan play
MP3/WMA :
This function allows you to locate and play the
first 10 seconds of the first track of all the folders
on an MP3/WMA disc/USB memory device.
1. Press and hold the [SCN ] button for 1 second
or longer to perform all scan play.
The
play.
and
indicators light in the dis-
∗ All scan play starts from the next track after the
track currently being played.
26
DUB278RMP
Repeat play
CD-DA, MP3/WMA :
This function allows you to play the current track
repeatedly.
1. Press the [RPT] button to perform repeat play.
The
indicator lights in the display.
All repeat play
MP3/WMA :
This function allows you to play all tracks in the
MP3/WMA folder repeatedly.
1. Press and hold the [RPT] button for 1 second
or longer to perform all repeat play.
The
play.
and
indicators light in the dis-
Random play
CD-DA :
This function allows you to play all tracks recorded on a disc in a random order.
MP3/WMA :
This function allows you to play all tracks of current folder in a random order.
1. Press the [RDM] button to perform random
play.
The
indicator lights in the display.
All random play
MP3/WMA :
This function allows you to play all the tracks of
all the folders recorded on an MP3/WMA disc/
USB memory device in a random order.
1. Press and hold the [RDM] button for 1 second
or longer to perform all random play.
The
play.
and
To cancel play
indicators light in the dis-
1. Press the operating button previously selected.
Adjustment Mode
1. Press the [ADJ] button to switch to the adjustment selection display.
2. Press the [
name”.
,
] button to select the “Item
“SCRN SVR”
“KNOB LED”
“A-SCROLL”
“AUX SENS”
“TEL-SP”
“TEL-SW”
3. Turn the [ROTARY] knob to select the “Desired
setting value”.
∗ After completing settings, press the [ ADJ ]
button to return to the previous mode.
Turning the screen saver function on or
off
This unit is provided with the screen saver function
which allows you to show various kinds of patterns
in a random order in the operation status indication
area of the display. You can turn on and off this
function.
If the button operation is performed with the
screen saver function on, the operation display
corresponding to the button operation is shown
for about 30 seconds and the display returns to
the screen saver display.
∗ The factory default setting is “ON”.
2-1. Select “SCRN SVR”.
3-1. Turn the [ROTARY] knob to select “SS ON”
or “SS OFF”.
SS ON:
Screen saver is enabled and message knob
indication in power saving mode.
SS OFF:
Screen saver is disabled and message knob
indication is display all the time.
Setting the method for title scroll
Set how to scroll in MP3/WMA title.
∗ The factory default setting is “ON”.
2-1. Select “A-SCROLL”.
3-1. Turn the [ROTARY] knob to select “ON” or
“OFF”.
English
Operations Common to Each Mode
ON:
To scroll automatically.
OFF:
To scroll just 1 time when the title was changed
or the [TITLE] button was pressed for 1 second
or longer.
Selecting AUX IN sensitivity
Make the following settings to select the sensitivity when sounds from external devices connected to this unit are difficult to hear even after
adjusting the volume.
∗ The factory default setting is “MID”.
2-1. Select “AUX SENS”.
3-1. Turn the [ROTARY] knob to select “LOW”,
“MID” or “HIGH”.
Note:
This adjustment only affects music playing via
[AUX] input. Telephone interrupt will be using “MID”
as default.
Setting the car speaker output for the
cellular phone
∗ The factory default setting is “RIGHT”.
∗ To output the telephone calls, set the cellular phone
interrupt to ON.
2-1. Select “TEL-SP”.
3-1. Turn the [ROTARY] knob to select “RIGHT”,
or “LEFT”.
“RIGHT”
Telephone calls can be heard on the front right
speaker connected to this unit.
“LEFT”
Telephone calls can be heard on the front left
speaker connected to this unit.
Cellular phone interrupt setting
If you connect this unit and your cellular phone
with a separately sold unit, you can listen to your
telephone calls on your car speakers.
∗ The factory default setting is “OFF”.
2-1. Select “TEL-SW”.
3-1. Turn the [ROTARY] knob to select the setting.
Each time you turn the [ROTARY] knob, the
setting changes in the following order:
OFF
ON
MUTE
DUB278RMP
27
English
Operations Common to Each Mode
OFF:
This unit continues normal operation even when
the cellular phone is used.
ON:
You can listen to your telephone calls from the
speakers connected to this unit.
MUTE:
The sound from this unit is muted during telephone calls.
Notes:
When the “TEL-SW” is set to “ON” or “MUTE” and
telephone is connected, system will automatically
power ON (Initially power OFF). When telephone
is disconnected, system will return to power OFF.
This unit requires hands-free kit that supports [AUX]
input as a cellular phone audio input. Please consult your local authorized Clarion dealer for more
information on the handsfree kit offered.
If connecting a hands-free kit, please ensure the
setting is ON to receive the telephone audio through
the system.
When listening to your calls on your car speakers, you can adjust the volume by turning the
[ROTARY] knob, it will be memorized as new telephone volume.
The factory default setting for this volume is
“19”.
This unit requires special wiring to mute the audio
signal automatically when a cellular telephone rings
in the car.
This function is not compatible with all cellular
telephones. Please contact your local authorized
Clarion dealer for information on proper installation
and compatibility.
Setting the button and screen
illumination
Press the [COLOR] button to select a color type.
Each time you press the [COLOR] button, the
type changes in the following orders:
COLOR-SCAN
INDIGO-BLUE
SURF-BLUE
SILKY-WHITE
AQUA-GREEN FRESH-GREEN
LEAF-GREEN
WARM-AMBER
PASSION-RED VIVID-PINK
PALE-PINK DARK-VIOLET
PURE-PURPLE U-COLOR1
U-COLOR2 U-COLOR3 COLOR-SCAN...
28
DUB278RMP
Setting COLOR SCAN mode
As selecting “COLOR-SCAN”, the color automatically changes.
∗ The factory default setting is “COLOR-SCAN”.
∗ After 3 seconds the color changes to the other.
Setting USER mode
As selecting “U-COLOR 1, 2, 3”, press and hold
the [COLOR] button for 1 second or longer to enter the setting.
1. “R8 G8 B8” appears in the display.
∗ The factory default setting is “R8 G8 B8”
(R: red, G: green, B: blue) for all user colors.
] button to move the cursor
2. Press the [
,
for adjusting the R, G or B value. The value of
R is blinking by default.
3. Turn the [ ROTARY ] knob to select from
0 to 8.
] button to store the color in
4. Press the [
memory and cancel setting mode.
Note:
Since “R0 G0 B0” will not display anything, thus
all values are prevented from setting to 0 at the
same time.
R
G
B
INDIGO-BLUE
COLOR
0
0
8
SURF-BLUE
0
4
8
SILKY-WHITE
8
8
7
AQUA-GREEN
0
8
2
FRESH-GREEN
0
8
0
LEAF-GREEN
3
8
0
WARM-AMBER
8
3
0
PASSION-RED
8
0
0
VIVID-PINK
8
0
3
PALE-PINK
8
2
3
DARK-VIOLET
3
0
8
PURE-PURPLE
6
0
8
U-COLOR1
8
8
8
U-COLOR2
8
8
8
U-COLOR3
8
8
8
English
Operations Common to Each Mode
DUB278RMP
29
English
6. TROUBLESHOOTING
Problem
General
Measure
Fuse is blown.
Replace with a fuse of the same amperage.
If the fuse blows again, consult your store of
purchase.
Incorrect wiring.
Consult your store of purchase.
No sound output when
operating the unit with
amplifiers or power antenna attached.
Power antenna lead is
shorted to ground or
excessive current is required for remote-on the
amplifiers or power antenna.
1. Turn the unit off.
2. Remove all wires attached to the power antenna lead. Check each wire for a possible
short to ground using an ohm meter.
3. Turn the unit back on.
4. Reconnect each amplifier remote wire to the
power antenna lead one by one. If the amplifiers turn off before all wires are attached,
use an external relay to provide remote-on
voltage (excessive current required).
Nothing happens when
button are pressed.
Display is not accurate.
The microprocessor has
malfunctioned due to
noise,etc
Turn off the power, then push the [PUSH OPEN]
cover to flip down.
Press the reset button with a thin rod.
No sound heard.
The speaker protection
circuit is operating.
1. Turn down sound volume. Function can
also be restored by turning the power off
and on again. (Speaker volume is reduced
automatically when the speaker protection
circuit operates).
2. If the sound is muted again, consult our
service department.
Power does not turn on.
(No sound is produced)
30
Cause
DUB278RMP
Problem
Measure
MP3/WMA files are absent in a disc.
Write MP3/WMA files onto the disc properly.
Files are not recognized
as an MP3/WMA file.
Use MP3/WMA files encoded properly.
File system is not correct.
Use ISO9660 level 1, 2 or JOLIET or Romeo
file system.
Disc is dirty.
Clean the disc with a soft cloth.
Disc is heavily scratched
or warped.
Replace with a disc with no scratches.
Sound is cut or skipped.
Noise is generated or
no ise is mi xed with
sound.
MP3/WMA files are not
encoded properly.
Use MP3/WMA files encoded properly.
Sound is bad directly
after power is turned on.
Water droplets may form
on the internal lens when
the car is parked in a
humid place.
Let dry for about 1 hour with the power on.
Wrong filename.
File system is not correct.
Use ISO9660 level 1, 2 or JOLIET or Romeo
file system.
WMA file has no sound
output and skip to next
track.
The song may be copy
protected (DRM).
Disable DRM as describe in the chapter “To disable DRM (Digital Rights Management)”
No sound heard.
Sound skips or is noisy.
CD/MP3/WMA DISC
Cause
DUB278RMP
English
Troubleshooting
31
Troubleshooting
English
Problem
MP3/WMA (USB memory device)
32
Cause
Measure
MP3/WMA files are absent in a USB memory
device.
Write MP3/WMA files onto the USB memory
device properly.
Files are not recognized
as an MP3/WMA file.
Use MP3/WMA files encoded properly.
Sound is cut or skipped.
Noise is generated or
n oi se i s mixe d with
sound.
MP3/WMA files are not
encoded properly.
Use MP3/WMA files encoded properly.
USB memory device
cannot be detected.
USB memory device may
be damaged.
Reinsert the USB memory device to try again.
Replace with a new USB memory device if
failed.
No sound heard.
USB memory device connector is in bad condition.
Compatibility issue
Please consult your Clarion dealer for USB
memory device compatibility.
The USB memory device connector may be
inserted to the port in the
wrong direction.
Reinsert the USB memory device with the
correct direction.
The USB memory device
connector is damaged.
Replace with a new USB memory device.
The shape design of the
USB memoru device.
Use an USB extension cable.
USB card reader cannot
be detected.
USB card reader is connected to main unit first
before inserting memory
card to the card reader.
Insert the memory card to USB card reader first
before connecting to the main unit.
iPod shuffle, nano or USB
harddisk drive ( HDD )
cannot playback or error
display is shown.
These devices are not
supported.
However, the device may be able to playback
by reconnecting the device or power off and
on the main unit.
Unable to playback
songs.
Compatibility issue.
Please consult your Clarion dealer for USB
memory device compatibility.
Too many songs are
stored, some amount of
time are required to read
all the tracks available.
Reduce the number of songs in the USB
memory device.
USB memory device is
unable to plug into the
USB port.
DUB278RMP
CD/MP3/WMA DISC
Error Display
Cause
ERROR 2
This is a failure of CD deck’s mechanism
and consult your store of purchase.
ERROR 3
A DISC cannot be played due
to scratches, loaded upsidedown inside the CD deck etc.
Replace with a non-scratched, non-warpeddisc.
Eject the disc then reload it properly.
NO FILE
No audio file is detected in the
DISC.
Replace with audio contents loaded DISC.
Cause
Measure
Error Display
USB MEMORY
DEVICE
Measure
A DISC is caught inside the CD
deck and is not ejected.
MNT ERR
Failure detection of USB memory device when it is plugged
into the port.
Unplug the USB memory device and re-plug
into the port.
NO FILE
No audio file is detected in the
media.
Replace with audio contents loaded USB
memory device.
USB ERR
USB connector short circuit/
overloaded.
Unplug the USB memory device , turn off
the car stereo power and then turn on the
power again.
English
7. ERROR DISPLAYS
8. SPECIFICATIONS
FM tuner
CD player
Usable Sensitivity: 11 dBf
Usable Discs: Compact disc
Frequency Range: 87.5 MHz to 108 MHz
50 dB Quieting Sensitivity: 17 dBf
Alternate Channel Selectivity: 75 dB
Stereo Separation (1 kHz): 35 dB
Frequency Response (±3 dB): 30 Hz to 15 kHz
System: Compact disc audio system
Frequency Response: 10 Hz to 20 kHz (±3 dB)
Signal-to-Noise Ratio: 85 dB (1 kHz) IHF-A
Dynamic Range: 80 dB (1 kHz)
Harmonic Distortion: 0.01%
AM tuner
Frequency Range:
MW
531 kHz to 1602 kHz
LW
153 kHz to 279 kHz
Usable Sensitivity: 25 μV
DUB278RMP
33
English
Specifications
Audio
Maximum Power Output: 200 W (50 W X 4 ch)
Power Output: 4 X 25 W (DIN 45324, +B=14.4 V)
Bass Control Action (100 Hz): ±14 dB
Treble Control Action (10 kHz): ±14 dB
Line Output (with A/C 1 kHz, 10 kΩ): 1.8 V
General
Power Supply Voltage:
14.4 V DC (10.8 V to 15.6 V allowable), negative ground
Current Consumption: Less than 15 A
Speaker Impedance: 4 Ω (4 Ω to 8 Ω allowable)
Weight: 2.42 lb. (1.7 kg)
Dimensions:
178 mm Width X 100 mm Height X 156 mm
Depth
Notes:
Specifications comply with JEITA Standards.
Specifications and design are subject to change
without notice for further improvement.
Please make sure when connecting external power
amplifier, that you properly, to the car chassis,
ground the amplifier.
If this is not done, severe damage to the source
unit may happen.
34
DUB278RMP
Owner’s manual
Mode d’emploi
Bedienungsanleitung
Istruzioni per l’uso
Gebruiksaanwijzing
Manual de instrucciones
Bruksanvisning
Manual de instruções
CD/USB/MP3/WMA RECEIVER
RECEPTEUR CD/USB/MP3/WMA
CD/USB/MP3/WMA RECEIVER
RICEVITORE CD/USB/MP3/WMA
CD/USB/MP3/WMA ONTVANGER
RECEPTOR PARA CD/USB/MP3/WMA
CD/USB/MP3/WMA MOTTAGARE
RECEPTOR PARA CD/USB/MP3/WMA
Clarion Co., Ltd.
All Rights Reserved. Copyright © 2007: Clarion Co., Ltd.
Printed in Malaysia / Imprimé en Malaisie / Gedruckt in Malaysia / Stampato in Malaysia
Gedrukt in Maleisi / Impreso en Malasia / Tryckt i Malaysia / Impresso na Malásia
PE-2973E
280-8528-00
280-8346-00