1
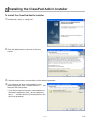
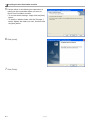
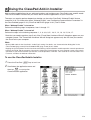
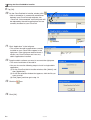
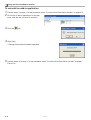
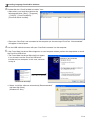
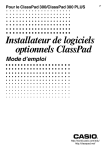
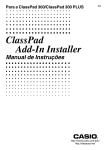
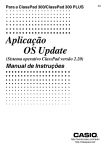
For ClassPad 300/ClassPad 300 PLUS
ClassPad
Add-In Installer
User’s Guide
http://world.casio.com/edu/
http://classpad.net/
E
ClassPad Add-In Installer
The ClassPad Add-In Installer lets you install add-in software applications on your ClassPad. Add-in
software applications let you add new functions and configure your ClassPad to your specific needs.
Important!
• Never disconnect the USB cable unless specifically instructed to do so. Doing so can cause the calculator to
malfunction.
Minimum System Requirements
Computer:
CPU:
Operating System:
Disk Space:
Memory:
Video Display:
IBM PC/AT or compatible with USB port
Intel ® Pentium ® II 200 or AMD DuronTM, Intel ® Pentium ® II 300 recommended
Windows ® 98SE/Me or Windows ® 2000/XP
100 MB available for installation
16 MB, 32 MB recommended
Above values do not include memory required for the operating system.
800 × 600 or higher video adaptor and monitor
Note
• Windows is a registered trademark or trademark of Microsoft Corporation in the United States and/or other countries.
• Intel and Pentium are trademarks or registered trademarks of Intel Corporation or its subsidiaries in the United States
and other countries.
• AMD Duron is a registered trademark or trademark of Advanced Micro Devices, Inc. in the United States and/or other
countries.
• Company and product names used herein are trademarks of their respective owners.
20031201
E-1
Contents
1. Installing the ClassPad Add-In Installer ......................................................... E-3
To install the ClassPad Add-In Installer .............................................................. E-3
2. Using the ClassPad Add-In Installer ............................................................... E-5
To use the ClassPad Add-In Installer ................................................................. E-5
To uninstall an add-in application ..................................................................... E-10
3. Checking for Correct Add-In Installation ...................................................... E-11
4. Installing Language Pack Add-In Software .................................................. E-12
To install the Language Pack add-in software .................................................. E-12
E-2
20031201
1 Installing the ClassPad Add-In Installer
To install the ClassPad Add-In Installer
1. Double-click “setup” or “setup.exe”.
2. Click the [Next] button to advance to the next
screen.
3. Carefully read the terms and conditions of the license agreement.
4. If you agree to the terms and conditions of the
license agreement, click “I accept the terms…”, and
then click the [Next] button.
• If you do not agree to the terms and conditions of
the license agreement, click “I do not accept the
terms…” and then click the [Cancel] button to exit
the install procedure.
20031201
E-3
1 Installing the ClassPad Add-In Installer
5. Perform either of the following two operations to
specify the drive and folder where you want to
install ClassPad Add-In Installer.
• To use the default settings, simply click the [Next]
button.
• To specify a different folder, click the [Change...]
button. Specify the folder you want, and then click
the [Next] button.
6. Click [Install].
7. Click [Finish].
E-4
20031201
2 Using the ClassPad Add-In Installer
Add-in software applications let you add new functions and configure your ClassPad to your specific needs.
The ClassPad Add-In Installer lets you install add-in software applications on your ClassPad.
The steps you need to perform depend on whether you have the ClassPad’s “Wakeup Enable” feature
turned on or off. For information about “Wakeup Enable”, see “Configuring Communication Parameters” in
the ClassPad 300 (page 15-3-1)/ClassPad 300 PLUS (page 16-3-1) User’s Guide.
When “Wakeup Enable” is turned on
Perform the following steps in sequence, from 1 through 17.*
When “Wakeup Enable” is turned off
Perform the steps in the following sequence: 1, 2, 3, 4, 8, 9, 5*, 10, 11, 12, 13, 14, 15, 16, 17.
* Note that you need to perform step 5 only if the “Found New Hardware Wizard” dialog box appear on your
computer screen. The “Found New Hardware Wizard” dialog box appears only the first time you connect
the ClassPad to your computer.
Note
• Specify USB cable for the ClassPad’s “Cable Type” setting. For details, see “Communication Dialog Box” in the
ClassPad 300 (page 13-3-8)/ClassPad 300 PLUS (page 14-3-8) User’s Guide.
• Tapping the [Cancel] button on the ClassPad screen during ClassPad Add-In Installer operation cancels operation on
both the ClassPad and the computer. Conversely, clicking the [Cancel] button on your computer screen also cancels
operation on your ClassPad. After you execute a cancel operation, it will take a few seconds for it to take effect. This
is normal, and does not indicate malfunction.
To use the ClassPad Add-In Installer
1. Press the ClassPad o key to turn it on.
2. Scroll down the application menu and
then tap B to start up the
Communication application.
20031201
20050601
E-5
2 Using the ClassPad Add-In Installer
3. Double-click the “ClassPad Add-In Installer” icon.
• Alternatively, you could also perform the
following operation: [Start] – [Programs]
– [CASIO] – [ClassPad Add-In] –
[ClassPad Add-In Installer].
• Since your ClassPad is not connected to the computer yet, the message “ClassPad - Not connected”
will appear in the left pane.
4. Use the USB cable that comes with your ClassPad to connect it to the computer.
5. If the Found New Hardware Wizard appears on your computer screen, perform the steps below to install
the ClassPad USB driver.
• The Found New Hardware Wizard will not appear
if you already have the ClassPad USB driver
installed on your computer. In this case, advance
to step 6.
Select “No, not this time”.
(Windows XP SP2 only)
a. Select “Install the software automatically (Recommended)”
and then click [Next].
(Windows XP only)
E-6
20031201
20050601
2 Using the ClassPad Add-In Installer
b. Though a message appears to let you know
that the software has not passed the “Windows
Logo Test”, there is no need for concern. Simply
click [Continue Anyway] and proceed with
installation.
c. Click [Finish].
6. On your ClassPad, press the c key.
7. Tap [OK].
8. Tap [Link], [Install], and then [Add-In].
20031201
20040201
E-7
2 Using the ClassPad Add-In Installer
9. Tap [OK].
10. On the ClassPad Add-In Installer window, click
.
• After a connection is successfully established
between your ClassPad and computer, the
“ClassPad - Not connected” on the left pane will
be replaced by the add-in applications that are
currently installed on your ClassPad.
11. Click “Application” in the left pane.
• This causes the add-in applications currently
installed on your ClassPad to appear in the
right pane. If the right pane remains blank, it
means your ClassPad does not have any
add-in applications installed.
12. Drop the add-in software you want to use onto the right pane.
• This starts installation of the add-in.
• You can also use the following steps to install a single add-in
application.
(1) On the ClassPad Add-In Installer window, click [Add-In] and
then [Application].
(2) On the file selection window that appears, click the file you
want to install.
(3) Click [Open] and then go to step 14.
13. Click the
icon.
14. Click [OK].
E-8
20031201
2 Using the ClassPad Add-In Installer
15. On your ClassPad, tap [OK].
16. Click [File] – [Exit].
17. Disconnect the ClassPad from your computer.
20031201
E-9
2 Using the ClassPad Add-In Installer
To uninstall an add-in application
1. Perform steps 1 through 11 of the procedure under “To use the ClassPad Add-In Installer” on page E-5.
2. On the list of add-in applications in the right
pane, click the one you want to uninstall.
3. Click the
icon.
4. Click [Yes].
• Clicking [No] cancels the delete operation.
5. Perform steps 13 through 17 of the procedure under “To use the ClassPad Add-In Installer” on pages
E-8 to E-9.
E-10
20031201
3 Checking for Correct Add-In Installation
1. On your ClassPad, tap m to display the application menu.
2. Select “All” and confirm that the icon of the newly installed add-in appears
on the display.
20031201
20050601
E-11
4 Installing Language Pack Add-In Software
Installing the Language Pack add-in software adds other languages for the menus and help screens.
The steps you need to perform depend on whether you have the ClassPad’s “Wakeup Enable” feature
turned on or off. For information about “Wakeup Enable”, see “Configuring Communication Parameters” in
the ClassPad 300 (page 15-3-1)/ClassPad 300 PLUS (page 16-3-1) User’s Guide.
When “Wakeup Enable” is turned on
Perform the following steps in sequence, from 1 through 15.*
When “Wakeup Enable” is turned off
Perform the steps in the following sequence: 1, 2, 3, 4, 8, 9, 5*, 10, 11, 12, 13, 14, 15.
* Note that you need to perform step 5 only if the “Found New Hardware Wizard” dialog box appear on your
computer screen. The “Found New Hardware Wizard” dialog box appears only the first time you connect
the ClassPad to your computer.
Note
• Specify USB cable for the ClassPad’s “Cable Type” setting. For details, see “Communication Dialog Box” in the
ClassPad 300 (page 13-3-8)/ClassPad 300 PLUS (page 14-3-8) User’s Guide.
• Tapping the [Cancel] button on the ClassPad screen during ClassPad Add-In Installer operation cancels operation on
both the ClassPad and the computer. Conversely, clicking the [Cancel] button on your computer screen also cancels
operation on your ClassPad. After you execute a cancel operation, it will take a few seconds for it to take effect. This
is normal, and does not indicate malfunction.
To install the Language Pack add-in software
1. Press the ClassPad o key to turn it on.
2. Scroll down the application menu and
then tap B to start up the
Communication application.
E-12
20031201
20050601
4 Installing Language Pack Add-In Software
3. Double-click the “ClassPad Add-In Installer” icon.
• Alternatively, you could also perform the
following operation: [Start] – [Programs]
– [CASIO] – [ClassPad Add-In] –
[ClassPad Add-In Installer].
• Since your ClassPad is not connected to the computer yet, the message “ClassPad - Not connected”
will appear in the left pane.
4. Use the USB cable that comes with your ClassPad to connect it to the computer.
5. If the Found New Hardware Wizard appears on your computer screen, perform the steps below to install
the ClassPad USB driver.
• The Found New Hardware Wizard will not appear
if you already have the ClassPad USB driver
installed on your computer. In this case, advance
to step 6.
Select “No, not this time”.
(Windows XP SP2 only)
a. Select “Install the software automatically (Recommended)”
and then click [Next].
(Windows XP only)
20031201
20040201
E-13
4 Installing Language Pack Add-In Software
b. Though a message appears to let you know
that the software has not passed the “Windows
Logo Test”, there is no need for concern. Simply
click [Continue Anyway] and proceed with
installation.
c. Click [Finish].
6. On your ClassPad, press the c key.
7. Tap [OK].
8. Tap [Link], [Install], and then [Add-In].
E-14
20031201
20040201
4 Installing Language Pack Add-In Software
9. Select “Language” and then tap [OK].
10. On the ClassPad Add-In Installer
window, click [Add-In] and then
[Language].
11. Click the file you want to install, and then click [Open].
12. Click [OK].
20031201
E-15
4 Installing Language Pack Add-In Software
13. On your ClassPad, tap [OK].
14. Click [File] – [Exit].
15. Disconnect the ClassPad from your computer.
E-16
20031201
CASIO COMPUTER CO., LTD.
6-2, Hon-machi 1-chome
Shibuya-ku, Tokyo 151-8543, Japan
SA0506-C