1
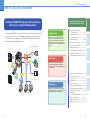
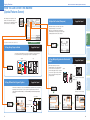
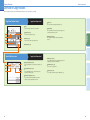
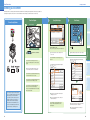
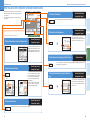
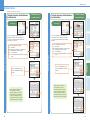
Easy
Operation
Guide
CONTENTS
Preface
How the Manuals Are Divided .................... 1
What You Can Do with This Machine ......... 3
The Control Panel ..................................... 5
Copying Functions
Making a Copy ............................................ 7
What You Can Do with This Machine
(Copy Basic Features Screen) ........ 9
What You Can Do with This Machine
(Special Features Screen) ............. 11
Over view of Copy Features ...................... 15
Send Function
Sending a Fax ......................................... 17
Sending a Document ................................ 19
What You Can Do with This Machine
(Send Basic Features Screen) ....... 21
Over view of Send Features ..................... 25
Additional Functions ..................................... 27
Other Useful Features
Operating the Machine from a Computer
(Remote UI) ................................... 45
Printing from Your Computer
(Printer Driver) ............................... 47
Store this guide next to the machine for future reference.
Troubleshooting ............................................. 51
How the Manuals Are Divided
How the Manuals Are Divided
Easy Operation Guide
Network Guide
Read this manual to learn
how to connect the machine
to a network.
Operating the Machine from a
Computer
Remote UI Guide
Read this manual to learn the basic operations of the machine, grasp a basic
knowledge of what the machine can do, or find out what kind of useful functions
it has. Keep it next to the machine for future reference.
The Control Panel
The Additional Functions Mode
Making a Copy
How to Make the Machine More Convenient
Read this manual to learn
how to access the machine
from a computer to operate
and confirm jobs, and edit
the various settings of the
machine.
Using the Machine in a TCP/IP
Network
Confirming the Status of the
Machine
Using the Machine in a NetBIOS
Network
Operating Jobs
Preface
How to Use the Machine and Function Overview
Connecting the Machine to a
Network or Computer
Copying
Functions
The manuals for the machine are divided as follows. Please read them as necessary to make full use of the machine.
Manuals included with optional equipment are included in the list below. According to the product you have bought
and the system configuration, you may not have some of these manuals.
Editing the Address Book and the
Various Settings of Machine
Using the Send Function
Other Useful Functions
Copying Guide
Before Using the Machine
System Manager Settings
Operating the Touch Panel Display
Loading Paper
Using Optional Equipment
Replacing Toner Cartridges
Additional Functions
Removing a Paper Jam
PCL/UFR II
Printer Guide
Read this manual to learn how to copy documents, and the various copying
features.
Basic Copying Procedure
Read these manuals to learn
how to edit the settings in
order to use the machine as
a printer.
Read these manuals to learn
how to edit the settings in
order to use the machine as
a scanner.
Setting the Various Items in
Settings Menu
Installing the Drivers
Setting the Various Items in Utility
Menu
Various Send Features
Driver Guides
Useful Copying Features
Sending Guide
Send
Functions
Reference Guide/
User’s Guide
Read this manual to learn about the things to take care of when using the
machine, basic operations, optional equipment, machine maintenance and
paper jam removal procedures.
Additional
Functions
Handling and Operating the Machine
Using the Machine as a
Scanner
How to Send
Other Useful
Features
Using the Machine as a Printer
Other Guides
Memory Mode
Changing the Settings to Suit Your Needs
Facsimile Guide
Read this manual to learn how to send scanned documents to fax destinations.
Fax Function
1
Basic Fax Methods
Registering/Editing an Address in the
Address Book
Useful Fax Functions
System Settings
Checking/Changing the Fax Status
Printing Communication Reports
Customizing Fax Settings
Troubleshooting
Fax Driver Guide
Network Quick Start Guide
Read this manual to learn how to install and use the
driver which enables you to fax documents created
on a computer with the machine.
Read this manual to start learning how to install and
use the driver of the machine.
Starter Guide
PCL Driver Guide
UFR II Driver Guide
Read this manual to start using this machine first.
Read this manual to learn how to install and use the
driver which enables you to print from a computer.
2
What You Can Do with This Machine
What You Can Do with This Machine
Preface
Refer to this manual for examples of the useful
ways in which you can use your machine.
The ImageCLASS MF7280 brings to you all the elements you
will ever need in a digital multitasking machine.
To Enlarge/Reduce an Image to Copy
Send Outside the Company
Fax
Original
3
4
Send
Function
Copy
Function
I-Fax
Internet
3
1
2
To Copy Multiple Originals onto One sheet of Paper .......P.12
To Recall Commonly Used Settings .................................P.13
To Erase the Dark Border when Copying a Book ..............P.14
Send Function
To Select a Desitnation from the Address Book ............... P.21
LAN
Print
Function
To Send Documents Clearly ............................................. P.21
To Delete a Destination ..................................................... P.21
Remote UI
Function
3
To Adjust the Contrast (Sharpness) ..................................P.12
E-Mail
2
1
To Copy Different Size Originals Together .......................P.11
Enables you to send scanned documents. You can
also send to multiple destinations, and forward
received faxes as well. You can send by Fax, I-Fax, Email, or File Server.
4
Copy/Print
To Copy Facing Pages in a Book .......................................P.11
Other Useful
Features
2
To Make Two-Sided Copies ...............................................P.10
To Confirm a Destination .................................................. P.22
4
Print Function
In-company Computers
Enables you to print on both sides of paper, output
sets of printouts, and use various other useful features
when printing documents from a computer.
To Recall the Last Destinations ........................................ P.22
Send Function
1
To Copy onto Irregular Sized Paper ...................................P.10
Additional
Functions
Fax
Function
Telephone Line
To Collate Sets of Output Together ................................... P.9
Copying
Functions
of document work in a digitized office, the ImageCLASS MF7280 represents the
ultimate in digital multitasking machines.
Enables you to save costs with features such as
printing a single sided document on both sides of
the paper, or printing two pages of a document on
each sheet of paper. Also with the Collate mode, the
Copying function is perfect for creating materials for
meetings.
Send
Functions
can greatly enhance your efficiency. Equipped with features that meet the needs
to a Different Size Paper .......................................... P.9
Copying Function
Copying Function
The ImageCL ASS MF7280 incorporates a rich array of input and output features that
To Send Documents Specifying the File Format .............. P.22
To Specify the Destination Using the Numeric Keys ....... P.22
To Specify the Time to Start Sending ............................... P.23
To Stamp Originals
Which Have Already Been Scanned....................... P.23
To Register the Favorite Settings...................................... P.24
To Edit a Destination from a Computer ............................. P.24
To Send Fax from a Computer .......................................... P.24
3
4
The Control Panel
The Control Panel
The control panel consists of a touch panel display, for setting the various functions, and physical keys such as the
Start key, Stop key, and the Control Panel Power Switch. The following is an explanation of the keys used in this
manual. For more information, see Chapter 1, “Before You Start Using This Machine,” in the Reference Guide.
To Switch Functions
COPY
COPY key
Press to use the Copy function.
SEND key
Preface
SEND
Press to use the Send function.
ABC
1
Reset Key
Control Panel Power Switch
ON/OFF
SEND
Reset
2
4
3
5
PQRS
TUV
Press to turn the control panel ON or OFF.
6
WXYZ
7
8
Log In/Out
Clear
Additional
Functions
Serial No.
MNO
JKL
GHI
Press to restore the standard settings of the machine.
DEF
Send
Functions
COPY
Copying
Functions
Send Basic Features screen
9
Serial No. Key
0
Stop
Start
Press to display the serial No. on the touch panel
display.
Additional
Functions
Display
Contrast
Touch Panel Display
Processing/
Data
The settings screen for each function is shown on this
display.
Error
Power
Stop Key
Press to stop a job in progress (scanning only), such
as a scan job, copy job, or fax job.
To Confirm or Edit the Job Status
Press [System Monitor] to
display the screen on the
left, enabling you to confirm
the job status, and cancel
print jobs. You can also see
the machine status, such
as the amount of remaining
paper.
Additional Functions key
Press to specify additional functions.
For more information about additional
functions, see p.27.
Press to enter numeric values.
Start Key
Log In/Out Key
Press to start an operation.
Press after entering your ID and
password when Department ID
Management is set.
Display Contrast Dial
Other Useful
Features
Numeric Keys
Clear Key
Press to clear entered values.
Use to adjust the brightness of the touch panel
display.
System Monitor Screen
5
6
Copying Functions
Making a Copy
Making a Copy
The following is an explanation of the basic procedure for copying a document. For more detailed procedures, see the
references to other guides.
Place Your Originals
Specify the Number of Copies
Start Copying
Preface
Preparations
Placed in the feeder
1
Reset
2
4
PQRS
3
5
TUV
8
Log In/Out
Clear
TUV
WXYZ
7
8
Log In/Out
Clear
itional
ctions
6
WXYZ
7
Additional
Functions
Serial No.
MNO
JKL
GHI
PQRS
DEF
9
0
Stop
Start
Display
Contrast
9
0
Processing/
Data
Stop
Error
Copying
Functions
ABC
Power
Start
Display
Contrast
to switch to the Copy
If the following screen is displayed, enter the
[Department ID] and [Password]
press
on
the control panel.
Place your originals.
If you have placed your originals on the platen
glass, close the feeder/platen glass cover after
placing your originals.
If necessary, set copy modes in the Copy Basic
Features screen.
Press
Enter the desired number of copies (1 to 99)
with the numeric keys.
If you make a mistake when entering values, press
enter the correct values.
Send
Functions
COPY
Press
function.
Placed on the platen glass
.
When copying is complete, remove your originals.
If the following screen is displayed, follow the
instructions on the screen and press
once for
each original. When scanning of the originals is
complete, press [Done].
The number of copies you specify is displayed on
the right side of the Copy Basic Features screen.
Additional
Functions
Copy Basic Features screen
PQRS
TUV
WXYZ
7
8
Log In/Out
Clear
Additional
Functions
9
To set the various copy modes, press [Special
Features].
0
Stop
Start
If Department ID Management is set, press
Display
Contrast
Processing/
Data
Error
Other Useful
Features
For more information on the copy modes you can
set in the Copy Basic Features screen, see p. 9.
Power
If Department ID Management is set, it is
necessary to enter an ID and password. (If an
optional Card Reader-E1 is attached, insert a
control card.)
.
For more information on the copy modes you can
set in the Special Features screen, see p. 11.
To cancel, or continue copying
You can also place paper in the stack bypass to
copy. (For more information, see Chapter 2, “Basic
Operations,” in the Reference Guide.)
To cancel scanning
Press
.
To make another copy while printing
Press [Done].
Place the next original.
For more information, see Chapter 2, “Basic
Operations,” in the Reference Guide.
7
To cancel using the touch panel display
Press
.
Press [Cancel] on the pop-up screen that appears while
the machine is scanning, printing, or waiting to print.
8
Copying Functions
What You Can Do with This Machine (Copy Basic Features Screen)
What You Can Do with This Machine
(Copy Basic Features Screen)
The following is an explanation of the features often used
when copying a document. For more detailed procedures,
see the references to other guides.
To use more convenient functions (Special Features), press
[Special Features] to access the Special Features screen.
To Copy onto Irregular Sized Paper
Preface
Copying Guide Chapter 2
To copy onto non-standard size paper, simply set the type
(such as Plain, Heavy) of the paper, and load it into the
stack bypass.
Copying
Functions
1
3
Copy Basic Features screen
* The numbers in the illustrations refer to operation steps.
2
4
To Enlarge/Reduce an Image to Copy to a
Different Size Paper
Copying Guide Chapter 2
Original
Copy
To Make Two-Sided Copies
Send
Functions
Useful when enlarging or reducing an original of one
standard paper size to another, such as enlarging an LTR
sized original to LGL size, or reducing LGL to LTR size.
Simply select the desired paper size from the displayed
keys to automatically set the optimal zoom ratio.
Copying Guide Chapter 2
When copying many single sided originals, printing on both the front and back sides of paper can help you save
half of the paper costs.
In the screen on the left, press
[Option] to set the orientation of the
two-sided copies.
2
2
1
To Collate Sets of Output Together
Original
Copy
Copying Guide Chapter 2
Copies are automatically collated into sets
arranged in page order, and output to the trays,
as shown below.
Original
3 Copies
1
Copy 1
1
2
3
4
2
Copy 2
1
3
4
2
3
Copy 3
1
3
4
2
3
Other Useful
Features
1
Additional
Functions
1
4
For more information on Special Features, see p. 11 to p. 14.
1
2
9
10
Copying Functions
What You Can Do with This Machine (Special Features Screen)
What You Can Do with This Machine
(Special Features Screen)
To Adjust the Contrast (Sharpness)
Copying Guide Chapter 3
Preface
The following is an explanation of the
features often used when copying a
document. For more detailed procedures,
see the references to other guides.
Copying
Functions
This mode enables you to make copies of the
original with sharper or softer contrast.
When you copy a blurry image, use [High] to
make it sharper, and use [Low] to copy an image
containing halftones with a softer contrast.
Special Features screen
* The numbers in the illustrations refer to operation steps.
To Copy Facing Pages in a Book
Send
Functions
Copying Guide Chapter 3
It is common for the paper size to become too large when copying an opened
book. Use this mode to copy facing pages in a book or bound original.
To Copy Multiple Originals onto One sheet of
Paper
1
1
This mode enables you to reduce
multiple originals or two-sided originals
to fit onto one sheet of paper. This is
useful for arranging a variety of originals
on one sheet of paper for easy viewing
and for saving paper and space when
storing printouts.
Copying Guide Chapter 3
Copy
Original
or
1
Copy
This mode can enable you to copy a mix of different size originals in the feeder together,
depending on the mix of sizes. You can copy a mix of originals such as 11x17 and
LTR (originals with different widths), or LTR and STMT (both width and height slightly
different).
11x17 Original
4
1
2
Copying Guide Chapter 3
2
3
2 On 1
(two pages on one sheet of paper)
1
To Copy Different Size Originals Together
Additional
Functions
Copy
Other Useful
Features
Original
1
2
3
4
4 On 1
(four pages on one sheet of paper)
1
3
5
LTR Original
1
Direction to load
the paper
2
11
2
4
6
12
Copying Functions
What You Can Do with This Machine (Special Features Screen)
What You Can Do with This Machine (Special Features Screen)
Copying Guide Chapter 3
Preface
To Erase the Dark Border when Copying a Book
This enables you to erase the dark border, as well as center and contour lines
that appear if you are copying facing pages in a book or bound original onto a
single sheet of paper.
1
Original
With Original
Frame Erase
Special Features screen
Copy
2
To Recall Commonly Used Settings
Copying Guide Chapter 3
Without Original
Frame Erase
Commonly used combinations of modes can be stored in
Mode Memory to be recalled with the touch of a button.
Specify the Copy Settings you want to store beforehand,
and store the settings.
Copy
3
Original
1 1
Send
Functions
* The numbers in the illustrations refer to operation steps.
Copying
Functions
Copy
With Book
Frame Erase
Additional
Functions
4
Copy
Without Book
Frame Erase
2
6
Other Useful
Features
5
Copy
3
7
4
Original
With Binding Erase
5
Copy
Without Binding Erase
To recall stored settings, display the Mode Memory screen
which the settings are stored
press [OK].
select the key in
1
2
13
14
Copying Functions
Overview of Copy Features
Overview of Copy Features
Copy Basic Features Screen
Copying Guide Chapters 1 and 3
5
Preface
Use the Copy Basic Features screen and the Special Features screen to set the various copy modes.
Paper Select
Press to select the paper size/type and the paper source.
1
Direct
Press to make copies in the same size as your original.
2
5
Press to manually control the copy exposure. Press [A] to select or
cancel the automatic exposure control.
Copy Ratio (see p. 9)
Press to reduce or enlarge the copy size.
7
2
6
3
7
3
Adjust Contrast
Original Type Selection
Copying
Functions
1
6
Press to change the original type when the originals include
photos, etc.
Finisher (see p. 9)
Press to select the Collate, Group, or Staple mode.
4
Copying Guide Chapters 4 and 5
1
1
2
3
4
5
3
Frame Erase (see p. 14)
Press to eliminate dark border areas and lines that appear around
original images or shadows from binding holes.
5
Mode Memory (see p. 13)
Press to store or recall copy modes.
Image Combination (see p. 12)
Press to automatically reduce two or four originals to fit onto a
one-sided or two-sided copy sheet.
6
4
Two-page Separation (see p. 11)
Press to copy facing pages of an opened book onto separate copy
sheets.
2
Send
Functions
Special Features screen
Two-sided (see p. 10)
Additional
Functions
4
6
Sharpness (see p. 12)
Press to sharpen or soften the image of the original in the copy.
Different Size Originals (see p. 11)
15
Other Useful
Features
Press to make copies when feeding different size originals
together in one group, by placing them in the feeder.
16
Send Functions
Sending a Fax
Sending a Fax
The following is an explanation of the basic procedure for sending a fax. For more information on the settings, see the
references in each step.
Enter the Fax Number
Placed in the feeder
ABC
1
Reset
DEF
2
4
PQRS
TUV
8
Log In/Out
Clear
TUV
9
WXYZ
7
8
Log In/Out
Clear
itional
ctions
6
9
0
WXYZ
7
Additional
Functions
3
5
PQRS
Serial No.
MNO
JKL
GHI
Start Sending the Fax
Preface
Place Your Originals
Stop
Start
Display
Contrast
0
Stop
Start
Processing/
Data
Error
Copying
Functions
Preparations
Power
Display
Contrast
Enter the fax number manually.
to switch to the fax mode.
If Department ID Management is set, it is
necessary to enter an ID and password. (If an
optional card reader is attached, insert a control
card.)
Send
Functions
SEND
.
Placed on the platen glass
Send Basic Features screen
Press
Press
Place your originals.
For bound or irregular sized originals, place them
on the platen glass.
To specify two or more destinations, use the
Address Book, one-touch buttons, or favorites
buttons. You can enter one destination using the
numeric keys.
When scanning is complete, remove your originals.
Additional
Functions
For more information, see Chapter 2, “Basic
Operations,” in the Reference Guide.
You can also specify the fax destination using an
address book if you have registered a fax destination
in the address book in advance.
2
By pressing [One-touch Buttons], you can also
specify destinations you have registered in
advance.
1
For instructions on registering destinations in the address
book, see p.43.
Other Useful
Features
Specifying the Fax Number Using an Address Book
3
By pressing [New Address], you can enter one
new destination.
To send a clear fax, set a high resolution. You can
set the resolution by pressing [Scan Settings].
By pressing [Address Book], you can also specify
destinations you have registered in advance.
Specifying the Fax Number Using a One-touch Dialing
2
For more information on registering fax
destinations, see p.43.
You can also specify the fax destination using a onetouch dialing if you have registered a fax destination in
the address book in advance.
1
2
1
For more information on registering destinations for the onetouch dialing, see p.44.
17
3
For information on useful fax features, see p. 21.
18
Send Functions
Sending a document
Sending a Document
Send is function to send a document via a Internet network. The following is an explanation of the basic procedure for
scanning an original to a file server. For more information on the settings, see the references in each step.
Place Your Originals
Specify Scan Settings
Placed in the feeder
Start Scanning
PQRS
1
2
TUV
WXYZ
7
8
Log In/Out
Clear
itional
ctions
Preface
Diverse Sending Methods
9
0
Stop
Start
3
Select a folder to send.
Placed on the platen glass
Power
.
For more information on scan settings, see p.21
and p.24.
Specifying new file path by using the Keyboard
Send
Functions
When scanning is complete, remove your originals.
Specifying new flie path by using the Browse Key
1
2
Additional
Functions
You can specify various scan settings from the
Scan screen.
You can register destinations that you send to
often, in Address Book or One-touch Buttons.
For instructions on registering destinations for I-fax
or e-mail in the address book, see p.43.
Press
Error
This procedure is specifying a file path from Address Book.
SEND
Press
to switch to the send mode.
Place your originals.
For instructions on sending a document, see
Chapter 4, “Sending Documents,” in the Sending
Guide.
Processing/
Data
Copying
Functions
Display
Contrast
1
2
Other Useful
Features
For instructions on registering destinations for I-fax
or e-mail in the one-touch dialing, see p.44.
For instructions on registering file paths in the
address book or the one-touch dialing, see
Chapter 8, “Storing/Editing Address Book Settings,”
in the Reference Guide.
You can easily scan paper documents and send
them to one or multiple recipients through e-mail,
or I-fax, bringing to your work environment
increased efficiency in the arena of document
exchange. I-fax enables you to send a fax or
e-mail via an Internet network. The ability to
send documents to FTP and SMB file servers
also serves to help digitize paper documents for
convenient data access and management.
19
3
Specify ‘User’ and ‘Password’ when the folder
setting up a password.
If you do not know the password, consult your
network administrator.
For instructions on specifying a file path, see
Chapter 2, “Basic Sending Methods,” in the
Sending Guide.
If a password has been set for the folder, the Enter
Network Password screen is displayed.
If you do not know the password, consult your
network administrator.
20
Send Functions
What You Can Do with This Machine (Send Basic Features Screen)
What You Can Do with This Machine (Send Basic Features Screen)
The following is an explanation of functions commonly
used when sending a fax or when sending a document
to a computer.
For more detailed procedures, see the references to
other guides.
Facsimile Guide Chapter 2
Sending Guide Chapter 2
To Confirm a Destination
Preface
You can view the detailed information of the destination.
Send Basic Features screen
This feature enables you to send
documents to the last three destinations
under the same condition as before.
Facsimile Guide Chapter 2
Sending Guide Chapter 2
1
2
To Send Documents Specifying the File Format
Facsimile Guide Chapter 2
Sending Guide Chapter 3
To Send Documents Clearly
To send fine text clearly, select [Super
Fine] or [Ultra Fine] for the resolution.
To send faxes which include photos
clearly, select [Photo] Mode for the
Image Quality.
The time it takes to send a fax may
increase according to the selected
resolution and Image Quality.
1
1
To Delete a Destination
Send
Functions
You need to register destinations in the
address book beforehand. This can be
done through Address Book Settings
from the Additional Functions screen.
Send Guide Chapter 4
You can specify the file format from among TIFF, JPEG, PDF and PDF (Compact), when
sending for I-Fax, E-mail or File.
To Specify the Destination Using the Numeric
Keys
1
Additional
Functions
To Select a Destination from the Address Book
Facsimile Guide Chapter 2
Sending Guide Chapter 2
Other Useful
Features
* The numbers in the illustrations refer to operation steps.
Copying
Functions
Facsimile Guide Chapter 2
Sending Guide Chapter 2
To Recall the Last Destinations
You can specify a new destination using
the numeric keys from [New Address].
You can enter one destination using the
numeric keys.
Facsimile Guide Chapter 2
Sending Guide Chapter 2
Select the destination you want to delete, and press [Erase].
21
22
Send Functions
What You Can Do with This Machine (Send Basic Features Screen)
What You Can Do with This Machine (Send Basic Features Screen)
Facsimile Guide Chapter 2
Sending Guide Chapter 2
To Register the Favorite Settings
You can set any possible combination of send
settings and register them in a favorites button
in memory. There are 18 favorites buttons and
they can be assigned names for increased
convenience. This feature is useful for registering
frequently used send settings.
Copying
Functions
1
Send Basic Features screen
To Specify the Time to Start Sending
To specify the time to start sending a
document, for example, to send a document
the first thing the next morning, use Delayed
Send. The document is sent at the specified
time simply by entering that time.
1
2
3
4
5
To Edit a Destination from a Computer
2
3
Send
Functions
Facsimile Guide Chapter 2
Sending Guide Chapter 4
Remote UI Guide Chapter 2
Additional
Functions
* The numbers in the illustrations refer to operation steps.
You can edit addresses registered in the address book from a Web browser using the Remote UI of the
machine. This is convenient because you can copy and paste Fax numbers E-mail addresses, etc., found on
your computer.
Facsimile Guide Chapter 2
Sending Guide Chapter 4
You can stamp every page on the documents
that are sent or scanned using the stamp
features. If you place the document horizontally
on the feeder, it will be stamped at the position
shown in the illustration.
Fax Driver Guide
To Send Fax from a Computer
Other Useful
Features
To Stamp Originals Which Have Already Been
Scanned
1
Preface
The following is an explanation of the
features often used when using the Fax/
Send function of the machine. For more
detailed procedures, see the references to
other guides.
3
1
4
Stamp
2
2
Select the print function from the application
on your computer
press [Print].
After entering the destination, press
[Add to Recipient List].
* It is necessary to install the fax driver to send faxes from your computer. The display may differ according to the OS (operating
system) you are using and the fax driver. For more information, see the Fax Driver Guide.
23
24
Send Functions
Overview of Send Features
Overview of Send Features
SEND
Pressing
displays the Send Basic Features screen. For more information on the features described here, see
the Facsimile Guide or the Sending Guide.
1
5
Register your Favorite settings in a button. (see p.24)
Details
Enables you to see details about specified send settings. (see p.21)
Favorites Buttons
Preface
Facsimile Guide Chapter 2
Sending Guide Chapter 2
Send Basic Screen
6
One-touch Buttons
Press to select a destination from the One-touch buttons.
7
2
2
Address Book
Press to select a destination from the address book. (see p.21)
4
Scan Settings
Enables you to specify the resolution, image quality, and exposure
of the document to send. (see p.21)
8
9
3
7
Copying
Functions
1
3
5
Erase
Erases the destinations. (see p.21)
6
8
New Address
Set a destination by numeric keys. (see p.22)
Recall
Enables you to recall one of the last three destination. (see p.22)
9
Send
Functions
4
File Format
Select a file format. (see p.22)
Facsimile Guide Chapter 3
1
2
3
1
Delayed Send
Set to send the document at a specified time. (see p.23)
6
2
Document Name
Stamp
Enables you to stamp every page on the documents that are sent
or scanned. (see p.23)
6
Direct
Enables you to send a document ahead of other documents
stored in memory.
Enter a document name. (Only for E-mail, I-Fax and File)
3
4
Subject
Other Useful
Features
5
5
Additional
Functions
Send Settings
Enter a subject for the documents. (Only for E-mail and I-Fax)
4
Message
Enter messages for the documents. (Only for E-mail and I-Fax)
1
Enter destination name. (Only for E-mail and I-Fax)
1
2
25
Reply-to
2
E-mail Priority
Set your e-mail proprity. (Only for E-mail)
26
Additional Functions
Additional Functions
COPY
ON/OFF
SEND
ABC
1
Press
on the touch panel to display the Additional Functions screen. The Additional Functions screen enables you
to customize the various settings of the machine. You can also make the necessary settings for using the Fax/Send
function, such as the telephone line type and fax number, address book settings, and forwarding conditions.
Reset
DEF
2
4
5
PQRS
TUV
6
WXYZ
7
8
Log In/Out
Clear
Additional
Functions
Serial No.
3
MNO
JKL
GHI
9
0
Stop
Start
Display
Contrast
Error
Power
Preface
Processing/
Data
Control Panel
Timer Settings
See p. 31
1
Common Settings
See p. 29
6
Copy Settings
See p. 34
7
Communications Settings
See p. 35
Copying
Functions
2
3
Press to edit settings for the Copy function.
Press to edit the Fax and Send Settings according to your
needs.
Send
Functions
Adjustment/Cleaning
Press to specify the settings that are common to the Copy,
Fax, and Send functions.
Printer Settings
See p. 31
See PCL/UFR II Printer Guide
Additional
Functions
Press to make various timer related settings for the machine,
such as the time it takes for the machine to enter into the
Sleep mode.
PRINTER SETTINGS
1.DEFAULT PAPERSIZE
4
Report Settings
See p. 32
Press to set the print conditions for printing a TX Report and
Activity Report, or to print the contents of the Address Book or
Additional Functions.
27
5
System Settings
See p. 33
Press to set System Settings, Department ID Management
settings, Network Settings, and other system settings.
8
Address Book Settings
Other Useful
Features
For more information, see the PCL/UFR II Printer Guide.
Press to make fine adjustments to the zoom, adjust the
contrast, or perform cleaning for the machine.
See p. 38
Press to register destinations in the Address Book.
28
Additional Functions
Additional Functions
Language Switch (see p. 40)
Enables you to select the language displayed on the touch panel display.
Reference Guide Chapter 3
Preface
Common Settings
Reversed Display (B/W) (see p. 40)
Enables you to reverse the contrast on the touch panel display for better viewing. The
Reversed Display mode reverses the light and dark areas on the touch panel display.
Enables you to specify the settings that are common to the Copy, Fax, and Send functions.
Error Display for Dirty Feeder
Initial Function (see p. 39)
Enables you to specify the screen that is displayed when you turn ON the main power. You
can select [Copy] or [Send]. For example, if you often use the Send function, it is convenient
to set the Send function as the initial function.
Enables you to set this mode to ‘On’ to display the error message on the touch panel display
if there is dust in the feeder.
Copying
Functions
1
(4/5)
Auto Clear Setting
Initialize Common Settings
Enables you to set whether the screen specified as the Initial Function is displayed after Auto
Clear initiates.
Enables you to restore all of the Common Settings to their defaults (initial settings).
Audible Tones (see p. 39)
Send
Functions
Enables you to set whether to sound audible tones.
Toner Saver Mode
Enables you to select the toner consumption for printing.
(1/5)
(5/5)
Printer Density
Additional
Functions
Enables you to set the density for printing.
Inch Entry (see p. 39)
Enables you to ensure that the key for entering values in inches is displayed on the various
numeric entry screens.
Drawer Eligibility For APS/ADS
Other Useful
Features
(2/5)
Enables you to set which paper sources can be used for Automatic Paper Selection and
Auto Drawer Switching. This setting can be made independently for all the different functions
of the machine, and is especially useful when you want to use different paper sources for
different purposes.
Register Paper Type
Enables you to specify the paper type loaded in each paper source.
Energy Consumption in Sleep Mode
Enables you to set the amount of energy that the machine consumes when it is in the Sleep
mode.
Stack Bypass Standard Settings
Enables you to set the paper size and type that the stack bypass uses beforehand. This
setting is useful if you always load the same paper size and type into the stack bypass.
Paper Feed Method Switch
Enables you to set the priority of copy speed or copy quality for each cassette.
(3/5)
29
30
Additional Functions
Additional Functions
Bond Special Fixing Mode
2
Timer Settings
Enables you to specify to perform special fixing for bond paper.
Reference Guide Chapter 3
Special Mode S
Auto Adjustment for Dirty Feeder
When this function is set to ‘On’, dust, dirt or foreign objects in the feeder will not be printed.
Date & Time Settings
Preface
Enables you to choose whether to set a high priority on avoiding offset or on speed.
Enables you to make various timer related settings for the machine, such as the time it takes for the machine to
enter into the Sleep mode.
Enables you to set current date and time. The date and time set here is used as the time
setting when required for any of the device functions.
Enables you to set the machine to automatically switch the control panel power switch OFF
when it has been idle for a certain period of time after the last print job or a key operation is
performed.
Auto Clear Time
Enables you to set the machine to automatically return to the Basic Features screen of the
selected function when it has been idle for a certain period of time after the last print job or a
key operation is performed.
4
Copying
Functions
(3/3)
Auto Sleep Time
Facsimile Guide Chapter 7
Sending Guide Chapter 10
Report Settings
Press to set the print conditions for printing a TX Report and Activity Report, or you can print the contents of the
Address Book or Additional Functions.
Send
Functions
Settings
Enables you to set the print conditions for printing a TX Report and Activity Report.
(1/1)
TX Report
3
Adjustment/Cleaning
Reference Guide Chapter 3, 6
Enables you to check whether faxes were sent correctly to the intended destination. A TX
Report can automatically be printed after the documents are sent. You can also set the
machine to print a TX Report only when a transmission error occurs.
Activity Report
Enables you to clean the transcription roller in the main unit when the backside of paper is
smudged with printing.
Fixing Unit Cleaning
Enables you to clean the fuser roller in the main unit when black streaks appear with printing
or you replace the toner cartridges.
Feeder Cleaning
Enables you to clean the rollers of the feeder by repeatedly feeding blank sheets of paper
through it.
Additional
Functions
Transfer Roller Cleaning
Enables you to show the results of sent and received documents. You can set for the
Activity Report to be printed at a specified time or be automatically printed when the
number of sent and received documents reaches 40. You can also print the send and
receive logs separately.
RX Report
Enables you to check whether the documents were sent correctly from the sender’s
machine and were received successfully by this machine. A RX Report can be printed
automatically after documents are received. You can also set the machine to print a RX
Report only when a reception error occurs.
Other Useful
Features
Enables you to make fine adjustments to the zoom, adjust the contrast, or perform cleaning for the machine.
Print List
Enables you to print an Address Book List or a User’s Data List (contents of the
settings specified from the Additional Functions screen).
(1/3)
Special Mode M
Enables you to improve the print quality or irregular print density.
Special Mode N
Enables you to prevent paper curling or jamming.
Special Mode O
Enables you to prevent paper jams with two-sided printing.
Special Mode P
Enables you to use more efficiently lightweight paper for printing.
(2/3)
31
32
Additional Functions
Additional Functions
System Settings
See the Facsimile Guide Chapter 6, the Sending Guide Chapter 9
Enables you to restrict sending documents to destinations that are not registered in the
address book.
Press to set System Manager Settings, Department ID Management settings, Network Settings, and other
system settings.
Preface
5
Restrict Access to Destinations
See the Reference Guide, Facsimile Guide,
Sending Guide, Network Guide
License Registration
This setting is not functional in this model.
System Manager Settings
Display Dept. ID/User Name
See the Reference Guide Chapter 5
Enables you to set the System Manager settings.
Department ID Management (see p. 41)
Enables you to manage the machine by limiting its use to only those who enter the correct
Department ID and password. This is called Department ID Management. Department
IDs and passwords for up to 1000 departments can be registered. Use Department ID
Management to keep track of the copy, scan, and print totals for each department.
Enables you to set whether or not to display the Department ID on the Job/Print Status
Display Area of the touch panel display.
Job Log Display
See the Reference Guide Chapter 5
Enables you to confirm the jobs using [System Monitor].
Network Settings
Send
Functions
Use USB Device
See the Network Guide
See the Reference Guide Chapter 5
Enables you to make the necessary settings to connect the machine to a network.
(1/2)
Copying
Functions
See the Reference Guide Chapter 5
(2/2)
Enables you to set whether or not to restrict jobs through the USB interface.
Forwarding Settings (see p. 42)
Enables you to set the machine to forward received fax/I-fax documents to other machines
or file servers.
6
Copy Settings
Copying Guide Chapter 4
Enables you to set a unit name and location for the machine.
Press to edit settings for the Copy function.
Image Orientation Priority
User ID Management
Enables you to set the image orientation priority.
See the Reference Guide Chapter 5
Enables you to set whether or not to use the User ID Management.
Auto Orientation
Enables you to set the machine to use information, such as the size of the original and
the zoom ratio, to determine the most suitable orientation for the specified paper size and
automatically rotate the image, if necessary.
Communications Settings
See the Facsimile Guide Chapter 5, the Sending Guide Chapter 7
Enables you to make various settings, such as settings for the send/receive start speed and
the reception mode.
Standard Settings
Enables you to change the Standard Settings to suit your needs, or restore them to their
default settings. The Standard Settings refers to a combination of copy modes that the
machine automatically returns after the power is turned ON, or when
is pressed.
Remote UI On/Off
See the Reference Guide Chapter 5
Enables you to set whether to use the Remote UI of the machine. The Remote UI enables
you to operate the machine and perform settings from your computer.
Initialize Copy Settings (see p. 40)
(1/1)
33
Other Useful
Features
See the Reference Guide Chapter 5
Additional
Functions
Device Info Settings
Enables you to restore all of the Copy Settings to their defaults.
34
Additional Functions
Additional Functions
TX Settings
Register Favorites Button
Facsimile Guide, Sending Guide
See the Sending Guide Chapter 7
Enables you to set any possible combination of send settings and register them in a favorites
button in memory.
Press to register or edit the default Communications Settings according to your needs.
Preface
Communications Settings
Color TX Scan Settings
TX Settings
See the Sending Guide Chapter 7
Unit Name
Enables you to set the priority for color scanned data.
See the Facsimile Guide Chapter 1, the Sending Guide Chapter 1
(3/3)
Enables you to register your name or your company’s name as the unit’s name (a
department name is optional). The unit name is printed at the top of sent documents. For fax,
the unit name can be displayed on the touch panel display of the receiving party’s machine.
Default Screen for Send
See the Sending Guide Chapter 7
Enables you to set whether the Favorites buttons, one-touch buttons, or the initial function
screen will be displayed on the initial Send Basic Features screen when the power is turned
ON, or the Auto Clear mode is activated.
Data Compression Ratio
Copying
Functions
7
See the Sending Guide Chapter 7
Enables you to set the compression ratio for color scanned data.
Initialize TX Settings
See the Sending Guide Chapter 7
Retry Times
Send
Functions
Enables you to restore almost all of the TX settings to their default settings.
See the Sending Guide Chapter 7
Enables you to set the mode which automatically resends data when the data could not be
sent.
RX Settings
Two-Sided Print
TX Settings
See the Sending Guide Chapter 7
Select Cassette
See the Sending Guide Chapter 7
Enables you to set how the machine prints documents when there is no paper matching the
size of the received document.
Additional
Functions
Enables you to print received documents on both sides of the paper you select.
Receive Reduction
See the Sending Guide Chapter 7
(1/3)
RX Settings
Other Useful
Features
Enables you to set the machine to automatically reduce received documents so that the
whole document is printed within the printable area of the paper.
TX Settings
Edit Standard Send Settings
See the Sending Guide Chapter 7
Enables you to change the standard settings for the Send function, including the scan mode.
TX Terminal ID
See the Facsimile Guide Chapter 5
(1/2)
Enables you to specify whether the Terminal ID information is printed at the top of documents
that you send through fax.
(2/3)
Gamma Value for Color Send Jobs
RX Settings
See the Sending Guide Chapter 7
Continue Printing When Toner Is out
Enables you to set the gamma value for color scanned data.
See the Sending Guide Chapter 7
Enables you to set whether the machine continues printing received documents and reports
when it is running out of toner.
Sharpness
See the Sending Guide Chapter 7
Enables you to scan original images with a sharper or softer contrast.
(2/2)
35
36
Additional Functions
User Settings
RX Settings
Unit Telephone #
ECM RX
Preface
Additional Functions
See the Facsimile Guide Chapter 4
See the Facsimile Guide Chapter 1
Enables you to receive incoming documents using the Error Correction Mode (ECM).
Enables you to store the machine’s fax number. The number may also be displayed on the
touch panel display of the receiving party’s machine, depending on their type of machine.
Tel Line Type
See the Facsimile Guide Chapter 1
Copying
Functions
Enables you to set the telephone line type.
Monitor Volume Control
Enables you to set the volume for the alarm and monitor tones that this machine emits during
a fax transmission.
File Settings
Send
Functions
See the Facsimile Guide Chapter 4
Register Destinations
(1/1)
(1/1)
TX Settings
ECM TX
Enables you to reduce the effect of system and line errors on documents that occur during
sending or receiving with another fax unit that supports ECM.
Pause Time
8
Facsimile Guide Chapter 5
Sending Guide Chapter 8
Address Book Settings
Additional
Functions
See the Facsimile Guide Chapter 4
Press to register destinations that you send often.
See the Facsimile Guide Chapter 4
Register Address (see p. 43)
Enables you to set the pause time when sending a fax.
Auto Redial
TX Settings
See the Sending Guide Chapter 4
One-touch Buttons (see p. 44)
Enables the machine to automatically redial the recipient’s fax number if the recipient cannot
be reached due to a busy line, or if a sending error occurs.
Enables you to store up to 200 destinations in the one-touch buttons.
Other Useful
Features
Enables you to save yourself the effort of entering the destination every time it is used.
Check Dial Tone Before Sending
See the Facsimile Guide Chapter 4
Enables you to set whether to check for a dial tone before dialing when sending a fax.
(1/2)
Rotate Send
See the Facsimile Guide Chapter 4
(1/1)
Enables you to set the mode which automatically corrects the orientation of the document by
rotating the image when sending.
(2/2)
37
38
Additional Functions
Additional Functions
* The numbers in the illustrations refer to operation steps.
* The numbers in the illustrations refer to operation steps.
1
Language Switch
1
2
2
Reference Guide Chapter 3
Additional
Functions
1
2
2
To Enter Values in Inches
Inch Entry
Enables you to reverse the contrast on the touch panel
display for better viewing. The Reversed Display mode
reverses the light and dark areas on the touch panel
display. If you find it hard to read what is being shown
on the touch panel display, try using this mode.
3
To Change the Initial Settings for the Copy
Function
Reference Guide Chapter 3
1
2
Enables you to enter values in inches on screens
in which millimeter units are used. Ensures that the
key for entering values in inches is displayed on the
various numeric entry screens, as in the screen shot
on the right. Press [Inch] to enter values in inches.
Other Useful
Features
You can set on or off about enter tone and error
tone ect. Also, you can control the volume of audible
tones.
39
To Reverse the Contrast of Display
Reversed Display (B/W)
1
Copy Settings
Common Settings
Job Duration Display
Reference Guide Chapter 3
Common Settings
Enables you to select the language displayed on the
touch panel display.
Enables you to specify the screen that is displayed
when you turn ON the main power, or when Auto
Clear initiates. You can also set the Auto Clear
mode.
To Turn Off the Audible Tones
Copying
Functions
Initial Function
Reference Guide Chapter 3
Preface
To Change the Display Language
Reference Guide Chapter 3
Send
Functions
To Set the Send Screen as the Initial Function
Copying Guide Chapter 4
Standard Settings
Enables you to change the Standard Settings to suit
your needs, or restore them to their default settings.
The Standard Settings refers to a combination of copy
modes that the machine automatically returns after the
power is turned ON, or when is
pressed.
40
Additional Functions
Additional Functions
* The numbers in the illustrations refer to operation steps.
* The numbers in the illustrations refer to operation steps.
Department ID Management
To Forward a Fax/I-Fax
Reference Guide Chapter 5
2
Sending Guide Chapter 9
Preface
To Set a Department ID and Password
Forwarding Settings
1
Copying
Functions
1
Enables you to forward Received documents to a
destination that has been registered in the machine
beforehand.
4
5
System Settings
4
* Make sure not to forget your password.
3
Send
Functions
3
Additional
Functions
By setting the Department ID Management,
you can restrict which User can use copy, fax and
printer. Also you can set the restriction of print totals
for each departments.
5
Other Useful
Features
System Settings
2
6
7
41
42
Additional Functions
Additional Functions
* The numbers in the illustrations refer to operation steps.
Address Book Settings
To Register Commonly Used Destinations as
One-touch Buttons
Facsimile Guide Chapter 5
Sending Guide Chapter 8
Address Book Settings
1
Facsimile Guide Chapter 5
Sending Guide Chapter 8
1
Preface
To Register Commonly Used Destinations in
the Address Book
2
3
In addition to the addresses/numbers and
names of destinations, you can also set
communications settings such as the sending
time and sending speed. For more information,
see Chapter 5, “Customizing Fax Settings” in
the Facsimile Guide and Chapter 7 “Customizing
Communications Settings” in the sending Guide.
You can set Sending Speed, Long
Distance, and ECM TX in the Option
settings.
Copying
Functions
4
Send
Functions
3
You can select Address Type as follows.
Fax
: Normal Fax.
E-mail : Sending a file attached to an e-mail message.
I-Fax : Sending Fax by Computer network.
File
: Scan Folder Path.
Group : You can register plural destinations in one Address
button.
Additional
Functions
You can set Sending Speed, Long
Distance, and ECM TX in the Option
settings.
You can store the address/number and name of a
destination in the One-touch Button. This enables
you to easily specify the destination when sending a
document.
5
4
5
In addition to the addresses/numbers and
names of destinations, you can also set
communications settings such as the sending
time and sending speed. For more information,
see Chapter 5, “Customizing Fax Settings” in
the Facsimile Guide and Chapter 7 “Customizing
Communications Settings” in the sending Guide.
Other Useful
Features
You can select Address Type as follows.
Fax
: Normal Fax.
E-mail : Seiging a file attached to an e-mail message.
I-Fax : Sending Fax by Computer network.
File
: Scan Folder Path.
Group : You can register plural destinations in one Address
button.
2
Address Book Settings
Address Book Settings
You can store the address/number and name of a
destination in the Address Book. This enables you
to easily specify the destination when sending a fax,
I-fax, E-mail, or to a file server.
6
7
43
44
Other Useful Features
Operating the Machine from a Computer (Remote UI)
Operating the Machine from a Computer
(Remote UI)
To Edit the Address Book from a Computer
The Remote UI enables you to control functions, such as confirming the status of the machine, and job
operations, all from your PC’s web browser. For more information, see the Remote UI Guide.
The Remote UI enables you to edit the Address Book of the machine using the Web browser on your computer.
Select the Address Book in the Remote UI, and enter a new destination. Destinations registered using the
Remote UI are stored in the Address Book of the machine. For more information, see the Remote UI Guide.
Copying
Functions
To Operate the Machine from Your Seat
Preface
For more information, see the Remote UI Guide.
2
1
Enter the IP address of the machine into the Web
browser on your computer to access the Remote UI.
You can perform various functions from the Remote
UI, such as editing the Address Book.
Press [None] to display the screen for registering
destinations.
Send
Functions
1
Specify the type of address from [Type]
enter
the necessary infomation depending on the type of
address you have selected
click [OK].
Additional
Functions
* The IP address in the above screenshot is fictitious. Ask your
system administrator for the IP address of your machine.
To Check the Remaining Amount of Paper from Your Seat
Forwarding Settings
System Settings
The Remote UI enables you to check the machine’s current status, such as the amount of paper remaining in
the various paper sources. This is useful as a guide for knowing when to load paper.
Other Useful
Features
Register Address
Network
45
Select [Device] in the
Remote UI.
Check the remaining amount of paper.
46
Other Useful Features
Printing from Your Computer (Printer Driver)
Printing from Your Computer (Printer Driver)
For more information, see the printer and driver guides.
* The following screenshots are when the UFR II printer driver is installed, and may differ from the ones you see, according to the driver or
operating system you are using.
Output Method
Output Size
Enables you to select the
output method for a print
job.
Enables you to select the
size of the paper to print on.
Print With Mixed Paper Sizes/
Orientations
Enables you to print a document with
a combination of paper sizes and
orientation.
Preface
Add Profile
Enables you to save the
current settings as a profile.
Finishing Details
Enables you to specify detailed finishing
settings.
Print Banner Page
Enables you to print a banner page for each print
job. A banner page shows user name, date, and
file name.
Edit Profile
Page Layout
Enables you to edit the
contents of registered
profiles.
Print with Upper Left of Sheet as Starting Point
Enables you to print
multiple pages onto one
sheet of paper, or one page
onto multiple sheets of
paper.
Page Size
Enables you to expand print area.
Rotate Print Data 180 Degrees
Enables you to rotate the image 180 degrees when
printing.
Enables you to select
the size of a document
you have created in an
application.
Advanced Settings
Send
Functions
Profile
Enables you to set the
printer driver simply by
selecting an item from the
list. Printer drivers settings
for different purposes are
registered.
Finishing
Copying
Functions
Page Settings
When you have trouble outputting with
finishing options, this enables you to
display the [Advanced Settings] dialog
box.
Image Refinement
Additional
Functions
Enables you to set whether to perform smoothing.
Smoothing allows you to soften the jagged edges
of text and figures when printing.
Manual Scaling
Enables you to print each page
of the document on one sheet of
paper, using manual zooming.
Special Fine Line Process
Enables you to select this option if you have selected [Super Fine]
(1200dpi) for [Resolution] in the [Detailed Settings] dialog box of the
[Quality] sheet, and find that fine lines do not print correctly.
Page Options
View Settings
Enables you to check a list of
all the current sheet settings.
47
Watermark
EMF Spooling
Enables you to add transparent
text and print the original.
Enables you to specify to spool the print data in the EMF (metafile)
format. Select this to perform spooling in the EMF format, and make the
software you are using send print data to the machine faster. Deselect
this to print in the RAW format.
Detailed Settings for Booklet
Edit Watermark
Enables you to edit the
position and direction of
a watermark, or create an
original watermark.
Other Useful
Features
Enables you to add
page frames, the date,
a user name, and page
numbers. You can also
select whether to use
the Overlay mode to
print.
Print Style
Enables you to set 1-sided
printing, 2-sided printing, or
booklet mode.
Binding Location
Enables you to select long edge
(left) or short edge (top) binding
for prints, when you have selected
1-sided Printing or 2-sided
Printing for the Print Style.
Gutter
Enables you to specify booklet printing
options. Selectable when you have
selected Booklet Printing for Print Style.
Enables you to specify the gutter
width.
48
Other Useful Features
Printing from Your Computer (Printer Driver)
Printing from Your Computer (Printer Driver)
* The following screenshots are when the UFR II printer driver is installed, and may differ from the ones you see, according to the driver or
operating system you are using.
Preface
Quality
Paper Source
Objective
Select by
Enables you to select
[Paper Source] or [Paper
Type] for the selection
method.
Copying
Functions
Enables you to print a document with the ideal print settings
according to its content. When you select an item, a comment
is displayed below the list. To specify more detailed settings,
click [Details], which is on the right.
Details
Same Paper for All Pages
Enables you to specify the graphics mode, rendering rate, host
side rasterization and the Toner Save mode.
Send
Functions
Enables you to set all pages to use the same paper type. You
can still select the paper sources.
Different for First, Others, and Last
Additional
Functions
Enables you to set a different paper type for the first page, last page,
and other pages. This is useful when you want to add a cover, etc.
Enables you to set a different paper type for the cover when
making a booklet.
49
Different for First, Second, Others, and Last
Enables you to set a different paper type for the first page, second
page, last page, and other pages.
Enables you to adjust the brightness and
contrast.
Matching
Enables you to set or edit the matching mode and matching
method (minimize color difference, make colors more vibrant,
and adjust colors to your monitor).
Other Useful
Features
Grayscale Adjustment
Different Cover and Others
50
Troubleshooting
For toner replacement and paper loading procedures, or when problems have occurred when using the machine, and
you want to know how to solve them, see the following references to the other guides.
Symptom
Guide
Chapter
Title
When paper has run out
Reference
7
Paper Drawers
When there is a paper jam
Reference
7
Clearing Paper Jams
When there are frequent paper jams
Reference
7
Reducing the Frequency of Paper Jams
Reference
6
Replacing the Cartridge
Reference
6
Routine Cleaning
Reference
7
If Memory Becomes Full during Scanning
Facsimile
8
When Problems Occur
When the density of a copy or print is different to the original
Reference
3
Specifying Common Settings
When a print is dirty
Reference
6
Routine Cleaning
When you cannot send
Facsimile
8
When Problems Occur
When you cannot receive
Facsimile
8
When Problems Occur
When communications are slow
Facsimile
8
When Problems Occur
When the power does not turn ON
Reference
7
Troubleshooting
When the message “contact your service representative with
the error code below” is displayed.
Reference
7
Service Call Message
Paper
Toner
When toner has run out
Scanning trouble
When originals scanned with the platen glass/feeder become
dirty
When memory becomes full during scanning
Printing trouble
Communications trouble
Other trouble
When an error message not covered by the above is displayed, see Chapter 7 “Service Call Message,” in the Reference Guide, Chapter 8 “Error
Messages,” in the Facsimile Guide, and Chapter 11 “Error Messages,” in the Sending Guide .
51
CANON INC.
30-2, Shimomaruko 3-chome, Ohta-ku, Tokyo 146-8501, Japan
CANON U.S.A., INC.
One Canon Plaza, Lake Success, NY 11042, U.S.A.
CANON CANADA INC.
6390 Dixie Road Mississauga, Ontario L5T 1P7, Canada
CANON EUROPA N.V.
Bovenkerkerweg 59-61 1185 XB Amstelveen, The Netherlands
CANON FRANCE S.A.S.
17, quai du Président Paul Doumer 92414 Courbevoie Cedex, France
CANON COMMUNICATION & IMAGE FRANCE S.A.S.
12, rue de I’Industrie 92414 Courbevoie Cedex, France
CANON (U.K.) LTD.
Woodhatch, Reigate, Surrey, RH2 8BF, United Kingdom
CANON DEUTSCHLAND GmbH
Europark Fichtenhain A10, 47807 Krefeld, Germany
CANON ITALIA S.p.A.
Via Milano, 8 20097 San Donato Milanese (MI) Italy
CANON LATIN AMERICA, INC.
703 Waterford Way Suite 400 Miami, Florida 33126, U.S.A.
CANON AUSTRALIA PTY. LTD.
1 Thomas Holt Drive, North Ryde, Sydney, N.S.W. 2113, Australia
CANON CHINA CO., LTD.
15F, North Tower, Beijing Kerry Centre, 1 Guang Hua Road, Chao Yang District, 100020, Beijing, China
CANON SINGAPORE PTE. LTD.
1 HarbourFront Avenue #04-01 Keppel Bay Tower, Singapore 098632
CANON HONGKONG CO., LTD.
19/F., The Metropolis Tower, 10 Metropolis Drive, Hunghom, Kowloon, Hong Kong
FA7-9487 (000)
©
CANON INC. 2006
120V
PRINTED IN JAPAN OR CHINA