1
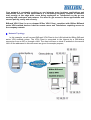
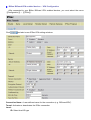
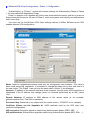
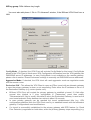
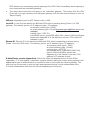
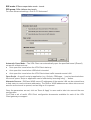
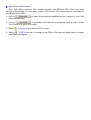
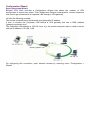
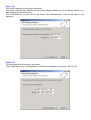
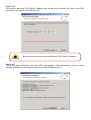
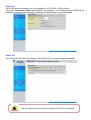
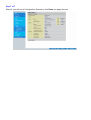
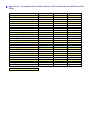
BiGuard C01
BiGuard VPN Client
Quick Installation Guide
(BiGuard series VPN enabled devices)
Secure access to Company Network
Your network is constantly evolving as you integrate more business applications and
consolidate servers. In that environment, it is becoming extremely complex to maintain
total security at the edge while users being employees or Teleworkers on the go are
working with customers and partners. You need to get access to those applications and
servers quickly, easily and securely.
BiGuard VPN Client is an on demand IPSec VPN Client, compliant with Billion BiGuard
series VPN enabled devices. Ideal for remote users and Teleworkers requiring access to
the company network.
Network Topology
In this example, we will connect BiGuard VPN Client to the LAN behind the Billion BiGuard
series VPN enabled routers. The VPN Client is connected to the Internet by a DSL/dialup
connection from an ISP or through a LAN. The client will have a virtual IP address in the remote
LAN. All the addressed in this document are given for example purpose,
Billion BiGuard VPN enabled devices – VPN Configuration
After connected to your Billion BiGuard VPN enabled devices, you must select the menu:
【Configuration】→ 【IPSec】.
Click
and add a new IPSec VPN setting as below.
Connection Name: A user-defined name for the connection (e.g. “BiGuardVPN”).
Tunnel: Activates or deactivates the IPSec connection
Local:
ID: Select local ID type
Data: Input ID’s information, like domain name www.ipsectest.com.
Network: Set the Any local address, subnet or single address of the local network.
~Any Local Address: All IP address of the local network
~ Subnet: The subnet of the local network. For example, IP: 192.168.100.0 with netmask
255.255.255.0 specifies one class C subnet starting from 192.168.100.1 (i.e. 192.168.100.1
through to 192.168.100.254).
~ Single Address: The IP address of the local host.
Remote:
Secure Gateway Address (or hostname): The IP address or hostname of the remote
VPN device that is connected and establishes a VPN tunnel. It must be filled in with VPN
Client IP address or public IP address of the router behind which the VPN Client is
(“vpnclient.dyndns.org” in our example).
ID: Select remote ID type
Data: Input ID’s information, like domain name www.ipsectest.com.
Network: Set the IP address, subnet or address range of the remote network. In our
example, you must add FQUN ([email protected]) for the VPN Client.
Proposal:
Secure Association: (SA) is a method of establishing a security policy between two points.
There are three methods of creating a Secure Association, each varying in degrees of
security and speed of negotiation.
~ Main Mode: Uses the automated Internet Key Exchange (IKE) setup; most secure
method with the highest level of security.
~ Aggressive Mode: Uses the automated Internet Key Exchange (IKE) setup; mid-level
security. Speed is faster than Main mode.
~ Manual Key: Manual; standard level of security. It is the fastest of the three methods.
Method: There are two methods of checking the authentication information, AH
(authentication header) and ESP (Encapsulating Security Payload). Use ESP for greater
security so that data will be encrypted and authenticated. Using AH data will be
authenticated but not encrypted.
Encryption: Select the encryption method from the pull-down menu. There are several
options, DES, 3DESand AES (128, 192 and 256). 3DES and AES are more powerful but
increase latency.
~ DES: Stands for Data Encryption Standard, it uses 56 bits as an encryption method.
~ 3DES: Stands for Triple Data Encryption Standard, it uses 168 (56*3) bits as an
encryption method.
~ AES: Stands for Advanced Encryption Standards, you can use 128, 192 or 256 bits as
encryption method.
Authentication: Authentication establishes the integrity of the datagram and ensures it is
not tampered with in transmit. There are two options, Message Digest 5 (MD5), and Secure
Hash Algorithm (SHA1). SHA1 is more resistant to brute-force attacks than MD5, however it
is slower.
~ MD5: A one-way hashing algorithm that produces a 128−bit hash.
~ SHA1: A one-way hashing algorithm that produces a 160−bit hash.
Perfect Forward Secrecy: Choose whether to enable PFS using Diffie-Hellman public-key
cryptography to change encryption keys during the second phase of VPN negotiation. This
function will provide better security, but extends the VPN negotiation time. Diffie-Hellman is
a public-key cryptography protocol that allows two parties to establish a shared secret over
an unsecured communication channel (i.e. over the Internet). There are two modes, MODP
768-bit, and MODP 1024-bit. MODP stands for Modular Exponentiation Groups.
Pre-shared Key: This is for the Internet Key Exchange (IKE) protocol. Both sides should
use the same key. IKE is used to establish a shared security policy and authenticated keys
for services (such as IPSec) that require a key. Before any IPSec traffic can be passed,
each router must be able to verify the identity of its peer. This can be done by manually
entering the pre-shared key into both sides (router or hosts).
IKE Life Time: Allows you to specify the timer interval for renegotiation of the IKE security
association. The value is in seconds, eg. 28800 seconds = 8 hours.
Key Life: Allows you to specify the timer interval for renegotiation of another key. The value
is in seconds eg. 3600 seconds = 1 hour.
Select the
flash.
to submit the setting then click the
to save the settings into
After changing the router’s configuration settings, you must save all of the
configuration parameters to FLASH to avoid them being lost after turning
off or resetting your router.
BiGuard VPN Client Configuration – Phase 1 Configuration
“Authentication” or “Phase 1” window will concern settings for Authentication Phase or Phase
1. It is also called IKE Negotiation Phase.
Phase 1's purpose is to negotiate IKE policy sets, authenticate the peers, and set up a secure
channel between the peers. As part of Phase 1, each end system must identify and authenticate
itself to the other.
You need use for the BiGuard VPN Client settings defined in Billion BiGuard series VPN
enabled devices VPN configuration.
Name: Label for Authentication phase used only the configuration user interface. This value is
never used during IKE negotiation. It is possible to change this name at any time and read it in
the tree control. Two Phase 1 can not have the same name (“billion” in our example).
Interface: IP address of the network interface of the computer, through which VPN connection is
established. If the IP address may change (when it is received dynamically by an ISP), select
"any".
Remote Gateway: IP address or DNS address of the remote router (in our example:
gateway.dyndns.com). This field is mandatory.
Pre-shared key: Password or key shared with the remote router (“12345678” in our example).
Certificate (Please see the Appendix A): X509 certificate used by the VPN client (see
certificate configuration).
IKE encryption: Encryption algorithm used during Authentication phase (3DES, AES, ...).
IKE authentication: Authentication algorithm used during Authentication phase (MD5, SHA, ...).
IKE key group: Diffie-Hellman key length.
You must also add phase 1 IDs in “P1 Advanced” window, if the BiGuard VPN Client from a
LAN.
Config-Mode : If checked, the VPN Client will activate Config-Mode for this tunnel. Config-Mode
allows to the VPN Client to fetch some VPN Configuration information from the VPN gateway like
DNS/WINS server IP addresses. In case Config-Mode is not available on the remote gateway,
please refer to section 'Phase2 Advanced' settings to manually set DNS/WINS server addresses.
Aggressive Mode: If checked, the VPN client will used aggressive mode as negotiation mode
with the remote router.
Redundant GW : This allows the VPN Client to open an IPSec tunnel with an alternate gateway
in case the primary gateway is down or not responding. Enter either the IP address or the url of
the Redundant Gateway (e.g. router.dyndns.com).
z
BiGuard VPN Client will contact the primary gateway to establish a tunnel. If it fails after
several tries (default is 5 tries, configurable in "Parameters" panel then modify
"Retransmissions" field to modify this default value) the Redundant Gateway is used as the
new tunnel endpoint. Delay between two retries is about 10 seconds.
z
In case primary gateway can be reached but tunnel establishment fails (e.g. VPN
configuration problems) then the VPN Client won't try to establish tunnels with the redundant
gateway. Configurations need modifications.
z
If a tunnel is successfully established to the primary gateway with DPD feature (i.e. Dead
Peer Detection) negotiated on both sides, when the primary gateway stops responding (e.g.
DPD detects non-responding remote gateways) the VPN Client immediately starts opening a
new tunnel with the redundant gateway.
z
The exact same behaviour will apply to the redundant gateway. This means that the VPN
Client will try to open primary and redundant gateway until the user exits software or click on
'Save & Apply'.
IKE port: Negotiation port for IKE. Default value is 500.
Local ID: Local ID is the identity the BiGuard VPN client is sending during Phase 1 to VPN
gateway. This identity can be: an IP address (type = IP address);
an domaine name (type = DNS);
an email address (type = Email)([email protected] in our
example)
a string (type = KEY ID);
a certificate issuer (type=DER ASN1 DN) (About X509 certificates,
please see Appendix A) If this identity is not set, VPN client's IP
address is used.
Remote ID: Remote ID is the identity the BiGuard VPN client is expecting to receive during
Phase 1 from the VPN router. This identity can be: an IP address (type = IP address);
an domaine name (type = DNS);
an email address (type = Email);
a string (type = KEY ID);
a certificate issuer (type=DER ASN1 DN)
(About X509 certificates, please see
Appendix A) If this identity is not set, VPN
gateway's IP address is used.
X-Auth(Please see the Appendix A): Define the login and password of an X-Auth IPSec
negotiation. If "X-Auth popup" is selected, a popup window asking for a login and a password will
appear each time an authentication is required to open a tunnel with the remote gateway. The
end user has 20 seconds to enter its login and password before X-Auth authentication fails.
If X-Auth authentication fails then the tunnel establishment will fail too.
BiGuard VPN Client Configuration – Phase 2 Configuration
“IPSec Configuration” or “Phase 2” window will concern settings for Phase 2.
The purpose of Phase 2 is to negotiate the IPSec security parameters that are applied to the
traffic going thought tunnels negotiated during Phase 1.
Name: Label for IPSec Configuration only used by the VPN client. This parameter is never
transmitted during IPSec Negotiation. It is possible to change this name at any time and read it in
the tree list window. Two Phases can not have the same name (“billion” in our example).
VPN Client address: Virtual IP address used by the client inside the remote LAN: The computer
will appear in the LAN with this IP address (“192.168.205.117” in our example). It is important
this IP address not to belong to the remote LAN.
Address type: The remote endpoint may be a LAN or a single computer. In the first case
choose "Subnet address". Choose "Single address" otherwise. When choosing "Subnet address",
the two fields "Remote LAN address" and "Subnet mask" became available. When choosing
"Single address", only the field "Remote host address" is available.
Remote address: This field may be "Remote host address" or "Remote LAN address"
depending of the address type. It is the remote IP address, or LAN network address of the
gateway, that opens the VPN tunnel.
Subnet mask: Subnet mask of the remote LAN. Only available when address type is equal to
"Subnet address".
ESP encryption: Encryption algorithm negociated during IPSec phase (3DES, AES, ...).
ESP authentication: Authentication algorithm negociated during IPSec phase (MD5, SHA, ...).
ESP mode: IPSec encapsulation mode : tunnel.
PFS group: Diffie-Hellman key length.
For more advanced settings, click on 'P2 Advanced'.
Automatic Open Mode : The VPN Client can automatically open the specified tunnel (Phase2)
on specific events such as:
z
Auto open this tunnel when the VPN Client starts up.
z
Auto open this tunnel when USB stick is inserted.
z
Auto open this tunnel when the VPN Client detect traffic towards remote LAN.
Open Script : A specific script or application (e.g. Outlook, CRM apps, ..) can be launched when
this tunnel opens. Script or application can be selected by browsing using '...' button.
Alternate Servers : DNS ans WINS server IP addresses of the remote LAN can be entered here,
to help users to resolve intranet addressing. The DNS or WINS addresses are taken into account
as soon as the tunnel is opened, and as long as it is opened.
Once the parameters are set, click on 'Save & Apply' to save and to take into account the new
configuration.
You'll find a set of useful VPN Client configuration documents available for each of the VPN
Client gateway we support.
Open IPSec VPN Tunnels
Once both Billion BiGuard VPN enabled devices and BiGuard VPN Client has been
configured accordingly, you are ready to open VPN tunnels. First make sure you enabled your
firewall with IPSec traffic.
1. Clink on
Client Configuration.
to make into account all modifications we’ve made on your VPN
2. Click on
, or generate traffic that will automatically open a secure IPSec
VPN Tunnel (e.g. ping, IE browser).
3. Select
to see opened VPN Tunnels.
if you want to access to the IPSec VPN logs and adjust filters to display
4. Select
less IPSec messaging.
Configuration Wizard
Seven easy steps Wizard
BiGuard VPN client provides a Configuration Wizard that allows the creation of VPN
configuration in seven easy steps. This Configuration Wizard is designed for remote computers
that need to get connected to a corporate LAN through a VPN gateway.
Let take the following example:
The remote computer has a dynamically provided public IP address.
It tries to connect the Corporate LAN behind a VPN gateway that has a DNS address
"gateway.mydomain.com".
The Corporate LAN address is 192.168.1.xxx. e.g. the remote computer want to reach a server
with the IP address: 192.168.1.100.
For configuring this connection, open wizard's window by selecting menu "Configuration >
Wizard".
Step 1 of 7
You need to specify the following information:
The public (network side) address of the remote gateway Address (In IP or Domain name). (e.g.
specify gateway.mydomain.com)
The Preshared-key you will use for this tunnel (this Preshared-key must be the same in the
gateway).
Step 2 of 7
You must specify the following information:
The IP address of your remote gateway LAN Network address (e.g. specify 192.168.1.0).
Step 3 of 7
You need to input this VPN Client IP address that will be used to identify the client in the VPN
connection (e.g. specify 192.100.205.101).
Be sure that each client must use different VPN Client IP Address.
Warning
Step 4 of 7
The fourth step summaries your new VPN configuration. Other parameters may be further
configured directly via the main interface (e.g.virtual IP address, etc..).
Step 5 of 7
As for BiGuard side, please go to >Configuration >VPN >IPSec >IPSec Wizard
And input Connection Name (BiGuardVPN as example), and PreShared Key(12345678 as
example), and select LAN to Host(For BiGuard VPN Client Only), then press Next.
Step 6 of 7
Input BiGuard VPN Client IP Address. (195.100.205.101 as example) and press Next.
Be sure that each client must use different VPN Client IP Address.
Warning
Step 7 of 7
After all, you will see a Configuration Summary, click Done too apply this rule.
Appendix A – Compatible table of Billion BiGuard VPN enabled devices & BiGuard VPN
Client
Hash algorithms
MD5
SHA1
Encryption
DES
3DES
AES 128
AES 192
AES 256
Diffie Hellman Group Support
Group1: MODP 768
Group2: MODP 1024
Group5: MODP 1536
Authentication Mechanism
Preshared key
X509 Certificate support (PEM)
X-Auth
Key Management
ISAKMP (RFC2408)
IKE (RFC2409)
IPSec Mode
ESP
Tunnel
IKE Mode
Main
Aggressive
Quick
x = not support
BiGuard 2
BiGuard 10
BiGuard 30
v
v
v
v
v
v
v
v
v
v
v
v
v
v
v
v
v
v
v
v
v
v
v
v
v
v
v
v
v
v
v
x
x
v
x
x
v
x
x
v
v
v
v
v
v
v
v
v
v
v
v
v
v
v
v
v
v
v
v
v
Appendix B – Product Support and Contact Information
Referring to the Troubleshooting section in the User’s Manual can solve most problems. If you
cannot resolve the problem with the Troubleshooting chapter, please contact the dealer
where you purchased this product.
Contact Billion
WORLDWIDE
http://www.billion.com