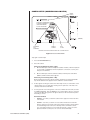
1
ADDENDUM
Addendum No.: C1588M
Date: May 5, 2005
Manuals Affected: KBD300A Universal Keyboard – C527M-L
KBD4000 Genex Multiplexer Keyboard - C1921M-G
Manual Update: ECO 05-10910 optimizes joystick performance whenever you power up the KBD300A and
KBD4000. It also provides an automatic calibration mode.
Automatic Calibration of the Joystick
The KBD300A and KBD4000 will calibrate the joystick automatically on power-up and every 30 minutes of
inactivity. This is the default operation of the keyboard and will ensure optimal joystick performance.
Make sure the joystick remains in the center position as power is applied to the keyboard. Do not move or
hold down the joystick until after the red LEDs have finished flashing the software version number.
Worldwide Headquarters • 3500 Pelco Way • Clovis, California 93612 USA • www.pelco.com
USA & Canada • Tel: 800/289-9100 • Fax: 800/289-9150
International • Tel: 1-559/292-1981 • Fax: 1-559/348-1120
®
KBD4000
Genex® Multiplexer
Keyboard
Installation/
Operation Manual
C1921M-G (1/04)
Pelco World Headquarters • 3500 Pelco Way, Clovis, CA 93612-5699 USA • www.pelco.com
USA & Canada: Tel: 800/289-9100 • Fax: 800/289-9150
International: Tel: 1-559/292-1981 • Fax: 1-559/348-1120
2
Pelco Manual C1921M-G (1/04)
CONTENTS
Section
Page
IMPORTANT SAFEGUARDS AND WARNINGS ........................................................................ 4
REGULATORY NOTICES ........................................................................................................... 4
DESCRIPTION ........................................................................................................................... 5
INSTALLATION ........................................................................................................................... 6
MODES OF OPERATION .................................................................................................. 6
DO A MULTIPLEXER MODE INSTALLATION ........................................................... 6
DO A MULTIPLEXER SERVER MODE INSTALLATION ........................................... 8
CHECK THESE THINGS ................................................................................................... 9
MULTIPLEXER .......................................................................................................... 9
MULTIPLEXER SERVER .......................................................................................... 9
SETTING COAXITRON CONTROL OF CAMERAS ......................................................... 10
WHAT’S NEXT? ................................................................................................................ 10
PROGRAMMING ....................................................................................................................... 11
CONTROLLING THE MULTIPLEXER WITH THE KEYBOARD ....................................... 11
PASSWORD ...................................................................................................................... 11
MENUS ............................................................................................................................. 12
SYSTEM SETUP (VIEW KEY) ................................................................................. 13
ADVANCED SYSTEM SETUP (VIEW KEY) ............................................................ 15
RECORD SETUP (LIVE/VCR KEY) ......................................................................... 18
CUSTOM VCR SETUP (LIVE/VCR KEY) ................................................................. 20
CAMERA SETUP (NUMBER AND CAM KEYS) ....................................................... 21
ACTIVITY DETECTION MASK SETUP .................................................................... 23
SEQUENCE SETUP (SEQ KEY) ............................................................................. 24
HELP MENU ............................................................................................................. 25
ALARM LOG ............................................................................................................. 25
MULTIPLE CAMERA DISPLAY SETUP ............................................................................ 26
PROGRAMMING THE PICTURE-IN-PICTURE DISPLAY (
) ............................ 26
PROGRAMMING THE 4-CAMERA DISPLAY (
) ............................................... 26
PROGRAMMING THE 9-CAMERA DISPLAY (
) ............................................... 27
PROGRAMMING THE 16-CAMERA DISPLAY (
) .............................................
PROGRAMMING MENU DEFAULTS ...............................................................................
PROGRAMMING A PRESET ............................................................................................
PROGRAMMING A PATTERN ..........................................................................................
OPERATION ..............................................................................................................................
TROUBLESHOOTING ...............................................................................................................
SPECIFICATIONS .....................................................................................................................
INDEX ........................................................................................................................................
WARRANTY AND RETURN INFORMATION ............................................................................
27
28
29
29
30
38
39
40
42
LIST OF ILLUSTRATIONS
Figure
1
2
3
4
5
6
7
8
9
10
11
12
13
Page
Connecting Keyboard to Multiplexer .......................................................................... 6
Connecting Keyboards to the Server ......................................................................... 8
Multiplexer Front Panel ............................................................................................. 11
Menu Tree ................................................................................................................ 12
Basic System Setup Menu ....................................................................................... 13
Advanced System Setup Menu ................................................................................ 15
Basic VCR Setting Menu .......................................................................................... 18
Custom VCR Setup Menu ........................................................................................ 20
Basic Camera Menu ................................................................................................. 21
Activity Detection Mask ............................................................................................ 23
Camera Sequencing Menu ....................................................................................... 25
Help Menu ................................................................................................................ 25
KBD4000 Keyboard Definitions ................................................................................ 30
LIST OF TABLES
Table
A
B
C
D
E
Pelco Manual C1921M-G (1/04)
Page
Camera Numbers with Switch 7 ON .......................................................................... 7
Keyboard Addresses ................................................................................................. 8
VCR Types ............................................................................................................... 19
Programming Menu Defaults .................................................................................... 28
Operation Guide ....................................................................................................... 31
3
IMPORTANT SAFEGUARDS AND WARNINGS
Prior to installation and use of this product, the following WARNINGS should be observed.
1.
Installation and servicing should only be done by qualified service personnel and
conform to all local codes.
2.
Unless the unit is specifically marked as a NEMA Type 3, 3R, 3S, 4, 4X ,6 or 6P
enclosure, it is designed for indoor use only and it must not be installed where
exposed to rain and moisture.
3.
Only use replacement parts recommended by Pelco.
4.
After replacement/repair of this unit’s electrical components, conduct a resistance
measurement between line and exposed parts to verify the exposed parts have not
been connected to line circuitry.
REGULATORY NOTICES
This equipment has been tested and found to comply with the limits of a Class B digital
device, pursuant to part 15 of the FCC rules. These limits are designed to provide
reasonable protection against harmful interference in a residential installation. This
equipment generates, uses, and can radiate radio frequency energy and, if not installed
and used in accordance with the instructions, may cause harmful interference to radio
communications. However there is no guarantee that the interference will not occur in a
particular installation. If this equipment does cause harmful interference to radio or
television reception, which can be determined by turning the equipment off and on, the user
is encouraged to try and correct the interference by one or more of the following measures:
4
•
Reorient or relocate the receiving antenna.
•
Increase the separation between the equipment and the receiver.
•
Connect the equipment into an outlet on a circuit different from that to which the receiver is connected.
•
Consult the dealer or an experienced radio/TV technician for help.
Pelco Manual C1921M-G (1/04)
DESCRIPTION
The KBD4000 Genex® Multiplexer Keyboard is a full-function keyboard controller for the
MX4000 Genex Multiplexer and MX4000SVR Genex Multiplexer Server.
This manual covers the KBD4000 keyboard’s operation with both duplex and simplex
models of the multiplexer. The differences, as they pertain to the keyboard, are indicated as
necessary.
The mode of operation depends on whether the keyboard is connected to a multiplexer or
to a server. (See Modes of Operation for an explanation.)
In addition to performing all the control functions that can be done from the multiplexer’s
front panel, the keyboard features a three-axis joystick and additional keys to control fixed
and variable speed pan, tilt, and lens functions. The keyboard can also operate presets,
auxiliaries, and patterns and can be used to program the multiplexer or server.
IMPORTANT DIFFERENCES IN SIMPLEX AND DUPLEX MULTIPLEXER
OPERATING MODES.
The simplex multiplexer has three operating modes:
Live
The main monitor can show live video both in full-screen or multi-screen
views. You cannot record in live mode. The multiplexer’s DISPLAY/
RECORD LED is off.
VCR
The main monitor shows full-screen or multi-screen views of videotape
playback. You cannot record in VCR mode. The multiplexer’s DISPLAY/
RECORD LED is off.
Record
The main monitor shows live video of an individual camera in full-screen
view only. You can record only when in record mode. While recording, all
cameras are being recorded simultaneously. The multiplexer’s DISPLAY/
RECORD LED is on.
The duplex multiplexer has two operating modes:
Pelco Manual C1921M-G (1/04)
Live
The main monitor shows live video both in full-screen or multi-screen views.
You can record while viewing any or all cameras. While recording, all
cameras are being recorded simultaneously. The multiplexer’s LIVE/VCR
LED is on.
VCR
The main monitor shows full-screen or multi-screen views of videotape
playback. You can record in VCR mode if you have a second VCR connected to the VCR OUT jack on the multiplexer. The multiplexer’s LIVE/VCR
LED is off.
5
INSTALLATION
The following parts are supplied:
1
1
1
KBD4000 keyboard
25-foot (7.6 m) data cable
MODES OF OPERATION
The mode of operation depends on whether the keyboard is connected to a multiplexer or
to a server.
Multiplexer Mode
A single keyboard is plugged into the back of a Genex
MX4000 Multiplexer.
Multiplexer Server Mode
Up to four keyboards can be connected to the back of a
Genex MX4000SVR Multiplexer Server. Each keyboard
connected to the remote keyboard port requires a
KBDKIT(-X).
Proceed to the Do A Multiplexer Mode Installation section (step 1A) or Do A Multiplexer
Server Mode Installation section (step 1B).
DO A MULTIPLEXER MODE INSTALLATION
1A
PIN 1
1
2
3
4
SPOT
MAIN
VCR
OUT
AUX
SVHS
IN
IN
SVHS
COM
}
RJ-45
JACK PINOUTS
TX+
5 GND
TX—
6
12 VAC/DC
7 RX—
NONPOLAR 8 RX+
OUT N NH
OCC S
ALARMS
1 2 3 4 5 6 7 8
9 10 11 12 13 14 15 16
110-240V 50/60 Hz
00018
Figure 1. Connecting Keyboard to Multiplexer
1.
Remove the DIP switch cover plate from the rear of the keyboard (refer to Figure 1).
2.
Set the switches (refer to Figure 1 for switch locations).
ADDRESS
Set switches 1, 2, and 3 OFF. This is address 0, which selects the multiplexer
operating mode.
COMMUNICATION MODE
•
Set switch 4 OFF to enable polled communication mode. Use this for normal
keyboard operation.
•
6
Set switch 4 ON to put the keyboard in non-polled communication mode. Use this
when the keyboard communicates remotely over communications media that do
not support polled mode. These are any communications media that introduce
significant delay in transmitting data (for example, phone line transmission
systems). In non-polled mode, the keyboard can control multiplexers only. The
multiplexer server does not support non-polled mode.
Pelco Manual C1921M-G (1/04)
UNUSED
Leave switch 5 OFF. It is not used.
TURBO MODE
Set switch 6 ON to enable the turbo (extra fast) pan feature or OFF to disable.
CAMERA ADDRESS MODE
There are two modes for addressing cameras:
•
Set switch 7 ON if you want to address all cameras consecutively from 1-256
(refer to Table A).
•
Set switch 7 OFF if you want to address cameras in groups of 16 according to
the multiplexer to which they are connected. For example, multiplexer 1, cameras
1-16; multiplexer 2, cameras 1-16, etc.
Table A. Camera Numbers with Switch 7 ON
Multiplexer
Cameras
9-channel
16-channel
1
1-9
1-16
2
17-25
17-32
3
33-41
33-48
4
49-57
49-64
5
65-73
65-80
6
81-89
81-96
7
97-105
97-112
8
113-121
113-128
9
129-137
129-144
10
145-153
145-160
11
161-169
161-176
12
177-185
177-192
13
193-201
193-208
14
209-217
209-224
15
225-233
225-240
16
241-249
241-256
PROGRAMMING MODE
Set switch 8 ON to program the multiplexer and camera presets and patterns from the
keyboard. Set to OFF to disable programming.
NOTE: For distances over
25 feet (7.6 m), you must
3.
Replace the cover on the back of the keyboard.
4.
The keyboard comes with a 25-foot (7.6 m) data cable with RJ-45 connectors. Plug
one end into the back of the keyboard and the other end into the COM IN connector
on the back of the multiplexer. Refer to Figure 1.
order the KBDKIT(-X) Remote Keyboard Wiring Kit.
Refer to the KBDKIT(-X)
manual for installation
procedures.
The keyboard receives power from the multiplexer. The LED display lights momentarily when the keyboard receives power and stays on when you enter a
multiplexer address.
The KBD4000 has calibrating software for automatically centering the joystick. Be
certain the joystick remains in the neutral (vertical) position as power is applied to the
keyboard. Do not move or hold down the joystick until after the red digit LEDs have
finished flashing the firmware revision.
5.
Pelco Manual C1921M-G (1/04)
Peel off the protective covering over the LED display in the keyboard’s upper left
corner.
7
DO A MULTIPLEXER SERVER MODE INSTALLATION
1B
ADDRESS #1 (LOCAL)
CONTROLS MONITOR 1
ON
LOCAL
KEYBOARD
ADDRESS #2 (REMOTE)
CONTROLS MONITOR 2
ADDRESS #3 (REMOTE)
CONTROLS MONITOR 3
ADDRESS #4 (REMOTE)
CONTROLS MONITOR 4
1 2 3 4 5 6 7
1
2
3
4
5
6
7
ON
ON
R- R+
ON
T+ T
1 2 3 4 5 6 7
1 2 3 4 5 6 7
TX+
TX12VAC
12VAC
GND
NC
RX-
1
2
3
4
5
6
7
1 2 3 4 5 6 7
TX+
TX12VAC
12VAC
GND
NC
RX-
1
2
3
4
5
6
7
TX+
TX12VAC
12VAC
GND
NC
RX-
MULTIPLEXER
WALL BLOCK
KBDKIT
4
5
3
6
2
7
1
8
00017
Figure 2. Connecting Keyboards to the Server
If the keyboard will be connected to a server that will operate in paired mode configuration,
only addresses 1 and 3 can be used. Refer to the server manual for information about
paired mode configuration.
1.
Remove the DIP switch cover plate from the rear of the keyboard (refer to Figure 1).
2.
Set the switches (refer to Figure 1 for switch locations).
ADDRESS
Set the keyboard address according to Table B.
Table B. Keyboard Addresses
Keyboard
Address
1
2
3
4
1
ON
OFF
ON
OFF
Switch Settings
2
OFF
ON
ON
OFF
3
OFF
OFF
OFF
ON
UNUSED
Switches 4 and 5 must be set OFF. They are not used in multiplexer server mode.
TURBO MODE
Set switch 6 ON to enable the turbo (extra fast) pan feature or OFF to disable.
CAMERA ADDRESS MODE
There are two modes for addressing cameras:
•
Set switch 7 ON if you want to address all cameras consecutively from 1-256
(refer to Table A).
•
Set switch 7 OFF if you want to address cameras in groups of 16 according to
the multiplexer to which they are connected. For example, multiplexer 1, cameras
1-16; multiplexer 2, cameras 1-16, etc.
PROGRAMMING MODE
Set switch 8 ON to program the multiplexer and server and OFF to disable programming.
8
Pelco Manual C1921M-G (1/04)
3.
Replace the cover on the back of the keyboard.
4.
Connect the keyboard to the MX4000SVR Multiplexer Server.
You can connect up to four keyboards to the server—one to the server’s LOCAL
KEYBOARD port and three to its REMOTE KEYBOARD(S) port, or all four to the remote.
LOCAL KEYBOARD PORT CONNECTION
Plug one end of the 25-foot (7.6 m) data cable with RJ-45 connectors supplied with
the keyboard into the back of the keyboard. Plug the other end into the LOCAL
KEYBOARD port on the server. Refer to the multiplexer server manual for instructions.
The keyboard receives power from the multiplexer, as indicated by a lighted LED
display. The display shows the address of the multiplexer with which the keyboard is
communicating.
REMOTE KEYBOARD(S) PORT CONNECTION
You must order a KBDKIT(-X) for each keyboard you intend to connect to the server’s
REMOTE KEYBOARD(S) port. Follow the instructions supplied with the kit. Refer to
Figure 1 for the keyboard RJ-45 pin-outs.
The keyboard receives power from the transformer, as indicated by a lighted LED display. The display shows the address of the multiplexer with which the keyboard is
communicating.
The KBD4000 has calibrating software for automatically centering the joystick. Be certain the joystick remains in the neutral (vertical) position as power is applied to the
keyboard. Do not move or hold down the joystick until after the red digit LEDs have
finished flashing the firmware revision.
5.
2
Peel off the protective covering over the LED display in the keyboard’s upper left corner.
CHECK THESE THINGS
IMPORTANT: The key-
board is ready to operate
when plugged into a multiplexer or multiplexer server.
However, some minimal programming may
be required to make
your system work. Do
not assume there is nothing
more to do after connecting
the keyboard to the system.
MULTIPLEXER
2A
Below are the minimum things to check.
1.
If you have more than one multiplexer, each one must have its own address (UNIT ID
in the Advanced System Setup menu). If you have a server, the multiplexer address
must match the input on the server to which it is connected. For example, if the
multiplexer is connected to input 3 on the server, set the multiplexer address to 3.
2.
Set the master/slave designation to let the keyboard communicate with multiplexers.
•
In polled mode (switch 4 OFF), you must designate one multiplexer (any one) as
the master and all the others as slaves. If you have just one multiplexer, it must
be the master.
•
In non-polled communication mode (switch 4 ON), all multiplexers must be
slaves (the keyboard is the master).
Set the address and master/slave designation from the front panel of the
multiplexer, not from the keyboard. For instructions, refer to Controlling the
Multiplexer with the Keyboard in the Programming section.
2B
MULTIPLEXER SERVER
Below is the minimum you should check.
If you intend to control two monitors from one keyboard (paired mode), you must change
the settings for the monitors (Monitor menu). Programming the server can only be done
from the keyboard. Refer to the server manual for instructions.
Pelco Manual C1921M-G (1/04)
9
3
NOTE: If you have a multiplexer server, you must enter the Camera menu from
the multiplexer’s front panel.
Then you can program the
cameras from the front
panel of the multiplexer or
from the keyboard.
SETTING COAXITRON® CONTROL OF CAMERAS
The KBD4000 keyboard provides Coaxitron control of pan, tilt, and lens functions. There
are three Coaxitron format settings, which are set in the Camera Setup section.
4
Standard
Use for moveable cameras controlled by 15-bit standard Coaxitron
receivers, such as the CX9000 Series, the PT7700, and the ED25/27/
28/29. The KBD4000 keyboard, in conjunction with a Genex multiplexer, supports all pan, tilt, and lens functions, and auxiliary on/off.
The keyboard does not set or call presets or support preset scanning.
Extended
(Default)
Use for moveable cameras controlled by 32-bit extended Coaxitron
receivers, such as Esprit®, Intercept®, Spectra®, and the LRD41C21/
LRD41C22 Series. The KBD4000 keyboard, in conjunction with a
Genex multiplexer, supports all 15-bit functions, plus the setting and
calling of presets and patterns. A different control, such as the
MPT9500, is required to program labels for presets and patterns.
Off
Use for fixed cameras.
WHAT’S NEXT?
At this point you can work through the Programming section or proceed directly to the
Operating section.
10
Pelco Manual C1921M-G (1/04)
PROGRAMMING
NOTE: To program a multi-
This section applies only to programming the multiplexer. The multiplexer can be
programmed from the keyboard or from the multiplexer’s front panel. To program the
multiplexer from the front panel, refer to the multiplexer manual. To program the
multiplexer server, refer to the server manual.
plexer if a multiplexer server
is installed, you must enter
programming mode from the
multiplexer’s front panel.
After doing so, you can program the multiplexer
through its front panel or
you can navigate and make
programming selections
through the keyboard.
Programming lets you configure the multiplexer (from the KBD4000) for the way you want your
system to operate. The multiplexer automatically selects the most common operating parameters. However, some minimal programming may be required to make your system work.
Programming of system, camera, and VCR setup; camera sequencing; and alarm and
activity detection is done through on-screen menus displayed on the main monitor. You can
enable a password to prevent unauthorized access to the menus.
Programming of the picture-in-picture, and 4-, 9-, and 16-camera displays can be done
directly without going through menus. (Refer to the Multiple Camera Display Setup section.
CONTROLLING THE MULTIPLEXER WITH THE KEYBOARD
IMPORTANT INSTRUCTIONS
Before you can use the keyboard to control the multiplexer(s), do the following at the front
panel of the multiplexer(s).
VCR
LIVE
Duplex Color Multiplexer
00019
Figure 3. Multiplexer Front Panel
IMPORTANT: The Genex
multiplexer lets you work in
any of four languages:
English (default), French,
German, or Spanish. If you
need to change the language, do so before programming because you
must reset the multiplexer to
factory defaults before you
can change the language.
See the MX4000 Genex
Series Simplex and Duplex
Multiplexers Installation/
Operation Manual for details.
1.
Press the VIEW button for about three seconds. The basic System Setup menu
appears and the currently selected menu item blinks.
2.
Use the arrow buttons to highlight ADVANCED SETUP.
3.
Press the +/- button. The Advanced System Setup menu appears. Skip steps 4 and 5
if your system has only one multiplexer.
4.
Use the arrow buttons to move the cursor to UNIT ID.
5.
Press the +/- button to select the multiplexer’s UNIT ID.
6.
Use the arrow buttons to move the cursor to COMM TYPE.
7.
•
In polled communication mode (switch 4 off), one multiplexer must be the
master and all others slaves.
•
In non-polled mode (switch 4 on), all multiplexers must be slaves (the
keyboard is master).
Use the arrow buttons to go to EXIT. Press the +/- button to exit the menu. You can
now use the keyboard to program the multiplexer(s).
PASSWORD
You can program the multiplexer to request a password for access to programming menus.
Refer to the Advanced System Setup section for information on enabling the password.
The universal password is 3916 and cannot be changed. You must enter this password
whenever the system requests one. Enter it from the keyboard by pressing each number
followed by the CAM key (3, CAM, 9, CAM, 1, CAM, 6, CAM).
Pelco Manual C1921M-G (1/04)
11
MENUS
NORMAL REC. SPEED
ALARM REC. SPEED
2/6/8 Hr
2/6/8 Hr
VCR TYPE
VCR VIDEO FORMAT
VCR SWITCH PULSE
UNIVERSAL
COMPOSITE
DISABLED
VCR SETUP
ALARM HANDLING
RECORD ALARMS AS A
ALARM RECORD TIME
LIVE/VCR
PRIORTIY
ALARM DURATION
CONFIGURE CUSTOM VCR
PLAYBACK FORMAT
PELCO
MONITOR
UNIT
MAIN
SPOT
1
2
3
4
5
6
7
8
9
SEQ
NEAR
OPEN
VIEW
PATTERN PRESET
ON
OFF
FAR
CLOSE
NORMAL RECORD SETUP
RECORD SPEED 2/6/8 Hr
SWITCH INTERVAL 003
0
CAM
ALARM RECORD SETUP
CLEAR
RECORD SPEED 2/6/8 Hr
SWITCH INTERVAL 003
EXIT
CAMERA 1
NORMAL
2/6/8 Hr
2/6/8 Hr
VIDEO INPUT TERMINATION 75 OHM
ALARM INPUT NORMALLY
OPEN
COAXITRON FORMAT
OFF
ACTIVITY DETECTION
SET DETECTION MASK
MAIN MONITOR VIDEO
MAIN MONITOR DISPLAY HIGH RESOLUTION
ENABLED
GROUP
QUAD (2x2)
1
04
2
04
3
04
CLEAR ALL
EXIT
TEST
NINE (3x3)
04
04
RESET ACTIVITY DETECTION ALL CH TO
HELP
ACTIVITY DETECTION MED SENSITIVITY
SET ALL
BACK
BUTTON
* VCR/LIVE
DATE FORMAT
MM-DD-YY
PASSWORD
DISABLED
FRONT PANEL CONTROL ENABLED
SETTING
VCR SPEED & ALARM
MAIN MONITOR DISPLAY
RESPONDS TO
*** AUX MONITOR DISPLAY
*** RESPONDS TO
MONITOR SETUP
+/–
NONE
SPOT MONITOR DISPLAY SEQUENCE
RESPONDS TO
ALARMS
QUICK SETUP
- SINGLE PRESS MODIFY
DOUBLE PRESS CHANGE
EDIT DIRECTION
HOLD BUTTONS TO ENTER/EXIT
THEIR ASSOCIATED MENU
USE ARROWS TO NAVIGATE
BLANK
ACTIVITY
CAMERA TYPES
ALL COLOR
UNIT ID
COMM. TYPE
001
MASTER (KBD-T/D)
RELAY OUTPUT
ALARM
01473
NOTE: Refer to the procedures for larger views of the menus.
Figure 4. Menu Tree
TIP: Once in a menu, you
can access another by
pressing that menu’s key(s).
Press and hold the VIEW key to switch to the System Setup menu.
Enter a camera number and then press and hold the CAM key to change to the Camera
menu.
Press and hold the SEQ key to switch to the Sequence menu.
TIP: In any menu you can
scroll the options forward with
the OPEN key and backward
with the CLOSE key.
Press and hold the LIVE/VCR key to switch to the Record Setup menu.
You must be in main monitor mode to program from the keyboard. Press the MAIN
MONITOR key.
To exit the menus, select EXIT and then press the OPEN or CLOSE key.
12
Pelco Manual C1921M-G (1/04)
SYSTEM SETUP (VIEW KEY)
2/6/8 Hr
2/6/8 Hr
MAIN MONITOR VIDEO
MAIN MONITOR DISPLAY HIGH RESOLUTION
*2,6,or 8 Hr
12 Hr
16 Hr
18 Hr
24 Hr
48 Hr
72 Hr
84 Hr
96 Hr
120 Hr
168 Hr
180 Hr
240 Hr
360 Hr
480 Hr
600 Hr
720 Hr
960 Hr
**
**
RESET ACTIVITY DETECTION ALL CH TO
HIGH RESOLUTION
REDUCED FLICKER
* 2/6/8 HR FOR NTSC/EIA MODEL MULTIPLEXERS, 3 HR FOR PAL/CCIR MODELS.
REMAINING RECORD SPEEDS DEPEND UPON VCR MODEL.
** NOT SHOWN ON DUPLEX MONOCHROME MODELS OR SIMPLEX MULTIPLEXERS
Figure 5. Basic System Setup Menu
To program the main basic system parameters:
1.
Press the MAIN MONITOR key.
2.
Use the number pad to enter the address of the multiplexer (1-16 if the keyboard is
connected to a multiplexer; 1-8 if the keyboard is connected to a server), and then
press the UNIT key.
3.
Press the VIEW key for about three seconds.
4.
Type the password (3916), if requested. Enter it by pressing each number key
followed each time by the CAM key. The System Setup menu appears. The currently
selected menu item blinks.
5.
Use the joystick to move among items on the screen. When the menu item you desire
is highlighted (blinking), do one of the following:
•
If a menu item has more than one option, press the OPEN key to cycle through
the options to select the one you want.
•
If a menu item has only one option, press the OPEN key to select it.
Time and Date
Set the current time and date. The time uses a 24-hour clock.
NOTE: Title Display shows
12 characters maximum in
all modes except 16-camera
display, in which only 9 characters are shown.
Time Display
ON – Displays the time on the main monitor.
OFF – The time is not shown on the main monitor.
Title Display (Duplex Multiplexer)
ON – Displays camera titles and the word LIVE or VCR on the main monitor.
OFF - Camera titles and the word LIVE or VCR are not shown on the main monitor.
Title Display (Simplex Multiplexer)
ON – Displays camera titles on the main monitor.
OFF - Camera titles are not shown on the main monitor.
Pelco Manual C1921M-G (1/04)
13
Record Speeds
Sets the speed at which the VCR normally records video and at which it records when
there is an alarm(s). Setting the speeds in the System Setup menu also sets the
speeds in the Record Setup and Custom VCR Setup menus.
Main Monitor Video (Duplex Color Models Only)
COMPOSITE is standard video on coaxial cable. SVHS is higher resolution video on a
special cable.
Main Monitor Display
The options are HIGH RESOLUTION and REDUCED FLICKER. Select REDUCED
FLICKER when there is flickering on the monitor screen, such as from a neon light.
This problem is more visible to the eye in PAL-format multiplexers.
GLOBAL SETUPS
Video Terminations
These settings set the terminations for all video inputs. To set individual inputs, refer
to the Camera Setup section.
•
Set to 75 OHM when equipment is connected only to the video IN connectors.
There must be no equipment connected to the video OUT connectors.
•
Set to LOOP HI-Z when equipment is connected to the video OUT (looping)
connectors. For every channel that has equipment connected to the video IN
connector, there must be equipment connected to the video OUT. Do not use
this global setting if any channel has equipment connected to a video input but
no equipment connected to the video output. Equipment connected to the
looping connectors must be terminated at 75 ohms.
•
NO CHANGE – This is a pass-through selection in case you unintentionally hit
the OPEN key. This is not an undo key. This will not change settings.
Alarm Inputs
•
Normally closed operation = current flow
•
Normally open operation = current flow
= alarm switch or relay closed
= alarm switch or relay open
Dwell Rates
Sets the sequence dwell rate for all cameras. To set individual dwell rates for
cameras, refer to the Sequence Setup section.
Activity Detection
•
ENABLED/DISABLED – Turns activity detection on or off for all video inputs. To
set individual inputs, refer to the Camera Setup section.
•
NO CHANGE – This is a pass-through selection in case you unintentionally hit
the OPEN key. This is not an undo key. This will not change settings.
6.
When you finish all the changes you want to make, go to EXIT or ADVANCED SETUP.
7.
Press the OPEN key to exit programming mode or go to the Advanced System Setup
menu.
When HELP is highlighted, you can press the OPEN key to display a help screen that tells
you which keys to press to configure specific options.
14
Pelco Manual C1921M-G (1/04)
ADVANCED SYSTEM SETUP (VIEW KEY)
DATE FORMAT
MM-DD-YY
PASSWORD
DISABLED
FRONT PANEL CONTROL ENABLED
MAIN MONITOR DISPLAY
RESPONDS TO
NONE
SPOT MONITOR DISPLAY SEQUENCE
RESPONDS TO
ALARMS
*** AUX MONITOR DISPLAY
*** RESPONDS TO
SEQUENCE
BLANK
TRACK MAIN
BLANK
ACTIVITY
CAMERA TYPES
ALL COLOR
UNIT ID
COMM. TYPE
001
MASTER (KBD-T/D)
RELAY OUTPUT
ALARM
BLANK
CAM 1
CAM 16
SEQUENCE
ALL COLOR*
COLOR & B/W
RESERVED
001–240
MASTER (KBD-T/D)** (1)
SLAVE
(2)
* ALL B/W SHOWN ON MONOCHROME MODELS.
** MUST BE SET IN THIS MODE FROM THE FRONT PANEL OF THE
MULTIPLEXER TO PROGRAM THE MULTIPLEXER FROM THE KEYBOARD.
*** DUPLEX MULTIPLEXER ONLY; NOT ON SIMPLEX
(1) SIMPLEX DEFAULT SETTING
(2) DUPLEX DEFAULT SETTING
Figure 6. Advanced System Setup Menu
To program the advanced main system parameters:
1.
Press the MAIN MONITOR key.
2.
Use the number pad to enter the address of the multiplexer (1-16 if the keyboard is
connected to a multiplexer; 1-8 if the keyboard is connected to a server), and then
press the UNIT key.
3.
Press the VIEW key for about three seconds. The basic System Setup menu appears.
The currently selected menu item blinks.
4.
Use the joystick to highlight ADVANCED SETUP.
5.
Press the OPEN key. The Advanced System Setup menu appears.
6.
Use the joystick to move among items on the screen. When the menu item you desire
is highlighted (blinking), press the OPEN key to cycle through the options.
Date Format
Sets the format for displaying the date on the main monitor.
Password
Enables or disables password control to access programming menus.
Front Panel Control
Enables or disables the front panel buttons to operate the multiplexer. In either mode
you can access programming menus. It has no effect on the keyboard.
Main Monitor Display
•
Select ALARMS, ACTIVITY, or ALARMS/ACTIVITY if you want the main monitor
to switch to cameras that have alarms or activity detection.
•
Pelco Manual C1921M-G (1/04)
Select NONE if you are using the main monitor for normal video and you do not
want alarms or activity detection to override what you are watching.
15
Spot Monitor Display
•
Select BLANK, SEQUENCE, or TRACK MAIN if you want the spot monitor to
switch to cameras that have alarms or activity detection. Then under RESPONDS TO, select ALARMS, ACTIVITY, or ALARMS/ACTIVITY.
•
Select NONE if you are using the spot for normal video and you do not want
alarms or activity detection to override what you are watching.
The options are defined as follows:
•
BLANK – Lets you view an individual camera, but you cannot run a sequence. An
alarm or activity detection will override the camera you are watching. When the
alarm or activity detection goes away, the screen returns to the camera you were
watching.
•
SEQUENCE – Lets you view an individual camera or run a sequence. An alarm
or activity detection will override the camera you are watching. When the alarm
or activity detection goes away, the screen returns to the camera you were
watching.
•
TRACK MAIN – The spot monitor will follow the camera switching that occurs on
the main monitor. This feature is used only when a KBD4000 keyboard is
connected to the multiplexer for controlling moveable cameras. This mode
provides an easy way of simplifying PTZ control in single-monitor applications.
The operator does not have to switch to SPOT to gain PTZ control and there is
no separate control of the spot monitor when in this mode.
Aux Monitor Display (Duplex Multiplexer Only)
•
Select ALARMS, ACTIVITY, or ALARMS/ACTIVITY if you want the auxiliary
monitor to show cameras that have alarms or activity detection.
•
Select NONE if you are using the auxiliary monitor to sequence through all
cameras and you do not want alarms or activity detection to override the
sequence.
The options are defined as follows:
NOTE: When programming
the MX4000 multiplexer
from the KBD4000 keyboard, DO NOT TRY TO
CHANGE THE UNIT ID.
Changing the unit ID from
the keyboard interrupts
keyboard communication to
the multiplexer, causing
erratic multiplexer operation.
Refer to the Troubleshooting
section to correct the
situation.
•
BLANK – This means the screen remains blank unless there is an alarm or
activity detection.
•
SEQUENCE – This means the monitor sequences all cameras unless there is an
alarm or activity detection.
•
CAM 1 through CAM 16 – This means the monitor displays the selected camera
unless there is an alarm or activity detection.
Camera Types
•
COLOR & B/W – This setting lets the multiplexer adapt to the combination of
both color and monochrome video signals. The multiplexer’s switching speed is
slower when it must change formats between monochrome and color cameras.
For duplex monochrome models, you will not receive color from a color camera
except on the SPOT or AUX monitor displays.
For simplex monochrome models, you will not receive color from a color
camera except in RECORD mode.
•
RESERVED – This setting can improve performance when using cameras with
non-standard sync or poor video quality.
Unit ID
This is the multiplexer’s address. If your system has more than one multiplexer, each
must have its own address. This must be set at the multiplexer—not at the keyboard.
16
Pelco Manual C1921M-G (1/04)
Comm. Type
•
In polled communication mode (switch 4 off), one multiplexer (any one) must be
the master. Only one multiplexer can be master; all others must be slaves. The
master multiplexer communicates with the slave multiplexers.
•
In non-polled communication mode (switch 4 on), all multiplexers must be
slaves (the keyboard is master).
The default is MASTER for duplex models and MASTER (KBD T/D) for simplex
models.
Relay Output
This operates the relay on the back of the multiplexer. The relay is used to change the
VCR to its alarm recording speed.
•
In alarm mode, an alarm signal is produced when a remote switch opens or
closes a ground in the multiplexer (for example, if a switch is on a door and the
door is opened).
•
In activity mode, the multiplexer continually monitors select camera inputs for
motion. When motion is detected, the multiplexer increases the frequency with
which that camera(s) is shown and recorded. Activity detection is most effective
when only a few cameras are showing activity (refer to the Camera Setup
section).
7.
When you finish all the changes you want to make, go to EXIT or BASIC SETUP.
8.
Press the OPEN key to exit programming mode or go to the basic System Setup
menu.
When HELP is highlighted, you can press the OPEN key to display a help screen that tells
you which keys to press to configure specific options.
Pelco Manual C1921M-G (1/04)
17
RECORD SETUP (LIVE/VCR KEY)
NORMAL REC. SPEED
ALARM REC. SPEED
*2, 6, or 8 Hr
12 Hr
16 Hr
18 Hr
2/6/8 Hr
2/6/8 Hr
**
ENABLED +
ENABLED DISABLED
ALARM HANDLING
AS A PRIORITY
ONLY
PRIORTIY
ALARM DURATION
ALARM DURATION
30 SECONDS
1 MINUTE
2 MINUTES
5 MINUTES
10 MINUTES
15 MINUTES
CONFIGURE CUSTOM VCR
PLAYBACK FORMAT
240 Hr
360 Hr
480 Hr
600 Hr
720 Hr
960 Hr
**
UNIVERSAL
COMPOSITE
DISABLED
RECORD ALARMS AS A
ALARM RECORD TIME
96 Hr
120 Hr
168 Hr
180 Hr
SEE TABLE C
VCR SETUP
VCR TYPE
VCR VIDEO FORMAT
VCR SWITCH PULSE
24 Hr
48 Hr
72 Hr
84 Hr
PELCO
PELCO
ROBOT
DM
* 2/6/8 HR FOR NTSC/EIA MODEL MULTIPLEXERS, 3 HOUR FOR PAL/CCIR MODELS.
REMAINING RECORD SPEEDS DEPEND UPON VCR MODEL.
** NOT SHOWN ON MONOCHROME MODELS.
Figure 7. Basic VCR Setting Menu
To program the VCR recording parameters:
1.
Press the MAIN MONITOR key.
2.
Use the number pad to enter the address of the multiplexer (1-16 if the keyboard is
connected to a multiplexer; 1-8 if the keyboard is connected to a server), and then
press the UNIT key.
3.
Press the LIVE/VCR button for about three seconds.
4.
Type the password (3916), if requested. Enter it by pressing each number key
followed each time by the CAM key. The Record Setup menu appears. The currently
selected menu item blinks.
5.
Press the OPEN key to cycle through the options to select the one you want.
Record Speeds
Sets the speed at which the VCR normally records video and at which it records when
there is an alarm(s). Setting the speeds in the System Setup menu also sets the
speeds in the Record Setup and Custom VCR Setup menu.
VCR Type (See Table C)
If your VCR is not listed among the options, do either of the following:
•
Select UNIVERSAL. In the recording speed menu item at the top of the screen,
select an option your VCR will support.
•
Select CUSTOM. Then go to CONFIGURE CUSTOM VCR and press the OPEN
key to go to the Custom VCR Setup menu. The switch interval can be changed
only while in this setting.
VCR Video Format
This feature is not available on monochrome multiplexers. COMPOSITE is standard
video on a coaxial cable. SVHS is higher resolution video on a special cable.
18
Pelco Manual C1921M-G (1/04)
VCR Switch Pulse
•
ENABLED + means the multiplexer waits for a positive head switching pulse
from the VCR. If the multiplexer does not get a pulse from the VCR (because of a
broken wire or the VCR does not give a pulse in some modes), it may appear the
multiplexer is not working properly.
•
ENABLED – (minus sign) means the multiplexer waits for a negative head
switching pulse from the VCR.
•
DISABLED means the VCR head switching pulse is not used.
Alarm Handling
This determines how alarms are recorded and for how long.
Configure Custom VCR
Press the OPEN key to access the CUSTOM VCR SETUP menu.
Playback Format
You can play tapes made using Pelco, Robot, and DM multiplexers.
6.
When HELP is highlighted, you can press the OPEN key to display a help screen that
tells you which keys to press to configure specific options.
7.
Press the OPEN key to exit the programming mode.
Table C. VCR Types
NTSC
UNIVERSAL
GYYR TLC1800
GYYR 2100
GYYR 2100 HD MODE
JVC SR-L900U
JVC SR-L901U
JVC SR-9070U
JVC BR-S925U
MITSUBISHI HS7424U
MITSUBISHI HS7496U
MITSUBISHI HS5168U
MITS. HS7168U NORM
MITS. HS7168U HD
PANASONIC AG-RT600
PANASONIC AG6124
PANASONIC AG 6730
PELCO TLR2024
PELCO TLR2096
PELCO TLR2168 NORM
PELCO TLR2168HD
SANYO SRT600
SANYO TLS924/972
SANYO TLS2500/7000
TOSHIBA KV6300
TOSHIBA KV7024A
TOSHIBA KV7168A
TOSHIBA KV7960A
TOSHIBA KV8168A
CUSTOM
Pelco Manual C1921M-G (1/04)
PAL
UNIVERSAL
ASUTA TLVCR 251
ASUTSA TLVCR 964
BURLE TC3910X
HITACHI VTL30E
HITACHI VT-L1000E
HITACHI VT-L2000E
JVC BR9060E
JVC BR-S920/925
JVC SR-L900E
MITS. HS5300/5600
MITS. HS5424E
PANAS. AG6024/6124
PANASONIC AG6720
PANASONIC AG6730
PANASONIC AG6040
SANYO TLS900P
SANYO TLS1000
SANYO SRT-500P
SANYO TLS2000
SONY SVT100P
SONY SVT5000P
CUSTOM
19
CUSTOM VCR SETUP (LIVE/VCR KEY)
*2,6,or 8 Hr
12 Hr
16 Hr
18 Hr
24 Hr
48 Hr
72 Hr
84 Hr
96 Hr
NORMAL RECORD SETUP
RECORD SPEED 2/6/8 Hr
SWITCH INTERVAL 003
ALARM RECORD SETUP
RECORD SPEED 2/6/8 Hr
SWITCH INTERVAL 003
120 Hr
168 Hr
180 Hr
240 Hr
360 Hr
480 Hr
600 Hr
720 Hr
960 Hr
003 TO 509 **
EXIT
BACK
* 2/6/8 HR FOR NTSC/EIA MODEL MULTIPLEXERS, 3 HR FOR PAL/CCIR MODELS.
REMAINING RECORD SPEEDS DEPEND UPON VCR MODEL.
** VCR TYPE IN RECORD SETUP MENU MUST BE SET TO CUSTOM IN ORDER TO
MAKE SELECTIONS.
Figure 8. Custom VCR Setup Menu
NOTE: For proper record-
ing, the switching rate of the
multiplexer must match that
of the VCR. If they do not
match, the VCR may skip
frames or record duplicate
frames.
To program the advanced VCR parameters:
1.
Press the MAIN MONITOR key.
2.
Use the number pad to enter the multiplexer’s address (1-16 if the keyboard is
connected to a multiplexer; 1-8 if the keyboard is connected to a server), and then
press the UNIT key.
3.
Press the LIVE/VCR button for about three seconds. The Record Setup menu appears
and the currently selected menu item blinks.
4.
Ensure VCR TYPE in the Record Setup menu is set to CUSTOM.
5.
Use the joystick to highlight CONFIGURE CUSTOM VCR.
6.
Press the OPEN key. The Custom VCR Setup menu appears.
7.
Use the joystick to move between items on the screen. When the menu item you
desire is highlighted (blinking), press the OPEN key to cycle through the options.
Record Speeds
Sets the speed at which the VCR normally records video and at which it records when
there is an alarm(s). Setting the speeds in the Custom VCR Setup menu also sets the
speeds in the System Setup and Record Setup menus.
Interval
Interval is the number of fields the VCR records before switching to the next camera.
8.
When you finish all the changes you want to make, go to EXIT or BACK.
9.
Press the OPEN key to exit programming mode or return to the Record Setup menu.
When HELP is highlighted, you can press the OPEN key to display a help screen that tells
you which keys to press to configure specific options.
20
Pelco Manual C1921M-G (1/04)
CAMERA SETUP (NUMBER AND CAM KEYS)
NORMAL
COVERT
CAMERA 1
NORMAL
*
ä
à
á
â
c
ê
ë
è
ï
î
ì
‹
›
, (COMMA)
VIDEO INPUT TERMINATION 75 OHM
ALARM INPUT NORMALLY
OPEN
COAXITRON FORMAT
EXTENDED
ACTIVITY DETECTION
SET DETECTION MASK
ENABLED
ENABLED
DISABLED
EXTENDED
OFF
STANDARD
OPEN
CLOSED
* ONLY NINE CHARACTERS APPEAR WHEN IN THE 16-CAMERA DISPLAY.
Figure 9. Basic Camera Menu
To program a camera input:
1.
Press the MAIN MONITOR key.
2.
Select the camera.
Addressing by Multiplexer (Switch 7 OFF)
a. On the number pad, enter the multiplexer’s address number (1-16 if the keyboard
is connected to a multiplexer; 1-8 if the keyboard is connected to a server), and
then press the UNIT key.
b.
On the number pad, enter the camera’s number, and then press and hold the
CAM key until the Camera menu appears.
Addressing Consecutively (Switch 7 ON)
On the number pad, enter the camera’s number, and then press and hold the CAM
key until the Camera menu appears. Refer to Table A for camera numbers.
3.
A video appears showing the camera view. This helps ensure you selected the correct
camera and lets you see what effect selecting a menu option has on the video. The
currently selected menu item blinks.
4.
Use the joystick to move among items on the screen. When the menu item you desire
is highlighted (blinking), press the OPEN key to cycle through the options to select the
one you want. Move the joystick to the right to advance to the next character position
when titling a camera.
Normal/Covert Mode
•
NORMAL – Use when you want the camera view to appear on the monitor. This
is the default.
•
Pelco Manual C1921M-G (1/04)
COVERT – Use when you want to record a camera view but do not want the
picture to appear on the monitor. The monitor will show only the camera number
on a black background; however, the videotape will record what the camera
sees. (You might use this if you do not want the operator or visitors to see the
picture but want it recorded.) You can set each camera individually.
21
(If you play back the tape on the same equipment, any covert picture will still appear
blanked. Change the setting to NORMAL to see the picture.)
Video Termination
•
Set to 75 OHM when equipment is connected to the video IN connector only.
•
Set to LOOP HI-Z when equipment is also connected to the video OUT (looping)
connector. Equipment connected to the looping connector must be terminated at
75 ohms.
Alarm Input
•
Normally closed operation
•
Normally open operation
NOTE: The Coaxitron
= current flow
= current flow
= alarm switch or relay closed
= alarm switch or relay open
Coaxitron Format
•
EXTENDED – Use when your system has moveable cameras controlled by 32bit Coaxitron receivers, such as Esprit, Intercept, Spectra, and the LRD41C21/
LRD41C22 Series.
format default setting is
EXTENDED.
•
OFF – Use when your system has fixed cameras only.
•
STANDARD – Use when your system has moveable cameras controlled by 15-bit
Coaxitron receivers, such as the CX9000 Series, the PT7700, and the ED25/27/
28/29.
Activity Detection
A camera can be set to respond or not respond to activity. If enabled, select SET
DETECTION MASK to define what part of the camera’s viewing field will be monitored
for activity.
5.
To program another camera, press the number key for that camera, and then press
the CAM key. Repeat steps 2-4.
6.
When you finish all the changes you want to make, go to EXIT.
7.
Press the OPEN key to exit programming mode.
When HELP is highlighted, you can press the OPEN key to display a help screen that tells
you which keys to press to configure specific options.
22
Pelco Manual C1921M-G (1/04)
ACTIVITY DETECTION MASK SETUP
ACTIVITY DETECTION MED SENSITIVITY
SET ALL
CLEAR ALL
EXIT
LOW SENSITIVITY
MED SENSITIVITY
HIGH SENSITIVITY
TEST
ACTIVITY BOX SET
ACTIVITY BOX CLEAR
Figure 10. Activity Detection Mask
Activity detection continually monitors selected camera inputs for motion. When motion is
detected, the multiplexer shows and records that camera(s) more frequently. Activity
detection is most effective when only a few cameras are showing activity. As more cameras
have activity, the frequency at which they are shown and recorded decreases. If all 16
cameras show activity, there will be virtually no increase.
The activity detection mask selects the portions of the camera’s field of view the multiplexer
will monitor for activity. The entire grid is active on default.
To program an activity detection mask for a camera:
1.
Press the MAIN MONITOR key.
2.
Select the camera.
Addressing by Multiplexer (Switch 7 OFF)
a. On the number pad, enter the multiplexer’s address number (1-16 if the keyboard
is connected to a multiplexer; 1-8 if the keyboard is connected to a server), and
then press the UNIT key.
b.
On the number pad, enter the camera’s number, and then press and hold the
CAM key until the Camera menu appears.
Addressing Consecutively (Switch 7 ON)
On the number pad, enter the camera’s number, and then press and hold the CAM
key until the Camera menu appears. Refer to Table A for camera numbers.
Pelco Manual C1921M-G (1/04)
3.
The currently selected menu item blinks. Use the joystick to highlight SET DETECTION MASK.
4.
Press the OPEN key. The Activity Detection Mask appears. The currently selected
menu item or activity box blinks.
5.
Use the joystick to move between menu items and activity boxes on the screen.
6.
Highlight the sensitivity menu item. Press the OPEN key to select the sensitivity. The
higher the sensitivity, the less motion needed to detect activity.
23
7.
Turn activity boxes on or off (the default is all are on).
•
To turn on all boxes, use the joystick to choose SET ALL. Press the OPEN key.
All boxes contain a symbol (as shown in Figure 10). The multiplexer monitors
activity in those boxes.
•
To turn off all boxes, use the joystick to choose CLEAR ALL. Press the OPEN
key. All boxes are blank.
•
To turn on or off an individual box, use the joystick to select the box. Press the
OPEN key to toggle the box on or off.
Turn off boxes where you want activity ignored, such as blowing trees, highways,
computer monitors, fluorescent lighting, and non-problem areas. An example of a
non-problem area would be a camera focused on a bank vault entrance but
ignoring tellers working nearby.
8.
To test activity detection, highlight TEST and press the OPEN key.
Create motion in front of the camera. Small black and white dashes flash where
activity is detected.
To exit test mode, press the OPEN key to return to the mask.
9.
If you did not like what you saw in test mode, change the mask and retest.
10. When you finish defining the activity detection mask, go to EXIT. Press the OPEN or
CLOSE key to exit programming mode.
11. If necessary, repeat steps 1-10 to program the activity detection mask for other cameras.
SEQUENCE SETUP (SEQ KEY)
GROUP
1
2
3
4
QUAD (2x2)
04
04
04
04
NINE (3x3)
04
04
Figure 11. Camera Sequencing Menu
Sequencing can be programmed in full-screen, four-camera, and nine-camera displays.
The cameras will not sequence when you are zooming. The LEDs above the camera
buttons on the multiplexer light to indicate which cameras are being displayed.
To program camera sequencing:
24
1.
Press the MAIN MONITOR key.
2.
Use the number pad to enter the multiplexer’s address (1-16 if the keyboard is
connected to a multiplexer; 1-8 if the keyboard is connected to a server), and then
press the UNIT key.
Pelco Manual C1921M-G (1/04)
3.
Press the SEQ key for about three seconds.
4.
Type the password (3916), if requested. Enter it by pressing each number key
followed each time by the CAM key. The Sequence menu appears. The currently
selected menu item blinks.
5.
Use the joystick to move among items on the screen. When the menu item you desire
is highlighted (blinking), press the OPEN key to cycle through the options to select the
one you want.
6.
Press the OPEN key to exit programming mode.
When HELP is highlighted, you can press the OPEN key to display a help screen that tells
you which keys to press to configure specific options.
HELP MENU
HELP
BUTTON
* VCR/LIVE
SETTING
VCR SPEED & ALARM
QUICK SETUP
MONITOR SETUP
+/–
- SINGLE PRESS MODIFY
DOUBLE PRESS CHANGE
EDIT DIRECTION
HOLD BUTTONS TO ENTER/EXIT
THEIR ASSOCIATED MENU
USE ARROWS TO NAVIGATE
* SIMPLEX MULTIPLEXERS SHOW “DISP/REC”.
PRESS THE “LIVE/VCR” KEY ON THE KEYBOARD.
Figure 12. Help Menu
Access the Help menu from any other menu.
1.
2.
Use the joystick in any menu to highlight HELP.
Press the OPEN key. The Help menu appears.
ALARM LOG
The alarm log cannot be accessed through the keyboard—only through the multiplexer.
Refer to the multiplexer manual for instructions.
Pelco Manual C1921M-G (1/04)
25
MULTIPLE CAMERA DISPLAY SETUP
You can use the keyboard to configure multiple camera display formats. The LEDs above
the camera buttons on the multiplexer light to indicate which cameras are being displayed.
PROGRAMMING THE PICTURE-IN-PICTURE DISPLAY (
)
You can program the on-screen location and size of the picture-in-picture (PIP) display. PIP
is unavailable in duplex VCR playback and in simplex record mode.
To program the PIP display:
1.
Press the MAIN MONITOR key.
2.
Use the number pad to enter the multiplexer’s address (1-16 if the keyboard is
connected to a multiplexer; 1-8 if the keyboard is connected to a server), and then
press the UNIT key.
3.
Press the
key.
4.
Press the
appears.
key for about three seconds until the message PROGRAM PIP SIZE
5.
Use the joystick to increase or decrease the PIP display size.
6.
Press the
key for about three seconds until the message PROGRAM PIP
POSITION appears.
7.
Use the joystick to move the PIP display location.
8.
Press and hold the
key to exit the PIP programming menu.
PROGRAMMING THE 4-CAMERA DISPLAY (
)
You can program four groups of four cameras each. Each of the four groups can be
programmed to include any four cameras.
is unavailable in simplex record mode.
To program the four-camera displays:
26
1.
Press the MAIN MONITOR key.
2.
Use the number pad to enter the multiplexer’s address (1-16 if the keyboard is
connected to a multiplexer; 1-8 if the keyboard is connected to a server), and then
press the UNIT key.
3.
Press the
key to call up a four-camera display. If necessary, press the
again to advance to the four-camera group you wish to configure.
4.
Press the
key for about three seconds. A bar appears in the first camera location
of the four-camera display, indicating that you are in programming mode.
5.
Use the joystick to move to each camera location in the four-camera display.
6.
When the camera location you desire is highlighted, choose the new camera by
pressing the number key for the desired camera and then pressing the CAM key.
7.
To exit programming mode, use the joystick to move the bar off the screen.
8.
If necessary, repeat steps 1-7 to program another group.
key
Pelco Manual C1921M-G (1/04)
PROGRAMMING THE 9-CAMERA DISPLAY (
)
You can program two groups of nine cameras each. Both groups can be programmed to
include any nine cameras.
is unavailable in simplex record mode.
To program the nine-camera displays:
1.
Press the MAIN MONITOR key.
2.
Use the number pad to enter the multiplexer’s address (1-16 if the keyboard is
connected to a multiplexer; 1-8 if the keyboard is connected to a server), and then
press the UNIT key.
3.
Press the
to call up a nine-camera display. If necessary, press the
advance to the other nine-camera group.
4.
Press the
for about three seconds. A bar appears in the first camera location of
the nine-camera display, indicating that you are in programming mode.
5.
Use the joystick to move to each camera location in the nine-camera display.
6.
When the camera location you desire is highlighted, choose the new camera by
pressing the number key for the desired camera and then pressing the CAM key.
7.
To exit programming mode, use the joystick to move the bar off the screen.
8.
If necessary, repeat steps 1-7 to program another group.
PROGRAMMING THE 16-CAMERA DISPLAY (
again to
)
is unavailable in simplex record mode.
To program the 16-camera display:
Pelco Manual C1921M-G (1/04)
1.
Press the MAIN MONITOR key.
2.
Use the number pad to enter the multiplexer’s address (1-16 if the keyboard is
connected to a multiplexer; 1-8 if the keyboard is connected to a server), and then
press the UNIT key.
3.
Press the
4.
Press the
key for about three seconds. A bar appears in the first camera location
of the 16-camera display, indicating that you are in programming mode.
5.
Use the joystick to move to each camera location in the 16-camera display.
6.
When the camera location you desire is highlighted, choose the new camera by
pressing the number key for the desired camera and then pressing the CAM key.
7.
To exit programming mode, use the joystick to move the bar off the screen.
key to call up the 16-camera display.
27
PROGRAMMING MENU DEFAULTS
Table D. Programming Menu Defaults
Menu
System Setup
Item
Time Display
Title Display
Normal Record Speed
Alarm Record Speed
Main Monitor Video (Duplex Only)
Main Monitor Display
Reset All Video Terminations To
Reset All Alarm Inputs to Normally
Reset All Seq Dwell Rates To
Reset Activity Detection All Ch To
Advanced System
Setup
Date Format
Password
System Password
Front Panel Control
Main Monitor Display Responds To
Spot Monitor Display
Responds To
Aux Monitor Display (Duplex Only)
Responds To (Duplex Only)
Camera Types
Unit ID
Comm. Type
Relay Output
Record Setup
Normal Rec. Speed
Alarm Rec. Speed
VCR Type
VCR Video Format
VCR Switch Pulse
Record Alarms
Alarm Record Time
Playback Format
Custom VCR
Setup
Normal Record Speed
Normal Switch Interval
Alarm Record Speed
Alarm Switch Speed
Camera
28
Title
Video Input Termination
Alarm Input Normally
Coaxitron® Format
Default
On
On
2/6/8 Hr (NTSC/EIA)
3 Hr (PAL/CCIR)
2/6/8 Hr (NTSC/EIA)
3 Hr (PAL/CCIR)
Composite
High Resolution
75 Ohm
Opened
02
Enabled
MM-DD-YY (NTSC/EIA)
DD-MM-YY (PAL/CCIR)
Disabled
3916
Enabled
None
Sequence
Alarms
Blank
Activity
All Color (All B/W for monochrome)
001
Master (KBD-T/D) (Simplex)
Slave (Duplex)
Alarm
2/6/8 Hr (NTSC/EIA)
3 Hr (PAL/CCIR)
2/6/8 Hr (NTSC/EIA)
3 Hr (PAL/CCIR)
Universal
Composite
Disabled
As A Priority
Alarm Duration
Pelco
2/6/8 Hr (NTSC/EIA)
3 Hr (PAL/CCIR)
003
2/6/8 Hr (NTSC/EIA)
3 Hr (PAL/CCIR)
003
Activity Detection
Camera Number
75 Ohm
Open
Extended (Simplex)
Off (Duplex)
Enabled
Activity Detection
Sensitivity
Activity Boxes
Med
Set All
Sequence
Individual Camera Dwell Time
Quad (2x2) Dwell Time
Nine (3x3) Dwell Time
02
04
04
Pelco Manual C1921M-G (1/04)
PROGRAMMING A PRESET
NOTE: DIP switch number
8 must be ON for programming.
1.
Press the MAIN or SPOT MONITOR key. The green LED over the MAIN or SPOT key
lights.
When using the MAIN MONITOR, the SPOT MONITOR DISPLAY menu item in the
Advanced System Setup menu must be set to TRACK MAIN (refer to the Advanced
System Setup section).
NOTE: The LEDs above
2.
the camera buttons on the
multiplexer light to show
which cameras are being
displayed.
Select the camera.
Addressing by Multiplexer (Switch 7 OFF)
a. On the number pad, enter the multiplexer’s address number (1-16 if the keyboard
is connected to a multiplexer; 1-8 if the keyboard is connected to a server), and
then press the UNIT key. The LED displays the address.
b.
On the number pad, enter the camera’s number (1-16), and then press the CAM
key.
Addressing Consecutively (Switch 7 ON)
On the number pad, enter the camera’s number, and then press the CAM key. Refer
to Table A for camera numbers.
3.
Position the camera.
4.
On the number pad, enter the preset’s number, and then hold down the PRESET key
for five seconds.
PROGRAMMING A PATTERN
NOTE: Refer to your dome
1.
or pan and tilt system
manual for information on
the number of available patterns and pattern durations.
Press the MAIN or SPOT MONITOR key. The green LED over the MAIN or SPOT key
lights.
When using the MAIN MONITOR, the SPOT MONITOR DISPLAY menu item in the
Advanced System Setup menu must be set to TRACK MAIN (refer to the Advanced
System Setup section).
2.
Select the camera.
Addressing by Multiplexer (Switch 7 OFF)
a. On the number pad, enter the multiplexer’s address number (1-16 if the keyboard
is connected to a multiplexer; 1-8 if the keyboard is connected to a server), and
then press the UNIT key. The LED displays the address.
b.
On the number pad, enter the camera’s number (1-16), and then press the CAM
key.
Addressing Consecutively (Switch 7 ON)
On the number pad, enter the camera’s number, and then press the CAM key. Refer
to Table A for camera numbers.
Pelco Manual C1921M-G (1/04)
3.
On the number pad, press a number key for the pattern number. Example: If you are
programming pattern 1 press the number 1 key. Then hold down the PATTERN key
until the message PROGRAMMING PATTERN appears on the screen.
4.
Move the camera through the pattern.
5.
To stop programming the pattern, repress the number key for the pattern followed by
the PATTERN key. Example: Press number 1 and then the PATTERN key if you are
programming pattern 1. The message PROGRAMMING PATTERN disappears.
29
OPERATION
2
3
5
4
6
7
1
8
LIVE/VCR
* The turbo pan feature
* The turbo pan feature
be disabled. Place
maymay
be disabled.
switch
Place switch66on
onthe
the rear
DIP switch
switch block
rear panel
panel DIP
See
blockininthe
theoff
offposition.
posi1. 1.
tion.Figure
See Figure
MONITOR
19
UNIT
MAIN
SPOT
1
2
3
4
5
6
7
8
9
CAM
0
CLEAR
SEQ
VIEW
PATTERN PRESET
NEAR
FAR
OPEN
CLOSE
ON
OFF
18
9
17
10
KBD4000
MADE IN USA.
11 *
16
15
14
13
12
For complete instructions on how to use the keys, refer to Table E, Operation Guide.
1. LED DISPLAY Displays the address of the multiplexer
(from 1-16) with which the keyboard is communicating.
10. PATTERN KEY Press to begin a pattern. Also is used
to program a pattern.
2. LIVE/VCR KEY Selects the source of video to display
on the monitor(s). LIVE is live video from the cameras.
VCR is recorded video that is played back from a VCR.
11. PTZ FUNCTION JOYSTICK Variable-speed, vectorsolving, bi-directional joystick for pan/tilt control. Turbo
pan* is achieved by full joystick deflection in either pan
direction. Twisting head for zoom control. Controls PIP
size and location also.
The simplex multiplexer must be in the record mode to
record video. Check the main monitor screen to see that
it indicates REC. Press the LIVE/VCR key to change
modes.
3. ZOOM KEY Zooms in (2X or 4X) on the displayed
camera. Use the joystick to control the zoom location.
4. PIP KEY Displays on the main monitor a picture-inpicture insert on top of the full-screen display.
5. FOUR-CAMERA DISPLAY KEY Press once to
display a group of four cameras on the main monitor.
Repeat pressing to display other groups.
6. NINE-CAMERA DISPLAY KEY Press once to
display a group of nine cameras on the main monitor.
Press again to display second group.
7. 16-CAMERA DISPLAY KEY Press once to display all
16 cameras on the main monitor.
8. AUXILIARY KEYS Turn receiver auxiliary functions on
and off.
12. VIEW KEY Press and hold to enter program mode for
multiplexer/multiplexer server. Press to view a
multiplexed video signal going to a VCR.
13. LENS CONTROL KEYS Control camera lens iris and
focus functions.
14. SEQ KEY Starts/stops a sequence.
15. CLEAR KEY Press to clear a numeric entry.
16. CAM KEY Selects a camera: Enter the camera
number and then press this key.
17. NUMBER PAD Enter numbers.
18. MONITOR KEYS Select the main or spot monitor for
viewing individual cameras. A green LED above each
key indicates which monitor is selected.
19. UNIT KEY Selects the multiplexer with which the
keyboard communicates: Enter the address of the
multiplexer (1-16) and then press this key.
9. PRESET KEY Sends a camera to a preset: Enter the
preset number and then press this key. Also is used for
programming presets.
Figure 13. KBD4000 Keyboard Definitions
30
Pelco Manual C1921M-G (1/04)
Table E. Operation Guide
Refer to “Functions” in the Index for an alphabetical list of the operations described in Table E.
NOTE: References to switch 7 in this table refer to the switch behind the panel on the back of the keyboard. There are two
modes for addressing cameras: by addressing all cameras consecutively from 1-256 (switch 7 ON, refer to Table A) or by
addressing cameras in groups of 9 or 16 according to the multiplexer to which they are attached (switch 7 OFF); for example, multiplexer 1, cameras 1-9 or 1-16; multiplexer 2, cameras 1-9 or 1-16, etc.
OPERATION
Call a camera to the
main monitor.
KEYBOARD COMMAND
1.
2.
RESULT
Press the MAIN MONITOR key. The green LED over the
MAIN key lights.
Displays the camera on the
main monitor.
Select the camera.
Stops a sequence if one is in
progress.
Addressing by Multiplexer (Switch 7 OFF)
a. On the number pad, press the multiplexer’s address
number (1-16 if the keyboard is connected to the
multiplexer; 1-8 if connected to a server), and then
press the UNIT key. The LED displays the address.
b.
On the number pad, press the camera number (1-16),
and then press the CAM key.
Addressing Consecutively (Switch 7 ON)
On the number pad, press the camera number, and then
press the CAM key. Refer to Table A for camera numbers.
Call a camera to the
spot monitor.
3.
Press the LIVE/VCR key to select the operation mode.
1.
Press the SPOT MONITOR key. The green LED over the
SPOT key lights.
2.
Select the camera. (You cannot select the camera when
TRACK MAIN is set in Advanced Setup.)
Displays the camera on the
spot monitor.
Addressing by Multiplexer (Switch 7 OFF)
a. On the number pad, press the multiplexer’s address
number (1-16 if the keyboard is connected to the
multiplexer; 1-8 if connected to a server), and then
press the UNIT key. The LED displays the address.
b.
On the number pad, press the camera number (1-16),
and then press the CAM key.
Addressing Consecutively (Switch 7 ON)
On the number pad, press the camera number, and then
press the CAM key. Refer to Table A for camera numbers.
Set main tracking.
1.
Go to the Advanced System Setup menu.
2.
Move the joystick so the cursor highlights SPOT MONITOR
DISPLAY items.
3.
Press the OPEN key until TRACK MAIN is displayed.
4.
Exit the Advanced System Setup menu.
Spot monitor follows the
camera switching that occurs
on the main monitor in singlescreen mode. In multi-screen
mode, the spot monitor
switches to camera 1.
Allows only PTZ control while in
main monitor mode. Press the
SPOT key to have presets and
patterns while in this mode.
(Continued on next page)
Pelco Manual C1921M-G (1/04)
31
Table E. Operation Guide (Continued)
OPERATION
Exit main tracking.
Call a group of
cameras to the
main monitor.
Display a picture-inpicture (PIP) insert
on the main
monitor.
KEYBOARD COMMAND
1.
Go to the Advanced System Setup menu.
2.
Move the joystick so the cursor highlights SPOT MONITOR
DISPLAY items.
3.
Press the OPEN key until SEQUENCE or BLANK is
displayed.
4.
Exit the Advanced System Setup menu.
1.
Press the MAIN MONITOR key. The green LED over the
MAIN key lights.
2.
On the number pad, press the multiplexer’s address number
(1-16 if the keyboard is connected to a multiplexer; 1-8 if
connected to a server), and then press the UNIT key. The
LED displays the address.
3.
Press the key below the 4, 9, or 16 icon.
4.
Repeatedly press the key until the correct group is displayed
(4 or 9 only).
5.
Press the LIVE/VCR key to select the operating mode.
1.
Press the MAIN MONITOR key. The green LED over the
MAIN key lights.
2.
Select the camera you want displayed full size.
RESULT
Exits main tracking mode.
Displays the group of
cameras on the main monitor.
The full-size view appears on
the main monitor with PIP
insert.
Addressing by Multiplexer (Switch 7 OFF)
a. On the number pad, press the multiplexer’s address
number (1-16 if the keyboard is connected to the
multiplexer; 1-8 if connected to a server), and then
press the UNIT key. The LED displays the address.
b.
On the number pad, press the camera number (1-16),
and then press the CAM key.
Addressing Consecutively (Switch 7 ON)
On the number pad, press the camera number, and then
press the CAM key. Refer to Table A for camera numbers.
3.
Ensure the main monitor displays live video. If not live, press
the LIVE/VCR key.
4.
Press the PIP icon key.
5.
On the number pad, press the number of the camera you
want to display in the insert. Then press the CAM key. (Note:
Both cameras must be connected to the same multiplexer.)
6.
To change the insert display, press the number of the
camera, and then press the CAM key.
7.
To exit, press the PIP icon key.
NOTE: You must exit PIP
mode to change the camera
shown in full-screen view.
(Continued on next page)
32
Pelco Manual C1921M-G (1/04)
Table E. Operation Guide (Continued)
OPERATION
Zoom on a camera
on the main
monitor.
KEYBOARD COMMAND
1.
Press the MAIN MONITOR key. The green LED over the
MAIN key lights.
2.
Select the camera.
Addressing by Multiplexer (Switch 7 OFF)
a. On the number pad, press the multiplexer’s address
number (1-16 if the keyboard is connected to the
multiplexer; 1-8 if connected to a server), and then
press the UNIT key. The LED displays the address.
b.
RESULT
Displays a 2X or 4X zoom of
the camera selected on the
main monitor.
Stops a sequence if one is in
progress.
On the number pad, press the camera number (1-16),
and then press the CAM key.
Addressing Consecutively (Switch 7 ON)
On the number pad, press the camera number, and then
press the CAM key. Refer to Table A for camera numbers.
Run a sequence of
cameras from one
multiplexer on the
main monitor.
3.
Press the LIVE/VCR key to select the operating mode.
4.
Press the key below the zoom icon. Zoom will be 2X. Press
again for 4X.
5.
Use the joystick to control the zoom location.
6.
To exit, press the zoom icon key or the number of the
camera, and then press the CAM key.
1.
Press the MAIN MONITOR key. The green LED over the
MAIN key lights.
2.
Select a camera on the multiplexer you want to sequence.
Starts the programmed
sequence of individual
cameras or groups of
cameras on the main monitor.
Addressing by Multiplexer (Switch 7 OFF)
a. On the number pad, press the multiplexer’s address
number (1-16 if the keyboard is connected to the
multiplexer; 1-8 if connected to a server), and then
press the UNIT key. The LED displays the address.
b.
On the number pad, press the camera number (1-16),
and then press the CAM key.
Addressing Consecutively (Switch 7 ON)
On the number pad, press the camera number, and then
press the CAM key. Refer to Table A for camera numbers.
3.
Press the LIVE/VCR key to select the operating mode.
4.
To sequence individual cameras, go to step 5. To sequence
groups of cameras, press the key below the 4- or 9-screen
icon, and then go to step 5.
5.
Press the SEQ key.
(Continued on next page)
Pelco Manual C1921M-G (1/04)
33
Table E. Operation Guide (Continued)
OPERATION
Run a sequence of
cameras from one
multiplexer on the
spot monitor.
(SPOT MONITOR
DISPLAY in the
Advanced System
Setup menu must
be in SEQUENCE.)
KEYBOARD COMMAND
1.
Press the SPOT MONITOR key. The green LED over the
SPOT key lights.
2.
Select a camera on the multiplexer you want to sequence.
RESULT
Starts the sequence of
individual cameras on the
spot monitor.
Addressing by Multiplexer (Switch 7 OFF)
a. On the number pad, press the multiplexer’s address
number (1-16 if the keyboard is connected to the
multiplexer; 1-8 if connected to a server), and then
press the UNIT key. The LED displays the address.
b.
On the number pad, press the camera number (1-16),
and then press the CAM key.
Addressing Consecutively (Switch 7 ON)
On the number pad, press the camera number, and then
press the CAM key. Refer to Table A for camera numbers.
Stop a sequence of
cameras on a
multiplexer.
Sequence multiplexers connected to a
server.
Sequence
multiplexers
connected to a
server and
sequence cameras
on a multiplexer(s).
3.
Press the SEQ key.
1.
Press the MAIN or SPOT MONITOR key.
2.
On the number pad, press the multiplexer’s address number
(1-16 if the keyboard is connected to the multiplexer; 1-8 if
connected to a server), and then press the UNIT key. The
LED displays the address.
3.
Press the SEQ key.
1.
Select the desired multi-camera display.
2.
Press and hold the multi-camera display key to enter multiscreen programming mode. A bar appears in the first camera
location.
3.
Use the joystick to move the on-screen bar to the desired
camera location for sequencing, and press the SEQ key to
initiate the sequencing of all active cameras.
Hold down the SEQ key for about three seconds.
Stops the sequence. The
monitor displays video from
the camera on which
sequence stops.
The sequence will run until
the SEQ key is pressed or
until another camera or multiscreen display is selected.
Starts sequencing the
multiplexers in numerical
order, displaying the main
monitor first, and then the spot
monitor. Monitors to be
displayed are selected in the
Set Sequence submenu of the
server’s Monitor menu.
Sequencing appears on the
monitor affiliated with the
keyboard; for example, if the
keyboard is set for address 1,
the sequence appears on
monitor 1.
(Continued on next page)
34
Pelco Manual C1921M-G (1/04)
Table E. Operation Guide (Continued)
OPERATION
KEYBOARD COMMAND
RESULT
1.
Follow the steps under “Run a sequence of cameras from
one multiplexer on the main monitor” or “Run a sequence of
cameras from one multiplexer on the spot monitor” to start
sequencing the cameras on the main and spot monitors of
individual multiplexers you want to sequence.
2.
Hold down the SEQ key for about three seconds to start
sequencing the multiplexers.
Sequence the
picture-in-picture
(PIP) display.
1.
Press the
2.
Press the SEQ key.
Stop a sequence of
multiplexers.
Move the joystick or select any camera.
Sequence stops.
Call a camera or run
a sequence of
cameras on the
auxiliary monitor
(duplex multiplexer
only).
Program the monitor in the Advanced System Setup menu.
Monitor responds to programming instructions.
Call a preset.
1.
Moves the camera to the
preset location.
Sequence multiple
cameras in one
location of a 4-, 9-,
or 16-camera
display.
2.
key.
Press the MAIN or SPOT MONITOR key. The green LED
over the MAIN or SPOT key lights. When using the MAIN
MONITOR, the SPOT MONITOR DISPLAY menu item in the
Advanced System Setup menu must be set to TRACK
MAIN (refer to the Advanced System Setup section).
Starts sequencing the
multiplexers in numerical
order, displaying the main
monitor first, and then the spot
monitor. Monitors to be
displayed are selected in the
Set Sequence submenu of the
server’s Monitor menu. As
each monitor is displayed, it
sequences. Sequencing
appears on the monitor
affiliated with the keyboard; for
example, if the keyboard is set
for address 1, the sequence
appears on monitor 1.
Sequences all active cameras
in the PIP display.
Select the camera.
Addressing by Multiplexer (Switch 7 OFF)
a. On the number pad, press the multiplexer’s address
number (1-16 if the keyboard is connected to the
multiplexer; 1-8 if connected to a server), and then
press the UNIT key. The LED displays the address.
b.
On the number pad, press the camera number (1-16),
and then press the CAM key.
Addressing Consecutively (Switch 7 ON)
On the number pad, press the camera number, and then
press the CAM key. Refer to Table A for camera numbers.
3.
On the number pad, press the number of the preset, and
then press the PRESET key. (Note: When calling preset 95
on Esprit and Spectra systems, hold the PRESET key until
the menu appears.)
(Continued on next page)
Pelco Manual C1921M-G (1/04)
35
Table E. Operation Guide (Continued)
OPERATION
Start auto scan with
15-bit receiver.
KEYBOARD COMMAND
1.
Press the SPOT MONITOR key. The green LED over the
SPOT key lights.
2.
Select the camera.
RESULT
Starts auto scanning.
Addressing by Multiplexer (Switch 7 OFF)
a. On the number pad, press the multiplexer’s address
number (1-16 if the keyboard is connected to the
multiplexer; 1-8 if connected to a server), and then
press the UNIT key. The LED displays the address.
b.
On the number pad, press the camera number (1-16),
and then press the CAM key.
Addressing Consecutively (Switch 7 ON)
On the number pad, press the camera number, and then
press the CAM key. Refer to Table A for camera numbers.
3.
On the number pad, press 97 and then the PRESET key.
Starts auto scanning.
Start random scan
with 15-bit receiver.
With the system in auto scan, press 97 on the number keyboard,
and then press the PRESET key.
Starts random scanning.
Start manual scan
(or stop auto or
random scan) with
15-bit receiver.
1.
Press the SPOT MONITOR key. The green LED over the
SPOT key lights.
Starts manual scanning.
2.
Select the camera.
Stops auto or random
scanning, if operating.
Addressing by Multiplexer (Switch 7 OFF)
a. On the number pad, press the multiplexer’s address
number (1-16 if the keyboard is connected to the
multiplexer; 1-8 if connected to a server), and then
press the UNIT key. The LED displays the address.
b.
On the number pad, press the camera number (1-16),
and then press the CAM key.
Addressing Consecutively (Switch 7 ON)
On the number pad, press the camera number, and then
press the CAM key. Refer to Table A for camera numbers.
Begin a pattern.
3.
On the number pad, press 96 and then the PRESET key.
1.
Press the MAIN or SPOT MONITOR key. The green LED
over the MAIN or SPOT key lights. When using the MAIN
MONITOR, the SPOT MONITOR DISPLAY menu item in the
Advanced System Setup menu must be set to TRACK
MAIN (refer to the Advanced System Setup section).
2.
Select the camera.
The pattern operates until
stopped.
Addressing by Multiplexer (Switch 7 OFF)
a. On the number pad, press the multiplexer’s address
number (1-16 if the keyboard is connected to the
multiplexer; 1-8 if connected to a server), and then
press the UNIT key. The LED displays the address.
b.
On the number pad, press the camera number (1-16),
and then press the CAM key.
Addressing Consecutively (Switch 7 ON)
On the number pad, press the camera number, and then
press the CAM key. Refer to Table A for camera numbers.
3.
On the number pad, press 1 and then the PATTERN key.
4.
To stop the pattern, move the joystick.
(Continued on next page)
36
Pelco Manual C1921M-G (1/04)
Table E. Operation Guide (Continued)
OPERATION
Turn an auxiliary
function on or off.
KEYBOARD COMMAND
1.
Press the SPOT MONITOR key. The green LED over the
SPOT key lights.
2.
Select the camera.
RESULT
The auxiliary function
operates.
Addressing by Multiplexer (Switch 7 OFF)
a. On the number pad, press the multiplexer’s address
number (1-16 if the keyboard is connected to the
multiplexer; 1-8 if connected to a server), and then
press the UNIT key. The LED displays the address.
b.
On the number pad, press the camera number (1-16),
and then press the CAM key.
Addressing Consecutively (Switch 7 ON)
On the number pad, press the camera number, and then
press the CAM key. Refer to Table A for camera numbers.
3.
Record a tape.
On the number pad, press the number of the auxiliary you
want to operate, and then press the AUX ON or OFF key.
For the duplex multiplexer, recording is done automatically.
For the simplex multiplexer, the multiplexer must be in record
mode (DISPLAY/RECORD LED is on).
Play a tape.
1.
Press the MAIN MONITOR key. The green LED over the
MAIN key lights.
2.
On the number pad, press the multiplexer’s address number
(1-16 if the keyboard is connected to a multiplexer; 1-8 if
connected to a server), and then press the UNIT key. The
LED displays the address.
3.
Press the LIVE/VCR key to put the multiplexer in playback
mode.
4.
Select the cameras to play back from one of the following:
5.
•
For an individual camera, press the number of the
camera and then the CAM key. If switch 7 is OFF, enter
a camera number from 1-16. If ON, refer to Table A for
camera numbers.
•
For multiple camera display, press the key below the 4-,
9-, or 16-camera icon.
•
For sequencing, select an individual or multiple camera
display, and then press the SEQ button.
Records all cameras
connected to the multiplexer.
While the simplex multiplexer is in record mode, you
can only see a full-screen
view of one camera (or one
camera at a time if sequencing) on the main monitor, but
all active cameras are being
recorded.
Displays the recorded
cameras in the selected
format on the main monitor.
Turn on the VCR and press the PLAY button.
Pelco Manual C1921M-G (1/04)
37
TROUBLESHOOTING
If you have difficulty operating your system, run through the following checklist to see if you
can solve the problem.
1.
Are the keyboard switches set properly?
2.
Is the equipment wired properly?
3.
Are the menu options in the multiplexer(s) and server set properly?
4.
Is the multiplexer set to the correct mode for live video or tape playback?
5.
Only the main monitor displays multiple-screen images. The spot monitor displays fullscreen views only.
6.
Patterns, presets, and auxiliaries operate with the spot monitor only. You must push
the SPOT key, even if the spot monitor is set to track the main monitor. Tracking the
main monitor applies to PTZ control only, not to patterns, presets, and auxiliaries.
7.
Programming controls the auxiliary monitor (duplex multiplexer only). You cannot
control it from the keyboard or from the multiplexer’s front panel.
8.
Tape playback can be done only on the main monitor (in VCR mode).
9.
Moveable cameras must be Coaxitron compatible with the proper Coaxitron format
selected in the multiplexer’s Camera menu. If an improper format is selected, the
camera will either not move or have sluggish control.
10. Moveable cameras can be operated with the joystick only if SPOT MONITOR is chosen
or if the spot monitor is programmed to track the main monitor. The camera moves on
the main monitor if the same camera is being shown on both the main and spot monitors.
11. Switch 7 on the keyboard determines how you call cameras.
•
If the switch is ON, all cameras are addressed consecutively. Do not count just
the installed cameras. Count 16 camera inputs per multiplexer, even if a
multiplexer has only nine inputs. The first input of multiplexer 1 is always camera
1; the first input of multiplexer 2 is always camera 17; the second input of
multiplexer 3 is always camera 34.
•
If the switch is OFF, cameras are addressed in groups of 9 or 16 according to the
multiplexer’s address. Select a multiplexer (number 3 for example), then choose
a camera (1-9 or 1-16).
12. Switch 4 on the keyboard determines the communication mode.
•
In polled communication mode (switch 4 OFF), if you have one multiplexer, it
must be the master. If you have multiple multiplexers, one (any one) must be the
master and all others slaves.
•
In non-polled communication mode (switch 4 ON), all multiplexers must be
slaves. Refer to the multiplexer’s Advanced System Setup menu.
13. If you have more than one multiplexer, each must have a unique address
(multiplexer’s Advanced System Setup menu).
14. If you have a server, the multiplexer’s address must correspond to the server’s input to
which it is connected. For example, if the multiplexer goes to input 4 on the server, the
multiplexer must be address 4.
15. If you have a server, each keyboard must have its own address.
38
Pelco Manual C1921M-G (1/04)
16. If you have a server, each keyboard controls its corresponding monitors.
•
In SINGLE mode, keyboard 1 controls monitor 1, keyboard 2 controls monitor 2, etc.
•
In PAIRED mode, keyboard 1 controls monitor 1 (main) and monitor 2 (spot), and
keyboard 3 controls monitor 3 (main) and monitor 4 (spot). In paired mode,
keyboards 2 and 4 are not used.
17. If you have a server and cannot change between full-screen and multi-screen views
on the main monitor, check the MAIN MONITOR CONTROL setting in the server’s
Monitor menu.
18. Inadvertently changing the UNIT ID (in the Advanced System Setup menu) at the
keyboard can cause uncontrollable sequencing of unit ID numbers and loss of
keyboard control. Do one of the following:
•
Press the down arrow button on the multiplexer. Sequencing should stop. Exit the
menu, return to the Advanced System Setup menu, and change UNIT ID back to
001. Continue normal programming from the keyboard.
•
If the multiplexer is remotely located from the keyboard, wait until the numbers
sequence to the correct multiplexer unit ID number and immediately move the
joystick in any direction. Sequencing should stop. Continue normal programming
from the keyboard.
SPECIFICATIONS
ELECTRICAL
Input Voltage:
Power Consumption:
12 VAC or ±12 VDC
5 watts
KEYBOARD COMMUNICATION
Keyboard Interface:
Connector Type:
RS-485 (25-foot flat cable supplied)
RJ-45 8-pin modular (female)
MECHANICAL
Keyboard Keypad:
Mechanical
Joystick:
Three-axis, vector solving, with twisting, return-to-center head
Digital Display:
Two red seven-segment LEDs
Main/Spot
Monitor Indicators:
Two green LEDs
GENERAL
Ambient Operating
Temperature:
20° to 120°F (-7° to 49°C)
Humidity:
10% to 90%, non-condensing
Dimensions:
9.50 in. W x 7.125 in. L x 2.25 in. H (24.13 x 18.10 x 5.72 cm)
Weight:
2.5 lb (1.12 kg)
Shipping Weight:
4 lb (1.81 kg)
(Design and product specifications subject to change without notice.)
Pelco Manual C1921M-G (1/04)
39
INDEX
sequence pip display 35
set main tracking 31
start a pattern 36
start auto scan (15-bit) 36
start manual scan (15-bit) 36
start random scan (15-bit) 36
stop auto or random scan 36
stop sequence of multiplexers 35
turn auxiliary function on/off 37
zoom camera on main monitor 33
A
Activity detection 14
Activity detection mask setup 23
Address setting 9
Address switch setting 6, 8
Addressing by multiplexer 21, 23, 29
Addressing consecutively 21, 23, 29
Advanced system setup menu 15
Alarm handling 19
Alarm input 22
Alarm inputs 14
Alarm log 25
Aux monitor display 16
C
G
German 11
H
Help menu 25
CAM key 21
Camera address mode switch setting 7, 8
Camera setup 21
Camera types 16
Coaxitron format 22
Coaxitron format settings 22
Comm type 17
Communication mode switch setting 6
Configure custom VCR 19
Controlling the multiplexer with the keyboard 11
Covert mode 21
Custom VCR setup menu 20
D
Date 13
Date format 15
Differences (simplex versus duplex) 5
Dwell rates 14
I
Installation (multiplexer mode) 6
Installation (multiplexer server mode) 8
Interval 20
K
Keyboard control of the multiplexer 11
Keyboard port connection 9
Keys
cam 21
live/VCR 18, 20
number 21
seq 24
view 13, 15
L
English 11
Language 11
Live/VCR key 18, 20
Local keyboard port connection 9
F
M
Fixed cameras setting 10, 22
Four-camera display programming 26
French 11
Front panel control 15
Functions
call a preset 35
call camera on auxiliary monitor 35
call camera to main monitor 31
call camera to spot monitor 31
call group of cameras to main monitor 32
display picture-in-picture 32
exit main tracking 32
play a tape 37
record a tape 37
run sequence on auxiliary monitor 35
run sequence on main monitor 33
run sequence on spot monitor 34
sequence multiple cameras 35
sequence multiplexers hooked to server 34
sequence multiplexers hooked to server and cameras on
multiplexer 34
Main monitor display 14, 15
Main monitor video 14
Master/slave 11
Master/slave designation 9
Menu defaults 28
Modes of operation 5, 6
Monitor display (main) 15
Monitor display (spot) 16
Moveable cameras setting 10, 22
Multiple camera display setup 26
Multiple multiplexers 9
Multiplexer mode installation 6
Multiplexer server mode installation 8
E
40
N
Nine-camera display programming 27
Normal/covert mode 21
Number key 21
Pelco Manual C1921M-G (1/04)
O
S
Operating differences 5
Operating modes 5, 6
SEQ key 24
Sequence setup 24
Set up multiple camera display 26
Sixteen-camera display programming 27
Slave/master 11
Slave/master designation 9
Spanish 11
Specifications 39
Spot monitor display 16
Switch settings 6
System setup menu 13
P
Paired mode 9
Password 11, 15
Pattern programming 29
Playback format 19
Polled/non-polled communication 9
Polled/non-polled communication mode 11, 17
Preset programming 29
Program mode switch setting 7
Programming a pattern 29
Programming a preset 29
Programming from the keyboard 12
Programming menu defaults 28
Programming mode switch setting 8
Programming the 16-camera display 27
Programming the 4-camera display 26
Programming the 9-camera display 27
T
Termination 22
Time and date 13
Time display 13
Title display 13
Troubleshooting 38
Turbo mode switch setting 7
U
R
Record setup menu 18
Record speeds 14, 18, 20
Relay output 17
Remote keyboard(s) port connection 9
Pelco Manual C1921M-G (1/04)
Unit ID 16
Unused switch setting 7, 8
V
VCR switch pulse 19
VCR type 18
VCR video format 18
Video termination 22
Video terminations 14
View key 13, 15
41
WARRANTY AND RETURN INFORMATION
WARRANTY
Pelco will repair or replace, without charge, any merchandise proved defective in
material or workmanship for a period of one year after the date of shipment. Exceptions to this warranty are as noted below:
•
•
•
•
•
•
•
•
•
Five years on Pelco manufactured cameras (CC3500/CC3600/CC3700 and
MC3500/MC3600 Series); two years on all other cameras.
Three years on Genex® Series (multiplexers, server, and keyboard).
Two years on all standard motorized or fixed focal length lenses.
Two years on Legacy®, Camclosure® Camera Systems, CM6700/CM6800/
CM8500/CM9500/CM9740/CM9760 Matrix, DF5 and DF8 Series Fixed Dome
products.
Two years on Spectra®, Esprit®, and PS20 Scanners, including when used in
continuous motion applications.
Two years on Esprit and WW5700 series window wiper (excluding wiper blades).
Eighteen months on DX Series digital video recorders.
One year (except video heads) on video cassette recorders (VCRs). Video heads
will be covered for a period of six months.
Six months on all pan and tilts, scanners or preset lenses used in continuous
motion applications (that is, preset scan, tour and auto scan modes).
Pelco will warrant all replacement parts and repairs for 90 days from the date of
Pelco shipment. All goods requiring warranty repair shall be sent freight prepaid
to Pelco, Clovis, California. Repairs made necessary by reason of misuse,
alteration, normal wear, or accident are not covered under this warranty.
Pelco assumes no risk and shall be subject to no liability for damages or loss
resulting from the specific use or application made of the Products. Pelco’s liability
for any claim, whether based on breach of contract, negligence, infringement of
any rights of any party or product liability, relating to the Products shall not exceed
the price paid by the Dealer to Pelco for such Products. In no event will Pelco be
liable for any special, incidental or consequential damages (including loss of use,
loss of profit and claims of third parties) however caused, whether by the negligence
of Pelco or otherwise.
The above warranty provides the Dealer with specific legal rights. The Dealer may
also have additional rights, which are subject to variation from state to state.
If a warranty repair is required, the Dealer must contact Pelco at (800) 289-9100
or (559) 292-1981 to obtain a Repair Authorization number (RA), and provide the
following information:
1. Model and serial number
2. Date of shipment, P.O. number, Sales Order number, or Pelco invoice number
3. Details of the defect or problem
If there is a dispute regarding the warranty of a product which does not fall under
the warranty conditions stated above, please include a written explanation with
the product when returned.
Method of return shipment shall be the same or equal to the method by which the
item was received by Pelco.
RETURNS
In order to expedite parts returned to the factory for repair or credit, please call
the factory at (800) 289-9100 or (559) 292-1981 to obtain an authorization number (CA number if returned for credit, and RA number if returned for repair).
All merchandise returned for credit may be subject to a 20% restocking and
refurbishing charge.
Goods returned for repair or credit should be clearly identified with the assigned
CA or RA number and freight should be prepaid. Ship to the appropriate address
below.
If you are located within the continental U.S., Alaska, Hawaii or Puerto Rico:
Service Department
Pelco
3500 Pelco Way
Clovis, CA 93612-5699
If you are located outside the continental U.S., Alaska, Hawaii or Puerto Rico:
Intermediate Consignee
American Overseas Air Freight
320 Beach Road
Burlingame, CA 94010
USA
Ultimate Consignee
Pelco
3500 Pelco Way
Clovis, CA 93612-5699
USA
REVISION HISTORY
Manual #
C1921M
C1921M-A
C1921M-B
C1921M-C
Date
5/98
7/98
12/98
7/99
9/99
C1921M-D
C1921M-E
C1921M-F
C1921M-G
9/00
6/02
9/03
1/04
Comments
Preliminary version released for beta evaluation.
Original version.
Added Sections 5.0 through 5.4. Added note to section 3.1. Added operations to Table C.
Added use of keyboard with simplex multiplexers. Revised manual to new format.
Added polled/non-polled communication. Added steps 1 and 2 to programming menus. Added tip about how to switch between
menus. Added information about camera types. Added information about TRACK MAIN feature with presets and patterns.
Added information on language option. Reorganized manual with index.
Revised graphics to reflect new joystick. Added material about powering up keyboard.
Moved Regulatory Notices section and changed power specification.
Revised per ECO #03-9291, software upgrade to increase the number of programmable patterns.
® Pelco, the Pelco logo, Spectra, Genex, Legacy, Esprit, Camclosure, and Coaxitron are registered trademarks of Pelco.
All rights reserved.
42
© Copyright 2002, Pelco.
Pelco Manual C1921M-G (1/04)