1
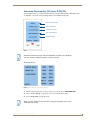
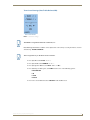
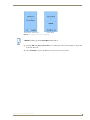
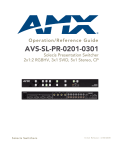
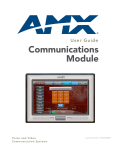
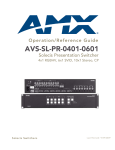
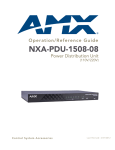
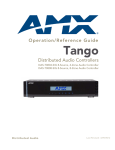
Operation/Reference Guide
Audio Controller LCD Keypads
Flush-Mount LCD Keypad (DAS-KP-LCD-G)
Surface-Mount LCD Keypad (DAS-KP-LCDS-W)
Distributed Audio
Last Revised: 3/03/2008
AMX Limited Warranty and Disclaimer
This Limited Warranty and Disclaimer extends only to products purchased directly from AMX or an AMX Authorized Partner which
include AMX Dealers, Distributors, VIP’s or other AMX authorized entity.
AMX warrants its products to be free of defects in material and workmanship under normal use for three (3) years from the date of
purchase, with the following exceptions:
•
Electroluminescent and LCD Control Panels are warranted for three (3) years, except for the display and touch overlay components are warranted for a period of one (1) year.
•
Disk drive mechanisms, pan/tilt heads, power supplies, and MX Series products are warranted for a period of one (1) year.
•
AMX lighting products are guaranteed to switch on and off any load that is properly connected to our lighting products, as long
as the AMX lighting products are under warranty. AMX also guarantees the control of dimmable loads that are properly connected to our lighting products. The dimming performance or quality there of is not guaranteed, impart due to the random combinations of dimmers, lamps and ballasts or transformers.
•
AMX software is warranted for a period of ninety (90) days.
•
Batteries and incandescent lamps are not covered under the warranty.
•
AMX AutoPatch Epica, Modula, Modula Series4, Modula CatPro Series and 8Y-3000 product models will be free of defects in
materials and manufacture at the time of sale and will remain in good working order for a period of three (3) years following the
date of the original sales invoice from AMX. The three-year warranty period will be extended to the life of the product (Limited
Lifetime Warranty) if the warranty card is filled out by the dealer and/or end user and returned to AMX so that AMX receives it
within thirty (30) days of the installation of equipment but no later than six (6) months from original AMX sales invoice date. The
life of the product extends until five (5) years after AMX ceases manufacturing the product model. The Limited Lifetime Warranty
applies to products in their original installation only. If a product is moved to a different installation, the Limited Lifetime Warranty
will no longer apply, and the product warranty will instead be the three (3) year Limited Warranty.
All products returned to AMX require a Return Material Authorization (RMA) number. The RMA number is obtained from the AMX
RMA Department. The RMA number must be clearly marked on the outside of each box. The RMA is valid for a 30-day period. After
the 30-day period the RMA will be cancelled. Any shipments received not consistent with the RMA, or after the RMA is cancelled, will
be refused. AMX is not responsible for products returned without a valid RMA number.
AMX is not liable for any damages caused by its products or for the failure of its products to perform. This includes any lost profits, lost
savings, incidental damages, or consequential damages. AMX is not liable for any claim made by a third party or by an AMX Authorized Partner for a third party.
This Limited Warranty does not apply to (a) any AMX product that has been modified, altered or repaired by an unauthorized agent or
improperly transported, stored, installed, used, or maintained; (b) damage caused by acts of nature, including flood, erosion, or earthquake; (c) damage caused by a sustained low or high voltage situation or by a low or high voltage disturbance, including brownouts,
sags, spikes, or power outages; or (d) damage caused by war, vandalism, theft, depletion, or obsolescence.
This limitation of liability applies whether damages are sought, or a claim is made, under this warranty or as a tort claim (including
negligence and strict product liability), a contract claim, or any other claim. This limitation of liability cannot be waived or amended by
any person. This limitation of liability will be effective even if AMX or an authorized representative of AMX has been advised of the
possibility of any such damages. This limitation of liability, however, will not apply to claims for personal injury.
Some states do not allow a limitation of how long an implied warranty last. Some states do not allow the limitation or exclusion of incidental or consequential damages for consumer products. In such states, the limitation or exclusion of the Limited Warranty may not
apply. This Limited Warranty gives the owner specific legal rights. The owner may also have other rights that vary from state to state.
The owner is advised to consult applicable state laws for full determination of rights.
EXCEPT AS EXPRESSLY SET FORTH IN THIS WARRANTY, AMX MAKES NO OTHER WARRANTIES, EXPRESSED OR
IMPLIED, INCLUDING ANY IMPLIED WARRANTIES OF MERCHANTABILITY OR FITNESS FOR A PARTICULAR PURPOSE. AMX
EXPRESSLY DISCLAIMS ALL WARRANTIES NOT STATED IN THIS LIMITED WARRANTY. ANY IMPLIED WARRANTIES THAT
MAY BE IMPOSED BY LAW ARE LIMITED TO THE TERMS OF THIS LIMITED WARRANTY. EXCEPT AS OTHERWISE LIMITED
BY APPLICABLE LAW, AMX RESERVES THE RIGHT TO MODIFY OR DISCONTINUE DESIGNS, SPECIFICATIONS, WARRANTIES, PRICES, AND POLICIES WITHOUT NOTICE.
Table of Contents
Table of Contents
Matrix Audio Controller LCD Keypads ...............................................................1
Overview .................................................................................................................. 1
DAS-KP-LCD-G Flush Mount LCD Keypad (FG1120-0X) .................................................. 1
DAS-KP-LCDS-W Surface Mount LCD Keypad (FG1120-12) ............................................ 1
Audio Controller Keypads - Features By Model .............................................................. 2
Installing the Surface-Mount LCD Keypad (DAS-KP-LCDS-W) ............................3
Overview .................................................................................................................. 3
Installing the Flush-Mount LCD Keypad
(DAS-KP-LCD-G) ...............................................................................................5
Overview .................................................................................................................. 5
Customizing LCD Keypad Labels ........................................................................7
Overview .................................................................................................................. 7
Customizing SOURCE Labels........................................................................................... 7
Customizing Source Command Labels ............................................................................ 8
Using the LCD Keypads ......................................................................................9
Basic Functionality (Mi Series & Delta) ..................................................................... 9
Turn On a Source (Single Room) ..................................................................................... 9
Turn Off a Source (Single Room) ..................................................................................... 9
Turn a Source On in All Rooms........................................................................................ 9
Turn All Rooms Off (System Off) ..................................................................................... 9
Direct Entry (From The Source Main Screen) ............................................................ 9
Tuner ............................................................................................................................... 9
CD ................................................................................................................................... 9
Cable / Satellite............................................................................................................. 10
Presets (Setting & Recalling) .................................................................................. 10
Setting a Preset............................................................................................................. 10
Recalling a Preset.......................................................................................................... 10
Advanced Functionality (Mi Series & DELTA).......................................................... 11
Grouping Rooms .......................................................................................................... 11
Setting/Clearing the Alarm Clock ................................................................................. 12
Locking/Unlocking Keypads ......................................................................................... 12
Tone Control Settings (Bass/Treble/Balance/SRS) ........................................................ 13
Backlight Settings ........................................................................................................ 14
Privacy Mode ................................................................................................................ 14
Matrix Audio Controller LCD Keypads
i
Table of Contents
ii
Matrix Audio Controller LCD Keypads
Matrix Audio Controller LCD Keypads
Matrix Audio Controller LCD Keypads
Overview
The Matrix Audio Controller LCD Keypads (FIG. 1) are compatible with both Delta and Mi Series
Audio Controller Systems and provide Direct Access Control and advanced functionality such as:
Setting and recalling Source Presets
Setting and recalling Source Favorites
Zone Grouping
Alarm clock settings
Keypad Lockout
DAS-KP-LCD-G
Flush Mount LCD Keypad
DAS-KP-LCDS-W
Surface Mount LCD Keypad
FIG. 1 Matrix Audio Controller LCD Keypads
DAS-KP-LCD-G Flush Mount LCD Keypad (FG1120-0X)
The DAS-KP-LCD-G Flush Mount LCD Keypad combines the control functionality of the DAS-KP-4e/
KP-6e and DAS-KP-NUM keypads, with the added benefit of visual feedback.
The DAS-KP-LCD-G is available in the following colors:
Gloss Black (FG1120-01)
Gloss White (FG1120-02)
Gloss Almond (FG1120-03)
Gloss Ivory (FG1120-04)
DAS-KP-LCDS-W Surface Mount LCD Keypad (FG1120-12)
The DAS-KP-LCDS-W Surface Mount (retrofit) LCD Keypad combines the control functionality of the
DAS-KP-4e-G/KP-6e-G and DAS-KP-NUM-G keypads, with the added benefit of visual feedback.
The DAS-KP-LCDS-W is available in the following color:
Matte White
Matrix Audio Controller LCD Keypads
1
Matrix Audio Controller LCD Keypads
Audio Controller Keypads - Features By Model
The following table indicates the features supported by each of the Matrix Audio Controller Keypads:
Audio Controller Keypads - Features By Model
Model Name
Description
Features
Flush Mount LCD Keypad
• Direct access control
LCD Keypads:
• DAS-KP-LCD-G (FG1120-0X)
• Setting/recalling presets
• Setting/recalling favorites
• DAS-KP-LCDS-W (FG1120-12) Surface Mount LCD Keypad
• Zone grouping
• Alarm clock settings
• Keypad lockout
Pushbutton Keypads:
• DAS-KP-4e-G (FG1120-3X)
Flush Mount 4 Source Keypad
• Control of 4 sources
• 5-button navigation control
• Bass, treble and balance control
• DAS-KPI-4e-G (FG1121-3X)
Flush Mount 4 Source Keypad
(International)
• Built-in IR receiver
• Metal chassis for enhanced rigidity
• Field-replaceable buttons and bezel
• Opaque button color
• 4-pin input/output connectors
• DAS-KP-6e-G (FG1120-4X)
Flush Mount 6 Source Keypad
• Control of 6 sources
• 5-button navigation control
• Bass, treble and balance control
• DAS-KPI-6e-G (FG1121-4X)
Flush Mount 6 Source Keypad
(International)
• Built-in IR receiver
• Metal chassis for enhanced rigidity
• Field-replaceable buttons and bezel
• Opaque button color
• 4-pin input/output connectors
• DAS-KP-NUM-G (FG1120-2X)
Flush Mount Numeric Keypad
• 12-button numeric control
• Direct access control
• Setting/recalling presets
• DAS-KPI-NUM-G (FG1121-2X)
Flush Mount Numeric Keypad
(International)
• Setting/recalling favorites
• Zone grouping
• Alarm clock settings
• Keypad lockout
2
Matrix Audio Controller LCD Keypads
Installing the Surface-Mount LCD Keypad (DAS-KP-LCDS-W)
Installing the Surface-Mount LCD Keypad
(DAS-KP-LCDS-W)
Overview
The DAS-KP-LCDS-W Surface Mount LCD Keypad (FIG. 1) is shipped completely assembled. To
correctly install the DAS-KP-LCDS-W (retrofit) in the wall, you must remove the Front Bezel and the
LCD screen.
Please follow these instructions carefully to ensure correct installation and operation.
FIG. 1 DAS-KP-LCDS-W Surface Mount (Retrofit) LCD Keypad
Parts List
• Front Bezel
• Keypad Control Board
• Mounting Plate
• LCD Touch-screen
• Keypad Connector Board
• Mounting Screws x 2
Before installing the LCD Keypads, POWER OFF the Matrix Controller (and
Expansion Controllers, if applicable).
1. To remove the Front Bezel, firmly hold the rear connector board with one hand while squeezing the
top and bottom near one edge of the front bezel with the other hand.
While squeezing, gently pull the bezel back and down.
A soft click should be heard when the bezel is freed from the mounting plate.
2. Use a small Phillips screwdriver to remove the four screws in the corners of the LCD board.
Once all the screws have been removed, gently grip each side of the LCD screen and rock it away
from the mounting plate.
This will slowly release the LCD screen from the bank of pins connecting it to the Keypad Control
Board.
Matrix Audio Controller LCD Keypads
3
Installing the Surface-Mount LCD Keypad (DAS-KP-LCDS-W)
3. Plug the speaker-wire connectors to the “To Speakers” connector and plug the Zone wires into the
“To Controller” connector on the back of the Keypad Connector Board.
Ensure the wiring scheme is correct and that the connector at the Controller is plugged into the Zone
output.
4. Use the provided screws to mount the Keypad Mounting Plate to the j-box in the wall.
Make sure the screws are secure enough that the keypad will not move when touched but be sure not
to overtighten the screws. If the screws are over-tightened, the connection between the LCD Screen
and the Keypad Control board may not be adequate.
5. Reconnect the LCD screen to the Keypad Control board making sure to line up the four screw holes
correctly.
This will ensure that all the pins will plugged into their appropriate receptacles.
6. Secure the LCD screen with the four screws that were removed in step #2.
Make sure the volume buttons are still in place on the switches.
7. Before placing the Front Bezel over the screen, POWER ON the Controller (and Expansion
Controllers, if applicable). The DAS-KP-LCDS-W will start the initialization process immediately.
When the System is first powered ON, it could take up to 4 minutes to load all the
information to the LCD keypads. Please wait until initialization has completed before
using the keypad.
8. If everything initialized correctly you should see the source listing at the top of the screen and “AllOn”, “All-Off” and the time displayed at the bottom of the screen.
9. Remove the protective film from the front of the LCD Touch-screen.
10. Place the Front Bezel on the LCD screen and firmly “click” it into place. It should fit tightly to the
Mounting plate.
4
Matrix Audio Controller LCD Keypads
Installing the Flush-Mount LCD Keypad (DAS-KP-LCD-G)
Installing the Flush-Mount LCD Keypad
(DAS-KP-LCD-G)
Overview
The DAS-KP-LCD-G Flush Mount LCD Keypad (FIG. 1) is shipped completely assembled.
FIG. 1 DAS-KP-LCD-G Flush Mount LCD Keypad (Flushmount)
Parts List
• Front Bezel
• LCD Touch-screen & Housing
Before installing the LCD Keypads, POWER OFF the Matrix Controller (and
Expansion Controllers, if applicable).
1. Using the cut-out template provided, center the template on the desired location on the wall and
mark the hole to be cut.
2. Connect the appropriate speaker & controller cables to the back of the DAS-KP-LCD-G.
The speaker connector is located on the right-hand side
The controller connector is located on the left-hand side.
3. Remove the bezel from the front, and insert the LCD Keypad and housing into the hole in the wall.
4. Press the housing firmly against the wall and tighten the 4 mounting screws (black Phillips head)
located in each corner of the housing. This will cause the doglegs to extend and press against the
drywall and will secure the Keypad to the drywall.
Be sure not to over-tighten these screws.
5. Remove the protective film from the front of the LCD Touch-screen.
Matrix Audio Controller LCD Keypads
5
Installing the Flush-Mount LCD Keypad (DAS-KP-LCD-G)
6. Carefully place the keypad bezel on the front of the Keypad.
Start on one side making sure the volume button fits through the appropriate volume hole, and
gently squeeze the cover to secure it to the other side of the housing.
The second volume button may need to be pressed in order to fit through the appropriate volume
hole.
7. POWER ON the controller (and Expansion Controllers, if applicable). The DAS-KP-LCD-G will
start the initialization process immediately.
When the System is first powered ON, it could take up to 4 minutes to load all the
information to the LCD keypads. Please wait until initialization has completed before
using the keypad.
8. If everything initialized correctly you should see the source listing at the top of the screen and
“All-On”, “All-Off” and the time displayed at the bottom of the screen.
9. To remove the cover, gently pry from the top corner until all four clips release from the housing.
6
Matrix Audio Controller LCD Keypads
Customizing LCD Keypad Labels
Customizing LCD Keypad Labels
Overview
Customization of labels displayed on the LCD keypad is done via the Setup menu on the front of the
Controller. Both Source labels and Source Control labels can be customized (FIG. 1).
Source Labels
Source Control
Labels
FIG. 1 Source Labels and Source Control labels
Customizing SOURCE Labels
1. Enter the Setup menu from the front of the Matrix Controller, by pressing the SELECT button
(FIG. 2).
FIG. 2 Press the SELECT button on the front of the Matrix Controller
2. From the menu displayed, select SETUP / MRC / PROGRAM.
3. Select the source # of which you wish to customize the source name. The default Source name will
be displayed.
4. Select "Label". The first letter of the Source Name will be highlighted. Use the UP/DOWN buttons
to change the letters in the source name.
To move from letter to letter, use the FORWARD >> button.
Matrix Audio Controller LCD Keypads
7
Customizing LCD Keypad Labels
To delete a letter, use the << BACK button.
Press the CENTER button to save the label.
Source Names are limited to 6 characters.
Customizing Source Command Labels
1. Enter the Setup menu from the front of the Matrix Controller, by pressing the SELECT button.
2. From the menu displayed, select SETUP / MRC / PROGRAM.
3. Select the source # of which you wish to customize the source command name.
4. Select "Learn IR". The first IR command for the source will be displayed.
5. Select "Next" until the IR command you wish to customize is displayed.
6. Select "Label". The first letter of the IR Command Name will be highlighted. Use the UP/DOWN
buttons to change the letters in the IR command name.
To move from letter to letter, use the FORWARD button.
To delete a letter, use the BACK button.
Press the CENTER button to save the label.
Source Command Names are limited to 6 characters.
8
Matrix Audio Controller LCD Keypads
Using the LCD Keypads
Using the LCD Keypads
Basic Functionality (Mi Series & Delta)
HOME Screen
Source MAIN Screen
Source MORE
FIG. 1 Basic Functionality - Home, Source MAIN and Source MORE screens
Turn On a Source (Single Room)
Touch the desired source. The LCD screen will switch to the Source MAIN screen and the source will
begin playing. An arrow will be displayed beside the source name to indicate that the source is ON (see
FIG. 1).
Turn Off a Source (Single Room)
Touch the source that is currently On. The source will no longer play and the arrow will no longer be
displayed beside the source name.
Turn a Source On in All Rooms
From the HOME screen, touch "ALL ON". The text "Select Source" will flash. Touch the desired
source. All rooms will begin playing the selected source.
Turn All Rooms Off (System Off)
From the HOME screen, touch "ALL OFF". Audio in all rooms will be turned off.
Direct Entry (From The Source Main Screen)
Tuner
To enter a specific station, touch "NUMERIC". The numeric screen will be displayed. Touch the station
numbers plus ENTER.
Examples:
104.5 (use the "dot" for FM stations)
1050 (if "dot" is not used, station = AM)
CD
To enter a specific Disc & Track, touch "NUMERIC" and enter the Disc #, touch the dot, then enter the
Track #, plus ENTER (disc and track must be separated by "dot").
To enter a specific Track while listening to a Disc, touch "NUMERIC" and enter the Track # plus
ENTER.
Matrix Audio Controller LCD Keypads
9
Using the LCD Keypads
Cable / Satellite
To enter a specific channel, touch "NUMERIC" and enter the Channel # plus ENTER.
Presets (Setting & Recalling)
Source MORE Screen
Set Preset Screen
Recall Preset Screen
FIG. 2 Basic Functionality - Setting and Recalling Presets
Setting a Preset
Presets can only be set from the Source MORE screen.
1. Access the Source MORE screen from the source MAIN screen by touching "MORE>>".
2. Touch "PRESETS". A numeric screen will be displayed.
3. Enter the Station, CD & Track, Channel plus ENTER.
4. A Presets screen will be displayed with 10 possible preset positions.
5. Select any preset position.
Recalling a Preset
From the Source MAIN screen, touch "PRESETS" and select the desired preset.
10
Matrix Audio Controller LCD Keypads
Using the LCD Keypads
Advanced Functionality (Mi Series & DELTA)
Advanced functions are accessed by simultaneously pressing & holding the Vol - / Vol+ buttons for 3
seconds. FIG. 3 shows the Advanced Functionality screen for KP-LCD Keypads.
Room Grouping options
Alarm Clock options
Keypad Lock options
Tone Control settings
Backlight settings
FIG. 3 KP-LCD Advanced Functionality screen
Advanced Functionilty is largely reserved for Mi/Tango Controllers. Only Backlight
and Tone (except for SRS) are available on Delta Controllers.
Grouping Rooms
Group Screen
Create Group Screen
FIG. 4 Advanced Functionality - Creating Groups
1. With the desired source ON, access the Advanced screen and select "GROUP ROOMS".
2. Select "Create a Group" to specify the rooms to be included in the Group.
3. Select "Group ALL" to group all rooms.
When a group is created all rooms included in the group will behave as one room
(same source & volume)
Matrix Audio Controller LCD Keypads
11
Using the LCD Keypads
To adjust the Group Volume, Touch Vol - / Vol+ while on the Group screen.
To adjust the Volume for an individual room, exit the Group screen, and touch Vol - / Vol+
from the keypad in each room.
To clear a Group, access the Group Room screen and touch "Clear Group".
Setting/Clearing the Alarm Clock
FIG. 5 Alarm Clock options
1. To set an Alarm for a specific room, access the Advanced screen and select "ALARM CLOCK".
2. Select "Set Alarm".
3. Select the source by touching "Source" to scroll through the available sources
4. Set the time & adjust the volume and touch SET.
When the selected time is reached, the room will turn on to the selected source and the volume will ramp
up to the set volume.
To clear an Alarm for a specific room, select "Clear Alarm" from the Alarm Clock screen.
To clear all Alarms for all rooms, select "Clear All Alarms" from the Alarm Clock screen.
Locking/Unlocking Keypads
FIG. 6 Keypad Lock Options
When a keypad is locked, touching the screen or buttons will have no effect until the keypad is unlocked.
1. To lock a keypad, select "LOCK KEYPADS" from the Advanced screen and select "LOCK/
UNLOCK".
2. Select the room to be locked/unlocked and touch SAVE or MORE.
To unlock all keypads, select "UNLOCK ALL" from the Lock Keypads screen.
12
Matrix Audio Controller LCD Keypads
Using the LCD Keypads
Tone Control Settings (Bass/Treble/Balance/SRS)
Tone Control Screen
FIG. 7 Tone Control Settings
SRS/WOW is a registered trademark of SRS labs, Inc.
Bass/Treble/Speaker Balance & SRS® can be adjusted for each room by accessing the Advanced screen
and selecting "TONE CONTROL".
SRS is supported only on Mi Series Audio Controllers.
To adjust Bass touch BASS "+" or "-".
To adjust Treble touch TREBLE "+" or "-".
To adjust Speaker Balance touch BAL "<L>" or "<R>".
To add/change an SRS option, touch SRS and select one of the following options:
BASS BOOST
3D
WOW
FOCUS
To remove or turn SRS off select "SRS OFF" from the SRS screen.
Matrix Audio Controller LCD Keypads
13
Using the LCD Keypads
Backlight Settings
FIG. 8 Backlight Settings
The Intensity and Mode can be adjusted for the LCD keypad by accessing the Advanced screen and
selecting "BACKLIGHT".
To adjust Intensity, touch the % to increase/decrease the brightness of the screen
(range = 5% - 95%).
To adjust the Mode, touch the text to scroll through the following options:
ALWAYS ON
ALWAYS OFF
AUTO ON (backlight turns off after 30 seconds)
Privacy Mode
To access Privacy mode:
1. Select MORE>> in the Setup Main screen (FIG. 9).
Main Setup screen
Privacy Mode screen
FIG. 9 Privacy Mode screen
2. Select PRIVACY MODE to display the Privacy Mode-More screen (FIG. 10).
14
Matrix Audio Controller LCD Keypads
Using the LCD Keypads
Privacy Mode - More screen
Privacy Mode
FIG. 10 Privacy Mode - More screen / Privacy Mode
<<BACK will return you to the Setup-Main screen (FIG. 3).
3. Selecting OK on the Privacy Mode-More screen will set the room to Privacy Mode: no pages will
be heard in this room
4. Select CANCEL to return to the Main Screen where you can select a Source.
Matrix Audio Controller LCD Keypads
15
Using the LCD Keypads
16
Matrix Audio Controller LCD Keypads
Using the LCD Keypads
KP-LCD Audio Controller Keypads
17
AMX. All rights reserved. AMX and the AMX logo are registered trademarks of AMX. AMX reserves the right to alter specifications without notice at any time.
©2008
3/08
It’s Your World - Take Control™
3000 RESEARCH DRIVE, RICHARDSON, TX 75082 USA • 800.222.0193 • 469.624.8000 • 469-624-7153 fax • 800.932.6993 technical support • www.amx.com