1
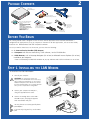
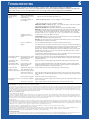
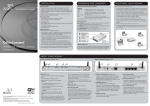
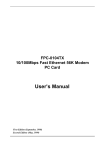
3Com OfficeConnect
®
®
Dual 56K LAN Modem
Getting Started Guide
MODEL NO.
3C888
Par t No. 1.024.2153
Published May
THREE-STEP SETUP
Congratulations on choosing the 3Com OfficeConnect Dual 56K LAN Modem! For the most
common network application — creating a local area network (LAN) with shared access to the
Internet, the Dual 56K LAN Modem setup is a simple, three-step process:
1. Install...
2
RE
SE
ONE
1 PH
NE
1 LI
ONE
2 PH
3. Configure...
2
4
1
3
LINE
2. Optimize...
N
LA
T
C
0 VDAX
10-38A M
0¥
Connect the cables
Run the EZ-LAN Wizard
to optimize TCP/IP
Launch your Web browser
to run the ISP Wizard
2
PACKAGE CONTENTS
OfficeConnect
Dual 56K LAN Modem
t!!
rr
ss
t
R
Reeaa
e
M
M
d
d
Fii
F
®
®
t
nec
Con
ffice em
m O AN Mod Guide
3CoDual 56inK gL Started
Sta
tus
2
DE
1
ect
Conn
ice
Off
dem
4
N Mo
k LA
al 56
Du
Gett
PR
OD
UC
Pa
T
Pu rt
NO
bli No
.:
she . 1.0
3C
88
d 24
8
De .21
cem 53
be
r 19
99
LAN
L
COL
TX
MO
3
OH
SD
RD
CD
MO
DE
AA
M1
Rubber feet
and
stacking clip
OfficeConnect Dual 56K
LAN Modem Getting Started Guide
M2
OH
SD
RD
sage
Mes
CD
AA
er
Pow
Aler
t
8
. A
i on
ll
N
LA
o
f 3C
ark o
nnect is
a registered tradem
Offic
eCo
orp
mC
t
ora
Contains:
• Getting Started Guide (PDF)
• User Guide (PDF and HTML)
• EZ-LAN Wizard
• LAN Modem Desktop Manager
• Virtual FAX Modem/Fax Software
• Dial-Up Networking 1.3
• Adobe Acrobat Reader
• Web Browsers
9A
3C1679
Ne
OfficeConnect Dual 56K LAN Modem
Companion Programs CD-ROM
As tw
or
As sist k
si an As
st t si
en Ré st
te se an
di au t •
Re • As
te Ne is
tz tent
w e
er de
kAs Re
si d
st
en
t
ers.
ow n
propert
y of their respective
rks
are
the
rad
em
a
rt
ot
he
1.0
32
.01
35
rte
Gu
d
88
3C
er
Sta
g
zar
Us
er
Wi
ttin
ws
N
er
Ge
Bro
-LA
ad
m
b
r
EZ
Re
de
We
Mg
at
Mo
op
X
rob
Ac
skt
l FA
e
De
ob
tua
Ad
Mo
de
Vir
m
d
ide
Gu
In
clu
de
ide s:
W
in
CD do
run ws
Pla
s
an ce in au
tom
d
Or, wa CD ati
it -RO cal
Se
a M
ly.
few
fro lec
dri
D:\ m t STA
sec ve
SE tas RT,
on
M
TU kb
ds.
Co Do ac
P ar. the
mp ub in
Typ n RU
an le-clic to
e N
sh
ion
k
ico LA
n. N
Mo
de
m
®
ct em
ne od ms
on N M ogra
ficeC LA Pr
Of 56K nion
al
Du mpa
Co
CT
NO.:
PRODU
N
2.0
VERSIO
Phone port adapter
(not provided for
all locations)
Network Assistant CD
Power supply
transformer and
country-specific
power cord
Contains helpful networking
tutorials, troubleshooting
tips and product information
One 10BASE-T
Ethernet cable
(RJ-45 to RJ-45)
Two analog
telephone cables
(RJ-11 to RJ-11)
BEFORE YOU BEGIN
This Getting Started Guide is designed to cover the most common application of the Dual 56K LAN Modem —
configuration for shared Internet access on a dynamic IP network. For all other applications, refer to the User Guide,
located on the OfficeConnect Dual 56K Companion CD-ROM.
To set up a LAN for shared access to the Internet, you must have the following:
■
An Internet Service Provider (ISP) Account
■
A Computer with Ethernet connectivity, TCP/IP software,* and a CD-ROM drive
■
A Web Browser, such as Netscape Navigator (4.0 or later) or Microsoft Internet Explorer (4.0 or later),
installed on your computer
* TCP/IP is automatically included with Windows 95, 98, NT, and 2000 and is built in with Mac OS 7.6 or later.
STEP 1. INSTALLING THE LAN MODEM
To install the Dual 56K LAN Modem:
1
Turn off your computer.
CAUTION: You should only connect one
computer to the LAN Modem for the initial setup.
After installing and configuring, you can connect
additional computers to the unit. Do not connect
the Dual 56K LAN Modem to an existing LAN until
after you have completed the configuration.
2
Connect your computer to LAN port 1,
using the supplied Ethernet cable.
2
E1
NE
1L
INE
H
2P
ON
RJ-45
E2
4
1
Ethernet
cable
N
LA
3
3
LIN
O
PH
Connect the analog cables to the LINE 1
and LINE 2 ports, and plug the opposite
ends into available wall jacks.
RJ-45
RJ-11
You may have to use country-specific phone
port adapters.
4
2
L
3
PH
4
1
If you are only using one line, use the LINE 1
port.
1
INE
LA
RE
SE
T
E1
LIN
E2
ON
PH
E2
RJ-11
RJ-11
Analog
telephone cables
N
RJ-11
C
ON
3
STEP 1. INSTALLING THE LAN MODEM (CONT’D)
4
(Optional) Connect up to two other analog
devices, using ports PHONE 1 and PHONE 2.
2
Connect the power supply to the unit.
3
ON
E1
LIN
E2
PH
ON
E2
4
1
5
LIN
PH
E1
LA
N
T
SE
RE
N
LA
3
6
Plug the other end into a wall outlet.*
Watch for the LEDs on the front of the
unit to flash. The Power LED remains lit.
T
SE
RE
DC
8 V AX
10-18A M
0¥
* Use of a surge-protector strip is recommended
7
Turn on your computer.
Watch for the LAN Status LED
to flash and then remain lit.
This completes the installation. Continue with
“Step 2. Optimizing your computer.”
Refer to “Troubleshooting,” page 6 if you
experience difficulty. To set up additional
workstations, follow steps 1, 2 and 7, using
an additional Ethernet cable (not provided)
for each computer you connect to the LAN Modem.
MODEM 1
Message
LAN
CD
AA
RD
L
COL
TX
Alert
MO
Power
DE
tus
Sta
2
1
Off
ice
Conn
ect
4
3
Du
al 56
k LA
SD
MODEM 2
N Mo
OH
OH
SD
RD
CD
MO
DE
LAN Status
dem
M2
AA
CD
RD
SD
OH
TX
COLL
1
2
3
4
OfficeConnect Dual 56k LAN M
AA
M1
OH
SD
RD
sage
Mes
CD
AA
er
Pow
Aler
t
STEP 2. OPTIMIZING YOUR COMPUTER
Before you can configure the LAN Modem for Internet access, each computer must be properly set up with
TCP/IP and optimized for use with the LAN Modem. Follow the instructions below for your operating system.
If you already know that you will be connecting to a static IP network, the EZ-LAN Wizard can attempt to
optimize your network settings to allow you to access the initial LAN Modem configuration screens. If you have
difficulty, or if you prefer to follow a more detailed manual procedure, refer to the instructions in
Chapter 3 of the User Guide instead of running the EZ-LAN Wizard.
Windows 95, 98, 2000 and NT: Run the EZ-LAN Wizard from the OfficeConnect Dual 56K Companion
Programs CD-ROM. EZ-LAN checks the settings on your computer and, if you choose, optimizes them for use
with the LAN Modem. Be sure to run the EZ-LAN Wizard on all PCs that you plan to network.
Macintosh: Perform this simple check to verify that the settings on your computer or computers are
optimized for use with the LAN Modem:
1
From the Apple menu, select Control Panels, and then TCP/IP.
2
In the Connect Via field, select Ethernet (if iMac, select Ethernet built-in).
3
Look at the Configure field entry.
If it is set to Using DHCP Server and all other fields are blank or set to <will be supplied by server>, then you are
ready to continue directly with Step 2, “Installing the LAN Modem.”
If Configure is set to anything other than Using DHCP Server (there are specific values in any of the other fields), your computer may have a static IP address. Refer to Chapter 3 of the User Guide to perform additional steps not covered in this
Getting Started Guide.
STEP 3. CONFIGURING FOR INTERNET ACCESS
4
Before You Start the Configuration, have the following information ready:
■
■
■
■
■
Your analog telephone number or numbers
ISP telephone number
ISP account user ID
ISP account password (including ISP DNS server address if required)
(Optional) Call Waiting Disable Command (your telephone company can provide this value)
To Configure for Internet Access:
1
Launch the Web browser on the computer that you connected to the LAN Modem.
A welcome message appears. (If it does not, refer to “Troubleshooting,” page 6.)
2
Click Continue.
The Dual 56K LAN Modem clock synchronizes itself to the date and time on your computer. The
Set Password window appears.
3
(Optional) Enter a password in the Password field and in the Password (repeat) field to confirm. (Be sure to
record this for future use.) A password guards access to the LAN Modem, and is recommended if you will set
up dial-in access. If you do not want to set a password, leave blank.
4
Click Submit.
The Set Country and Telephone Numbers window opens.
5
Choose your country from the drop-down list.
6
Enter your analog telephone number(s) including area code and click Continue.
If you chose any country other than the United States, the LAN Modem resets and then returns you to
the initial Welcome screen. Continue from Step 2, above.
The ISP Wizard window appears.
7
Enter your ISP information. Choose any name for the ISP Name field. If you are not sure about the DNS
server address, leave this field blank.
8
In the Dial Out Prefix field, enter the number you must dial to reach an outside line from your location, if
applicable (for example, “9” for use with a PBX).
9
(Optional) In the Call Waiting Disable Command field, enter the value provided by your telephone company.
This is used to prevent incoming calls from interfering with data calls.
10
Click Continue.
A call is launched to your ISP, and a message confirming proper configuration appears.
If the call to your ISP does not go through, refer to the troubleshooting section in the User Guide, located
on the OfficeConnect Dual 56K LAN Modem Companion CD-ROM.
11
Click Continue.
This completes the initial setup and will verify your configuration by placing a test call to the LAN Modem
Support page on 3Com’s World Wide Web site.
12
Click Register to register your product.
The ISP Wizard sets your LAN Modem configuration parameters to a typical default. If necessary, you can
change these settings by returning to the LAN Modem’s configuration pages. To do so, enter
http://3com.oc.lanmodem or http://192.168.1.1 in your browser.
The connection made as a result of the ISP Wizard will automatically disconnect after seven minutes of
inactivity. If you want to manually disconnect the call, access the LAN Modem configuration page and click
Manual Calling.
You can now connect up to three more computers (and/or printers) to your new LAN. If you wish to add more than
four users, see “Connecting More Than Four Users,” page 5. To set up a connection to a Private Network or second
ISP, refer to Chapters 6 and 7, respectively, in the User Guide.
For documentation, firmware upgrades, and updated information about your LAN Modem, visit the LAN
Modem Support page at any time at http://www.3com.com/support/docs/lanmodem/.
5
CONNECTING MORE THAN FOUR USERS
After you have finished configuring your Dual 56K LAN Modem, you can connect an additional Ethernet hub or hubs to
the Dual 56K LAN Modem to add up to 25 users. An example of a ten-user connection is shown.
To connect an additional hub:
1
OfficeConnect
Ethernet Hub 8
Insert one end of a 10BASE-T Ethernet cable
(not included) into any available port on the back
of the Dual 56K LAN Modem.
1
2
3
2
4
OfficeConnect
Dual 56K LAN Modem
5
6
7
2
3
4
Insert the opposite end of the cable into one of
the 10BASE-T Ethernet ports on the Ethernet
hub. (If you are connecting to an OfficeConnect
Ethernet Hub 8, insert the cable into port 8.)
If you are connecting to an OfficeConnect
Ethernet Hub 8, set the MDI/MDIX switch to
MDI (that is, pressed in).
8
DIX
I/M
MD
2
E1
LIN
E1
ON
PH
4
1
DC
8 V AX
10-18A M
0¥
E2
ON
PH
E2
LIN
N
LA
3
1
T
SE
RE
Ethernet cable
DC
0V X
10-3A MA
0.8
Connect additional workstations to any
available port.
3
If the hub to which you are connecting does not
have an MDI/MDIX switch, you will need a
cross-over Ethernet cable.
STACKING OFFICECONNECT UNITS
Use the rubber feet for desktop use. The four self-adhesive rubber feet prevent your Dual 56K LAN Modem from
sliding. Attach the feet to the underside of the LAN Modem in the marked corners.
Use the Stacking Clip to stack two or more OfficeConnect units together securely.
Po
CAUTION: You can stack up to a maximum of four units. Smaller units must be stacked on top of larger units.
To stack two units:
1
Place the first unit on a flat surface.
2
Fit the clip across the top of the unit, as shown.
The longer end of the fastening pieces should point
downward.
3
Align the fastening pieces over the slots on each side
of the unit, and then push the clip down gently to
secure it. Ensure that the fastening pieces snap into
the slots.
4
Rest the second unit on top of the clip, and align it
with the front of the bottom unit.
5
Press down gently to secure the top unit onto the clip,
ensuring that the fastening pieces fit into the slots,
as shown.
To unstack units, gently pry the top unit away from the clip, and
then carefully pull each fastening piece out of its slot to detach
the clip from the bottom unit.
2
Fastening
piece
Messa
ge
MO
Alert
Power
DEM
AA
1
CD
RD
SD
MO
OH
DEM
AA
2
CD
RD
SD
OH
LAN
TX
COLL
Sta
tus
1
Offi
2
ceCo
3
nne
ct Dua
4
l 56k
LAN
Mod
em
5
Fastening
piece
6
TROUBLESHOOTING
The table below lists symptoms of common problems, possible causes, and possible solutions. For additional
troubleshooting information, refer to the User Guide located on the 3Com Companion Programs CD-ROM. For FAQs and
other technical notes, refer to the LAN Modem web site at: http://www.3com.com/support/docs/lanmodem/
Symptom
Possible Cause
Web browser does not
start (the welcome
message does not
appear).
Web browser needs the IP
address of the LAN Modem;
or the browser is not set to a
default start page
Solution
1 Enter the following URL in your Web browser: http://3com.oc.lanmodem. Alternatively, you can enter http://192.168.1.1.
Incompatible IP address on
your computer.
2 Run the EZ-LAN Wizard, or refer to Chapter 3 of the User Guide.
3 Reset the IP address on your computer, as follows:
Windows 95 and 98: Run winipcfg.exe. Select the Ethernet adapter connected to the Dual
56K LAN Modem. Click Release All and then Renew All.
Windows NT 4.0/2000: Run ipconfig /release and then ipconfig /renew.
Macintosh: From Apple menu, select Control Panels; then TCP/IP. In the Connect via field, make
sure Ethernet is selected. In the Configure field, select Using Bootp Server to clear the fields. Close
and save changes. Re-open the TCP/IP control panel, and select Using DHCP Server. The fields
should now read <will be supplied by server>. Select File, then Close, saving changes.
Web browser may be
configured to use a proxy
server.
Set the browser to use the LAN Modem, as follows:
Internet Explorer: From the View menu, choose Internet Options. Click the Connection tab.
Uncheck the box labeled Connect using Proxy server.
Netscape: From the Edit menu, choose Preferences. Under Advanced, choose Proxies. Check the
box labeled Direct Connection to the Internet.
There is a configuration
problem.
Reset the Dual 56K LAN Modem to the factory default setting as follows :
Press and release the reset button located on the back of the unit. The Alert LED will begin to
flash. While the LED is still flashing, press and continue to hold in the reset button on the back
of the unit. (You must continuously hold the reset button through three cycles of LED
flashing: Reset, Firmware Download Mode, and Factory Default Reset.) After the ALERT LED
has flashed for the third cycle, you have successfully reset the LAN Modem back to factory
defaults. Release the reset button.
The LAN Modem reinitializes itself and is reset to the factory defaults. All user-entered information
will be erased. Restart your computer and launch your Web browser.
At installation, LAN LED
does not light up.
Wrong cable used to connect
your computer to the LAN
Modem’s LAN port.
Make sure you are using the RJ-45 to RJ-45 cable labeled Ethernet which was provided with your
Dual 56K LAN Modem. If you are using another 10BASE-T Ethernet (Category 5) cable, it must be a
straight-through cable.
At installation, ALERT
LED remains lit.
An internal failure.
Notify your reseller or technical support that the Dual 56K LAN Modem has failed the self-test.
At installation, ALERT
LED continues to flash.
Self-test failure, or LAN
Modem is in firmware
download mode
Power-cycle the Dual 56K LAN Modem. If the ALERT LED continues to flash, the Dual 56K LAN
Modem has failed the self-test. Contact your reseller or technical support. If the ALERT LED is not
flashing, then the LAN Modem is now operating correctly.
No dial tone when
Telephone line cables, power Check all cables and connectors to ensure that they are inserted securely.
handset of a phone
cable, and/or phone cables
attached to unit is lifted. may not be firmly connected.
Cannot place test call to
the Internet
Telephone line cables may
not be in the correct ports.
Ensure that the incoming analog telephone line cables have been connected to the ports labeled
LINE 1 and LINE 2 on the Dual 56K LAN Modem’s back panel. If using a single analog line, connect
to Line 1.
Data call may be in progress.
Disconnect any data calls currently in progress.
ISP not properly configured.
Confirm your ISP connection settings, such as Username, Password, and telephone number. Follow
steps 7-11 on page 4.
Phone line not connected.
Check all cables and make sure that telephone line is connected to the Line 1 port.
3Com Corporation, 5400 Bayfront Plaza, Santa Clara, California, 95052-8145
© 3Com Corporation, 2000. All rights reserved. No part of this documentation may be reproduced in any form or by any means or used to make any derivative work (such as translation,
transformation, or adaptation) without permission from 3Com Corporation. 3Com Corporation reserves the right to revise this documentation and to make changes in content from time
to time without obligation on the part of 3Com Corporation to provide notification of such revision or change. 3Com Corporation provides this documentation without warranty of any
kind, either implied or expressed, including, but not limited to, the implied warranties of merchantability and fitness for a particular purpose. 3Com may make improvements or changes in
the product(s) and/or the program(s) described in this documentation at any time.
UNITED STATES GOVERNMENT LEGEND;
For units of the Department of Defense:
The Software is commercial computer software as defined in 48 C.F.R. 211 and therefore is provided to units of the Department of Defense under the terms of this License Agreement,
which is 3Com's standard commercial agreement for the Software. In the alternative, if 48 C.F.R. 211 is not invoked, the Software is licensed as follows: Restricted Rights Legend: Use,
duplication or disclosure by the United States Government is subject to restrictions as set forth in subparagraph (c)(1)(ii) of the Rights in Technical Data and Computer Software Clause at
48 C.F.R. 52.227-7013. 3Com Corporation, 5400 Bayfront Plaza, Santa Clara, California 95052-8145.
For civilian agencies:
Restricted Rights Legend: Use, reproduction or disclosure is subject to restrictions set forth in subparagraph (a) through (d) of the Commercial Computer Software - Restricted Rights clause
at 48 C.F.R. 52.227-19 and the limitations set forth in 3Com's standard commercial agreement for the Software. Unpublished rights reserved under the copyright laws of the United States.
If there is any software on removable media described in this documentation, it is furnished under a licence agreement included with the product as a separate document, in the hard copy
documentation. If you are unable to locate a copy, please contact 3Com and a copy will be provided to you.
Unless otherwise indicated, 3Com registered trademarks are registered in the United States and may or may not be registered in other countries.
3Com and OfficeConnect are registered trademarks of 3Com Corporation.
Acrobat and Adobe are registered trademarks of Adobe Systems, Incorporated. Macintosh is a registered trademark of Apple Computer. Pentium is a registered trademark of Intel
Corporation. Windows and Windows NT are registered trademarks of Microsoft. Netscape Navigator is a registered trademark of Netscape Communications.
Other brand and product names may be registered trademarks or trademarks of their respective holders.
Environmental Statement
It is a 3Com policy to be environmentally friendly in all operations. This manual is printed on paper that comes from sustainable, managed European forests. The production process for
making the pulp has a reduced AOX level (absorbable organic halogen) resulting in elemental chlorine-free paper. This paper is fully biodegradable and recyclable.