1
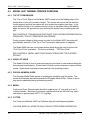
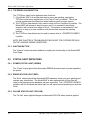
Model 160P Stacker Quick Reference Guide Model 160P Stacker & Model 466P Thermal Printer MICROCOM CORPORATION 8220 Green Meadows Drive North Lewis Center, Ohio 43035 740-548-6262 Fax: 740-548-6556 - Revised 8/31/00 RHF - This page intentionally left blank. TABLE OF CONTENTS CHAPTER 1: INTRODUCTION .........................................................................................1 CHAPTER 2: FEATURES AND SPECIFICATIONS ..........................................................3 2.1 SPECIAL FEATURES..................................................................................3 2.2 STACKING PERFORMANCE ...................................................................... 3 2.3 INTERFACE COMMUNICATIONS ..............................................................3 2.4 PHYSICAL ................................................................................................... 4 2.5 STACKER AND PRINTER FOOTPRINT .....................................................4 2.6 ENVIRONMENTAL ......................................................................................4 2.7 ELECTRICAL ...............................................................................................4 2.8 OPTIONS ..................................................................................................... 4 CHAPTER 3: MODEL 160P STACKER BASIC OPERATION ...........................................5 3.1 STACKER COMPONENT DESCRIPTION...................................................5 3.2 MODEL 160P STACKER OVERVIEW .........................................................6 3.2.1 ADJUSTABLE “TOP OF STACK” LEVER..................................... 6 3.2.2 REMOVABLE STACK CARTRIDGE.............................................6 3.2.3 CARTIDGE BACKSTOP ...............................................................6 3.2.4 CARTRIDGE REMOVAL PROCEDURE....................................... 6 3.2.5 SLIDING STACK WEIGHT............................................................7 3.2.6 STACKER JAM SENSOR .............................................................7 3.2.7 PINCH ROLLER............................................................................7 3.2.8 ENGAGEMENT RELEASE LEVER ..............................................8 3.2.9 PRINTER ENGAGEMENT BRACKET ..........................................8 3.3 ENGAGEMENT PROCEDURE.................................................................... 8 CHAPTER 4: MODEL 466P BASIC OPERATION.............................................................9 4.1 MEDIA LOADING DIAGRAM ....................................................................... 9 4.2 MEDIA LOADING INSTRUCTIONS.............................................................9 4.3 MODEL 466P THERMAL PRINTER OVERVIEW ........................................10 4.3.1 TOP OF FORM SENSOR .............................................................10 4.3.2 HEAD LIFT KNOB.........................................................................10 4.3.3 PLEXIGLAS MEDIA GUIDE..........................................................10 4.3.4 MEDIA...........................................................................................10 4.3.5 CUTTER........................................................................................10 4.3.6 STACKER ENGAGEMENT BRACKET.........................................11 4.3.7 INTERNAL MEDIA GUIDE............................................................11 4.3.8 MEDIA SUPPLY SHAFT ...............................................................11 4.3.9 REMOVABLE MEDIA GUIDE .......................................................11 CHAPTER 5: MODEL 466P FRONT PANEL OPERATION ..............................................13 5.1 BUTTON FUNCTIONALITY .........................................................................13 5.1.1 PAUSE/RESUME BUTTON ..........................................................13 5.1.2 TOF/ERROR CLEAR BUTTON ....................................................14 5.1.3 INACTIVE BUTTON...................................................................... 14 5.2 STATUS LIGHT DEFINITIONS.................................................................... 14 5.2.1 POWER STATUS LIGHT ..............................................................14 MODEL 160P STACKER – Quick Reference Guide 5.2.2 5.2.3 ERROR STATUS LIGHT...............................................................14 ON LINE STATUS LIGHT .............................................................14 CHAPTER 6: TROUBLESHOOTING GUIDE .................................................................... 15 6.1 STATUS MESSAGES..................................................................................15 6.2 ERROR CORRECTION PROCEDURES.....................................................15 6.2.1 >CUTTER ERROR< ..................................................................... 15 6.2.2 >DATA ERROR< ..........................................................................16 6.2.3 >HEAD IS UP<..............................................................................16 6.2.4 >LOW STOCK< ............................................................................16 6.2.5 >OVER VDD< ...............................................................................17 6.2.6 >PAPER JAM<..............................................................................17 6.2.7 >PRINTER PAUSED< .................................................................. 17 6.2.8 >READY<......................................................................................17 6.2.9 >RESTARTED< ............................................................................17 6.2.10 >STACKER ERROR< ................................................................... 18 MODEL 160P STACKER – Quick Reference Guide CHAPTER 1: INTRODUCTION The Model 160P is a Stacker designed to work in conjunction with the Model 466P Direct Thermal printer. The 160P Stacker will stack up to 1000, .007" thick tags without user intervention. The Model 160 "P" version is an application specific product derived from the standard Model 160 Stacker. The 160P was designed specifically to stack 3.34" wide by 1.91" long tags generated from the Model 466P thermal printer. The Model 466 "P" version is also an application specific product that was derived from the standard Model 466 Direct Thermal or Thermal Transfer printer. The 466P was designed specifically to print on 3.34" wide continuous rolled direct thermal media. The Model 466P thermal printer has complete control over the stacking process. The 466P will monitor all stacker error conditions that are generated during the print process. The Model 160P Stacker will generate an error when the stacker is full and also in the unlikely event of a media jam that might occur between the printer’s cutter and the stacker. MODEL 160P STACKER – Quick Reference Guide 1 Introduction Chapter 1 This page intentionally left blank. 2 MODEL 160P STACKER – Quick Reference Guide CHAPTER 2: FEATURES AND SPECIFICATIONS The Model 160P and Model 466P Stacking system is design with many features that are unique when compared to other systems. The 160P Stacker is built to meet the demands of high throughput applications and rigorous use. The large capacity of the stacker reduces user intervention to a minimum, allowing the stacking system to be unattended for long periods of time. 2.1 SPECIAL FEATURES 3-belt configuration for accurate stacking Adjustable Stacker Full Sensor - Adjusts from 1.5" high stack (~200 .007" tags) to 9" high stack (~1250 .007" tags). Stacker Jam Sensor – The Model 160P Stacker will generate an error condition when the stacker does not see a tag within two print cycles at the beginning of a batch. Stacker also generates an error condition if there is no gap (sensor blocked continuously) between any two tags. Removable Stack Cartridge Magnetic Stack Rider Weight - The weight will lock into place temporarily while the user is removing cartridge. This feature allows for one hand cartridge removal. Positive Stacker to Printer Engagement hooks to ensure both units remain locked during operation 2.2 STACKING PERFORMANCE Stacks at 5" per second High Throughput – prints and stacks approximately 90 1.91" long tags in one minute Stacks up to 1000, .007" thick tags 2.3 INTERFACE COMMUNICATIONS 9-pin female D-Sub connector. Connection for Model 466P Stacker Interface Cable ONLY. MODEL 160P STACKER – Quick Reference Guide 3 Features and Specifications Chapter 2 2.4 PHYSICAL Heavy duty painted exterior covers Rigid metal stacker mechanism Height: 16.77" (426.0mm) Width: 6.5" (165.1mm) Depth: 9" (228.6mm) without engagement brackets or 11.38" (289.1mm) with engagement brackets attached Weight: 17 lbs. (7.7kg) 2.5 STACKER AND PRINTER FOOTPRINT Width: 11" (279.4mm) Depth: 27.8" (706.1mm) 2.6 ENVIRONMENTAL Temperature: 0° C to 40° C operating Humidity: 10-85% non-condensing 2.7 ELECTRICAL Power supplied through the Model 466P Stacker Interface Cable 2.8 OPTIONS Table with Printer Guide Rails and Printer Lockdown Kit Height: 30.5" (774.7mm) Width: 24" (609.6mm) Depth: 36" (914.4mm) Weight: 90 lbs. (40.7kg) 4 MODEL 160P STACKER – Quick Reference Guide CHAPTER 3: MODEL 160P STACKER - BASIC OPERATION 3.1 STACKER COMPONENT DESCRIPTION Adjustable “Top of Stack” Lever Removable Stack Cartridge Sliding Stack Weight Stacker Jam Sensor Pinch Roller Engagement Release Lever Printer Engagement Bracket Cartridge Backstop MODEL 160P STACKER – Quick Reference Guide 5 Model 160P Stacker – Basic Operation 3.2 Chapter 3 MODEL 160P STACKER OVERVIEW 3.2.1 ADJUSTABLE “TOP OF STACK” LEVER This unique feature provides a manual adjustment for the desired maximum stack height. Once the media in the stacker reaches the “Top of Stack” lever height location, the stacking and printing process is halted until user intervention. This condition is referred to later in this document as “Stacker Full”. The Stack height adjustment is performed by sliding the “Top of Stack” lever to the desired height. A ruler label has been provided on the Model 160P for stack height reference. The minimum adjustment can be set to a 1.5” high stack or approximately 200 .007” thick tags. The maximum adjustment can be set to a 9” high stack or approximately 1250 .007” thick tags. The Factory default position will be set to the maximum stack height. 3.2.2 REMOVABLE STACK CARTRIDGE The Removable Stack Cartridge allows the user to remove a full stack of media at one time from the Model 160P. CAUTION: DO NOT OPERATE STACKER WITHOUT CARTRIDGE INSTALLED. 3.2.3 CARTRIDGE BACKSTOP The Cartridge Backstop is used to adjust the stacker for various lengths. The Model 160P has a fixed media length of 1.91”, which is set from the Factory with a sockethead Allen screw. No field adjustment should be necessary. 3.2.4 CARTRIDGE REMOVAL PROCEDURE 1.) Printing and Stacking Process must be stopped if not already in a paused or halted condition. 2.) Raise Sliding Stack Weight to the top of the stacker. 3.) Remove Cartridge. 6 MODEL 160P STACKER – Quick Reference Guide Chapter 3 Model 160P Stacker – Basic Operation 3.2.5 SLIDING STACK WEIGHT The Sliding Stack Weight is used to apply a moderate amount of pressure to the top of the media being stacked. This weight will assist in maintaining a uniform stack. To ease cartridge removal, raise the sliding stack weight to the top of the stacker. The weight will be magnetically held in the top most position. Lower the Sliding Stack Weight once the cartridge has been reinstalled. CAUTION: DO NOT OPERATE STACKER WITH SLIDING STACK WEIGHT IN THE RAISED OR LOCKED POSITION. Sliding Stack Weight in Normal Operating Position Sliding Stack Weight in Magnetically Held Position 3.2.6 STACKER JAM SENSOR The Stacker Jam Sensor is used to detect two different types of stacking problems. 1.) The sensor will generate an error and stop the printing process if it does not sense or “see” the media within two print cycles. 2.) The sensor will generate an error and stop the printing process if it does not sense or “see” a gap between each tag. SEE CHAPTER 6 “TROUBLESHOOTING GUIDE” FOR FURTHER INFORMATION ON RESOLVING STACKER ERRORS. 3.2.7 PINCH ROLLER The Pinch Roller is an integral part of the stacker used to grip the tag as it is being cut, and then advances the tag into the stack. MODEL 160P STACKER – Quick Reference Guide 7 Model 160P Stacker – Basic Operation Chapter 3 3.2.8 ENGAGEMENT RELEASE LEVER The Engagement Release Lever provides a positive locking system between the stacker and printer. This lever is used to “unlock” the stacker from the printer. To disengage, push Engagement Release Lever down and pull the stacker away from the printer. To engage, firmly push the stacker into the printer until the Engagement Release Lever locks. 3.2.9 PRINTER ENGAGEMENT BRACKET The Printer Engagement Bracket on the stacker consists of the Engagement Release Lever and a U-shaped bracket with the three slots used to align and guide the stacker into the printer. The corresponding Receiving Bracket on the printer consists of three engagement pins to complete the locking mechanism. Printer Engagement Bracket with 3 slots and Release Lever Receiving Bracket with 3 engagement pins TABLE 3.3 ENGAGEMENT PROCEDURE: 1.) Align Printer Engagement Bracket on the stacker with Receiving Bracket on the printer. 2.) Push stacker towards printer until Engagement Release Lever is firmly locked onto receiving pins. 8 PRINTER STACKER MODEL 160P STACKER – Quick Reference Guide CHAPTER 4: MODEL 466P - BASIC OPERATION 4.1 MEDIA LOADING DIAGRAM TOP OF FORM SENSOR HEAD LIFT KNOB RMG STACKER ENGAGEMENT BRACKET CUTTER 4.2 PLEXIGLAS MEDIA GUIDE MEDIA MEDIA SUPPLY SHAFT INTERNAL MEDIA GUIDE MEDIA LOADING INSTRUCTIONS 1.) Rotate “HEAD LIFT KNOB” counter clockwise. Lift print head, remove and discard remaining media. 2.) Load a new roll of media onto “MEDIA SUPPLY SHAFT”. (SEE DIAGRAM) 3.) Rotate “INTERNAL MEDIA GUIDE” (GREEN) outward and away from media path. 4.) Thread media through the printer according to the “MEDIA LOADING DIAGRAM”. a.) Leading edge must be square. b.) Leading edge of media must be placed on the highest point of the rubber drive roller. Refer to positioning sticker near drive roller. 5.) Rotate “INTERNAL MEDIA GUIDE” (GREEN) down for printing. 6.) Lower print head and secure into locked position. 7.) Lower side cover. 8.) Push and release “TOF/Error Clear” button on front panel to continue. MODEL 160P STACKER – Quick Reference Guide 9 Model 466P – Basic Operation 4.3 Chapter 4 MODEL 466P THERMAL PRINTER OVERVIEW 4.3.1 TOP OF FORM SENSOR The “Top of Form” Sensor on the Model 466P is used to find the leading edge of the media when a new roll of media is loaded. This sensor will ensure that the media is loaded properly and that the stacker will only receive the properly sized tags. In the event that the media is not loaded correctly or there is a problem finding the leading edge, the sensor will generate an error and stop the printer from processing the next tag. SEE CHAPTER 6 “TROUBLESHOOTING GUIDE” FOR FURTHER INFORMATION ON RESOLVING “TOP OF FORM/PAPER JAM ERRORS”. During a power outage or when power is cycled on the Model 466P, the printer will automatically perform a “Find Top of Form” procedure when power is reapplied. The Model 466P also has a front panel button which allows the user to perform the “Find Top of Form” procedure. The button is labeled – “TOF/Error Clear”. SEE CHAPTER 5 “MODEL 466P FRONT PANEL OPERATION” FOR FURTHER DETAILS. 4.3.2 HEAD LIFT KNOB The Head Lift Knob is used to raise and lower the print head to ease media loading and thermal print head cleaning. Rotate Head Lift Knob counter clockwise to raise and load media. Rotate knob clockwise to lower and lock into operating position. 4.3.3 PLEXIGLAS MEDIA GUIDE The Plexiglas Media Guide assists in funneling the media through the printer. The media should always be loaded beneath the Plexiglas Media Guide. Failure to do so may cause undesired printing and stacking results. 4.3.4 MEDIA Continuous Direct Thermal media should be supplied on a 3” core with up to an 8” outside diameter. Microcom Corporation supplies rolls that are 450 feet long, which calculates to approximately 2827 1.91” long tags. 4.3.5 CUTTER The Cutter on the Model 466P is a Guillotine style with self-sharpening blades. CAUTION: KEEP ALL OBJECTS AWAY FROM CUTTER DURING OPERATION. 10 MODEL 160P STACKER – Quick Reference Guide Chapter 4 Model 466P – Basic Operation 4.3.6 STACKER ENGAGEMENT BRACKET The Stacker Engagement Bracket consists of three pins to lock the printer and stacker together. For further details on engagement procedures, see CHAPTER 3 section 3.3 “ENGAGEMENT PROCEDURE”. 4.3.7 INTERNAL MEDIA GUIDE The Internal Media guide aligns the media to the left edge of the Model 466P. CAUTION: THIS GUIDE MUST BE DOWN DURING OPERATION. FAILURE TO DO SO WILL PRODUCE UNDESIRABLE PRINTING RESULTS AND POSSIBLE MEDIA JAMS. 4.3.8 MEDIA SUPPLY SHAFT The Media Supply Shaft provides a location for the Continuous Direct Thermal Media Roll. 4.3.9 RMG – REMOVABLE MEDIA GUIDE The Removable Media Guide has been provided to assist in the unlikely event of a “Paper Jam”. This guide can be removed without tools to clear the media path between the cutter and print head on the printer. CAUTION: DO NOT OPERATE THE MODEL 466P WITHOUT THE REMOVABLE MEDIA GUIDE INSTALLED. FAILURE TO DO SO WILL PRODUCE UNDESIRABLE PRINTING RESULTS AND POSSIBLE MEDIA JAMS. MODEL 160P STACKER – Quick Reference Guide 11 Model 466P – Basic Operation Chapter 4 This page intentionally left blank. 12 MODEL 160P STACKER – Quick Reference Guide CHAPTER 5: MODEL 466P FRONT PANEL OPERATION Pause/Resume TOF/Error Clear Power Inactive Error On Line 5.1 BUTTON FUNCTIONALITY 5.1.1 PAUSE/RESUME BUTTON The “Pause/Resume” button has two basic functions. 1.) If you press and hold the button during printing, the printer will pause and send a message to the host “>PRINTER PAUSED<”. To recover from a paused condition, simply tap the Pause/Resume button and the printer continues from where it left off. 2.) The Pause/Resume button can also be used to recover from a “>STACKER ERROR< “ condition. This can only occur if the print head on the Model 466P has not been lifted during this error condition. If the print head is lifted during a “>STACKER ERROR<” condition, it is assumed that the media has been adjusted, and a “find Top of Form” procedure must take place before the printer continues operation. In this case, the user must then tap the “TOF/Error Clear” button to continue. This extra functionality was added to this button because most often a >STACKER ERROR< does not require the user to lift the print head. The >STACKER ERROR< problem typically occurs either in the stacker (full condition) or between the stacker’s pinch point and the cutter on the Model 466P. MODEL 160P STACKER – Quick Reference Guide 13 Model 466P Front Panel Operation Chapter 5 5.1.2 TOF/ERROR CLEAR BUTTON The “TOF/Error clear” button performs three functions. 1.) If the Model 466P is in an idle state and no errors are pending, tapping the TOF/Error clear button will perform a “find Top of Form” procedure. This is the normal process after the Media has been loaded or reset for some reason. 2.) The TOF/Error clear button is also used to clear all Error Conditions if possible. The Model 466P will attempt to clear the error and if it is successful, the printing operation will continue from where it left off. If the printer is unsuccessful, it will continue to stay in an error condition until the user has resolved the pending problem. 3.) The TOF/Error clear button can be used to resume from a “>PRINTER PAUSED<” condition. NOTE: SEE CHAPTER 6 “TROUBLESHOOTING GUIDE” FOR FURTHER DETAILS ON THE VARIOUS ERROR CONDITIONS. 5.1.3 INACTIVE BUTTON The “Inactive” button has been disabled to simplify the functionality of the Model 466P Front Panel. 5.2 STATUS LIGHT DEFINITIONS 5.2.1 POWER STATUS LIGHT (GREEN) The “Power” status light will be illuminated GREEN whenever there is power applied to the printer. 5.2.2 ERROR STATUS LIGHT (RED) The “Error” status light will be illuminated RED whenever there is an error pending and requires user intervention. The Model 466P is also equipped with a Piezo that will report a fast repeating tone whenever an error is pending. The “>PRINTER PAUSED<” condition will not illuminate the status light, but will report a slow repeating tone with the Piezo. 5.2.3 ON LINE STATUS LIGHT (YELLOW) The “On line” status light will always be illuminated YELLOW when power is applied. 14 MODEL 160P STACKER – Quick Reference Guide CHAPTER 6: TROUBLESHOOTING GUIDE The Model 466P has the capability of sending several Status Messages back to the host upon an error condition. The actual error message reported by the host could vary depending on how the Host Software interprets the messages from the Model 466P. 6.1 STATUS MESSAGES STATUS MESSAGES TEXT RESPONSE FROM MODEL 466P TO HOST DEFINITION >CUTTER ERROR< Cutter cannot properly cut >DATA ERROR< Communication error >HEAD IS UP< Print Head is raised >LOW STOCK< Out of Media >OVER VDD< Print Head voltage is out of range >PAPER JAM< Printer failed to perform "find Top of Form" >PRINTER PAUSED< Printer is paused >READY< Normal condition >RESTARTED< Printer has been reset >STACKER ERROR< Stacker is either full or jammed 6.2 ERROR CORRECTION PROCEDURES 6.2.1 >CUTTER ERROR< A “>CUTTER ERROR<” message is returned from the Model 466P to the host when the cutter fails to rotate, which is usually due to media jamming beneath the cutter. Upon >CUTTER ERROR<, the cutter blade automatically reverses directions and removes power for safety reasons. Error Correction Procedure: 1.) Turn printer power off and remove power cord. 2.) Push Engagement Release Lever and pull stacker away from printer. Remove any partially cut tags that may have fallen between stacker and printer. 3.) Carefully lift the stack of tags in the stacker and check the bottom tag. If there are any partially cut tags, they must be removed to prevent further jamming. 4.) Open right side panel of the printer, and raise the print head. Remove remaining media between print head and cutter. Tear off a clean edge on the media and reload into printer following the Media Loading Instructions. 5.) Verify Internal Media guide is down. MODEL 160P STACKER – Quick Reference Guide 15 Troubleshooting Guide Chapter 6 6.) Lower right side cover and engage stacker into operating position. 7.) Plug power cord back in and turn power on. 8.) Press “TOF/Error Clear”. The printer will perform a “find Top of Form” procedure, reprint the last tag, and continue to print from where printing process left off before the error condition. If >CUTTER ERROR< persists, printer requires maintenance. 6.2.2 >DATA ERROR< A “>DATA ERROR<” message is returned from the Model 466P to the host when the printer encounters a communication problem. This error could be the result of a bad serial cable, or the serial parameters of the printer do not match those of the device communicating with it. Error Correction Procedure: 1.) Replace printer’s serial cable with a known good cable. 2.) The problem could be at a system level as in communication protocol differences, which will require investigation from a system administrator. 6.2.3 >HEAD IS UP< A “>HEAD IS UP<” message is returned from the Model 466P to the host when the print head on the Model 466P is not in it’s operating position. Error Correction Procedures: 1.) Lift right side panel of the Model 466P. 2.) Visually inspect print head, and lower into it’s operating and locked position by turning the “Head Lift Knob” clockwise. 3.) Lower right side panel and press “TOF/Error Clear” Front Panel button to continue printing from where the printer left off in the printing process before the error condition. 6.2.4 >LOW STOCK< A “>LOW STOCK<” message is returned from the Model 466P to the host when the printer runs out of media. Error Correction Procedure: 1.) Lift right side panel and raise print head. Remove the remaining media beneath the print head. Load new media per Media Loading Instructions. 2.) Lower print head and close right side panel. 3.) Press “TOF/Error Clear” button. The printer will perform a “find Top of Form” procedure, reprint the last tag, and continue to print from where the printing process left off before the error condition. 16 MODEL 160P STACKER – Quick Reference Guide Chapter 6 Troubleshooting Guide 6.2.5 >OVER VDD< A “>OVER VDD<” message is returned from the Model 466P to the host when there is a problem with the print head voltage. Error Correction Procedures: 1.) Cycle Power on the Model 466P. If the error persists, printer requires maintenance. 6.2.6 >PAPER JAM< A “>PAPER JAM<” message is returned from the Model 466P to the host when the printer fails to properly perform a “find Top of Form” procedure. This usually occurs when the media is not correctly loaded under the print head. Error Correction Procedure: 1.) Lift right side panel and raise print head. 2.) Reinstall media properly under print head – Refer to positioning sticker near drive roller and Media Loading Instructions. 3.) Verify Internal Media Guide is down. 4.) Press “TOF/Error Clear” button. The printer will perform a “find Top of Form” procedure, reprint the last tag (if necessary), and continue to print from where the printing process left off before the error condition, if applicable. 6.2.7 >PRINTER PAUSED< A “>PRINTER PAUSED<” message is returned from the Model 466P to the host when the printer is placed in pause mode. The printer is put into this mode when the “Pause/Resume” button on the Front Panel is held during operation. Error Correction Procedure: 1.) Press “Pause/Resume” or “TOF/Error Clear” button and the printer will resume the printing process where it left off before the pause condition. 6.2.8 >READY< A “>READY<” message is returned from the Model 466P to the host when the printer is ready to print. 6.2.9 >RESTARTED< A “>RESTARTED<” message is returned from the Model 466P to the host the first time the printer’s status is queried after it has been reset or restarted. This informs the user of either a scheduled or unscheduled loss of printer power. MODEL 160P STACKER – Quick Reference Guide 17 Troubleshooting Guide Chapter 6 6.2.10 >STACKER ERROR< A “>STACKER ERROR<” message is returned from the Model 466P to the host when there is a problem with the Model 160P Stacker. The >STACKER ERROR< indicates that the stacker is full, or there was a problem with the “Stacker Jam Sensor”. There are three possible scenarios that will generate a >STACKER ERROR< condition. 1.) The stacker is full. The stack has reached it’s full potential by tripping an internal sensor set by the Adjustable “Top of Stack” lever. 2.) The “Stacker Jam Sensor” generated an error, which stopped the printing process because there was no media fed into the stacker within two print cycles. 3.) The “Stacker Jam Sensor” generated an error, which stopped the printing process because a gap was not recognized between each tag. Error Correction Procedure: Visually inspect the stacker to see if the Cartridge is full or if there is a Media Jam between the printer and the stacker. STACKER FULL CONDITION 1.) Raise “Sliding Stack Weight” to top; a magnet will hold it in the top most position. Carefully grasp the “Cartridge” handle and remove the stack of tags from the stacker. 2.) After emptying cartridge, return it to it’s operating position, and lower the Sliding Stack Weight to the belts. 3.) Press either “Pause/Resume” or “TOF/Error Clear” to continue printing from where it left off in the printing process before the error condition. STACKER JAM CONDITION 1.) Push the “Engagement Release Lever” and pull stacker away from printer. Remove any partially cut tags that may have fallen between stacker and printer. 2.) Visually inspect bottom of stack and remove any jammed tags. Typically, this will resolve the problem. Engage stacker into printer and press either “Pause/Resume” or “TOF/Error Clear” front panel button to continue printing from where the printer left off in the printing process before the error condition. 3.) If there is no apparent jam in the stacker, lift the right side cover and raise the print head. Remove remaining media between print head and cutter. Tear off a clean edge on the media and reload into the printer following the Media Loading Instructions. 4.) Verify Internal Media Guide is down and lower right side cover. 5.) Press “TOF/Error Clear” front panel button to continue printing from where the printer left off in the printing process before the error condition. 18 MODEL 160P STACKER – Quick Reference Guide NOTES: __________________________________________________ __________________________________________________ __________________________________________________ __________________________________________________ __________________________________________________ __________________________________________________ __________________________________________________ __________________________________________________ __________________________________________________ __________________________________________________ __________________________________________________ __________________________________________________ __________________________________________________ __________________________________________________ __________________________________________________ __________________________________________________ __________________________________________________ __________________________________________________ __________________________________________________ __________________________________________________ __________________________________________________ __________________________________________________ __________________________________________________ __________________________________________________ __________________________________________________ __________________________________________________ __________________________________________________ __________________________________________________ __________________________________________________ __________________________________________________ MODEL 160P STACKER – Quick Reference Guide 19