1
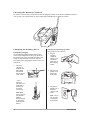
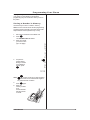
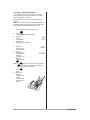
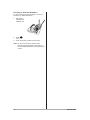
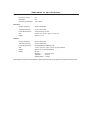
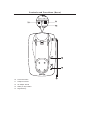
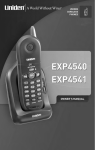
CONTENTS
Important Safety Instructions . . . . . . . . . . . . . . . . . . . . . . . . . . . . . . . . . . . . . . . . . . . . . . . . . . . . . . . . . . . . . 2
Battery Safety Precautions . . . . . . . . . . . . . . . . . . . . . . . . . . . . . . . . . . . . . . . . . . . . . . . . . . . . . . . . . . . 3
Introduction . . . . . . . . . . . . . . . . . . . . . . . . . . . . . . . . . . . . . . . . . . . . . . . . . . . . . . . . . . . . . . . . . . . . . . . . . . . 4
Features . . . . . . . . . . . . . . . . . . . . . . . . . . . . . . . . . . . . . . . . . . . . . . . . . . . . . . . . . . . . . . . . . . . . . . . . . . . . . 4
Important Electrical Considerations . . . . . . . . . . . . . . . . . . . . . . . . . . . . . . . . . . . . . . . . . . . . . . . . . . . . . . . . 5
Range . . . . . . . . . . . . . . . . . . . . . . . . . . . . . . . . . . . . . . . . . . . . . . . . . . . . . . . . . . . . . . . . . . . . . . . . . . . . . . . 5
Telephone Line Problems . . . . . . . . . . . . . . . . . . . . . . . . . . . . . . . . . . . . . . . . . . . . . . . . . . . . . . . . . . . . . . . 5
Radio Interference . . . . . . . . . . . . . . . . . . . . . . . . . . . . . . . . . . . . . . . . . . . . . . . . . . . . . . . . . . . . . . . . . . . . . 5
More Than One Cordless Telephone. . . . . . . . . . . . . . . . . . . . . . . . . . . . . . . . . . . . . . . . . . . . . . . . . . . . . . . 5
Cordless Telephone Privacy . . . . . . . . . . . . . . . . . . . . . . . . . . . . . . . . . . . . . . . . . . . . . . . . . . . . . . . . . . . . . 5
Installation. . . . . . . . . . . . . . . . . . . . . . . . . . . . . . . . . . . . . . . . . . . . . . . . . . . . . . . . . . . . . . . . . . . . . . . . . . . . 6
Selecting a Location . . . . . . . . . . . . . . . . . . . . . . . . . . . . . . . . . . . . . . . . . . . . . . . . . . . . . . . . . . . . . . . . 6
Telephone Line Outlets . . . . . . . . . . . . . . . . . . . . . . . . . . . . . . . . . . . . . . . . . . . . . . . . . . . . . . . . . . . . . . . . . 6
Connecting the Telephone Cords . . . . . . . . . . . . . . . . . . . . . . . . . . . . . . . . . . . . . . . . . . . . . . . . . . . . . . . . . 6
Applying Power to the Base Unit . . . . . . . . . . . . . . . . . . . . . . . . . . . . . . . . . . . . . . . . . . . . . . . . . . . . . . . . . . 6
Desk or Tabletop Installation . . . . . . . . . . . . . . . . . . . . . . . . . . . . . . . . . . . . . . . . . . . . . . . . . . . . . . . . . . . . . 7
Wall Installation . . . . . . . . . . . . . . . . . . . . . . . . . . . . . . . . . . . . . . . . . . . . . . . . . . . . . . . . . . . . . . . . . . . . 8
Direct Wall Mounting . . . . . . . . . . . . . . . . . . . . . . . . . . . . . . . . . . . . . . . . . . . . . . . . . . . . . . . . . . . . . . . . 8
Setting Up Your Phone. . . . . . . . . . . . . . . . . . . . . . . . . . . . . . . . . . . . . . . . . . . . . . . . . . . . . . . . . . . . . . . . . 11
Extending the Antenna . . . . . . . . . . . . . . . . . . . . . . . . . . . . . . . . . . . . . . . . . . . . . . . . . . . . . . . . . . . . . . . . . 11
Installing the Handset Battery Pack . . . . . . . . . . . . . . . . . . . . . . . . . . . . . . . . . . . . . . . . . . . . . . . . . . . . . . . 11
Cleaning the Battery Contacts . . . . . . . . . . . . . . . . . . . . . . . . . . . . . . . . . . . . . . . . . . . . . . . . . . . . . . . . . . . 12
Charging the Battery Pack . . . . . . . . . . . . . . . . . . . . . . . . . . . . . . . . . . . . . . . . . . . . . . . . . . . . . . . . . . 12
Low Battery Indicator . . . . . . . . . . . . . . . . . . . . . . . . . . . . . . . . . . . . . . . . . . . . . . . . . . . . . . . . . . . . . . 14
Setting the Pulse/Tone Switch . . . . . . . . . . . . . . . . . . . . . . . . . . . . . . . . . . . . . . . . . . . . . . . . . . . . . . . 14
Adjusting Ringer Controls . . . . . . . . . . . . . . . . . . . . . . . . . . . . . . . . . . . . . . . . . . . . . . . . . . . . . . . . . . . 14
Adjusting Handset Receiver Volume . . . . . . . . . . . . . . . . . . . . . . . . . . . . . . . . . . . . . . . . . . . . . . . . . . 14
Automatic Digital Code Security . . . . . . . . . . . . . . . . . . . . . . . . . . . . . . . . . . . . . . . . . . . . . . . . . . . . . . 14
Using Your Phone . . . . . . . . . . . . . . . . . . . . . . . . . . . . . . . . . . . . . . . . . . . . . . . . . . . . . . . . . . . . . . . . . . . . 15
Making and Receiving Calls . . . . . . . . . . . . . . . . . . . . . . . . . . . . . . . . . . . . . . . . . . . . . . . . . . . . . . . . . 15
Changing Channels, Flash, and Page/Find . . . . . . . . . . . . . . . . . . . . . . . . . . . . . . . . . . . . . . . . . . . . . 15
Programming Your Phone . . . . . . . . . . . . . . . . . . . . . . . . . . . . . . . . . . . . . . . . . . . . . . . . . . . . . . . . . . . . . . 17
Storing a Number in Memory . . . . . . . . . . . . . . . . . . . . . . . . . . . . . . . . . . . . . . . . . . . . . . . . . . . . . . . . 17
Storing a Mixed Number . . . . . . . . . . . . . . . . . . . . . . . . . . . . . . . . . . . . . . . . . . . . . . . . . . . . . . . . . . . . 18
Dialing a Stored Number. . . . . . . . . . . . . . . . . . . . . . . . . . . . . . . . . . . . . . . . . . . . . . . . . . . . . . . . . . . . 19
Chain Dialing . . . . . . . . . . . . . . . . . . . . . . . . . . . . . . . . . . . . . . . . . . . . . . . . . . . . . . . . . . . . . . . . . . . . . 19
Erasing a Stored Number . . . . . . . . . . . . . . . . . . . . . . . . . . . . . . . . . . . . . . . . . . . . . . . . . . . . . . . . . . . 20
Troubleshooting . . . . . . . . . . . . . . . . . . . . . . . . . . . . . . . . . . . . . . . . . . . . . . . . . . . . . . . . . . . . . . . . . . . . . . 21
Specifications . . . . . . . . . . . . . . . . . . . . . . . . . . . . . . . . . . . . . . . . . . . . . . . . . . . . . . . . . . . . . . . . . . . . . . . 22
One-Year Limited Warranty . . . . . . . . . . . . . . . . . . . . . . . . . . . . . . . . . . . . . . . . . . . . . . . . . . . . . . . . . . . . . 23
Addendum to Specifications. . . . . . . . . . . . . . . . . . . . . . . . . . . . . . . . . . . . . . . . . . . . . . . . . . . . . . . . . . . . . 25
Important Safety Instructions
When using your telephone equipment, these basic safety precautions should always be followed to reduce
the risk of fire, electrical shock, and injury to persons:
1.
2.
3.
4.
5.
6.
7.
8.
9.
10.
11.
12.
13.
2
Read and understand all instructions.
Follow all warnings and instructions marked on the product.
Unplug this product from the wall outlet before cleaning, and use a dry cloth, without liquid or aerosol
cleaners.
Do not use this product near water; for example, near a bath tub, wash bowl, kitchen sink or laundry tub,
in a wet basement, or near a swimming pool.
Do not place this product on an unstable cart, stand, or table. The telephone may fall, causing serious
damage to the unit.
Slots and openings in the cabinet and the back or bottom are provided for ventilation. To protect the
product from overheating, these openings must not be blocked or covered. This product should never be
placed near or over a radiator or heat register. This product should not be placed in a built-in installation
unless proper ventilation is provided.
This product should be operated only from the type of power source indicated on the marking label. If you
are not sure of the type of power supply to your home, consult your dealer or local power company.
Do not allow anything to rest on the power cord. Do not locate this product where the cord will be
damaged by persons walking on it.
Do not overload wall outlets and extension cords, as this can result in the risk of fire or electrical shock.
Never push objects of any kind into this product through cabinet slots, as they may touch dangerous
voltage points or short out parts that could result in a risk of fire or electric shock. Never spill liquid of any
kind on the product.
To reduce the risk of electric shock, do not disassemble this product. Take it to qualified service personnel
when service or repair work is required. Opening or removing covers may expose you to dangerous
voltages or other risks. Incorrect reassembly can cause electric shock when the appliance is subsequently
used.
Unplug this product from the wall outlet and refer servicing to qualified service personnel under the
following conditions:
A. When the power supply cord is damaged or frayed.
B. If liquid has been spilled into the product.
C. If the product has been exposed to rain or water.
D. If the product does not operate normally when following the operating instructions. (Adjust only those
controls that are covered by the operating instructions. Improper adjustment of other controls may
result in damage and will often require extensive repair work by a qualified technician.)
E. If the product has been dropped or the cabinet has been damaged.
F. If the product exhibits a distinct change in performance.
Do not use the telephone to report a gas leak in the vicinity of the leak.
DX834/DXC834
Battery Safety Precautions
Caution: To reduce the risk of fire or injury to persons by the battery, read and follow these instructions:
1.
2.
3.
4.
5.
6.
Use only the appropriate type and size Battery Pack specified in this Operating Guide.
Do not dispose of the Battery Pack in a fire. The cell may explode. Check the Nickel-Cadmium Battery
Disposal package insert for disposal instructions.
Do not open or mutilate the Battery Pack. Released electrolyte is corrosive and may cause damage to the
eyes or skin. It may be toxic if swallowed.
Exercise care in handling the battery in order not to short the battery with conducting materials such as
rings, bracelets, and keys. The battery or conductor may overheat and cause burns.
Charge the Battery Pack provided with or identified for use with this product only in accordance with the
instructions and limitations specified in the instruction manual provided for this product.
Observe proper polarity orientation between the Battery Pack and battery charger.
SAVE THESE INSTRUCTIONS
DX834/DXC834
3
Introduction
Congratulations on your purchase of the Uniden DX834/DXC834 Cordless Telephone. These phones are
designed to exacting standards which provide reliability, long life, and outstanding performance.
Features
•
•
•
•
•
•
•
•
•
•
•
•
•
•
The UltraClear Plus innovative technology, together
with 25 different channels, virtually eliminates
background noise and provides you with the best
possible reception during all of your conversations.
25 Channels
AutoSecure™
Random Code™ Digital Security
Handset Ringer/Volume Controls
UltraClear Plus
Pulse/Tone Dialing
AutoTalk™
AutoStandby™
Voice Scramble
10-Number Memory
1-way Page/Find Button
Redial/Flash Key
14 Day Battery Life
Charging Cradle (DXC834 only)
To protect you against misbilled calls which might
result from your phone being activated by other
equipment, Random Code™ digital security
automatically selects one of over 65 thousand digital
security codes for the Handset and Base Units.
Also, the AutoSecure™ feature electronically locks
your phone when the Handset is in the Base.
To get the most from your phone, please read this
Operating Guide thoroughly. Also be sure to
complete the Product Registration form and mail it
in.
Be sure to visit our Internet site at:
http:\\www.uniden.com!
Voice Scramble protects your privacy by scrambling
any call you make or receive. The RF signal between
the Handset and Base Unit are changed, making it
difficult or impossible for someone to receive and
understand your phone calls.
AutoTalk™ allows you to answer a call by just
removing the Handset from the Base so you don’t
have to waste time pushing buttons or flipping
switches. AutoStandby™ allows you hang up by
simply returning the Handset to the Base.
Included with the DX834/DXC834 Phone
If any of these items are missing or damaged, contact Uniden Customer Service at: (800) 297-1023, 8:00 am
to 5:00 p.m. Central, Monday through Friday.
e
arg
ch
Handset
Base Unit
Rechargeable Battery
hon
A•P
•
d
ten
x
ss E
834
Charging Cradle
(DXC834 Only)
dle
Cor
4 /DXC
DX 83
Long Telephone Cord
e®
181
e
uid
gG
tin
era
Op
8ZZ
ZZ0
UD
2 AC Adapters
4
Short Telephone Cord
Operating Guide
Other Printed Material
DX834/DXC834
Important Electrical Considerations
Unplug all electrical appliances when you know an electrical storm is approaching. Lightning can pass through
your household wiring and damage any device connected to it. This phone is no exception.
Warning:
Please do not attempt to unplug any appliance during an electrical storm.
Caution: Changes or modifications to this product not expressly approved by Uniden, or operation of this
product in any way other than as detailed by this Operating Guide, could void your authority to
operate this product.
Range
Your new phone is designed to achieve the maximum possible range by transmitting and receiving according
to the highest specifications set forth by the FCC. We have rated this phone to operate at a maximum distance
with the qualification that the range depends upon the environment in which the telephone is used. Many
factors limit range, and it would be impossible to include all the variables in our rating. The Maximum Range
rating of this phone is meant to be used as a means of comparison against other range claims.
Telephone Line Problems
The FCC has granted the telephone company the right to disconnect service in the event that your phone
causes problems on the telephone line. Also, the telephone company may make changes in facilities and
services which may affect the operation of your unit. However, your telephone company must give adequate
notice in writing prior to such actions to allow you time for making necessary arrangements to continue
uninterrupted service.
If you are having trouble with your telephone service, you must first disconnect your phone to determine if it is
the cause of your problem. If you determine that it is the cause, you must leave it disconnected until the trouble
has been corrected.
Radio Interference
Radio interference may occasionally cause buzzing and humming in your cordless Handset, or clicking noises
in the Base Unit. This interference is caused by external sources such as TV, refrigerator, vacuum cleaner,
fluorescent lighting, or electrical storm. Your unit is NOT DEFECTIVE. If these noises continue and are too
distracting, please check around your home to see what appliances may be causing the problem. In addition,
we recommend that the Base not be plugged into a circuit that also powers a major appliance because of the
potential for interference. Be certain that the antenna on the unit is fully extended when needed.
In the unlikely event that you consistently hear other voices or distracting transmissions on your phone, you
may be receiving radio signals from another cordless telephone or other source of interference. If you cannot
eliminate this type of interference, you need to change to a different channel.
Finally, it should be noted that some cordless telephones operate at frequencies that may cause interference
to nearby TVs and VCRs. To minimize or prevent such interference, the base of the cordless telephone should
not be placed near or on top of a TV or VCR. If interference is experienced, moving the cordless telephone
farther away from the TV or VCR will often reduce or eliminate the interference.
More Than One Cordless Telephone
If you want to use more than one cordless telephone in your home, they must operate on different channels.
Press the channel key to select a channel that provides the clearest communication.
Cordless Telephone Privacy
Cordless telephones are radio devices. Communications between the handset and base of your cordless
telephone are accomplished by means of radio waves which are broadcast over the open airways. Because of
the inherent physical properties of radio waves, your communications can be received by radio receiving
devices other than your own cordless telephone unit. Consequently, any communications using your cordless
telephone may not be private.
DX834/DXC834
5
Installation
Selecting a Location
Before choosing a location for your new phone, there are some important guidelines you should consider:
• The location should be close to both a phone jack and continuous power outlet.
Note: A continuous power outlet is an AC outlet which does not have a switch to interrupt its power.
• Keep the Base Unit and Handset away from sources of electrical noise such as motors or fluorescent
lighting.
• Be sure there is sufficient space to fully extend the Base Unit antenna.
• The Base Unit can be placed on a desk or tabletop or mounted on a standard AT&T or GTE wall plate.
• If you decide to mount your phone on the wall, make sure to change the handset retainer so that the tab
which holds the Handset faces up. (See page 10 for more information.)
• You should charge your new phone for 15-20 hours before completing the installation or using the
Handset.
Telephone Line Outlets
There are two types of phone outlets:
Modular Jack
Most phone equipment available now uses modular jacks. Phone cords are fitted with a molded plastic
connector which plugs into this type of jack. If you do not have modular phone jacks, contact your local
telephone company for information about their installation.
Hard-wired Jack
Some equipment is wired directly to a phone jack, and these types of installations require a modular jack
converter. This type of installation is not difficult; however, you should contact your Uniden telephone dealer or
a telephone supply store for advice about the proper adapter or converter for your particular situation.
Connecting the Telephone Cords
Consider these safety guidelines before connecting the telephone cords:
Caution!
• Never install telephone wiring during a lightning storm.
• Never touch uninsulated telephone wires or terminals unless the telephone line has been disconnected.
• Use caution when installing or modifying telephone lines.
Applying Power to the Base Unit
All the DX834 phone requires an AC outlet, without a switch to interrupt power, and the included AC adapter.
To relieve strain on the DC plug when the phone is placed on a desk or table, connect the adapter as shown
below.
Wrap the power cord around the convenient notch on the bottom.
Important:
6
Place the power cord so that it does not create a trip hazard, or where it could become chafed and
create a fire or other electrical hazards.
DX834/DXC834
Desk or Tabletop Installation
1.
Place the Base
on a desk or
tabletop.
2.
Plug the AC
Adapter cord into
the 9V DC input
jack on the Base
Unit.
3.
Place the AC
Adapter cord
around the strain
relief.
5.
Plug the other
end of the cord
into the
telephone jack
on the wall.
6.
Plug the AC
Adapter into a
standard
120V AC wall
outlet.
Note: Do not
use an outlet
controlled by a
wall switch.
\
Use only the Uniden AC Adapter
supplied with this phone.
4.
Plug one end of
the long
telephone cord
into the TEL LINE
jack on the Base
Unit.
DX834/DXC834
7
Wall Installation
5.
Place the
Base Unit on
the posts of
the wall plate
and push
down until it’s
firmly seated.
6.
Plug the AC
Adapter into a
standard
120V AC wall
outlet.
Note: Do not
use an outlet
controlled by
a wall switch.
Standard Wall Plate Mounting
These phones are designed to be mounted on a
standard AT&T or GTE wall plate.
1.
2.
Plug the AC
Adapter into
the Base Unit.
Place the AC
Adapter cord
inside the
molded
channel.
Direct Wall Mounting
3.
Plug one end
of the short
telephone cord
into the
TEL LINE jack
on the Base
Unit.
4.
Place the
telephone cord
inside the
molded
channel on the
bottom of the
Base Unit.
Then plug the
other end of
the telephone
cord into the
modular jack
on the wall.
8
If you do not have a standard wall plate, you can
mount your phone directly on a wall. Before
mounting your phone, consider the following:
• Select a location away from electrical cables,
pipes, or other items behind the mounting
location that could cause a hazard when
inserting screws into the wall.
• Make sure the wall material is capable of
supporting the weight of the Base Unit and
Handset.
• Use #10 screws with anchoring devices
suitable for the wall material where the Base
Unit will be placed.
1.
Insert two
mounting
screws 315⁄16
inches apart.
Allow about
3⁄
16 of an inch
between the
wall and
screw heads
for mounting
the phone.
DX834/DXC834
2.
Plug the AC
Adapter into the
Base Unit.
6.
Place the Base
Unit on the
screws and
push down until
it’s firmly seated.
3.
Place the AC
Adapter cord
inside the
molded channel.
7.
Plug the other
end of the
telephone line
cord into the
wall jack.
4.
Plug one end of
the long
telephone cord
into the TEL LINE
jack on the Base
Unit.
8.
Plug the AC
Adapter into a
standard 120V
AC wall outlet.
Note: Do not
use an outlet
controlled by a
wall switch.
5.
Place the cord
inside the
molded channel
on the bottom of
the Base Unit.
DX834/DXC834
9
Setting the Handset Retainer
The handset retainer holds the Handset in place if
your phone is mounted on a wall. The steps below
describe how to remove and replace the retainer so
that the tab faces up.
1.
2.
10
Push up on the
Handset
retainer on the
Base Unit, and
slide the tab
out.
3.
Put the
retainer back
into its slot on
the Base Unit.
4.
Push down on
the Handset
retainer until it
snaps into
place.
Flip the
retainer over
so the tab
faces up.
DX834/DXC834
Setting Up Your Phone
Extending the Antenna
Before using your phone, be sure to raise its antenna to the vertical position. Then, fully extend the antenna.
Installing the Handset Battery Pack
1.
Press in on the
Battery Cover
Release.
3.
Align the plastic
connector of the
Nickel-Cadmium
battery pack
with its socket
and plug it in.
Note: The black
lead will be on
the left when the
plug is properly
aligned.
2.
Slide the battery
compartment
cover down.
4.
Place the
battery pack
inside the
battery
compartment,
and slide the
battery cover
back on.
Note: The built-in Memory Backup feature allows up
to 3 minutes to disconnect the old battery
pack and install a new one without losing any
numbers stored in memory.
DX834/DXC834
11
Cleaning the Battery Contacts
To maintain a good charge, it is important to clean all charging contacts on the Handset and Base Unit about
once a month. Use a pencil eraser or other contact cleaner. Do not use any liquids or solvents.
Contacts
Charging the Battery Pack
(Only for the DXC834 phone.)
Initial Battery Charging
The rechargeable Nickel-Cadmium battery pack
must be fully charged before using your phone for
the first time. We recommend that the battery pack
charge for approximately 15-20 hours, without
interruption, before plugging the phone line into your
new phone.
1.
page/find
status
Place the
Handset on
the Base Unit.
Either place
the Handset
with ear peace
in the cradle
Charging from the Charging Cradle
1. Plug the
Charging
Cradle AC
Adapter cord
into the DC
Input Jack on
the Charging
Cradle.
2. Place the AC
Adapter cord
around the
strain relief.
DCIN9V +
_
UNIDEN AMERICA CORPORATION
model : dxc834
cordless telephone charger
—OR—
Place the
Handset in the
cradle with it
standing on
end (desk
mount only) .
Note: Make
sure to change
the Handset
Retainer
before hanging
up the phone
(wall mounted
bases).
12
INPUT : DC 9V 100mA
use uniden AC adaptor AD-800 only
made in China
3. Plug the AC
Adapter into a
standard
120V AC wall
outlet.
Note: Do not
use an outlet
controlled by
a wall switch.
DX834/DXC834
flash/rdl
talk
talk
batt low
3def
1
2abc
4 ghi
5 jkl
6 mno
7 pqrs
8 tuv
9 wxyz
tone
Q
4. Place the
Handset upright
on the Charging
Cradle. The red
Status LED
lights while the
unit is charging.
mem
0 oper
r.tone
r.vol
pause
volume
chan
Charge
Battery Memory Effect
Rechargeable batteries can develop a “memory”
(reduced charge capacity) caused by repeated
charge and discharge cycles. The battery life will
seem to be shorter every time you use the unit.
To Avoid this Memory Effect
At least once a month, operate the unit until the
“Battery Low” indicator appears. Then recharge the
battery for a full 15 - 20 hours. Avoid putting the
handset back in the base after using the phone for a
short time. This could cause “topping off” the charge.
Also, do not charge the Rechargeable Battery for
extended periods of time.
DX834/DXC834
13
Low Battery Indicator
Adjusting Ringer Controls
To adjust the ringer volume of your Handset, press
G when the phone is not in use.
When the Battery Pack
in the Handset is very
low and needs to be
charged, the TALK/BATT
LOW LED flashes.
You can also select one of two different ringer tones
for the Handset.
Press G to select a different ringer tone when the
phone is not in use.
Adjusting Handset Receiver
Volume
If the TALK/BATT LOW LED begins to flash, the phone
is programmed to eliminate its functions to save
power. The table below describes what to do to
return your phone to normal operation.
During a Call
Only the T button operates.
In Standby Mode
None of the buttons will
operate.
Volume settings are Normal and High. When the
Handset is first picked up, the volume will be at the
normal setting. Pressing the V will change the
volume to High. This can be accomplished during a
call.
Automatic Digital Code Security
Complete your call as
quickly as possible.
You will not be able to make
a call.
To avoid unauthorized calls on your phone, a Digital
Code feature was added to the DX834 phone. This
Digital Code is shared only between the Handset
and Base Unit. The Code is set automatically when
you first use the phone.
Return the Handset to the
Base Unit for charging.
Return the Handset to the
Base Unit for charging.
To change the Digital Code:
1. Be sure the Handset is on the Base then:
The Handset beeps and the The Handset TALK/BATT
TALK/BATT LOW LED flashes LOW LED flashes once
once every 3 seconds.
every 3 seconds.
Note: Allow 15 to 20 hours without any interruption
for the Handset to fully recharge.
Setting the Pulse/Tone Switch
Be sure the
PULSE/TONE switch is in
the TONE position.
2.
Press the PAGE/FIND button on the Base Unit.
The Handset begins beeping.
3. When the
beeping stops,
remove the
Handset for 5
seconds, and then
return it to the
Base Unit.
Note: The Status
LED will blink to
indicate that the
Digital Security
Code is set to one
of the more than
65,000 codes.
Note: Most phone systems are Tone dialing. Check
with your local phone company if you are not
sure whether your system is Tone or Pulse
dialing.
14
If the Base Unit loses power while the Handset is off
the Base, the Digital Code may be erased. When
this happens, the Handset will not function. To
reestablish communication between the Handset
and Base Unit:
1.
Restore power to the Base Unit.
2.
Place the Handset back on the Base Unit.
3.
The Status LED will blink to indicate that the
Digital Security Code is set.
DX834/DXC834
Using Your Phone
Making and Receiving Calls
The following features of the DX834 phone are
different depending on the Handset’s location when
you make or receive a call.
Answer Call
Handset On Base
Handset Off Base
Pick up Handset
(AutoTalk)
Press T.
1) Pick up Handset.
1) Press T.
2) Listen for dial
tone.
3) Dial the number.
Make Call
2) Press T.
3) Listen for dial
tone.
4) Dial the number.
Hang up,
Return Handset to
Press T
Base (AutoStandby)
1) Pick up Handset.
Redial,
2) Press T.
3) Listen for dial
tone.
4) Press
Changing Channels, Flash, and
Page/Find
To change channels or access call waiting while the
phone is in use, or to use the one-way page to
locate the Handset, follow these steps:
Changing
Channels
1) Press T.
2) Listen for dial
tone.
.
3) Press
Note: Sometimes when you press T to hang up the
phone, you may get an error tone and the
phone will not disconnect. If this happens,
place the Handset on the Base Unit or press T
again while holding the Handset close to the
Base Unit.
You Will Hear
Press C.
Note: Change
channels to help
eliminate
background noise.
A click similar to
is
when
pressed. There
may be a brief
pause as your
phone searches
for a clear
channel.
If the call waiting
tone sounds,
to
press
accept the
waiting call
A click, a short
pause, then the
caller (if you were
on a call).
— OR —
FLASH
If you have
finished a call
and want to make
another call,
to
press
hang up and get
a dial tone.
Page/Find
DX834/DXC834
Press These Keys
Press PAGE/FIND
on the Base Unit
to locate the
Handset
— OR —
A click, and then
a dial tone so you
can make a
different call.
The Handset will
beep more than 5
times.
15
This Page Intentionally Blank.
Programming Your Phone
All programming functions must be completed when
your phone is in the standby mode because
programming keys do not function while you are on
the phone.
Storing a Number in Memory
Use these keys to store a number in memory.
Note: An error tone will sound and the programming
procedure will be canceled if more than 20 seconds
elapse between each keystroke entry or step.
1.
Remove the Handset from the Base Unit.
2.
Press M.
The TALK/BATT LOW LED blinks.
3.
4.
Enter the number
you want to store
(up to 16 digits).
If a pause is
needed during
dialing to access
a long distance
service, press
P.
5
5
5
1
2
1
2
9P
5
5
5
1212
Note: The P button counts as one digit. Pressing
P more than once increases the length of
the pause between numbers.
5.
6.
Press M again.
Enter the
memory location
(0-9).
A tone indicates
that the number
is stored.
DX834/DXC834
17
Storing a Mixed Number
If your phone is set up for Pulse dialing, you can
store a mixed mode number so that you can easily
access long distance services.
Use these keys to store a mixed mode number in
memory.
Note: An error tone will sound and the programming
procedure will be canceled if more than 20 seconds
elapse between each keystroke entry or step.
1.
Remove Handset from the Base Unit.
2.
Press M.
The TALK/BATT LOW LED blinks.
3.
4.
5.
6.
Enter the
number
to be dialed in
pulse mode.
PressOon the Handset.
555
1212
Enter the
number to be
dialed in tone
mode.
If a pause is
needed during
dialing to
access a long
distance
service, press
P.
3300
P3300
Note: The P button counts as one digit. Pressing
P more than once increases the length of
the pause between numbers.
7.
8.
18
Press M
again.
Enter the
memory
location (0-9).
A tone
indicates that
the number is
stored.
DX834/DXC834
Dialing a Stored Number
To dial a number previously stored in memory, follow
these steps:
1.
1.
2.
3.
Store the access code into one of the memory
numbers.
Dial the main number.
Problem
Charge light won’t come on when Handset is placed in Base
Unit.
Suggestion
• Make sure AC Adapter is plugged into the Base Unit and
wall outlet.
• Make sure Handset is properly seated in Base Unit.
• Make sure that the charging contacts on the Handset and
Base Unit are clean.
Audio sounds weak and/or scratchy.
• Make sure that the Base Unit antenna is fully extended
and vertical.
• Move the Handset and/or Base Unit to different locations
and try again.
Can’t make or receive calls.
• Press the C button to select another channel.
• Check both ends of the Base Unit telephone line cord.
• Make sure the AC Adapter is plugged into the Base Unit
and wall outlet.
• Disconnect the AC Adapter for a few minutes, and then
reconnect it.
Handset doesn’t ring or receive a page.
• Nickel-Cadmium battery pack may be weak. Charge the
battery on the Base Unit for 15–20 hours.
• Extend the Base Unit antenna vertically.
• The Handset may be too far away from the Base Unit.
• Place the Base Unit away from noise sources.
• The Digital Security Code may be erased. Set the Digital
Code.
Remove the
Handset from the
Base Unit.
2.
3.
At the appropriate time, press M followed by
the memory location number where the access
code is saved.
Press T.
Press M.
4. Press the memory location number (0-9).
Chain Dialing
On certain occasions, after dialing a number, you
may be requested by the party or service you are
calling to enter a special access code, such as when
performing a banking transaction. To do this, simply:
DX834/DXC834
19
Erasing a Stored Number
To erase a number previously stored in a memory
location (0-9), follow these steps:
1.
Remove the
Handset from
the Base Unit.
2.
Press M
twice.
3.
Press the memory location number (0-9).
Note: An error tone will sound and the erase
procedure will be canceled if more than 20
seconds elapse between each keystroke entry
or step.
20
DX834/DXC834
Troubleshooting
If your DX834 Cordless Telephone is not performing to your expectations, please try these simple steps. If you
are still unable to resolve the problems, contact Uniden Customer Service at (800) 297-1023,
8:00 a.m. to 5:00 p.m. Central, Monday through Friday.
Specifications
General – The DX834 complies with FCCParts15 and 68.
Frequency Control
PLL
Modulation
FM
Operating Temperature
-10° to 50° C
Base Unit
Receive Frequency
48.76 to 49.99 MHz
Transmit Frequency
43.72 to 46.97 MHz
Power Requirements
120V AC 60 Hz ± 3V AC
Size
7-1/4 in. (H) x 4-3/4 in. (W) x 2-1/2 in. (D)
Weight
Approx. 11.1 oz.
Receive Frequency
43.72 to 46.97 MHz
Transmit Frequency
48.76 to 49.99 MHz
Power Requirements
Rechargeable Ni-Cd Battery Pack
Handset
Size
7-1/4 in. (H) x 2-1/4 in. (W) x 2 1/2 in. (D) (w/o antenna)
Weight
Approx. 10 oz. (including battery)
Battery
BT-801
Capacity .............. 300 mAh, 3.6V
Talk Mode ........... 8 hours
Standby Mode..... 14 days
Specifications, Features, and availability of Optional Accessories are all subject to change without prior notice.
Addendum to Specifications
General – The DX834 complies with FCCParts15 and 68.
Frequency Control
PLL
Modulation
FM
Operating Temperature
-10° to 50° C
Base Unit
Receive Frequency
48.76 to 49.99 MHz
Transmit Frequency
43.72 to 46.97 MHz
Power Requirements
120V AC 60 Hz ± 3V AC
Size
8-1/2 in. (H) x 3-1/2 in. (W) x 2-1/4 in. (D)
Weight
Approx. 11.1 oz.
Receive Frequency
43.72 to 46.97 MHz
Transmit Frequency
48.76 to 49.99 MHz
Power Requirements
Rechargeable Ni-Cd Battery Pack
Handset
Size
7-3/4 in. (H) x 2 in. (W) x 2 1/4 in. (D) (w/o antenna)
Weight
Approx. 10 oz. (including battery)
Battery
BT-185
Capacity .............. 270 mAh, 3.6V
Talk Mode ........... 8 hours
Standby Mode..... 14 days
Specifications, Features, and availability of Optional Accessories are all subject to change without prior notice.
PRECAUTIONS
Before you read anything else,
Please observe the following:
WARNING!
Uniden America Corporation DOES NOT represent this unit to be waterproof.
To reduce the risk of fire, electrical shock, or damage to the unit, DO NOT
expose this unit to rain or moisture.
RECHARGEABLE NICKEL-CADMIUM BATTERY
WARNING
This equipment contains a Rechargeable Nickel-Cadmium
Battery.
Cadmium is a chemical known to the State of California to
cause cancer.
The Rechargeable Nickel-Cadmium Battery contained in this
equipment may explode if disposed of in a fire.
Do not short circuit the battery.
Do not charge the Rechargeable Nickel-Cadmium Battery
used in this equipment in any charger other than the one
designed to charge this battery as specified in this Guide.
Using another charger may damage the battery, or cause
the battery to explode.
RECHARGEABLE NICKEL-CADMIUM
BATTERIES MUST BE RECYCLED OR
DISPOSED OF PROPERLY
Residents Of Minnesota should contact 1-800-225-PRBA for
information concerning reclamation and disposal of
Rechargeable Nickel-Cadmium batteries.
Residents outside of Minnesota should contact their local
authorities for information concerning reclamation and
disposal of Rechargeable Nickel-Cadmium batteries.
Controls and Functions (Base)
10.
Tone Pulse switch
11.
Telephone Jack IN
12.
AC Adapter Jack IN
13.
Status (in use) Indicator
14.
Page/Find Key
Controls and Functions (Handset)
1.
Talk Button T
6.
Talk/Batt Low Indicator
2.
Numeric Keypad
7.
Flash/Redial Key r
3.
Tone Key O
8.
Channel Select Key C
9.
Pause P
4.
Memory Key M
5.
Ringer Volume V/Ringer Key G
One-Year Limited Warranty
Important:
Evidence of original purchase is required for warranty service.
WARRANTOR: UNIDEN AMERICA CORPORATION (“Uniden”)
ELEMENTS OF WARRANTY: Uniden warrants, for one year, to the original retail owner, this Uniden Product to be free from defects in materials and
craftsmanship with only the limitations or exclusions set out below.
WARRANTY DURATION: This warranty to the original user shall terminate and be of no further effect 12 months after the date of original retail sale. The
warranty is invalid if the Product is (A) damaged or not maintained as reasonable or necessary, (B) modified, altered, or used as part of any conversion
kits, subassemblies, or any configurations not sold by Uniden, (C) improperly installed, (D) serviced or repaired by someone other than an authorized
Uniden service center for a defect or malfunction covered by this warranty, (E) used in any conjunction with equipment or parts or as part of any system
not manufactured by Uniden, or (F) installed or programmed by anyone other than as detailed by the Operating Guide for this product.
STATEMENT OF REMEDY: In the event that the product does not conform to this warranty at any time while this warranty is in effect, warrantor will
repair the defect and return it to you without charge for parts, service, or any other cost (except shipping and handling) incurred by warrantor or its
representatives in connection with the performance of this warranty. THE LIMITED WARRANTY SET FORTH ABOVE IS THE SOLE AND ENTIRE
WARRANTY PERTAINING TO THE PRODUCT AND IS IN LIEU OF AND EXCLUDES ALL OTHER WARRANTIES OF ANY NATURE WHATSOEVER,
WHETHER EXPRESS, IMPLIED OR ARISING BY OPERATION OF LAW, INCLUDING, BUT NOT LIMITED TO ANY IMPLIED WARRANTIES OF
MERCHANTABILITY OR FITNESS FOR A PARTICULAR PURPOSE. THIS WARRANTY DOES NOT COVER OR PROVIDE FOR THE
REIMBURSEMENT OR PAYMENT OF INCIDENTAL OR CONSEQUENTIAL DAMAGES. Some states do not allow this exclusion or limitation of
incidental or consequential damages so the above limitation or exclusion may not apply to you.
LEGAL REMEDIES: This warranty gives you specific legal rights, and you may also have other rights which vary from state to state. This warranty is void
outside the United States of America.
PROCEDURE FOR OBTAINING PERFORMANCE OF WARRANTY: If, after following the instructions in this Operating Guide you are certain that the
Product is defective, pack the Product carefully (preferably in its original packaging). Include evidence of original purchase and a note describing the
defect that has caused you to return it. The Product should be shipped freight prepaid, by traceable means, or delivered to warrantor at:
Uniden America CorporationParts and Service Division
4700 Amon Carter Blvd.
Fort Worth, TX 76155
(800) 297-1023, 8 a.m. to 5 p.m. Central,
Monday through Friday
DX834/DXC834
23
Covered under one or more of the following U.S.
patents
4,511,761
4,523,085
4,595,795
4,797,916
5,426,690
®
©1997 Uniden America Corporation. All rights reserved.
Printed in Hong Kong
DX834/DXC834