1
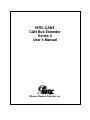
WRC-CANX
CAN Bus Extender
Series 4
User’s Manual
Western Reserve Controls, Inc.
Western Reserve Controls
PUB 14.1
WRC-CANX-xx Series 4
User’s Manual
Although every effort has been made to insure the accuracy of this document, all information is subject to
change without notice. WRC takes no liability for any errors in this document or for direct, indirect,
incidental or consequential damage resulting from the use of this manual.
Document PUB 14.1
Rev 4.01
April 2011
Copyright © 1997 – 2011 WRC
Western Reserve Controls, Inc.
1485 Exeter Road
Akron OH 44306
330-733-6662 (Phone)
330-733-6663 (FAX)
[email protected] (Email)
http://www.wrcakron.com (Web)
SmartMux-Lite, CAN-Bus Extender and WRC are trademarks of Western Reserve Controls, Inc.
DeviceNet is a trademark of the Open DeviceNet Vendor Association, Inc. (“ODVA”).
SDS is a trademark of the Honeywell, Inc.
All other trademarks are property of their respective companies.
Western Reserve Controls
PUB 14.1
WRC-CANX-xx Series 4
User’s Manual
TABLE OF CONTENTS
1.
OVERVIEW ....................................................................................................................................................... 1
SERIES 4 SPECIFIC FEATURES ....................................................................................................................... 2
FEATURES .................................................................................................................................................... 2
BASIC OPERATION ........................................................................................................................................ 2
REFERENCE DOCUMENTS ............................................................................................................................. 3
1.1.
1.2.
1.3.
1.4.
2.
QUICK START .................................................................................................................................................. 4
3.
GENERAL SPECIFICATIONS........................................................................................................................ 5
4.
HARDWARE INSTALLATION AND CONFIGURATION ......................................................................... 6
4.1.
4.2.
4.3.
4.4.
4.5.
4.5.1.
4.5.2.
4.5.3.
4.5.4.
5.
OVERVIEW ................................................................................................................................................... 6
DIP SWITCH SETTINGS ................................................................................................................................. 7
LED OPERATION .......................................................................................................................................... 8
POWER REQUIREMENTS................................................................................................................................ 9
NETWORK CABLING AND CONFIGURATION ................................................................................................. 10
Cable Lengths ....................................................................................................................................... 10
Network Termination............................................................................................................................. 10
DeviceNet Connection Wiring............................................................................................................... 12
SDS Bus Connection Wiring ................................................................................................................. 13
OPERATION.................................................................................................................................................... 15
5.1.
5.1.1.
5.1.2.
5.1.3.
5.1.4.
APPLICATION NOTES .................................................................................................................................. 15
CANX Theory of Operation................................................................................................................... 15
Network Throughput Design Considerations........................................................................................ 16
Fixed Operation .................................................................................................................................... 16
Autobaud Operation.............................................................................................................................. 17
6.
EXAMPLE CONFIGURATIONS .................................................................................................................. 18
7.
ACCESSORIES AND OTHER CAN PRODUCTS....................................................................................... 21
8.
TROUBLESHOOTING................................................................................................................................... 23
9.
SUMMARY OF CHANGES TO SERIES 4 FROM REV 2 AND SERIES 3.............................................. 24
9.1.
9.2.
9.3.
DIP SWITCH BAUD RATE SETTINGS ........................................................................................................... 24
TERMINATING RESISTORS........................................................................................................................... 24
FIELD PROGRAMMABLE UPDATES .............................................................................................................. 24
10.
FREQUENTLY ASKED QUESTIONS ..................................................................................................... 25
WRC-CANX.............................................................................................................................................................. 25
WRC-CANR.............................................................................................................................................................. 25
i
Western Reserve Controls
PUB 14.1
WRC-CANX-xx Series 4
User’s Manual
LIST OF FIGURES
FIGURE 1-1 WRC-CANX-DIN-DN SERIES 4 ................................................................................................................ 1
FIGURE 4-1 WRC-CANX-DIN SERIES 4 DIMENSIONAL DRAWING .............................................................................. 6
FIGURE 4-2 WRC-CANX-NEM SERIES 3 DIMENSIONAL DRAWING ............................................................................ 7
FIGURE 4-3 WRC-CANX-DIN-DN DEVICENET CABLE CONNECTOR ........................................................................ 12
FIGURE 4-4 DEVICENET CABLE SPECIFICATIONS ........................................................................................................ 12
FIGURE 4-5 WRC-CANX-NEM DEVICENET CONNECTORS ........................................................................................ 13
FIGURE 4-6 SDS MINI CONNECTOR ............................................................................................................................. 14
FIGURE 6-1 LINEAR TOPOLOGY EXAMPLE ................................................................................................................... 18
FIGURE 6-2 LINEAR TOPOLOGY WITH DOUBLE DISTANCE EXAMPLE ........................................................................... 19
FIGURE 6-3 LINEAR TOPOLOGY WITH MULTIPLE EXTENDERS EXAMPLE...................................................................... 19
FIGURE 6-4 LINEAR TOPOLOGY WITH MULTIPLE EXTENDED DROP LINES EXAMPLE ................................................... 20
FIGURE 6-5 STAR TOPOLOGY WITH MULTIPLE DROP LINES EXAMPLE ......................................................................... 20
FIGURE 10-1 SAMPLE WRC-CANX SETUP ................................................................................................................. 27
LIST OF TABLES
TABLE 4-1 BAUD RATE SETTINGS FOR SWITCHES .......................................................................................................... 8
TABLE 4-2 MODULE STATUS LED (LABELED MS)......................................................................................................... 9
TABLE 4-3 NETWORK STATUS LED’S (LABELED NSA AND NSB) ................................................................................. 9
TABLE 4-4 DIAGNOSTIC STATUS LED’S (LABELED DGN) ............................................................................................. 9
TABLE 4-5 NETWORK MAXIMUM LENGTHS - DEVICENET ........................................................................................... 10
TABLE 4-6 NETWORK MAXIMUM LENGTHS - SDS....................................................................................................... 10
TABLE 4-7 TERMINATING RESISTORS........................................................................................................................... 11
TABLE 7-1 ADDITIONAL WRC DEVICENET PRODUCTS ............................................................................................... 22
TABLE 10-1 CANX AND CANR MODELS ................................................................................................................... 25
ii
1.
Overview
The WRC-CANX Extenders is a family of products that extend the communications cable lengths
for DeviceNet, SDS (Smart Distributed System), J1939, CANopen and other CAN, V2.0, Part A or Part B
serial bus systems. By allowing the user to extend the bus length for any given speed, they assist the user
in cost-effectively implementing I/O or other nodes on these buses at remote locations that would be more
difficult or more expensive to do otherwise.
A WRC-CANX Extender (the family members collectively referred to here as CANX or Extender)
can be connected in a bus trunk line or drop line and is transparent to the other nodes on the bus. It
receives and actively re-transmits (store-and-forward) each message from either side of the network
without interpreting the message or acting upon it.
Each product has two network interfaces with an electrical isolation path between the two. Power
is delivered to the unit through the network connectors. For DeviceNet and SDS systems power is
provided through the 5-conductor bus cable.
A CANX can be used for quite a number of helpful purposes, including
•
to extend the network beyond its absolute maximum length (e.g., 500 meters for
DeviceNet) at the slowest speed
•
to implement a longer network for a given baud rate (e.g., pushing a 500K baud network
beyond 100 m for DeviceNet)
•
to provide higher speed baud rates for a given network length
•
to extend the length of the drop cable (e.g., longer drops than 6 m for DeviceNet)
•
to provide 2600V electrical isolation between the 2 sub-nets
•
to create a unique network topology instead of a conventional bus structure, such as a
star configuration
Figure 1-1 WRC-CANX-DIN-DN Series 4
Western Reserve Controls
PUB 14.1
WRC-CANX-xx Series 4
User’s Manual
1.1. Series 4 Specific Features
The Series 4 CANX provides enhancements over previous versions. Enhancements include:
* CAN 2A and 2B support
* New Switch settings allow selection for CANopen speeds up to 1 M Baud in addition to the
standard DeviceNet Baudrates
* Increased message internal buffers – Automatic Memory Technology (AMT) operation
* Shorter latency time compared to CANX series 3
* Improved Reverse voltage protection and Can data lines noise immunity
* Jumper-selectable terminating resistors on-board the CANX
1.2. Features
The WRC-CANX has the following features:
Extends CAN-Bus cable lengths - trunk line or drop lines
Allows operation at higher speeds for specific distances
Expands the usable applications for CAN-Bus systems
Operates at 9.6K, 10K, 20K, 40K, 50K, 100K 125K, 250K, 500K, 800K and 1M baud
Operates up to 1M baud for other CAN protocols
No configurable parameters
Automatic baud rate selection
No address selection required
Isolates the two sides of the bus - 2500 volts
Logically transparent to the Master and Slave devices on the bus
DeviceNet; SDS; CANopen, J1939, CAN, V2.0, Part A and Part B compatible
Powered from the 24Vdc supplied by bus network or the user
Two mechanical packages:
DIN rail mount:
WRC-CANX-DIN
Sealed NEMA-4X enclosure:
WRC-CANX-NEM
5-pin pluggable connection for the DIN mount unit
5-pin round mini-style connection for the NEMA mount unit
Standard CAN chips manage bus error detection
Standard CAN chips handle message bus contention
Less than 100 µsec latency
4 bi-color (red/green) status LED's
CE Compliant for WRC-CANX-NEM-xx versions
EN 55011 Class A
EN 50082-2: 1994
1.3. Basic Operation
There are two bus connections for each CANX, referred to as Network A and Network B. The
CAN Bus is connected to each side of the CANX and each side receives its power and signals from the
Bus on its respective side. See
Figure 1-2 for a typical application.
2
Western Reserve Controls
PUB 14.1
WRC-CANX-xx Series 4
User’s Manual
Whenever a message is transmitted on the Bus to which CANX is connected, CANX receives the
message on the side where it was initiated and performs a store-and-forward of the message to the other
side. It then transmits the message to the bus on the other side, following the defined bus arbitration rules.
This action is performed for any valid CAN message independent of who generated it or to whom it is
intended.
There is approximately a 75 µsec propagation delay of the message through the CANX.
The CANX is not addressed as a specific device on the Bus and cannot be interrogated by other
nodes. It is transparent to all other nodes on the bus.
WRC-CANX
CAN-Bus
Master
T
T
Network A
A
PS
T
Network B
T
B
PS
I/O Nodes
I/O Nodes
Terminating resistor requirements indicated by “T”
Figure 1-2 Typical CANX network configuration
1.4. Reference Documents
The following documents are referenced in this User’s Manual
* ODVA DeviceNet Specification Volume I, Release 2.0 or CIP specification Volume 3
* Honeywell Micro Switch Specification GS 052 104, “SDS Smart Distributed System Physical
Layer Specification”, release date 12/8/1994
3
Western Reserve Controls
PUB 14.1
2.
WRC-CANX-xx Series 4
User’s Manual
Quick Start
To quickly and easily install your CAN-Bus Extender in your DeviceNet system, follow the instructions
below. For more details, see Section 4.
To Install and Establish Communications
1. Remove the CAN-Bus Extender from the box and connect your CAN-Bus cable to the 5-pin plugs
(supplied with CANX-DIN) or the mini-style connectors (user-supplied) according to wiring
specifications for the CAN Bus you are using and described later in this manual.
2. Leave the DIP switches in the FF or all OPEN positions. The DIP switches are set to autobaud both A
and B sides from the first valid CAN message on either side.
3. Using on-board jumpers W1 and W3, terminate each side of the CAN-Bus network, as appropriate.
(This is especially critical at the higher baud rates.)
4. The CANX does not differentiate between A side and B side from a functional perspective. The CANX
can be oriented with either side toward the Master.
5. Make sure that there is power on both network sides. (The CANX isolated power and signal.)
6. Plug the CANX into your network.
7. The CAN-Bus Extender will undergo its initialization sequence, flashing the LED’s. After approximately
5 seconds, the Module Status LED (labeled “MS”) will go on solid green and network LED’s (labeled
“NSA” and “NSB”) will flash green.
8. Both Network A and B Status LED’s (NSA and NSB) will go on solid once a valid CAN message is
received into either side of the Extender and the baudrate auto-detect has been successfully
performed.
9. The CAN-Bus Extender is now operating on the network and is ready to repeat messages from either
Network A or Network B.
4
Western Reserve Controls
PUB 14.1
3.
WRC-CANX-xx Series 4
User’s Manual
General Specifications
Product:
WRC-CANX-DIN and WRC-CANX-NEM CAN-Bus Extender, Series 4
Description:
Electrical extender to extend the permitted cable distances defined for CANbased network products
Device Type:
Communications Extender
Product Revision:
4.1
DeviceNet Conformance: Designed to conform to the ODVA DeviceNet Specification Version 2.0.
Baud rate:
9.6K, 10K, 20K, 40K, 50K, 100K 125K, 250K, 500K, 800K and 1M baud fixed
or auto-detect baud rate on DeviceNet
Address selection:
Not applicable
Bus Connection:
WRC-CANX-DIN
Extender:
CAN-Bus Cable:
5-pin pluggable header (male pins)
Phoenix Contact MSTBA 2.5/5-G-5.08/AU
5-contact plug (female contacts)
Phoenix Contact MSTB 2.5/5-ST-5.08/AU (included)
WRC-CANX-NEM
Extender:
Woodhead # 51354, female sockets, female threads
Woodhead # 1R5006A17A120, male pins, male threads
CAN-Bus Cable:
See accessories list
Status Indicators:
Module Status:
Network A Status:
Network B Status:
Diagnostic Data:
Voltage Isolation:
2500 V
Maximum power:
Voltage:
Current:
green/red bi-color LED
green/red bi-color LED
green/red bi-color LED
green/red bi-color LED
11 - 25 Vdc
Network A:
Network B:
110 mA @ 11 Vdc - 60 mA @ 25 Vdc
20 mA @ 11 Vdc - 10 mA @ 25 Vdc
Power: 1.5 W
Mounting:
WRC-CANX-DIN: DIN rail mount, EN 50022
WRC-CANX-NEM: Panel-mount, 4 screws
Size:
Length:
Depth:
Height:
WRC-CANX-DIN
4.32” (110 mm)
1.79” (45,5 mm)
3.44” (87,4 mm)
Operating Temp:
0-70 ºC
Humidity:
0-95% RH, non-condensing
5
WRC-CANX-NEM
5.11” (130 mm)
2.27” (57,7 mm)
3.70” (94,0 mm)
Western Reserve Controls
PUB 14.1
4.
WRC-CANX-xx Series 4
User’s Manual
Hardware Installation and Configuration
4.1. Overview
A CAN-Bus Extender is a single device connecting to two parts (sub-network) of a single CANBus network. The CANX-DIN is to be mounted on an EN50022 DIN rail (available from WRC and WRC’s
distributors as part number WRC 50022) in any orientation. The CANX-NEM is a NEMA-4X polycarbonate
enclosure and is panel mounted.
NSA
DGN
MS
W1
NETWORK A
1.79” ( 45,5 mm)
--NET A- -NET B-1 2 3 4 5 6 7 8
SW1
OPEN
W3
NSB
NETWORK B
4.65” (118 mm)
Figure 4-1 WRC-CANX-DIN Series 4 Dimensional Drawing
6
Western Reserve Controls
PUB 14.1
WRC-CANX-xx Series 4
User’s Manual
5 4 3 2 1
V+ CH
CL V-
DeviceNet
Male, Mini
W1
NSA
DGN
MS
NETWORK A
DeviceNet
Female,
Mini
--NET A- --NET B1 2 3 4 5 6 7 8
2.27” ( 57,7 mm)
SW1
W3
NSB
1 2 3 4 5
V- CL CH V+
NETWORK B
5.11” (130 mm)
2.25” ( 57,2 mm)
DeviceNet
Female,
Mini
DeviceNet
Male, Mini
0.82”
(80,2 mm)
5.11” (130 mm)
Figure 4-2 WRC-CANX-NEM Series 3 Dimensional Drawing
4.2. DIP Switch Settings
7
Western Reserve Controls
PUB 14.1
WRC-CANX-xx Series 4
User’s Manual
The WRC-CANX-XX has an 8-pole DIP switch.
•
•
Switch positions 1-4 are used to set the Network A baud rate.
Switch positions 5-8 are used to set the Network B baud rate.
The baud rates can be set independently, or one side can take its baud rate from the other side
(in the “Remote” setting).
The Autobaud detects from DeviceNet bauds.
For CANopen speeds, select the fix baudrate setting.
When both the CANX units are set to all open switch positions (remote-remote) it scans through
DeviceNet baudrates.
Table 4-1 Baud Rate Settings for Switches
Baud rate
125K
250K
500K
Local Position 1 Position 2
Remote Position 5 Position 6
CLOSED
CLOSED
CLOSED
CLOSED
CLOSED
CLOSED
Position 3
Position 7
CLOSED
CLOSED
OPEN
Position 4
Position 8
CLOSED
OPEN
CLOSED
Autobaud
CLOSED
CLOSED
OPEN
OPEN
9.6K
10K
20K
40K
50K
100K
800K
1M
CLOSED
CLOSED
CLOSED
CLOSED
OPEN
OPEN
OPEN
OPEN
OPEN
OPEN
OPEN
OPEN
CLOSED
CLOSED
CLOSED
CLOSED
CLOSED
CLOSED
OPEN
OPEN
CLOSED
CLOSED
OPEN
OPEN
CLOSED
OPEN
CLOSED
OPEN
CLOSED
OPEN
CLOSED
OPEN
Remote
OPEN
OPEN
OPEN
OPEN
Autobaud
ALL OTHER SWITCH POSITIONS
Meaning
Fixed
Fixed
Fixed
Autobaud for DeviceNet
Bauds (125k,250k,500k)
Fixed
Fixed
Fixed
Fixed
Fixed
Fixed
Fixed
Fixed
Takes baud rate from the
opposite end device. If
both sides are remote,
Autobaud from either side.
Autobaud
4.3. LED Operation
The WRC-CANX-XX Multiplexer has four (4) LED’s that provide visual status information to the
user about the product and the DeviceNet network. See Figure 4-1, Table 4-2, Table 4-3 and Table 4-4.
8
Western Reserve Controls
PUB 14.1
WRC-CANX-xx Series 4
User’s Manual
Table 4-2 Module Status LED (labeled MS)
LED State
Module Status
Meaning
OFF
No Power
There is no power through DeviceNet.
Device Operational
WRC-CANX is operating normally.
Flashing Red
Minor Fault
Advanced Memory Technology (AMT)
buffers space exceeded.
Red
Unrecoverable Fault
WRC-CANX may be damaged.
Flashing Red/Green
Device Self-Testing
WRC-CANX is in self-test mode.
Green
Table 4-3 Network Status LED’s (labeled NSA and NSB)
LED State
Module Status
OFF
No Power / Not on-line
Flashing Green
Idle
Fast Flashing Green
Autobaud selection
Green
Meaning
On-line
WRC-CANX has no power or device is not
operating.
WRC-CANX has not received a valid
message for 0.5 sec.
The WRC-CANX is waiting for a valid
message to fix the baudrate.
WRC-CANX is operating normally.
Flashing Red
CAN controller buffer overflow
Red
Critical link failure (Bus Off)
There is more traffic on the network than
the system can handle.
WRC-CANX has detected an error that
makes it incapable of communicating on
the link.
Table 4-4 Diagnostic Status LED’s (labeled DGN)
LED State
Module Status
Meaning
OFF
Normal operation
No Power, or
Normal Operation with power applied.
4.4. Power Requirements
The WRC-CANX-XX CAN-Bus Extender subsystem is powered from the 11-25 Vdc provided by
the DeviceNet network. The WRC-CANX consumes 60 mA of current at 25 Vdc, or 1.5 Watts, typical. See
Section 3.
Power is typically taken from the bus on each side and each side (A and B) requires power. Power
applied to the A Side powers the entire unit except the B Side isolated transceiver. If isolation is not
required for your application, then the power line may be jumpered from side A to side B. Care must be
taken that the power supply is capable of handling the entire load on both sides of the CANX.
9
Western Reserve Controls
PUB 14.1
WRC-CANX-xx Series 4
User’s Manual
4.5. Network Cabling and Configuration
This section provides general guidelines for connecting DeviceNet and SDS systems. You can
find detailed specifications in the appropriate ODVA DeviceNet and Honeywell SDS specifications.
4.5.1. Cable Lengths
The following provide cable length limits for DeviceNet and SDS systems.
Table 4-5 Network Maximum Lengths - DeviceNet
Baud Rate
125 Kbits/s
250 Kbits/s
500 Kbits/s
Trunk Line Length
Maximum Distance
Meters
Feet
500 m
1640 ft
250 m
820 ft
100 m
328 ft
Drop Length
Maximum
Cumulative
Meters
Feet
Meters
Feet
6m
20 ft
156 m
512 ft.
6m
20 ft
78 m
256 ft.
6m
20 ft
39 m
128 ft.
DeviceNet has a limit of 64 nodes per network for any baud rate. The CANX does not count as an
addressed device.
Table 4-6 Network Maximum Lengths - SDS
Baud Rate
125 Kbits/s
250 Kbits/s
500 Kbits/s
1 Mbits/s
Trunk Line Length
(maximum)
Meters
Feet
457.2
1500
182.8
600
91.4
300
22.8
75
Drop Length
(maximum)
Meters
Feet
3.6
12
1.8
6
0.9
3
0.3
1
No.
Nodes
64
64
64
32
SDS has a limit of 32 nodes per network for any baud rate. The CANX does not count as an
addressed device.
4.5.2. Network Termination
A CAN-Bus system must be terminated at each end of the trunk line. The host controller and
the last device (CAN-Bus Extender or other DeviceNet node) on the network section must always be
terminated to eliminate reflections, even if only two nodes are present. Follow the information below when
using a CANX.
The CANX Series 4 has built-in terminators, which can selectively included or omitted from the
network. To include the on-board terminator on side A, install jumper W1; or remove the W1 jumper if the
10
Western Reserve Controls
PUB 14.1
WRC-CANX-xx Series 4
User’s Manual
on-board terminator in not desired. For the side B sub-network, install or remove jumper W3. The CANX
is shipped from the factory with the jumpers installed.
Trunk line use
For the purpose of network termination, the CANX is treated as the last node on the section of the
trunk network to which it is connected. Therefore, when a CANX is used directly in a trunk line, it must be
terminated on both the Network A and Network B sides. You must also place a terminating resistor on the
other end device of Network A and on the last device on Network B side of the trunk line.
Drop line use
When CANX is used in a drop line (the Network A side is toward the main trunk), the Network A
connection is not terminated. In this configuration the Network B section is considered as an independent
bus line electrically. The CANX, as the first node in this new bus line and must be terminated, and the last
device on the line must also be terminated.
Some specifications for the terminating resistor are:
Table 4-7 Terminating Resistors
DeviceNet
121 ohm
1% metal film
1/4 watt
SDS
120 ohm
2%
1/4 watt
Important: Per the DeviceNet and SDS specs -- do not terminate devices on drop lines.
An appropriate terminating resistor kit, WRC part number RM121DN, which satisfies both
DeviceNet and SDS specs, is included with your Extender.
Note: The WRC-CANX Series 4 family is configured at the factory with 2 internal terminating
resistors on each network – one for Network A and one for Network B – using jumpers W1 and W3. If
these are used in a trunk line, no other terminators should be placed at the CANX that end of the network.
Note: If the CANX is used on a drop line, the internal terminating resistor should be removed on
Network A – the drop line directly from the trunk line.
11
Western Reserve Controls
PUB 14.1
WRC-CANX-xx Series 4
User’s Manual
4.5.3. DeviceNet Connection Wiring
The supplied 5-pin CAN-Bus connection plug accepts cable sizes from 12 AWG - 24
AWG. The maximum wire size (12 AWG) has an area of 6530 circular mils and the smallest (24 AWG)
has an area of 3265 circular mils.
Figure 4-3 WRC-CANX-DIN-DN DeviceNet cable connector
Figure 4-4 DeviceNet cable specifications
12
Western Reserve Controls
PUB 14.1
WRC-CANX-xx Series 4
User’s Manual
Figure 4-5 WRC-CANX-NEM DeviceNet Connectors
4.5.4. SDS Bus Connection Wiring
The supplied 5-pin CAN-Bus connection plug accepts cable sizes from 12 AWG - 24
AWG. The maximum wire size (12 AWG) has an area of 6530 circular mils and the smallest (24 AWG)
has an area of 3265 circular mils.
13
Western Reserve Controls
PUB 14.1
WRC-CANX-xx Series 4
User’s Manual
Figure 4-7 SDS Plug Connector
Figure 4-6 SDS Mini Connector
14
Western Reserve Controls
PUB 14.1
5.
WRC-CANX-xx Series 4
User’s Manual
Operation
The CANX accepts and stores messages received at either network connection and actively retransmits the messages to the other sub-net while providing 2500V isolation between the two sections of
the network. The two bus connections for each CANX are referred to as Sub-Network A and Sub-Network
B, and the two sub-nets are one logical network with isolation between them. The CANX may be used to
extend the maximum distance that a network can operate at any given speed. That is a CANX may be
used
•
to extend the network beyond its absolute maximum length (e.g., 500 meters for
DeviceNet) at the slowest speed
•
to implement a longer network for a given baud rate (e.g., pushing a 500K baud network
beyond 100 m for DeviceNet)
•
to provide higher speed baud rates for a given network length
•
to extend the length of the drop cable (e.g., longer drops than 6 m for DeviceNet)
•
provide 2500V electrical isolation between the 2 sub-nets
The CAN Bus is connected to each side of the CANX and each side receives its power and
signals from the Bus on its respective side.
Whenever a message is transmitted on the Bus to which CANX is connected, CANX receives the
message on the side where it was initiated and performs a store-and-forward of the message to the other
side. This action is performed for any valid CAN message independent of who generated it or to whom it is
addressed.
The CANX is not addressed as a specific device on the Bus and cannot be interrogated by other
nodes. It is transparent to all other nodes on the bus.
5.1. Application Notes
To help insure ease of installation and reliable operation of your system, the following guidelines
should be followed CANX installation in your CAN network.
You may install the Network A side or B Side of CANX toward the Bus Master.
The CANX takes its logic power from the A Side, but you may power up the CANX from either
side first.
There is approximately a 75 µsec propagation delay of the message through the CANX.
In autobaud mode, each side can autobaud from the other side or from the first message on
its own side.
CANX is not a grounded device and the Bus shield is not connected electrically to the device.
Therefore, follow appropriate wiring practices to eliminate noise and other problems.
5.1.1. CANX Theory of Operation
As described the CANX performs a store-and-forward operation on each message received. The
operation is described in this section.
15
Western Reserve Controls
PUB 14.1
WRC-CANX-xx Series 4
User’s Manual
The CANX will verify and accept (consume) on either network side any and all valid CAN
messages. The message will be momentarily stored internally and the CANX will immediately attempt to
re-send (produce) the message on the other side bus. Because the other side of the CANX is a different
bus electrically and from a data link perspective, it will perform a negotiation session on that bus section to
retransmit (produce) the message onto that section. This action has the effect of doubling the overall
number of total attempts to get onto the bus of each message. This is the case because every message
is reproduced independent of where the target node exists; that is, the CANX does not interrogate the
message to determine the target node and does not know physically where the target node is connected.
As the bus negotiation is performed on the second side, the retransmitted message may or may
not get on the next bus section immediately. That will depend solely upon the priority of the message the
CANX is sending with respect to the messages being generated by nodes on that side of the bus and on
the amount of overall bus traffic on that side. In the case where the CANX does not immediately win the
negotiation it stores the messages and attempts to resend it in the same fashion as any other device on
the network. To the extent that it cannot produce immediately the message will be stored in an internal
buffer until it can be sent.
As other messages arrive at the CANX they also are put into an internal buffer and retransmitted
as quickly as possible. The internal buffers (one for each side) are FIFO buffers so that the messages for
each side will be retransmitted in the order that they are received with respect to the other messages
received on the same side. Up to 100 messages can be held in the internal AMT buffers.
5.1.2. Network Throughput Design Considerations
The effect of the operations described above and the internal propagation delay inside the CANX
(approximately 75us) as it performs the store-and-forward is that it may be possible to design a network
with more traffic that the CANX can be expected to handle. Care should be taken to design the network so
that the amount of total traffic does not exceed the capabilities of the total system. Each application and
installation has its own requirements and configurations so a definitive formula would be very difficult to
define. However, a good rule of thumb would be to set up the scan time for a network that includes a
CANX that is no faster that twice the fastest scan time possible to achieve the desired communications
that may be obtained without the CANX.
In the event that the network operation prevents all messages on one side from getting out before
the buffer on that side fills, subsequent messages will be lost. The CANX will continue to process
transmitting all stored messages and will accept new messages once room clears in the buffer. The red
LED labeled NSA or NSB will illuminate and will remain illuminated for 5 seconds after the “buffer full”
condition clears.
5.1.3. Fixed Operation
Fixed baud rate operation has the specific advantage that it can be used in networks where all
devices are autobaud only.
The baud rate is set by setting SW1 switch positions before powering up the A side of the CANX.
See Table 4-1.
16
Western Reserve Controls
PUB 14.1
WRC-CANX-xx Series 4
User’s Manual
5.1.4. Autobaud Operation
Autobaud is the method by which a device automatically determines the baud rate on the
DeviceNet network and sets it’s internal baud rate to match without the need for switches or software
configuration. The CANX supports autobaud.
Autobaud operation has the advantage of allowing a system implementer or designer to ignore the
operating baud rate when installing the CANX. The general practice is that when an I/O device is
autobaud, it does not transmit a DupMacID request message immediately upon power up. It waits for
another (fixed baud rate) device to send its DupMacID message in order use that message to determine
to which baud rate the network has been set.
Since the CANX is not a logical node on DeviceNet, it does not initiate any DeviceNet
communications. When both the A and B sides are set to autobaud, a valid message on either side will be
used to set the baud rate on both sides. In addition, that message is transmitted out the other side of the
network to the nodes there, from which they can establish their baud rates if in autobaud.
In the case where no device that initiates this DupMacID sequence, all the autobaud devices will
just wait for some valid message to be generated.
The CANX baud rate is set by setting SW1 switch positions before powering up the A side of the
CANX, as defined in Table 4-1.
17
Western Reserve Controls
PUB 14.1
6.
WRC-CANX-xx Series 4
User’s Manual
Example Configurations
Examples of valid configurations are shown in the following figures. The first example shown
demonstrates a standard linear bus structure for comparison.
• Linear Bus Topology
Terminator
Tap
Terminator
Drop Line
Nodes
Zero Drop
Short Drops
Figure 6-1 Linear Topology Example
18
Western Reserve Controls
PUB 14.1
WRC-CANX-xx Series 4
User’s Manual
• Linear Bus Topology - distance doubled
Terminator
Extender
Tap
Terminator
Drop Line
Nodes
Zero Drop
Short Drops
Figure 6-2 Linear Topology with Double Distance Example
• Linear Bus Topology - multiple Extenders
Terminator
Extender
Tap
Extender
Terminator
Drop Line
Nodes
Zero Drop
Short Drops
Figure 6-3 Linear Topology with Multiple Extenders Example
19
Western Reserve Controls
PUB 14.1
WRC-CANX-xx Series 4
User’s Manual
• Linear Bus Topology - multiple extended
drop lines
Terminator
Tap
Drop Line
Terminator
Extender
Extender
Nodes
Zero Drop
Short Drops
Figure 6-4 Linear Topology with Multiple Extended Drop Lines Example
• Modified Star Topology - multiple extended
drop lines
Host PLC
Extender
Figure 6-5 Star Topology with Multiple Drop Lines Example
20
Western Reserve Controls
PUB 14.1
7.
WRC-CANX-xx Series 4
User’s Manual
Accessories and Other CAN Products
The following components can be used with a WRC-CANX CAN-Bus Extender for replacements
or spare parts.
Part
• CANX-DIN Link Connector
and Terminator Resistor
•
CANX-NEM Cable
WRC P/N
Equivalent Mfr. Part Number
CANX-DN-CK
Phoenix Contact MSTB2.5/5-ST-5.08/AU
n/a
Various manufacturers’ Mini-Style Connector
Examples:
Cable assy. w/ female threads, fem. sockets:
Turck RKM 570-*M/630 (“trunk line”)
Turck RKM 571-*M/630 (“drop line”)
Cable assy. w/ male threads, male pins:
Turck RSM 570-*M/630 (“trunk line”)
Turck RSM 571-*M/630 (“drop line”)
•
DIN rail (1 meter)
WRC 50022
Phoenix Contact NS 35/7,5 0801733 (2 m)
Allen-Bradley 199-DR1 (1 m)
WRC also provides discrete and analog I/O signal conditioning and multiplexing on DeviceNet, as
well as communication gateways. See Table 7-1 on the next page.
21
Western Reserve Controls
PUB 14.1
WRC-CANX-xx Series 4
User’s Manual
Table 7-1 Additional WRC DeviceNet Products
Part
WRC Part Number
DIN rail
WRC 50022
Terminating resistor, axial lead
RM121DN
Connector, 5-pin mini-round for CANX, CANR
B 4151-0/16 (Turck)
Discrete I/O block – 4 channels
1782-JDB4
Discrete I/O block – 8 channels
1781-JDB8
Analog Input block – 4 channels, 10-bit
1782-JDA4
Analog I/O block – 8 channels, 12-bit
1782-JDA8
DeviceNet to Serial I/O Gateway
1782-JDC
DeviceNet to Serial I/O Gateway, Enhanced
1782-JDCE
DeviceNet-to-Serial I/O Gateway, 4 channels
W5-JDC4
DeviceNet to Modbus Gateway
1782-JDM
Discrete I/O block – 24 channels
WRC1-JDB24
Discrete I/O block – 48 channels
WRC1-JDB48
Discrete I/O, Analog Input block – 24 DIO, 32 AI
WRC1-JDA/24
Discrete I/O, Analog Input block – 48 DIO, 32 AI
WRC1-JDA/48
Analog I/O block - 32 channels
WRC1-JDAIO
Discrete and Analog I/O block – 24 DIO, 32 AIO
WRC1-JDAIO/24
Discrete and Analog I/O block – 48IO, 32 AIO
WRC1-JDAIO/48
Discrete I/O block – 8 DIs, 8 DOs, 4 AIs
W5-JDB16x
DeviceNet, CANopen Extender, DIN mount
WRC-CANX-DIN-DN
SDS Extender, DIN mount
WRC-CANX-DIN-SD
DeviceNet, CANopen Extender, DIN mount
WRC-CANX-DIN-C7
DeviceNet, CANopen Extender, NEMA box
WRC-CANX-NEM-AU
DeviceNet, CANopen Extender, NEMA box
WRC-CANX-NEM-DN
SDS Extender, NEMA box
WRC-CANX-NEM-SD
DeviceNet, CANopen Extender, Fiber Optic, NEMA
box
WRC-CANR-DF-DN
22
Western Reserve Controls
PUB 14.1
8.
WRC-CANX-xx Series 4
User’s Manual
Troubleshooting
This section identifies some of the common problem observed when commissioning or operating
a CANX Extender.
Problem:
DeviceNet devices will not communicate on the network
Module Status LED is solid Green
Network Status LEDs are flashing Green at ½ second intervals
Meaning
No transmissions have been received by the CANX for 0.5 seconds.
Possible Solutions:
1. Network cables are broken or disconnected.
2. Network is not properly terminated.
3. All devices have stopped trying to communicate on the network.
4. Power has been lost on the B Side subnetwork.
Problem:
DeviceNet devices will not communicate on the network
Module Status LED is solid Green
Network Status LEDs are flashing Green quickly
Meaning
The CANX is in autobaud and is waiting for a valid message to fix its baud rate.
Possible Solutions:
1. Network cables are broken or disconnected.
2. Network is not properly terminated.
3. All devices have stopped trying to communicate on the network.
Problem:
Some messages are missed on network.
Module Status LED is solid Green
NSA and NSB LEDs are flashing Red
Meaning
Internal CAN buffers are full. Network has more traffic than it can handle.
Possible Solutions:
1. Reduce the scan rate from the Master.
2. Reduce the COS frequency on I/O devices.
3. Decrease the assembly sizes of I/O connections.
4. Recalculate the network traffic and bandwidth without the CANX.
Problem:
Some messages are missed on network.
Module Status LED is solid Green
NSA and NSB LEDs are flashing Red
Meaning
Internal AMT buffers are full. Network has more traffic than it can handle.
Possible Solutions:
1. Reduce the scan rate from the Master.
2. Reduce the COS frequency on I/O devices.
3. Decrease the assembly sizes of I/O connections.
4. Recalculate the network traffic and bandwidth without the CANX.
23
Western Reserve Controls
PUB 14.1
9.
WRC-CANX-xx Series 4
User’s Manual
Summary of Changes to Series 4 from Rev 2 and
Series 3
To facilitate implementation of the new Series 3 CANX products for customers that are currently
users of the CANX Revision 2.xx products, this section summarizes the product changes from Rev 2 to
Series 3.
9.1. DIP Switch Baud Rate Settings
Several new options exist for setting the baud rate on the CANX Series 3.
•
Like the Series 3, the Series 4 has an 8-position DIP switch block. All 8 switches are
defined and used.
•
The Series 4 unit is compatible with all CANopen baud rates. These baud rates are fixed
by setting the 8 position dip switch to the appropriate configuration.
•
Like Series 3, a “remote mode” exists which allows either side to set its baud rate based
on the other side’s BR – in either fixed baud or autobaud.
•
See Section 4.2 above for details.
9.2. Terminating Resistors
The Series 4 has an on-board terminating resistor on each CAN connection that can be
selectively included or excluded from the network circuit. With jumpers W1 and/or W3 in place, the CANX
puts a 121-ohm resistor across the CAN_H and CAN_L lines on sub-network sides A and/or B. See
Figure 4-1and Figure 4-2 for the location of these jumpers.
9.3. Field Programmable Updates
The CANX Series 4 has its program held in flash memory, which can be updated in the field.
Contact the factory for details.
24
Western Reserve Controls
PUB 14.1
WRC-CANX-xx Series 4
User’s Manual
10. Frequently Asked Questions
1. On what networks do the WRC CANX and CANR work?
The WRC CANX and CANR function with DeviceNet, CANopen, J1939, SDS and other CAN 2.0,
Part A and Part B networks. If you don’t see your network listed here contact WRC for more
information on your network compatibility.
2. What’s the difference between WRC-CANX-xx and WRC-CANR-xx product families?
The primary difference between the two different extender families is the way in which the CAN
messages travel. The WRC CANX handles all message transfer internally, while the WRC CANR
sends the messages across a fiber link.
• The WRC-CANX-xx family is a group of single unit CANbus extenders. The unit receives a CAN
message on one side and transmits it, without processing or modifying the message, on the
other side. It is one unit with two CANbus connectors, one for each “network side.”
• The WRC-CANR-xx is a set of two CANbus extenders. The first unit receives CAN messages
and transmits them over a fiber link to the other extender, which receives them, then
reproduces the messages on the CANbus without processing or modifying them.
3. What are all of these different models? Which WRC CANX or CANR should I choose?
We offer many different models of the CANX and CANR in order to meet a wide range of customer
needs. The following table provides descriptions of each available CANX and CANR model.
Table 10-1 CANX and CANR Models
Product Type
WRC-CANX
WRC-CANR
Model
Description
1 extender with Phoenix connectors. Open frame, DIN rail mounted.
DIN-C7
Includes protective plexi-glass cover.
DIN-DN
1 extender with Phoenix connectors. Open frame, DIN rail mounted.
1 extender with Phoenix connectors. Open frame, DIN rail mounted.
DIN40K
Switches preset for 40K baud rate.
1 extender with Phoenix connectors. Open frame, DIN rail mounted.
DIN960
Switches preset for 9.6K baud rate.
NEM-DN 1 extender with M18 connectors. Comes in protective NEMA 4X box.
1 extender with M18 connectors. Comes in protective NEMA 4X box.
NEM-40K
Switches preset for 40K baud rate.
1 extender with M18 connectors. Comes in protective NEMA 4X box.
DN-HK
DNET power wired from side A to side B-no isolation.
Kit includes 2 extenders with M18 and fiber optic connectors. For use
DF-DN
with multi-mode fiber optic cable.
Kit includes 2 extenders with M18 and fiber optic connectors. For use
DF-SM
with single-mode fiber optic cable.
Kit includes 2 extenders with Phoenix connectors. For use with multiDIN-DF
mode fiber optic cable. Open frame, DIN rail mounted.
MTGKIT
Mounting kit for DIN rail. For use with CANX or CANR.
25
Western Reserve Controls
PUB 14.1
WRC-CANX-xx Series 4
User’s Manual
4. Why does WRC offer CANX & CANR extenders?
The WRC-CANX/R Extenders are a family of products that extend the communications cable
lengths for DeviceNet, J1939, CANopen and other CAN, V2.0, Part A or Part B serial bus systems.
These repeaters serve to:
• extend a network beyond its absolute maximum length (e.g., 500 meters for DeviceNet) at the
slowest speed
• implement a longer network for a given baud rate (e.g., pushing a 500K baud network beyond
100 m for DeviceNet)
• provide higher speed baud rates for a given network length
• extend the length of the drop cable (e.g., longer drops than 6 m for DeviceNet)
• provide 2500V electrical isolation between 2 sub-nets.
• allow the user to employ non-linear network topologies (e.g., star, tree, etc.)
5. What types of connections are available for WRC CANX and CANR extenders?
Please see question 3 if you need to know what connectors come on which WRC CANX or CANR
models.
Several of the WRC CANX and CANR extenders come with the 5-pin CANbus connection plug,
which accepts cable sizes from 12 AWG - 24 AWG. This is the standard round, mini-style connector
(M18) with male pins for copper cable. A standard DeviceNet cord with a female end connects to
the CANX or CANR.
• Turck supplies individual connectors ends that can be used to build custom DeviceNet or
copper cables (part number B4151-0/16 is a 5 pin, 600V, 9A connector that comes in a male or
female variety that will connect to the CANX or CANR). Please refer to www.turck.com to find a
distributor near you.
• If you are interested in purchasing pre-fabricated cables with the proper DeviceNet connectors,
Brad Harrison is the manufacturer of Woodhead P/N 105002A01F030 (male pins) and
Woodhead P/N 105000A01F030 (female pins), which are distributed by Gross Automation at
http://www.bradharrisonsales.com/ along with many other 5-pole plug in options. All Woodhead
products that are compatible with WRC CANX and CANR are called “mini-change” cordsets.
• Standard Phoenix connectors for use with non-NEMA enclosed units will be supplied with your
order if you choose a model using these connectors.
• WRC CANRs use fiber optic receiver/transceivers that are compatible with different fiber
grades, so long as they are terminated with ST fiber connectors.
6. At what baud rates do the WRC CANX and CANR function?
The WRC CANX and CANR function at baud rates of 9.6K, 10K, 20K, 40K, 50K, 100K, 125K, 250K,
500K, 800K and 1M fixed and will auto-detect the baud rate on DeviceNet. The CANX and CANR
are also capable of handling different baud rates on each side (e.g., a network with a baud rate of
125K plugged into Network side A can communicate with, through the CANX or CANR, a network
with a baud rate of 1M on Network side B).
7. Does the WRC CANX or CANR require additional termination resistance on the data lines?
The WRC CANX or CANR functions as the beginning or ending of a new segment of the network.
With no power supplied to the network, the resistance across the CAN data lines should be
approximately 60 ohms (two 120-ohm resistors in parallel—one on each “end” of the network bus).
26
Western Reserve Controls
PUB 14.1
WRC-CANX-xx Series 4
User’s Manual
• The WRC CANX has two user-selectable 121-ohm resistors on board. Keeping the plastic
jumpers, which are installed on all units at the factory, on W1 and W3 will keep these resistors
in the circuit, across the CAN data lines. In this case, the user needs only to terminate the other
end of each side of the bus with a 120 ohm resistor to insure correct termination on Network
side A (on one side of the CANX) and Network side B (on the other side of the CANX). If your
network is already terminated at the beginning and end of the bus (net resistance of ~60 ohms),
it will be necessary to take the W1 or W3 jumpers off so that the network is not improperly
terminated.
• The WRC CANR has one user-selectable 121-ohm resistor on board, which is selected or
deselected using the plastic jumper (installed on all units at the factory) on W1. With the jumper
on, this resistor remains in the circuit across the CAN data lines. In this case, the user needs
only to terminate the other end of the bus with a 120-ohm resistor to insure correct termination.
If your network is already terminated at the beginning and end of the bus (net resistance of ~60
ohms), it will be necessary to take the W1 jumper off so that the network is not improperly
terminated.
¾
It should also be noted that drop lines should not be terminated where they are connected
to the main trunk line. For a CANX or CANR in this position the jumper will have to be
removed. See the diagrams below for further clarification of proper network setup.
Figure 10-1 Sample WRC-CANX Setup
27
Western Reserve Controls
PUB 14.1
WRC-CANX-xx Series 4
User’s Manual
8. How do I determine the location in my network at which I might need a WRC CANX or CANR?
• Drop Line: The WRC CANX or CANR should be used in a drop line when you would like to extend
the drop more than 6m.
• Trunk Link: The CANX or CANR should be used in the main trunk line when you desire to extend
a network beyond its maximum length (e.g., 500 meters for DeviceNet at 125K baud rate or
beyond 100 m for DeviceNet at 500K baud rate)
• Differences in baud rate: The WRC CANX and CANR can pass communications from two
different baud rates back and forth with each other (e.g., Network A at 125K and Network B at
500K)
• Isolation: The CANX and CANR can provide 2500V electrical isolation between 2 sub-nets.
9. Does the WRC CANX or CANR act as a node on the network?
No. The WRC CANX and CANR are repeaters, which remain completely invisible to the master
device or PLC. The unit does not have a MAC ID. It will only pass messages through (without
modifying them) and cannot generate its own messages.
10. How much power does my WRC CANX or CANR require and what is the best means of
supplying it?
The WRC CANX and CANR should be powered with 11-25Vdc provided by the DeviceNet network,
or other DC power supply. The WRC CANX and CANR Series 4 consume approximately 1.5W
(60mA at 25Vdc). Power is typically taken from the bus on each side and each side (A and B)
requires power. Power applied to the A Side powers the entire unit except the B Side isolated
transceiver. If isolation is not required for your application, then the power line may be jumpered
from side A to side B. Care must be taken that the power supply is capable of handling the entire
load on both sides of the CANX.
11. Is there a limit to the number of times a network can be extended using a WRC CANX or
CANR?
There is no technical limit to the number of WRC CANXs or CANRs that can be placed in a
network. The number of extenders in a network is generally dictated by the length limitations, due to
the operation baud rate, of the network desired. Also, although the CANX and CANR have very
small propagation delays, their delay times add up when there are multiple units on one network.
For this reason, the master device’s EPR time should be adjusted to be greater than the message
transmission time (which includes the transmission time on the data lines plus the propagation delay
of the CANXs or CANRs) when adding several CANXs or CANRs to your network.
12. How do I know how many WRC CANXs or CANRs my application will require?
While there is no set formula for determining the number of WRC CANXs or CANRs, the length of
the network you are trying to create is most likely the dictating factor in the answer to this question.
The lengths of drop and trunk lines must follow CANbus guidelines for the selected protocol. A
CANX or CANR should be added in the network whenever you desire to extend the length of a drop
or trunk line beyond the normal maximum allowed length. Please refer to the WRC CANX or CANR
User’s Manual section “Cable Lengths” for more information on the allowed cable distances for each
baud rate and network protocol.
13. What do the LEDs on the WRC CANX or CANR tell me about how the unit(s) are behaving?
The Network LEDs on a CANX will be green and blinking slowly if a connection is established, but
no messages are being transmitted/received. They will be solid green when messages pass. These
same LEDs will be red if there is no connection. The same diagnostics apply for the NSA LED of a
CANR, but the NSB LED of a CANR indicates the status of the remote unit and whether the fiber
28
Western Reserve Controls
PUB 14.1
WRC-CANX-xx Series 4
User’s Manual
link is hooked up correctly (blinking green with no messages, solid green with messages) or
incorrectly (red). The MS LED gives the status of the unit. If it is green the unit is operating normally.
If it is blinking red the unit is out of memory, while solid red means the device has failed and may be
need to be power cycled or be repaired. Please refer the WRC CANX or CANR User’s Manual and
see the section on “LED Operation.”
14. Do WRC CANX and CANR extenders cause signal delays, and what speed of messages can
they handle?
V ZKLOH WKH &$15 KDV D
V 7KH 6HULHV XQLWV KDYH LQFUHDVHG EXIIHU VL]HV IURP 6HULHV DQG IDVWHU
7KH :5& &$1; KDV D VPDOO SURSDJDWLRQ GHOD\ RI DSSUR[LPDWHO\ GHOD\ RI DERXW message forwarding as well.
15. What testing has WRC completed to guarantee the reliable operation of CANX and CANR
extenders?
The WRC production and engineering teams have rigorously tested the CANX and CANR
extenders at a variety of strenuous network speeds and environmental conditions with many
different network configurations. Although there is no official ODVA test for this type of device, the
CANX and CANR have been included in the circuit while running the ODVA conformance testing for
a slave device. The slave device passed WRC’s in-house protocol conformance test with the CANX
or CANR in the circuit, between the master and slave. The CANX and CANR also passed the inhouse execution of the OVDA physical layer test. Each CANX or CANR pair is tested for
functionality individually before leaving our facility.
16. How does the Series 4 WRC CANX or CANR differ from the Series 3 model?
Single Mode fiber cable is now an option, available with the Series 4 CANR. New switch settings
allow selection for CANopen speeds up to 1M baud in addition to the standard DeviceNet baud
rates. There are larger internal buffers, which allow the WRC CANX and CANR to store more
messages while forwarding them in a first-in-first-out manner, making it even less likely that a
message will ever be lost in transmission. There is shorter latency time compared to CANX and
CANR series 3. The CANX and CANR also feature improved reverse voltage protection and CAN
data lines noise immunity.
17. Does the WRC CANX or CANR come with a warranty?
Yes, the WRC CANX and CANR, like all WRC products, are covered under a two year factory
warranty from the date of invoice that all hardware furnished under order will be free from defects in
material, workmanship and design.
18. How are field programming updates accomplished?
In the event that your WRC CANX or CANR is in need of an update, contact WRC. We will discuss
with you the options you have for your network.
If the answer to your question is not found here, or you require further assistance, please contact Western
Reserve Controls at:
1485 Exeter Road
Akron, OH 44306
330-733-6662 (phone)
330-733-6663 (fax)
For product information, e-mail: [email protected]
For technical support, e-mail: [email protected]
29