1
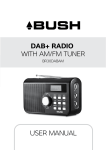
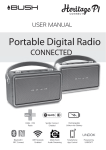
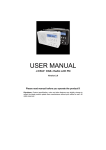
USER MANUAL
It’s radio as you know it plus…
Please read this user manual carefully before using the receiver
Important to know about digital radio coverage
Please note that digital radio is currently only available in Australian
metropolitan cities. It is not available in remote area yet. You can visit
www.digitalradioplus.com.au to discover the coverage of the available digital
radio broadcasting around Australia by typing your living area postcode.
Please make sure that your area has digital radio signal available to use the
DAB+ mode. We do not accept warranty returns due to no reception outside
the coverage area.
Digital radio is a new, exciting and involving way for listeners to tune into
their favorite radio stations.
Offering an exceptionally high sound and signal quality, digital radio offers a
range of exciting features to enhance your listening experience.
•
Clearer sound and improved reception
•
Extra features such as extra channels pause and rewind radio,
downloadable music, more details about the advertised product,
slideshows, scrolling text, Electronic Program Guides, updated
news, sports and racing information. Just to name a few
•
Extra channels potentially doubles the number of commercial
stations
•
Tuning by station name, not frequency, making it easy to find
favorite stations
•
A wider choice of shows and program highlights better meets the
needs of niche audiences
With digital radio all you need is a digital receiver or a device with a DAB+
chip in it and that’s it – no subscription fees, no messing about with signing
up or logging on, just tune in.
Location of controls
1
2
3
4
Speaker
LCD Display
ON/ OFF Key
Display Key
10. DAB+/ FM Mode Key
11.Previous Key
12. Select Key
13. Next Key
5
6
7
8
Scan Key
Preset Key
Menu Key
Volume Down Key
14. 3.5mm Earphone Socket
15. DC Power Socket
16. Aerial Input
9. Volume Up Key
1. Switching your radio on for the first time
1.1 Power the device
1.1.1 Main Adaptor (supplied with the package).
Connect the mains adaptor to the DC power socket of the radio to the
wall socket.
1.1.2 Battery (not supplied).
Open the battery door and insert 4 "AA” size alkaline batteries. Remark:
Insert batteries correctly. Pay attention to the positive and negative +/Pole.
1.1.3 Extend the telescopic aerial as far as it can go to ensure a good
reception.
1.1.4 Press the Power button to turn on the radio. The LCD backlight
will light up during the operation of the radio. The radio will
automatically show:
Your Radio will return to the mode that it was last used in (DAB+/FM).
If you listened to a DAB+ station before then this station will
automatically selected.
Note: Always make sure that the aerial is extended to ensure the
maximum signal strength and the best possible sound quality,
especially in the first time to use.
1.2 Adjusting the volume
Press the "Vol" up to increase the volume and the "Vol" down to
decrease the volume. Press and hold the "Vol+” or "Vol-" to
progressively increase or decrease the volume.
1.3 Changing radio stations
1.3.1 If you are not already in DAB+ mode, Press the "DAB+/FM"
button to go to DAB+ mode. Then you can press "DAB+/FM" button
again to go to FM mode.
1.3.2 Press the "◄◄" or "►►" button, to scroll through the stations.
By default, the stations are listed in numerical and then alphabetical
order.
1.3.3 In DAB+ mode, when the station that you would like to listen to
is displayed, press the "Select" button. "Connecting…" will be
displayed whilst your radio tunes to your selected station.
1.3.4 In FM mode, the radio will tune to your selected station
automatically.
1.4 Scanning for stations
With DAB+ radio, additional stations and services regularly become
available so it's a good idea to carry out a manual scan every now and
then to make sure that you have the most up to date station listing
stored within the memory of your radio. If you have moved your radio
to another location, eg: if you go on holiday, then it" s also a good idea
to carry out a manual scan.
Note: before start, please pull out the telescopic aerial or walk outdoor
to get max reception of the digital radio signal during initially scans.
1.4.1 If you are not already in DAB+ mode, Press the "DAB+/FM"
button to go to DAB+ mode first.
1.4.2 Press the "Scan" button to begin a local search for stations. The
display will change to "scanning..." and the number of stations found
during the scan will be displayed .A local scan takes approximately 20
seconds to finish.
1.4.3 If you are using your DAB+ radio outside of the UK, then Press
and hold the "Scan" button for 2 seconds to begin a wider, national
and full scan. A national and full scan takes approximately 1 minute
but can take up to 3 minutes depending on the area and signal
strength.
1.5 Storing a preset station
Your digital radio can store up to 10 DAB+ stations and 10 FM stations
in its preset memories for instant access to your favorite stations.
1.5.1 Tune your radio to the station that you wish to preset (see
changing stations, 1.3).
1.5.2 Press and Hold the "Preset" button for seconds and the display
message on LCD will change to “Preset store <X: empty> “where "X"
is the number of the preset (1-10).
1.5.3 Using the "◄◄" or "►►" button, select the preset number that
you would like to store the station to Press and hold the "Select" button
store the station.
For example: I am listening “ABC news” in DAB+ mode, I want to
preset it into my favorite station. I press and hold “Preset” button for
seconds, the LCD shows message like ”Preset store <X: empty>”,
then I press “Select” key , so the LCD shows “Preset store 1” , if I
want to store this station in 2-10 , I can press the "►►" button to
choose between 1-10 as I like.
Note:
If there is already an existing DAB+ or FM station stored under a
preset, it will be overwritten when you store the new station
When you store DAB+ radio station presets, these do not overwrite
your FM station presets.
1.6 Tune to a preset station
1.6.1 Briefly Press the "Preset" button.
1.6.2 Use the "◄◄" or “►►" buttons to scroll through the station
presets. Press "SELECT" when you see the station that you would like
to listen to the radio will instantly tune to that station and begin to play.
Note: If no station has been stored under the preset, the display will
change to "Preset Empty" and then revert to the previously selected
station after a few seconds.
1.7 Station Display Symbols
You may see the following symbols displayed alongside a station
name. Normally you will see these symbols under DAB+ mode.
?
Station is not available/not active. This could be used if you try to
tune into a secondary service/station at a time when it is not
transmitting.
>>>
After the station name, this is a primary station with secondary
services eg: a sports station may add extra commentaries at certain
times of the day
<<<
Before the station name, this is a secondary station.
1.8 Display information
When listening to a station you can change the information that will
appear on the second line of the display.
To do this operation, press the "Display" button repeatedly to move
through the display options.
There are eight different types of information that are sent by the
broadcaster as below:
Dynamic Label Segment (DLS) - this is scrolling text information
supplied by the broadcaster. Information could be the name of an artist
or music title, DJ" s name, contact details for the radio station etc.
Program Type (PTY) - such as "Rock", "Pop", "Talk" or "News".
Multiplex Name - displays the broadcasting area and collection of
radio stations on this frequency eg: DAB Melbourne 2.
Channel and Frequency - eg: 12B 225.64 MHz
Signal Error - The information provided gives details of the signal
error rate, shown as a number between 0 - 99.It will not be possible to
satisfactorily listen to a radio station with a signal error rate of 30 or
above. Try adjusting the aerial or relocating your radio to improve
reception.
Signal Information - Stereo or Mono and the data rate at which the
signal is being transmitted.
Time - supplied by the broadcaster.
Date - supplied by the broadcaster.
Remark: In FM analog radio mode, there will no the display of Channel
Frequency, Signal Error and Signal Information, but has additional
“Stereo” and “Mono” information depending on the broadcasters
2. Using the Menu Key
The "MENU" button enables you to change some of the default
settings of your Radio, so that it works just the way you want it to. Use
"Select" to confirm your choose, use "◄◄"or "►►" to scroll through
the menu list.
2.1 Under DAB+ mode, the Main menus are as below
2.1.1 Station List
All the stations will list out under the Station List, you can choose the
listing order you want under the "Station Order" menu.
2.1.2 Local Scan
Local Scan searches the all the local stations in your area. Sometime a
National or Full scan required if your living area does not provide local
stations.
2.1.3 Full Scan
Full Scan searches the all the stations that available near your area
2.1.4 Manual Tune
Using the manual tune feature, you can select a specific digital radio
channel frequency andthen manually adjust the aerial, or the location
of the radio, to get the strongest possible signal for that channel in your
location.
2.1.4.1 Press the "Menu" button to enter the default settings menu.
2.1.4.2 Use the "◄◄" or "►►" button to display "Manual tune" and
press "Select”.
2.1.4.3 Use the "◄◄" or "►►" button to scroll through the digital radio
frequencies and Preset "Select”. An empty □ will appear on the first
line of the display to indicate the minimum signal strength for
acceptable listening. The row of solid rectangles indicates the actual
signal strength that you are receiving. The stronger the signal, the
further to the right the row of solid rectangles will be. For example:
Note: If only an empty □ is displayed, you are not receiving any signal
at all for that particular digital radio channel in your area.
2.1.4.4 Adjust the position of the aerial on the radio, to obtain the
maximum signal strength and press "Select" to exit back.
2.1.5 DRC (Dynamic range control)
The dynamic range for each radio program is set by the broadcaster
for each radio station and may be different for the types of program
broadcast, such as pop or classical music or a chat show. The
dynamic range control signal is transmitted in parallel with the audio
signal for each program and with your Touch DAB+ radio you can use
this control signal to expand or compress the dynamic range (the
difference between the loudest and quietest sounds) of the
reproduced audio signal. Changing the dynamic range can affect the
"loudness" and/or "quality of sound" of the program that you hear so
that it will be more suited to your listening conditions and your own
personal listening requirements
e.g. in a noisy environment, where quiet sounds might be swamped,
setting the compression to maximum will "boost" the quiet sounds,
whilst keeping the loudest sounds at their original level.
There are 3 levels of compression:
DRC off - no compression. This is the default setting.
DRC high - maximum compression.
DRC low - medium compression.
2.1.5.1 Press the "Menu" button to enter the default settings menu.
2.1.5.2 Use the "◄◄" or "►►" button to display "DRC" and press
"Select" The current DRC value will appear on line 2 of the display.
2.1.5.3 Use the "◄◄" or "►►" button to scroll through the 3 levels of
compression, which will appear on line of the display.
2.1.5.4 Press "Select" to confirm your compression setting.
2.1.6 Factory Reset
You can reset your radio and restore all of the original factory settings
Note: If you reset your radio all of your DAB+ and FM station presets
will be deleted. Press "Select" . The display will change to
Use “Previous” and “Next” to change your choose on <No> and <Yes>,
just press Select button to confirm your choose on <Yes>, then return
the radio to its original factory settings. The display will change to
“Restarting…” followed a few seconds later by “Welcome to Digital
Radio” and will begin scanning for stations. If you decide not to reset
your radio at this point, please press “Menu” to return to the previous
play mode.
2.1.7 SW version
Choose this menu to see the SW version.
2.2 Under FM mode, the Main menus are as below
Check that your radio is in FM mode. You will see "FM" or "RDS" to the
far right of line 1 of the display together with a radio frequency e.g.:
89.60MHz or station name. When your radio is in FM mode it can
receive Radio Data System or "RDS" information if this is being
transmitted by the broadcaster. RDS information will often include the
station name, detail about the program and the current time. If you
were listening to an FM station when you switched the radio off then
this station will be automatically selected when you switch the radio
back on. Note: With FM radio it may be necessary to "fine tune" each
station by rotation the "Tune" If reception is still poor adjust the
position of the aerial or try moving the radio to another location.
2.2.1 Scan Setting
There are two scan types, the "Strong stations" and "All stations",
Use the "◄◄" or "►►" button to choose the one you want, then
press select to confirm it. Then return to menu mode to scan the
stations.
2.2.2 Audio Setting
There are two audio types, the “Forced mono” and “Stereo allowed”
2.2.3 Factory Reset
Please refer to 2.1.6
2.2.4 SW version
Please refer to 2.1.7.
Product Q & A
If you are experiencing problems with your DAB+ radio there are some
quick and easy checks that you can do, which may help to solve the
problem.
Radio reception is poor
-Please check that the aerial is extended for the maximum signal
strength and improved reception.
-Use the manual tune (see 2.2), to adjust your aerial for the best
reception.
-Try moving your radio to an alternative location to see if the reception
improves Please remember to scan for DAB+ stations again once you
have moved your radio See 2.2
-Check that you do not have other electrical equipment too close to
your radio, causing interference.
-Visit www.digitalradioplus.com.au for information about DAB+
reception in your area.
No sound or No power
-Adjust the volume using the "Vol+” button
-Please check that the mains power lead is connected at the back of
the radio and the mains power wall socket is switched on
-If you use the battery, make sure the batteries get enough power to
drive the device
Visit www.mbeat.com.au for more products information