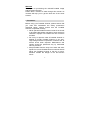
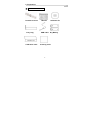
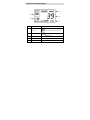
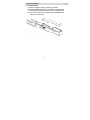
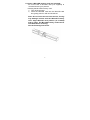
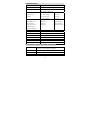
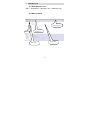
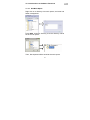
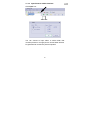
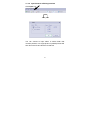
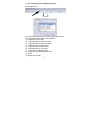
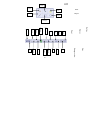
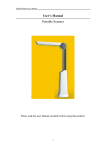
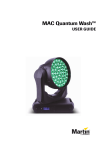
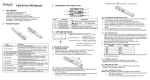
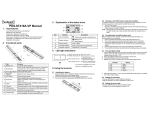
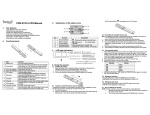
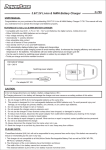
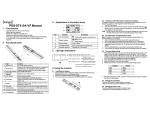
1
EN
Table of Contents
1. Precaution…………………………………………….…2
2. Preparation……………………………………………..5
z Standard Accessories……………………………5
z Part Names & Functions………………………..6
3. key features…………………….….………..…….……7
4. Status Icons Explanations……….…….………….…..8
5. Use the scanner……………..……….………………..9
z Install battery……………………….…..…………9
z Insert MicroSD memory card…….……………10
z Set system Date & Time……………….….…...11
z Format MicroSD memory card…..……….……12
z Set resolution……………………………………12
z Set scan mode…………………..…..………….12
z How to scan……………….……..….…..………13
z White Balance Calibration…………….…..…...13
6. LED light indications………………….……….…..…14
7. Connect to computer………..……………….…..…15
8. Specifications…………………………………...….…16
9. Computer system minimum requirement………..…16
10. Troubleshooting………………………………….……17
11. NimoDoc Lite…………………………………..……….18
z Start NimoDoc…….…………………………….18
z Main Interface Introduction……………………18
z Introductions on Software Functions………….19
12.Product registration and warranty…………………… 30
1
Welcome
Thank you for purchasing the mbeat® Portable Image
and Document Scanner.
Please take a moment to read through this manual. Its
contents will help you to get the best use of the smart
scanner.
1. Precaution
Before using your Portable Scanner, please ensure that
you read and understand the safety precautions
described below. Always ensure that the Portable
Scanner is operated correctly.
• Never operate Portable Scanner inside of an aircraft
or anywhere else where operation of such devices is
restricted. Improper use creates the risk of serious
accident.
• Do not try to open the case of Portable Scanner or
attempt to modify Portable Scanner in any way.
High-voltage internal components create the risk of
electric shock when exposed. Maintenance and
repairs should be performed only by authorized
service providers.
• Keep Portable Scanner away from water and other
liquids. Do not use Portable Scanner with wet hands.
Never use Portable Scanner in the rain or snow.
Moisture creates the danger of fire and electric
shock.
2
• Keep Portable Scanner and its accessories out of
the reach of children and animals to prevent
accidents or damage to the Portable Scanner.
If you notice smoke or a strange odor coming from
Portable Scanner, turn the power off immediately. Take
Portable Scanner to the nearest authorized service
center for repair. Never attempt to repair Portable
Scanner on your own.
• Portable Scanner may become slightly warm during
use. This does not indicate malfunction.
• If the exterior of Portable Scanner needs cleaning,
wipe it with a soft, dry cloth.
3
EN
2. Preparation
EN
■ Standard accessories
Portable scanner
Carry bag
Calibration card
Manual
Software CD
USB cable Dry Battery
Cleaning cloth
4
■ Parts Names & Functions
Parts
Functions
1
Battery door
For 2xAA alkaline batteries
2
Power/Scan
Power on/off: Press and hold this key for 2 seconds to
turn power on or off. In power on mode, press this button
start scan, press this button again to stop
3
C/BW
Select Color/Mono scan. Color/Mono mode icon will be
displayed on status LCD
4
Resolution
Select High (600dpi) /Low (300dpi) resolution; High/Low
resolution mode icon will be displayed on status LCD
5
LCD screen
Scanning status display
6
Error LED
Over speed: Red LED on
indicator
7
Scan
LED
Ready for scan: Green LED on
indicator
8
Time set
Setup system time
9
USB interface
Download photo to computer via USB cable provided
10
MicroSD
11
Formal button
slot
MicroSD card storage location
Press this button to format the MicroSD card
5
3. Key Features
z
z
z
z
z
EN
Color/Monochrome (Mono) scan selection
600/300 dpi scan selection
Direct save JPG file to MicroSD card
Support MicroSD card up to 32GB
Driver free to download for Windows XP SP2/Vista
Windows 7 and Mac OS 10.4 or above (direct plug-in,
driver installation not required)
6
4. Status Icons Explanations
Item
1
Function
Description
SD card
indicator
2
Battery indicator
3
Effect indicator
Photos will be stored in MicroSD card
Battery is full
Empty battery
Color or Mono
4
Counting indicator
Show qty of scanned files in MicroSD card
5
Selected resolution
High: 600dpi/Low: 300dpi
7
EN
5. Use the scanner
5.1 Install battery
1). Open the battery door by sliding it outward.
2). Insert 2x AA batteries into the battery compartment
according to the polarities shown in the compartment.
3). Turn on the scanner by pressing the [POWER]/Scan
button for 2 seconds.
8
5.2 Insert a MicroSD memory card (not included)
You must insert a MicroSD card (not supplied) to
record and store your pictures.
Inserting the MicroSD memory card:
1) Turn off the scanner
2) Insert the MicroSD card into the MicroSD card
slot; gently press in until card is latched.
Note: Do not force the card into the slot; forcing
may damage scanner and the MicroSD memory
card. Align MicroSD card position (as marked)
and try again. The MicroSD memory card must be
formatted before scanning.
See the following instruction.
9
5.3 Set system Date & Time
EN
Press Time Set button (hole) with the tip of a ball pen or
pin, then the Date & Time setting interface shows.
Sequence
No.
1
2
3
4
5
How to set
Meaning
1
Press C/BW or DPI to select a target year
2
Then press
Year
to enter into Month setting.
1.
Press C/BW or DPI to select a target month.
2.
Then press
1.
Press C/BW or DPI to select the target day.
2.
Then press
1.
Press C/BW or DPI to select the target Hour.
2.
Then press
Month
to enter into Day setting
Day
to enter into Hour setting
Hour
Minute
to enter into Minute setting
1. Press C/BW or DPI to select the target Minute.
2. Then press Time Set to quit.
10
5.4 Format MicroSD memory card
1). Insert a new MicroSD card into the scanner, and
then turn on the scanner.
2). Press the format button with the tip of a ball pen
into format mode. “F” shows on the LCD.
3). Press the Power /Scan button to start formatting
the MicroSD card.
4). SD card indicator will blink until format is complete.
5.5 Set resolution
Press the (OPI) button to select High/Low resolution.
High/Low resolution icon will be displayed on status
LCD.
5.6 Set scan mode
Press the (C/BW) button to select Color/Mono
mode.
Color/Mono icon will be displayed on status LCD.
11
5.7 How to scan
EN
1). Place the document or image at the non-slip and
flat surface. Hold the document firmly by one hand.
2). Place the scanner on the start scanning position.
3). Hold the scanner tightly and press the scan button
once.
4). Slide the scanner downward slowly and you’re
your hand stable to get the best quality picture.
5). Press again to stop scanning.
5.8 White Balance Calibration
Please refer to the note on the white balance
12
calibration paper that comes with the scanner!
6. LED light indications
“GREEN” SCAN LED ON
Scan in process
“GREEN” SCAN LED OFF
Standby/Scan is
complete
“RED” ERROR LED ON
Scanning too fast.
May cause
scanning distortion
Restart and scan again.
No error in scanning
“RED” ERROR LED OFF
Continue scanning
process.
button is pressed
* Scan will START when
* To END scan, press
button again
13
7. Connect to Computer
You may also connect your scanner to your computer
and view pictures on the computer monitor.
14
8. Specifications
Image sensor
A4 Color Contact Image Sensor
Number of sensor
5138 dots ( 1st -5104 dots available)
Resolution
Low resolution: 300x300 dpi (default)
High resolution: 600x500 dpi
Maximum scanning
Color High resolution
13 seconds
speed for A4 size
Mono High resolution
6 seconds
document
Color Low resolution
3 seconds
Mono Low resolution
2 seconds
Capacity (Based on
600dpi color
220 Photos (Min.)
1GB MicroSD card.
600dpi mono
290 Photos (Min.)
Scan A4 size file.
300dpi color
780 Photos (Min.)
The quantity of scans
300dpi mono
1280 Photos (Min.)
varies depending on
the content complexity)
Scan width
8.27
Scan length
300DPI: 50 (Max), 600DPI: 25 (MAX)
File format
JPEG
LCD
Scanning status display
Autc Power off
3 Minutes
USB port
USB 2.0 high speed
External memory
MicroSD card
Standard Battery
2xAA alkaline batteries
9. Computer system minimum requirement
Operating system
Windows XP SP2/Vista /7and Mac OS 10.4 or above
CPU
Pentium 11 or above
(direct plug-in, drive installation not required)
RAM
64MB
Interface
USB port
15
10. Troubleshooting
Problems
EN
Cause
Solution
1.
Low battery
Replace or install the
power
battery correctly
Cannot turn on the
scanner
2.
Battery not
inserted properly
1.
MicroSD card has
1.
not been Installed
2. Memory is full The
Pictures cannot
be saved
when
Install MicroSD
card
2.
Download the
MicroSD card has not
pictures from the
Been formatted properly
scanner to the
computer to
you are
create storage
scanning them
space
3.
Place refer to
section 4:3
Computer does not
recognize
Connection failure
your
Make sure all cable
connections are
scanner
secured. Restart the
when connected.
computer if necessary
(You can not
find removable disk)
The battery life is
USE wrong type of
Replace with new 2xAA
very short
battery
alkaline batteries
The lens of scanner is
Clean the lens with soft
dirty
dry cloth
Scanning speed is too
Press the power/Scan
fast
button to reset and scan
Blurry Images
ERR. LED is on when
scanning a document
again the document
16
11. NimoDoc Lite
11.1 Start NimoDoc Lite
Start → Programes → NimoDoc Lite → NimoDoc Lite
11.2 Main Interface
Search input box
Menu bar
Shortcut icon
Preview area
Work space
17
11.3 Introductions on Software Functions
11.3.1 Set Work Space
Right click on a directory from work space, and enter into
folder management.
Press Add, choose a directory, then the directory will be
set as a work space:
Then, files inputted will be stored at the work space.
18
EN
11.3.2 Create New NSD File
NSD file is a folder into which you can put source files.
Click New NSD File icon, and then a new folder is created
in the preview area.
You can rename the new folder by right clicking its icon.
19
11.3.3 Input Pictures at Main Interface
Click Input icon:
You can choose to input either a whole folder that
contains pictures or a single picture. A new folder will then
be generated to contain the pictures inputted.
20
EN
11.3.4 Output files from Main Interface
Choose a folder you want to output by clicking it, and then
click Output icon:
Then you can choose the target type you want to output
the pictures.
21
EN
11.3.5 Editing Interface
Double click a folder at the main interface, and then you
can enter into editing interface, where you can do input
and output pictures, recognition and picture edit.
Picture list area
Recognized words area
Picture edit tools
Picture preview area
22
11.3.6 Input Pictures at Editing Interface
Click Input icon:
You can choose to input either a whole folder that
contains pictures or a single picture. Inputted pictures will
then list on the Picture list area on that left.
23
11.3.7 Recognition
EN
Click recognition icon:
Choose the target pictures you need to do recognition.
Then you must choose the language compatible to that on
picture.
Click ok, and then the recognized txt will display in the
Recognized words area.
24
11.3.8 Output Files from Editing Interface
Click Output icon:
Choose the target format you need to output the pictures.
Target formats can be either of the following:
1) Output pictures to PDF
2) Output pictures to word document
3) Output pictures to excel document
4) Output pictures to BMP format
5) Output pictures to JPG format
6) Output pictures to TIF format
7) Output text to word document
8) Output text into Notepad document
9) Email
10) Export text to PDF
25
11.3.9 View Mode
EN
Click View Mode icon:
You can choose any of the five View modes:
1) Normal mode
2) Photo mode
3) List mode
4) Image mode
5) Text edit mode
26
11.3.10 Picture Edit Tools
Select
Color
Cut
Negative
Gray
Mirror
Rotate
Threshold
Gray
Erase Black edge
Erase red eye
OCR
Quick notes
Pen
Font
27
Erase red eye
Pen
Eraser
EN
Filler
Ellipse
Line
Delete
Save as
Print
Delete
Save as
Print
Undo
Right rotate
Full screen
Zoom in
Best size
Previous
Save
Print preview
Save
Print view
Redo
Image size
Left rotate
Zoom out
Actual size
Next
28
Filler
Pencil
Ellipse
Rectangle
11.3.11 Email
EN
Email function enables you to send files by email.
11.3.12 Search
By inputting key words, search function enables you to
locate history files easily and efficiently.
29
12. Product registration and warranty
To receive the full support of your product, please register
your product and your details with our distributor in your
country.
For Australian user, go to www.ultra-imagiantion.com ,
click product registration page to fill out the details.
Join
us
at
facebook™,
“ultraimaginationtechnology”
for
by
our
searching
distributor
information or “mbeat” for mbeat® information. Keep
updating with product information and you have the
chance to win the monthly prize or free gift from us.
30