1
Instruction Manual
CRAFT.SlVl
A
7.2-Volt Cordless
TRIM SAW
Model No.
900.112650
CAUTION: Read and follow all
Safety Rules and Operating
Instructions before First Use
of this Product.
VERSnPnK
INTERCHANGEABLE
BATTERYSYSTEM
Sears, Roebuck and Co., Hoffman Estates, IL 60179 USA
Form No. 382306-_,o
° VersaPak
OCT97-CD-2
is a trademark of The Black & Decker Corporation.
Printed
in U.S.A.
Full one year warranty on Craftsman Cordless Circular Trim Saw
If this Craftsman Cordless Circular Trim Saw fails due to a defect in material or
workmanship within one year from the date of purchase Sears will replace it free of
charge.
WARRANTY
SERVICE IS AVAILABLE BY SIMPLY RETURNING
THE TOOL TO THE
NEAREST SEARS STORE OR SEARS SERVICE CENTER IN THE UNITED STATES.
This warranty gives you specific legal rights and you may have other rights which vary
from state to state.
Sears, Roebuck and Co., D/817 WA, Hoffman
NOTE:
Refer to battery and/or charger
manual for battery and charger safety and
usage information.
WARNING:IMPORTANT
SAFETY
WARNINGS
ANDINSTRUCTIONS
TO REDUCE
RISK OF INJURY:
.
Before any use, be sure everyone
using this tool reads and
understands all safety instructions
and other information contained in
this manual.
•
Save these instructions and review
frequently prior to use and in
instructing others.
•/EWARNING:
When using electric
tools, basic safety precautions should
always be followed to reduce risk of fire,
electric shock, and personal injury,
including the following.
READ ALL INSTRUCTIONS
Estates, IL 60179
normally spark, and the sparks may
ignite the fumes.
• GUARD AGAINST ELECTRIC
SHOCK. Prevent body contact with
grounded surfaces. For example;
pipes, radiators, ranges, refrigerator
enclosures. Use extreme caution
when drilling, driving, or cutting into
walls, floors, ceilings or other areas
or wherever live electrical wires may
be contacted, do not touch any
metal parts of the tool. Hold the
tools only by the plastic handle to
prevent electric shock.
• KEEP CHILDREN AWAY. Do not let
children and visitors contact tool or
extension cord. All children and
visitors should be kept away from
work area.
•
STORE IDLE TOOLS. When not in
use, tools should be stored in dry,
and high or locked-up place--out of
reach of children.
•
GENERALSAFETYWARNINGS
ANDINSTRUCTIONSFORALL
TOOLS
DON'T FORCE TOOL. It will do the
job better and safer at the rate for
which it was intended.
•
USE RIGHT TOOL. Don't force
small tool or attachment to do the
job of a heavy-duty tool. Don't use
tool for purposes not intended.
• DRESS PROPERLY. Do not wear
KEEP WORK AREA CLEAN.
Cluttered areas and benches invite
injuries.
CONSIDER WORK AREA
loose clothing or jewelry. They can
be caught in moving parts. Rubber
gloves and non-skid footwear are
recommended when working
outdoors. Wear protective hair
covering to contain long hair.
ENVIRONMENT.
Don't expose
power tools to rain. Don't use power
tools in damp or wet locations.
Keep work area well lit. Do not use
in presence of flammable liquids or
gases. Motors in these tools
2
OTHER
SAFETY EQUIPMENT.
operate tool when you are tired or
otherwise impaired.
CHECK DAMAGED PARTS. Before
Use safety goggles or safety
glasses with side shields, complying
with applicable safety standards
and, when needed, a face shield.
Also use face or dust mask if
further use of the tool, a guard or
other part that is damaged should be
carefully checked to determine that
it will operate properly and perform
its intended function. Check for
cutting operation is dusty. This
applies to all persons in the work
area. Also use a hard hat, hearing
alignment of moving parts, binding
of moving parts, breakage of parts,
mounting, and any other conditions
that may affect its operation. A guard
or other part that is damaged should
be properly repaired or replaced by
an authorized service center. Do not
use tool if switch does not turn it on
and off.
protection, gloves, safety shoes and
dust collection systems when
specified or required.
DON'T ABUSE CORD. Never carry
tool by cord or yank it to disconnect
from receptacle. Keep cord from
heat, oil, and sharp edges.
SECURE WORK. Use clamps or a
vise to hold work. It's safer than
REPAIRS AND SERVICE. Repairs,
maintenance and any adjustments
not specified in this manual should
be performed by Sears authorized
service centers or other qualified
service organizations, always using
identical replacement parts.
USE OF ACCESSORIES AND
using your hand and it frees both
hands to operate tool.
DON'T OVERREACH. Keep proper
footing and balance at all times.
MAINTAIN TOOLS WITH CARE.
Keep tools sharp and clean for
better and safer performance.
Follow instructions for lubricating
and changing accessories. Inspect
tool cords periodically and if
damaged, have repaired by
authorized service facility. Inspect
extension cords periodically and
replace if damaged. Keep handles
dry, clean, and free from oil and
grease.
DISCONNECT TOOLS. Unplug the
tool when not in use, when moving
tool from place to place, before
servicing, and when changing
accessories (such as blades, bits,
cutters) or making adjustments.
REMOVE ADJUSTING KEYS AND
WRENCHES. Form habit of
ATTACHMENTS.
The use of any
accessory or attachment not
recommended for use with the tool
could be hazardous. Note: Refer to
the accessory section of this manual
for further details.
IMPORTANTSAFETY
INSTRUCTIONS(FORBATTERYAND
CHARGER)
, Z_ WARNING:
When using electric
tools, basic safety precautions should
always be followed to reduce risk of fire,
electric shock, and personal injury,
including the following:
READ ALL INSTRUCTIONS
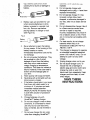
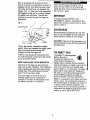
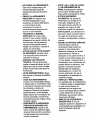
1. Do not store or carry battery so that
metal objects can contact exposed
metal end shown in Figure 1. For
example, do not place battery in
aprons, pockets, tool boxes,
drawers etc. with loose nails,
screws, keys, etc. without battery
checking to see that keys and
adjusting wrenches are removed
from tool before turning it on.
AVOID UNINTENTIONAL
STARTING. Don't carry tool with
finger on switch. Be sure switch is
off when plugging in.
STAY ALERT. Watch what you are
3
c_p.
_al.t_ry
_UUIU _llUrt
UIfUUlt
causing fire or burns or damage to
battery.
explode.
Fig. 1
Metal end
.
Battery caps are provided for use
when carrying batteries or while
battery is stored in a pocket, tool
box, etc. Remove cap before
placing battery in charger or tool
(see Figure 2).
Battery
Fig. 2
cap "
8.
Do not operate charger with
damaged cord or plug -- have them
replaced immediately.
9.
Do not operate charger if it has
received a sharp blow, been
dropped, or otherwise damaged in
any way; take it to a Sears service
center.
10.
service or repair is required.
Incorrect reassembly may result in
risk of electric shock or fire. There
are no consumer serviceable parts
inside.
("'?'.
i,,,,.,!,! ""
Never attempt to open the battery
for any reason. If the housing of the
battery breaks or cracks,
immediately discontinue use and do
not recharge.
4. Do not incinerate the batteries. They
can explode in a fire. A small
leakage of liquid from the battery
cells may occur under extreme
usage, charging or temperature
conditions. This does not indicate a
failure. However, if the outer seal is
broken and this leakage gets on
your skin:
a. Wash quickly with soap and water.
b. Neutralize with a mild acid such as
11.
For best results, do not charge
batteries when they or air
temperature is BELOW +40°F or
ABOVE +105°F.
12.
The charger is designed to operate
on standard household electrical
3.
c.
5.
6.
power (120 volts AC only). Do not
attempt to use it on any other
voltage.
13.
14.
Unplug charger when not in use.
Do not abuse charger cord. To
reduce the risk of damage to
electric plug and cord, never carry
charger by cord or yank it to
disconnect from receptacle. Keep
charger cord from heat, oil, and
sharp edges.
SAVE THESE
lemon juice or vinegar.
If the battery liquid gets in your eyes,
flush them with clean water for a
minimum of 10 minutes and seek
immediate medical attention.
MEDICAL NOTE:The battery liquid
is a 25-35% solution of potassium
hydroxide.
INSTRUCTIONS
Charge batteries only with
VersaPak TM battery charger.
Do not use charger in wet or damp
conditions. It is intended for indoor
use only. Do not use near sinks,
tubs, or the like. Do not immerse in
water.
7.
Do not disassemble charger; take it
to a Sears service center when
Do not use charger for any uses
other than charging VersaPak TM
4
SAFETYWARNINGSAND
INSTRUCTIONS:
CIRCULAR
SAWS
•
Z_CAUTION;
Remove batteries
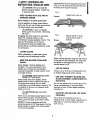
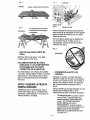
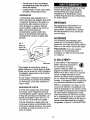
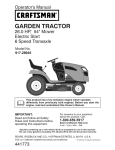
Large panels must be supported as shown
(Fig. 3) in this manual to minimize the risk
of blade pinching and kickback.
before changing blades, inspecting,
or cleaning saw.
• KEEP GUARDS IN PLACE AND IN
WORKING ORDER.
Fig. 3
Correct
Support work near cut
Never wedgeor tie lower guard open.
Check operation of lower guard before
each use. Do not use if lower guard does
not close briskly over saw blade.
• L_CAUTION:
If saw is dropped,
lower guard may be bent, restricting
full return.
Snagging the lower guard on a surface
below the material being cut can
momentarily reduce operator control. The
saw can lift partially out of the cut
increasing the chance of blade twist.
Ensure there is sufficient clearance under
the workpiece.
Fig. 4
Wrong
Material bends on btade
causing heavy loads or
kickback
• LOWER GUARD
When necessary to raise lower guard
manually, use the retracting handle.
When cutting operation requires the resting
of the saw on the workpiece, the saw shall
be rested on the larger portion and the
smaller piece cut off.
• KEEP THE BLADES CLEAN AND
SHARR
Sharp blades minimize stalling and
kickback. The use of dull and/or dirty
blades can increase the saw loading
causing the operator to push harder which
promotes twisting.
•
• USE RIP FENCE
Always use a rip fence (included with tool)
or straight edge guide when ripping.
/_ DANGER: KEEP HANDSAWAY
FROM CUTTING AREA.
• USE ONLY CORRECT BLADES AND
BLADE ASSEMBLY COMPONENTS
IN
MOUNTING
Keep hands away from blades. Never
place hands in front or behind the path of
the blade while cutting. Do not reach
underneath work while blade is rotating. Do
not attempt to remove cut material when
blade is moving.
•
,'_CAUTION:Blades
turn off.
Do not use blades with incorrect size holes.
Never use defective or incorrect blade
washers or bolts. Follow blade assembly
procedures.
coast after
• SUPPORT AND SECURE
PROPERLY
When cut is completed, allow blade to stop
before removing saw. The telescoping
lower guard will close as the saw is lifted.
THE WORK
Insure that the material to be cut is
clamped (Fig. 5) and solidly supported and
balanced on a strong, stable and level
work set-up.
NOTE:This saw is equipped with two
general purpose 3-3/8" saw blades. Cutting
particle board or plastic with these blades
is not recommended.
5
I Fig. 5
Correct
GUARDAGAINSTKICKBACK
• WHAT IS KICKBACK?
Kickback is the sudden movement of the
saw, during a cut, back toward the
operator" which may cause serious
personal injuries.
•
Auxiliary handle
Support the work so that the wide portion
of the saw shoe is on the portion of the
material that doesn't fall after the cut is
made.
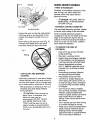
Never hold cut off piece by hand (Fig. 6).
Kickback from blade pinch can result.
Keep both hands on saw at all times.
Fig. 6
• KICKBACK CAN BE CAUSED BY:
The saw blade becoming pinched, twisted
or bound while cutting or the saw stalls.
When the blade becomes twisted or
misaligned in the cut, the teeth at the back
edge of the blade can dig into the top
surface of the wood causing the blade to
climb out of the cut and move suddenly
back toward the operator.
• TO REDUCE THE RISK OF
KICKBACK:
Keep a firmgrip on saw with both
hands at all times.
Wrong
Stay alert - exercise control.
Support long overhanging materials.
As the material is cut and weakens,
it will sag, causing apinched blade.
Support large panels as shown
(Fig. 3). Material supported only at
the ends (Fig. 4) will lead to blade
pinching.
Avoid sawing overhead. Material
can sag and will pinch blade.
Keep blades sharp and clean.
Use fence or straight edge guide
when ripping. Be careful as the cut
off strip can sag or twist, closing the
cut and pinching the blade, leading
to kickback.
Don't force tool. Wood variables
such as knots, hardness, toughness,
wetness, pressure treated and
freshly cut green lumber can heavily
load the saw which can lead to
stalling. Push the saw slower when
this occurs.
\
• STAY ALERT AND EXERCISE
CONTROL
Keep body positioned to one side of blade.
Always maintain a firm grip and control of
saw with both hands. Do not change hand
grip or body position while saw is running.
Take precaution to avoid injury from cut
off pieces and other falling material
during operation.
•
,4kDANGER;
RELEASE SWITCH
IMMEDIATELY IF BLADE BINDS
OR SAW STALLS.
/_CAUTION:
When sawing into
walls, floors, or wherever "live"
electrical wires may be
encountered, DO NOT TOUCH
ANY METAL PARTS OF THE
TOOL! Hold the saw only by its
plastic handles to prevent electric
shock if you accidentally saw into a
live wire.
Don't remove saw from work during
a cut while the blade is moving.
Allow saw to reach full speed before
blade contacts material to be cut.
Starting the saw with the blade
against the work or pushed forward
into cut can lead to stalling or
6
Always secure work to prevent
workpiece movement during cut.
Do not try to force saw back on line
if your cut begins to go off line. This
can cause kickback. Stop saw,
withdraw from cut and start a new
cut on line.
"
Saw spindle
Inner clamp
washer
Do not back up a rotating blade in
the cut. Twisting the saw can cause
the back edge of the blade to dig
into the material, climb out of the
work and run back toward the
of teeth
operator.
Avoid cutting nails. Inspect for and
remove all nails from lumber before
cutting.
Never pull the saw backwards
through the kerf while the saw blade
is still rotating.
3.
OTHERIMPORTANTSAFETY
WARNINGSAND INSTRUCTIONS
•
•
4.
Some wood contains preservatives
such as copper chromium arsenate
(CCA) which can be toxic. When "
cutting these materials, extra care
should be taken to avoid inhalation
and minimize skin contact.
Blade depth is not adjustable.
Ensure there is ample room
underneath the workpiece.
.
2.
AND
REMOVING
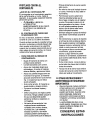
Place the outer clamp washer onto
the spindle and tighten the the
clamping screw by hand (the screw
has left-hand threads; turn
counterclockwise
to tighten).
Insert a screwdriver or long nail
through one of the holes in the
blade to prevent the blade from
rotating (Fig. 8).
Fig. 8
Loosen
!l"k,WARNING: Always remove batteries
from saw before any of the
following operations.
ATTACHING
Blade clamping
screw
Outer clamp washer
Tighten
BLADES
Place inner clamp washer on
spindle.
Retract the lower blade guard and
place blade over the inner clamp
washer. The direction of the blade
rotation arrows must match the
direction of the arrows on the upper
guard (Fig. 7)
5.
Firmly tighten the blade clamping
screw with the blade wrench
(counterclockwise)
REMOVING
BATTERIES
(Fig.8).
AND INSTALLING
THE
NOTE: VERSAPAK TM BATTERIES
NOT FULLY CHARGED AT THE
FACTORY.
ARE
To install the batteries into the tool, slide
them into the handle until they click into
place.
To remove the VersaPak TM batteries from
the tool, press the release buttons, as
7
shown in Fig. 9, and pull the batteries out
of the tool handle.
Release
Fig. 9
•
buttons
/
NOTE: Battery caps are provided for use
when carrying batteries or while battery is
stored in a pocket, tool box, etc. Remove
cap before placing battery in charger or
tool.
To reduce the risk of
serious personal injury, read,
understand and follow all important
safety warnings and instructions
prior to using tool.
GENERAL
•
Align the blade with the line of cut
to be made making sure blade
clears material.
•
Pull trigger switch, allow blade to
attain full speed. Never lock the
trigger on by any means.
•
Move the saw forward across
the matet;ial, keeping the saw shoe
flat until the cut is completed.
•
Release trigger, allow blade to
stop before removing saw.
POCKET CUTTING (SEE FIG. 10)
Pocket cutting is used to cut a hole in a
piece of material without cutting from the
side.
• Tilt saw forward and rest front of the
shoe on material to be cut. Align so
that cut will begin at the back of the
drawn rectangle.
• Using the retracting lever, retract
blade guard to an upward position,
with the blade just clearing the
material, start motor and gradually
lower the saw into the material.
Install the battery cap, (see Fig. 2), by
snapping it in place. To remove the cap,
simply pull it off. NOTE: Only operate tool
with both VersaPak TM batteries installed.
•/_ WARNING:
of control which could cause
personal injury. Fig. 5 illustrates
typical hand support of the saw.
Place the front of the saw shoe flat
on the material to be cut.
•
CUTS
•
IMPORTANT: Read safety warnings
and instructions. GUARD AGAINST
KICKBACK.
•
With batteries removed, follow all
assembly, adjustment and set up
instructions. Make sure lower guard
operates. Select the proper blade
for the material to be cut.
•
•
Measure and mark work for cutting.
Support and secure work properly
(See Safety Warnings and
Instructions).
Use appropriate and required safety
equipment (See Safety
Instructions).
Secure and maintain work area
(See Safety Instructions).
Make sure switch turns saw on and
off.
z_WARNING:
As blade starts
cutting the material, release the
retracting lever immediately.
Never tie the blade guard in a
raised position.
When the shoe rests flat on the
material being cut, complete the cut
in forward direction.
Allow the blade to come to a
complete stop before lifting saw
from material.
When starting each new cut, repeat
the above steps.
Fig. 10
/_WARNING:
It is important to
support the work properly and to
hold the saw firmly to prevent loss
WARNING: When blade starts cutting, release
retraction lever immediately
8
II_Ar;l
Saw is equipped with a switch lock-off
feature to prevent unintentional running. To
operate the tool, first slide the switch lockoff button and hold it as you depress the
trigger, (Fig. 11). After you have depressed
the trigger and the tool is running, release
the switch lock-off button. The tool will
continue to run as long as the trigger is
depressed.
I i_I l ,-I i_r '.._i1_Li _l _---'----
Use only mild soap and damp cloth to
clean the tool. Never let any liquid get
inside the tool; never immerse any part of
the tool into a liquid.
IMPORTANT
To assure product SAFETY and
RELIABILITY, repairs, maintenance and
adjustment should be performed by Sears
service centers.
Fig. 11
Lock-off button
ACCESSORIES
Recommended
accessories for use with
your tool are available at extra cost from
Sears stores or Sears service centers.
\
CAUTION: The use of any accessory not
recommended for use with this tool could
be hazardous.
Switch
To turn the tool off, release the trigger
switch. When you release the trigger (each
time) the switch lock-off button will
engage, locking the trigger off.
THE RBRCTM SEAL
There is no provision for locking the tool
on, and the switch should never be locked
on by any other means.
The RBRC TM (Rechargeable
_
Battery Recycling
Corporation) Seal on the
#_//!!.'7/,
nickel-cadmium
battery (or
battery pack) indicates that the costs to
recycle the battery (or battery pack) at the
end of its useful life have already been
paid by Sears. In some areas, it is illegal to
place spent nickel-cadmium batteries in
the trash or municipal solid waste stream
and the RBRC program provides an
environmentally conscious alternative.
RBRC in cooperation with Sears and other
battery users, has established programs in
the United States to facilitate the collection
of spent nickel-cadmium batteries. You
may contact your local recycling center for
information on where to drop off the spent
battery, or call 1-800-8-BATTERY.
KERF AND BLADE TIP-IN INDICATOR
The front of the shoe has two markings
which act as kerf indicators. The indicators
help in guiding the saw along pre-marked
cutting lines. The markings are located 1"
and 3" from the shoe's edge.
The outer edge of the shoe has one
marking which acts as a blade tip-in
indicator. This helps in anticipating when
the blade contacts the workpiece.
9
i
ii
11
i
|
IL--i
_
L--_
EIII
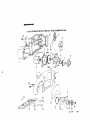
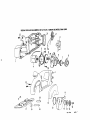
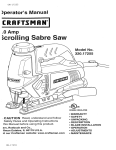
7.2 VOLT CORDLESS
CIRCULAR
TRIM SAW - MODEL
NUMBER
900.112650
22
0
22
/
2O
10
\
18
1
15
Engr:
RWA
5,'96TS
7.2
VOLT
CORDLESS
CIRCULAR
TRIM
SAW
MODEL
NUMBER
900.112650
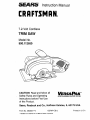
I The Model Number will be found on the Nameplate. Always menlion I
the Model Number in ell correspondence regarding your toot.
I
SEE BACK PAGE FOR PARTS ORDERING
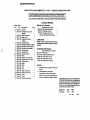
PARTS
_,J,
ITEM
NO.
PART
NO.
el
2
3
152729-01
152721-02
152120-03
4
5
6
7
8
9
10
11
152717-00
152734-00
152733-00
152719-00
152720-00
152730-00
152738-01
152710-01
e12
13
14
15
16
17
18
19
20
21
22
23
25
26
152706-00
152740-00
152706-00
152707-00
152716-00
152718-00
99212-36
152722-00
99212-28
152122-01
330019-00
381913-0O
99163-04
382163-00
INSTRUCTIONS
LIST
PARTS
DESCRIPTION
Clamshell Set
Lock Off Switch
Terminal Board
Motor & Pinion
Gear Case Cover
Gear Case
Output Spindle Assembly
Gear And Spindle Assembly
Bearing Cap Assembly
Upper Guard
Lower Guard
QI"Y
1
1
1
1
1
1
1
1
1
1
1
Torsion Spring
Retaining Ring
Inner Blade Clamp
Outer Blade Clamp
Blade Bolt
Shoe
Roll Pin
1
1
1
1
1
1
1
Guard Bumper
Roll Pin
1
1
Battery Latch
Thread Forming Screw
Screw
Screw
Spring Washer
1
13
2
1
1
NOT ILLUSTRATED:
(Supplied with Unit)
382306-00
Instruction Manual
98000-09
4ram Flex Wrench
87118-00
Rip Fence
3 3/r 50 tooth combination blade
1
1
1
1
LUBRICATION:
Apply 1 gram of Polyrex grease into gear case
in the area of the pinion and output gear.
OPTIONAL
ACCESSORIES:
(Not Supplied With Unit)
900.112710
Battery (Acc.)
900.112730
Charger & 2 Batteries
761995-00
Polyrex Grease (6 oz.)
283484-00
152739-00
Polyrex Grease (32 oz.)
Connection Diagram
e NOTES:
1 Date Code located on bottom.
12 To be assembled with one end hooked into
the slot in lower guard, and the other end
hooked into the slot in bearing cover
assembly.
IMPORTANT! To assure product SAFETY and
RELIABILITY, repairs, maintenance and adjustment should be performed by Sears Service Centers or other qualified service organizations, always
using Sears replacement parts.
Model
No.
900.112650
Volts
RPM
7.2 DC
1000
Engr:
RVVA
5/_TS
For the repair or replacement part you need
delivered directly to your home
Call 7 am -- 7 pm, 7 days a week
1-800-366-PART
(1-800-366-7278)
For in-house major brand repair service
Call 24 hours a day, 7 days a week
1-800-4-REPAIR
(1-800-473-7247)
For the location of a Sears Parts and
Repair Center in your area
Call 24 hours a day, 7 days a week
1-800-488-1222
|||||--'!
For information on purchasing a Sears
Maintenance Agreement or to inquire
about an existing Agreement
Call 9 am -- 5 pm, Monday-Saturday
1-800-827-6655
When requesting service or ordering
parts, always provide the following
information:
• Product Type
• Part Number
• Model Number
• Part Description
SEARS
America's
sold by Sears, Roebuck
Repair Sl;_cialists
and Co., Hoffman Estates, IL 60179 U.S.A.
S_,_/_S
Manual de instrucciones
I:RRFTSMRN
SIERRA CIRCULAR INALAMBRICA
de 7,2 Volts
Modelo No.
900.112650
PRECAUCION: Lea y siga todas ias
reglas de seguridad e instrucciones
de operaci6n antes de utilizar este
producto por primera vez.
VERSAPAKINTERCHANGEABLEBATTERYSYSTEM
Sears, Roebuck and Co,, Hoffman Estates, IL 60179 USA
Form No. 382306
OCT97-CD-2
"VefsaPak es una marca registrada do The B_ck & Decker Corporation,
Printed in U.S.A.
;araptla completa por un aho en la Ensambladora Craftsman
Si esta Sierra circular inal-_,mbricaCraftsman falla debido a defectos el los materials o
mano de obra dentro del argosiguiente a la fecha de compra, Sears la reemplazard sin
cargo alguno.
EL SERVICIO EN GARANTIA ESTA A SU DISPOSICION SIMPLEMENTE ENVIANDO
LA HERRAMIENTA A LA TIENDA O CENTRO DE SERVICIO MAS CERCANO EN LOS
ESTADOS UNIDOS.
Esta garant{a le otorga ciertos derechos y usted puede tener otros, que pueden variar
de estado a estado.
Sears, Roebuck
and Co., D/817 WA, Hoffman
IOTA: Consulte los manuales de la
,ater'a y el cargador para encontrar la
lformaci--n
de seguridad y uso de la
later'a y el cargador.
DELE PRIORIDAD
:_ARA REDUCIR EL RIESGO DE
.ESIONES:
• Antes de cualquier uso, aseg_rese
que cualquier persona que vayaa
utilizar esta herramienta lea y
comprenda todas las instrucciones
de seguridad y la informaci0n
contenida en este manual.
herramientas producen chispas,
que pueden encender los vapores.
PROTEJASE CONTRA EL
CHOQUE ELECTRICO. Evite el
contacto corporal con superficies
aterrizadas, por ejemplo; tuberlas,
radiadores, hornos, gabinetes de
refrigeracibn, etc. Tenga precaucibn
extrema cuando taladre, atornille o
corte en muros, pisos, techos u
otras _reas en donde pueda
encontrar cables eldctricos vivos,
no toque ninguna parte metdlica de
la herramienta. Sujete las
herramientas solamente pot las
empuhaduras de pl_stico para
evitar descargas el_ctricas.
CONSERVE APARTADOS A LOS
NINOS. No permita que ni_os ni
otros visitantes toquen la
herramienta ni los cables de
extensibn. Todos los ni_os y otros
visitantes deben apartarse del _rea
de trabajo.
GUARDE LAS HERRAMIENTAS
Conserve estas instrucciones y
rep_selas con frecuencia antes de
usar la herramienta e instruir a
otras personas.
•/h ADVERTENClA:
Siempre que utilice
herramientas eldctricas debe seguir
ciertas precauciones b,_sicas de
seguridad, a fin de reducir los
riesgos de incendio, choque
eldctrico y lesiones personales,
entre las que se encuentran las
siguientes.
LEA TODAS LAS INSTRUCClONES
/h ADVERTENCIAS
E
,.
INSTRUCCIONESGENERALES
DE
SEGURIDADPARATODASLAS
HERRAMIENTAS.
•
CONSERVE
AL AMBIENTE
DE TRABAJO. No exponga las
herramientas electricas a la Iluvia.
No utilice herramientas eldctricas
en lugares ht_medos o inundados.
Ilumine bien la zona de trabajo. No
utilice las herramientas eldctricas
en presencia de liquidos o gases
inflamables. Los motores de estas
ADVERTENCIA:
ADVERTENCIAS
"INSTRUCCIONESIMPORTANTES
}E SEGURIDAD
•
Estates, IL 60179
QUE NO EMPLEE. Siempre que no
use las herramientas, debe
guardarlas en un lugar seco y
elevado o bajo chapa, fuera del
alcance de los nifios.
LIMPIA LA ZONA DE
TRABAJO. Las superficies y
bancos con objetos acumulados
propician los accidentes.
2
NO FUERCE LA HERRAMIENTA.
Esta hard el trabajo mejor y de
manera rods segura bajo las
especificaciones para las que se
dise_6.
EMPLEE LA HERRAMIENTA
ADECUADA. No fuerce a una
herramienta pequefia o a sus
dispositivos en tareas destinadas a
una herramienta de alto
rendimiento. No utilice la
herramienta para tareas para las
que no ha sido diseSada.
VISTASE DE LA MANERA
ADECUADA. No utilice ropas
sueltas ni joyas, pueden quedar
atrapadas en las partes m6viles. Se
recomienda el uso de guantes y
calzado antiderrapante cuando
trabaje a la intemperie. C_brase el
cabello si Io tiene largo.
UTILICE GAFAS Y OTRO EQUIPO
DE SEGURIDAD. Tambidn utilice
una mascarilla contra polvo si la
operaci6n Io produce.
ASEGURE LAS PIEZAS DE
TRABAJO. Utilice prensas para
sujetar su pieza de trabajo; es m_s
seguro que usar su mano y le deja
ambas manos libres para operar la
herramienta.
NO SE SOBREEXTIENDA.
Apoye
bien los pies y conserve el equilibrio
siempre.
CUIDE SUS HERRAMIENTAS.
Conserve sus herramientas limpias
y afiladas para un rendimiento mejor
y m_.s seguro. Siga las instrucciones
de lubricaci6n y cambio de
accesorios. Revise la herramienta
peri6dicamente y si est,, dafiada,
h&gala reparar por una estaci6n de
servicio autorizada, Conserve las
empuSaduras secas, limpias y libres
de aceite y gra.sa.
DESCONECTE O ASEGURE EN
POSIClON DE APAGADO LAS
HERRAMIENTAS
cuando no las
utilice, cuando las cambie de lugar,
antes de darles servicio y cuando le
cambie accesorios (como brocas,
puntas, cortadores).
QUITE LAS LLAVES'DE AJUSTE
Y LAS HERRAMIENTAS
DE
MANO. AcostOmbrese a verificar
que se hayan retirado todas las
Ilaves antes de encender la unidad.
EVITE EL ENCENDIDO
ACCIDENTAL.
No acarree la
herramienta con el dedo en el
interruptor. Aseg=Jrese que el
interruptor est_ en posici6n de
apagado (con seguro si estd
disponible) cuando las transporte.
ESTE ALERTA. Conc_ntrese en Io
que hace. Utilice el sentido comL_n.
No opere la herramienta si est&
cansado o discapacitado de alguna
manera.
REVISE LAS PARTES DA_iADAS.
Antes de seguir usando la
herramienta, debe revisar las
guardas y otras partes para
determinar realizardn su funci0n
adecuadamente. Revise la
alineaci6n de las partes m6viles, la
manera en que estdn sujetas, que
no haya piezas o soportes rotos, y
cualesquiera otras condiciones que
puedan afectar la operaci6n. Una
guarda u otra pieza que este
dafiada debe set reparada o
reemplazada en un centro de
servlcio autorizado. No use la
J
herramienta si el interruptor no
enciende y apaga.
SERVIClO Y REPARACIONES.
Las reparaciones, el mantenimlento
y cualquier ajuste no especificados
en este manual deben ser
realizados por los centros de
servicio autorizado Black & Decker
u otras estaciones de servicio
calificadas, que siempre utilicen
refacciones iddnticas.
EMPLEO DE ACCESORIOS Y
DISPOSITIVOS.
El uso de
cualquier accesorio o dispositivo no
recomendado para emplearse con
esta herramienta puede ser
peligroso.
una pequer]a fuga de liquido de las
celdas de la bateria bajo
condiciones extremas de uso, carga
o temperatura. Esto no indica fallas,
sin embargo, si el sello externo est,_
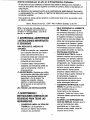
IN TRUCCIONESIMPORTANTES
E SEGURIDAD
(PARALABATERJA
ELCARGADOR)
•
/hADVERTENCIA:
Es
indispensable sujetarse alas
precauciones b&sicas de seguridad,
con la finalidad de reducir el peligro
de incendio, choque eldctrico y
lesiones personales, en todas las
ocasiones en que se utilicen
herramientas eldctricas. Entre estas
precauciones se incluyen la
siguientes:
EA TODAS LAS INSTRUCCIONES
• No guarde o Ileve la baterfa en tal
manera que objetos met_,licos
puedan hacer contacto con el
extremo met_lico de la bateria,
como se ilustra en la figura 1, Por
ejemplo, no ponga baterfas en
delantales, bolsillos, cajas de
herramienta, cajones, etc., en los
que pueda haber clavos, tornillos
Ilaves, etc. La baterfa puede hacer
corto circuito, ocasionando rlesgo
de incendio o quemaduras, o dar3os
a la baterfa.
roto y el Ifquido hace contacto
su piel:
Lave inmediatamente
jabbn.
a°
Neutralice
bo
•
c°
•
•
___-,tm"
WlIit
La baterfa no est_i diser_ada para
otra cosa que no sea cargar
baterias VersaPak. Otras baterias
pueden estallar.
•
No opere el cargador si la clavija o
el cord6n el_ctrico est&n dahados
--hdgalos
reemplazar
inmediatamente.
•
No opere el cargador si ha recibido
algOn golpe seco, se ha caJdo, o se
ha dahado en cualquier otra forma;
118velo a un centro de servicio
autorizado Black & Decker.
•
No desarme el cargador, Ildvelo a
un Centro de Servicio autorizado
-"
Nunca intente abrir la baterfa por
ning_n motivo. Si la cubierta de la
bateria se rompe o estrella,
desc_lrtela de inmediato y no la
recargue.
No incinere las baterfas, pueden
explotar con el fuego. Puede ocurrir
Cargue las baterfas solamente con
el cargador de baterfas VersaPak.
No exponga el cargador a
condiciones de humedad. Estd
disehado para utilizarse 5nicamente
bajo techo. No Io utilice cerca de
lavaderos, tinas o similares. No Io
sumerja en agua.
•
Fig. 2
Capuchbn de la
baterfa_":"i";-
con un _icido debil como
NOTA MEDICA: el Ifquido es una
solucibn de potasa c&ustica en
concentracidn de 25 a 35%.
_--
Los capuchones de las baterfas se
proporcionan para trasladarlas o
guardarlas en bolsillos, cajas de
herramientas, etc. Quite el
capuch6n antes de colocar la
bateria en el cargador o en la
herramienta (figura 2).
con agua y
jugo de limSn o vinagre.
Si el Ifquido de la baterfa toca sus
ojos, enju,_guelos con agua limpia
por un minimo de 10 minutos y
busque inmediatamente atenci6n
mddica.
:ig.
1
Extremo
metallco
con
Black & Decker cuando requiera
ser reparado. Ensamblarlo de modo
incorrecto puede ocasionar
descargas eldctricas o incendios.
No contiene partes susceptibles de
ser reparadas por el usuario en su
interior.
•
Para obtener meiores resultados,
no cargue la bateria cuando la
•
•
•
•
tempera_urasea _i,_rr-_vr_ a o-_,
(+40°F), o SUPERIOR a 40°C
(+105°F).
El cargador est_ disefiado para
funcionar con corriente electrica
dom_stica est_,ndar(120 volts,
corriente alterna). No intente
utilizal:locon otro voltaje.
Desconecte el cargador cuando no
Io utilice.
No abuse del cord6n electrico del
cargador. Para reducir el riesgo de
dafios a la clavija y al cord6n
el_ctrico, nunca sujete el cargador
por el cord6n el_ctrico ni tire de
_ste para desconectarlo de la toma
de corriente. Cons_rvelo alejado de
calor, aceite y bordes cortantes.
Solamente emplee el cargador
suministrado por el fabricante para
recargar sus baterias.
•
• CONSERVE
AFILADOS.
•
LIMPIOS Y
,_PELIGRO:
CONSERVE LAS
MANOS ALEJADAS DEL AREA DE
CORTE.
Aleje las manos del disco. Nunca coloque
las manos por delante o por detr&s del
camino del disco mientras corta. No las
coloque por debajo de la pieza de trabajo
mientras el disco gira. No intente sacar la
pieza cortada mientras el disco contin0e
en movimiento.
•
L_PRECAUCION: El disco
continQa girando despu8s de
apagar la herramlenta.
Cuando complete el corte, permita que el
disco se detenga antes de sacar la sierra.
La guarda telesc6pica inferior se cerrar_ a
levantar la sierra.
/_PRECAUCION:
Retire las
baterias antes de cambiar de
discos y de inspeccionar o limpiar
la sierra.
NOTA: Esta sierra est,. equipada con un
disco para uso general de 85,7 mm
(3-3/8"). No se recomienda cortar
aglomerados o pl&sticocon este disco.
• CONSERVE LAS GUARDAS EN SU
SITIO Y LISTAS PARA TRABAJAR.
Nunca sujete o amarre la guarda de
manera que quede abierta.
• APOYO
Verifique la operacibn de la guarda inferior
antes de cada uso. No se use si la guarda
inferior no cierra completamente
sobre el
disco de la sierra.
Z_ PRECAUCION:
LOS DISCOS
Los discos afilados minimizan el riesgo de
atascaduras y contragolpes. El empleo de
discos desafilados y/o sucios puede
increment_
la carga de la sierra,
ocasionando que el operador tenga que
empujar con m&s fuerza, Io que promueve
la formacibn de dobleces.
INSTRUCCIONES
DESEGURIDAD:
SIERRASCIRCULARES
•
II_lr'lF.l"llUrt
Utilice el asa del mecanismo retractil
cuando sea necesario levantar la guarda
manualmente.
/h ADVERTENCIAS
E
•
tJIU/,_I'IU/_
PARA PIEZAS GRANDES
Los p_neles grandes deben soportarse
como se ilustra en la figura 3 de este
manual para minimizar la posibilidad de
que el disco se atore y ocasione un
contragolpe.
Si la sierra se
cae la guarda inferior puede
doblarse, restfingiendo el regreso
completo.
Enganchar la guarda inferior en una
superficie que se encuentre por debajo del
material que se va a cortar puede reducir
el control del operador
moment&neamente.
La sierra se puede
levantar parcialmente incrementando
las
posibilidades de que el disco se doble.
aseg_rese que haya suficiente espacio
libre debajo de la pieza de trabajo.
Cuando la operaci6n de corte requlera
que la sierra descanse sobre la pieza de
trabajo, la sierra debe apoyarse en la
porci6n mds grande, y la parte m&s
pequefia debe ser la que se separe.
5
Fig. 3
orrecto
rl_.
L;orreclo
;3
Apoye la pieza cerca del corte
\
Zapata de 1_
Fig. 4
ncorrecto
sierra
El material oprime el disco
ocasionando sobrecarga o
contragolpe
Mango auxiliar
Apoye la pieza de manera que la porci6n
m&s ancha de la zapata de ia sierra quede
sobre la parte del material que no caer_i
despu_s del corte.
Nunca sujete
con la mano
contragolpe.
manos en la
Fig. 6
• USO DE GUIA PARA CORTE DE
TIRAS
la pieza que se desprende
(fig. 6). Puede ocurrir un
Conserve siempre ambas
sierra.
\
Incorrecto
\
Siempre utilice una guia o una regla
cuando vaya acortar tiras.
.SOLAMENTE
EMPLEE EL DISCO
ADECUADO Y LOS COMPONENTES
DE ENSAMBLAJE
DEL DISCO
CORRECTOS EN EL MONTAJE
No utilice discos con orificios de tamafio
incorrecto. Nunca utilice tornillos o tuercas
defectuosos o incorrectos para el disco.
Siga los procedimientos de ensamblaje
del disco.
APOYEY ASEGURELAPIEZADE
MANERAADECUADA
AsegQrese que el material que vaya a
cortar est_ sujeto (fig. 5) y s61idamente
soportado y balanceado en una base de'
trabajo estable y nivelada.
• CONSERVESE ALERTA Y EN
CONTROL
Coloque su cuerpo a un lado del disco.
Siempre sujete con firmeza y controlando
la sierra con ambas manos. No cambie la
manera de sujetar la sierra ni la posici6n
del cuerpo durante la operaci6n de la
sierra.
Tenga cuidado para evitar lesiones con las
piezas que se desprenden y otros
materiales que caen durante la operaci6n.
•
/_ PRECAUCION: Cuando corte en
muros, pisos, o dondequiera que
pueda encontrar cables el_ctricos
"vivos", NO TOQUE NINGUNA
PARTE METALICA DE LA
HERRAMIENTA, Sujete la sierra
6nicamente por las empuSaduras de
pl&stico para evitar descargas
el(_ctricas si accidentalmente corta
un cable vivo,
PROTI:JASE
CONTRAEL
CONTRAGOLPE
Empuje lentamente
esto ocurra.
No retire la sierra del trabajo durante
un corte y mientras el disco est_ en
movimiento.
•i.,QUE ES EL CONTRAGOLPE?
El contragolpe es el movimiento repentino
de la sierra durante un code, hacia el
operador, Io que puede ocasionar lesiones
personales graves.
• _PELIGRO:
LIBERE EL
INTERRUPTOR
INMEDIATAMENTE
SI EL DISCO
SE ATORA O LA SIERRA SE
ATASCA.
Permita que la sierra alcance la
m&xima velocidad antes que el
disco haga contacto con el material
a cortar. Encender la sierra con el
disco apoyado en la pieza zo forzar
el corte puede ocasionar que se
atore o que la sierra salta hacia
atr&s intempestivamente.
Siempre asegure la pieza de trabajo
para evitar movimientos durante el
corte.
• EL CONTRAGOLPE
PUEDE SER
OCASIONADO
POR:
El disco al atorarse, doblarse o rebotar
durante el corte o si la sierra se atasca.
No intenteforzarlasierrade regreso
a laIfneade cortesiestase desvla.
Cuando el disco se desvfa o pierde la Ifnea
de corte, los dientes y el borde trasero del
disco pueden enterrarse en la superficie
superior de la madera ocasionando que el
disco salga del canal de corte y se mueva
s6bitamente hacia el operador.
PARA REDUCIR EL RIESGO
CONTRAGOLPE:
•
,
Esto puede ocasionarcontragolpe.
Apague lasierra,
retirela
delcortee
inicie
un cortenuevo en lalinea.
No regreseeldiscocuando est_en
movimiento,ya que se puede
desviary algOndientese puede
enterraren elmaterial,
ocasionando
que lasierrasaltehaciaatr,_s,
hacia
eloperador.
Evitecortarclavos,reviselapiezay
quitetodos losclavosde lamadera
antes de cortarla.
Nunca tirede lasierrahaciaatr_,s
a
tray,sdelcanal de cortemientrasel
discoaOn est_ en movimiento.
DE
Sujete firmemente la sierra con
ambas manos siempre.
Cons_rvese alerta yen control.
Apoye los materiales largos que
sobresalgan. AI cortar el material,
este se debilita y aprisiona el disco.
• Apoye los pdneles largos como se
muestra en la figura 3. El material
apoyado solamente en los extremos
(fig. 4) ocasionard que el disco
quede atrapado.
Evite cortar en alto. El material se
puede doblar y atrapar al disco.
• Conserve los discos limpios y
afilados.
•
•
•
Utilice una guia o una regla cuando
corte tiras. Tenga cuidado ya que la
tira que se desprende puede
aprisionar el disco y ocasionar un
contragolpe.
No fuerce la herramienta. Las
maderas tienen condiciones
variables como nudos, dureza,
humedad, etc. Las maderas
tratadas a presi6n y las reci_n
cortadas pueden sobrecargar la
sierra ocasionando que se atasque.
la_sierra cu_ndo
ih OTRASINSTRUCCIONES
Y
ADVERTENCIAS
DE SEGURIDAD
IMPORTANTES
•
Algunos tipos de madera contienen
conservadores
como el arsenato
ct_prico de cromo (CCA) que
pueden ser tbxicos. Cuando corte
estos materiales, debe tener
precauciSn extrema para evttar la
Inhalaci6n y minimizar el contacto
con la piel.
• La profundidad del disco no se
puede ajustar. Aseg0rese que haya
espacio suficiente debajo de la
pieza de trabajo.
CONSERVE
ESTAS
INSTRUCClONES
Apriete tirmemente tornliioael aisco
con la Ilave del disco (en sentido
contrario alas manecillas del reloj)
(fig. 8).
So
' ADVERTENCIA: Siempre retire
las baterfas antes de realizar
cualquiera de las siguientes
operaciones.
NSTALACION
)ISCOS
Y REMOCION
Fig. 8
DE
1.
Coloque la roldana de seguridad
interior en la flecha.
2. Abra la guarda inferior y coloque el
disco sobre la roldana de sujeci6n
interior. Las flechas de sentido de
rotacibn del disco deben concordar
con la direcci6n de las flechas de la
guarda superior (fig. 7).
Fig. 7
Flecha de la sierra
Roldana de
Apriete
REMOCION
BATERIAS
•
Disco
.
,
•
Direcci6n
los dientes
.
Roldana de sujeci6n
exterior
3.
4.
DE LAS
NOTA: LAS BATERIAS VERSAPAK TM NO
VIENEN COMPLETAMENTE
CARGADAS
DE FABRICA.
sujeci6n
interior
•
E INSTALACION
Fig. 9
Torni
de
sujeci6n del disco
Coloque la roldana de sujecibn
exterior en la flecha y apriete el
tornillo de sujecibn a rnano (el
tornillo tiene cuerda izquierda;
glrelo en sentido contrario alas
manecillas del reloj para apretarlo).
Introduzca un destornillador o un
clav.o largo a trav_s de uno de los
orificios del disco para evitar que
gire (fig. 8).
Para instalar las baterfas en la
herrarnienta, sirnplernente
deslfcelas dentro del mango hasta
que hagan "clic" en su lugar.
Para sacar las baterfas VersaPak TM
de la herrarnienta, optima los
botones de liberaci6n, corno se
observa en la figura 9, y tire de las
baterfas hacia afuera del mango de
la herramienta.
liberaci6n
Botones de
NOTA: los capuchones de las baterfas se
proporcionan para usarlos cuando se
requiera transportar las baterfas, o para
guardarlas en un bolsillo, caja de
herramientas, etc. Quite el capuch6n
antes de colocar la baterfa en la
herrarnienta o en el cargador.
Instale el capuchbn de la baterfa (figura
2), oprirni_ndolo en su lugar; para quitarlo,
simplemente tire de _1 hacia afuera.
8
NOTA: Solamente opere la herramienta
con ambas baterias VersaPak TM
instaladas.
/_ ADVERTENCIA"
Mueva la sierra hacia adelante, a
travds del material, conserva la
zapata plana hasta completar el
corte.
Para reducir el
riesgo de lesiones personales
graves, lea, comprenda y siga
todas las advertencias e
instrucciones importantes de
seguridad antes de usar la
herramienta.
CORTES
m&xima. Nunca trabe e!.gatillo e._
posici6n de encendido por ning5n
motivo.
GENERALES
IMPORTANTE: Lea las
advertencias e instrucciones de
seguridad - PROTEJASE CONTRA
EL CONTRAGOLPE.
Siga todas las instrucciones de
ensamblaje y ajuste con las
batefias fuera de la herramienta.
Aseg_rese que la guarda inferior
funcione. Seleccione el disco
apropiado para el material que va a
cortar.
Suelte el gatillo, permita que el
disco se detenga antes de sacar la
sierra.
CORTE DE BOLSILLO
FIGURA 10)
El corte de bolsillo se emplea para hacer
un orificio en una pieza sin cortar el
material desde la orilla.
•
•
Mida y marque la pieza en la zona
de code.
Apoye y sujete la pieza
apropiadamente (consulte las
advertencias e instrucciones de
seguridad).
Emplee el equipo de seguridad
adecuado y requerido (vea las
instrucciones de seguridad).
Conserve el &rea de trabajo segura
(vea las instrucciones de
seguridad).
Aseg_rese que el interruptor
encienda y apague.
/_ ADVERTENClA:Es
importante
dar buen apoyo a la pieza de
trabajo y sujetar la sierra con
firmeza para evitar la pdrdida de
control que podrfa ocasionar
lesiones personales. La figura 5
ilustra la manera correcta de sujetar
la sierra.
Coloque la parte frontal de la
zapata en piano sobre la superficie
que va a cortar.
Haga coincidir el disco con la Ifnea
de corte para asegurarse que el
disco pasa libre.
Optima el gatillo interruptor, permita
que el disco alcance la velocidad
(VEA LA
Incline la sierra hacia adelante y
apoye el frente de la zapata en la
pieza que va a cortar. Colbquela de
manera que el corte se inicte en la
parte posterior del rect&ngulo que
dibuj6.
Suba la guarda inferior por medio
de la palanca del mecanismo
retr&ctil, con el disco libre en la
parte que iniciar_ el code, encienda
el motor y comience a bajar la
guarda paulatinamente.
Fig. 10
ADVERTENCIA:
Cuando el disco inicie el
code, suelte inmediatamente
mecanismo retrdctil
•
Z_ADVERTENCIA:
la palanca del
AI iniciar el
corte, libere la palanca del
mecanismo retr_.ctil
inmediatamente.
•
•
Nunca ate la guarda en posicibn
levantada.
Cuando la zapata descanse sobre
el material que estd cortando,
complete el corte empujando hacia
adelante.
•
p_ermitaque el disco se detenga
completamente antes del sacar la
s'ierradel material.
• Cuando inicie un corte nuevo repita
los pasos mencionados arriba.
Solamente utilice jabbn suave y un trapo
h_Jmedo para limpiar la herramienta.
Nunca permita que ningSn Ilquido se
introduzca en la herramienta; nunca
sumerja ninguna parte de la herramienta
en ningen liquido.
NTERRUPTOR
a herramienta est,. equipada con un
istema de seguro de apagado para evitar
;I encendido accidental. Para operar la
_erramienta, debe deslizar primero el
_ot6n del seguro y sujetarlo mientras
_prime el gatillo. Despu_s de oprimir el
;]atillo,con la herramienta en
uncionamiento, suelte el botbn del
_eguro; la herramienta continuar_, en
uncionamiento
mientras el gatillo est_
_primido.
IMPORTANTE
Para garantizar la SEGURIDAD y la
CONFIABILIDAD,
deber_n hacerse
reparaciones, mantenimiento y ajustes
de esta herramienta en los centros de
servicio Sears.
ACCESORIOS
Los accesorios recomendados para
usarse con su herramienta est&n a su
disposici6n con costo extra en las tiendas
Sears o en los centros de servicio Sears.
Fig. 11
Bot6n de
seguro
PRECAUCION:
El uso de cualquier
accesorio no recomendado para
emplearse con esta herramienta puede
ser peligroso.
ELSELLORBRC
TM
j
El sello RBRC TM (Rechargeable ,._-_,.
Battery Recycling Corporation)
#_].._
en las baterlas de nfquelcadmio, indica que Sears ha
pagado los costos de reciclado de las
baterias al fin de su vida _til. En algunas
zonas, es ilegal deshacerse de las
baterias de nfquel cadmio desgastadas
por los medios de recolecci6n de basura
usuales, y el programa RBRC proporciona
una alternativa protectora del ambiente.
Interruptor
Para apagar la herramienta, suelte el
gatillo interruptor. Cuando libere el gatillo
(cada vez) se activar& el botbn de seguro
de apagado, asegurando la herramienta
en esa posicibn.
No hay ningen mecanismo para asegurar
la herramienta en posici6n de encendido,
y el interruptor nunca debe trabarse por
ning_n medio.
INDICADOR
RBRC en cooperacibn con Sears y otros
usuarios de baterias, ha establecido una
serie de programas en los estados Unidos
para facilitar la recolecci6n de las baterias
de niquel-cadmio desgastadas. Puede
usted comunicarse al centro de reciclado
de su Iocalidad para que le proporcionen
mayor informaci6n acerca de los sitios en
donde podr& deshacerse de su bateria
desgastada, o Ilame al 1-800-8-BATTERY.
DE CORTE
El frente de la zapata tiene dos marcas
que act_an como indicadores de corte.
Los indicadores ayudan a guiar la sierra a
'1o largo de las Ifneas pre marcadas. Las
,mamas se Iocalizan a 25,4 mm (1") y a
76,2 mm (3") de la orilla de la zapata.
El borde frontal de la zapata tiene una
marca que funciona como indicador de la
punta de los dientes del disco, que ayuda
a anticipar el contacto del disco con la
pieza de trabajo.
10
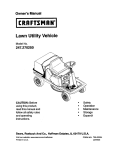
SIERRA CIRCULAR INALAMBRICA
DE 7,2 VOLTS - NUMERO DE MODELO 900.112650
22
5
23
6
7
4
22
/
f/25
20
10
•
t_
\
17
19
18
Engr:
RWA
_R613
SIERRA CIRCULAR INAI._MBRICA
DE 7,2 VOLTS - NUMERO DE MODELO 900.112650
I nOmero
EI numero
modelo
encuentra
en la placa o
decuando
identificaci6n.
de de
modelo
en se
toda
la correspondencia
ordene Slempre
pelles demenck_e
repuesto. el
VEA LA PAGINA DE ATRAS PARA i_AS INSTRUCCIONES
SOBRE
II
COMO ORDENAR
LISTA DE PARTES
Pieza
No.
_tl
2
Parte
No.
152729-01
152721-02
3 152120-03
4 152717-00
5 152734-00
...J.
Po
6
7
8
9
10
11
152733-00
152719-00
152720-00
152730-00
152738-01
152710-01
_,12
13
14
15
16
17
18
19
2O
21
22
23
25
26
152708-00
152740-00
152706-00
152707-00
152716-00
152718-0O
99212-36
152722-00
99212-28
152122-01
330019-00
381913-00
99163-04
382163-00
PARTES
Descripcion
Cant.
Carcaza
1
Interrupter del seguro de
apagado
1
Tablero de terminal
1
Motor y pi66n
Cubierta de la caja de
engranes
Caja de engranes
Montaje de le flecha de salida
Montaje de engrane y flecha
Montaje de tapa del balero
Guarda superior
Guarda inferior
Resorte de torsi6n
Ret_n
I
1
1
1
1
1
1
1
1
Sujetador interior del disco
Sujetador externo del disco
Tornillo del disco
1
1
1
Zapata
Rodillo
Tope
Perno
Seguro de la bateria
Tornilio auto roscante
Tornillo
Tornillo
Roldana de seguridad
NO ILUSTRADAS:
(Surninistmdascon la unidad)
382306-00
Manual del instrucciones
98000-09
Llave allen de 4 mm
87118-00
Guia para cortes el hilo
Disco de combinaci_n de 50 dientes
1
1
1
1
1
LUBRICATION:
1
1
1
1
1
13
2
1
1
Aplique 1 gramo de grasa Polyrex dentro de la
caja de engranes en la &tea del pi66n y el engrane
de salida.
ACCESORIOS
OPCIONALES:
(No SuministTado con la unidad)
900.112710
Bateria (Acc.)
900.112730
Cargador & 2 Bateria (Acc.)
761995-00
Grasa Polyrex (170 g)
283484-00
Grasa Polyrex (907 g)
! 52739-00
Diagrama de conexiones
NOTAS:
1
12
El c_:ligo de fecha se encuentra en la parte
inferior.
Para ensamblar con un extremo
enganchado on la ranura de la guarda
inferior, y el otto extremo enganchado a la
ranura del montaje de la cubierta de baleros.
ilMPORTANTE! Para garantizarla SEGURIDAD y
la CONFIABILIDAD del producto, es indispensable
que todas las reparaciones, el mantenimiento y los
ajustes sean electuados por los Centros de Servicio Sears u otras organizaclones calificadas que
empleen siempre refacciones Sears.
Modelo
No.
900.112650
Volts
RPM
7,2 CD
1000
Engr:
RWA
5_TS
Para ordenar piezas con entrega a
domicilio --
1-800-659-7084
Para pedir servicio de reparacion a
domicilio
1-800-676-5811
Para Iocalizar
el centro de servicio
y partes Sears de su drea
Llame las 24 horas, 7 dlas a la
semana
1-800-488-1222
Para obtener informacibn sobre la
compra de una pbliza de
mantenimlento Sears o preguntar
sobre una pbliza existente
Llame de 9 am a 5 pm, de lunes a
1-800-827-6655
Cuando pida servicio u ordene
refacciones, siempre proporcione
la sigulente informacibn:
• Tipo de producto • Parte Numero
• Modelo Numero
• Descripcibn de parte
SEARS
America's
vendido
por Sears,
Roebuck
and Co., Hoffman
Estates,
Repair Specialists
IL 60179
U.S.A.