1
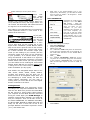
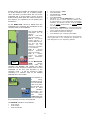
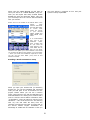
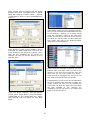
mLAN16E & MOTIF ES
A Getting Started Power User Guide
(Studio Manager 2 – Windows: Sonar/Cubase/SQ01v2)
Phil Clendeninn
Senior Product Specialist
Technology Products
©Yamaha Corporation of America
MIDI Connections
Word Clock
Audio Connections
WORD CLOCK: Word Clock in mLAN world is
negotiated automatically – again via the same
single cable. Word Clock is a necessity when you
are using more than one digital device in a setup.
Basically it allows you to make one of the devices
the Master clock – and although all your digital
devices may be set to run at 44.1kHz (44,100
cycles per second), 48kHz, 88.2kHZ or 96kHz –
you need to have them agree on what is a “1” and
what is a “0” otherwise you will get these
seemingly random clicks and pops (errors). It
wasn’t 10 years ago that a multiple word clock
interface device would have cost you over a
thousand dollars. Clocking multiple devices was
extremely expensive. Word Clock negotiation is
built in to mLAN. Do not confuse Word Clock
Synchronization with MIDI clock or other types of
musical synchronization – word clock is all about
the zeros and ones of digital data.
Background: mLAN16E:
Music Local Area Network
The Ultimate Expansion Option for Motif ES
“mLAN is a digital network for music that was
developed based on IEEE1394, an industrystandard high-performance data communications
protocol. Digital music environments that do not
feature mLAN require dozens of cables for various
devices and purposes, including MIDI cables and
audio cables to route MIDI and audio signals. If
you wish to make changes to such systems, you
must physically disconnect and re-connect these
cables. For example, adding another synthesizer
to a system requires two MIDI cables and two or
more cables for audio (for stereo equipment).
Making the appropriate connections may require
special knowledge of inputs, outputs, stereo
settings, and perhaps connector impedance. The
larger the system, the more complicated and
expensive these connections become, increasing
the likelihood of errors and difficulties. It takes
time and effort to investigate such errors and
their underlying causes. You may have already
experienced the unpleasantness of tracking
various cables through a spider’s web of
connections. mLAN simplifies the physical cable
connections by using only one type of IEEE1394
cable, thus enabling you to configure extremely
sophisticated systems. There is no need to repatch cables to change routings of MIDI and audio
signals between mLAN devices.”
MIDI IN and OUT PORTS: MIDI is handled on 4
MIDI PORTS. Each Port is a 16-channel
communication bus (this is basic MIDI stuff). In
this setup, Port 1 for regular note/performance
data and clock timing (16 Channels), Port 2 could
be used for optional PLG Boards or external MIDI
devices (up to 16 channels), Port 3 for General
Remote control functions of Motif ES software
(Multi-Part Editor for Motif ES 6/7/8), and Port 4
for specific Remote control functions of your
computer-based DAW software (Cubase/Nuendo,
Sonar, Digital Performer, Logic, SQ01). And again
you have just a single cable between your Motif
ES and your Computer. Actually the PORT
assignment is selectable, except for Port 1, which
is fixed as the main communication port for the
Motif ES. The other assignments are customizable.
What functions does mLAN add to my Motif ES?
AUDIO OUTPUTS: The mLAN16E adds fourteen
individual audio outputs plus the system’s main
stereo L&R output down a single cable (16
outputs). The question may arise about why do
you need the stereo L&R – but of course, you do.
It is not always the case that you need individual
outputs on everything. Depending on what you
are doing, you may only need to take a few
PARTS and route them to individual outputs for
special processing. The mLAN16E is 14+2 digital
outputs.
When can I use mLAN in my setup?
mLAN audio outputs can be assigned anytime
you could use the assignable outputs and the
main stereo L&R outputs. Therefore in Voice mode
signal is always routed to the main L&R outputs –
this will be true of the mLAN side of things, as
well. You cannot route a Voice in Voice mode to
an assignable output, however. In Performance
Mode and in a Song Mix / Pattern Mix you can
route a PART to either the main “L&R” or any of
14 assignable outputs (as1~as14).
AUDIO INPUTS: The mLAN16E also adds four
stereo audio inputs returning from your firewire
equipped computer or other mLAN device – down
that same single cable (8 inputs). These inputs
are referred to as mLAN1 – mLAN4 within the
Motif ES. Each represents a pair of inputs. You can
route the mLAN input to the System Effects of the
Motif ES. This can be useful when monitoring
signal during record sessions. You can also route a
pair of mLAN inputs to the Motif ES sampler as a
digital Source during sample sessions.
mLAN inputs can be assigned anytime you could
use the “Audio In” functions. That is, in
Performance Mode, or in a Song MIX / Pattern
MIX… never in Voice mode. Voice mode has no
capability to have external input. In a
Performance or Mix you have the option of
interfacing the Motif ES (both input and output)
with external gear. For example, if you want to
2
plug in a microphone as an AD input to the Motif
ES, you would need to be in Performance or Mix.
The same is true for mLAN inputs…you have four
pairs of mLAN audio inputs available during any
Performance or Mix. If you want to route a PART
out via an assignable output you would need to be
in Performance or Mix. The same is true for mLAN
outputs.
•
This is not a limitation in any real sense, because
if you know about your Motif ES, any Voice can be
placed in a PART of a Performance. The
Performance mode has the ability to store more
than just a single Voice – it has the ability to store
an Analog-to-Digital (AD) input and it has the
ability to route a PART to an assignable output.
You will begin to recognize that the mLAN
assignments are simply digital domain versions of
the analog outputs. In fact, you already know
everything in theory that mLAN addresses…it is
still simply the same audio and MIDI – the cabling
has been made simpler. There should be no fear
of a big learning curve to mLAN – it is simply
audio as you have always known it and MIDI as
you have always known it, but made so that all
configurations can be stored and totally recalled
whenever necessary. And if there is a learning
curve it is that you now can network large
configurations
of
gear
very
simply
by
manipulating a digital Graphic Patchbay.
•
•
•
The screen shot above shows the A/D input page
– the page you are looking at is indicated in the
upper left corner (red arrow). You navigate to this
screen as follows:
•
•
•
•
Press
Press
Press
Press
[MIXING]
[EDIT]
[COMMON]
[F5] AUDIO IN
The mLAN inputs can be routed in the following
manner.
You can maintain the highest quality (24-bit)
signal path while routing signal to an mLAN mixer
(like the Yamaha 01X) or directly to your
computer’s digital audio workstation (DAW)
software. mLAN is principally used when the Motif
ES is in a multi-timbral/multi-Part mode.
•
It is, in fact, a good way to think about mLAN in
your Motif ES… it is a method of interfacing your
Motif ES with external inputs and outputs on a per
PART basis. There are additional pages added to
the Audio Input section when you add the
mLAN16E to your Motif ES. There are four pair of
mLAN audio input channels. Incoming signal can
be routed through the Motif ES System Effects
(for monitoring with effects), Master EQ and
Master Effects.
•
•
What is different about the mLAN16E inputs?
There are some differences between the mLAN
inputs versus the analog AD inputs.
•
The AD inputs can be routed through the Effects
processors of the Motif ES in the following
manner:
•
You cannot sample the AD input with the SYSTEM
Effects, however – the send to the sampler is pre
the System Effect.
You can route the AD input to its own set of DUAL
INSERTION EFFECTS
You can record the AD inputs to the sampler with its
DUAL INSERTION EFFECTS in tact. The insertion
point for the Dual Insertion Effects (to and from) is
pre the send to the sampler. So sampling with
Insertion Effects is possible.
You can route the AD inputs to the Assignable
outputs with DUAL INSERTION EFFECTS in tact. This
means you can apply Insertion Effects prior to
sending signal to the digital audio workstation
record track.
You can monitor an AD input with the SYSTEM
Effects (Reverb and Chorus processors)
3
You have the option of applying the SYSTEM Effects
(Reverb and Chorus processors) to any mLAN input.
This is perfect for a scenario when you are using the
Motif ES to create your monitor mix. mLAN inputs
can be used to feed a headphone mix when
overdubbing to your DAW. Often you want to
monitor with reverb but not record it. If you are
routing signal via the mLAN inputs you can use the
headphone jack of the Motif ES as your headphone
rig. You can apply effects to the monitor mix
without having to commit to recording those effects
to the DAW.
You can sample the mLAN input – mLAN can be the
source for the sampler unit in the Motif ES. This can
be a creative tool when you are flying in some audio
clips or combining audio from external sources.
You cannot route the mLAN input to the Motif ES
DUAL INSERTION EFFECTS directly. However, as
you may be aware, you can create a Motif ES USER
Voice out of any sample that you create and then
you can apply the Dual Insertion Effects.
You can route the mLAN input to another mLAN
output - sending the signal back again to the DAW.
The screen shown below is the “mLAN1” Audio Input
screen. Remember to read the current screen in the
upper left corner (circled in red).
•
Pressing
the
SF5
button
will
call
up
the
mLAN2 Audio Input screen (shown below):
•
Notice
that
each
mLAN
input pair has
a setting for
Volume, Pan, Reverb Send, Chorus Send, Dry
Level, Mono/Stereo select, and Output Select. You
can monitor the mLAN input with effects and send
the signal out to an mLAN output dry.
Right Click on the mLAN Manager icon in your
System Tray. Alternatively, you can start the mLAN
driver by going to START > All Programs > mLAN
Tools > Start mLAN
AUTO CONNECTOR
Introduced in mLAN version
package 1.5.4 is the AUTO
ON function – which will
activate mLAN automatically
when you power up your
computer.
If
you
have
dedicated this computer as
your music computer, you
may opt to click the AUTO
ON option. Right Click on the
mLAN Manager icon in the
System Tray and select AUTO
CONNECTOR.
Also added to your Motif ES when you inserted the
mLAN expansion board is a new screen in the
UTILITY area shown here:
At [F2] I/O>
SF2 OUTPUT
you will find
the
“mLAN
Monitor Switch”. What this Switch does is allow
you to hear what you are routing out to your
digital audio workstation (mLAN Monitor Switch
ON) versus what is post the send to the recorder
(mLAN Monitor Switch OFF). I like to refer to this
as a switch between the scientific output (that
which you are sending to your recorder) and the
subjective output (that which you are monitoring
in your speakers). In a scenario where you are
using the Motif ES to add effects to a signal for
the purpose of monitoring (subjective)- the mLAN
Monitor Switch OFF will let you hear any Reverb
you have added to the mLAN signal. Press mLAN
Monitor Switch ON and you will hear exactly what
is being sent to the record track of your digital
audio workstation (the dry signal).
Make the initial settings for example:
•
Model Name Motif ES 7
•
Sampling Rate 44.1kHz
•
Master Clock = PC
•
PC -> Motif ES7: 8 CH mLAN [There are 8 channels
coming from the computer back to the Motif ES via
the mLAN cable that arrive at the AUDIO INPUT
monitor bus.]
•
ASIO ____ ASIO
•
PC <- Motif ES: 14 channels; –MAIN OUT- is 15 &
16 [There are 14 channels going from the Motif ES
to the computer; ASSIGNABLE OUT 1-14 plus the
Main left and right outputs are sent on mLAN 15
and 16]
Also added is the Assignable Output Gain for the
L&R, as1&2, as3&4, as5&6, as7&8, as9&10,
as11&12 and as13&14. This will allow you to
boost the level of an assignable output when you
are attempting to record directly out from the
mLAN outputs. Remember you lose little or
nothing when you move data in the 24-bit digital
domain…welcome to the future.
Getting Started
Install your mLAN16E and appropriate drivers
according to the setup documentation that comes
with the unit. Make sure you have the latest Motif
ES OS. Connect a single firewire cable between
your computer and the Motif ES when instructed
during the install. Open your mLAN Manager to
establish communication between your Motif ES
and your computer. Then we will take a look at
the AUTO CONNECTOR, the GRAPHIC PATCHBAY,
the MULTI-PART EDITOR for MOTIF ES 6/7/8 and
finally we will take a close look at two of the
principal Windows workstation sequencers: Sonar
(3.1.1) and Cubase SX3.
•
4
Click CONNECT
OUTPUTS from the computer (some future
expansion is already planned). You can select a
single connector by clicking in the empty space to
the right of the number – a small jack will appear.
You can hold [SHIFT] on your computer keyboard
and click next to number 8 to prep 8 cables for
connection.
The computer will take a few more seconds to
negotiate the setup.
•
•
Open the “Graphic Patchbay”.
Right Click on the mLAN Manager icon in the
System Tray and select “Graphic Patchbay.
Although the Graphic Patchbay is for use with a
system network (more than just computerÙMotif
ES) you might as well start to learn about how
this works. This utility will be your digital patch
bay and allow you to route audio and MIDI parts
to and from your computer. It will be best to
understand this utility separate from your
sequencing software. Think of this as a way to
manage the connections between your two major
pieces of hardware: the Motif ES and the
computer itself. What you do with the connection
within the software is a separate issue. (Routing
hardware inputs to tracks and routing tracks to
hardware outputs will be a separate operation
handled within the DAW software of your choice).
The potential of a network consisting of an
mLAN16E and a firewire equipped computer will
be 16 audio channels from the Motif ES to the
computer, you will be able to return 4 separate
stereo audio signals from the computer, you will
be able to communicate to and from software via
multiple MIDI Ports. All this is accomplished
simultaneously down the single cable.
•
•
•
Next, click on the IN bar on the mLAN16E node and
the input strip will appear.
Click to the right of number 1 and the patchbay will
connect all 8 cables.
Now connect the 16 outputs from the mLAN16E to
the computer.
Cable connection or ‘patching’ is the first skill in
mastering mLAN operation. It is quick and easy
and eliminates the ganglion of cables that would
be absolutely impossible to plug into your
computer. Think about this for a minute: you just
connected 24 cables between your Motif ES and
your computer! If you are like most people there
is no room behind your computer for that many
physical wires, no less the input and output jacks.
Audio
Patch
Making and breaking patch connections: There are
three graphic views: Audio, MIDI and Word
Clock.
•
Select the AUDIO graphic view…you can click on the
Audio icon in the toolbar or you can use your
QWERTY keyboard: CTRL + 7
Breaking a connection: Place the cursor arrow
on the connecting line that runs from the
mLAN16E (Motif ES) to the computer, it will turn
into cross-hairs...
•
Right Click and select DISCONNECT ‘ALL’ or any one
•
of the connections as necessary. If you break a
single connection the graphic will adjust and redraw
the connections as necessary.
Break the connection that runs from the computer
to the Motif ES.
Making a connection:
Connections are made by
routing signal OUTPUT to
INPUT (always follow the
signal flow from output
to input). Click on the
OUT
bar
on
the
COMPUTER node (shown
with red arrow at left) –
a
box
showing
the
potential OUTS will open.
There are a potential 32
Add to this, the ‘cables’ are capable of being
patched and re-patched without crawling behind
your computer or your gear. These ‘cables’ are of
5
highest quality and capable of transferring signal
at 24-bit resolution with up to 96kHz sample
rates. And when you think about the cost of the
mLAN16E and a single firewire versus 24 high
quality analog cables (that still couldn’t function in
this manner), the expansion kit has already paid
dividends!!!
•
•
•
•
•
•
On the MIDI view: connect 4 PORTS from the
mLAN16E to the computer and 4 PORTS from the
computer back to the mLAN16E.
•
The 4 Ports for MIDI
connection are as
follows:
•
•
Port 1 – main Motif
ES communication
Port 2 – for PLG150
boards (optional)… or
external MIDI devices.
The Port and MIDI
channels
can
be
assigned as necessary
in your software.
Port 3 – General
Remote
(Multi-Part
Editor for Motif ES)
Port 4 – Remote
Control
for
Digital
Audio
Workstation
software.
*In this setup with Local Control OFF you would typically
route signal back to the selected tone generator via
track assignment in your sequencing software.
On the Word Clock
view:
(shown
below) make the
computer the MASTER and connect the Word
Clock out of the computer to Word Clock in of the
mLAN16E. To do this click anywhere in the
computer node – it will be outlined in black
indicating it is selected. Click on the SINGLE
MASTER icon in the toolbar.
MIDI
The Patchbay is
a
living,
breathing thing.
You can and will
refer to it often
as the task you
have at hand
dictates.
Eventually you
will create your
own
setup
TEMPLATES that
you can recall for different tasks. This will happen
as you develop your own work methods.
The Motif ES should be set as follows:
•
•
•
Set the Local Ctrl = OFF*
Press SF4 OTHER
Set MIDI IN/OUT = mLAN
Press F4 CTL ASN
Press SF4 REMOTE
Set Mode A = <-Your DAW here-> = Port 4 should be used to control sequencer software (set
as appropriate for your Digital Audio Workstation
software). On Windows XP that would be SONAR
3.1.1 or Cubase SX/SL/Nuendo or GENERAL if you
are using SQ01v2
Set Mode B = <GENERAL> = Port 3 (the Motif ES’s
Port 3 will be used to remote control the Motif ES
via the “Multi Part Editor for Motif ES”)
Press ENTER to make these settings
Press STORE to lock-in settings (Flash ROM)
Press UTILITY
Press F5 MIDI
Press SF2 SWITCH
6
Chapter: Studio Manager version2
7
When you launch Studio Manager as a separate
application you will need to setup the Modify
Workspace screen and then set the MIDI Port
screen.
Launching Yamaha Studio Manager ver2
•
If you are using a non-Studio Connections
compliant application (something other than
Cubase SX3/Nuendo3) you will open Studio
Manager separate from your main sequencer
program. Basically, setup your DAW software
– we will give a few examples below; then
launch the Studio Manager host program. You
will save your data in a separate .YSM file
•
If you are using SQ01v2: You do not need
Studio Manager in SQ01v2. The Editors run
within SQ01 without Studio Manager2.
•
If you are using Cubase SX3/Nuendo3 you will
be able to launch Studio Manager from the
“Devices” pulldown
•
o
o
Launch Sonar and setup for using mLAN as
normal. This includes:
o
o
o
o
Motif ES 6/7/8 (Voice)
Motif ES 6/7/8 (Multi)
•
Click the MIDI Ports tab and select:
•
•
Click Apply
Click OK
Input Ports: Yamaha mLAN MIDI In and Yamaha mLAN
MIDI In (3)
Output Ports: Yamaha mLAN MIDI Out and Yamaha
mLAN MIDI Out (3)
The Yamaha mLAN MIDI In and Yamaha mLAN MIDI Out
Ports will be used to communicate between the Voice
and Multi Editors and the Motif ES.
The Yamaha mLAN MIDI In (3) and Yamaha mLAN MIDI
Out (3) will be used to remote control the Multi-Part
Editor from the front panel of the Motif ES.
SONAR 3 / SONAR 4
o
All the Yamaha Device Editors on your computer will
appear at left. Select the editors you want to
associate with this session. Click “ADD” for each to
create your “Workspace” (shown below). Select:
OPTIONS> MIDI Devices: Setup for using
mLAN IN/OUT 1-4
OPTIONS> Instruments: If you use an
Instrument Definition to select your sounds
set it up
OPTIONS> Audio: Setup for ASIO mLAN
operation. This will include the three tabs
“General, Advanced and Drivers”. Make
sure you activate the driver for the number
of inputs and outputs you have active.
Setup your sampling rate and bit
resolution, etc. Re-launch, if necessary.
OPTIONS> Project: Set up Sonar to your
own particular preferences. If you plan on
using the Motif ES in sync with Sonar set
the SYNC to transmit MIDI clock/MTC to
Motif ES, etc. Setup your Metronome.
OPTIONS> Control Surface: Set Sonar to
communicate with the Motif ES on PORT 4.
This will allow you to Remote Control Sonar
from the front panel of the Motif ES. Use
either “Mackie Control” or the “Yamaha
General Mode 01X” protocols.
CUBASE SX3
•
8
If you are using Cubase SX3 or Nuendo 3 then
Studio Manager is fully integrated into the
program and will be launched within the DAW
environment.
Saving
normally
will
automatically incorporate your Motif ES data
with the .cpr or .npr Project file.
•
it to a VOICE EDITOR File and then Import that Voice
Editor file into your active Multi-Part Editor data.
Additional Note: The Voice and Multi editors are fully
Studio Connections compliant. If you have PLG150
Board Editors (AN Expert, DX Simulator, VL Visual
Editor, etc.), they are not fully Studio Connections
compliant so there will be some limitations on what they
will be able to “recall”. Look for more improvements in
time.
If you are using Cubase SX3 you will be able to
launch Studio Manager within the program. On the
toolbar find “Devices” and select Yamaha Studio
Manager. This will launch the host application’s
Setup inside of Cubase.
Multi Part Editor: MIDI Setup
•
All the Yamaha Device Editors on your computer will
appear at left. Select the editors you want to
associate with this session. Click “ADD” for each to
create your “Workspace” (shown below). Select:
o
o
Motif ES 6/7/8 (Voice)
Motif ES 6/7/8 (Multi)
•
Open the Multi-Part Editor by double clicking on the
MULTI icon in your workspace
•
Click on “SETUP” and select MIDI IN/OUT Ports as
shown above.
You can have the Multi-Part Editor correctly reference
the current User 1, User 2 and User Drum Voices that
are in your Motif ES by doing one of two things
1) Request and receive a MIDI bulk dump of the
current User Voice setup
2) Use the IMPORT VOICE function to load a Voice
Editor (.w7e) file into the Multi-Part Editor
•
Under the Setup pulldown, select ‘Receive Voice
Bulk…’
Note: The first time you set these up in a session you
will have to configure them. Every time afterwards they
will open automatically as part of this Project and will be
ready to work. In our example, we will setup for using
the VOICE Editor and MULTI Editor of the Motif ES to
show you how they can be associated with a Project. As
you get to know the Editors a bit better you will see that
the Multi-Part Editor includes not only the current Multi
Mix but also all the internal USER Voices and USER
Drum Voices. The Voice Editor is included here so you
can see how it can be setup and, of course, if you need
to tweak a Voice beyond the available MIX PART offset
parameters, you can. If you edit a Voice, you can store
You can request that the Motif ES send the MultiPart Editor its USER bank sounds. Normal (USER 1
9
and 2) and Drum User Voices – this way you can
select sounds by name in the Editor. Each Editor
file will archive not only your current MIX it will
save the entire internal USER Voice set in one
neat file (.m4e). Alternatively, you can ‘import’
other Motif ES Voice Editor files (.w7e) – so you
can access any Voice libraries you may have
accumulated.
•
•
Under the FILE pulldown find the “Import Voice…”
selection
This will allow you to browse your computer for your
libraries of Voice Editor files (.w7e). It is highly
recommended that as you create and acquire new
Voice banks for your Motif ES that you archive them
as Voice Editor files for this purpose. Importing a
Voice file that represents your current Motif ES User
Voices is much faster and is more efficient.
•
Click the MIDI Ports tab and select:
If you are using Cubase SL or SE or any nonStudio Connections software you will need to run
Studio Manager as a separate program behind you
software sequencer.
Input Ports: Yamaha mLAN MIDI In and Yamaha mLAN
MIDI In (3)
Output Ports: Yamaha mLAN MIDI Out and Yamaha
mLAN MIDI Out (3)
The Yamaha mLAN MIDI In and Yamaha mLAN MIDI Out
Ports will be used to communicate between the Voice
and Multi Editors and the Motif ES.
The Yamaha mLAN MIDI In (3) and Yamaha mLAN MIDI
Out (3) will be used to remote control the Multi-Part
Editor from the front panel of the Motif ES.
Launch Cubase SL and setup for using mLAN as
normal. This includes:
•
•
Click Apply
Click OK
Later in the article we will come back to discuss
the use of the Multi-Part Editor.
Cubase SL/SE
•
•
Devices> Device Setup:
Set the Default MIDI Ports to:
o
o
•
•
In SL2/SL3 you have the option to add remote
control of Cubase via the Motif ES (this is not
available in SL 1.06 or in SE) If there no REMOTE
DEVICES folder select the ADD function “(+)” and
add the “Yamaha 01X” to the list of available
devices
Highlight the Yamaha 01X set the MIDI Input and
Output Ports to: Remote Control Surface control
o
o
•
•
“mLAN MIDI In” and “mLAN MIDI Out”
Click APPLY
“mLAN MIDI In (4)” and “mLAN MIDI Out (4)
Click APPLY
Set the VST Audiobay: ASIO mLAN
o
Click APPLY
CLICK OK
SQ01ver2
When using the free SQ01v2 you do not use the Studio
Manager host application to run the newest versions of
the Motif ES MULTI and VOICE Editors. SQ01v2 allows
the editors to be launched from within the program as a
fully compliant OPT program (in affect SQ01 is the host).
ON the toolbar select “Setup > MIDI Device > activate
all the mLAN MIDI Ports that will be used “mLAN MIDI
In/Out 1-4)
Once you have Cubase setup for mLAN you can launch
the Studio Manager and set it up to run concurrently.
Setup the Modify Workspace screen and then set the
MIDI Port screen.
•
All the Yamaha Device Editors on your computer will
appear at left. Select the editors you want to
associate with this session. Click “ADD” for each to
create your “Workspace” (shown below). Select:
o
o
Motif ES 6/7/8 (Voice)
Motif ES 6/7/8 (Multi)
On the toolbar of SQ01v2 click on the Plug-in option…
10
A full listing of the Yamaha
Editors will be shown. You
simply launch them from
this list. When each opens
you will need to set the
MIDI communication ports
to and from the particular
Editor.
For normal communication
“mLAN MIDI IN” Input
“mLAN MIDI Out” Output
For Multi Editor (Remote)
“mLAN MIDI In (3) Remote
“mLAN MIDI Out (3) Remote
For Control Surface Remote
“mLAN MIDI In (4) Remote
“mLAN MIDI Out (4) Remote
11
Chapter: Assigning Parts to mLAN Outputs
12
Assigning Motif ES Outs in a MIX:
Routing of PARTS to outputs in the Motif ES is
handled typically in Song Mixing or Pattern Mixing
modes (however, you can do this in Performance
mode). Voice mode only uses the main outputs
and does not use Parts. Mainly you will want to
work in the Motif ES’s multi-timbral modes. This
will give you greater flexibility with routing and
processing signal for recording. How you proceed
with your session is really personal taste. You
could record MIDI tracks first, then print them as
audio tracks; or you could simply just record
audio tracks. There is no right or wrong way to
proceed. Here we will learn about how to route
Motif ES PARTS from a MIXING setup to the
individual mLAN outputs.
Drums: In addition to the assignment of
individual PARTS, the Motif ES allows you to
assign individual drums from within a KIT. Editing
the Kit in Voice mode and then assigning the
Output Select to reflect those Voice mode settings
handle this. You will see a selection for “DRUM” if
a drum kit is assigned to a PART.
When
a
drum kit
has been
edited in
regular
Voice mode, individual drum sounds can be routed
to any of the assignable outputs, as necessary. In
the screen shot above a Kick drum on Key C1 is
being routed to ‘as1’. Then when this Drum kit is
saved as USER KIT and is placed in a PART of
your MIX, you can select “drum” as the OUTPUT
SELECT assignment (shown below). This will allow
the assignments made in Voice mode to be
respected in the MIX.
Assignable 1-14 – Any Motif ES PART set to
Output Select “as1” through “as14” will be routed
out via mLAN as an individual output. The
assignable outputs from the Motif ES can be setup
as individuals or as ODD/EVEN pairs (as1&2,
as3&4, etc).
If you are using the front panel of the Motif ES
you must leave the MIXING mode to return to
VOICE mode in order to edit your Drum Kit. The
VOICE EDITOR allows you to edit your kit while
you remain in MIXING mode. You can also use the
Voice Editor at any time to edit your Drum kit and
make the appropriate output assignments. When
you launch the VOICE EDITOR you can start to
edit any preset or user drum kit. You do not have
to change modes. You will store your edits to a
User location within the Editor and store the entire
Voice Editor file. And finally you will import this
Voice Editor file so that you are synchronized with
your latest updated Voices in the MIX/Multi-Part
Editor.
Outputs are assigned as follows:
•
•
•
•
•
Press [MIXING]
Press [EDIT]
Press Track Select [1]-[16] to select the Part you
want to assign
Press [F2] OUTPUT
Press [SF3] SELECT
L&R
asL
asR
as1&2
as3&4
as5&6
as7&8
as9&10
as11&12
as13&14
as1
as2
as3
as4
as5
as6
as7
as8
as9
as10
as11
as12
as13
as14
L&R
Drum
Main stereo out (mLAN15 & mLAN16)
analog assignable output (not mLAN)
analog assignable output (not mLAN)
mLAN1 & mLAN2 stereo pair
mLAN3 & mLAN4 stereo pair
mLAN5 & mLAN6 stereo pair
mLAN7 & mLAN8 stereo pair
mLAN9 & mLAN10 stereo pair
mLAN11 & mLAN12 stereo pair
mLAN13 & mLAN14 stereo pair
mLAN 1 mono
mLAN 2 mono
mLAN 3 mono
mLAN 4 mono
mLAN 5 mono
mLAN 6 mono
mLAN 7 mono
mLAN 8 mono
mLAN 9 mono
mLAN 10 mono
mLAN 11 mono
mLAN 12 mono
mLAN 13 mono
mLAN 14 mono
mLAN15 & mLAN16 L&R main System outputs
When selected the individual output assignments as
edited in the USER DRUM Voice will be applied
13
indicators disappear from the Reverb and Chorus
knobs) and is routed up and to the output.
Once you have launched the Voice Editor and
double clicked on the Kit you want to edit the
above COMMON screen will open. The drum kit
you select will be sent to the Motif ES Editor
buffer and you will hear your edits immediately.
•
Click on the ELEMENT KEY button (red circle
above) to open a view where you can edit
each individual drum.
•
Click on the Key you want to edit – it will
sound and will be highlighted in aquamarine.
If, in another example, you elect to route the
snare to an assignable output, say Assignable 2
(asn2)…
…notice the signal now bypasses the effects
altogether on its way to the individual output.
“L&R” Out = 15&16 – Any Motif ES PART set to
Output Select “L&R” (the normal default) will be
sent via mLAN outputs 15&16.
•
The Motif ES assignable outputs are the
equivalent to individual outputs. The stereo L&R
mix is sent on mLAN audio channels 15 and 16.
The stereo output is also referred to as the
SYSTEM output. The System Effects (your Reverb
and Chorus processors) will be applied as normal
to the L&R outputs. Any Part or Parts set to an
assignable output will not have the System
Effects, obviously. Those that do go to the System
L&R outputs will naturally have the System
Effects. However, if you have applied the Dual
Insertion Effect to a Part, it will accompany the
signal assigned to the individual output. The
exception is drums. Since when a Dual Insertion
Effect is assigned to a KIT, if a drum is routed
within the KIT Voice to an assignable output, it is
taken out of the general pool and is stripped of
the Dual Insertion Effect assigned to that kit.
Click on the OUTPUT assignment (circled in
red above) and a list of possible routing
assignments will open for the selected key.
Above is a close-up view of the left-to-right signal
flow of an individual drum key – at the bottom of
the Drum Key Editor.
LevelÆPanÆRandom PanÆAlter PanÆInsert Effects A/B*
or ThruÆSystem Effects (Reverb/Chorus)Æ Output
Putting Theory into Action
You can transfer as many tracks individually as
you wish. At first you may think that you will
always be transferring multiple tracks – all at one
time. In actual practice you may find that you will
work differently. The point is you can decide and
you can operate, as you need, when you need.
*the relationship between Insert Effect A/B is
determined on the COMMON page – depending if the
routing between Insertion Effects is “parallel” or AÆB, or
BÆA.
Experiment with assignment here and you will
learn all you need to know about the effects
within a drum Voice.
In any multi-track recording scenario you are
typically working on one track at a time, and
when it comes time to transfer data as audio, you
are probably going to settle into a work method
where you are doing just a few tracks at a time
(don't forget everything runs in sync each time).
Besides since you have 8 Dual Insertion Effects
that seems to be an appropriate maximum
number of tracks to transfer (at a single time).
But (the beautiful thing is) it's up to you!!!
If, for example you elect to send this particular
snare drum (Key D1) through Insertion Effect A…
…notice how the graphic changes. The signal is no
longer routed to System Effects (the send
Also before ever doing this, it is natural to think
that you don't need the stereo output (but once
14
you start working you realize that, OF COURSE
you do. When multi-tracking who cares if you do
them all at one time? Modern recording sessions
rarely assemble all the musicians at one time. It
was maybe 30 years ago the last time “live” in the
studio sessions were the norm. (I remember
those days...)
Once you have assigned these to tracks in your
DAW, you run it once and transfer just the drums
to create 6 Mono tracks and 4 Stereo tracks (JUST
Drums!!!!) 1 MIDI track just became 10 audio
tracks (via 14 individual sends)...
Now you can mute the Drum MIDI Track and
transfer the rest of the rhythm section in the next
pass:
Here is a real world scenario with the mLAN16E.
The advantage of printing a track as MIDI data
first (or at all) is so that you can take advantage
of the functions that MIDI provides... Note
correction, timing correction, etc. You can get the
MIDI track exactly as you like it. Say you create
an entire Song this way in the Motif ES or in your
DAW of choice as “MIDI” tracks.
Bass Guitar to "as1"
Rhythm Guitar to "as2"
Electric Piano to "as3 & as4"
Synth Comp to "as5 & as6"
Clavinet to "as7"
and so on....
You can do the transfers at your leisure; This
method allows you to concentrate on a few
related things and do the transfers in groups that
make sense musically. Notice that not all tracks
need to be stereo. Recording a bass guitar in
stereo is most likely a waste of memory, while
recording the electric piano in stereo might
actually have an impact. Analyze what tracks
would benefit from being recorded in stereo and
what tracks you can record as mono. As ‘engineer’
you should look for things that you can place in
the stereo panorama. For example if you have a
mono rhythm guitar part and a mono clavinet –
often these two instruments serve a similar
purpose chordal-harmonic-rhythmic support –
these make excellent candidates to counterbalance each other on opposite sides of a mix.
Say your Motif ES sequencer session is the
following track layout:
Track
Track
Track
Track
Track
Track
Track
Track
Track
Track
Track
Track
Track
Track
Track
Track
1 Drums
2 Bass
3 Rhythm Gtr
4 Lead Gtr
5 Electric Piano
6 Piano
7 Synth Pad
8 scratch Vocals
9 Choir Pad
10 audio sample loop
11 Synth lead
12 Strings
13 Brass
14 Synth comping
15 Clavinet
16 Background Vocal compilation
Once you print those MIDI tracks as Audio tracks,
you can mute the MIDI tracks and worry about
the rest of your mix...re-assigning PARTS to
available outputs. You may have 16 Tracks in the
Motif ES and wind up with 30 or more audio tracks
by the time you split them out into Cubase. It
depends on what the mix requires. Consider that
the Motif ES has a maximum of 8 Parts that can
use their Dual Insertion Effects at any one time –
this makes this a pretty good maximum of Parts
you will want to transfer to audio at any one time.
Now you come to the point where you are going
to commit these tracks to audio tracks of your
DAW software. You might possibly use the entire
first pass to transfer just the drums to audio.
Even though your drums are playing from a single
PART (single Track) of the Motif ES, you can edit
that drum kit so that you are using the various
assignable outputs for individual drums sounds
(see the Clinician's Corner article:
Setting Up Assignable Outputs On a Drum Kit
Strings to "as1 & as2" (stereo)
Brass to "as3 & as4" (stereo)
Background Vocals to "as5 & as6" (stereo)
Acoustic Piano to "as7 & as8" (stereo)
You might assign your drum kit as follows:
Kicks go to "as1"
Snare/Rimshot/cross stick go to "as2"
Hi hat to "as3"
Crash/China to "as4"
Tom-toms to "as5& as6" (Stereo)
Ride/splash to "as7"
Handclaps to "as8"
Clave/Cowbell to "as9 & as10" (Stereo)
Congas and Bongos "as11& as12" (Stereo)
Miscellaneous percussion "as13 & as14" (Stereo)
You do not always wind up with a 1:1 ratio
between the number of tracks you have as MIDI
and the number of tracks you will wind up with as
Audio tracks... they do not have to be the same
number. They can increase or...decrease in
number.
In fact, you can take the exact opposite approach
15
and simply record your entire Motif ES sequence
as a stereo track. Or you can as I outlined briefly
above - split it out to as many mono and stereo
pairs of tracks as you desire to accomplish your
mix. The idea is to get the music to your DAW
with the number of tracks that you feel will make
sense to accomplish the sound you are going
after.
There are some projects where you may print the
drums to a stereo track ...(done) - because the
sound you get in the Motif ES, is exactly what that
particular project needs.
The importance of doing EVERYTHING ALL AT
ONCE will hopefully pass once you realize the built
in benefits of multi-tracking. You get to reuse the
effect processing, you get to concentrate your
energy and focus on just the few tracks at hand.
Each pass will be synchronized so there is no
worry about having to do them all at once.
The thing that is so nice about it all is there is no
one single way to work. If you perfect the
sequence in the Motif ES or in the DAW of choice,
nothing prevents you from simply opening a
stereo track and print it straight up. But if you
want to go crazy and separate each drum to its
own track, and each instrument part to its own
track, you can do that too. You may want to work
with your DAW strictly as an audio recorder –
nothing says you have to use MIDI tracks. These
are decisions you have to make when you
conceptualize your session.
Now let’s take a close look at some typical
Windows DAW and some specific issues…
16
Chapter: SONAR
17
SONAR 3 / SONAR 4
There is no one-way to proceed, but for the sake
of this article let’s continue with what a Motif ES
with mLAN can provide in the way of routing
AUDIO and MIDI. Make sure LOCAL CONTROL is
OFF: [UTILITY] > [F5] MIDI > [SF2] SWITCH.
Select mLAN as your MIDI I/O and Sonar as your
“MODE-A” Remote Setting assignment.
•
•
•
•
•
•
•
•
•
•
•
Press [ENTER] to SET
Press [STORE] to write UTILITY settings to ROM
Use Auto Connector to establish communication
Start the Graphic Patchbay (as described earlier)
Launch SONAR 3.1.1 (please update your Sonar to
this version or later for proper functioning)
Create a New Project
Click on OPTIONS > MIDI Devices…
Select the appropriate “mLAN MIDI In” and “mLAN
MIDI Out” Ports. In the example above:
mLAN
mLAN
mLAN
mLAN
•
•
•
•
Click OPTIONS > AUDIO…
ON the GENERAL TAB make setting appropriate for
your computer. If ASIO is not an option…Go to the
Advanced tab and select it.
Click on the ASIO Panel…
MIDI
MIDI
MIDI
MIDI
In
In(2)
In(3)
In(4)
|
|
|
|
mLAN
mLAN
mLAN
mLAN
MIDI
MIDI
MIDI
MIDI
Out
Out
Out
Out
- Motif ES
(2) – PLG150/ext
(3) – Multi Part
(4) – Remote
Click OK
Return to OPTIONS
Click on “Instruments …” if you plan on using the
SONAR Instrument Definition to select your
programs. "mLAN MIDI OUT/1” through “mLAN
MIDI OUT/16” connect to Motif ES ALL
Click OK
Your mileage will vary depending on your computers
muscle. Here you see a computer running with a 2 ms
buffer and Latency of 4ms Send and 6ms Receive,
operating at 24bit. If you get scratchy audio you may
need to increase the Preferred Buffer Size.
18
In general 24-bit will give you better sound quality while
tracking. Of course, when you burn a CD you will have
to dither down to 16-bit (44.1kHz).
SONAR – Setup a MIDI Track
Recording MIDI data into Sonar is handled as
usual. If you are new to Sonar please consult the
manual for Sonar. Nothing has changed in how
you record MIDI data to Sonar - other than the
fact that you are now using mLAN MIDI Ins and
Outs. Here is a close-up of the data on a typical
MIDI track.
•
•
•
Click on the DRIVERS tab and all ASIO mLAN
drivers you will use. We have 16 inputs and 8
outputs…this translates in SONAR (which treats
these as stereo odd/even pairs) as shown above.
Only the ODD numbers are shown (the even
number is assumed as the right channel of an
ODD/EVEN pair).
If you need to make changes here, SONAR will need
to be re-launched. And the changes will take effect
when you startup again.
Under the OPTION pulldown find CONTROL
SURFACES and set this up so that SONAR thinks it
is addressing a Mackie Control surface on IN and
OUT Ports (4). (At some point soon there will be a
version upgrade and you will find a “Yamaha 01X”
object that can be used – until then you can use
Mackie Control). If you have a YAMAHA 01X object
use it.
Auto Thru
I – or Input is set to “mLAN MIDI In – Ch 1” (you can
select any channel to transmit on from the Motif ES). If
in the past you were used to working with OMNI IN
(basically any incoming channel) please alter your
operating procedure. It is imperative that you select
specifically which MIDI input you are going to record. In
a ‘network’ you are likely to have more than one port
sending data. For example, if you had OMNI selected
you run the risk of recording unwanted data generated
by button presses during remote operations.
O – or Output is set to “1-mLAN MIDI Out”. The “1”
prior to the mLAN MIDI Out is a SONAR reference to the
first MIDI OUTPUT listed.
•
Ch – or Channel – in this case we have selected
“MotifESAll” – this is the Instrument Definition. When
properly installed you can view the names of the sounds
and select sounds here. We are using the Sonar
Instrument Definition posted on Motifator.com - you will
be able to see the 6 Preset banks, the 2 User banks, the
Preset Drum bank, the User Drum bank, the GM bank,
the GM Drum bank, the PLG User banks, the PLG Preset
banks, and the User Sample Voice Bank. The instrument
definition can be used to select Voices for tracks – the
MIX can be captured by the Multi-Part Editor by
extracting the MIX with the “Receive Multi Bulk…”
function.
mLAN MIDI In Port (4)/Out Port (4) settings
correspond to the settings we made in the Motif ES
for “MODE A = SONAR = Port 4”
19
Left ASIO mLAN
mLAN 01 is the first
of
16
possible
mLAN
inputs…
Select this if the
signal
is
mono.
Right ASIO mLAN
mLAN 01 is the
second
of
16
possible
inputs…
Select if the signal
is mono. If your
signal is a stereo
input it will use
both of these – and
you would select
“Stereo ASIO mLAN
mLAN 01”.
Patch – The sound
selected
in
this
screen shot is the
drum kit Dr: Hyper
STD.
The
red
arrow
indicates the Sonar
“AUTO
THRU”
function. We are
operating with the
Local Control Off
on the Motif ES.
Therefore
the
THRU function of
the software will
select
what
we
hear. So when we
transmit from the Motif ES keyboard the MIDI
data goes directly to the mLAN MIDI out arrives
here and if the THRU is activated on a track in
Sonar it will echo back and sound in the Motif ES.
Click this icon to set it to ECHO ON when you wish
to hear your MIDI tone module.
Therefore here is how it applies to the Motif ES…
Motif ES output:
Left ASIO mLAN – mLAN 01
Right ASIO mLAN – mLAN 01
Stereo ASIO mLAN – mLAN 01
Left ASIO mLAN – mLAN 03
Right ASIO mLAN – mLAN 03
Stereo ASIO mLAN – mLAN 03
Left ASIO mLAN – mLAN 05
Right ASIO mLAN – mLAN 05
Stereo ASIO mLAN – mLAN 05
Left ASIO mLAN – mLAN 07
Right ASIO mLAN – mLAN 07
Stereo ASIO mLAN – mLAN 07
Left ASIO mLAN – mLAN 09
Right ASIO mLAN – mLAN 09
Stereo ASIO mLAN – mLAN 09
Left ASIO mLAN – mLAN 11
Right ASIO mLAN – mLAN 11
Stereo ASIO mLAN – mLAN 11
Left ASIO mLAN – mLAN 13
Right ASIO mLAN – mLAN 13
Stereo ASIO mLAN – mLAN 13
Left ASIO mLAN – mLAN 15
Right ASIO mLAN – mLAN 15
Stereo ASIO mLAN – mLAN 15
I cannot cover all the functions of Sonar but this
should be sufficient for you to get recording and
playing back MIDI tracks. For additional
information
please
consult
the
Sonar
documentation.
SONAR – Setup an AUDIO Track
Recording Audio data into Sonar is handled as
usual. If you are new to Sonar please consult the
manual for Sonar. Nothing has changed in how
you record Audio data to Sonar other then you
now are using mLAN Ins and Outs. Above is a
close-up of the data on a typical Audio track.
=
=
=
=
=
=
=
=
=
=
=
=
=
=
=
=
=
=
=
=
=
=
=
=
as1
as2
as1&2
as3
as4
as3&4
as5
as6
as5&6
as7
as8
as7&8
as9
as10
as9&10
as11
as12
as11&12
as13
as14
as13&14
not applicable
not applicable
L&R main system
O – or Output is set to MASTER. The Master can be
assigned to any of the stereo mLAN inputs of the
mLAN16E. For example, if you go to the MASTER Track
view:
Here you see
the
Master
OUTPUT is set to
“ASIO
mLAN
mLAN 07” and
since it is stereo
this will return
to the Motif ES
to mLAN4:
I – or Input is set to “Left ASIO mLAN – mLAN01” (you
can select from a long list of possibilities).
The first time you see this selection process you may
scratch your head – but it is logical. As we saw earlier
Sonar refers to the inputs in stereo pairs (Left/Right)
and therefore deals with the odd/even pairings. The
ODD number is always the left channel and the EVEN
number channel is always the right channel.
mLAN16E Ins
mLAN1
mLAN2
mLAN3
mLAN4
20
=
=
=
=
SONAR mLAN Outs
ASIO mLAN mLAN 01&02
ASIO mLAN mLAN 03&04
ASIO mLAN mLAN 05&06
ASIO mLAN mLAN 07&08
You can select any pair of inputs on the mLAN16E
card that suits you. These would typically be so
you could monitor the signal.
The signal comes back to one of the four-mLAN
AUDIO IN screens:
Signal sent on ASIO mLAN 07 (&08) coming into
mLAN4 (is shown in the bottom screen shot
above) is heard as audio coming back to the Motif
ES. Here I have added Reverb to it (30) – most
often you record without printing reverb but
during tracking and overdubbing you can monitor
using the Motif ES’s powerful System effects.
Whether or not you hear the System Effects
added here will be controlled by the “mLAN
Monitor Switch” setting, found in UTILITY> F2 I/O
> SF2 OUTPUT:
If the mLAN
MonitorSw is
OFF
(as
shown) you are
hearing signal coming back from SONAR – post
the recorder (you will hear the reverb if you add
it). When the mLAN Monitor Switch is ON you are
monitoring the mLAN signal being sent from the
mLAN16E to Sonar (you will hear the “dry” send
signal). When the Monitor Switch is ON you can
hear the individual assignable outputs that you
are routing to the software. You have great
flexibility in sending and returning audio to and
from your DAW software.
21
Chapter: Cubase SX3
22
Cubase
There is no one-way to proceed, but for the sake
of this article let’s continue with what a Motif ES
with mLAN can provide in the way of routing
AUDIO and MIDI in Cubase SX3. Make sure LOCAL
CONTROL is OFF:
•
•
[UTILITY] > [F5] MIDI > [SF2] SWITCH
Set Remote mode to Cubase
•
•
•
•
•
•
•
•
Press [ENTER] to SET
Press [STORE] to write UTILITY settings to ROM
Start the mLAN Driver
Use Auto Connector to establish communication
Start the Graphic Patchbay (as described earlier)
Launch Cubase
Click on DEVICES > Device Setup…
Select the +/- option in the upper left corner and
add the Yamaha 01X to the list of available devices
Highlight the Yamaha 01X option under REMOTE
DEVICES
•
•
•
Remote ports for control of Cubase will be “mLAN
MIDI (4) In/mLAN MIDI Out (4)”
Click APPLY
This setting corresponds to the setting we make in
the Motif ES in [UTILITY]> [F4] Control Assign>
[SF4] REMOTE: Mode A = Cubase = Port 4
•
Select the Default MIDI Ports
•
Set the Default MIDI Ports to “mLAN MIDI IN” and
“mLAN MIDI OUT”.
This setting corresponds to the main transmit
(keyboard) and receive (tone generator) settings
for the Motif ES. Anytime a new track is added it
will open with this Port assignment, which will
address the software from the Motif ES keyboard
and send back to the Motif ES tone generator.
Select Yamaha 01X as your Remote Devices object - if
not available in your version of Cubase you can use the
Mackie Control protocol.
•
Select VST Audiobay and set for ASIO mLAN
•
Select ASIO mLAN and verify your Clock Source is
Firewire
Once all Device setting are made click APPLY and
OK
•
23
Cubase MIDI Track setup
A close up of a MIDI
track
information
box
shows
the
following:
MIDI IN is set to
“mLAN MIDI In”; if
in the past you were
used to working with
ALL
MIDI
IN
(basically
any
incoming
channel)
please alter your
operating procedure.
It is imperative that
you
select
specifically
which
MIDI input you are
going to record. In a ‘network’ you are likely to
have more than one port sending data. For
example, if you had ALL MIDI INPUT selected you
run the risk of recording unwanted data generated
by button presses during remote operations.
Cubase will create a MONO IN and you can select
an ASIO Device Port to feed this input.
If you click on the ASIO Device Port area you will
see a drop down (shown at left below) that lets
you select from the available ASIO
mLAN inputs. The mLAN16E, of
course, in our setup is occupying
the first 16 mLAN device ports.
Had you selected a STEREO IN Bus
you would be able to select any
two-mLAN device ports (shown
above).
MIDI OUT is set to a Motif ES Device (a script file
that allows you to select Motif ES Voices by Bank
and name…available on Motifator.com
MIDI channel is set to Channel 1
You can create as many mono
and/or stereo input buses as is
necessary to record your session.
Please check the documentation for
Cubase for more details on creating
and deleting Input bus devices.
Voice name selected currently is “Dr: Hyper STD”
Cubase AUDIO Track setup
On this same VST Connections screen you can
select the OUTPUTS tab and setup a method for
you to hear signal, post (after) the recorder.
Under the Devices pulldown you will find “VST
Connections” or you can press F4 on your
QWERTY keyboard to launch the above screen.
You can then click on the “ADD BUS” button to
add
an
input
device. You can
select various types
of input – we will
concern ourselves
here with either a
mono
or
stereo
input.
In the screen shot above the Outputs are set to
return to the Motif ES via mLAN 07 and mLAN 08.
mLAN16E Ins
mLAN1
mLAN2
mLAN3
mLAN4
Select a MONO Input
Click OK
24
=
=
=
=
Cubase mLAN Outs
ASIO mLAN mLAN 01&02
ASIO mLAN mLAN 03&04
ASIO mLAN mLAN 05&06
ASIO mLAN mLAN 07&08
What about Studio Connections and using
the Motif ES Editors within Cubase SX3?
If you have installed Studio Manager v2.x.x and
the Voice and Multi-Part Editors and have setup a
workspace as described earlier in the article, you
can use them inside of Cubase SX3. They can be
useful in archiving not only the current Voice
selection but all the Mix parameters and in fact,
the entire User 1, User 2
and User Drum Voices
current in the Motif ES.
The Multi-Part Editor can
be setup to be launched
in the same manner you
would launch a VSTi
Editor inside of Cubase.
You can select any pair of inputs on the mLAN16E
card that suits you. These would typically be so
you could monitor the signal.
The signal comes back to one of the four-mLAN
AUDIO IN screens:
Shown here is the track
Inspector
where
the
MIDI OUT has been set
to
“Motif
ES
6/7/8
(Multi)” in place of the
typical
MIDI
Out
connection,
VSTi
assignment or the Script
text file. Instead when
you click on the OUT
assignment
you
can
select from the Yamaha
hardware synth editors
you
placed
in
your
Workspace when you
configured your Studio Manager for this session.
Now by clicking on the small keyboard icon (red
arrow) you can open the Multi-Part Editor of if
assigned, the Motif ES
6/7/8 Voice Editor (shown
at left below). If you are
used to working with
script
files
you
can
continue to work with
them and when you are
ready to capture your MIX
setups you can simply
change the OUT assign for
a particular track and,
since any track can be
used to launch the MultiPart Editor, you can
switch to it. When you
launch the Editor you can
use the RECEIVE BULK
icon to capture the entire
mix. If you need to edit a
Voice, you simply change
the OUT assignment to
the Voice Editor and edit as necessary.
Signal coming into mLAN4 (shown on the bottom)
is heard as audio coming back to the Motif ES.
Here I have added Reverb to it (30) – most often
you record without printing reverb but during
tracking and overdubbing you can monitor using
the Motif ES’s powerful System effects. Whether
or not you hear the System Effects added here
will be controlled by the “mLAN Monitor Switch”
setting, found in UTILITY> F2 I/O > SF2 OUTPUT:
If the mLAN
MonitorSw is
OFF
(as
shown) you are
hearing signal coming back from Logic – post the
recorder (you will hear the reverb if you add it).
When the mLAN Monitor Switch is ON you are
monitoring the mLAN signal being sent from the
mLAN16E to Cubase (you will hear the “dry” send
signal). You have great flexibility in sending and
returning audio to and from your DAW software.
You do not have to monitor in simple stereo. You
might, for example, return all vocal tracks to
mLAN1 as a stereo mix, send all normal
instruments to mLAN2 as a stereo mix, you might
send the drums to mLAN3, etc. You can use the
four stereo inputs as you see fit. Or you can use a
simply stereo pair – there is no rule here. It is a
matter of preference.
25
can work without a computer on line. And your
system is easily expandable.
When using the VOICE EDITOR you will want to
store your edit to in a VOICE EDITOR (.w7e) file.
Then you will import that newly created VOICE
EDITOR file with the Multi-Part Editor. This way
you will always have the current data associated
with your session.
Shown here on the toolbar of the MULTI editor is the
Import
Voice
function. This allows
the Multi-Part Editor
to
“know”
what
Voices are current
in
your
internal
USER1, USER2 and
USER DRUM Voice
banks.
It is recommended
that user of the
Multi-Part
Editor
keep a folder with
all your Motif ES
Voice data as .w7e
Voice Editor files so
that you can easily
reference and update your Voice selection. This allows
you to always be able to know what is in your User bank
– where you would need a different script file for each,
you can use the Voice Editor (.w7e) files as this
reference material.
Recalling a Studio Connections setup
When you open your Cubase SX3 (or Nuendo3)
Project file, you will be prompted and reminded
what you had open as far as hardware on this
project. Shown above you can see a session
where I was using an 01X and the Motif ES 6/7/8
Multi-Part Editors. It is asking me to confirm that I
want to send the stored Editor information back
“To Hardware”. I have an option to request “From
Hardware” – this would be used if I was working
with my 01X and Motif ES away from the
computer environment and want to import that to
the stored Cubase Project. Remember the
advantage of mLAN and its hardware is that you
26
Chapter: SQ01v2
27
When you are ready to use any of the editors you
can click on the list shown above or you can even
place Quick Launch icons on your main toolbar.
SQ01v2
You can think of the SQ01v2 as an advanced
entry-level program. While worth much more than
its “free” status would lead you to believe, it can
give
you
a
real
good
idea
of
the
hardware/software
integration
concept.
The
SQ01v2 is OPT compliant. Open Plugin Technology
was the germ idea that launched the Studio
Connections concept of hosting a series of
hardware editors (synth Voice editors, Multi-Part
editors, Plugin board editors, digital mixer editors
and effect processor editors) and linking them to
the software you are using to record.
Click on the chevron to the right of the icons to
open the “Customize Toolbar” window.
The recommended method of working with the
Motif ES Voice and Multi-Part Editors is to simply
launch them from within the SQ01v2 environment
– that is, you do not need to launch or use the
Studio Manager host application. Think of it as
already built-in to the SQ01v2 program.
When you have properly installed the Motif ES
6/7/8 Multi-Part Editor and the Motif ES 6/7/8
Voice Editor on your computer, SQ01v2 will find
and be able to not only launch these editors but
also store the associated files. You do not need to
launch the STUDIO MANAGER 2.x.x. Host
application.
From the list of available Yamaha Editors on your
computer you can “ADD” the icon to the current
toolbar list on the right. These will allow you to
open the editor when you need to customize your
mix (Multi) or edit an individual Voice (Voice).
When you save your SQ01v2 file (.yws) the Voice
Editor
and
Multi-Part
Editor
setups
are
automatically stored with the file. When you open
the file next time you are working on this song all
your data comes back with it.
Think of the SQ01v2 as a proof of concept and it
is an excellent basic getting started software.
28
When working with the SQ01v2 find the SETUP
pulldown and select your MIDI Device. A typical
setup with Motif ES is shown above – activate
“mLAN MIDI In” Ports 1-4 and “mLAN MIDI Out”
Ports 1-4.
Under SETUP locate the Tone Generator function.
Here you can associate the mLAN MIDI OUT port
to the Motif ES – allowing you to select sounds
using the “Generator” option on the main track
screen. This will let you see a list of the Voices in
your Motif ES. You can select via this method and
then import that data to the Multi-Part Editor
(they can work well together).
Under SETUP you want to select AUDIO > Device
and select the ASIO mLAN driver and check the
Active Channel In and Out buses. Typically, with a
Motif ES with mLAN16E will be sending 16
channels “In” and you will be sending up to 8
channels “Out”.
Shown above the Generator is Motif ES, the Voice
selected is Ba: Velo Bass; when you click on the
chevron to the right of the Voice the Voice List
opens and you can even monitor the sound –
SQ01v2 sends an arpeggio to the unit so you can
hear what the particular Voice sounds like.
Troubleshooting: If you do not see the Motif ES in
the list of available Tone Generator products, this
usually means you have not yet installed the
Voice Editor for Motif ES. When the Voice Editor
has been installed on your computer the
installation puts the Voice list in a location that
SQ01v2 can find and use it.
Under the SETUP pulldown, find the Remote
Control option. Select Mode = 01X and highlight
“mLAN MIDI In” and “mLAN MIDI Out”. Select
Motif ES6/7/8 Multi Part Editor as your MIDI
Editor.
29
Chapter: Multi-Part Editor
30
sequencer data – this way when you recall the
song file you can go and get the Mix data as well.
You will immediately see the benefit that the Multi
Part Editor has over the definition files or mixer
script files because it contains everything you
tweaked about the Motif ES. The Multi Part Editor
is every parameter in your Motif ES MIXING mode
setup including how you have the signal routed
per Part.
Multi Part Editor for Motif ES 6/7/8
This powerful tool is an OPT (Open Plugin
Technology) Editor/Librarian for your Motif ES.
You will find it more useful than an Instrument
Definition or Mixer Map script when it comes to
remote controlling your Motif ES while sequencing
in your computer. While definitions and scripts
speak generally to your Motif ES for selecting
Voices for tracks (and they can still be used for
this purpose), the Multi-Part Editor is a remote
controller for every Mix parameter. It can save
and recall by name all the Voices (Preset and
User) currently in your Motif ES. It can memorize
the Effects routing, the send levels, the pan
position, the tuning, the EQ setting, etc., etc. –
every Mix parameter. OPT is Yamaha’s protocol to
make Voice and Multi Part Editor functions
available to synth workstation users when they
are working in a computer environment. OPT2 is
what is now growing to be Studio Connections
Recall – a method to integrate hardware editors
for synthesizers, rack mount effect processors,
digital mixers, etc., into your preferred software
Digital Audio Workstation’s software environment.
It also addresses the constant request for a larger
screen – by providing a fully graphic interface to
their Motif ES. Your computer screen can be the
best resolution and when you think about it…
when do you really need the graphic user
interface? It is when you are working in your
project studio. “Studio Connections” is a industrywide initiative launched by Yamaha and Steinberg
to try and bring the functionality of Voice editors,
Multi-Part editors and Digital Mixer controlling
software editors to some kind of universal
standard – so currently you can run Multi Part
Editor and even the Voice Editor for Motif ES in
the background while your sequencer software is
open. Eventually, however, software sequencers
will have a fully integrated way of addressing the
various editors – so that when you save a
“project” or a “session” it will save your synth
settings (all your synth settings), your mixer
settings, and your effect processor settings as well
– be they virtual or actual. Stay tuned… Although
Yamaha and Steinberg spearhead this initiative,
you can anticipate that all music/MIDI/Audio
companies will be involved. Yamaha, as the
world’s largest manufacturer of musical gear, and
Steinberg, as a company that can address both
Windows and Macintosh computer software, were
a natural choice to get the initiative started.
Hopefully we can see the fruits of this initiative
very soon. When you save a Multi Part Editor for
Motif ES file (.m4e) it will be the current Mix and a
Voice Editor data that contains the current User
Voices. You can bulk the data to and from the
Motif ES, as necessary. Store your Multi Part
Editor files in a folder along with your computer
If you are using either Cubase SX3 or Nuendo3,
the Studio Manager data is automatically saved
when you create your Project file (.cpr –in Cubase
and .npr – in Nuendo).
If you use instrument definitions or script files to
select sounds in your software sequencer, you can
then bulk your selections to the Multi-Part Editor
for archiving.
Remote Control
You activate the Remote Control function of the
Motif ES by pressing the Remote ON/OFF button.
Pressing [F6] + [Remote] will toggle between
Mode A (audio) and Mode B (MIDI) Remote
Control. Please refer to the documentation in the
Data List booklet for your particular software
sequencer – page 58-62. Spend some time
exploring the functions available and adopt those
that seem to make sense for the way you like to
work. In general, you should find that you can
operate the transport, select tracks, mute/solo,
arm tracks, adjust EQ, add tracks, locate
measures, turn loop on and off, zoom tracks view
horizontally and/or vertically, etc. The Remote
mode lets you turn your Motif ES front panel into
a giant mouse (with “Mackie Control” level
functions). The Knob Control Function buttons, the
Knobs, the Track Select buttons, the cursor
arrows, the Data Wheel, the Transport buttons,
the Function and Sub-Function buttons are all
involved in remote controlling your software
package. The best (and only) way to become
familiar with these functions is to spend time
using them. Each software package is a little
different in its implementation but if you follow
the Data List booklet and the section of the
Owner’s Manual (page 150-152) you may find
functions that are just what you need.
How should I work?
This very common question is one that has no
specific answer. I can only hope to suggest
methods of working, but I find that each project is
different and dictates how you should proceed. In
general (if I had to make a suggestion) I
recommend that you use each type of record for
what it offers you. In other words, the key
advantage of recording tracks as MIDI is that you
31
and later) is the +6dB boost parameter per mLAN
output pair. This can help bring MIDI tracks with
softer performances up in level when rendering
them as audio via mLAN.
have unbelievable tools in terms of editing and
tweaking your performance. You can adjust
velocity, fix wrong (or unfortunate) notes, you can
perfect the performance. Audio tracks have ‘a
certain permanence’ about them and of course,
allow you to record things that are acoustic. But if
you are a person (and you know who you are)
that runs out of polyphony or that likes to layer
and layer levels of sounds, you will find a method
of working that lets you initially record tracks as
MIDI data, correct them, then render them to
audio tracks in your software sequencer. This will
free up your hardware to create new layers of
sounds. Use each tool for its key features. Often
users struggle to transfer a feature or function
that the Motif ES does so very easily internally to
their external sequencer – learn to use the Motif
ES sequencer for what it does best. For example,
Real Time Loop Remix is a function that is kind of
unique to the Motif ES, Pattern mode of the ES
has some very unique functions that when you
want to take advantage of them – simply use the
Motif ES sequencer to develop that idea. The Motif
ES has a function that makes recording the output
of the arpeggio very easy to its internal
sequencer, for example. Your first experiments in
attempting to transfer that magic to an external
sequencer may cause you to scratch your head –
or pull your hair out. This is basically due to the
fact that you need a separate setup to record the
output of the arpeggio to an external device
(Local Control needs to change, MIDI clocks need
to be synchronized, transmit channels and receive
channels need to be tweaked while recording and
changed again when playing back). It is almost
easier to use the Motif ES’s “Record Arp” function
– then export the result as a SMF or simply record
the output as audio. Of course, if you understand
what is involved in the routing it becomes a much
easier task.
The rules differ slightly for recording MIDI
tracks and recording Audio tracks. Audio tracks
require that you pay attention to levels – in
general when recording MIDI tracks you tend to
ignore the rules of record level. However, if you
want your audio recordings to have proper impact
you had better know and follow the rules of gain
and level adjustment. In an mLAN rig that
includes a Motif ES and a computer, your MIX
fader levels are your level controls. When using
the mLAN outputs the L&R are a sum of the
individual (there is no master fader) – much like a
recording console – the main output is at 0dB –
you fill in the mix with levels of the individual
channels. Your Control Sliders (CS) will be
responsible for the output on a per Part basis.
(The main Volume slider is analog and does not
live in the world of mLAN). And as mentioned in
UTILITY (added with Motif ES version update 1.05
Do I need a mixer?
This is another common question. The beautiful
thing is that the reason to get a mixer remains
the same as it always has been…when you need
the ability to add additional inputs, effects,
processing and flexibility then you are ready for a
mixer. The thing about mLAN that makes this
special is that unlike other digital systems,
whether they are based on USB or firewire, they
are typically peer-to-peer. This means they are
simply connections between 2 devices. What
makes mLAN different and unique it is a network
of multiple devices all interconnected. The degree
of flexibility is exponentially increased in an mLAN
system. The 01X will give 8 additional analog
inputs plus 16 mLAN inputs. So you could plug
your Motif ES to it digitally (using the 16 mLAN
inputs) and then you have 8 additional analog
inputs plus the 2 on your Motif ES. The
01V96ver2 with MY16mLAN will give you 16
analog inputs (12 with phantom power) plus 16
digital inputs via mLAN (and 8 ADAT channels).
The 02R96ver2 with MY16mLAN offers you 24
analog inputs, plus 3 slots for further expansion
(you could put 2 MY16mLAN cards in and send up
to 32 channels to your computer) and so on up
the Yamaha line of digital mixers. All use the
Studio Manager with a product Editor and have a
consistent user interface…only the flexibility
increases as you go up the line.
The main thing is to learn to work your
tools for the advantage each provides. …And for
goodness sake, have some fun!
Phil Clendeninn
Senior Product Specialist
Technology Products
©Yamaha Corporation of America
32