1
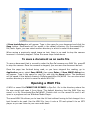
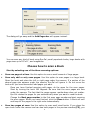
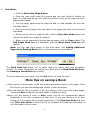
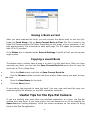
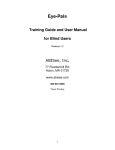
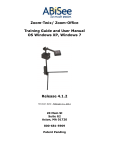
Eye-Pal
Training Guide and User Manual
OS Windows XP, Windows 7
Release 4.1.2
Revision date: February 25, 2011
20 Main St
Suite G2
Acton, MA 01720
800-681-5909
Patent Pending
Table of Contents
What is Eye-Pal?..................................................................................................................................................................3
Setting Up Eye-Pal................................................................................................................................................................3
How to Place a Document Under the Camera.....................................................................................................................4
Keyboard Keys to Navigate Reading....................................................................................................................................4
Changing the Language........................................................................................................................................................5
To save a document as a text file.....................................................................................................................................6
To save a document as an audio file................................................................................................................................7
Opening a WAV File.............................................................................................................................................................7
Creating and Managing Books.............................................................................................................................................8
Creating a Book................................................................................................................................................................8
Choose how to scan a Book.............................................................................................................................................9
Scanning modes.............................................................................................................................................................10
Adding pages to a new Book..........................................................................................................................................10
More tips on saving a Book................................................................................................................................................11
Reading a saved Book....................................................................................................................................................12
Managing Books.................................................................................................................................................................13
Adding pages to an existing Book..................................................................................................................................13
Deleting pages in an existing Book.................................................................................................................................14
Deleting a Book..............................................................................................................................................................14
Closing a Book................................................................................................................................................................15
Saving a Book as text.....................................................................................................................................................16
Copying a saved Book....................................................................................................................................................16
Useful Tips for the Eye-Pal Camera....................................................................................................................................16
Eye-Pal Quick Reference Guide (4.1.2)...............................................................................................................................17
2
What is Eye-Pal?
Eye-Pal is a computer-connected portable electronic scanner/reader that helps those
with low vision to hear text read aloud.
Eye-Pal reads aloud books, magazines, newspapers, documents, prescription labels
and other print in a variety of naturally-sounding voices and languages.
The software program is fully customizable to accommodate individual preferences.
Default settings can be changed by going to Application and down to Settings.
Setting Up Eye-Pal
1.
Remove the device from the box and unfold the two legs. Pivot the two pins at the
base of the vertical camera stand outward over each leg. This locks the legs in
position (Picture 1).
Locks
Picture 1
2.
This part is important. Insert the software installation CD into your computer and
follow the installation instructions. Do not connect Eye-Pal to your PC until the
installation wizard instructs you.
3.
When instructed by the setup CD, plug the USB cable directly into the computer or
laptop. Do not use bus-powered USB hub.
4.
Locate Eye-Pal application by pressing the “Windows” key plus “D” key to open
the desktop. Press “Z” key to locate Eye-Pal icon. Click on Eye-Pal icon to hear
“Camera Started.” This indicates that the camera is ready to start scanning and
reading aloud.
Quick Start
3
How to Place a Document Under the Camera
Place a document under the Eye-Pal camera and press the Space bar to hear
“Camera started”
1. To scan and hear printed material read aloud, press E on the keyboard, and wait until
you hear a shutter sound. Reading starts immediately.
2. Press X to pause and resume reading.
3. Press E to have the text read to you from the beginning of the document. Follow
along as the text is read aloud and displayed on the screen.
Keyboard Keys to Navigate Reading
1.
Place printed material under the camera.
2.
Press the Space bar to turn the camera on. You will hear “Camera Started”.
3.
Press the E key on the computer keyboard to start reading from the beginning of
the page. You can also start reading by going to the menu’s Voice tab and
choosing Speak Entire Page.
4.
Press the X key to stop or resume reading.
5.
Press Shift + E to hear the page layout description.
a. Number of words on the page
b. Number of sections on the page
c. Percentage of text on the page
d. Number of columns and headers on the page
6.
Press Control + Right Arrow to move to the next word.
7.
Press Control + Left Arrow to move to the previous word.
8.
Press Down Arrow to move to the next sentence.
9.
Press Up Arrow to move to the previous sentence.
10.
Press Control + Down Arrow to move to the next section
11.
Press Control + Up Arrow to move to the previous section.
12.
Press Right Arrow to move to the next character
13.
Press Left Arrow to move to the previous character
To stop the document from being read, press the Control key.
Changing the Voice Settings
4
You can change the voice parameters by going to Application, Settings then Voice
tab:
Test different voices, select the one that you like and click Apply.
You can change the speed by clicking the Shift + Q key to make it faster or the
Shift + Z key, to make it slower. You can also change the speed by going to
Application, down to Settings, over to the Voice tab and using the slide bar.
Changing the Language
When you go to Application, down to Settings, and over to the Voice tab, there are
two other options that you can modify. The first is OCR Language.
OCR Language is the language of the document that you are putting under the EyePal camera. By default, the OCR Language is English.
The second is Application Language, which is the language of the application,
5
including text, menus, and dialog boxes. By default, the Application Language is
English.
Saving a Document and Opening a Previously Saved
Document
Place a new page at the Eye-Pal base. Go to Application and down to Save Image. A
Save Image dialog box will appear.
Type in the name for your document, and click the Save button. The image will be
saved in the default directory My Documents\Eye-Pal\Images. You can also select
another directory in which to save the document.
To view a previously saved image: Go to Application and down to Load Image. A
Load Image dialog box will appear. Select the image and right click Open. Press the
E button to read it.
Note: Eye-Pal does not have to be plugged in to read previously saved images.
To save a document as a text file
To save a document as text that is currently under the Eye-Pal camera, press E to stop
the camera. Once the camera is stopped you can save the document as text.
To quickly save text with default name as date/time stamp in the default folder My
Documents\Eye-Pal\Temp, and immediately display the text file on the screen, press
Control + Shift + W.
You can also save text in any directory and give it any name by going to the
Application menu, down to Save text, and then press Enter.
6
A Save text dialog box will appear. Type in the name for your document and click the
Save button. Documents will be saved in the default directory My Documents\EyePal\Texts. Again, you can select another directory in which to save the document.
When saving a previously saved image as text, there is no need to stop the camera
because it is already stopped. Follow the same steps listed above.
To save a document as an audio file
To save a document that is currently under the Eye-Pal camera as a WAV file, press E
to stop the camera. Once the camera is stopped, you can save the document as text.
Once the page has finished being read, or you have stopped the reading, go to
Application menu, select Save WAVE, then press Enter. A Save WAVE dialog box
will appear. Type in the name for your file, and click the Save button. The document
will be saved in the default directory MyDocuments\Eye-Pal\WAVE .You can also select
another directory in which to save the audio WAV file.
Opening a WAV File
A WAV or sound file CANNOT BE OPENED in Eye-Pal. Go to the directory where the
file was saved and open it from there. The default directory that the WAV files are
saved in is My Documents\Eye-Pal\WAVE. Double click on the saved file and it will
open in a program such as Windows Media Player.
The saved WAV file allows you to hear the full text without having to first change it to a
text format to be read. Use the WAV file, burn it onto a CD and upload it to an MP3
player so you can listen to your own audio book.
7
Creating and Managing Books
A Book is an electronic copy of a book that you can create using the Eye-Pal camera.
Eye-Pal allows you to scan and save multi-page documents to a computer. While
reading a Book you can use all the same document capabilities that are available for
documents with Eye-Pal.
You can listen while the book is read to you page by page. The whole book can be
saved as text, using any third party software to read the file.
A Book allows you to bring your book anywhere with you. Just save it to a CD or
upload it to your MP3 player.
Eye-Pal can be used separately from the Eye-Pal device to read saved documents.
Creating a Book
Have a book or a multi-page document handy for scanning and reading with Eye-Pal.
Place your document under the Eye-Pal camera.
Find the Book menu and click on it or click Alt + B and then the Enter key.
The Create Book dialog will appear. Put in the book title and the author’s name, and
click Create.
8
The dialog will go away and the Add Pages bar will appear instead.
You can save any kind of book using Eye-Pal; small paperback books, large books with
page sizes up to 8.5’x11’, and magazines.
Choose how to scan a Book
Start by selecting one of the three scanning options:
1.
Scan one page at a time. Use this option to scan a small amount of large pages.
2.
Scan only odd or only even pages. Use this option to scan pages in a large book.
Open the book and place the left or right page under the camera. If a portion of the
second page also appears under the camera, Eye-Pal will ignore it. Do not move the
book until you have scanned all odd pages you want.
Once you have finished scanning odd pages, do the same for the even pages.
Start by turning the book 180 degrees. Be sure that the even pages are now
under the camera. The fact that the pages appear upside-down does not matter.
Eye-Pal rotates the pages for you automatically when you want to read the book.
Change the Next page number to the first even page number and start scanning
the even pages. When you have finished, click the Done button. A Book will sort
and keep all the pages in the right order automatically.
3.
Scan two pages at once. Use this option to scan small sized books. If you place the
open book under the camera and can see both pages in the preview window (F5), you
9
can save both pages at once. While using this option, the book orientation is important.
Always put the book in landscape format and align the edges of the book with the EyePal base.
When you scan two pages at once, both pages will be saved with their respective
numbers. You will be able to view each page separately. If the Book failed to
separate two pages, this will be indicated by an error sound and will be saved as
one page. In this case, you can delete that page. See Deleting a Page in a Book
section to adjust the book and save the same pages again.
Note: The default selection is to scan one page at a time.
Scanning modes
There are 2 types of scanning modes:
1.
Manual Mode: Press the A key or click the Add button to scan and save the page. You
will hear a shutter sound indicating that the page has been scanned and saved.
2.
Auto Mode: Click the Start Auto Mode button to start scanning and saving
pages. Then simply turn the pages. The Eye-Pal camera has motion detectors so it
will scan each page as soon as the page image is still for a few seconds. It waits
while you turn the pages. Auto Mode allows you to use both hands to hold the
pages in place, since you don’t have to operate the mouse or keyboard to push
the Add button.
Note: The default selection is Manual mode.
Adding pages to a new Book
Now that you’ve chosen how to scan and save a book, let’s start adding
pages.
1.
Manual Mode:
a) Put the first page of your document under the Eye-Pal camera and it will
appear on the screen.
b) Click the Add (A) button. Use your hands to keep the book flat and in a
second, you will hear a shutter sound. The page is now saved, and the Current
page field should display 1. The Next page number should display 2 if you
are saving one page at a time or 3 if you are saving two pages at a time, (or
odd or even) pages.
c) Put the next page of your document down, click the Add button or press A
on the keyboard.
d) Save as many pages as you need by repeating the previous step.
e) If you are saving many pages, you can continue saving pages later.
10
2.
Auto Mode:
a) Click the Start Auto Mode Button.
b) Place the open book under the camera and use both hands to flatten the
page. In a few seconds you will hear the shutter sound, as the page has been
scanned and saved.
c) Turn the page, again keep the page flat and in a few seconds you will hear
the same sound.
d) Continue turning pages until you have all the pages you want to be scanned
and saved.
e) When you are done or need a break, click the Stop Auto Mode button and
remove the book from under the camera.
When you are completely finished saving pages, click the Done button. The
Add Pages Book bar will disappear, and the Read Mode Book bar will
appear.
f)
Note: You can add more pages to this book later. See Adding Additional
Pages to an Existing Book section of the manual for more details.
The Read Mode bar allows you to easily read your saved book with navigation
buttons. For more information on reading your book with the Read Mode Book bar,
see Reading a Saved Book topic below.
If you are done with your book, click the Exit button to close the book.
More tips on saving a Book
1. Place a piece of white paper under the camera and place a book on the paper. Then
Eye-Pal will not scan the background as part of your document.
2. Make the book as flat as possible. If you are saving a thick book with many pages,
choose the Auto mode and use both hands to flatten the book.
3. When you are saving a book in Auto mode, Eye-Pal will automatically adjust
brightness to the light conditions at that time. If you are taking a lot of time
saving all of the pages, take a break occasionally. Click Stop Auto Mode and then
click Start Auto Mode to allow Eye-Pal to re-adjust the brightness according to
the illumination of your room.
11
4. When you are saving a lot of pages in Auto mode, you may notice you have to wait
longer to hear the shutter. It could be due to one of three reasons:
a) The camera detects some motion such as wind, unstable hands, etc.;
b) The camera missed a motion when you flipped the page; or
c) Eye-Pal turned the camera off because the conditions have changed; for
example, the lights in the room were turned on or off.
You can always restart the camera and click the Start Auto Mode button again.
5. If you are using Manual mode, be sure that the page is stable on the screen before
clicking Add (A).
Reading a saved Book
To browse through the saved pages of your document:
1.
Go to the Book menu and select Open Book.
2.
The Open Book dialog will show the books in the default folder My Documents\EyePal\Books. If you want to open the book that was saved in another folder, use the
Browse button to select the desired folder. The location of the selected folder will be
displayed in the Book location field. The list of books in this folder will be displayed on
the screen.
Note: Select the folder that contains all of your books, and not the folder that
bears the name of a specific book. You might see the folder which bears the
name of the specific book – do not select it.
3.
Select the book you would like to view, and click the Open button.
Note: The Open button is disabled if no book is selected; as soon as you click any
book in the list, the Open button will become enabled and clickable.
The Open Book dialog box disappears. The Read Mode bar appears at the top
of the screen; the first page of the chosen document is displayed on screen as
well.
The Read Mode bar has the Previous and Next buttons, the Go to page field
and Go button to jump to a page out of order. The Read Mode bar also has the
Current Page field, which displays the number of the page currently being
12
viewed.
If the Status Parameter box is checked under General Settings, Eye-Pal will tell
you the current page number.
Eye-Pal will remember all of your selections when you move from page to page or
from book to book. If you use the Save only odd or only even pages option
while saving the book, you will have to rotate only the first even (odd) page. EyePal will rotate the rest of the pages automatically.
4.
Click the Next button or N on the keyboard to go to the next page of your document.
Click the Previous button or P on the keyboard to go to the previous page. You can
also put in a page number out of sequence, and click the Go button to jump to that
page.
5.
When you are done browsing the book, click the Exit button.
6.
Note: When the cursor is on the Current Page or Go to Page field and you are moving
from page to page using Previous (P) or Next (N) buttons, you will hear N or P
instead of the “Next” or “Previous”. To avoid this, use TAB to move the cursor.
Managing Books
Adding pages to an existing Book
To add additional pages to an existing book:
1. Open the book by going to the Book menu and go down to Open Book.
2. Once the Read Mode bar appears, go to the Book menu and select Add Pages
3. The Add Pages Book bar will appear.
4. Place the page you want to scan under the camera, set its page number, and press
the Add button or the letter A. You can also use the Auto Save mode and/or save
two pages at a time. See “Creating and Saving a Book” section for details.
13
5. Repeat step 4 as needed.
6. When you finish adding new pages, click the Done button. If you are saving pages in
Auto Mode, click the Stop Auto Mode button first and then click the Done
button. The Add Pages book bar will disappear, and the Read Mode Book bar
will appear again.
Deleting pages in an existing Book
In order to delete a page in a book:
1. Open the book by going to the Book menu, and click on Open Book. The Read
Mode Book bar will appear.
2. Navigate to the page that you want to delete by putting the page number into the Go
to page field and pressing Go.
3. Go to the Book menu, and click on Delete This Page.
4. You will be asked to confirm your instruction. Click yes.
5. The page will be deleted. The display will automatically move to the next page or to
the previous page if the deleted page was the last page of the document.
Deleting a Book
14
1. Go to the Book menu, and click on Delete Book.
2. The Delete Book dialog box will appear. Select the book that you wish to delete and
click the Delete button. You cannot delete an open book.
3. You will be asked to confirm your instruction. Click yes.
Closing a Book
To close a book you can click the Exit button or go to the Book menu, and click Close
Book.
15
Saving a Book as text
After you have scanned the book, you can convert the whole book to one text file.
Under the Book Menu, click on Save Current Book as Text. The file is saved in the
folder My Documents\Eye-Pal\Texts. Depending on the power of your computer, it will
take approximately 3 to 6 seconds to save each page. For 200 pages the process may
take 10 to 20 minutes.
If the Status box is checked under General Settings, Eye-Pal will tell you the current
page number.
Copying a saved Book
The fastest way to initially save a book is to save it on the hard drive. After you have
scanned your book, you can use the Save Current Book As menu item to copy the
book onto a CD or a flash drive.
1.
2.
Go to the Book menu, and click on Save Current Book As.
Use the Browse button to select the drive and/or folder where you want to copy
the book.
3.
Enter the New Name for the book.
4.
Click the Save button.
It may take a few seconds to save the book. You may view and read the copy you
made using Eye-Pal software on any IBM compatible computer.
Useful Tips for the Eye-Pal Camera
If you are working with more than one windows application at a time, the Eye-Pal
window may lose focus. If you have tried to turn the camera on or off by pressing the
Space bar and nothing happens, cClick the mouse anywhere on the screen to bring
focus to the Eye-Pal application.
16
There is a check box under the General tab of the Settings window: “Use arrow
keys to simulate X-Y table”. The default is unchecked. The unchecked option allows
you to use arrow keys while reading the text. For example: to move to the next word,
sentence, etc. If you noticed that arrow keys do not behave properly for reading,
check this setting.
Eye-Pal Quick Reference Guide (4.1.2)
Notebook (Laptop) Keystrokes for Reading Functions
To Scan and Start reading: E or (Caps Lock +Down)
Stop Eye-Pal Camera: Space or (Caps Lock + Dot)
Pause/Resume reading: X or (Caps Lock +End)
Reading by word:
Next: (Control + Right) or (Caps Lock + Right)
Current: (Control + I)
Previous: (Control + Left) or (Caps Lock + Left)
Reading by character:
Next:
Right
Current:
I
Previous:
Left
Reading by
Next:
Current:
Previous:
sentence:
Down
( Control + Caps Lock + I)
Up
Reading by
Next:
Current:
Previous:
section:
(Control + Down)
( Caps Lock + Shift + I)
(Control+Up)
Keypad Keystrokes for Reading Functions
17
Start/Stop Eye-Pal Camera: (Insert + Delete)
Start reading: (Insert + 2) (It will read to the end of page.)
Stop/Pause/Resume reading: (Insert + 1)
Reading by
Next:
Current:
Previous:
word:
(Insert + 6)
( Insert + 5)
(Insert + 4)
Reading by
Next:
Current:
Previous:
character:
6
5
4
Reading by
Next:
Current:
Previous:
sentence:
2
( Control + Insert + 5)
8
Reading by
Next:
Current:
Previous:
section:
(Control + 2)
( Shift + Insert + 5)
Control
Speech Output Control Keystrokes
Increase voice speed: (Shift + Q) or (F9)
Decrease voice speed: (Shift + Z) or (F8)
Hear page description: (Shift + E)
Hear current control: Shift
Stop speaking current control: Control
Zoom-Book Keyboard Command Keys
Add page:
A (While creating a new book).
18
Next page:
Previous page:
N
P
Zoom-Book Menu Accelerator Keys
(Alt + B) is an accelerator for Book Sub-Menu.
Key
B
O
D
L
V
A
G
T
Function
Book Menu, Create new book
Open Book
Delete Book
Close book
Save current book as
Save current book as text
Add pages
Delete this page
ABiSee Contact and Customer Service
Information
Please feel free to contact us regarding any questions or
concerns you may have.
ABiSee, Inc.
20 Main St
Suite G2
Acton, MA 01720
Phone: 978-635-0202
Toll-free: 800-681-5909
19
Fax: 253-595-3623
E-mail: [email protected]
20