1
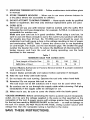
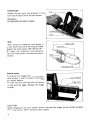
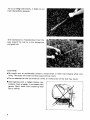
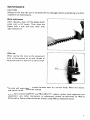
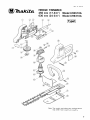
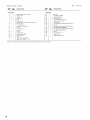
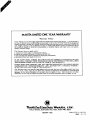
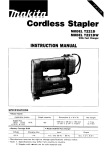
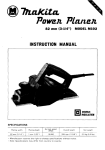
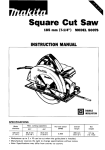
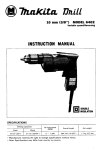
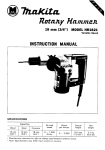
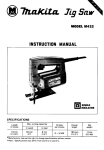
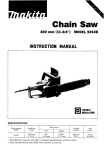
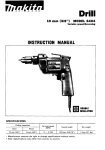
450 mm (17-3/4 ’)
630 mm (24-3/4 ’)
MODEL UH4510A
MODEL UH6310A
Equipped with electric brake
INSTRUCTION MANUAL
DOUBLE
INSULATION
SPEC IFICAT IONS
MODEL
UH4510A
UH6310A
Effective cutting
blade length
Strokes
per minute
Dimensions
(L x W x H)
Net
weight
450 mm
(17-314”)
1,800
825 mm x 180 mm x 170 m m
(32-112” x 7 118” x 6 518”)
3 2 kg
(7 0 Ibs)
630 mm
(24-314”)
1,800
1,000 mm x 180 mm x 170 mm
(39-318” x 7-118” x 6-518”)
3 4 kg
(7 5 Ibs)
* Manufacturer reserves the right t o change specifications without notice.
* Note: Specifications may differ from country to country.
IMPORTANT
SAFETY INSTRUCTIONS
(For All Tools)
WARNING
- TO REDUCE THE RISK OF INJURY, BASIC
SAFETY PRECAUTIONS SHOULD BE OBSERVED. INCLUDING
THE FOLLOWING:
READ AND FOLLOW ALL INSTRUCTIONS.
1. DRESS PROPERLY - Do not wear loose clothing or jewelry. They can be
caught in moving parts. Use safety glasses and nonskid footwear. Use of
sturdy gloves is recommended.
2. STAY ALERT - Watch what you are doing
- use common sense. D o not
operate trimmer when fatigued.
3. DANGER
- RISK OF CUT - KEEP HANDS AWAY
FROM BLADES
- Keep both hands on handles when power is on.
Do not attempt t o remove cut material nor hold material t o be cut when
blades are moving. Make sure trimmer is switched off and unplugged when
clearing jammed material from blades. Do not grasp the exposed cutting
blades or cutting edges of trimmer.
CAUTION - Blades coast after turn off.
-
TO REDUCE THE RISK OF ELECTRIC SHOCK - Don't use
trimmer i n rain, in wet locations, or on wet hedges of shrubbery. Use only
extension cords marked "for use w i t h outdoor appliances" having electrical rating not less than rating of trimmer. Do not use damaged extension
cords. Inspect cords periodically and replace if damaged. Do not abuse cord.
Never carry trimmer by cord. Do not yank cord t o disconnect from receptacles. Keep cord away f r o m heat, oil, and sharp edges.
4. WARNING
5 . KEEP CHILDREN AWAY - Do not permit children t o contact trimmer or
extension cord. Keep children a safe distance from work area.
6. USE TRIMMER PROPERLY - Use only for trimming the type of shrub,
growth, and the like, described in the operating instructions. Do not abuse
trimmer. Do not cut grass and weeds with this trimmer.
7 . DON'T OVERREACH OR STAND ON UNSTABLE SUPPORT - Keep good footing and balance at all times.
8. AVOID UNINTENTIONAL STARTING OF TRIMMER - Before plugging in
trimmer, be sure trimmer switch is off. Don't carry trimmer w i t h finger on
switch.
9 . AVOID LOCKING TRIMMER SWITCH ON - Never attempt t o tape, wire or
fasten the switches so as t o stay in the ON position.
10. DISCONNECT (UNPLUG) TRIMMER FROM POWER SUPPLY - When not in
use. Before servicing, cleaning, and the like.
2
11. MAINTAIN TRIMMER WITH CARE - Follow maintenance instructions given
in manual.
12. STORE TRIMMER INDOORS - When not in use store trimmer indoors in
a dry place where not accessible t o children.
13. DO NOT ATTEMPT TO REPAIR TRIMMER - Have repairs made by qualified
dealer or repairman. See that only identical replacement parts are used.
14. CORD SETS -The cord set you use with trimmer shall be marked w i t h the suffix W-A
following the cord type designation, for example -SJTW-A, t o indicate it is
acceptable for outdoor use.
Make sure your cord set is in good condition. When using a cord set, be
sure t o use one heavy enough t o carry the current your product will draw.
For lengths less than 25 feet, No. 18 AWG cord set should be used. A n
undersized cord will cause a drop i n line voltage resulting in loss o f power
and overheating. (NOTE: Table 1 shows the correct size t o use depending
on cord length. If in doubt, use the next heavier gage. The smaller the gage
number the heavier the cord.) To reduce the likelihood of disconnection of
hedge trimmer cord f r o m the cord set during operating, use the hook
described in this manual.
Table 1
MINIMUM GAGE FOR CORDS SETS
-t
Total Length of Cord in Feet
AWG Size of Cord
18
I
50
16
1
I
16
14
Contact Makita Authorized or Factory Service Center if a proper extension
cord cannot be found.
15. Inspect blades periodically and replace before operation if damaged.
16. Hold the tool firmly with both hands.
17. Do not leave the tool running. Operate the tool only when hand-held.
18. Attention! Do not expose this tool t o rain.
The tool must not be left outdoors and it must not be used when wet.
19. Be cautious not t o cut through the supply cable while trimming. Pull plug
immediately if the supply cable be damaged or cut.
20. When not in use, be sure t o cover the blades with the blade guard.
VOLTAGE WARNING: Before connecting the tool t o a power source (receptacle,
outlet, etc.) be sure the voltage supplied is the same as that specified on the
nameplate of the tool. A power source with voltage greater than that specified
for the tool can result in SERIOUS INJURY t o the user - as well as damage t o
the tool. If in doubt, DO NOT PLUG IN THE TOOL. Using a power source with
voltage less than the nameplate rating is harmful t o the motor.
SAVE THESE INSTRUCTIONS.
3
Installing grip
Attach the grip onto the grooves in the
tool side and secure with the two screws.
WARNING:
DO NOT USE WITHOUT GRIP.
Hook
When using an extension cord, secure it
to the tool's cord with the hook provided.
Attach the hook about 100-200 mm (4"8") from the extension cord connector.
This will help prevent unintentional disconnection.
Power cord
Cord connector
Extension cord
1
Switch action
To prevent the trigger from being accidentally pulled, a lock-off button i s provided
as a safety feature.
To start the tool, press the lock-off button
in and pull the trigger. Release the trigger
to stop.
CAUTION :
Before plugging in the tool, always check to see that the trigger switch actuates properly
and returns to the "OFF" position when released.
4
Operation
Refer to the Important Safety Instructions
before operation.
Do not attempt to cut branches thicker
than 12 mm (15/32”) diameter with this
trimmer. These should first be cut with
shears down to the hedge trimming level.
Hold the trimmer with both hands and
move i t in front of your body.
When operating the trimmer, keep extension cord behind trimmer. Never drape it
over hedge being trimmed.
Safety glasses
~~
~~~~
~
Sturdy gloves
To cut a hedge top evenly, it helps to t i e
a string or cord a t the desired hedge height
and to trim along it, using i t as a reference
line.
5
To cut a hedge side evenly, it helps to cut
from the bottom upwards.
Trim boxwood or rhododendron from the
base toward the top for a nice appearance
and good job.
CAUTION :
Be careful not t o accidentally contact a metal fence or other hard objects while trimming. The blade will break and may cause serious injury.
0
Do not attempt t o trim too much a t a time, or malfunction of the tool may result.
Overreaching with a hedge trimmer, particularly from a ladder, i s extremely dangerous. Don't work from anything wobbly or unfirm.
6
MA1NTENANCE
CAUTION :
Always be sure that the tool is switched off and unplugged before attempting to perform
inspection and maintenance.
Blade maintenance
After operation, clean off the blades (both
sides) with a stiff brush. Then wipe the
blades with a cloth and coat them with
light machine oil.
After use
When storing the tool, use the convenient
hole in the bottom of the tool handle to
hang the tool on a wall from a nail or hook.
The tool will stop when the carbon brushes wear to a certain length. When this occurs,
both carbon brushes should be replaced.
To maintain product SAFETY and RELlABl LITY, repairs, carbon brush inspection and
replacement, any other maintenance or adjustment should be performed by Makita
Authorized or Factory Service Centers, always using Makita replacement parts.
7
ACCESSORIES
CAUTION :
These accessories or attachments are recommended for use with your Makita tool specified in this
manual. The use of any other accessories or attachments might present a risk of injury to persons. The
accessories or attachments should be used only in the proper and intended manner.
0
Blade cover
Part No. 414247-4
(For model UH4510A)
Part No. 414248-2
(For model UH6310A)
Shear blade assembly
Part No. 125008-4
(For model UH4510A)
Part No. 125009-2
(For model UH6310A)
8
0
Hook
Part
No. 158024- 1
Mar
@TlmKita
13 89 US
HEDGE T R I M M E R
450 mm (17-3/4") Model UH4510A
630 mm (24-3/4"1 Model UH6310A
Note: The switch and other part configurattons
may differ from country to country.
9
Mar
MODEL UH451OA. UH6310A
IitM
$FD
'itM$!,
DESCRIPTION
MACHINE
_
_
MACHINE
_
_
1
2
3
4
5
6
7
8
9
11
13
14
15
16
17
18
19
20
21
1
1
1
1
1
1
2
1
1
Housing Set IWith Item 261
sponge Seal
Switch
1
Compression Spring
P," 1 0
Flat Washer 10
Gear 68
1
1
1
1
1
1
1
1
1
Cord Guard
Cord
Strain Relief
Pan Head Screw M4x18 [With Washer]
Switch Lever
Lock Of1 Button
3
Crank
Sponge Sea1
Ball Bearing 608LB
Terminal Bare
Field
ARMATURE ASSEMBLY
IWith Item 1 8 & 21
231
22
23
24
25
26
21
28
29
30
31
32
33
1
1
2
2
1
5
1
3
1
2
1
4
1
1
1
1
2
34
35
36
37
38
-
Note The Switch and other part specifications may differ from country to country
10
DESCRIPTION
Fan 70
Ball Bearing 609LB
Receptacle Sleeve
Carbon Brush
Housing Set IWith llem 11
Tapping Screw 4 x 2 0
Name Plate
Pan Head Screw M5x55 IWith Washerl
Grip 2 1
Pan Head Screw M5x20 IWith Waaherl
SHEAR BLADE ASSEMBLY
Pan Head Screw M5x16 [With Washerl
Pan Head Screw M4x12
Guard
Hex Nut M 4 10
Bottom Cover
Tapping Screw 4x14
13
89 U S
MAKITA LIMITED ONE YEAR WARRANTY
Warranty Policy
Every Makita tool is thoroughly inspected and tested before leaving the factory. It is warranted to
be free of defects from workmanship and materials for the period of ONE YEAR from the date of
original purchase. Should any trouble develop during this one-year period, return the COMPLETE
tool, freight prepaid, to one of Makita’s Factory or Authorized Service Centers. If inspection shows
the trouble is caused by defective workmanship or material, Makita will repair (or at our option,
replace) without charge.
This Warranty does not apply where:
0 repairs have been made or attempted by others:
re~airsare reaulred because of normal wear and tear.
0 T6e tool has Geen abused, misused or improperly maintained;
alterations have been made to the tool.
IN NO EVENT SHALL MAKITA BE LIABLE FOR ANY INDIRECT, INCIDENTAL OR CONSEQUENTIAL DAMAGES FROM THE SALE OR USE OF THE PRODUCT. THIS DISCLAIMER
APPLIES BOTH DURING AND AFTER THE TERM OF THIS WARRANTY.
MAKITA DISCLAIMS LIABILITY FOR ANY IMPLIED WARRANTIES, INCLUDING IMPLIED
WARRANTIES OF “MERCHANTABILITY” AND “FITNESS FOR A SPECIFIC PURPOSE,”
AFTER THE ONE-YEAR TERM OF THIS WARRANTY.
This Warranty gives you specific legal rights, and you may also have other rights which vary from
state to state. Some states do not allow the exclusion or limitation of incidental or consequential
damages, so the above limitation or exclusion may not apply to you. Some states do not allow
limitation on how long an implied warranty lasts, so the above limitation may not apply to you.
€Lu&&icwu.nh%,Ltd.
11-8,3-chome, Sumiyorhi-cho, Anjo, Aichi 446, Japan
883664-065
PRINTED I N JAPAN
1990 - 3 - N