1
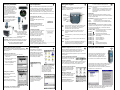
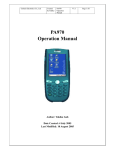
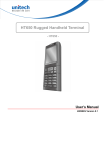
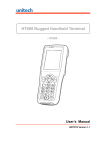
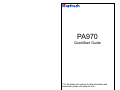
PA970
QuickStart Guide
* For the latest and most up-to-date information and
downloads, please visit www.ute.com.
Laser Scanner
IMPORTANT
The PA970’s Backup Battery arrives to the customer
switched off. Before charging the PA970, the Backup
Battery must be switched ON in order to avoid accidental data loss.
17
The Unitech PA970 is certified in the U.S. to conform to the
requirements of DHHS/CDRH 21CFR Subchapter J and to
the requirements of IEC 825-1. Class II and Class 2
products are not considered to be hazerdous. The PA970
contains internally a Visible Laser Diode (VLD) whose
emissions do not exceed the maximum limits as set forth in
the above regulations. The scanner is designed so that
there is no human access to harmful laser light during
normal operation, user maintenance, or during prescribed
service operations.
19
If the screen is blank or the unit fails to turn on, charge the
battery for 16 hours. If the battery is fully charged and the
unit still fails to turn on, reboot the device by inserting the
end of an unfolded paper clip (or other similar blunt-ended
pin) in the reset hole.
Service and Support
http://www.ute.com
This procedure is again covered in the “Charging the
PA970” section, later in this guide.
FCC ID: HLEPA970
This device complies with part 15 of the FCC Rules.
Operation is subject to the following two conditions:
1. This device may not cause harmful interferance, and
2. this device must accept any interferance received,
including interferance that may cause undesired
operation.
CAUTION - The use of controls or adjustments or
performance of proceduyres other than those specified
herein may result in hazardous laser light. Use of optical
instruments with the scanner will increace eye hazard.
Optical instruments include binoculars, microscopes, and
magnifying glasses. This does not include eye glasses worn
by the user.
The laser safety warning label required by the DHHS/IEC for
the PA970’s optional laser scanner module is located on the
memory compartment cover, on the back of the unit.
Troubleshooting
Open the SD Compartment and flip the white switch
toward the stylus slot.
FCC Statement
1 (800) 861-8648
Notes
18
Power Status
13
Check Battery Status
On the Main Screen click Power.
Under the Battery tab you will see
the status of the main and backup
batteries with three types of
indicators - “Good”, “Low”, and
“Very Low”, with bold text indicating the actual status.
GPRS, WLAN, and Bluetooth
14
Introduction
1
Unitech PA970 and Accessories
Please make sure the following items are present:
GPRS Setup
1. Under Program Files select
GPRS. Click DialUpGPRS.
Thank you for choosing Unitech’s PA970. Your PA970 is a
rugged and compact mobile computer for data collection via
keypad built-in bar code scanner, capable of wireless
communication via built-in Bluetooth, 802.11b, and GPRS.
This Quick Reference Guide will briefly guide you through
the PA970’s main functions and features.
It is necessary to charge the PA970 when “Low” or “Very
Low” are displayed. If “Low” or “Very Low” are still displayed
after charging, please contact Unitech Technical Support.
CD
Four different icons are displayed on the PA970’s status bar
(bottom of the screen) to indicate on-board power status:
When no icon is displayed there is no external
power supply to the PA970, but its battery power is
good.
Stylus
PA970
2. Select GPRS @ 115200.
Click “OK”.
The plug icon indicates that the PA970 is charging
from an external source: either the 12VDC Power
Adapter or the Charging Cradle.
The “Battery Low” icon indicates that the battery is
low and needs charging.
Battery
QuickStart
Communication Cable
The “Backup Battery Low” icon indicates that the
backup battery is low and needs charging.
WLAN Setup
1. Under Program Files select
Communication. Click
RFPowerOn.
AC Power Adapter
3. GPRS Connected
The “Battery Very Low” icon indicates that the
PA970’s operation should be stopped and the
batteries charged immediately.
The “Backup Battery Very Low” icon indicates that
the PA970’s operation should be stopped and the
backup batteries charged immediately.
15
2
Note: Please install the SIM card before powering on
GPRS. (Remove the battery cover and battery pack to
access the SIM compartment.
Bluetooth Setup
16
Tour of the Unitech PA970
3
1. Under Program Files click
Bluetooth.
Select BTPowerOn.
Power Cord
•
Unpack the box and save the packaging in the event the
unit needs to be stored or returned to Unitech for service.
•
Check the unit for shipping damage. If anything is
missing or damaged, notify your Unitech Sales
Representative.
Installing the Battery
4
CAUTION - Please turn off the terminal
before removing the main battery.
Improper installation of the
rechargeable battery pack can cause
the metal clips in the battery
compartment to bend and/or break.
Carefully read and follow the battery
pack installation procedure below.
Stylus
Laser Scanner
Scanner Trigger
2. Select RF Wireless Card
Power ON and click OK.
2. Select Bluetooth Module
Power ON. CLick OK.
1. Remove the battery compartment
door (located on the lower back side
of the unit) by rotating the
compartment latches outward.
Touch Screen
IrDA Port
Keypad
Reset Hole
3. Under Wireless Information
select AP, then set the
wireless properties.
Then click OK.
Note: For ActiveSync via Bluetooth, please refer to the
PA970 User’s Manual for detailed instructions.
2. Position the battery with the battery
connectors towards the right side of
the compartment, facing downwards.
Insert and fully seat the battery pack,
making sure the shape of the battery
pack fits the shape of the battery
compartment.
SD Compartment
Hand Strap
3. Close the battery compartment door.
Push the latches down and flip them
inward.
Battery Compartment
SIM Compartment
(under Battery Compartment)
RS232/USB/
Charging Port
Charging the PA970
5
NOTE: The PA970’s Backup
Battery arrives to the customer
switched off. Before charging the
PA970, the Backup Battery must
be switched ON in order
to avoid accidental data loss.
Open the SD Compartment and
flip the white switch toward the
stylus slot.
Initial Operation
6
Note: Your Unitech PA970 is shipped with a protective film
covering the display. This film may be left in place to protect
the screen from scratches, but this will slightly reduce the
clarity and contrast of the screen image. If you choose to
remove the protective film, do so by peeling it from one corner.
Note: Make sure the unit is fully charged before turning it on.
Pressing the ON / OFF Key
The Unitech PA970 welcome screen
appears.
The Windows CE® appears shortly
thereafter.
Connect the Charging Cable
(RS232 or USB) to the PA970, and
then connect the AC Adapter to
the cable’s power jack and
electrical outlet.
Using the Keypad
Keypad
The PA970 keypad contains 19 keys, which includes 0 - 9
numbers, Cursor, Alpha, On/Off, Function, Escape,
Backspace, and Enter keys.
16 hours of charging are required to initially charge the
empty Backup Battery to insure proper backup.
CAUTION: Operating the PA970 without fully charging the
Backup Battery may result in loss of data stored in RAM.
RECYCLE LITHIUM-ION BATTERIES.
DO NOT DISPOSE OF IN TRASH.
Setting Time Zone, Date, and Time
After calibrating the PA970, the Date/TIme Properties
dialog box will appear. Follow the steps below to set the
date and time.
Setting the Time Zone First
Follow the steps below to set up your time zone:
1. Tap the location arrow to see
a list of cities
7
ESC
FUNC The Function key is used to perform alternative key
functions.
TAB
8
Flash Storage is a re-writable
location in which to store up to
64MB of data and program files.
The benefit of this feature is
that files and programs saved in
Flash Storage are unaffected by
the PA970’s power status.
4. Tap the apply button
Or, tap the year and month
directly to change their settings.
Exiting Date / Time Properties Settings
Tap OK to affirm or X to cancel and exit.
The Tab key is used to toggle between data fields or
to place the cursor at pre-determined places in a
programming or word processing application.
Software Keyboard (Windows CE Keyboard)
11
Since the PA970’s keypad allows input of numeric
characters only, Windows CE software provides a touchscreen keyboard for input of other characters. The
Windows-based keyboard replicates the layout of a standard
PC keyboard.
Opening the Windows CE Keyboard
The Windows CE keyboard can be opened by tapping the
keyboard icon on your task bar.
Keying in Characters
Once the Windows CE keyboard appears, character input is
similar to that of a standard PC. Simply tap the on-screen
key corresponding to the character you want to input.
3. Check the Daylight Savings
Time box if applicable
Tap the up and down arrows to
scroll the year.
The Escape key performs the same function as
tapping the CANCEL or X button on the touch
screen.
The Backspace key is used to erase previously input
characters.
The PA970 will prompt you to
calibrate the unit by tapping a
sequence of screen locations. Tap
gently but firmly. When you have
completed the series of taps, press the [Enter] key to
confirm, or press the [ESC] key to cancel.
To access the contents of Flash
Storage, simply select My
Computer on the desktop and
then select Flash Storage. The
programs and data files
currently stored in Flash
Storage will be displayed.
Tap the left or right arrows to
scroll the month.
To save to Flash Storage, select
File, Save To, and select Flash
Storage just like you would
select any other storage
medium.
The Enter key is used to initiate a process
10
or confirm a selection made by the user.
[Cursor] The Cursor key is used to navigate amont the
applications.
alpha
The Alpha key is used to toggle between numeric
and alpha mode. The Alpha key is also used to
toggle between upper and lower case while in
alpha mode.
When the PA970 boots, the default condition is numeric
mode on. After toggling to alpha mode, the default condition
is Caps off (lower case).
Alpha Mode Press alpha to enter alpha mode. The default
condition is Caps off.
Caps
Press the alpha key twice to toggle Caps.
Key In
Press Cursor-Up to enter selected character.
Useful Hotkeys
2. Choose your location or one
in your time zone
Setting Year and Month
Enter
When the PA970 is off, pressing the On/Off key will
turn the unit on. Alternatively, when the unit is on,
this key must be pressed down for about two
seconds in order to turn the unit off.
Calibrating the PA970
The first time the PA970 is powered
on, or after it’s been reset, the
calibration screen to the right
appears. This screen can also be
accessed at any time by pressing
the [FUNC] and [Esc] keys.
Flash Storage
ENT
Alpha Key
Escape
Backspace
Power On/Off
Tab
Function
Alpha
Adjusting Screen Brightness
Press the [FUNC] key and the
Cursor key to increase or decrease
screen brightness.
Or place the PA970 into
the Docking Station (after
connecting the Docking
Station to the AC Adapter).
9
International Character Support
Tap the [áü] button to toggle
between the standard English
keyboard and the European
keyboard.
The PA970 provides eight combination hotkeys to activate
specified screen setting functions or programs, listed below.
Press and hold the [FUNC] key in combination with the
corresponding second key.
[FUNC] + [ESC] Check stylus properties and re-calibrate
the PA970’s touch screen.
[FUNC] +
Increase screen brightness.
[FUNC] +
Decrease screen brightness.
[FUNC] + [TAB] Toggle screen and keypad backlight.
[FUNC] + [6]
Task manager
[FUNC] + [7]
Scanner Setting.exe
[FUNC] + [8]
Scanner Setting utility
[FUNC] + [9]
System information
[FUNC] + [0]
Space
[FUNC] +
Increase keypad brightness.
[FUNC] +
Decrease keypad brightness.
Using the Laser Scanner
12
The PA970 has an integrated laser scanner,
which reads all major bar code types with
excellent performance. Trigger keys are
located on the left and right sides of the unit.
Press either one to activate the laser scanner.
The PA970 also has a built-in Scanner Setting.exe program
that allows the user to test the bar code scan function.
Scanner Setting.exe is located in the directory
\Windows\Control and is also accessible by shortcut via
Setting\Control on the Start menu.
Moving the Keyboard
Use the stylus to point to the title
bar (the bar displaying “Input
Panel”), and move the stylus
without lifting it from the screen.
Closing the Keyboard
Tap the keyboard icon to close
the Windows CE keyboard.
Note: Reading software must be enabled in order to operate
the scanner. This can be a user-loaded application or a preloaded utility such as Scanner Setting.exe.