1
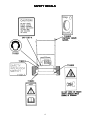
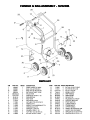
Model:
SV0230B
SV0230BSP
Scavenger
OPERA
TION
OPERATION
Revised 7/05
SERVICE
PAR
TS
ARTS
CARE
TABLE OF CONTENTS
General Safety Instructions
1&2
Warning Decal Placement
3
Assembly & Operation Instructions
4
Maintenance
5
Handle Assembly SV Basic
6
Handle Assembly SV Self-Propelled
7
Housing & Drive Assembly
8 &9
Warranty
Back Cover
1
IMPOR
TANT SAFETY INSTRUCTIONS
IMPORT
READ ALL INSTRUCTIONS BEFORE USING
WARNING
• To prevent personal injury or property damage, do not attempt to start engine until all
assembly steps are complete and you have read and understand the safety and operating
instructions in this manual.
• Under California, and under laws of several other states, you are not permitted to operation
internal combustion’s engine using hydrocarbon fuels on any forest covered, brush covered,
or grass covered land, or on land with grain, hay, or other flammable agricultural crop,
without an engine spark arrester in continuous effective working order. The engine on your
power equipment, like most outdoor power equipment, is an internal combustion engine that
burns gasoline, a hydrocarbon fuel. Therefore, your power equipment must be equipped with
a spark arrester muffler in continuous effective working order. The spark arrester must be
attached to the engine exhaust system in such a manner that flames or heat from the system
will not ignite flammable material. Failure of the owner/operator of the equipment to comply
with this regulation is a misdemeanor under California law, and may also be a violation of other
state and/or federal regulations, laws, ordinances, or codes. Contact your local fire marshal or
forest service for specific information about what regulations apply in your area.
• Wear approved safety glasses when operating this equipment. The operation of any powered
machine can result in foreign objects being thrown by high-speed rotating parts.
• Wear work gloves, sturdy footwear, and hearing protection when operating this equipment.
• Remove hearing protection and watch for traffic when operating near, or when crossing
roadways.
• Do not operate this equipment on a paved, gravel or hard surface unless the collection bag
is installed. Discharged material may bounce from a hard surface.
• Before inspecting or servicing any part of equipment, shut off engine, disconnect spark plug
wire from spark plug, and make sure that all moving parts have come to a complete stop. Be
aware that rotating blades slow down gradually after engine is shut off.
• Exercise extreme caution on slopes and avoid excessively steep slopes.
• Never leave equipment unattended when engine is running. Shut off engine and disconnect
spark plug wire from spark plug before leaving equipment.
• Do not vacuum any burning or smoldering materials such as cigars, cigarettes, ashes or
cinders.
2
• Do not vacuum areas that have been recently treated with fertilizers, pesticides or herbicides.
Follow chemical manufacturer’s safety instructions regarding contact with treated areas.
• Do not vacuum flammable liquids such as gasoline, kerosene, diesel fuel, paint thinner, etc.
• Never allow children or untrained adults to operate this equipment.
• Keep the area of operation clear of all persons, particularly small children, and pets.
Keep bystanders at least 25 feet away from the area of operation.
• Do not run engine in an enclosed area. Engine exhaust contains carbon monoxide gas,
a deadly poison that is odorless, colorless, and tasteless. Do not operate this equipment
near buildings, windows, or air conditioners.
• Do not allow hands or any other part of the body or clothing inside the vacuum inlet.
• Before removing or installing collection bag, shut off engine, disconnect spark plug
wire from spark plug, and allow all moving parts to come to a complete stop.
• If equipment jams or becomes clogged, immediately shut off engine, disconnect spark
plug, and allow all moving parts to come to a complete stop. Use only a wooden stick
to clear away debris.
• Do not start engine or operate this equipment with any safety guards or housing removed.
DANGER
Gasoline is highly flammable and its vapors are explosive. To prevent personal injury or property
damage:
•
Do not add fuel if engine is running or still hot from recent operation. Allow engine to
cool for at least three minutes.
•
Do not fill fuel tank indoors. After filling, wipe up any spills and move away from gasoline
fumes before starting engine.
•
Do not allow open flame, matches, or smoking in area.
•
Fill fuel tank with fresh, clean unleaded regular automotive gasoline, (leaded regular
and unleaded or leaded premium grades of gasoline are acceptable substitutes).
•
Do not mix oil with gasoline.
•
Clean the area around the fuel fill cap and remove the cap from the fuel tank. Insert a
clean funnel into the fuel tank.
•
Fill the tank to 1/2 inch below the bottom of the filter neck to provide space for any fuel
expansion.
•
Reinstall the fuel fill cap securely and wipe up any spilled gasoline.
SA
VE THESE INSTRUCTIONS
SAVE
3
SAFETY DECALS
4
ASSEMBL
Y INSTRUCTIONS
ASSEMBLY
NOTE: Remove unit from carton. Do not discard any inserts or packing until unit is completely assembled. All mounting
hardware is on the unit in its proper location.
TO ASSEMBLE HANDLES
NOTE: The numbers used in the following steps refer to those used in the parts list and exploded view of the Handle and Bag
Assembly on Page 7.
1.
Remove the four hex hd. bolts (3), lock nuts (4), and the lower cross brace (2) from the top of the lower handles (14).
2.
Slide the upper handle assembly down over the top of the lower handles (14).
3.
Reassemble the hardware removed in Step 1, making sure the lower cross brace (14) is assembled to the top holes
and bolts.
ATT
ACHING CLUTCH CABLE - TRACTION MODELS ONL
Y
TTACHING
ONLY
1.
The clutch cable is preassembled to the upper handle assembly in the correct position. Once the handles are
completely assembled it must be connected to the clutch arm weldment.
NOTE: The numbers used in the following steps refer to those used in the parts list and exploded view of the housing and
drive assembly on Page 8 and 9.
2.
Remove the round hd. machine screw (51) used to secure the throttle cable clip (19) to the side plate (18).
3.
Place throttle cable clip around clutch cable. Lift the clutch handle to release tension in the clutch cable.
4.
Attach hook at the end of the cable into the hole in the clutch arm weldment (21).
5.
Place the clip against side plate in its proper location and replace screw.
OPERA
TING INSTRUCTIONS
OPERATING
READ SAFETY & OPERATING INSTRUCTIONS BEFORE OPERATING
ENGINE OPERA
TION
OPERATION
CAUTION: The engine contains NO OIL
OIL. Before starting the engine, make sure the crankcase is filled with the proper amount
and type of oil. Refer to the Engine Operating Manual for proper lubrication of the engine. Read the Engine Manual carefully
before operating unit.
TO ASSEMBLE HANDLES
NOTE: The numbers used in the following steps refer to those used in the parts list and exploded view of the Handle and Bag
Assembly on Page 7.
1.
Remove the four hex hd. bolts (3), lock nuts (4), and the lower cross brace (2) from the top of the lower handles (14).
2.
Slide the upper handle assembly down over the top of the lower handles (14).
3.
Reassemble the hardware removed in Step 1, making sure the lower cross brace (14) is assembled to the top holes
and bolts.
MAINTENANCE INSTRUCTIONS
OBSERVE SAFETY RULES AT ALL TIMES.
WARNING: DO NOT WORK ON SCAVENGER with engine running or idling. Bring to a complete stop. Remove spark plug
wire on engine.
1.
For servicing and operating instructions for engine refer to Engine Manufacturers Service Manual. Careful attention to
care of air cleaner and crankcase lubrication instructions will insure longer engine life. KEEP ENGINE CLEAN.
2.
Clean the engine air cleaner every 10 hours of operation. (Do so more often under dusty conditions.) If it is punctured,
torn, or uncleanable, it should be replaced.
3.
Be sure to keep the oil at the proper level in the engine. Check the oil level each time you fill the fuel tank.
4.
To drain the crankcase oil from the engine, use a siphon pump. To use it, run the engine for a short time to warm the oil
and make it flow more easily. Then remove the cap from the filler hole in the engine and insert the plastic tube into the
hole. Hold the pump below the bottom of the crankcase and squeeze it several times until oil appears in the tube above
the pump, and allow the oil to siphon into a container for disposal. DISPOSE OF PROPERLY.
5.
Once a year, remove the wheels and add fresh grease in the teeth of the gears.
6.
DUST BAG CARE
a. Keep the dust bag clean at all times.
b. To clean the dust bag, turn the bag inside out and reattach to the sweeper.
c. Start the engine and run at full throttle. Lightly tap the bag to release the dust trapped in the weave.
d. When the bag is clean remove it and turn it right side out again. Reattach to the sweeper and resume sweeping.
e. DO NOT wash the dust bag to clean. Washing will shrink the material, reducing air flow through the bag and seriously
reduce vacuum.
7.
The efficiency of this unit depends on the breathing capacity of the dust bag. Under extremely dusty conditions the bag
should be emptied and cleaned frequently. Always empty and clean bag before storing after use. Debris allowed to
remain in the bag may cause spontaneous combustion, resulting in an explosion or fire.
5
SAFETY INTERLOC SYSTEM
This equipment incorporates a Bag Safety Interloc System, Figure 1. When bag assembly is
removed and lanyard switchfoot is disconnected
Briggs & Stratton/Honda engine wiring schmatic.
To drain oil, use hand pump.
6
HANDLE & BAG ASSEMBL
Y - SV0230B
ASSEMBLY
PAR
TS LIST
ARTS
7
HANDLE & BAG ASSEMBL
Y - SV0230BSP
ASSEMBLY
PAR
TS LIST
ARTS
8
HOUSING & DRIVE ASSEMBL
Y
ASSEMBLY
9
HOUSING & DRIVE ASSEMBL
Y
ASSEMBLY
PAR
TS LIST
ARTS
10
LIMITED W
ARRANTY
WARRANTY
The Parker Sweeper Company warrants to the original purchaser/user that this product is free from defects in workmanship and
materials under normal use and service for a period of two years from date of purchase. In addition, Parker Sweeper Company
will, at its option, honor labor warranty claims for the first 12 months from date of sale, provided such claims are submitted
through and approved by factory authorized repair stations. Parker Sweeper Company will, at its option, repair or replace without
charge, except for transportation costs, parts that fail under normal use and service when operated and maintained in accordance
with the applicable operation and instruction manuals.
This warranty does not apply to normal wear, or to items whose life is dependent on their use and care, such as belts, cords,
switches, hoses, rubber parts, electrical motor components or adjustments. Parts not manufactured by Parker Sweeper Company
such as engines, batteries, battery chargers, hydraulic pumps, and tires are covered by and subject to the warranties and/or
guarantees of their manufacturers. Please contact Minuteman International, Inc. for procedures in warranty claims against these
manufacturers.
Special warning to purchaser — Use of replacement filters and/or prefilters not manufactured by Parker Sweeper Company or
its designated licensees, will void all warranties expressed or implied.
A potential health hazard exists without exact original equipment replacement.
All warranteed items become the sole property of Parker Sweeper Company or its original manufacturer, whichever the case
may be.
Parker Sweeper Company disclaims any implied warranty, including the warranty of merchantability and the warranty of fitness
for a particular purpose. Parker Sweeper Company assumes no responsibility for any special, incidental or consequential
damages.
This limited warranty is applicable only in the U.S.A. and Canada, and is extended only to the original user/purchaser of this
product. Customers outside the U.S.A. and Canada should contact their local distributor for export warranty policies. Parker
Sweeper Company is not responsible for costs or repairs performed by persons other than those specifically authorized by
Parker Sweeper Company. This warranty does not apply to damage from transportation, alterations by unauthorized persons,
misuse or abuse of the equipment, use of non-compatible chemicals, or damage to property, or loss of income due to malfunctions
of the product.
If a difficulty develops with this machine, you should contact the dealer from whom it was purchased.
This warranty gives you specific legal rights, and you may have other rights which vary from state to state. Some states do not
allow the exclusion or limitation of special, incidental or consequential damages, or limitations on how long an implied warranty
lasts, so the above exclusions and limitations may not apply to you.
A Member of the Hako Group of Companies
World Headquarters
Minuteman International, Inc.
111 South Rohlwing Road
Addison, Illinois 60101
Minuteman Canada, Inc.
2210 Drew Road
Mississauga, Ontario
L5S 1B1
Phone 630-627-6900
Fax 630-627-1130
www.minutemanintl.com
Phone 905-673-3222
Fax 905-673-5161
988232
Printed in U.S.A.