1
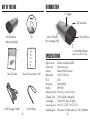
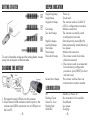
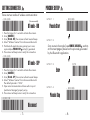
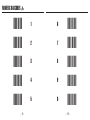
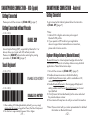
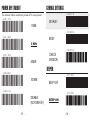
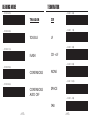
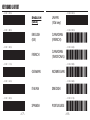
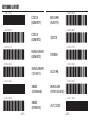
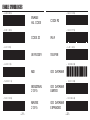
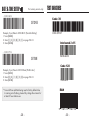
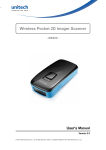
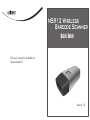
because we care
MS912 Wireless
Barcode Scanner
Quick Guide
Full user’s manual is available on
the enclosed CD.
Version 1.0
FCC WARNING STATEMENT
This equipment has been tested and found to comply with the limits for a Class B digital
device, pursuant to Part 15 of the FCC Rules. These limits are designed to provide
reasonable protection against harmful interference in a residential installation.
This equipment generates, uses and can radiate radio frequency energy and, if not
installed and used in accordance with the instructions, may cause harmful interference
to radio communications. However, there is no guarantee that interference will not
occur in a particular installation. If this equipment does cause harmful interference to
radio or television reception, which can be determined by turning the equipment off
and on, the user is encouraged to try to correct the interference by one of the following
measures:
• Reorient or relocate the receiving antenna.
• Increase the separation between the equipment and receiver.
• Connect the equipment into an outlet on a circuit different from that to which the
receiver is connected.
• Consult the dealer or an experienced radio/TV technician for help.
CANADIAN DOC STATEMENT
This digital apparatus does not exceed the Class B limits for radio noise for digital
apparatus set out in the Radio Interference Regulations of the Canadian Department of
Communications.
Le présent appareil numérique n’émet pas de bruits radioélectriques dépassant les
limites applicables aux appareils numériques de las classe B prescrites dans le
Réglement sur le brouillage radioélectrique édicté par les ministère des Communications du Canada.
CE MARKING AND EUROPEAN UNION COMPLIANCE
Testing for compliance to CE requirements was performed by an independent
laboratory. The unit under test was found compliant with all the applicable Directives,
2004/108/EC and 2006/95/EC.
WASTE ELECTRICAL AND ELECTRONIC EQUIPMENT
The WEEE directive places an obligation on all EU-based manufacturers and
importers to take-back electronic products at the end of their useful life.
ROHS STATEMENT OF COMPLIANCE
1. Take any metals into contact with the terminals in connectors.
2. Use the scanner where any inflammable gases.
If following condition occur, immediately power off the host computer,
disconnect the interface cable, and contact your nearest dealer.
1. Smoke, abnormal odors or noises come from the scanner.
2. Drop the scanner so as to affect the operation or damage its housing.
Do not do behavior below.
1. Put the scanner in places excessively high temperatures such as expose
under direct sunlight.
2. Use the scanner in extremely humid area or drastic temperature
changes.
3. Place the scanner in oily smoke or steam environment such as cooking
range.
4. Be covered or wrapped up the scanner in bad-ventilated area such as
under cloth or blanket.
5. Insert or drop foreign materials or water into scanning window or vents.
6. Using the scanner while hand is wet or damp.
7. Use the scanner with anti-slip gloves containing plasticizer and
Do Not
chemicals or organic solvents such as benzene, thinner, insecticide etc
to clean the housing. Otherwise, it could not result fire and electrical
shock but housing may be broken and injured.
8. Scratch or modify the scanner and bend, twist, pull or heat its interface
cable.
9. Put heavy objects on interface cable.
Do not stare the light source from the scanning window or do not point the
scanning window at other people’s eyes or eyesight may be damaged
by direct exposure under the light.
Do not put the scanner on an unstable or inclined plane.
The scanner may drop, creating injuries.
This product is compliant to Directive 2002/95/EC.
NON-MODIFICATION STATEMENT
Changes or modifications not expressly approved by the party responsible for
compliance
RoHS
-1-
WARNING AND CAUTION
Once the interface cable is damaged such as exposed or broken copper
wires, stop using immediately and contact your dealer. Otherwise, it could
result fire or electrical shock.
-2-
OUT OF THE BOX
INTRODUCTION
2. Trigger
because we care
3. LED Indicator
Mini Wireless
Barcode Reader
NUMERIC BARCODES
MS912 Wireless
Barcode Reader
*1*
*2*
*3*
*4*
*5*
Quick Guide
Quick Guide
1. Mini USB port
(for charging only)
CD
1
2
3
4
5
Quick Connection Card
USB Charger Cable
Hand Strap
-3-
SPECIFICATIONS
Light source
Scan rate
Sensor
Resolution
PCS
Housing
Profile
Working Hours
Charge Time
Coverage
4. Exit Window
5. Hard Reset Button
(insert pin into the hole)
625nm visible red LED
240 scans/sec
Linear CMOS sensor
5mil/ 0.127mm
30%
Plastic(ABS)
SPP, HID
8 hours (1 scan/ 5 sec)
2 hours (fully charged)
10M/33ft. (line of sight)
Operating Temp 0 to 50˚C (32˚F to 122˚F)
Symbologies All major 1D barcodes incl. GS1 Databar
-4-
GETTING STARTED
BEEPER INDICATION
Single long beep
Single beep
Single short beep
Two beeps
Two short beeps
To scan a barcode, make sure the aiming beam crosses
every bar and space of the barcode.
High-low beeps
Low-High beeps
Five beeps
Three beeps
Three short beeps
CHARGING THE BATTERY
Several short beeps
LED INDICATION
1. Flip open the mini USB port on the scanner.
2. Insert the mini USB connector into the port on the
scanner and USB A connector into a USB port on
the host PC.
-5-
Off
Flashing Green
Green for 2 sec
Flashing Red
Solid Red
Power up
Good read
The scanner reads a Code39 of
ASCII in configuration procedure
Wireless connection
The scanner successfully reads
a configuration barcode
Data temporarily stored (Batch)
Data permanently stored (Memory)
Low power
Wireless disconnection
i. The scanner reads a barcodes
while disconnected.
ii. The scanner reads an unexpected
barcode during configuration
procedure. (scan [RESET] to abort
and start over)
The scanner switches from one
communication mode to another
Standby or Power off
Disconnected or Discoverable
Good Read
Low power
Charging
-6-
GETTING CONNECTED
PINCODE SETUP
There are two modes of wireless communication:
. E043$
*.E043$*
(Recommanded)
BT mode - HID
1. Press the trigger for 1 second to activate the scanner.
2. Scan [DISCONNECT]
3. Scan [BT mode - HID]; the scanner will emit several beeps.
4. Select “Wireless Scanner” from discovered device list.
5. The Bluetooth application may prompt you to scan
a pincode(see PINCODE SETUP section) it generated.
6. The scanner will beep twice to verify the connection.
. E032$
STEP 1
Pincode Start
*.E032$*
STEP 2
Scan numeric barcodes (see NUMERIC BARCODES section
on the next pages) based on the pincode generated
by the Bluetooth application.
. E042$
*.E042$*
BT mode - SPP
1. Press the trigger for 1 second to activate the scanner.
2. Scan [DISCONNECT]
3. Scan [BT mode - SPP]; the scanner will emit several beeps.
4. Select “Wireless Scanner” from discovered device list.
The default pincode is “1234”.
5. Open serial communication software with com port
(see Device Manager) properly set up.
6. The scanner will beep twice to verify the connection.
. E031$
*.E031$*
-7-
STEP 3
$TX
*$TX*
Enter
STEP 4
Pincode Stop
. E033$
*.E033$*
Disconnect
-8-
NUMERIC BARCODES
*1*
*2*
*3*
*4*
*5*
-9-
1
6
2
7
3
8
4
9
5
0
*6*
*7*
*8*
*9*
*0*
- 10 -
SMARTPHONE CONNECTION - iOS (Apple)
Getting Connected
Please pair with the scanner via [BT mode - HID]. (page 7)
Getting Connected without Pincode
. E049$
ENABLE SSP
Secure Simple Pairing (SSP), supported by Bluetooth 2.1 or
above, allows you to pair with iOS without pincode.
Please scan [Enable SSP] above before entering the pairing
procedure of [BT mode - HID]. (page 7)
Touch Keyboard
. E047$
ENABLE iOS HOTKEY
. E048$
DISABLE iOS HOTKEY
1. After enabling iOS Hotkey(disabled by default), you may simply
double-click the trigger to toggle the iPhone/iPad Touch Keyboard.
2. The function is supported by firmware 1.04 or higher.
- 11 -
SMARTPHONE CONNECTION - Android
Getting Connected
To get connected to Android, please follow the instruction
in [BT mode - SPP] (page 7)
*Note:
1. Android 3.0 or higher version may also support
Bluetooth HID profile.
2. If you operate in SPP mode but your application
does not support direct external device connections,
please refer to below section.
Keyboard Wedge Software (BluetoothConnect)
BluetoothConnect is a free keyboard wedge software that
can convert SPP data into virtual key-strokes on any Android
applications. Please follow below steps:
1. Pair with the scanner via [BT mode - SPP]. (page 7)
2. Enable unknown resources in Android Authority.
3. Install BluetoothConnect.apk, which is available on CD,
and enter the program.
4. Enable BluetoothConnect in the Language & Keyboard
setting window and choose BluetoothConnect as Current
Input Method.
5. Click [Connect to Barcode Reader] on the menu and select
the paired wireless scanner.
6. The scanner will beep twice to verify a successful connection.
*Note: Please contact with your sales representative for detailed
information on BluetoothConnect.
- 12 -
GENERAL SETTINGS
POWER OFF TIMEOUT
The timeout before automatic power-off to save power.
. B017$
*.B017$*
*.B018$*
*.B019$*
*.B020$*
*.B021$*
1 MIN
. A001$
DEFAULT
. P023$
. B018$
3 MIN
RESET
. A007$
. B019$
5 MIN
CHECK
VERSION
BEEPER
. B020$
. F012$
10 MIN
BEEP OFF
. B021$
- 13 -
. F018$
DISABLE
(NO POWER-OFF)
BEEP ON
- 14 -
READING MODE
TERMINATOR
. F002$
. D012$
TRIGGER
CR
. D011$
. F003$
TOGGLE
LF
. D013$
. F001$
FLASH
CR + LF
. D010$
. F005$
CONTINUOUS
NONE
. D015$
. F006$
CONTINUOUS
AUTO OFF
SPACE
. D014$
TAB
- 15 -
- 16 -
KEYBOARD LAYOUT
. C010$
ENGLISH
(USA)
JAPAN
(106 key)
ENGLISH
(UK)
CANADIAN
(FRENCH)
FRENCH
CANADIAN
(TRADITIONAL)
. C018$
. C009$
. C025$
. C034$
. C012$
. C029$
. C011$
GERMAN
NORWEGIAN
. C026$
. C014$
ITALIAN
SWEDISH
. C031$
. C013$
SPANISH
- 17 -
PORTUGUESE
- 18 -
KEYBOARD LAYOUT
. C017$
CZECH
(QWERTY)
BELGIAN
(AZERTY)
. C030$
. C028$
. C022$
CZECH
(QWERTZ)
DUTCH
. C027$
. C021$
HUNGARIAN
(QWERTZ)
DANISH
. C032$
. C024$
HUNGARIAN
(101 KEY)
SLOVAK
. C033$
. C016$
SWISS
(GERMAN)
. C023$
SWISS
(FRENCH)
- 19 -
BRAZILIAN
(PORTUGUESE)
. C015$
ALT CODE
- 20 -
ENABLE SYMBOLOGIES
. G010$
. A002$
ENABLE
ALL CODE
CODE 93
. N017$
. K010$
CODE 32
IATA
. L014$
. L010$
UK PLESSEY
TELEPEN
. L001$
. N032$
MSI
GS1 DATABAR
INDUSTRIAL
2 OF 5
GS1 DATABAR
LIMITED
MATRIX
2 OF 5
GS1 DATABAR
EXPANDED
. N010$
. N001$
. M010$
- 21 -
. N026$
- 22 -
BATCH MODE
MEMORY MODE
For memory version only
. R001$
Being out of range, the scanner will temporarily
keep scanned data in its memory buffer(2K RAM)
until the buffer is full. The scanner will send all
stored data back to the host after getting in range.
ENABLE MEMORY
*Note: Batch Mode will not function when Memory
Mode is enabled, or no connection is made beforehand.
DISABLE MEMORY
*.R001$*
*.R002$*
. R002$
Once enabled, the scanner will stop sending data via Bluetooth
and start storing data into the internal flash disk (2MB)
MEMORY MODE
The following pages only apply to the memory
version mini wireless scanner, MS912M (P/N:
MS912-5UBB00-SG), which can be easily
distinguished by an “M” mark on the rear of
the scanner.
Delete Last Record/ Clear All Record
. R005$
DELETE LAST RECORD
*.R005$*
*.R004$*
. R004$
CLEAR ALL RECORD
- 23 -
- 24 -
OUTPUT DATA
For memory version only
DATA FORMAT
. R003$
*.R003$*
OUTPUT DATA
You may output data ONLY when memory is enabled (page 24).
Data Output Method
. R014$
*.R014$*
*.R013$*
WIRELESS
. R013$
USB-VCP
To output stored data via Wireless, please do the following:
1. Scan [WIRELESS]
2. Scan [OUTPUT DATA]
To output stored data via USB-VCP, please do the following:
1. Install VCP driver (available on CD)
2. Connect the scanner & host with USB cable
3. Scan [USB-VCP]
4. Save data as *.csv by “Covert to CSV.exe” (available on CD)
- 25 -
For memory version only
. R011$
DATA FORMAT
*.R011$*
The default Data Format is <Barcode Data> only
below are items and their setup codes:
Code
Item
Code
Item
1
2
Item No.
Date
3
4
Time
Barcode Data
Example:
To change Data Format to <Item No.>, <Barcode Data>, <Date>, <Time>
1. Scan [Data Format]
2. Scan [1], [4], [2], [3] on page 9.
3. Scan [Data Format]
. R010$
FIELD SEPARATOR
*.R010$*
Default is comma ( , ) . You may replace it with any alphanumeric
characters from the full ASCII table in User’s Manual (on CD).
Example: To change Field Separator to Semicolon ( ; )
1. Scan [Field Separator]
2. Scan [ ; ] from the full ASCII table.
3. Scan [Field Separator]
- 26 -
DATE FORMAT
For memory version only
TIME FORMAT
. R008$
*.R008$*
For memory version only
. R009$
DATE FORMAT
TIME FORMAT
*.R009$*
The default Date Format is DD/MM/YYYY (Code = 09), below
is full list of available formats and their setup codes:
The default Time Format is HH:MM:SS (Code = 01), below
are available formats and their setup codes:
Code
Format
Code
Format
Code
Format
Code
Format
01
02
03
04
05
06
07
08
DD-MM-YYYY
MM-DD-YYYY
DD-MM-YY
MM-DD-YY
YYYY-MM-DD
YY-MM-DD
DD-MM
MM-DD
09
10
11
12
13
14
15
16
DD/MM/YYYY
MM/DD/YYYY
DD/MM/YY
MM/DD/YY
YYYY/MM/DD
YY/MM/DD
DD/MM
MM/DD
01
HH:MM:SS
02
HH:MM
Example:
To set Time Format to HH:MM (Code = 02)
1. Scan [Time Format]
2. Scan [0], [2] on page 9 & 10.
3. Scan [TimeFormat]
Example:
To set Date Format to MM/DD/YY (Code =12)
1. Scan [Date Format]
2. Scan [1], [2] on page 9.
3. Scan [Date Format]
- 27 -
- 28 -
DATE & TIME SETUP
For memory version only
. R006$
*.R006$*
SET DATE
Example: To set Date to 2012-08-01 (Year-Month-Day):
1. Scan [Set Date]
2. Scan [1], [2], [0], [8], [0], [1] on page 9 & 10.
3. Scan [Set Date]
TEST BARCODES
Code 39
CODE-39 TEST
Interleaved 2 of 5
. R007$
*.R007$*
SET TIME
Example: To set Time to 08:10:30 am (Hr:Min:Sec)
1. Scan [Set Time]
2. Scan [0], [8], [1], [0], [3], [0] on page 9 & 10.
3. Scan [Set Time]
* To avoid Time and Date being reset to factory default due
to running out of battery, please fully charge the scanner for
at least 3 hours before use.
- 29 -
9876543210
Code 128
12345678
EAN
- 30 -