1
Owner's Manual
CRAFTSMAN
+
6.75 HORSEPOWER
21" REAR DISCHARGE
POWER PROPELLED
ELECTRIC START
ROTARY LAWN MOWER
Model No.
917.377631
•
•
•
•
•
•
Safety
Assembly
Operation
Maintenance
Espa_ol
Repair Parts
CAUTION:
Read and follow all
Safety Rules and Instructions
before operating this equipment
Sears, Roebuck
and Co., Hoffman Estates,
IL 60179
2
2
4
6
10
10
W_rrat_
S_fety_lules
A_ern_ly
Ol_era|on
M_intel_ance Sihelule|
M_intelhanle
ui
If
Product Specifications
Service and Adjustments
Storage
Troubleshooting
Repair Parts
Parts Ordering
11
14
14
16
34
Back Cover
ON CRAFTSMAN POWER MOWER
purchase, when this Craftsman Lawn Mower is maintained,
according to the operating and maintenance instructions inthe
repair free of charge any defect in material or workmanship.
is used for commercial or rental purposes, this warranty
the date of purchase.
worn during normal use, such as rotary mower
:3
•
;, air cleaners and spark plug.
operator abuse or negligence, including bent crank- _
the equipment according to the instructions con-
shafts arld, the failure to
tained in the owner's manual.
Warranty service is available by returning the Craftsman power mower to the nearest
Sears Service Center/Department in the United States. This warranty applies only while
this product is in use in the United States.
This Warranty gives you specific legal rights, and you may also have other rights which
vary from state to state.
SEARS, ROEBUCKAND
CO., D/817 WA, HOFFMAN ESTATES, ILLINOIS 60179
TRAINING:
• Read this operator's manual carefully.
Become familiar with the controls and
•
•
•
•
• Do not use accessory attachments that
are not recommended by the manufacturer. Use of such attachments may be
hazardous.
• The blade turns when the engine is
running.
know how to operate your mower
properly. Learn how to quickly stop
mower.
Do not allow children to use your mower.
Never allow adults to use mower without
proper instructions.
Keep the area of operation clear of all
persons, especially small children and
pets.
Use mower only as the manufacturer
intended and as described in this manual.
Do not operate mower if it has been
dropped or damaged in any manner.
Always have damage repaired before
using your mower.
PREPARATION:
• Always thoroughly check the area to be
mowed and clear it of all stones, sticks,
wires, bones, and other foreign objects.
These objects will be thrown by the blade
and can cause severe injury.
• Always wear safety glasses or eye
shields when starting and while using
your mower.
• Dress properly. Do not operate mower
when barefoot or wearing open sandals.
Wear only solid shoes with good trac_tion
when mowing.
2
• Check fuel tank before starting engine.
Do not fill gas tank indoors, when the
engine is running or when the engine is
hot. Allow the engine to cool for several
minutes before filling the gas tank. Clean
off any spilled gasoline before starting the
engine.
• Always make wheel height adjustments
before starting your mower. Never
attempt to do this while the engine is
running.
• Mow only in daylight or good artificial
light.
• Do not run the engine indoors. Exhaust
fumes are dangerous.
• Never cut grass by pulling the mower
towards you. Mow across_e fame_f-slopes, never up and down or you might
lose your footing. Do not mow excessively steep slopes. Use caution when
operating the mower on uneven terrain or
when changing directions -- maintain
good footing.
• Never operate your mower without proper
guards, plates, grass catcher or other
safety devices in place.
OPERATION:
MAINTENANCE
• Keep your eyes and mind on your mower
and the area being cut. Do not let other
interests distract you. --• Do not mow wet or slippery grass. Never
run while operating your mower. Always
be sure of your footing -- keep a firm
hold on the handles and walk.
• Do not put hands or feet near or under
rotating pads. Keep clear of the discharge
opening at all times.
• Always stop the engine whenever you
leave or are not using your mower, or
before crossing driveways, walks, roads,
and any gravel--covered areas.
• Never direct discharge of material toward
bystanders nor allow anyone near the
mower while you are operating it.
• Before cleaning, inspecting, or repairing
your mower, stop the engine and make
absolutely sure the blade and all moving
parts have stopped. Then disconnect the
spark plug wire and keep it away from the
spark plug to prevent accidental starting.
• Do not continue to run your mower if you
hit a foreign object. Follow the procedure
outlined above, then repair any damage
before restarting and operating you
mower.
• Do not change the govemor settings or
overspeed the engine. Engine damage or
personal injury may result.
• Do not operate your mower if it vibrates
abnormally. Excessive vibration is an
indication of damage; stop the engine,
safely check for the cause of vibration
and repair as required.
• Check the blade and the engine mounting
AND STORAGE:
bolts often to be sure they are tightened ,.,.
properly.
• Check all bolts, nuts and screws at
frequent intervals for proper tightness to
be sure mower is in safe working
condition.
• Keep all safety devices in place and
working.
• To reduce fire hazard, keep the enginefree of grass, leaves or excessive grease
and oil.
• Check grass catcher often for deterioration and wear and replace wom bags.
Use only replacement bags that are
recommended by and comply with
specifications of the manufacturer of your
mower.
• Always keep a sharp blade on your
mower.
• Allow engine to cool before storing in any
enclosure.
• Never store mower with fuel in the tank
inside a building where fumes may reach
an open flame or an-ignition-source such
as a hot water heater, space heater,
clothes dryer, etc.
CAUTION: Always disconnect spark plug
wire and place wire where it cannot
contact spark plug in order to prevent
accidental starting when setting up,
transporting, adjusting or making repairs.
WARNING
The engine exhaust from this product
contains chemicals known to the State of
C_);fornia to cause cancer, birth defects, or
oth_ r reproductive harm.
3
Theseaccessorieswereavailablewhenthislawnmowerwasproduced.They ar_so
availableat mostSearsretailoutletsandservicecenters.MostSearsstores can also oerc_
repair partsfor you, when you providethe model number of your lawn mower. Some of these
accessories may not apply to your lawn mower.
LAWN MOWER PERFORMANCE
CUPPING DEFLECTOR
FOR REAR DISCHARGE LAWN MOWERS
MULCHER
GRASS CATCHERS
FOR
REAR DISCHARGE
LAWN MOWERS
KITS
STABlUZER
GRASS CATCHERS
FOR
"
SIDE DISCHARGE
LAWN MOWERS
+GAS CANS
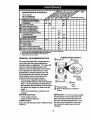
LAWN MOWER MAINTENANCE
+
MUFFLERS
BELTS
AIR FILTERS
BLADES
BLADE ADAPTERS
Read these instructions and this manual in
LAWN MOWER
WHEELS
ENGINE OIL
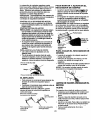
presence control bar to upper handle.
Roll lawn mower out of carton and check
carton thoroughly for additional loose
pads.
its entirety before you attempt to assemble
or operate your new lawn mower. Your
new lawn mower has been assembled at
the factory with the exception of those
parts left unassembled for s_ipping
purposes. To ensure safe and proper
operation of your lawn mower, all parts
and hardware you assemble must be
tightened securely. Use the correct tools
as necessary to ensure proper tightness.
All parts such as nuts, washers, bolts, etc.,
necessary to complete the assembly have
been placed in the parts bag.
TO REMOVE
CARTON
SPARK PLUGS
HOW TO SET UP YOUR LAWN
MOWER
......... -.....
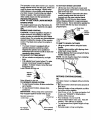
TO UNFOLD HANDLE
IMPORTANT:
Unfold handle carefully so
as not to pinch or damage control cables.
• Raise lower handle section to operating
position and squeeze the bottom ends of
lower handle towards each other until
the pin in handle can be inserted into
one of the three height adjustment
holes.
• Remove protective padding, raise upper
handle section into place on lower
handle and tighten both handle knobs.
• Remove any packing material from
around control bar.
• Your handles may be adjusted for your
mowing comfort. Refer to Service and
Adjustments section of this manual.
FROM
• Remove loose parts included with
mower.
• Cut down two end corners of carton and
lay end panel down flat.
• Remove all packing materials except
padding between upper and lower
handle and padding holding operator
4
Operator presence
control, bar
Upper handle
TO INSTALL ATTACHMENTS
Mowing
position
Lower
handle
Handle
pin
3-position
Handle
Your lawn mower was shipped ready to be
used as a mulcher. To convertto4N_jgirlg
or discharging:
• Open rear door and remove mulcher
plug. Store mulcher plug in a safe
place.
• You can now install catcher or optional
clipping deflector.
• To retum to mulching operation, install
mulcher plug into discharge opening of
mower.
J
Mulcher Plug
adjustment
bracket
TO PREPARE
BATTERY
NOTE: Your battery must be charged
before you can start your lawn mower.
• Disconnect engine battery connector
(male) from battery connector (female)
• Connect battery charger connector
(male) to battery connector (female).
• Plug battery charger into 110 volt A.C.
outlet.
• Leave battery charger connected for 24
hours before starting your engine for the
first time.
• After charging, connect engine connector (male) to battery connector (female).
Your engine has an integral alternator for
partial charging. Connect your battery
charger to charge battery as required.
IMPORTANT: The engih-e_alt-ei'fi_f6r-will
not charge a discharged battery.
At the end of the mowing season the
battery should be charged for 48 hours to
protect the battery during winter storage.
CAUTION: Always disconnect the engine
connector (male) from the battery
connector (female) to prevent accidental
starting when transporting or storing your
lawn mower after the season.
5
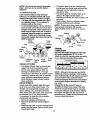
<NOW YOUR LAWN MOWER
READ THIS OWNER'S MANUALAND
SAFETY RULES BEFORE OPERATING YOU'_,WN
k4OWER. Compare the illustrations with your lawn mower to familiarize yourself with the
kx_ationof various controls and adjustments. Save this manual for future reference.
These symbols may appear on your lawn mower or in literature supplied with the product.
Learn and understand their meaning.
CAUTION
OR WARNING
ENGINE
ON
ENGINE
OFF
FAST
SLOW
CHOKE
FUEL
OIL
DANGER, KEEP HANDS
AND FEET AWAY
Operator presencecontrol
Ddve control
Electric start key_
Starter handle
Cable clip
Grass catcher
Gasoline cap
Wheel adjuster
lever
Primer
Engine oil cap w/dipstick
Housin.c
MEETS CPSC SAFETY REQUIREMENTS
Sears rotary walk-behind power lawn mowers conform to the safety standards of the
American National Standards Institute and the U.S. Consumer Product Safety Commission. The blade turns when the engine is running,
Drive control bar - used to engage
power-propelled foward motion of lawn
mower.
Mulcher plug - Located at the rear
discharge opening must be removed when
converting to bagging operation.
Electric start key - used for starting the
engine.
Operator presence control - must be
held down to the handle to start the
engine. Release to stop the engine.
Primer - pumps additional fuel from the
carburetor to the cylinder for use when
starting a cold engine.
Starter handle - used for starting the
engine.
6
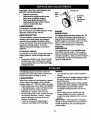
The ()peration of any lawn mower can result in
foreign objectsthrown intothe eyes, which can
resultin severe eye damage. Always wear
safety glasses or eye shieldswhile operating
your lawn mower or performing any adjustmentsor repairs. We recommend awide
vision safety mask over the spectacles or
TO ATTACH GRASS CATCHER
• Liftthe rear door of the lawn mower and
place the grass catcher frame hooks into the
slots of the rear door.
• The grass catcher issecured to the lawn
mower housing when the rear door is
lowered onto the grass catcher frame.
CAUTION: Do not run your lawn mower
without clippingdeflectoror approved grass
catcher in place. Never attempt to operate the
lawn mower with the rear door removed or
propped open.
Rear door
slots
Grass
standard
safety
glasses.
HOW TO USE YOUR LAWN MOWER
ENGINE SPEED
The engine speed was set at the factory for
optimum performance. Speed is not adjustable.
ENGINE ZONE CONTROL
CAUTION: Federal regulations require an
engine control to be installedon this lawn
mower in order to minimize'the risk of blade
contact injury.Do not under any circu_
attempt to defeat the function of the operator
control. The blade tums when the engine is
running.
handle
Catcher frame
hook
TO EMPTY GRASS CATCHER
• Lift up on grass catcher using the frame
handle.
• Remove grass catcher with clippingsfrom
under lawn mower handle.
• Empty d'_opingsfrom bag using both frame
handle and bag handle.
NOTE: Do not drag the bag when emptying;
itwillcause unnecessary wear.
• Your lawn mower is equipped with an
operator presence control bar which
requires the operator to be positioned
behind the lawn mOwer handle to start and
operate the lawn mower.
TO ADJUST CUTTING HEIGHT
• All four wheals are adjusted by a single
lever.
• Pull adjuster lever toward wheel. To raise
mower, move lever forward to desired
position.To lower mower, move the lever
toward the rear.
Lower Wheels for high cut
\
Acluster
/
J
Lever
BEFORE STARTING ENGINE__
OIL
Raise Wheels for low cut
TO OPERATE DRIVE SYSTEM
• To start forward motion, liftdrive control bar
up to handle.
• To stop forward motion, release drive
control bar.
Your lawn mower is shipped without oil in the
engine.
• Be sure mower is level and area around oil
fill is dean.
• Remove engine oil cap w/dipstick and fill to
the full line on the dipstick.
• Use 20 ozs. of oil. For type and grade of oil
to use, see =ENGINE" in Maintenance
sectionof this manual.
• Pour oil slowly. Do not over fill.
• Check oil level before each use. Add oil if
needed. Fillto full line on dipstick.
• To read proper level, tighten engine oil cap
each time.
• Reinstall engine oil cap and tighten.
IMPORTANT: Always keep drive controlbar
fully engaged against handle when in use.
Drive
Operator presence
control bar
control bar--
To engage_'_
drive control
Drivecontrol
desengaged
7
• Change the oil after every 25 hours of
operation or each season. You may need
to change the oil more often under dusty,
dirtyconditions.
GAS
• Fill fuel tank. Use fresh, clean, regular
unleaded gasoline with a minimum of 87
octane. (Use of leaded gasoline will
increase carbon and lead oxide deposits
and reduce valve life). Do not mix,oil
with gasoline. Purchase fuel in quantities that can be used within 30 days to
assure fuel freshness.
IMPORTANT: WHEN OPERATING IN
TEMPERATURES
BELOW 32°F(0°C), use
fresh, clean winter grade gasoline to help
insure good cold weather starling.
WARNING: Experience indicates that
alcohol blended fuels (called gasohol or
using ethanol or methanol) can attract
moisture which leads to separation and
formation of acids during storage. Acidic
gas can damage the fuel system of an
engine while in storage. To avoid engine
problems, the fuel system should be
emptied before storage of 30 days or
longer. Drain the gas tank; start the
engine and let it run until the fuel lines and
carburetor are empty. Use fresh fuel next
season. See Storage Instructions for
additional information. Never use engine
or carburetor cleaner products in the fuel
tank or permanent damage may occur.
CAUTION:
Fill to bottom of gas tank filler
neck. Do not overfill. Wipe off any spilled
oil or fuel. Do not store, spill or use
gasoline near an open flame.
Gasolinefiller
Engineoil cap
w/dipstick
j
TO START ENGINE
• To start a cold engine, push primer five
(5) times before trying to start. Use a
firm push. This step is not U_Jall_
necessary when starting an engine
which has already run for a few minutes.
• Hold operator presence control bar
down to the handle.
• Tum electric start key clockwise to crank
engine.
IMPORTANT: Do not crank engine more
than five continuous seconds between
each time you try to start. Wait 5 to 10
seconds between each attempt.
• To start engine using the auxiliary
starter handle, follow the steps above.
Exchange the use of the start key for -_
starter handle. Pull starter handle
quickly. Do not allow starter rope to
snap back.
• To stop engine, release operator
presence control bar.
NOTE: In cooler weather it may be
necessary to repeat priming steps. In
warmer weather over priming may cause
flooding and engine will not start. If youdo
flood engine wait a few minutes before
attempting to start and do not repeat
priming steps.
MOWING
cap
8
TIPS
• Under certain conditions, such as very tall
grass, it may be necessary to raise the
heightof cut to reduce pushing effort and to
keep from overloading the engine and
leaving clumps of grass clippings.
• For extremely heavy cutting, reduce the
width of cut by overlapping previously cut
path and mow slowly.
• When using a rear discha_
la_WTrnowerin
moist, heavy grass, dumps of cut grass
may not enter the grass catcher. Reduce
ground speed (pushing speed) and/or run
the lawn mower over the area a second
time.
• Ifa trailof clippings is left on the rightside of
a rear discharge mower, mow in a clockwise directionwith a small overlap to collect
the dippings on the next pass.
• Pores in cloth grass catchers can become
filledwith dirt and dust with use and
catchers willcollect less grass. To prevent
this, regularlyhose catcher off with water
and let dry before using.
• Keep top of engine around starterclearand
clean of grass clippings and chaff. This will
help engine air flow and extend engine life.
MULCHING MOWING TIPS
IMPORTANT:Forbest performance,keep
mowerhousingfree of built-upgrass and
• For best results,adjust the lawn mower
cuttingheight so tt'_t the lawn mower cuts
off only the top one-third of the grasF blades.
If the lawn is overgrown it willbe,meesSary
to raise the height of cutto reduce pushing
effort and to keep from overloadingthe
engine and leaving clumps of mulched
grass. For extremely heavy mulching,
reduce your widthof cut by overlapping •
previouslycut path and mow slowly.
• Certain types of grass and grass conditions
may require that an area be mulched a
second time to completely hide the
clippings. When doing a second cut, mow
across or perpendicularto the firstcut path.
• Change your cuttingpattem from week to
week. Mow north to south one weektherr-.
change to east to west the next week. This
will help prevent mating and graining of the
lawn.
trash. See =Cleaning" in Maintenance section
of this manual.
• The special mulching blade WIUrecut the
grass cr=ppingsmany times and reduce
them in size so that as they fag onto the
lawn they will disperse into the grass and
not be noticed. Also, the mulched grass will
biodegrade quicklyto provide nutrientsfor
the lawn. Always mulch with your highest
engine (blade) speed as this wRIprovidethe
best recuffingaction of the blades.
• Avoid cuttingyour lawn when it is wet. Wet
grass tends to form dumps and interferes
with the mulching action:-The best time to
mow your lawn is the early aftemoon. At
this time the grass has dried and the newly
cut area will not be exposed to the direct
sun.
.
9
°", i
1
Max,/3
.
AS YOUCOMPLETE
Ir
Check for LooseFasteners
Clean/InspectGrassCatcher
, (If Equipped)
v'
_".,'_
v'
v'
Clean Under
La_m Mower
Clean
Drive Cover
v'
W, {Power-Propelled
Check drive belt/pulleys
Mowers)
,(Power-Propelled Mowers)
R Check/Sharpen/Replace Blade
Lu_caUon
Chart
Clean Battery/Recharge
(Electric Start Mowers)
-It
v'
v'3
V'
V'
_
Ik/4
....
RECheck EngineOil Level
Change Engine Oil
Clean Air Fdter
N
_1_1._
Inspect Muffler
Clean
Replace
Spark Cartridge
Plug
ReplaceorAir
Filter Paper
If
2
1 - Change more often when oporaHngunder a heavy loador kl hlghamblemlem_ms.
2 - SeNice more often when opemlk_ In di_y or dustyconddJons.
3 - Replace blades mornoften when mowingin sandysoiL
4 - Charge 48 houm at end of season.
GENERAL
LUBRICATION
RECOMMENDATIONS
(_ Engineoil
The warranty on this lawn mower does not
cover items that have been subjected to
operator abuse or negligence. To receive full
value from the warranty, operator must
maintain mower as instructedin this manual.
Some adjustments willneed to be made
periodicallyto property maintain your unit.
All adjustments in the Service and Adjustments section of this manual should be
checked at least once each season.
• Once a year, replace the spark plug,
replace air filter element and check blade for
wear. A new spark plug and clean/new air
filterelement assures proper air-fuelmixture
and helps your engine rail better and last
longer.
• Follow the maintenance schedule in this
manual.
BEFORE EACH USE
• Check engine oil level.
• Check for loose fasteners.
LUBRICATION
Keep unit well lubricated (See "LUBRICATION
CHART").
(_ Wheel
adjuster
__0
(_)- Drive pins
_Brake ....
spring
bracket
(_ Rear
door
hinge
(_0 Spray lubricant
(_ Refer to Maintenance "ENGINE"
section.
IMPORTANT: Do not oil or grease plastic
wheel bearings. Viscous lubricantswill
attractdust and dirtthat will shorten the
lifeof the self lubricatingbearings. If you
feel they must be lubricated,use only a
dry,powdered graphite type lubricant
spa ngly.
10
CHART
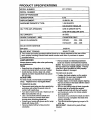
PRODUCT SPECIFICATIONS
MODEL NUMBER
SERIAL
917.377631
NUMBER
DATE OF PURCHASE
HORSEPOWER:
6.75
DISPLACEMENT:
12.56 CU. IN.
GASOLINE
1.25 QUARTS
CAPACITY/TYPE:
UNLEADED
OIL TYPE (API-SF/SG/SH):
REGULAR
SAE 30 (ABOVE 32°F)
SAE 5W,,30 (BELOW 32°F)
OIL CAPACITY:
SPARK PLUG(GAP:
20 OZS.
.030")
CHAMPION
VALVE CLEARANCE:
RN4C
INTAKE:
.004 - .008
EXHAUST:
.004 - .008
SOLID STATE IGNITION
AIR GAP:
.0125 IN.
BLADE BOLT TORQUE:
35-40 FT. LBS.
• The model and serial numbers will be found on a decal attached to the rear of the
lawn mower housing.Record both serial number and date of purchase in space
provided above.
.AWN MOWER
Always observe safety rules when performing
any maintenance.
TIRES
• Keep tires free of gasoline, oil, or insect
controlchemicals which can harm rubber.
• Avoid stumps, stones, deep ruts,sharp
objects and other hazards that may cause
tire damage.
BLADE CARE
For best results, mower blade must be kept
sharp. Replace bent or damaged blades.
TO REMOVE BLADE
• Disconnect spark plug wire from spark plug
and place wire where itcannot come in
contact with spark plug.
• Turn lawn mower on itsside. Make sure air
filterand carburetor are up.
• Use a wood block between blade and
mower housing to prevent blade from
tuming when removing blade bolt.
• Protect your hands with gloves and/or wrap
blade with heavy cloth.
• Remove blade bolt by turning counterclockwise.
• Remove blade and attaching hardware
(bolt, lockwasher and hardened washer).
NOTE: Remove the blade adapter and check
the key inside hub of blade adapter. The key
must be in good conditionto work properly.
Replace adapter ifdamaged.
TO REPLACE BLADE
• Position the blade adapter on the engine
crankshaft. Be sure key=in-adapterand
crankshaft keyway are aligned.
• Positionblade on the blade adapter aligning
the two (2) holesin the blade with the raised
lugs on the adapter.
• Be sure the trailingedge of blade (opposite
sharp edge) is up toward the engine.
• Install the blade bolt with the lockwasher
and hardened washer into blade adapter
and crankshaft.
• Use blockof wood between blade and lawn
mower housing and tightenthe blade bolt,
tuming clockwise
The recommended tightening torque is 3540ft. Ibs.
IMPORTANT: Blade bolt is grade_8heat
treated.
11
NOTE: We do notrecommendshaq_ning
blade - butif youdo, be surethebladeis
balanced.
TO SHARPEN BLADE
Care should be taken to keep the blade
balanced. An unbalanced blade wiUeause
eventual damage to lawn mower or engine.
. The blade can be sharpened .with a file or
on a grindingwheel. Do not attempt to
sharpen while on the mower.
• To check blade balance, drive a nail into a
beam or walL Leave about one inch of the
straight nagexposed. Place center hole of
blade over the head of the nail. If blade is
balanced, itshould remain in a horizontal
position, if either end of thQblade moves
downward, sharpen the heavy end unblthe
blade is balanced.
Blade
Crank-
adaptor
shaft
keyway
Key
• The pinion gear must be installed with
the left gear on the left side and with the
right gear on the right side, from an
operator's view.
• The pinion gear is stamped with an "L"
(left) or "R" (right) on the inside. If
installed incorrectly, the drive system will
not work.
• Place wheels back on adjuster axles.
• Replace Iocknuts and hubcaps.
NOTE: Pinions and drive pawls should be
cleaned and lubricated with grease
approximately every 25 hours or once a
year.
LocknutWash_
^o"_
Drive pin
Dust cover
Pinion
E-dng
Blade,
Blade
bolt
• Lock
washer
GRASS
Hardened
washer
Blade
Trailing
edge
adaptor
Crank-
ENGINE
_.
LUBRICATION
Use only high quarry detergent oil rated with
AP! service classificationSF, SG or SH.
Select the oil'sSAE viscositygrade according
to your expected operating temperature.
shaft
SAE VISCOSITY GRADES
4
CATCHER
• The grass catcher may be hosed with
water, but must be dry when used.
• Check your grass catcher often for
damage or deterioration. Through
normal use it will wear. If catcher needs
replacing, replace only with a manufacturer approved replacement catcher.
Give the lawn mower model number
when ordering.
DRIVE WHEELS
Check rear drive wheels each time you
mow to be sure they move freely. The
wheels not tuming freely means trash,
grass cuttings, etc., may be inside the
drive wheel and dust cover area and must
be cleaned out to free drive wheels.
If necessary to clean the drive wheels,
check both rear wheels.
• Remove hubcaps and Iocknuts.
* Remove wheels from wheel adjuster
axles.
• Remove any trash or grass cuttings from
inside the dust cover, pinion and/or drive
wheel gear teeth.
=IF
I,
-20"
TEMPERATURE
0"
30"
32" 40"
RANGE ANTICIPATED
60"
BEFORE
80°
100"
NEXT OIL CHANGE
NOTE: Althoughmulti-viscosityoils(5W30,
10W30 etc.) improve starting in cold weather,
these multi-viscosityoilswillresult in increased
oil consumption when used_abo-Ve32°F..
Check your engine oil level more frequently to
avoid possibleengine damage from running
low on o=1.
Change the oil after every 25 hours of
operation or at least once a year if the lawn
mower is not used for 25 hours in one year.
Check the crankcase oil level before starting
the engine and after each five (5) hours of
continuoususe. Tighten oil plug securely each
time you check the oil level.
12
TO CHANGE ENGINE OIL
Tum
Coil
NOTE: Before tipping lawn mower to drain oJ,
drain fuel tank by runningengine unb'lfuel tank
is empty.
• Disconnect spark plug wirefrom spark plug
and place wire where itcannot come in
clockwiseto
remove
Clip
contact sparkplu
• Remove engine oil cap; lay aside on a clean
surface.
• Tip lawn mower on its side as shown and
drain oil intoa suitable container. Rock lawn
mower back and forth to remove any oil
trapped inside of engine.
• W'_eeoff any spilled oil on lawn mower and
on side of engine.
• Fill engine with oil. RII only to the =FULL"
line on the dipstick. DO N(_T OVER RLL
• Replace engine oil cap.
• Reconnect spark plugwire to spark plug.
Air filter
Tab
Air filter
cover
counterclockwise
to
tighten
MUFFLER
";
Inspect and replace corroded muffler as it
could create afire hazard and/or damage.SPARK PLUG
Change your spark plug each year to make
your engine start easier and run better. Set
spark plug gap at .030 inch.
CLEANING
IMPORTAN'E For best performance, keep
mower housing free of built-up grass and trash.
Clean underside of mower housing after each
Container
use.
AIR FILTER
CAUTION: Disconnect spark plug wire from
spark plugand place wire where it cannot
come in contact with the spark plug.
• Turn lawn mower on its side. Make sureair
filter and carburetorare up. Clean the
underside of your lawn mower by scraping
to remove build-up of grass and trash.
• Clean engine often to keep trash from
accumulating. A dogged engine runs hotter
and shortens engine life.
• Keep finished surfaces and wheels free of
all gasoline, oil,etc.
• We do not recommend using-a'_tdeh hose
to clean lawn mower unless the electrical
system, muffler,air filterand carburetorare
covered to keep water out. Water in engine
can resultin shortened engine life.
Your engine will not run properly and may
be damaged by using a dirty air filter.
Replace the air filter every year, more
often if you mow in very dusty, dirty
conditions. Do not wash air filter.
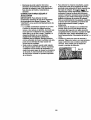
TO CHANGE AIR FILTER
• Remove the air filter by turning clockwise to the stop and pull away from
collar.
• Remove filter from inside of cover.
• Clean the inside of the cover and the
collar to remove any dirt accumulation.
• Insert new filter into cover.
• Put air filter cover and filter into collar
aligning the tab with the slot.
• Push in on cover and tum counterclockwise to tighten.
13
CAUTION; BEFOREPERFORMING ANY
SERVICE OR ADJUSTMENTS:
=
Release €ontrol bar.
°
Make sure the blade and all moving
parts
havecomp
•
High
Med.
Low
steppecL
/
3-position
Handle
adjustment
bracket
Disconnect
sparkplugwirefrom
spark plug and place where itcannot
come in contact withplug.
LAWN MOWER
TO ADJUST cUTnNG
HEIGHT
See "TOADJUSTCUTI'ING HEIGHT"in the
Operationsectionofthis manual.
REAR DEFLECTOR
....
The rear detlector,attached between the rear
wheels of your lawn mower, isprovided to
minimize the possibilitythat objectswillbe
thrown out the rear of the lawn mower intothe
operator's mowing position. Ifthe rear
deflector becomes damaged, it should be
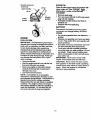
TO ADJUST HANDLE
The handle on your lawn mower has three (3)
height positions- adjust to heightthat suits
you.
• Squeeze the bottom ends of lower handle
towards each other untilthe pin in handle
can be inserted intoone of the three height
adjustment holes.
Immediately prepare your lawn mower for
storage at the end of the season or ifthe unit
will not be used for 30 days or more.
LAWN MOWER
When lawn mower is to be stored for a period
of time, clean itthoroughly, remove all dirt,
grease, leaves, etc. Store in a clean, dry area.
• Clean entire lawn mower (See "CLEANING"
in the Maintenance section of this manual).
• Lubricate as shown in the Customer
Maintenance section of this manual.
• Be sure that all nuts, bolts,screws, and pins
are securely fastened. Inspect moving
parts for damage, breakage and wear.
Replace if necessary.
• Touch up all rusted or chipped paint
surfaces; sand lightlybefore painting.
ENGINE
..
ENGINE SPEED
Your engine speed has been factory set.- Do
not attempt to increase engine speed or it
may resultin personal injury. Ifyou believe
that the engine is runningtoo fast or too slow,
take your lawn mower to an authorized
service center/department for repair and
adjustmenL
CARBURETOR
Your carburetorhas a non-adjustablefixed
main jet for mixturecontrol. If your engine
does not operate properlydue to suspected
carburetorproblems, take your lawn mower to
an authorized service center/department for
repair and adjustment.
HANDLE
• You can fold your lawn mower handle for
storage.
• Loosen the two (2) handle Imobson-sides of
the upper handle and allow handle to fold
down to the rear.
• Squeeze the bottom ends of lower handle
toward each other untilpins in handle clear
the brackets and pivot entire handle
assembly forward and allow itto rest on
mower.
• When setting up your handle from the
storage position,the lower handle will
require manually lockingintothe mowing
position.
IMPORTANT: When folding the handle for
storage or transportationbe sure to fold the
handle as shown or you may damage the
controlcables.
14
Operator presence
control bar
Upper handle
ENGINE OIL
Uftup
Uft up
Drain oil (with enginewaml) andreplace
clean engine oil. (See "ENGINE" in lhe
Maintenance section of thisl_"--tahU
.i_._
CYMNDER
• Remove
sparkplug.
Mowing
position
Lower
handle
• Pour one ounce (29 mi) of oil through spark
plug hole intocylinder.
• Pull starter handle slowly a few times to
dL_tn]_Jteoil.
• Replace with new spark plug.
BATTERY
J
Disconnect the battery from the engine
connector and charge battery 48 hours.
OTHER
ENGINE
FUELSYSTEM
IMPORTANT: It is importantto prevent gum
depositsfrom forming in essential fuel system
parts such as carburetor, fuel filter, fuel hose,
or tank duringstorage. Also, experience
intimatesthat alcoholblended fuels (called
gasohol or using ethanol or methanol) can
attract moisturewhich leads to separation and
formaUon of acids duringstorage. Acidicgas
can damage the fuel system of an engine
while in storage.
• Drain the fuel tank.
• Start the engine and let it run untilthe fuel
lines and carburetor are empty.
• Never use engine or carburetor cleaner
products in the fuel tank or permanent
damage may occur.
• Use fresh fuel next season.
• Do not store gasoline from one season to----another.
• Replaceyourgasoline
can ifyourcan starts
torust Rustand/ordirt
inyourgasoline
wiU
cause problems.
• Ifpossible,
storeyourunitindoorsand cover
ittogiveprotection
fromdustand dirL
• Cover yourunitwitha suitable
protective
coverthatdoes not retain
moisture.Do not
use plastic.
Plastic
cannotbreathewhich
allowscondensation
toformand wiUcause
your unit to rust.
IMPORTANT: Never cover mower while
engine and exhaust areas are stillwarm.
CAUTION:
Never store the lawn mower
with gasoline in the tank inside a building
where fumes may reach an open flame or
spark. Allow the engine to cool before
storing in any enclosure.
NOTE: Fuel stabilizeris an acceptable
altemative in minimizingthe formation of fuel
gum depositsduringstorage. Add stabilizerto
gasoline in fuel tank or storage container.
Always follow the mk ratiofound on stabilizer
container. Run engine at least 10 minutes
after adding stabilizerto allow the stabir_.erto
reach the carburetor. Do not drain the gas
tank and carburetorif using fuel stabilizer.
15
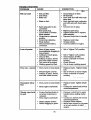
TROUBLE SHOOTING
PROBLEM
CAUSE
Will not start
CORRECTION
• Dirty air filter.
• Out of fuel.
• Stale fuel.
• Water in fuel.
•
•
•
•
•
•
•
Loss of power
•
•
•
•
•
•
Poor cut - unever
Excessive
tion
vibra-
Rear of lawn mower
housing/blade dragging in
heavy grass.
Cutting too much grass.
Dirty air filter.
Buildup of grass, leaves
and trash under mower.
Too much oil in engine.
Walking speed too fast.
• Wom, bent or loose blade.
• Replace spark plug.
• "13ghten'blade
bolt or replace
blade adaPter.
• Depress'i:ontrolbar to handle.
• Replace control bar.
• Charge battery.
• Connect battery to engine.
• Set in =Higher Cut" position.
• Set in =Higher Cut" position.
• Clean/replace air filter.
• Clean underside of mower
housing.
,, Check oil level.
• Cut at slower walking speed.
• Wheel heights uneven.
• Buildup of grass, leaves,
and trash under mower.
• Replace blade. Tighten blade
bolt.
• Set all wheels at same height.
• Clean underside of mower
housing.
• Wom, bent or loose blade.
•
•
Starter rope hard
to pull
Spark plug wire is dis-.
connected
Bad spark plug.
Loose blade or broken
blade adapter.
Control bar in released
position
Control bar defective
Weak battery
Disconnected battery
connector.
• Clean/replaceair filter.
• Fill fuel tank.
• Drain tank and refill with fresh
clean fuel.
• Drain fuel tank and carburetor
and refill tank with fresh gasoline.
• Connect wire to plug.
Bent engine crankshaft.
•
Engine flywheel brake is
on when control bar is
released.
• Bent engine crankshaft
• Blade adapter broken.
• Blade dragging in grass.
16 _
Replace blade. Tighten blade
bolt.
• Contact an authorized service
center/department.
•
Depress control bar to upper
handle before pulling starter
rope.
• Contact an authorized service
center/department.
• Replace blade adapter.
• Move lawn mower to cut grass
or to hard surface to start _
engine.
TROUBLE
SHOOTING
;)ROBLEM
CAUSE
CORRECTION
Loss of drive
(Self-Propelled
Mowing)
• Drive wheels not turning
with drive control engaged.
• Belt not driving.
• Adjust or replace drive control
cable, if broken.
• Put belt on pulleys or replace
belts if broken.
Grass catcher
not filling (If so
equipped)
• Cutting height too low.
• Lift on blade worn off.
• Catcher not venting air.
• Raise cutting height.
• Replace blade.
• Clean grass catcher.
Hard to push
• Grass is too high or wheel
height is too low.
• Rear of lawn mower
housing/blade dragging
in grass.
• Grass catcher too full.
• Handle height position not.
right for you.
•
17
Raise cutting height.
• Raise rear of lawn mower
housing one (1)
setting higher.
• Empty grass catcher.
• Adjust handle height to suit.
Garantfa
Reglas de Seguridad
Montaje
Operaci_
Mantenimiento
Programa de Mantenimiento
18
18
20
22
26
26
Especificaciones del Producto
Servicio y Adjustes
Almacenamiento
Identificacibn de problemas
Partes de repuesto
Orden de Partes
_.730
30
32
Vea el manual
ingl6s del due_o
Contratapa
GARANT[A UMITADA DE DOS AI_iOS PAPA LA SEGADORAA MOTOR CRAFTSMAN
Por dos (2) ar3os,a partir de la fecha de compra, cuando esta Segadora Craftsman se mantenga, lubrique
y aflne segt3n las _
para la operaci_ y el mantenimiento en el manual del dueho, Sears
reparar& gratistodo defecto en el matedal y la mano de obra.
......
Si la Segadora Craftsman se usa para fines comerciales o de ardendo, esta garantfa sblo se aplica pot
noventa (90) diasa par'dr de la fecha de compra.
Esta Garantia no cubre:
• Artfculosque se desgastan durante el uso normal tales como las cuchillassegadoras mtatorias, los
adaptadores de la cuchilla, las correas, los filtms de aim y las b_ias.
• Reparaciones necesarias debido el abuso o a la negligencia del operador, inctuyL_:lose a los
cig0e£_es doblados y a la falta de manten'wnientodel equipo segt_nlas instrucclonesque se induyen
en el manual del duer3o.
EL SERVIClO DE GARANTiA ESTA DISPONIBLE al devoiver la segadpra a motor Craftsman al centro/
departmento de serviclo Sears mas cercano en los Estados Unidos. Esta garantfa se aplica solamente
mientras el producto este en uso en los Estados Unidos.
Esta Garant{a le otorga derechos legales espec{flcos, y puede que tambi_n tenga otros derechos que
vadan de estado a estado.
Sears, Roebuck and Co., D/817WA, Hoffman Estates, IL 60179 USA
Los estandrares de seguridad exigen la presencia
del operator en los controles para reducir a un
minimo el riesgo de lesionarse. Su unidad viene
equipada con dichos controles. Por ningun motivo
tTate del eliminar la funcibn de los controlesque
exigen la presencia del operador.
ENTRENAMIENTO:
•
Lea este manual del operador cuidadosamente.
Familiadcese con los contmles y aprenda a
operar su segadora en forma adecuada.
Aprenda a parar su segadora r'_pidamente.
• No permita que los ni_os usen su segadora.
Nunca permita que los adultos operen la
segadora sin contar con las i_ones
adecuadas.
•
Mantenga el &rea de operacibn despejada de
gente, especiaimente de ni£_s peque_:_sy de
animales dom_sticos.
• Use la segadora sotamente para los fines
propuestos por el fabdcante y seg_n las
explicacionesdescritas en este manual.
• No opere la segadora si se ha caido o daSado en
cualquiera forma. Siempre reL?are!osd_ar__
s
antes de usada.
• No use accesorios que no hayan sido
recomendados por el fabricante. El uso de dichos
accesorios puede ser peligroso.
• La cuchillagira cuando el motor estd
funcionando.
PREPARAClON:
• Siempre revise cuidadosamente el &rea que se
va a segar y desl_jela de todas las piedras,
palos, alambres, huesos y otros objetos
extraSos. Estos objetos ser'&nlanzados con la
cuchillay pueden producirlesiones graves.
• Siempre use anteojos de seguridad o protectores
de ojos cuando arranque y durante el tiempo
que use la segadora.
• V{stase en forma adecuada. No opere la
segadora sin zapatos o con sandalia6 mie[_tras
que el motor est& funcionando.
18
• SiL=guesiempre durante el dfa o con buena luz
artificial.
OPERACI6N:
• Mantenga sus ojos y su mente en la segadora
yen el drea que se est_ cortando. No permita
que otros intereses Io distmigan.
• No corte cdsped mojado o resbaloso. Nunca
corra mientras est6 operando su segadora.
Siempre aseg0rese de mantener el equilibdo mantenga el mango agarrado firmemente y
camine.
• No ponga las manos o los pies cerca odebajo
de las pades rotatodas. Mantdngase alejado
de la abertura de descarga en todo momento.
• Siempre pare el motor cuando se vaya
ocuando no estd usando su segadora, o antes
de atravesar las entradas para autos, los
senderos, caminos y dreas cubiertas de ripio.
• Nunca dirija la descargadel material hacia los
espectadores ni permita a nadie cerca de la
segadora mientras la estd operando.
• Antes de limpiar, inspeccionar o de reparar la
segadora, pare el motor y estd completamente
seguro de que la cuchilla y que todas las
partes que se mueven se hayan detenido.
Luego, desconecte el alambre de la bujfa y
mant(mgalo alejado de dsta para evitar el
arranque por accidente.
• No contin0e haciendo funcionar su segadora
si le pega a un objeto extrar_o. Siga el
procedimiento descrito anteriormente, luego
repare cualquier dafio antes de volver a
arrancar y de operar su segadora.
• No cambie los ajustes del regulador o
hagaque el motor ande a una velocidad
excesiva. Se pueden producir daJ_osen el
motor y I esiones personales.
• No opere su segadora si vibra fuera de Io
normal. La vibraci6n excesiva es una
indicaci6n de dafio; pare el motor, revise en
forma segura la causa de la vibraci6n y haga
las reparaciones seg0n sea necesario.
• No haga funcionar el motor en
recintoscerrados. Los gases de escape son
peligrosos.
• Nunca corte el cdsped tirando la segadora
hacia ustedoSiegue a travds de la cara de las
pendientes, nunca hacia arriba o hacia abajo
pues puede perder el equilibdo. No siegue
pendientes demasiado empinadas. Tenga
cuidado cuando opere la segadora en terreno
disparejo o cuando cambie de direcci6n mantenga un buen equilibrio.
• Nunca opere la segadora sin las protecciones
adecuadas, las planchas, el recogedor de
c6sped y otros disposiUvos de seguddad en su
lugar.
MANTENIMIENTO Y
ALMACENAMIEN-TO:
• Revise la cuchiUa y los pernos de rnontaje del
motor a menudo, para asegurarse que estdn
apretados en la forma adecuada.
• Revise todos los pemos, tuercas y tomiUos a
intervalos frecuentas, para veriticar si estdn
apretados en forma adecuada, y
asegurarseque la segadora se encuentm en
condiciones de funcionamiento seguro.
• Mantenga todos los dispositivos de seguridad
en su lugar y listos para funcionar.
• Para reducir el peligro de incendio, mantenga
el motor sin c6sped, hojas y grasa oaceite en_
exceso.
• Revise el recogedor de _sped a menudo
para vedficar si hay detedoro y desgaste y
cambie las bolsas desgastadas. Use
solamente las bolsas de repuesto
recomendadas por el fabricante de su
segadora o que cumplen con las
especificaciones de dste.
-_
• Siempre mantenga una cuchiUa afilada en su
segadora.
• Siempre permita que el motor se enfrfe antes
de guardarla en cualquier recinto cerrado.
• Nunca guarde la segadora con combustible en
el estanque dentro de un edificio en donde los
gases pueden alcanzar una llama expuesta o
una fuente de ignici6n, tal como el calentador
de agua, la estufa de calefacci6n, la secadom
de ropa, etc.
PRECAUCI(_N:
Siempre desconecte el
alambre de la bujfa y p6ngalo donde no pueda
entrar en contacto con la bujia, para evitar el
arranque por accidente, durante la preparaci6n,
el transporte, el ajuste o cuando se hacen
reparaciones.
-................
PRECAUCI()N:
Es conocido por el Estado de
Califomia que los gases de escape del motor de
este productor contienen qufmicos los cuales a
ciertos niveles, pueden ocasionar, cdncer,
defectos de nacimiento, y otros dafios al sistema
reproductivo.
19
Estosaccesodos
estaban
clisponibles cuando se produjo la segadora. Tambidn esldn _
-mayoda de las tiendas de Sears yen Ioscentros de servicio.La mayoda de las tiendas Sears tambidn
pueden mandarape_r partesderepuestoparausted, silesproporcionaeln_merodelmodelodesu
segadora. Algunos de estos accesodos taivez no se apliquen a su segadora.
RENDIMIENTO
DE LA SEGADORA
n
_
,,_
DESVIADOR DE RECORTES
PARA SEGADORAS
CON DESCARGA
TRASERA
RECOREDOR
PAPA
SEGADORAS
CON DESCARGA
TRASERA
MANTENIMIENTO
JUEGOS
PARA
LA ACOLCHADORA
PAPA
SEGADORAS
CON
DESCARGA
.ECO.E.O.
LATERAL
_!
RLTROS
DE AIRE
BUJ|AS
ADAPTADORES
CUCHILLAS
DE CUCHILLA
Lea estas instruccionesy ests manual
completamente antes de tratar de montar u operar
su segadora nueva. Su segadora nueva ha sido
montada en la fdbrica con la excepci6n de aquellas
partes que se dejaron sin montar por razones de
env_o.Todas las partes como la_ tuercas, las
arandelas, los pemos, etc., que son necesarias
pare complel_" el mon_e han sido colocadas en la
bolsa de partes. Para asegurarse que su segadora
funcione en forrna segura y adecuada, todas las
partes y los arlfculosde ferreterfa que se monten
tJenenque ser apretados segurarnente. Use las
herramientas correctas, como sea necesario, para
asegurar que se apdeten adecuadamente.
DEL MOTOR
COMO PREPARAR SU
SEGADORA
PARA OESDOBLAR E-LM_GO
IMPORTANTE:
Despliegue el mango con mucho
cuk_ado
paranopelt=caro dar_ bs cablesde
conlmi.
• Levante la secci6n del mango inferiorhasta la
posici6nde operaci6n y alinee el agujero en _ste
con uno de lostins agujeros para determinar la
altura en el punlai del mango.
• Inserte el pemo del mango a trav_s de dste y del
puntal y asegQrelo con la manHla.
• Repita el procedimiento para el lado opuesto del-
DE LA CAJA DE CARTON
• Remueva las partes sueltas que se induyen con
la segadora.
• Corte las dos esquinas de los exb'emosde la
caja de cart6n y tJendael panel del extremo
mango.
• Levante la secci6n del mango supedor hasta la
posici6nde operaci_, remueva la curia
protectoray apriete las manillas del mango en
forma segura.
• Remueva el material de empaque_e alrededor
de la barta de control.
piano.
Rernueva todo el material de empaque, excepto
la curia enVe el mango superior y 61inferior,y la
aJ_a que sujeta la barra de los controlque exige
la presencia dei operador junto con el mango
superior.
ACEITE
RUEDAS
• Haga rodar la segadora hacia afuera de la caja
de cart6n y mvfsela cuidadosarnente 10am
verificarsi todavfa quedan partes sueltas
ac_ionales.
PARA REMOVER LA SEGADORA
•
ENVASES
DE GASOUNA
DE LA SEGADORA
SILENCIADORES
CORREAS
ESTABIUZADORES
20
• Susmangos
pueden
ahstarse
paraquele
acomode al segar. Fie_rase a la seod6n de
Sen_o y A]ustes en este manual
Barra de controlque exige
la presencladel operador
Mango superior
Levantar
Mango
infedor
Levantar
Posii6npara segar
Pinza
del mango
Soporte de
ajuste
Mango de
3 posiciones
PARA INSTALAR LOS ACCESORIOS
Su segadora rue enviada lista para usarse
como una acolchadora de capa vegetal_Pa_
convertirla de rnodoque pueda_'ensai_lflY"
•
descargar:.
• Abra la puerta trasera y remueva la tapon
acolchadora. Gudrdela en un lugar seguro.
• Ahora puede instalar el recogedor o el
desviador de recortes opcional.
• Para volver a la operaci6n de acolchamiento
con capa vegetal, instale la tapon
acolchadora en la abertura de descarga de la
segadora.
PRECAUCl6N:
No haga funcionar su
segadora sin la tapon acolchadora aprobada en
su lugar, o sin el desviador de recortes, o sin el
recogedor de c6sped, aprobados, en su lugar.
Nunca trate de operar la segadora cuandose --.
ha removido la puerta trasera o cuando estd un
poco abierta.
TalOn acolchador
PARA PREPARAR
LA BATER|A
AVISO: Su baterfa tiene que estar cargada
antes de que pueda hacer arrancar su
segadora.
• Desconecte el conector del motor (macho) al
conector de la baterfa (hembra).
• Conecte el conector del cargador de la
baterfa (macho) al conector de la baterfa
(hembra).
• Enchufe el cargador de la baterfa dentro del
enchufe de 110 volt C.A.
• Deje el cargador de la baterfa conectado por
24 horas antes de hace_r_arrancar_sumotor
por la primera vez.
• Despuds de cargar, conecte el conector del
motor al conector de la baterfa.
Su motor cuenta con un altemador integrado
para carga parcial. Conecte su cargador de
baterfa para cargarla seg0n sea necesario.
IMPORTANTE: El altemador del motor no
cargara una bateria descaargada.
AI final de la temporada de siega, la baterfa se
debe cargar por 48 horas para protegerla
durante el perfodo de almacenamiento en el
inviemo.
PRECAUCI(_N: Siempre desconecte el
conector del motor del conector de la baterfa
para evitar el arranque por accidente al
transportar o guardar su segadora despud s de
la temporada.
----:
21
FAMlUARICESE
CON SU SEGADORA
LEA ESTE MANUAL DEL DUEI_) Y LAS REGLAS DE SEGURIDAD ANTES DE OPERAR SU
SEGADORA. Compare las iluslracionescon su segadora para farniliarizarse con la ubicaci6nde los
diversos controlssy ajustes. Guarde este manual para referenda en el future.
Estos sfmbolos pueden apareser sobre su segadora o en la literatura pmpordonada
producto. Aprenda y cornprenda sus signilicados.
ATTENCK_)N O
ADVERTENClA
MOTOR
ENCENDIDO
MOTOR
APAGAIDO
R_PIDO
LENTO
ESTRANGU
LACK_)N
COMBUSTIBLE
ACEITE
con el
PEUGRO, GUARDE LAS
MANOS Y LOS PIES LIEJOS
control que ex,ige la presencia
operador
Barrade controlde la
impulsi6n
Interruptor de arranque
de Ilave
Cord6narrancador
Manilla
Recogedorde c6sped
Tapa del
deposito de
gasolina
Ajustadorde la rueda
Cebador
Caja
Tapa del deposito
de aceite del
motor con varilla
indicadora de
nivel
_.--.."_..-.-
...._ "
CUMPLE CON LOS REQUISITOS DE SEGURIDAD DE LA CPSC
Las segadoras a motor,que se conducen desde la parte de atrds, rotatodas,Sears, cL_plen con los
estdndares de seguridad del American National Standards Institutey de la U.S. Consumer Product Safety
Commission. La cuchillagira cuando el motor estd funcionando.
Barra de control de la impulsion - se usa para
enganchar la segadora para movimiento hacia
adelante impulsada a motor.
Barra de conh'ol que exige la presencia del
operador- tiene que sujetarse abajo, junto con el
mango, para hacer arrancar el motor. Su_ltela para
parar el motor.
Cebador- bombea combustibleadidonal desde el
carburador al dlindro para uso cuando se necesita
hacer arrancar un motor ffio.
Cordor arrancadormotor.
Tapon de la acolchadora- situada en la abertura
de la descarga trasera y debe ser quitada cuando
se convierte la opracci6n de ensacado a descarga.
se usa para hacer arrancar el
22
Interruptor de arranque de Ilave --se us_para
hacer arrancar el motor.
La operacibnde cualquiersegadorapuede
PARA MONTAR Y ADJUNTAR
hacerquesaltenobjetosextrafiosdentrodesus RECOGEDOR DE CESPED
ojos,Ioquepuedeproducirdafiosgravesen
6stos. Siempre use anteojos de seguridad o
protecci6n para los ojos mientras opere su
segadora o cuando haga ajustes o
reparaciones: Recomendamos una mascara de
seguridad de visi6n amplia, para uso espejuelos
o anteojos de seguridad estandarte.
CONTROL DE LA VELOCIDAD DEL MOTOR.
La velocidad del motor se estableci6 en la Vabrica
para un rendimiento 6primo. La veiocidad no se
puede
aiustar.
CONTROL DE ZONA DEL MOTOR
PRECAUCl6N: Las regulacionesfederales exigen
que se instale un conbol para el motor en esta
segadora para reducir a un mfnimo el riesgo de
lesionarse debido al contaclo,con la cuchila. Por
ning_ rnotivobate de elirninarla fund6n del
control del operador. La ctx:_la gira cuando el
motor estd fundonando.
• Su segadora viene equipada con una barra de
control que exige la presencia del operador, Io
que requiem que el operador est6 deb_ del
mango de ia segadora para hacerla arrancar y
operarla.
PARA AJUSTAR LA ALTURA DE CORTE
• Las cuatro ruedas son ajustadas con una
palanca 0nica.
• "13mde la palanca de ajustes hada la rueda.
Levante la segadora, mueva la palanca hasta
delante a la posici6n deseada. Para bajar la
segadora, rnueva la palanca hacia la retaguardia.
Para un corte alto, baje
las ruedas
EL
• Levante la puerta trasem de_.se_ade
c6sped y ponga el marco cle_x3"='e_'_'de
c6sped a dentro de las mnuras de la pusrta
trasera.
• El recogedor de c6sped queda asegurado en
la caja de la segadora cuando se baja la
puerta tmsera para descansar en el bastidor
del recoge.dor de c6sped.
PRECAUCION: No haga funcionarsu segadom
sin el desviador de recortes o sin el recogedor
de c6sped, aprobados, en su lugar. Nunca trate
de operar la segadom cuando se ha removido
la puerta trasera o cuando est& un poco abierta.
Puerta trasera
Mango del
bastidordel
recogdor
Ganchodel
marcodel
recogedorde
c6sped
PARA VAClAR EL RECOGEDOR
ClaSPED
DE
• Levante el recogedor de c6sped usando el
mango del bastidor.
• Remueva el recogedor de c6sped, con los
recortes, de debajo del mango de la
segadora.
• Vacfe los recortes de la bolsa usando tanto el
mango del bastidor como 61de la bolsa.
AVISO: No arrastre la bolsa cuando la vacfe;
se producir& un desgaste innecesario.
/
Mango
Para un corte bajo, levante las ruedas
EL IMPULSION
• Para arrancar en movimiento hada adelante, _m
la barra de controlde la impulsibnhacia el
mango.
• Para parar el movimiento hacia adelante, alivie la
bana de control de la impulsi6n.
IMPORTANTE: durante la uhlizaci<_n,
guarde
siempre la barra de controlde la impulsion en
contra del mango.
Barra con control que exige
la presenciadel operador
Control
de la impulsi6n
Para engrancharel
controlde la
impulsi6n
Controlde la impulsi6n
desenganchado
ANTES DE HACER ARRANCAR EL
MOTOR
AcErrE
Su segadora rue enviada sin aceite en el motor.
• Asegerese que la segadora estd nivelada y que
el _ea alrededor del dep<_ito de aceite est_
limpia.
• Reueva el tapa del dep6sito del aceite con la
varilla indicadorade nivel y rellene hasta la ffnea
de Ileno en dsta.
• Use 20 oz. de aceite. Para el tipo y la calidad vea
=MOTOR" en la secci6n de las "Mantenimento"
en este manual.
--_
• Vacfe el aceite lentamente. No Io Ilene
demasiado.
23
• Revise el nivaldal acalte antes de cada uso.
Agregue acalte si es necesado. LLene hasta la
Ifnea de fleno on la vadfla incicadora de nivel.
• Vuelva a instalar la lapa dal depdd_ de aceite
dal motor y apd61ela.
• Cambieal ace_edespu_.s
de25horasde
ope_
o pot Io menos ur_ _z 81_Eu_o
d la
Puede necesilar cant_
rrenudo cuando las _
o sucias.
el aceite mds a
son p61vorosas
GASOUNA
• Llene el estanque de combustible. Use
gasolina regular, sin plomo, nueva y limpia
con el mfnimo de 87 octanos. (El uso de
gasolina con plomo aumentar_ los dep6sitos
de 6xido de plomo y carbono y se reducird la
duracibn de la v_lvula). No mezcle el aceite
con la gasolina. Para asegurar que la
gasolina utilizada sea fresca compre
estanques los cuales puedan ser utilizados
durante los primeros 30 dfas.
IMPORTANTE: Cuando se opere en
temperaturas por debajo de 32 ° F (0 ° C) use
gasoline de calidad de inviemo, imviemo, limpia
y nueva para ayudar a segurar un buen
arranque in clima _o.
ADVERTENClA:
La experiencia ha indicado
que los combustibles mezclados con alcohol
(conocidos como gasohol, o el uso de etanol o
metanol) pueden atraer la humedad, la que
conduce a la separaci6n y formaci6n de dcidos
durante el almacenamiento. La gasolina acfdica
puede dafiar el sistema del combustible de un
motor durante el almacenamiento. Para evitar
los problemas con el motor, se debe vaciar el
sistema de combustible antes de guardado por
un perfodo de 30 d/as o rnds. Vacfe el estanque
de combustible, haga arrancar el motor y
hdgalo funcionar hasta que las Ifneas del
combustible y el carburador queden vacios. La
pr6xima temporada use combustible nuevo. Vea
las Instrucciones para el Almacenamiento para
mds informaci6n. Nunca use productos de
limpieza para el motor o para el carburador en
el estanque del combustible pues se pueden
producir dafios permanentes.
PRECAUCl6N:
Llene hasta la parte
inferior del cuello de relleno del estanque de
gasolina. No Io Ilene demasiado. Limpie el
aceite o el combustible derTamado. No
almacene, derrame o use gasolina cerca de una
llama expuesta.
Tapa del
depositode
aceite con
vadlla
indicadorade
nivel
PARA HACER ARRANCAR
MOTOR
EL
•
Para hacer arrancar un motor fr,jo__erp_ie eL
cebador cinco (5) veces ante's'_)trata"_=rr_._
Use un empuje firmemente. Este paso
normalmente no as necesario cuando se
hace arrancar un motor que ya ha estado
funcionando por unos cuantos minutos.
• Mueva la palanca de control de valocidad a la
posici6n de rdpido.
• Sujete la barra de control que exige la
presencia del operador abajo en el mango.
• Gire la Ilave para el arranque el6ctdco en el
sentido de las manillas del reloj para hacer
arrancar el motor.
IMPORTANTE:
No hraga arrancar el motor
mds de 5 segundos continuados. Espere 5 a 10
segundos entre cada vezque trate de hacedo
arrancar.
• Para hacer arrancar el motor usando la
manilla del arrancador auxiliar, siga los pasos
anteriores. Intercambie el uso de la Ilave del
arranque el6ctrico por el cord6n arrancador.
Tire la manilla arrancadora rdpidamente. No
permita que el cord6n arrancador se
devuelva abruptamente.
-• Para parar el motor, suelte la barra de control
que exige la presencia del operador.
CONSEJOS
PARA SEGAR
• Bajo ciedas condiciones, tal como c_sped
muy alto, puede ser necesario el elevar la
altura del code para reducir el esfuerzo
necesario para empujar la segadora y para
evitar sobrecargar el motor, dejando
montones de recortes de c6sped.
• Para un corte muy pesado, reduzca el ancho
del code pasando parcialmente por encima
del lugar anteriormente cortado y siegue
lentamente.
• Cuando use una segadora con descarga
trasera en c6sped hOmedo y pesado, los
montones del c6sped coi_a0 p-tJe-d_-queno
entren en el recogedor de c6sped. Reduzca
la velocidad del recorddo (velocidad de
empuje) y/o haga funcionar ia segadora
sobre el _.rea por segunda vez.
• Si queda una huella de codes en el lado
derecho de una segadora con descarga
trasera, siegue en la direcci6n en que giran
las manillas del reloj, solapando un poco para
recaudar los recortes en la pr6xima pasada.
• Los poros en los recogedores de cdsped de
tela pueden Ilenarse con mugre y polvo con
el uso y los recogedores recaudardn menos
c_sped. Para evitar 6sto, rocie el recogedor
con la manguera de agua regularmente y
dejelo secarse antes de usado.
Tapa del
rellenadorde
gasolina
24
• Mantenga la pade superior del motor,
alrededor del arrancador, despejada y sin
recortes de c6sped y paja. Esto ayudard el
flujo del aire del motor y extenderd su
duraci6n.
CONSEJOS
PARA SEGAR Y
ACOLCHAR
IMPORTANTE: Pare obtener el mejor
rendimiento mantenga la caja de la segadora
sin acumulac6n de cdsped y basura. Vea
"LIMPIEZA" en la secci6n de Mantenimento de
este manual.
•
La cuchilla acolchadom especial va a volver
a cortar los recortes de cdsped muchas
veces, y los reduce en tama_o, de modo que
si se caen en el c6sped se van a dispesar
entre 6ste y no se van a notan Tambi6n, el
c.,6spedacolchado se vaa deshacer
rdpidamente entregando substancias
nutritivas para el c.,6sped.Siempre acolche
con la velocidad del motor (cuchilla) rods aria,
pues asf se obtendrd la mejor acci6n de
recorte de las cuchillas.
• Evite cortar el cdsped cuando estd mojado.
El cdsped mojado tiende a formar montones
e interfiere con la acci6n de acolchado. La
mejor hora para segar el c6sped es tempmno
en la tarde. A esa horn dste se ha secado y
el drea recidn codada no quedard expuesta
al sol directo.
•
Para obtener los mejores resultados, ajuste
ia altura de! corte de la segadora de modo
que dsta corte solamente el tercio supedor de
las hojas de cdsped. En e/_.
_e
el
cdsped haya crecido den_ast_ado,_'e_e ser
necesado el elevar la altura del corte para
reducir el esfuerzo necesario para empujar la
segadora y para ev'_ar sobrecargar el motor,
dejando montones de recortes de c_sped.
Para un acolchamiento muy pesado, reduzca
el ancho del corte pasando por encima del
lugar anteriormente cortado y siegue
lentamente.
• Ciertos tipos de cdsped y sus condiciones
pueden exigir que un drea tenga que ser
acolchada por segunda vez para esconder
completamente'los recortes. Cuando se haga
el segundo code, siegue atravesado o en
forma perpendicular a la pasada del pdmer --.
code.
• Cambie su patr6n de corte de semana a
semana. Siegue de norte a sur una semana y
luego cambie de este a oeste la pr6xima
semana. Esto evitard que el c_sped se
enrede y cambie de direcci6n.
_.
25
I
t
t
,
_sar
sihaysujet_o_ sue_os
VI
UmPiar/'mspeccionarel r.e_)gedorde
SE c_ped
equipad°)Umpiar
(sl
la segadora
vlene
V*
_
GA misiOn(segadoras
U.rr_iar debajo de la
cubierta de la transconpoderpropulsor)
IV#
poder
propulsoq
oD sadas
Revisar(segadoras
las correascon
y las
poleas
impul-,
_
Limpiar la bateda/recargar
(segadorasconarranqueeldctdco)
M!
Revisar el ntvel del aceite
Carnbiar el aceite del motor
3
¥1
Ik/4
tl_
. I/'1,2
! Umpiar
el filtro
aim
Inspeccionar
el de
silenciador
R
-.
1#1
Revisaro/afilarlcambiarla cuchilla
J_2
ll/
Umpiar o/cambiar la buji'a
Cambiar el cartucho de papel del rdtro
!1/ =
de ldre
-
1 - Camblar rn_ a menudo cuandose opere bajocarga pesada o en ambientesconaltastemperaturas.
2 - Dar servtciom_Lsa menudocuandose opere en condlcionessuciaso polvorosas.
3 - Cambtelas cuddllasmils a rnenudocuandosiegue en ten'enoarenoso.
4 - Cargarpot 48 hocasal finde la temporada.
TABLA DE LUBRICACION
RECOMENDACIONES
GENERALES
(_) Aceite del
motor
La garantia de esta segadora no cubre los arb'culos
que han estado sujetos al abuso o a ia negligencia
del operador. Para recibirtodo el valor de la
garantJa,el operador 8ene que mantener la
segadora seg_n las instruccionesdescritas en este
manual.
i'_ Ajustador de
,.7 la rueda
Hay algunos ajustes que se tJenenque hacer en
forma periddica para poder mantener su unidad
adecuadamente.
Todos los ajustes en la secck_ de Servicio y
Ajustes de este manual tienen que ser revisados
por Io menos un vez por cada temporada.
• Una vez al a_o,cambie la bujia, Hmpie o camloie
el elernento del filtrode aim y revise si la cuchgla
estd desgastada. Una bujfa nueva y un elemento
del filtrode aim limpio/nuevoaseguran la mezda
de aire-cornbustJbleadecuada y ayudan a que
su motor fundone mejor y que dure rnds.
• Siga el prograrnade mantenimiento en este
manual.
ANTES DE CADA USO
• Revise el nivel del aceite del motor.
• Revise si hay sujetadores sueltos.
LUBRICAClON
(_) Support de
la ressort
(_
(_
Clavija de la (_ Bisagrade la
transmisi6n
puertatrasera
Rocei el lubricante
(_) Refierase a la secci6n de Mantenimento
"MOTOR"
en
IMPORTANTE: No aceite o engrase los
rodamientosde la rueda de plaslico. Los lubricantes
viscososatraeran poive y mugre, Io que acortara la
duracidn de Io rodamientos autolubdcantes. Si cree
que tJenenque lubdcarse, use solamente un
lubdcantetipo graffio,de poke seco, en forma
moderada.
Mantenga la un'K_d bien lubricada (vea la "I'ABLA
DE LUBRICACION").
26
ESPECIFICACIONES
NUMERO
DE MODELO
NUMERO
DE SERIE
FECHA
DEL PRODUCTO
917.377631
DE COMPRA
CABALLOS
DE FUERZA:
6.75
DESPLAZAMIENTO:
12.56 CU. IN.
CAPACIDAD
Y TIPO
DE GASOLINA:
1.25 Cuartos
REGULAR
SIN PLOMO
TIPO DE ACEITE:
(API-SF/SG/SH)
SAE 30 (sobre 32°F)
SAE 5W-30 (debajo 32°F)
CAPACIDAD
20 oz. de capacidad
DE ACEITE:
BUJfA (ABERTURA:
TOLERANCIA
SENCENDIDO
DE VALVULA:
RN4C
ADMISI6N:
.004 - .008
DESCARGA:
004 - 008
DE ESTADO
SOLIDO ABERTURA
TORSION
CHAMPION
.030")
_
DE AIRE:
.0125 IN.
DEL PERNO
DE LA CUCHILLA:
35-40 FT LBS
El num6ro del nodelo y el de serie se encuentran en la calcomania adjunta a la parte
trasera de la caja de la segadora Debe registrar tanto el num6ro de serie come la
fecha de compra y mantengalos en un lugar seguro para refencia en el futuro
SEGADORA
Siempre observe las reglas de seguridad cuando
haga el mantenimiento.
LLANTAS
• Mantenga las Ilantas sin gasolina, aceite o
substancias quimicas para controlde insectos
que pueden daf_arla goma.
• Evite los tocones, las piedras, las gdetas
profundas, los objetos atilados y otros peligros
que pueden dar_ a las Ilantas.
• Remueva el pemo de la cuchUlagirdndoloen el
sentido contrarloen que giran las manillas del
reloj.
• Remueva la cuchillay los artfculosde ferreterfa
adjuntadores (el pemo, la arandela de seguridad
y la arandela endurecida).
AVISO: Remueva el adaptador de la cuchillay
revise el cubo interiorde la ranura del adaptador de
la cuchilla.
La ranura_ene gue e_sXar,
en buenas
condicionespara que funcione en forma adecuada.
Cambie el adaptador si est_ da_ado.
CUIDADO DE LA CUCHILLA
Para obtener los mejores resultados, la cuchilla de
la segadora tJeneque mantenerse afilada. Cambie
la cuchilladoblada o darhada.
PARA REMOVER
•
LA CUCHILLA
Desconecte el alambre de la bujia y p6ngalo en
donde no pueda entrar en contacto con _sta
• Haga descansar la segadora en su lado
AsegOrese que el filko de aire y que el
carburador queden mirando hacia arriba.
• Use un bloque de madera entre la cuchilla y la
caja de la segadora para evitar que la cuchilla
gire cuando se le quite el pemo.
• Proteja sus manos con guantes y/o envuelva la
cuchillacon una tela gruesa.
PARA CAMBIAR LA CUCHILLA
• Ponga el adaptador de la cuchUlaen el dgueBai
del motor. AsegQmse que la ranura del
adaptador y que el chavetero del cigue£-Ialest6n
alineados.
• Ponga la cuchillaen el adaptador de 6sta
alineando los dos (2) agujeros en la cuchillacon
las salientes elevadas en el adaptador.
• Aseg_rese de que el borde de salidade la
cuchilla (opuesto al borde alilado) est_ hada
arriba hacia el motor.
• Instale el pemo de la cuchillacon la arandela de
seguridad y la arandela endurecida en el
adaptador de la cuchillay el cigue£-_al.
27
• Use un bloque de madem entre la cuchila y la
caja de la segadora y apdete el perno de la
cuchiila gir'andoloen el sentido en que giran las
Es necesado lirnpiarles ruedas de impulse; revise
ambas medas traseras.
• Remueva los tapacubos y las tuer_cap_,
de
_
segu_.
manaes
d_ rek_.
• La kxsibn para apretar recomendada es de 35 40 pies libras.
IMPORTANTE: EL PERNO DE LA CUCHILLA ES
CLASE 8 TRATADO A CALOR.
AViSO: No _
el afilar la cuchillapero si Io hace, aseg_rese de que quede
balancead_
PARAAFILAR LA CUCHILLA
Se tiene que tener cuidado de mantenerla
balanceada. Una cuchillaque no estd balanceada
va a producireventualmente da_o en la segadora o
en el motor.
• La cuchillapuede afilarse cori I_na Umao en una
_3da_
No irate de afila_a ,_ms
se e_x_a
en la segade_
• Para reviser el balance de la cuchnla,dave un
davo en una riga o en la pared. Deje alrededor
de una pulgada de un davo recto expuesto.
Ponga el agujero central de la cuchillasobre la
cabeza del davo. Si la cuchillaest_ balanceada
debe permanecer en la podci6n horizontal.Si
cualq_era de los e_de
la cuchillase
• Remueva las medas de los ejes de los
aiustado_
de_sruedas.
• Remueva la basura y los recodes de crisped de
der_ro
de_ cu_erta
conVa
elpolo,p_ y/ode
los dientes de los engranajes de les medas de
_puL_..
• [] _
d'_erenciailJeneque instalarse con el
engranaje izquierdo en el lade izquierdo y con el
engranaje derecho en el lado derecho desde el
punto de vista dei operador.
• [] pifi(Snd_erendal viene estampado con una =L."
0eft_=q_erda))
oconuna"R"(_ght(derecha))
en la parte interior.Si se instala inconectamente
el sistemade irnpulsi6nno va a fundonar, _• Ponga las ruedas de vuelta en los ejesdel
aiustador.
• Vuelva a poner las tuercas de seguridad y los
tapacubos.
AVISO: Los pifionesy los trincluetesde impulsi6n
deben impiame y lubdcarse con grasa,
aproxJmadamentecada 25 horas, o una vez al afio.
Arandela
Tt
rr,Jevehadaabajo,a_leel extremo
pesado
seguridad
hesta que _ta quede balancead_
Chaveterodel
Adaptadorde la
cuchilla
_
ciguenal
Ranura
Clavija de la
transmision
Tapacubo
Cuchilla
Perno de la
cuchilla
Cubierta
contra
el polvo
Pifion
MOTOR
LUBRICACION
Arandelade
seguddad
Borde
Arandela
de
endurecida salida
RECOGEDOR
Adaptador
de la
cuchilla
DE ClaSPED
• B recogedor de cdsped puede ser rodado con el
agua de la manguera pero liene que estar seco
cuando se vaya a usar.
• Revise su recogedor de c_sped a menudo para
verificar si est_ da_do o deteriorado. Se va a
desgastar con el uso normal. Si se necesita
cambiar el recogedor, c_'nbielo solamente por
uno que sea aprobado por el fabricante. D_ el
nt_ero del modelo de la segadora cuando Io
ordene.
RUEDAS DE IMPULSION
Use solamente aceite de detergente de alia calidad
con la desifK:ad____SF, SG.o___S_H
de
servicio API. Selecdone la car_lad de viscosided
SAE segt_nsu tempemtura de operack_ esperada.
SAE VISCOSITY GRADES
<
I1=
"c._
I,
-20"
O"
_
CAUOADES
30"
-,_
_1_
40"
_
OE VISCOSIOAD
_
'_"
80"
_"
100"
="
'_
OE SAE RECOMENDADAS
AVISO: A pesar de que los aceites de
multiviscosidad(5W30, 10W30, etc.) mejoran el
arranque en dima No, estos aceites de
multiviscosidadvan ha aumentar el consumo de
aceite cuando se usan en temperatures sobre 32°
F. Revise el nivel del aceite del motor mds a
menudo, para evitar un pos_blecla_) en el motor,
debido a que no tJenesuficiente aceite.
Revise las ruedas de impulsk_ traseras cada vez
antes de segar, para asegurarse de que se mueven
libremente. Si las ruedas no giran libremente quiere
decir que hay basura, recodes de c_sped, etc.
dentro del drea de las ruedas de impulsid_y de ia
cubierta contra el polvo y tienen que limpiarse para
liberarles
28
Cant_ elaceltodespu_de25 horasde
oper'_i_ o pot Io menos una mz al afio _ la
_
se uti_.a rnenos 251"Kx'asel afiO.
Revise el nivel del acelto del cdrter antes de
anancar el motor y despu_ de cada dnco (5) horas
de uso cordJnuado./_oriete
eltap_ndelacelteen
forma segura cada vez que revise el niveldel
aceite.
Collar
Gireen
sentidol
Alas manillas
I_ra
apretarla
Remover
Ranura
PARA CAMBIAR ELACEITE DEL MOTOR
Gire en el
sentido
contradolas
minillasdel
Filtrode aire _
AVISO: Antes de indinar lasegadorapara drenar
el aceite, drene el lanque de combush'blehadendo
correr el motor hasta que el tanque esld vacio.
• Desconocte el alambm de la bujia y p6ngalo de
modo que no pueda entrar en cordactocon dsta.
• Remueva la tapa del depdsito del aceite; d_ela a
un lado en una superficie limpia.
• Inclinela codadora de cdsped pot este costado
tal como se mueslra y purgue el acelte en un
recipienteidSneo. Mueva la segadora de at_ts
para adelante para remover todo el aceite que se
haya quedado atrapado denim del motor.
• Umpie todo el acelte denamade en la segadora
y en el lade del motor.
• Uene el rnotorcon aceite. U6nelo solamente
hasta la Ifnea de Ileno (FULL) en la vadlla
indicadora de nivel. NO LO LLENE
DEMASlADO.
• Vuelva a porter la tapa en el dep6sito del aceite.
• Vuelva a conectar el alambre de la bujfa a dsta.
Abra zader
Oreja"
Cublertadel
filtrode aire
relojpara
apretai
SILENCIADOR
Inspecdone y cambie_ silenciadorsi est&corrofdo
pues Bodudr un peligrD_
de incendio y/o da_.
BUJIA
Cambie su bujfa cada a_o para hacer que su motor
arranque mds fdcilmente y funcione mejor. Ajustela
abertura de la bujfa en 0.030 pulgada.
UMPIEZA
IMPORTANTE: Para obtenerel mejor remdimien_to,
mantenga, lal caja de la segadora sin _
de cesped y basura. Umpie la parle de aba}o de su
segadora
despues
decadauso.
PRECAUCI(_N: Desconecte el aiambre de la bujfa
y I:x_ngaloen donde no pueda entrar en contacto
con dsta.
• Haga descansar la segadora en su lado.
AsegQrese que el filtrode aire y que el
carburador queden mirando hacia _
Umpie
la parte inferiorde su segadora _
para
remover la acumulaci6n de c_sped y basura.
• Umpie el motor a menudo para evitar que se
acumule la basura. Un motor tapado funciona
mds caliente y se acorta su duraciSn.
• Mantenga las superficiespulidasy las ruedas sin
gasolina, aceite, etc.
• No recomendamos el usode unamanguera de
jardfn para limpiarla segadora a rnenos que el
sistema eldctdco,el ._lenciador,el firm de aire y
el carburador estdn tapados para evitar que les
entre el agua. [] agua en el motor puede acortar
la duracibn de dste.
Envase
RLTRO DE AIRE
Su motor no funcionard en forma adecuada y
puede sufrir dar3ossi se usa un flltm de aire sucio.
Cambie el filtro de aim cada a_o, y rnds a menudo
si siega en condicionesmuy Ix_orosas o sucias.
No lave el flltm de aire.
PARA CAMBIAR EL FILTRO DE AIRE
•
Remueva el filtro de aire girdndolo en el
sentido en que gfrela de las manillas del reloj
para apretada, hasta el tope, y retfrelo del
collar.
• Remueva el filtro de la parte interior de la
cubierta.
UMPIE DEBAJO DE LA CUBIERTA DE
LA
IMPULSION
• Limpie la parte interior de la cubierta y el
collar para remover toda acumulaci6n de
mugre.
• Inserte el filtro nuevo en la cubierta.
Umpie debajo de la cubierta de la impulsi6n por Io
menos dos veces cada temporada, aaspe debajo
de la cubierta con un cuchglo para masilla o con una
herramienta parecida, para remover toda
acumulacibn de c_sped o basura en la parte inferior
de la cubierta de la impulsi6n.
•
Ponga la cubierta del filtro de aire dentro del
collar alineando la oreja con la ranura.
• Empuje la cubierta hacia adentro y girela en
el sentido contrario de las manillas del reloj
para apretarla.
29
PRECAUCl6N:
ANTES DE DAR CUALQUIER
SERVICIO O DE HACER AJUSTES:
alta
• Suelte la barra de control y pare el motor.
• Asegdrese que la cuchilla y que todas las
partes movibles se hayan detenido
completamente.
Desconecte el alambre de la buj|a y p6ngalo
en donde no pueda entrar en contacto con
6sta.
pinza del.
mango
baja
Soportede
ajuste
Mango de 3
posiciones
PARA AJUSTAR EL MANGO
MOTOR
B rnango de su segadora cuenta con tres (3)
posiciones de altura- ajt_steloa la alturaque le
acomode.
• Presione las exlmmidades inferioresdel mando
VELOClDAD DEL MOTOR
La velocidad del motor'ha side ajustada en la
fdbrica.No Irate de aumentar la velocidad de! motor
pues se pueden produ_irlesiones personals. Si
cree que el motor estd fundonando demasiado
r'apidoo demasiado lento, Ileve su segadora a un
centrofdepartamento de servicio autodzado para
repararla o ajustarla.
infedoruna en conlra una de_a ot]a hasta que la
pinza del mango pueda ser inserlada en uno de
los tres agujeros del controlde la altura.
DESVIADOR
TRASERO
CARBURADOR
Se proporciona un desviador trasero, adjunto
entre las ruedas traseras de su segadora, para
reducir a un minimo ia posibilidad que objetos
sean lanzados hacia afuera de la parte trasera
de la segadora, en la posici6n en donde se
encuentra el operador. Si se daSa el desviador
debe cambiarse.
Su carburadortiene un chorroprincipal fijono
ajustable para controlarla mezda. Si su motor noestd funcionando en forn_ adecuada debido a
problemas que se sospecha vienen del carbumdor,
Ileve su segadora a un centm/deparlamento de
servicioautodzado para reparada y/o ajustarla.
MANGO
Inmediatamente prepare su segadora para el
almacenamiento al final de cada temporada o si la
unidad no se va a usar por 30 dfas o n'_s.
• Puede doblar el mango de su segadora para el
aimacenamiento.
• Suelte las dos (2) manillas del mango en cada
lade del mango superior y permita que el mango
se doble hacia detr-_s.
• Apriete las ext_emidades del mango inferior una
en contra de la otra hesta que la pinza en el
mando despardle los soportes y pivote el
conjunto completo del rnar_.(_O
I_'_-&cTe]-ante
para que se pueda reposar encima de la
segadora.
• Cuando prepare su mango a parUrde la posicibn
de almacenamiento, el mango inferior necesilar&
cerrado manualmente para la posiciSnde sega.
IMPORTANTE: Cuando doble el mango para el
almacenamiento o el transporte, asegurese que Io
doble segun se muestra o puede danar los cables
de control.
SEGADORA
Cuando se va a guardar la segadora por derto
pedodo de tiempo, Ifmpielacuidadosamente,
remueva toda la mugre, la grasa, las hojas, etc.
Gud_lela en un drea limpia y seca.
• Umpie toda la segadora (Vea =LIMPIEZA" en la
secci_ de Mantenimento de este manual).
• Lubdquela seg0n se muestm en la secci0n de
Mantenimento de este manual.
• Asegt_n_sede que todas las tuercas y cla_as y
todos los pemos y tomillosest_ apretados en
foma segura. Inspeccione la_ partes que se
mueven para verificar si estdn da_adas,
quebradas o desgastadas Cdmbielas si es
necesario.
• Retoque todas las superficiesque estdn
oxidadas o con la pintura picada; use una Ii_
antes de pintar.
30
ACEITE DEL MOTOR.
Barm de controlque exige
la presenciadel operador
•Drene el aceite (con el motor caliente) y
con acelte de motorlimpio: (Vea'MOTOR' enla
secci6n de Mantenimento de es_'ll"e_ullw_.
Mango superior
-
ClUNDRO
Levantar
Levantar
Mango
infedor
Posii6npara segar
J
• Remueva la buj[a.
• Vacfe una onza (29 ml) de aceite a trav6s del
agujero de la bujfa en el cilindro.
• Tire la n'Bnillade ananque ientarnente unas
cuantas veces para disldbuirel acelte.
• Vuelva a mortar la nueva bujfa.
BATERIA
Sepre la baterfa del conector del motor y cartue
la baterfa durante 40 horas,
OTROS
MOTOR
SISTEMA DE COMBUSTIBLE
IMPORTANTE: Es importante evitar clue se formen
depositos de goma en partes fundamentales del
sistema de combusb'bletales como el carburador, el
tiltrodel combustible, la manguera del combustible
o en el estanque durante el elmacenarniento. La
expefiencia tambien indica que los €_les
mezdados
conalcohol(conoddo
comegasohoio
que tiene etanol o metanol) pueden atraer
humedad, Io que conduce a la separaci6n y a Is
formaci6n de acidos durante el almacenamiento. La
gesolinaadd'_a puede dar3arel sistema de
conbuslible de un motor durante el periodo de
almacenamiento.
• Drene el estanque de combustible.
• Haga arrancar el motor y ddjelo funcionar hesta
que las Ifneas del combustible y el carburador
est6n vacfos.
• Nunca use los productos para limpieza del
carburador o del motor en el estanque de
combustible pues se pueden producirdar_s
permanentes.
• Use combustible nuevo la pr6xima temporada.
AVlSO: [] estabir_.adorde combuslible es una
altemativa aceptable pare reducira un mfnimo la
formacibn de delx_sitos de goma en el combustible
durante el perfodo de alrnacenamiento. Agregue
estabiHzadora la gasolina en el estanque de
combustible o en el envase para el
almacenamiento. Siempre siga la proporci6n de
mezda que se encuentra en el envase del
estabilizador.Haga funcionar el motor por Io menos
10 minutos despuds de agregar el estabilizador,
para permitirque este Ilegue al carburador. No
drene la gasolina del estanque de gasolina y el
carburador si se estd usando estabilizador de
combustible.
• No guarde la gasolina de una temporada a la
otra.
-:-
•
-
• Camble el envase de la gasolina si se empieza a
oxidar. La oxidack_ y/ola mugre en su gasolina
producir&nproblemas.
• Si es posible, guarde su unidad en un recinto
cenado y c0brala para protegeda contrael polvo
y la mugre.
• Cubra su unidad con un form protectoradecuado
que no mtenga la humedad. Nouse pidslico.B
pi_L_co no puede respirar, Io que permite la
formackSnde condensaci6n, Io que producirdla
oxidaci6n de su unidad.
IMPORTANTE: Nunca cubra la segador a mientras
el motor y las areas de escape todavia estan
calientes.
PRECAUCl6N: Nunca almacene la segadora con
gasolina en el estanque dentro de un edificioen
donde los gases pueden aicanzar una llama
expuesta o una chisp_LPermita que se enfrfe el
motor antes de almacenada en algt_nrecinto
cerrado.
31
IDENTIFICACION
DE PROBLEMAS
PROBLEMA
CAUSA
CORRECCl6N
No arranca
•
FiRm de aire sucio.
•
Limpie/cambie el filtr_db abe_=. - "
•
Sin combustible.
•
Uene el estanque de combustible.
•
Combustible rancio.
•
Drene el estanque y vuelva a
Ilenado con combustible limpio y
nuevo.
•
Agua en el combustible.
•
Drene el estanque de combustible
y el carburador y vuelva a Ilenar el
estanque con gasolina nueva.
•
Alambre de la bujla
desconectado.
•
Conecte el alambre a la bujfa.
•
Bujfa mala.
•
Cambie la bujfa.
Cuchilla suelta o adaptador
de la cuchilla quebrado.
Ba'fra de control en la
posici6n suelta.
Barra de control defectuosa.
•
•
Apriete et'pemo de la cuchilla o
cambie el adaptador de la cuchilla.
Presione la barra de control hacia
•
el mango.
Cambie la barra de control.
•
•
•
•
Baterfa ddbi
•
Desconecte el conector de
la baterfa.
•
•
Parte trasera de la caja/
cuchilla de la segadora
arrastr&ndose en el cdsped
pesado.
Estd cortando mucho
•
•
cdsped.
Filtm de aim sucio.
Ajuste a la posici6n de "Code mds
alto."
•
Umpie/cambie
•
Umpie la parte inferior de la caja
de la segadora.
•
Revise el nivel del aceite.
i
Falta de fuerza
•
•
•
Acumulaci6n de c6sped,
hojas y basura debajo de la
segadora.
Demasiado aceite en el
motor.
• Cague la bateda
• Conecte la baterfa al motor.
Ajuste a la posici6n de "Code mSs
alto ."
Velocidad de recorrido
el filtro de aire.
Corte a una velocidad de recorrido
mds lenta.
demasiado r&pida.
!
Mal corte-disparejo
Cuchilla desgastada,
doblada o suelta.
•
Cambie la cuchilla. Apriete el
pemo de la cucri_a.- ......
Altura de las ruedas
•
Ajuste todas las ruedas a la mism_
altura.
Acumulaci6n de cdsped,
hojas o basura debajo de la
segadora.
•
Limpie la parte inferior de la caja
de la segadora.
Cuchilla desgastada,
doblada o suelta.
•
Cambie la cuchilla. Apriete el
pemo de la cuchilla.
Ciguefial del motor doblado.
•
P6ngase en contacto con su
centro de servicio autorizado mds
cercano.
dispareja.
Vibraci6n
excesiva
32
IDENTIFICACION
DE PROBLEMAS
PROBLEMA
Cord6n arrancador
diffcil de tirar
CORRECCl0N
CAUSA
•
El freno del volante del
•
motor estd aplicado cuando
se suelta la barra de
control.
Presione ia barmde_c_n__
el mango superior antes de tirar el
cordbn arrancador.
P6ngase en contacto con su centro
de servicio autorizado mbs
cercano.
Ciguefial del motor
doblado.
Cambie el adaptador de la cuchilla.
•
•
Adaptador de la cuchilla
quebrado.
La cuchilla se arrastra en el
Mueva la segadora a un lugar en
donde el c6sped ha sido cortado o
a una superflcie firme para hacer
arrancar el motor.
c_sped.
.
Recogedorde
c6spedno sellena
(sivieneequipado
Dificil de empujar
•
Altura de corte demasiado
•
Eleve la aitura de code.
baja.
•
Levantamiento de la
cuchilla desgastado.
•
Cambie las cuchillas.
•
Recogedor sin ventilacibn
de aim.
•
Limpie el recogedor de cdsped.
•
El c6sped est_ demasiado
alto o la aitura de la rueda
demasiado baja.
•
Eleve la altura de code.
•
Parte trasera de la caja/
cuchilla de la segadora
arrastrdndose en el c6sped.
•
Eleve la pade trasem de la caja de
la segadom (1) un lugar mds alto.
•
Vacie el recogedor de cdsped.
Recogedor de c(_sped
demasiado Ileno.
Posici6n de la altura del
mango no adecuada para
usted.
33
Ajuste la altura del mango de modo
que le acomode.
34
•
N
0 "_.
0
mo_O
•_
_
.,,.., 0
®
_,_
(.5,,0_ 0
0
_c
S
t"-
0
ffl
O3O3O3
>=F-_ F. F.
I,_0
_.Z
0
X
_0_0_
_ooo_____o
o
_0
35
0
X
_
XX
0
36
0
0
0
O_
X
_
_
X_
X
0
0
X
_d
_Z
_
O0
0
_d
_Z
___0___0_
37
_
0
_0
_0
ROTARY LAWN MOWER - - MODEL NO. 917.377631 .
BATTERY
3
I
I
I
I
I
KEY
NO.
PART
NO.
1
2
3
161334
750909
17411312
4
5
86353
111549X
DESCRIPTION
Battery Box
Battery
Hex Washer Head Screw
13x.750
ConnectorMountingClip
BatteryCharger
38
39
CRAFTSMAN
4-CYCLE
MODEL NUMBER 143.986718
ENGINE
9O0
_370A
3OO
292
157
29O
153_
224
_223
207
185
238
250
4O
_RAFTSMAN
KEY PART
NO. NO.
1
2
6
7
12
12A
36835A
26727
33734
36557
32447
36558
12B
14
15
16
17
18
19
2O
30
40
36694
28277
30589
34839A
31335
651018
36281
32600
35801
35544A
35545A
35546
35541
35542
41
35543
42
43
45
46
48
50
52
69
70
35547A
35548A
35549
20381
32875A
32610A
35616
37011
29914
35261
36995
72 30572
73 28833
75 27897
80 30574A
81 30590A
82 30591
83 30588A
86 650488
89 611004
90 611044
92 650815
93 650816
100 34443B
101 610118
103 651007
110 37047
110A 36953
110B 36954
119 36738
120 36721
125 36471
36472
126
29314B
29315C
130 650912
130A650999
135 34645
150 31672
151 31673
153 36649
154 650913
4-CYCLE
ENGINE
DESCRIPTION
Cylinder (Incl. 2 & 20)
Dowel Pin
Breather Element
Breather Ass'y. (Incl. 6 & 12A)
Breather Tube
Breather Cover & Tube
(Incl.12B)
Breather Tube Elbow
Washer
Governor Rod (Incl. 14)
Governor Lever
Governor Lever Clamp
Screw, Torx T-15, 8-32 x 19/64"
Extension Spdng
Oil Seal
Crankshaft
Piston, Pin &'Ring Set (Std.)
Piston, Pin & Ring Set (.010"OS)
Piston, Pin & Ring Set (.020"OS)
Piston & Pin Ass'y. (Std.)
Piston & Pin Ass'y. (.010" OS)
(Incl. 43)
Piston & Pin Ass'y. (.020" OS)
(Incl. 43)
Ring Set (Std.)
Ring Set (.010" OS)
Ring Set (.020" OS)
Piston Pin Retaining Ring
Connecting Rod Ass'y. (Incl. 46)
Connecting Rod Bolt
Valve Lifter
Camshaft (MCR)
Oil Pump Ass'y.
Mounting Flange Gasket
Mounting Flange
(Incl. 72 thru 83)
Oil Drain Plug (Incl. 73)
Drain Plug Gasket
Oil Seal
Governor Shaft
Washer
Governor Gear Ass'y. (Incl. 81)
Governor Spool
Screw, 1/4-20 x 1-1/4"
Flywheel Key
Flywheel
Belleville Washer
Flywheel Nut
Solid State Ignition
Spark Plug Cover
Screw, Ton(T-15,10-24 x 15/16"
Ground Wire
Ground Wire
D.C. Starter Wire
Cylinder Head Gasket
Cylinder Head
Exhaust Valve (Std.) (Incl. 151)
Exhaust Valve (1/32" OS)
(Incl. 151)
Intake Valve (Std.) (Incl. 151)
Intake Valve (1/32" OS)
(Incl. 151)
Screw, 5/16-18 x 1-1/2"
Screw, 5/16-18 x 2-41/64"
Resistor Spark Plug (RN4C)
Valve Spdng
Valve Spring Cap
Push Rod Guide
Rocker Arm Stud
MODEL NUMBER 143.986718
KEY PART
NO. NO.
155 35624A
157 650914
158 36629
159 35626
160 35627
161 30063
178 29752
182 30088A
184 26756
185 36579
186 32653
187 36580
189 650831
191 36559
195 610973
196 35035
207 34336
216 33086
223 651044
223A 651043
224 36581
238 650932
239 34338
241 36919
245 36905
250 36920
260 37180
261 30063
262 650831
263A 37184
275 36950
276 36949
277 651039
285 35000A
287 650926
290 29774
292 26460
298 28763
300 36916
301 36246
305 35647
306 36996
307 35499
309 650562
310 35648
313 34080
314 650767
315 36952
322 35013
322A 610885
325 35249
325A 37152
325B 29443
341A 36578
347 651038
370A 36261
370C 37199
380 640160
390 590739
395 35709
400 36806B
900
900
from 71-999
DESCRIPTIOI_':
_
Rocker Arm
Lock Nut
Push Rod
Rocker Arm Cover Gasket
Rocker Arm Housing
Screw, Torx T-30, 1/4-20 x 1/2"
Nut & Lock Washer, 114-28
Screw, 1/4-28 x 1"
Carburetor Gasket
Intake Pipe
Governor Link
Spacer
Screw, 1/4-20 x 1/2"
S.E, Brake Ass'y. (Incl. 195)
Terminal
Power Restart Switch
....
Thlottie Unk
R.P.M. Adjusting Lever
Screw, 1/4-20 x 2-25/32"
Screw, 1/4-20 x 1-31/64"
Intake Pipe Gasket
Screw, 10-32 x 49/64"
Air Cleaner Gasket
Air Cleaner Collar
Air Cleaner Filter
Air Cleaner Cover
Blower Housing
Screw, Torx T-30, 1/4-20 x 1/2"
Screw, 1/4-20 x 1/2"
Starter Grill
Muffler (Incl. 276 & 277)
Locking Plate
Screw, 1/4-20 x 2-47/64"
Starter Cup
Screw, 8-32 x 21/64"
Fuel Line
Fuel Une Clamp
Screw, 10-32 x 35/64"
Fuel Tank (Incl. 292 & 301)
Fuel Cap
Oil Fill Tube
_O'-Ring
"O"-Ring
Screw, 10-32 x 1/2"
Dipstick
Spacer ....
Screw, 8-32 x 27/64"
Alternator Coil
Connector Body
Connector Body
Spring Clip
Spring Clip
Spring Clip
Blower Housing Support Bracket
Screw, 10-32 x 27132"
Lubrication Decal
Pdmer Decal
Carburetor (IncL 184)
Rewind Starter
Electric Starter Motor (12 Volt)
Gasket Set (Incl. Items Marked *)
Replacement Engine NONE
Replacement S/B 750834, order
RPM High 3000 to 3300
NOTE: This engine could have been_uilt
with 590702 starter.
41
CRAFTSMAN
4-CYCLE
ENGINE
MODEL NUMBER 143.986718
KEY
NO.
PART
NO.
64O16O
631615
2
4
5
6
7
16
17
631767
631184
631163
640O70
650506
631807
651025
18
20
20A
630766
640016
640053
25
27
28
29
30
631867
631024
632019
631028
631021
31
35
631022
36045A
36
36A
37
640080
632766
632547
40
44
47
640074
27110
630748
48
631027
?.-,
KEY
NO.
PART
NO.
1
2
3
4A
5B
6
7
8
10A
11C
35709
34955
34950
34954
34949A
34953
33450
34944
34945
590500
35714
12
13
14
15
16
17
18
34947
34946
34951
34952
34948
34953
590608
11C
6
\
Q
_15
17
42
OESCRtP_ON=
Carburetor(IncL184 of
Engine PartsList)
ThrottleShaft & Lever
Assembly
Throttle Return Spring
Dust Seal Washer
Dust Seal (ThmtUe)
Throttle Shutter
ShutterScrew
Fuel Fitting
Throttle Crack Screw/idle
Speed Screw
TensionSpring
Idle RestrictorScrew
Idle Restrictor Screw
Cap
Roat Bowl
Roat Shaft
Roat
Roat Bowl "O"Ring
Inlet Needle, Seat, & Clip
(Incl. 31)
SpdngClip
PrimerBulb/Retainer
Ring
Main Nozzle Tube
CarburetorTube
"O" Ring,Main Nozzle
Tube
High Speed BowlNut
BowlNut Washer
Welch Plug, Idle Mixture
Well
Welch Plug, Atmospheric
Vent
DESCRIPTION
ElectricStarter (12 Volt)
Retainer Ring
SpringRetainer
--spring.........
Gear
Drive End Cap Ass'y.
Lock Nut
Armature
HousingAss'y.
ThrustWasher
CommutatorEnd Cap
Ass'y.(Incl. brushes)
Bolt, 10-32 x 3-3/16"
PinionDriver
Cup Washer
Retainer Ring
Washer
DriveNut
Washer
CRAFTSMAN
4-CYCLE
.
ENGINE
MODEL NUMBER 143.986718
.
KEY
NO.
PART
NO.
DESCRIPTION
11
590703
12
590535
13
590701
RecoilStarter
SpringPin (Incl. 4)
Washer
Retainer
Washer
Brake Spring
Starter Dog
Dog Spring
Pulley& RewindSpring
Ass'y.
Starter HousingAss'y.
(40 degreegrommet)
StarterRope (98" X 9/
64"dia.)
StarterHandle
PART
NO.
DESCRIPTION
1
2
3
4
5
6
7
8
590702
590599A
590600
590696
590601
590697
590698
590699
590700
V_I4
KEY
NO.
3
6
7
8
/
590739
590740
590616
590617
590618,_
11
590638
12
590535
13
14
590701
590741
13
I1
ill m_
43
Rewind Starter
Retainer
Starter Dog
DogSpring
Pulley& RewindSpring
Ass'y
Starter HousingAss'y
(40de_ grommet)
StarterRope (Length98"
x 9/64" dia.)
StarterHandle
LockingTab
For the repair or replacementparts you need
delivered directly to your home
Call 7 am - 7 pm, 7 days a week
1-800-366-PART
(1-800-366-7278)
Para ordenar piezas con entrega a
domicilio - 1-800-659-7084
For in-house major brand repair service
Call 24 hours a day, 7 days a week
1-800-4-REPAIR
(1-800-473-7274)
Para pedir servicio de reparaci6n
domicilio - 1-800-676-5811
a
For the location of a Sears Parts and
Repair Center in your area
Call 24 hours a day, 7 days a week
1-800-488-1222
SEARS
mlmmmm
|mmmmm
For information on purchasing a Sears
Maintenance Agreement or to inquire
about an existing Agreement
Call 9 am - 5 pm, Monday-Saturday
1-800-827-6655
When requesting service or ordering
parts, always, provide the following
information:
• Product Type
• Part Number
• Model Number
° Part Description
SEARS
Amenca's
165683
05.27i98
VB
Repair Specia.sts
Printed in U.S.A.