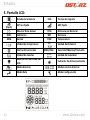
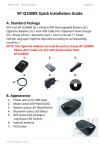
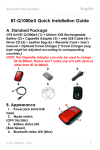
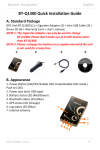
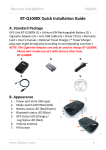
1
SR- Q2100
English
……………………………………………..………………………………………………………………………………………………………………………………….……………………………………………………………………………. SR‐Q2100 Quick Installation Guide A. Standard Package (1) GPS Unit SR‐ Q2100 (2) mini USB Cable (3) Bike Mount Kit (4) Protective cover (5) Software CD (6) Warranty Card + Quick Guide 1. 2. 3. 4. 5. 6. ……………………………………………..………………………………………………………………………………………………………………………………….……………………………………………………………………………. www.Qstarz .com
1
English
……………………………………………..………………………………………………………………………………………………………………………………….……………………………………………………………………………. B. Appearance 1. Power/Mode Select Button 2. Start/Stop/Mark/Reset Button 3. Select/Adjust Button 4. Power jack (mini USB type) 5. Internal antenna 6. LCD Screen ……………………………………………..………………………………………………………………………………………………………………………………….……………………………………………………………………………. 2
www.Qstarz.com
SR- Q2100
English
……………………………………………..………………………………………………………………………………………………………………………………….……………………………………………………………………………. C. Safety Notice z Charging time is about 4 hour typically for this unit. We suggest disconnecting the unit from the cigarette charger or AC charger after the unit has been fully charged. z When the unit is not in use or not charged, we suggest disconnecting the unit from the cigarette charger. Otherwise battery drain may result. z Note that the built in battery cannot be charged outside the temperature range 0℃ ~ 45℃. z The charging time might be extended if you use the product while charging z Do not heat or leave the unit in high temperature or direct sunshine for a long period of time as the built‐in battery capacity will deteriorate, or will become unchargeable. z Do not leave the unit staying below car’s wind shield after car parked during hot summer season. Some position below wind shield may generate high temperature over 158℉/70℃. Such temperature may melt the unit and damage the battery. ……………………………………………..………………………………………………………………………………………………………………………………….……………………………………………………………………………. www.Qstarz .com
3
English
……………………………………………..………………………………………………………………………………………………………………………………….……………………………………………………………………………. D. Hardware Function Hardware Function Power Jack Power/Mode select Button Select/Adjust Button Start/Stop/Mark/Reset Button Description Take the USB mini cable and connect it to the power jack (mini USB type) for charging with PC USB ‐Press and hold for 1 sec to power On ‐Press and hold for 3 sec to power Off. ‐After power on SR‐Q2100, press and hold for 1 sec to switch among Bike/Location Back/Route Plan mode. After power on SR‐Q2100: ‐Press and hold for 1 sec to display functions/configure parameters. ‐Press and hold for 3 sec to enter Setup mode. After power on SR‐Q2100: ‐Press and hold for 1 sec to turn log mode On/Off. ‐Press and hold 3 sec to enable/disable LCD backlight ‐In Setup mode: Press and hold 1 sec to mark locations or reset parameters setting NOTE: The measurement value will be saved even when the device is turned off. Only after you reset it in Setup mode will its value be erased. ……………………………………………..………………………………………………………………………………………………………………………………….……………………………………………………………………………. 4
www.Qstarz.com
SR- Q2100
English
……………………………………………..………………………………………………………………………………………………………………………………….……………………………………………………………………………. E. LCD Display Overview: (Flash) ODO AZM Battery Status TOA Time Of Arrival GPS not Fix Show Current Time Odometer Azimuth DTG DST TMP GPS Fix Distance To Go Distance Temperature Temperature Unit Directional Arrows Calorie Unit Route Mode Maximum/Average Speed Storage indicator Bike Mode Distance unit Speed Unit LCD Backlight Enabled
MAX/AVG Location Back Mode Setup Mode ……………………………………………..………………………………………………………………………………………………………………………………….……………………………………………………………………………. www.Qstarz .com
5
English
……………………………………………..………………………………………………………………………………………………………………………………….……………………………………………………………………………. Time: Timer will only measure the moving time. Your stop time will be eliminated. Average Speed: Average Speed will show the Moving Average Speed eliminating stop time. Current Time
: It will show the local time depending on time zone setting through Software F. Charging your battery For the first time using the SR‐Q2100, please charge battery until it is fully charged. Connect the supplied USB mini cable it to the power jack (mini USB type) and recharge through PC USB. This will begin to charge the battery. Charging time is about 4 hours typically. ‐ When recharging the battery. The battery icon will cycle from bottom‐ up ‐ When the battery icon shows all 3 blocks, the battery has reached a full‐charge state ‐ When the Battery indicator has dropped to one block, battery power is in low status. Please recharge. NOTE 1: The best and the fastest way of recharging the device is to turn the power off before charging. NOTE 2: To be sure the data is secured, please do charge your battery when the battery has dropped to one block NOTE 3: Please recharge the battery on a regular interval if the unit is not used for a long time. ……………………………………………..………………………………………………………………………………………………………………………………….……………………………………………………………………………. 6
www.Qstarz.com
SR- Q2100
English
……………………………………………..………………………………………………………………………………………………………………………………….……………………………………………………………………………. G. Setup Q2100 G‐1 Install the USB Driver and software utility (Only support Microsoft Windows XP / Vista/Win7) Please insert the Software CD to your computer. The autorun window will appear and please select Q2100. Please press “Install PC Suite” to install the main program. If the autorun windows did not appear, please browse the CD and find the folder “Utility\PC Suite\”.Double click “Qstarz_PC_Suite_installer_Q2100.exe” to install the software utility package. This software package contains USB driver, QTravel™, QSports™ and QPlanner™ software inside. G‐2 Install Google Earth Q2100 supports showing your travel path directly on Google Earth. Please go to http://earth.google.com for the free download of Google Earth, and then install it to your computer. ‐Apply Q2100 as a Backpacker’s Guide Q2100 is also a good recommendation to carry with a Backpacker. Q2100 can support either pre‐planing POI to device, or on the spot marking POI on device. So Backpacker can in advance plan your favorite spots on the device then go on your trip without worry finding those spots. At the mean time it provide each waypoint’s estimate arrival distance and 8‐directional compass so you can always check how long to each destination and whether you are on right direction to each destination. Make you feel safe carring with Q2100. Attached software Qplanner™ provide very useful and flexible tool to mark POI and make route plan, which mixing the max 103 points (A~D, 1~99) to operate. QPlanner™ can be easily add/delete/edit these max. 103 points in each project and auto arranges numbers in order. ……………………………………………..………………………………………………………………………………………………………………………………….……………………………………………………………………………. www.Qstarz .com
7
English
……………………………………………..………………………………………………………………………………………………………………………………….……………………………………………………………………………. H. Start to use H‐1 Fully charge the battery when using at the first time Please charge the device for at least 4 hours before you begin using it. A fully charged battery can last up to 25 hours continuously operation. H‐2 Connect SR‐Q2100 with your PC Power on SR‐Q2100 and then connect SR‐Q2100 with your PC by mini USB cable. H‐3 Make sure that your GPS device is properly configured Start the QSports/QTravel software, in Config device, set your local time zone and body weight and make sure save it Default logging interval is 1 point every 5 seconds. Config GPS items can be adjusted per your preference. NOTE 1: Before starting the software utility, please make sure that the driver and the software utility has been installed properly. NOTE2: Qstarz PC Suite only supports SR‐Q2100. Any intention to use PC Suite connecting GPS units other than Q2100 would result in software disconnection automatically. H‐4 Hardware Instructions 1. Bike mode . Under Bike mode, it contains 6 screens, By default, the device starts in Bike mode
cycle (switch) through each screen by pressing Select/Adjust button. The first screen shows the following items: 1) Moving time, shown as Time 2) Odometer cumulative distance, shown as ODO in MI or KM. 3) Current speed, shown as mi/h or km/h 4) Digital compass arrow pointing north ……………………………………………..………………………………………………………………………………………………………………………………….……………………………………………………………………………. 8
www.Qstarz.com
SR- Q2100
English
……………………………………………..………………………………………………………………………………………………………………………………….……………………………………………………………………………. Resets items and switch measurement unit: 1. Press down the "Select" button for 3 seconds to enter in Setup Mode 2. Pressing the “Select “button to cycle (switch) through DST/ODO/Distance unit. And pressing"Reset/Mark" button to resets parameters or change distance unit 3. Pressing “Select”button for 3 seconds to closes Setup mode. 2. Location Back mode In bike mode, press the “Power” button switches to Location Back mode .Press the “Select” button to cycle through waypoint A~D. 1) Estimated time of arrival shown as TOA. 2) Estimate direct line distance shown as DTG in MI or KM. 3) Current speed shown as mi/h or km/h. 4) Digital compass arrow pointing towards the destination. Set Waypoint: 1. Pressing the “Select” button for 3 seconds to open Setup mode 2. Pressing “Reset/Mark” button resets the waypoint. The DTG for the newly marked point should blinks and display “0.00”. 3. Pressing the “Select” buttons for 3 seconds to close the Setup mode, the waypoint has now been marked Route Plan mode In Location Back mode, press “Power “button to switch to Route Plan mode . Pressing the "Select" button to move forward or “Start /Stop” button to move backward between route destinations ID 1~ 99 ……………………………………………..………………………………………………………………………………………………………………………………….……………………………………………………………………………. www.Qstarz .com
9
English
……………………………………………..………………………………………………………………………………………………………………………………….……………………………………………………………………………. 1) Estimated time of arrival shown as TOA. 2) Estimated direct line distance shown as DTG in MI or KM. 3) Current waypoint ID between 1~99. 4) Directional Compass arrow pointing north. Mark Route: 1. Pressing the "Select" button for 3 seconds to open Setup mode. 2. Pressing the "Reset/Mark" button to mark waypoint coordinates. Use this method to mark all 99 waypoints. 3. Pressing the “Select” buttons for 3 seconds to close the Setup mode, the waypoint has now been marked For more detail instruction, please refer to the user manual in software CD. H‐5 Software Introduction QPlanner ™ QPlanner ™ supports organizing preloading POIs and plan your route in advance. You can edit and upload up to 4 POIs from Google map for Location back mode or 99 waypoints for Route Plan mode. 1. Click from <Start> / <All Programs> / <Qstarz PC Suite (2100)> / QPlanner (2100) Users have to input product key at the first time of use. The product key is located on the cover of the software CD. Important: Do not lose your Product Key. Please write the number down and keep it in a safe place. ……………………………………………..………………………………………………………………………………………………………………………………….……………………………………………………………………………. 10
www.Qstarz.com
SR- Q2100
English
……………………………………………..………………………………………………………………………………………………………………………………….……………………………………………………………………………. 2. Setting up the Turn Point (For Route Plan mode) 2.1 Click on the icon “Add new Line” to place your Turn Point. 2.2 Move your cursor around the map to mark your next Turn Point; it will then draw a line to get from point to point. At most 99 Turn Points can be added 2.3 Click on the last point to end the line, add a title and description. 2.4 To Edit, Remove or change line’s Properties, click on the line to open the info window. 3. Setting up the POI (For Location back mode) 3.1 Click on “Add New Placemark” icon.
3.2
Click your mouse button to place your Location Back points (A,B,C,D ). You may add up to 103 placemarks. 3.3 To edit your placemark's title or description, click on the icon to open the info window. 4. Sync to Device 4.1 Upload the preplanning points to device by clicking on <File>\<Sync To Device>.
It will synchronize the selected project to device. 5. Read from device Download the hand marked points from device to QPlanner, it will create a new project and read the data into the new project. 6. Print the Mapping list Click on Generate Mapping List to edit and print out your mapping list for reference. *For detail QPlanner™ functionality, please refer to QPlanner™ Users Manual attaching with Software. QSports™: QSports™ is software with database structure QSports™ can record, manage, and analyze all your daily/weekly/monthly activities with various sports gear such as Cycling, Running, Jogging, Climbing, Skiing, etc. Train yourself by ……………………………………………..………………………………………………………………………………………………………………………………….……………………………………………………………………………. www.Qstarz .com
11
English
……………………………………………..………………………………………………………………………………………………………………………………….……………………………………………………………………………. means of QSports™ statistics to have good health control. Different sport gear will generate corresponding category for better management and analysis. 1. Click from <Start> / <All Programs> / <Qstarz PC Suite (Q2100)> / QSports 2. Add New User QSports™ supports multiple users. User information includes “User Name”, Gender, Birth Date, and Weight. In order to get correct calories calculation, please fill in the correct personal data. 3. <File> \ < Import Wizard > Import Wizard can guide you to load the tracks from GPS device easily. NOTE: Make sure to Power on GPS unit first before connecting with computer for downloading tracks. 4. <File> \ <Export Wizard> Export Wizard can guide you to proceed export process easily. *For detail QSport™ functionality, please refer to QSport™ Users Manual attaching with Software. QTravel™: QTravel is the best Geotagging software to integrating your travel track and photo together easily. Support track editing, playback, and import/export Wizard. 1. Click from <Start> / <All Programs> / <Qstarz PC Suite (Q2100)> / Qtravel 2. <File> \ < Import Wizard > Import Wizard can guide you to proceed the Geotag process easily. NOTE: Make sure to Power on GPS unit first before connecting with computer for downloading tracks. 3. <File> \ <Export Wizard> Export Wizard can guide you to proceed export process easily. *For detail QTravel™ functionality, please refer to QTravel™ Users Manual attaching with Software ……………………………………………..………………………………………………………………………………………………………………………………….……………………………………………………………………………. 12
www.Qstarz.com
SR- Q2100
English
……………………………………………..………………………………………………………………………………………………………………………………….……………………………………………………………………………. I. GPS Features 1. Large LCD display with backlight support: 38 x 32mm 1.8” for instant GPS information 2. Multi‐function handheld GPS with Bike mode / Location Back mode / Route Plan mode 3. Sport GPS mode can display info as Odometer/Distance/Current Speed/Max Speed/Average Speed/Azimuth/Temperature/Calories/8‐directional compass/Total Time/Current time 4. Smart power saving and support 25 hours usage (22hrs with backlight) 5. Adopts latest GPS chipset with high sensitivity ‐159dBm 6. Excellent performance ‐ Cold/Warm/Hot start time: 42/38/1 sec. (average) 7. Waterproof design with IPX‐7 class J. Trouble Shooting Question Answer Q2100 can not power on? Battery low or damaged, please recharge the battery GPS signal not detected? 1. Check satellite icon to see if it is blinking. If it stops blinking, it has acquired fix on satellites. 2. Keep the device in an open area, not blocked by buildings. Device can't connect with PC? 1. Device not correctly connected with USB cable, check that USB is correctly connected to device or replace with a new USB cable 2. Reinstall the software PC suite Q2100. ……………………………………………..………………………………………………………………………………………………………………………………….……………………………………………………………………………. www.Qstarz .com
13
DEUTSH
……………………………………………..………………………………………………………………………………………………………………………………….……………………………………………………………………………. SR‐Q2100 – Schnellinstallationsanleitung A. Lieferumfang (1) GPS‐Gerät SR‐Q2100 (2) Mini‐USB‐Kabel (3) Fahrradhalterung (4) Schutzkappe(5) Software‐CD (6) Garantiekarte und Schnellstartanleitung 1. 2. 3. 4. 5. 6. ……………………………………………..………………………………………………………………………………………………………………………………….……………………………………………………………………………. 14
www.Qstarz.com
SR-Q2100
DEUTSH
……………………………………………..………………………………………………………………………………………………………………………………….……………………………………………………………………………. B. Äußeres 1. Ein/Aus/Modusauswahl‐Taste
2. Start/Stopp/Marke/Zurücksetzen‐Taste 3. Wählen/Einstellen‐Taste 4. Stromanschluss (Mini‐USB) 5. Internal antenna 6. LCD‐Bildschirm ……………………………………………..………………………………………………………………………………………………………………………………….……………………………………………………………………………. www.Qstarz .com
15
DEUTSH
……………………………………………..………………………………………………………………………………………………………………………………….……………………………………………………………………………. C. Allgemeine und Sicherheitshinweise z Die Ladezeit beträgt gewöhnlich etwa eine Stunde. Wir empfehlen, das Gerät nach dem Aufladen wieder vom Zigarettenanzünder oder Netzteil zu trennen. z Verwenden Sie ausschließlich das mitgelieferte Reiseladegerät; andernfalls kann das Gerät mit zu hoher Spannung versorgt werden, in Brand geraten sowie Unfälle und Verletzungen verursachen. z Bitte beachten Sie, dass der Akku nur bei Außentemperaturen zwischen 0 und 45 °C aufgeladen werden darf. z Die Ladezeit verlängert sich, wenn Sie das Gerät beim Aufladen benutzen z Erwärmen Sie das Gerät nicht, lassen Sie es nicht an Stellen liegen, an denen hohe Temperaturen herrschen – z. B. nicht im prallen Sonnenlicht. Ansonsten kann der interne Akku Schaden nehmen, seine Kapazität verlieren oder komplett ausfallen. z Trennen Sie das Gerät vom Reiseladegerät, wenn Sie es nicht verwenden und nicht aufladen möchten. Andernfalls kann der Akku Schaden nehmen ……………………………………………..………………………………………………………………………………………………………………………………….……………………………………………………………………………. 16
www.Qstarz.com
SR-Q2100
DEUTSH
……………………………………………..………………………………………………………………………………………………………………………………….……………………………………………………………………………. D. Hardwarefunktion Hardwarefunktion Stromanschluss Ein/Aus/Modusauswahl‐Taste Wählen/Einstellen‐Taste Start/Stopp/Marke/ Zurücksetzen‐Taste Beschreibung Mit diesem Anschluss verbinden Sie das Stromkabel (Mini‐USB) zum Aufladen. ‐Zum Einschalten 1 Sekunde lang gedrückt halten ‐Zum Ausschalten 3 Sekunden lang gedrückt halten. ‐Nachdem Sie den Q2100 eingeschaltet haben, drücken Sie 1 Sekunde lang, um zwischen den Modi Fahrrad/Weg zurück/Routenplanung. Nach dem Einschalten des SR‐Q2100: 1 Sekunde lang drücken, um die Funktions‐/Konfigurationsparameter anzeigen. 3 Sekunden lang drücken, um den Setup‐Modus. Nach dem Einschalten des SR‐Q2100: 1 Sekunde lang drücken, um den Protokollmodus ein‐ auszuschalten. 3 Sekunden lang drücken, um das LCD‐Hintergrundlicht aktivieren/deaktivieren. Im Setup‐Modus: 1 Sekunde lang drücken, um Orte zu markieren oder die Parameter zurückzusetzen Hinweis: Die Messwerte werden auch beim Ausschalten des Gerätes gespeichert. Die Messwerte werden lediglich beim Rücksetzen gelöscht. ……………………………………………..………………………………………………………………………………………………………………………………….……………………………………………………………………………. www.Qstarz .com
17
DEUTSH
……………………………………………..………………………………………………………………………………………………………………………………….……………………………………………………………………………. E. LCD‐Bildschirm: Batteristatus (Flash) ODO AZM Richtungspfeile Kalorieeinheit LCD‐Hintergrundlicht aktiviert Fahrradmodus Ankunftszeit GPS positin ermittelt DTG DST TMP Temperatureinheit
TOA GPS position nicht ermittelt Aktuelle Zeit zeigen Kilometerzähler Azimut Laufentfernung Entfernung Temperatur Entfernungseinheit MAX/AVG Speicheranzeige
Routenmodus Maximale/durchschnittliche Geschwindigkeit Geschwindigkeitseinheit Weg zurück‐Modus Setup‐Modus ……………………………………………..………………………………………………………………………………………………………………………………….……………………………………………………………………………. 18
www.Qstarz.com
SR-Q2100
DEUTSH
……………………………………………..………………………………………………………………………………………………………………………………….……………………………………………………………………………. Timer: Vom Timer wird lediglich die Zeit in Bewegung erfasst. Die Zeit, in der Sie sich nicht bewegen, wird nicht berücksichtigt. Durchschnittsgeschwindigkeit: Die Durchschnittsgeschwindigkeit bezieht sich auf die Zeit in Bewegung; die Zeit bei Stillstand wird nicht berücksichtigt. Aktuelle Zeit: Diese Anzeige entspricht der Lokalzeit – je nach Zeitzoneneinstellung F. Akku aufladen Bevor Sie den Explore 2000 zum ersten Mal benutzen, laden Sie den Akku bitte vollständig auf. Verbinden Sie das Stromversorgungskabel mit dem Stromanschluss (Mini‐USB) des Gerätes und laden Sie das Gerät über USB‐Kabel, Reiseladegerät oder Zigarettenanzünderadapter auf. Der Akku wird nun geladen. Die Ladezeit liegt gewöhnlich bei etwa einer Stunde. ‐ Beim Aufladen des Akkus bewegt sich der Ladebalken von unten nach oben ‐ Wenn auf dem Batteriesymbol alle 3 Blöcke angezeigt werden, ist der Akku voll geladen. ‐Wenn auf dem Batteriesymbol nur noch ein Block zu sehen ist, der Akku fast leer. Er muss wieder aufgeladen werden. HINWEIS 1: Am schnellsten wird das Gerät geladen, wenn der Strom ausgeschaltet ist. HINWEIS 2: Um Ihre Daten zu sichern, sollten Sie den Akku wieder aufladen, wenn nur noch ein Balken angezeigt wird HINWEIS 3: Laden Sie den Akku regelmäßig auf, wenn Sie das Gerät über einen längeren Zeitraum nicht verwenden ……………………………………………..………………………………………………………………………………………………………………………………….……………………………………………………………………………. www.Qstarz .com
19
DEUTSH
……………………………………………..………………………………………………………………………………………………………………………………….……………………………………………………………………………. G. SR‐Q2100 einrichten G‐1 USB‐Treiber und Software für installieren (nur unter Microsoft Windows XP / Vista unterstützt/ Win7) Legen Sie die Treiber‐CD ein und öffnen Sie den Ordner „Utility\Qstarz PC Suite\“. Zur Installation des USB‐Treibers doppelklicken Sie auf die Datei „Qstarz_PC_Suite_installer_Q2100.exe“. Dieses Softwarepaket enthält USB‐Treiber und PC Suite Software. Im Softwarepaket sind USB‐Treiber, QPlanner QTravel und QSports™ enthalten. G‐2 Google Earth installieren Ihr Explore 2000 kann Ihre Reiseroute direkt über Google Earth anzeigen. Bitte rufen Sie http://earth.google.com auf. Dort können Sie Google Earth kostenlos herunterladen und auf Ihrem Computer installieren. Das Q2100 als Reiseführer für Individualtouristen Das Q2100 ist eine gute Empfehlung für Individualtouristen. Mit dem Q2100 können Sie POIs vorplanen oder vor Ort POIs markieren. Auf diese Weise können Sie auf dem Gerät im Voraus die Punkte markieren, die besucht werden sollen. Sie werden dann jeden Punkt problemlos finden. Gleichzeitig liefert das Gerät die geschätzte Ankunftsdauer am Wegpunkt, und mit Hilfe des 8‐Richtungs‐Kompass können Sie immer prüfen, ob Sie auf dem richtigen Weg in die richtige Richtung sind. Mit dem Q2100 werden Sie sich sicher fühlen. Die enthaltene Software Qplanner™ bietet ein sehr nützliches und flexibles Werkzeug zum Markieren von POIs und zum Planen von Routen, wobei bis zu 103 Punkte (A ‐ D, 1 ‐ 99) festgelegt werden können. Mit QPlanner™ können diese 103 Punkte einfach hinzugefügt, gelöscht und bearbeitet werden und die Nummern der Reihe nach angeordnet werden. Laden Sie das Gerät mindestens 4 Stunden auf, bevor Sie es benutzen. Mit einem voll aufgeladenen Akku kann das Gerät 25 Stunden lang ununterbrochen verwendet werden ……………………………………………..………………………………………………………………………………………………………………………………….……………………………………………………………………………. 20
www.Qstarz.com
SR-Q2100
DEUTSH
……………………………………………..………………………………………………………………………………………………………………………………….……………………………………………………………………………. H. Anwendung H‐1 Fully charge the battery when using at the first time Please charge the device for at least 4 hours before you begin using it. A fully charged battery can last up to 25 hours continuously operation. H‐2 Akku vor der ersten Benutzung vollständig aufladen Ein komplett geladener Akku sorgt (bei optimalen Bedingungen) für bis zu 20 Stunden ununterbrochenen Betrieb. H‐3 Stellen Sie sicher, dass Ihr GPS‐Gerät richtig konfiguriert ist Starten Sie die QSports/Qtravel‐Software, legen Sie bei “Gerät konfigurieren” die lokale Zeitzone und Ihr Körpergewicht ein, und speichern Sie diese Eingaben. Das Protokoll‐Standardintervall ist 1 Punkt alle 5 Sekunden. „GPS‐Einträge konfigurieren“ kann nach Bedarf eingestellt werden. HINWEIS: Das Qstarz PC Suite unterstützt ausschließlich den Explore 2000. Jeder Versuch, das PC Suite mit anderen GPS‐Geräten als dem Explore 2000 zu verbinden, führt zum sofortigen Abbruch der Softwareverbindung. H‐4 Anleitungen zur hardware 1. Bike mode .Der Fahrradmodus besteht aus 6 Standardmäßig startet das Gerät im Fahrradmodus
Fenstern. Wechseln Sie die Fenster durch Drücken der Wählen/Einstellen‐Taste. Im ersten Fenster werden die folgenden Einträge gezeigt: 1) Bewegungszeit, als Zeitangabe dargestellt 2) Kilometerzähler kumulativ, als ODO in MI oder KM angezeigt. 3) Aktuelle Geschwindigkeit, als mi/h oder km/h angezeigt. 4) Digitale Kompassnadel, die nach Norden zeigt ……………………………………………..………………………………………………………………………………………………………………………………….……………………………………………………………………………. www.Qstarz .com
21
DEUTSH
……………………………………………..………………………………………………………………………………………………………………………………….……………………………………………………………………………. Einträge zurücksetzen und Maßeinheiten wechseln: 1. Drücken Sie 3 Sekunden lang auf die "Wählen"‐Taste, um den Setup‐Modus aufzurufen 2. Drücken Sie wiederholt auf die “Wählen“‐Taste, um zwischen DST/ODO/Entfernungseinheit zu wechseln. Wenn Sie auf die Taste "Zurücksetzen/Markieren" drücken, werden die Parameter zurückgesetzt oder die Entfernungseinheit geändert 3. Drücken Sie 3 Sekunden lang auf die “Wählen”‐Taste, um den Setup‐Modus zu schließen. 2. Weg zurück‐Modus Wenn Sie im Fahrradmodus auf die “Ein/Aus”‐Taste drücken, wechselt das Gerät in den Weg zurück‐Modus. Drücken Sie auf die “Wählen”‐Taste, um zwischen den Wegpunkten A – D zu wechseln. 1) Geschätzte Ankunftszeit, als TOA angezeigt. 2) Geschätzte Luftlinienentfernung, als DTG in MI oder KM angezeigt. 3) Aktuelle Geschwindigkeit, als mi/h oder km/h angezeigt 4) Digitale Kompassnadel, die in Richtung des Zielorts zeigt. Wegpunkt einstellen: 1. Drücken Sie 3 Sekunden lang auf die “Wählen”‐Taste, um den Setup‐Modus zu starten. 2. Wenn Sie auf die Taste “Zurücksetzen/Marke” drücken, wird der Wegpunkt zurückgesetzt. Der DTG des neu markierten Punkts blinkt und zeigt “0.00” an”. 3. Drücken Sie 3 Sekunden lang auf die “Wählen”‐Taste, um den Setup‐Modus zu schließen. Der Wegpunkt ist jetzt markiert. ……………………………………………..………………………………………………………………………………………………………………………………….……………………………………………………………………………. 22
www.Qstarz.com
SR-Q2100
DEUTSH
……………………………………………..………………………………………………………………………………………………………………………………….……………………………………………………………………………. 3. Routenplaner‐Modus Drücken Sie im Weg zurück‐Modus auf die “Ein/Aus“‐Taste, um in den Routenplaner‐Modus zu wechseln. Drücken Sie auf die "Wählen"‐Taste, um sich zwischen den Routenzielen ID 1 ‐ 99 vorwärts zu bewegen oder auf die “Start /Stopp”‐Taste, um sich rückwärts zu bewegen 1) Geschätzte Ankunftszeit, angezeigt als TOA . 2) Geschätzte Luftlinienentfernung, angezeigt als DTG in MI oder KM 3) Aktuelle Wegpunkt‐ID zwischen 1 ‐ 99. 4) Richtungskompassnadel, die nach Norden zeigt Routenmarkierung: 1. Drücken Sie 3 Sekunden lang auf die "Wählen"‐Taste, um den Setup‐Modus zu starten. 2. Drücken Sie auf die "Zurücksetzen/Markieren"‐Tate, um Wegpunktkoordination zu markieren. Auf diese Weise können Sie alle 99 Wegpunkte markieren.. 3. Drücken Sie 3 Sekunden lang auf die “Wählen”‐Taste, um den Setup‐Modus zu schließen. Die Wegpunkte sind jetzt markiert Weitere detaillierte Anweisungen entnehmen Sie bitte der Bedienungsanleitung in der Software‐CD. H‐5 Einführung in die Software
QPlanner ™ Mit QPlanner ™ können Sie POIs vorher laden und Ihre Route im voraus planen. 1. Klicken Sie auf <Start> / <Alle Programme> / <Qstarz PC Suite> / QPlanner ……………………………………………..………………………………………………………………………………………………………………………………….……………………………………………………………………………. www.Qstarz .com
23
DEUTSH
……………………………………………..………………………………………………………………………………………………………………………………….……………………………………………………………………………. Beim ersten Starten des Programms müssen Sie die Produktseriennummer eingeben. Die Produktserienummer finden Sie auf der Hülle der Treiber‐CD. . 2. Abbiegepunkt festlegen (im Routenplaner‐Modus) 2.1 Klicken Sie auf das Symbol “Neue Linie hinzufügen” , um den Abbiegepunkt festzulegen. 2.2 Schieben Sie den Cursor über die Karte, um den nächsten Abbiegepunkt zu markieren. Dabei wird eine Linie zwischen den beiden Punkten gezeichnet. Es können 99 Abbiegepunkte hinzugefügt werden 2.3 Klicken Sie auf den letzten Punkt, um die Linie zu beenden. Fügen Sie einen Titel und eine Beschreibung hinzu. 2.4 Um die Linieneigenschaften zu bearbeiten, entfernen oder verändern, klicken Sie auf die Linie. Dabei wird das Informationsfenster geöffnet. 3. POI (Point of Interest) festlegen (im Weg zurück‐Modus) 3.1 Klicken Sie auf das “Neue Ortsmarke hinzufügen ”‐Symbol 3.2
Klicken Sie mit der Maustaste, um Ihre Weg zurück‐Punkte (A, B, C, D) zu setzen. Sie können bis zu 103 Ortsmarken setzen. 3.3 Um den Titel oder die Beschreibung der Ortsmarke zu bearbeiten, klicken Sie auf das Symbol, um das entsprechende Fenster zu öffnen. 4. Auf Gerät laden 4.1 Laden Sie die Vorplanungspunkte auf das Gerät, indem Sie auf <Datei>\<Auf Gerät laden>. Dadurch wird das ausgewählte Projekt auf das Gerät geladen. 5. Vom Gerät lesen Laden Sie die manuell markierten Punkte vom Gerät nach Qplanner. Dabei wird ein neues Projekt erstellt, und die Daten werden in das neue Projekt geladen. 6. Kartenliste drucken Klicken Sie auf Kartenliste erstellen, um Ihre Kartenliste auszudrucken. ……………………………………………..………………………………………………………………………………………………………………………………….……………………………………………………………………………. 24
www.Qstarz.com
SR-Q2100
DEUTSH
……………………………………………..………………………………………………………………………………………………………………………………….……………………………………………………………………………. * Für Details QPlanner ™‐Funktion finden Sie in QPlanner ™ Benutzerhandbuch Befestigung mit Software QSports™: QSports™ ist eine Datenbanksoftware Mit QSports™ können Sie Ihre täglichen/wöchentlichen/monatlichen sportlichen Aktivitäten wie Radfahren, Laufen, Jogging, Klettern, Skifahren, usw. aufzeichnen, verwalten und analysieren. Wenn Sie mit den QSports™ ‐Statistiken trainieren, haben Sie Ihre Gesundheit im Griff. Unterschiedliche Sportarten werden in entsprechende Kategorien eingeteilt und können so bequem verwaltet und analysiert werden. 1. Klicken Sie auf <Start> / <Alle Programme> / <Qstarz PC Suite> / QSports Beim ersten Starten des Programms müssen Sie die Produktseriennummer eingeben. Die Produktserienummer finden Sie auf der Hülle der Treiber‐CD.. 1. Klicken Sie auf <Start> / <All Programs> / <Qstarz PC Suite (Q2100)> / QSports 2. Neuen Benutzer hinzufügen QSports™ unterstützt mehrere Benutzer. Zu den Benutzerinformationen zählen Benutzername, Geschlecht, Geburtsdatum und Gewicht. Bitte geben Sie korrekte persönliche Daten ein, damit zum Beispiel Kalorien richtig berechnet werden können. 3. <Datei> \ <Importassistent> Mit dem Importassistent können Sie die Daten Ihres GPS‐Gerätes bequem laden. 3.1 Wählen Sie die Standard‐„Sportart“. QSports erstellt entsprechende Eintragungen zur Standardsportart, die Sportart kann nach dem Importieren geändert werden. 3.2 Das PC‐Dienstprogramm erkennt COM‐Port und Baudrate zum Laden der GPS‐Daten automatisch. Hinweis: Achten Sie darauf, dass das GPS‐Gerät eingeschaltet ist, bevor Sie es zur Datenübertragung mit dem Computer verbinden4. <File> \ <Export Wizard> Export Wizard can guide you to proceed export process easily. * Für Detail QSport ™‐Funktion finden Sie in ™ Benutzerhandbuch Befestigung mit ……………………………………………..………………………………………………………………………………………………………………………………….……………………………………………………………………………. www.Qstarz .com
25
DEUTSH
……………………………………………..………………………………………………………………………………………………………………………………….……………………………………………………………………………. Software QSport. QTravel™: QTravel ist eine praktische Geotagging‐Software, mit der Sie Fotos ganz einfach mit dem Aufnahmeort verbinden können. Die Software bietet die Bearbeitung von Tracks, Wiedergabe sowie einen Import‐/Exportassistenten. 1. Klicken Sie auf <Start> / <Alle Programme> / <Qstarz PC Suite> / QTravel Beim ersten Starten des Programms müssen Sie die Produktseriennummer eingeben. Die Produktserienummer finden Sie auf der Hülle der Treiber‐CD. 2. <Datei> \ <Importassistent> Vom Importassistent können Sie sich durch die Geotag‐Schritte leiten lassen. Hinweis: Achten Sie darauf, dass das GPS‐Gerät eingeschaltet ist, bevor Sie es zur Datenübertragung mit dem Computer verbinden. 3. <Datei> \ <Exportassistent> Vom Exportassistent können Sie sich auf einfache Weise durch den Exportprozess leiten lassen.. * Für Detail QTravel ™‐Funktion, lesen Sie bitte QTravel ™ Benutzerhandbuch Befestigung mit Software beziehen I. GPS‐Funktionen 1. Großes LCD‐Display mit Hintergrundbeleuchtung: 38 x 32 mm 1,8” für direkte GPS‐Informationen 2. Multifunktions‐GPS mit Fahrrad‐Modus/Weg zurück‐Modus/Routenplaner‐Modus 3. Im Sport‐GPS‐Modus können Wegstreckenzähler/Entfernung/aktuelle Geschwindigkeit/maximale Geschwindigkeit/durchschnittliche Geschwindigkeit/Azimut/Temperatur/Kalorien/8‐Richtungskompass/Gesamtdauer/aktuel
le Uhrzeit angezeigt werden 4. 25 Stunden Betriebsdauer durch intelligente Stromsparfunktion (22 Stunden mit eingeschaltetem Hintergrundlicht) ……………………………………………..………………………………………………………………………………………………………………………………….……………………………………………………………………………. 26
www.Qstarz.com
SR-Q2100
DEUTSH
……………………………………………..………………………………………………………………………………………………………………………………….……………………………………………………………………………. 5. Enthält neuesten GPS‐Chipsatz mit hoher Empfindlichkeit –159 dBm 6. Hervorragende Leistung – Kalt‐/Warm‐/Heißstartzeit: 42/38/1 Sek. (Durchschnittswert) 7. Wasserfestes Design gemäß IPX‐7 J. Problemlösung Question Warum kann das Q2100 nicht eingeschaltet werden? Warum wird kein GPS‐Signal erkannt? Answer Der Akku ist fast leer oder beschädigt. Laden Sie ihn neu auf, oder setzen Sie einen neue Akku ein. 1. Prüfen Sie, ob das Sattelitensymbol blinkt. Wenn es nicht mehr blinkt, hat es Satelliten fixiert. 2.Halten Sie das Gerät in einer offenen Umgebung ohne störende Gebäude. ……………………………………………..………………………………………………………………………………………………………………………………….……………………………………………………………………………. www.Qstarz .com
27
ESPAÑOL
……………………………………………..………………………………………………………………………………………………………………………………….……………………………………………………………………………. SR‐Q2100 ‐ Guía de instalación rápida Paquete estándar (1) Unidad GPS SR‐Q2100 (2) Cable Mini‐USB (3) Kit de montaje en bicicleta (4) Cubierta de protección (5) CD de aplicaciones (6) Tarjeta de garantía + Guía rápida 1. 2. 3. 4. 5. 6. ……………………………………………..………………………………………………………………………………………………………………………………….……………………………………………………………………………. 28
www.Qstarz.com
SR-Q2100
ESPAÑOL
……………………………………………..………………………………………………………………………………………………………………………………….……………………………………………………………………………. B. Appearance 1. Botón de Selección Potencia/Modo 2. Botón de Inicio/Stop/Marca/Reiniciar 3. Botón de Seleccionar/Ajuste 4. Conector de alimentación (tipo Mini‐USB) 5. Antena interna 6. Pantalla LCD ……………………………………………..………………………………………………………………………………………………………………………………….……………………………………………………………………………. www.Qstarz .com
29
ESPAÑOL
……………………………………………..………………………………………………………………………………………………………………………………….……………………………………………………………………………. C. Advertencia de seguridad z El tiempo de carga es de aproximadamente 3 hora para este dispositivo. Le sugerimos que desconecte el dispositivo del cargador de mechero o el cargador AC después de cargarlo por completo.
z Asegúrese de utilizar el cargador de viaje incluido en la caja; de lo contrario podría aplicarse un voltaje excesivo al equipo y generarse humo, o derivar en incendios o accidentes.
z Recuerde que la batería integrada no se puede cargar a temperaturas que se encuentren fuera del rango 0 ºC ~ 45 ºC.
z El tiempo de carga podría ser mayor si utiliza el producto durante la carga
z No caliente ni deje el equipo en entornos de alta temperatura o bajo la luz solar directa durante un periodo largo de tiempo. La capacidad de la batería integrada podría deteriorarse o quedar inutilizada. Si el equipo no se encuentra en uso o no está cargado, desconéctelo del cargador de viaje. De lo contrario, la batería podría agotarse. ……………………………………………..………………………………………………………………………………………………………………………………….……………………………………………………………………………. 30
www.Qstarz.com
SR-Q2100
ESPAÑOL
……………………………………………..………………………………………………………………………………………………………………………………….……………………………………………………………………………. D. Función de hardware Función de hardware Conector de alimentación Botón de Selección Potencia/Modo Botón de Seleccionar/Ajuste Botón de Inicio/Stop/Marca/Reiniciar Descripción Tome el cable mini USB y conéctelo al puerto (tipo mini USB) para cargar con PC USB ‐ Presione y mantenga por 1 segundo para Encender ‐ Presione y mantenga por 3 segundos para Apagar. ‐ Luego de encender el Q2100, presione y mantenga por 1 segundo para intercambiar entre Modo Bicicleta/Locación Anterior/Plan de Ruta. Luego de encender el SR‐Q2100: Presione y mantenga por 1 segundo para mostrar los parámetros de funciones/configuración. Presione y mantenga por 3 segundos para entrar a modo Configuración. Luego de encender el SR‐Q2100: Presione y mantenga por 1 segundo para Encender/Apagar el modo de registros. Presione y mantenga por 3 segundos para habilitar/deshabilitar la luz de fondo del LCD En modo Configuración: Presione y mantenga por 1 segundo para marcar locaciones o reiniciar la configuración de parámetros NOTE: The measurement value will be saved even when the device is turned off. Only after you reset it in Setup mode will its value be erased. ……………………………………………..………………………………………………………………………………………………………………………………….……………………………………………………………………………. www.Qstarz .com
31
ESPAÑOL
……………………………………………..………………………………………………………………………………………………………………………………….……………………………………………………………………………. E. Pantalla LCD: (Flash) Estado de la Batería GPS no fijado Unidad de temperatura Flechas Direccionales Unidad de Calorías Habilitar Luz de Fondo del LCD Modo Bicicleta Tiempo de Llegada GPS fijado Mostrar Hora Actual Odómetro Azimut ODO AZM TOA DTG DST TMP Distancia por Recorrer Distancia Temperatura MAX/AVG Indicador de Almacenamiento Velocidad Máxima/Promedio Unidad de Velocidad Modo Ruta Unidad de Distancia Modo Locación Anterior Modo Configuración ……………………………………………..………………………………………………………………………………………………………………………………….……………………………………………………………………………. 32
www.Qstarz.com
SR-Q2100
ESPAÑOL
……………………………………………..………………………………………………………………………………………………………………………………….……………………………………………………………………………. Temporizador: el temporizador mide únicamente el tiempo que permanece en movimiento. No contabilizará el tiempo que permanezca detenido. Velocidad media: este valor corresponde a la velocidad media en movimiento sin contar el tiempo de detenimiento. Hora actual: muestra la hora local, dependiendo de la configuración de zona horaria del hardware F. Charging your battery Cargue completamente la batería cuando vaya a utilizar el dispositivo Explore 2000. Enchufe el cable de alimentación al conector de alimentación (tipo mini USB) y realice la recarga a través del cargador de viaje o del adaptador del encendedor de cigarrillos. De este modo la batería comenzará a cargarse. El tiempo de carga es de 4 horas‐ When recharging the battery. ‐Al recargar la batería. El icono de batería hará un ciclo de abajo a arriba ‐ Cuando el icono de batería muestra los 3 bloques, la batería se ha cargado completamente ‐ Cuando el indicador de batería ha disminuido hasta un bloque, la potencia de la batería se encuentra en estado bajo. Por favor recárguela NOTA 1: La mejor forma y más rápida de recargar el dispositivo es apagándolo antes de cargar. NOTA 2: Para asegurarse de que los datos se encuentran asegurados, por favor cargue su batería cando haya disminuido a un bloque. NOTA 3: Por favor recargue la batería por un intervalo regular si la unidad no se utiliza en mucho tiempo. ……………………………………………..………………………………………………………………………………………………………………………………….……………………………………………………………………………. www.Qstarz .com
33
ESPAÑOL
……………………………………………..………………………………………………………………………………………………………………………………….……………………………………………………………………………. G. Configurar la unidad Explore 2000 H‐1 Instalar el controlador USB y utilidad de software (sólo compatible con Microsoft Windows XP/Vista/Win7) Inserte el CD con el controlador y busque la carpeta “Utility\Qstarz PC Suite\”. Haga doble clic en el archivo “Qstarz_PC_Suite_installer_Q2100.exe.” Este paquete de software contiene un controlador USB y software de PC Suite en el interior. Este paquete de aplicaciones contiene el controlador USB, Qplanner, Qtravel y QSports™. H‐2 Instalar Google Earth La unidad Explore 2000 puede mostrar la ruta del viaje directamente en Google Earth. Visite la dirección http://earth.google.com para obtener una descarga gratuita de Google Earth y, a continuación, instálelo en su PC. ‐ Aplicar Q2100 como una Guía de Mochila Es una buena recomendación cargar con el Q2100 en una mochila. El Q2100 puede soportar planeación previa de POI al dispositivo, o marcar el POI en el momento en el dispositivo. De tal manera que los Mochileros pueden planear por anticipado sus sitios favoritos en el dispositivo y luego irse de viaje sin preocuparse por encontrar esos sitios. Mientras tanto le provee un estimado en la distancia para llegar a cada punto y 8 compases direccionales para que siempre pueda revisar cuanto falta para cada destino y si se encentra en la dirección correcta hacia cada destino. Le hará sentirse seguro cargar con el Q2100. Viene adjunto el software Qplanner™, el cual provee una herramienta muy útil y flexible para marcar los POI y hacer un plan de ruta, mezclando un máximo de 103 coordenadas actuales (A~D, 1~99) para funcionar. El QPlanner™ puede fácilmente agregar/borrar/editar estos 103 puntos en cada proyecto y organiza los números en orden automáticamente. ……………………………………………..………………………………………………………………………………………………………………………………….……………………………………………………………………………. 34
www.Qstarz.com
SR-Q2100
ESPAÑOL
……………………………………………..………………………………………………………………………………………………………………………………….……………………………………………………………………………. H. Empezar a usar la unidad H‐1 Cargue completamente la batería cuando la use por primera vez Por favor cargue el dispositivo por 4 horas al menos antes de utilizarlo. Una batería completamente cargada, puede durar hasta 25 horas de operación continua.. H‐2 Conecte la unidad SR‐Q2100 a su PC Encienda el dispositivo Q2100 y conecte BT‐Q2000 a su PC utilizando el cable mini USB. H‐3 Asegúrese de qué su dispositivo GPS este propiamente configurado Inicie el software QSports/QTravel, en Configurar Dispositivo, coloque su zona horaria y peso corporal y asegúrese de guardarlo como predeterminado, el intervalo es 1 punto cada 5 segundos. Las opciones de Config. del GPS se pueden ajustar según sus preferencias. NOTA: Qstarz PC Suite sólo admite Q2100. Cualquier intento de utilizar equipos GPS de conexión PC Suite distintos del Q2100 provocaría la desconexión automática del software. H‐4 Instrucciones de Hardware 1. Modo Bicicleta Como predeterminado, el dispositivo inicia en modo Bicicleta. Bajo el modo Bicicleta, hay 6 pantallas, cambie a través de cada pantalla presionando el botón Seleccionar/Ajustar. La primera pantalla muestra las siguientes opciones: 1) Tiempo en movimiento, mostrado como Tiempo 2) Odómetro distancia cumulativa, mostrada como ODO en MI o KM. 3) Velocidad Actual, mostrada como mi/h o km/h 4) Flechas de Compas Digital apuntando al norte ……………………………………………..………………………………………………………………………………………………………………………………….……………………………………………………………………………. www.Qstarz .com
35
ESPAÑOL
……………………………………………..………………………………………………………………………………………………………………………………….……………………………………………………………………………. Reiniciar las opciones y cambiar las unidades de medidas: 1. Presione hacia abajo el botón de "Selección" por 3 segundos para entrar al modo Configuración 2. Presione el botón de "Selección" para cambiar entre las unidades de DST/ODO/Distancia. Y presione el botón "Reiniciar/Macar" para reiniciar los parámetros o cambiar la unidad de distancia 3. Presionar el botón de “Selección” por 3 segundos para cerrar el modo Configuración 2. Modo Locación Anterior En modo bicicleta, presione el botón de “Potencia” para cambiar al modo Locación Anterior. Presione el botón “Seleccionar” para recorrer los puntos de paso A~D. 5) Tiempo estimado de legada se muestra como TOA. 6) La distancia en línea recta estimada se muestra como DTG en MI o KM. 7) La velocidad actual se muestra como mi/h o km/h. 8) La flecha de compas digital apunta hacia el destino. Fijar el punto de paso: 1. Presione el botón de "Selección" por 3 segundos para abrir el modo Configuración 2. Presione el botón “Reiniciar/Marca” para reiniciar el punto de paso. La DTG para el nuevo punto marcado deberá titilar y mostrar “0.00”. 3. Presione el botón de "Selección" por 3 segundos para cerrar el modo Configuración, el punto de paso no se ha marcado ……………………………………………..………………………………………………………………………………………………………………………………….……………………………………………………………………………. 36
www.Qstarz.com
SR-Q2100
ESPAÑOL
……………………………………………..………………………………………………………………………………………………………………………………….……………………………………………………………………………. 3. Modo Plan de Ruta En el modo Locación Anterior, presione el botón de “Potencia “para cambiar al modo Plan de Ruta. Presionar el botón de "Selección" para adelantarse o “Iniciar /Stop” entre lo ID de destino de las rutas entre 1~ 99 1) Tiempo estimado de legada se muestra como TOA. 2) La distancia en línea recta estimada se muestra como DTG en MI o KM. 3) El ID del punto de paso actual entre 1~99. 4) La flecha de compas digital apunta hacia el norte. Marcar Ruta: 1. Presione el botón de "Selección" por 3 segundos para abrir el modo Configuración. 2. Presione el botón de "Reiniciar/Marcar" para marcar las coordenadas de los puntos de paso. Utilice este método para marcar todos os 99 puntos de paso. 3. Presione el botón de "Selección" por 3 segundos para cerrar el modo Configuración, el punto de paso aun no ha sido marcado Para obtener instrucciones más detalles, consulte el manual de usuario en el software del CD. H‐5 Introducción al Software QPlanner ™ El QPlanner ™ soporta organizar y pre cargar POIs y planear su ruta por adelantado. ……………………………………………..………………………………………………………………………………………………………………………………….……………………………………………………………………………. www.Qstarz .com
37
ESPAÑOL
……………………………………………..………………………………………………………………………………………………………………………………….……………………………………………………………………………. Podrá editar y cargar hasta 4 POIs desde Google map para el modo Locación Anterior o 99 puntos de paso para el modo Plan de Ruta. 1. aga clic en <Start> (Inicio) / <All Programs> (Todos los programas) / <Qstarz PC Suite> / QPlanner™ Los usuarios deben introducir la clave del producto la primera vez que lo usen. La clave del producto está situada en la portada del CD del controlador.. 2. Configurar el Punto de Giro (Para el modo Plan de Ruta) para ubicar su Punto de Giro 2.1 Haga clic en el icono “Agregar nueva Línea” 2.2 Mueva su cursor alrededor del mapa para marcar su próximo Punto de Giro; luego dibujará una línea para legar de punto a punto. Se pueden agregar máximo 99 Puntos de Giro 2.3 Haga clic en el último punto para finalizar la línea, agregue un titulo y una descripción. 2.4 Para editar, remueva o cambie las propiedades de la línea, haga clic en la línea para abrir la información de la ventana. 3. Configurar el POI (Para el modo Locación anterior) 3.1 Haga clic en el icono “Agregar nuevo Punto” .
3.2
Haga clic con el botón del mouse para ubicar sus puntos de Locación Anterior (A, B, C, D). Pude agregar hasta 103 puntos. 3.3 Para editar el titulo o la descripción de sus puntos, haga clic en el icono para abrir la ventana de información. 4. Sinc con Dispositivo 4.1 Cargar los puntos pre planeados al dispositivo haciendo clic en <Archivo>\< Sinc con Dispositivo>. Sincronizara el proyecto seleccionado con el dispositivo. 5. Leer del Dispositivo Descargar los puntos marcados a mano del dispositivo al QPlanner, eso creará un nuevo ……………………………………………..………………………………………………………………………………………………………………………………….……………………………………………………………………………. 38
www.Qstarz.com
SR-Q2100
ESPAÑOL
……………………………………………..………………………………………………………………………………………………………………………………….……………………………………………………………………………. proyecto and leerá todos los datos dentro del nuevo proyecto. 6. Imprimir la lista de Mapas Hacer clic en Generar Lista de Mapas para editar e imprimir su lista de mapas para s referencia. Para más detalles QPlanner funcionalidad ™, por favor refiérase a los usuarios QPlanner ™ Manual vinculados con Software. QSports™: QSports™ es una aplicación que funciona por medio de una base de datos QSports™ puede registrar, administrar y analizar todas sus actividades diarias / semanales / mensuales relacionadas con distintos deportes, como ciclismo, carrera, jogging, escalada, esquí, etc. Entrénese utilizando las estadísticas de QSports™ y controle su salud. Los distintos deportes generan categorías correspondientes para una mejor administración y análisis. 1. Haga clic en <Start> (Inicio) / <All Programs> (Todos los programas) / <Qstarz PC Suite> / QSports™ Los usuarios deben introducir la clave del producto la primera vez que lo usen. La clave del producto está situada en la portada del CD del controlador. 2. Archivo> \ <Asistente de importación> El Asistente de importación le guiará para cargar fácilmente los rastros del dispositivo GPS. Nota: asegúrese de encender el dispositivo GPS antes de conectarlo al equipo para descargar los rastros. 3. <File> (Archivo) \ <Export Wizard> (Asistente de Exportación) El Asistente de Exportación puede guiarle para llevar a cabo el proceso de exportación.. QTravel™: QTravel es el mejor programa de etiquetado geográfico para integrar con facilidad su rastro de desplazamiento y sus fotografías. Es compatible con la edición de rastros, la reproducción y cuenta con un asistente de importación / exportación. ……………………………………………..………………………………………………………………………………………………………………………………….……………………………………………………………………………. www.Qstarz .com
39
ESPAÑOL
……………………………………………..………………………………………………………………………………………………………………………………….……………………………………………………………………………. 1. Haga clic en <Start> (Inicio) / <All Programs> (Todos los programas) / <Qstarz PC Suite> / QTravel 2. <File> (Archivo) \ < Import Wizard > (Asistente de Importación) El Asistente de Importación puede guiarle para llevar a cabo el proceso Geotag con facilidad.. 3. <File> (Archivo) \ <Export Wizard> (Asistente de Exportación) El Asistente de Exportación puede guiarle para llevar a cabo el proceso de exportación. I. Características del GPS 1. Pantalla grande LCD con soporte de luz de fondo: 38 x 32mm 1.8” para información instantánea de GPS 2. GPS portable multifunción con modos Bicicleta/Locación Anterior/Plan de Ruta 3. El modo Deporte del GPS puede mostrar información como el Odómetro/Distancia/Velocidad Actual / Velocidad Máxima /Velocidad Promedio /Azimut/Temperatura/Calorías/8 compases direccionales /Tiempo Total /Hora Actual 4. Ahorro inteligente de energía y soporta 25 horas de uso (22hrs con luz de fondo) 5. Adopta el ultimo chipset de GPS con alta sensibilidad ‐159dBm 6. Excelente funcionamiento – Hora de Inicio en Frio/Tibio/Caliente: 42/38/1 sec. (promedio) 7. Diseño a prueba de agua con clase IPX‐7 J. Solucionar problemas Question Q2100 no enciende? Answer Bajo de batería o dañado, por favor recargue la batería El GPS no detecta señal? 1.Revise el icono del satélite para ver si esta titilando. Si deja de titilar, ha encontrado los satélites. 2.Mantenga el dispositivo en un área, sin bloquearlo entre edificios. ……………………………………………..………………………………………………………………………………………………………………………………….……………………………………………………………………………. 40
www.Qstarz.com
SR-Q2100
FRANÇAIS
……………………………………………..………………………………………………………………………………………………………………………………….……………………………………………………………………………. Guide d’installation rapide du SR‐Q2100 Emballage standard (1) Unité GPS SR‐Q2100 (2) câble mini USB (3) Kit de montage vélo (4) étui de protection (5) CD logiciel (6) Carte de garantie + Guide rapide 1. 2. 3. 4. 5. 6. ……………………………………………..………………………………………………………………………………………………………………………………….……………………………………………………………………………. www.Qstarz .com
41
FRANÇAIS
……………………………………………..………………………………………………………………………………………………………………………………….……………………………………………………………………………. B. Appearance 1. Touche Démarrer/ mode sélection 2. Touche de Démarrage/ Arrêt/ Marque/Réinitialisation 3. Touche de Selection/ Réglage 4. Plot (type mini USB) 5. Antenne interne 6. Écran LCD ……………………………………………..………………………………………………………………………………………………………………………………….……………………………………………………………………………. 42
www.Qstarz.com
SR-Q2100
FRANÇAIS
……………………………………………..………………………………………………………………………………………………………………………………….……………………………………………………………………………. C. Avertissement relatif à la sécurité z La durée de mise en charge est d'environ 4 heure typiquement pour cet appareil. Nous vous conseillons de débrancher l'appareil de l'allume‐cigare ou du chargeur CA une fois l'appareil complètement chargé. z Assurez‐vous d'utiliser le chargeur de voyage fourni, inclus dans l'emballage ; sinon, une surtension pourrait être appliquée à l'appareil et causer de la fumée, un incendie ou un accident. z Notez que la batterie intégrée ne peut pas être chargée hors d'une plage de température de 0℃ ~ 45℃. z La durée de mise en charge peut être prolongée si vous utilisez le produit pendant la charge z Ne chauffez pas et ne laissez pas l'appareil sous une température élevée ni sous la lumière directe du soleil pendant une période prolongée, car la capacité de la batterie intégrée se détériorerait, ou deviendrait non chargeable. Quand l'appareil n'est pas en service ou n'est pas chargé, nous vous conseillons de débrancher l'appareil du chargeur de voyage. Sinon la batterie peut se vider ……………………………………………..………………………………………………………………………………………………………………………………….……………………………………………………………………………. www.Qstarz .com
43
FRANÇAIS
……………………………………………..………………………………………………………………………………………………………………………………….……………………………………………………………………………. D. Fonction du matériel Fonction du matériel Plot Touche Démarrer/ mode sélection Touche de Selection/ Réglage Touche de Démarrage/ Arrêt/ Marque/Réinitialisation Description Prendre le câble d’alimentation et le connecter au plot (type mini USB) pour le chargement uniquement. ‐ Enfoncée la touche 1sec pour allumer ‐ Maintenez et enfoncée la touche 3 sec pour éteint. ‐ Apres allumer Q2100, enfoncée la touche 1 sec pour bascule entre le Mode vélo /point de navigation/Route. Apres allumer SR‐Q2100: ‐ Enfoncée la touche 1sec pour afficher fonctions/ configurer les paramètres ‐ Press and hold for 3 sec to enter Setup mode. Maintenez et enfoncée la touche 3 sec pour entrer en mode de paramétrage. Apres allumer SR‐Q2100: ‐ Enfoncée la touche 1sec pour allumer/ éteint mode journal. ‐ Maintenez et enfoncée la touche 3 sec pour allumer/ éteint rétro‐éclairage LCD ‐ Dans le mode de paramétrage: Enfoncée la touche 1sec pour marquer des emplacements ou réinitialiser les parameters. Remarque: La valeur de la mesure est sauvegardée, même lorsque l'appareil est éteint. Sa valeur n'est effacée qu'après l'avoir réinitialisé en appuyant sur le bouton Réinitialiser la mesure ……………………………………………..………………………………………………………………………………………………………………………………….……………………………………………………………………………. 44
www.Qstarz.com
SR-Q2100
FRANÇAIS
……………………………………………..………………………………………………………………………………………………………………………………….……………………………………………………………………………. E. Écran LCD: (Flash) ODO AZM État de la batterie TOA Temps d’ arrivée GPS non Fix Afficher le temp actuel Odomètre Azimut DTG DST TMP GPS Fix Distance parcourue Distance Température Unité de température Flèches directionnelles Unité de Calorie Rétroéclairage LCD activé Mode vélo MAX/AVG
Indicateur de mémoire Vitesse maximum/moyenne
Unité de vitesse Mode Route Unité de distance Mode Point de navigation mode paramétrage ……………………………………………..………………………………………………………………………………………………………………………………….……………………………………………………………………………. www.Qstarz .com
45
FRANÇAIS
……………………………………………..………………………………………………………………………………………………………………………………….……………………………………………………………………………. Minuterie: La minuterie ne mesure que le temps en mouvement. Vos temps d'arrêt vont être éliminés. Vitesse moyenne: Vitesse moyenne affiche la vitesse moyenne mobile en éliminant les temps d'arrêt. Heure actuelle: Ceci affiche l'heure locale en fonction du réglage de fuseau horaire du matériel. F. Chargement de votre batterie Lors de la première utilisation du SR‐Q2100, veuillez charger la batterie complètement. Prenez le cordon d’alimentation et branchez‐le à la prise (type mini USB), puis rechargez la batterie au moyen du cable mini USB. Cela déclenchera le chargement de la batterie. Le temps de chargement est généralement de 4 heures. ‐ Lorsque rechargerment de la batterie. L'icône de la batterie fera un cycle de bas en haut ‐ Lorsque l'icône de la batterie indique l'ensemble des 3 blocs, la batterie a atteint un état de charge complet ‐ Lorsque l'indicateur de batterie a chuté à un seul bloc, la batterie est en faible statut. S'il vous plaît recharge. NOTE 1: Le meilleur moyen et le plus rapide de recharger l'appareil est d'éteindre l'appareil avant de le charger NOTE 2: Pour être sûr que les données sont sécurisées, s'il vous plaît de recharger votre batterie lorsque la batterie a chuté à un seul bloc NOTE 3: S’il lvous plaît recharger la batterie sur un intervalle régulier si l'appareil n'est pas utilisé pendant une longue période. ……………………………………………..………………………………………………………………………………………………………………………………….……………………………………………………………………………. 46
www.Qstarz.com
SR-Q2100
FRANÇAIS
……………………………………………..………………………………………………………………………………………………………………………………….……………………………………………………………………………. G. Configuration du Q2100 G‐1 Installer le pilote USB et un l’utilitaire logiciel (ne prend en charge que Microsoft Windows XP/Vista/Win7) Insérez le CD des pilotes et recherchez le dossier “Utility\Qstarz PC Suite\”. Cliquez deux fois sur “Qstarz_PC_Suite_installer_Q2100.exe” La boîte de ce logiciel contient un lecteur USB et un logiciel PC Suite. Ce package logiciel contient le pilote USB, l'utilitaire QPlanner,QTravel, et QSports ™ à l'intérieur. G‐2 Installer Google Earth Le Explore 2000 est capable d’afficher votre itinéraire de voyage directement sur Google Earth. Veuillez visiter le site http://earth.google.com pour obtenir le téléchargement gratuit de Google Earth, puis installez‐le sur votre ordinateur. ‐ Appliquer Q2100 comme le guide du routard Q2100 est une bonne recommandation pour porter avec le Routard, Q2100 peuvent supporter soit planification un point de navigation en avance au périphérique ou marquer sur place un point de navigation au périphérique . Alors le Routard peut aller en voyage sans être obligé de chercher ces lieux. au même temps, elle fournit à chaque point de navigation une estimation de la distance 'arrivée et une boussole à 8‐directionnelle, de sorte que vous pouvez toujours vérifier combien de temps pour chaque destination et si vous êtes à la bonne direction pour chaque destination. Vous faire sentir en sécurité avec Q2100. Le logiciels attachés Qplanner ™ fournissent outil très utile et flexible pour marquer point de navigation et faire plan de la route qui mélange des 103 points max (A ~ D, 1 ~ 99) pour exploiter. QPlanner ™ peut être facilement ajouter / supprimer / éditer ces max. 103 points dans chaque projet et arrange automatiquement les nombres points dans l'ordre ……………………………………………..………………………………………………………………………………………………………………………………….……………………………………………………………………………. www.Qstarz .com
47
FRANÇAIS
……………………………………………..………………………………………………………………………………………………………………………………….……………………………………………………………………………. H. Lancer l’utilisation H‐1 Recharger complètement la batterie lors de la première utilisation Une batterie complètement rechargée peut durer jusqu’à 35 heures sans interruption (dans des conditions optimales). H‐2 Connecter le SR‐Q2100 au PC Power on SR‐Q2100 and then connect SR‐Q2100 with your PC by mini USB cable. H‐3 Assurez‐vous que votre appareil GPS est correctement configure Démarrer le logiciel QSports/QTravel, dans le configuration du GPS, définissez votre fuseau horaire local et le poids corporel et par défaut l'intervalle d'enregistrement du journal est de 1 point toutes les 5 secondes. REMARQUE: Qstarz PC Suite ne prend en charge que le SR‐Q2100. Toute tentative d'utiliser PC Suite en branchant des appareils GPS autres que le SR‐Q2100 provoque une déconnexion logicielle automatiquement. H‐4 Instructions du Matériel 1. Mode vélo Par défaut, l'appareil démarre en mode vélo, En mode de vélo, il contient 6 écrans, cycle (switch) à travers chaque écran en appuyant sur Select / Ajuster bouton. Le premier écran affiche les éléments suivants: 1) Le temp du déplacement , indiqué comme Time 2) La distance parcourue cumulée, indiqué comme ODO en MI ou KM. 3) La vitesse réelle, indiqué comme mi/h ou km/h 4) Flèche en direction vers le nord ……………………………………………..………………………………………………………………………………………………………………………………….……………………………………………………………………………. 48
www.Qstarz.com
SR-Q2100
FRANÇAIS
……………………………………………..………………………………………………………………………………………………………………………………….……………………………………………………………………………. Réinitialiser les paramètres et changer d'unité de mesure: 1. Appuyez sur le bouton "Sélectionner" pendant 3 secondes pour entrer en mode de configuration 2. Appuyant sur le bouton "Sélectionner" pour faire défiler(changer)par DST / ODO / Distance unité. Et en appuyant sur "Reset / Mark" pour réinitialisation des paramètres ou changer unité de distance 4. Appuyez le bouton de “Select” pendant 3 seconde pour fermer le mode paramétrage. 2. Pont de navigation En mode Vélo, appuyez sur la touché ”Démarrer” pour passer en mode Point de navigation. Appuyez sur la touché de Sélection pour faire défilerles points A à D. 1) Temp d’arrivée(estimée) indiqué comme TOA. 2) Distance parcourue estimé indiqué comme DTG en MI ou KM. 3) La vitesse réelle, indiqué comme mi/h ou km/h. 4) Flèche en direction du point de destination. Paramétrer un point de navigation: 1. Maintenez la touche “Sélectionner" enfoncée pendant 3 seconde pour entrer dans la mode paramétrage 2. Appuyez sur la touche “Marque/Redémarrer pour paramétrer le point de navigation.Le DTG pour le point de navigation nouvellement marquee devrait être “0.00”. 3. Appuyez le bouton de “Select” pendant 3 seconde pour fermer le mode paramétrage, le point de navigation a été marquée Mode Route En mode Point de navigation appuyez sur la touche “Démarrer” passer en mode route. ……………………………………………..………………………………………………………………………………………………………………………………….……………………………………………………………………………. www.Qstarz .com
49
FRANÇAIS
……………………………………………..………………………………………………………………………………………………………………………………….……………………………………………………………………………. Appuyez sur la touche “Select” pour déplacer en avant ou appuyez sur la touche “Démarrer / Arrêter” pour déplacer vers l'arrière entre les destinations de l'itinéraire ID 1 ~ 99 1) Temp d’arrivée(estimée) indiqué comme TOA. 2) Distance parcourue estimé indiqué comme DTG en MI ou KM. 3) D'identité actuelle du point de waypoint entre 1 ~ 99. 4) Flèche en direction du point de destination. Marquer un itinéraire: 1. Maintenez la touche “Sélectionner" enfoncée pendant 3 seconde pour entrer dans la mode paramétrage. 2. Appuyant sur la touche "Reset / Mark" bouton pour marquer waypoint coordonnées. Utilisez cette méthode pour marquer les 99 points d'intérêts. 3. Appuyez le bouton de “Select” pendant 3 seconde pour fermer le mode d’installation et l’exposition, le points d'intérêts a été marquée Pour de plus amples instructions en détail, s'il vous plaît se référer au manuel d'utilisation dans le logiciel CD. H‐5 Introduction de logiciel QPlanner ™ QPlanner ™ supporte l'organisation de préchargement des POI et planifier votre itinéraire à l'avance. ous pouvez éditer et de télécharger jusqu'à 4 POI sur la carte Google pour mode point de ……………………………………………..………………………………………………………………………………………………………………………………….……………………………………………………………………………. 50
www.Qstarz.com
SR-Q2100
FRANÇAIS
……………………………………………..………………………………………………………………………………………………………………………………….……………………………………………………………………………. navigation ou 99 points de cheminement de la mode Route. 1. Cliquez sur <Démarrer>/<Tous les programmes> / <Qstarz PC Suite> / QPlanner™ L’utilisateur doit saisir le code du produit lors de la première utilisation. Le code du produit est situé sur le couvercle du CD pilote. 2. Mise en place du Turn Point (Pour la mode Route) 2.1 Cliquez sur l'icône " Tracer une Ligne " pour passer votre Turn Point. 2.2 Déplacez votre curseur sur la carte à l'occasion de votre prochain tour Point, il sera alors tracer une ligne pour aller du point à point. Tout au plus 99 Turn points peuvent être ajoutés 2.3 Cliquez sur le dernier point de terminer la ligne, ajoutez un titre et la description. 2.4 Pour modifier, supprimer ou changer la ligne Propriétés, cliquez sur la ligne pour ouvrir la fenêtre d'informations. 3. Mise en place du POI (pour la mode point de navigation) 3.1 Cliquez sur l'icône “Ajouter un Repère” .
3.2
Cliquez sur le bouton de la souris pour placer vos points de navigation (A,B,C,D ). Vous pouvez ajouter jusqu'à 103 repères. 3.3 Pour modifier, supprimer ou changer le repères Propriétés, cliquez sur le repères pour ouvrir la fenêtre d'informations. 4. Synchroniser avec l’appareil 4.1 Charger les points préplanification points à dispositif en cliquant sur<Fichier>\< Synchroniser avec l’appareil >. Elle synchronisera le projet sélectionné au dispositif. 5. Lire les données à partir du périphérique Télécharger des points marqué à la main de périphérique à QPlanner, il va créer un nouveau projet et lire les données dans le nouveau projet. 6. Imprimer Mapping list ……………………………………………..………………………………………………………………………………………………………………………………….……………………………………………………………………………. www.Qstarz .com
51
FRANÇAIS
……………………………………………..………………………………………………………………………………………………………………………………….……………………………………………………………………………. Cliquez sur Créer Mapping liste pour éditer et imprimer votre mapping liste pour référence. Pour de plus amples instructions en détail, s'il vous plaît se référer au manuel d'utilisation dans le logiciel CD. QSports™: QSports™ est un logiciel avec une structure de base de données QSports ™ permet d'enregistrer, de gérer, et d'analyser toutes vos activités quotidiennes / hebdomadaires / mensuelles avec divers équipements de sport comme le cyclisme, la course à pied, le jogging, l'escalade, le ski, etc. Entraînez‐vous par le biais des statistiques QSports™ pour avoir un bon contrôle de la santé. Différents équipements de sport génèrent des catégories correspondantes pour améliorer la gestion et l'analyse. 1. Cliquez sur <Démarrer>/<Tous les programmes> / <Qstarz PC Suite> / QSports™ L’utilisateur doit saisir le code du produit lors de la première utilisation. Le code du produit est situé sur le couvercle du CD pilote. 2. <fichier> \ <Assistant d'importation> L'Assistant d'importation peut vous guider pour charger des itinéraires depuis un périphérique GPS facilement. 3. <File> (Fichier) \ <Export Wizard> (Assistant d’exportation) L’Assistant d’exportation vous guidera pas à pas dans la procédure d’exportation Pour de plus amples instructions en détail, s'il vous plaît se référer au manuel d'utilisation dans le logiciel CD. QTravel™: QTravel est le meilleur logiciel de geotagging pour intégrer votre itinéraire de voyage et vos photos en même temps et facilement. Prend en charge l'édition d'itinéraires, la lecture, et l'Assistant d'importation / exportation. 1. Cliquez sur <Démarrer>/<Tous les programmes> / <Qstarz PC Suite> / QTravel L’utilisateur doit saisir le code du produit lors de la première utilisation. Le code du produit ……………………………………………..………………………………………………………………………………………………………………………………….……………………………………………………………………………. 52
www.Qstarz.com
SR-Q2100
FRANÇAIS
……………………………………………..………………………………………………………………………………………………………………………………….……………………………………………………………………………. est situé sur le couvercle du CD pilote. 2. <File> (Fichier) \ < Import Wizard > (Assistant importation) L’Assistant d’importation vous guidera pas à pas dans la procédure de Géocodage. Remarque: Assurez‐vous d'allumer le GPS d'abord avant de raccorder à l'ordinateur pour télécharger des itinéraires. 3. <File> (Fichier) \ <Export Wizard> (Assistant d’exportation) L’Assistant d’exportation vous guidera pas à pas dans la procédure d’exportation. Pour de plus amples instructions en détail, s'il vous plaît se référer au manuel d'utilisation dans le logiciel CD I. Caractéristiques du GPS 1. Grand afficheur LCD avec soutien de rétro‐éclairage: 38 x 32mm 1.8” 2. Multi‐fonction GPS de poche avec Mode Vélo / Mode point de navigation /Mode route 3. Le mode Sport GPS peut afficher les infos comme Odomètre /Distance/La vitesse actuel/Vitesse Max / Vitesse moyenne/Azimut/Temperature/Calories/8‐ directionnelle boussole /le temp total/Le temp actuel 4. Smart économie d'énergie et l'appui de 25 heures d'utilisation (22hrs avec rétro‐éclairage) 5. Adopte dernier chipset GPS à haute sensibilité ‐159dBm 6. Excellentes performances ‐ froid/ tiède /chaud démarrage: 42/38/1 sec. (en moyenne) 7. Imperméable conception avec IPX‐7 class ……………………………………………..………………………………………………………………………………………………………………………………….……………………………………………………………………………. www.Qstarz .com
53
FRANÇAIS
……………………………………………..………………………………………………………………………………………………………………………………….……………………………………………………………………………. J. Dépannage Question Q2100 Impossible de démarrer? GPS signal non détecté? Le périphérique ne peut pas se connecter avec un PC? Réponse Batterie faible ou endommagée, s'il vous plaît recharger la batterie 1. Vérifiez icône du satellite pour voir si elle clignote. Si elle s'arrête de clignoter, il a acquis fixer sur les satellite. 2. Tenir l'appareil dans une zone dégagée, pas bloqué par des immeubles. 1. Dispositif n'est pas correctement connecté avec un câble USB, vérifiez que l'USB est correctement connecté à l'appareil ou le remplacer par un nouveau câble USB 2. Réinstallez le logiciel PC suite Q2100. ……………………………………………..………………………………………………………………………………………………………………………………….……………………………………………………………………………. 54
www.Qstarz.com
SR-Q2100
ITALIANO
……………………………………………..………………………………………………………………………………………………………………………………….……………………………………………………………………………. Guida all'installazione rapida SR‐Q2100 Confezione standard (1) Unità GPS SR‐Q2100 (2) Cavo USB mini (3) Kit montaggio su bici (4) coperchio di protezione (5) CD Software (6) Garanzia + Guida rapida 1. 2. 3. 4. 5. 6. ……………………………………………..………………………………………………………………………………………………………………………………….……………………………………………………………………………. www.Qstarz .com
55
ITALIANO
……………………………………………..………………………………………………………………………………………………………………………………….……………………………………………………………………………. B. Aspetto 1. Pulsante Accensione/Selezione Modalità 2. Pulsante Start/Stop/Mark/Reset 3. Pulsante Seleziona/Regola 4. Connettore alimentazione (tipo USB mini) 5. Antenna interna 6. Schermo LCD ……………………………………………..………………………………………………………………………………………………………………………………….……………………………………………………………………………. 56
www.Qstarz.com
SR-Q2100
ITALIANO
……………………………………………..………………………………………………………………………………………………………………………………….……………………………………………………………………………. C. Considerazioni sulla sicurezza z Il periodo di ricarica per questa unità è generalmente di circa 3 ora. Si consiglia di scollegare l’unità dal caricatore da auto o dal caricatore CA una volta che l’unità è completamente carica. z Assicurarsi di utilizzare il caricatore da viaggio incluso nella confezione; in caso contrario, potrebbe essere applicata all’unità una tensione eccessiva causando fumo, fuoco o incidenti. z La batteria integrate non può essere caricata in temperature non comprese tra 0℃ e 45℃. z Il periodo di carica potrebbe aumentare nel caso venga utilizzato il prodotto durante la carica. z Non scaldare o lasciare l’unità esposta a temperature elevate o alla luce diretta del sole per molto tempo poiché la capacità della batteria interna potrebbe ridursi o la batterie potrebbe non essere più ricaricabile. Quando l’unità non è in uso o in carica, si consiglia di scollegare l’unità dal caricatore da viaggio. In caso contrario si potrebbe esaurire la batteria. ……………………………………………..………………………………………………………………………………………………………………………………….……………………………………………………………………………. www.Qstarz .com
57
ITALIANO
……………………………………………..………………………………………………………………………………………………………………………………….……………………………………………………………………………. D. Funzionamento dell’hardware Funzionamento dell’hardware Connettore alimentazione Pulsante Accensione/Selezione Modalità Pulsante Seleziona/Regola Pulsante Start/Stop/Mark/Reset Descrizione Prendere il cavo mini USB e connetterlo al connettore di alimentazione jack (tipo mini USB) per la ricarica con PC USB ‐ Premere per 1 secondo per accendere ‐ Premere per 3 secondi per spegnere. ‐ Dopo l’accensione di Q2100, premere per 1 secondo per scegliere tra le modalità Bike/Posizione Precedente/Pianificazione Itinerario. Dopo l’accensione di SR‐Q2100: ‐ Premere per 1 secondo per mostrare le funzioni/configurare i parametri. ‐ Premere per 3 secondi per entrare nella modalità Impostazioni. Dopo l’accensione di SR‐Q2100: ‐ Premere per 1 secondo per attivare/disattivare la modalità log. ‐ Premere per 3 secondi per attivare/disattivare la retroilluminazione LCD ‐Nella modalità Impostazioni: Premere per 1 secondo per marcare la posizione o per reimpostare le impostazioni dei parametri Nota: Il valore della misurazione verrà salvato anche quando il dispositivo viene spento. Il valore verrà eliminato solo dopo aver eseguito il ripristino premendo il pulsante Ripristino misurazione ……………………………………………..………………………………………………………………………………………………………………………………….……………………………………………………………………………. 58
www.Qstarz.com
SR-Q2100
ITALIANO
……………………………………………..………………………………………………………………………………………………………………………………….……………………………………………………………………………. E. Schermo LCD: (Flash) ODO AZM Stato della Batteria TOA Tempo di Arrivo GPS non fissato Mostra Orario Attuale Odometro Azimut DTG DST TMP GPS fissato Distanza da Percorrere Distanza Temperatura Unità Temperatura Frecce Direzionali Unità Calorie Retroilluminazione LDC Attivata MAX/AVG
Indicatore di Memoria Modalità Itinerario Velocità Massima/Media Unità Velocità Modalità Bike Unità Distanza Modalità Posizione Precedente Modalità Impostazioni ……………………………………………..………………………………………………………………………………………………………………………………….……………………………………………………………………………. www.Qstarz .com
59
ITALIANO
……………………………………………..………………………………………………………………………………………………………………………………….……………………………………………………………………………. Timer: Il Timer misura solamente il tempo in movimento. I tempi delle soste vengono eliminati. Velocità media: La Velocità media mostra la Velocità media in movimento eliminando le soste. Ora corrente: Mostra l’ora locale in relazione all’impostazione hardware del fuso orario F. Caricamento della batteria La prima volta che si usa il Explore 2000, caricare completamente la batteria. Collegare il cavo di alimentazione all’apposito jack (di tipo mini USB) ed effettuare la ricarica tramite un trasformatore da viaggio o un adattatore per accendisigari. La ricarica in genere richiede 4 ore ‐ Quando si ricarica la batteria, l’icona della batteria si accenderà gradualmente dal basso verso l’alto. ‐ Quando l’icona della batteria mostra tutti I 3 blocchi, la batteria è completamente carica. ‐ Quando l’indicatore della Batteria scende ad un blocco, il livello della batteria è basso. Si prega di ricaricare. NOTA 1: Il modo migliore e più veloce per ricaricare il dispositivo è spegnere l’alimentazione prima di ricaricare. NOTA 2: Per assicurarsi che i dati siano protetti, ricaricare la batteria quando l’indicatore mostra un solo blocco. NOTA 3: Si prega di ricaricare la batteria ad intervalli regolari se l’unità non è utilizzata per un lungo periodo ……………………………………………..………………………………………………………………………………………………………………………………….……………………………………………………………………………. 60
www.Qstarz.com
SR-Q2100
ITALIANO
……………………………………………..………………………………………………………………………………………………………………………………….……………………………………………………………………………. G. Configurazione di Q2100 G‐1 Installare il driver USB e il l’utilità software (supporta solo Microsoft Windows XP / Vista/Win7) Inserire il CD Driver e trovare la cartella “Utility\Qstarz PC Suite\”. Fare doppio clic su “Qstarz_PC_Suite_installer_Q2100.exe.” La confezione del software contiene al suo interno i driver USB e il software PC Suite. Questo pacchetto software contiene il driver USB, QPlanner,QTravel e QSports™. G‐2 Installare Google Earth SR‐Q2100 supporta la visualizzazione del percorso di viaggio direttamente su Google Erta. Andare al sito http://earth.google.com per scaricare gratuitamente Google Earth, e poi installarlo sul computer Utilizzare Q2100 come una Guida per Backpacker Per un Backpacker, portare con sé Q2100 può essere molto utile. Q2100 supporta sia PDI su dispositivo pre‐programmati, sia PDI su dispositivo marcati direttamente sul posto. In questo modo, il Backpacker può programmare in anticipo i suoi punti preferiti sul dispositivo e in seguito cominciare il suo viaggio senza doversi preoccupare di come trovare questi luoghi. Allo stesso tempo, il dispositivo fornisce la distanza di arrivo stimata per ogni punto di passaggio e una bussola ad 8 punti cardinali, così è sempre possibile controllare quanto manca ad ogni destinazione e se la direzione è corretta. Sentiti sempre sicuro, portando con te Q2100. Il software allegato Qplanner™ fornisce un dispositivo molto utile e flessibile per marcare PDI e costruire la pianificazione degli itinerari, utilizzando un massimo di 103 punti (A~D, 1~99). Con Qplanner™ si possono facilmente aggiungere/eliminare/modificare questi punti fino ad un massimo di 103 per ogni progetto e organizzare automaticamente i numeri in ordine crescente. Si prega di caricare il dispositivo per almeno 4 ore prima di cominciare ad utilizzarlo. Una ……………………………………………..………………………………………………………………………………………………………………………………….……………………………………………………………………………. www.Qstarz .com
61
ITALIANO
……………………………………………..………………………………………………………………………………………………………………………………….……………………………………………………………………………. batteria completamente carica può durare fino a 25 ore di utilizzo continuo H. Iniziare ad usare H‐1 Caricare completamente la batteria prima dell'uso iniziale Una batteria completamente carica può operare fino a 20 ore continuate (in condizioni ottimali). H‐2 Collegare Q2100 al PC Accendere Q2100 e collegare il Q2100 con il PC tramite il cavo mini USB. H‐3 Assicurarsi che il proprio dispositivo GPS sia configurato correttamente Avviare il software QSports/QTravel. Nella Config dispositivo, impostare il proprio fuso orario locale e peso corporeo e assicurarsi di salvare l’intervallo di log predefinito per 1 punto ogni 5 secondi. Gli elementi Config GPS possono essere regolati a seconda delle proprie preferenze. NOTA: Qstarz PC Suite supporta solamente il Explore 2000. Qualsiasi tentativo di utilizzare le unità di collegamento GPS PC Suite con dispositivi diversi dal Explore 2000 potrebbe causare la disconnessione automatica del software. H‐4 Istruzioni Hardware 1. Modalità Bike Per impostazione predefinita, il dispositivo si avvia in modalità Bike. In modalità Bike, il dispositivo contiene 6 schermate, scorrere (cambiare) ogni schermata premendo il pulsante Seleziona/Regola. La prima schermata mostra i seguenti elementi: 1) Tempo di movimento, mostrato come Tempo 2) Distanza cumulativa odometro, mostrata come ODO in MI oppure KM. 3) Velocità attuale, mostrata come mi/h oppure km/h 4) Freccia della bussola digitale che punta verso Nord ……………………………………………..………………………………………………………………………………………………………………………………….……………………………………………………………………………. 62
www.Qstarz.com
SR-Q2100
ITALIANO
……………………………………………..………………………………………………………………………………………………………………………………….……………………………………………………………………………. Reimpostare gli elementi e cambiare unità di misura: 1. Premere il pulsante “Seleziona” per 3 secondi per entrare nella Modalità Impostazioni 2. Premere il pulsante “Selezione” per scorrere (cambiare) DST/ODO/Unità distanza. Premere il pulsante “Reset/Mark” per reimpostare i parametri o cambiare l’unità della distanza 3. Premere il pulsante “Seleziona” per 3 secondi per chiudere la Modalità Impostazioni. 2. Modalità Posizione Precedente In modalità bike, premere il pulsante “Accensione” per passare alla modalità Posizione Precedente. Premere il pulsante “Seleziona” per scorrere i punti di passaggio A~D. 1) Tempo di arrivo stimato mostrato come TOA. 2) Distanza in linea d’aria stimata mostrata come DTG in MI oppure KM. 3) Velocità corrente mostrata come mi/h oppure km/h. 4) Freccia della bussola digitale che punta verso la destinazione. Impostare Punti di Passaggio: 1. Premere il pulsante “Seleziona” per 3 secondi per entrare nella Modalità Impostazioni 2. Premendo il pulsante “Reset/Mark” si reimposta il punto di passaggio. La DGT per il nuovo punto di passaggio marcato lampeggia e mostra “0.00”. 3. Premere il pulsante “Seleziona” per 3 secondi per uscire dalla modalità Impostazioni. Il punto di passaggio è ora stato marcato. Modalità Pianificazione Itinerario In modalità Posizione Precedente, premere il pulsante “Accensione” per passare alla modalità Pianificazione Itinerario. Premere il pulsante “Seleziona” per scorrere in avanti oppure il pulsante “Start/Stop” per scorrere indietro l’elenco delle destinazioni dell’itinerario ID 1~ 99 ……………………………………………..………………………………………………………………………………………………………………………………….……………………………………………………………………………. www.Qstarz .com
63
ITALIANO
……………………………………………..………………………………………………………………………………………………………………………………….……………………………………………………………………………. 1)
2)
3)
4)
Tempo di arrivo stimato mostrato come TOA. Distanza in linea d’aria stimata mostrata come DTG in MI oppure KM. ID del punto di passaggio attuale tra 1~99.. Freccia direzionale della bussola che punta verso Nord. Marcare l’Itinerario: 1. Premere il pulsante “Seleziona” per 3 secondi per entrare nella modalità Impostazioni.. 2. Premere il pulsante “Reset/Mark” per marcare le coordinate del punto di passaggio. Utilizzare questo metodo per marcare tutti i 99 punti di passaggio. 3. Premere il pulsante “Seleziona” per 3 secondi per uscire dalla modalità Impostazioni. Il punto di passaggio è ora stato marcato Per istruzioni maggiori dettagli, consultare il manuale d'uso in CD software. H‐5 Introduzione al Software QPlanner ™ QPlanner ™ supporta l’organizzazione e il precaricamento di PDI e pianifica in anticipo il tuo itinerario. Si possono modificare e caricare fino a 4 PDI da Google map per la modalità Posizione Precedente oppure 99 punti di passaggio per la modalità Pianificazione Itinerario. 1. Fare clic su <Start> / <All Programs> (Tutti i programmi) / <Qstarz PC Suite> / QPlanner™ 2. Impostazione dei Punti di Svolta (per la Modalità Pianificazione Itinerario) 2.1 Cliccare sull’icona “Aggiungi nuova linea”
per posizionare il proprio Punto di ……………………………………………..………………………………………………………………………………………………………………………………….……………………………………………………………………………. 64
www.Qstarz.com
SR-Q2100
ITALIANO
……………………………………………..………………………………………………………………………………………………………………………………….……………………………………………………………………………. Svolta. 2.2 Muovere il cursore sulla mappa per marcare il prossimo Punto di Svolta; verrà disegnata una linea che va da punto a punto. Possono essere aggiunti fino ad un massimo di 99 Punti di Svolta 2.3 Cliccare sull’ultimo punto per terminare la linea, aggiungere un titolo e descrizione. 2.4 Per Modificare, Rimuovere o cambiare le Proprietà della linea, cliccare sulla linea per aprire la finestra con le informazioni. 3. Impostazione dei PDI (Per la modalità Posizione Precedente) 3.1 Cliccare sull’icona “Aggiungi nuovo Placemark” .
3.2
Cliccare con il pulsante del mouse per posizionare i propri punti Posizione Precedente (A, B, C, D). Si possono aggiungere fino a 103 placemark. 3.3 Per modificare il titolo o la descrizione del placemark, cliccare sull’icona per aprire la finestra con le informazioni. 4. Sincronizzazione con il Dispositivo 4.1 Caricare i punti preprogrammati sul dispositivo cliccando su <File>\<Sync To Device>. In questo modo i progetti selezionati verranno sincronizzati con il dispositivo. 5. Lettura dal Dispositivo Scaricare i punti marcati manualmente dal dispositivo a QPlanner. In questo modo verrà creato un nuovo progetto e i dati saranno letti all’interno del nuovo progetto. 6. Stampa della Mapping List Cliccare su Genera Mapping List per modificare e stampare la propria Mapping List per riferimento. QSports™: QSports™ è un software con una struttura a database ……………………………………………..………………………………………………………………………………………………………………………………….……………………………………………………………………………. www.Qstarz .com
65
ITALIANO
……………………………………………..………………………………………………………………………………………………………………………………….……………………………………………………………………………. QSports™ può registrare, gestire, e analizzare le attività giornaliere/settimanali/mensili per vari sport come ad esempio Ciclismo, Corsa, Jogging, Arrampicata, Sci, ecc. Tenetevi in allenamento tramite le statistiche di QSports™ che aiutano ad avere il controllo della propria salute. Diversi sport daranno luogo a diverse categorie per meglio gestire e analizzare l’allenamento. 1. Fare clic su <Start> / <All Programs> (Tutti i programmi) / <Qstarz PC Suite> / QSports™2. 2. <File> \ < Procedura guidata per l’importazione > Procedura guidata per l’importazione aiuta a caricare in modo semplice i percorsi dal dispositivo GPS. Nota: Assicurarsi di accendere l’unità GPS prima di collegarla al computer per scaricare i percorsi. 3. <File> \ <Export Wizard> Export Wizard (La procedura guidata per l’esportazione) può guidarvi attraverso il processo di esportazione in modo semplice. QTravel™: QTravel è il migliore software per la Georeferenziazione che consente di integrare in modo semplice i percorsi e le foto. Supporta la modifica dei percorsi, la riproduzione, e la Procedura guidata per l’importazione/esportazione. 1. Fare clic su <Start> / <All Programs> (Tutti i programmi) / <Qstarz PC Suite> / Travel Recorder 2. <File> \ < Import Wizard > Import Wizard (Procedura guidata per l’importazione) può guidarvi nella procedura Geotag in modo semplice Nota: Assicurarsi di accendere l’unità GPS prima di collegarla al computer per scaricare i percorsi. 3. <File> \ <Export Wizard> Export Wizard (La procedura guidata per l’esportazione) può guidarvi attraverso il processo ……………………………………………..………………………………………………………………………………………………………………………………….……………………………………………………………………………. 66
www.Qstarz.com
SR-Q2100
ITALIANO
……………………………………………..………………………………………………………………………………………………………………………………….……………………………………………………………………………. di esportazione in modo semplice I. Caratteristiche GPS 1. Grande display LCD con supporto retroilluminazione: 38 x 32 mm 1.8” per informazioni GPS istantanee 2. GPS portatile multi‐funzione con modalità Bike/Posizione Precedente/Pianificazione Itinerario 3. La modalità Sport GPS può mostrare informazioni come Odometro/Distanza/Velocità Attuale/Velocità Massima/Velocità Media/Azimut/Temperatura/Calorie/bussola ad 8 punti cardinali/Tempo Totale/Tempo attuale 4. Risparmio energetico intelligente e supporto di 25 ore di utilizzo (22 ore con retroilluminazione) 5. Adotta gli ultimi chipset GPS con alta sensibilità – 159dBm 6. Performance eccellente – tempo di avvio a Freddo/Tiepido/Caldo: 42/38/1 sec. (in media) 7. Design Waterproof con classe IPX‐7 J. Risoluzione dei problemi Domanda Riposta Non è possible accendere Batteria scarica o danneggiata, si prega di ricaricare la Q2100? batteria. Segnale GPS non rilevato? 1.Controllare l’icona del satellite per vedere se lampeggia. Se smette di lampeggiare, ha acquisito i satelliti. 2.Mantenere il dispositivo in un’area a cielo aperto, non bloccato da edifici. ……………………………………………..………………………………………………………………………………………………………………………………….……………………………………………………………………………. www.Qstarz .com
67
中文繁體
……………………………………………..………………………………………………………………………………………………………………………………….……………………………………………………………………………. SR‐Q2100簡易使用指南 A. 盒裝標準配備
(1) GPS 本體 SR-Q2100(2) mini USB 連接線(3) 腳踏車架組 (4)保護套(5) 軟體光
碟(6) 保固說明卡 + 簡易使用指南
1. 2. 3. 4. 5. 6. ……………………………………………..………………………………………………………………………………………………………………………………….……………………………………………………………………………. 68
www.Qstarz.com
SR-Q2100
中文繁體
……………………………………………..………………………………………………………………………………………………………………………………….……………………………………………………………………………. B. 外觀 1. 電源鍵/模式鍵 2. 開啟/關閉/標示/重置鍵 3. 選擇/調整鍵 4. 電源插座 (mini USB) 5. 內建天線 6. LCD螢幕 ……………………………………………..………………………………………………………………………………………………………………………………….……………………………………………………………………………. www.Qstarz .com
69
中文繁體
……………………………………………..………………………………………………………………………………………………………………………………….……………………………………………………………………………. C. 安全注意事項 z 正常的充電時間為四個小時,建議完成充電後便移除充電器
z 請使用內附的旅行用充電器充電,使用其他不合規格的充電器可能會造成機器的損
壞
z 內建電池所適用的充電溫度範圍為 0℃ ~ 45℃.
z 如果您同時使用產品跟充電,充電時間將會延長
z 請勿將機器置於高溫環境或是於太陽直射底下太久的時間,這將會折損電池的壽命
……………………………………………..………………………………………………………………………………………………………………………………….……………………………………………………………………………. 70
www.Qstarz.com
SR-Q2100
中文繁體
……………………………………………..………………………………………………………………………………………………………………………………….……………………………………………………………………………. D. 硬體功能 硬體功能
電源插座
說明
將電源線連接電源插座 (mini USB) 並進行充電
‐按下電源鍵一秒開機,
電源鍵/模式鍵 ‐按下電源鍵三秒關機. ‐開啟SR-Q2100後,按一下電源鍵/模式鍵便可在自行
車模式/地標指示/航線連續彎道指示三種模式中切
換. 開啟SR-Q2100後: 選擇/調整鍵 ‐按一下切換操作模式下的顯示功能/參數設定選取,按
下三秒啟動設定模式. 開啟SR-Q2100後: 開啟/關閉/標示/重置鍵 ‐按一下開啟/關閉旅遊行程紀錄功能. ‐按下三秒啟動LCD背光 ‐在設定模式下: 按一下設定位置或重置參數設定. 注意:: 里程記、計時器和平均速度的數值即使在關機後仍會被儲存,只有使用工具鍵
重置後數值才會被移除並重新開始計算
……………………………………………..………………………………………………………………………………………………………………………………….……………………………………………………………………………. www.Qstarz .com
71
中文繁體
……………………………………………..………………………………………………………………………………………………………………………………….……………………………………………………………………………. E. LCD 螢幕: (Flash) ODO AZM 電池狀態 GPS定位 顯示目前時間 去程距離 里程表
DST 距離
方位
TMP 溫度
溫度單位
熱量單位
距離單位
MAX/AVG 最大/平均 速度
速度單位
LCD背光啟用
到達時間 DTG GPS 未定位 電子羅盤
TOA 儲存指標 自行車模式 航點模式 地標指示模式 設定模式 ……………………………………………..………………………………………………………………………………………………………………………………….……………………………………………………………………………. 72
www.Qstarz.com
SR-Q2100
中文繁體
……………………………………………..………………………………………………………………………………………………………………………………….……………………………………………………………………………. 計時器: 只會顯示您的移動時間,靜止的時間將不會被計算
平均速度: 平均的移動速度,靜止的速度將不會被計算
現在時間: 將會根據您從軟體設定的時區,顯示當地的現在時間
F. 為您的電池進行充電 如果您是第一次使用 SR-Q2100,請將電池完全充電。
將電源線連接電源插座並藉由mini USB線進行充電。
充電時間約為4小時
‐當電池充電時。該電池圖標會循環從下往上.
-當電池圖標顯示所有 3 區塊,電池已達到了完全充電的狀態
-當電池指標已下降到剩 1 區塊,表示電池電力不足。請充電
注1:最好,最快的充電方式是充電之前先關閉電源。
注2:要確保數據的安全,當電池已下降至1區塊,請將您的電池充電。
注3:若裝置間隔很長時間沒有使用,請定期充電電池。
G. 設定Q2100 G‐1 安裝USB驅動程式和軟體工具程式(支援 Windows XP / Vista/Win 7)
請插入驅動程式光碟,至光碟目錄底下尋找 “Utility\Qstarz PC Suite\”,點擊
……………………………………………..………………………………………………………………………………………………………………………………….……………………………………………………………………………. www.Qstarz .com
73
中文繁體
……………………………………………..………………………………………………………………………………………………………………………………….……………………………………………………………………………. “Qstarz_PC_Suite_installer_Q2100.exe” 並進行軟體工具程式安裝,此安裝包含
USB驅動程式以及軟體工具程式
G‐2 安裝 Google地球
Explore 2000 可以讓您在 Google地球 上顯示您的旅行軌跡紀錄,請至
http://earth.google.com 免費下載 Google地球 軟體並安裝在您的電腦上
-將Q2100作為背包客指南 Q2100適合攜帶於喜愛自助旅行的背包客身上,Q2100可透過軟體將預先計劃好的地
標上傳於設備上或當場手動標記地標於設備上.因此,背包客可事前先規劃最喜愛的景點
後在上傳於設備上,然後開始你的旅程不必擔心會找不到這些景點.同時它可提供每個航
點估計到達的距離和8方向的指南針,所以你可以隨時知道每個目的地的到達時間和你
是否在每個目標的正確方向上.攜帶Q2100會讓您出門旅遊更有安全感.
附加軟件 Qplanner™ 提供了非常有用和靈活的工具,可以預先規劃喜愛的地標,和路線
圖.其中支援使用航點最多到103個航點(A~D, 1~99) 在每一個專案QPlanner™ 都可
以很容易地添加/刪除 /編輯這103個航點也會自動調整編輯後的號碼順序。
H. 開始使用 H‐1 第一次使用前請將電池完全的充電
完全充電的電池可以讓 SR-Q2100 持續使用達25小時(在最佳的情況下)
……………………………………………..………………………………………………………………………………………………………………………………….……………………………………………………………………………. 74
www.Qstarz.com
SR-Q2100
中文繁體
……………………………………………..………………………………………………………………………………………………………………………………….……………………………………………………………………………. H‐2 將SR-Q2100與電腦連接
請先開啟電源,再使用 mini USB 連接線將SR-Q2100與您的電腦連接
H‐3 請確保您的GPS設備已正確設定
開始 QSports / QTravel 軟件,於設定 GPS 紀錄器裡,設定您的本地時區和體重,並確認
其默認的記錄間隔為每 5 秒鐘 1 點.設定 GPS 紀錄器裡的項目可以根據您的喜好調整
注意: Qstarz PC Suite 是為SR-Q2100所設計的專屬軟體,用其它GPS裝置與PC
Suite連接將導致軟體自動斷線
H‐4 硬體使用說明 1.
自行車模式 在默認情況下,設備將開始在自行車模式
. 在自行車模式下, 它包含6屏幕, 按選擇
/調整按鈕循環(轉換)每個屏幕.第一個屏幕顯示下列項目: 1) 目前騎乘時間,顯示為時間 2) 騎乘總里程, 顯示為ODO, MI 或 KM. 3) 目前速度, 顯示為 mi/h 或 km/h 4) 指南針箭頭顯示指北位置
重置項目和計量單位轉換: 1.
按下“Select”按鈕 3秒進入設定模式
2.
按下“Select”按鈕,循環(轉換)去程距離/里程表/距離的單位. 然後按
……………………………………………..………………………………………………………………………………………………………………………………….……………………………………………………………………………. www.Qstarz .com
75
中文繁體
……………………………………………..………………………………………………………………………………………………………………………………….……………………………………………………………………………. “Reset/Mark”按鈕,重置參數或改變距離單位
3.
按“Select”按鈕 3秒關閉設定模式
2.
地標指示模式
在自行車模式, 按一下“電源”鍵進入到地標指示模式
按一下 “選擇” 鍵
切換A~D循環. 1) 預計到達時間顯示為TOA. 2) 估計直線距離顯示為DTG,MI 或 KM. 3) 目前的速度顯示為mi/h 或 km/h. 4) 指南針箭頭朝著目的地.
標記地標: 1.
按下“選擇”按鈕 3秒,進入設定模式
2.
按“Reset/Remark”按鈕,重置航點.新標記點的DTG應閃爍然後顯示“0.00”
3.
按“Select”按鈕 3秒關閉設定模式, 此時地標已被標定 3.
航點模式
在地標指示模式, 按一下“電源”鍵進入到航點模式
.按下"Select"或按“Start
/Stop”鍵可在目標點ID 1~99之間向前或向後移動 ……………………………………………..………………………………………………………………………………………………………………………………….……………………………………………………………………………. 76
www.Qstarz.com
SR-Q2100
中文繁體
……………………………………………..………………………………………………………………………………………………………………………………….……………………………………………………………………………. 1)預計到達時間顯示為TOA. 2)估計直線距離顯示為DTG ,MI 或 KM. 3)目前航點編號,在ID1~99之間. 4)指南針箭頭朝著目的地. 標記路線:
1.
按下“選擇”按鈕 3秒,進入設定模式. 2.
按下“重置/標記”按鈕,以標記航路點坐標. 使用此方法標記所有99個航點. 3.
按“Select”按鈕 3秒關閉設定模式, 此時地標已備標定. 如需詳細說明,請參閱光碟中的用戶使用手冊. H‐5 軟體簡介 QPlanner ™ QPlanner ™ 支援預先管理,規劃您喜愛的地標,和路線圖. 您可以從Google地圖編輯和
上傳多達4個興趣點到地標指示模式或99航點到航點模式.
1. 請從 <開始> / <所有程式> /<Qstarz PC Suite (2100)> / QPlanner (2100) 第一次使用必須輸入產品金鑰才能啟用本軟體,產品金鑰位於驅動程式光碟的封套上
2. 設定航行轉彎點 (航點模式) ……………………………………………..………………………………………………………………………………………………………………………………….……………………………………………………………………………. www.Qstarz .com
77
中文繁體
……………………………………………..………………………………………………………………………………………………………………………………….……………………………………………………………………………. 2.1 點擊圖標“新增折線” 開始規劃航行轉彎點. 2.2 移動滑鼠游標新增您的下一個航線轉彎點後便會繪製一條線從點到點. 最多
可以添加到99個航線轉彎點 2.3
點擊最後一點結束航線規劃,並添加標題和描述.
2.4 點擊該線打開編輯信息窗口以刪除或更改線的屬性. 3. 設定地標 (地標指示模式) 3.1 點擊圖標
3.2
“新增景點” .
以滑鼠游標點選地標點(A~D),移動編輯地標. 最多可以添加到 103 個地標
點.
3.3 點擊地標點以修改您的地標的標題或說明.
4. 與裝置同步 上傳預先規劃點到裝置,按一下<檔案>\<與裝置同步>.這將同步上傳所選的
專案到裝置上
5. 從裝置讀取資料
將裝置設定之地標下載至QPlanner地圖上, 這將建立一個新的專案和讀取裝置數據到
新專案中
6. 列印地圖清單 點擊”列印地圖清單”來編輯和列印您的地圖清單以做參考. QSports™: ……………………………………………..………………………………………………………………………………………………………………………………….……………………………………………………………………………. 78
www.Qstarz.com
SR-Q2100
中文繁體
……………………………………………..………………………………………………………………………………………………………………………………….……………………………………………………………………………. QSports™ 是個以資料庫為基礎的軟體
QSports™ 能根據不同的運動類型,例如單車、跑步、慢跑、登山、滑雪等… .來記錄、
管理和分析您每天、每周或每個月的運動,不同運動類型的資料將會產生並歸納成不
同的運動資料庫,您可依據QSports™ 整理的統計資料來訓練自己以達到健康管理的目
的
1. 請從 <開始> / <所有程式> /<Qstarz PC Suite (2100)> / QSports
第一次使用必須輸入產品金鑰才能啟用本軟體,產品金鑰位於驅動程式光碟的封套上
2. 新增使用者
QSports™ 支援多重使用者的資料管理,為了得到正確的卡路里消耗計算,請輸入正
確的個人資料,包括”姓名” “性別” “生日” “體重”
3. <檔案> \ < 匯入精靈 >
匯入精靈將會導引您下載GPS中的軌跡記錄
3.1 選擇預設的”運動類型,QSports™ 將會依選擇的運動類型產生軌跡,使用者
也可以於下載後再改變對應的運動類型
3.2 程式將會自動偵測連接的Com Port和Baud Rate並自動下載軌跡軌跡記錄
注意: 在下載旅遊記錄前請務必確認機器已經開機
4.
<檔案> \ <匯出精靈>
匯出精靈將會導引您匯出相關檔案
QTravel™: ……………………………………………..………………………………………………………………………………………………………………………………….……………………………………………………………………………. www.Qstarz .com
79
中文繁體
……………………………………………..………………………………………………………………………………………………………………………………….……………………………………………………………………………. QTravel™:是您最佳的相片地理標籤寫入幫手,並支援軌跡編輯、軌跡動畫撥放和輸
入輸出精靈界面 1. 請從 <開始> / <所有程式> / <Qstarz PC Suite> / Travel Recorder
第一次使用必須輸入產品金鑰才能啟用本軟體,產品金鑰位於驅動程式光碟的封套上
2. <檔案> \ < 匯入精靈 >
匯入精靈將會導引您軌跡相片寫入的步驟
2.1 匯入精靈會在您每次程式執行時出現,您也可以從 <檔案>\<匯入精靈> 或快
速啟動圖示執行精靈
2.2 程式將會自動偵測連接的 Com Port 和 Baud Rate 並自動下載軌跡檔案
2.3 從軌跡列表中選擇要匯入的軌跡
2.4 選擇要匯入跟軌跡對應的照片資料夾,您也可直接按節結束來省略這一步,軌
跡將會直接顯示在 Google地圖 上
注意: 在下載旅遊記錄前請務必確認機器已經開機
3. <檔案> \ <匯出精靈>
匯出精靈將會導引您匯出相關檔案
I. GPS 特色 1. 大LCD屏幕顯示支援背光: 38 x 32mm 1.8” 2. 多功能手持GPS 支援 自行車模式 /地標指示模式 /航點模式 3. 低電量消耗,內建可充電式鋰電池
……………………………………………..………………………………………………………………………………………………………………………………….……………………………………………………………………………. 80
www.Qstarz.com
SR-Q2100
中文繁體
……………………………………………..………………………………………………………………………………………………………………………………….……………………………………………………………………………. 4. 高感度晶片 -159dBm 5. 性能優異-熱/暖/冷 開機: 1/38/42 秒 (平均) 6. 防水設計IPX - 7級 J. 疑難排除 問題 Q2100無電源?
裝置未偵側到衛
星? 解決方法 電池電壓過低,或已損毀, 請將電池充電
1. 檢查衛星圖示是否持續閃爍,或已停止閃
爍,代表已擷取衛星.
2. 保持裝置處於無建築物遮蔽的空曠空間. 裝置無法與電腦
1. 檢查USB線是否正確連上裝置,或更換USB線。
連線?
2. 從新安裝軟體 PC suite Q2100.
……………………………………………..………………………………………………………………………………………………………………………………….……………………………………………………………………………. www.Qstarz .com
81
繁體中文
……………………………………………..………………………………………………………………………………………………………………………………….……………………………………………………………………………. ……………………………………………..………………………………………………………………………………………………………………………………….……………………………………………………………………………. 82
www.Qstarz.com