1
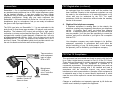
Warranty
RemoteMix 3 / 3.m is covered by a 2 year warranty to be
free from defective workmanship and materials. In the
event that the RemoteMix 3 / 3.m needs repair, you must
call us to get an authorization, and then carefully pack and
ship it to us. You will pay for shipping to us and we will pay
for return back to you, UPS ground. No free repairs will be
made if the defect was caused by misuse, weather
conditions, or other cause, except for defective
workmanship or materials.
THERE ARE NO EXPRESSED OR IMPLIED
WARRANTIES WHICH EXTEND BEYOND THE
WARRANTY HERE MADE.
RemoteMix 3 / 3.m
Phone Line Hybrid and
Telephone Handset Interface
for Remote Broadcasts
User Guide
10/06
JK Audio, Inc. 1311 E 6th Street, Sandwich, IL 60548 USA
Voice: (815) 786-2929 Toll Free: 800-JK-Audio
Fax: 815-786-8502
[email protected]
www.jkaudio.com
Copyright © 2006 JK Audio.
All Rights Reserved.
JK Audio
Connections
FCC Registration (continued)
RemoteMix 3 / 3.m is a professional audio mixer designed to work on
any standard analog telephone line or PBX / digital telephone system
via the handset interface. It can also connect to many cellular
telephones using a fax/modem adapter available from your cellular
telephone manufacturer. Simply plug your audio equipment into
RemoteMix 3 / 3.M and connect to a phone line. You can now put on
headphones, plug in a microphone, and you are ready to broadcast
the game or talk up a taped interview.
The RCA type jacks on RemoteMix 3 / 3.m are equivalent to the
jacks found on most home tape recorders, CD players, and receiver/
amplifiers. The balanced XLR output jack provides a high quality
connection to mixers and professional tape gear. This XLR output is
equipped with a switch to select between a telephone line / mic mix
at telephone bandwidth (200 Hz - 3400 - Hz) or a clean mic mix at full
bandwidth (80 Hz - 16 kHz). The clean mic mix contains mic 1, mic 2
and line 3 inputs. The adjustable hybrid circuit provides control over
the mix of transmit and receive audio at the output jacks.
Tape recorder or
audio equipment
input or output,
RCA or XLR
to RJ-11
wall jack
Microphones,
2 XLR jacks
(mic 1 is mic/line
switchable)
Headphones or small
speaker, 2 jacks 1/4”
stereo or mono
2
be unplugged from the modular outlet until the problem has
been corrected. Repairs to this telephone equipment can only
be made by the manufacturer or its authorized agents or by
others who may be authorized by the FCC. For repair
procedures, follow the instructions outlined under the warranty
section of the manual.
4.
Rights of the telephone company
If telephone equipment is causing harm to the network, the
telephone company may temporarily discontinue your telephone
service. If possible, they'll notify you before they interrupt
service. If advanced notice isn't practical, you'll be notified as
soon as possible. You'll be given the opportunity to correct the
problem, and you'll be informed of your right to file a complaint
with the FCC.
Your telephone company may make changes in its facilities,
equipment, operations or procedures that could affect the
proper functioning of your JK Audio product. If such changes
are planned, you'll be notified by your telephone company.
FCC Part 15 Compliance
This equipment has been tested and found to comply with the limits
for a Class A digital device, pursuant to Part 15 of the FCC Rules.
These limits are designed to provide reasonable protection against
harmful interference when the equipment is operated in a
commercial environment. This equipment generates, uses, and can
radiate radio frequency energy and, if not installed and used in
accordance with the instruction manual, may cause harmful
interference to radio communications. Operation of this equipment in
a residential area is likely to cause harmful interference in which
case the user will be required to correct the interference at his own
expense.
Changes or modifications not expressly approved by JK Audio can
void the user's authority to operate the equipment.
11
FCC Registration
Operation
Your new JK Audio product has been registered with the Federal
Communications Commission (FCC). This product complies with the
standards in Part 68 of the FCC rules.
1. Connect your audio equipment, microphone(s), and headphones
to the input and output jacks on RemoteMix 3.
1.
Connection and use with the nationwide telephone
network
The FCC requires that you connect this telephone equipment
to the national telephone network through a USOC RJ-11C
modular telephone jack.
2.
This equipment may not be used with Party Line Service or
Coin Telephone Lines.
3. Turn on the power switch, flip the "Phone Line" switch to "Dial/
Talk" and dial your call. You are now ready to broadcast or
record a telephone interview.
This equipment is hearing aid compatible.
Cellular Telephones
Information for the telephone company
Upon request from your local telephone company, you are
required to provide the following information:
a)
3.
2. Connect the jack marked "Phone Line" to any standard analog
telephone line,
or connect to the Fax/Modem adapter on a cellular telephone,
or disconnect the handset on the existing telephone and plug
the coily cord into the PBX handset interface jack on RemoteMix
The "line" to which you will connect the telephone
equipment (that is, your telephone number), and
b)
The telephone equipment's FCC registration number.
This can be found on the bottom of your t e l e p h o n e
equipment, and,
c)
The ringer equivalence number (REN) for this equipment.
The REN is used to determine the quantity of devices
which will be connected to the telephone line. Excessive
RENs on the telephone line may result in the devices not
ringing in response to an incoming call. In most, but not
all areas, the sum of the RENs should not exceed 5.0. To
be certain of the number of devices that may be
connected to the line, as determined by the total R E N s ,
contact the local telephone company.
Repair Instructions
RemoteMix 3 / 3.m was designed to work well with the data interface
(fax / modem adapter) for your cellular telephone, available through
your cellular dealer. These adapters turn your cellular telephone into
an RJ11 equivalent jack which replaces the wall jack in the picture on
the previous page.
Handset Interface
If you cannot get to an analog phone line or if the phone system is a
digital or analog PBX, ISDN, or a key telephone system, you can use
the built-in handset interface. Simply disconnect the handset from the
coily cord and plug the cord into the RemoteMix 3 / 3.m PBX
Handset Interface Jack. Now select the handset type on the 3
position switch. Trial and error works faster than a chart of handset
types, but this basic description may help.
Switch Position
A
B
C
Handset Microphone Type
Electret
Dynamic
Carbon
Note: The handset type switch only affects audio you are attempting
to send down the telephone line. The receive side of the RemoteMix
3 will work no matter what position the handset type switch is in.
If it is determined that your telephone equipment is
malfunctioning, the FCC requires that it not be used and that it
10
3
Operation (continued)
FAQ’s
VU Meter
? The output from Mic 1 is very low but the other two mics are fine.
! Check the position of the Mic/Line switch near Mic 1. This first input can
The VU meter shows the mix of both microphones and the tape
signal going out over the phone line or handset interface.
Send Side (To Phone Line)
There are separate volume controls for the two microphone inputs
and the line 3 input RCA jack. You can use all three inputs at the
same time. Mic 1 also has a Mic/Line selector switch which lowers
the gain on the Mic 1 XLR jack by 30 dB to allow a balanced line
level input.
be switched to accept a line level signal from a mixer or other equipment.
? I'm trying to use my RemoteMix 3 with a PBX system but it doesn't
!
Receive Side (From Phone Line)
The receive side has separate controls for headphone output level
and mix audio output level. The Line Out control adjusts the signal
going out of the balanced XLR jack marked Balanced Line Out. This
is either a mix of both sides of the telephone call at telephone bandwidth (200 Hz - 3400 Hz) or a clean mic / line input mix at full bandwidth (80 Hz - 16 KHz).
Headphones
The built-in headphone amplifier is strong enough to power two pair
of headphones or a small desktop speaker. The left and right
channels contain the same mono signal, but are powered by
separate amplifier channels. These jacks will drive either two 1/4"
stereo plugs or two 1/4" mono plugs.
Talkback Feature
A built in speaker lets you monitor the phone line during call setup
and station breaks. The monitor speaker volume is controlled by the
headphone volume control and has an additional on / off switch. An
internal push-to-talk microphone also helps when setting up your call.
The speaker switches off when the microphone button is pushed on
to prevent feedback.
Ringer
RemoteMix 3 / 3.m has an internal ringer for incoming calls.This can
be turned off using the switch on the side of the unit.
4
seem to work. I've plugged the handset cord into the handset line
in jack but nothing happens. What's wrong?
The "Handset (line in)" jack is for connecting a handset to the RemoteMix 3. The correct jack to plug the handset cord into is on the other
side of the unit labeled "handset cord". Just plug one end of the handset
cord into this jack and the other end into the existing telephone and dial
your call. Switch between the three different handset types on the ABC
selector switch if you're still having trouble sending audio down the
phone line.
? I've lost my power supply for my RemoteMix 3 unit. I have another
!
power supply that fits from a different product. Can I use this instead?
NO! Never use a power supply other than the one that was supplied by
your manufacturer. Power supplies are available in either AC or DC output with many combinations of voltage and available current. DC supplies carry either positive or negative center pin output and may or may
not be "regulated". If you connect a negative center pin power supply to
a positive center pin jack, it's just like hooking up the battery cables to
your car backwards. Obviously you would not want to do this to your car
or your expensive audio equipment. "Regulation" is the tolerance to the
specified voltage of your DC power supply. All of our DC power supplies
have a low noise 5% tolerance. This means that our 9V DC power supplies will always output 9 volts +/- 5%, whether you are using no power
at all or applying a full load. Most consumer power supplies are not
regulated. A non-regulated 9V, 800mA power supply could actually output 16V until an 800 mA load is applied. This could invariably damage
your equipment, and also create a great deal of noise. There is also no
standard for the size of your power jack. This means that a 16VAC
power supply and a 1.5VDC power supply could both have the same
2.1mm jack.
? Can I wire a stereo mini output to the XLR input of a RemoteMix 3?
! Yes, simply wire the tip to pin 2, the sleeve to pin 1, and leave the ring
and pin 3 floating. You should use the mic 1 input since it is mic/line
switchable, and use mic 2 for an additional microphone.
9
Specifications
Operation (continued)
Inputs:
Line:
Connector
Input Impedance
Level
RCA phono Jack
20 k ohms
250 mV RMS
(-10 dBm nom.)
Microphone:
Connector
Input Impedance
Female XLR
1000 ohms
Mic / Line:
Line = -30dB from microphone gain.
Handset:
Modular 4pin/4wire handset jack
Electret microphone bias.
Outputs:
Line:
Connector
Output Impedance
Level
RCA phono Jack
50 ohms
250 mV RMS
Balanced:
Connector
Output Impedance
Level
Male XLR
200 ohms
500 mV RMS
(+12 dBm max.)
Headphone:
Connector
Output Impedance
Power
1/4"stereo jacks
8 ohms
1/2 watt
Phone Line:
Connector
Isolation
Ringer (REN)
RJ11C
1500 volts
1.2B
Handset Interface:
Switchable electret, dynamic, carbon
handset microphone bias types.
Keypad:
DTMF (Dual Tone Multi-Frequency)
Pulse Dialing
Handset Jack
The handset jack on the right side of RemoteMix 3 / 3.m allows you
to plug in a telephone handset and quickly set up a call before you
set up your microphones and headphones. The handset microphone
volume is adjusted using the Line 3 knob. The earpiece volume is
adjusted using the Headphone level knob. All telephone handsets
are different, so if yours is not compatible, try an AT&T, Sony, or
Radio Shack residential phone handset.
Keypad
The telephone keypad is for tone or pulse dialing. You may use the
keypad at anytime during a call but keep in mind that both transmit
and receive audio are muted during a keypress.
Tone / Pulse Dialing
RemoteMix 3 / 3.m is equipped with a switch to select tone (DTMF)
dialing or pulse dialing. The switch is located underneath the battery
door. With the switch towards the volume control knobs, the unit is in
the “pulse” mode. When in “pulse” mode the “*” key will set the unit
to transmit digits as tones regardless of the switch position. To
return to pulse dialing turn the keypad off and back on.
Keypad ON / OFF
This switch disables the DTMF keypad to prevent tones from being
blasted down the phone line during a broadcast.
Phone Line Switch
FAQ’s
This switch acts as the switch-hook for the telephone line. The Hang
Up position is the normal on-hook position when you are not using
the line or you are waiting for a call. When you want to place a call,
or when a call comes in, switch to the Dial/Talk position. Keep this
switch in the Hang Up position if you are using the PBX Handset
Interface.
? Will your RemoteMix 3 provide phantom power for my condenser
Power
!
microphone?
No, our devices will not provide phantom power. If you are connecting
your microphone directly to a JK Audio RemoteMix, you should use a
dynamic mic.
8
RemoteMix 3 / 3.m is powered by two 9 volt alkaline batteries located
under the cover on the bottom of the unit. Under normal use, you
should get at least 30 hours of continuous use from a fresh set of
batteries.
5
Operation (continued)
Hybrid Null Adjustment (continued)
To test the batteries, simply press the Battery Test button on the
front of the unit. If the LED lights, the batteries are still good. The unit
may still function if the LED does not light, but there will be significant
audio distortion and a loss of level as the batteries continue to
discharge.
The amount of transmit/receive isolation will depend on the quality of
the telephone line. This circuit is factory set to give a good mix on an
average telephone line, and is therefore perfect for recording both
sides of a telephone interview.
To find the absolute null for any telephone line, follow this procedure:
The batteries are wired in parallel so it is important to replace both at
the same time with identical batteries. If two fresh batteries are not
available, it is better to run using only one good battery. The two
battery fixtures are wired in parallel so it does not matter which one
gets the single battery.
We also provide a high quality, regulated AC to DC adapter to power
RemoteMix 3 / 3.m when AC power is available. Simply plug it into
the back of RemoteMix 3 / 3.m and plug the transformer into a 110
VAC wall outlet. When the power connector is inserted into the jack,
the batteries are bypassed. The AC adapter does not charge the
batteries. Remember to NEVER use a different power supply than
the one that was provided with the unit. Serious damage and poor
performance could result.
Hybrid Null Adjustment (optional)
The receive side of RemoteMix 3 / 3.m has a hidden fine tuning
control which is adjusted by inserting a screwdriver into the back of
the unit just below the words Null Adj. and turning left or right. This is
a ten-turn potentiometer. This adjustment controls the level of
transmit audio that appears on the Receive audio jacks. The null
circuit matches the characteristics of RemoteMix 3 / 3.m with the
characteristics of the telephone line. Although much of the transmit
audio can be removed, this is not the equivalent of a mix-minus
output.
6
1. Place a call to a quiet location.
2. Send a signal down the line at moderate levels, this can be a
prerecorded tape of music or speech, or preferably a test signal.
3. Connect the Receive line output to a meter or scope, or listen to
the receive signal over the headphones. Be sure to turn up the
From Phone or Headphones volume control depending on which
method you are using to monitor the receive signal.
4. On the back of RemoteMix 3 / 3.m, below the words Null Adj.,
there is a hole for a small flat blade screwdriver. This is a 10-turn
potentiometer to allow for very sensitive adjustments. Try to
remember the position of the blade, and the number of turns you
are making as you first adjust clockwise, and then back to the
original position, and then counterclockwise.
The goal is to adjust the null signal until the receive signal contains a
minimum amount of transmit audio. However, if you want a good mix
of transmit and receive signals, you must have someone on the far
end speak or send audio down the line as you adjust for the proper
balance.
To Reset Null to Factory Setting:
Disconnect from phone line, switch the Phone Line switch to On
Hook, and the set the null to minimum. This presets the null to an
average phone line impedance.
7