1
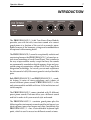
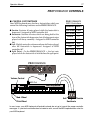
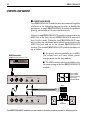
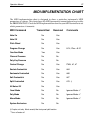
PROFORMANCE
PROFORMANCE +
OPERATION MANUAL
CONTENTS
INVENTORY
6
INTRODUCTION
7
CONNECTIONS
8
BASIC OPERATION
10
MAKE MUSIC
12
PRESETS
13
CONTROLS
16
OVERFLOW MODE
18
INTRODUCTION
TO MIDI
19
2
PROFORMANCE
Operation Manual
Safety Instructions
3
WARNING: READ THIS FIRST!
Different countries may require the use of a different AC
adapter or attachment plug, or both. To reduce the risk of fire
or electric shock, refer servicing to qualified service personnel. To reduce risk of fire or electric shock do not expose this
product to rain or moisture.
CAUTION
If the 9101-91**, PROFORMANCE is rack mounted, an E-mu
19-inch, two space rack shelf (Model 9104) must be used.
User-Maintenance Instructions
1. The PROFORMANCE should be kept clean and dust free.
Periodically wipe the unit with a clean, lint free cloth. Do not
use solvents or cleaners.
2. There are no user lubrication or adjustment requirements.
3. Refer all other servicing to qualified service personnel.
Instructions pertaining to a risk of fire, electric
shock, or injury to persons
Warning: When using electric products, basic precautions
should always be followed, including the following:
1. Read all instructions before using the PROFORMANCE.
2. To reduce the risk of injury, close supervision is necessary
when the PROFORMANCE is used near children.
3. Do not use the PROFORMANCE near water — for example
near a bathtub, washbowl, kitchen sink, or in a wet basement.
4. The PROFORMANCE should be located away from heat
sources such as radiators, heat registers, fireplaces, stoves, or
ovens.
4
Safety Instructions
PROFORMANCE
5. The PROFORMANCE should only be connected to an AC
adapter of the type described in the operating instructions
and included with the product.
6. The AC Adapter of the PROFORMANCE should be unplugged from the outlet when left unused for a long period of
time.
7. Care should be taken so that objects do not fall onto and
liquids are not spilled into the enclosure of the
PROFORMANCE.
8. The PROFORMANCE should be serviced by qualified
personnel when:
■ The AC Adapter, cord or plug has been damaged, or
■ Objects have fallen onto, or liquid has been spilled into the
PROFORMANCE, or
■ The PROFORMANCE has been exposed to rain, or
■ The PROFORMANCE does not appear to operate
normally or exhibits a marked change in performance, or
■ The PROFORMANCE has been dropped, or the enclosure
damaged.
9. Do not attempt to service the PROFORMANCE beyond
that described in the user maintenance instructions. All other
servicing should be referred to qualified service personnel.
Radio and Television Interference
This equipment generates and uses radio frequency energy.
If not installed and used correctly, that is, in strict accordance
with the manufacturer’s instructions, it may cause interference to radio and television reception. It has been certified to
comply with the limits for a Class A computing device in
accordance with the specifications in Subpart J of Part 15 of
Operation Manual
the FCC Rules, which are designed to provide reasonable
protection against such interference in a residential installation. However, there is no guarantee that interference will not
occur in a particular installation. If this equipment does cause
interference to radio or television reception, which can be
determined by turning the equipment on and off, the user is
encouraged to try to correct the interference by one or more of
the following means:
■ Reorient the receiving antenna.
■ Relocate the PROFORMANCE away from the receiver.
■ Relocate the PROFORMANCE to a different outlet so that
the receiver, drive and instrument are on different branch
circuits.
■ Install a rooftop antenna with a coaxial cable lead-in
between the antenna and receiver.
If necessary, the user should consult E-mu Systems or an
experienced radio/television technician for additional
suggestions.
You may find the following booklet prepared by the Federal
Communications Commission helpful: How to Identify and
Resolve Radio-TV Interference Problems. This booklet is available from the U. S. Government Printing Office, Washington,
DC 20402, Stock No. 004-000-00345-4.
Save These Instructions
Safety Instructions
5
6
PROFORMANCE
INVENTORY
Unpacking the PROFORMANCE
The PROFORMANCE shipping carton should contain the
following items:
■ This Manual
■ The PROFORMANCE Module
■ The AC Adapter and Power Cord
If any of the above items are missing, please contact E-mu
Customer Service at (408) 438-1921 between the hours of 8:00
AM and 5:00 PM PST.
Make sure that the AC adapter that you received uses the
correct voltage for your part of the world. The USA uses 110
Volt power, Europe uses 220V, and Japan uses 100V. If you do
not have the correct AC Adapter, please contact your dealer.
ALSO...
In addition to the PROFORMANCE and accessories, you will
also need the following items:
■ A MIDI controller such as a MIDI keyboard, guitar controller, wind controller, personal computer with MIDI interface, etc.
■ A MIDI cable.
■ A stereo audio amplification system, such as a keyboard
amplification system, a home stereo system, or headphones.
■ The appropriate audio connection cables for your system.
7
Operation Manual
INTRODUCTION
PRO formance
Plus
POWER/MIDI
VOLUME
FINE TUNE
TRANSPOSE
MIDI CHANNEL
-oct C +oct
DEMO 1 2
+2oct OMNI
-2oct
3
4
C
B
SPLIT
5
D
A
13
A
6
12
D
7
11
G
E
G F F
10 9 8
The PROFORMANCE/1, 16-bit True Stereo Piano Module
provides you with the rich, true-stereo sound of a concert
grand piano at a fraction of the cost of an acoustic piano.
Subtle nuances of the hammers, strings and soundboard are
all captured with amazing detail.
The PROFORMANCE/1 sound is exceptionally realistic and
convincing because the PROFORMANCE/1 is based on actual stereo recordings of a real Grand Piano. This is similar to
the way a tape recorder works, except that here, the sounds
are permanently recorded on digital memory chips and processed using our proprietary custom VLSI (Very Large Scale
Integration) technology. As a result, you can now experience
the rich sound of a $18,000 concert grand at a truly affordable
price.
Both PROFORMANCE/1 and PROFORMANCE/1 + models feature 16 notes of stereo polyphony and a choice of
several different piano sounds. PROFORMANCE/1 is the
only piano module available with true 16 -bit architecture and
stereo samples.
The PROFORMANCE/1 comes standard with 15 different
preset piano sounds. Each one offers you a different sound
and feel in order to fit your musical style and mood.
The PROFORMANCE/1 + contains grand piano plus the
following other instruments: acoustic and electric basses, two
electric pianos, tone-wheel organ, and vibes. In addition, the
PROFORMANCE/1 + has a user-definable keyboard split
point, which is used to access two different sounds at once.
PRESET
MIDI 1 2
3
15
4
14
5
13
12
6
7
11
10 9 8
8
PROFORMANCE
CONNECTIONS
POWER
Connect the AC adapter to the 9V AC power jack on the rear
of the PROFORMANCE.
MIDI IN
The PROFORMANCE is controlled by MIDI messages received at the MIDI In connector. Connect the MIDI In of the
PROFORMANCE to the MIDI Out of a MIDI controller such
as a MIDI keyboard, MIDI wind controller, or MIDI guitar
controller.
MIDI THRU
The MIDI Thru jack is used to connect additional MIDI
devices onto the MIDI chain. MIDI Thru transmits an exact
copy of the messages received at the MIDI In jack.
MIDI OUT
Used ONLY for MIDI overflow mode. MIDI Out may be
connected to the MIDI In jack of another PROFORMANCE,
which increases the polyphony from 16 to 32 stereo channels.
AUDIO OUTPUTS
The PROFORMANCE is a high quality, stereo audio device.
In order to reproduce its wide dynamic range and frequency
response, use a high quality amplification and speaker system such as a keyboard amplifier or home stereo system.
Stereo connection is highly recommended because of the
added realism provided by stereophonic sound. If you have
PROFORMANCE connected in mono, you are only using
half of the circuitry! Headphones may be used if an amplifier
and speaker system is not available. Plug stereo headphones
into the Left/Stereo output jack. The Right/Mono output jack
serves as a monophonic output when the left jack is not
plugged in.
Connections
Operation Manual
9
CONNECTION INSTRUCTIONS
MIDI Controller
(MIDI Keyboard, Sequencer, Computer, etc.)
Additional
MIDI
Devices
Use the Left
Audio Output
for Stereophones
MIDI In
MIDI Out
Connect for
MIDI Overflow
ONLY!
E-MU SYSTEMS, INC.
MIDI
AUDIO OUTPUT
POWER
IN
OUT
THRU
LEFT/STEREO
RIGHT/MONO
9V AC
To
Audio Outs
L
Male RCA plug
to
Male Phone plug
R
Mixer
AC
Adapter
OR
Home
Stereo
Amp
&
Speakers
This diagram shows a typical equipment setup for the PROFORMANCE.
Stereo connection is HIGHLY recommended!
10
PROFORMANCE
BASIC OPERATION
PRO formance
Plus
VOLUME
Sharp
FINE TUNE
TRANSPOSE
PRESET
MIDI 1 2
3
15
4
14
5
13
12
6
7
11
10 9 8
■ Volume Control - This is the master volume control. The
PROFORMANCE has a relatively high output level in order
to drive headphones. If you hear the sound start to "break up"
or clip, the output level should be reduced using this control.
VOLUME
-oct C +oct
+2oct
-2oct
B
C
D
A
A
D
G
E
G F F
MIDI CHANNEL
■ Power/MIDI Activity LED - Glows green, indicating that
power is connected and flashes when MIDI data is being
received.
POWER/MIDI
Transpose
Down
TRANSPOSE
-oct C +oct
DEMO 1 2
+2oct OMNI
-2oct
3
4
C
B
SPLIT
5
D
A
13
A
6
12
D
7
11
G
E
G F F
10 9 8
POWER/MIDI
Flat
FINE TUNE
Transpose
Up
■ Fine Tune Control - This control is used to tune the
PROFORMANCE to other instruments. With the control set
in the center detent position, the PROFORMANCE will be
precisely tuned to concert pitch (A=440 Hz). Tuning the
control clockwise raises the pitch and turning it counterclockwise lowers the pitch. The range of this control is ± 1/2
semitone, with a resolution of 1 cent (1/100 semitone).
■ Transpose Selector - Transposes the PROFORMANCE
up or down one octave in semitone increments. It also has
settings to transpose ± 1 or 2 octaves. Transpose selections are
referenced to C on the musical scale. With the control set
straight up at C, there is no transposition. The two positions
on either side give 1 and 2 octave transpositions. As the knob
is rotated clockwise, transpose is shifted up in semitone steps
from C# up to B. When the knob is rotated counterclockwise,
transpose is shifted down in semitone steps from B down to
C#.
11
Operation Manual
BASIC OPERATION
■ MIDI Channel Selector - This control selects the MIDI
channel number in Poly mode, and also selects Omni mode,
the Keyboard Split Point (+ unit only) or the Demo Sequence.
● When a MIDI channel number is selected, the
PROFORMANCE is automatically placed in Poly Mode and
will only respond to information on the selected MIDI channel.
● Selecting Omni places the PROFORMANCE in Omni
mode so that it responds to any and all MIDI channels.
● The Split function pertains to the PROFORMANCE + only.
On the ‘plus’, certain presets have been programmed with a
split keyboard so that two sections of the keyboard play a
different sound. The split point can be user-defined.
To define the point at which the keyboard is divided:
1. Set the selector to Split.
2. Play a key on the keyboard (the last note you play
will be used).
3. Move the selector out of the Split mode.
■ For more information on
the various MIDI modes, see
Introduction to MIDI, on page
19 of this manual.
DEMO 1
OMNI
SPLIT
2
3
4
5
13
12
11
6
10 9
8
7
MIDI CHANNEL
▼ When using the Split function and Overflow mode, you
must select the split point on
both PROFORMANCE units.
Any "Split" presets will now be divided at the selected split
point. If no split point is defined, the factory setting of G2 will
be used. The split point is not retained upon power down.
● About two seconds after selecting Demo, the demo
sequence will begin playing. Turning the knob to another
position stops the sequence.
■ Preset Selector - This control allows you to select one of
the 15 presets (sounds). When this control is set to the "MIDI"
position the preset numbers are accessed via MIDI program
change command. The PROFORMANCE + model has an
additional 17 presets which are available over MIDI. As on
many other devices, the PROFORMANCE preset numbers
are offset by +1 from the MIDI preset numbers. Therefore,
MIDI preset change #0 equals preset #1 on
PROFORMANCE.
Responds
to Preset
Changes
over MIDI
MIDI 1 2
3
15
4
14
5
13
12
6
11
7
10 9 8
PRESET
12
PROFORMANCE
MAKE MUSIC
If you have your AC power adapter, audio and MIDI cords
hooked up, it's time to start playing. The green LED on the
front of the PROFORMANCE should be lit, and it should
flash when you play your MIDI keyboard (or other MIDI
controller).
■ Turn the MIDI channel selector to Omni mode. This mode
is the easiest to use while getting started.
■ Set the volume control on PROFORMANCE to full. Set
your amplifier (stereo or mixer) to low volume and slowly
turn it up while you play your MIDI controller. You should
now be hearing music.
If you still aren't getting sound, consult the following chart:
PROBLEM SOLVER
● The green LED on the front
panel is not lit.
✓ Check the AC power
adapter. Make sure it is
plugged in correctly and that it
is of the proper voltage for
your part of the world.
● The green LED is lit, but
doesn't flash when notes are
played.
✓ Check the MIDI cable and
make sure that your MIDI
keyboard (controller) is
turned on.
● The green LED flashes, but
the PROFORMANCE does
not make any sound.
✓ Check
the
audio
connections. Play the demo
sequence and use a pair of
headphones to verify that the
PROFORMANCE is playing.
● The demo plays, and the
green light flashes, but the
PROFORMANCE doesn't
play from the keyboard.
✓ Set the PROFORMANCE
to Omni mode, and try again.
● Wavering notes.
✓ Turn down the Modulation
Wheel on the keyboard.
13
Operation Manual
PROFORMANCE PRESETS
PRESETS (Standard Unit)
1. Dark Grand
Medium touch sensitivity and dynamic tonal
response, perfect for solo pieces.
2. Classic Grand
Medium touch sensitivity and brighter overall tone
make this piano ideal for ensembles or concertos.
3. Mellow Ivory
Medium touch sensitivity and overall dark tone
creates very soft moods and textures.
4. Rock Piano
Medium touch sensitivity and bright timbres allow the
piano to cut through a mix without EQ.
5. Honky Tonk
Very detuned and bright, good for ragtime.
6. Mellow Chorus
Same as preset #3, detuned.
7. Modern Rock
A bright, slightly detuned piano.
8. Dark Touch
Same as preset #1, but with more touch sensitivity.
9. Rock Touch
Same as preset #4, but with more touch sensitivity.
10. Mellow Touch
Same as preset #3, but with more touch sensitivity.
11. Classic Touch
Same as preset #2, but with more touch sensitivity.
12. Dark Patterns
Same as preset #1, but with less touch sensitivity.
13. Rock Patterns
Same as preset #4, but with less touch sensitivity.
14. Mellow Patterns
Same as preset #3, but with less touch sensitivity.
15. Classic Patterns
Same as preset #2, but with less touch sensitivity.
14
PROFORMANCE
PROFORMANCE + PRESETS
In addition to the grand piano sounds, the PROFORMANCE + contains samples of electric
piano, electric and acoustic bass, vibes, and organ for a total of 32 presets. Presets 16 - 32 can
be accessed only via a MIDI program change command.
+ PRESETS
1. Dark Grand
Medium touch sensitivity and dynamic tonal
response, perfect for solo pieces.
2. Classic Grand
Medium touch sensitivity and brighter overall tone
make this piano ideal for ensembles or concertos.
3. Mellow Ivory
Medium touch sensitivity and overall dark tone
creates very soft moods and textures.
4. Rock Piano
Medium touch sensitivity and bright timbres allow
the piano to cut through a mix without EQ.
5. Warm Electric Piano
A rich dark sound, great for solo playing.
6. Studio Electric Piano
A lighter electric piano sound.
7. Electric Organ
This is a straight Hammond B3 sample.
8. Rock Organ
This organ has a full, rich sound.
9. Straight Vibes
Vibraphone samples with velocity-to-mallet, and
tremolo on the modulation wheel.
10. Bright Vibes
Vibes plus digital waveforms, mod. wheel tremolo.
11. Acoustic Bass/Piano
Split preset.
12. Electric Bass/Organ
Split preset.
13. Synth Tines
An 8-voice digital Electric Piano
15
Operation Manual
PROFORMANCE + PRESETS
+ PRESETS (cont)
14. Piano Bell
An 8-voice, electronic synth keyboard patch.
15. Acou. Bass/Elec. Piano
Split preset.
16. Acoustic Bass/Vibes
Split preset.
17. ElectricBass/Piano
Split preset.
18. Honky Tonk
Very detuned and bright, good for ragtime.
19. Acoustic Bass/Organ
Split preset.
20. Elec. Bass/Elec. Piano
Split preset.
21. Exceptionally Bright Piano
Lots of high frequency.
22. Mellow Chorus
Same as preset #3, detuned.
23. Ice Keys
High harmonic digital waveforms. An 8-voice sound.
24. Modern Rock
A bright, slightly detuned piano.
25. Dark Touch
Same as preset #1, but with more touch sensitivity.
26. Rock Touch
Same as preset #4, but with more touch sensitivity.
27. Mellow Touch
Same as preset #3, but with more touch sensitivity.
28. Classic Touch
Same as preset #2, but with more touch sensitivity.
29. Mellow Patterns
Same as preset #3, but with less touch sensitivity.
30. Rock Patterns
Same as preset #4, but with less touch sensitivity.
31. Dark Patterns
Same as preset #1, but with less touch sensitivity.
32. Classic Patterns
Same as preset #2, but with less touch sensitivity.
16
PROFORMANCE
PROFORMANCE CONTROLS
■ CONTROL WHEELS
Your MIDI keyboard will probably have a pair of control
wheels (or levers) located on the left side of the unit. The left
wheel or lever is usually spring loaded and is normally used
Mod. Wheel
to control pitch. The right wheel or lever is usually not spring
loaded and is a general purpose wheel normally used to
control modulation amount.
The Left Wheel is programmed to be a pitch bender and
allows you to bend notes up and down. This wheel bends the
pitch up when pushed forward, down when pulled back and
returns to normal tuning when the wheel is centered.
Pitch Wheel
Your MIDI keyboard
controller may have two
or more control wheels.
The Right Wheel is programmed to control the amount of
modulation applied to the sound. This modulation may be
different for each preset and can take the form of vibrato,
tremolo, or chorusing. With the right wheel all the way
toward you (down), there is no modulation. As the wheel is
pushed forward, more modulation is added. The modulation
amount is assigned to MIDI continuous controller #1.
● Vibrato is a cyclic change in pitch.
● Tremolo is a cyclic change in amplitude.
● Chorusing is a voice doubling effect created by detuning
the two sides of the stereo sound and slightly modulating
the pitch.
■ MIDI VOLUME CONTROL
Your MIDI keyboard may have a provision for a MIDI volume
control. This may be a control mounted on the keyboard itself,
or it may be controlled via a footpedal. In any case, the volume
of PROFORMANCE can be controlled from your MIDI
controller if it sends this information on MIDI continuous
controller channel #7. Consult the operation manual of your
MIDI controller to find out if it transmits MIDI Volume
information. For more information on MIDI, see page 19 in
this manual.
17
Operation Manual
PROFORMANCE CONTROLS
■ CONTROL FOOTSWITCHES
Your MIDI keyboard may also have footswitches which can
control the following functions on the PROFORMANCE.
● Sustain- Sustains all notes played while the footswitch is
depressed. Assigned to MIDI controller #64
● Sostenuto- Sustains all notes which are being held at the
time of the footswitch depression, but all subsequent notes
played will decay normally. Assigned to MIDI controller
#66.
● Soft - Slightly mutes the volume and tone of all notes played
after the footswitch is depressed. Assigned to MIDI
controller #67.
● Split Point - On the PROFORMANCE +, the last note
played while the footswitch is held defines the split point.
PROFORMANCE
MIDI Controllers
Controller MIDI #
Pitch Wheel PWH
Mod. Wheel
#1
Volume
#7
Sustain
#64
Sostenuto
#66
Soft
#67
Split Point
#70
(Plus Only)
PROFORMANCE
PRO formance
Plus
POWER/MIDI
VOLUME
FINE TUNE
TRANSPOSE
MIDI CHANNEL
DEMO 1 2
-oct C +oct
+2oct OMNI
-2oct
3
4
SPLIT
C
B
5
D
13
A
A
6
12
D
7
11
G
E
G F F
10 9 8
PRESET
MIDI 1 2
3
15
4
14
5
13
12
6
7
11
10 9 8
MIDI In
Volume Control
MIDI Out
MIDI Keyboard
Mod. Wheel
Pitch Wheel
Soft
Sustain
Sostenuto
In most cases, your MIDI keyboard will probably already be set up to transmit the proper controller
messages. If a particular controller does not seem to work, consult the MIDI implementation chart for
your MIDI keyboard.
18
PROFORMANCE
OVERFLOW MODE
■ OVERFLOW MODE
Two PROFORMANCE modules may be connected together
as shown in the following diagram in order to double the
polyphony. A single PROFORMANCE module is capable of
playing a maximum of 16 notes simultaneously.
When a second PROFORMANCE module is connected to the
MIDI Out of the first, the first PROFORMANCE puts itself
into Overflow mode. When the first PROFORMANCE runs
out of notes, any additional notes played are directed to the
MIDI Out port and on to the second PROFORMANCE
module. The second PROFORMANCE module should be set
up as follows:
■ The preset selector should be set to MIDI.
The second unit will now follow preset
changes made on the first module.
MIDI Controller
(MIDI Keyboard, Sequencer, etc.)
■ The MIDI channel selector should be set to
the same setting as the first PROFORMANCE
module.
MIDI Out
L
R
L
R
E-MU SYSTEMS, INC.
MIDI
AUDIO OUTPUT
POWER
IN
OUT
THRU
LEFT/STEREO
RIGHT/MONO
Two Y-cables
may be used
in lieu of a mixer
when using
Overflow Mode.
9V AC
Mixer
E-MU SYSTEMS, INC.
MIDI
AUDIO OUTPUT
POWER
IN
OUT
THRU
LEFT/STEREO
RIGHT/MONO
9V AC
Amp
&
Speakers
Two PROFORMANCE modules may be linked via Overflow mode to provide 32 note polyphony.
19
Operation Manual
INTRODUCTION TO MIDI
MIDI, or Musical Instrument Digital Interface, is a link
between musical instruments which allows various types of
musical equipment to be connected together. The MIDI cable
transmits information about the status of one instrument to
another. For example, when you press a key on your MIDI
keyboard, a message is transmitted which tells the instrument
at the other end of the cable to play that note. When you
release the key, a message is transmitted which tells the
instrument to stop playing that note.
At its simplest level, MIDI uses 3 basic types of messages: note
on/off, program change, and continuous controller messages.
■ Note On/Off messages tell the instrument which notes to
play. This message also includes information on how hard
the note was played (velocity).
■ Program Change messages tell the instrument to change its
program or sound.
■ Continuous Controller messages tell the instrument to
change a parameter, such as the volume.
MIDI
Channel 1
MIDI
Channel 2
MIDI
Channel 3
MIDI
Channel 16
Note
On/Off
Note
On/Off
Note
On/Off
Note
On/Off
Program
Change
Program
Change
Program
Change
Program
Change
Continuous
Controllers
Continuous
Controllers
Continuous
Controllers
Continuous
Controllers
The messages described above are called Channel Messages.
MIDI contains 16 MIDI channels which are comparable to the
channels on your television. You can tune-in to a particular
channel and ignore information coming in on another
channel. Unlike your TV, some MIDI instruments have the
ability to listen to multiple channels at once. Each of the
sixteen MIDI channels can carry its own note on/off, program
change and continuous controller messages.
20
PROFORMANCE
INTRODUCTION TO MIDI
Continuous Controllers
There are many specific continuous controllers for each MIDI
channel. A continuous controller is a knob or wheel that can
be continuously adjusted, as opposed to a switch that can be
turned on or off. Some controllers such as the pitch wheel,
modulation wheel and volume, have standardized controller
numbers. For example, volume is usually sent on continuous
controller #7. The PROFORMANCE will only respond to
volume information if your MIDI keyboard transmits volume
information on continuous controller #7.
MIDI Modes
There are 4 different MIDI modes which can be used for
different applications. (Only two of the modes, Omni and
Poly, are used on the PROFORMANCE.) The four MIDI
modes currently in use are described below.
DEMO 1 2
3
OMNI
4
SPLIT
5
13
12
11
6
10 9
8
7
Omni Mode - This is the simplest and easiest to use MIDI
mode. A synth in Omni mode transmits on channel 1 and
receives on all MIDI channels simultaneously. This mode is
useful when you simply want to connect two pieces of gear
together. Connect MIDI Out to MIDI In and away you go.
MIDI CHANNEL
Mono Mode - When an instrument is in mono mode, it can
only play one note per MIDI channel. This mode is sometimes
useful with MIDI guitar and wind controllers.
DEMO 1 2
3
OMNI
4
SPLIT
5
13
12
11
6
10 9 8
7
MIDI CHANNEL
Poly Mode - Poly mode uses any one of the sixteen channels.
In poly mode, only one channel can be received. The
advantage of using poly mode is that each channel is kept
separate from the others. Using poly mode, you could have 16
independent musical lines playing on 16 different
synthesizers at the same time!
Multi Mode - This mode is used on multi-timbral instruments
which can listen to more than one of the 16 MIDI channels
simultaneously and can play a separate sound on each
channel.
21
Operation Manual
MIDI IMPLEMENTATION CHART
The MIDI implementation chart is designed to show a particular instrument's MIDI
parameters at a glance. This chart shows the MIDI parameters transmitted and received by
the PROFORMANCE. Check the MIDI implementation chart for your MIDI controller to see
which parameters it transmits.
MIDI Command
Transmitted
Received
Note On
No
Yes
Note Off
No
Yes
Pitch Wheel
No
Yes
Program Change
No
Yes
Overflow Mode
Yes
Yes
Channel Pressure
No
No
Poly Key Pressure
No
No
Control Change
No
Yes
PWH, #1, #7
Sustain Footswitch
No
Yes
#64
Sostenuto Footswitch
No
Yes
#66
Soft Footswitch
No
Yes
#67
Split Footswitch
No
Yes
#70 †
All Notes Off
No
Yes
Omni Mode
No
No
Ignores Mode ∆ *
Poly Mode
No
No
Ignores Mode ∆ *
Mono Mode
No
No
Ignores Mode ∆ *
System Exclusives
No
No
† On plus unit only. Works exactly like front panel split function.
* Turns all notes off.
Comments
0-14, Plus = 0-31
22
PROFORMANCE
WORLD HEADQUARTERS
E-MU/ENSONIQ
P.O. BOX 660015
SCOTTS VALLEY, CA USA
95067-0015
TELEPHONE: 831-438-1921
FAX: 831-438-8612
EUROPE, AFRICA, MIDDLE EAST
E-MU SYSTEMS
SUITE 6, ADAM FERGUSON HOUSE
ESKMILLS INDUSTRIAL PARK
MUSSELBURGH, EAST LOTHIAN
SCOTLAND, EH21 7PQ
TELEPHONE: +44 (0) 131-653-6556
FAX: +44 (0) 131-665-0473