1
Winterm™ 9000 Series XPE-Based Terminals
Quick Reference Guide
Issue: 071702
This page intentionally blank.
Winterm™ 9000 Series XPE-Based Terminals
Quick Reference Guide
Issue: 071702
883731-01 Rev. A
July 2002
Wyse Technology Inc.
3471 North First Street
San Jose, CA 95134-1801
This page intentionally blank.
iii
Copyright Notice
© 2002, Wyse Technology Inc. All rights reserved.
This manual and the software and firmware described in it are copyrighted. You may not
reproduce, transmit, transcribe, store in a retrieval system, or translate into any language
or computer language, in any form or by any means, electronic, mechanical, magnetic,
optical, chemical, manual or otherwise, any part of this publication without express written
permission.
Trademarks
WYSE is a registered trademark and Winterm and Rapport are trademarks of Wyse
Technology Inc.
ICA is a registered trademark and MetaFrame is a trademark of Citrix Systems Inc.
Microsoft, Windows, Windows CE, Windows NT, Windows XP, and Windows Terminal
Server are registered trademarks of Microsoft Corporation.
All other products are trademarks and/or registered trademarks of their respective
companies.
The Energy Star emblem does not represent endorsement of any product or service.
Specifications subject to change without notice.
Patents
The Wyse product(s) described herein is(are) covered by U.S. Patent No. 5,918,039 and
other patents pending.
Restricted Rights Legend
Use, duplication, or disclosure by the Government is subject to restrictions as set forth in
subparagraph (c)(1)(ii) of the Rights in Technical Data and Computer Software clause at
DFARS 252.227-7013 or subparagraphs (c)(1) and (2) of the Commercial Computer
Software - Restricted Rights at 48 CFR 52.227-19, as applicable. Manufacturer is Wyse
Technology Inc.
Ordering Information
For availability, pricing, and ordering information in the United States and Canada, call
1-800-GET-WYSE (1-800-438-9973). In all other countries, contact your sales
representative.
Wyse Technology Inc.
3471 North First Street
San Jose, CA 95134-1801 U.S.A.
iv
License Agreement
THIS LICENSE SETS FORTH THE TERMS UNDER WHICH WYSE TECHNOLOGY INC.
AND/OR ITS LICENSORS (collectively referred to as “Licensor”) IS WILLING TO
LICENSE THE SOFTWARE WHICH IS OWNED BY WYSE TECHNOLOGY INC. OR ITS
LICENSORS TO YOU. LICENSOR IS WILLING TO LICENSE THE ENCLOSED
SOFTWARE TO YOU ONLY IF YOU ACCEPT ALL OF THE TERMS CONTAINED IN
THIS LICENSE. PLEASE READ THIS AGREEMENT CAREFULLY BEFORE
UNPACKING AND USING THE TERMINAL. BY UNPACKING AND USING THE
TERMINAL, YOU AGREE TO BE BOUND BY THE TERMS OF THIS LICENSE. IF YOU
DO NOT AGREE TO THESE TERMS, LICENSOR IS UNWILLING TO LICENSE THE
SOFTWARE TO YOU, AND YOU SHOULD NOT UNPACK AND USE THE TERMINAL.
IN SUCH CASE, PROMPTLY RETURN THE PRODUCT AND ALL ACCOMPANYING
MATERIALS AND YOU WILL RECEIVE A REFUND OF YOUR MONEY.
License Grant
Licensor grants to You, the Licensee, a non-exclusive right, during the term of this
License, to install and use the Firmware program (“Firmware”) or Application program
(“Application”) solely in conjunction with your Wyse-manufactured hardware (“Terminal”) in
object code only. You have the right to use this Firmware by loading it onto a computer(s)
containing the capability of transferring the Firmware (in whole or in part) to the
Wyse-manufactured Terminal. You also have the right to load the Application onto a
computer(s) containing the capability of communicating to the Wyse-manufactured
Terminal. “Firmware” and “Application” shall collectively be known as “Software” as used
in this License. You may use the Software in this fashion as many times as is permitted by
your paid-up license fees, so long as such use is always in conjunction with your Terminal.
The Software may contain programs or codes (“Licensed Components”) which have been
licensed or sublicensed to Licensor by third parties (“Third-Party Producers”). Such
Licensed Components shall be included within the term “Software”) as used in this
License. Subject to the express terms of this License, all right, title, and ownership interest
in and to the Software and all related materials, and in any and all related patents,
trademarks, copyrights, or proprietary or trade secret rights therein shall remain the sole
property of the Licensors, each of whom shall retain all rights not expressly granted in this
License. You shall not have the right to inspect, possess, use, or copy the source code (or
any portion thereof) used to create the Software.
Patent and Copyright
The Software and all related documentation are protected by patent, copyright and other
intellectual property laws. You may copy and use the Software and related documentation
only as expressly permitted in this License. You must reproduce and maintain all
proprietary marks, legends, and copyright notices that appear in or on the Software and
related materials, or any portion thereof, on any copies of the Software that you make or
use. Third-Party Producers named in such copyright notices shall each have the right to
enforce provisions of this License.
Restrictions on Transfer
You may not sublicense, assign or transfer the Software or ownership of the Terminal and
equipment, including the right to use the Software, this License, or any rights or
obligations hereunder, either in whole or in part, to any third party unless such third party
agrees in writing to the terms of this License.
v
Term
This License becomes effective when you unpack and use the terminal. This License will
terminate automatically if you fail to comply with any of its terms or conditions, including
any attempt to modify the Software. Upon termination for any reason, you agree that you
will destroy all copies of the Software and related material or return all such copies to
Licensor.
No Warranties
The software and licensed components are provided to you, “AS IS,” with no warranties
whatsoever. Licensor and all Third-Party Producers specifically disclaim all warranties,
representations, or conditions, express or implied, including but not limited to, any implied
warranty or condition of merchantability or fitness for a particular purpose. SOME
JURISDICTIONS DO NOT ALLOW THE EXCLUSION OF IMPLIED WARRANTIES, SO
THE ABOVE EXCLUSION MAY NOT APPLY TO YOU.
Limitation of Liability
In no event shall licensor, any Third-Party Producer, or any other party that has been
involved in the creation, production, or delivery of the software be liable for any direct,
consequential, incidental, indirect, or special damages, including without limitation lost
profits or losses resulting from business interruption or loss of data, regardless of the form
of action or legal theory under which the liability may be asserted, even if advised of the
possibility or likelihood of such damages. Licensor does not warrant that the functions
contained in the product will meet your requirements or that the operation will be
uninterrupted or error free. SOME JURISDICTIONS DO NOT ALLOW THE LIMITATION
OR EXCLUSION OF LIABILITY FOR INCIDENTAL OR CONSEQUENTIAL DAMAGES,
SO THE ABOVE LIMITATION OR EXCLUSION MAY NOT APPLY TO YOU.
Use Restrictions
You may not modify, decompile, disassemble, reverse engineer, or otherwise manipulate
the Software so as to derive the source code, or for any other purpose, or create a
derivative work of the Software. You acknowledge that a breach of this paragraph shall
cause irreparable harm to Licensor and the Third-Party Producers and that Licensor and
the Third-Party Producers shall be entitled to injunctive relief to prevent or remedy such
breach.
Export
You agree that you will not knowingly export or transmit the Software, directly or indirectly,
to any restricted countries or in any manner that would violate United States laws and
regulations as shall, from time to time, govern the License and delivery of technology
abroad by persons subject to the jurisdiction of the United States, including the Export
Administration Act of 1979, as amended, and any export administration regulations issued
thereafter.
vi
Severability
If any provision of this License is held to be invalid or unenforceable under any
circumstances, its application in any other circumstances and the remaining provisions of
the License shall not be affected.
Governing Law
This License shall be governed by and interpreted in accordance with the laws of the State
of California of the United States of America.
No Third-Party Beneficiary Rights
No provisions in any agreement between Wyse Technology and a Third-Party Producer
shall be deemed to provide or create any third-party beneficiary rights or any other rights
of any kind to Licensee.
Entire Agreement
Opening this package is an acknowledgement that you have read and understood this
agreement and that you agree to be bound by its terms and restrictions. You further agree
that this license is the complete and exclusive statement of the agreement between you
and Licensor, and that it supersedes any prior proposal or agreement, oral or written, and
any other communication relating to the subject matter hereof. No vendor, provider, OEM,
sales representative, or other person is authorized to modify this License or to make any
warranty, representation or promise that is different from those set forth in this License.
Note on Java Support
The Software may contain support for programs written in Java. Java technology is not
fault tolerant and is not designed, manufactured, or intended for use or resale as online
control equipment in hazardous environments requiring fail-safe performance, such as in
the operation of nuclear facilities, aircraft navigation or communication systems, air traffic
control, direct life support machines, or weapons systems, in which the failure of Java
technology could lead directly to death, personal injury, or severe physical or
environmental damage.
U.S. Government Restricted Rights
If you are licensing the Software on behalf of the U.S. Government (the “Government”),
the following provisions apply to you. If the Software is supplied to the Department of
Defense (“DoD”), it is classified as “Commercial Computer Software” under paragraph
252.227-7014 of the DoD Supplement to the Federal Acquisition Regulations (“DFARS”)
(or any successor regulations) and the Government is acquiring only the license rights
granted herein (the license rights customarily provided to non-Government users). If the
Software is supplied to any unit or agency of the Government other than DoD, it is
classified as “Restricted Computer Software” and the Government's rights in the Software
are defined in paragraph 52.227-19 of the Federal Acquisition Regulations (“FAR”) (or any
successor regulations) or, in the case of NASA, in paragraph 18.52.227-86 of the NASA
Supplement to the FAR (or any successor regulations).
05/01 883647-03 Rev. B
vii
EULA for Microsoft® Windows® XP Embedded Runtime
IMPORTANT—READ CAREFULLY:
This End User License Agreement (EULA) is a legal agreement between you (either an
individual or a single entity) and the manufacturer (MANUFACTURER) of the special
purpose computing device (SYSTEM) you acquired which includes certain Microsoft
software product(s) installed on the SYSTEM and/or included in the SYSTEM package
(SOFTWARE). The SOFTWARE includes computer software, the associated media, any
printed materials, and any online or electronic documentation. By installing, copying or
otherwise using the SOFTWARE, you agree to be bound by the terms of this EULA. If you
do not agree to the terms of this EULA, MANUFACTURER and Microsoft Licensing, Inc.
(MS) are unwilling to license the SOFTWARE to you. In such event, you may not use or
copy the SOFTWARE, and you should promptly contact MANUFACTURER for
instructions on return of the unused product(s) for a refund.
Software License
The SOFTWARE is protected by copyright laws and international copyright treaties, as
well as other intellectual property laws and treaties. The SOFTWARE is licensed, not sold.
1. Grant of License
SOFTWARE includes software already installed on the SYSTEM (SYSTEM SOFTWARE)
and, if included in the SYSTEM package, software contained on the CD-ROM disc and/or
floppy disk(s). This EULA grants you the following rights to the SOFTWARE:
•
Refund. If you do not agree to the terms of this EULA, MANUFACTURER and MS are
unwilling to license the SOFTWARE to you. In such event, you may not use or copy the
Licensed Product, and you should promptly contact MANUFACTURER for instructions
on return of the unused product(s) for a refund.
•
Restricted Uses. The SOFTWARE is not designed or intended for use or resale in
hazardous environments requiring fail-safe performance, such as in the operation of
nuclear facilities, aircraft navigation or communication systems, air traffic control, or
other devices or systems in which a malfunction of the SOFTWARE would result in
foreseeable risk of injury or death to the operator of the device or system, or to others.
•
Restricted Functionality. You are licensed to use the SOFTWARE to provide only the
limited functionality (specific tasks or processes) for which the SYSTEM has been
designed and marketed by MANUFACTURER. This license specifically prohibits any
other use of the software programs or functions, or inclusion of additional software
programs or functions, on the SYSTEM.
viii
•
Client Access Licenses. If you use the SYSTEM to access or utilize the services or
functionality of Microsoft Windows Server products (such as Microsoft Windows NT
Server 4.0 (all editions) or Microsoft Windows 2000 Server (all editions)), or use the
SYSTEM to permit workstation or computing devices to access or utilize the services
or functionality of Microsoft Windows Server products, you may be required to obtain a
Client Access License for the SYSTEM and or each such workstation or computing
device. Please refer to the end user license agreement for your Microsoft
WindowsServer product for additional information.
•
No Warranties. EXCEPT AS EXPRESSLY PROVIDED IN THE LIMITED WARRANTY
SECTION BELOW, THE SOFTWARE IS PROVIDED TO YOU “AS IS” WITHOUT
WARRANTY OF ANY KIND, EITHER EXPRESSED OR IMPLIED, INCLUDING, BUT
NOT LIMITED TO, WARRANTIES OF NON-INFRINGEMENT, MERCHANTABILITY,
AND OR FITNESS FOR A PARTICULAR PURPOSE. THE ENTIRE RISK OF THE
QUALITY AND PERFORMANCE OF THE SOFTWARE IS WITH YOU. IF YOU HAVE
RECEIVED ANY WARRANTIES REGARDING THE DEVICE OR THE SOFTWARE,
THOSE WARRANTIES DO NOT ORIGINATE FROM, AND ARE NOT BINDING ON,
MS.
•
No Liability for Consequential Damages. [MANUFACTURER AND/OR]
MANUFACTURER’S SUPPLIERS SHALL NOT BE HELD TO ANY LIABILITY FOR
ANY DAMAGES SUFFERED OR INCURRED BY YOU (INCLUDING, BUT NOT
LIMITED TO, GENERAL, SPECIAL, CONSEQUENTIAL, OR INCIDENTAL DAMAGES
INCLUDING DAMAGES FOR LOSS OF BUSINESS PROFITS, BUSINESS
INTERRUPTION, LOSS OF BUSINESS INFORMATION AND THE LIKE), ARISING
FROM OR IN CONNECTION WITH THE DELIVERY, USE OR PERFORMANCE OF
THE SOFTWARE. IN NO EVENT SHALL MS BE LIABLE FOR ANY AMOUNT IN
EXCESS OF U.S. TWO HUNDRED FIFTY DOLLARS (U.S.$250.00).
•
Customer Remedies. [MANUFACTURER’s and] MANUFACTURER’s supplier’s
entire liability and your exclusive remedy shall be, at MANUFACTURER’s option, either
(a) return of the price paid, or (b) repair or replacement of the defective SOFTWARE
that does not meet the Limited Warranty and which is returned to the manufacturer with
a copy of your receipt. This Limited Warranty is void if failure of the SOFTWARE has
resulted from accident, abuse, or misapplication. Any replacement SOFTWARE will be
warranted for the remainder of the original warranty period or thirty (30) days,
whichever is longer.
•
Limitations on Reverse Engineering, Decompilation, and Disassembly. You may
not reverse engineer, decompile, or disassemble the SOFTWARE, except and only to
the extent that such activity is expressly permitted by applicable law notwithstanding
this limitation.
•
Installation and Use. The SOFTWARE may not be used by more than two (2)
processors at any one time on the SYSTEM. You may permit a maximum of ten (10)
computers or other electronic devices (each a "Client") to connect to the SYSTEM to
utilize the services of the SOFTWARE solely for file and print services, internet
information services, and remote access (including connection sharing and telephony
services). The ten (10) connection maximum includes any indirect connections made
through "multiplexing" or other software or hardware which pools or aggregates
connections. Except as otherwise permitted in the NetMeeting/Remote Assistance/
Remote Desktop Features terms below, you may not use a Client to use, access,
display or run the SOFTWARE, the SOFTWARE's user interface or other executable
software residing on the SYSTEM.
ix
•
Security Updates. Content providers are using the digital rights management
technology ("Microsoft DRM") contained in this SOFTWARE to protect the integrity of
their content ("Secure Content") so that their intellectual property, including copyright,
in such content is not misappropriated. Owners of such Secure Content ("Secure
Content Owners") may, from time to time, request MS, Microsoft Corporation or their
subsidiaries to provide security related updates to the Microsoft DRM components of
the SOFTWARE ("Security Updates") that may affect your ability to copy, display and/
or play Secure Content through Microsoft software or third party applications that
utilize Microsoft DRM. You therefore agree that, if you elect to download a license from
the Internet which enables your use of Secure Content, MS, Microsoft Corporation or
their subsidiaries may, in conjunction with such license, also download onto your
SYSTEM such Security Updates that a Secure Content Owner has requested that MS,
Microsoft Corporation or their subsidiaries distribute. MS, Microsoft Corporation or
their subsidiaries will not retrieve any personally identifiable information, or any other
information, from your SYSTEM by downloading such Security Updates.
•
NetMeeting/Remote Assistance/Remote Desktop Features. The SOFTWARE may
contain NetMeeting, Remote Assistance, and Remote Desktop technologies that
enable the SOFTWARE or other applications installed on the SYSTEM to be used
remotely between two or more computing devices, even if the SOFTWARE or
application is installed on only one SYSTEM. You may use NetMeeting, Remote
Assistance, and Remote Desktop with all Microsoft products; provided however, use of
these technologies with certain Microsoft products may require an additional license.
For both Microsoft products and non-Microsoft products, you should consult the license
agreement accompanying the applicable product or contact the applicable licensor to
determine whether use of NetMeeting, Remote Assistance, or Remote Desktop is
permitted without an additional license.
•
Consent to Use of Data. You agree that MS, Microsoft Corporation and their affiliates
may collect and use technical information gathered in any manner as part of product
support services related to the SOFTWARE. MS, Microsoft Corporation and their
affiliates may use this information solely to improve their products or to provide
customized services or technologies to you. MS, Microsoft Corporation and their
affiliates may disclose this information to others, but not in a form that personally
identifies you.
•
Internet Gaming/Update Features. If the SOFTWARE provides, and you choose to
utilize, the Internet gaming or update features within the SOFTWARE, it is necessary to
use certain computer system, hardware, and software information to implement the
features. By using these features, you explicitly authorize MS, Microsoft Corporation
and/or their designated agent to use this information solely to improve their products or
to provide customized services or technologies to you. MS or Microsoft Corporation
may disclose this information to others, but not in a form that personally identifies you.
•
Internet-Based Services Components. The SOFTWARE may contain components
that enable and facilitate the use of certain Internet-based services. You acknowledge
and agree that MS, Microsoft Corporation or their affiliates may automatically check the
version of the SOFTWARE and/or its components that you are utilizing and may
provide upgrades or supplements to the SOFTWARE that may be automatically
downloaded to your SYSTEM.
x
•
Links to Third Party Sites. The SOFTWARE may provide you with the ability to link to
third party sites through the use of the SOFTWARE. The third party sites are not under
the control of MS, Microsoft Corporation or their affiliates. Neither MS nor Microsoft
Corporation nor their affiliates are responsible for (i) the contents of any third party
sites, any links contained in third party sites, or any changes or updates to third party
sites, or (ii) webcasting or any other form of transmission received from any third party
sites. If the SOFTWARE provides links to third party sites, those links are provided to
you only as a convenience, and the inclusion of any link does not imply an
endorsement of the third party site by MS, Microsoft Corporation or their affiliates.
•
Separation of Components. The SOFTWARE is licensed as a single product. Its
component parts may not be separated for use on more than one SYSTEM.
•
Single SYSTEM. The SOFTWARE is licensed with the SYSTEM as a single integrated
product. The SOFTWARE may only be used with the SYSTEM as set forth in these
licensing terms.
•
Rental. You may not rent, lease, or lend the SOFTWARE.
•
SOFTWARE Transfer Allowed But With Restrictions. You may permanently transfer
all of your rights set forth in these licensing terms only as part of a permanent sale or
transfer of the SYSTEM, and only if the recipient agrees to these licensing terms. If the
SOFTWARE is an upgrade, any transfer must also include all prior versions of the
SOFTWARE.
•
Back-up Copy. If MANUFACTURER has not included a back-up copy of the
SOFTWARE with the SYSTEM, you may make a single back-up copy of the
SOFTWARE. You may use the back-up copy solely for archival purposes. Except as
expressly provided in these licensing terms, you may not otherwise make copies of the
SOFTWARE, including the printed materials accompanying the SOFTWARE.
•
NOT FAULT TOLERANT. THE SOFTWARE MAY CONTAIN TECHNOLOGY THAT IS
NOT FAULT TOLERANT AND IS NOT DESIGNED, MANUFACTURED, OR
INTENDED FOR USE IN ENVIRONMENTS OR APPLICATIONS IN WHICH THE
FAILURE OF LICENSED SOFTWARE COULD LEAD TO DEATH, PERSONAL
INJURY, OR SEVERE PHYSICAL OR ENVIRONMENTAL DAMAGE OR FINANCIAL
LOSS.
•
Additional Software/Services. The SOFTWARE may permit MANUFACTURER, MS,
Microsoft Corporation or their affiliates to provide or make available to you SOFTWARE
updates, supplements, add-on components, or Internet-based services components of
the SOFTWARE after the date you obtain your initial copy of the SOFTWARE
("Supplemental Components").
•
If MANUFACTUER provides or makes available to you Supplemental Components
and no other EULA terms are provided along with the Supplemental Components,
then the terms of this EULA shall apply.
•
If MS, Microsoft Corporation or their affiliates make available Supplemental
Components, and no other EULA terms are provided, then the terms of this EULA
shall apply, except that the MS, Microsoft Corporation or affiliate entity providing the
Supplemental Component(s) shall be the licensor of the Supplemental
Component(s).
MANUFACTURER, MS, Microsoft Corporation and their affiliates reserve the right to
discontinue any Internet-based services provided to you or made available to you
through the use of the SOFTWARE.
xi
This EULA does not grant you any rights to use the Windows Media Format Software
Development Kit ("WMFSDK") components contained in the SOFTWARE to develop a
software application that uses Windows Media technology. If you wish to use the
WMFSDK to develop such an application, visit http://msdn.microsoft.com/workshop/
imedia/windowsmedia/sdk/wmsdk.asp, accept a separate license for the WMFSDK,
download the appropriate WMFSDK, and install it on your system.
•
Recovery Media. If SOFTWARE is provided by MANUFACTURER on separate media
and labeled “Recovery Media”, you may use the Recovery Media solely to restore or
reinstall the SOFTWARE originally installed on the DEVICE.
•
Termination. Without prejudice to any other rights, MANUFACTURER may terminate
this license if you fail to comply with the licensing terms. In such event, you must
destroy all copies of the SOFTWARE and all of its component parts.
2. Copyright
All title and copyrights in and to the SOFTWARE (including but not limited to any
images, photographs, animations, video, audio, music, text and “applets,” incorporated
into the SOFTWARE), the accompanying printed materials, and any copies of the
SOFTWARE, are owned by MS or its suppliers (including Microsoft Corporation). You
may not copy the printed materials accompanying the SOFTWARE. All rights not
specifically granted under this EULA are reserved by MS and its suppliers (including
Microsoft Corporation).
3. Limited Warranty
MANUFACTURER warrants that the SOFTWARE will perform substantially in
accordance with the accompanying written materials for a period of ninety (90) days
from the date of receipt. Any implied warranties on the SOFTWARE are limited to
ninety (90) days. Some states/ jurisdictions do not allow limitations on duration of an
implied warranty, so the above limitation may not apply to you.
4. Product Support
Product support for the SOFTWARE is not provided by MS, its parent corporation,
Microsoft Corporation, or their affiliates or subsidiaries. For product support, please refer
to MANUFACTURER’s support number provided in the documentation for the SYSTEM.
Should you have any questions concerning this EULA, or if you desire to contact
MANUFACTURER for any other reason, please refer to the address provided in the
documentation for the SYSTEM.
•
Note on Java Support. The SOFTWARE may contain support for programs written
in Java. Java technology is not fault tolerant and is not designed, manufactured, or
intended for use or resale as online control equipment in hazardous environments
requiring fail-safe performance, such as in the operation of nuclear facilities, aircraft
navigation or communication systems, air traffic control, direct life support
machines, or weapons systems, in which the failure of Java technology could lead
directly to death, personal injury, or severe physical or environmental damage. Sun
Microsystems, Inc. has contractually obligated Microsoft Corporation to make this
disclaimer.
xii
EXPORT RESTRICTIONS
You acknowledge that SOFTWARE is of US-origin. You agree to comply with all applicable
international and national laws that apply to the SOFTWARE, including the U.S. Export
Administration Regulations, as well as end-user, end-use and country destination
restrictions issued by U.S. and other governments. For additional information on exporting
the SOFTWARE, see http://www.microsoft.com/exporting/.
U.S. GOVERNMENT RESTRICTED RIGHTS
The SOFTWARE and documentation are provided with RESTRICTED RIGHTS. Use,
duplication, or disclosure by the Government is subject to restrictions as set forth in
subparagraph (c)(1)(ii) of the Rights in Technical Data and Computer Software clause at
DFARS 252.227-7013 or subparagraphs (c)(1) and (2) of the Commercial Computer
Software—Restricted Rights at 48 CFR 52.227-19, as applicable.
xiii
FCC Statement
This equipment has been tested and found to comply with the limits for either Class A or
Class B digital devices (refer to “Terminal Requirements Compliance”), pursuant to Part
15 of the FCC Rules. These limits are designed to provide reasonable protection against
harmful interference in a residential installation. This equipment generates, uses, and can
radiate radio frequency energy and, if not installed and used in accordance with the
instructions, may cause harmful interference to radio communications. However, there is
no guarantee that interference will not occur in a particular installation. If this equipment
does cause harmful interference to radio or television reception, which can be determined
by turning the equipment off and on, the user is encouraged to try to correct the
interference by one or more of the following measures:
•
Reorient or relocate the receiving antenna.
•
Increase the separation between the equipment and the receiver.
•
Connect the equipment into an outlet on a circuit different from that to which the
receiver is connected.
•
Consult the dealer or an experienced radio/TV technician for help.
Caution
Changes or modifications not covered in this manual must be approved in
writing by the manufacturer’s Regulatory Engineering department. Changes
or modifications made without written approval may void the user’s authority
to operate the equipment.
Terminal Requirements Compliance
FCC Compliance
The Models 9235LE and 9440XL terminals meet Class B requirements.
IEC/EN Compliance
The Model 9235LE and 9440XL terminals meet Class B requirements.
Canadian DOC Notices
Refer to the previous section, “Terminal Requirements Compliance,” to find out to which
terminal model each of the statements below refers.
Class A
This digital apparatus does not exceed the Class A limits for radio noise emissions from
digital apparatus set out in the Radio Interference Regulations of the Canadian
Department of Communications.
Le présent appareil numérique n’émet pas de bruits radioélectriques dépassant les limites
applicables aux appareils numériques de la classe A prescrites dans le Réglement sur le
brouillage radioélectrique édicté par le Ministère des Communications du Canada.
xiv
Class B
This digital apparatus does not exceed the Class B limits for radio noise emissions from
digital apparatus set out in the Radio Interference Regulations of the Canadian
Department of Communications.
Le présent appareil numérique n’émet pas de bruits radioélectriques dépassant les limites
applicables aux appareils numériques de la classe B prescrites dans le Réglement sur le
brouillage radioélectrique édicté par le Ministère des Communications du Canada.
IEC/EN Notice
These products conform to the requirements of IEC950 and EN60950.
These products conform to requirements of EN55022 for Class A equipment or EN55022
for Class B equipment (refer to “Terminal Requirements Compliance”).
Caution
For use with supplied power adaptor. Replace only with the same or
equivalent type as recommended by the manufacturer.
Model 9235LE Terminals
For use with External Power Supply DVE Model DSA-0301-05 or certified equivalent
model supplied by the manufacturer.
Model 9440XL Terminals
For use with External Power Supply Flytech/CARRY-I Model FT-8006A or certified
equivalent model supplied by the manufacturer.
Noise Suppressor
A noise suppressor (ferrite bead) must be installed on the network cable of your terminal.
This installation is necessary to maintain compliance with U.S. FCC B limits and European
CISPR B EN55022 Class B limits. The noise suppressor is supplied by the manufacturer
and is packed in your terminal’s shipping carton.
Cable Notice
The use of shielded I/O cables is required when connecting this equipment to any and all
optional peripheral or host devices. Failure to do so may cause interference and violate
FCC and international regulations for electromagnetic interference.
Contents
Introducing the 9000 Series XPE-Based Terminals 1
About This Guide 1
Server Environment Requirements 1
Session Servers 1
Citrix Independent Computing Architecture (ICA) 2
Microsoft Remote Desktop Protocol (RDP) 2
Terminal Emulation Support 2
Support Servers 2
Rapport Remote Administration 2
Virtual Network Computing (VNC) Viewer 3
Model Summary 3
Model 9235LE 3
Model 9440XL 4
Mounting and Connecting the Terminal 5
Extended XPE Features 6
Logging On 6
Automatic Log on 6
Manual Log on 6
Automatically Launched Utilities 7
Write Filter 7
NetXClean 7
VNC Server 7
Time Synchronization Utility 7
The XPE Desktop 8
User’s Desktop 8
Administrator’s Desktop 10
About Dialog Box 11
Logging Off from, Restarting, and Shutting Down the Terminal 13
Programs Menu Extended Selections 15
Citrix Program Neighborhood 15
Remote Desktop Connection 16
TeemNT 17
Internet Explorer 18
VNC User Settings 19
Write Filter 20
Control Panel Extended Selections 21
Ramdisk 22
Custom Fields 23
Regional and Language Options 24
Administrative Tools 25
Peripherals 27
USB to Serial Converter Cable 27
xvi
Printers 27
Adding Printers - Using the Generic Text Print Only Driver
Using the Manufacturer’s printer drivers 28
Audio 28
Utilities and Settings 29
Write Filter 29
Write Filter Command Line Control 29
Write Filter Control Dialog Box 30
NetXClean Utility 31
Function Summary 31
Local Drives 32
Drive Z 32
Drive C and Flash 32
Saving Files 33
Mapping Network Drives 33
Domain Participation 33
Joining to a Domain 33
Roaming Profiles 34
WinPing Utility 34
User Log on Accounts 35
Creating a New User Account 35
User Profiles 35
Remote Administration and Firmware Upgrades 36
Rapport Administrative Software 36
Add-on Modules 36
Firmware Upgrades 36
WinVNC (Windows VNC) 37
VNC Server Properties Settings 37
VNC Viewer Setup and Operation 38
28
xvii
List of Figures
1
2
3
4
5
6
7
8
9
10
11
12
13
14
15
16
17
18
19
20
Model 9235LE Terminal 3
Model 9440XL Terminal 4
User’s Desktop and Start Menu 9
Administrator’s Desktop and Start Menu 10
About Dialog Box 12
Installed Modules Dialog Box 13
Citrix Program Neighborhood Window 15
Remote Desktop Connection Dialog Box (Expanded) 16
Terminal Emulation Window 17
Internet Explorer Window 18
WinVNC: Current User Properties Dialog Box 19
Write Filter Control Dialog Box 20
Administrator’s Control Panel Window (Classic View/List) 21
Ramdisk Configuration Dialog Box 22
Custom Fields Dialog Box 23
Services Window 26
WinPing Window 34
VNC Connection Details Dialog Box 39
VNC Authentication Dialog Box 39
VNC Connection Options Dialog Box 40
List of Tables
1
VNC Connection Options Dialog Box Selections
40
xviii
Winterm 9000 Series XPE-Based
Terminals Quick Reference Guide
Introducing the 9000 Series XPE-Based Terminals
Winterm 9000 Series terminals use the Windows XP Embedded (XPE) operating system.
These terminals provide thin-client access to applications, files, and network resources
made available on machines hosting Citrix ICA and Microsoft RDP session services. Only
the keyboard, mouse, audio/video, and display data are transmitted over the network
between the terminals and session servers.
Terminal emulation software may be installed locally on special order. Other locally
installed software permits remote administration of the terminals and provides local
maintenance functions.
Winterm 9000 Series XPE-Based terminals currently include the Model 9235LE and the
Model 9440XL.
About This Guide
This quick reference guide supplements the standard Windows XP and Windows XPE
documentation supplied by Microsoft Corporation. The guide explains the differences,
enhancements, and additional features provided by Wyse with the terminal. It does not
attempt to describe the standard features found in Windows XP and Windows XPE.
XPE help can be accessed from the Microsoft Help and Support site:
http://support.microsoft.com/default.aspx
Server Environment Requirements
The terminal uses a variety of services accessed through the network. These include
session and product support services as well as standard network services such as DHCP
and DNS. The following session and support services are required:
Session Servers
Any of the following services must be available on the network to which your terminal is
connected.
2
Citrix Independent Computing Architecture (ICA)
ICA servers and published applications can be made available on the network using either
of the following services:
•
•
Windows 2000 Server with Terminal Services and one of the following installed:
•
Citrix MetaFrame 1.8 (alone or with Service Packs 2 or 3 and FR1)
•
Citrix MetaFrame XP
Windows NT 4.0 Terminal Server Edition with Citrix MetaFrame 1.8 installed.
Microsoft Remote Desktop Protocol (RDP)
RDP services are accessed by the Terminal Services Client application on the terminal.
RDP can be made available on the network using any of the following services:
•
Windows 2000 Server with Terminal Services installed
•
Windows NT 4.0 Terminal Server Edition
•
Windows XP Professional
•
Windows .NET Server
Terminal Emulation Support
Third-party terminal emulation software optionally may be installed on the terminal to
support computing on legacy platforms. Access to accounts on these machines is the
responsibility of the terminal user. The terminal emulation software uses the Telnet
protocol to communicate with the computing platform.
Support Servers
Rapport Remote Administration
The Wyse Rapport Administrative Software must be installed on a Windows NT 4.0 or
Windows 2000 Server or workstation capable of logging on as administrator to a domain
that provides specified network services, and which can access a software repository for
your terminal. Refer to the Rapport documentation for instructions for installing Rapport
and configuring the server environment. The Rapport Administrative Software accesses
your terminal through the factory-installed Rapport Agent and Preboot Execution
Environment (PXE) client utilities. PXE upgrade services and Virtual Network Computing
(VNC) Viewer (see below) are built-in to Rapport.
Rapport for Workgroups is suitable for managing up to 250 client terminals. It is provided
with the terminal without charge.
Rapport Enterprise Edition is designed to manage larger numbers (greater than 250) of
client terminals. For information about obtaining or upgrading to Rapport Enterprise
Edition contact Wyse Sales or Service (see “Ordering Information” in the front matter of
this document).
3
Virtual Network Computing (VNC) Viewer
VNC Server is factory-installed on your terminal and is by default automatically launched
on log-on. It allows the terminal to be operated/monitored (“shadowed”) from a remote
machine on which VNC Viewer is installed, primarily for troubleshooting and support
purposes. The administrator may open a VNC Server dialog box that allows the password
to be changed and properties to be set. An administrator wanting to shadow your terminal
must run the VNC Viewer component on the remote machine (accessed either from the
Rapport Remote Administration software or from a separate installation). The
administrator using the VNC Viewer must know the password to the server component on
your machine as well as your machine’s IP address or valid DNS name. Refer to
“WinVNC” in “Remote Administration and Firmware Upgrades” for information about VNC.
Model Summary
Note
Terminal data sheets, the product registration form, and information about
Rapport Remote Administration Software are available through the Wyse
Web site, http://www.wyse.com.
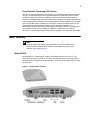
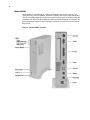
Model 9235LE
Model 9235LE is a small-footprint, modular XPE-based terminal (see Figure 1). The
connections for power, the network, a monitor, and a keyboard are on the back panel of
the terminal (the mouse plugs into the keyboard). The power push-button switch is on the
top of the unit.
Figure 1
Model 9235LE Terminal
4
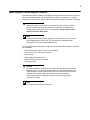
Model 9440XL
Model 9440XL is a small-footprint, modular XPE-based terminal (see Figure 2). The
connections for power, the network, a monitor, keyboard, and mouse, serial and parallel
devices, and USB peripherals are on the back panel of the terminal. A PCMCIA option slot
is available if an ISA to PCI Riser/Extender card and a PCMCIA adapter are installed. The
power push-button switch, four LED indicators, and audio connectors are on the front of
the terminal.
Figure 2
Model 9440XL Terminal
5
Mounting and Connecting the Terminal
The Quick Start Guide included in the shipping carton provides instructions for mounting
and connecting the terminal. The terminal may be placed on a desktop, or it may be
mounted on a wall using an optional wall-mount bracket available from Wyse Technology.
Caution
Mount and connect the terminal only as directed in the Quick Start Guide
(and in the wall-mount bracket instructions if used). Be sure that there is
sufficient space around the terminal for ventilation. Follow all precautions
listed in the Quick Start Guide.
Note
On the Model 9235LE the amber power LED may stay on for up to a minute
after plugging power into the unit. The user should not press the power
button to boot up until the amber light goes out.
The following items are provided in the box with each terminal and should be used with
the installation:
•
Keyboard and mouse (may or may not be included)
•
Power cord (may or may not be included)
•
Power supply
•
Noise suppressor (ferrite bead)
•
Desktop mounting stand (if required)
•
Quick Start Guide
Caution
To ensure regulatory compliance, use only the power supply included in the
shipping carton, or a Wyse-approved equivalent, with the terminal. Also, the
noise suppressor (ferrite bead) included in the box with the terminal must be
installed on the network cable as described in the accompanying
instructions. Refer to the regulatory notices in the front matter of this
document for details.
Note
A 3-button wheel mouse may be used.
6
Extended XPE Features
The Winterm XPE-based terminal’s operating system has extended features not found in
standard Windows XP. With the exception of the Citrix Program Neighborhood and the
Microsoft Terminal Server Client (Remote Desktop Connection Manager), and possibly a
special-order terminal emulation application if installed, controls for extended XPE
features are available only through an Administrator logon account.
Logging On
Automatic Log on
The default for the XPE-based terminal is automatic log on. The administrator can use the
Winlog applet in the Control Panel to enable/disable auto logon and change the auto
logon user name, password, and domain. Only the administrator logon account can
change auto logon properties.
Note
To save the changes be sure to flush the write filter cache (at any time during
the current boot session). See “Write Filter” in “Utilities and Settings” for
information about the write filter and instructions for flushing the cache.
The Log On to Windows dialog box is bypassed if automatic log on is enabled. If you
want to log on as a different user while autologon is enabled, log off while holding down
the Shift key. This will cause the Log On to Windows dialog box to display and allow you
to manually enter the log-on information.
Manual Log on
When automatic log on is not enabled (see above), upon terminal startup the Log On to
Windows dialog box displays.
Type the log-on information in the User Name and Password text boxes:
·
For a user log-on account, the factory-default user name and password are both
User (enter in both text boxes).
·
For an administrator log-on account, the factory-default user name and password
are both Administrator (enter in both text boxes).
Note
Passwords are case sensitive but user names are not case sensitive.
Caution
For security purposes it is recommended that the passwords be changed
from the defaults. An administrator can change passwords by typing
Ctrl+Alt+Del to open the Windows Security dialog box and then selecting
Change Password. The password can not be changed when logged-on as a
user.
7
Note
The administrator may create additional user accounts by using the User
Manager utility available through the Control Panel. However, due to local
memory constraints, the number of additional users should be kept to a
minimum. See “User Log on Accounts” for instructions.
Automatically Launched Utilities
Write Filter
Upon system boot the write filter utility is automatically launched. The write filter provides
security and protects the flash memory from excessive write activity. The active/inactive
status of the write filter is indicated by the color of the button in the system tray on the
desktop task bar. See “Write Filter” in “Utilities and Settings” for information about the write
filter.
Note
Changes made to the terminal configuration will be lost when the terminal is
rebooted unless the write filter cache is flushed during the current boot
session. See “Write Filter” in “Utilities and Settings” for instructions on how to
flush the cache.
NetXClean
Upon system boot the NetXClean utility is automatically launched. NetXClean is a cleanup
utility that keeps extraneous information from being stored on the local disk. See
“NetXClean” in “Utilities and Settings” for information about this utility.
VNC Server
Upon terminal log on the Windows VNC Server utility is automatically launched. VNC
allows the terminal’s desktop to be accessed remotely for administration and support.
Refer to “WinVNC” in “Remote Administration and Firmware Upgrades” for information
about VNC.
Time Synchronization Utility
Upon log-in the dialog box for a time synchronization utility briefly displays. This feature
may be defeated by the administrator (locally or remotely) if desired.
8
The XPE Desktop
User’s Desktop
The desktop that appears for a user log-on (see Figure 3) is a classic Windows desktop,
except that the only icons present on the default desktop are Citrix Program
Neighborhood, Remote Desktop Connection, and Internet Explorer. These selections
are also available from the Start menu. If the terminal emulator application is installed, it
may be opened from the Start | Programs menu. The write filter status indicator is located
in the task bar system tray.
Note
Links to remote ICA NFuse-published applications may also be listed on the
Start menu and/or appear as icons on the desktop. Refer to the Citrix NFuse
1.6 server documentation for information and instructions.
For information pertaining to the functionality of the standard Windows XP desktop and
Start menu items, refer to the applicable Microsoft documentation:
http://support.microsoft.com/default.aspx
(Search and navigate to the Windows XP Support Center.)
See '”Programs Menu Extended Selections” for Internet locations of the Citrix Program
Neighborhood and Remote Desktop Connection help documents.
Note
The Control Panel available to a user through Start | Settings provides
access to a limited set of resources for making Windows XP user preference
settings. You must be logged on as administrator to access the extended set
of system resources.
9
Figure 3
User’s Desktop and Start Menu
Note
Right-clicking the mouse when the pointer is on the user’s desktop
background does not open a pop-up menu.
Note
You may copy and paste text between remote session and the local
computer by using standard copy and paste methods.
Note
Figure 3 shows the Model 9440XL desktop; for the Model 9235LE the shown
Start menu ShutDown listing is replaced with listings for logging off,
restarting, and shutting down the terminal.
10
Administrator’s Desktop
The desktop that appears for an administrator log-on (see Figure 4) is a classic Windows
desktop. Icons present on the default administrator desktop are My Computer, My
Network Places, Citrix Program Neighborhood, Remote Desktop Connection, and
Internet Explorer. The three application selections are also available from the Start
menu. If the terminal emulator application is installed it may be opened from the Start |
Programs menu. The write filter status indicator and the VNC server icon are located in
the task bar system tray. Extended resources available only to administrators may be
accessed from the Start menu.
For information pertaining to the functionality of the standard Windows XP desktop and
Start menu items, refer to the applicable Microsoft documentation:
http://support.microsoft.com/default.aspx
(Search and navigate to the Windows XP Support Center.)
Extended selections are described in the following subparagraphs.
Figure 4
Administrator’s Desktop and Start Menu
11
Note
Right-clicking the mouse when the pointer is on the administrator’s desktop
background opens a pop-up menu.
Note
Figure 4 shows the Model 9440XL desktop; for the Model 9235LE the shown
Start menu ShutDown listing is replaced with listings for logging off,
restarting, and shutting down the terminal.
About Dialog Box
Click on About in the Start menu to open the About dialog box (Figure 5). This dialog box
displays general information about the terminal.
Note
Figure 5 is a typical About dialog box and is presented as an example only.
The information in the dialog box will vary for different terminals and software
releases.
Click on the Installed Modules command button to open a dialog box (see Figure 6)
showing the list of modules that have been installed on the terminal.
12
Figure 5
About Dialog Box
13
Figure 6
Installed Modules Dialog Box
Logging Off from, Restarting, and Shutting Down the Terminal
To log off from, restart, or shut down the terminal, click on the Task Bar Start button to
open the Start pop-up menu (see Figures 3 and 4). On the Model 9440XL, select Shut
Down from the Start menu to open a sub-menu; on the Model 9235LE, select the desired
action from the Start menu.
Note
You may also log off or shut down using the Windows Security dialog box,
which may be opened by using the Ctrl+Alt+Del key combination.
Note
If automatic log-on is enabled, when you log off (without shutting down) the
terminal immediately logs on the default user. See “Logging On” for
instructions for logging on as a different user.
The following utilities are affected by logging off, restarting, and shutting down the
terminal:
•
Write Filter Cache - See “Utilities and Settings” for information about the write filter. If
you make changes to system configuration settings and want them to persist, you must
flush the write filter cache during the current boot session. Otherwise the new settings
will be lost when the terminal is shut down or restarted. The write filter cache contents
are not lost when you simply log off and on again (as the same or different user); that
is, you may flush the write filter cache after the new log on and still retain the changes.
See “Write Filter Control Dialog Box” in “Control Panel Extended Selections” for
instructions on how to flush the write filter cache.
A User log-on account does not have cache flush privileges; this is a local or remote
administrator function.
•
NetXClean Utility - Refer to “NetXClean Utility” in “Utilities and Settings” for details
about NetXClean. NetXClean is a cleanup utility that keeps extraneous information
from being stored on the flash memory. Cleanup is triggered automatically on reboot,
shut down, or user log off.
14
•
Power Management - A “Monitor Saver,” turns off the video signal to the monitor,
allowing the monitor to enter a power-saving mode after a designated idle time.
Parameters for this mode are available by right-clicking on the desktop background
and selecting Properties | Screen Saver | Power.
•
Wake-on-LAN - This standard XP feature allows the Rapport Administration Software
to perform image updates and remote administration functions at any time. The
terminal power must remain plugged-in for this to work.
•
Terminal Time - After power off, clock time will not be lost as long as the power source
remains plugged in. Clock time will be lost, however, if the power source is unplugged
and the battery option is not installed. The local time utility may be set to synchronize
the terminal clock to a time server automatically at a designated time or manually.
Note
Correct time should be maintained because some applications may require
access to local terminal time. The Date and Time Properties dialog box may
be opened by clicking on the time area in the task bar or by double-clicking
on the Date and Time icon in the Control Panel.
15
Programs Menu Extended Selections
Open the Programs menu by clicking on Start | Programs. Additional selections
available on the Programs menu are:
Citrix Program Neighborhood
Opens the Citrix Program Neighborhood window (see Figure 7). This window, which
also opens from a desktop icon, facilitates connections to remote applications running on
ICA servers.
Documentation for the ICA client application is available from the Citrix Corporation Web
site:
http://www.citrix.com/support (navigate to Support | Product Documentation)
Figure 7
Citrix Program Neighborhood Window
16
Remote Desktop Connection
This selection opens the Remote Desktop Connection dialog box (expanded view
shown in Figure 8 obtained by clicking Options button). This dialog box, which also opens
from a desktop icon, is used to establish connections to remote applications using RDP.
See Microsoft documentation for a detailed explanation and instructions on how to use the
Remote Desktop Connection dialog box:
http://www.microsoft.com (search for Remote Desktop)
Figure 8
Remote Desktop Connection Dialog Box (Expanded)
17
TeemNT
A terminal emulation application may be installed on the terminal as an option. Figure 9
shows the initial terminal emulation window. Refer to the terminal emulation
documentation (supplied separately) for complete instructions. By default, a desktop icon
is not installed.
Figure 9
Terminal Emulation Window
18
Internet Explorer
Version 6.0 of the Microsoft Internet Explorer browser is installed locally on the terminal
(see Figure 10). The Internet options settings for the browser have been preselected at
the factory to limit writing to flash memory. These settings prevent exhaustion of the
limited amount of flash memory available and should not be modified. The user may
access another browser through an ICA or RDP account if more browser resources are
required. The local browser opens from the Start menu or from a desktop icon.
Figure 10
Internet Explorer Window
19
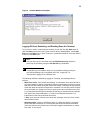
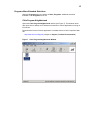
VNC User Settings
This selection is available to administrators only and opens the WinVNC: Current User
Properties dialog box (Figure 11). It appears in the administrator’s Start | Programs
menu and an icon is available in the administrator’s system tray only.
The WinVNC: Current User Properties dialog box allows entry of the VNC log-on
password (the default password is Wyse) and selection of parameters for the VNC server
utility installed on your terminal.
VNC server allows the terminal to be operated/monitored (“shadowed”) from a remote
machine on which VNC Viewer is installed. VNC is intended primarily for support and
troubleshooting purposes.
See “WinVNC (Windows VNC)” in “Remote Administration and Firmware Upgrades” for
instructions.
Note
Hovering the mouse pointer over the VNC icon on the task bar pops up the
terminal’s current IP address.
Figure 11
WinVNC: Current User Properties Dialog Box
20
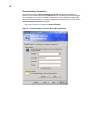
Write Filter
This selection is available to administrators only and opens the Write Filter Control
dialog box (Figure 12). The dialog box may be opened from Control Panel |
Administrative Tools. This dialog box is used to query the cache, flush the cache, view
the status of the write filter, and disable/enable the write filter.
The system tray on the task bar contains a color icon that indicates the status of the write
filter. Green indicates that the write filter is active, and red indicates that the write filter is
inactive.
See “Write Filter” in “Utilities and Settings” for detailed information about the write filter.
Figure 12
Write Filter Control Dialog Box
21
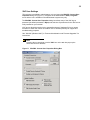
Control Panel Extended Selections
The Control Panel window (the administrator’s control panel is shown in Figure 13) is
accessed by clicking on Start on the task bar and selecting Settings | Control Panel.
Figure 13
Administrator’s Control Panel Window (Classic View/List)
Extended selections available on the administrator’s Control Panel are discussed in the
following subparagraphs.
22
Ramdisk
The RAM disk is volatile memory space set aside for temporary data storage. It is the Z
drive shown in the My Computer window.
The following items are stored on the RAM disk:
•
Browser Web page cache
•
Temporary Internet files
•
Browser history
•
Print spooling
•
Browser cookies
•
User/system temporary files
•
Browser cache
The RAM disk also may be used for temporary storage of other data (e.g., roaming
profiles) at the administrator’s discretion (see “Local Drives” in “Utilities and Settings”).
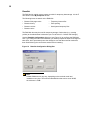
Use the Ramdisk Configuration dialog box (see Figure 14) to configure the RAM disk
size. If you change the size of the RAM disk, you will be prompted to restart for changes to
take effect, but to permanently save the change be sure that the write filter cache has
been flushed during the current boot session before restarting.
Figure 14
Ramdisk Configuration Dialog Box
Note
Default RAM disk size may vary, depending on the terminal model and
installed memory size. The maximum Ramdisk size that can be set is 30 MB,
the minimum is 2 MB.
23
Custom Fields
The Custom Fields dialog box (see Figure 15) is available from the Control Panel. It
allows entry of configuration strings for use by the Rapport Remote Administrative
Software (see “Remote Administration and Firmware Upgrades”).
The strings may contain information about the location, user, administrator, and other
unspecified information. Refer to the Rapport documentation for instructions on the need
and use of custom fields information.
Click on the Change button in the dialog box to transfer the custom fields information to
the Windows registry. The information is then available to the Rapport Client Manager.
To permanently save the information, flush the write filter cache during the boot session in
which the registry entries are made or changed.
Figure 15
Custom Fields Dialog Box
24
Regional and Language Options
Keyboard language selection is made through the Regional and Language Options
selection in the Control Panel. The following keyboard languages are supported:
Arabic
Belgian French
Brazilian (ABNT)+A34
Canadian Eng. (Multi)
Canadian Fr (Multi)
Canadian French
Danish
Dutch
English (UK)
English (US) (default)
Finnish
French
German
Hebrew
Italian
Italian (142)
Japanese
Korean
Latin American
Norwegian
Portuguese
Spanish
Spanish Variation
Swedish
Swiss French
Swiss German
Thailand
US International
Czech
Hungarian
Romanian
Slovak
Polish (214)
Polish (Programmers)
Russian
Turkish-F
Turkish-Q
Greek
Croatian
Slovenian
Chinese
Note
An IEPC keyboard is required for any language other than English (US). The
keyboard layouts are different for each of the languages listed above.
25
Administrative Tools
Click on the Administrative Tools icon in the Control Panel to open a window containing
administrative tool selections.
Write Filter
This selection opens the Write Filter Control dialog box (Figure 12). The dialog box may
also be opened from the administrator’s Start | Programs menu. This dialog box is used
to query the cache, flush the cache, view the status of the write filter, and disable/enable
the write filter. See “Write Filter” in “Utilities and Settings” for detailed information about the
write filter.
Services
The Services selection opens the Services window (see Figure 16), which lists the
services installed on the terminal. Of particular interest are VNC Server and Client
Cleanup (NetXClean), either of which may need to be stopped or restarted by the terminal
administrator as discussed in “Utilities and Settings” in this document.
Note
These two services cannot be stopped or started using the Task Manager.
Other Administrative Tools
Other tools in this window that may be of use to an administrator are:
User Manager - See “User Profiles.”
Winlog - Used for changing the autologon user.
26
Figure 16
Services Window
VNC User Settings
This selection opens the WinVNC: Current User Properties dialog box (Figure 11). An
administrator also may open this dialog box through an icon in the task bar system tray
and also from the Start | Programs menu.
See “WinVNC (Windows VNC)” in “Remote Administration and Firmware Upgrades” for
instructions.
27
Peripherals
Depending on the ports available on the terminal (see “Model Summary”), the terminal can
provide services through a USB port, the serial port, or a PCMCIA card plugged-in to the
back of the terminal, as long as the appropriate software is installed. Factory-installed
software is described in the following subparagraphs. Add-ons for other services, as they
become available, may be installed using the Rapport Remote Administrative software
(discussed in “Remote Administration and Firmware Upgrades”).
USB to Serial Converter Cable
Use this procedure to determine the port assigned to a device connecting to the terminal
through a USB to serial converter cable.
Note
Only up to two USB to serial converters may be used at one time.
1. Connect a printer or other device to the serial port of the converter cable. Do not
connect the USB end of the converter cable to the terminal at this time.
2. Open the Device Manager window (Control Panel | System | Hardware Tab | Device
Manager).
3. A Ports (COM & LPT) listing may or may not be present, depending on the terminal
model and whether a device driver was previously installed to a port. If the listing is
present, expand it so that ports presently used are displayed.
4. Plug the USB end of the converter cable into the terminal.
5. The Ports (COM & LPT) listing will appear if not already present. Under the Ports
(COM & LPT) listing, a new COM port will appear for the new connection. Note which
COM port number is assigned to the new connection.
6. Continue the installation procedure for the connected device, using the discovered port
number when prompted. Use manufacturer’s procedures for other devices such as a
serial touch screen.
Printers
A universal print driver is installed on the terminal to support text-only printing to a
locally-connected printer. To print full text and graphics to a locally connected printer,
install the driver provided by the manufacturer and follow the manufacturer’s instructions.
Be sure to flush the write filter cache to save the installation. Printing to network printers
from ICA and RDP applications can be achieved through print drivers on the servers.
Note
Printing to a locally-connected printer from an ICA or RDP session using the
server’s print drivers produces full text and graphics functionality from the
printer. To do this, you must have the print driver installed on the server and
the text only driver installed on the terminal (see “Adding Printers - Using the
Generic Text Only Print Driver”).
28
Adding Printers - Using the Generic Text Only Print Driver
1. Connect the printer to the parallel port.
2. Choose Printers and Faxes from the Start | Settings menu.
3. Double click on Add a printer. This opens the Add Printer Wizard.
4. Click on Next in the first panel of the wizard.
5. Select the Local printer attached to this computer radio button.
6. Make sure that the Automatically detect and install my Plug and Play printer check
box is not selected.
7. Click on Next.
8. Select the Use the following port: radio button.
9. Select the appropriate port from the drop-down list and click on Next.
10.Choose the Manufacturer and Model of the printer and click on Next.
11. Use the assigned default name or other name for the printer and click on Next.
12.Select the Do not share this printer radio button and click on Next.
13.Choose whether to print a test page or not and click on Next.
14.Click on Finish.
15.The installation will complete and a test page will print if this option was chosen.
Using the Manufacturer’s Print Drivers
Install the driver provided by the manufacturer and follow the manufacturer’s instructions.
Be sure to flush the write filter cache to save the installation.
Audio
Audio may be redirected from applications to the audio jacks on the terminal. The level
must be controlled externally (such as by a 600-ohm potentiometer control) and a power
booster is required to drive speakers. The volume can be adjusted using the sound icon in
the task bar system tray. You can single-click on this icon to open the master volume
control, or double-click to open the volume control application dialog box.
29
Utilities and Settings
Write Filter
The write filter provides a secure environment for thin-client computing. It does this by
protecting the terminal from undesired flash memory writes (flash memory is where the
operating system and functional software components reside). The write filter also
extends the life of the terminal by preventing excessive flash write activity. It gives the
appearance of read-write access to the flash by employing a cache to intercept all flash
writes and returning success to the process that requested the I/O.
The intercepted flash writes stored in cache are available as long as the terminal remains
active but will be lost when the terminal is rebooted or shut down. To preserve the results
of writes to the registry, favorites, cookies, etc., the contents of the cache can be
transferred (“flushed”) to the flash on demand by the Rapport Remote Administration
Software or manually using the Write Filter Control dialog box (see Figure 12) available
from the Control Panel | Administrative Tools | Write Filter selection or through the
Start menu. After the write filter has flushed the cache, all future writes during the current
boot session are written to the flash, with no further caching until a reboot occurs. The
write filter may also be enabled/disabled through the command line or through the Write
Filter Control dialog box. The enabled/disabled status of the write filter is displayed on
the green/red button icon on the task bar system tray (green indicates that the write filter is
active, and red indicates that the write filter is inactive).
The administrator should periodically check the status of the cache. The terminal should
be rebooted if the cache is more than eighty percent full.
Note
When administering the terminal for permanent changes, to avoid flash
corruption it is strongly recommended flushing the write filter cache
immediately following a fresh reboot before making permanent modifications
to the system. Do not flush the cache if the terminal has been used in the
current boot session.
Caution
The write filter cache should never be flushed if it is eighty-percent or more
full.
The write filter can be manipulated through the command line or the Write Filter Control
dialog box, as follows:
Write Filter Command Line Control
Note
Command line arguments cannot be combined.
Caution
Terminal Administrators should use NT file security to prevent undesired
usage of these commands.
30
Start | Run | Open Command Line:
·
wtflush.exe with no arguments - Brings up the Write Filter Control dialog box
(Figure 12). This dialog box also may be accessed through the Start | Programs
menu or via the Administrative Tools selection in the Control Panel. See the
following description of the dialog box.
·
wtflush.exe \f - Flushes the cache and disables the write filter until the next boot.
The write filter status icon is red.
·
wtflush.exe \d - Flushes the cache and disables the write filter; the write filter stays
disabled after the boot and must be enabled manually either through the dialog box
or through the command line. The write filter status icon stays red while disabled.
·
wtflush.exe \e - Write filter enabled after the next boot. After enabling the write filter
you must reboot. You do not need to flush the cache first since the write filter is
currently disabled. The write filter status icon is green when the write filter is
enabled.
Note
Flush and disable (\f and \d arguments) open and automatically close a DOS
command window during the process. However, the flush could take up to
several minutes to complete after the window closes. Because the DOS
window does not stay open long enough to view the results, you should open
the Write Filter Control dialog box to determine if flushing has completed.
Note
The write filter status icon on the task bar system tray turns red immediately
when the cache flush operation is started, although the flush action may take
up to several minutes to complete.
Caution
Do not attempt to flush the cache while the cache is currently being flushed.
If you open a MS-DOS Prompt window (by entering command in the Run dialog),
append “.exe” to the wtflush command: wtflush.exe, wtflush.exe \f, wtflush.exe \d, and
wtflush.exe \e.
Write Filter Control Dialog Box
The Write Filter Control dialog box is shown in Figure 12. It can be opened either
through the command line (wtflush) or via the Administrative Tools selection in the
Control Panel. The controls in this dialog box function as follows:
•
The Write Filter Enable/Disable check boxes are disabled until the Display Write
Filter Partition Information button is clicked.
•
Click on the Display Write Filter Partition Information button to enable the
WriteFilter Enable/Disable check boxes.
•
Select the Disable WriteFilter check box to flush the cache and disable the write filter
(the WFilterPartition1 key value is set to 0). The write filter status icon in the desktop
system tray turns red. The write filter stays disabled after boot. To re-enable the write
filter, select the Enable WriteFilter check box and reboot.
31
•
Select the Enable Write Filter check box to set the write filter to be enabled after
reboot (the WFilterPartition1 key value is set to the platform default). The write filter
status icon in the task bar system tray is green when the write filter is enabled.
Note
The drop-down list box located just below the Display Write Filter Partition
Information button should never be used for any reason and has no value to
the user.
•
Click the Flush Cache button to flush the cache and turn off the write filter; the write
filter status icon turns red and the write filter remains off until the next boot.
•
When the cache is flushed by clicking the Flush Cache button or selecting the Disable
Write Filter check box, all controls are disabled (grayed-out) until the flush completes.
•
Once the cache has been flushed, clicking on the Flush Cache button causes the
following message to display:
DeviceIoControl IOCTL_WFILTER_MODE_QUERY failed
•
Click on the Query Cache button to display a cache status report.
NetXClean Utility
NetXClean keeps extraneous information from being stored in flash memory. NetXClean
is a service that runs constantly in the background and operates only on the flash memory.
Cleanup is triggered on either service startup or user logoff.
NetXClean performs the cleanup invisibly and no user input is necessary.
If a flush of the write filter cache puts junk in flash directories that must be kept clean, or
allows junk to continue being written to flash after the write filter cache is flushed (until a
reboot occurs), NetXClean prevents garbage files from building up and filling the free
space in the flash. This is particularly important when multiple users have logon rights to a
terminal because memory space can be used up quickly by locally stored profiles and
temporary caching of information.
Function Summary
NetXClean performs the following TweakUI functions:
•
Clears Run history at log on
•
Clears Document history at log on
•
Clears Find Files history at log on
•
Clears Find Computer history at log on
•
Clears Internet Explorer history at log on
•
Clears Last User at log on
•
Clears Selected Items Now
NetXClean purges certain directories, files, and profiles. It uses a configuration file to
determine which directories and files to purge, and which profiles to not purge. The
selections are made by the manufacturer and should not be changed without
manufacturer supervision.
32
Regardless of the configuration file selections, NetXClean does not clean up the following
directories or any parent to these directories:
•
The Windows directory
•
Windows System subdirectory
•
The current directory the service is installed in
NetXClean will not delete these profiles:
•
Administrator
•
All Users
•
Default User
•
The profile of the last user who logged on
Local Drives
Drive Z
Drive Z is onboard volatile memory (Ms-ramdrive) on the logic board of the terminal.
Because drive Z is volatile memory, it is recommended that you do not use this drive to
save data that you want to retain. See “Ramdisk” for Ramdisk configuration instructions.
See also “Domain Participation,” below, for information about using the Z drive for roaming
profiles.
Drive C and Flash
Drive C is onboard non-volatile flash memory. It is recommended that you avoid writing to
drive C. Writing to drive C reduces the size of the flash. If flash size is reduced to below
3 MB, the terminal will become unstable.
Caution
If flash memory size is reduced to 2 MB, the terminal’s image will be
irreparably damaged and it will be necessary for you to contact an authorized
service center to repair the terminal. It is recommended that 3 MB be left
unused.
The write filter (if ACTIVE) protects the flash from damage and presents an error message
if the cache is overwritten. However, if this occurs you will not be able to flush the write
filter cache and any terminal configuration changes still in cache will be lost.
Note
Refer to “NetXClean Utility” for its role in keeping the flash memory clean.
Items that are written to the write filter cache (or directly to the flash if the write filter has
been flushed) during normal operations are:
•
Favorites
•
Created connections
•
Delete/edit connections
33
Saving Files
Caution
The terminal uses an embedded operating system with a fixed amount of
flash memory. It is recommended that you save files that you want to keep on
a server rather than on your terminal. Be careful of application settings that
write to the C drive, which resides in flash memory (in particular, many
applications by default write cache files to the C drive on the local system). If
you must write to a local drive, change the application settings to use the Z
drive. The default configuration settings mentioned below in “User Logon
Accounts” minimize writing to the C drive for factory-installed applications.
Note
Also see descriptions of the write filter and the need to flush the cache to
permanently save configuration data.
Mapping Network Drives
You can map network drives if you log on as either Administrator or User. To keep the
mappings after the terminal is rebooted you must:
1. Select the Reconnect at logon check box
and
2. Flush the write filter cache during the current boot session
Since a user log-on can not flush the write filter cache, the mappings can be retained by
logging off the user (do not shut down or restart) and logging back on as Administrator,
and then flushing the cache.
A remote home directory also may be assigned by using a user manager utility or by other
means known to administrators.
Domain Participation
Joining to a Domain
As an administrator you may join the terminal to a domain through the Computer Name
Changes dialog box, accessed through Control Panel | System | Computer Name |
Change button.
Caution
Exercise caution when joining to a domain – the profile downloaded at log on
could overflow the cache or flash memory. To protect the flash, it is
suggested that the write filter be enabled when joining to a domain.
34
Roaming Profiles
Write roaming profiles to the C drive. The profiles need to be limited in size and will not be
retained when the terminal is rebooted.
Note
For roaming profiles to work and be downloaded, there must be sufficient
flash space available. In some cases it may be necessary to remove
software components to free up space for roaming profiles.
WinPing Utility
The WinPing window (Figure 17) is opened by typing WinPing in the Run menu (opened
from the Start menu). The WinPing window is used to launch the Windows Ping
diagnostic utility and view the results from pinging.
Windows Ping (Packet InterNet Groper) is a diagnostic tool familiar to administrators. It
sends an echo request to a network host. The host parameter is either a valid host name
or an IP address. If the host is operational and on the network, it responds to the echo
request. The default is to send 5 echo requests and then stop if no response is detected.
WinPing sends one echo request per second and calculates round trip times and packet
loss statistics, and displays a brief summary on completion.
Figure 17
WinPing Window
WinPing can be used to:
•
Determine the status of the network and various hosts.
•
Track and isolate hardware and software problems.
•
Test, measure, and manage networks.
•
Determine the IP address of a host if only the host name is known.
35
User Log on Accounts
Creating a New User Account
Caution
Be sure to flush the write filter cache during the current boot session in which
a new account is created.
You must be logged-on as administrator to create user accounts, which you can do locally
or remotely via VNC.
Due to local flash/disk space constraints, the number of additional users should be kept to
a minimum.
New user accounts may be created by the User Manager utility, accessed through
Control Panel | Administrative Tools.
User Profiles
A new user profile will be automatically configured from a template based on the default
user or administrator access settings in the registry, browser profiles, and ICA and RDP
initial settings. If the default user or administrator profile settings are changed from those
set at the factory, the changed settings are automatically applied to the new user profile.
For the new user to match the characteristics of the default user, the administrator must
create the user in the User group and also add the new user to the administrator group.
The default user is in both groups; otherwise the new user will not be able to add a local
printer. While the user is in the administrator group, he is still locked-down in what he can
do.
To create the user:
1. Log in as administrator.
2. Open the Administrative Tools window (Start | Settings | Control Panel (Classic
view) | Administrative Tools).
3. Double-click on User Manager to open the Local Users and Groups window.
4. Double-click the Users folder to view the contents in the right pane.
5. Click Action in the menu bar and select New User in the drop-down menu. This opens
the New User dialog box.
6. Type in the user name and password, and select the attributes you want.
7. Click on the Create command button, then click on the Close command button.
8. In the Local Users and Groups window, select (highlight) the Users folder in the left
pane.
9. In the right pane, double click the name of the user just created. This opens the [user
name] Properties tabbed dialog box.
10.Open the Member Of tab dialog.
11. Click the Add command button. This opens the Select Groups dialog box.
36
12.Type Administrators in the field labelled Enter the object names to select. This will
enable the Check Names command button.
13.Click the Check Names command button, then click OK.
14.The newly created user will now be a member of both the Administrators and Users
groups and should match the privileges of the default user account.
15.Flush the cache to retain this change.
Caution
Because of the limited size of the flash memory, it is strongly recommended
that other applications available to the new and existing users be configured
to prevent writing to the local file system. For the same reason, it is also
recommended that extreme care be exercised when changing configuration
settings of the factory-installed applications.
Remote Administration and Firmware Upgrades
Rapport Administrative Software
Rapport is a full-featured remote administration tool set available from Wyse Technology.
It accesses the terminal through the Rapport Agent, PXE, and VNC server utilities
installed on the terminal. Rapport allows the terminal administration functions (including
firmware upgrades) to be performed without requiring an administrator to visit the
individual terminal sites.
For specific information on using Rapport, consult the Rapport help documentation.
For local custom fields that may be accessed by Rapport, refer to “Custom Fields” in
“Control Panel Extended Selections”.
Add-on Modules
If it is desired to install an add-on module, an administrator must use the built-in Rapport
packages for administering the terminal. Disable the write filter and enable the write filter
as needed to save the changes.
Firmware Upgrades
Intel's Preboot Execution Environment (PXE) is a protocol that defines interaction
between TCP/IP, DHCP and TFTP to enable a client to download a preboot environment
from a server.
PXE client is installed on the terminal and the PXE server component is part of the
Rapport Administrative Software suite.
Note
Citrix ICA auto update does not function for the ICA client installed on the
terminal; updates are implemented through the standard firmware upgrade
process.
37
WinVNC (Windows VNC)
Windows VNC (WinVNC) Server is installed locally on the terminal. It allows the terminal
to be operated/monitored (“shadowed”) from a remote machine on which VNC Viewer is
installed. VNC is intended primarily for support and troubleshooting purposes.
VNC Server starts automatically as a service at terminal startup. The service may be
stopped/started by using the Services window (opened from the Administrative Tools
selection on the Control Panel).
Note
Be sure to flush the write filter during the current boot session if you want to
permanently save the state of the service.
VNC Server Properties Settings
The WinVNC: Current User Properties Dialog Box (Figure 11) is available from the
administrator’s Start | Programs menu. It may be opened by the administrator by clicking
on the VNC icon in the task bar system tray. The default password in this dialog box is
“Wyse”.
Caution
The default password permits a remote administrator to configure a new or
reset terminal from a remote location rather than making a personal
appearance at the terminal site. For security, this password should be
changed as soon as possible upon receipt of the terminal.
Before a client computer can access your terminal:
1. You must furnish the IP address or valid DNS name of your terminal to the user (the
terminal remote administrator) of the machine from which your desktop is to be viewed.
·
The IP address can be obtained from the Local Area Connection Status dialog
box (accessed through Start | Settings |Control Panel | Network Connections |
Local Area Connection | Support tab).
2. You must have entered a password for the administrator to use into the WinVNC:
Current User Properties dialog box (see Figure 11).
Note
The options that may be set using the check boxes in this dialog box are
self-explanatory; refer to the VNC Web site for details.
38
VNC Viewer Setup and Operation
VNC Viewer software must be installed on the shadowing computer.
•
VNC Viewer is included as a component of the Rapport Administrative Software suite.
•
If another machine is to be used to access your terminal, the VNC Viewer software for
Unix/Linux and Win32 (Windows 95 and Windows NT) is available at no charge and
can be downloaded for installation on the remote machine from:
http://www.uk.research.att.com/vnc/
Complete instructions for setting up and using VNC are available at the VNC site.
The user of the shadowing computer must know the IP address/name and the password
set up on your terminal (the host). The shadowing computer operator may log on to your
terminal as follows:
1. Start the VNC Viewer program; this will open the Connection Details dialog box.
2. If the network is slow, press the Options... button to open the Connection Options
dialog box. Check the Restrict Pixels to 8-bit box (this will increase speed at the
expense of display quality). Press OK to return to the Connection Details dialog box.
3. In the VNC server field, type the IP address or valid DNS name of the host terminal,
followed by a colon and 0. For example:
snoopy:0
or
132.237.16.238:0
4. Press OK.
5. This will open the VNC Authentication dialog box. Type the password of the host
terminal (see above) and press OK.
6. The host terminal desktop will be displayed in a separate window on your desktop. Use
your mouse and keyboard to operate the remote terminal just as you would if you were
operating it locally.
39
Figure 18
VNC Connection Details Dialog Box
Figure 19
VNC Authentication Dialog Box
40
Figure 20
VNC Connection Options Dialog Box
Note
This dialog box may vary for different VNC software releases.
Table 1
VNC Connection Options Dialog Box Selections
Selection
Description
Preferred encoding radio buttons
Normally the VNC viewer requests
CopyRect, Hextile, CoRRE and RRE in
that order. The selection alters this
behavior by specifying the encoding
method to be used before any of the
others is tried.
Check boxes:
Allow CopyRect encoding
When selected, VNC viewer informs the
VNC server it can cope with CopyRect
encoding.
Deiconify on Bell
Often a beep will sound because you are
being notified of something such as e-mail
arriving or a compilation finishing. This
selection causes a minimized VNC viewer
to be restored when the bell character
(escape sequence) is received.
Swap mouse buttons 2 and 3
Generally selected by left-handed
persons.
Restrict pixels to 8-bit (for slow
networks)
Trade-off of color depth for transmission
speed.
41
Table 1
VNC Connection Options Dialog Box Selections, Continued
Selection
Description
Request shared session
When you make a connection to a VNC
server, all other existing connections are
normally closed. This option requests that
they be left open, allowing you to share
the desktop with someone already using
it.
View only
Select this if you only want to monitor the
desktop of the remote terminal but do not
want to operate it using the keyboard and
mouse.
Disable clipboard transfer
Clipboard changes caused by cutting or
copying at either the viewer of server are
normally transferred to the other end. This
option disables clipboard transfers.
Emulate 3 Buttons (with 2-button
click)
Users with a two-button mouse can
emulate a middle button by pressing both
buttons at once if this option is selected.
Full-screen mode
Causes the connection to start in
full-screen mode.
WintermTM 9000 Series XPE-Based Terminals Quick Reference Guide
Issue: 071702
Written and published by:
Wyse Technology Inc., July 2002
PDF created using FrameMaker®and Acrobat®