1
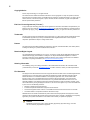
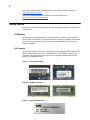
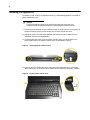
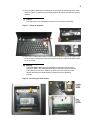
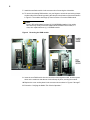
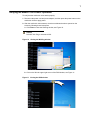
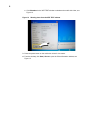
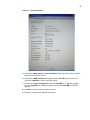
Installation Guide
Wyse® X90L and X90Le Mobile Thin Clients
Flash and Memory Upgrade Kit
Issue: 072310
PN: 883884-22L Rev. A
ii
Copyright Notice
© 2010, Wyse Technology Inc. All rights reserved.
This manual and the software and firmware described in it are copyrighted. You may not reproduce, transmit,
transcribe, store in a retrieval system, or translate into any language or computer language, in any form or by any
means, electronic, mechanical, magnetic, optical, chemical, manual or otherwise, any part of this publication
without express written permission.
End User License Agreement (“License”)
A copy of the Wyse Technology End User License Agreement is included in the software and provided for your
reference only. The License at http://www.wyse.com/license as of the purchase date is the controlling licensing
agreement. By copying, using, or installing the software or the product, you agree to be bound by those terms.
Trademarks
The Wyse logo and Wyse are trademarks of Wyse Technology Inc. Other product names mentioned herein are
for identification purposes only and may be trademarks and/or registered trademarks of their respective
companies. Specifications subject to change without notice.
Patents
This product and/or associated software are protected by copyright, international treaties, and various patents,
including the following U.S. patents: 6,836,885 and 5,918,039.
Restricted Rights Legend
You acknowledge that the Software is of U.S. origin. You agree to comply with all applicable international and
national laws that apply to the Software, including the U.S. Export Administration Regulations, as well as
end-user, end-use and country destination restrictions issued by U.S. and other governments. For additional
information on exporting the Software, see http://www.microsoft.com/exporting.
Ordering Information
For availability, pricing, and ordering information in the United States and Canada, call 1-800-GET-WYSE
(1-800-438-9973) or visit us at http://www.wyse.com. In all other countries, contact your sales representative.
FCC Statement
This equipment has been tested and found to comply with the limits for either Class A or Class B digital devices,
pursuant to Part 15 of the FCC Rules. These limits are designed to provide reasonable protection against
harmful interference in a residential installation. This equipment generates, uses, and can radiate radio
frequency energy and, if not installed and used in accordance with the instructions, may cause harmful
interference to radio communications. However, there is no guarantee that interference will not occur in a
particular installation. If this equipment does cause harmful interference to radio or television reception, which
can be determined by turning the equipment off and on, the user is encouraged to try to correct the interference
by one or more of the following measures:
•
•
•
•
Reorient or relocate the receiving antenna.
Increase the separation between the equipment and the receiver.
Connect the equipment into an outlet on a circuit different from that to which the receiver is connected.
Consult the dealer or an experienced radio/TV technician for help.
Shielded interconnect cables and shielded AC power cable must be employed with this equipment to insure
compliance with the pertinent RF emission limits governing this device. Changes or modifications not expressly
approved by the system's manufacturer could void the user's authority to operate the equipment.
Caution
Modifications made to the product, unless expressly approved by Wyse Technology, could void
the user’s authority to operate the equipment.
iii
Regulatory Compliance for Wyse Products
Basic EMC and Safety Requirements
Wyse appliances are compliant with the regulatory requirements in the regions listed below.
U.S.A. - FCC Part 15 (class B)
Canada - CAN/CSA-C22 No. 60950
Europe - EN 55022 (class B), EN 61000-3-2 (class A), EN 61000-3-3, EN 90650-1:2000+ALL
Canadian DOC Notices
Class A
This digital apparatus does not exceed the Class A limits for radio noise emissions from digital apparatus set out
in the Radio Interference Regulations of the Canadian Department of Communications.
Le présent appareil numérique n’émet pas de bruits radioélectriques dépassant les limites applicables aux
appareils numériques de la classe A prescrites dans le Réglement sur le brouillage radioélectrique édicté par le
Ministère des Communications du Canada.
Class B
This digital apparatus does not exceed the Class B limits for radio noise emissions from digital apparatus set out
in the Radio Interference Regulations of the Canadian Department of Communications.
Le présent appareil numérique n’émet pas de bruits radioélectriques dépassant les limites applicables aux
appareils numériques de la classe B prescrites dans le Réglement sur le brouillage radioélectrique édicté par le
Ministère des Communications du Canada.
Device Power Supply
Use only the external power supply that comes with your mobile thin client. For power and voltage ratings, see
the serial number label or regulatory label on your device. For power adapter replacement, contact your Wyse
Service Representative. For proper replacement compare the labels on both mobile thin client and power
adapter to ensure that their voltages match.
Warning
Use of any other power adapter may damage your mobile thin client or the power adapter. The
damage caused by an improper power adapter is not covered by warranty.
Battery Information
Model Xn0L mobile thin clients contain an internal button cell battery replaceable by Wyse or one of our
Authorized Service Centers. For service, visit http://www.wyse.com/serviceandsupport/service/service.asp.
Warning
There is a risk of explosion if the battery is replaced by an incorrect type. Always dispose of used
batteries according to the instructions accompanying the battery.
Perchlorate Materials - Special Handling May Be Required under California Code of
Regulations, title 22. (Only required within the U.S.A.)
Model Xn0L mobile thin clients contain a user-replaceable battery pack. The battery is designed to work with
your Wyse mobile thin client. Do not use a battery from other mobile thin clients or laptop computers with your
mobile thin client. Replace the battery only with a compatible battery purchased from a Wyse Authorized Service
Center. For service, visit http://www.wyse.com/serviceandsupport/service/spares.asp.
Caution
Misuse of the battery pack may increase the risk of fire of chemical burn. Do not puncture,
incinerate, disassemble, or expose the battery to temperatures above 65°C (149°F). Keep the
battery away from children. Handle damaged or leaking batteries with extreme care. Damaged
batteries may leak and cause personal injury or equipment damage.
iv
This page intentionally blank.
Contents
About this Guide 1
Finding the Information You Need in this Guide 1
Wyse Technical Support 1
Wyse Online Community 1
Related Online Resources Available at Wyse 1
Getting Started 2
Kit Warranty 2
Kit Contents 2
Required Tools and Materials 3
Installing the Upgrade Kit 4
Verifying the Mobile Thin Client’s Operation 7
Attaching the Upgrade Serial Label 10
Figures 11
vi
Contents
This page intentionally blank.
Wyse® X90L and X90Le Mobile Thin Clients
Flash and Memory (RAM) Upgrade Kit
Installation Guide
About this Guide
This guide describes how to install the 1-GB, 2-GB, or 4-GB flash and two (2) 1-GB RAM
Upgrade Kit in a Wyse X class mobile thin client. The information in this document is
intended for users of the following mobile thin client products:
•
X90L
•
X90Le
Finding the Information You Need in this Guide
You can use either the Search window or Find toolbar to locate a word, series of words, or
partial word in an active PDF document. For detailed information on using these features,
refer to the Help in your PDF reader.
Wyse Technical Support
To access Wyse technical resources, visit http://www.wyse.com/support. If you still have
questions, you can submit your questions using the Wyse Self-Service Center (on the
Wyse.com home page, go to Support | Knowledge Base | Home tab) or call Customer
Support at 1-800-800-WYSE (toll free in U.S. and Canada). Hours of operation are from
6:00 A.M. to 5:00 P.M. Pacific Time, Monday through Friday.
To access international support, visit http://www.wyse.com/global.
Wyse Online Community
Wyse maintains an online community where users of our products can seek and
exchange information on user forums. Visit the Wyse Online Community forums at:
http://community.wyse.com/forums.
Related Online Resources Available at Wyse
Wyse mobile thin client features can be found in the datasheet for your specific model.
Datasheets are available on the Wyse Web site. Go to http://www.wyse.com/products,
click the Wyse Mobile Thin Clients link, click the link for your mobile thin client, and then
click the Download Datasheet link.
Administrator and User documentation for your mobile thin client model are available at:
http://www.wyse.com/manuals.
2
If you need to upgrade your operating system, contact Wyse Customer Support at:
http://www.wyse.com/support.
Wyse Thin Computing Software is available on the Wyse Web site at:
http://www.wyse.com/products/software.
Getting Started
This section provides information about your flash and RAM kit warranty, kit contents, and
required tools.
Kit Warranty
The warranty on this kit assumes the remaining months of warranty of the mobile thin
client in which it is installed, or for 90 days, whichever is greater. Installation of this kit will
not void the factory warranty, however the user will be responsible for damage due to
improper installation.
Kit Contents
You kit may included a 1GB, 2-GB, or 4-GB flash module (with Microsoft® Windows® XP
Embedded pre-loaded) and one (1) 1-GB RAM module. See Figures 1 and 2 for your
mobile thin client module type. See Figure 3 for the upgrade serial label that you will
attach to your mobile thin client.
Figure 1
Flash module types
Figure 2
RAM module types
Figure 3
Upgrade Serial Label
3
Required Tools and Materials
You will need the following recommended tools to install the kit:
•
Small Phillips screwdriver
•
Plastic alignment tools or equivalent
Figure 4
Recommended tools
Warning
Flash and RAM modules may be susceptible to damage by Electro-Static
Discharge (ESD). All industry-standard cautions should be followed to avoid
ESD. Before you remove or install a modules, touch any metal part of the
chassis and keep that contact with the chassis during the installation
process.
4
Installing the Upgrade Kit
To install the 1-GB, 2-GB, or 4-GB flash and one (1) 1-GB RAM Upgrade Kit in an X90L or
X90Le mobile thin client:
Caution
Follow all precautions listed in the Quick-Start Guide that came with your
mobile thin client for disconnecting and reconnecting the mobile thin client.
1. Perform a proper shutdown of the mobile thin client by closing all files and ending your
session, and then press the power button to turn off the mobile thin client.
2. Unplug the power cord and power adapter, and remove any other cables from the
mobile thin client prior to disassembly.
3. Turn the mobile thin client to the back side, and then using your finger nails or the
plastic alignment tool, unsnap the switch covers as indicated in Figure 5.
Figure 5
Unsnapping the switch covers
4. Open the lid of the mobile thin client. Using the plastic alignment tool or your finger
nails, carefully pry off the switch cover starting at the corners as indicated in Figure 6.
Figure 6
Prying off the switch cover
5
5. Using the plastic alignment tool carefully lift up the keyboard (start lifting at the arrow
shown in Figure 7), and then lay keyboard facedown to expose the flash and memory
modules.
Caution
The keyboard is very susceptible to bending so use caution when lifting.
Figure 7
Lifting up keyboard
6. Remove the existing flash module. Locate the flash module and push its retaining clip
out of the way in the direction of the arrow shown in Figure 8. Carefully lift flash module
out of the socket.
Warning
Flash and RAM modules may be susceptible to damage by Electro-Static
Discharge (ESD). All industry-standard cautions should be followed to avoid
ESD. Before you remove or install a modules, touch any metal part of the
chassis and keep that contact with the chassis during the installation
process.
Figure 8
Removing the flash module
6
7. Install the new flash module in the reverse order of removing the old module.
8. To remove the existing RAM module, use your fingers to unlock the two locking clamps
at either side of the module by pushing the clamps in the direction of the arrows shown
in Figure 9. The module should pop up from its socket. Lift out the RAM module.
Note
Early 1-GB configurations had two (2) 512-MB DIMMs installed. Your mobile
thin client may or may not have a RAM module installed in this location; if it
does, then replace with one (1) 1-GB RAM module.
Figure 9
Removing the RAM module
9. Insert the new RAM module into the connector of the original module, and then press
down on the module so that the two locks will snap in place, securing the module.
10.Replace the cover and keyboard in the reverse order as shown in Figures 5 through 7.
11. Proceed to “Verifying the Mobile Thin Client’s Operation.”
7
Verifying the Mobile Thin Client’s Operation
To verify that the mobile thin client works properly:
1. Reconnect the power cord and power adapter, and then press the power button on the
mobile thin client to apply power.
2. After the mobile thin client restarts, close three windows that have opened on the
screen by following these instructions:
a. Click Close to close the WinPing window, see Figure 10.
Caution
DO NOT click Ping or this test will fail.
Figure 10
Closing the WinPing window
b. Click on the X in the upper right corner of the DOS window, see Figure 11.
Figure 11
Closing the DOS window
8
c. Click Shutdown in the XPE TEST window to shutdown the mobile thin client, see
Figure 12.
Figure 12
Shutting down from the XPE TEST window
3. Press the power button on the mobile thin client for it to restart.
4. From the desktop, click Start | About to open the Client Information window, see
Figure 13.
9
Figure 13
Client Information
5. Verify that the MAC address and Serial Number matches the serial number and MAC
address on the mobile thin client.
6. Verify that the RAM Configuration is approximately 1471 MB for early mobile thin
clients and 1984 MB for current mobile thin clients.
7. Verify that the Flash Configuration is less than 1024 MB for a 1-GB flash upgrade,
less than 2048 MB for a 2-GB flash upgrade, and less than 4096 MB for the 4-GB
upgrade.
8. Click OK to close the Client Information window.
9. Proceed to “Attaching the Upgrade Serial Label.”
10
Attaching the Upgrade Serial Label
The Wyse conversion kit is supplied with a serial label that must be attached to each
mobile thin client.
1. Attach the label as shown in Figure 14. Sufficient labels must be purchased for mobile
thin clients to be upgraded.
Caution
Failure to install the label may cause the mobile thin client to receive
incorrect replacement parts if sent in for service.
Figure 14
Attaching the Upgrade Serial Label
2. The mobile thin client is ready for operation and setup by the Administrator.
11
Figures
1
2
3
4
5
6
7
8
9
10
11
12
13
14
Flash module types 2
RAM module types 2
Upgrade Serial Label 2
Recommended tools 3
Unsnapping the switch covers 4
Prying off the switch cover 4
Lifting up keyboard 5
Removing the flash module 5
Removing the RAM module 6
Closing the WinPing window 7
Closing the DOS window 7
Shutting down from the XPE TEST window
Client Information 9
Attaching the Upgrade Serial Label 10
8
Installation Guide
Wyse® X90L and X90Le Mobile Thin Clients
Flash and Memory Upgrade Kit
Issue: 072310
Written and published by:
Wyse Technology Inc., July, 2010
Created using FrameMaker® and Acrobat®