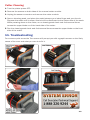
1
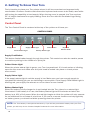
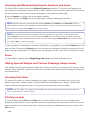
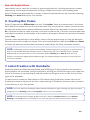
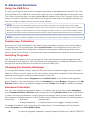
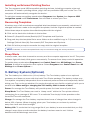
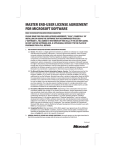
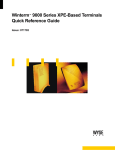
Por table Integrated Printer
User’s Guide
1-800-788-5572
Local: 503-644-5572
www.DuraLabel.com
www.GraphicProducts.com
Toro Portable
Integrated Printer
Standalone Capability
Toro is an independent printing system complete with keyboard, touch screen, software and
mouse. Toro comes with everything you need to design and print arc flash, pipe marking,
NFPA, right-to-know, OSHA compliance, barcoding, wayfinding and custom labels and signs.
Independence
Toro’s complete system means there is no longer a need to network into your in-house
computer system so there are NO security or interface issues.
Portability
Toro weighs in at 13.8 pounds (without supply). Because it does not rely on network support,
you can take it to a secondary location, to a remote site, or put it on a cart and take it
throughout your facility for inventory identification or lean manufacturing.
On The Go Accessories
Toro offers a portable battery module accessory for working remotely. The battery comes
with its own charging brick and will last for three hours of continuous printing in the field.
The Toro also comes with a 12V car charger for printing on the go.
User Manual Copyright Information
No part of this manual, including the products and software described in it, may be reproduced, transmitted,
transcribed, stored in a retrieval system, or translated into any language in any form or by any means, except
documentation kept by the purchaser for backup purposes, without the express written permission of Graphic
Products, Inc.
Products and corporate names appearing in this manual may or may not be registered trademarks or copyrights of
their respective companies, and are used only for identification or explanation and to the owners’ benefit, without
intent to infringe.
Specifications and information contained in this manual are furnished for informational use only, and are subject
to change at any time without notice, and should not be construed as a commitment by Graphic Products. Graphic
Products assumes no responsibility or liability for any errors or inaccuracies that may appear in this manual.
Table of Contents
1. Warranty Information/FCC Compliance/
Safety Instructions . . . . . . . . . . . . . Pg. 2
Warranty Information
FCC Compliance
Safety Instructions
2. Getting To Know Your Toro. . . . . . . . Pg. 4
Control Panel
Supply Feed Light
Printer Status Light
Supply Status Light
Battery Status Light
Power Button
Keyboard Release Slider
I/O Panel
Ethernet Print Server Port
USB-A, Wireless Mouse Connectivity
USB-B
DC Power
Keyboard
Keyboard Release
Keyboard Operation
Screen
Screen Release
Screen Interface
3. Loading Vinyl and Ribbon
Supply. . . . . . . . . . . . . . . . . . . . . . . . Pg. 7
Loading Vinyl
Loading Ribbon
4. Getting Started. . . . . . . . . . . . . . . . . Pg. 9
Opening Screen DuraSuite Software
QLabel-IV Barcode Software
Templates Pull-down Menu
Programs Pull-down Menu
D Drive
C Drive
My Documents
Printer Preferences and Settings
Supply Status
Contact Information
Battery Power
Shutdown Power Button
Clock
5. Label Creation with OpenOffice
Label Writer . . . . . . . . . . . . . . . . . . Pg. 13
Opening a New Document from Template
Changing Label Size
Text Frames
Adding a Text Frame to a Template
Changing Size of Text Frame
Adding Text in a Frame
Formatting Text
Inserting and Manipulating Graphics
Zoom
Adding Special Shapes & .Custom Drawings
Inverting Text Color
Printing a Label
Special Applications
6. Creating Bar Codes . . . . . . . . . . . . Pg. 15
7. Label Creation with DuraSuite . . . Pg. 15
Creating and Modifying Symbols
8. Advanced Functions. . . . . . . . . . . . Pg. 16
Using the USB Drive
Installing Programs
Changing the Desktop Wallpaper
Password Protection
Using an External Monitor
Installing an External Pointing Device
Recovering Templates
Power Saver Mode
9. Battery System (Optional). . . . . . . Pg. 17
Power
Sleep Mode
Charge
Battery Life
Maintenance
Battery Charger
12V Car Adaptor
10. Cleaning and Maintenance. . . . . Pg. 18
Print Head Cleaning
Cutter Cleaning
11. Troubleshooting. . . . . . . . . . . . . .Pg. 19
12. Specifications. . . . . . . . . . . . . . . . Pg. 21
13. End User License Agreement. . . Pg. 22
Microsoft XP – Embedded Device
Other Software
-1-
1. Warranty Information/FCC Compliance/Safety
Instructions
Warranty Information
The DuraLabel Toro is warranted to be free from defects in materials or workmanship for
a period of one year from the date of purchase. Within this period, Graphic Products, Inc.
will, at its sole discretion, repair or replace any components that fail in normal use. Such
repairs or replacements will be made at no charge to the purchaser for parts or labor,
provided the purchaser shall be responsible for any transportation cost. This warranty
does not cover equipment or parts that have been misused, altered, neglected, carelessly
handled, used for purpose other than those for which the printer was manufactured, or
damages resulting from unauthorized service.
NOTE: Repairs have a 90-day warranty. If the unit sent in is still under its original warranty, then
the new warranty is 90 days or to the end of the original warranty, depending upon which is longer.
The warranties and remedies contained herein are exclusive and in lieu of all other warranties
whether expressed, implied or statutory, including any liability arising under any warranty of
merchantability or fitness for a particular purpose, statutory or otherwise. This warranty gives the
purchaser specific legal rights, which may vary from state to state.
In no event shall Graphic Products be liable for any incidental, special, indirect or
consequential damages, whether resulting from the use, misuse or inability to use the
product for any reason, including defect. Some states do not allow the exclusion of incidental
or consequential damages, so the above limitation may not apply in all areas.
Graphic Products retains the exclusive right within all warranty periods to repair the product,
replace the product or offer a full refund of the purchase price, at its sole discretion. Such
remedy shall be the purchaser’s sole and exclusive remedy for any breach of warranty.
General maintenance and cleaning of the Toro printer is the purchaser’s responsibility
and is not covered by the warranty. For further service information, please contact your
representative at 1-800-788-5572, or visit www.DuraLabel.com.
NOTE: If the Toro needs to be serviced or shipped, the battery and power supply need to be
removed.
NOTE: User programs cannot be installed on Toro.
-2-
FCC Compliance for American Users
This device complies with part 15 of the FCC Rules. Operation is subject to the following
two conditions: (1) This device may not cause harmful interference, and (2) this device
must accept any interference received, including interference that may cause undesired
operation. These limits are designed to provide reasonable protection against harmful
interference when the equipment is operated in a commercial environment. This equipment
generates, uses, and can radiate radio frequency energy and if not installed and used in
accordance with instructions may cause harmful interference to radio communications.
Changes and modifications could void the user’s authority to operate this equipment.
Safety Instructions
Please review the following safety instructions prior to using the printer:
1. The Toro is intended for indoor use only. Keep the printer away from humidity and
ultraviolet radiation.
2. Before you connect the printer to a power outlet, please check the voltage of the
power source.
3. When not in use, disconnect the printer from its power source.
4. To avoid electrical shock, DO NOT pour any liquid onto the printer or printer parts.
5. ONLY qualified service personnel should attempt to repair the printer.
6. Under any circumstances, DO NOT repair or adjust energized equipment without
supervision. For your protection, a person capable of providing first aid must always
be present.
7. Obtain first aid or medical attention immediately after an injury. Never neglect an injury,
no matter how slight it seems.
8. Toro supply may build a small static charge in static sensitive environments. Do not
operate Toro or any other electronic equipment near flammable materials.
-3-
2. Getting To Know Your Toro
Find a location to place your Toro printer where it will be convenient and ergonomically
comfortable. Choose a location that allows the keyboard and screen to be easily used while
still having the capability to load supply. When the top cover is opened, the Toro requires
21" of height clearance for supply loading. Place the Toro with the DuraLabel logo facing
toward you.
Control Panel
The Toro Control Panel is centered at the top of the printer as it faces you.
CONTROL PANEL
Supply Feed
Supply Status Light
Printer Status Light
Power Button
Battery Status Light
Keyboard
Release Slider
Supply Feed Button
This button feeds loaded supply through the printer. This control can also be used to pause
or continue printing in the middle of a print job.
Printer Status Light
When the printer status light is green, your Toro is operational. If it is red amber or blinking,
open the top cover and make sure the print head is locked into place or check printer
error screen.
Supply Status Light
If the supply status light is red the supply is low. Make sure you have enough supply to
complete the labeling job you are intending to accomplish. If the Supply Feed Status Light is
blinking red, your supply has almost run out or there is none loaded.
Battery Status Light
When the battery is fully charged or is not loaded into the Toro, there is no status light
illuminated. If the battery is in use, the Battery Status Light will illuminate red when the
battery is at 10% of full power. When the red light begins to blink the printer will only operate
for an additional five minutes of print time. If you are at a remote location and relying solely
on battery power, you should consider powering down the printer.
NOTE: The Toro battery is an optional accessory. If you did not purchase a battery with your Toro
printer, you still may do so. Contact Graphic Products for more information.
-4-
Power Button
This button powers up your Toro both in battery mode and A/C mode. When you first activate
the power button a tone will sound and the green light will blink for approximately 30
seconds while the Toro software is booting up. When the light turns solid green your Toro is
ready to print. For powering down push the power button. The light will flash green and the
Toro screen will go dark.
If the power light is slowly blinking green Toro is in sleep mode. Press any key a few times to
wake up Toro.
Keyboard Release Slider
This button releases your Toro keyboard from its locked upright position.
I/O Panel
The I/O panel includes the power and data transfer ports for Toro (L to R).
Ethernet Port
USB-A Ports
USB-B Port
24-VDC Port
• Two USB-A ports which can be used for a USB drive for file transfer or for a mouse.
• One USB-B port which can be used to connect to an external computer.
• 24-VDC port for external power source. Use only the Toro power brick provided with
your printer.
• An optional Ethernet Print Server Port allows you to connect the Toro printer to an
external computer. Check with your IT Department before connecting the Toro to your
in-house system. In electrically noisy environments the ethernet port might have
degraded performance.
To enable Ethernet or an external computer select Programs then System then
Preferences. Select the appropriate button.
NOTE: When using the Toro as a printer connected to a computer or network, the software will
instruct you to close the Toro screen and keyboard. This will disengage the Toro software and allow
the printer to serve as an output device for the external network.
NOTE: A wireless optical mouse was shipped with your Toro. A USB plug is seated in the base of
the mouse. Place the USB plug into one of the USB-A ports on the I/O Panel and place a single AA
battery in the mouse then flip the small On/Off switch. The Toro will recognize the wireless optical
mouse automatically. For mouse optimization follow the directions under Screen Interface.
NOTE: The Toro supports communication through a USB cable no longer than three meters or
9 ½ feet.
-5-
Toro Keyboard
Keyboard Release
The Toro keyboard is permanently mounted to the
printer housing. It features an 11" QUERTY layout
with an embedded calculator function. Open the
keyboard by moving the release slider on the
control panel and pull the screen down until it
seats on your work surface. Above the keyboard
on the right, there are three indicator lights that
illuminate when “Lock” functions are engaged:
1 = Numbers Lock (Num Lock), A = Upper Case
Lock (Caps Lock) and Arrow = Scroll Lock.
Keyboard Operation
When the keyboard is in the up position and the printer is on, the software will shut down.
The power light on the control panel will blink on and off, then stay solid green. This position
is useful for reserving battery power and is necessary when the printer is being networked as
an output device through the Ethernet port or a USB-B external computer on the I/O panel.
Toro Screen
Screen Release Button
The button to the right of the LED screen is the screen release button. Push in and the
screen will release from its locked position. You will find indents on the back of the screen
at both sides near the bottom. Grasp these with your forefinger and thumb and lift the
screen toward you. The screen features four tilt positions to optimize your viewing angle and
touch accessibility. These tilt positions hold the screen securely in place for finger touch or
for pointer use.
Screen Interface
The Toro houses an LED 9" diagonal screen with touch capability. You can use your
fingertip, or use the Toro stylus that is seated in a custom slot in the bottom right edge of
the keyboard.
An external mouse may also be used by plugging it into one of the USB-A ports on the I/O
panel. A wireless mouse has been included with your Toro printer (see I/O Panel – USB-A).
To optimize mouse recognition speed Select Programs then System then Improve USB
recognition speed under Preferences. You will need to reboot your Toro.
-6-
3. Loading Ribbon and Vinyl Supply
Loading Ribbon
1. Open the Toro cover all the way
until it seats. Install a ribbon rewind
core onto the gray, spring-loaded
ribbon rewind holder on the top of
the print carriage.
2. Place the other end of the ribbon core
onto the holder on the other side.
Make sure to align the notch on the
holder with the notch on the core.
Ribbon Rewind
Core Holders
Print head
release buttons
3. Pull the cutter station down until it
rests, then push the gray print head
release buttons above the printer
carriage. The print head will spring
upward. Hold the ribbon so the loose
end falls to the rear of the printer,
then place one end of the ribbon on
the gray, spring loaded holder.
4. Place the other end of the ribbon
onto the holder on the other side
ensuring that the notches lock
into place.
5. Extend the ribbon around the print
carriage and use a small piece of
vinyl supply or tape to secure the
ribbon end on the empty rewind core.
Ribbon Holders
Take-Up Wheel
6. Pull the ribbon snug by turning the
gray take-up wheel.
-7-
Loading Supply
Fixing Tabs
1. Make sure the print carriage is in
the up position (gray buttons over
cutter station).
2. Place the label supply onto the supply
shaft and secure with the label fixing
tabs on either side.
3. With the label supply extending over
the top of the spool toward the cutter
station, place the spindle into the
slots within the supply well. With the
DuraLabel supply label facing the
back of the printer.
4. Feed the end of the label supply
under the print carriage threading
it underneath the gray, adjustable
label guides.
Print Carriage
5. Feed the supply through the print
carriage and thread the end through
the cutter station.
Adjustable
Label Guides
Cutter Station
6. Adjust the gray guides toward the
edges of the supply, without binding.
7. Close the cutter mechanism by lifting
it up until it clicks into place.
8. Close the print carriage, then close
the Toro cover.
-8-
4. Getting Started
Opening Screen
The Toro opening screen and menu bar is your introduction to the Toro software, drives and
instructions. The Menu Bar Icons are numbered below.
1
2
3
4
5
6
7
8
9
10
11
12
1. DuraSuite Software
This link takes you to our DuraSuite software program. This is where you will find readymade templates for arc flash, pipe marking, NFPA diamonds, RTK color bars and a custom
label designer.
A DuraSuite manual has been included with your Toro printer. A digital PDF version of the
manual is included in the Toro software in addition to instructional videos.
-9-
2. QLabel-IV Barcode Software for Number Sequencing and Database Merging
QLabel-IV software allows you to build and save your own barcodes. A printed QLabel
Walkthrough is included with your Toro. There is also a PDF version available on the Toro.
Select Training under Programs on the Toro toolbar.
3. Templates Pull-down Menu
Clicking Templates reveals a drop-down menu listing the major categories of label
templates. Selecting a category displays a pop-up window showing the labels in that
category. There is also a list of symbols available from the Templates menu.
-10-
4. Programs Drop-down Menu
This menu provides paths to the four most commonly used applications: DuraSuite, Label
Writer, Label Draw and QLabel Barcoding.
This menu also links to Training. Select this to access How-To documents, Label
Examples, Manuals and Instructional Videos.
5. C Drive & D Drive
Toro documents and programs are located on the “C” and “D” drives.
6. My Documents
This folder serves as a shortcut to your most commonly used templates, label designs,
symbols and pictures.
-11-
7. Printer Settings
The Printer Settings window will come up when you change supply between continuous
vinyl, and blackmark or die-cut supply or when a print driver change is needed.
a. To bring up the Printer Settings window select Printer Icon in the Toro toolbar.
b. Driver settings will automatically default to the supply loaded in the Toro. If you want to
manually change the setting select the arrow to the right of the window to see other driver
setting options.
c. Ribbon type is not automatically sensed by the Toro. Verify that your ribbon setting
matches the ribbon supply you have loaded by selecting Ribbon Type then Apply.
Ribbon supply is identified by the color coding on the cardboard core
Black Core - Premium Black Ribbon
Blue Core – Petroleum Resistant Ribbon
Red Core – Extreme Chemical Resistant Ribbon
Orange Core – Shrink Tube Ribbon
Green Core – Custom Ribbon
Plain Core – Colors: White, Red, Green, Orange, Yellow, Dark Blue
Trim Label: The cutter can override the printer and cut supply on command. Select Trim
Label. The Toro will advance the supply approximately one inch and cut the supply. When
loading a different supply type a dialog box will appear if printer calibration is required.
Select Calibrate under supply calibration. Toro will sense the supply that is loaded and
will self-adjust.
8. Supply Information
Select the Supply icon and a window will pop up telling you what type of supply is loaded
in the Toro. The green color in this label icon will step down as the supply is being used.
9. Battery Power
This icon provides battery status in percentages. Pass the curser over the icon and a
pop up window will appear telling you the percentage of power the battery has left without
a recharge.
-12-
10. Contact Information
This button opens a window that provides a phone number and website you can use for
toll-free customer support, supply orders and product updates.
11. Shutdown Power Button
This button provides an option to shut down electronically rather than using the manual
button on the control panel.
12. Date & Time
To change the time zone setting, or to toggle automatic daylight savings time setting,
select the Time Zone tab and select the desired time zone from the pull-down list. Click
on the check box at the bottom to disable automatic daylight savings time adjustment.
NOTE: Changes to the time zone settings will not take effect until the Toro is restarted.
5. Label Creation with OpenOffice Label Writer
The Toro Label Writer is based on OpenOffice Writer word processing software. The basic
principles of label creation in Label Writer are the same as in Microsoft Word or other
programs. There are some customizations developed specifically for the Toro. Here are some
shortcuts for creating label templates.
Opening a New Template in OpenOffice
Option #1: Select Templates in the Toro toolbar then select a template size or type from the
drop-down menu. Double-click on a template. A window will open. Select Template Type (such
as safety or pipe marking) and double click. A window showing the template will open. You
can now manipulate existing text and graphics to create your message or print the label as is.
Option #2: Select Programs in the Toro toolbar then select Label Writer. A window showing
a blank template palette will open. Now you are ready to create your custom label.
Changing Label Size from OpenOffice
With the template window open select Format then Page. You can then set width, height
and margins. There is also a page icon in the toolbar to accomplish this.
Text Frames (Text Boxes)
Adding a Text Frame to a Template: From an OpenOffice template, select Insert then Text
Frame: select OK. A box with green squares will appear within the template.
Changing Size of Text Frame: Select any one of the green boxes bordering the text frame
and drag to resize the dimensions of frame.
Adding Text in Text Frame: Select the inside of the text frame. Now you may type your
message in the frame.
Formatting Text: Similar to other text editors – select text options on tool bar: bold, size,
font, center etc. You can also use the pulldown menus such as Format. You can
also select anywhere within the text and select Character in the pull down menu.
-13-
Inserting and Manipulating Graphic Symbols and Icons
On OpenOffice toolbar select the Picture Frame Icon (Gallery). A Symbol/Icon gallery will
open above the template window. Select a New Theme from the scroll menu to the left (such
as Elec Sound). A family of symbols will appear in the window to the right.
Select a Symbol and drag it to the template palette.
To resize, select and Drag one of the eight green boxes outlining the symbol.
HINT: Graphics can also be inserted by selecting Insert then Picture then From File from the
Label Writer tool bar. A list of available folders appears in a new window. Select the desired folder
and select an image. Select Open to insert the image.
HINT: For more precise control of graphic size and placement, right-click on the graphic and
select Picture from the pop-up menu. Select the Type tab in the window that appears. Enter the
desired height, width, and placement as for a frame. Selecting the Keep Ratio box will avoid distortion. Select OK to make the change.
To flip a graphic horizontally or vertically, right-click on the graphic and select Picture from the
pop-up menu. Select the Picture tab in the window that appears. Check the boxes for the desired changes. A preview of the flipped picture appears at right. Click OK to make the change.
Zoom
On OpenOffice toolbar select Magnifying Glass Icon and select desired zoom.
Adding Special Shapes and Custom Drawings (shape boxes)
The easiest way to select desired shape is to select one from the toolbar at the bottom of the
screen. Once selected, move the cursor to the inside of the label field and drag the shape to
the desired size.
Inverting Text Color
To create color text on a black background, begin by loading the printer with vinyl of the
desired text color. Create a label in Label Writer as described above. Select Format then
Page to set the background color. The text will automatically revert to white.
NOTE: The Toro does not support color printing. If a label contains a color other than black or
white, it will print as a shade of gray.
Printing a Label
To print a label, select File then Print from the Label Writer tool bar. In the window that
appears, verify that the correct printer model and printer port are selected. Click the Up and
Down buttons at the lower right of the window to select the desired number of copies. Click
OK to print.
-14-
Special Applications
Label Writer can be used for a variety of special applications, including automatic number
sequencing, mail merge functionality, printing multiple wire wraps, and creating table
tents. Tutorials and templates for a variety of special applications can be found by selecting
Training then How To from the Toro toolbar.
6. Creating Bar Codes
Select Programs then EZBarCode from the Toro toolbar. Enter the desired text in the blank
field. Select the desired bar code format and size from the pull-down menus. Some barcode
formats will require you to select additional choices. When the information is correct, select
Go. A preview of the bar code is shown in the box at bottom left. If the bar code text has been
improperly formatted, a description of the problem will appear. When the barcode is finalized,
select Copy.
Format a label as desired in Label Writer. Insert a frame large enough to hold the barcode.
Place the text cursor inside the frame. From the Label Writer tool bar, select Edit then Paste
to insert the barcode into the label document. Label Writer will treat a barcode like text.
NOTE: If barcoding requires extensive formatting, sequencing and/or merging, it is recommended
that you use QLabel Barcode Software which is loaded into your Toro software suite. A QLabel
Walkthrough is included with your Toro materials. Select Training then How To from the Toro
toolbar to access the digital QLabel Walkthrough. The QLabel Program shortcut is a barcode icon
on the Toro toolbar.
7. Label Creation with DuraSuite
DuraSuite allows arc flash warning labels and NFPA Right-To-Know labels to be printed on
pre-formatted, die-cut labels. Open DuraSuite by clicking the DuraSuite logo in the upper left
of the Toro screen or by selecting DuraSuite under the Program menu or the DL key to the
right of the spacebar.
To learn how to create arc flash labels or RTK labels using DuraSuite, please refer to the
DuraSuite manual included on the Toro under training. A DuraSuite manual is also included
in the delivery of your Toro printer.
NOTE: Your Toro also has DuraSuite video tutorials available for pipe marking, arc flash and label
designing. Go to Training under the Programs icon on your Toro toolbar.
NOTE: For extended print lengths greater than 30", select the Printer Icon from the Printer
Settings, select Ext under cut drop down. For use with pipe markers and ammonia markers.
-15-
8. Advanced Functions
Using the USB Drive
To copy non-program files, such as images, templates, or spreadsheets, onto the Toro, first
load the files onto a USB drive. Insert the drive into any unused USB port on the side of the
Toro. After a few moments, a button labeled D: will appear on the Toro Toolbar. Click on this
button to view the contents of the USB drive. Drag and drop files to the desired location on
the Toro using the folder tree at the left of the window.
NOTE: The only user-rewriteable portions of the built-in hard drive are the My Documents folder
and its subfolders. This is the default location for all user functions, including saving new or modified
templates, images, or other documents. Files changed, deleted, moved, or otherwise modified in other
portions of the file structure will automatically revert to their original state when the Toro is rebooted.
NOTE: To speed up USB recognition select the How To’s document under Programs in the Toro toolbox.
Touchscreen Calibration
Over time your Toro touchscreen may need to be calibrated to improve touch performance.
To calibrate the Toro touchscreen select Control Panel in the Programs menu in the Toro
toolbar. Then select Touch Calibration. Follow the instructions by selecting the X in each
screen corner until it beeps. Your screen will then be calibrated for optimum touch accuracy.
Installing Programs
The Toro cannot install or run user programs. Only manufacturer-supplied upgrades can
be installed on the machine. The Toro printer can be slaved to an external software source
through the optional Ethernet Print Server Port and USB-B port.
Changing the Desktop Wallpaper
To change the Desktop image, insert a USB drive with the desired image into any unused
USB port. Click on the D: button in the Toro toolbar. Select the image file in the window that
appears, and drag it to the My Symbols folder on the Toro.
From the Toro toolbar, select Programs then Control Panel. In the window that appears,
select Display. In the new window, select the Desktop tab, then Browse. Navigate to the My
Symbols folder, select the desired image, and select Open. Select OK to make the change.
Password Protection
The Toro has a password protection option. To enable, from the toolbar, select Programs
then Password Control, Add User and complete by clicking Enable Lock. After a shutdown
or return from the screensaver, a logon prompt will display. Once a user is added, several
other password options appear on the Toolbar. Under Password Control the following items
are shown:
• Add User
• Delete User
• Change Password • Disable Station Lock (toggle - disable/enable)
To disable the station lock, select the 4th bullet above. To immediately lock the station,
select Programs then Lock Station Now.
-16-
In case of forgotten password, contact Graphic Products at 1-800-788-5572.
Installing an External Pointing Device
The Toro supports most USB-compatible pointing devices, including computer mice and
trackballs. To install a pointing device, plug it into any available USB port on the Toro. The
computer will automatically recognize the device.
To optimize mouse recognition speed select Programs then System then Improve USB
recognition speed under Preferences. You will need to reboot your Toro.
Recovering Templates
A backup copy of all manufacturer-supplied label templates is permanently maintained. If
changes have been made to the supplied templates, and the original template is needed,
follow these steps to replace the edited template with the original:
1. Click on the hard drive indicator in the toolbar.
2. Select C:\GraphicProducts\BackUp\DLP Templates and Symbols.
3. Drag and drop the template file to same folder as the modified copy in C:\Documents and
Settings\Default User\My Documents\DLP Templates and Symbols.
4. Click OK at the prompt to overwrite the copy with the original template.
HINT: If desired, an entire template folder may be recovered using the same procedure.
Sleep Mode
In sleep mode, user data is saved to memory and the computer appears to be off. The power
indicator light will slowly blink green momentarily. To recover from sleep mode hit spacebar.
To enable sleep mode select Programs then Control Panel then All Settings then Power
Options. A reboot is required to save options. Select Programs then Control Panel then All
Settings then Power Options….
9. Battery System (Optional)
The Toro battery is a Lithium-Ion (Li-Ion) battery. The Toro battery system is an optional
accessory and does not come with the basic Toro Printer package. The battery makes your
Toro system completely independent from an external power source and is especially useful
taking your Toro on the go whether it’s moving throughout your facility or taking it with you to
another site. When using or charging the Toro battery think in terms of three.
Power: On average the Toro Battery will provide power for three hours of print time.
Sleep Mode: The Toro Battery can rest in “sleep mode” within the Toro printer without
recharging for an average of 30 hours. To re-activate Toro simply hit the spacebar a few
times and Toro will reactivate.
Charge: On average the Toro battery requires three hours of charge time when charge is
below 10% of power. When charging, place your Toro battery on a clean dry surface
away from heat and direct sunlight.
Battery Life: To maximize the long-range life of your battery is recommended that you fully
charge it every three months whether the battery has been used or not. Lithium
-17batteries will self-discharge over time.
Battery Loading:
The Toro battery
conveniently mounts
into the back of the
Toro. Remove the
battery cover door by
pushing the slot downward and pulling the door away. Position the battery so the cut-outs are
aligned and the contacts are in position with the contact interface. Push the battery in until
the locking slider on the right of the battery slot can be locked into the up position.
Battery Maintenance: When not in use, keep your Toro battery in a cool, dry place. It is
especially important that you keep your Toro battery away from direct exposure to the sun.
Do not disassemble your Toro battery. Do not let the metal battery pins come into contact
with another metal surface. If you notice odor or leakage, remove battery immediately and
clean any residue from skin and clothes and contact your DuraLabel representative.
Battery Charger: The Toro battery should be charged only with the battery charging unit
provided. Plug the charging unit jack into the Toro battery and place the battery flat on a
clean, dry surface. Plug the charger into an AC outlet. The light on top of the charger will
illuminate red. When the charger light turns green, your Toro battery is charged and ready.
Charging time averages three hours.
10. Cleaning and Maintenance
IMPORTANT! Always turn the printer OFF and remove the battery before cleaning or
performing maintenance. Always wait at least 5 seconds before turning ON the power. Basic
cleaning of the print head, cutter and platen roller will prolong the life of the printer and allow
crisp, clear labels and signs with every print.
NOTE: A video tutorial on Toro cleaning is available. Select Programs on the Toro toolbar then
Training and Videos. Or, select the “?” button
training section.
in the Toro toolbar to access Toro’s built-in digital
Print Head Cleaning
Unclear printouts may be caused by a dusty print head, ribbon stain or label supply residue.
Therefore, when printing, it is necessary to keep the top cover closed. Also, prevent vinyl from
being stained or becoming dusty to ensure print quality and to prolong print head life.
1. Turn the printer power OFF.
2. Open the printer cover, and remove the ribbon and/or label supply from the printer.
3. Open the print head by pressing the gray locking levers.
4. To open a cleaning swab, place the swab between your index finger and your thumb.
Squeeze the swab until it snaps. Alcohol will be distributed to the cotton side of the swab.
5. Run the swab back and forth several times across the front and underside of the print
head to remove any built-up adhesive, residue or dust particles.
-18-
Cutter Cleaning
1. Turn the printer power OFF.
2. Remove the screws on both sides of the manual cutter module.
3. Unplug the sensor connector and remove the cutter module.
4. Open a cleaning swab, and place the swab between your index finger and your thumb.
Squeeze the swab until it snaps. Alcohol will be distributed to the cotton side of the swab.
While pressing down on the cutter, run a cleaning swab back and forth several times
across the upper blade on of the back side of the cutter.
5. Run the cleaning swab back and forth several times across the upper blade on the front
side of the cutter.
11. Troubleshooting
For common print errors the Toro screen will prompt you with a graphic screen on the likely
cause of the error and what you can do to fix it.
-19-
Other Troubleshooting Tips
Q: When printing, only part of the contents were printed.
- Check if label or ribbon is stuck on the thermal print head.
- Check if application software has errors.
- Check if start position setting has errors.
- Check if ribbon has wrinkles.
- Check if power supply is correct.
- Check driver setting.
Q: When printing, part of the label was not printed completely.
- Check if thermal print head is stained or dusty.
- Check the quality of the vinyl supply and ribbon.
- Check print head alignment.
Q: Printout not in desired position.
- Check if sensor is covered by paper or dust.
- Check if liner is suitable for use. Contact DuraLabel for more information.
- Check if label roll edge is aligned with label width guide.
- Check calibration.
Q: When printing, page skipping occurs.
- Check if error occurs on label height setting.
- Check if sensor is covered by dust.
- Check calibration.
Q: Unclear printout.
- Check print darkness setting.
- Check if thermal print head is covered with glue or stain.
Q: When using cutter, label would not feed, or abnormal cutting occurs.
- Check if cutter is installed properly.
- Check if platen roller is sticky.
Q: Slow USB recognition.
- To optimize USB recognition speed Select Programs then System then Improve USB
recognition speed under Preferences. You will need to reboot your Toro.
Q: Poor touch screen calibration.
- Select Control Panel in the Programs menu in the Toro toolbar. Then select Touch
Calibration. Follow the instructions by selecting the X in each screen corner until
it beeps.
-20-
12. Specifications
Printer
• Type: Thermal Transfer
• Print Speed: up to 3 inches per second
• Resolution: 300 dots per inch
• Max. Print Width: 4.0"
• Max. Print Length: 30 inches using Label Writer software
• Unlimited length using DuraSuite software and EXT cut setting
Indicators & Buttons
• Indicators: Power, Printer Status, Supply Status, Battery Status
• Buttons: Power, Supply Feed, Keyboard Release, Screen Release, Battery Release
Communication Interface
• Communications: USB 2.0, Optional Ethernet Print Server Port
• Memory: 4GB Flash, 1GB SDRAM
Power Requirements
• Input Voltage: 24 VDC, 5A DuraLabel labelers have worldwide voltage capability
Software
• OpenOffice 3.2
• QLabel-IV 1.19 Barcode Software
• DuraSuite 1.5.0.8 Labeling Software
• Adobe Acrobat
Environment
• Operating Temperature: 41°F – 104°F (5°C – 40°C)
• Operation Humidity: 30% – 85%, non-condensing
• Storage Temperature: -4°F – 122°F (-20°C – 50°C)
• Storage Humidity: 10% – 90%, non-condensing
• Ventilation: Fan mounted on circuit board
Label Stock
• Type: Continuous, Black Mark & Die-Cut
• Width: 0.20 inch minimum, 4" maximum
Ribbon Supply
• Premium Resin
• Width: 106 mm (4.17 inch)
• Capacity: 360 ft. with 0.5 in. core diameter
Printer Body
• Dimensions: 13.5" wide, 10.25" deep, in. (L) x 6.7 in. (H) x 8.8 in. (W)
• 13.8 lbs (6.26 kg), excluding supplies
Toro specifications are subject to change without notice.
-21-
13. End User License Agreement
Microsoft XP – Embedded Device
You have acquired a device (“DEVICE”) that includes software licensed by Graphic Products,
Inc. from Microsoft Licensing, GP or its affiliates (“MS”). Those installed software products
of MS origin, as well as associated media, printed materials, and “online” or electronic
documentation (“SOFTWARE”) are protected by international intellectual property laws and
treaties. The SOFTWARE is licensed, not sold. All rights reserved.
IF YOU DO NOT AGREE TO THIS END USER LICENSE AGREEMENT (“EULA”), DO NOT USE THE
DEVICE OR COPY THE SOFTWARE. INSTEAD, PROMPTLY CONTACT GRAPHIC PRODUCTS, INC.
FOR INSTRUCTIONS ON RETURN OF THE UNUSED DEVICE FOR A REFUND. ANY USE OF THE
SOFTWARE, INCLUDING BUT NOT LIMITED TO USE ON THE DEVICE, WILL CONSTITUTE YOUR
AGREEMENT TO THIS EULA (OR RATIFICATION OF ANY PREVIOUS CONSENT).
GRANT OF SOFTWARE LICENSE. This EULA grants you the following license:
•
LIMITATION ON USE. You may use the SOFTWARE only on the DEVICE.
•
SUITABILITY. THE SOFTWARE IS NOT FAULT TOLERANT. GRAPHIC PRODUCTS, INC.
HAS INDEPENDENTLY DETERMINED HOW TO USE THE SOFTWARE IN THE DEVICE, AND
MS HAS RELIED UPON GRAPHIC PRODUCTS TO CONDUCT SUFFICIENT TESTING TO
DETERMINE THAT THE SOFTWARE IS SUITABLE FOR SUCH USE.
•
NO WARRANTIES FOR THIS SOFTWARE. THE SOFTWARE IS PROVIDED “AS IS” AND
WITH ALL FAULTS. THE ENTIRE RISK AS TO SATISFACTORY QUALITY, PERFORMANCE,
ACCURACY, AND EFFORT (INCLUDING LACK OF NEGLIGENCE) IS WITH YOU. ALSO, THERE
IS NO WARRANTY AGAINST INTERFERENCE WITH YOUR ENJOYMENT OF THE SOFTWARE
OR AGAINST INFRINGEMENT. IF YOU HAVE RECEIVED ANY WARRANTIES REGARDING THE
DEVICE OR THE SOFTWARE, THOSE WARRANTIES DO NOT ORIGINATE FROM, AND ARE
NOT BINDING ON, MS.
•
NO LIABILITY FOR CERTAIN DAMAGES. EXCEPT AS PROHIBITED BY LAW, MS SHALL
HAVE NO LIABILITY FOR ANY INDIRECT, SPECIAL, CONSEQUENTIAL OR INCIDENTAL
DAMAGES ARISING FROM OR IN CONNECTION WITH THE USE OR PERFORMANCE OF
THE SOFTWARE. THIS LIMITATION SHALL APPLY EVEN IF ANY REMEDY FAILS OF ITS
ESSENTIAL PURPOSE. IN NO EVENT SHALL MS BE LIABLE FOR ANY AMOUNT IN EXCESS
OF U.S. TWO HUNDRED FIFTY DOLLARS (U.S.$250.00).
•
LIMITATIONS ON REVERSE ENGINEERING, DECOMPILATION, AND DISASSEMBLY. You
may not reverse engineer, decompile, or disassemble the SOFTWARE, except and only to
the extent that such activity is expressly permitted by applicable law notwithstanding
this limitation.
-22-
•
SOFTWARE TRANSFER ALLOWED BUT WITH RESTRICTIONS. You may permanently
transfer rights under this EULA only as part of a permanent sale or transfer of the DEVICE,
and only if the recipient agrees to this EULA. If the SOFTWARE is an upgrade, any transfer
must also include all prior versions of the SOFTWARE.
•
EXPORT RESTRICTIONS. You acknowledge that SOFTWARE is subject to U.S. export
jurisdiction. You agree to comply with all applicable international and national laws that
apply to the SOFTWARE, including U.S. Export Administration Regulations, as well as
end-user, end-use and destination restrictions issued by U.S. and other governments. For
additional information see http://www.microsoft/exporting/.
•
LIMITED USE OF PARTICULAR SOFTWARE SERVICES. Provided that the DEVICE
continues to comply with the terms of the “Restricted Functionality” paragraph below,
without limiting the number of computers or other electronic devices that might connect
to the DEVICE to access or utilize other software or SOFTWARE services on the DEVICE,
you may permit a maximum of ten (10) computers or other electronic devices to connect
to the DEVICE to utilize the services of the SOFTWARE for (a) file and print services, (b)
internet information services, and/or (c) remote access (including connection sharing).
The ten (10) connection maximum includes any indirect connections made through
“multiplexing” or other software or hardware which pools or aggregates connections.
•
CLIENT ACCESS LICENSE MAY BE REQUIRED. If you use the DEVICE to access or utilize
the services or functionality of Microsoft Windows Server products (such as Microsoft
Windows NT Server 4.0 (all editions) or Microsoft Windows 2000 Server (all editions)),
or use the DEVICE to permit workstation or computing devices to access or utilize the
services or functionality of Microsoft Windows Server products, you may be required to
obtain a Client Access License for the DEVICE and/or each such workstation or computing
device. Please refer to the end user license agreement for your Microsoft Windows Server
product for additional information.
•
RESTRICTED DEPLOYMENT. The SOFTWARE is not designed or intended for use
or resale in hazardous environments requiring fail-safe performance, such as in the
operation of nuclear facilities, aircraft navigation or communication systems, air traffic
control, or other devices or systems in which a malfunction of the SOFTWARE would result
in foreseeable risk of injury or death to the operator of the device or system, or to others.
•
RESTRICTED FUNCTIONALITY. You are licensed to use the SOFTWARE to provide only the
limited functionality (specific tasks or processes) for which the DEVICE has been designed
and marketed by Graphic Products, Inc. This license specifically prohibits any other use of
the SOFTWARE, or inclusion of additional software programs or functions, on the DEVICE.
Subject to the terms of the “Limited Use of Particular Services” paragraph above, you may
use the SOFTWARE on the DEVICE to interact with other computers or electronic devices.
•
MAXIMUM NUMBER OF PROCESSORS. The SOFTWARE may not be used by more than
two (2) processors at any one time on the DEVICE.
-23-
•
SECURITY UPDATES. Content providers are using the digital rights management
technology (“Microsoft DRM”) contained in this SOFTWARE to protect the integrity of
their content (“Secure Content”) so that their intellectual property, including copyright, in
such content is not misappropriated. Owners of such Secure Content (“Secure Content
Owners”) may, from time to time, request MS, Microsoft Corporation or their subsidiaries
to provide security related updates to the Microsoft DRM components of the SOFTWARE
(“Security Updates”) that may affect your ability to copy, display and/or play Secure
Content through the Microsoft software or third party applications that utilize Microsoft
DRM. You therefore agree that, if you elect to download a license from the internet which
enables your use of Secure Content, MS, Microsoft Corporation or their subsidiaries may,
in conjunction with such license, also download onto your DEVICE such Security Updates
that a Secure Content Owner has requested that MS, Microsoft Corporation or their
subsidiaries distribute. MS, Microsoft Corporation or their subsidiaries will not retrieve
any personally identifiable information, or any other information, from your DEVICE by
downloading such Security Updates.
•
CONSENT TO USE OF DATA. You agree that MS, Microsoft Corporation and their affiliates
may collect and use technical information gathered in any manner as part of product
support services related to the SOFTWARE. MS, Microsoft Corporation and their affiliates
may use this information solely to improve their products or to provide customized
services or technologies to you. MS, Microsoft Corporation and their affiliates may
disclose this information to others, but not in a form that personally identifies you.
•
ADDITIONAL SOFTWARE/SERVICES. The SOFTWARE may permit Graphic Products,
Inc., MS, Microsoft Corporation or their affiliates to provide or make available to you
SOFTWARE updates, supplements, or add-on components of the SOFTWARE after the
date you obtain your initial copy of the SOFTWARE (“Supplemental Components”).
•
SUPPLEMENTAL COMPONENTS. If Graphic Products, Inc. provides or makes available
to you Supplemental Components and no other EULA terms are provided along with the
Supplemental Components, then the terms of this EULA shall apply.
•
LICENSOR OF THE SUPPLEMENTAL COMPONENT(S). If MS, Microsoft Corporation or
their affiliates make available Supplemental Components, and no other EULA terms
are provided, then the terms of this EULA shall apply, except that the MS, Microsoft
Corporation or affiliate entity providing the Supplemental Component(s) shall be the
licensor of the Supplemental Component(s).
•
WINDOWS MEDIA FORMAT SOFTWARE DEVELOPMENT KIT. This EULA does not
grant you any rights to use the Windows Media Format Software Development Kit
(“WMFSDK”) components contained in the SOFTWARE to develop a software application
that uses Windows Media technology. If you wish to use the WMFSDK to develop such
an application, visit http://msdn.microsoft.com/workshop/media/windowsmedia/
sdk/wmsdk.asp, accept a separate license for the WMFSDK, download the appropriate
WMDSDK, and install it on your system.
-24-
Other Software
Toro includes, in addition to Microsoft software, the following licensed software:
•
Adobe Reader 9.0® - Use of Adobe Reader is subject to the End User License Agreement
available online at http://www.adobe.com/products/eulas/.
•
OpenOffice Writer, Open Office Draw, and Open Office Calculator - This product is made
available subject to the terms of GNU Lesser General Public License Version 3.0. A copy
of the LGPL license can be found at http://www.openoffice.org/license.html.
-25-
1-800-788-5572
P.O. Box 4030
Beaverton, OR 97076
© 2011, Graphic Products, Inc. All Rights Reserved
www.DuraLabel.com
v. 1.1 - 5/18/11