1
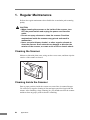
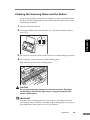
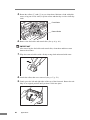
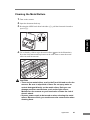
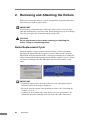
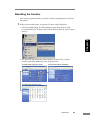
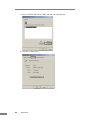
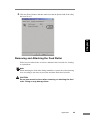
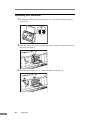
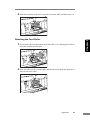
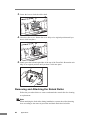
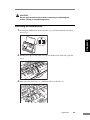
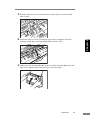
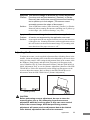
Document Scanner
DR-2050C
DR-2050SP
Maintenance Guide
Chapter 3
Appendices
1. Regular Maintenance ......................... 58
Cleaning the Scanner ................................
Cleaning Inside the Scanner .....................
Cleaning the Scanning Glass and the
Rollers .......................................................
Cleaning the Metal Rollers ........................
58
58
59
61
2. Removing and Attaching the Rollers 62
Roller Replacement Cycle .........................
Resetting the Counter ...............................
Removing and Attaching the Feed Roller ..
Removing and Attaching the Retard
Roller .........................................................
62
63
65
68
3. Troubleshooting ................................. 72
The Scanner Does Not Turn ON ...............
The Scanner Is Not Recognized ...............
Slow Scanning Speed ...............................
Scanning Is Not Performed .......................
Documents Are Not Fed Correctly ............
Paper Is Not Ejected Correctly ..................
Saved Image Files Do Not Open ...............
Scanning Results Are Not as Expected ....
72
72
73
74
74
75
75
75
1. Regular Maintenance
Perform the regular maintenance described below to maintain peak scanning
quality.
CAUTION
• When cleaning the scanner or the inside of the scanner, turn
OFF the power switch and unplug the power cord from the
outlet.
• Do not use spray cleaners to clean the scanner. Precision
mechanisms inside the scanner may get wet and result in
malfunction.
• Never use paint thinner, alcohol, or other organic solvents to
clean the scanner. Such solvents can damage or discolor the
exterior of the scanner, or create a risk of fire or electric shock.
Cleaning the Scanner
Moisten a cloth with plain water, wring out the excess water, and then wipe the
exterior of the scanner to clean it.
Cleaning Inside the Scanner
Dust or paper particles inside the scanner can cause lines in scanned images.
Use a blower for regular cleaning of dust and paper particles from inside the
scanner. After finishing a large scanning job, you should turn OFF the scanner
and then clean any paper particles that are remaining.
58
Appendices
Cleaning the Scanning Glass and the Rollers
If your scanned images contain lines or smudges, or if the scanned documents
are dirty, then the scanning glass or the rollers inside the scanner may be dirty.
Clean them periodically.
1. Open the document feed tray.
2. Pressing the OPEN knob from both sides (a), pull the front unit forward to
Chapter 3
open it (b).
3. Use a blower to keep the interior of the scanner free of dust and paper particles.
4. Use a clean dry cloth to wipe dirt off the scanning glass.
Wipe both the top and bottom scanning glasses.
CAUTION
Do not use spray type cleaners to clean the scanner. Precision
mechanisms, such as the light source, may get wet which will
cause a malfunction.
IMPORTANT
Scratches on the scanning glass may cause marks on the images and could
cause feeding errors. If there are scratches on the scanning glass, contact your
local authorized Canon dealer or service representative.
Appendices
59
5. Rotate the rollers (a) and (b) as you clean them. Moisten a cloth with plain
water, wring out excess water, wipe the rollers and then dry it with a clean dry
cloth.
Feed Roller
Retard Roller
6. Remove the feed roller and retard roller. (See p. 66, p. 69.)
IMPORTANT
After removing the feed roller and retard roller, clean them and then return
them to the scanner.
7. Wipe the removed rollers with a firmly wrung cloth moistened with water.
8. Attach the rollers that were removed. (See p. 67, p. 70.)
9. Gently press the left and right sides of the top of the front unit. Return the unit
fully to its original position until you hear it click into place.
60
Appendices
Cleaning the Metal Rollers
1. Turn on the scanner.
2. Open the document feed tray.
3. Pressing the OPEN knob from both sides (a), pull the front unit forward to
Chapter 3
open it (b).
4. Use a clean dry cloth to wipe the metal rollers (
parts in the illustration).
Press the Scan button and Stop button at the same time to rotate the metal
rollers in small increments.
CAUTION
• There are two metal rollers, one for the Front Unit and one for the
scanner. Be sure to wipe both of them. Do not spray water or
neutral detergent directly on the metal rollers. Doing so can
damage precision mechanisms, such as the light source.
Moisture on the scanner or your hands also creates the risk of
electric shock.
• Scanner power needs to be turned on when cleaning the metal
rollers. Because of this, you need to exercise extra caution when
cleaning them.
Appendices
61
2. Removing and Attaching the Rollers
Follow the relevant procedure to remove and attach the feed roller and retard
roller when you clean or replace them.
IMPORTANT
Feed rollers are consumable parts. When the rollers start to wear out, paper
jams and misfeeds may occur more often. When this happens, buy an exchange
roller kit, and replace the feed roller and the retard roller.
CAUTION
Do not use excessive force when removing or attaching the
rollers. Doing so may damage them.
Roller Replacement Cycle
When the number of pages scanned exceeds 30,000, a roller replacement
message will appear when the computer is started. When you are using the
DR-2050SP in the Presentation mode, a message prompting you to change the
rollers is displayed after the opening screen when the scanner’s power is turned
ON. Buy an exchange roller kit, and replace the feed roller and the retard
roller.
When using the DR-2050SP in Presentation mode
IMPORTANT
• If misfeeds happen often, check the rollers for wear, and replace them if
necessary before the message is displayed.
• Be sure to reset the counter after replacing the rollers. (See “Resetting the
Counter,” on p. 63.)
• Contact your local authorized Canon dealer or service representative for
information about the exchange roller kit (feed roller and retard roller).
62
Appendices
Resetting the Counter
After replacing the feed rollers, open the [Counter setup] dialog box and reset
the counter.
1. Follow the procedure below to open the [Counter setup] dialog box.
Chapter 3
1. Click the [Start] button, Æ click [Settings] on the Start menu Æ click
[Control Panel]. (For Windows XP, click the [Start] button Æ click [Control
Panel].)
2. For Windows XP, switch the Control Panel to Classic View, or select
[Printers and Other Hardware] in the working field.
Control Panel (category view)
Printers and Other Hardware
Control Panel (classic view)
Appendices
63
3. Select [CANON DR-2050C USB], and then click [Properties].
4. Click the [Counter] tab.
64
Appendices
2. Click the [Reset] button, and then make sure that the [Retard and Feed roller]
Chapter 3
has been set to 0.
Removing and Attaching the Feed Roller
Follow the procedure below to remove and attach the feed roller for cleaning
or replacement.
Note
When attaching the feed roller during installation, operate the roller fastening
lever according to the removal procedure and then attach the feed roller.
CAUTION
Do not use excessive force when removing or attaching the feed
roller. Doing so may damage them.
Appendices
65
Removing the Feed Roller
1. Pressing the OPEN knob from both sides (a), pull the front unit forward to
open it (b).
2. Open the roller cover on the scanner side. Insert a finger into the depression in
the cover and open it.
3. Raise the roller lock lever (a), and then slide it to the left (b).
66
Appendices
Attaching the Feed Roller
1. Set the feed roller into the hollow inside the roller cover, and align the notch in
the roller with the scanner shaft.
2. Slide the roller lock lever to the right, and then insert the shaft into the hole on
the left side of the roller.
Appendices
67
Chapter 3
4. Shift the feed roller to the left to separate it from the shaft, and then remove it.
3. Lower the lever to lock the roller shaft.
4. Close the roller cover. Return the cover fully to its original position until you
hear it click into place.
5. Gently press the left and right sides of the top of the Front Unit. Return the unit
fully to its original position until you hear it click into place.
Removing and Attaching the Retard Roller
Follow the procedure below to remove and attach the retard roller for cleaning
or replacement.
Note
When attaching the feed roller during installation, operate the roller fastening
lever according to the removal procedure and then attach the feed roller.
68
Appendices
CAUTION
Do not use excessive force when removing or attaching the
rollers. Doing so may damage them.
Removing the Retard Roller
1. Pressing the OPEN knob from both sides (a), pull the front unit forward to
Chapter 3
open it (b).
2. Holding the edges of the roller cover on the inside of the front unit, open the
cover.
3. Raise the roller lock lever (a), and then slide it to the left (b).
Appendices
69
4. Shift the Retard Roller to the left to separate it from the shaft, and then remove
it.
Attaching the Retard Roller
1. Position the retard roller so the notch in the roller is facing the scanner’s shaft.
2. Slide the roller lock lever to the right, and then insert the shaft into the hole on
the left side of the retard roller.
70
Appendices
3. Push the roller lock lever towards the back of the scanner to lock the retard
roller in place.
Chapter 3
4. Attach the roller cover. Be sure that the upper unit is completely closed by
pushing on both edges with both hands until you hear a click.
5. Gently press the left and right sides of the top of the front unit. Return the unit
fully to its original position until you hear it click into place.
Appendices
71
3. Troubleshooting
This section describes the possible problems that might occur during use of the
scanner and how to solve them.
The Scanner Does Not Turn ON ........................................P. 72
The Scanner Is Not Recognized ........................................P. 72
Slow Scanning Speed.........................................................P. 73
Scanning Is Not Performed................................................P. 74
Documents Are Not Fed Correctly ....................................P. 74
Paper Is Not Ejected Correctly ..........................................P. 75
Saved Image Files Do Not Open........................................P. 75
Scanning Results Are Not as Expected............................P. 75
If, after consulting this section, you still cannot resolve the problem, contact
your local authorized Canon dealer or your service representative.
The Scanner Does Not Turn ON
Check the following if the scanner does not turn on:
• Is the power cord connected correctly?
• Is the power cord connected securely?
• Is the power cord inserted into the power outlet?
For details on connecting the power cord, see “Step 4. Connecting the Scanner
to Your PC,” in the Easy Start Guide.
The Scanner Is Not Recognized
The following are possible causes of the PC failing to recognize the scanner.
Check each possible cause.
72
Problem
The scanner is not correctly connected.
Solution
Make sure that the scanner and the computer are correctly
connected with the USB cable. (See “Step 4. Connecting the
Scanner to Your PC,” in the Easy Start Guide.)
Problem
The scanner power is switched OFF.
Solution
Make sure that the scanner is switched ON. If the scanner is OFF,
turn the scanner ON. (See “Step 4. Connecting the Scanner to
Your PC,” in the Easy Start Guide.)
Appendices
Problem
The scanner does not support your USB interface.
Solution
This product is not guaranteed to operate with all types of USB
interfaces. Contact your local authorized Canon dealer or service
representative for more information. (See p. 15.)
Problem
The scanner does not support the USB cable.
Solution
Use the USB cable provided with the scanner.
Problem
The USB hub is not compatible with the scanner.
Solution
Remove the USB hub.
Chapter 3
Slow Scanning Speed
The following problems might cause the scanning speed to be slow.
Problem
Other applications are running in the background on your
PC.
Solution
Quit all other applications that are running.
Problem
Resident applications, such as anti-virus software, are
draining memory resources.
Solution
Quit all resident applications.
Problem
Temporary files cannot be created in the TEMP folder, as
there is not enough free space on the hard disk.
Solution
Delete unwanted files on the hard disk to increase free space on
the hard disk.
Problem
The USB port you are using does not support Hi-Speed
USB 2.0.
Solution
Scanning speeds are lower if your computer’s standard USB
interface is not compatible with Hi-Speed USB 2.0. (See p. 15.)
Use a computer that is equipped with USB that is compatible with
Hi-Speed USB 2.0 as standard.
Problem
The USB cable does not support Hi-Speed USB 2.0.
Solution
Use the USB cable provided with the scanner.
Problem
The USB hub does not support Hi-Speed USB 2.0.
Solution
Remove the USB hub.
Appendices
73
Scanning Is Not Performed
Check the following if the scanner does not scan an image even though the
scanning operation is performed:
• Is the scanner correctly connected to the computer?
• Has the scanner driver been installed?
• Has the application software been installed correctly? Has the application
software been set up correctly?
• Is there a problem in the PC system?
IMPORTANT
• If documents are not scanned normally even if the scanner setup is OK, a
probable cause is that the scanner driver or application software is not
running correctly. Re-install the scanner driver or application software.
• When system errors result in the scanner not functioning at all, turn OFF the
scanner and wait at least ten seconds before turning it ON again. If the error
continues to occur, restart the computer.
• When scanning continues, make sure that the last document scanned was
scanned correctly.
Documents Are Not Fed Correctly
The following are possible causes when documents are not fed correctly.
Problem
Static electricity, etc., is causing the pages of the document
to stick together, and they cannot be separated correctly by
the scanner.
Solution
Before you place your document, thoroughly fan the stack of
papers. (See “Placing a Documents,” on p. 23.)
Problem
An attempt was made to scan a size, thickness, or type of
paper that cannot be scanned by the scanner.
Solution
Check the document size, thickness, and paper type. (See
“Documents,” on p. 20.)
Problem
The rollers inside the scanner are dirty or worn.
Solution
Refer to p. 59 and clean the rollers. If the rollers are worn, then
they need to be replaced. Contact your local authorized Canon
dealer or service representative to purchase a roller replacement
kit.
For details on how to clear jammed paper, see “Clearing a Paper Jam,” on
p. 42.
74
Appendices
Paper Is Not Ejected Correctly
When you are performing page-by-page scanning while a multi-page
document is set in the scanner, scanning pauses with the trailing edge of the
scanned sheet being engaged by the eject roller.
Problem
Under these conditions, the scanner enters a standby state
and pauses for the next sheet. It does not indicate a paper
jam.
Solution
To scan the next sheet of the document, manually remove the page
that is engaged by the eject roller, or just start the next scan job.
Chapter 3
For details on how to clear jammed paper, see “Clearing a Paper Jam,” on
p. 42.
Saved Image Files Do Not Open
When image files saved by CapturePerfect 3.0 cannot be opened by other
applications, the probable causes are as follows.
Symptoms A multi-page TIFF file saved in CapturePerfect 3.0
cannot be opened by other applications.
Problem
The application you are using to open the TIFF file does not
support multi-page TIFF files.
Solution
Open the file with an application that supports multi-page TIFF
files.
Symptoms A TIFF file saved in CapturePerfect 3.0 cannot be
opened by other applications.
Problem
If the TIFF file saved in CapturePerfect 3.0 has been
compressed, the application you are using to open the TIFF
file does not support the compression type that was used to
save the file in CapturePerfect 3.0.
Solution
Set the compression type for the image file to [None] and save the
file again in CapturePerfect 3.0.
Scanning Results Are Not as Expected
If there is a problem with the scanning result (e.g., the scanned image is not
clear, or the image is striped or dirty), the probable causes are incorrect ISIS/
TWAIN driver settings or a problem with the scanning unit inside the scanner.
Scanning results can also become skewed if the ISIS/TWAIN driver has not
been installed correctly, or the application in use does not support ISIS/
TWAIN driver functions.
Appendices
75
Symptoms The scanned image is too dark (or faint).
Problem
The [Brightness] setting is not set to an appropriate value.
Solution
If the image is dark, set a higher [Brightness] setting, or if the
image is faint, set a lower [Brightness] setting.
(See “Software Settings,” on p. 49.)
Symptoms Text or images on the rear side of your document
appear in the scanned image.
Problem
The [Brightness] setting is too low, or the paper is too thin.
Solution
Set a higher [Brightness] setting. If the paper is too thin, make a
copy of the documents and then scan the copy.
Symptoms Double-sided scanning is not possible.
Problem
“Scanning Side” is set to [Simplex].
Solution
Set “Scanning Side” to [Double-sided].
Symptoms A black margin appears around the scanned document.
Problem
A document smaller than the preset paper size has been
scanned. Or, the loaded document has shifted out of
position.
Solution
Set “Paper size” to [Auto-detection]. Or, set [Border Removal] to
on.
Symptoms The scanned image is skewed.
Problem
The document has been fed at an angle. (skew)
Solution
Use the document guide adapter to prevent document skew, and
set [Deskew] to on. (See p. 22.)
Symptoms Lines, smudges, or dirt appear on the scanned image.
76
Problem
CauseThe scanning glass or rollers inside the scanner are
dirty.
Solution
Clean the scanning glass and rollers.
If lines still appear on the image even after cleaning the scanning
glass and rollers, the scanning glass inside the scanner may be
scratched. Contact your local authorized Canon dealer or service
representative. (See p. 59.)
Appendices
Symptoms The scanned image is abnormal for certain documents.
Problem
Functions such as [Auto-detection], [Deskew], or [Border
Removal] were used when scanning documents containing
text or photos up to their edges. (The scanner cannot
accurately process the edges of documents.)
Solution
Turn off functions such as [Auto-detection], [Deskew], or [Border
Removal] when scanning documents containing text or photos up
to their edges. (See “Software Settings,” on p. 49.)
Problem
A function not supported by the application was used.
Solution
Some applications do not support functions such as auto-detection
of the paper size. Scanning documents with an application such as
this will result in an abnormal scanned image. Try scanning with
auto-detection of the paper size set to “off.”
Adjusting the Scanner
To adjust the scanner, set the supplied Adjustment Sheet (Shading Sheet) in the
scanner. Orient the adjusting sheet in the direction indicated by the arrow when
setting it in the scanner. After setting the Adjustment Sheet in the scanner, click
the Windows [Start] button, and then click [Programs] (All Programs in the
case of Windows XP) Æ [Canon Document Scanner], and then [DR-2050C &
2080C Adjustment Tool], or use the [Scanner Adjustment] function of the ISIS/
TWAIN driver. Follow the instructions on the dialog box that appears on the
screen to adjust the scanner. Refer to Help for the ISIS/TWAIN driver for
information about the ISIS/TWAIN driver [Scanner Adjustment].
Adjustment Sheet
(Shading Sheet)
CAUTION
Before performing scanner adjustment, be sure to clean the
scanning glass (see p. 59). Attempting to perform scanner
adjustment while the scanning glass is dirty can cause vertical
lines in the scanned image. Note that performing scanner
adjustment will cause previous adjustment data to be deleted.
Once deleted, adjustment data cannot be recovered.
Appendices
77
Chapter 3
Symptoms The scanned image is abnormal in some applications.