1
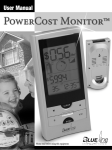
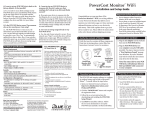
PowerCost Monitor User Guide Install your PowerCost Monitor™ before reading this Guide Front Current Consumption – Top Row The top row displays your current energy consumption. If you press the $ button, you see the value in dollars and cents per hour. If you press the KW button, you see the value in kilowatts. The value displayed is directly linked to the rate at which the Disk Emulator spins: the faster it spins, the greater the rate of energy consumption and the higher the dollars-per-hour or kilowatts value you will see on the screen. Back Top In the examples on the right, you are currently using $0.83/hour (top) and 5.2 kW (bottom) worth of electricity. IMPORTANT: If your Display Unit shows unusually low consumption (0.4 KW or less) for an extended period of time when you are performing normal household tasks such as cooking or laundry, your Sensor Unit may be misaligned. See the Troubleshooting section on the reverse side. BUTTON $ KW FUNCTION Dollars & Cents Mode Displays values in Dollars and Cents and cents per kilowatt-hour. Kilowatt Mode CLEAR Reset totals Displays values in Kilowatts and Kilowatt-hours. Press and hold to reset the consumption totals to zero. 12/24 Time Format Press to switch the clock between 12-hour and 24-hour time display format. ºC/ºF Temperature Format Press to switch between Celsius and Fahrenheit degrees temperature display format. NOTE: You see the temperature at the meter location, where your Sensor Unit is mounted, and not the ambient temperature of your house (unless your meter is located inside your house). MODE Factory Reset Press simultaneously with the SET key to reset the Display Unit to its factory default values. LIGHT Backlight Press to illuminate the display backlight for 5 seconds Dollars & Cents Mode ($ Button) Consumption Totals – Third Row The value in the third row shows the cumulative total of electricity consumed since you last reset the totals. Pressing the $ and KW buttons toggles the display from dollars and cents to kilowatt/hours respectively. In the examples on the right, you have used $27.09 (top) and 36.9 kWh (bottom) worth of electricity since you last reset the totals. Kilowatt Mode (KW Button) $ Dollars & Cents Mode ($ Button) When the Display Unit is in Dollars and cents mode ($ key), the displayed total is replaced, every 10 seconds for 2 seconds, by the electricity rate you are currently paying according to the values you entered when setting up your billing rate structure. Kilowatt Mode (KW Button) Blue Line PowerCost Monitor —1 Status – Second Row Factory (Hard) Reset To reset the Display Unit to its factory-set default values, simultaneously press-and-hold the and buttons for three seconds. The Disk Emulator spins counter-clockwise at a speed proportional to the rate at which you consume electricity: the more you consume, the faster it spins. All the values you entered are deleted and your Display Unit is configured with its default factory settings. The Signal Quality Indicator shows vertical bars representing the quality of the signal received from the Sensor Unit. Five bars represent the best possible signal. The two Low Battery Level Indicators are not displayed as long as the batteries provide enough power. A battery icon appears when the battery of the corresponding unit is low. It is recommended to replace the battery as soon as an icon appears. Loss of Signal Display In the event that your Display Unit loses the signal transmitted by your Sensor Unit, you will see that the first rows displays dashes instead of values, and since the Sensor Unit also transmits temperature information, the temperature disappears from the last row. Consumption History Indicator The Display Unit stores two peak energy consumption values in kilowatts: the peak value that has occurred since you last reset the consumption totals, as well as the peak value for the last 24 hours. For example, this may occur if you move the Display Unit to a location in your house that is too far from the Sensor Unit. The MAX level represents the highest consumption since you last reset the totals. The number of bars displayed represents how the 24-hour peak compares to the maximum peak. For example, the illustration above shows 7 bars out of a possible 10, therefore the peak for the last 24 hours is 70% of the peak recorded since the consumption totals were reset. Here are a few causes of loss of signal: The Sensor Unit batteries are exhausted. The Display Unit has been moved out of range of the Sensor Dollars & Cents Mode ($ Button) Unit. There is a strong interference from other electronic devices, The arrow indicates how the current level of energy consumption compares to both the maximum and 24-hour peaks. In the illustration, the arrow points to the fifth bar; this means that your current energy consumption is 50% of the maximum peak (5 bars out of a possible 10) and about 70% (5 bars out of 7 displayed) of the 24-hour peak. such as wireless weather stations. To solve the problem, move the Display Unit closer to your Sensor Unit and repeat Step 10 in the Installation Guide to re-synchronize your Sensor and Display Units If that does not solve the problem, see the TROUBLESHOOTING section on the reverse side. Kilowatt Mode (KW Button) Resetting the Totals Press-and-hold the CLEAR button located on the front of the Display Unit until you hear a beep. Blue Line Innovations Inc. 187 Kenmount Road 1st Floor, ICON Building St. John’s, NL Canada A1B 3P9 This resets the Total values (Dollars and kW) that appear on the third row, as well as the peak values for the Consumption History Indicator. All the other values remain the same. Dollars & Cents Mode ($ Button) Kilowatt Mode (KW Button) [email protected] www.bluelineinnovations.com Toll Free: 1-866-607-2583 © 2008. Blue Line Innovations Incorporated. All rights reserved. Information in this document is subject to change without notice. Blue Line Innovations and PowerCost Monitor are trademarks of Blue Line Innovations Incorporated. All other trademarks are the property of their respective owners. Printed in China. PN BLI-00241R002 Blue Line PowerCost Monitor —2 PowerCost Monitor Troubleshooting - Page 1 If you do not see your problem listed here, or you are still unable to get your system working properly, more information is available at http://www.bluelineinnovations.com or you may send an email to [email protected] describing the difficulty you are having. You may also call us toll-free at 1-866-607-2583. Q A I am unsure of my utility meter type. How can I find out which type of meter I have? The illustrations in Step 4 of the Installation Guide represent various kinds of meters that we have grouped arbitrarily under “types”, based on different sequences of operations that are required to mount a Sensor Unit correctly. The majority of existing meters fall under one of these generic types. Determine which illustration most closely matches your meter, and remember to follow the installation instructions for that meter type. Also find the meter’s power factor on the face of the meter and write it in the box labeled “Power factor”. The power factor is a number (usually 1.0 or 7.2) preceded by two letters (usually Kh or Ks or Kt). Proceed with the installation steps in order and, in Steps 8 and 9, follow the installation instructions for that meter type. IMPORTANT: If your box contains separate installation instructions for specific meters that do not fall under one of our generic types, please read them all carefully when determining your meter type. Q A After installing the Sensor Unit on my meter and pressing the RESET button, nothing happens. The red indicator does not light up. Either you have installed the Sensor Unit batteries backwards or the batteries are exhausted. Ensure that the battery closest to the Sensor Arm is inserted with its positive (+) side facing the bottom of the compartment and that the positive (+) side of the other battery is facing you. Also, if you are changing the batteries, ensure that the new batteries are fresh. Q A The red STATUS indicator on my Sensor Unit is flashing rapidly, and I cannot proceed with the installation as described. Press the RESET button. The indicator will turn off and light up again after 10 seconds. You can then proceed with the installation normally. Q A My Sensor Unit STATUS LED is flashing regularly, but every now and then, there is an extra flash. Is there anything wrong with my unit? This is exactly what you should see. Electronic meters produce one single pulse every time you have consumed one watt-hour. When the Sensor Unit first detects a pulse from an electronic meter, the STATUS indicator starts flashing. Thereafter, the indicator keeps on flashing at the same frequency, but in addition, it will flash once every time it reads a pulse from your meter, at intervals that vary according to your current rate of electricity consumption. This periodic irregular flashing is absolutely normal. Q A When I try to synchronize my Display and Sensor Units, the Display Unit keeps showing “id” on the screen. This indicates that the Display Unit is in ID mode, meaning that is searching for your Sensor Unit. Press the RESET button on the Sensor Unit. If the Display Unit remains in ID mode, move it to a location between 2 and 10 feet (60 cm to 3m) of the Sensor Unit, and then press the RESET button again. Q A The Sensor Battery indicator shows a low battery level, but I installed fresh batteries not long ago. Regular alkaline batteries can become exhausted very rapidly when it is extremely cold outside. If you are expecting an extended period of temperatures below -20°C (-4°F), try using lithium type AA batteries in the Sensor Unit. These batteries are commonly available wherever you can buy batteries and they provide better performance in cold weather. Q A The Sensor Unit appears to have detected my meter properly, but I only see dashes (--) on my Display Unit. This indicates that the Display Unit is not receiving transmissions from the Sensor Unit. Ensure that the Display Unit is located within 100 feet (30m) of the Sensor Unit. Note that each wall of your house reduces the range by approximately 15 feet (5m). Also, aluminium siding on your house will significantly reduce the range. If this is the case, try to position the Display Unit so that there is a window between it and the Sensor Unit. If neither range nor wall construction seem to cause be the problem, repeat Step 10 in the Installation Guide to re-synchronize your Display and Sensor Units, ensuring that you keep the RESET button pressed for at least 5 seconds. Lastly, it is possible that the batteries in the Sensor Unit are exhausted. Replace the batteries with fresh ones. Blue Line PowerCost Monitor —3 PowerCost Monitor Troubleshooting - Page 2 Q A The power usage shown on my Display Unit is not updating or is unusually low. Try turning on an electric appliance that consumes a large amount of power such as a stove or dryer. If the values on the Display Unit do not start to update within a few minutes, then the Sensor Unit is likely not aligned correctly on your utility meter. Try repeating the appropriate alignment steps described in the Installation Guide. Q A The temperature shown on the Display Unit does not match weather reports or appears to be incorrect. Q A The total shown on my Display Unit does not match the total shown on my electricity bill. In order for the two totals to match, you would need to clear the totals on the Display Unit on the exact day and time the utility company reads your meter. In addition, your electricity bill also includes other fees, as well as any applicable taxes. The total amount shown on the PowerCost Monitor is accurate, but is really meant as a reference to indicate how much power you have consumed since you last cleared the totals. For example, if you clear the totals at the beginning of every monthly cycle, then you can use the PowerCost Monitor to compare against your monthly budget. The temperature shown on the Display Unit is the ambient temperature at your utility meter; it may vary from other sources, such as TV weather reports, because of distance and other factors. Also, if your utility meter is exposed to direct sunlight during any part of the day, then the reading will be higher than normal. The reading will return to the correct value when the utility meter is in the shade. Q A My Display Unit behaves erratically and shows illogical values. Should your Display Unit start displaying any unexpected values, reset it to the factory settings by pressing on the SET and MODE keys simultaneously. However, doing so will erase all your existing rate entries and you will have to follow the instructions in Steps 6 and 7 of the Installation Guide to setup your Display Unit again. Q A The consumption information shown on my Display Unit is not correct and it jumps randomly. Several factors can affect the accuracy of the information shown on your Display Unit and they all relate to interference. If your neighbour also has a PowerCost Monitor system, you may be receiving their information. In this case, you need to change the Sensor Unit address and resynchronize the Display Unit. Repeat Step 10 in the Installation Guide, but press and hold the RESET button for five (5) seconds. The Sensor Unit then selects a new address randomly on which to base the synchronization.Wireless devices, such as weather stations or old-style baby monitors and cordless phones, transmit information on frequencies similar to the PowerCost Monitor. If you have a wireless weather station try turning it off briefly and check to see if the PowerCost Monitor Display Unit returns to normal operation. If it does, then check to see if you can change the weather station’s operating channel. WARRANTY - LIMITED ONE YEAR WARRANTY Blue Line Innovations warrants this product to be free from defects in materials and workmanship for a period of one year from the date of sale to the original user or consumer purchaser. Blue Line Innovation’s exclusive obligation under this warranty shall be, at its option, (a) to supply, without charge, a replacement of the product or (b) to refund the purchase price in respect of any product that is found to be defective and that is returned, with its proof of purchase, to the original supplier. This warranty excludes and does not cover defects, malfunctions, or failures caused by misuse, unauthorized repairs, modifications or accidental damage. Note: This warranty does not apply to batteries or damage to the product caused by the use of faulty batteries. Warning: Changes or modifications not expressly approved by Blue Line Innovations Inc. void the user’s authority to operate the equipment. This warranty is only applicable to a product purchased through a Blue Line Innovations authorized dealer. In no event shall Blue Line Innovations be liable for consequential or incidental damages. This warranty is in lieu of all other expressed warranties. The duration of any implied warranty is limited to the period of the expressed warranty set forth above. Blue Line Innovations Inc. 187 Kenmount Road, 1st Floor, ICON Building, St. John’s, NL Canad, A1B 3P9 [email protected] • www.bluelineinnovations.com Toll Free: 1-866-607-2583 Blue Line PowerCost Monitor —4