1
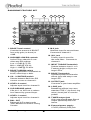
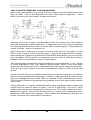
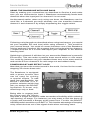
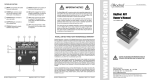
www.radialeng.com
™
BASSBONE™
Owners Manual
®
1638 Kebet Way, Port Coquitlam BC V3C 5W9
Tel: 604-942-1001 Fax: 604-942-1010
email: [email protected]
Radial Engineering is a division of C•TEC (JP CableTek Electronics Ltd.)
True to the Music
BASSBONE™ OWNER’S MANUAL
Table of Contents ..............................................Page
Introduction ............................................................ 2
Bassbone Feature Set ........................................... 3
The Concept behind the Bassbone ....................... 5
Using the Bassbone with Two Basses ................... 5
Using the Bassbone with One Bass ...................... 6
Power Boost and Effect Loop ................................ 6
Using the Tuner Output.......................................... 8
Using the XLR Output ............................................ 8
FAQ’s ..................................................................... 9
Warranty ........................................................ Back cover
Greetings from Radial... You are now an official Bonehead!
The Bassbone has been developed to help you make music more fun
and hopefully, enhance your creative spirit.
The following manual has been written to assist you in using your new
Radial Bassbone. Please take the time to read it through so that you can
take maximum advantage of all the features that have been designed
into this marvelous device.
Should you have any questions on the Bassbone, please visit our web
site www.tonebone.com for up-to-date information. If you have a question
that is not covered in this manual, please feel free to contact Radial at
[email protected] and we will do our very best to get you an answer
quickly. These questions are often posted on our website as FAQ’s and
serve to help other Boneheads.
Now get out there and play some 12-bar blues!
www.tonebone.com
www.radialeng.com
Radial is a division of JP Cabletek Electronics Ltd.
Specifications and appearances subject to change without notice.
Radial Tonebone™ owners manual V1.0 - Part #: R870 1110 00
Radial Engineering
1
Bassbone Owner’s Manual
True to the Music
INTRODUCTION
In the beginning, bass was the foundation behind the band that worked
with the drums to keep it all together. A good, solid and powerful amplifier
with a good bass was all that was needed. But over the years, bass has
expanded from a simple 4-string instrument to powerful active 5 and 6
stringed monsters.
As such, bassists, whether covering or creating new material, must
be equipped to produce these tonal ranges and be able to transition
between these sounds quickly during a live performance. The Bassbone
was designed to help bass players meet these demands by creating a
control center specifically designed around the bass guitar.
This being said, most bass players employ two basses when they perform.
These typically include a traditional passive bass such as a Fender PBass® and a new generation 5 or 6 string active instrument. These basses
produce very different volume levels and tonal ranges. This poses a
problem when switching from one instrument to the other, as the amplifier
settings must be dramatically adjusted to compensate.
The Tonebone Bassbone allows the bass player to transition between the
two different basses by simply depressing a foot selector switch. Each
instrument channel on the Bassbone features separate level adjustment
and equalization. On gigs where only one bass is used, the Bassbone
automatically converts to a 2-channel preamp. The powerful on-board
EQ allows the player to create two completely different sounds to create
‘the impression’ of two different basses. Very tricky indeed!
To further enhance on-stage performance, the Radial Bassbone is outfitted
with a power-booster for soloing or extra kick during particular passages.
An effect loop circuit may also be switched-in to simultaneously introduce
dramatic and powerful effects.
For those coffeehouse gigs where you may not want to bring your doublestack Ampeg SVT®, the Bassbone makes it easy with a built-in direct box
with XLR output to drive the PA system. There’s even a separate tuner
out that lets you monitor your bass for on-the-fly adjustments.
Be it live or in the studio... Bassbone is a control center for players that
truly makes playing easier!
Radial Engineering
2
Bassbone Owner’s Manual
True to the Music
BASSBONE FEATURE SET
1
2
3
4
5
6
7
16
15
8
14
9
13
10
12
11
9. IN-2 jack
Alternate input for second bass.
Connects to channel 2.
1. BOOST level control
Controls the amount of BOOST
from unity-gain (no boost) to
+8dB.
10. IN-1 jack
Primary input is used for
the main bass. Connects to
channel 1.
2. HIGH-MID-LOW EQ controls
Active EQ on channel-2 overrides amp EQ settings
Low +/-12dB @ 75 Hz,
Mid +/-10dB @ 470 Hz,
High +/-16dB @ 5.6 KHz.
11. INPUT TOGGLE footswitch
Selects between input 1 or 2.
Features bright, easy to see
large LED’s.
3. BOOST ASSIGN switch
Assigns the BOOST footswitch to
boost, effect loop or both.
12. BOOST footswitch
Activates power boost and/or
effects loop with easy to see
large LED.
4. CH. 1 CONTOUR switch
Selects between flat & two EQ
contour curves on channel-1.
13. OUTPUT jack
Connects to your bass amplifier.
5. LEVEL-2 control
Adjusts input level for channel-2.
14. LOOP jack
Bassbones effects loop uses
standard TRS ¼” (tip-send, ring
return) insert-jack to connect
pedals.
6. XLR GROUND switch
Lifts pin-1 on XLR out to reduce
hum caused by ground-loops.
7. LEVEL-1 control
Adjusts input level for channel-1.
15. TUNER output jack
High output band-pass filtered
output specifically EQ’d for
tuners.
8. BAL. OUT
Balanced XLR output sends
‘post’ Bassbone sound to mixing
console.
Radial Engineering
16. External power supply.
15VCD (400mA) PSU jack.
3
Bassbone Owner’s Manual
True to the Music
THE CONCEPT BEHIND THE BASSBONE
Before you get started, you need to know why we built the Bassbone the
way we did. This is the Bassbone’s flow chart (block diagram). Let’s
take a moment to see what’s under the hood…
Starting from left to right, the Bassbone has two inputs for two basses
and two separate signal channels. A separate tuner out is provided that
is buffered and filtered to drive a tuner with a clean signal. This powerful
‘tuner friendly’ output is always on.
Input channel-1 features a contour control with choice of bypass or two
EQ curves. A level control allows input-1 gain to be adjusted as needed.
Input channel-2 features a powerful 3 band EQ that allows you to override
your amplifier’s EQ section. A separate level control is also provided to
balance the level between bass-1 and bass-2.
The input toggle footswitch selects between input channels 1 or 2. Keep
in mind that when only one bass is being used, input-1 will feed both
channels allowing you to use the Bassbone like a two channel amplifier.
This will give you control over two dramatically different EQ curves and
levels.
A power boost circuit is available that can be used for soloing or for added
power during a particular passage. To reduce ‘tap-dancing’ an effect loop
may be engaged at the same time or instead of the powerboost circuit.
This has the benefit of keeping noisy pedals out of the signal chain when
not in use.
Along with the ¼” output, the Bassbone is also equipped with a balanced
output that is used to feed a mixer. This is a 600-ohm, mic level, XLR
output that can be used instead of a direct box. The XLR output is a ‘post’
Bassbone signal. The sound being sent to a mixer will incorporate your
Bassbone EQ and level settings. This makes the Bassbone perfect for
studio session work and direct recording.
Radial Engineering
4
Bassbone Owner’s Manual
True to the Music
USING THE BASSBONE WITH TWO BASSES
The Radial Bassbone comes equipped with its own power supply. This
is a special 15-Volt supply that provides greater headroom than typical
9-Volt supplies. Connecting the power supply will automatically turn the
Bassbone on. Leaving the Bassbone on will not harm the unit. Only use
a Tonebone supply as others may harm your Tonebone.
The Radial Bassbone is both easy and intuitive to use. Begin by making
sure your amplifier and mixer volumes are turned off so that when
connections are being made, you will not cause the speakers to pop.
Think of channel-1 as ‘straight-through’ whereby you will use the EQ and
volume on your amp to control your primary bass. Once your connections
are done, turn up your amp volume and EQ settings to the levels you
would normally use. Set channel-1 level control to about 2 o’clock and
make sure the contour switch is set to flat. Now go back to your amplifier
and readjust your input level to compensate as needed.
This is the starting point to properly setup the Bassbone. You will note that
channel-1 also features a 3-position voicing switch. This offers a choice
between flat (bypass), and two preset EQ curves to help capture popular
sought after tones that may be difficult to achieve with some amplifiers.
We suggest adjustments on channel-1 be made with the contour set to
flat (bypass). Then feel free to try the two voicing curves with your amp
settings. You may find that inserting the Bassbone’s EQ settings will
stimulate new sounds that you have not yet encountered.
Channel-2 is the over-ride channel. This channel features a powerful
EQ that lets you counter and/or assist the EQ on your amplifier when
connecting your second bass. Once you have established the amp
settings for your primary bass, you would then select your second bass
and depress the toggle switch to select channel-2.
Start with the HI-MID-LOW EQ controls at 12 o’clock and the channel-2
level control at 2 o’clock. You will notice that each of the EQ controls
are extremely active and provide tons of cut and boost. Play with these
controls until you have found your sound and then adjust the LEVEL-2
control to match your other bass, you are now set to go!
Radial Engineering
5
Bassbone Owner’s Manual
True to the Music
USING THE BASSBONE WITH ONE BASS
Start by making your connections as described in Section 4 and make
sure you are connected to input-1. Bassbone automatically feeds both
channels when the input-jack on channel-2 is not used.
As discussed earlier, when only using one bass, the Bassbone can be
used like a 2-channel pre-amp whereby one can transition between
channel-1 and channel-2 by simply depressing the toggle switch.
Following a similar path as described when using two basses, you would
set your amplifier EQ and level while using channel-1. This would be
your normal sound. You could of course introduce one of the Bassbone
voicing settings if desired. We suggest that you begin with the channel1 output level set at 2 o’clock and adjust your amplifier to the desired
listening level.
Switching to channel-2 will then let you access the Bassbone’s powerful
EQ section. This can make a passive bass sound active or vise versa!
You could for instance set your standard bass tone to be warm and fat
and set the EQ on channel-2 for mid-range cut and added clarity.
POWER BOOST AND EFFECT LOOP
Now that you have the coolest sound in the world, it’s time for the crowdstopping 25 minute bass solo!
The Bassbone is equipped
with a power booster that
can be used for soloing
or special effects. To add
more fun and flexibility, the
BOOST ASSIGN is a 3position selector switch that
lets you assign the BOOST
footswitch to boost only,
effect-loop only or both.
Being able to engage both
the boost and the effects
loop with a ‘single foot action’ adds tremendous flexibility while reducing
‘tap dancing’ on stage. For instance you may want to kick the bass up
a notch and introduce a flanger at the same time. For this, the BOOST
ASSIGN switch would be set to BOTH. This has the advantage of keeping
noisy effect devices out of the signal chain when not being used.
Radial Engineering
6
Bassbone Owner’s Manual
True to the Music
USING THE POWER BOOSTER
The BOOST control knob is designed to go from unity gain (full counter
clockwise) to +8dB of gain boost (full clockwise). Depress the BOOST
footswitch so the LED is illuminated and turn the BOOST control knob
clockwise until the desired level is attained. Check the relationship
between the two channels with and without the power-booster to fine
tune your gain structure so there are no surprises when drepressing the
footswitches.
USING THE EFFECT LOOP
The effect loop features an insert jack like the ones used on professional
mixers. This employs a standard tip ‘send’, ring ‘return’ insert jack with a
stereo TRS (tip ring sleeve) plug at one end and two standard ¼” mono
plugs on the other.
Tip - Send
Ring - Return
1/4" MONO
1/4" TRS
1/4" MONO
Common ground
Send effect input
Return effect output
Insert Cable Return
The TRS plug connects to the Bassbone LOOP jack and the two ¼” mono
plugs connect to the input and output jacks of the effect pedal.
Insert Cable Send
Bass 2 Input
Bass 1 Input
Output
The advantages of using an effect loop to connect pedals include reduced
pick-up loading for a more natural bass guitar sound, less noise because
your sound is going directly to your amplifier and the ability to pre-set
different multi-pedal setups while playing without actually hearing the
setups until you engage the effect loop.
Combining pedal effects with the power booster can be both powerful and
dramatic. With the touch of a button, one can produce thunderous tones
that can completely change the ambience from one song to another. This
will most assuredly spur on creativity!
Radial Engineering
7
Bassbone Owner’s Manual
True to the Music
USING THE TUNER OUTPUT
The Bassbone incorporates a separate tuner out. This output passes
through a band-pass filter to make it easier for a tuner to lock-on to the
fundamental tone. Without the band-pass filter, some basses produce so
many harmonics that the tuner is unable to lock-on and this causes the
needle (or LED read out) to jump all over the place. Because the tuner
out is separately buffered, the tuner circuit is completely removed from
the primary audio signal path thus reducing its effect or added load on
the circuit.
TUNER MUTE
The power-boost and effects-loop
features may be used to create
a tuner mute function for silent
tuning. Insert an unterminated 1/4"
"dummy" plug into the LOOP jack
and set the BOOST ASSIGN switch
to LOOP. With this arrangement,
depressing the BOOST footswitch
will mute the Bassbones's main
output. If you intend to employ this
mute function on a regular basis,
we recommend trimming the 1/4"
dummy plug's solder posts down
and using it without the outter shell
to save space.
1/4" plug with solder leads
trimmed off and shell removed.
USING THE XLR OUTPUT
The Bassbone is equipped with a separate XLR male output that acts like a
direct box to feed a mixer. The 600-Ohm mic level output is designed to run
along side microphone signals in a snake without causing crosstalk.
It is important to note that unlike a
direct box that would normally be
connected before the Bassbone,
the XLR out is post Bassbone.
This means that all of the
Bassbone EQ and volume settings
will be heard on the XLR output.
This is particularly advantageous
when playing gigs without a sound
engineer as the bass signal going to the mixer will be boosted or altered
to follow your Bassbone settings. An example would be on a solo where
the engineer would normally increase the bass volume: by engaging the
Bassbone’s power booster, the level would increase on your bass amp
and at the mixer at the same time.
The XLR output is particularly handy in the studio for direct recording,
as well as for live sistuations where bringing an amplifier may not be
practical. Simply connect the Bassbone’s XLR output to the mixer and
use the Bassbone as your miniature amp. All your EQ settings are now
right at your feet!
Radial Engineering
8
Bassbone Owner’s Manual
True to the Music
The XLR male connector is wired to AES standards with pin-1 being
ground, pin-2 hot. A ground-lift switch disconnects the ground on pin-1
at the output to help reduce hum and buzz caused by so-called ‘groundloops’.
To reduce opportunity for noise, it is always a good idea to have your bass
amp and Bassbone connected to the same power bar. When connecting
to a mixer, should you encounter a ground-loop or 60-cycle hum, try lifting
the ground. This disconnects pin-1 and assumes that the Bassbone’s
safety ground will be connected at the input.
FAQ
Can I use any two basses with the Bassbone?
Yes, the Bassbone is designed for use with all types of basses. This
means that you can use both active and passive basses, fretted or
fretless and so on.
Do I still need a direct box with the Bassbone?
No… The Bassbone has a balanced out that sends your post-Bassbone
sound to the mixer. This is cool because if you do not have a soundman,
the bass EQ and level can be controlled by you. If however you do have
a sound engineer, he may prefer to get the sound of your bass ‘direct’
before it goes into your Bassbone. Any of the Radial direct boxes will
work fine for this.
Can I use the Tuner out to drive another amp or effect?
You can but the sound may not be what you want. We have optimized
the tuner out to provide a typical tuner circuit with a fundamental tone
so that tuning is easy. This tone will not sound the same as the output
from the Bassbone.
I have an active & passive bass. Which should be used where?
Both can work in either Bassbone channel. If you are a purist, you may
want to have your passive bass in channel-1 and set it flat. This would
allow your amp to control your EQ for this bass. If you want to beef up your
passive, then channel-2 with the active EQ will give you more control.
Can I use other pedal power supplies with the Bassbone?
No. The Bassbone requires a more powerful 15V supply than a typical
9-volt pedal in order to provide maximum power handling and headroom.
This is why we include the supply with the unit.
Can I use the ‘effect send’ to drive another amplifier?
Technically ‘yes’ but be careful. We produce a device called the Radial
JX2 Switchbone that is designed to do this properly. It is outfitted with
an isolation transformer that will eliminate noisy ground loops while the
Bassbone effect send does not. Some older amplifiers are not equipped
with proper U-ground connection and could cause an electric shock.
Please consult a qualified technician before combining amplifiers with
the Bassbone.
Radial Engineering
9
Bassbone Owner’s Manual
True to the Music
Will the Bassbone alter the tone of my bass?
When using channel-1 with the contour switch set to off or bypass, the
original tone of the instrument will pass through the Bassbone without
adding EQ. Keep in mind however that changing the output level on
channel-1 will cause the perception to shift due to a volume change.
Why is the tuner output is so loud?
When you pluck the string, it sometimes takes a while for the harmonics
and the string vibration to settle down to a stable ‘tunable’ position. By
having a high output to the tuner, it gives you more time to tune the
string.
Why do you have EQ shapes on channel-1 if this is designed to go
to my amps EQ?
Some amps just do not have the ability to create some of the cool sounds
that have become popular today. This is particularly true with older vintage
amps that sound great, but need that extra kick. We included two EQ
curves that we felt would be beneficial when using the Bassbone with
older amps and of course, when using it direct to a PA system.
Why does the volume go down when I turn the EQ knobs
counterclockwise?
The EQ section on the Bassbone is active and is capable of boosting or
cutting. This lets you create very powerful EQ settings that can override
the EQ settings on your amplifier. The 12 o'clock position is neutral or
flat. If all three EQ knobs are cutting it's like the overall volume is being
turned down.
Can I use the Bassbone straight into a power amplifier?
You can try, but you will most likely find that there is not enough level to
drive a power amp to it's maximum output. The reason for this is that the
Bassbone is a unity gain device and is designed to drive a pre-amp such
as found in bass and guitar amplifiers or the XLR mic input on a mixer.
Radial Engineering
10
Bassbone Owner’s Manual
Radial Engineering - a division of JP Cabletek Electronics Ltd. warrants this
product to be free from defects in material and workmanship to the original
owner and will remedy any such defects free of charge according to the
terms of this warranty. Radial Engineering will repair or replace at its option
any defective component(s) of this product, excluding the finish, the tube,
the footswitch (tube and footswitch are warranted for 90 days) and wear and
tear from normal use, for a period of three (3) years from the original date of
purchase. In the event that a particular product is no longer available, Radial
Engineering reserves the right to replace the product with a similar product
of equal or greater value. To make a request or claim under this limited warranty, the product must be returned prepaid in the original shipping container
(or equivalent) to Radial Engineering or to an authorized repair centre and
you must assume the risk of loss or damage. A copy of the original invoice
showing date of purchase and the dealer name must accompany any request for work to be performed under this limited warranty. This limited warranty shall not apply if the product has been damaged due to abuse, misuse,
misapplication, accident or as a result of service or modification by any other
than an authorized repair centre.
THERE ARE NO EXPRESSED WARRANTIES OTHER THAN THOSE
ON THE FACE HEREOF AND DESCRIBED ABOVE. NO WARRANTIES
WHETHER EXPRESSED OR IMPLIED, INCLUDING BUT NOT LIMITED
TO, ANY IMPLIED WARRANTIES OF MERCHANTABILITY OR FITNESS
FOR A PARTICULAR PURPOSE SHALL EXTEND BEYOND THE RESPECTIVE WARRANTY PERIOD DESCRIBED ABOVE OF ONE YEAR.
RADIAL ENGINEERING SHALL NOT BE RESPONSIBLE OR LIABLE
FOR ANY SPECIAL, INCIDENTAL OR CONSEQUENTIAL DAMAGES
OR LOSS ARISING FROM THE USE OF THIS PRODUCT. THIS WARRANTY GIVES YOU SPECIFIC LEGAL RIGHTS, AND YOU MAY ALSO
HAVE OTHER RIGHTS, WHICH MAY VARY FROM STATE/PROVINCE TO
STATE/PROVINCE.
Radial Engineering
1638 Kebet Way, Port Coquitlam BC V3C 5W9
tel: 604-942-1001 • fax: 604-942-1010
email: [email protected] • web: www.radialeng.com
Radial Engineering is a division of C•TEC (JP CableTek Electronics Ltd.)
Radial Bassbone Owner’s Manual - Part #R800 9648 • V2.0 04-25-05
Specifications and appearence are subject to change without notice.
www.radialeng.com
RADIAL LIMITED THREE YEAR WARRANTY