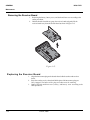
1
NP88 Encoreâ
PRO Encoreâ
NP88 FLXä
SERVICE MANUAL
NP88 FLEX
NP88 FLEX
Foreword
Foreword
Unication maintains a worldwide organization that is dedicated to provide responsive, full-service customer support. Unication products are serviced by an international network of company-operated product care centers as well as authorized
independent service firms.
Available on a contract basis, Unication's comprehensive maintenance and installation programs enable customers to meet requirements for reliable, continuous
communications.
To learn more about the wide range of Unication service programs, contact your local
Unication representative or the nearest Customer Service Manager (refer to the
inside back cover of this manual).
Product Identification
Unication products are identified by the model number on the housing. Use the entire
model number when inquiring about the product. Numbers are also assigned to
chassis and kits. Use these numbers when requesting information or ordering
replacement parts.
Product Changes
When electrical, mechanical or production changes are incorporated into Unication
products, a revision letter is assigned to the chassis or kit affected, for example;
-A, -B, or -C, etc.
The chassis or kit number, complete with revision number is imprinted during
production. The revision letter is an integral part of the chassis or kit number and
is also listed on schematic diagrams and printed circuit-board layouts.
Regulatory Agency Compliance
This device complies with Part 15 of the FCC Rules. Operation is subject to the
following conditions:
1. This device may not cause any harmful interference, and
2. this device must accept interference received, including interference that may
cause undesired operation.
This device complies with RSS-210 of Industry and Science Canada. Operation is
subject to the following two conditions:
1. This device may not cause interference, and
2. this device must accept any interference, including interference that may cause
undesired operation of the device.
June 21, 2004
1
Foreword
NP88 FLEX
Computer Software Copyrights
The Unication products described in this manual may include copyrighted Unication
computer programs stored in semiconductor memories or other media. Laws in the
United States and other countries preserve for Unicationcertain exclusive rights for
copyrighted computer programs, including the exclusive right to copy or reproduce
in any form the copyrighted computer program. Accordingly, any copyrighted
Unication computer programs contained in the Unication products described in this
manual may not be copied or reproduced in any manner to the extent allowed by
law without the express written permission of Unication. Furthermore, the purchase
of Unication products shall not be deemed to grant either directly or by implication,
estoppel, or otherwise, any license under the copyrights, patents or patent applications of Unication, except for the normal, non-exclusive, royalty-free license to use
that arises by operation of law in the sale of a product.
Unication, NP88 Encore!, PRO Encore!, NP88 FLX, and FLEX are trademarks or registered trademarks of Unication, Inc.
IBM is a trademark or registered trademark of International Business Machine, Corporation.
Tektronix is a trademark or registered trademark of Tektronix, Inc.
2
June 21, 2004
GENERAL
NP88 FLEX
GENERAL
Contents
Contents
About This Publication . . . . . . . . . . . . . . . . . . . . . . . . . . . . . . . . . . . . . . . . . . . . . . . . . . . . . . . . . . . . . . . . . . . .1-1
Audience . . . . . . . . . . . . . . . . . . . . . . . . . . . . . . . . . . . . . . . . . . . . . . . . . . . . . . . . . . . . . . . . . . . . . . . . . . . . . . . . . . 1-1
Finding Information . . . . . . . . . . . . . . . . . . . . . . . . . . . . . . . . . . . . . . . . . . . . . . . . . . . . . . . . . . . . . . . . . . . . . . . . . 1-1
Conventions . . . . . . . . . . . . . . . . . . . . . . . . . . . . . . . . . . . . . . . . . . . . . . . . . . . . . . . . . . . . . . . . . . . . . . . . . . . . . . . . 1-1
Revisions . . . . . . . . . . . . . . . . . . . . . . . . . . . . . . . . . . . . . . . . . . . . . . . . . . . . . . . . . . . . . . . . . . . . . . . . . . . . . . . . . . 1-2
Related Publications . . . . . . . . . . . . . . . . . . . . . . . . . . . . . . . . . . . . . . . . . . . . . . . . . . . . . . . . . . . . . . . . . . . . . . . . . 1-2
Specifications . . . . . . . . . . . . . . . . . . . . . . . . . . . . . . . . . . . . . . . . . . . . . . . . . . . . . . . . . . . . . . . . . . . . . . . . . . .1-3
Product Overview . . . . . . . . . . . . . . . . . . . . . . . . . . . . . . . . . . . . . . . . . . . . . . . . . . . . . . . . . . . . . . . . . . . . . . . .1-4
Product Names . . . . . . . . . . . . . . . . . . . . . . . . . . . . . . . . . . . . . . . . . . . . . . . . . . . . . . . . . . . . . . . . . . . . . . . . . . . . . 1-4
Display . . . . . . . . . . . . . . . . . . . . . . . . . . . . . . . . . . . . . . . . . . . . . . . . . . . . . . . . . . . . . . . . . . . . . . . . . . . . . . . . . . . . 1-4
Housing . . . . . . . . . . . . . . . . . . . . . . . . . . . . . . . . . . . . . . . . . . . . . . . . . . . . . . . . . . . . . . . . . . . . . . . . . . . . . . . . . . . 1-4
Features . . . . . . . . . . . . . . . . . . . . . . . . . . . . . . . . . . . . . . . . . . . . . . . . . . . . . . . . . . . . . . . . . . . . . . . . . . . . . . . . . . . 1-4
Addressing . . . . . . . . . . . . . . . . . . . . . . . . . . . . . . . . . . . . . . . . . . . . . . . . . . . . . . . . . . . . . . . . . . . . . . . . . . . . . . . . . 1-5
Controls and Indicators . . . . . . . . . . . . . . . . . . . . . . . . . . . . . . . . . . . . . . . . . . . . . . . . . . . . . . . . . . . . . . . . . . . . . . 1-5
Standard Features . . . . . . . . . . . . . . . . . . . . . . . . . . . . . . . . . . . . . . . . . . . . . . . . . . . . . . . . . . . . . . . . . . . . . . . . . . 1-8
Standard Options . . . . . . . . . . . . . . . . . . . . . . . . . . . . . . . . . . . . . . . . . . . . . . . . . . . . . . . . . . . . . . . . . . . . . . . . . 1-12
Alert Options
. . . . . . . . . . . . . . . . . . . . . . . . . . . . . . . . . . . . . . . . . . . . . . . . . . . . . . . . . . . . . . . . . . . . . . . . 1-13
FLEX-Specific Options . . . . . . . . . . . . . . . . . . . . . . . . . . . . . . . . . . . . . . . . . . . . . . . . . . . . . . . . . . . . . . . . . . . . . 1-15
Theory of Operation . . . . . . . . . . . . . . . . . . . . . . . . . . . . . . . . . . . . . . . . . . . . . . . . . . . . . . . . . . . . . . . . . . . . . . . . . . . . . . . .1-17
General Circuit Description . . . . . . . . . . . . . . . . . . . . . . . . . . . . . . . . . . . . . . . . . . . . . . . . . . . . . . . . . . . . . . . . . .. 1-18
Paging Coding Schemes . . . . . . . . . . . . .. . . . . . . . . . . . . . . . . . . . . . . . . . . . . . . . . . . . . . . . . . . . . . . . . . . . . . . . . . . . . . . .1-20
FLEX Paging Format, Code and Code Capacity . . . . . . . . . . . . . . . . . . . . . . . . . . . . . . . . . . . . . . . . . . . . . . . . . . 1-20
Maintenance
. . . . . . . . . . . . . . . . . . . . . . . . . . . . . . . . . . . . . . . . . . . . . . . . . . . . . . . . . . . . . . . . . . . . . . . . . . . . . . . . . . 1-22
Removing The Battery ....... . . . . . . . . . . . . . . . . . . . . . . . . . . . . . . . . . . . . . . . . . . . . . . . . . . . . . . . . . . . .1-22
Replacing The Battery
. . . .. . . . . . . . . . . . . . . . . . . . . . . . . . . . . . . . . . . . . . . . . . . . . . . . . . . . . . . . . . . . . . . . . . 1-22
Removing The Back Cover . ......... . .. . . . . . . . . . . . . . . . . . . . . . . . . . . . . . . . . . . . . . . . . . . . . . . . . . . . . .1-23
Replacing The Back Cover . . . . . . . . . . . . . . . . . . . . . . . . . . . . . . . ...................
.
..
.. . . . . . . .. . . .. . . . . 1-24
Removing The Belt Clip
. . . . . .. . . . . .. . . . . . . . . . . . . . . . . . . . . . . . . . . . . . . . . . . . . . . . . . . . . . . . . . 1-24
Replacing The Belt Clip . . . . . . . . . . . . . . . . . . . . . . . . . . . . . . . . . . . . . . . . . . . . . . . . . . . . . . . . . . . . . . . . . . . . . 1-24
Removing The Front Cover. ...... . . . . . . . . . . . . . . . . . . . . . . . . . . . . . . . . . . . . . . . . . . . . . . . . . . . . . . . . 1-25
Removing The Receiver Board... . . . . . . . . . . . . . . . . . . . . . . . . . . . . . . . . . . . . . . . . . . . . . . . . . . . . . . . . . . . . . . . 1-26
Replacing The Receiver Boards
.. . . . . . . . . . . . . . . . . . . . . . . . . . . . . . . . . . . . . . . . . . . . . . . . . . . . . . . . . . . 1-26
Removing The Light Guide And Snubber Pad
. . . .. . . .. . . . . . . . . . . . . . . . . . . . . . . . . . . . . . . . . . . . . . . . . .1-27
Troubleshooting . . . . . . . .. . . . . . . .. . . . . . . . . . . . . . . . . . . . . . . . . . . . . . . . . . . . . . . . . . . . . . . . . . . . . . . . . . . . . . . . . . 1-28
Self-Diagnostic Feature . . . . . . .. . . . . . .. . . . . . . . . . . . . . . . . . . . . . . . . . . . . . . . . . . . . . . . . . . . . . . . . . . . . 1-29
Corrective Maintenance . . . . . . . .. . . . . . . . . . . . . . . . . . . . . . . . . . . . . . . . . . . . . . . . . . . . . . . . . . . . . . . . . . . . 1-29
Paging Sensitivity Check .. . . . . . . . . . . . . . . . . . . . . . . . . . . . . . . . . . . . . . . . . . . . . . . . . . . . . . . . . . . . . . . . . . . . 1-32
Circuit Check . . . . . . . . . . . . . . . .. . . . . . . .. . . . . . . . . . . . . . . . . . . . . . . . . . . . . . . . . . . . . . . . . . . . . . . . . . . . . . 1-34
June 21,2004
1-iv
NP88 FLEX
GENERAL
About This Publication
About This Publication
Using this manual and the many suggestions contained in it assures proper
installation, operation, and maintenance of Unication products and equipment.
Refer any questions about this manual to the nearest Customer Service Manager.
Audience
This Service Manual is provided to assist service personnel in the test and repair
of Unication NP88 FLEX . Service personnel should be familiar with
electronic assembly test methods and troubleshooting and with the operation and
use of associated test equipment.
Finding Information
This manual provides descriptive data and service information for the Unication
NP88 FLEX. A pager’s product family is identified by the first three
digits of the pager serial number, unless the pager is covered by an extended
warranty. Extended warranty pagers have two alphabetic characters in place of the
first two digits of the product family code. The first digit following the alphabetic
code indicates the number of years the warranty period is in effect.
Where information is specific to a type of pager, it is indicated, otherwise information is pertinent to NP88 FLEX.
Schematic diagrams, parts lists, and printed-circuit board layouts are contained in
supplementary manuals.
This Service Manual consists of three types of major sections.
• General - Describes the product family, its features and options, and theory of
operation. Also provided, are procedures for disassembling, troubleshooting,
and repairing Unication NP88 FLEX.
• Decoder - Provides decoder-specific circuit descriptions and troubleshooting
flowcharts.
• Receiver - By frequency band, provides receiver-specific circuit descriptions,
alignment procedures, and troubleshooting flowcharts.
Conventions
Special characters and typefaces, listed and described below, are used in this
publication to emphasize certain types of information.
Q234
This typeface is used to emphasize circuit board component reference
designators.
cell
This typeface represents text displayed on the pager LCD.
N
G
Note: Emphasizes additional information pertinent to the subject matter.
Caution: Emphasizes information about actions which may result in equipment
damage.
June 21,2004
1-1
GENERAL
NP88 FLEX
About This Publication
E
Warning: Emphasizes information about actions which may result in personal
injury.
Revisions
Any changes that occur after manuals are printed are described in Publication
Revision bulletins.
Related Publications
Operating Instructions:
NP88 Encoreâ!
6881015B75
PRO Encoreâ!
6881021B41
NP88 FLXä
6881021B43
Other Publications:
NP88 Encoreâ!/RSVP Pager
Programming Guide
6881015B76
PRO Encoreâ!
Programming Software User’s Guide
6881023B95
PRO Encoreâ! /NP88 FLXä Pager
Programming Software User’s Guide
6881021B65
Supplements
1-2
Refer to applicable
receiver and decoder
sections
June 21,2004
NP88 FLEX
GENERAL
Specifications
Specifications
Paging
Sensitivity:
Refer to specific receiver information.
Spurious & Image Refer to specific receiver information.
Rejection:
Frequency
Stability:
Refer to specific receiver information.
EIA Selectivity:
Refer to specific receiver information.
Alert Tone
Frequency:
2731 Hz standard alert with user selectable alerts
Alert Tone
Duration:
8 ± 0.5 seconds, unless manually reset
Alert Tone
Loudness:
80 dB typical, 78 dB minimum, at 30 cm (12 inches)
Power
Consumption:
Refer to specific receiver information.
Battery:
One 1.5V, AAA-size alkaline
Battery Life:
Refer to specific receiver information.
Weight (with
battery):
45 grams (approximate)
Size:
63.5 x 45 x 17.5 mm
Code Format:
FLEX code, 1600, 3200, and 6400 bps
Channel Spacing:
25 kHz
Frequency
Deviation:
±4.8 kHz
Memory Capacity
Maximum of 16 numeric slots (20
characters per slot) with a maximum of
320 characters.
SPECIFICATIONS SUBJECT TO CHANGE WITHOUT NOTICE
June 21, 2004
1-3
GENERAL
NP88 FLEX
Product Overview
Product Overview
The Unication NP88 FLEX pagers are miniature, microcomputer-controlled
FM receivers that operate in the high-band 900 MHz range
(929-932 MHz). Each pager has a 12-digit numeric display and is powered by a
single AAA-size battery.
These pagers use FLEX paging format. Refer to the applicable Receiver section in this manual for information about which format is used
with each frequency range.
Product Names
Product names included in NP88 FLEX are listed on the front cover.
Product names are subject to change without notice. Some product names, as well
as some frequency bands, are available only in certain markets.
Display
Product NP88 FLEX feature a numeric backlighted LCD which can receive
and display messages of up to 20 characters in length.
Housing
The pager is housed in an impact-resistant plastic case that offers excellent
protection against dust intrusion, vibration, and shock. Small in size and lightweight, the unit is designed to be clipped to your belt or fit comfortably in a shirt
or jacket pocket.
Features
These pagers use the most advanced, self-contained, sealed, custom-integrated
circuits to perform the complex functions required FLEX paging.
In addition to the space and
weight advantage, microcircuits enhance basic pager reliability, simplify maintenance, and provide a wide variety of operational functions.
The following features are standard in the Product Family 352 pagers:
• Attractive, miniature styling
• Leadless component technology
• Powered by a single, replaceable AAA alkaline battery
• Microprocessor-controlled decoder
• 12-digit numeric display
• Programmable memory
• Attached battery door
• Time and date features
• Memory retention
• User-selectable pleasing alert tones
This publication also describes programmable options that can be selected using
the Pager Programming Software (PPS). Refer to the applicable Software User’s
1-4
June 21,2004
NP88 FLEX
GENERAL
Product Overview
G uide listed in "R elated P ublications" for mor e infor mation about pr ogr ammable
options.
A ddres s ing
E ach pager has memor y which can be pr ogr ammed for either one or two addr esses.
T he memor y can be pr ogr ammed by using the appr opr iate P ager P r ogr amming
S oftwar e and P ager M echanical I nter face.
C ontrols and Indic ator
T he pager contr ols ar e the thr ee buttons located on the fr ont of the pager
(r efer to F igur e 1-1). I ndicator s, in the for m of icons, ar e displayed on the L C D . T he
following par agr aphs descr ibe the contr ols and indicator s.
B uttons
N P 88 F L E X pager s have thr ee elastomer ic buttons as shown in F igur e 1-1:
)
1. On/R ead/S elect (
2. M enu (
)
)
3. B ack light/R eset (
T he buttons tur n the pager on and off, r ead messages, activate the back light, and
scr oll thr ough the function menu options.
On/Read/Select
Button
Menu Button
Backlight/Reset
Button
NP8 8
A
F igur e 1-1. Pager C ontr ol s
On/R ead/S elec t B utton
) is used to turn the pager on and read messages
T he On/R ead/S elect button (
stor ed in memor y. W hen the pager is off, a single push of the On/R ead/S elect button
tur ns the pager on.
June 21, 2004
1-5
GENERAL
NP88 FLEX
Product Overview
When a battery is first inserted into the pager, the pager powers up in the OFF
state. In this cold start condition, the On/Read/Select button has priority over the
Menu button, and the Menu button has priority over the Backlight button, respectively, if more than one button is pressed simultaneously.
Menu Button
The
button is used to display and scroll through the menu. The
button is also
pressed to increment the digits when setting the time or an alarm.
Backlight/Reset Button
Pressing the Backlight/Reset button
causes the lamp to backlight the display
for easy viewing in low-light conditions. Pressing the button twice resets the pager
display to the Display Status screen.
Liquid Crystal Display (LCD)
A12-digit, 4-indicator, backlit LCD installed on the top side of the pager displays
messages and message status information (see Figure 1-2). Special temperaturecompensating circuitry in the pager ensures the display’s high contrast and wide
viewing angle are maintained over the pager’s entire operating temperature range.
ACPB-930351C
Figure 1-2. Pager Display
1-6
June 21, 2004
NP88 FLEX
GENERAL
Product Overview
The pager indicators (also known as icons) are listed in Table 1-1.
Table 1-1. Indicators
Icon
D
Meaning
Description
Alert Tone Enabled
Incoming messages are indicated by an alert tone.
Message Protected
The displayed message is “locked” and protected from
deletion.
[
Silent Alert Enabled
Incoming messages cause the pager to vibrate. An alert
tone is not given.
B
Continued Message
The message is continued on the next screen.
\
Alarm Enabled
The pager is programmed to provide an alert (tone or
vibrate) at a specified time.
Status Screen
The Status screen consists of the time of day and date plus applicable status icons.
Figure 1-3 shows a Status screen with Audible Alert enabled.
D
7:44a 11-11
Figure 1-3.
Status Screen
Service Screen
The Service screen consists of a message slot number followed by a message time
stamp as shown in Figure 1-4. The Service screen is available only if the time option
is selected.
2: 11:45a
Figure 1-4.
Service Screen
Menu Prompts
A series of prompts used to select pager functions make up the pager’s menu.
Table 1-2 lists the prompts and describes how to respond.
Table 1-2. Menu Prompts
Prompt
Response
silent ?
Pager is in Audio mode. Press
pager vibrates.
to change to Silent mode and
audio ?
Pager is in silent mode. Press
pager chirps.
to change to Audio mode and
June 21, 2004
1-7
GENERAL
NP88 FLEX
Product Overview
Table 1-2. Menu Prompts (Continued)
Prompt
Response
pager off ?
Press
set alert ?
Press
to display selected alert type. Press
to sample alert
types. Press
again to select an alert type and return to the Status
screen.
set alarm ?
Press
to select on/off sequence. on or off flashes. Press
to
turn alarm on or off. Press
to select the hour. Press
to change
the hour. Press
to select minutes. Press
to change the first digit
of minutes. Press . Press
to change the second digit of minutes.
Press
. Press
to select am or pm. Press twice to return to the
Status screen.
set time ?
Press
to select the hour. Press
to change the hour. Press
to
select minutes. Press
to change the first digit of minutes. Press
. Press
to change the second digit of minutes. Press . Press
to select am or pm. Press twice to return to the Status screen.
set date ?
Press
to select the month. Press
to change the month. Press
to select the day. Press
to change the day. Press
to repeat
setting the date, if desired. Press twice to return to the Status
screen.
protect ?
Press
to protect the message being read. Press
while reading
a protected message to display the unprotect ? prompt.
unprotect ?
Press
erase all ?
Press
to turn pager off.
to remove protection of the message being read.
to erase all read, unprotected messages.
Standard Features
The following information describes the standard features of the NP88 FLEX pagers.
Some pager features are programmable using the proper Pager Programming Software
(PPS). The PPS User's Guide listed in "Related Publications" provides
additional information about programmable features.
Tone-Alert Operation
This is the standard operating mode of the pager in which it responds to a sequence
of signals that includes the address that matches the address information programmed into the pager’s code plug. The pager responds to the correct paging
sequence by emitting an interruptible alert tone and by displaying the number of
unread messages. When the pager’s messages are read, the display shows the time
of day.
The pager receives tone-only and numeric pages. When a message is received that
does not contain numeric data, tone only displays. Tone Only pages show a tone
number associated with the sender.
1-8
June 21, 2004
NP88 FLEX
GENERAL
Product Overview
VIBRA-Page® Operation
VIBRA-Page is a standard feature in NP88 FLEX pagers. The pager is
equipped with a miniature motor causing the pager to vibrate when a message is
received in the silent mode.
Pagers operating in the silent mode do not produce a tone alert. Instead, when a
page is received, only the vibrator and the alert lamp activate.
The silent mode permits the pager to receive a paging call while inhibiting the tone
alerting circuit. The silent mode is used when the alert tone would disturb the user
or others in the vicinity, such as in a conference room or library. When this mode
is selected, the speaker icon is displayed with a slash through it ([).
When the user switches to this mode, the pager vibrates for two seconds. When a
page is received, the pager vibrates for eight seconds (unless in lo cell mode).
Message Features
The pager’s unique codes permit the display of messages intended only for that
pager. The message is not displayed until the On/Read/Select ( ) button is pressed.
Capacity
For a single page, the pager can receive and display messages of up to 20 characters,
12 characters at a time.
Memory
FLEX models: The pager stores up to 16 of the most recent messages, up to 320
total characters.
A page received when memory is full caused the oldest read message to be overwritten
This overwrite feature allows the pager to automatically clear itself of old pages as
new pages are received.
Duplicate Message Indicator
When a message is received, the pager compares the new message to all messages
stored in memory. If the new message is exactly the same as a message already in
memory a duplicate message indicator (duplicate) displays at the beginning of the
latest message. This lets the user know the message has been received more than
once. It also prevents duplicate messages from occupying more than one memory
slot. The new message contains the latest time stamp.
Duplicate message detection is not applicable to tone-only messages.
June 21, 2004
1-9
GENERAL
NP88 FLEX
Product Overview
Confirmation Alert
When switched from tone-only to silent mode, the pager vibrates for a short period
of time to confirm the pager is in the silent mode. When switched from silent to
tone-only mode, a short beep is emitted to confirm the switch to tone-only.
Page Alert/Unread Message Indicator
When a message is received, the pager emits an alert (either tone or vibrate) and
displays an unread message indication (i.e., 1 page, 2 pages, etc.).
The number displayed indicates the total number of unread messages in the pager
memory. When the number of messages is greater than the number of available
memory slots, the pager displays the overflow indicator. Either the overflow
indicator or the unread message indicator remains displayed until all messages
have been read, and/or erased.
The pager’s memory is displayed by pressing the On/Read/Select (
) button.
Overflow Indicator
An overflow condition occurs when all message slots are filled with unread messages
and a new message is received. Upon receipt of a message, while the pager is in the
overflow condition, the oldest unread message is discarded. With an overflow
condition, the next message received causes the oldest read, unlocked message to
be overwritten. In this mode, the overflow indicator replaces the default idle display.
Messages must be read and erased to clear the overflow display.
Personal Alarm
The alarm feature is activated through a Menu prompt. The alarm is a twenty
second tone or an twenty second vibrate alert. When the alarm is set, it operates even
while the pager is off. The alarm is two seconds long when the pager is in a lo cell
condition.
Message Lock/Unlock
You can selectively lock up to eight messages (FLEX) so they cannot be
overwritten by incoming messages, or erased if erase all is selected.
Tone-only messages can also be locked. A message is locked by pressing the Menu
button ( ) while any portion of the message (including the service screen) is displayed.
A locked page can be unlocked in the same manner.
N
When all of the protected memory is full and the user attempts to protect another
message is displayed to indicate the message cannot be
message, a
protected.
Erase All
The Erase All feature allows you to delete all read and unprotected messages.
Unread and protected messages are relocated to the top of the message stack.
1-10
June 21, 2004
NP88 FLEX
GENERAL
Product Overview
Selective Message Erase
The user can delete the message currently displayed. A single unprotected message
is erased by pressing the Menu ( ) button while any portion of the message is
displayed. If the user clears a message, all of the remaining messages are renumbered starting at slot 1.
Battery Saver
FLEX pagers use the advanced battery saving features of the FLEX paging protocol.
The pager can be programmed to check for pages at intervals ranging from 1.8
seconds to 4 minutes. The interval that one chooses depends on how much delay is
acceptable in receiving messages versus battery life. For more information on FLEX
paging protocol, see the "FLEX Paging Format, Code, and Code Capacity" section
of this manual.
Battery Check And Monitor
The battery is automatically checked at all times (pager off or on). A good battery
(typically 1.3 volts or greater) is indicated by a standby condition display (time of
day and date or a field of dashes when time option is deleted) following the powerup alert.
A low battery is indentified by a low battery warning display
following the power-up alert and display check.
and an alert,
During normal operation, if the battery drops below 1.3 volts, the
warning
is displayed. As long as a low battery is in the pager, the
warning is produced
to remind the user of a low battery condition. All tone and vibrate alerts are
shortened to two seconds during low battery conditions. When the pager is off, there
is no low battery alert, and the low battery warning is not displayed.
Reminder Alert
When a message is received, the reminder alert feature monitors the pager to
determine if the message is read. If the message is not read within two minutes,
the page emits either a 1/8 second tone or a two second vibration, depending on the
mode of operation. The reminder alert continues to alert the user every two minutes
until all unread messages are read. The reminder alert is selectable via the Pager
Programming Software.
June 21, 2004
1-11
GENERAL
NP88 FLEX
Product Overview
Automatic Reset
The eight-second paging alerts automatically stop unless manually reset (halted)
by pressing any one of the buttons before the alert ends. All alerts are changed to
two-second alerts during the lo cell condition.
Standard Options
Battery
NP88 FLEX pagers are designed to operate with a single AAA-size alkaline
battery.
N
To ensure proper memory retention, turn the pager off before removing the battery.
Immediately replace the old battery with a fresh battery.
Data Invert
The pager uses direct FSK (Frequency Shift Keying) in non-return-to-zero manner
for modulation type as specified in Radio Paging Code No. 1 per recommendation
359.2 of CCIR.
Depending on the pager type, it receives 2 or 4 level FSK data which represents
binary digits. Some paging systems send inverted data, where a binary 1
is a 0 and a 0 is a 1. The invert data option corrects the data if such a system
is used.
Silent Mode
This option allows the selection of either a vibrating alert or a chirp alert when the
pager is in silent mode.
Memory Cleanup
When the pager is turned off, all read and unprotected messages are are removed
from memory.
Time and Date Options
Real Time Clock
The real-time clock displays the time and date. The pager can be programmed to
display the time in a12- or 24-hour format.
Time Stamping
When this option is enabled the time stamp is visible on the last screen of the
message.
1-12
June 21, 2004
NP88 FLEX
GENERAL
Product Overview
Date Format
The date can be shown in the U.S. style with the month followed by the day or in
the European style with the day followed by the month.
Alert Options
Audible Low Battery Alert
If the pager senses a low battery voltage, this option provides a low battery audio
alert with a two second warble tone indicating the battery needs to be changed.
Page Alert Duration
This option allows you to select the alert time of 2 seconds, 8 seconds, or 16 seconds
in length.
Completely Silent
This option renders the pager completely silent, removing all alerts, including
lo cell, incoming message, reminder, vibrate, and all others, including FLEX
priority pages.
Alert Menu and Pleasing Alerts
When the alert menu is set via the Pager Programming Software, up to five pleasing
alert tones can be selected from the pager menu. When the alert menu is not set,
one of the alert tones must be selected from the Pleasing Alert menu in the Pager
Programming Software. The selectable alert tones are:
Alert Menu
Alert 1
Alert 2
Alert 3
Alert 4
Alert 5
June 21, 2004
1-13
GENERAL
NP88 FLEX
Product Overview
specific options that are available for group call, and the corresponding addresses
that are active for that option or each option.
Table 1-3. Group Call Options (POCSAG)
1st Code
2nd Code
Option
1
2
3
4
1
2
3
4
R397BB
D
D
D
D
D
D
D
D
Group
R397BN
D
D
D
D
D
D
D
D
Individual
R397BG
D
D
D
D
D
D
D
D
Group
R308BN
D
D
D
D
-
-
-
-
Group
R308BW
D
D
D
D*
-
-
-
-
Group
R308DA
D
T
T
T
-
-
-
-
Individual
R308EV
D
D
D
D
-
-
-
-
Individual
D = Data T = Tone * = Priority Override
Priority Override
Priority override can be programmed on any active POCSAG code address. When
a priority call address page is received, the pager gives the audio alert, even if the
pager is in the silent mode. Either of the POCSAG code addresses can be ordered
as a priority call, as long as that address is programmed active. Refer to Table 1-4
for a list of the priority override options and the corresponding priority addresses
for each option.
Sequential Lockout
When a paging address has been received by the pager, the Sequential Lockout
option keeps the pager from responding to another page of the same address until
a specific time period has passed. There are three Sequential Lockout options
available:
• R432AV − 60-second lockout
• R435AU − 150-second lockout
• R442AU − 390-second lockout
Bad Data Indication
This option causes the pager to display an e as the last character of the message
when a possible error in the message data is detected. If this option is not selected,
the user will not be notified of a possible error.
Baud Option
The pager can operate at 512, 1200, or 2400 baud. The baud rate is selected by
programming the pager’s memory.
1-14
June 21, 2004
NP88 FLEX
GENERAL
Product Overview
FLEX-Specific Options
Group Call/Independent Second Address
The group call option allows multiple pagers to be alerted at the same time by using
the second FLEX address programmed as a Group address. The individual is
contacted in one of two ways: individually or as part of a group. Refer to Table 1-4
for a list of the options and the address combinations.
Table 1-4. FLEX Code Options
Address 1
Address 2
Data/Short Address
Not Active
Data/Short Address
Data/Short Address
Data/Short Address
Data/Short Address/Group
Data/Long Address
Not Active
Data/Long Address
Data/Short Address
Data/Long Address
Data/Short Address/Group
Data/Long Address
Data/Long Address
Data/Long Address
Data/Long Address/Group
Priority Override
The Priority override function causes a tone alert while the pager is in the silent
mode of operation. If a FLEX priority page is received, on any address, a priority
page tone alert occurs. Any FLEX address can be tagged as containing a priority
page. FLEX priority alerts function the same way as the normal alerts, differing
only in the silent alert mode.
Automatic Adjusting Baud
The NP88 FLEX pager is designed to decode all FLEX transmission speeds. The
pager automatically adjusts to one of three FLEX transmission speeds; 1600 bps,
3200 bps, or 6400 bps.
June 21, 2004
1-15
GENERAL
NP88 FLEX
Product Overview
Automatic Message Formatting
This system-driven feature allows the user to view a 10 character numeric message
formatted with hyphens. Upon receipt of a formatted message, the pager automatically inserts hyphens following the area code and the exchange.
Automatic Reset
The paging alerts automatically stop unless manually reset (halted) by pressing
any one of the buttons before the alert ends.
Erroneous Data Indication
This option permits a message to be received even if the integrity of the incoming
data is corrupted. If a page contains corrupted data, the pager displays an error
banner. The error text screen is visible after the last portion of the message text is
displayed. The error indicator displays error. If this option is not selected, the user
is not notified of possible errors.
Out of Range Option
If the pager cannot detect the FLEX synchronization sequence for a four minute
period, the out of range message is displayed.
The out of range message is also displayed when:
• The pager does not detect a valid synchronization sequence within one to four
minutes of initial power-up.
• The pager leaves the coverage area of the paging system.
1-16
June 21, 2004
NP88 FLEX
GENERAL
Theory of Operation
Theory of Operation
The NP88 FLEX pagers consists of a radio frequency (RF) receiver section
and a microcomputer-controlled decoder section. A message is received via an RF
carrier that is frequency modulated by a coded binary sequence utilizing FLEX
paging protocol.
The circuitry in the receiver performs the RF to intermediate frequency (IF)
conversion. The receiver then passes the frequency demodulated audio signal to the
decoder, which contains the customized analog and digital circuitry necessary to
decode the page information. Additionally, the decoder contains other support
circuitry to capture switch closures, provide tone and visual alerts, and display
pages and other user information on the LCD. Refer to the appropriate receiver
section for further specifics about each signal frequency.
June 21, 2004
1-17
GENERAL
NP88 FLEX
Theory of Operation
General Circuit Description
The following information describes the general theory of operation for the 352
pager. Refer to Figure 1-5 for a functional block diagram.
Figure 1-5. Functional Block Diagram
Power
Operating power for both the receiver and the decoder boards is obtained from the
battery. On the receiver board, a 1-volt regulator supplies the RF circuitry with
power. The regulator is turned on and off by the decoder via the control lines. On
the decoder board, the support IC receives its power from the battery and generates
the operating voltage supplied to the microcomputer.
1-18
June 21,2004
NP88 FLEX
GENERAL
Theory of Operation
Receiver
The antenna receives the modulated RF paging signal and couples it to the
amplifier/preselector to amplify and filter the RF signal. The mixer converts the RF
signal to an intermediate frequency (IF).
The crystal filter attenuates the signal above and below the RF carrier. The
oscillator/multiplier supplies the appropriate injection signal to convert the RF
paging signal to the correct IF.
The IF demodulator amplifies, filters, and mixes with the first IF to produce a 140
kHz second IF and demodulates the signal to recover the audio (FLEX) or digital
(POCSAG) data.
Decoder
The microcomputer controls the receiver circuits, powering them up and down at
the proper time intervals, decodes the binary information received, stores the
received message and generates the alert tones. It also processes user inputs from
the buttons, controls the display and drives the lamp and vibrator motor.
The support module provides boosted dc voltage to all decoder circuits, monitors
battery conditions, and drives the speaker.
June 21,2004
1-19
GENERAL
NP88 FLEX
Paging Coding Schemes
Paging Coding Schemes
FLEX Paging Format, Code, and Code Capacity
A FLEX transmission cycle is 4 minutes long and divided into 128 frames, numbered
from 0 to 127. Fifteen FLEX cycles (numbered 0 through 14) occur in one hour.
A single FLEX frame is transmitted at 1.875 seconds per frame (32 frames per
minute) and consists of 1 sync block followed by 11 frame blocks (numbered
0 through 10). The structure of a FLEX frame is shown in Figure 1-8.
A frame sync block provides timing and frame information and is divided into three
parts:
• sync 1
• frame info
• sync 2
The sync 1 portion is transmitted at 1600 bps providing frame timing and 1600 bps
symbol timing. Sync 1 also specifies frame timing as 1600, 3200, or 6400 bps.
The frame information word contains the frame and cycle numbers, indications of
low traffic (address field does not extend past block 0), and a 4-bit check character
to ensure quality of the received information.
The sync 2 portion of the frame is designed to provide synchronization at the frame’s
block speed allowing proper demultiplexing and decoding of the message blocks.
Figure 1-8. FLEX Paging Format
1-20
June 21, 2004
NP88 FLEX
GENERAL
Paging Coding Schemes
Eleven message blocks containing interleaved data follow the sync block. Data is
interleaved within the message blocks to provide signal fading protection for up to
10 msec. The message blocks contain frame and system information, addresses,
vector and original data.
Each address has an associated vector which specifies the message type and points
to the beginning of the message data. The FLEX code provides five billion address
combinations.
When the pager is turned on, it performs a search for a FLEX frame. The duration
of the search is programmable from 1 to 4 minutes. When a valid frame is received,
the pager decodes the frame number to determine where it is in the FLEX cycle.
The pager decodes future frames based on two parameters, home frame and
collapse, which are programmed with its address. The pager always decodes its
programmed home frame.
For example, if the pager is programmed for frame 10, and collapse 2, the decode
frequency is equal to 22 frames or every four frames. Therefore, the pager decodes
frames 10, 14, 18, 22, 26, and so on.
In addition to the programmed collapse parameter, a system collapse is transmitted
as part of the FLEX frame. The pager uses the smaller of the two collapse values
to determine the frequency of frame decoding.
If the initial search time ends and the pager has not found a FLEX frame, the pager
changes to a baud search mode where it “wakes up” every 1.6 seconds and looks for
a signal on the channel for approximately 80 milliseconds. If the baud search detects
a signal, the pager then begins another search for a FLEX frame.
June 21, 2004
1-21
GENERAL
NP88 FLEX
Maintenance
Maintenance
G
This product contains static-sensitive devices. Use anti-static handling procedures
to prevent electrostatic discharge and component damage.
Removing/Replacing the Battery
1.
2.
Locate the ribbed battery door lock on the side of the pager. To unlock the
battery door, slide the lock away from the battery door.
Press on the indented, ribbed area of the battery door and slide the door in the
direction indicated by the arrowhead as shown in Figure 1-9. Release the door
and the door swings open.
Figure 1-9.
3.
4.
5.
6.
G
1-22
Tilt the pager to allow the battery to slide out.
Hold the pager with the display facing down and insert a new AAA-size battery
so the positive (+) end of the battery enters first and slides to the bottom. Refer
to Figure 1-10.
Push down on the battery door and slide it back, in the opposite direction
indicated by the arrowhead on the door, until it snaps into place.
Ensure the battery door is closed and slide the ribbed battery door lock toward
the door.
Putting the battery in the wrong way (incorrect battery polarity) causes all messages
to be erased.
June 21, 2004
NP88 FLEX
GENERAL
Maintenance
Figure 1- 10.
Removing the Back Cover
When performing the following step, ensurethe pager is not damaged when inserting
the disassembly tool into the exposed battery end. Do not push the disassembly tool
all the way inside of the pager.
1.
2.
Hold the pager with t he back cover facing up .
Insert the flat head of the disassembly tool into the open battery end, no more
than 1/2 inch, and place it between th e flexible latch on the front housin g and
chamfered rib in the ba ck cover. Refer to Figure 1-11 for correct placement of
the dis assembly tool.
Figur e 1-11.
June 21, 2004
1-23
GENERAL
NP88 FLEX
Maintenance
3.
Twist the disassembly tool counterclockwise while lifting it up toward the back
housing.. The latch should begin to unsnap .
Separate the front and back housin g by liftin g the back housing up and away
from t he front housing as shown in Figure 1-12. The back housing lip at t he
LCD end will separate last.
4.
Figure 1-12.
Replacing the Back Cover
1.
2.
3.
4.
5.
6.
7.
Insert the lip of t he back housin g below t he up per inside edge of the front
housin g disp la y area .
Cen ter the back housing a nd push it down t owa rd t he front housing, k eeping
the lip of the back housin g in place.
Sque eze the back housi ng t oget her wi th the fron t housing until all of the snaps
have engaged.
Align the ba ttery door hinges with t he recesses in the bottom of the housing .
Press t he battery door in to the recessed area until it snaps in to place.
Close t he battery door by sliding it back in to position, in the direction opposite
the arrow, until it snaps into position.
Engage the batte ry door lock as explained in the earlier procedure.
Removing/Replacing the Belt Clip
1.
2.
1-24
Pullt up the belt clip from the direction as shown in Figure 1-13. to remove it.
Squeeze the clip-holderon the belt clip together with the slot on the vack housing until
all of the snaps have engaged.
June 21, 2004
NP88 FLEX
GENERAL
Maintenance
Figure 1-13.
Removing the Front Cover
1.
2.
Remove the battery, battery cover, and back cover according to the earlier procedure.
Hold the front housing down, pull the innerunit to the LCD end and lift it from
front housing as shown in Figure 1-14.
Figure 1-14.
June 21, 2004
1 -25
GENERAL
NP88 FLEX
Maintenance
Removing the Receiver Board
1.
2.
Removing the battery, battery cover, and back and front cover according to the
earlier procedures.
Hold the decoder board down, grasp the receiver board and gently lift the
receiver board away from the decoder board as shown in Figure 1-15.
F igur e 1-15.
R eplac ing the R ec eiver B oard
1.
2.
3.
1-26
Align the interconnect plug on the decoder board with the socket on the receiver
board.
Press down on the receiver board until all the pins of the interconnect plug are
fully engaged. The bodies of the plug and socket must be touching.
Replace the back and front cover , batter y, and batter y cover accor ding to the
ealier procedur es .
June 21, 2004
NP88 FLEX
GENERAL
Maintenance
Removing the Light Guide and Snubber Pad
1.
2.
Remove the battery, battery cover , back and front cover , and r eceiver boar d as
described in the ear lier pr ocedur es.
R emove the light guide as shown in Figur e 1-16.
F igur e 1-16.
3.
4.
Remove the snuvver pad as shown in Figure 1-17.
The left is decoder board.
F igur e 1-17.
June 21, 2004
1-27
GENERAL
NP88 FLEX
Troubleshooting
Troubleshooting
NP88 FLEX pagers combine leadless-component technology with a unique
miniature design to provide a unit that lends itself well to serviceability. The pager’s
circuitry is contained in two individual sections. One section is the receiver circuit
board, and the other is the decoder circuit board. To disassemble the pager and
remove the major assemblies, refer to the Maintenance procedures.
G
1-28
Leadless-component technology requires the use of specialized equipment and
procedures for repair and servicing of this pager. If you are not sufficiently familiar
with leadless component repair techniques, it is recommended you defer maintenance to qualified service personnel and service shops. Irreparable damage to the
pager can result from service by unauthorized personnel. Unauthorized attempts to
remove or repair parts can void any existing warranties of extended performance
agreements with the manufacturer.
June 21, 2004
NP88 FLEX
GENERAL
Troubleshooting
Self-Diagnostic Feature
FLEX Pagers
1.
With the pager in the OFF mode, press the
button eight (8) times within 3
seconds to enter the Tuning Test mode and disable the battery saver. The LCD
displays:
-----------1
Figure 1-28.
2.
To exit the test mode, press the
the pager is on.
button. The status screen is displayed and
Corrective Maintenance
Corrective maintenance involves two basic procedures: localization/isolation of
trouble, and replacing the defective component.
Fault Isolation
Localization of trouble to a defective circuit in the pager unit is most easily
accomplished by performing the test procedures outlined in the subsequent paragraphs. Localization involves tracing the trouble to the defective circuit causing the
abnormal operation. Isolation means tracing the trouble to a defective component
within the localized circuit.
G
Remove circuit components with care. Avoid bending pins. Use anti-static handling
procedures to prevent electrostatic discharge and component damage.
Defining the problem is the most important step in the isolation of a malfunction.
Inaccuracy of problem definition and unfamiliarity with pager operation can lead
to the introduction of additional problems. With the basic understanding of the
pager operation, problems are isolated by analyzing the following:
• Are most, some, or all pager functions inoperative?
• Which particular modes are inoperative?
Concentrate on troubleshooting circuits that are common to the inoperative modes.
Component Replacement
Integrated circuits (ICs) are very reliable components and are not replaced unless
it is definitely indicated they are defective.
G
Some ICs are not field-replaceable. Attempting to remove and/or replace these
devices can result in damage to the device, the circuit board, or other devices. Refer
to the applicable decoder or receiver servicing supplement for further information.
Before replacing an IC, make sure the external components in the circuit are
normal. Signal tracing with an oscilloscope is the preferred IC testing method. It
provides a visual indication of an input signal condition, its pulses (shape and/or
June 21, 2004
1-29
GENERAL
NP88 FLEX
Troubleshooting
distortion), and timing of pulses. The input and output oscilloscope check easily
isolates a defective IC.
Circuit voltages are given in various key places on the schematic diagrams as an
aid to the isolation process. Give particular attention to the dc voltages at the input
and output pins of the circuit and its decoupling circuits. A low voltage, or a higher
than normal voltage at the input or output should be investigated further before
replacing the circuit. A generalized troubleshooting flowchart is provided in
Figure 1-29.
1-30
June 21, 2004
NP88 FLEX
GENERAL
Troubleshooting
START
TURN POWER ON.
NO
BATTERY
ALERT OK
?
MEASURE BATTERY
VOLTAGE.
YES
BATTERY
VOLTAGE OK
?
NO
REPLACE BATTERY.
YES
REGULATOR
VOLTAGE
OK?
NO
REPAIR.
YES
PERFORM
SENSITIVITY CHECKS
ALIGNMENT
OK?
NO
REALIGN OR
REPAIR.
YES
PERFORM PAGER
DECODING CHECKS.
DECODES
PROPERLY
?
NO
REPAIR.
YES
TURN POWER
OFF.
STOP
Figure 1-29. General Troubleshooting Flowchart
June 21, 2004
1-31
GENERAL
NP88 FLEX
Troubleshooting
Paging Sensitivity Check
N
Paging sensitivity tests must be performed in a screen booth with a minimum of 80
dB attenuation. Pagers, especially FLEX pagers, lock onto the first identifiable
signal regardless of the source. If a pager under test locks onto a signal from a source
other than the signal generator it will not respond to the paging code from the
encoder. Ensure the pager is not turned on until it is secured within the booth.
Paging sensitivity is estimated by reducing the RF input signal level to the lowest
level that produces an alert tone on three successive trials.
1. Ensure the pager is turned off.
2. Enter the screen booth and turn the pager on.
3. Place the unit in the RTL-1005 Radiation Test Fixture.
4. Connect the test equipment as shown in Figure 1-30.
TEST
ENCODER
FM SIGNAL
GENERATOR
6 dB
PAD
RF INPUT
PAGER
UNDER
TEST
RADIATION
TEST FIXTURE
ACPB-931512-O
Figure 1-30. Paging Sensitivity Check
N
Shield the pager from the signal generator to protect the pager from RF spray.
5.
6.
7.
8.
1-32
Determine the paging codes (address 1, 2, 3, and 4 as applicable) and the carrier
frequency under test.
Set the test encoder for the address 1 code, FLEX, as applicable.
Set the FM signal generator to the carrier frequency of the pager, with a
relatively strong output level of about -60 dBm to ensure the unit pages.
Connect the output of the test encoder to the FM generator external modulation
input and adjust the modulation deviation to the following values.
FLEX
±4.8 kHz
June 21, 2004
NP88 FLEX
GENERAL
Troubleshooting
9.
Using the test encoder, initiate the paging code. The pager emits an interrupted
alert tone each time the paging code is initiated.
10. Reduce the RF signal level from the FM signal generator to the lowest level
that produces an alert tone on three successive tries. This level must be less
than the level specified in the applicable receiver section.
N
All specified RF signal levels are produced by the RF signal generator and measured
at the input to the RTL fixture unless otherwise indicated.
This completes the paging sensitivity check. Failure indicates a defect exists.
Making the following 10 dB rise measurement further isolates the trouble to either
the receiver or decoder circuit boards.
June 21, 2004
1-33
GENERAL
NP88 FLEX
Troubleshooting
ACPB-930353-A
Figure 1-31. 10 dB Rise Measurement
Circuit Checks
Refer to the applicable receiver section in this publication for identification of the
components and test points referenced in the following sections.
Oscillator Warp Range
The oscillator warp range is the difference between the highest and lowest IF
frequencies obtained while varying the Oscillator Trimmer Capacitor.
1. Ensure a battery with a minimum output of 1.3 volts is installed in the pager.
2. Refer to Tables 1-9 and 1-10 for lists of recommended test equipment.
3. Refer to the applicable schematic waveform and voltage information in the
appropriate supplement.
4. Ensure the pager is in self-diagnostic mode 5 (refer to "Self-Diagnostic Feature").
5. Monitor metering point M1 with a frequency counter.
6. Set the RF signal generator to the pager’s exact carrier frequency and at a
sufficient level to trigger the frequency counter.
7. Tune the Oscillator Trimmer Capacitor and note the highest and lowest IF
frequency displayed by the counter. The difference must be between 7 and 15
kHz.
Mixer Injection Voltage Measurement
N
First and second oscillator activities and injections must be observed using a
high-impedance probe.
1.
2.
1-34
Ensure a battery with a minimum output of 1.3 volts is installed in the pager.
Refer to Tables 1-9 and 1-10 for lists of recommended test equipment.
June 21, 2004
NP88 FLEX
GENERAL
Troubleshooting
3.
4.
5.
6.
Refer to the applicable schematic waveform and voltage information in the
appropriate supplement.
Ensure the pager is in self-diagnostic mode 5 (refer to "Self-Diagnostic Feature").
Turn off the RF output of the signal generator.
Monitor the collector of the First Mixer Transistor and note the maximum and
minimum dc voltage levels as the oscillator is enabled and disabled. The
maximum dc voltage occurs when the oscillator is inactive (that is, the base of
the Oscillator Transistor is grounded). The difference between these two dc
voltage levels must be between 5 and 40 mV.
Another way of expressing the mixer injection voltage measurement is mixer delta
current (ΔI). Mixer ΔI is a formulated percentage measurement representing the
change in mixer dc bias current when the oscillator is off (maximum dc voltage),
then on (minimum dc voltage). Mixer ΔI is defined by the following equation:
Mixer
ΔI = Vmax - Vmin x 100%
Vreg - Vmax
where:
• Vmax is when the oscillator is inactive.
• Vmin is when the oscillator is active.
• Vreg is the regulated voltage at TP3.
With a properly functioning mixer/tripler circuit, mixer ΔI is between 2% and 15%,
corresponding to the 5 mV and 40 mV difference reading from the previous
measurement.
If the mixer injection voltage measurement is incorrect or cannot be obtained, it
indicates that either the mixer or the oscillator is not working properly. In this case,
troubleshoot the oscillator and mixer circuits by checking the dc voltages given in
the schematic diagram and then isolating the defective component.
If the injection measurement is normal, proceed with takeover/noise level measurements.
Takeover/Noise Level Measurements
Takeover measurements are recommended for checking the RF Amplifier and mixer
circuit. The RF takeover is defined as the drop in noise level (measured at M1) when
the RF Amplifier is disabled from the receiver; for example, base of the RF Amplifier
is grounded. The mixer takeover is the drop in the noise level measured at M1 when
the mixer stage and the RF Amplifier are disabled.
The theory behind system noise figure and receiver sensitivity shows a receiver
with sufficient takeover has a noise figure that is dominated by the noise figure of
the RF Amplifier. In other words, with sufficient RF takeover, the noise of the stages
following the RF amplifier is “taken over” and the receiver noise level is as good as
the noise figure of the RF amplifier.
Receiver Noise Level
1. Ensure a battery with a minimum output of 1.3 volts is installed in the pager.
2. Refer to Tables 1-9 and 1-10 for lists of recommended test equipment.
3. Refer to the applicable schematic waveform and voltage information in the
appropriate supplement.
June 21, 2004
1-35
GENERAL
NP88 FLEX
Troubleshooting
4.
5.
6.
7.
Ensure the pager is in self-diagnostic mode 5 (refer to "Self-Diagnostic Feature").
Install the alignment back cover on the pager.
Place the unit in the RTL-1005 Radiation Test Fixture, modified with the RPX4687 Nest and Contact Flip-down Assembly.
Measure the ac voltage at M1 with no RF signal applied. The noise level reading
must be between -48 dBm and -65 dBm for a properly aligned/tuned receiver.
Takeover Measurements
Due to the very high frequencies involved at the front end of the pager, a probe with
a shunt capacitance as low as 1 pF is sometimes sufficient to detune a circuit and
cause inaccurate readings. Refer to “Troubleshooting” in the appropriate receiver
section of this manual for information about the receiver-specific test points used
in this procedure.
1. Ensure a battery with a minimum output of 1.3 volts is installed in the pager.
2. Refer to Tables 1-9 and 1-10 for lists of recommended test equipment.
3. Refer to the applicable schematic waveform and voltage information in the
appropriate supplement.
4. Ensure the pager is in self-diagnostic mode 5 (refer to "Self-Diagnostic Feature").
5. Install the alignment back cover on the pager.
6. Place the unit in the RTL-1005 Radiation Test Fixture, modified with the RPX4687 Nest and Contact Flip-down Assembly.
7. Set up the test equipment.
1-36
June 21, 2004
NP88 FLEX
GENERAL
Troubleshooting
8.
Check the RF takeover:
a. Apply 1.3 Vdc to the battery contacts.
b. Monitor M1 with ac voltmeter.
c. Tune pager according to “Alignment Procedure” in the applicable receiver
section.
d. Turn the RF signal generator off and note the noise level at M1.
e. Short the base of the RF Amplifier to ground and note the level drop. With
a properly functioning RF amplifier, the noise drops 5 to 9 dB, which
indicates the proper amount of gain in the stage.
Excessive RF takeover indicates the RF Amplifier is noisy or regenerative. Low
RF takeover does not always indicate the RF Amplifier is defective. Either too
much or too little gain in any other stage can cause a loss of RF takeover.
9. Check mixer takeover:
a. Ensure the input of the RF Amplifier is still shorted to ground.
b. Short the base of the First Mixer Transistor to ground. The noise level at
M1 must drop 3 to 5 dB. If the noise level drops less than 2 dB, recheck
mixer injection frequency to produce a reference reading of 40 dBm (on
HP400 FL ac voltmeter) at M1.
10. Check system bandwidth:
a. Use the same test setup as in “10 dB Rise Measurement.”
b. Adjust the RF generator level to the pager’s exact carrier frequency to
produce a reference reading of 6 dB above the receiver noise level at M1.
c. Increase the RF signal generator frequency to produce a 3 dB drop in the
level at M1. The signal generator frequency must be greater than or equal
to 5 kHz above the carrier frequency.
d. Perform the same measurement below the carrier frequency. The signal
generator frequency must be greater than or equal to 5 kHz below the
carrier frequency. The total bandwidth must not exceed 15 kHz; refer to
Figure 1-32.
.
-40 dB
-43 dB
3 dB
5kHz
MIN
5kHz
MIN
18kHz
MAX
OUTPUT
LEVEL
AT M1
f1
fc
f2
FREQUENCY
Figure 1-32. Bandwidth Measurement Detail
e.
Handle differences as follows:
• If the difference between fc and f1 or f2 is less than 5 kHz, or the total
bandwidth is less than 10 kHz or more than 18 kHz, connect an ac
voltmeter to the receiver-specific test point and repeat the bandwidth
measurement.
June 21, 2004
1-37
GENERAL
NP88 FLEX
Troubleshooting
• If the bandwidth is still outside the prescribed limits, replace the IF
Crystal Filter.
• If the bandwidth is within the prescribed limits, replace the Ceramic
IF Filter (Discovery I receivers).
• If testing a Discovery II receiver or if the bandwidth is still outside
the prescribed limits, replace the Backend Demodulation IC on the
receiver circuit board.
11. Check data filter cutoff frequency:
a. Connect the output of the function generator (set for a 50 Hz sinewave,
1 V peak) to the external modulation input of the signal generator.
b. Set the generator to the pager’s carrier frequency with the following
deviation.
FLEX
±4.8 kHz
c. Measure the output at the receiver-specific test point on the Backend
Demodulation IC with a 1:1 probe connected to the ac voltmeter.
d. Adjust the generator level until the reading on the ac voltmeter is 6 dB
above the noise level output.
e. Slowly increase the frequency of the function generator until the reading
on the ac voltmeter decreases 3 dB. The frequency at the function generator must be within the following applicable range:
FLEX
2400 Hz ±20%, 6400 bps
Backend Filter Measurement
1.
2.
3.
Ensure a battery with a minimum output of 1.3 volts is installed in the pager.
Refer to Tables 1-9 and 1-10 for lists of recommended test equipment.
Refer to the applicable schematic waveform and voltage information in the
appropriate supplement.
4. Ensure the pager is in self-diagnostic mode 5 (refer to "Self-Diagnostic Feature").
5. Install the alignment back cover on the pager.
6. Place the unit in the RTL-1005 Radiation Test Fixture, modified with the RPX4687 Nest and Contact Flip-down Assembly.
7. Set up the test equipment.
8. Set the RF generator to the customer frequency:
a. Apply an unmodulated signal.
b. Adjust its amplitude so the reading is 5 dB below the full comprehension
level.
9. Check the frequency above and below the customer frequency:
a. Offset the frequency 4.5 kHz above the customer frequency. Note the
reading (VdB1).
b. Offset the frequency 4.5 kHz below the customer frequency. Note the
reading (VdB2).
c. Reposition the RF generator frequency to the customer frequency.
10. Determine if the backend is properly aligned (Is | VdB1 - VdB2 | <=1.5dB)
1-38
June 21, 2004
NP88 FLEX
GENERAL
Troubleshooting
a. If yes, the backend is properly aligned; no further action is needed.
b. If no, realign the backend.
11. Replace and realign the Backend Demodulator IC if the problem persists.
June 21, 2004
1-39
DECODER
NP88 FLEX
DECODER
Contents
Contents
Model Numbers . . . . . . . . . . . . . . . . . . . . . . . . . . . . . . . . . . . . . . . . . . . . . . . . . . . . . . . . . . . . . . . . . . . . . . . . . .2-1
Related Publications . . . . . . . . . . . . . . . . . . . . . . . . . . . . . . . . . . . . . . . . . . . . . . . . . . . . . . . . . . . . . . . . . . . . . . . . . 2-1
Operating Modes . . . . . . . . . . . . . . . . . . . . . . . . . . . . . . . . . . . . . . . . . . . . . . . . . . . . . . . . . . . . . . . . . . . . . . . . .2-2
Power-up Mode . . . . . . . . . . . . . . . . . . . . . . . . . . . . . . . . . . . . . . . . . . . . . . . . . . . . . . . . . . . . . . . . . . . . . . . . . . . . . 2-2
Page Search Mode . . . . . . . . . . . . . . . . . . . . . . . . . . . . . . . . . . . . . . . . . . . . . . . . . . . . . . . . . . . . . . . . . . . . . . . . . . . 2-2
Page Alert/Display Mode . . . . . . . . . . . . . . . . . . . . . . . . . . . . . . . . . . . . . . . . . . . . . . . . . . . . . . . . . . . . . . . . . . . . . 2-3
Circuit Description . . . . . . . . . . . . . . . . . . . . . . . . . . . . . . . . . . . . . . . . . . . . . . . . . . . . . . . . . . . . . . . . . . . . . . .2-4
Power . . . . . . . . . . . . . . . . . . . . . . . . . . . . . . . . . . . . . . . . . . . . . . . . . . . . . . . . . . . . . . . . . . . . . . . . . . . . . . . . . . . . . 2-4
Support Module . . . . . . . . . . . . . . . . . . . . . . . . . . . . . . . . . . . . . . . . . . . . . . . . . . . . . . . . . . . . . . . . . . . . . . . . . . . . . 2-4
Microcomputer . . . . . . . . . . . . . . . . . . . . . . . . . . . . . . . . . . . . . . . . . . . . . . . . . . . . . . . . . . . . . . . . . . . . . . . . . . . . . . 2-4
LCD . . . . . . . . . . . . . . . . . . . . . . . . . . . . . . . . . . . . . . . . . . . . . . . . . . . . . . . . . . . . . . . . . . . . . . . . . . . . . . . . . . . . . . 2-5
Alert Circuitry . . . . . . . . . . . . . . . . . . . . . . . . . . . . . . . . . . . . . . . . . . . . . . . . . . . . . . . . . . . . . . . . . . . . . . . . . . . . . . 2-5
Troubleshooting . . . . . . . . . . . . . . . . . . . . . . . . . . . . . . . . . . . . . . . . . . . . . . . . . . . . . . . . . . . . . . . . . . . . . . . . .2-6
FLEX Pagers . . . . . . . . . . . . . . . . . . . . . . . . . . . . . . . . . . . . . . . . . . . . . . . . . . . . . . . . . . . . . . . . . .. . . . . . .. . . . . . 2-7
NP88 Encore!, PRO Encore!, NP88 FLX, FLEX, and VIBRA-Page are trademarks or registered trademarks of Unication, Inc.
IBM is a trademark or registered trademark of International Business Machine Corporation.
Tektronix is a trademark or registered trademark of Tektronix, Inc.
June 21,2004
2-i
NP88 FLEX
DECODER
Model Numbers
Model Numbers
Refer to the applicable receiver section for a list of model numbers, their descriptions, and contents.
Related Publications
Decoder Supplement - NYN4858,
NYN6473, NYN6665
6881104B18
Decoder Supplement -NYN4063
6881015B81
Refer to the GENERAL section and applicable receiver section of this manual
for additional publications.
June 21,2004
2-1
DECODER
NP88 FLEX
Operating Modes
Operating Modes
There are three basic modes of operation of the NP88 FLEX decoder:
power-up, page search and page alert/display.
Power-up Mode
NP88 FLEX decoder operates in one of two power-up modes, depending
on the condition (at or below minimum voltage or good) of the primary battery. If
the primary battery is not present, the pager does not power up.
Primary Battery At or Below Minimum Voltage
If a primary battery is inserted in a pager with the VCC level at or below the
minimum operating voltage 2.8 Vdc , the linear support module issues
a reset to the µC and the display module, which in effect resets the entire decoder.
The linear support module boosts the primary battery voltage to generate the
3.1 Vdc VCC supply for the decoder, and the µC executes its initialization code. With
the peripheral circuits initialized, a power-up alert is issued and the pager proceeds
to enter the page search mode. The primary battery voltage must exceed 1.15 Vdc
for the pager to power-up in this mode.
Good Primary Battery
A normal power-up occurs when a battery with a minimum output of 1.3 volts is in
the pager at the time the pager is turned on. When the Read button is pressed, the
pager proceeds with a power-up alert and enters the page search mode.
Page Search Mode
Page search is the main operating mode of NP88 FLEX. Page search
mode operation is divided into battery-saver and data-decoding intervals. The pager
software determines when the pager shifts from battery-saver mode to datadecoding mode and back again through the use of one of the µC internal timers.
Page search operation FLEX pagers as follows:
Battery-saver Interval
FLEX pagers utilize battery-saver intervals. During battery-saver
intervals, the µC generally is in a low-speed, low-power mode and the decoder is
operating at a clock frequency of 38.4 kHz for approximately 80% of the time (lowspeed clock rate).
When the pager is not in a battery-saver interval, the µC internal frequency
synthesizer boosts the external crystal frequency of 38.4 kHz to a default frequency
of 4.19MHz.
2-2
June21,2004
NP88 FLEX
DECODER
Operating Modes
Data-decoding Interval - FLEX Pager
When the pager powers up, the receiver is turned on, and the decoder begins to
search for a valid FLEX frame. When a valid FLEX frame is detected, the pager
performs the following sequence of operations:
a. synchronizes to the channel
b. searches for the pager’s FLEX address
c. begins to operate at the desired collapse value
d. changes to the page alert/display mode
If no frame is detected within the programmed time (1 to 4 minutes), the pager
enters a baud detect mode to conserve battery power. While in baud detect mode,
the pager searches every 1.6 seconds to determine if there is any FLEX information
on the channel.
If no address is detected after channel synchronization, the pager shuts off the
receiver and decoder circuits and enters a lower current consumption mode and
remains in that mode until the next FLEX frame is due on the channel.
Page Alert/Display Mode
Either an incoming message or a button press changes operating modes from page
search mode to page alert/display mode.
Button Press
If a button is pressed, an interrupt is generated in the microcomputer (µC) and the
software determines which button was pressed and the correct response. The µC
turns on the voltage multiplier that is internal to the LCD module causing the
respective LCD pixels pattern to be visible.
Incoming Message
If the display mode is entered due to an incoming message, the page is decoded and
the µC generates signals to the Support Module to produce an alert pattern
The µC writes the message data to the LCD driver and turns on the display. Certain
messages such as the time and date are stored within the µC itself.
The Support Module drives the Transducer to produce an audible2731 Hz tone
pattern (tone alert) which lasts for a pre-selected period of time. The tone pattern
is controlled by the µC.
The tone alert can be stopped before the programmed time has elapsed by pressing
any button. The µC is programmed to sense this and halt the signals to the
Transducer. Pressing the ON/READ/SELECT (W) button after silencing the alert
causes the message to be displayed. The button information is decoded by the
Support Module and the information is transferred to the µC for analysis.
Pagers operating in the silent mode will not produce a tone alert. Instead, when a
page is received, only the Vibrator and Alert Lamp are activated. A completely silent
pager option is also available.
June 21,2004
2-3
DECODER
NP88 FLEX
Circuit Description
Circuit Description
The decoder section consists of five functional blocks:
• Power Circuits
• Support Module
• Microcomputer (µC)
• LCD
• Alert Circuits
Refer to “ Theory of Operation” in the GENERAL section for a functional block
diagram.
Power
The negative side of the battery is connected to circuit common. The positive voltage
from the battery is applied to the Support Module where it is converted to 3 V
operating voltage. The Support Module supplies the 3 Vdc to the µC and distributes the operating voltage throughout the decoder and receiver circuitry.
The memory backup battery (BAT 1) is used to preserve the real-time clock
information and the contents of the message memory during primary battery
changes. If the backup battery is fully charged, all memory and time data is retained
in the pager for at least five minutes after the primary battery is removed. A good
primary battery must be installed for at least 24 hours to fully recharge the backup
battery. The pager does not power up without a primary battery. The circuitry
present in the pager prevents loss of memory provided the pager is off at the time
the primary battery is removed.
Support Module
The Support Module provides all voltage management, signal acquisition, and
decoder support functions such as alert generation, keypad decoding, and code plug
retention. The Support Module consists of:
• Voltage management and support circuits that provide the main system voltages for the decoder circuits.
• Voltage comparator circuits to detect the voltage of the primary battery and
provide feedback to the µC.
• Various signal acquisition circuits to decode and format the incoming audio signal from the receiver and buffer it for transfer to the µC.
• Clock Oscillator and support circuits to provide the main system clock of
38.4 kHz to the decoder and receiver.
• A keypad encoder to debounce the user-interface buttons.
• An alert generator to provide the main driving waveform to the Transducer.
• A protected EEPROM array containing codeplug information.
Microcomputer
The Support Module initializes execution of the microcomputer (µC) program by
generating a reset pulse each time power is supplied to the pager.The µC decodes
the demodulated data from the receiver board, and sends the appropriate Transducer signal and message for the LCD to display.
2-4
June 21,2004
NP88 FLEX
DECODER
Circuit Description
The µC controls all major functions of the decoder, including processing of receiver
data passing through the Support Module and user interface functions via the alert
circuits and LCD. The µC module consists of:
• Read-Only-Memory (ROM) to store the executable program code.
• Random Access Memory (RAM) to store all user messages and other key processing data.
• A display driver to control the LCD.
• Ports to enable serial communications with on-board circuitry and external
devices (for example, the programming interface).
LCD
Data messages are viewed on a high contrast, liquid crystal display (LCD) module
affixed to the decoder board via a highly reliable heat seat connector (HSC). The
LCD is controlled via 28 lines from the LCD driver in the µC.
Alert Circuitry
The alert circuitry consists of a Transducer, a Vibrator, and incandescent LED.
These circuits provide the audio and visual feedback to the user.
The Transducer and Transducer Drive Circuit provide the audio alerts and are
driven by the Support Module.
The Vibrator is mounted in the back housing and is connected to the Vibrator Drive
Circuit via two spring contacts. The Vibrator provides alerts when in the silent
mode of operation. The Vibrator is controlled by the µC.
The Alert LED and LED Drive Circuit provide a visual alert out of phase with
the Transducer alert. The Alert LED is controlled by the µC. The Alert LED also
serves as the display backlight when viewing the display under dark lighting
conditions.
June 21,2004
2-5
DECODER
NP88 FLEX
Troubleshooting
Troubleshooting
If the pager failed the paging sensitivity check but passed the 10 dB rise measurement, and the receiver circuits have the required data output level, the fault is
probably in the decoder circuits.
The following table (Table 2-1) provides a quick, preliminary check of possible
problem areas. However, refer to the troubleshooting charts in the following
paragraphs and the diagnostic waveforms on the schematic diagram in the appropriate supplement for a complete guide to troubleshooting the decoder board.
Table 2-1. Preliminary Decoder Troubleshooting
Malfunction
2-6
Probable Cause
Pager does not turn on
1. Battery voltage low or incorrect polarity
2. VCC voltage incorrect
No display or partially active display
1. Broken LCD
2. Damaged display contacts
No page/inactive data port
1. Receiver section
2. Receiver board socket
June 21,2004
NP88 FLEX
DECODER
Troubleshooting
FLEX Pagers
No Power-Up
1.
2.
Ensure battery contacts are good.
Check Support Module pin 40 for a high to ensure the Support Module is not
resetting the £gC.
NO POWER-UP
FAIL
BATTERY VOLTAGE
REPLACE BATTERY
FAIL
OK
VOLTAGE AT SUPPORT
MODULE U5Pin3 ≥1.30V
REPAIR BATTERY
CONNECTIONS TO
SUPPORT MODULE PIN 49
FAIL
REPLACE DECODER
BOARD
OK
CHECK VOLTAGE AT
TSP3 = 3V
OK
CHECK WAVEFORM AT
SUPPORT MODULE PIN 2
FAIL
FAIL
CHECK CLOCK
OSCILLATOR
CHECK DECODER BOARD
ADN SOLDER JOINTS
OK
FAIL
REPLACE
SUPPORT MODULE
FAIL
REPLACE OSCILLATOR
SUPPORT CIRCUIT
REPLACE DECODER
BOARD
FAIL
REPLACE
SUPPORT MODULE
Figure 2-7. No Power-Up Troubleshooting Flowchart, FLEX Decoder
June 21,2004
2-7
DECODER
NP88 FLEX
Troubleshooting
No Display or Bad Display on Power-Up
Check the solder connection between the circuit board and the Heat Seal Connector
of the LCD.
NO DISPLAY ON
POWER-UP
CHECK SUPPORT MODULE
U5 PIN 2 OR TSP3 FOR 3V
FAIL
REPLACE
SUPPORT MODULE
OK
CHECK SIGNALS AT µC
PINS 24-27,2
24-27,29-52
FAIL
REPLACE µC
OK
REPLACE HEAT SEAL
CONNECTOR/LCD
ASSEMBLY
Figure 2-8. No Display Troubleshooting Flowchart,
FLEX Decoder
2-8
June 21,2004
NP88 FLEX
DECODER
Troubleshooting
No Audible Alert
Ensure the following before initiating this troubleshooting procedure:
a. Verify the pager is in the audio mode and not in the silent alert mode
(check for the speaker icon).
b. Check the options set with the Pager Programming Software to ensure
the “Completely Silent” pager option is not set.
c. Verify the transducer contacts are okay.
NO AUDIBLE ALERT
CHECK WAVEFORM AT
U1 PIN 58
FAIL
REPLACE SUPPORT MODULE
AND RE-TEST
FAIL
OK
CHECK SIGNAL AT BU1
= 1.3V P-P AT 2731Hz
FAIL
REPLACE Q2, R11
AND RE-TEST
FAIL
OK
REPLACE BU1
FAIL
REPLACE DECODER
BOARD
Figure 2-9. No Audible Alert Troubleshooting Flowchart,
FLEX Decoder
June 21,2004
2-9
DECODER
NP88 FLEX
Troubleshooting
No Vibrator Alert
Ensure the following before initiating this troubleshooting procedure:
a. Verify the pager is in silent mode.
b. Check the options set with the Pager Programming Software to ensure
vibrator alerts are enabled and the “Completely Silent” pager option is not
set.
c. Verify that there is no flux or other residue on either the circuit board or
vibrator contacts.
NO VIBRATOR ALERT
APPLY 1.3 V ACROSS
THE VIBRATOR
TERMINALS TO CHECK
SPRING CONTACTS AND
VIBRATOR MOTOR
FAIL
REPLACE SPRING
CONTACTS, MOTOR
OK
CHECK SIGNAL AT µC
PIN 18
FAIL
OK
FAIL
REPLACE Q1
R5
REPLACE
DECODER BOARD
Figure 2-10. No Vibrator Alert Troubleshooting
Flowchart, FLEX Decoder
2-10
June 21,2004
NP88 FLEX
DECODER
Troubleshooting
No Backlighting
Ensure the following before initiating this troubleshooting procedure:
a. Verify the low cell indicator is not activated. If it is, change the primary
battery.
b. Verify the backlighting is activated correctly by pressing any of the
buttons.
NO BACKLIGHTING
CHECK SIGNAL AT µC
PIN 57
FAIL
OK
CHECK SIGNAL
AT D5
FAIL
REPLACE LED
DRIVE CIRCUIT
FAIL
OK
REPLACE DECODER
BOARD
Figure 2-11. No Backlighting Troubleshooting Flowchart, FLEX Decoder
June 21,2004
2-11
DECODER
NP88 FLEX
Troubleshooting
Good Power-up Alert, but DOES NOT Page
1.
2.
Ensure receiver connection is clean and free of debris.
For waveform checks:
a. Place the pager in receiver diagnostic mode.
b. Connect the decoder to a known-good receiver with a receiver/decoder
interconnect cable.
DOES NOT PAGE
CHECK CODEPLUG AND ENCODER
HAVE PROPER CODE
AND DATA POLARITY.
SEE NOTE.
FAIL
REPROGRAM THE CODE
PLUG OR ENCODER
OK
REPLACE SUPPORT
MODULE
OK
REPLACE DECODER
BOARD
NOTE: THIS PAGER DOES NOT
REQUIRE DATA INVERSION, BUT
CAN BE CONFIGURED FOR
INVERSION DUE TO TERMINAL
REQUIREMENTS.
Figure 2-12. FLEX Decoder Troubleshooting
Flowchart - Does Not Page
2-12
June 21,2004
RECEIVER
NP88 FLEX
578 and 584
6881020B80
3VHF RECEIVER
RECEIVER
Contents
3VHF RECEIVER
Contents
Specifications . . . . . . . . . . . . . . . . . . . . . . . . . . . . . . . . . . . . . . . . . . . . . . . . . . . . . . . . . . . . . . . . . . . . . . . . . . . . . . . . . . . . . 3-1
Circuit Description . . . . . . . . . . . . . . . . . . . . . . . . . . . . . . . . . . . . . . . . . . . . . . . . . . . . . . . . . . . . . . . . . . . . . . . . . . . . . . . . . 3-2
Antenna and RF Amplifier . . . . . . . . . . . . . . . . . . . . . . . . . . . . . . . . .. . . . . . . . . . . . . . . . . . . . . . . . . . . . . . . . . . . . 3-2
Mixer Circuit . . . . . . . . . . . . . . . . . . . . . . . . . . . . . . . . . . . . . . . . . . . . . . . . . . . .. . . . . . . . . . . . . . . . . . . . . . . . . 3-3
Tuning . . . . . . . . . . . . . . . . . . . . . . . . . . . . . . . . . . . . . . . . . . . . .. . . . . . . . . . . . . . . . . . . . . . . . . . . . . . . . . . . . . 3-4
O s c i l l a t o r F r e q u e n c i e s . . . . . . . . . . . . . . . . . . . . . . . .. . . . . . . . . . . . . . . . . . . . . . . . . . . . . . . . . . . . . . . . . . . 3-5
June 21, 2004
3-i
578 and 584
6881020B80
3VHF RECEIVER
3VHF RECEIVER
NP88 FLEX
RECEIVER
Specifications
Specifications
FLEX
Frequency Stability
±2.5 PPM from -10°C to +50°C
(+25°C ref.)
EIA Spurious
40 dB below carrier
EIA Image Rejection
!!
40 dB below carrier
SPECIFICATIONS SUBJECT TO CHANGE WITHOUT NOTICE
June 21, 2004
3-1
RECEIVER
NP88 FLEX
Circuit Description
The following information describes the circuitry specific to the NP88 Flex 900MHz pager with a
synthesizer receiver board. RF circuit structure of NP88 Flex 900MHz is as RF diagram. RF signal is
received by antenna circuit, then get into RF-amplifier circuit which is low noise and high gain, signal
is amplified about 20dB, afterwards pass through band pass filter to filter out noise. After that, to mix
oscillator signal(L01) which characteristic is excellent, it will filter out noise and send IF1 signal to IF IC,
then restore receiving data to connect DECODER circuit.
Antenna Circuit
NP88 Flex 900MHz uses PCB Antenna, add matching circuit VC004, C4 … etc, it makes
amplifier circuit can work in low noise condition, and resonate to receiving frequency.
RF-amplifier & SAW Filter
• RF-amplifier CircuitΚIt amplifies signal which is received by antenna circuit on needed strength in best
noise figure. RF-amplifier Circuit of NP88 Flex 900MHz uses series connection which composed of Q101
and Q102 to amplify structure. The structure can gain the circuit to the max, and improve sensitivity.
• SAW FilterΚIt filter out all signal except carrier, makes receiver to have good sensitivity and image
rejection. Circuit components for the part includes bias with R1, R3, C6 and C412 load and SAW
filter circuit with L1, C10, VC003, L105, F101, L107 will couple RF signal to mixer circuit.
Oscillator Circuit
Feature of NP88 Flex 900MHz receiving circuit is stable and frequency can be changed any time. It uses feedback
and temperature compensation circuit which composed of PLL IC (U2), low-pass filter circuit, Colpitts
oscillators circuit and frequency multiplier circuit to resonate stable oscillator frequency.
• PLL IC (U2) CircuitΚPLL IC is a integrated circuit which handle frequency compound specially,
DECODER board provides data of oscillator frequency to PIN11 (CLK), PIN12 (Data), PIN13 (LE) of PLL
IC ,PIN1 and PIN2 of PLL IC connect to 12.8 MHz Crystal oscillator (X1, C36, C37, VC5) for offering
sequence. PIN5 of PLL IC output to low-pass filter which composed of C731, R732, C733, R700, C735, R741,
C742 and filter out high frequency noise for offering a stable voltage to VCO Oscillator circuit.
• VCO Oscillator CircuitΚThe circuit changes D406 capacitance through voltage which provide by LPF,
resonate programming frequency. Components are composed of D406, C405, C404, VC404, C403, C402, Q401,
R406, C417, C413, C414, R405, C415, L401 provide bias circuit C416 provides a feed back circuit to PLL IC.
• Frequency Multiplier CircuitΚOscillator signal is multiplied by Q501, then take out triple multiplier through
L501, C501. It couples to Buffer by C520
.
3-2
June 21, 2004
NP88 FLEX
RECEIVER
Mixer Circuit
Mixer is to mix RF signal (Fr) and first local oscillator signal (Flo), and it will bring the first intermediate
frequency which is lower frequency (45MHz), the circuit composed of Q3, C17, R5, L3, C13,
R4, R6 is bias. L3, C13 are Tank circuit. Q3 mixes Fr and Flo, then take out 45MHz first intermediate signal (IF1) by L3 and C13. IF1 = Fr – Flo. IF1 signal will couple to Crystal filter by through F1.
IF IC CircuitΚIF IC is an integrated circuit for dealing with intermediate frequency only. The function as
following.
• Second Local Oscillator(LO2)Κ˨̆˸ʳˇˇˁˈˇˈˠ˛̍ʳ˖̅̌̆̇˴˿.
• MixerΚMixer of the IC is double balance type, the first intermediate signal which is 45MHz input
through PIN24, after correct circuit by matching, IF1 will output with 455KHz second intermediate
frequency, which is produced by local oscillating signal mixer. And it will output through PIN3.
• LimiterΚSignal of IF2(455KHz) output from PIN3, it is usually received into ceramic filter for filtering out
noise which is out the channel, signal will back to inner IC through PIN5, it is amplified about 100dB and
limited the voltage amplitude for dealing with detector.
• DetectorΚIt is composed of quadrature type detector. Discriminator connects F3 to PIN8 in IC and R31.
The phase of the modulated FSK signal is shifted.
• Baud Rate FilterΚBefore data outputs to Decoder, for avoiding interference of noise to cause incorrect
message rate too high. Noise of data which is detected should be filter out. Circuit is composed of OP
amplifier which is inner IC, and match by C321, C322, C323.It will become a Butterworth
low-pass filter. Signal will be input from PIN9, 10, 11, then the internal part amplify to PIN15, 16, take out
data signal of NRZ through FSK comparing circuit from PIN18, 19, finaly connect PIN3 of J1.
• Regulating and stabling circuitΚFor avoiding characteristic abnormal this is caused by changing of RF
circuit. PIN22 of IFIC offers 1.0 regulating and stabling power. The power offers NP88 Flex 900MHzz bias
of the first local oscillator, mixer, PLL circuit and VCO circuit.
Power Saving Circuit
Power saving control is a control signal EC which sent by PIN17 of CONNECTOR J1.Turn it on when it
connect to IFIC PIN17 ”H”, RF circuit will start to receive message right away. Turn it off when it is “L”,
and RF circuit won’t work. At standby mode, it can save power.
June 21, 2004
3-3
RECEIVER
NP88 FLEX
Tuning
Synthesized receivers are tuned to the middle of the bandsplit at the factory for optimal performance across
the band. To ensure optimal performance is maintained,execute the tuning download from the PPS to put the
pager in the middle of the band. This frequency is called the “ tuning frequency” and is different for every
band split.
Alignment Procedure
The NP88 Flex 900MHz pagers is aligned at the factory to provide peak performance over a long
period of time. If alignment is ever required, use the following procedure
1. Turn on the RF circuit: To turn on the RF circuit, short the EC by soldering a wire to both pads.
2. Ensure a battery with a minimum output of 1.5 volts is installed in the pager.
3. Connect the test equipment.
4. Align the pager according to the alignment procedure described below.
Signal generator setup
Frequency = Center frequency of each band
Amplitude signal output = -30dbm
FM encoder = 4.8KHz deviation
!
Tuning VCO voltage!
Measure voltage of TP12 by Multi-meter, rotate VC404 by ceramic tuning tool to make the voltage measured
is 1.2V.
Tuning center frequency deviation
Connect probe of scope with frequency counter, put probe on TP3, adjust SG to center frequency and out put
signal from normal Load antenna, then increase signal until 455KHz value is shown on frequency counter,
indication of GATE on frequency counter will be glitter continuously. Adjust VC5, make frequency counter
value is 455KHz +/-50Hz.
Tuning RF-amplifier
Connect probe of scope with frequency counter, put probe on TP3, adjust SG to center frequency and out put
signal from normal Load antenna, then increase signal until 455KHz value is shown on frequency counter,
indication of GATE on frequency counter will be glitter continuously. Adjust VC003, make frequency counter
value 455KHz has maximal amplitude.
ʳ
Tuning Antenna
ʳ
Connect probe of scope with frequency counter, put probe on TP3, adjust SG to center frequency and out put
signal from normal Load antenna, then increase signal until 455KHz value is shown on frequency counter,
indication of GATE on frequency counter will be glitter continuously. Adjust VC004, make frequency counter
value 455KHz has maximal amplitude.
3-4
June 21, 2004
NP88 FLEX
RECEIVER
Oscillator Frequencies
Oscillator Frequencies- FLEX Pager
Table 3-1. First and Second Oscillator Frequencies for FLEX 900MHz
CARRIER FREQ. (MHz)
:3:/1111.:43/1111
1ST OSC. FREQ. RANGE
(MHz)
2ND OSC. FREQ.
(MHz)
332.332/86
!!55/656
fc = 4fo + 45MHz (929.0000-932.000 MHz)
June 21, 2004
3-5