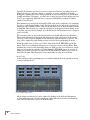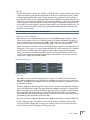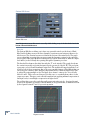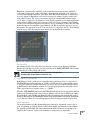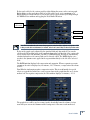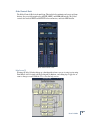
1
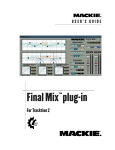
USER’S GUIDE
Final Mix VST
™
For Tracktion
Plug-in for Software Audio Recording Applications
By Acuma Labs
Mackie Software License
Please read this license carefully before using the accompanying Software. By downloading and using the
Software, you are agreeing to be bound by the terms of this license. Software as used herein means all computer
code (both source and object) including, but not limited to, all interfaces, navigational devices, search engines,
databases, menus, menu structures or arrangements, drivers, development tools, icons, operational instructions,
scripts, commands, and syntax, whether created, or licensed from third parties by LOUD Technologies Inc.,
including all associated documentation.
1. Software License. Any Software whether on disk, in read-only memory, or on any other media, and related
documents are licensed to you by LOUD Technologies Inc. You own the disk(s) on which the Software is recorded but LOUD Technologies and/or LOUD Technologies’ Licensor(s) retain all rights, title, and interest to the
Software and related documentation. This License allows you to use the Software on a single computer and make
one copy of the Software in machine-readable form for backup purposes only. You must reproduce on such copy
LOUD Technologies’ copyright notice and any other proprietary legend on the original copy of the Software.
2. Restrictions on Software Use. The Software contains copyrighted material, trade secrets and other proprietary material and in order to protect them you may not decompile, reverse engineer, disassemble or otherwise
reduce the Software to human-perceivable form, or in any way analyze or utilize in a manner inconsistent with
this license, or allow a third party to do so. You may not modify, network, rent, lease, loan, distribute, create
derivative works, or use the Software to create a compilation based upon the Software in whole or in part. You
may not electronically transmit the Software from one computer to another over a network or other means of
transmission.
3. Support. You acknowledge and agree that LOUD Technologies may not offer any technical support in the use
of the Software.
4. Termination. This License is effective until terminated. You may terminate this License at any time by destroying the Software and related documentation and all copies thereof. This License will terminate immediately
without notice from LOUD Technologies if you fail to comply with any provisions of this License. Upon termination you must destroy the Software and related documentation and all copies thereof.
5. Export Law Assurances. You agree and certify that neither the Software nor any other technical data received from LOUD Technologies, nor the direct product thereof, will be exported outside the United States except
as authorized and as permitted by the laws and regulations of the United States and with LOUD Technologies’
express permission.
6. Government End Users. If you are acquiring the Software on behalf of any unit or agency of the United States
Government, the following provisions apply. The Government agrees:
(i) if the Software is supplied to the Department of Defense (DOD), the Software is classified as “Commercial
Computer Software” and the Government is acquiring only “restricted rights” in the Software and its documentation as that term is defined in Clause 252.227-701(c)(1) of the DFARS; and
(ii) if the Software is supplied to any unit or agency of the United States Government other than DOD, the
Government’s rights in the Software and its documentation will be defined in Clause 52.227-19(c)(2) of the FAR
or, in the case of NASA, in clause 18-52.227-86(d) of the NASA supplement to the FAR.
7. Limited Warranty on Software Media (if provided on disks). LOUD Technologies Inc. warrants the disks on
which the Software is recorded to be free from defects in materials and workmanship under normal use for a period of ninety (90) days from the date of purchase as evidenced by a copy of the purchase receipt. LOUD Technologies’ entire liability and your exclusive remedy will be the replacement of the defective disk when it is returned
postage prepaid to LOUD Technologies at the address below or a Mackie authorized representative with a copy
of the purchase receipt. LOUD Technologies will have no responsibility to replace a disk damaged by accident,
abuse or misapplication. THIS WARRANTY SPECIFICALLY EXCLUDES ANY OTHER WARRANTY RELATED
TO SOFTWARE MEDIA, INCLUDING, BUT NOT LIMITED TO, ANY IMPLIED WARRANTIES ON THE DISKS,
SUCH AS THE IMPLIED WARRANTIES OF MERCHANTABILITY OR FITNESS FOR A PARTICULAR PURPOSE OR USE. THIS WARRANTY GIVES YOU SPECIFIC LEGAL RIGHTS, AND YOU MAY ALSO HAVE OTHER
RIGHTS, WHICH VARY FROM STATE TO STATE AND FROM COUNTRY TO COUNTRY.
2
User’s Guide
8. Disclaimer of Warranty on Software. You expressly acknowledge and agree that use of the Software is at
your sole risk. The Software and related documentation are provided “AS IS” and without warranty of any kind.
LOUD TECHNOLOGIES EXPRESSLY DISCLAIMS ALL WARRANTIES, EXPRESS OR IMPLIED, INCLUDING,
BUT NOT LIMITED TO, THE IMPLIED WARRANTIES OF MERCHANTABILITY AND FITNESS FOR A PARTICULAR PURPOSE OR USE. LOUD TECHNOLOGIES DOES NOT WARRANT THAT THE FUNCTIONS CONTAINED
IN THE SOFTWARE WILL MEET YOUR REQUIREMENTS, OR THAT THE OPERATION OF THE SOFTWARE
WILL BE UNINTERRUPTED OR ERROR-FREE, OR THAT DEFECTS IN THE SOFTWARE WILL BE CORRECTED. FURTHERMORE, LOUD TECHNOLOGIES DOES NOT WARRANT OR MAKE ANY REPRESENTATIONS
REGARDING THE USE OR THE RESULTS OF THE USE OF THE SOFTWARE OR RELATED DOCUMENTATION
IN TERMS OF THEIR CORRECTNESS, ACCURACY, RELIABILITY, OR OTHERWISE. NO ORAL OR WRITTEN
INFORMATION OR ADVICE GIVEN BY LOUD TECHNOLOGIES OR A MACKIE AUTHORIZED REPRESENTATIVE SHALL CREATE A WARRANTY OR IN ANY WAY INCREASE THE SCOPE OF THIS WARRANTY. SHOULD
THE SOFTWARE PROVE DEFECTIVE, YOU (AND NOT LOUD TECHNOLOGIES OR ANY MACKIE AUTHORIZED REPRESENTATIVE) ASSUME THE ENTIRE COST OF ALL NECESSARY SERVICING, REPAIR OR CORRECTION. SOME STATES DO NOT ALLOW THE EXCLUSION OF IMPLIED WARRANTIES, SO THE ABOVE
EXCLUSION MAY NOT APPLY TO YOU.
9. Limitation of Liability. UNDER NO CIRCUMSTANCES INCLUDING NEGLIGENCE, SHALL LOUD TECHNOLOGIES BE LIABLE FOR ANY INCIDENTAL, SPECIAL OR CONSEQUENTIAL DAMAGES INCLUDING, BUT NOT
LIMITED TO, LOST PROFITS OR EARNINGS, DAMAGE TO PROPERTY OR PERSON, OR ATTORNEYS’ FEES
THAT RESULT FROM THE USE OR INABILITY TO USE THE SOFTWARE OR RELATED DOCUMENTATION,
EVEN IF LOUD TECHNOLOGIES OR A MACKIE AUTHORIZED REPRESENTATIVE HAS BEEN ADVISED OF
THE POSSIBILITY OF SUCH DAMAGES. SOME STATES DO NOT ALLOW THE LIMITATION OR EXCLUSION
OF LIABILITY FOR INCIDENTAL OR CONSEQUENTIAL DAMAGES SO THE ABOVE LIMITATION OR EXCLUSION MAY NOT APPLY TO YOU. IN NO EVENT SHALL LOUD TECHNOLOGIES’ TOTAL LIABILITY TO YOU
FOR ALL DAMAGES, LOSSES, AND CAUSES OF ACTION (WHETHER IN CONTACT, TORT (INCLUDING NEGLIGENCE) OR OTHERWISE) EXCEED THE AMOUNT PAID BY YOU FOR THE SOFTWARE.
10. Controlling Law and Severability. This License shall be governed by and construed in accordance with the
laws of the United States and the State of Washington, as applied to agreements entered into and to be performed
entirely within Washington between Washington residents. If for any reason a court of competent jurisdiction
finds any provision of this License, or portion thereof, to be unenforceable, that provision of the License shall be
enforced to the maximum extent permissible so as to effect the intent of the parties, and the remainder of the
License shall continue in full force and effect.
11. Complete Agreement. This License constitutes the entire agreement between the parties with respect to the
use of the Software and related documentation, and supersedes all prior or contemporaneous understandings or
agreements, written or oral, regarding such subject matter. No amendment to or modification of this License will
be binding unless in writing and signed by a duly authorized representative of LOUD Technologies Inc.
LOUD Technologies Inc. • 16220 Wood-Red Road NE • Woodinville, WA 98072 • USA
©2004 LOUD Technologies Inc.
All Rights Reserved.
VST is a trademark of Steinberg Media Technologies GmbH.
User’s Guide
3
Iconography
This icon will lead you to some further explanations of features and practical tips.
This icon marks information that is very important, so please make sure you have
a read.
This icon does not appear in this guide.
Note: Visit our website at www.mackie.com to obtain the latest manuals and
downloads for all your Mackie products.
“Mackie” and the “Running Man” figure are trademarks or registered trademarks of
LOUD Technologies Inc. VST is a trademark of Steinberg Media Technologies GmbH.
All other brand names mentioned are trademarks or registered trademarks of their
respective holders, and are hereby acknowledged.
Part No. SW0081 Rev. B 5/04
© 2004 LOUD Technologies Inc. All Rights Reserved.
4
User’s Guide
Contents
Mackie Software License------------------------------------------- 2
Iconography ----------------------------------------------------------4
Introduction ----------------------------------------------------------6
About Final Mix --------------------------------------------------------6
Main Features ----------------------------------------------------------7
Using Final Mix -------------------------------------------------------8
Front Panel Overview-------------------------------------------------8
Pre/Post Parametric Equalizers Block-------------------------------8
Dynamics Crossover/Key Block---------------------------------------8
Global Controls Block---------------------------------------------------9
Pre/Post Parametric Equalizers ------------------------------------9
EQ Editing --------------------------------------------------------------- 10
EQ Values Panel -------------------------------------------------------- 10
DC– ----------------------------------------------------------------------- 10
EQ Bands On/Off ------------------------------------------------------- 11
EQ Shelving--------------------------------------------------------------- 11
Dynamics – Crossover/Key Graph -------------------------------- 11
Overview of Operation ------------------------------------------------ 11
Control Panel ------------------------------------------------------------12
Key Gain ------------------------------------------------------------------13
Frequency Center/Bandwidth ---------------------------------------13
Dynamics Processing --------------------------------------------------13
Contour Edit Screen ----------------------------------------------------14
Node Editing ------------------------------------------------------------16
Other Controls in the Dynamics Section-------------------------- 18
Global Controls Block -----------------------------------------------19
Help Screen (?)-----------------------------------------------------------19
Preset Toggle Buttons------------------------------------------------- 20
Preset Title Window -------------------------------------------------- 20
Memory A/Memory B ------------------------------------------------ 20
Menu --------------------------------------------------------------------- 20
L/R Input and Output Clip LEDs------------------------------------ 20
Link ----------------------------------------------------------------------- 20
Specifications-------------------------------------------------------- 21
Final Mix Factory Presets ---------------------------------------- 22
User’s Guide
5
Introduction
Thank you for choosing Mackie software products for your computer-based audio recording
system. This version of Mackie's Final Mix stereo mastering plug-in comes with the PC version of Tracktion, our easy-to-use music production software application. When you install
Tracktion on your PC, Final Mix is automatically installed in Tracktion's plug-ins folder.
Note: This version of Final Mix only works with Tracktion, and will not work with any
other VST host applications you may have on your computer. You can visit our website
(www.mackie.com) and purchase the universal version of Final Mix that works with any
PC application that supports VST 2.0 (Virtual Studio Technology).
Final Mix is a professional stereo mastering plug-in that offers multi-band dynamics processing and equalization. It has three individual dynamics processors, each with its own set of
controls and selectable crossover points. It also has two separate six-band parametric eqs,
one located before the dynamics section, and the other after. Each dynamics band is typically
used as a compressor, but expansion is also possible. An intuitive dynamics contour edit
screen providess easy setup of your compressor parameters and allows you to create the perfect soft knee curve. Final Mix also offers a simple to use noise gate and a soft-clip limiter.
With intuitive screens and controls, Final Mix promises to be one of your most invaluable
tools. It can take your projects to new heights.
About Final Mix
Mastering is often the element that separates a good production from a great one. Mackie's
Final Mix enables you to master your session within your computer's software application
and print directly to hard disk. All this without having to rely on expensive mastering houses
or outboard gear. Best of all, settings can be saved as part of your DAW session! Final Mix
features a six-band parametric (pre-dynamics) equalizer, a multi-band dynamics processor,
and a six-band parametric (post-dynamics) equalizer—12 bands of stereo EQ and three bands
of dynamics processing in all. All settings are easily edited to create perfect EQ curves and
compression settings. All three dynamics bands feature individual threshold, attack, and
release times. A graphical contour edit screen for each dynamics band allows you to easily
set a desired ratio. Then you can create your own hard knee or soft knee, or even create an
expander curve. Each dynamics band features its own key filter and operating bandwidth.
This allows you to customize the frequency band triggering each compressor. The Soft-Clip
feature adds a smooth, analog-style clip response when your signal gets close to overload.
These features and others, such as Noise Gate and Band Linking, ensure that Final Mix will
be an integral part of your mixes from here out.
6
User’s Guide
Main Features
•
•
•
•
•
•
•
•
•
•
•
•
•
•
•
•
•
•
•
•
•
•
•
Stereo mastering plug-in solution for the PC version of Tracktion
6-band pre-dynamics parametric equalizer
3-band dynamics processor
6-band post-dynamics parametric equalizer
Soft-Clip feature to provide peak overload protection
DC removal filter
Noise gate
Integrated on-screen help (click on the question mark button)
Dynamics auto make-up gain
Individual key selector for each dynamics band
Graphical user-definable dynamics band contours
Linking of dynamics band edits
Full stereo operation
Fully automatable
Global enable button
On/Off for the dynamics section and each EQ
Solo for each key filter to assist with dynamics setup
Mute for each dynamics band to assist with crossover setup
Separate dynamics and EQ reset buttons
Integrated factory presets and user presets
Memories A and B for quick comparisons
Input, output, and gain reduction metering
Full Mackie Control Universal parameter support
User’s Guide
7
Using Final Mix
Front Panel Overview
You can think of Final Mix as being broken into three basic blocks: EQ, Dynamics, and Global. The dynamics and equalizer blocks have alternate pop-up screens that can be accessed
for detailed editing.
Pre/Post Parametric Equalizers (Six Band)
Dynamics Crossover/Key
Global Controls
Pre/Post Parametric Equalizers Block (see page 9)
The parametric equalizer block is comprised of two separate six-band parametric equalizers. One is pre-dynamics processing and the other is post-dynamics. Each offers a visual
representation of your EQ curve that can be viewed together or separately on one convenient
screen. Each of the six EQ bands is represented by a colored node (or ball). Each node has
independent gain, frequency, Q, and filter type (shelf or bandpass) controls. Control-click
sets a node to its default value. Right-clicking and dragging allows editing of the Q rather
than the gain and frequency. Double-clicking on the EQ screen background brings up the EQ
Values Panel. This allows you to view and adjust the numeric values of each band independently.
Dynamics Crossover/Key Graph Block (see page 11)
This screen allows you to view and edit the crossovers and key filters. The crossover is used
to split the signal into three individual bands, each of which is then sent to its own dynamics
processor. In Final Mix each of the three dynamics bands has its own adjustable key filter.
This can be used to emphasize or de-emphasize the compression within each band. From the
crossover/key setup screen you can drag nodes to adjust crossover points and key parameters. Each band has an individual IN/OUT button to enable or disable dynamics processing
for the band. Each band also has a mute button, which is useful for allowing you to listen to
exactly what the crossover is doing. By muting all but one band at a time you can solo the
band. Similarly, each key filter has its own KEY SOLO button that lets you solo the key signals. Double-clicking anywhere on the crossover screen opens another editing window. This
window displays numeric values of the crossover frequencies, slopes, key gains, frequency
centers, and bandwidths.
At the bottom of the dynamics block, there are three small windows. These show an overview of the dynamics contours, as well as the attacks, releases, and gains, of the three
dynamics bands. Double-clicking on any of the smaller contour screens brings up the corresponding larger screen for detailed editing of the contour. The contour allows you to control
8
User’s Guide
the threshold and ratio, as well as a desired knee. It is a view of the overall ‘shape’ or contour of exactly what the compressor is going to do your signal. You can even draw in regions
of expansion. From this screen you can also enable or disable the band’s auto make-up gain.
Band View displays the edit screen of a selected band along with numeric windows that
display makeup gain, attack, and release values. For more information see the "Dynamics
Processing" section, later in this manual.
Global Controls Block (see page 19)
The global block contains all of Final Mix’s global assignments. These assignments include
Preset Toggle Control, Preset Title Window, ACTIVE, MENU, Mem A/B, and Fader LINK.
There are also Input and Output faders, and Meters. Note that there is also a help button,
marked with a question mark (?), in the top right corner of this section.
Pre/Post Parametric Equalizers
Pre and Post Parametric Equalizer graphs
The main EQ graph allows you to display and edit both the Pre and Post EQ. Note that Pre
and Post refer to where the EQs occur in the signal processing path relative to the dynamics
processing. You can see a block diagram of this path by clicking on the question mark (?) on
the top right corner of the Final Mix main screen.
There are four buttons in the EQ section that allow you to select what EQ you view and what
EQ you edit. These are the PRE and POST EQ EDIT, and PRE and POST EQ VIEW buttons.
They are located just to the right of the main graph display. To toggle between which EQ
curve you are editing, use the EQ EDIT PRE and POST selector buttons. You can only edit
one of the Pre or Post EQs at a time, although you can view both depending on which EQ
views are active. Turn the views on and off with the EQ VIEWS buttons.
User’s Guide
9
The EQ screen defaults to EQ EDIT PRE ON when Final Mix is initially activated. EQ EDIT
PRE ON is also indicated by the letters (PRE) that are highlighted on the background screen.
EQ Editing
Six nodes (balls) are displayed for each of the Pre and Post EQ curves. Each node on a selected curve offers independent gain, frequency and Q control. To adjust EQ curves, simply
drag individual bands (nodes) by grabbing a ball with your left mouse button. Move it up and
down to adjust the gain or to the left and right to adjust frequency. The Q of each band can
be adjusted by right-clicking on a node and moving it to the left and right. Control-click sets
a selected node to its default value.
EQ Values Panel
Double-clicking anywhere on the EQ screen background brings up the EQ Values Screen (see
below). This shows the gain, frequency and Q corresponding to either the Pre or Post EQ.
What is shown depends on which of these is selected for editing (by the EQ EDIT PRE/POST
buttons). EQ bands can also be adjusted from this screen using the mouse to click on a readout and adjust the numeric values up or down.
Fine adjustment is accomplished by clicking in the text boxes. A single right-click in the box
increments the value, and single left-click in the box decrements the value.
EQ Values panel
Achieving the right amount of compression can change the EQ of a signal. For this reason, it’s handy to have post compression EQ. The changes that are made in the Post EQ
can be used to rebalance the overall EQ of your mix.
If you find that the display is too hard to see, try turning off either the EQ PRE or POST
VIEW button so that only one is lit. These are labeled as EQ VIEWS in the Equalizer status screen. This allows you to view one curve at a time.
If you have deactivated the dynamics section of Final Mix, the Pre and Post EQs essentially cascade together to give you a 12-band parametric EQ.
DC–
DC– stands for Direct Current offset. This is a high-pass filter with a sharp slope that automatically removes DC offset noise that is unwanted when you are at the mastering stage.
The default state is on when you activate Final Mix. If you don’t have a need for this filter,
simply click the button to disengage.
10
User’s Guide
DC offset is noise that may be present within your signal but typically is not audible by itself. Why would you want to remove it? It can damage speakers by offsetting the "resting"
position of the cone. It can also require extra energy to reproduce, robbing an amplifier of
power that could be used to reproduce the music.
EQ Bands On/Off
The six EQ BANDS ON/OFF buttons correspond to the six red nodes (balls) found on both the
Pre and Post EQ screens. You can enable or disable each of the bands with either EQ EDIT
PRE or POST selected by simply switching them on or off with your mouse.
EQ Shelving
The six select buttons in the EQ SHELVING section correspond to the six red nodes found
on both the Pre and Post EQ screens. These buttons allow you to switch the band filter type
from bandpass to high or low shelving. Bands 1, 2, and 3 are low shelving filters; and bands
4, 5, and 6 are high shelving filters. The EQ SHELVING buttons work in either the Pre or
Post EQ edit screen depending on which EQ is active. Final Mix defaults to one low-pass
shelf on (number 1), and one high-pass shelf on (number 6). Switching the EQ SHELVING
button off means that the band becomes fully parametric.
Dynamics – Crossover/Key Graph
Crossover and Key graph
Overview of Operation
The dynamics graph illustrates the crossover and key filter settings. As with the Pre and
Post EQ graph, parameters and views of this screen are controlled using four buttons to the
right of the graph. These are: DYN EDIT XOVER and KEY, and DYN VIEWS XOVER and
KEY. DYN VIEWS enables or disables viewing. DYN EDIT selects which feature is being edited. To facilitate viewing this information, the function which is not being edited is dimmed.
The purpose of the crossover is to split your incoming signal into three different frequency
bands (Low, Mid, and High). Each of these bands feeds into its own dynamics processor.
Note: You can see a block diagram of the processing path by clicking on the question mark (?) on the
top right corner of the Final Mix main screen.
User’s Guide
11
Typically, the dynamics processor is used as a compressor. However, depending on the settings it can act as a compressor, limiter, or expander, or even a combination of all three.
Having three dynamic processors acting separately on each band can give you great flexibility while mastering. For instance, you don’t have to worry about your bass causing your lead
vocal to get compressed. All bands can be compressed individually, resulting in a tighter,
punchier overall sound.
Each dynamics processor has its own key filter. This can be used to emphasize or de-emphasize
the key (or control) signal within a band. The key signal is used to trigger the associated dynamics processor. Having separate control of the key filter is one of the most unique features
of Final Mix. This allows you to control the dynamics of one frequency band by keying off another. This can be useful, for example, if you would like the low frequencies not to overpower
your lead vocals.
The crossover points are represented by the black nodes (balls) with vertical yellow lines.
These can be adjusted by dragging the two black nodes found at the bottom of the screen.
The slope of the crossovers determines how sharply the adjacent bands are separated. The
slope can be adjusted by right-clicking on these crossover nodes and moving the mouse.
Below the graph, there are three sets of three buttons labeled IN, KEY SOLO, and M (for
mute). These are very handy for helping you to set up your crossover and key filters. Mute
will mute the crossover band. By muting all but one band at a time, you can listen to exactly
what part of your mix is going into each band. Similarly, KEY SOLO acts as an override, allowing you to listen to just the key signal. The IN button switches dynamics processing on
and off for the band. This allows you to hear exactly what is going on in each band.
Control Panel
Double-clicking on the graph brings up a screen which displays all of the parameters for the
crossover and key filters.
Crossover/Key Values panel
All the values from this screen can be adjusted by clicking on the digits and dragging up
or down with your mouse. For fine adjustments, right-click in the text box to increment the
value, and left-click in the box to decrement the value.
12
User’s Guide
Key Gain
The Key Gain Control ranges from –15 dB to +15 dB. This gain control is not the same as the
compressor make-up gain, which is found in the contour screen (and beside the three small
contour graphs). Instead, this control adjusts the gain of the signal that is sent to the key
level detector. This is used in conjunction with the key bandwidth to determine when the dynamics processor acts on the signal. You can use this, for instance, to drive the control signal
to the compressor a little harder. This results in the signal becoming more compressed. It is
also useful if you notice that the compressor input signal is very low, and you want to key off
of a more moderate level. The compressor input signal is indicated by the horizontal meter
below the contour graph.
Note: The compressor input signal level is not the key level.
Frequency Center/Bandwidth
Each key has its own adjustable frequency center and bandwidth controls. These controls
can be used together to zero in on a specific portion of the signal. Bandwidth, the inverse of
Q, is measured in octaves and ranges from 0.0 to 10.0 octaves. You can use the KEY SOLO
button, located directly below the Crossover/Key graph, to listen to the key signal.
These controls give you further choices concerning what the compressor does with the band.
For instance, let’s say you’ve set up the low band (Band 1) of your compressor so it contains
mostly the bass and kick drum. If you want to compress more of the bass than the kick
drum, you can use the low band’s key filter to hone in on the bass. Then more of the bass
is sent to the compressor key than the drum. The result is that the bass tends to cause the
compressor to engage more than the drums.
Dynamics Processing
Dynamics overview
Overview
Final Mix’s crossover splits the signal into three bands, each of which is fed into its own
independent dynamics processor. Typically, the dynamics processor is used as a compressor.
However, depending on the settings it can act as a compressor, limiter, or expander, or even a
combination of all three.
The three windows at the bottom of the screen offer an overview of the dynamics settings for
each of Final Mix’s three bands. The graph shows the dynamics contour. It is a graph showing the band input level (on the horizontal) vs. what the output level will be (on the vertical)
after passing through the dynamics processor. The white horizontal line is the threshold.
Below this value, the signal is unaffected. Beside the graph are readouts and controls for the
band make-up gain, attack time, and release time.
Left-click and drag to adjust the Threshold node. Right-click and drag to adjust the End node.
Double-clicking on any of the smaller contour screens brings up the larger Contour Edit
Screen for detailed editing. Once the larger screen has been accessed, contour values for a
selected band are edited by dragging and dropping nodes.
User’s Guide
13
Contour Edit Screen
Contour Edit screen
Note: The Dynamics Contour Edit screen is accessed by double-clicking on any of the three bands found at the
bottom of the main Final Mix screen.
Overview
The Contour Edit Screen allows you to have very powerful control over the heart of Final
Mix. Double-clicking on any of the three dynamics overview screens brings up this more detailed screen. The overview screens are found at the bottom of the main screen. The graph
you see when first accessing this screen represents the dynamics contour for the currently
selected band. This graph shows the band input level (on the horizontal) vs. what the output
level will be (on the vertical) after passing through the dynamics processor.
The threshold is shown as the white line with the “T” node attached. The graph also shows
the contour’s moveable end point (designated by the green node, labeled “E”). The end point
represents a selected band’s maximum output level. The traditional Compression Ratio is affected by both of these parameters. One of the very powerful features of Final Mix is that you
can set up your contour to have different compression ratios for different input levels. This
is achieved by using multiple nodes. The figure above shows 2 extra nodes – the red balls
labeled 1 and 2. These nodes are being used, in this case, to essentially draw a knee for the
compressor curve. This gives a nice smooth transition from applying minimal compression at
low input levels, to much higher compression at higher levels.
The red line that crosses the graph diagonally represents unity gain (i.e., the signal is unaffected by the dynamics processor). Contours which are steeper than this, as illustrated below
by the segment between T and 1, represent expansion.
14
User’s Guide
Expansion section
Expansion occurs when the amplitude of the output increases faster than the amplitude
of the input. Compression, on the other hand, occurs when the amplitude of the output increases slower than the amplitude of the input. Final Mix allows expansion or compression
above the threshold. Expansion can be used to increase the volume of quiet passages and
bring a little bit more "life" into a performance. Note that each individual segment can be
set as either a compressor, an expander, or both. Having expansion for low input signals and
compression for higher signals is a good way to level out a signal's dynamics. Quiet signals
become louder and louder signals become quieter. We see an example of this below. For input
signals below node 2 in amplitude (approximately –28 dB), the dynamics processor acts as
an expander. For signals above node 2, the processor is a compressor. See the "Node Editing"
section on page 16 to find out more about how to set up these kinds of contours.
Expansion and compression together to “level” a signal
Band View/Edit
One dynamics band can be edited at a time from the contour screen. However, individual
bands can be quickly accessed by choosing a band from the BAND VIEW/EDIT radio buttons
found at the top of the contour edit section.
Note: If you press the ‘LINK ALL’ button, located just to the right of the
dynamics graph, all three bands are affected at once.
Gain Makeup and Auto Makeup
Gain Makeup is used to make up for volume that has been decreased due to compression.
The Gain Makeup window ranges from –15 dB to +15 dB and can be adjusted with a mouse
to scroll the values up or down. This control can also be accessed from the window labeled
as GAIN found in the Dynamics overview. You can also apply attenuation using this control.
This is represented by a negative value (i.e., –3.0 dB).
When the AUTO MAKEUP button is in, Final Mix automatically chooses an appropriate makeup
gain for you. This makeup gain is based on your dynamics contour. You can still use the ‘manual’ gain makeup control in this case. It merely adds to the makeup gain automatically applied.
When you first push the AUTO MAKEUP button in, Final Mix adjusts your makeup gain parameter so that the volume does not suddenly jump up. This is hearing (and speaker) protection!
Attack and Release
The attack parameter specifies how quickly gain reduction (or expansion) occurs at the attack, or beginning, of a signal. Release controls how quickly gain reduction backs off when
the signal drops back down. The time is measured in milliseconds and corresponds to the
length of time it takes to achieve a fixed amount of compression (or expansion).
User’s Guide
15
In general, the attack time should be much faster than the release time to get pleasing
results. If the attack time is set too quickly, you hear something resembling clipping on attacks, especially with low-frequency signals. Leaving the attack a little bit longer also allows
more of the ‘snap’ of the attacks to pass through the compressor. Setting a release time too
fast can result in ‘buzzing’, especially on low notes. This occurs because the compressor gain
is actually following individual cycles of the incoming waveform.
If you set the attack time to 0 ms, the dynamics section actually behaves as a limiter. It
won't permit the signal to go over the end point value.
As a general rule of thumb, lower frequencies require longer release times than higher frequencies. If a high- or mid-frequency band has a release time that is too long, you hear the
compressor ‘breathing’.
Threshold
Threshold sets the point at which compression (or expansion) starts to occur. Final Mix’s
threshold is displayed as the white line in the middle of the graph with the green “T” node
attached. You can adjust the threshold using your mouse to drag the line up or down. The
threshold level ranges from –48 dBfs to 0.0 dBfs. The Threshold can also be adjusted in the
Threshold window—use your mouse to scroll the values up or down.
Node Editing
Final Mix’s Node Editing is a unique and powerful feature that goes far beyond the usual concept of assigning a dynamics band’s ratio. The Contour Edit screen allows you to draw your
own curve between the threshold and the end point. Up to four nodes can be added to the
curve. This depth of editing is helpful in defining detailed nuances in your curve such as hard
knee, soft knee, and expansion. In the previous example we saw expansion combined with
compression to implement a leveling of the signal. This is where the quiet sections become
louder and louder sections become quieter. Below we see hard and soft knees drawn in.
Hard Knee curve
Soft Knee curve
Examples of Hard Knee and Soft Knee curves
About Hard Knee and Soft Knee Compression
The terms hard and soft do not refer to sound but rather the way that the compressor reacts
to incoming signal. The difference is somewhat subtle to hear but is more apparent at higher
compression ratios. A hard knee setting is well suited to lower ratios. When using higher
compression ratios, you may find it a little better sounding to draw in a smoother knee curve.
Look at the graphs above. A hard knee curve is represented as a straight line that connects
a point on the threshold to the end point or maximum output on the graph. A soft knee curve
has a smoother curve that connects the two points. This creates a more gradual transition
between non-compressed and compressed signals.
16
User’s Guide
Nodes can be added to the contour graph by right-clicking the mouse on the contour graph.
Right-clicking on the graph where there is no node adds a node, up to a maximum of 4.
Right-clicking on a node removes it. You can also add or remove nodes by scrolling through
the NODE selector window and toggling the Node Enable IN button.
Right-click to
add a node
Node Selector
Node Enable
Note: The four numbered nodes must always appear in order from left to right. A consequence of this
is that you can't add a node between, for instance, nodes 1 and 2, even if they are the only 2 nodes active.
Nodes on the graph can be adjusted by the standard click and drag method. You can also
edit the node’s In and Out levels in the small windows at the bottom right of the contour edit
screen. Beside these two windows, you will see a RATIO display. The ratio is automatically
calculated when the node is moved and can't be directly edited. The RATIO display corresponds to the dynamics ratio applied in the segment immediately to the left of the selected
node.
The RATIO window displays both compression and expansion. When a segment represents
expansion, the ratio is displayed as, for instance, 1:2.5. However, a compression ratio shows
as 2.5:1.
Final Mix also implements negative compression ratios. This is useful mainly for special
effects or repair work. In this case a node appears lower in the graph than the one to its immediate left. For negative compression, the ratio window displays, for instance, –2.5:1.
The graph above could be used on a snare track to drastically lower the volume of a few
snare hit by an over-excited drummer while leaving most of the snare track unaffected.
User’s Guide
17
Other Controls in the Dynamics Section
Active
This engages or disengages all of the compressors.
Note: The dynamics processor for each band can be individually enabled or disabled using the IN
button immediately below the key/crossover graph.
Reset
RESET DYNAMICS will reset the Dynamics section to its factory default settings.
Link All
When engaged, this button allows you to edit all three bands of dynamics at once. Changes
don't take place until you move a parameter within the dynamics section.
Soft-Clip On and Threshold
The SOFT CLIP button activates a soft-clip limiter circuit. There is also a THRESHOLD
adjustment. These controls are located just to the right of the three small contour screens.
When the output of the dynamics section goes above this threshold, the soft-clip circuit kicks
in. This circuit starts adding analog-style distortion. This avoids the harsher sound of a
straight digital clip. The lower the threshold, the more analog-style distortion is added. If the
threshold is set too low, you hear this as a very crunchy distortion sound. It is best to keep
the threshold between –3 dB and –1 dB unless you are going for a special sound effect.
The soft-clip circuit has an indicator light, located between the SOFT CLIP button and the
THRESHOLD adjustment. This activates when the signal is above the soft-clip threshold.
The soft-clip circuit is the last thing in the signal processing chain. If you notice it become
active and wish to avoid any kind of distortion being added, you can merely back off the output faders.
Noise Gate and Threshold
Final Mix also has a simple noise gate with a threshold adjustment. These controls are located just to the right of the three small contour screens (GATING and THRESHOLD). The
noise gate threshold can go from 0 dBfs to –125 dBfs. The attack rate (when the gate opens)
is very fast. The release rate is very slow. This can be used as an effect to generate a very
slow, smooth fade out of a song. To do this, set the threshold at 0 dB with the noise gate
disabled. When you want to start the fade out, enable the noise gate and the fade out starts.
The fade out lasts about 5 seconds.
The noise gate is located post-dynamics but pre-output fader. That is, adjustments made in
the output fader do not affect the performance of the noise gate.
18
User’s Guide
Global Controls Block
The Global Controls Block is shown below. This includes the minimize and preset up/down
buttons, the preset title window, the ACTIVE, MENU, and MEM A/B buttons. The global
controls also include INPUT and OUTPUT faders and meters, and fader LINK buttons.
Main Global Controls screen
Help Screen (?)
Pressing the help (?) button brings up a handy quick reference screen to assist you in using
Final Mix. It offers a signal path block diagram, definitions, and editing tips. Toggle the arrows to change screens. Click the "X" to close the help screen.
User’s Guide
19
Preset Toggle Buttons
The preset up/down arrow buttons enable you to scroll up or down through either the factory
or user presets. These toggle buttons are located just to the left of the Preset window.
Preset Title Window
The Preset Title window displays the currently selected preset. This window is located at
the top of the control bar. Click on it to access the pull-down menu where you can choose between factory or user presets.
Memory A/Memory B
The Mem A and Mem B buttons temporarily store Final Mix settings to allow comparative
referencing. You can also copy and paste settings from one memory location to another using
commands found on the menu.
Menu
Pressing the MENU button opens a pull-down menu that performs familiar functions:
About Final Mix: Opens a window that shows the version number and copyright information.
Undo: Undo the previous action.
Redo: Redo the previous undo.
Load Final Mix: Loads a previously saved preset file.
Save User Preset As...: Saves a Preset to the hard drive with a new file name.
Save User Preset: Saves changes to the current preset to the hard drive.
Reset Final Mix: Resets all the settings in Final Mix to the current preset values.
Cut Final Mix: Copies all the settings to the clipboard and resets them to their default values.
Copy: Copies all the settings to the clipboard, leaving the settings as they are.
Paste Final Mix: Copies the settings from the clipboard to the current Final Mix window.
Note: Cut/Copy/Past are useful for changing MEM A and B to identical settings.
L/R Input and Output Clip LEDs
The two small boxes at the top of the input and output meters are the clip LEDs. The clip
LEDs light if the signal goes above 0 dB. Avoid lighting the OUTPUT clip LEDs. When rendering to disk at either 24-bit or 16-bit, any clips will be written to the file.
You can generally get rid of clipping by backing off the input or output faders slightly, or by
engaging the SOFT CLIP button (see page 18). Actually, because Final Mix uses 32-bit floating point internal processing, the signal does not clip internally within the plug-in. However,
to maintain a reasonable gain structure and avoid clipping elsewhere in the signal chain,
avoid running the signal up above 0 dB.
Link
The LINK buttons link the Left and Right input faders or the Left and Right output faders
so they can be moved simultaneously. If the faders have an offset when link is engaged, they
maintain that offset.
20
User’s Guide
Specifications
6 band Parametric EQ
Crossover Frequencies
Gain
±15.0 dB
20 Hz to 20 kHz
Frequency
20 Hz to 20 kHz
Q range
0.1 to 16
Filter type
High/Low shelf
or bandpass
Dynamics
Gain Makeup
±15 dB
Attack
0 to 100 ms
Release
30 ms to 3000 ms
Threshold
–48 dBfs to 0 dBfs
Crossover Slopes
6 dB/octave to 36 dB/octave
Key Filters
Frequency
Limited to crossover band
Slope
4th order low pass
4th order high pass
DC Filter
On/Off, frequency = 3.3 Hz
Compressor Contours
Four nodes per
dynamics band,
each allowing for
any possible
compression or
expansion ratio
from 1:inf to inf:1
Input/ Output Meters
–90 dBfs to 0 dB FS
Routing
Pre or post insert,
auxiliary,
master L/R.
Soft-Clip
Threshold
0.0 dB to –20.0 dB
Input/ Output Faders
+10 dB to off
Noise Gate Threshold
0 dB FS to –125 dB FS
Need Help?
Contact our Technical Support staff at 1-800-898-3211, Monday to Friday,
from 7 am to 5 pm PST. After hours, please visit www.mackie.com and look
under Support, or email us at [email protected].
User’s Guide
21
Final Mix Factory Presets
The following table is a simple guide to help you understand some of Final Mix’s factory presets. A brief description and intended use is given. Final Mix presets can be used effectively
as they are, or as a starting point that lets you do the fine tuning mix. Final Mix also lets you
create your own user presets with custom parameters that meet your specific needs. So get
creative and have fun! Please visit www.mackie.com periodically to download new audio examples and additional free presets.
Note: Certain preset names shown here have the prefix ( H_). This indicates that the preset is associated
and explained in Final Mix’s help screen. The help screen is accessed by selecting the (?) found at the top
right hand corner of the screen.
22
Final Mix Preset
Preset Description
Preset Type
Acuma CD Mastering
A great full range compression
preset for all-around mastering.
Any style mastering
Acuma Dance Mix
Optimized dance mix guaranteed
to keep the beat pumping.
Dance production mix
Acuma Final Mix
Finely detailed midrange.
Great for any style.
All around mastering
Acuma Gentle Comp
Soft and gentle compression levels
for a light but definitive mix.
Easy mix
Acuma Punch
Medium compression emphasizing
low and high end compression.
Funky, punchy mix
Acuma Rock + EQ
Great all-around rock compression
with a boost in the low, mid and
hi EQ.
Rock and roll mix
Acuma Techno
EQ with the perfect fat bottom mix
and a sizzling, crisp top end.
Perfect for techo, house and groove.
Techno, trance,
house, groove mix
Acuma The Leveler
Maximizes your output level with a
very warm analog sound.
Hot output mix
Country + EQ
Just the right compression and EQ
creates a lively modern country mix.
Country mix
Country Female
Especially designed for today’s top
country music female singing sound.
Female country mix
Country Mix
All around country music with just
right crossovers and compression.
Male country mix
Drums
The ultimate drum compression.
Good for all styles of drumming.
Drum mix (any style)
Drums with Exp
Add some snap and punch to drum
tracks with a mix of expansion and
compression.
Drum mix (any style)
User’s Guide
Final Mix Preset
Preset Description
Preset Type
Female Broadcast
Optimized Female compression
settings for radio or TV broadcast.
Uses an EQ lift between 100 and
300Hz with a 75Hz roll off. This
simulates Electro Voice RE-20
microphone response.
Radio and television
broadcast (female)
Female Vox Comp
Good all around compression
and EQ. Good for most female
singing voices.
Good over all female
vocal mix
Final Mix Vocal
Medium compression set to
optimal vocal crossover points
500Hz to 2.5K.
Use with any vocal
style
General CD Mastering
General purpose, all around
mastering.
General all around
mastering
H_+6 dB Gain
A 6 dB lift created by a +3 dB input
gain and a +3 dB output gain.
Linked contour bands are set to
1:1 so they don’t introduce any
compression.
+6 dB boost
H_12 Band EQ
Shows off overlapping the 6 bands
of pre and post EQ’s to form a
12-band parametric EQ.
Demonstrates how
the pre and post EQs
can be combined to
create a 12-band EQ
H_Bass
Comp-Treble Exp
Pre EQ, high shelf; post EQ, low
shelf. The contours are set to add
compression to the lows, and
expansion to the highs.
Compress bass,
expand treble
H_Jazz Mix
Uses 3-band pre EQ w/three bands
of compression that are set as
tighter bass, mids, and highs.
Contemporary jazz
mastering
H_Leveler With EQ
Three bands of pre EQ with a shelf
set on the highs. A pronounced
key in the lows, and 6 dB of gain
makeup. Comp bands are linked.
Hot output + EQ mix
H_Loudness &
Mild Comp
Mild loudness EQ curve set by
post EQ peak in the lows, and a
shelf in the highs. Linked comp
bands with medium attack and
slow release used for over-all
compression.
Hot output with
mid boost
H_Loudness EQ
Smiley-face EQ to compensate for
quiet levels.
Hot output + EQ mix
H_Mid Lift
Simple wide Pre EQ midrange lift.
Boosts midrange
compression
H_Mild Expansion
Three contour bands are set to act
as midrange expanders to add a bit
more dynamics and liven up
a performance.
Expands midrange
User’s Guide
23
24
Final Mix Preset
Preset Description
Preset Type
H_Notch EQ
One pre EQ band set extremely low.
Used to remove a
problem frequency.
Use to eliminate bad
frequencies
H_One Comp Band
Uses the middle contour band as a
single broadband compressor. The
Xover has its borders at 20Hz and
20kHz with 36 dB slopes. The band
two key is set to match the Xover.
Used as one over all
compressor
H_Punchy Kick
Knock you through the wall kick
sound. Soft low band compression
with 100Hz pre EQ lift.
Rock steady bass
drum mix
H_Smooth Highs
Heavy high end compression with a
Post EQ high shelf lift.
Emphasize high end
H_Telephone Comp
Special effect that simulates
telephone reception. Shows off the
concept of shutting bands off as
effects.
Telephone effect
H_The Leveler #2
Linked comp bands @ 1.79:1 ratios.
A small post EQ high lift is added.
Use the Thresh or Input Gain faders
to add or remove compression.
The Output faders are used to trim
over all.
Good overall master
output control
Heavy Vox +
Heavily compressed vocal setting
Heavy vocal
10K Boost
and 10k boost with linking bands.
compression with
10k lift
Instrumental
Perfectly tweaked compression for
any instrumental mix.
All-around
instrumental mix
Jazz Final Mix
The perfect mastering compliment
to well recorded live jazz.
All-around jazz mix
Light + EQ
Just a touch of compression with
EQ for subtle mastering.
Easy comp
mastering +EQ
Light Vox Comp + EQ
Just a touch of light compression
with optimized vocal cross overs.
Light vocal
compression with EQ
Long Distance
Hello out there, does anyone
hear me? Spacey EQ and
compression effect.
Far away effect
Loudness
Gives you hotter output.
Hot output
mastering
Male Broadcast
Optimized Male compression
settings for radio or TV broadcast.
Uses an EQ lift between 100 and
300Hz. Has a 75Hz roll off to
simulate Electro Voice RE-20
microphone response.
Radio and television
broadcast (male)
User’s Guide
Final Mix Preset
Preset Description
Preset Type
Male Vox Comp
Good all around compression and
EQ. Good for most male singing
voices.
Good over all male
vocal mix
Moderate + Hi Low EQ
Moderate compression with high
and low EQ boost.
High and low EQ
boost
Moderate + Mid EQ
Moderate compression with a bit of
EQ boost for mid frequencies.
Mid EQ boost
Orchestral
Finely tuned light compression for
full orchestra.
All-around orchestra mix
Pop
Medium, non-intrusive compression.
All-around pop mix
Pump DA Bass
Pumps up the low end for an ultra
phatt sound.
Fat bottom end
Punch
Medium compression emphasizing
low and high end compression.
Punchy R&B mix
Radio Punch Mix
Gives your mix added punch for
radio or television. Designed for
FM frequencies.
Add punch for radio
and television
Sell It!
In your face sound that can’t
be denied.
Up front and noticeable
Smoothed Out 1
Top and bottom compression just
offset from key centers.
Lifts and tightens a
lifeless mix, mild
compression boosts
bottom and top end
Smoothed Out 2
Variation of Smoothed out 1.
Smoothed Out 3
Variation of Smoothed out 1.
Squash It 1
Extreme compression.
Reminiscent of the main mix
compressor on an SSL when it’s
pushed hard into a Pultec EQ.
Heavy compression
Squash It 2
Variation (extreme compression).
Reminiscent of the main mix
compressor on an SSL when it’s
pushed hard into a Pultec EQ.
Heavy compression
Squawk Squash
Designed to crush heavy midrange
(2-5k).
Mid killer
The Brass Balls
Medium to heavy compression with
bass boost EQ.
In your face, to the
wall compression
with bass boost
Vocal
General purpose vocal mastering;
less compression in the middle to
preserve a singer’s dynamics.
Good on vocals
User’s Guide
25
LOUD Technologies Inc.
16220 Wood-Red Road NE • Woodinville, WA 98072 • USA
US and Canada: 800.898.3211
Europe, Asia, Central and South America: 425.487.4333
Middle East and Africa: 31.20.654.4000
Fax: 425.487.4337 • www.mackie.com
E-mail: [email protected]