1
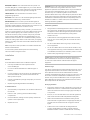
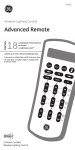
GE
Security
IS-ZW-RC-1 Remote Control
Installation Sheet
Description
Figure 1: Remote control
Z-Wave technology is designed to automate lighting/home control
and provides easy remote operation of all your Z-Wave enabled
devices. The GE Z-Wave family includes a variety of devices to
control lighting in your home.
LCD screen
The remote control (model IS-ZW-RC-1) allows you to control up to
18 individual Z-Wave devices with one easy-to-use, compact unit.
You can also set up and control up to 18 groups of lights as well as
18 scenes for task or mood lighting. Groups can include up to 232
Z-Wave devices and each scene can include up to 32 Z-Wave
devices. Lights can be included in multiple groups. Scenes can
include lights from different groups. Your Z-Wave home control
network can include up to 232 Z-Wave enabled devices.
Mode buttons
Menu selection
buttons
LIGHT
OK
1
•
Event programming
•
Control of a Z-Wave enabled thermostat for your HVAC
system
CANCEL
2
ALL
3
ON
ON
ON
OFF
OFF
OFF
4
5
6
ON
ON
ON
OFF
OFF
OFF
7
8
9
ON
ON
ON
OFF
OFF
OFF
Number buttons
An easy to use LCD menu system
SCENE
SHIFT
SETUP
Additional features include:
•
GROUP
This remote is based on the Z-Wave Controller Library and the
Remote Controller Generic Device Class. It controls devices that
support the following Z-Wave Command Classes:
•
Basic Command Class
•
Binary Switch Command Class
•
Configuration Command Class
The unit provides the following:
•
Controller Replication Command Class
LCD screen. Easy to use menu structure.
•
Manufacturer Specific Command Class
Mode buttons:
•
Multilevel Switch Version 1 Command Class
•
Thermostat Command Class
•
Version Command Class
LIGHT button. Use to program and/or control individual
lights.
GROUP button. Use to program and/or turn multiple lights on
or off with one button.
Note: When using the Basic Command Class to control devices,
the remote will either transmit a value of 0 or 255, depending on
the button pressed.
SCENE button. Use to program and/or control multiple lights
at preset brightness levels. The same light may be included in
multiple scenes.
Node is the technical term used to describe a Z-Wave device in a
home control network. Please note that the terms “Node”,
“Device”, and “Light” all refer to an individual Z-wave enabled
device and are interchangeable within the context of these
instructions.
Thermostat icon button. Use to check and adjust system
and temperature settings on a Z-Wave enabled thermostat.
Menu selection buttons. Use arrow buttons to scroll between
menu items. Press OK to select the displayed menu item.
© 2009 GE Security, Inc.
1 of 8
P/N 1069507 • REV A • ISS 18NOV09
SETUP/SHIFT button. Press and hold to enter setup mode. You
can then add lights to, or delete lights from your control network.
You can create or modify groups and scenes. Press and release to
shift number buttons from 1 through 9 to 10 through 18.
CANCEL button. Press and release to cancel the current
programming operation.
ALL button. Use to turn on or off all Z-Wave lighting at the same
time. Press ALL and then any number button.
Number buttons. Use to control up to 18 individual lights, 18
groups, and 18 scenes. Press and release to turn on or off. Press
and hold to adjust brightness. Press the button for numbers 1 to 9;
press SHIFT, then the button for numbers 10 to 18.
If this remote is used as the primary controller, you must use it to
create your control network. You can use multiple remote controls
with your Z-Wave lighting control network, however; only one
remote will act as the primary controller. The primary controller
must be used to add or delete devices (lights/nodes) from your
network. All other controllers are considered secondary and can
be used to create groups and/or scenes and control your lighting,
however, secondary controllers cannot add or delete devices from
your network.
Note: This product can be operated in one Z-Wave network with
Z-Wave certified devices.
WARNING: Due to risk of fire, electrical shock and burns, exercise
extreme caution when using Z-Wave devices to control
appliances. Operation of the Z-Wave device may be in a different
room than the controlled appliance, also an unintentional
activation may occur if the wrong button on the remote is
pressed. Z-Wave devices may automatically be powered on due to
timed event programming. Depending upon the appliance, these
unattended or unintentional operations could possibly result in a
hazardous condition. For these reasons, we recommend the
following installation guidelines.
Installation guidelines
•
Assign Z-Wave controlled appliances to device numbers 10 to
18 on the remote. The likelihood of unintentionally turning on
the appliance will be reduced significantly because the Shift
button will need to be pressed before pressing device
numbers 10 to 18.
•
Z-Wave devices controlling appliances should be removed
from the “All” control setting. See “All-on and all-off control”
on page 6.
•
Do not include Z-Wave devices in groups or scenes if they
control appliances.
•
Do not use Z-Wave devices to control electric heaters or any
other appliances that may present a hazardous condition due
to unattended, unintentional, or automatic power on control.
•
Double check programming for accuracy.
For best results, please read and perform all the remaining
instructions before using the remote.
Installation
Batteries
Three AAA alkaline batteries (not included) are required:
•
Use only fresh batteries of the required size and
recommended type.
•
Do not mix old and new batteries or different types of
batteries.
•
If you do not plan to use the remote for an extended period,
remove the batteries. They can leak chemicals that can
destroy electronic parts.
•
Dispose of old batteries promptly and properly. Do not burn
or bury them.
•
Replace fully discharged batteries immediately.
To install batteries:
Caution: Not for use with medical or life support equipment. ZWave enabled devices should never be used to supply power to,
or control the on/off status of medical and/or life support
equipment.
Wireless range
This device complies with the Z-Wave standard of open-air, line of
sight transmission distances of 100 feet. Actual performance in a
home depends on the number of walls between the remote
controller and the destination device, the type of construction, and
the number of Z-Wave enabled devices installed in the control
network. Every Z-Wave enabled device acts as a signal repeater
and multiple devices result in more possible transmission routes,
which help eliminate “RF dead spots”.
RF range guidelines
•
Each wall or obstacle (such as a refrigerator or big screen TV)
between the remote or a Z-Wave device and the destination
device will reduce the maximum range by approximately 25
to 30 percent.
1.
Open the battery compartment cover (located on the back of
the remote).
2.
Note the + and – polarity symbols inside the battery
compartment.
•
Brick, tile, or concrete walls block more of the RF signal than
walls made of wooden studs and plasterboard (drywall).
3.
Insert the batteries; making sure their polarity matches the
symbols in the compartment.
•
4.
Replace the cover.
Wall mounted Z-Wave devices installed in metal junction
boxes will suffer a significant loss of range (approximately 20
percent) since the metal box blocks a large part of the RF
signal.
•
Z-Wave home control networks are designed to work
properly alongside 802.11 wireless computer networks,
Bluetooth and other 2.4GHz or 5.8GHz devices. Some baby
2 of 8
P/N 1069507 • REV A • ISS 18NOV09
cams, wireless video devices and older cordless phones using
the 900MHz frequency range may cause interference and
limit Z-Wave functionality. Many 900 MHz products have a
switch to select channel “A” or “B”. You may find that one of
these channels will cause less interference than the other
channel.
Network management
Your remote control and every Z-Wave device you have added
with the primary controller are linked together in a wireless
network. Each device in your network has a unique address
assigned to it and cannot be activated by your neighbor’s Z-Wave
controller.
The screen displays ADD.
3.
The screen displays TO NETWORK.
4.
Scroll until the screen displays TO A KEY, and then press
OK.
5.
Press a digit (1 to 9) for the device location you wish to add.
Press SETUP (SHIFT) and the digit (1 to 9) if you are adding
devices 10 through 18.
6.
Press OK.
The screen displays SETUP WAITING.
7.
Add a node, group, or scene can also be referred to as include a
node, group, or scene. Remove a node, group, or scene can also
be referred to as exclude a node, group, or scene.
If the screen displays FAILURE during the setup or programming
process, you have pressed an invalid key or the desired action has
not been successfully completed. Make sure the remote is within
two feet of the device and try again.
Adding a device
In order to control lights, they must be Z-Wave enabled and you
must first add them to your home network. There are two ways to
do this.
•
•
Add lights to your remote so that they can be controlled
individually using the number keys (maximum of 18). Adding a
device to your remote also adds it to your network. If the
device number you are trying to add is already associated
with another device, the previous information is lost.
Add devices to your home network without assigning them to
a specific number key. These devices can only be controlled
through the Group, Scene, or All commands.
Press OK.
Press the button on the device so that it communicates with
the remote.
The screen displays SUCCESS to indicate that the Node/Light
has been successfully added to the number key and your
network.
Controlling individual lights
You can control a light to turn it on or off, or change its brightness
level. The operation of a specific device varies by product. Refer to
the manual for that device to learn its specific operation.
1.
Press and release the LIGHT key to put the remote into
individual light control mode. The remote will stay in this
mode until the Group, Scene, or All mode is activated.
2.
Select the lights you want to control. Press and release SHIFT
to control lights 10 to 18.
To turn a light on or off:
•
•
To turn a light on, press and release the ON key for less than
one second. The screen displays the selected light and ON.
To turn a light off, press and release the OFF key for less than
one second. The screen displays the selected light and OFF.
To add a device without assigning it to a specific number key:
To set a light’s brightness level:
1.
Press and hold SETUP until the screen shows LIGHT SETUP.
•
2.
Press OK.
The screen displays ADD.
3.
Press OK.
•
The screen displays TO NETWORK.
4.
5.
Press OK.
To make a light brighter, press and hold the ON key for more
than one second. The screen displays the selected light and
BRIGHT. The light will continue to grow brighter until the key is
released.
To make a light dimmer, press and hold the OFF key for more
than one seconds. The screen displays the selected light and
DIM. The light will continue to grow dimmer until the key is
released.
The screen displays SETUP WAITING.
To remove a device from your remote:
Press the button on the device so that it communicates with
the remote.
1.
Press and hold SETUP until the screen displays LIGHT
SETUP.
The screen displays SUCCESS to indicate that the Node/Light
has been successfully added.
2.
Press OK.
3.
Scroll until the screen displays REMOVE, and then press OK.
You can now add the device to groups and/or scenes.
To add a device and assign it to a specific number key:
1.
Press and hold SETUP until the screen displays LIGHT
SETUP.
2.
Press OK.
P/N 1069507 • REV A • ISS 18NOV09
The screen displays SEL DIGIT.
4.
Press a digit (1 to 9) for the device location you wish to
remove. Press SHIFT and the digit (1 to 9) if you are removing
devices 10 through 18.
5.
Press OK
3 of 8
The screen displays SUCCESS.
2.
This only removes individual number key control. The device is still
part of your home control network and can be controlled through
the GROUP, SCENE, and ALL controls.
To delete a device from your network:
1.
Press and hold SETUP until the screen displays LIGHT
SETUP.
2.
Press OK, and then press the right arrow key two times.
The screen displays DELETE.
3.
Press OK.
4.
Press the button on the device so that it communicates with
the remote.
The screen displays the selected group.
3.
Groups
Multiple Z-Wave devices can be turned on or off with a single
command when they are placed in a group. One example would
be grouping your porch light, exterior garage lights, and patio
lights together so that they can all be turned on if you hear a
strange sound in the middle of the night.
You can set up a maximum of 18 groups. A group can contain up
to 232 devices.
To remove a device from a group:
1.
Press and hold SETUP until the screen displays LIGHT
SETUP.
2.
Scroll until the screen displays GRP SETUP, and then press
OK.
3.
Press the right arrow key once.
The screen displays REMOVE.
4.
Press and hold SETUP until the screen displays LIGHT
SETUP.
2.
Scroll until the screen displays GRP SETUP, and then press
OK.
The screen displays ADD.
3.
4.
5.
5.
Press a digit (1 to 9) for the group from which you want to
remove the device. Press SHIFT and the digit (1 to 9) if you are
removing a device from groups 10 through 18.
6.
Press OK.
The screen displays SETUP WAITING.
7.
The screen displays SUCCESS.
This only removes the device from a specific group. The device is
still part of your home control network and the group still exists (if
it included more than one device).
To delete a group:
Press and hold SETUP until the screen displays LIGHT
SETUP.
The screen displays SEL DIGIT.
2.
Press the digit (1 to 9) for the group to which you wish to add
the device. Press SHIFT and the digit (1 to 9) if you are adding
a device to groups 10 through 18.
Scroll until the screen displays GRP SETUP, and then press
OK.
3.
Press the right arrow key two times.
Press OK.
Press the button on the device so that it communicates with
the remote.
The screen displays DELETE.
4.
To control a group:
Press GROUP to put the remote into Group control mode.
The screen displays GROUP. The remote will stay in this mode
until the Light, Scene, or All mode is activated.
4 of 8
Press OK.
The screen displays SEL DIGIT.
5.
Press a digit (1 to 9) for the group you wish to delete. Press
SHIFT and the digit (1 to 9) if you are deleting groups 10
through 18.
6.
Press OK.
The screen displays SUCCESS.
1.
Press the button on the device you wish to remove.
1.
Press OK.
The screen displays SETUP WAITING.
6.
Press OK.
The screen displays SEL DIGIT.
To create or add a device to a group:
1.
To turn a group on, press and release the ON key for less than
one second. The screen displays the selected group and ON.
To turn a group off, press and release the OFF key for less
than one second. The screen displays the selected group and
OFF.
The screen displays SUCCESS.
This completely removes the device from your home control
network and resets the device to its factory default settings.
Press the digit key for the group you wish to control (1 to 9).
Press SHIFT and the digit (1 to 9) if you are controlling groups
10 through 18.
The screen displays SUCCESS.
This only deletes the specific group. All of the devices are still part
of your home control network.
P/N 1069507 • REV A • ISS 18NOV09
Scenes
The screen displays SETUP WAITING.
A scene lets you establish preset brightness levels for multiple ZWave controlled lights and then control them with one command.
This is ideal for mood or task lighting. Scene 1 could be the family
room lights set to dim for watching TV. Scene 2 could have the
same lights set to a different brightness level for other activities
like reading or entertaining.
7.
Press the button on the device you wish to remove.
You can set up a maximum of 19 scenes, containing up to 32
devices per scene. Scenes can include lights from different groups.
To delete a scene:
The screen displays SUCCESS.
This only removes the device from a specific scene. The device is
still part of your home control network and the scene still exists (if
there were more than one device in it).
1.
Press and hold SETUP until the screen displays LIGHT
SETUP.
To add a device to a scene:
1.
Press and hold SETUP until the screen displays LIGHT
SETUP.
2.
Scroll until the screen displays SCN SETUP, and then press
OK.
2.
Scroll until the screen displays SCN SETUP, and then press
OK.
3.
Press the right arrow key two times.
The screen displays ADD.
3.
The screen displays DELETE.
4.
Press OK.
The screen displays SEL DIGIT.
4.
Press a digit (1 to 9) for the scene to which you wish to add
the device. Press SHIFT and the digit (1 to 9) if you are adding
devices to scenes 10 through 18.
5.
Press OK.
The screen displays SEL DIGIT.
5.
Press the button on the device that you are adding, and
adjust the brightness level on the device within 30 seconds
(refer to the manual for the device).
The screen displays SUCCESS.
To control a scene:
1.
Press SCENE to put the remote in Scene mode.
The remote will stay in this mode until the Light, Group, or All
mode is activated.
2.
Press the digit key for the scene you wish to control (1 to 9).
Press SHIFT and the digit (1 to 9) if you are controlling scenes
10 through 18.
The screen displays SCENE and the digit selected.
To remove a device from a scene:
1.
Press and hold SETUP until the screen displays LIGHT
SETUP.
2.
Scroll until the screen displays SCN SETUP, and then press
OK.
3.
Scroll until the screen displays REMOVE.
4.
Press OK.
6.
6.
Press OK.
The screen displays SUCCESS.
This only deletes the specific scene. All of the devices are still part
of your home control network.
Labels
Individual lights, groups, or scenes can all be labeled to help
identify their function or location in your home. The process is the
same for all three.
To create labels:
1.
Press and hold SETUP until the screen displays LIGHT
SETUP. Scroll to GROUP or SCENE if changing those labels.
2.
Press OK
The screen displays ADD.
3.
Scroll until the screen displays LABEL, and then press OK.
The screen displays SEL DIGIT.
4.
Press a digit (1 to 9) for the light, group, or scene you wish to
rename. Press SHIFT and the digit (1 to 9) if you are renaming
10 through 18.
The screen displays the selected light, group, or scene.
5.
Use the 1 On/Off key to scroll through the alphabet/numbers
until you reach the appropriate letter or number.
Press a digit (1 to 9) for the scene from which you want to
remove the device. Press SHIFT and the digit (1 to 9) if you are
removing a device from scenes 10 through 18.
6.
Use the right arrow key to move to the next letter and repeat
step 5.
7.
Continue this process until your new label is complete.
Press OK.
8.
Press OK.
The screen displays SEL DIGIT.
5.
Press a digit (1 to 9) for the scene you wish to delete. Press
SHIFT and the digit (1 to 9) if you are deleting scenes 10
through 18.
The screen displays the selected scene.
The screen displays SETUP WAITING.
6.
Press OK.
P/N 1069507 • REV A • ISS 18NOV09
5 of 8
The screen displays SUCCESS.
3.
Press OK.
The screen displays TIME 12 hr.
All-on and all-off control
Press ON or OFF with the 1 key to adjust the hour.
The factory default setting for Z-Wave lighting control devices is to
be included in all-on and all-off control.
Press ON or OFF with the 2 key to adjust the minutes.
To turn all devices on or off:
1.
4.
Press ALL once.
The screen displays ALL.
2.
Press ON or OFF with the 3 key to toggle between AM and PM.
Press either ON or OFF (you can press any ON or OFF button).
Once you have set up the correct time, press OK.
The screen displays SUCCESS.
To set the date:
1.
Press and hold SETUP until the screen displays LIGHT
SETUP.
2.
To add devices to All control mode:
Scroll until the screen displays DATE/TIME, and then press
OK.
1.
Press and hold SETUP until the screen displays LIGHT
SETUP.
The screen displays TIME.
2.
Scroll until the screen displays ALL SETUP, and then press
OK
The screen displays ALL ON or ALL OFF, depending on the
key you pressed.
3.
The screen displays the default date.
Press ON or OFF with the 1 key to adjust the month.
The screen displays EX ON/OFF.
3.
4.
Press ON or OFF with the 2 key to adjust the day.
Scroll until the screen displays INC ON/OFF, and then press
OK.
The screen displays SETUP WAITING.
Press the button on the device that you wish to add to All
control mode.
The screen displays SUCCESS.
Press ON or OFF with the 3 key to toggle between years.
4.
Press and hold SETUP until the screen displays LIGHT
SETUP.
2.
Scroll until the screen displays ALL SETUP, and then press
OK.
To set the current day:
1.
Press and hold SETUP until the screen displays LIGHT
SETUP.
2.
Scroll until the screen displays DATE/TIME, and then press
OK.
The screen displays TIME.
3.
The screen displays EX ON/OFF.
3.
4.
Once you have set up the correct date, press OK.
The screen displays SUCCESS.
To delete devices from All control mode:
1.
Scroll until the screen displays DATE, and then press OK.
Press the right arrow twice.
The screen displays DAY.
Press OK.
4.
The screen displays SETUP WAITING.
Note: The DTS and Time Zone settings are reserved for future use.
Press the button on the device that you wish to remove from
All control mode.
The screen displays SUCCESS.
Time and date setup
You will need to reprogram the date and time when the batteries
are replaced.
Scroll until the current day is displayed, and then press OK..
Events
An event is something you want to happen at a specific time and
day. This could be everyday, a specific day of the week, Monday
through Friday, Saturday and Sunday only, or a one-time
occurrence. Events can be set up to control an individual device, a
group, or a scene.
To set the time:
The remote allows you to program up to 15 automated events.
You must set the time and date before programming an event.
1.
Press and hold SETUP until the screen displays LIGHT
SETUP.
To add an event:
2.
Scroll until the screen displays DATE/TIME, and then press
OK.
The screen displays TIME.
6 of 8
1.
Press and hold SETUP until the screen displays LIGHT
SETUP.
2.
Scroll until the screen displays EVENTS, and then press OK.
P/N 1069507 • REV A • ISS 18NOV09
3.
The screen displays ADD.
4.
Press the digit for the event you want to delete.
Press OK.
5.
Press OK.
The screen displays SUCCESS.
The screen displays EVERY DAY.
Use either arrow key to change this option to MON-FRI, SATSUN, ONE TIME, or a specific day of the week.
4.
Once you have chosen the event profile, press OK.
The screen displays SEL DIGIT.
To enable all programmed events:
1.
Press and hold SETUP until the screen displays LIGHT
SETUP.
2.
Scroll until the screen displays EVENTS, and then press OK.
3.
Scroll until the screen displays ALL, and then press OK.
5.
Press any digit and the screen displays the event number.
6.
Press OK and the screen displays ENABLED.
7.
Press OK and the screen displays EVENT TYPE.
8.
Scroll between the Light, Scene, or Group options (pressing
digits 1 to 9 will adjust the Light number accordingly).
9.
After you select the event type, press OK.
To disable all programmed events:
The screen displays ON TIME.
1.
Press and hold SETUP until the screen displays LIGHT
SETUP.
2.
Scroll until the screen displays EVENTS, and then press OK.
3.
Scroll until the screen displays ALL, and then press OK.
The screen displays ALL ON.
4.
The screen displays SUCCESS.
Press ON or OFF with the 1 key to adjust the hour.
Press ON or OFF with the 2 key to adjust the minutes.
Press ON or OFF with the 3 key to toggle between AM and PM.
The screen displays ALL ON.
10. Press OK once you have programmed the ON TIME.
The screen displays OFF TIME.
Press ON or OFF with the 1 key to adjust the hour.
4.
Press either arrow key and the screen displays ALL OFF.
5.
Press OK.
The screen displays SUCCESS.
Press ON or OFF with the 2 key to adjust the minutes.
Press ON or OFF with the 3 key to toggle between AM and PM.
11. Once you have programmed the off time, press OK.
The screen displays SUCCESS.
Press OK.
Thermostats
The remote allows you to program and control a Z-Wave enabled
thermostat.
Random events
To add a thermostat to the remote control:
The event feature allows you to program automated events, such
as turning your lights on or off at a predetermined time and day.
By choosing the Random option, the event will start at +/- 15
minutes of the scheduled time.
1.
Press and hold SETUP until the screen displays LIGHT
SETUP.
2.
Scroll until the screen displays THERMOSTAT, and then press
OK.
To activate this function, after step 6 above, use either arrow key
to scroll until the screen displays RANDOM. Press OK and the
screen displays EVENT TYPE. Continue the programming as
shown in step 8 above.
The screen displays ADD.
3.
Press OK.
The screen displays SETUP WAITING.
Disabling an event
Once an event has been programmed, you can disable it by
following steps 1 to 6 above and then scrolling to DISABLED and
pressing OK.
To delete an event:
1.
Press and hold SETUP until the screen displays LIGHT
SETUP.
2.
Scroll until the screen displays EVENT, and then press OK.
The screen displays ADD.
3.
Scroll until the screen displays DELETE, and then press OK
The screen displays SEL DIGIT.
P/N 1069507 • REV A • ISS 18NOV09
4.
Press the button on the thermostat’s Z-Wave interface.
The screen displays SUCCESS.
Controlling a thermostat
The features and functions that can be controlled vary by
thermostat and you will need to refer to the documentation
provided with the thermostat to determine the capabilities of your
thermostat. If supported by the thermostat, the remote allows you
to check room temperature, adjust HVAC system modes (Heat,
Cool, Fan, and AUTO) and adjust temperature settings (setpoint).
Please note that your HVAC system may have to be set to Heat or
Cool mode in order to remotely check and/or adjust the room
temperature.
7 of 8
To delete a thermostat from the remote control:
Interoperability with Z-Wave devices
1.
Press and hold SETUP until the screen displays LIGHT
SETUP.
2.
Scroll until the screen displays THERMOSTAT, and then press
OK.
A Z-Wave network can integrate devices of various classes.
Although every Z-wave certified product is designed to work with
all other Z-Wave certified products, the remote control includes
the appropriate device classifications in order to control nonlighting Z-Wave devices.
The screen displays ADD.
3.
Scroll until the screen displays DELETE, and then press OK.
Specifications
The screen displays SETUP WAITING.
Operating voltage
4.5 V
Battery type
AAA heavy duty or Alkaline
2.9 V min., 4.5 V nom., 4.95 V max.
Low battery indication
2.4 V min., 2.8 V max.
Advanced configuration
Standby current
120 uA max.
Some Z-Wave devices provide advanced capabilities available
only with a remote control. Refer to the documentation provided
with the Z-Wave device for available options and specific
parameter and byte values.
Operating current
19 mA min., 27 mA nom., 50 mA max.
Range
Up to 100 feet line of sight between the
wireless controller and the closest
Z-Wave receiver module
4.
Press the button on the thermostat’s Z-Wave interface.
The screen displays SUCCESS.
Operating temperature
32 to 122ºF (0 to 50ºC)
To change advanced configuration settings:
Storage temperature
-20 to 140ºF (-20 to 60ºC)
1.
Press and hold SETUP until the screen displays LIGHT
SETUP.
For indoor use only
2.
Scroll until the screen displays ADV CONFIG, and then press
OK.
The screen displays PARAM 0.
3.
Scroll until the screen displays the proper parameter number
(1 to 255), and then press OK.
The screen displays NUM BYTES.
4.
Scroll until the screen displays the proper number of bytes (1,
2, or 4), and then press OK.
5.
Press the button on the device.
The screen displays SUCCESS.
Recovering network information
The recovery function is used to rebuild the routing table within
the remote control. This table identifies which Z-Wave devices can
communicate with other Z-Wave devices on the network and
helps ensure that commands are transmitted and repeated
through the most efficient route to your destination device.
To have your remote control recover network information:
1.
Press and hold SETUP until the screen displays LIGHT
SETUP.
2.
Scroll until the screen displays NETWORK, and then press OK.
FCC
This device complies with Part 15 of the FCC Rules. Operation is
subject to the following two conditions: (1) this device may not
cause interference, and (2) this device must accept any
interference, including interference that may cause undesired
operation.
If this equipment does cause harmful interference to radio or
television reception, which can be determined by turning the
equipment off and on, the user should:
•
•
Reorient or relocate the TV or radio antenna.
Increase the separation between the device and receiver.
Any changes or modification to the equipment without express
consent will void the user’s right to operate this equipment.
FCC ID: MG345601
IC: 6924A-45601
Model: 45601
Contact information
For contact information see our Web site: www.gesecurity.com.
The screen displays RESET.
3.
Scroll until the screen displays RECOVERY, and then press
OK.
When the screen displays COMPLETE, you have successfully
recovered network information.
8 of 8
P/N 1069507 • REV A • ISS 18NOV09