1
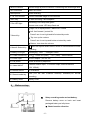
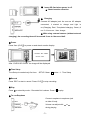
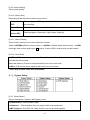
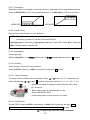
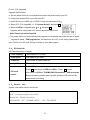
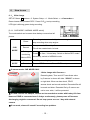
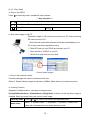
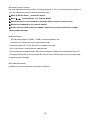
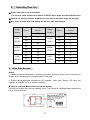
PDVR Manual MODEL: V700GC, V700GM This picture may be changed without any notice. -0- http://winycam.com Before Using – Please read this user manual carefully before using. ● SD card that support over 512MB / under 16GB is recommended to use. ● Use only specified AC/DC and voltage. (Input: DC5V, Output: 12V 150mA) ● Connect adapter correctly, otherwise it causes damage. ● Turn off PDVR when you plug in and off an external camera, it cause damage. ● Do not use the location where it rains and is humid, this product is not waterproof. ● Away from the location is exposed to hot-wind from heater; it causes to decrease the life of electric components. ● If PDVR is sealed, it block the effect of heat loss, and cause broken. ● Do not place PDVR for long time where it will be subjected to direct sunshine. ● Do not install near high-voltage generate (Motor, Outdoor Motor and Air Compressor), it cause damage the PDVR. ● Do not repair, break down and convert by yourself. ● Use only specified battery and accessory. Otherwise it decreases the parts of life and damage or might explode. In this case free charge service is not acceptable even during warrantee period. ● Please backup the data. We are not responsible for lost data. ● Please refer distributors for further information about the products. ● The contents of this manual could change without any notice. ● When you play the recorded video file, we recommend QuickTime player. -1- Contents 1. Packaged Items 2p 2. Feature 3p 3. Part name and Functions 3p 4. Before Setup 4p 5.Setting Menu 6p 5 – 1. Time Setup 6p 5 – 2. Record Setup 6p 5 – 3. System Setup 8p 5 – 4. SD Card Info 11p 5 – 5. Version Info 11p 6. How to use 12p 6 – 1. Video Recording 12p 6 – 2. Snap Shot 14p 6 – 3. MP3 Player 15p 7. Other Accessories 15p 8. Recoding Time List 17p 9. After Sales Service 17p 10. Specification 18p 1. Packaged Items [PDVR] [BATTERY] [SD CARD] [ADAPTER or CIGAR JACK] [A/V CABLE] [Manual] -2- 2.Feature ● Palm size SD recorder. ● Can check recorded video image directly by PDVR body with built-in color CMOS camera. ● Have 1.8 inch display. Can check recorded video by body. ● 1.8 inch LCD display on body. ● Record the moment of accident by built-in G-sensor (Car Mode only) ● Play audio file (MP3) by MP3 player. ● Snap shot (JPG) ● 2 channel record (Input by the external camera with each frame 15 and resolution 320*240) ● Can connect external camera with video-out function (Sell external camera separately) ● Ultra-high quality of sound with built-in microphone (Recorded video and sound) ● Record with motion detection function. ● Selectable resolution D1(704x480), VGA(640x480), Half D1(704*240), Half VGA(640*240), CIF(352x240), QVGA(320x240) ● Save recorded image in SD card (512MB ~ 16GB) ● Max: 3~4 hours continuous record with lithium-ion battery. ● Over write function: overwrite automatically from oldest file. ● Display in external monitor by video-out function. ● Inverting Function (top / bottom / right / left) ● Expand wide-angle to 150˚ with wide-angle lens (Only for V700GM) 3. Parts names and Functions -3- 1.Built-in camera Record image by built-in camera / Connecting with wide-angle lens 2.SD CARD slot Insert SD CARD 3.Microphone Audio recording 4. 1.8” LCD monitor Confirm recorded image on LCD monitor 5.REC Key To start recording / take snapshot 6. Rec LED light Recording: LED lamp flash green Screen save mode: LED lamp flash red Right: Go to replay screen / delete file / rewind Left: fast-forward / protect file Press 2 sec: Invert right and left at stand-by mode 7. Move Key Top: turn up the volume Press 2 sec: Invert top and bottom at stand-by mode Bottom: turn down the volume 8. Menu & Select Key M Menu set up and select button/ switch to motion detection mode in parking /Charged: Green 9. Battery LED light Recharging:Red 10. Power/Cancel key CLR 11. Power input AC/DC adapter(DC 5V 2A) 12. Ear phone Check a sound by earphone 13. Video IN/OUT 14. Bracket mount 15. Record mode key 16. Battery cover : Power ON (2sec) ・OFF (3sec)/Select cancel External monitor input, TV monitor output, external camera (12V 150mA) To fix bracket CAR (For car with G-sensor function)/ NORMAL(For normal recording) Battery cover 4. Before set-up ① Setup recording mode and set battery. Remove battery cover on back and insert packaged battery as left picture. ※ Check insertion direction -4- ② Insert SD Card when power is off. ※ Check insertion direction ③ Charging Connect AC adapter jack. As soon as AC adapter connected, it started to charge and light is on.(Charging: Red / Completed charging: Green) It run 3~4 hours on 1 hour charge. ※ With using external camera (without external charging), the recording time will be around 1hour to 1hour and half. ④ Power Press 2sec (CLR ) to power on and check monitor display. CHECK SD CARD Please wait .. After “CHECK SD CARD” the image will be displayed. ⑤ Time Setup Time Setup is needed only first time. SETUP: Menu M button – 1. Time Setup ⑥ Record Press „REC‟ to start to record. Press „CLR ‟ to stop recording. ⑦ Play Press on stand-by mode – Recorded list is shown. Press M to play. ⑧ To use Earphone Connect earphone to earphone jack on side of body. Volume can adjust with during playing. -5- or ⑨ External Camera As following left picture, connect enclosed Video cable to PDVR and external camera ※Video cable: Black-external camera 12V 150mA Yellow-video input, Blue-video output ※To use external camera, set up <<OUTER>>. ※Depend on external camera, BNC jack or RCA jack would be required ※Turn off power when plug / plug-off a video cable. 5. Set-up After power is ON, press M, setup menu and 5 items are displayed. 5 - 1.Time Setup MM / DD / YYYY Day / Year) ( Month / HH : (Hour MM : Minute) 5 - 2.Record Setup [5-2-1. Time Stamp ] Recorded date and time is stamped. -6- Scroll with / / / to set up the date and time. After set-up, press M to save. [5-2-2. Mpeg Codec] Set up what Mpeg Codec the image is compressed. [5-2-3. Quality] Set up the image quality. Select NORM (normal quality) / HIGH (high quality) / LOW (low quality)and press M to save. [5-2-4. Resolution] Set up the image resolution. Select <<320*240>> /<<640*240>> / <<640*480>> and press M to save. The resolution is different when external camera is used. ◎ Differences of resolution between built-in camera and external camera ◎ Built-in camera External camera CIF (QVGA) Half D1 D1 (VGA) 320*240 640*240 640*480 352*240 (NTSC) 704*240(NTSC) 704*480 (NTSC) 352*288 (PAL) 704*288(PAL) 704*576 (PAL) [5-2-5. Frame] Set up the Record Frame Rate. High Frame rate produce more frequent image. NTSC : 1/3/6/10/15/30F, PAL : 1/3/6/8/12/25F (each 6 ranges) Frame is different depend on external camera [5-2-6. Rec Time] Set up Rec Time as Normal Mode. Select 1 or 5 or 10min and press M to save. As Car Mode with G-sensor, file will be made even 1 minute. [5-2-7. Rec Volume] Select 1 (within 1 Meter) or 2 (Within 5 Meter) or 3 (Within 10 Meter) / MUTE, and press M to save. When record in inside, we recommend setup 1 or 2. [5-2-8. Rec ALC ] Set up mode to protect cracking sound during recording. (Maintain the sound tone)Select <<YES>> (ALC) or <<NO>> (No ALC) and press M to save. ※ To setup quite room, the noise might be heard because sound will be amplified. -7- [5-2-9. Audio Quality] Set up audio quality. [5-2-10. Motion Rec] Recording will be started only when some motion. Setup motion REC Create file LED status at motion REC After setup, press REC, green check will be shown if motion sensed and start recording. File will be created as setup file size. Minimum every 1min file is created. Flash light green: Recording / Light Green: Stand-by [5-2-11. Motion Sense] Set up motion sensitivity on motion detection function. Select <<NORM>>(Detect normal motion) / <<HIGH>> (Detect small, quick motion) / <<LOW >>(Large, slow motion) and press M to save. If setup HIGH, small motion can be sensed. [5-2-12. Over Write] <<YES>> If SD card memory capacity will be full, the oldest file will be deleted automatically and new file will be made. Recorded video by G-sensor and protected file can not be over write. <<NO>> If SD card memory capacity will be full, no more record. * Over write is basic setup with CAR MODE 5 - 3.System Setup [5-3-1. Mode Select] Set up Camcorder / Camera / MP3 player mode. <<Camcorder>>: Record video image <<Camera>> : Take snapshot (Can not support with external camera) <<MP3 player>>: Play MP3 file. Other function can not be used together. -8- [5-3-2. Camera Mode] Set up built-in camera or external camera to use. Select <<INNER>> (built-in camera) or <<OUTER>> (with external camera), When <<OUTER>> is set up, packaged AV cable should be used. ※Turn off power when plug or plug-off an external camera. It causes damage. [5-3-3. Adjustment] Select BRIGHT / CONTRAST / Color/ Exposure. Scroll or to set preferred Brightness. Press M to save. Brightness level is 0~100, when PDVR is format, the value will return to initial setup value. Can adjust built-in camera / external camera both. Initial setup value: BRIGHT: 51 / CONTRAST: 25 / Color: 20 / Exposure: 12 are recommended for car driving. But with dark tinted car window, please adjust the exposure value. [5-3-4. Record Channel] Built-in camera with external camera, 2 channel records is available. Select <<1CH>> / <<2CH>> and press M to save. Resolution 640*240 Frame NTSC F15 / PAL F12 Camera Setup Create File Save file each recorded by Built-in/External Camera. Inverting function available. Add “CA” at end of file name. Ex)“090810_101001CA.mp4” [5-3-5. Display Mode] Set up Video-out. Select <<LCD>> (Built-in LCD monitor) or <<TV>> (External monitor) and press M to save. ※ External monitor is set up, no image is shown in LCD. (Only Menu is displayed) [5-3-6. Video Format] Depend on external camera, set up <<NTSC>> or <<PAL>> NTSC: Available in South Korea, USA, Japan, Taiwan, Mexico, etc. Total 44 countries (Basic set-up) PAL: Available in Germany, England, China, Brazil, etc. 100 countries in total. ※ PAL setting image can work only PAL format. -9- [5-3-7. Orientation] Depend on when it is installed, can set up inversion image each built-in and external camera. Select <<DESKTOP>> (LCD is an upward direction) or <<CEILING>> (LCD is turned over.) <DESKTOP> <CEILING> [5-3-8. Screen Save] Set up screen save function to save a battery <<YES>> The display turns off automatically after 20seconds last key is pressed. Recording or power off can be confirmed LED light. (Flash light green = Recording, Light green= Stand-by motion REC mode, Red = Stand by) <<NO>> Display power is always ON. [5-3-9. Languages] Set up language Select <<English>> or <<한국어>>(Korean) / <<日本語>>(Japanese) and press M to save. [5-3-10. Buzzer] Set up sound / Sound-off of key operation. Select <<YES>> (Sound) / <<NO>> (Sound-off) and press M to save. [5-3-11. Setup G-sensor] The value of 3D coordinate can be changed. Press value with pressing or to move X, Y, Z, and setup the or . Press M to save. Initial setup value is X : 1.0 / Y : 2.4 / Z : 2.4 * Above is the value of change for shock level by each 10ms. 1G = 9.8m/s^2 * Basic setting value is recommended to use. * Note: CAR MODE ONLY * Lower setup value is more sensitive for shock. [5-3-12. Set Default] Format PDVR. Select <<YES>> (formatting) / <<NO>> (No formatting) and pres M ㅍㅍㅍㅍㅍㅍㅍㅍㅍㅍㅍㅍㅍㅍㅍㅍㅍㅍㅍㅍㅍㅍㅍㅍㅍㅍㅍㅍㅍㅍㅍ to save. ※ The data in SD card can not be formatted. - 10 - [5-3-13. F/W Upgrade] Upgrade the firmware. a. Get the latest S/W from our distributors contact and down load to your PC b. Copy down loaded S/W to your SD card PC c. Insert SD card to CARD slot of PDVR. Power on and press CLR d. Select【13. F/W Upgrade】in【3. System Setup】and pressM e. Select <<YES>> (upgrade) with or and pressM Upgrade will be completed in 10 second as shown left picture. * Note: Power should be kept ON. f. The power will be off automatically after upgrade is completed and power will be on again. ※ Upgrade is failed, “F/W Upgrade fail” will be shown on LCD. In this case, please make sure F/W file is in SD card. If there is kindly try from above again. 5 - 4.SD Card Info SD Card information is shown. 1. Total capacity Total capacity of SD card 2. Free space Free space of SD card 3. Video file The number of saved video file 4. Image file The number of saved picture file. Format SD card Press M and select <<YES>>/<<NO>>. Press M to save. 5. SD card After select <<YES>> "FORMATING Please wait…. Will be shown. Format? Before formatting, please back up data. All data of SD card will be deleted after formatting. 5 - 5.Version Info System information can be confirmed. H/W = Hardware system information S/W = Software system information Board Rev : Board information CAR-MODE : OFF : NORMAL MODE / ON : CAR MODE - 11 - 6. How to use 6 - 1.Video Image SETUP: Menu M bottom-> 3. System Setup -> 1. Mode Select -> <<Camcorder>> Record starts after pressed 'REC'. Press CLR to stop recording LED light is blinking green during recording. [6-1-1. CAR MODE / NORMAL MODE switch] The mode switch can be seen when battery removed as left picture. Power CAR Record MODE Parking monitoring (Motion REC) Recording starts automatically when car engine started and stop recording when stop engine. Always-record., Record by G-sensor File will be created each 1minute PressMfor 2sec, 3 times beep. Switch to Motion REC mode / twice beep, switch to NORMAL mode NORMAL Power Start/Stop recording by manual MODE Record Press “REC” to record, Press “CLR” to stop ※ G-sensor works CAR MODE ONLY. <Video image with G-sensor > Recording date, Time and XYZ coordinate value by G-sensor is shown left side. “SOCK!” is shown on right side. When car has shock, PDVR senses shock and record accident. Recorded file will be made red letter. Recorded file by G-sensor can not be over write, it will be protected. ※ If PDVR connect car adapter, 24hors can be recorded no matter with battery life time. However PDVR is connected over 3-4 days continuously, please power off because discharging might be concerned. Do not keep power on over 1 day with external camera. ※ If car mode, alarm will sound if recording has problem. - 12 - [6-1-2. Play Video] a. Play on the PDVR Press on stand by mode, recoded file lists is shown. ◎ Key operation ◎ / Volume control/ audio output / Fast Forward/Rewind playing if press longer. Press once, move frame each 5sec M Play / Pause CLR Stop b. Play video image on the PC Recorded image on SD card can be shown on PC with connecting SD card connect to PC. ※Note: Normal multimedia software should be downloaded to your PC to play recorded image before using. ① Take SD Card out from PDVR and connect your PC ② Open the file of "VIDEO" on you PC. ③ Select file to play with your own S/W. <Check Video image> c. Play on the external monitor Connect packaged AV cable to external monitor first. Refer [5. Display Mode] at page 9 and select <<TV>>. (Blue cable is for external monitor) d. Inverting Function Depend of installed location, can setup inverting screen. H-(right/left/top/bottom), -V(top/bottom), HV(right/left) is shown on the top when image is inverted. When you setup time, you can not invert image. Stand-by mode Menu setup Press or for 2sec, invert screen left/right/top/bottom Menu - 3. System Setup – 7. Orientation – <CELING>, <DESKTOP> value will be deleted when you setup stand-by mode - 13 - e. File Protection Recorded video by G-sensor or user setup to protect some files can not be deleted. Select file and press in file list. Select <<YES>>. Protecting file will be marked red letter. Mac 70 files can be protected. But if you format or delete file with your intention, file can not be protected. If file will be over 70files, oldest file will be over written. f. Delete File Press after selected file and select <<YES>>, then pressM to save. To cancel deleting file, select <<NO>> or CLR . ※ Note: Deleted file cannot be returned. g. File Name File name is made by “YEAR” “MONTH” “DAY””HOUR””MINUTE””SECOND” th Ex) 090415_104420C1 ->2009. Apr, 15 10:44: 22 am. C1 is for built-in camera and C2 is for external camera. For 2 channel recording, file name is 090415_104420CA 6 - 2. Snap Shot SETUP: Menu M button-> 3. System Setup -> 1. Mode Select -> <<Camera>> Can confirm Camera Mode if the camera image is shown on right side. Shot REC button Extension JPG Image Control External Camera N/A Inversion Resolution 640*480 Contrast, Color, Bright N/A [6-2-1. Check Picture] a. Check picture on PDVR Press on stand-by mode, list will be shown. ※ Can play video only in Camcorder mode. Can check picture only on Camera mode. b. Display picture on PC ① Same as how to play video ①. ② Open “IMAGE” folder in SD card ③ Select the file to open with Image viewer. - 14 - <Check picture list> 6 - 3. MP3 player Can play MP3 music file by PDVR. Menu M button-> 3. System Setup -> 1. Mode Select -> <<MP3 Player>> Insert SD card to PDVR, the file of “MUSIC” will be shown on display. Input music file to this folder and play. ◎ Key operation MP3◎ Clear Before/Next music play Switch play display File list Volume control Play Move list M Select file play M CLR Pause Menu list 7. Other Accessories ■ Bracket (option) Optioned our Bracket is easy to assemble/disassemble as well as can be installed mount hall the back side of PDVR. Can be installed preferred place on the wall and car. ■ Wide-angle lens (option, Only for V700GM) Remove socket that attached PDVR and screw wide-angle camera. With wide-angle lens, the view angle side to side will expand by 115˚. By expanding view angle, the image might not be displayed clearly 60˚ <Without lens / With lens> - 15 - 150˚ ■ External Camera (option) No need additional external power if external camera is 12V, but external camera dose not 12V, the adapter for external camera should be used. ※ Refer 4. Before Setup -> External Camera ※ Refer5-3.System Setup -> [2. Camera Mode] ※ External camera is not included in package. Please prepare customer side. ※ We are not responsible for external camera. ※ Please use specified voltage for adapter and external camera. Otherwise it might cause product damage. ■ About SD card - SD card that support (512MB ~ 16GB) is recommended to use. However, all of cards can not be guaranteed to use. - Power should be OFF when SD Card is inserted / removed. - Do not give shock to card and use watered card. - All recorded will be deleted when SD card is formatted. Please save imaged files to the PC. - During formatting SD card, do not take SD card out from PDVR and do not turn off the power. It causes product damage. ■ Purchase Accessory Available to purchase accessory through our website. - 16 - 8. Recording Time List ※ Please refer above list as standard. The result is came from best condition of PDVR, there might have some differences. ※ Depend on moving location, brightness on the place, the result might be changed. ※ Rec Time is longer with Low quality as well as Low Frame Range. Rec Time Image Quality Frame Rec Time Image (Hours) Quality Frame 2GB 30F HIGH (QVGA) NORM (QVGA) LOW (QVGA) 2GB 4 15F 7 1F 42 30F 7 15F 13 1F 50 30F 13 15F 21 1F 55 (Hours) HIGH (VGA) NORM (VGA) LOW (VGA) 30F 2 15F 5 1F 35 30F 5 15F 9 1F 45 30F 9 15F 16 1F 53 9. After Sale Service ■ Note 1. Please backup recorded data in customer side when customer ship to winy Technology for Repair. Winy Technology is not responsible for lost data. 2. Please return packaged accessories (AC Adapter, Cigar Jack, Battery, SD Card, etc) together. It is helpful for us to inspect a problem. ■ How to confirm a Model Name and Serial Number. You can see a label after remove a battery cover. The first line is the Model Name and the last line is a Serial Number. - 17 - 10.Specification Model Lens Angle Lux Image Sensor V700GC 3.02mm(F2.5) 120˚ 1Lux 1/4” CMOS, 300,000Pixel V700GM 1.79mm(F2.0) 62.8˚/150˚ 1Lux 1/4” CMOS, 300,000Pixel LCD External Camera Image Sensor 1.8Inch TFT Unser 12V 150mA 1/6inch CMOS CAMERA. 300,000 pixel G-Sensor Built-in G-sensor (CAR MODE ONLY) Recording MPEG4, H.264 Video In/Out jack NTSC/PAL COMPOSITE (1.0 Vpp, stereo jack) 1CH Jack (Use only AV cord) Audio In/Out jack Built-in high sensitivity microphone, 1CH Stereo Jack Record Channel 2channel recording(built-in/external camera) 640*240, 15F Monitor esolution 160×128 CIF (QVGA) Half D1 D1 (VGA) 320*240 640*240 640*480 External 352*240 (NTSC) 704*240 (NTSC) 704*480(NTSC) Camera 352*288 (PAL) 704*288(PAL) 704*576 (PAL) Built-in Resolution Frame Camera NTSC 1/3/6/10/15/30fps, PAL 1/3/6/8/12/25fps Video Quality 3 levels HIGH/NORM/LOW REC Volume 4 levels 1(1m)/2(5m)/3(10m)/MUTE Audio Quality Motion Sens Recording Media O/S Power Size ・Weight 2 levels High / Low AAC (44.1Khz, 16bit, 32Kpbs/8Khz, 16bit, 32Kbps) 3levels HIGH/NORM/LOW SD Card(512MB~32GB)SDHC RTOS Input DC5V Output External Camera 12V 150mA Battery 3.7V 1100mAh(Lithium ion battery) 92.5(W)×54(H)×18(D)mm / ARO 82g Temperature +0 ~ +60 ℃ Multimedia Player Quick Timer - 18 -